522HDR60X - Hedge trimmers HUSQVARNA - Free user manual and instructions
Find the device manual for free 522HDR60X HUSQVARNA in PDF.

| Brand | Husqvarna |
| Model | 522HDR60X |
| Product type | Petrol hedge trimmer |
| Engine | 2-stroke, displacement 21.7 cm³ |
| Idle speed | 3,000 rpm |
| Maximum recommended speed | 9,200 rpm |
| Max. engine power | 0.6 kW / 0.8 hp at 7,800 rpm |
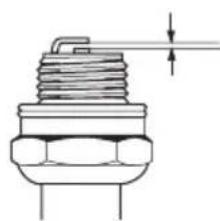
| Spark plug | NGK CMR6A, gap 0.5 mm |
| Fuel tank capacity | 0.45 L (450 cm³) |
| Weight (without fuel) | 5.0 kg |
| Cutting length | 600 mm |
| Blade type | Double-sided |
| Cutting speed | 3,200 cuts/min |
| Guaranteed sound power level | 102 dB(A) |
| Sound pressure level at ears | 93 dB(A) |
| Vibrations (front/rear handle) | 2.8 / 1.3 m/s² |
| Anti-vibration system | Yes |
| Muffler with catalytic converter | Yes |
| Fuel mixture | Unleaded petrol (max 10% ethanol) + 2-stroke oil, ratio 50:1 |
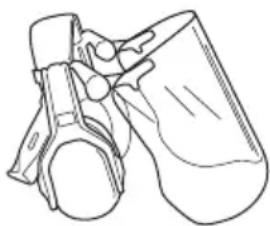
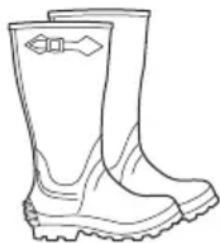
| Required protective equipment | Ear protection, safety glasses, gloves, non-slip boots |
| Regular maintenance | Air filter cleaning, blade lubrication, spark plug check |
Frequently Asked Questions - 522HDR60X HUSQVARNA
User questions about 522HDR60X HUSQVARNA
0 question about this device. Answer the ones you know or ask your own.
Ask a new question about this device
Download the instructions for your Hedge trimmers in PDF format for free! Find your manual 522HDR60X - HUSQVARNA and take your electronic device back in hand. On this page are published all the documents necessary for the use of your device. 522HDR60X by HUSQVARNA.
USER MANUAL 522HDR60X HUSQVARNA
EN Operator's manual 2-16
BG PbkoBoDCTBO 3a ekCnloatauia 17-32
Transportation, storage and disposal. 13
Safety. 3
Technical data. 13
Operation. 7
Declaration of Conformity. 15
Maintenance. 10
Introduction
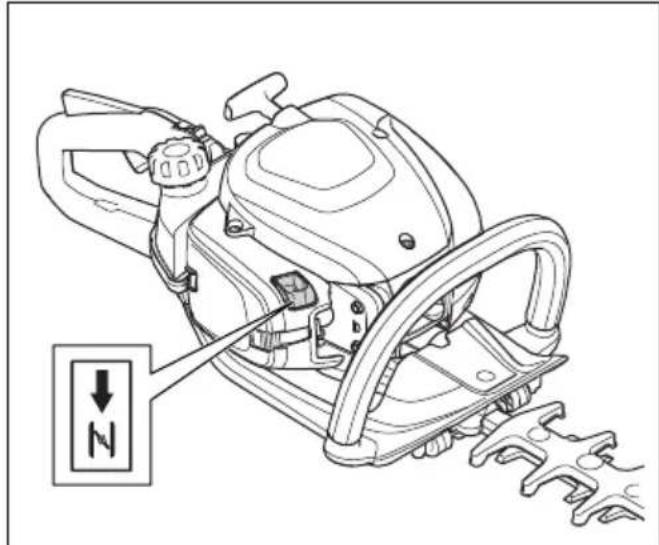
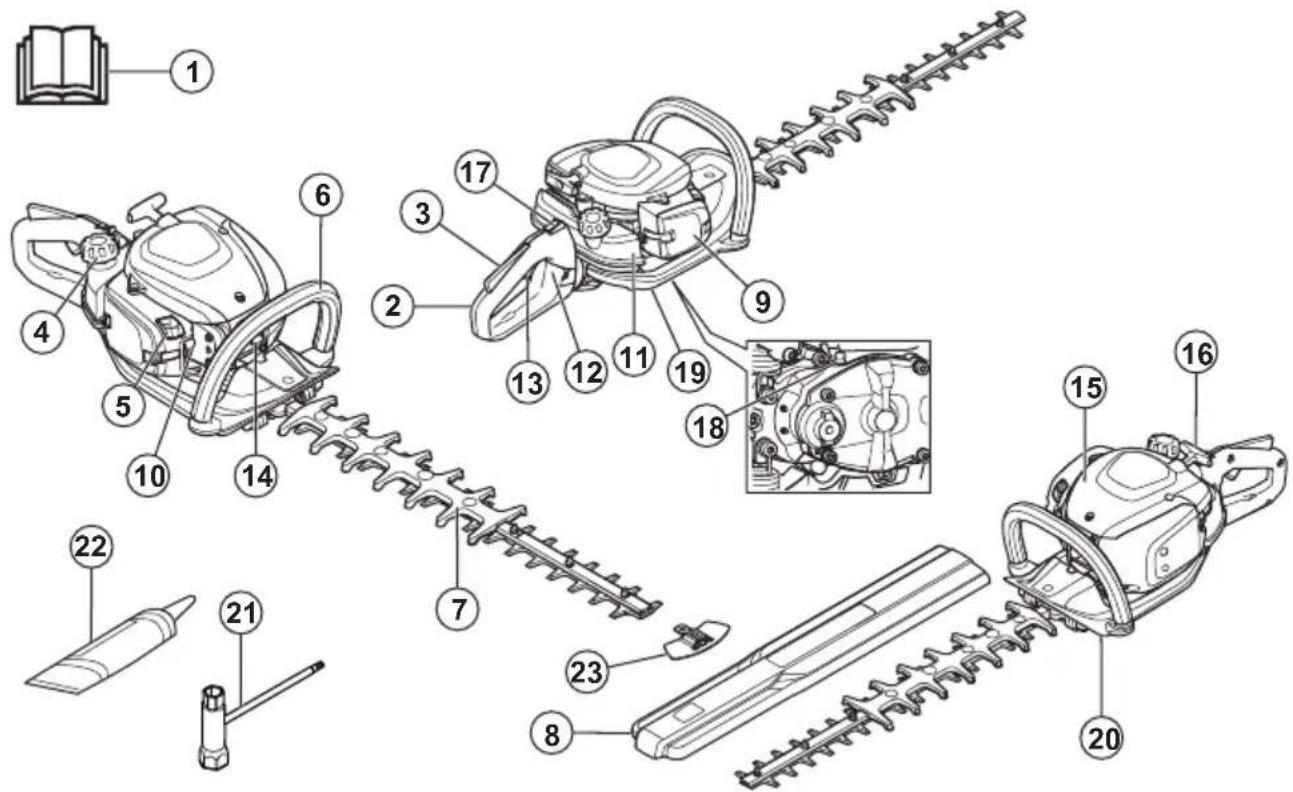
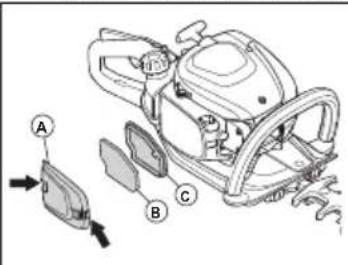
Product overview
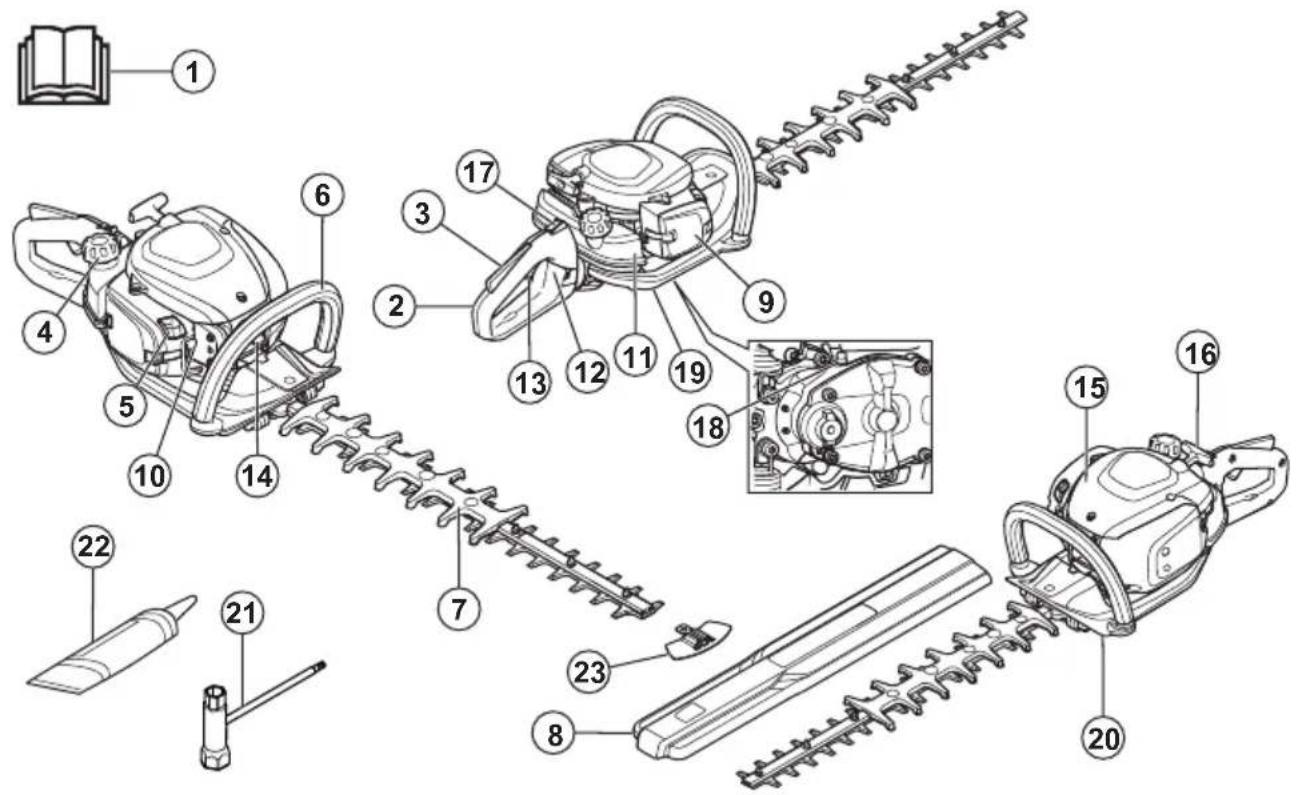
- Operator's manual
- Rear handle
- Throttle trigger lockout
- Fuel tank cap
- Choke control
- Front handle
- Blade and blade guard
- Transport guard
- Air filter cover
- Air purge bulb
- Fuel tank
- Handle lock
- Throttle trigger
- Spark plug cap and spark plug
- Cylinder cover
-
Starter rope handle
-
Stop switch
- Grease nipple
- Gear housing
- Hand guard
- Combination wrench
- Tube of grease
- Blade tip protection
Product description
The product is a hedge trimmer with a combustion engine.
Intended use
Use the product to cut branches and twigs. Do not use the product for other tasks.
Symbols on the product

Stop.
Be careful and use the product correctly. This product can cause serious injury or death to the operator or others.

Read the operator's manual carefully and make sure that you understand the instructions before use.

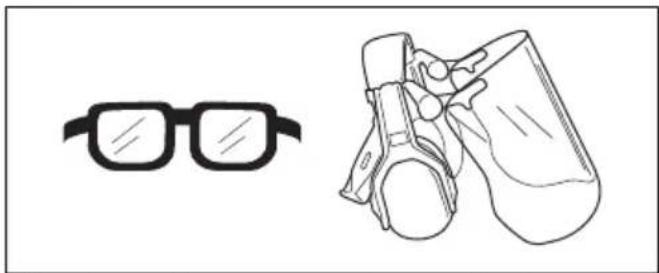
Use approved hearing protection and approved eye protection.

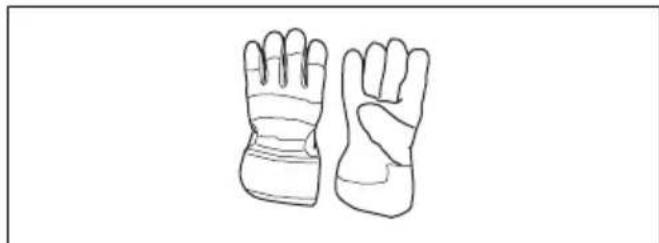
Use approved protective gloves.

Use heavy-duty slip-resistant boots.

Idle adjustment screw.

High speed needle.

Low speed needle.
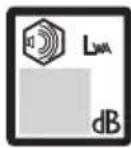
Noise emissions to the environment according to European Directive 2000/14/EC and New South Wales legislation "Protection of the Environment Operations (Noise Control) Regulation 2017". Noise emission data can be found on the machine label and in the Technical data chapter.

The product agrees with the applicable EC directives.
This product conforms to applicable UK regulations.
yyyywwxxx The
rating plate shows serial number.
yyyy is the production year and ww is the production week.
Note: Other symbols/decals on the product refer to certification requirements for some markets.
Euro V Emissions

WARNING: Tampering with the engine voids the EU type-approval of this product.
Safety
Safety definitions
Warnings, cautions and notes are used to point out specially important parts of the manual.

WARNING: Used if there is a risk of injury or death for the operator or bystanders if the instructions in the manual are not obeyed.

CAUTION: Used if there is a risk of damage to the product, other materials or the adjacent area if the instructions in the manual are not obeyed.
Note: Used to give more information that is necessary in a given situation.
General safety instructions

WARNING: Read the warning instructions that follow before you use the product.
- Incorrect or careless use of the product can turn it into a dangerous tool that can cause serious or even fatal injury. It is extremely important that you read and understand the contents of this operator's manual.
- This product produces an electromagnetic field during operation. This field may under some
circumstances interfere with active or passive medical implants. To reduce the risk of serious or fatal injury, we recommend persons with medical implants to consult their physician and the medical implant manufacturer before operating this product.
- Overexposure to vibration can lead to circulatory damage or nerve damage in people who have impaired circulation. Contact your doctor if you experience symptoms of overexposure to vibration. Such symptoms include numbness, loss of feeling, tingling, pricking, pain, loss of strength, changes in skin color or condition. These symptoms normally appear in the fingers, hands or wrists. The risk increases at low temperatures.
- If you encounter a situation where you are uncertain how to proceed you should ask an expert. Contact your dealer or your service workshop. Avoid all usage which you consider to be beyond your capability.
- Keep in mind that the operator is responsible for accidents or hazards occurring to other people or their property.
- Never allow anyone else to use the product without first ensuring that they have understood the contents of the operator's manual.
- Never allow children to use or be in the vicinity of the product. As the product is equipped with a spring-loaded stop switch and can be started by low speed and force on the starter handle, even small children under some circumstances can produce the force necessary to start the product. This can mean a risk of serious personal injury. Therefore remove the spark plug cap when the product is not under close supervision.
- Store the product out of reach of children.
- Never use the product if you are tired, if you have drunk alcohol, or if you are taking medication that could affect your vision, your judgement or your coordination.
- Never use a product that is faulty. Carry out the checks, maintenance and service instructions described in this manual. Some maintenance and service measures must be carried out by trained and qualified specialists. Refer to instructions under the heading Maintenance.
- Never use a product that has been modified in any way from its original specification.
Safety instructions for operation

WARNING: Read the warning instructions that follow before you use the product.
- Never use the product in extreme weather conditions such as severe cold, very hot and/or humid climates.
- Faulty blades can increase the risk of accidents.
-
Ensure that no-one comes closer than 15m / 50 ft while you are working.
-
Observe your surroundings and make sure that there is no risk of people or animals coming into contact with the cutting equipment.
- Inspect the working area. Remove any objects that could be thrown out.
- Always ensure you have a safe and stable working position.
- Never leave the product unsupervised with the motor running.
- Make sure that your hands and feet do not come near the cutting unit when the engine is running.
- If anything jams in the blades while you are working, switch off the engine and wait until it has stopped completely before cleaning the blades. Disconnect the HT lead from the spark plug. Refer to To examine the blades on page 12.
- When the engine is switched off, keep your hands and feet away from the cutting unit until it has stopped completely.
- Watch out for stumps of branches that can be thrown out during cutting.
- Listen out for warning signals or shouts when you are wearing hearing protection. Always remove your hearing protection as soon as the engine stops.
- Never work from a ladder, stool or any other raised position that is not fully secured.
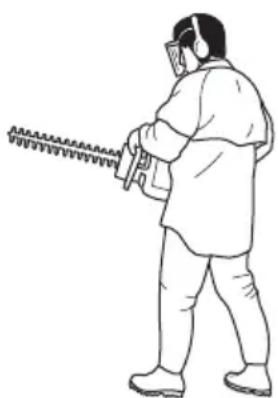
- Always use both hands to hold the product. Hold the product in front of your body.
- If any foreign object is hit or if vibrations occur stop the product immediately. Disconnect the HT lead from the spark plug. Check that the product is not damaged. Repair any damage.
- Ensure that the spark plug cap and ignition lead are undamaged to avoid the risk of electric shock.
- Check that all nuts and screws are tight.
Make sure the gear housing is lubricated correctly. Refer to To lubricate the gear housing on page 12 - The gear housing gets hot when the product has been in use. To avoid burning yourself do not touch the gear housing.
- All covers and guards must be fitted before starting.
- The transport guard should always be fitted to the cutting unit when the product is not in use.
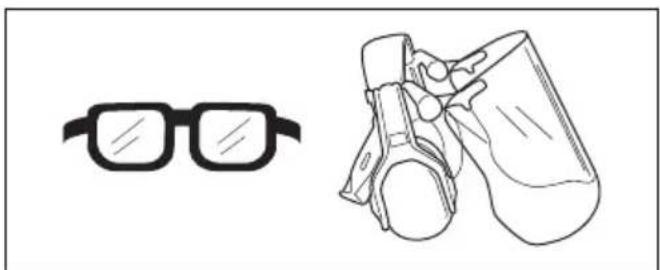
Personal protective equipment

WARNING: Read the warning instructions that follow before you use the product.
-
Always use approved personal protective equipment when you use the product. Personal protective equipment cannot fully prevent injury but it decreases the degree of injury if an accident does occur. Let your dealer help you select the right equipment.
-
Use approved hearing protection that provides adequate noise reduction. Long-term exposure to noise can result in permanent hearing impairment.
- Use approved eye protection. If you use a visor, you must also use approved protective goggles. Approved protective goggles must comply with the ANSI Z87.1 standard in the USAs or EN 166 in EU countries.
- Use gloves when necessary, for example when you attach, examine or clean the cutting equipment.
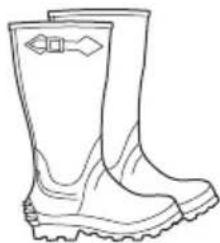
- Use sturdy non-slip boots or shoes.

- Use clothing made of a strong fabric. Always use heavy, long pants and long sleeves. Do not use loose clothing that can catch on twigs and branches. Do not wear jewelry, short pants, sandals or go with bare feet. Put your hair up safely above shoulder level.
- Keep first aid equipment close at hand.

Safety devices on the product

WARNING: Read the warning instructions that follow before you use the product.
-
Do not use a product with defective safety devices.
-
Do a check of the safety devices regularly. If the safety devices are defective, speak to your Husqvarna service agent.
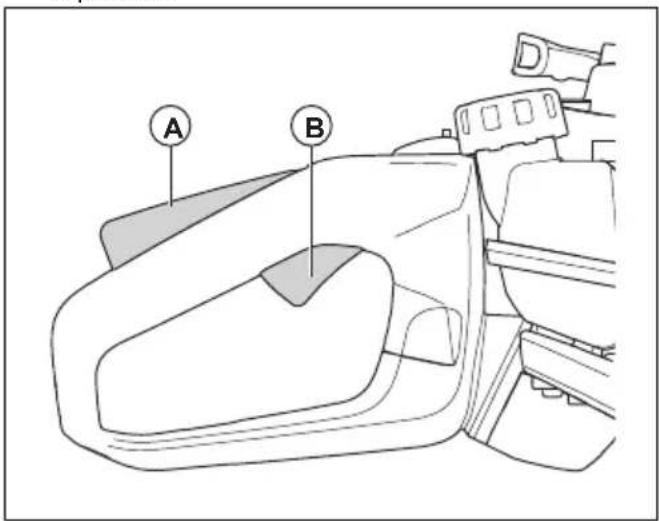
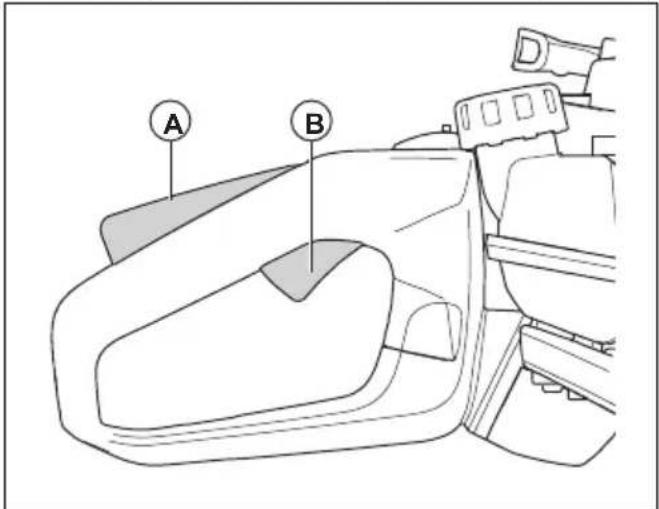
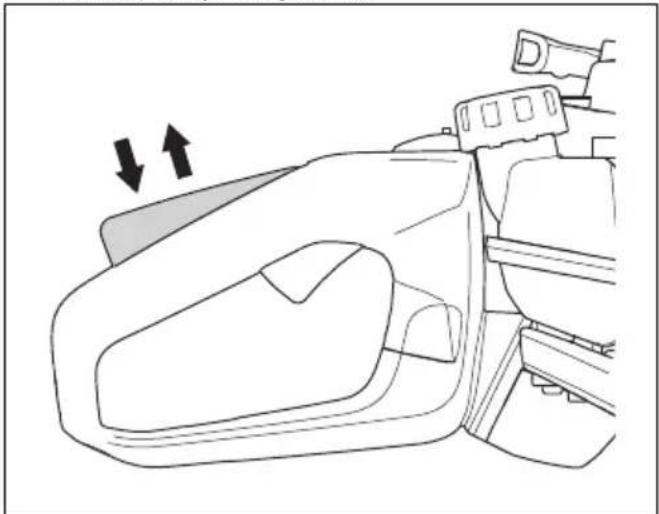
To do a check of the throttle trigger lockout
- Make sure that the throttle trigger lockout (A) and throttle trigger (B) move freely and that the return spring works correctly.
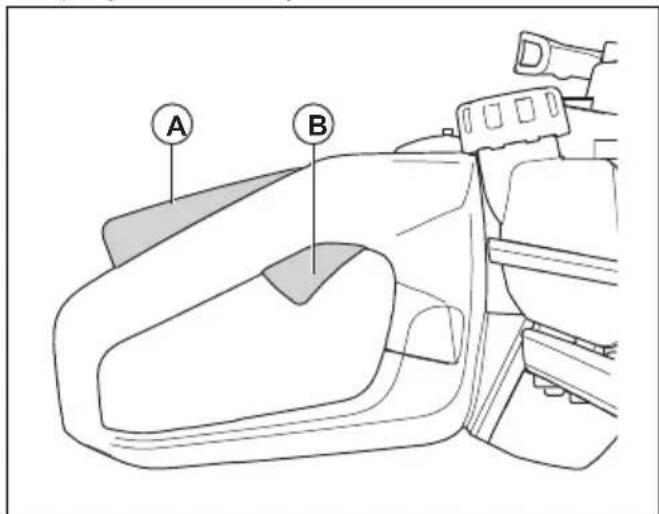
- Push down the throttle trigger lockout and make sure that it goes back to its initial position when you release it.
- Make sure that the throttle trigger is locked at the idle position when the throttle trigger lockout is released.
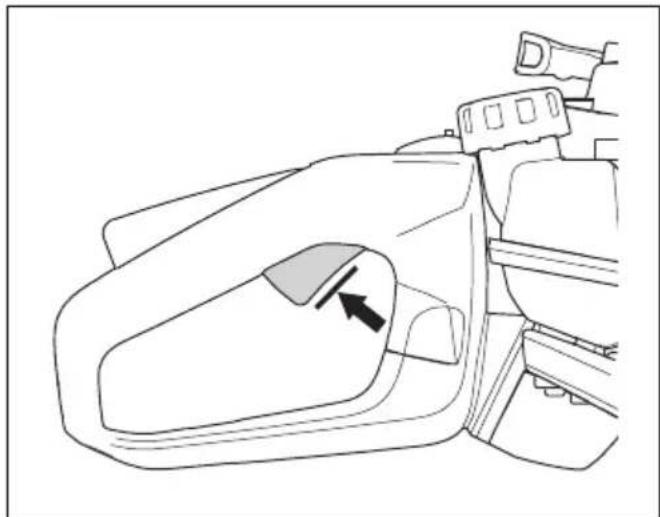
- Start the product and apply full throttle.
- Release the throttle trigger and make sure that the blades stop and stay stationary.

WARNING: If the blades move when the throttle trigger is in the idle position, then the carburetor idle speed must be adjusted. Refer to To adjust the idle speed on page 11.
To do a check of the stop switch
- Start the engine.
- Push the stop switch to the stop position and make sure that the engine stops.

WARNING: The stop switch automatically goes back to start position. To prevent accidental start, remove the spark plug cap from the spark plug when you assemble or do maintenance on the product.
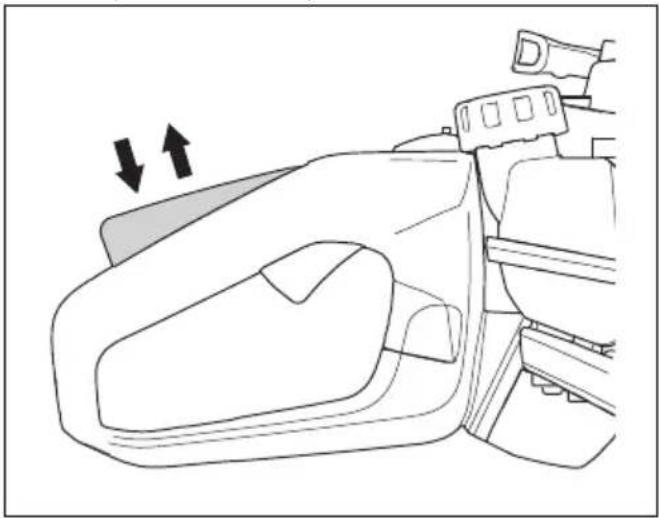
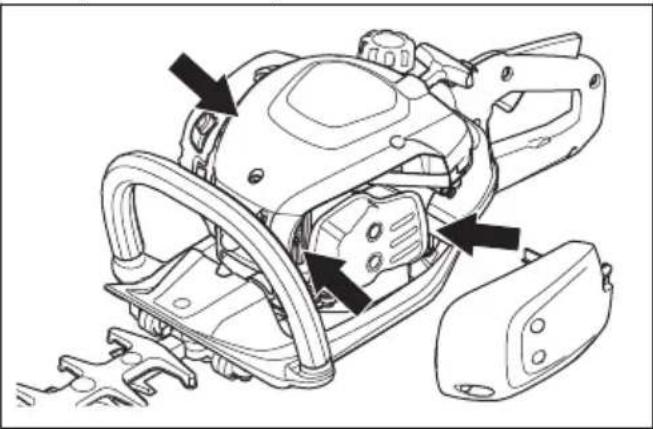
To do a check of the hand guard
The hand guard prevents injuries from the blades.
- Stop the engine.
- Make sure that the hand guard is attached correctly.
- Examine the hand guard for damages.
To do a check of the vibration damping system
The vibration damping system decreases vibration in the handles. Vibration damping units operate as a separation between the product body and the handle unit.
-
Do a visual check for deformation and damage.
-
Make sure that the vibration damping units are correctly attached.

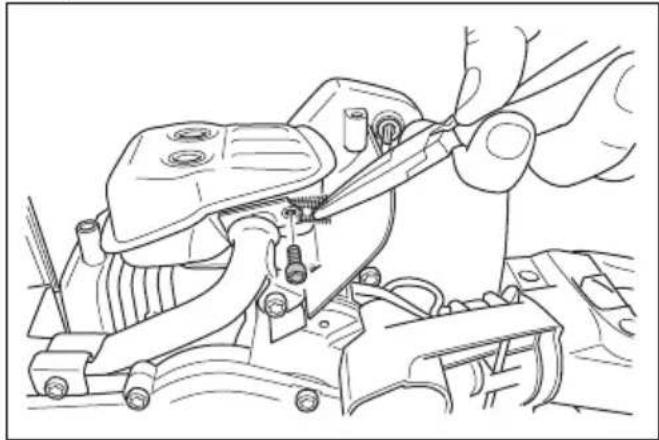
To do a check of the muffler

WARNING: Do not operate the product without a muffler or a defective muffler. A defective muffler can increase the noise level and the risk of fire. Do not use the product without, or with a broken, spark arrester screen. The spark arrester screen must be replaced if it is damaged.

WARNING: The mufflers become very hot during and after operation, also at idle speed.

CAUTION: If the spark arrester screen is frequently blocked it can be a sign that performance of the catalytic converter is decreased. Turn to your servicing dealer to examine the muffler. A blocked spark arrester screen will cause overheating and result in damage to the cylinder and piston.

WARNING: The inner surfaces of the muffler contain chemicals that can cause cancer. Be careful not to touch these elements if the muffler is damaged.
The muffler keeps the noise levels to a minimum and points the exhaust fumes away from the operator. A muffler with a catalytic converter decrease harmful exhaust gases.
- Stop the engine.
- Do a visual check for damage and deformation.
-
Make sure that the muffler is correctly attached to the product.
-
Clean the spark arrester screen with a wire brush.
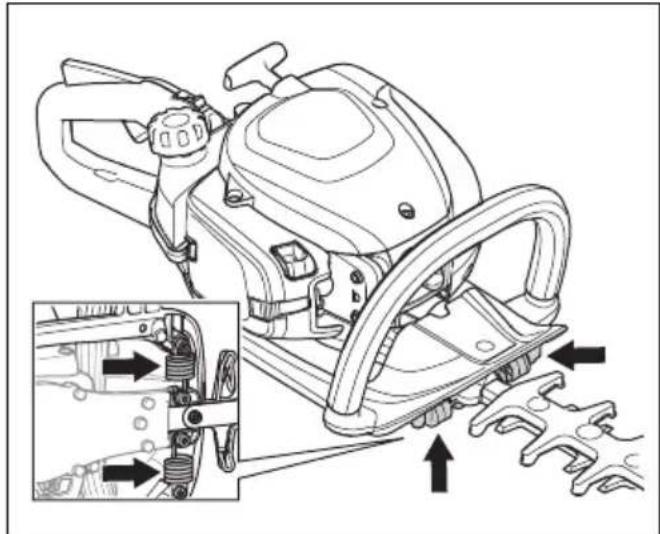
To do a check of the blades and blade guard
The outer part of the blades has the function of a blade guard. The blade guard prevents cut injuries.
- Stop the engine and make sure that the blades stop.
- Remove the spark plug cap from the spark plug.
- Put on protective gloves.
- Make sure that the blade and blade guard is not damaged or bent. Always replace a damaged or bent blade, or a damaged blade guard.
- Make sure that the screws to the blades and blade guard are tight.
Fuel safety

WARNING: Read the warning instructions that follow before you use the product.
- Do not start the product if there is fuel or engine oil on the product. Remove the unwanted fuel/oil and let the product dry.
If you spill fuel on your clothing, change clothing immediately. - Do not get fuel on your body, it can cause injury. If you get fuel on your body, use soap and water to remove the fuel.
- Do not start the product if the engine has a leak.
Examine the engine for leaks regularly. - Be careful with fuel. Fuel is flammable and the fumes are explosive and can cause injuries or death.
-
Do not breathe in the fuel fumes, it can cause injury.
Make sure that there is a sufficient airflow. -
Do not smoke near the fuel or the engine.
- Do not put warm objects near the fuel or the engine.
- Do not add the fuel when the engine is on.
- Make sure that the engine is cool before you refuel.
- Before you refuel, open the fuel tank cap slowly and release the pressure carefully.
- Do not add fuel to the engine in an indoor area. Not sufficient airflow can cause injury or death because of asphyxiation or carbon monoxide.
- Tighten the fuel tank cap fully. If the fuel tank cap is not tightened, there is a risk of fire.
- Move the product a minimum of 3m / 10 ft from the position where you filled the tank before a start.
- Do not fill the fuel tank fully. Heat causes the fuel to expand. Keep a space at the top of the fuel tank.
Safety instructions for maintenance

WARNING: Read the warning instructions that follow before you use the product.
- Stop the engine and make sure that the cutting equipment stops. Let the product become cool before you do the maintenance.
- Disconnect the spark plug cap before you do the maintenance.
- The exhaust fumes from the engine contain carbon monoxide, an odourless, poisonous and very dangerous gas that can cause death. Do not run the product indoors or in closed spaces.
- The exhaust fumes from the engine are hot and can contain sparks. Do not run the product indoors or near flammable material.
- Accessories and changes to the product that are not approved by the manufacturer, can cause serious injury or death. Do not change the product. Always use original accessories.
If the maintenance is not done correctly and regularly, there is an increased risk of injury and damage to the product. - Only do the maintenance as this operator's manual recommends. Let an approved Husqvarna service agent do all other servicing.
- Let an approved Husqvarna service agent do servicing on the product regularly.
- Replace damaged, worn or broken parts.
Operation
Introduction

WARNING: Read and understand the safety chapter before you use the product.
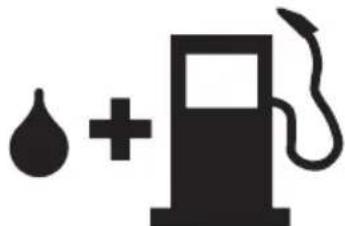
Fuel
This product has a two-stroke engine.

CAUTION: Incorrect type of fuel can result in engine damage. Use a mixture of gasoline and two-stroke oil.
Premixed fuel
- Use Husqvarna premixed alkylate fuel for best performance and extension of the engine life. This fuel contains less harmful chemicals compared to regular fuel, which decreases harmful exhaust fumes. The quantity of remains after combustion is lower with this fuel, which keeps the components of the engine more clean.
To mix fuel
Gasoline
- Use good quality unleaded gasoline with a maximum of 10% ethanol contents.

CAUTION: Do not use gasoline with an octane grade less than 90 RON/87 AKI. Use of a lower octane grade can cause engine knocking, which causes engine damages.
Two-stroke oil
- For best results and performance use Husqvarna two-stroke oil.
If Husqvarna two-stroke oil is not available, use a two-stroke oil of good quality for air-cooled engines. Speak to your servicing dealer to select the correct oil.

CAUTION: Do not use two-stroke oil for water-cooled outboard engines, also referred to as outboard oil. Do not use oil for four-stroke engines.
To mix gasoline and two-stroke oil
| Gasoline, liter | Two-stroke oil, liter |
| 2% (50:1) | |
| 5 0.10 | |
| 10 0.20 | |
| 15 0.30 | |
| 20 0.40 |

CAUTION: Small errors can influence the ratio of the mixture drastically when you mix small quantities of fuel. Measure the
quantity of oil carefully and make sure that you get the correct mixture.
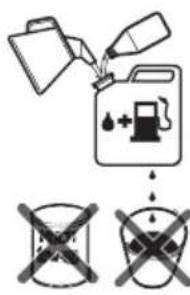
- Fill half the quantity of gasoline in a clean container for fuel.
- Add the full quantity of oil.
- Shake the fuel mixture.
- Add the remaining quantity of gasoline to the container.
- Carefully shake the fuel mixture.

CAUTION: Do not mix fuel for more than 1 month at a time.
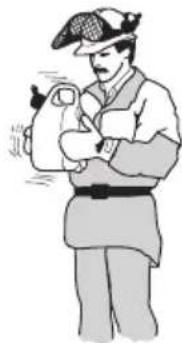
To fill the fuel tank

WARNING: Obey the procedure that follows for your safety.
- Stop the engine and let the engine become cool.
- Clean the area around the fuel tank cap.
- Shake the container and make sure that the fuel is fully mixed.
- Remove the fuel tank cap slowly to release the pressure.
- Fill the fuel tank.

CAUTION: Make sure that there is not too much fuel in the fuel tank. The fuel expands when it becomes hot.
- Tighten the fuel tank cap carefully.
-
Clean fuel spillage on and around the product.
-
Move the product 3m / 10 ft or more away from the refueling area and fuel source before you start the engine.
Note: To see where the fuel tank is on your product, refer to Product overview on page 2.
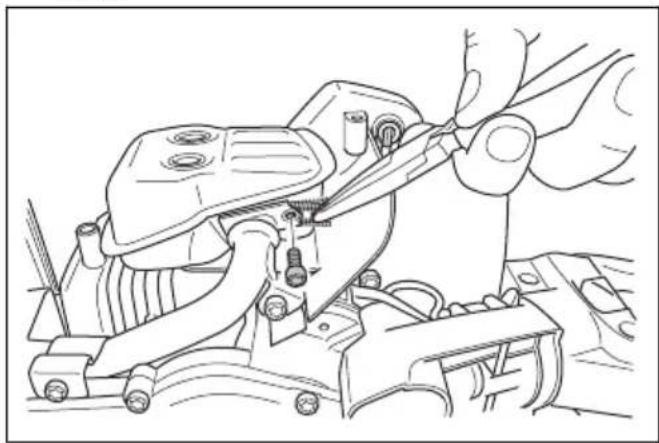
To install the blade tip protection
- Remove the nut and the bolt on the blade tip.
- Install the blade tip protection on the blade tip.
- Install the bolt and tighten it to 7Nm
- Install the nut and tighten it to 5Nm
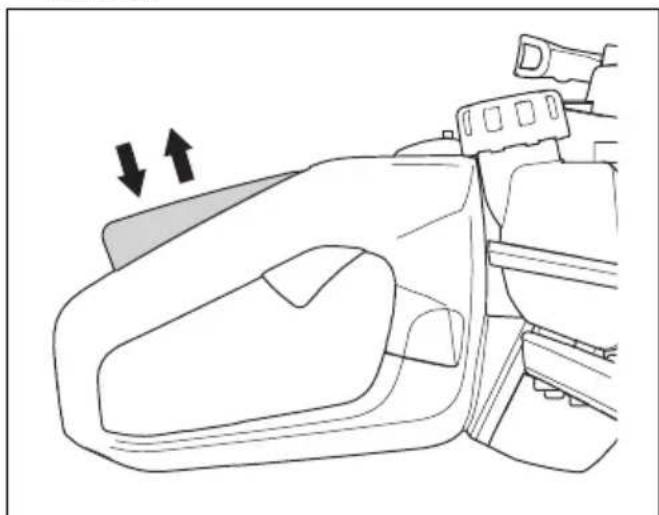
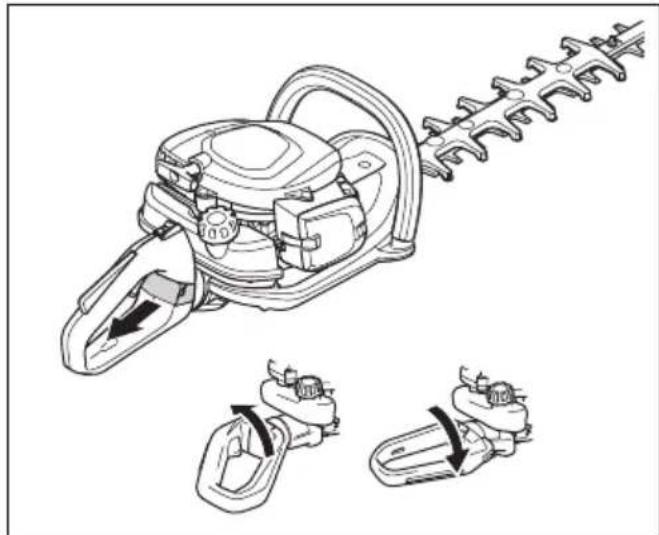
To adjust the handle
The rear handle can be adjusted into 3 positions.
- Release the handle lock and turn the handle.
To start the product with a cold engine
- Pull the choke control to choke position.
-
Push the air purge bulb approximately 6 times or until the bulb starts to fill with fuel. It is not necessary to fill the air purge bulb fully.
-
Hold the body of the product on the ground with your left hand. Do not step on the product.
- Pull the starter rope handle slowly with your right hand until you feel some resistance, then pull the starter rope handle quickly and with force.

WARNING: Do not wind the starter rope around your hand.

CAUTION: Do not pull the starter rope to full extension and do not let go of the starter rope handle.
- Continue to pull the starter rope handle until the engine fires, then push the choke control to its initial position.

WARNING: The blades move when the engine starts.
- Continue to pull the starter rope handle until the engine starts.
- Push and release the throttle trigger to set the engine to idle speed.
- Push the throttle trigger gradually to increase the engine speed.
- Make sure that the engine runs smoothly.
To start the product with a warm engine
- Hold the body of the product on the ground with your left hand. Do not step on the product.
- Pull the starter rope handle slowly with your right hand until you feel some resistance, then pull the starter rope handle quickly and with force. Continue until the engine starts.
Note: For more information about how to start the product, refer to To start the product with a cold engine on page 9.
To stop the product
- Move the stop switch to the stop position to stop the engine.

CAUTION: The stop switch automatically goes back to run position.
To operate the product
- Start near the ground and move the product up along the hedge when you cut the sides. Make sure that the body of the product does not touch the hedge.

WARNING: Make sure that the front of the cutting equipment does not touch the ground.
- Adjust the speed to align with the work load.
- Hold the product near your body for a stable work position.
- Be careful and operate the product slowly.
Maintenance
Introduction

WARNING: Read and understand the safety chapter before you do maintenance on the product.
Maintenance schedule
| Maintenance Before | operation | After 40 h | After 100 h |
| Clean the external surface. After each operation. | |||
| Clean the muffler, exhaust pipe and engine from leaves, dirt and unwanted lubricant. | After each operation. | ||
| Make sure that the cutting attachment does not move at idle speed. X | |||
| Do a check of the stop switch. X | |||
| Examine the cutting attachment and the cutting attachment guard for damages and cracks. Replace if it is damaged. | X | ||
| Examine the hand guard for damages and cracks. Replace if it is damaged. X | |||
| Do a check of the throttle trigger lockout and the throttle trigger. X | |||
| Examine the engine, the fuel tank and the fuel lines for leaks. X | |||
| Tighten nuts and screws. X | |||
| Examine the fuel filter for contamination and the fuel hose for cracks and other defects. Replace if necessary. | X | ||
| Examine the starter and the starter rope for damages. X | |||
| Clean the air filter. Replace if it is necessary. X | |||
| Examine the vibration damping units for damages and cracks. X | |||
| Examine the spark plug, refer to To examine the spark plug on page 11. | X | ||
| Clean the cooling system. X | |||
| Clean the external surface of the carburetor and the area around it. X | |||
| Clean or replace the spark arrester mesh. X | |||
| Clean the inner surface of the fuel tank. X | |||
| Examine the spark plug. X | |||
| Make sure that the gear housing is filled with grease. X | |||
To adjust the idle speed
- Clean the air filter and attach the air filter cover.
- Start the product, refer to To start the product with a cold engine on page 9.
- Turn the idle adjustment screw T clockwise until the cutting attachment starts to move.
- Turn the idle adjustment screw counterclockwise until the cutting attachment stops.

WARNING: If the cutting attachment does not stop when you adjust the idle speed, speak to your nearest servicing dealer. Do not use the product until it is correctly adjusted or repaired.
Note: The idle speed is correct when the engine operates smoothly in all positions. Refer to Technical data on page 13 for the recommended idle speed.
To clean the cooling system
The cooling system keeps the engine temperature down. The cooling system includes the cooling fins on the cylinder and the starter housing.

CAUTION: The air intake between the fuel tank and crankcase is easily blocked by leaves. Clean the air intake fully.
- Clean the cooling system with a brush weekly or more frequently if it is necessary.
- Make sure that the cooling system is not dirty or blocked.
To examine the spark plug

CAUTION: Always use the recommended spark plug type. Incorrect spark plug type can cause damage to the product.
- Examine the spark plug if the engine is low on power, is not easy to start or does not operate correctly at idle speed.
- To decrease the risk of unwanted material on the spark plug electrodes, obey these instructions:
a) Make sure that the idle speed is correctly adjusted.
b) Make sure that the fuel mixture is correct.
c) Make sure that the air filter is clean.
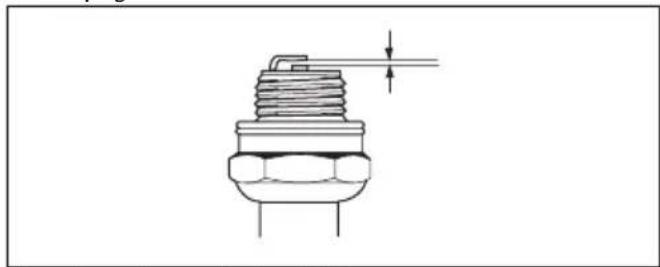
- If the spark plug is dirty, clean it and make sure that the electrode gap is correct, refer to Technical data on page 13.
- Replace the spark plug if it is necessary.
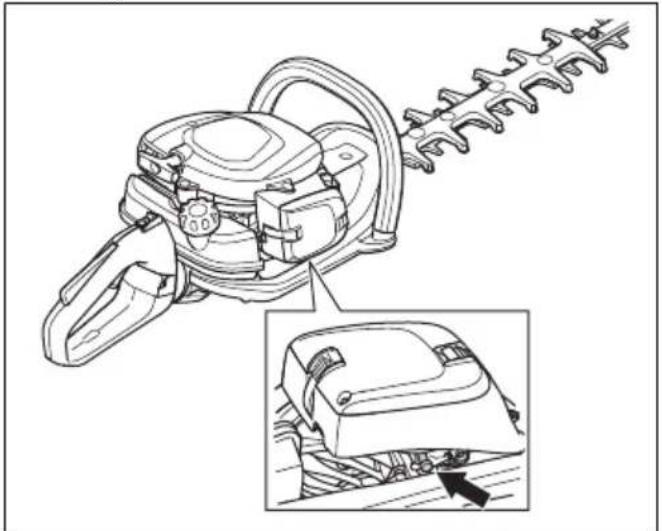
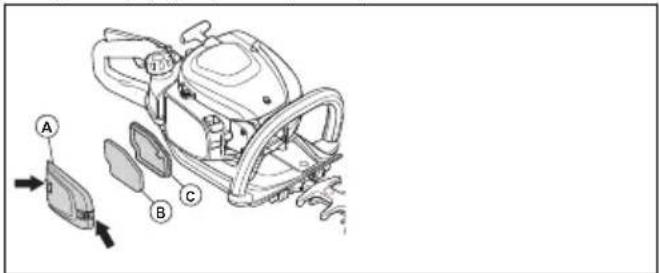
To clean the air filter
Clean the air filter regularly from dirt and dust. This prevents carburetor malfunctions, starting problems, loss of engine power, wear to engine parts and more fuel consumption than usual.
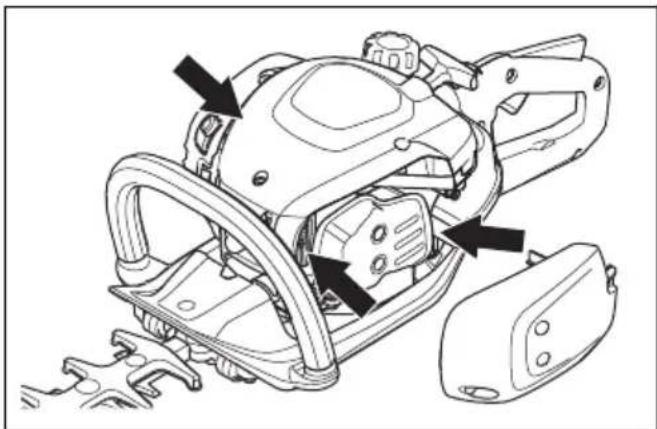
- Remove the air filter cover (A).
- Remove the foam filter (B) and the felt filter (C) from the filter frame.
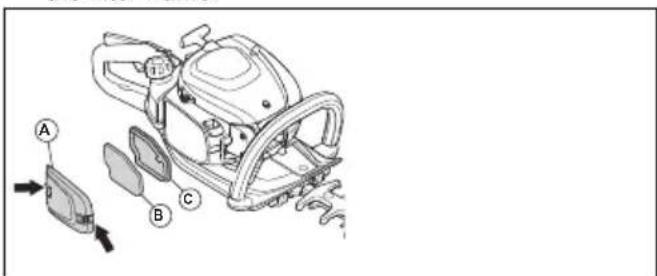
- Replace the felt filter (C).
- Clean the foam filter (B) with warm soap water.
Note: An air filter that is used for a long time can not be fully cleaned. Replace the air filter regularly and always replace a defective air filter.
- Make sure that the foam filter (B) is dry.
- Apply air filter oil to the foam filter (B). Refer to T_0 apply oil to the air filter on page 12
- Clean the inner surface of the air filter cover (A). Use compressed air or a brush.
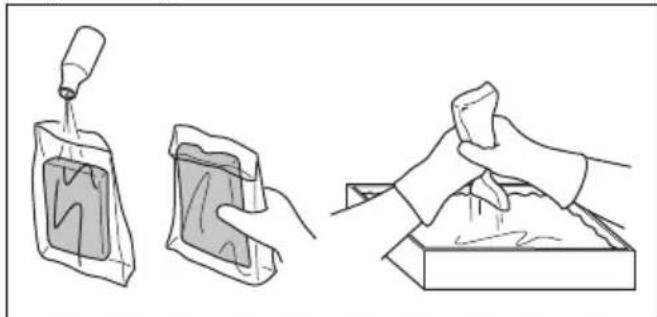
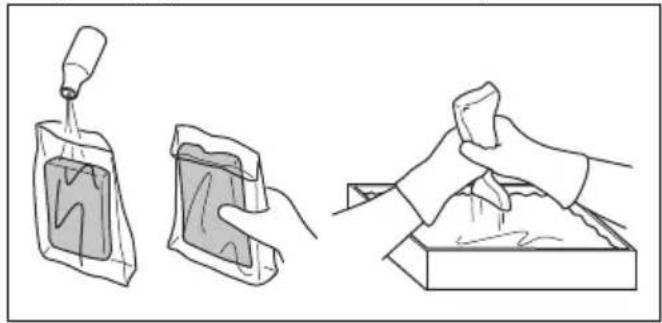
To apply oil to the air filter

CAUTION: Always use Husqvarna special air-filter oil. Do not use other types of oil.

WARNING: Put on protective gloves. The air-filter oil can cause skin irritation.
- Put the air filter in a plastic bag.
- Put the oil in the plastic bag.
-
Rub the plastic bag to supply the oil equally across the air filter.
-
Push the unwanted oil out of the air filter while in the plastic bag.
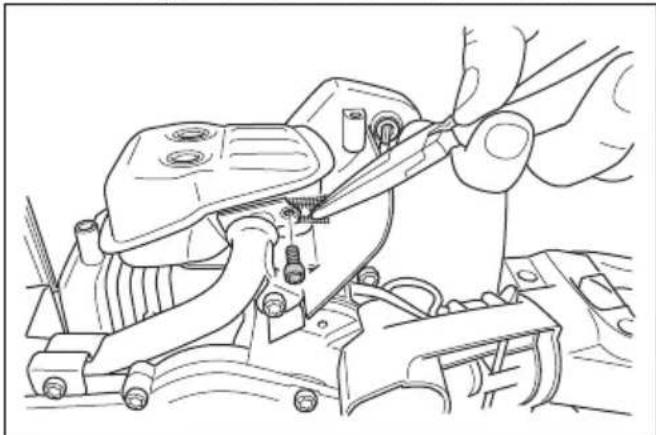
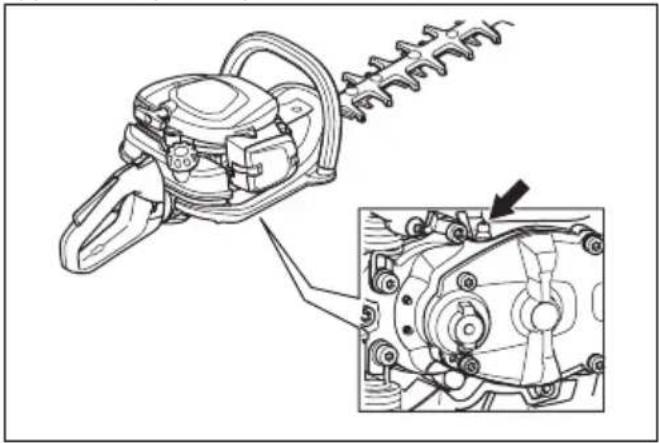
To lubricate the gear housing
- Use Husqvarna special grease. Speak to your servicing dealer for more information about recommended grease.
- Add the grease through the grease nipple.
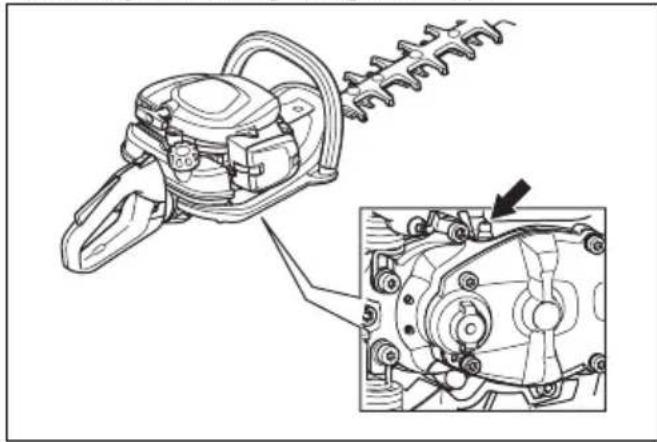

CAUTION: Do not fill the gear housing fully.
To clean and lubricate the blades
- Clean the blades from unwanted materials before and after you use the product.
- Lubricate the blades before long periods of storage.
Note: Speak to your servicing dealer for more information about recommended cleaning agents and lubricants.
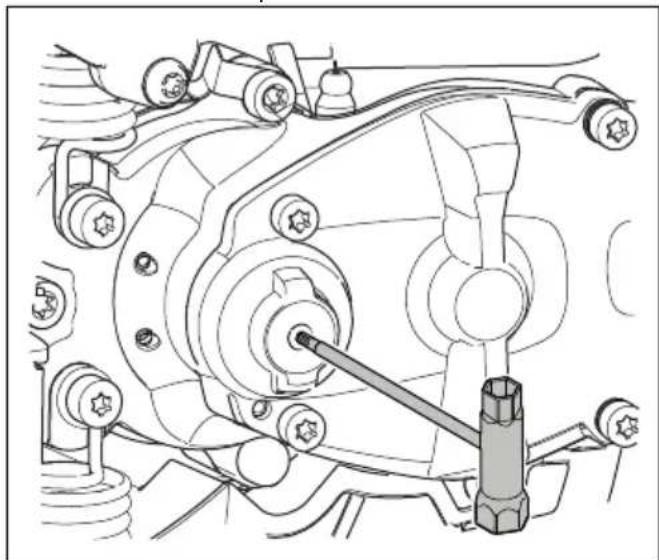
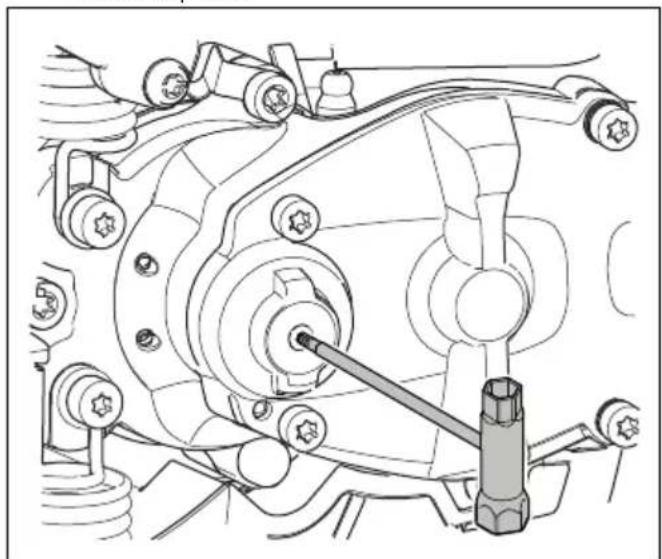
To examine the blades
-
Remove the cap on the gear housing.
-
Make sure that the blades move freely. Put the combination wrench in the gear housing and turn clockwise and counterclockwise.
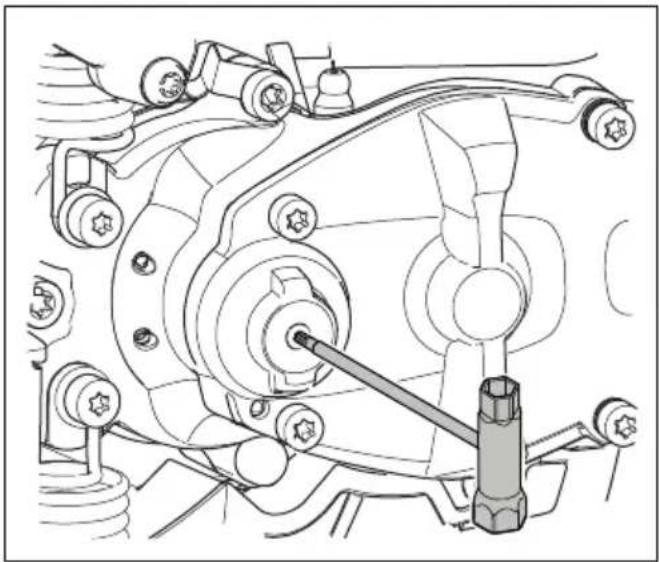
- Examine the edges of the blades for damages and deformation.
- Use a file to remove burrs on the blades.
Transportation, storage and disposal
Transportation and storage
- Always allow the product to cool down before storage.
- For storage and transportation of the product and fuel, make sure that there are no leaks or fumes. Sparks or open flames, for example from electrical devices or boilers, can start a fire.
- Always use approved containers for storage and transportation of fuel.
-
Empty the fuel before transportation or before long-term storage. Discard the fuel at an applicable disposal location.
-
Attach the transport guard during transportation and storage.
- Remove the spark plug cap from the spark plug.
- Attach the product during transportation. Make sure that it cannot move.
- Clean and do servicing on the product before long-term storage.
Technical data
Technical data
| 522HD60X 522HDR60 | X 522HDR75X | ||
| Engine | |||
| Cylinder displacement, cm3 | 21.7 | 21.7 21.7 | |
| Idle speed, rpm 3000 3000 3000 | |||
| Recommended max speed, rpm 9200 9200 9200 | 9200 | ||
| Maximum engine power acc. to ISO 8893, kW/hp @ rpm | 0.6/0.8 @ 7800 0.6/0.8 | @ 7800 0.6/0.8 @ 7800 | |
| Catalytic converter muffler Yes Yes Yes | |||
| Ignition system | |||
| Spark plug NGK CMR6A NGK CMR6A NGK CMR6A | CMR6A | ||
| Electrode gap, mm 0.5 0.5 0.5 | |||
| Fuel | |||
| Fuel tank capacity, l/cm3 | 0.45/450 0.45/450 0.45 | $/450 | |
| Weight | |||
| Without fuel, kg 4.9 5.0 5.2 | |||
| Noise emissions1 | |||
| Sound power level, measured dB (A) 101 101 | 101 | ||
| Sound power level, guaranteed LWA dB (A) 102 | 2 102 102 | ||
| Sound levels2 | |||
| Equivalent sound pressure level at the operator's ear, measured according to EN ISO 10517, dB(A) | 93 93 93 | ||
| Vibration levels3 | |||
| Equivalent vibration levels (ahv,eq) at handles, measured according to EN ISO 10517, m/s2: | |||
| Front/Rear, mm/s2 | 2.7/1.2 2.8/1.3 2.1/2.2 | ||
| Blades | |||
| Type Double sided Double sided Double sided | |||
| Cutting length, mm 600 600 750 | |||
| Cutting speed, cuts/min 4400 3200 3200 | |||
Declaration of Conformity
EU Declaration of Conformity
We, Husqvarna AB, SE-561 82 Huskvarna, Sweden, tel: +46-36-146500, declare on our sole responsibility that the product:
| Description Hedge trimmer | |
| Brand Husqvarna | |
| Type / Model 522HD60X, 522HDR60X, 522HDR75X | |
| Identification Serial numbers dating from 2022 and onwards | |
complies fully with the following EU directives and regulations:
| Regulation Description | |
| 2006/42/EC "relating to machinery" | |
| 2014/30/EU "relating to electromagnetic compatibility" | |
| 2000/14/EC "relating to the noise emissions in the environment" | |
| 2011/65/EU | "On the restriction of the use of certain hazardous substances in electrical and electronic equipment" |
and that the following standards and/or technical specifications are applied: EN ISO 12100:2021, CISPR 12:2009, EN ISO 10517:2009/A1:2013, EN IEC 63000:2018.
RISE SMP Svensk Maskinprovning AB, has performed voluntary type examination on behalf of Husqvarna AB. Certificate number: SEC/18/2518.
RISE SMP Svensk Maskinprovning AB, has verified conformity with Council's Directive of May 8, 2000 "relating to the noise emissions in the environment" 2000/14/EC. Certificate numbers: 01/094/026-522HD60X, 01/094/027-522HDR60X, 522HDR75X.
For information relating to noise emissions, refer to Technical data on page 13.
Huskvarna, 2022-05-09

Stefan Holmberg, R&D Director, Technology Management, Husqvarna AB
Responsible for technical documentation

UK Declaration of Conformity
We, Husqvarna AB, SE-561 82 Huskvarna, Sweden, tel:
+46-36-146500, declare on our sole responsibility that
the product:
| Description Hedge trimmer | |
| Brand Husqvarna | |
| Type / Model 522HD60X, 522HDR60X, 522HDR75X | |
| Identification Serial numbers dating from 2022 and onwards | |
complies fully with the following UK directives and
regulations:
| Description |
| The Restriction of the Use of Certain Hazardous Substances in Electrical and Electronic Equipment Regulations 2012 |
| The Supply of Machinery (Safety) Regulations 2008 |
| The Noise Emission in the Environment by Equipment for use Outdoors Regulations 2001, schedule 9 |
| Electromagnetic Compatibility Regulations 2016 |
and that the following standards and/or technical
specifications are applied: EN ISO 12100:2021, CISPR
12: 2009, EN ISO 10517:2009/A1:2013, EN IEC
63000:2018.
For information relating to noise emissions, refer to
Technical data on page 13.
Huskvarna, 2022-05-09

Stefan Holmberg, R&D Director, Technology
Management, Husqvarna AB
Responsible for technical documentation

UK Importer:
Husqvarna UK Ltd
Preston Road, Co. Durham
DL5 6UP
CbDbPkaHne
BbBeHeHne. 17
TpaHcnpTpupaHe,cbxpaHene n 3xbpnaHe.29
Bezonachoct. 18
Texnueckn daHHN 30
Onepaia 23
Deknapa3a cboTBcTBE 32
PoiipbXka. 26
BbVeDeHne
Ossh perepeHa npodykta
1.Инструкцязakcnoataua
2.3aHa npbkoxBatka
3.БлokровkaHaperpylaTOp3aRa3Ta
4. Kanayka ha pe3epboapa 3a ropuBO
5.Cmyka
6.Претнаддрьжka
7. Pe3euc nppeDna3en nT ha pe3eua
8.3aunTa npn TpaHcnpTupaHe
9. Kanak Ha Bb3dyuHnHn nnTbp
10. Kynon ha ronpBnata nomna
11. Pe3epBoap 3a ropuBo
12. 3aKnIOyBaHe Ha dpbXkKaTa
13. Perynatop 3a r3ta
14. Kanayka Ha cBeeu CBeu
15. Kanak Ha cnHbpa
16.ДрьжkaHaВьжetoHa cTapTepa
17.превкювATEЛЗСИпанE
18.Cma3oueHnneI
19. Kopnyc Ha npedakata
20. 3aunta 3a pbute
21. Kom6HHpaHraeueHKnIOU
22. Ty6a crpec
23. 3aunTa 3a BbpxHa oCtpnETo
OnncanHe Ha npOdyKta
PpOdykTbTe HOKnU 3a KAcTppeHa JKNB PnIe C DnuratEn C BbTppeHOropeHe.
PpeHa3NaueHne
N3noJ3BaIte npOyKta 3a n3p83BaHe Ha KIOHn BeiKn. He n3noJ3BaIte npOyKta 3a dpyr 3aJaun.
Cnmbonn Bbpxny npodykta

Cnnpahe.
BnMaBaTe n n3non3BaTe npOyKTa npaBnHOb. To3n npOyKT MoKe da npuHH cepno3HO hapaHbAhe nn Cmpt Ha onepaTopa n dpyrXopa.

PpoyeTe BnMaTeJHo pkoBocTBOTO 3a onepaTopa n ce ybepeTe, ye pa3bnpate nHCTpyKunTe, npedn da n3no3BaTe MaunHaT.

N3noJ3BaIte Odo6peHa 3aunTa Ha cnyxa n Odo6peHa 3aunTa Ha OHTe.

I3non3BaIte oO6peHn 3aunTHn pkbauu.

N3no3BaTe yCTOuNBn Ha nB3raHe 60Tu7n 3a TeKbPekmHa pa6oTa.

PerynpaBnT 3a o6opotn Ha npa3eH xoI.

O6uHnHCTpyKuH 3a 6e3oNaCHOCT

PPEyPExEHEHNE: PpOeTeCneBaHTe PpeynpeHtENn yka3aHna, PpeN da n3no3BaTe MaunHata.
- HenpaBnHTo nHn HeBnMaTeJHo n3NoJ3BaHe Ha npOdyKTa MOKe Da ro IpBbPhe B OnaceH INCTpyMeHT, KOITo MOKe Da npuynHn cepNo3Hn IIN dOpN cMbptOHocn HapaHraBaHna. MHoro e BaXHo Da npOyeTe TOBa pbKOBoDCTBO 3a ekCnloatauN i da pa36epeTe CbDbpKaHneTo My.
TaaMaaHnHa c3daBa eJekTpomarHHTHO nOne no Bpeme Ha pa6oTa. Ppr HraKoYcNoBnTOBa nOJe MOKe Da INTEpeepnpa C aKTNBn IIN PaCnBn MeiunHckn MMnlaHTaHTN. 3a Da HamaJIte pNCKa OT cepno3HO IIN CMbPTOHOCHO HapaHRAHe, Hne npenOpbVbame JIucaTa C MeiunHckn MMnlaHTn Da rOBoprT C Jekapr Cn IpnOn3BOIDnteHa MeiunHckn MMnlaHT, PpeDn da 3aNoCHat da pa60rT C To3n IpOdykT.
-П配电МбгИЗДАгаHe Ha Bn6paци Можe Да DOBEde Do NOpaxeHnBbpxy KpbBOHOCHn СБДОБЕ И HEPBHaTACNCTema Ha xopa CbC СмУшЕнЯ B KpbBoO6paZeHneTo. ПOTьрсete ЛЕКAPСКА NOMOu, aKO CE NOBRT CmNTOMN, KONTO MOraT Da ca pe3yIITaT OT Bn6paци. ТakINBA CmNTOMN Ca HAnpIMeR n3TpBnBaHe, 3ary6a Ha YyBCTBnTEJIHOCT, "IrIINuK", "6OdEKN", 60JKN, ФиЗИЧECKa OTNychaTOcT, РOMЯHa Na CBeTa IJIH cBCTOraHNeTO Ha KOxAta. Te3N CmNTOMN ce ПОЯВВaT OБИKHOBeHO Ha nPbCTInTe, pBcTeIe N КИТКITE. PnCKbT MoKe Da ce yBeIIuYn Ппн HnCKN Tempepatypn.
Ako ce okakete B cunyaun, B KOrTo cTe HeyBepen KaK Da nocTbniTe, Ce noCbBeTbaIe Cbc CneuaJIncT. CbPKeTe ce C dNCTpN6yTopa Nn Cbc cepBu3a. 136raBaIte BcKa yNoTppe6a, 3a KOrTo ce CyBcTaTe HeIOCTaTbUHO KBaINΦunpaHn. - Имайтпразд,在е onepaTOpbT HOCN OTROBOPHOC3a Heuactn Cnyan ININ ONaCHOCTN 3a dpyrX OpaIIN T8XHOTO IMUyecTBO.
He no3B0JIaBaIte HnKoI dpyr Da n3noJ3Ba npOdykTa, 6e3 nbpBO Da cTe ce yBepuN, ye pa36paJI cbIbpxKaHHeTo Ha pBkoBOdCTBOTO 3a onepaTopa.
Hikora He No3B0JBaIe Ha Deca Da H3noJ3BaT npOdyKTA nn Da 6bDaT B 6n3oCT Do Hero. TbN KATO npOdyKTB e OobpyDbaH c npyKInHeh npEbnIOuBaTea CnpaHe n MoKe da 6bDe CTapTupaH Ype3 npINaRaHe Ha HnCKa CKOpocT n Cnla Bbpxy DpbXkKaTa Ha CTapTepa, DOpn malkte Deca npHnKOn ObcToaTeJCTBa Morat Da ca cnOCo6Hn Da CTapTupaT npOdyKta. ToBa MOKe Da O3HaUaBa PnCK OT cepNo3Ha TeleCha nobPeDA. Iopadn TOBA OTcPAnBaIe Nynata Ha 3anaNTenHATA CBeu, KOrato npOdyKbT He e NOD npRkoTO Bn Ha6nIOJeHne.
CbxpahraBte npOyKta Ha MrcTo, HeIOCTbHNO 3a deua.
Hikora He n3non3BaTe npOkykTa, aKO cTe yMopeHN, yNtpe6bUNn CTe aIKOXON nIN npneMaTe neKapCTBa, KOnTO MOrAT Da NOBnRAr TBbpxy 3peHHeTo, ppeEHKaTaNJN KoOpDnHaunrTa Bn.
Hikora He n3non3BaIte npOyKT, KoTo e Henn3npaBeH. N3BbPbBaIte ONncaHtE B TOBa
pbKOBODCTBO 3a ekCnnoataunpeoDBH npOBepKn, noDpBxka n cepBn3. OnpedeneHn onepaunn oNoDpBxkata n cepBn3a ce N3BpWBat eINHCTBeHO OT KBaIInΦuPaHn CneuaNtN. BxTe nHCTpyKUnTE B pa3Je IOndpBxka.
- Hikora He n3no3BaIte npOyKT C moNpKaunn Ha opuHauHnte cneuNpKaunn.
Инструкции 3a 6e30anachocT 3a pa6oTa

PPEyPPEKDEHNE: PpOeTeCneBaNTe PpeynpeintenH yKa3aHn, PpeN da n3non3Bate MaunHaTa.
Hikora He n3non3BaIte npOyKta npn ekCTpeMHn aTMoccepHN yCNOBna, HApNmuE MHOrO cTyeH, MHORo ropeu N/INBlaJKeH KImMaT.
- Hen3npaBnHTe ocTpneTa mOrat da nobuWat pcka OT 3JNONyK.
BHHMaBaIe Da HЯMa HnKoB BaDnyc ot 15 m/50 ft npu pa6ota.
Cb6pa3eTe ce c cpeaTa n ce yBepTe,Ye Hma pnc 3a xopa nIIN JNWBOTn npn CbnpNKOCHOHe C peKeoTo o6OpyDbAe.
-Поверете pa6OTHЯ уacTB.ОТСТРаHTe BCnUKN 06eKtN, KONTO MOraT DA n3XbBpCuT BbB Bb3dYxa.
BnHaIe Ce rpuKTe Da 3acTaBaTe B6e3oNaCHO n Cta6uHNO pa6oTHO noJIOKeHne
- Hukora He octabraye npodykta 6e3 ha30p, Dokato Dbrateta ra6oTu.
- YBepete ce, ye pbcute n KpaKaTa Bn ca daane oT peKeunr moyn, Korato Dniratent pa60tn.
Ako Heio 3aceHne B HOXOBTe,doKaTO pa6oTnTe, H3KNIOyTe MOTOPa N3UaKaITe,doKaTO cnpe HAnbJIHO, PpeDN da NOuHCTnTe HOXOBTe. Pa3kaYTe npOBoHNHa 3a BucO Ko HanpeKeHne ot 3anaNTenHata CBeU. BuXTe 3a npOBepKa Ha HOXOBTe Ha CTpaHnua 29.
Korato Dnuratetae n3KnueH, na3eTe p6teN KpaKaTa CN OT peKeuMa MOnyN, DOkaTo ToH He cnpe HAnbJIHo.
BHHMaBaIte 3a napeta ot KNOHnTe, KOtO MoTa Da N3XBbpyat No BpeMe Ha pra3aHeTo.
-БдTe BnHn Haupek 3a npEynpeIeTENH cnHaHn nn NOBbKbAHn, KOrATo n3No3BaTe aHTnfoHn. BnHarn CbAJIte aHTnfoHnTe He3a6abHo cNe dCnpaH e Dniratela.
- He pa6oTeTe HnKOra ot CTbIb6a, CTOnYe nnIpyro noJoxKeHne Ha BnCOKO, KoETo He e HanbIHO 06e3onaceHo.
BnHarn npbXTe npOyKTa c DBe pBce. BnHarn dpbXTe npOyKta nped Tarnoto cn.
Ako HraKaBb YyKd o6eT 6bJe ydaepH nIaKO ce nonyuat Bn6paun, cnpeTe BeDhara npOdykTa. Pa3kaueTe npoBOdnHa Ka 3a BnCOKo HanpExKeHne OT 3anaJIteHnHa T CBeU. IpObePeTe daHn npOdyKTbT He e nobpehen. Nopabete BcKa nobpeDa.
- YBepete ce dani KanaykaTa Ha 3anaJntenHaTc Besei 3anaBaunr Ka6e ca n3npaBn, 3a da n36erHete onachocCTTA OT eNEKtpuecky yap.
-Поберета Дали BCИКи raIKи n BInTOBE ca 3aTeHaTu.
YBepTe Ce, Ye KOpnycbT Ha CkOpocThaTa Kytne cma3an npabuHNo. BuxTe 3a Cma3BaHe Ha KOpnyca Ha CKOpocTHaTa Kytna Ha CTpaHnua 29.
KopnycbT Ha ckopoctHaTa KyTna Ce HaropeuBa, KORATO npOdyKTbTe B yNtpe6a.3a Da n36erHeTe n3rapnHHe DOKOCBAte Kopnyca Ha npedabKaTa. - Bcunk kanaun npednataHnten Tp6ba da ca noctabehn npdi cTapTupaHe.
3aunTa npn TpaHcnpTnpaHe Tp6Ba BnHarn da e NOCTabeHa Ha pexeunr Moyn, KOrato npOdykTbT He ce n3non3Ba.
JIuHn npedna3Hn cpecdTa

PPEyPExEHENcIeBaunTe PpeynpeHnYka3aHna, npEn Da n3noJ3BaTe MaunHaT.
- Pn pa6oTa C npOdykTA BnHar n3noJ3BaIte Odo6peHn IuHn npEpa3Hn CpeCTBa. IuHnTe npEpa3Hn CpeCTBa He n3KnIOyBaT n3aINo pncA ot HapaHbAHe, HO HamaJIbAT CTeENTHa Ha HapaHbAHeTo npn 3IonoIyKa. Heka BaIInr T dIbP Bn NOMrHe da n36epTe nOxDxOJaTO o6OpYBaHe.
-ⅢnON3BaIte OoO6peHn aHTufoH,OCrypBaunnoXODaHamaNBAHe Ha UyMa.ДbIroTpauHOTOnlaIaHa He Ha Wym MoKe da DOBeDe Do NOCTOHHOBLOUbaHe Ha Cnyxa. - 3n0n3BaIte Oo6peHn 3aunTHn CpeCTBa 3a ouHTe. Ako n3no13BaTe MaCKa, n3no13BaIte CbIo n Oo6peHn 3aunTHn OuHa. C Oo6peHn 3aunTHn OuHa ce IMa npEiBnTakINBa, KOITO OTROBaprTa Ha cTaHApT ANSI Z87.1 3a CAU nn EN 166 3a CTpaHnte ot EC.
Korato e Heo6xoJIMO, HocTe pbkauu, Hanpimep, KORATO 3akpenBaTe, npOBepaTe nn nouchBaTe peKeuTo O6OpyDbHe.

HocTe 3dpabn 60TuIN nn O6yBKN, KOINTo He ce Xlb3rT.
- ⅢnON3BaIte dpexn, HanpaBENOT 3dpaba TBkaH. BnHar n3nON3BaIte 3dpaBn, Dblr n aHTaONn I dblrr pkbA. He Hocete n3nON3BaIte dpexn, KOnTO MORAT Da ce 3axBaHaT 3a xpactn KNOHN. He Hocete 6kxyta, Kbcn NaHTaONH, caHdann He pa6oTe 6ocn. Hocete kocata cn 6e30nacHo Ha nHBOTO Ha pameHaT.
-ДрьжTe B 6и3OCT KOMПЛКТ 3a Пьра NOMOu.

Ppncno6nne 3a 6e3onacnoct Ha MaunHaTa

PPEyPPEKDEHNE: PpOeTeCneBaunTe PpeynpeINuHN yKa3aHn, PpeN da n3no3BaTe MaunHaT.
- He n3no3BaTe MaunHa C Hn3npaBn npncoc6neHna 3a 6e30NaCHOCT.
-ПоверяBaIte peOBOH npucno6neHnraTa 3a 6e3onacHOCT.AKO npucno6neHnraTa 3a 6e3onacHOCT ca DepeKTHN,ROBopeTe c Baunr cepBu3 Husqvarna.
3a npobepka Ha 6IoknpOBkata Ha perynatopa Ha ra3Ta
- YBepete ce, ye 6JIOKIpOBKaTa Ha perynatopa 3a ra3Ta (A) n perynatopa 3a ra3Ta (B) ce DnKata CBO6Ondo N Bb3BpaTHaTn npyXnHa cyHKUHOHnp HOpMaIIHO.
- HatncheTe HADONY 6IOKIpOBkata Ha ra3Ta n ce yBepTe, ye Ce BpTa B nbPBOHaJHATA cn NO3nU, KOrato a OTnycheTe.
- YBepete ce, che perynaTOpbTa Ha ra3Ta ce qnkcapa B No3nua Ha npa3eH XoJ, KOraTo ce ocbo6oN 6JoknpOBkata My.

-
CtaptnpaTne npOdykTa n noaTe nbJHa ra3.
-
OTnycheTe perynaTopa 3a ra3Ta n ce yBepeTe, HeHOxOBeTe CNpAT N OCTaBAT HEnoDbNkHn.

PPEyPExKDEHNE: Ako pe3eTcE DnBxKoRATO peryaToptbT 3a ra3Ta e Ha o6OpOTn Ha npa3eH xOg TORaba Tp8Ba Da ce perynpa ckopocTtHa Kap6ypatopa 3a npa3eH xOd. BnKTe PeryuPapHe Ha o6OpOTte Ha npa3HnXoD Ha cTpaHnua 27.
3a npoBepka Ha npeBknIOuBaTeIa 3a cnpaHe
- CtraptnpaTe Dnuratela
2.ПремecTeпрБКИОчВаTeЯ 3a сираHe Do пложжЕнeto 3a сираHe n ce ybepeTe, Que ДвигаTeЯTсиpa.

ПЕДУПЕЖDEHNE:
IpeBknHoyBaTeJr3a cnipaHe aBTOMaTHUHO Ce BpbUa B NOJIOKeHHe 3a CTapTnpaHe.3a da npedOTbpaTnte CnyauHo CTapTnpaHe,MaxHete JyNaTa Ha 3anaJIteJIHaTa CBeu OT CBeuTa, KOraTO MOHTnPate IINn N3BpWbATETexHueCKO 06cIyXbaHe Ha npoDyKta.
3a npobepka Ha 3aunTaTa 3a pbute
3aunntata 3a pue He no3BOJRA HapaHraBaHe OT HOXOBTe.
1.CnpeteDnBraTeJIA.
2.Повереталлзштata3a рье e npabnHOn noctabaHa.
3. Поверете 3ашитata 3a рьцete 3a noBpeHn.
3a npoBepka Ha aHTnBn6paLIOHnHaTa CnCTeMa
ANTBn6paHnHaTcNCTema HamaJIbBa Bn6paHnTe Ha npBXKNTe.AHTNBn6paHnHnTe MoyIeN DeIcTBaT KaTO pa3dEINTeMEXNy KOpnyCa Ha npOdykTa mOdyna Ha dpBXKNTe.
1.ИЗБьршЕТВИЗУАнHa npOBepka 3a DeΦopMaциЯ nOBpeДa.
- YBepTe ce, ye aHTnBn6paunOHnTe qactn He ca noBpeHn.
3a npoBepka Ha aycnyxa

I PEPYPEXKDEHNE: HNKORA He
pa6oTe c npOyKa 6e3 aycnyx nII
c NOBpeDeH aycnyx. DepeKTHnT aycnyx
MOKe Da yBEnu HNBOTo Ha uMa i
onachocTa OT noXap. He n3NoJ3BaIte
npOyKTA c NOBpeDeHa nII IINCbauca
nCKporacnteHa MPexa. B cnUayi Ha
noBpeDa NCKporacnteHaHa T MPexa Tp8bBa
da 6bIe CMeHeHa.

PPEyPExEHEN: AycnucTe ce HarpBaT MHO NO BpeMe n cIepa60a n npn o6opOn Ha npa3eH xoJ.

BHIMAHHE: Ako nckporacnteHaTa Mpeka ce 3anyuBa yecTo,TOBa MoKe Da e npn3Na, ye epeKTHBocTtHa KaTaN3aTopa e hamaJeHa.ObbPHeTe ce KbMa Baunr cepBn3eH nucTp6yTop 3a npOBepKa Ha aycnyxa.3anyuHa NCKporacNTeHa Mpeka ige ppeiN3Bvka nperepahe, Koeto ige doBeede Do nobpeda Ha cinnHbpa n6byano.To

PPEyPExEHENE: BtpeHnTe NOBbpxHOCTn Ha aycnyxa CbIbPxT XmNkAIn, KOTo MOraT da npuynHr paK. BnImaBaTe Da He DOKOCBaTe Te3n eJeMeHTn, ako aycnyxbTe noBpeHe.
AycnyxbTe npedHa3nueH 3a MaKcImaJIHO HAMaJIBaHe Ha Hbata Ha UyMa N 3a OTBeJdaHe Ha OTPa6OTeHITe ra3OBe HAcTpaHn OT Notpe6nteJI. AycnyxC kATAJIIN3ATOp HAMaJIBA BpeHNTE OTPa6OTeHITe ra3OBe.
1.CnpeteDburatela.
2.3a n3BbpuBaHe Ha Bn3yaJHa npOBepka n deOpmaucna.
3. YBepete ce, ye aycnyxbT e npabunHO 3akpenen KbM npoaykta.
4. NocTeTe nckporacntenHaTmpeKa C TeHeHa YeTKa.
3a npoBepka Ha pe3uTe n ppeDnA3HnA znt Ha pe3eua
BbHnHte KpanuHa pe3nte fynKnoHpaT kaTo npedna3eh nHT ha pe3eua. PpeNa3HnT nHT Ha pe3eua npedOTbpaTBA HapaHbAHnO T nop3BaHe.
- Cnpete Dnuratena n ce yBepete, ye pe3uTe cnupaT.
- OToTpaHete lyNata Ha 3anaNTenHaTa CBeu ot 3anaNTenHaTa CBeu.
3.CnoKeTe 3aunTHn pbkabu. - YBepete ce, ye pe3eIbT n npedna3HnT uHT ha pe3eua He ca nobpeDeHn IIN orbHaTn. BnHaRcMeHnTe nobpeDeHn IIN orbHaT pe3eU nnIOBpeDeH npedna3eH uT Ha pe3eua.
5.YBepTe ce,Ye BnHTOBeTe Ha pe3uTe n npedna3HnT uNT Ha pe3eua ca 3aterHaTu.
Бezonaacnoct npn pa6ota c ronpbo

PPEyPPEKDEHNE: PpOeTeCneBaHTe PpeynpeNTENu Yka3aHna, PpeN Da N3nON3BATE MaunHaTa.
He BkIIOUBAIte npOdyKTa, aKO Bbpxy Hero mAm rOpINBO HnMOTOPHO MacNo. OTCpaHete HeKeJHaHOTo rOpINBO/MacNo n OcTaBeTe npOdyKTa Da n3CbxHe.
Ako pa3neete ropnBO no dpexnte cn, cmeheTe n He3a6abHO.
BHMMABaIe Da He nonaHne rOpINBO Bbpxy TaIIO To Bu, TOBa MoKe Da IOBeE Do TeJeCHN yBpeXdAnHr. Ako rOpINBO nonaHne Bbpxy TAIOTo Bu, n3non3BaIte canyH n BOda, 3a da ro OTCTpaHnTe.
He cnapaIte npodykta, ako OT dBiratena Ima Teu. PPOBepraBaTe peoBHO dBiratena 3a TeOBE.
BHHMaBaIe c rOpuBOTo. TOpuBOTo e 3anaHIMo, n3napenHnraTa ca B3pNUBoONaChn mORat da npNnHrT TeNECHn yBpeKdaHn nn CMbPt.
He BdnuBaTe rOpBnHTe n3napenry,TOBa MoKe DaIOBeDe Do TeJeCHNu YbpeJdAnH.N. YBepeTe ce, Ye mMa DOCTaTbUeH B3dyUeH NOTOK.
- HenyuweTe 6n3o Do ropuBTo nn DnBnTaTeJ.
- He noctabraye tonnn npedmetn 6n3o do ropnboto nnn dbratena.
- He do6abry Te ropnBO, kOrato DBrTaTeIa pa6oTn.
- YBepTe ce, Ye DnBiratEnIe n3CTnHaJI npEiN 3apeXdaHe C rOpNo.
-Преи зарекдане с горив OTборета 6abнokanaчкata Na pe3epBoapa 3a рорив OCBOOdeTeBHIMaTeHnHaJIraHeto.
He do6abayTe rOpBnKbM DnBnraTeJHa 3aKpnto. HeoCTaTbHnIe Tb3dyWeH NOTOK MOKe Da DOBeDe Do HapaHBAHe IIN Cmpt Nopadn 3aDywaBaHe IIN BvIpeOeH OKIC.
- 3aterheTe kanaqkaTa Ha pe3epBoapa 3a ropnBO dokpa. Ako kanaqkata Ha pe3epBoapa 3a ropnBO He e 3aterHaT, mMa pNCK OT 3IonoNyka.
-Ппдддддддддддддддддддддддддддддддддддддддддддддддддддддддддддддддддддддддддддддддддддддддддддддддддддд徳укт ha-NaMko Ha 3 m/10 ft ot MrcTO, KbDeTo cTe 3apeDnnpe3epBoapa.
- He 3apeKdaiTe pe3epBoapaa 3a ropnBO dorope. TOnnHATA npuHHBa yBeJIuHaBaHe Ha o6ema Ha ropnBTo. OCTaBnTe MAcTo B rOpHaTa Yact Ha pe3epBoapa 3a ropnBO.
IHCtpyKcH 3a 6e3oNaChOCT npI TexHnuecko O6cnyXbaHe

PPEyPExEHEHNE: PpOeTeCneBaHTe PpeynpeNTENu Yka3aHn, PpeNu n3No3BaTe MaunHaTa.
Cnpete Dbratena n ce ybepeTe, ye pexeioTo o60pydBahe cnupa. Ppeu Da n3BbpwnTe texnuecko obcnykBaHe, ocTabeTe npOdyKTbT da ce oxnai.
PaKaayeteIyNataHa3aanHTenHataCbeu,Ipei Da n3BbPwITeTexHueckoO6cnykBaHe.
- Otpa6oTeHnte ra3Obe ot DBnraTeTn cBdbpKta T BByrIepoDeH OKNC, MHOro ONaceH, OTPOBEH ra3 6e3 Mnpn3Ma, KOTo MoKe da npuHHn Cmbypt. He pa6oTeTe C npOdykTa Ha 3aKpnto nnn B 3aTbOpEH npocTpahCTBa.
- OTPa6oTeHnte ra3OBe ot DnBiratEnra ca ropeu n MoT a Da CbDpKAt NcKpn. He cTApTnpaTe npOdykTa Ha 3akPnto nn 6JIn3o Do 3anannm MaTePnaAn.
- Akcecoapn npomEn Ha npdykTa, KOnto He ca oOobpeHOn OT pOnn3BOaNTeJIa, MoT a Da DOBeaT Do cepno3HO HapaHbAHe nNcMbPt. He npabete npomEn No npdykTa. BnHaHn n3NoJ3BaIte opnHaJIHn npHaJaNexKHOCTn.
AkoTexHnueckToO6cIyXBaHe He ce n3IbJIHaBnpaBnJHO npEOBHO, CbIeCTByBa NOBnIeHaOnaCHOCT OT HapaHBAHe NIOBpeHa Na pOdykTa.
- N3nblHBAIte TexHueCKTo 06cnyKbaHe, KaKTo e NOCOeHO B HAcTOraTa NHCTpyKUra 3a ekCnloatau. LJIto 06cnyKbaHe Tp86Ba da ce n3BbPbBa OT OOn6peh cepBn3 Ha Husqvarna.
-ПоьеTe OОбрн Husqvarna cepBn3 peoBHO da obcnykBa npOdykTa.
3ameHete NOBpeHn, n3HOceHn nn CuyneHn Yactn.
Onepaun
BbBeJeHne

PPEyPExKDEHNE: PpOeTeT E pa36peTe pa3deIa c HnCTpyKcnn 3a 6e3oNacHOCT npEi n3non3BaHe Ha npOdykTa.
TopuBO
To3 npOdyKT pa3nOla r C DByTaKTOB DBIrataEJ.

BHIMAHHE: HenoJxOJaIuT TnnpRoHBO MoKe Da DoBeDe Do NOBpeHa HaDburatEna. 3non3BaTe Cmec OT 6eH3nH MaCNo 3a DByTaKToBn DBrAteni.
PpeBapnteJIHO cMeCeHO rOpNBO
3a noCTnraHe Ha ONTmAMn pa6oTHn xapakTepeNtIKn 3a yDbJXkBaHa He Cpoka Ha EKCNIOaTaun Ha DNBraTeJI N3NoJ3BaIte npedBapuTeJIHO CmeCeH OJIKNlaTHO rOpIBo Ha Husqvarna. Toba rOpINBO cbDbpxKa NO-MaNKo BpeHN XIMnKAJI IN CpaBHeHne C O6NIKHOBeHOTO rOpIBo I TOBA HAmJaBA BpeDNITE OTPa6OTEHI ra3OBe.C TOBA rOpINBO KONUcEeTBOTO OCTaTbUc cJeI n3rapaHTo e No-HNcKO, KOEtO 3ana3Ba KOMNOHEHTIe HA DNBraTeJI NO-NUCTN.
3a n3rotbHe Ha roptbHa cMec
BeH3nH
- 3n0n3BaIte KaueCTBEN 6e3oJOBEN 6eH3IN C mKcImaIIHO cblbpXaHne Ha eTaHON 10%.

BHIMAHHE: He n3no3BaIte 6eH3nH C OKtaHOBO YNCNo NO-MaIKO OT 90 RON/87 AKI. N3no3BaHeTo Ha NoHnCKO OKtaHOBO YNCNo MOKe Da DOBeDe Do DeToHaCuOHHO RopeHe B DBIrTaTeJI, KOeTO npEdu3BnKBA NOBpeN B Hero.
MaCNo 3a DByTaKToB DnRrATeN
3a noctnrahe Ha ha-no6pn pe3yIITaTN pa60THXapaKTepnTnN 3nON3BaTe MacNo 3a DByTAKTOBnDbratEn Ha Husqvarna.
Ako He pa3nojaraTe C MacNo 3a DByTAKTOBn DBuRatEn Ha Husqvarna, n3noJ3BaIte dpyro BnCOKOKaueCTBeHO MacNo 3a DByTAKTOBn DBuRatEn, pa3pa6oTeHO 3a DBruratoJe C Bb3DyUHO oxnaXdaHe. TObopeTe C nCtPn6yTopa No cepBn3HOTO O6cnykBaHe 3a N36Op Ha ToCHOTO MacNo.

BHIMAHNE: He n3no3BaTe MacNo 3a n3BbH6OpDoBNyTaKTOBN dBnraTeN C BoDnO OxJaXDaHe, NOHkORA HapuHaHO n3BbH6OpDoBO MacNo. He n3no3BaTeMacNo 3a YetnpNTaKTOBN dBnraTeN.
CmecBaHe Ha 6eH3nH n MacNo 3a DByTakToB DBrVaTeJ
IounCTBaHe Ha Bb3dUshnA qnnTbp
IOnuCTBaTe peoBHO Bb3dyuHnue pO 3aMbpCraBaHnue npax. Toba npedotBpTaRaHeu3npaBHoCTNa Ha Kap6bypaTopa, npo6nem npi cTaptnPaHe, 3ary6Ha MoUHocHT Na DBVratae,
H3HOCBaHe Ha YacTn Ha DnBraTeJn IIO-ROJm OT 0bUaHnpa3XoD Ha rOpuBO.
- Maxhe Kanaka Ha Bb3dyuHnHnФnTbp (A).
- OToTpaHete MacHeHnA nTbp (B) nΦnIcObna ΦnTbp (C) ot pamata Ha nTbpa.
3.CmHeTeΦnIIOBnФnITbp(C).
4. NocTeMaCHeHnA FInTbp (B) C Tonna canyHeHa BOda.
3a6eJekKa:Bb3dyWeH qnTbp, KOTo e H3noJI3BaH DblrO BpeMe, He MoKe Da ce 3uCTn HaIbIHO.CMeHnTe peoBHO B3dyHnH qnTbp n BInHa n CMeHnTe deEeKTHnTE B3dyuHN qnTprn.
5.YBepete ce,yeMacneHnTΦnTbp(B)ecyx.
6. Hahecete Macno 3a Bb3dyuweh fNITbP bBpxy Bb3dyuHnra fNITbp (B). HanpaBeTe cnpabKa c 3a HHaacrHe Ha MacNo Bbpxy Bb3dyuHnra fNITbP Ha CtpaHnua 28
7.Почирете Вьтpeшнота NOВьрхНСТ Ha KanaKaHa Bb3dUnHnЯ ФиNTbP (A).ИЗпОЛЗБаΙTe CгБСTeH Bb3dUx ИДуЧЕТК.
3a HaHacrHe Ha MacNo Bbpxy Bb3dUshnA qntTp

BHIMAHHE: BnHaHn n3noJ3BaIte Husqvarna cneuaHNO macNo 3a Bb3dyuWeH fNtbp. He n3noJ3BaIte dpyrTtnObe MacJa.

PPEyPExEHENc: Cnoxete 3aunTHn pkbauu. MacnoTo 3a Bb3dyuHn aonTbp MOKe da npuHn pa3pa3HeHne Ha Koxata.
- NocTabete Bb3dyuHnA qinTbp B HauNoHOBa Top6uKa.
- NocTabete MacNoTo B HainnoHOBaTa TOP6uKa.
-
Pa3tpnTe HaNoHObTa TOp6uKa, 3a da pa3HeCte MacNTo paBHomepHo Bbpxy Bb3dUHnA cnTbp.
-
OTeTaHETe H3NnHOTo MacNo OT Bb3dUWHINrФntbp, DOKaTo E B HauJHOHOBata Top6uKa.
3a cma3BaHe Ha Kopnyca Ha CKOPOCTHaTa KyTna
-ИЗнолзайта сецualна рес Husquvarna. Говоретс Baшия диспбут по обсякваенто за поевейнфорmaция OTHOCO npenopbЧITEJIHA рес.
- Dó6aBeTe rpeTa npe3 cma3ouHn HnneJ.

BHIMAHHE: He nbHHeTe do rope Kopnyca Ha ckopocHaTa KyTna.
3a NOUcTbaHe N CMa3BaHe Ha HOXOBETe
1.Почистете рзцпго.Tнжелани MaTePnAni npedNi cIeN n3non3BaHe Na BaUHЯ npOdyKT.
2.CmaKeTe pe3uTe npEn DbIrrn nepnoi Ha cbXpaHHe.
3a6eKka:ObpHeTe ce KbM Baunn cepBn3eH TbproBeu 3a NOBue HOpMaun OTHOCHO npenopbHTeHNTE nouchTbaun npenapTu n CmaKn.
3a npoBepka Ha HOxOBeTe
- OToTpaHete KanaykaTa OT KOpnyCa Ha CKopocTHaTa KyTna.
- YBepete ce, ye octpneeta Ce DnKaT CBO6oNHO. NocTabete KOMbHnpaHna Rauehen Knouy B Kopnyca Ha CKOpocTHaTa KyTu 3aBbPtTe INo YacOBHNKObATA CTpeJIka N O6paTHO Ha YacOBHNKObTA CTpeJIka.
- Поверете рббовete Ha octprneTata 3a noBpeu n deΦopmaци.
4.ИЗнолзайтплaja 3a OТСТраняВаHe Ha HepaBHOCTN BbpxOCTpneTata.
TpaHcnpTupaHe,cbXpaHHeNn n3XBbPJIaHe
TpaHcnpT n cbXpaHeHne
BnHaHn octaBraIte npOyKta da ce oxlaI npEIN cbXpaHeHne.
- Pn CbXpaHHeHneTo n TpaHCnpTupaHcTeo Ha npOdykTa n rOpNBoto ce yBepTe, ye Hma Teoye Bn N3napen. Nckpn nn OTkpNT orh, Hanpnmep ot eNeKtpnueckn ypeDn nn KOTnn MOKe da BB3HNKHe noxap.
BnHaHn 3n0n3BaIte Oo6peHn KOHeHepn 3a cbXpaHene n TpaHcnpOpTnpaHe Ha rOpBO.
-ИзпраЗнete ropивOTO npeДТранспортурае ИпnpeДиDbлrocpoчно CBxpaанен.ИЗXBьретeroPивOTOHaNoDxODAISO3aIeNTaMЯСTO.
3akpenete 3aunitata npn TpaHcnoptnupahe no BpeMe Ha TpaHCnpTupaHe n cbxpaHeHne.
- OTepaHete lyIaTa Ha 3anaJInteJHaTc BcEu,OT 3anaJInteJHaTc CBeU.
3akpenTe npoDyKTa npedn TpaHcnpTupaHe. YBepTe ce, ye He MoKe da ce DnKn.
-ПоунстeteиИЗБьршеTe O6cnyЖВанe Ha npodykTAppeNi CbXpaHHe 3aДьЛгпрпOD.
TexHnueckn DaHHN
TexHnueckx xapaKtepncTnKn
Sádan afterses knivene
Stefan Holmberg, R&D Director, Technology Management, Husqvarna AB
Ansvarlig for teknik dokumentation

Inhalt
Einleitung 62
Stefan Holmberg, R&D Director, Technology Management, Husqvarna AB
Anawon Suuupopwons. 92
Σuvπρηση 86
Eioaywyn
Eπισκότηση προίντος

EeYxoc ts eatianc (aiyoantnpa)

ПОНДОПОIHSH: Mny
xpnaiotoiie TOTe TO pioov xwipc
Egatian (aiyaonpa) n otav utapxei BaaBn
Otv Ecatian (aiyaonpa). Av n Ecatian
(iayaonpa) napouaic BaaBn, auavetai
to eTtioo 0opoukou kai o kivuvoc foTiaC.
Mnv xpniatoie To pioov ev n oita
ouyKpatnnc twv OTNVPWv LEITI n
exi OTAOi. Av n ovi auykpantong twv
OTIVnpwEv exi UTOATEI Znmu, PPETe va
avTKataotaei.

IPOEIAOIOIH: O1 EcaatmuieC
(oiyaotnpes) 8epaivovtai noukata Tn diapkeia kai meta tN aeitoupyia, aaaa kai oTpopec ava aeTTo pelaavti.

Tehnilised andmed. 119
Too 113
Stefan Holmberg, Responsible R&S, Technology Management, Husqvarna AB
Stefan Holmberg, R&D Director, Technology Management, Husqvarna AB
Atbildigais partehiskodokumentaciju

Inhoud
Inleiding. 225
Veiligheid 226
Werking. 231
Onderhoud. 234
WAARSCHUWING: Lees de
Limar e lubrificar as lamedas
IroJIbUaTbI KJIaHaH BbICOKNX O6OpOToB.
IroJbUaTbI KnaHn Hn3KnX 06OpOToB.
3MnCCnIyMaBOKpyKaHOUcpeDy cornacho DnapeKTHBe Ebponeckoro coo3a 2000/14/EC n 3akohodaTeNbCTBy HoBOrOIOXHOrOY3bCa"PernaMeHT 2017 roa no 3aunTe OkpyKaUeien Cpebl (KOHTpOnlb yPOBnA yMa)" DaHHbe o6 3mccnN yMa npnbEdeHbHa NaopoptHO Ta6nueKe N3dennu B pa3dene "Texnueckne daHhle".

H3dennecooTBeCTbByeTeJeCTbUcMM DnpeKtNBam EC.

HaHHe n3dJIeNc COOTBcTCTByET DeIcTByIOUm DnpeKtNbAm BeNKo6pntAHn.
yyyywwxxxx Ha
nacnpTHoT Ta5nueyka3aH cepinHbH HOpE. yyy O3HaayeT roI npOn3BOdCTBa, Ww - npOn3BOdCTBeHHyIO HeJeIO.
IpnmeaHne:pyrncnmbolbl/HakneKnHa 3deJIIM OTHOcTcK CNEuaJIbHbIM Tpe6oBaHnM cePTnOkaun Ha ONpeJeHHbIX pbHKax.
COOTBETCTBNE ypOBHЯ TOKCnHbIX Bbl6pocOB cTaNdapTy Euro V

PENYPNPEKDEHNE:BCnyae BMeWateBCTBaBpa60TyDnRaTeNJaHHoe N3JeNne nepectaHcCOOTBeTcBOBaTB HopMaTbAm EC.
Be30nacHOCTb
Hnctpykun no texhne 6e3onacnoctn
IpeynpeKdHn, npoocTepeKeHn nnpMeaHn nCNOJb3yOTc dNn BbIeHnOco6o BaXhIx NyHKTOB pyKOBOCTBa.

PPEyPPEKDEHNE:
IcnoB3yeTc, KOrda Heco6nOHeHne HNCTpyKcyn pyKOBOcTBa MOKeT pINBeCTu K TpaBMam Nm CMePTn OepaTopa Nn HaxOJaXnxCpAOM NOCTOPOHNX nU.

BHIMAHHE: NcnoIb3yeTcra, KOrda Heco6JIIODeHne HNCTpyKuIN pyKOBOIDCTBa MOKeT npVBecTN K NOBpeXdEHNO 13JeINr, dpyrIX MaTePnaNoB uIN npIneraoUe TeppuTopn.
PpmeHne: HcnoIb3yETc dI npdeOCTabHeHn DOONHHTeNbIX CBeDeHn O KOHKpeTHoCtuauN.
O6uIe HnCTpyKcHn No TeXHnKe 6e3OpacHOCTn

I P E D U N P E X K D E H N E: B
683aTeJIbHOM nopJKe npOuNTaIte CNeIyUoIe HNCTpyKUnn IO TexHnke 6e30NaChocTn, npExJe Yem npNCtTyNaTb K 3KcNllyaataunn 3dEJIIN.
- HenpaBnIbHoe nIe He6peXHoe IcNoIb3OBAHne 13JeIIMoKET npEbpATNTb erO B onaChbI INHCTpyMeHT, KOToPbIMoKET pPiBecTn K cepBe3HO I daJKe CMEpTeJIbHO TpaBMe. Upe3BbUaHIO BaxHo, UTO6bl Bbl npOHTaIIH hactOraUee PykoBoDCTBO no 3KcNlPyatauIN nnoHAnIero coOpexKaHne.
-BoBpempa6oTbIdaHHOe n3deJnne co3daet 3JIeKTPomarHHTHOe none. B onpeJeHbIX o6CTOaTeNbCTBax 3TO nOJe MOKeT CO3DaBaTb NOMEXN dIy IaccNBbIX N aKTNBbIX MeuNCHKIN NmPnAHTaTOB.B CEJIAX CnHexeHn PnCKa cepBe3HOI INCMEpTeNbHOI TpaBMbl IInCaM CMeDnHckMN NmPnAHTaTM PeKOMeHNyETcN pOKOHcyIbTnpOBaTbC R CBpaOM N 3rOTOBtJeM NmPnAHTa, PpeXDe YEm npICCTynaTb K 3KcNlNyataun DaHHoro n3deJnR.
Динтелhoe BO3deIcTBnE Bn6paun MoKeT npNBecTN K HApUWeHIO KpOoO6paueHna IIN paCCtpoiCTBAM HeBHOJ CnCTeMbI y JIOJe c HApUWeHHbIM KpOoBO6paueHneM. B Cnyuae NOaBHeHNA TpeBOxHBIX CmNtOMOB O6paNTeCb K BpaUy. TaKmN CmNtOMaMn MOrY T 6bITb OHMeHne, nOTepa YyBCTBnTEJBHOCTN, "UeKOTKa", "KONoTbe", 60JIb, nOTepa Cnblb IIN CNa6ocTb, N3MeHne UBeTa N COCTOraHNa KoxN. O6bUHNO NDo6HbIE CmNtOMbI nPraBJIaIOTcHa NaIbCuX, pykax IIN 3aJaCTbX. PnI Hn3KoI TempePaType pNCK yBeJIuHBAeTCr.
B Cnyaee BO3HKnHOBeHnCnTyauuN, B KOTopoB Bbl NOuyBCTByeTe HeYBepeHHOCb OTHOCHTbHO daIbHeiue paobToI c N3DeJIeM, 6paTntecb 3a KOHCyIbTaUneK CneuaAIncTy. CBXNTecb CO CBOIM DNepom UIN MaCTepCKoN NO 06cnykBaHIO. He NtaiTecb peWntb KaKyIO-NI6O 3aDaCy, ecn CHTaETe, YTO OHa HaxOHTc8 3a npedeNaMn BaUnx BO3MOXHOCTeN.
-ПOMHnTe:onepaTop HeCet OTBcTcBeHHocTh 3a abapuN uN onaChbIe CNTyaUu, yrpoXaIOuNe npTm NIOdAm uN IN NX IMyUecTBy.
3anpeaetcdoynyckaTbKnoIb3ObaHnIO HnCTpyMeHTa noCTOpOHnX niu,He y6eINBwncb Chauana B TOM,TOOHN npouN INoHn coepxahne PykoBOdCTBaNo 3kCnnyatauN.
Hikorda He no3BOJnTe DeTAM NOb3oBaTbcra H3dennem HIN HaxOuTbcra PdOM C HIM. H3dennie OchaueHO nepeKIOUaTeMe OCTaHOBKn C npyKHHbIM BO3BpaTom M MoXeT 6bITb 3aNyueHO C HN3KOI CKOpocTbH N He6OJIbWIM YcNJIne Ha pyUke CTapTepa, IN DaXe MaJeHbKne DEtN B ONpeDeIeHNbIX o6CToRrTeNbCTBax MOYr CO3aTb YcNJIne, Heo6xOdImoe DnAynCkA 3aNyckA 3To
co3daet pnck noJyehnra TjKeJbIX TpaBM. IooTOMy Bcerda CHImaIte KOnnak CBeu 3axnraHn, ecnn octabJIareTe n3dennne 6e3 npcmoTa.
XpaHnTe n3dJIeB HHeIOCTyNHom dIa DeTe MeCeTe.
Pa6oTa c n3dennm IuC B COCTOHN yCTaIOCTn IIN aIKKOrOBbHORO ONbIeHnA, a TaKKe IINU, pInHMaHOxN JekapCTBa, Bo3DeIcTByIOxne Ha 3peHnE, peakuH NIN KOOpDnHaCuH, He dOnyckaETcR.
3aPpeaetcnoB3oBaTbcHHeNCpabHBIM HnCTpyMeHTOM. PPOBOITe peryIarHbIE OCMOTpbI, yXoN o6CnyKINBAHNBE COOTBeTCTBUN C daHHbIM pyKOBoDCTBOM. HeKOTOpBie Oepaun no yXoND o6CnyKINBAHNIO DOnJXHbIBBINOJIHrTbcr TOJbKO KBaJIINΦUncPOBaHHbIMCneuaJIHCTAMN. CM. INHCTpyKUn B pa3dJe TExHNUeCKORO 06CnyKINBAHN.
3aPpeaaetcnoIb3oBaTbcn3dennem,B KOHCTpyKcNIO KOTOPOROBHeceHbKaKne-Jn60 n3MeHeHn.
HnctpyKuIN no TexHnke 6e3oNaCHOCTN BO BpEmaKcPnyaTaun

PPEyIpyKDEHNE:B
6o3aTeBbHOM npAKe npOHTaTe CNeIyUcNHe IHCTpyKuIN NO TEXHKe 6eOnaCHOCTn, IpEKe Yem pInctTyNaTb K 3KcNlyaTaunn N3dJIInr.
3anpeaetcnoIb3oBaTbcn3deHnem npn He6laonnpnTbIX NorOndhix ycNoBnX, TaKx KaCnJbHbX OJOD, Kapa NIN BnaXHOCTb.
HeicnpaBhIe HOxMOryT NOBbICHTb pNCK HeCuaCThIx CnyuaeB.
CneIte, Yo6bI BO BpeMa pa6oTbI HNKTo He HaxOuINcOYCTpOInCTBaHa pacCTOaHm MeHbUeM 15 M (50 cyTOB).
- OcmOTpuTe 3OHy BOKpyr ce6y u y6eIntecb, YTO IIOHNJIN KJIBOTHbIe He MOrYt OKa3aTbcR B 3OHe DeiCTBnpeKyuIero o6OpUdoBaHn.
- OcmotpuTe pa6oyu 30Hy. Y6epnte IIO6bIe npedMeTbI, KOToPbIe MOrY 6bITb OT6poWeHbI B cToPOHy npa6Ote n3dEInra.
Bb Bcerda DOnKhbH HaxoDnTbc B HaJeXHom u yctOuHBOM pa6oHem nonoKeHH.
HnB Koem cnyae He ocTabnIte n3dJIne C pa6oTaIOUm 3NeKtpoDBuRatEnem 6e3 npncMoTpa.
- Y6eNTecb, yTO Baun pyKn HOrn HaxOaTcH Ha 6e3oNaChOM pacCToHnn OT pexyueo 6NoKa, KOrda DBratelpa6oTaet.
-ПиЗ actpeBaHn Yero-JIb6 MExJy JNe3BnA MBO Bpempa60TbIO TKNIOUHTe DBnraTeJIb NIOOxKNTe, noka OH NOINHOCTbIO OCTaHOBnTCs, npexDe Yem npctynaTb K OOnCTKe Ne3Bn. OTcoEduHnTe npoBoD BBICOKOr HAnpRJaKeHnAOT CBeuN 3aXnRaHnCm. pa3dEn PpoBepKa HOKeHa cTp. 311.
- Pocne ocTaHOBKn DnurTaTeIaepKnte pykn n Horn Ha 6e3oNaChom pacctOarHm ot peKyuero 6NoKa do Tex nop, NOKa OH nonHoCTbIO He octaHOBNTcra.
Cneinte 3a Betkamn, KOtOpbIe MOryt 6blb ot6poWeHb B CTOpOHy npu pe3AHm. - Pn nCnoB3oBaHm 3aunThbix HayuHnKOB o6paaIte BHMaHne Ha npEynpeJdaIOUcne CnHaNbl nn KpNK. ChMaTe HayuHnKn cpa3y nocJe OCTaHOBKn DBrIraTeJia.
- Hn B KOe Cnyae He pa60TaIe, CToHa Na neCTHnCe, CTyne IIN NIObOM Dpyrom He3aKpENHeHHom PpeDMeTe.
Bcerda nepknte n3dene no6emn pykamn. Bcerda nepknte n3dene neped co6oJ.
Bcnyae cToJIKHOBeHnI3dEJIINa C NOCTOPOHNIM PpeDMeTOM NIN BO3HNIKHOBEHnI Bn6paun He3aMeDInTeNbHO OCTaHOBtne I3dEJIne. OTCoeDInHtpe IpOBoD BbICOKOHO HAprrKeHnO rCBeyn 3axnraHnY6eNTecb BOTCYTCTBnIOBpeXdEHN I3dEJIIN.PpN HAnuyn NOBpeXdEHN BBINOJHtE He06xOdMbl peMOHT.
-Bo n36eKaHne pncKa npaKHeHna 3JIeKtpnuecknM TOKOM y6eDuTecb, YTO KOJIpaK CBeuN 3aXnRaHnI INpoBOD 3aXnRaHnI He NOBpeJKeHbl. - Поверп Te NaDEЖHOCTh 3aTЯKKn BCex Raek n BnHTOB.
- Y6eHITecb, YTO KapTeP peDyKTopa CMa3bIBaETcra HAnIeXaUIM o6pa3oM. Cm. pa3JeI CMa3Ka Kopo6Kn IpeepaH Ha cTp. 311.
- Bo Врем рабови Издени Картep peуктора
- HarpeBaetс. Бо ИЗБекане охогов He kacaITecb
- Kaptepa peуктора.
-Перд Нааном pa6obtbl BCE uHTkn N KpbIuKndoJxHbI 6bITb yCTaHOBHeHb Ha CBOI MecTa.
TpaHcnpTnpoBOyHbI uNTOK Bcerda DoJKeH 3aKpbBaTb peKu7n6LoK B To BpeM, KOrda H3dJIe He hCNoB3yeTc.
CpeIcTbA INHINBnDyalbHoN 3aunTbI

PPEyIpyEKeHNE:B
683aTeIbHOMnopAKe npOHTaIte CLeDyUoUne HNCTpyKuIN NO TexHnke 6e30nacHoCTn, npEKeJe Yem npncTynatb K 3KcNnyatauIN3dEInna.
Kakdbi pa3 npn pa6oTe c n3deJinem CneDyeT NcNoB3OBaTB ODo6peHHbIe CpeCTBa HINIBNduyabHOb 3aUNTbl. CpeCTBa HINIBNduyabHOb 3aUNTbl He MOrY T NOHOCbIO NCKIQUHTb PNCK NoIyueHn TpaMbI, HO npn HeCuaCTHom Cnyuae OHN CHNXaOT TAAKeCTb TpaMbI. 3a NOMOuBuNO INo IpaBUNbHomy BbIbOpy obOpyIDOBAHn OBpaauTeCb K DInIepy.
CneJyET noJIb3OBAIb8c OIO6peHHbIM 3aUHTHbIMn HayuHNKAMN C DOCTaTOUHbIM yPOBHE M NOaABNeHnA Wyma. IpoIoJXKeTJIbHOe BO3dEYCTBNE Wyma MoKet IOBJIeYb HEn3JIeYHMoe yXyUWeHne Cnyxa.
-Поьзутесь повер�нбIMсрдCTВAM3aHTbI rna3.Пи ИСпОьБОВAHIM 3aUHTHOM Mackn CneDyET NOьБОВТБСТAKKE OДОБрEHNBIM 3aUHTHBIM OOKAMN.ПОД OДОБрEHNBIM 3aUHTHBIM OOKAMN NOДРаЗУМЕBAHOTc OOKN,OTBeVAIOJIe Tpe6OBAHm CTahdapTa ANSI Z87.1 ДЯ CUSA nIN EN 166 dЯ CTpaH EC.

-Пи Heo6xOДmOCTn HaIeBaIte NepuATKn, HapnpMep, np3zakpeHEnn, npOBepKe nIn Ounchke pexJuIero o6OpyIDobAHn.

HaBpempa6oTbHaedeBaIe yctOnuByIO, HeckOJIb3aIyU O6yBb.
- HadeBaIte OeJy n3 npOHoro MaTePnAna. Bcerda HadeBaIte DnnHhIe npOHyIe 6pIOKn n BepXHOIO OeJdy C DnHHbIMn pyKaBAmN. 3aIpeUaETcra HaneBaTb CBO6OHyIO OeJdy, KOtOpA MoKeT 3aCenITbcr 3a BetBn nn KyCTapHnk. He HadeBaIte IOBeInpHbIe yKpaWeHnra, WOpTbI, CaHdAInn I He XoDITe 6ocNKOM. 3aΦHKcpyIte BOLOcbl Bblwe yPOBn Pneu.
CpeCTBa OKa3AHnI nepBOI NOMOUN BCERda DOJXHbI 6bITb IOd pyKoI.

3aunthbte yctpojCTBa Ha n3deJIN

ПЕДУПЕЖДEHNE:В
683aTeIbHOM nopRKe npOHTaTe CJeNyUoIe HNCTpyKuIN NO TEXHKe 6e30NaChocTn, npExe Yem npInctyTaB K 3KcNlyatauIN 3dEHH.
3aPpeaaeTcNcNoB30BaTbN3dJIeNc HEnCnpaBbIMN 3aUHTbIMN yCTpoCTBaMn.
PeyraHOBbINONHnTe npOBepky 3aunTHbIX yctpoiCTB.Ecnn 3aunTHbIe ycTPOiCTBa HncnpabHB, o6paNTteCB cepBnCHbI ueHTp Husqvarna.
PpOBepka cTOnopa dPoocceIbHoro peryIaTopa
- Поверпг Te nlaBocTb cpa6aTbIbAHn Дросселboro perynarTopa (B) и ero CTonopa (A), a ТаЖke ФункционpoBaHne Bo3BpAthO npyKInHbl.
- Haxmite Ha cTOnop dPocceIbHoro peryIaTopa n y6eIntecb, yTO OH BO3BpaIaETCa B IxCxOdHoe IonoJKeHne np OTNyCKaHN.
- Y6eHntecb, yTo npn otnyckaHH cTOnopa dPoocceBHy peryIaTOp 6nokpyetcB nNoJxehn XOIOCTOro xOda.

- 3aynctte n3dene Ha noJHO MOUHOCn.
- OTnycntte DpocceIbHbI peryIaTOp n y6eIntecb, YTO HOxN OCTaHaBJIbNAOTcR N OCTaHTcR HeNoDBrXhblIMN.

IPEyPExEHE: Ecn Hoxn DvraHcTc, KOrda DpocceHbH perynTop hXoDITcB NIOxKeHH XoIOCTORO xOa, HeoXoHMo OTpeYnpOBaTB XoNcToH xOJ kap6opatopa. Cm. pa3dEe PerynpobKa ObOpOTB XoNcTOrO XoHa Ha cTp. 309.
Поверка Выкноуаел.
1.3anycntteBnraTeIb
2. NpebeBnte BbIKHouateJIb B NOJIOKeHHe OCTaHOBa n y6eNTecb, YTO DBNAteJIb OCTaHaBnBaETcra.

PPEyIpyEJKDEHNE:
BbIKHouaTeNb ABTomaTnueckn BO3BpaUaTaTcB INCXoJHOe NIOXKeHne.Bo n36ExaHne CnyaHoro 3anycka Chmnte KpbIshky C CBeuN 3axnraHnpeEd c6OpKo Hn TExnuecknM O6CnykBaHnem n3JeJIy.
PpOBepka uNTkA dny pyK
UHTOK npyk npedha3aueH dna 3aunTbI pyK OT KOHTAKTa C ne3BnMn.
1.OctaHOBnTe DBurTaTeNb.
2.Y6eNTecb,HTO uNTOK dIpyk yCTaHOBneH npabnIbHo.
3.Поверпг Teцнok Дя рк Ha HauNue noBpeKdHn.
PpOBepKa CnCTeMbI rAWeHnBn6paun
CnCTema raweHnBn6paun CHnkaet ypoBeHb Bn6paun Ha pyKoTkax. AmOpTu3aTopbI cyHKUHOHpyuT B KaueCTBe 3JeMeHTa, N3OnnpyUoJero pyKoTKn OT KOpnyca N3DeNIA.
- Ocmotpnte Ha haIyue nOBpeKdHn I deOpmaun.
2.Поверпгпрabиьhoectb yctahOBkn Bn6poracayux 3JEMeHToB.
PpOBeRka rJyUwTeJIa

IPEyPExKdEHN:
3anpeaaetcnaonb30aBt n3dennne 6e3 rnyuHTeTn nn C HeNCpabHBIM rnyuHTeTnem. NobpeXdeHne rnyuHTeTn MoKet npVBecTN K yBeJIuYeHIO yPOBnIyMaN pNCKy BO3ropaHn. 3anpeaaetcnaONb3oBaTb n3dennne 6e3 NckporacTeJbHO cETKn nn CO cNoMaHHO CETkoB. B cnyuae NOBpeXdeHn NCKporacTeJbHyO cETKy cNeDyeT 3aMeHnTb.

IPEyIPEXHEHNE:
IywnTeHn CnIbHO HArpeBaIOTcB XOe pa60tBu NocTaIOTc HArpeTbIMN OocNe OKOHuaHna pa60tBu, a TaKke BO Bpemr pa60tBu Dnuratena Ha XOnocTbIX OobopToX.

BHUMAHNE: Ecn
NCKporacnteHna CetKa Yacto 6bIbaet 3acopeha,3TO MOKET 6bITb npn3HaKom HapyuHnra pa60tbi KaTaN3aTopa. O6paNTecb K CBOemy cepBnCHOMy DnJIepy IJrnpOBepKN rIywnTeJI. Ppi 3acopEnnn NCKporacnteHbHO CetTKu BO3MOXeH nepepeB dBNrataJIe, yTO npNBedeT K NOBpeJeHIO cUINHnpa IN nopshn.

PPEyPExEHEN:Ha BHyTpeHHei NOBepxHOCTn rIyuHTeYr CKaIIBaIOCTc XIMNKaTbI, KOTOpBe MOrYT BbIbBAbTB paKOBbIe 3a6OJIeBAHHa. B cnyae NOBpeXdHn rIyuHTeY co6JIoDaIte OCToPOXHOCTb H He KacaITecb 3TNX 3JIeMeHToB.
InyuHTeNb npedHa3NaueH nIy MaKcImaJIbHOro CHNXeHn yPOBn IyMa N OTbOda BbIXNONbIX Ra3OB B CTOpOHy OT onepaTopa. InyuHTeNb, o6OpyOBAHHbIK KaTaNITUeCKM KOHBepTePOM, npedHa3NaueH TaIXKe IJr CHNXeHn CoedePkaHn B BbIXONaX BpeHbIX BeIecTB.
1.OctaHOBNTeDnBraTeJIb.
2. Ocmotpnte Ha hannue ne nobpekdeHn n deopmaun.
3. Поберп Te npавиьнocь креленя Гуштеля Ккорпсу n3дени.
4. Ouchntte NCKporacnteJIbHyIO ceTKy npoBOJouHOI UETKOI.
PpOBepKa HOKei KOKyXa HOKa
BHeuHra Yactb HOKeB bInOpJHReT pOnb 3aunTHoro KOxyxa. KoxyX Hoxa IpeHa3HaueH dIg 3aunTbI OT nope3OB.
1.BbIKIIOHTe DnBraTeIb n y6eIITecb, YTO HOXN OCTaHaBnBaOTcra.
2. CHMNTe KOJNAK CBeu 3aXnraHnco CBeu 3axnraHn.
3. Hanehbe 3aunTHbIe nepuATkn.
4. Y6eIntecb, yTo HOx I KOxHy HOxa He NOBpeKdHebl Hne NOrHyTbI. B O6ra3aTeNbHom NoprAKe 3aMeHnTe NOBpeKdEHbI INI NOrHyTbI HOX, a TAKKe NOBpeKdEHbI KOxHy HOxa.
5.Y6eIntecb,HTOBHtblHOKeINKOKxyaHOKa 3aTAYtbl.
IpaBnla 6e3oNacHoro o6paueHnca TOnJIINBOM

I P E D U N P E X K D E H N E: B
683aTeIbHOM nopJKe npOuNTaHTe CJIeNyUoIe HNCTpyKUnn IO TEXHKe 6e30NaChocTn, npExJe Yem npNCtTyNaTb K 3KcNlYatauun N3dEJIIN.
3anpeaetc3anyckaTb n3dennne,ecnHa Hero nonano TOnJIbBO nIM MOTOPHOe MacNo. YdaNITE NOCTOPOHHee TOJIbBO/MacNo n daTe n3dennIO BblCOXHyTb.
- Ecnn TOnJIINBO nonaJIO Ha oJeKdy, HemeIeHNO CMeHnTe ee.
- He donyckaIte nonaHnHa tonIbHa TeI0,3To MoKET npuHnTB Bpe 3dOpOBbIO. Pn nonaHa nTOJIbBa Ha TEIO CMOITe erO BOOn CMbIOM.
3aPpeaetc3aynckaTb n3dennepnHaHnynu yteKn n3 Dnuratela. Perynnpno npOBepnTe Dnuratelb Ha HauNue yteek.
C6bHIOaIteOCTOPOXHOCTb npn o6paueHN CTOINBOM.TONINBOYBNEETc JERKOBOCIIAMeHryUoSeiCRA KNDKOCTbIO CO B3pbIBOONaCHbIMNnapAMNMOXETPnVBecTKN cepBe3HBIMNJN CMEpTeJIbHbIM TpaBMam.
3aPpeaetcBdbixatbnapbTOnJIINBa,T.K.30 MoKET npuHHTb BpeD 3OpOBbIO.Y6eHITecB HAnuHn DOCTaTOHOro NOTOKa BO3dyxa.
3anpeaetcKypntbB6Jn3nTOnnBa nn DBnrgateJIa.
3aPpeaaetcCTaBnTB TeNbIe npEmdTebl pAOM c TOJINBOM ININ DBNrataTeJIem.
3anpeaaetcdoonBaTb TOnnBO npnpa6oTaHouem DBuratene.
- PpexJe Yem 3a npabntb n3dJIne, y6eIITecb, yTO DBnIraTeNb NOJHOCbIO OCTbl.
-ПердзарвковтониmaMeнноOTКpoNTe KpbIshkyТолИВHOrOБаиOCToPoxHc6pocbTe Давпен.
3aPpeaaetc3aINBaTb TOnnIBO B DnurTaTeJB B NomeuHIn. HeoCTaToUHra BeHTnIaIma MoKET npBecTu K TpaBMe IIn CmepTu B pe3yIbTaTe yduSbI IN OtpaBHeHryapHbIM ra3OM.
-ПлOTно 3aTЯнITE крblИку TOnnINBHorO 6aka.Еси КрblИka TOnnINBHorO 6aka He 3aTЯнHTa,Bo3HnIkaeТ риck пожара.
-Переметиеи3делпe МнимунHa 3M/10ФутOBOT MeCTa 3a npaBKn TOnJIbOBm,пржdeЧem3aNycTHTb erO.
HkoRda He 3apabIyTe TOnnBbI 6ak noNHOCTbIO. Teno npuBOuT K paCuHpeHHIO
TOnJIbBa. OcTaBbTe MeCTO B BepxHei Yactn TOnJIuBHorO 6aka.
HnctpykunnoTexnke 6e3oNaCHOCTN BO BpeMraTexnueCKoro 06cnyxnbAHn

PPEyPPEKDEHNE: B
6o3aTeBbHOM npAKe npOHTaTe CNeIyUoUne IHCTpyKuIN NO TEXHKe 6eOnaChOCTn, npExe Yem npNCTynatb K 3KcPnyatauIN n3DeJInr.
BbiknIOHTe DnuratEnb y6eIITecb,yTOpeKyuueo6OpUdoBaHne ocTaHaBnIBaETc. DaIte n3dEINIOocTbITb, npexde Yem HaunHaTb TexHnueckoe 6cbnykBaHne.
-Перд поведенем Тхиеского обсунваня OTcoeДнHTe KONNAc CBeUN 3aKnURAнЯ.
BbIXlonHbIe ra3bI n3 DBIrataTeIa COepKsAT OKNc b yrIepoJa - He IMeIoUm 3anaxa, TOKCNHybI N Ype3BbIyauHo onaChbI ra3, KOtOpbIMoKeT CTaTb npuHnOcmepTu. 3anpeuaetc 3KcNpyaTnpOBaTb N3dJIne B NOMeueHnn INB 3aMKHyTbIX npoctpaHCTbax.
- BbIXIONHbIe ra3bl DnBraTeJIaMeIOT BbICOKyIO TEMnepaTpy mOryT copeJkaTb NcKpbI. 3aIpe7aetcN cNoJIb3OBaTb N3dJIne B NOMEueHIN JIN PRAOM CJIerKOBocJIaMeHraHOUIMNCa MaTePnaJaM.
- IcnoIb3OBAHHe npHaJaTeJXHoCTeI INBHeCHeN e 13MeHeHn B KOHCTpyKuHIO n3JeJIa, He Oo6peHHbIX npOn3BOAnTeJIeM, MoKeT pPUBecTH K cepBe3HbIM INI CMEpTeJIbHbIM TpaBMam. 3anpeuaetcBHOcNTb N3MeHeHn B KOHCTpyKUHO n3DeJIa. Bcerda noJIb3yInTeCb TOnbKO opnIHbHBiM npHaJaTeJXHoCTaMn.
-Пи НecobлodeHIN npaBnI n cpoKOB BbInonHeHn TeXo6cnykBaHnR pNCK NOJyueHnRA TpaBMbl NnIOBpeKDeHnN 3dEJIra BO3pactaet.
- BbIIOJIHЯIe TexO6cIyKINBaHne B CtporOM COOTBeTCTBnC INHCTpyKUJIMN, pIuBEDeHHbIMN B PykoBOJcTBe no 3KcIIpyaTuqm.ДЯ npOBeDEHnB BCex dpyrnx pa6oT no 6cIyKINBaHnO obpauaTeCb B cepBnchbI ueTp Husqvarna.
- PeryIaRHO 6paauTecb B aBtOpn3oBaHHbI cepBnchbI ueHtp Husqvarna dny npOBeDeHnra Texo6cnyKuBaHnru3deHnra.
3aMeHHTe NOBpeKdEHHbIe, CLOMaHHbIe uNIMn3HOuEHHbIe DeTaII.
3KcPnyataua
BVeJeHne

PPEyNPEKDEHNE:Pepe3KcnnyaTauee H3dennBHHMaTeIbHO n3yUte pa3deTexn6e3oNaCHOCTn.
TOnJIInBO
Данhoeиздени obopyюBaHO DByXTaKTHbIM DBrIgATEm.

BHIMAHNE:3anpaBka
HeNoDxOJaUM TINOM TOJINBa MoKET npNBecTn K NOBpeXDeHIO DBNrataJIe. IcNoJIb3yIte CmEc6 BeH3NuHa MACla dIa DByXTaKTbIX DBNrataJIeN.
PpeBapnteIbHO CMeuHaHHoe TOnnBO
-ДЯ obecneueHn OITIMaJIbHOI npOn3BOOHTeJIbHOCTN IN PPOJIneHn Cpoka cnjXbI DnIRaTeJI NcNoJIb3yIte NpeDBapNTeJIbHO CMeUahHoe TOnJIbO-aIKNaT HUsqvarna.ДaHHbI TIN TOnJIbA CoDEPxNt MeHbWee KOJIueCTBO BPeHbIX BeUeCTB NO CpABHeHIO C ObiUHbIM TOnJIbOM, YTO pINBOoNT K COKpaUeHIO BpeHbIX Bbl6pocOB. TaKoe TOnJIbNO pRn cropanu N oBa3yET MeHbWee KOJIueCTBO OCTaTKOB, 6NaRoJaPra YEmy KOMIOHErbl DnIRaTeJI OCTaIOTc BoJIee UcIbIM.
CmeunbaHne TOnJIInBa
BeH3nH
-ИспοльзуITE He3TинрOBaHHb 6eH3nH Надлжацero KauecTBa C MaKcIMaJIbHbIM codepkaHHeM 3taHOna 10%

BHIMAHNE:He nCnoJIb3yIte 6eH3nH COKTaHOBBIM YHCnOM MeHbIe 90RON/87AKI.Pp6oJee H3KOM OKTAHOBOM YNCNe DBVaTeJIb MOXET npOIN3BOIDITb CTYK,HTOB CBOIO OuepeDb MOXET pPnBeCTN K NOBpeJKeHNIO DBNrAteJIa.
Macno dnydByxtakThbix Dbratenei
-ДяdoctnkeHЯ ONTImaJIbHbIX pe3yIbTaTOB mOuHocTn nonb3yIteCb Macnom Husqvarna dny DByXTaKTHbIX DBURAteJe.
- EcIn y Bac Het Macna Husqvarna dInyBxTaKTHbIX DBNrAteIeN, Bbl MoXete NcNoJIb3OBAtB BBICOKOKaYeCTBeHHoe MacNO, PpeHnHa3HaueHHoe DnA DByXTaKTHbIX DBNrAteIeN C Bo3DyUHbIX OxJaXdEHNm. IIny Bbl6opa npabunbHoro Macna 6paTntecb K CBOeMy dNJepy no o6CNIYKBaHHIO.

BHIMAHHE:3anpeaetcnaonb30BaTb Macno,npedha3NaueHoe dIyDByXTaKTHbIXDburateneC BHeuHM BOJHBMOxJaXdHnEM,T.H."outboardoil".NcnoB3OBaTb MacnoIpyTbipExTaKTHbIX DBratene3anpeaetc.
CmeunbaHne 6eH3nHa n Macna dIyXTaKTHbIX Dbratene
BHIMAHHE: Cpok xpaheHn TOnJIuBHOJ CMEcH He DoJIkeH npeBbIaTb 1 Meca.
3anpaBka TOnnIBHoro 6aka

PPEyPExEHE: CneyTe npBedeHHbIM Hxke uHCTpyKzmaM dna Baew be3oNaChocTu.
- OctaHOBInTe DnIgAteJIb I daIte Emy OCTbITb.
- OuHCTnTe NOBepxHOCTb BOKpyr KpbIiKIN TOIIIBHORO 6aka.

3.B360ntaIte emKoCTb n y6eIITecb, YTO TOnNIBO NOHOCTBQ CMEUACOB.
4. MeDneHHO CHIMITE KpbIky TOJIINBHOrO 6aka, YTO6bI CTpaBtB DaJIeHHe.
5.3aOpHnTe TOnnBbI 6ak.

BHIMAHHE: y6eHNTecb,TO B TOJIINBHom 6ake He cNIuKOM MHORO ToIINBa. Pn HArpeBe TOnNBO paCUnpReTcra.
- AkkypaTHO 3aTAHNTe KpbIuKy TOnnBHorO 6aka.
- Y6epnte npoHToe TOnnIBO C n3dJIy N BOKpyr Hero.
8.ПepeДЗAnyckOMДВИrataJIЯ OTHOCHTe N3ДeJIne B CTOpOHy He MeHee Yem Ha 3 M /10ФуТOB OT NCTOuHnKa TOnJInBa I MeCTa 3anpaBKn TOnJInBOM.
IpnmeaHne: HOpmauNo no pacnoJooKeHHo TOnnBHorO 6aka Ha n3dennm Cm. B pa3dene O63op n3dennHa cTp.299.
YCTaHOBka 3aINTbI HakoHeuHnKa HOXa
- OTBepHnte raKy u 6oNT Ha hakoHeuHke HOxa.
2.YCTaHOBNTe3auNTyHakoHeuHnKaHOxHa HakoHeuHnKHOx
3.YcTaHOBHTe 6oNTn 3aTAHHTe eO MOpHToM 7HM.
4.YCTAHOBNTe rayky n 3aTAHNTe ee MOMeHTOM 5 Hm.
PeynilpoBka pyKoTkn
CyueCTByET 3 noLoKeHnpeRyInpOBKn 3aHHe pyKoRTKn.
- CHIMITE 6JOKIPOBky pyKoTkn n NOBepHnTe pyKoTky.

3anyck n3delenc XOJIOHbIM DBNrgatelem
- NpebeDInTe 3acIOHky B 3akpbIToe NOIOKeHne.

- Haxmnte Ha rpyuHa rHaTeTaTn npImepHo 6 pa3 nn Haxmaite Ha ee, noka B rpyu He hauhet noctynatb TOnnBO. NOnHocTbO 3aONnHrTb rpyu TOnnnBOM He Tpe6yETcra.
3.ПижмTe KOPnyc n3deJIna K 3eMne JIeBOJ pyKoJ. He NaTynaTe Ha n3deJIne. - Праьо руко мeДинHо BытЯнBaNte pyky шура CTapTepa, NOka He NOчYbCTByeTe HeKOTOpoe СоюрТИВлЕнe, 3aTeM 6bICTpo n C yсипeM NOTAHTEpykUshypa.

PPEyPExEHE:He HaupyuBaTe uHyp cTapTepa Bokpyp pyKn.

BHIMAHHE: He BbITaRnBaIte HHyp cTapTepa noJIHOCTbIO n He BblNyckaIte pyKy Zhypa cTapTepa.
- 3aTeM NOBopauNBAIte BnHT peryInpOBKn npOTNB YacBOO CTpeJIKN, NOKa peKyuJee o6OpyIOBaHne He OCTaHOBNTCA.

PPEyPExEHE: Ecn
pekyue o6opyoBaHne He octaHaBnIBaetc B XOe peYInpOBKn 6opotob xOIOCToro xOda, 6paTntecb K 6nkaWemy cepBnCHOMy dInepy. 3anpeaaetc nOb30aTbcra n3dJIeHem, noka He 6ydt BInOnJIHeHa ero Hndnexaua perynipOBKa nn pemOHr.
PnmeuHne: O6oPoTbXoNocToRo XoDa
npaBnIbHbIe,ecnn DvIraTeIb pa6oTaET poBHO BO BcEx nIOJKeHHx.PekomeHDoBaHHbIe 06OpOblXONoCTORO xOda CM.B pa3dene TexHueckne daHHbIe Ha cTp.312
OuInCTka CnCTembl OxJaXdEHHa
CnCTema oxnaKeHnna noDnepKnBaet TemnepaTpy
BnIraTeNa Ha Hn3Kom ypOBHe. CnCTema oxnaKeHnna
BKIOUaET OXnAkaIOuIe pe6pa Ha cINnHdpe n
kopnyce cTapTepa.

BHIMAHHE:Bo3dyx03a6opHmK MEXy TOIINBbIM 6akOM N KapTePOM IeKO 3a6nBaetc NtCTbMy. NOnHOCTbO OuNsaIte BO3dyx03a6OpHmK.
- Ouetae cncemy oxnaeknue TckoexeHeJeBHO nnn yae (npn Heo6xOIMocTn).
2.Bcnteme oxnaKeHnHe eoKHO 6bITb 3aqr3HeHn n 3acOpOB.
PpOBepKa CBeuN 3aXnraHnA

BHIMAHNE: Bcerda nconnbayyTe
TOLbKO yka3aHHbI TnCBeH.
UcnoJIb3ObaHne HEnpaBnIbHOrTO TnPa
CBeH 3axnraHm MOKeT pInBecTe K
NOBpeKDeHIO n3deJn.
- PpOBepbTe CBevy 3aXnIraHnIe, ecn IDbIraTeIb He Ha6npaet MoUHocTb, IIOxo 3aBOJNTcI INI INIOxo pa6oTaet Ha XONoCTbIX O6OpOTax.
YTO6bI yMeHbWNTb PNCK NOBBHeHn HHexeJATEJIbHO MATEpnaJa Ha 3JeKtpoJax CBeu 3aXnraHn, CO6JIIOdaTe CJeDyUOuNe INHCTpyKUn:
a)Y6eIntecB INpaBnJIbHOCTn peryIuPOBKn YactOToBI O6OpOTOB XONOCTOXoJa.
b)Y6eIITecb,yTO nCnOJb3yETcHaIJIeKaaTg TOnJIINBHaI CMECb.
c)Y6eIInTeScb,HTO Bo3DyHbHnΦnJIbTp nCT.
- Ecnn Cbeya 3axirnna 3arpa3HeHa, ouncntte ee npobepbTe 3a3Op Mekdy 3JeKtpoamn, cm. pa3deT TexHueckne daHHbIe Ha cTp. 312.
-Прин Heo6xOДmOCTn 3aMeHHTe CBevy 3aXnHaHЯ.
OuInCTka BO3dUshoro qnIbTpTa
Peynpho Ounuau Te BO3dyuHbI pnt rpaHn nblnn.Peynphra Oucntka npedotBpaaet HeCnpabHoctn Kap6opatopa, npobmpi np 3anycke, CHNXHHe MOUHCTN DBrTaTena, n3HOC DeTanei DBrataTe I NOBtuHbI paCXoD TOnnBa.
-
CHIMMTE KpbIuKy BO3dUHOrO ΦnIbTpA (A).
-
CHIMITE NOPONHOBBI #HbTp (B) n #eTpOBBI #HbTp (C) c paMbI #HbTpA.
- 3aMeHnTeΦeTpObBmΦnBtp (C).
4.ПомоTe npoHOBbI ΦиьTp (B) TeNIOI MblbHO BDOI.
PpmeaHne:Bo3dyuHbI qnIbTp nocne 3KcIIyatauB TeueHne IINTeIbHOro BpeMeHN HeBO3MOxHO NOnHOCbIO OunchTb.PeryJrphO BbINOJIHrTe 3AmEHy BO3duHoro qnIbTp aN BCerda 3aMeHrTe HncnPabHbI qnIbTp.
- Y6eIntecb B TOM, yTo npoJHObBi JnJIbTp (B) NOJIHOCTBIO BBICOX.
- HaheCHTe MacNo Dnra BO3dyuHbIx FInIbTpOB Ha nopOioHOBbI FInIbTp (B). Cm. pa3dEn HaHeceHne Macna Ha BO3dyuHbI FInIbTp Ha cTp. 311
- OuHCTnTE BHyTpEHHOIO NOBepxHOCt b KpbIuKIN BO3DyUHOrO fNtpa(A). IcNoIb3yIe dIa OYNCTK CKaTbI B03DyX NII UeTKy.
HaHeceHne MacJa Ha BO3dUshbIe ΦnIbTp

BHIMAHNE: Heo6xoDnMo NCNoB3OBaTb CneuaNBHe MacNo DnBa BO3dyuHbIX FmNbTpOB Husqvarna. He NcNoJIb3yIte DpyrVe BnDbI Macna.

IPEyPExEHEHNE:HaedeHbTe 3aunTHbIe nepaTKn.Macno dJa BO3dyuHoroΦnIbTpamOKeT Bbl3BaTb pa3dpaxKeHne Koxn.
- NomeCTnTe BO3DyHbI ΦNJIbTp B NOJIN3TNJeHOBbI nAKeT.
- HajeTe MaCNO B NOIN3TUNeHOBbI NaKeT.
-
CoKmnte naket, yTo6bI paBHomepH o pacnpeJeNITb MacNo NO BO3DyUHOMY dNtpy.
-
OToXMnTe N3JNUKm Macna n3 BO3DyUHOro fNJIbTpab NnactIKOBbl NaKeT.

Cma3ka kopo6kn nepea
IcnoNb3yIte cneuaJIbHyIO cMa3ky Husqvarma. Inna nOyuHnHaOpMauIN O peKoMeHDoBaHHo CMA3Ke 6bpaTInTeCb K CBOeMy DnEpy No 06CJyXnBAHIO.
BVeIte cMa3ky uepe3 cMa3OHybHnHnPeJIb.


BHIMAHHE: He 3anoJIHЯTe Kopo6ky nepeaCma3KoI NOHOCbI.
OuInCTka HcMa3Ka HOKei
- Hoxn Heo6xOdmo OuHuaTb OT NOCTOpOHHX MaTePnaNoB Do n NocJe 3KcNpyataun.
2.CmaKbTe HOxN nepei NOMEuHEm n3JeJnHa npoDoJIkNTeJIbHOe xpaHeHne.
PpmeHne: nnoyehn HOpmaun O peKoMeHDoBaHHbIX YnCTaux CpeDCTBax N Cma3Ke o6paTntecb K CBOeMy cepBnCHOMy DnIepy.
Поберка HOж�eI
- Chmnte KpbuKky KapTepa peyKtopa.
2.Y6eHNTecb,TO HOKNCBO6OJHO nepemeaHOTcB. BCTaBbTe KOM6HHNPOBaHHb KJIouy KApTepeDyKTopa INOBepHHTe ero NO YacOBOn INpOTNB YacOBOn CTpeJIKN.
- Поверпг Краз Нж�а на Налчп NOBpeждн И Deфорmaци.
4.YdaIte 3ayceHcbl Ha HOXaX C NOMObHO HANJIbHnka.
TpaHcnpTnpOBka, XpaHeHne n yTnIn3aun
TpaHcNoptnOboBka n XpaHeHne
-ПердnomeшнemHaханe,ВбязATENBHOM nopdke,ДавaiteN3deJIINIOCTbITb.
Ipeed nomeueHnem Ha xpaHeHne n TpaHCnOpTnpOBKO u3deNn I TOpNnBa y6eDntEcB OTCyTCTBnYteUek Nn INCnapeHnra ToNNBa. NckpbI NnNCTOChNI KTOKbITOrO ORH, HApPmep, OT 3JIeKTPnueCKNX YCTPOINCTB Nn KOTIOB, MOryt npNBecTI K NOxapy.
Bcerda nCnoIb3yTe peKOMeHIOBaHHbIe KOHTeHepbl dny xpaHeHn I TpaHCnOpTnPOBKn TOJIINBa.
- PpeT TpaHcnpTnpOBKo Nn NomeueHem 3dEINr Ha dNITeJIbHOe XpAHHeHne CneIe TOINBO
n3 6aka. YtInn3npyTe TOnJIbBO CneuaNbHO npedHa3NaeHHOM DnA 3TOrMeCTe.
HaBpemTpaHcnpOpTPOBKnXpaHeHnyCtahabnBaIteHaN3dJIeTpeHcnpOpTPOBOHyIuNTOK.
CHIMMTE KOJInak CBeuN 3axnraHn CO CBeuN 3axnraHn.
3akpenIyTe n3deJnne Ha BpeM TpaHCnpTnpOBKn. Y6eIntecb, yTO n3deJnne HEnoDbNkHo 3aΦnKcnpObaHO.
-Пердnomeшенимндпгьhoeхpaehne Oчистеиdeлneиnpobeinte erTo Texo6cnykubahne.
TexHnueckne daHHbIe
TexHnueckne daHHbIe
Stefan Holmberg, R&D Director, Technology Management, Husqvarna AB
Ansvarig for tekniisk dokumentation

Içindekiler
Giris. 357
Taıma, depolama ve atma 368
Güvenlik. 358
Teknik veriler. 369
Calisma. 363
Original instructions
OpunHaBbIe HNcTpkyuM
Póvodné poukyny
Izvirna navodila
Bruksanvisning i original
Original talimatlar