Securio P36i - Shredder HSM - Free user manual and instructions
Find the device manual for free Securio P36i HSM in PDF.

User questions about Securio P36i HSM
0 question about this device. Answer the ones you know or ask your own.
Ask a new question about this device
Download the instructions for your Shredder in PDF format for free! Find your manual Securio P36i - HSM and take your electronic device back in hand. On this page are published all the documents necessary for the use of your device. Securio P36i by HSM.
USER MANUAL Securio P36i HSM
natural_image
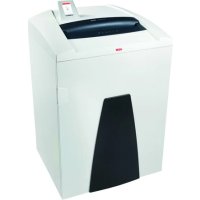
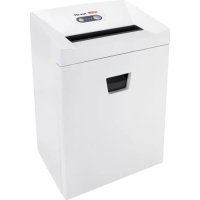
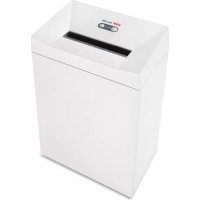
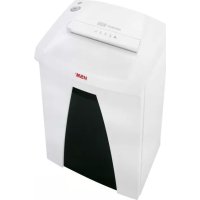
White HSM® medical device with black cover and control panel (no visible text or symbols on the device itself)SECURIO P36i
BETRIEBSANLEITUNG
OPERATING INSTRUCTIONS
NOTICE D'UTILISATION
MANUALE OPERATIVO
INSTRUCCIONES DE SERVICIO
natural_image
Exterior view of a mechanical or industrial component with labeled parts 6 and 7 (no readable text or symbols beyond labels)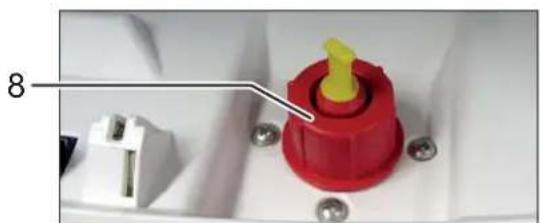
natural_image
Close-up of a red plastic component with yellow tip and white connector, mounted on a white base with screws (no visible text or symbols)natural_image
Close-up of a metallic faucet mounted on a wooden floor next to a wall-mounted base (no text or symbols visible)deutsch
natural_image
Close-up of a ceiling-mounted electronic component with two black arrows pointing to specific parts (no text or symbols visible)natural_image
Close-up of a blue circular disc with a small symbol and a square mark, placed on a white surface (no text or symbols visible)text_image
Control panel with warning symbols and a downward arrow, likely indicating a safety or hazard warning.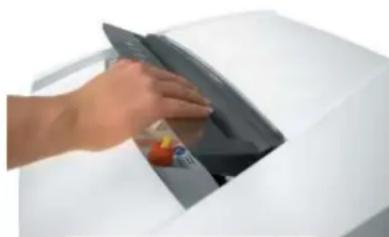
natural_image
Hand placing a dark object into a white appliance (no visible text or symbols)1 Explanation of symbols and safety instructions

WARNING
The safety alert sign with the signal word Warning and a text on a grey background alert you to the risk of serious to life-threatening injuries.
NOTICE
is used when property damage may occur by failure to comply.
Note
indicates information for the effective operation of the machine without risk of danger.
Safety instructions

Before using the machine for the first time, read the operating manual, and keep it for later use and to pass on to any subsequent users.
Observe all safety instructions onto the machine.
Risk of injury from sharp blades.
Never reach into the slot of the paper feed.
Risk of injury from being pulled in!
Keep long hair, loose articles of clothing, ties, scarves, jewellery, etc. away from feed opening. Material with the tendency to form loops, e.g. tapes, strapping material, etc. must not be shredded.

Dangerous for children and others!
The machine may not be used by persons (including children under 14 years of age) with limited physi-
cal, sensory or mental capabilities or with a lack of experience and knowledge, unless they are supervised by a responsible person or are instructed by them on the use of the machine. Children must be supervised to ensure they do not play with the machine.
Do not leave the document shredder switched on when it is unattended.
Dangerous mains voltage!
Improper handling of the machine can lead to an electric shock.
- Check the machine and cable regularly for damage.
Switch the shredder off if it is damaged or not working correctly or before relocating or cleaning it and disconnect it from the mains.
- Never pull the plug out of the socket using the power cable. Always pull out the plug directly.
- Make sure that no water gets into the shredder. Do not immerse the power cable or the power plug in water. Never touch the power plug with wet hands.
english
Check the name plate on the back of the machine to find out the cutting width and mains voltage for your document shredder and observe the applicable instructions in the operating manual.
The shredder is designed for destroying paper. Depending on the cutting type, it can also handle small quantities of the following materials:
| Shred width (mm) 5.8 3.9 4.5x30 1 | 9x15 | |||
| Credit cards | ● | ● | ● | ● |
| CDs | ● | ● | ● | ● |
| Floppy discs | ● | ● | ||
Its sturdy drive mechanism is not damaged by paper clips and staples. Only on machines with a cutting width of 1 x 5 mm can the paper not contain staples or paper clips.
Note
You can also shred CDs, diskettes and credit cards in the separate CD cutting unit (optional) without using the paper cutting unit.
The warranty period for the document shredder is 3 years. There is a special warranty for the HSM solid steel cutting rollers in the document shredder, which is provided independently of the guarantee, and remains valid for the entire service life of the machine (HSM Lifetime Warranty). This does not apply to document shredders with cutting widths of 0.78 x 11 mm and 1 x 5 mm. This warranty and guarantee exclude wear and damage caused by improper handling or actions taken by third parties.
HSM guarantees the delivery of spare parts for up to 10 years after the production of this model has been discontinued.
3 Overview2 Proper use, warranty
Note: Depending on the version, your machine may not include all the assemblies.
text_image
SECURIO TERR 1 2 3 4 5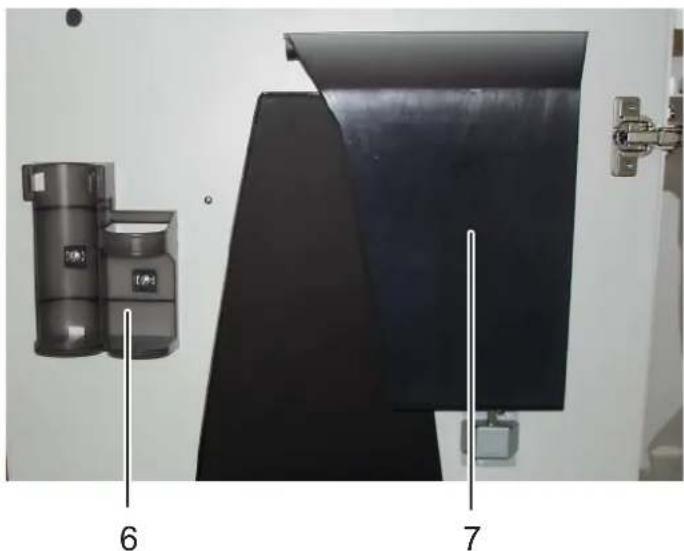
natural_image
Exterior view of a mechanical or industrial component with labeled parts 6 and 7 (no readable text or symbols beyond labels)
natural_image
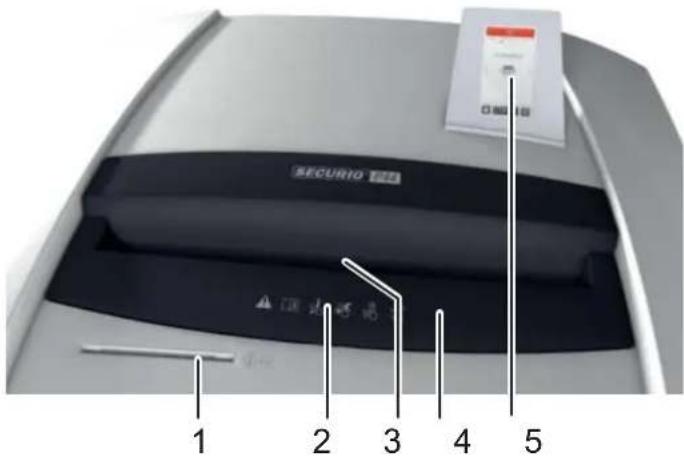
Close-up of a red plastic component with yellow tip and white connector, mounted on a white base with screws (no visible text or symbols)1 Feed slot for CDs, fl oppy discs and credit cards (optional)
2 Safety instructions
3 Light barrier in the paper feed
4 Safety element
5 Operating and display unit
6 Holder for operating manual and 250 ml-oil bottle
7 Shredded material for CDs, fl oppy discs and credit cards (optional)
8 Filler opening for cutting apparatus oil (cross cut only)
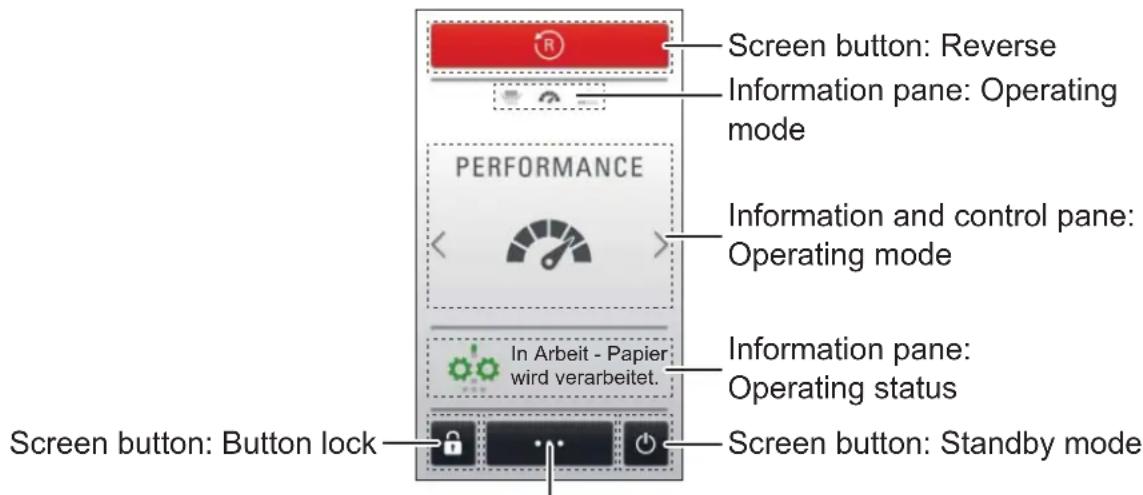
4 Display and control panel
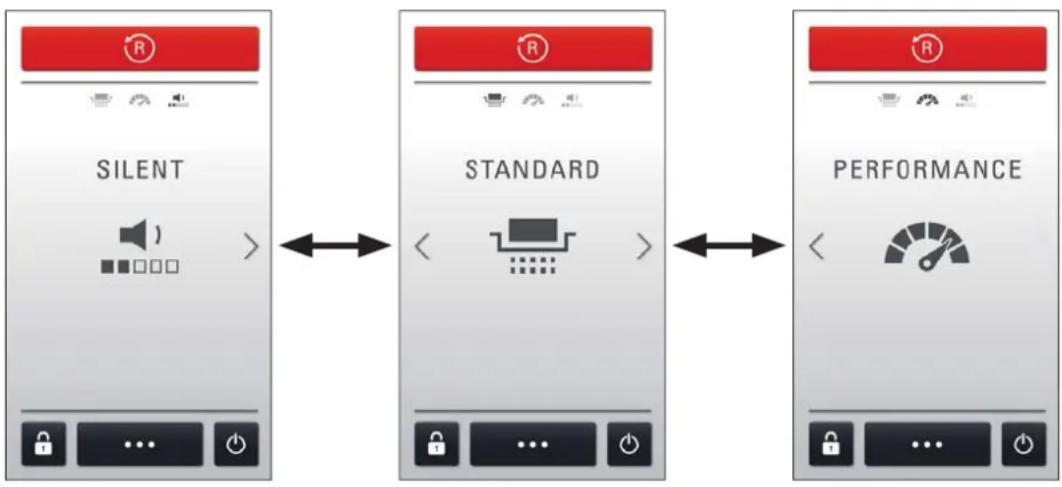
Your shredder is controlled by swipe gestures on the touch-screen display. You swipe your fingertip over the screen as you would on a smartphone.
The information panes inform you of the operating state of the appliance and indicate any necessary actions.
Example: Display during a shredding operation
text_image
Screen button: Reverse Information pane: Operating mode PERFORMANCE Information and control pane: Operating mode In Arbeit - Papier wird verarbeitet. Information pane: Operating status Screen button: Button lock Screen button: Standby modeScreen button: Information on the appliance and settings
5 Initial start-up

WARNING
Dangerous mains voltage!
Improper handling of the machine can lead to an electric shock.
- Only use the machine in a dry room indoors. Never operate the machine in damp rooms or in the rain.
- Keep the machine, the plug and cable away from open fire and hot surfaces.
- Make sure that the power plug is easily accessible.
-
Before you insert the power plug, make sure that the voltage and frequency of your power supply comply with the information on the name plate.
-
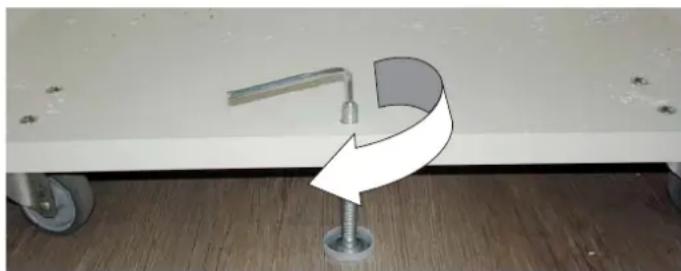
The shredder is equipped with 4 castors. Push the machine to the desired location and then fix it in position by screwing out the locking foot in the base of the lower cabinet. To do so, use the 4 mm Allen key.
natural_image
Close-up of a mechanical lever mounted on a stand with a curved arrow symbol, against a plain wall (no text or symbols)english
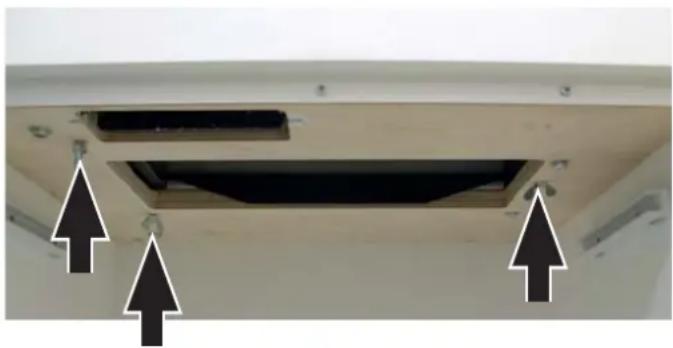
- Before starting up the machine for the first time, open the door and remove the three wing nuts of the transport locks from the base plate under the cutting unit.
natural_image
Close-up of a ceiling-mounted electronic component with two black arrows pointing to specific parts (no text or symbols visible)- In the case of particle cut machines, fi ll the oil reservoir with cutting head oil (see Section 7 "Filling the oil reservoir").
- Connect the power plug of the machine into a properly installed socket.
6 Operation
Switching on the shredder
- Set mains switch at rear of paper shredder to „I“.
- The first time you switch on, select the language for the display messages.
▶ The set operating mode is displayed.
Swipe to change the operating mode.
Note
The temperature of the shredder motor is monitored. Should it overheat, not all operating modes can be selected. You are informed of the situation by a message on the display. Once the motor has cooled down sufficiently, all modes are available again.
flowchart
graph LR
    A["SILENT"] <--> B["STANDARD"]
    B <--> C["PERFORMANCE"]
The shredder has 3 operating modes which vary with regard to shredding speed, throughput and noise emission level:
Silent: for especially quiet operation
Standard: for optimum throughput capacity with low noise levels
Performance: for maximum shredding and throughput capacity
▶ The machine is ready to operate.
Note
Paper and CD cutting unit cannot be used at the same time. Only shred one kind of material at a time.
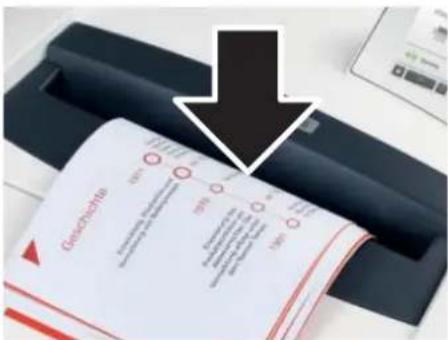
Shredding paper
text_image
Gezeichnetes 100% 100% 100% 100%- Feed the paper into the centre of the paper slot. The light barrier starts the cutting unit automatically. Therefore, with thin paper strips, make sure the light barrier detects them.
NOTICE
Do not shred paper in the CD cutting unit. This can cause damage.
The operating status "Operation - shredding paper" is indicated.
3 seconds after the light barrier in the paper feed opening is free again, the cutting unit is switched off automatically and the shredder switches to standby.
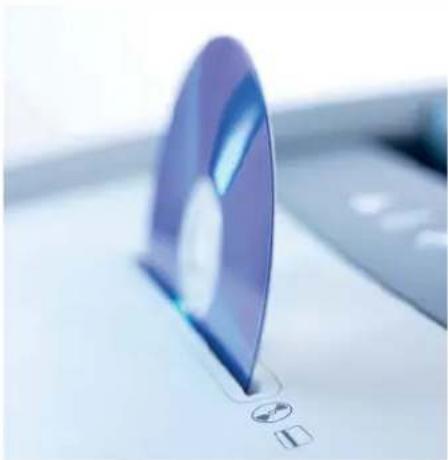
Shredding CDs, credit cards and fl oppy disks
natural_image
Close-up of a purple CD or DVD disc with a small circular icon and square base, no visible text or symbols.- Check whether your machine is certified for destroying these materials (see "Proper use").
Appliances with separate CD shredder (optional feature):
Feed the material into the CD shredder slot. This protects you from splinters.
Appliances without separate CD shredder:

WARNING
Danger of injury by splinters!

Depending on the type of material, splinters can fly out of the cutting unit while shredding CDs and injure your eyes.
- For this reason, wear protective goggles.
- Feed in just one CD/DVD in the middle of the feed opening.
- Dispose the shredded material and the waste paper separately.
Switching the shredder to standby mode
- Press and hold the standby mode button 📋 for one second.
The display panel is dimmed. As soon as shredding material is fed into the paper or CD shredder, the appliance starts up again.
- Set mains switch at rear of paper shredder to „0“.
Switching off the shredder
7 Fault and function indicators
Note
Messages on the display and control panel inform you of the operating status of the shredder. For that reason, the explanations below refer only to the error messages for which the necessary actions are not indicated directly on the display.
text_image
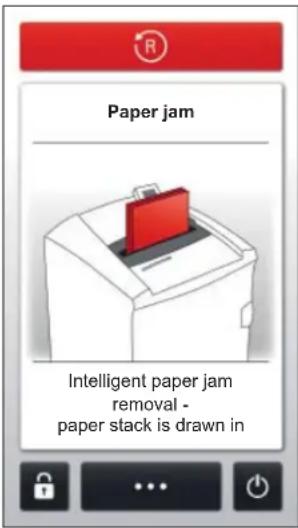
Paper jam Intelligent paper jam removal - paper stack is drawn inPaper jam
You have fed in too much paper at once.
If more than 1/2 an A4 sheet has already been processed, the shredder will draw in the paper stack even though more sheets than permitted have been fed in.
If the number of sheets to be shredded is far in excess of the number of sheets processable, the cutting unit runs in reverse for a few seconds and pushes the paper back out.
- If necessary, press the "R" button to run the cutting unit in reverse once more.
- Remove the stack of paper.
- Only feed in the amount of paper allowed (see Technical Data).
Note
You can lift up the safety element in order to better remove paper. To do this, press the middle section of the front of the safety element and lift up the flap.

text_image
Control panel with warning symbols and icons, including a downward arrow and battery icon
natural_image
Hand placing a dark object into a white appliance (no visible text or symbols)| Message displayed | Fault cause Remedy | |
| Please remove the stack of paper or the CD. | Paper and CD fed at the same time | · Do not use both cutting units at the same time, but rather shred paper and CDs/diskettes/credit cards separately. |
| Safety element open | Press safety element | ➢ Pressing lightly on the safety element prevents material being drawn in unintentionally. The cutting unit stops/does not start.· Do not press on the safety element. |
| Paper container full | Paper/shredded material container full | · Empty the paper/shredded material container. To open the door, press the right-hand edge of the door.NoteIf you press the “R” button before opening the door, some of the shredded material is drawn back into the cutting unit and does not fall into the inside of the shredder. |
| CD container full | CD container full | · Empty the CD container. To do so, lift it upwards out of the bracket. |
| Door open Door | open • Close the door. | |
| Safety element active | Safety element not engaged | • Snap the safety element into place.NoteThe movement of the safety element is monitored during the shredding process. |
| Metal detection Metal in the paper | • Press the “R” button and pull the paper out of the feed slot.• Remove any metal which is in the paper or on the safety element.• Acknowledge the fault. | |
| Motor overloaded The motor has overheated. | • Allow the shredder to cool down for 30 min. before using it again. | |
| Light barrier dusty Photoelectric beam obscured by paper dust | • Clean the photoelectric sensor in the paper feed using a dry brush or cloth. | |
| Oil reservoir empty Oil reservoir empty | • Fill the reservoir with cutting apparatus oil.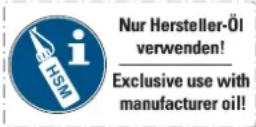 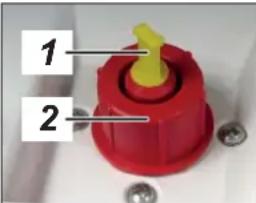 | Only use HSM special oil.Reservoir volume: 250 mlPress the safety element and lift up the fl ap. The oil fi lling opening is to the right of the feed chute.You can fi ll the oil either through the small opening 1 (take out the yellow plug) or the normal opening 2 (unscrew the red cap). |
8 Other functions and settings
Key lock
You can prevent unauthorised use of the shredder by locking the touch-screen display as follows:
- Press and hold the screen lock button 🔒 for one second.
▶ The numeric keypad is displayed. - Enter a 4-digit number of your choice.
▶ The display is dimmed. The screen is locked.
Unlocking the screen lock:
- Press anywhere on the display.
▶ The numeric keypad is displayed. - Enter the 4-digit number you used to lock the screen.
▶ The screen lock is unlocked.
Note
If you have forgotten the numeric code you used to lock the screen, you can override the screen lock by entering the master code: 8731
Other function modes
- Permanent mode
Function: Cutting unit runs continuously. If no material is fed in within a period of 2 minutes, the cutting unit shuts down and the shredder switches to standby. If fault or warning messages are displayed, the cutting unit is also switched off.
Start: Press and hold the centre of the display panel for 3 seconds.
Premature cancellation: Press the display panel.
- Stand-by mode
Function: 2 minutes after paper was last fed into the shredder, the appliance switches to standby mode. The shredder starts automatically when paper is fed in.
• Automatic shutdown
Function: If the shredder has not been used for 8 hours, the power consumption is further reduced.
Notes
Manual reversing
If you press the "R" button, the cutting unit runs in reverse and switches off after 2 seconds, even if you keep the button pressed. To be able to manually start another reversing operation, you have to release the button and press it again.
If the shredder is already running in shredding direction, pressing this button causes the shredder to immediately reverse.
Shredded material container
Both cutting units stop when the paper or CD container is full.
On machines with a separate CD cutting unit, the level in the CD container (see overview, item 7) is monitored. Empty the bin after an error message.
Please consider the environment and dispose of the different types of waste separately.
Automatic oiler (cross cut only)
The cutting unit is regularly lubricated by the internal oiler.
The “Oil reservoir empty” signal is automatically deactivated after the reservoir is filled. The shredder remains operational even when the oil reservoir is empty.
Metal detection (optional)
The document shredder can be optionally equipped with a metal detector. The automatic switch-off allows damage to the cutting unit by paper clips or other metal objects to be avoided.
Safety element monitoring
Movement of the safety element was detected during the shredding procedure. If your machine switches off without signalling an error, pull the paper out of the paper slit and feed it back in again.
Information on the appliance and settings
Press the menu button ⋯, on the home screen to display and alter appliance settings. The choice of available settings is displayed.
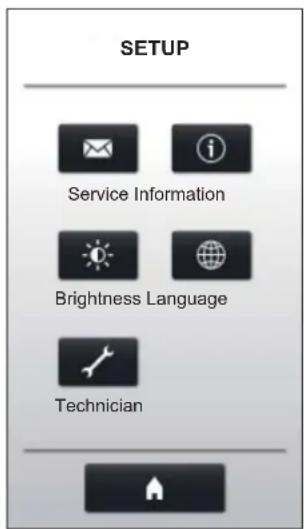
text_image
SETUP Service Information Brightness Language TechnicianSelect:
Service: Contact addresses for HSM and its subsidiaries
Brightness: Slide the control to adjust the brightness of the display.
Information: Shredder hours of duty and important appliance information
Language: Select a language for the display.
Technician: Password-protected access for HSM service technicians
The button takes you back to the home screen.
9 Cleaning and maintenance

WARNING
Dangerous mains voltage!
Improper handling of the machine can lead to an electric shock.
Switch the shredder off before relocating or cleaning it and disconnect the mains plug.
Service work which requires the housing covers to be removed may only be carried out by HSM Customer Service and service technicians of our contractual partners.
See page 224 for our customer service addresses.
Clean the document shredder only with a soft cloth and a mild soap-water solution. However, no water must enter the equipment.
text_image
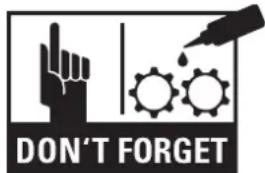
DON'T FORGETStrip cut only:
Oil the cutting unit when cutting performance decreases or the device becomes noisy, or every
time you empty the waste container. Only use HSM special lubricating oil for the cutting unit to do this:
- Spread the special cutting unit oil through the paper feed along the entire width of the cutting shafts.
- Let the cutting unit run in the permanent mode for about 10 seconds without any paper.
▶ Paper dust and particles are shaken off.
10 Disposal / Recycling

Electrical and electronic old devices contain a variety of valuable materials, but also hazardous substances which were required for function and safety. Incorrect disposal or handling can be dangerous to your health and the environment. Never dispose of old devices in the household waste. Observe the current applicable regulations and use the collection points for returning and recycling electric and electronic devices. Dispose of all the packaging materials also in an environmentally-responsible way.
11 Scope of delivery
- Paper shredder, ready for connection, in carton packing
- 5 bags for shredded material
• Special cutting block oil (cross cut) - Operating instructions
Acces so ries
• 10 bags for shredded material, order No.: 1.442.995.110
• Special cutting block oil 250 ml, order No.: 1.235.997.403
- Cardboard box, order No.: 1.850.995.200
See page 224 for our customer service addresses.
12 Technical data
| Cutting type | Strip cut Cross cut | |||||
| Cut size (mm) | 5.8 | 3.9 | 4.5 x 30 | 1.9 x 15 | 0.78 x 11 | 1 x 5 |
| Security level DIN 66399 | P-2 / O-2T-2 / E-2 | P-2 / O-2T-2 / E-2 | P-4 / O-3T-4 / E-3F-1 | P-5 / O-4T-5 / E-4F-2 | P-6 / F-3 | P-7 / F-3 |
| Cutting capacity* (sheets), A4 80 g/m270 g/m2 | 43 - 4552 - 54 | 34 - 3640 - 42 | 27 - 2929 - 31 | 16 - 1820 - 22 | 11 - 1312 - 14 | 810 |
| Cutting speed | 85 mm/s | |||||
| Intake width | 330 mm | |||||
| Power supply | 230 V, 50 Hz 120 V / 60 Hz 220 V / 60 Hz | |||||
| Power with max. number of sheetsin standby mode | 1000 W2 W | |||||
| Operating mode | Continuous operation | |||||
| Ambient conditions in operation:Temperature-10°C to +25°CRelative humiditymax. 90%, without condensationHeight above sea-level (MSL)max. 2,000 m | ||||||
| Size W x D x H (mm) | 580 x 550 x 1036 | |||||
| Weight | 68 kg | |||||
| Volume of the shredded paper container | 145 l | |||||
| Sound pressure level emissions(Idle running/ load) | Silent 45 dB(A) / 50 dB(A)Standard 55 dB(A) / 60 dB(A)Performance 65 dB(A) / 70 dB(A) | |||||
| Cutting size of the separate CD cutting unit(optional) | Order number +C ** | Order number +M, N ** | ||||
| 4 x 7 mm | 2 x 2 mm | |||||
| Security level of the CD cutting unit | O-4 / T-5 / E-4 | O-6 / T-6 / E-5 | ||||
* The maximum number of sheets (DIN A4, 70 g/m² or 80 g/m²), fed lengthways, which can be cut in one cycle. The performance data is determined when the motor is cold and the cutting device is freshly oiled. A weaker mains voltage or a different mains frequency to the one specified could result in less sheet capacity and increased noise during operation. The sheet capacity can vary depending on the structure and properties of the paper and on the way it enters.
** Identified by the letter after the 7-digit order number on the name plate on the back of the machine. e.g. 1873111C >> cutting size 4 x 7 mm

This document shredder meets the applicable harmonisation legislation of the European Union:
• Low Voltage directive 2014/35/EU
• EMC directive 2014/30/EU
• RoHS directive 2011/65/EU
The EU declaration of conformity can be requested from the manufacturer.
natural_image
Exterior view of a mechanical device with labeled parts 6 and 7 (no readable text or symbols beyond labels)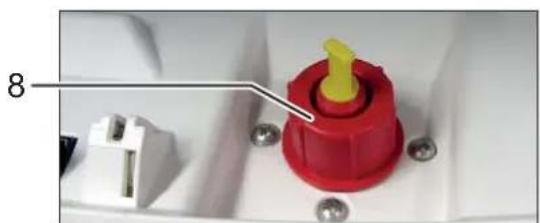
natural_image
Close-up of a red plastic component with yellow tip and white connector, mounted on a white base with screws (no visible text or symbols)natural_image
Interior view of a bathroom with a faucet and screw base, no visible text or symbolsfrançais
natural_image
Close-up of a ceiling-mounted electronic component with two black arrows pointing to features (no text or symbols visible)natural_image
Close-up of a purple circular disc with a small symbol and a square base, placed on a white surface (no text or symbols visible)text_image
Control panel with warning symbols and a downward arrow, likely indicating a safety or hazard warning.
natural_image
Hand placing a dark object into a white appliance (no visible text or symbols)natural_image
Exterior view of a black metal panel with two vertical measurement indicators labeled 6 and 7 (no text or symbols on the panel itself)
natural_image
Close-up of a red and yellow plastic component with pins and bolts, no visible text or symbolsnatural_image
Close-up of a metallic lever mounted on a small metal bracket next to a wall, with a curved arrow and screw base visible (no text or symbols)italiano
natural_image
Close-up of a ceiling-mounted electronic component with two black arrows pointing to specific components (no text or symbols visible)natural_image
Close-up of a purple CD or DVD disc with a small icon and square base, no visible text or symbols.text_image
Control panel with warning symbols and icons, including a downward arrow and battery icon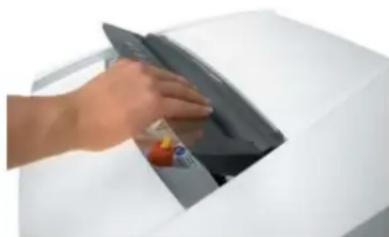
natural_image
Hand inserting a card into a printer (no visible text or symbols)natural_image
Exterior view of a mechanical assembly with labeled parts 6 and 7 (no readable text or symbols beyond labels)
natural_image
Close-up of a red plastic component with yellow tip and white connector, mounted on a white base with screws (no visible text or symbols)natural_image
Close-up of a metallic faucet mounted on a stand next to a wall, with a curved arrow graphic overlay (no text or symbols)español
natural_image
Close-up of a ceiling-mounted electronic component with two black arrows pointing to features (no text or symbols visible)natural_image
Close-up of a purple CD or DVD disc with a small icon and square base, no visible text or symbols.
ADVERTENCIA
text_image
Control panel with warning icons and a downward arrow, likely indicating a safety or hazard symbol
natural_image
Hand placing a dark object into a white appliance (no visible text or symbols)natural_image
Exterior view of a mechanical assembly with labeled parts (6 and 7), no readable text or symbols beyond labels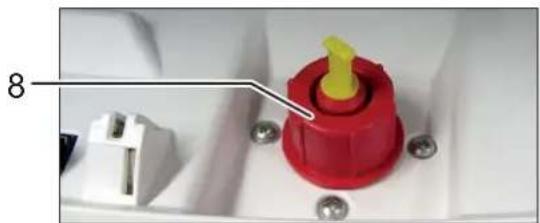
natural_image
Close-up of a red plastic component with yellow tip and white connector, mounted on a white base with screws (no visible text or symbols)natural_image
Close-up of a wall-mounted fixture with a handle and screw base, no visible text or symbolsportuguês
natural_image
Close-up of a ceiling-mounted electronic component with two black arrows pointing to features (no text or symbols visible)natural_image
Close-up of a blue circular disc with a small icon and square outline, placed on a white surface (no text or symbols visible)
AVISO
text_image
Control panel with warning symbols and a downward arrow, likely indicating a safety or hazard warning.
natural_image
Hand placing a dark object into a white appliance (no visible text or symbols)natural_image
Exterior view of a black metal panel with two labeled parts (6 and 7), no readable text or symbols beyond labels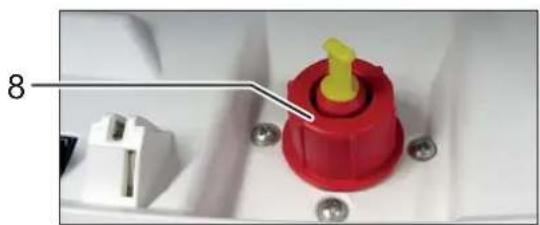
natural_image
Close-up of a red plastic component with yellow tip and white connector, mounted on a white surface with screws (no text or symbols visible)natural_image
Close-up of a mechanical component with a curved arrow and base, mounted on a floor next to a wall (no text or symbols visible)nederlands
natural_image
Close-up of a ceiling-mounted electronic component with two black arrows pointing to features (no text or symbols visible)natural_image
Close-up of a blue circular disc with a small icon and square base, placed on a white surface (no text or symbols visible)text_image
Control panel with warning icons and a downward arrow, likely indicating a safety or hazard symbol
natural_image
Hand placing a dark object into a white appliance (no visible text or symbols)natural_image
Exterior view of a mechanical or industrial component with labeled parts 6 and 7 (no readable text or symbols beyond labels)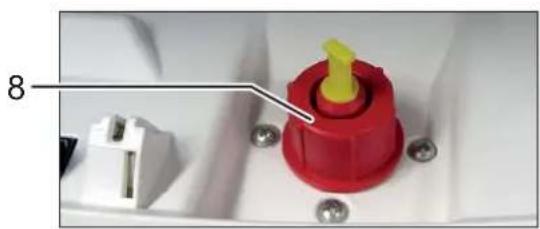
natural_image
Close-up of a red and yellow plastic component with pins, mounted on a white base (no visible text or symbols)1 Tilførselsåbning til cd'er, disketter og kreditkort (option)
natural_image
Close-up of a white wall-mounted fixture with a metallic lever and a curved arrow-shaped component mounted on a base (no text or symbols visible)dansk
natural_image
Close-up of a ceiling-mounted electronic component with two black arrows pointing to specific parts (no text or symbols visible)natural_image
Close-up of a blue circular disc with a small icon and square base, placed on a white surface (no text or symbols visible)text_image
Control panel with icons for warning, cycle, bicycle, and battery symbols, plus a downward arrow and battery icon
natural_image
Hand inserting a card into a white electronic device (no visible text or symbols)natural_image
Exterior view of a black metal panel with two labeled components (6 and 7), no readable text or symbols on the panel itself.
natural_image
Close-up of a red plastic component with yellow tip and white connector, mounted on a white base with screws (no visible text or symbols)natural_image
Interior view of a room with a water tap and a curved arrow-shaped object on a wooden floor (no text or symbols visible)svenska
natural_image
Close-up of a ceiling-mounted electronic component with two black arrows pointing to features (no text or symbols visible)natural_image
Close-up of a purple CD or DVD disc with a glossy surface and a small logo, placed on a white surface (no readable text or symbols)text_image
Control panel with icons for safety, cycling, and battery symbols, plus a downward arrow and battery symbol icon
natural_image
Hand inserting a device into a white machine (no visible text or symbols)natural_image
Exterior view of a black metal panel with two labeled components (6 and 7), no readable text or symbols beyond labels
natural_image
Close-up of a red plastic component with yellow tip and white connector, mounted on a white base (no text or symbols visible)natural_image
Close-up of a metallic pipe valve mounted on a small metal bracket, with a curved arrow symbol overlay (no text or symbols present)suomi
natural_image
Close-up of a ceiling-mounted electronic component with two black arrows pointing to features (no text or symbols visible)natural_image
Close-up of a purple circular disc with a small icon and square base, placed on a white surface (no text or symbols visible)text_image
Control panel with warning symbols and a downward arrow, likely indicating a safety or hazard warning.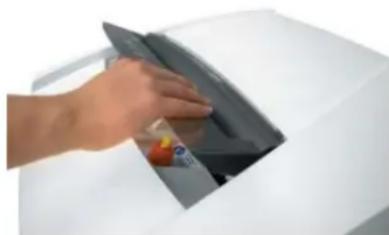
natural_image
Hand placing a dark object into a white electronic device (no visible text or symbols)natural_image
Exterior view of a black metal panel with two labeled components (6 and 7), no readable text or symbols beyond labels
natural_image
Close-up of a red and yellow plastic component with pins, mounted on a white base (no visible text or symbols)1 Innmatingsspor for CD-er, disketter og kreditt-kort (tillegg)
2 Sikkerhetsinstrukser
natural_image
Close-up of a metallic pipe fitting mounted on a stand, with wheels and a curved arrow symbol overlay (no text or symbols present)norsk
natural_image
Close-up of a ceiling-mounted electronic component with two black arrows pointing to features (no text or symbols visible)- Ved maskiner med partikkelsnitt fylles oljebeholderen med kutteblokkolje (se kapittel 7 "Fylle oljebeholder").
- Plugg maskinens nettstøpsel inn i en stikkontakt som er forskriftsmessig montert.
6 Betjening
natural_image
Close-up of a purple circular object with a small symbol and a small square mark, placed on a white surface (no text or symbols visible)text_image
Control panel with warning symbols and a downward arrow, likely indicating a safety or hazard warning.
natural_image
Hand placing a dark object into a white appliance (no visible text or symbols)natural_image
Exterior view of a black metal panel with two labeled components (6 and 7), no readable text or symbols beyond labels
natural_image
Close-up of a red plastic component with yellow tip and white connector, mounted on a white base with screws (no visible text or symbols)natural_image
Close-up of a mechanical component with a lever and base mount, mounted on a wooden floor (no text or symbols visible)polski
natural_image
Close-up of a ceiling-mounted electronic component with mounting holes and a central opening (no text or symbols visible)natural_image
Close-up of a purple CD or DVD disc with a small icon and square base, no visible text or symbols.text_image
Control panel with icons for safety, cycle, bicycle, and battery symbols, plus a downward arrow and battery icon.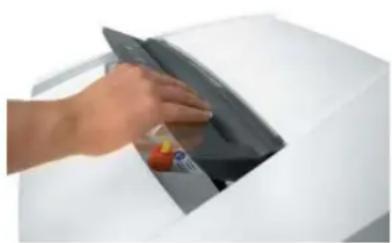
natural_image
Hand placing a dark object into a white appliance (no visible text or symbols)natural_image
Exterior view of a mechanical assembly with labeled parts 6 and 7 (no readable text or symbols beyond labels)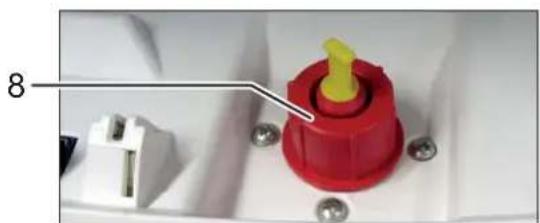
natural_image
Close-up of a red and yellow plastic component with a white connector, mounted on a white base with screws (no visible text or symbols)natural_image
Close-up of a metallic tool mounted on a stand next to a wall, with a curved arrow graphic overlay (no text or symbols)česky
natural_image
Close-up of a ceiling-mounted electronic component with two black arrows pointing to specific parts (no text or symbols visible)natural_image
Close-up of a blue circular disc with a small symbol and a small square below, placed on a white surface (no text or symbols visible)text_image
Control panel with icons for safety, cycle, bicycle, and battery symbols, plus a downward arrow indicator
natural_image
Hand placing a component into a white electronic device (no visible text or symbols)natural_image
Interior view of a mechanical or industrial setup with labeled components (no readable text or symbols)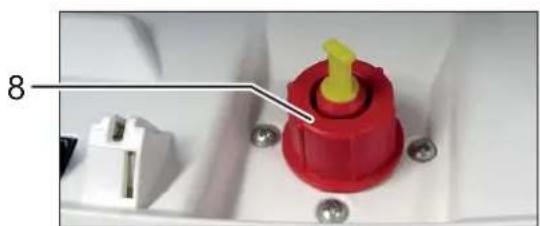
natural_image
Close-up of a red plastic component with yellow tip and white connector, mounted on a white base with screws (no visible text or symbols)natural_image
Close-up of a metallic faucet mounted on a small stand with a curved arrow graphic overlay (no text or symbols)slovensky
natural_image
Close-up of a ceiling-mounted electronic component with two black arrows pointing to features (no text or symbols visible)natural_image
Close-up of a blue circular disc with a small globe icon and a square symbol, placed on a white surface (no text or symbols visible)text_image
Control panel with icons for safety symbols and battery, including a downward arrow and battery icon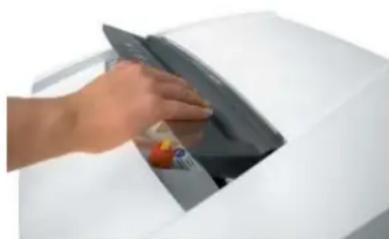
natural_image
Hand placing a circular object into a white appliance (no visible text or symbols)natural_image
Exterior view of a mechanical assembly with labeled parts (6 and 7), no readable text or symbols beyond labels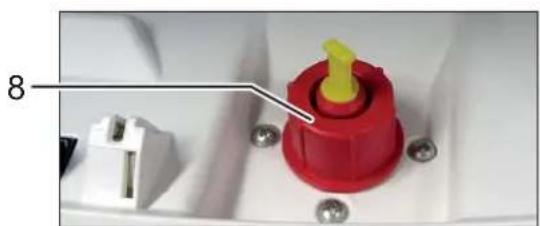
natural_image
Close-up of a red plastic component with yellow tip and white connector, mounted on a white surface with screws (no text or symbols visible)natural_image
Close-up of a metallic lever mounted on a small stand with a curved arrow symbol overlay (no text or symbols present)eesti
natural_image
Close-up of a ceiling-mounted electronic component with two black arrows pointing to specific parts (no text or symbols visible)6 Kasutamine
natural_image
Close-up of a purple CD or DVD disc with a small icon and square base, no visible text or symbols.text_image
Control panel with icons for safety, cycling, bicycle, and battery symbols, plus a downward arrow and battery icon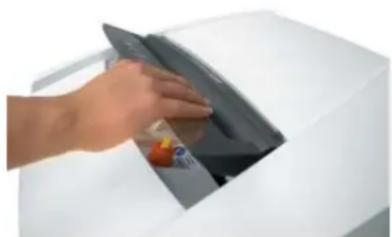
natural_image
Hand placing a dark object into a white machine casing (no visible text or symbols)natural_image
Exterior view of a mechanical or industrial component with labeled parts 6 and 7 (no readable text or symbols beyond labels)
natural_image
Close-up of a red and yellow plastic component with pins, mounted on a white base (no visible text or symbols)natural_image
Close-up of a mechanical component with a metallic lever and threaded base, mounted on a wheeled platform (no text or symbols visible)русский
natural_image
Interior ceiling view showing a double door and ventilation duct with two black arrows pointing to the sides (no text or symbols)natural_image
Close-up of a purple CD or DVD disc with a small icon and square base, no visible text or symbols.text_image
Control panel with warning symbols and a downward arrow, likely indicating a safety or hazard warning.
natural_image
Hand placing a dark object into a white electronic device (no visible text or symbols)natural_image
Exterior view of a mechanical or industrial component with labeled parts 6 and 7 (no readable text or symbols beyond labels)
natural_image
Close-up of a red plastic component with a yellow tip, mounted on a white base with screws (no visible text or symbols)natural_image
Close-up of a metallic faucet mounted on a small stand with a curved arrow graphic overlay (no text or symbols)slovenščina
natural_image
Close-up of a ceiling-mounted electronic component with two black arrows pointing to specific parts (no text or symbols visible)natural_image
Close-up of a purple circular object with a small icon and a small square below, placed on a white surface (no text or symbols visible)text_image
Control panel with warning symbols and icons, including a downward arrow and battery icon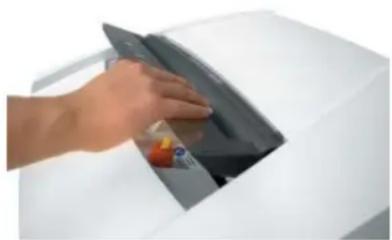
natural_image
Hand inserting a card into a printer (no visible text or symbols)natural_image
Exterior view of a black plastic panel with two labeled parts (6 and 7), no readable text or symbols beyond labels
natural_image
Close-up of a red plastic component with yellow tip and white connector, mounted on a white base with screws (no visible text or symbols)natural_image
Close-up of a mechanical lever mounted on a stand with a curved arrow symbol, against a plain wall (no text or symbols)magyar
natural_image
Close-up of a ceiling-mounted electronic component with two black arrows pointing to features (no text or symbols visible)natural_image
Close-up of a purple CD or DVD disc with a small icon and square base, no visible text or symbols.text_image
Control panel with warning icons and a downward arrow, likely indicating a safety or hazard symbol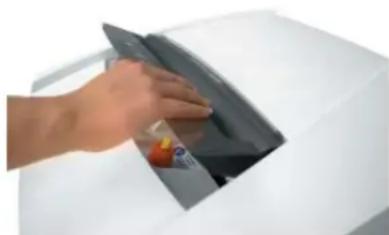
natural_image
Hand placing a dark object into a white electronic device (no visible text or symbols)natural_image
Exterior view of a black metal panel with two labeled parts (6 and 7), no visible text or symbols on the panel itself.
natural_image
Close-up of a red plastic component with yellow tip and white connector, mounted on a white base with screws (no visible text or symbols)natural_image
Interior view of a room with a hand valve and a curved arrow symbol, mounted on a floor next to a wheel (no text or symbols visible)română
natural_image
Close-up of a ceiling-mounted electronic component with two black arrows pointing to features (no text or symbols visible)natural_image
Close-up of a purple CD or DVD disc with a small icon and square base, no visible text or symbols.text_image
Control panel with warning symbols and a downward arrow, likely indicating a safety or hazard warning.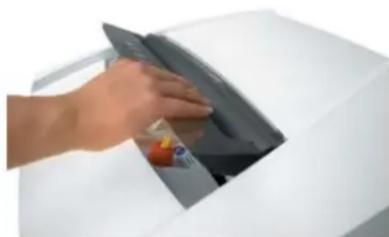
natural_image
Hand placing a dark object into a white electronic device (no visible text or symbols)natural_image
Exterior view of a mechanical assembly with numbered components (6 and 7), no visible text or symbols on the main subject.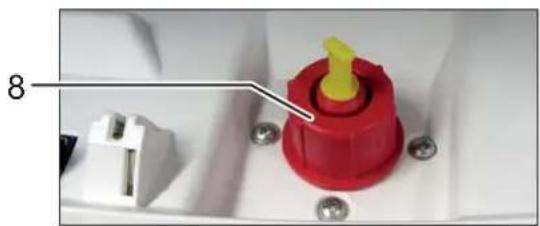
natural_image
Close-up of a red plastic component with yellow tip and white connector, mounted on a white base with screws (no visible text or symbols)natural_image
Close-up of a wall-mounted tool with a curved arrow and base mount, no visible text or symbolsбългарски
natural_image
Close-up of a ceiling-mounted electronic device with two black arrows pointing to the mounting bracket (no text or symbols visible)natural_image
Close-up of a purple circular disc with a small icon and square base, placed on a white surface (no text or symbols visible)text_image
Задръстване на хартия Intelligent paper jam removal - paper stack is drawn intext_image
Control panel with warning symbols and a downward arrow, likely indicating a safety or hazard warning.
natural_image
Hand placing a dark object into a white electronic device (no visible text or symbols)natural_image
Exterior view of a black metal panel with two labeled components (6 and 7), no readable text or symbols on the panel itself.
natural_image
Close-up of a red plastic component with yellow tip and white connector, mounted on a white base with screws (no text or symbols visible)natural_image
Interior view of a bathroom with a faucet and screw base (no text or symbols visible)ελληνικά
natural_image
Close-up of a ceiling-mounted electronic component with two black arrows pointing to specific parts (no text or symbols visible)natural_image
Close-up of a purple CD or DVD disc with a small icon and square base, no visible text or symbols.text_image
Control panel with icons for safety, bicycle, gear, and battery symbols, plus a warning arrow and battery icon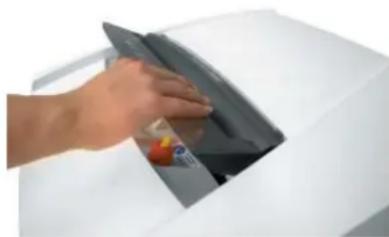
natural_image
Hand placing a dark object into a white electronic device (no visible text or symbols)natural_image
Exterior view of a black metal panel with two cylindrical components and numbered labels 6 and 7 (no readable text or symbols)
natural_image
Close-up of a red and yellow plastic component with pins, mounted on a white base (no visible text or symbols)natural_image
Close-up of a metallic pipe fitting attached to a wall-mounted screw, with a curved arrow symbol overlay (no text or symbols present)türkçe
natural_image
Close-up of a ceiling-mounted electronic component with two black arrows pointing to features (no text or symbols visible)natural_image
Close-up of a purple circular disc with a small symbol and a small square mark, placed on a white surface (no text or symbols visible)text_image
Control panel with warning symbols and a downward arrow, likely indicating a safety or hazard warning.
natural_image
Hand placing a dark object into a white electronic device (no visible text or symbols)88699 Frickingen / Germany
Tel. +49 7554 2100-0
Fax +49 7554 2100 160
info@hsm.eu
www.hsm.eu
Gratis Hotline
DE, AT, BE, NL, LU, IT
Tel. 00800 44 77 77 66
Fax 00800 44 77 77 67
HSM (UK) Ltd.
14 Attwood Road / Zone 1
Burntwood Business Park
Burntwood · Staffordshire
WS7 3GJ
United Kingdom
Tel. +44 1543 272-480
Fax +44 1543 272-080
info@hsmuk.co.uk
www.hsm.eu
HSM France SAS
Parc de Genève
240, Rue Ferdinand Perrier
69800 Saint-Priest
France
Tél. +33 472 210580
Fax +33 472 517481
France@hsm.eu
www.hsm.eu
HSM of America LLC
419 Boot Road
Downingtown, PA 19335
USA
Tel. +1 484 237-2308
+1 800 613-2110
Fax +1 484 237-2309
customerservice@hsm.us
info@hsm.us
www.hsm.us
Great Products, Great People.