CSM 1815 - Saw AL-KO - Free user manual and instructions
Find the device manual for free CSM 1815 AL-KO in PDF.
| Product type | Cordless pruning saw |
| Brand | AL-KO |
| Model | CSM 1815 |
| Dimensions (L x W x H) | 430 x 200 x 85 mm |
| Weight (with chain and guide bar, without battery) | 1.56 kg |
| Power supply | Lithium-ion battery 18 V (2.5 Ah included in kit) |
| Cutting length | 152 mm (6") |
| Guide bar | Length 179.5 mm (7") |
| Cutting chain | Pitch 0.3", drive link thickness 1.1 mm |
| Max. chain speed | 7 m/s |
| Motor power | 500 W (input) |
| Motor speed | 18,500 min⁻¹ |
| Oil tank capacity | 30 ml |
| Sound power level (LwA) | 93 dB(A) |
| Sound pressure level (LpA) | 78 dB(A) |
| Vibration value | 2.8 m/s² |
| Overload protection | Yes (automatic shut-off) |
| Folding chain guard | Yes |
| Hand guard | Yes |
| Chain lubrication | Manual (push button) |
| Compatible battery type | Li-ion AL-KO (ref. 113896) |
| Delivery content (kit ref. 114023) | Saw, 2.5 Ah battery, charger, carry case, 30 ml oil, manual |
| Intended use | Home gardening: pruning, cutting firewood and fragile branches |
| Warranty | Statutory (wear parts excluded) |
Frequently Asked Questions - CSM 1815 AL-KO
User questions about CSM 1815 AL-KO
0 question about this device. Answer the ones you know or ask your own.
Ask a new question about this device
Download the instructions for your Saw in PDF format for free! Find your manual CSM 1815 - AL-KO and take your electronic device back in hand. On this page are published all the documents necessary for the use of your device. CSM 1815 by AL-KO.
USER MANUAL CSM 1815 AL-KO
AL-KO KOBER GROUP Kottz, Germany
This documentation or excerpts therefrom may not be reproduced or disclosed to third parties without the express permission of the AL-KO KOBER GROUP.


CSM 1815
Refer to technical data section.
| B50 Li (PBA 18V 2.5Ah W-B) | B75 Li (PBA 18V 4.0Ah W-C) | B100 Li (PBA 18V 5.0Ah W-C) | B125 Li (PBA 18V 6.0Ah W-C) |
| 113893 113894 | 113895 113896 | ||
| 18 V | |||
| 2,5 Ah 4,0 Ah | 5,0 Ah 6,0 Ah | ||
| 45 Wh 72 Wh | 90 Wh 108 Wh | ||
| C50 Li: ≈ 60 min FC100 Li: ≈ 36 min | C50 Li: ≈ 95 min FC100 Li: ≈ 39 min | C50 Li: ≈ 105 min FC100 Li: ≈ 46 min | C50 Li: ≈ 130 min FC100 Li: ≈ 62 min |
| 0 °C – +45 °C | |||
| -20 °C – +50 °C | |||
| C50 Li (AL 1830 CV) | FC100 Li (AL 1880 CV) |
| 113897|113898 (UK) 113899|113900 (UK) | |
| 220 – 240 V AC, 50/60 Hz | |
| 14,4 V – 18 V DC | |
| 3 A 8 A | |
| 0 °C – +45 °C | |
| / / | |
1 About these operating instructions. 28
1.1 Symbols on the title page 28
1.2 Legends and signal words 28
2 Product description 28
2.1 Designated use 28
2.2 Possible foreseeable misuse 29
2.3 Residual risks 29
2.4 Safety and protective devices.. 29
2.4.1 Overload protection 29
2.4.2 Foldable chain cover 29
2.4.3 Hand guard 29
2.5 Symbols on the appliance 29
2.5.1 Safety signs 29
2.5.2 Operating signs 30
2.6 Product overview (01) 30
2.7 Scope of supply 30
3 Safety instructions. 30
3.1 General Power Tool SafetyWarnings 30
3.1.1 Work area safety 30
3.1.2 Electrical safety 31
3.1.3 Personal safety 31
3.1.4 Power tool use and care 31
3.1.5 Battery tool use and care 32
3.1.6 Service 32
3.2 Chain saw safety warnings.. 32
3.3 General safety warnings for chain saws 33
3.4 Causes and operator prevention of kickback. 33
3.5 Vibration load 33
3.6 Noise pollution 34
3.7 Safety notes for rechargeable battery and charger 34
3.8 Safety information when working..... 34
3.8.1Operator 34
3.8.2 Operating times 35
3.8.3 Working with the chain saw.. 35
4 Start-up 35
4.1 Filling with saw chain oil (02, 03) ....... 35
4.2 Charging the rechargeable battery.... 36
4.3 Inserting and removing the rechargeable battery (04, 05) 36
5 Operation 36
5.1 Checking the battery charge status (06) 37
5.2 Warning sign (06) 37
5.3 Check the saw chain oil 37
5.4 Switching the appliance ON and OFF (07) 37
6 Working behaviour and working technique. 37
6.1 Cutting converted timber (08) 37
6.2 Pruning (09-13) 38
7 Maintenance and care 38
7.1 Checking the saw chain lubrication.... 38
7.2 Checking the saw chain tension.. 38
7.3 Tensioning and slackening the saw chain (14) 39
7.4 Installing saw chain and chain bar (15-19) 39
8 Help in case of malfunction 39
9 Transport 41
10 Storage 41
10.1 Storing the appliance 41
10.2 Storing the rechargeable battery and charging unit 42
11 Disposal. 42
12 Technical data 43
13 After-Sales / Service 43
14 Information on the Declaration of Conformity 44
15 Guarantee 44
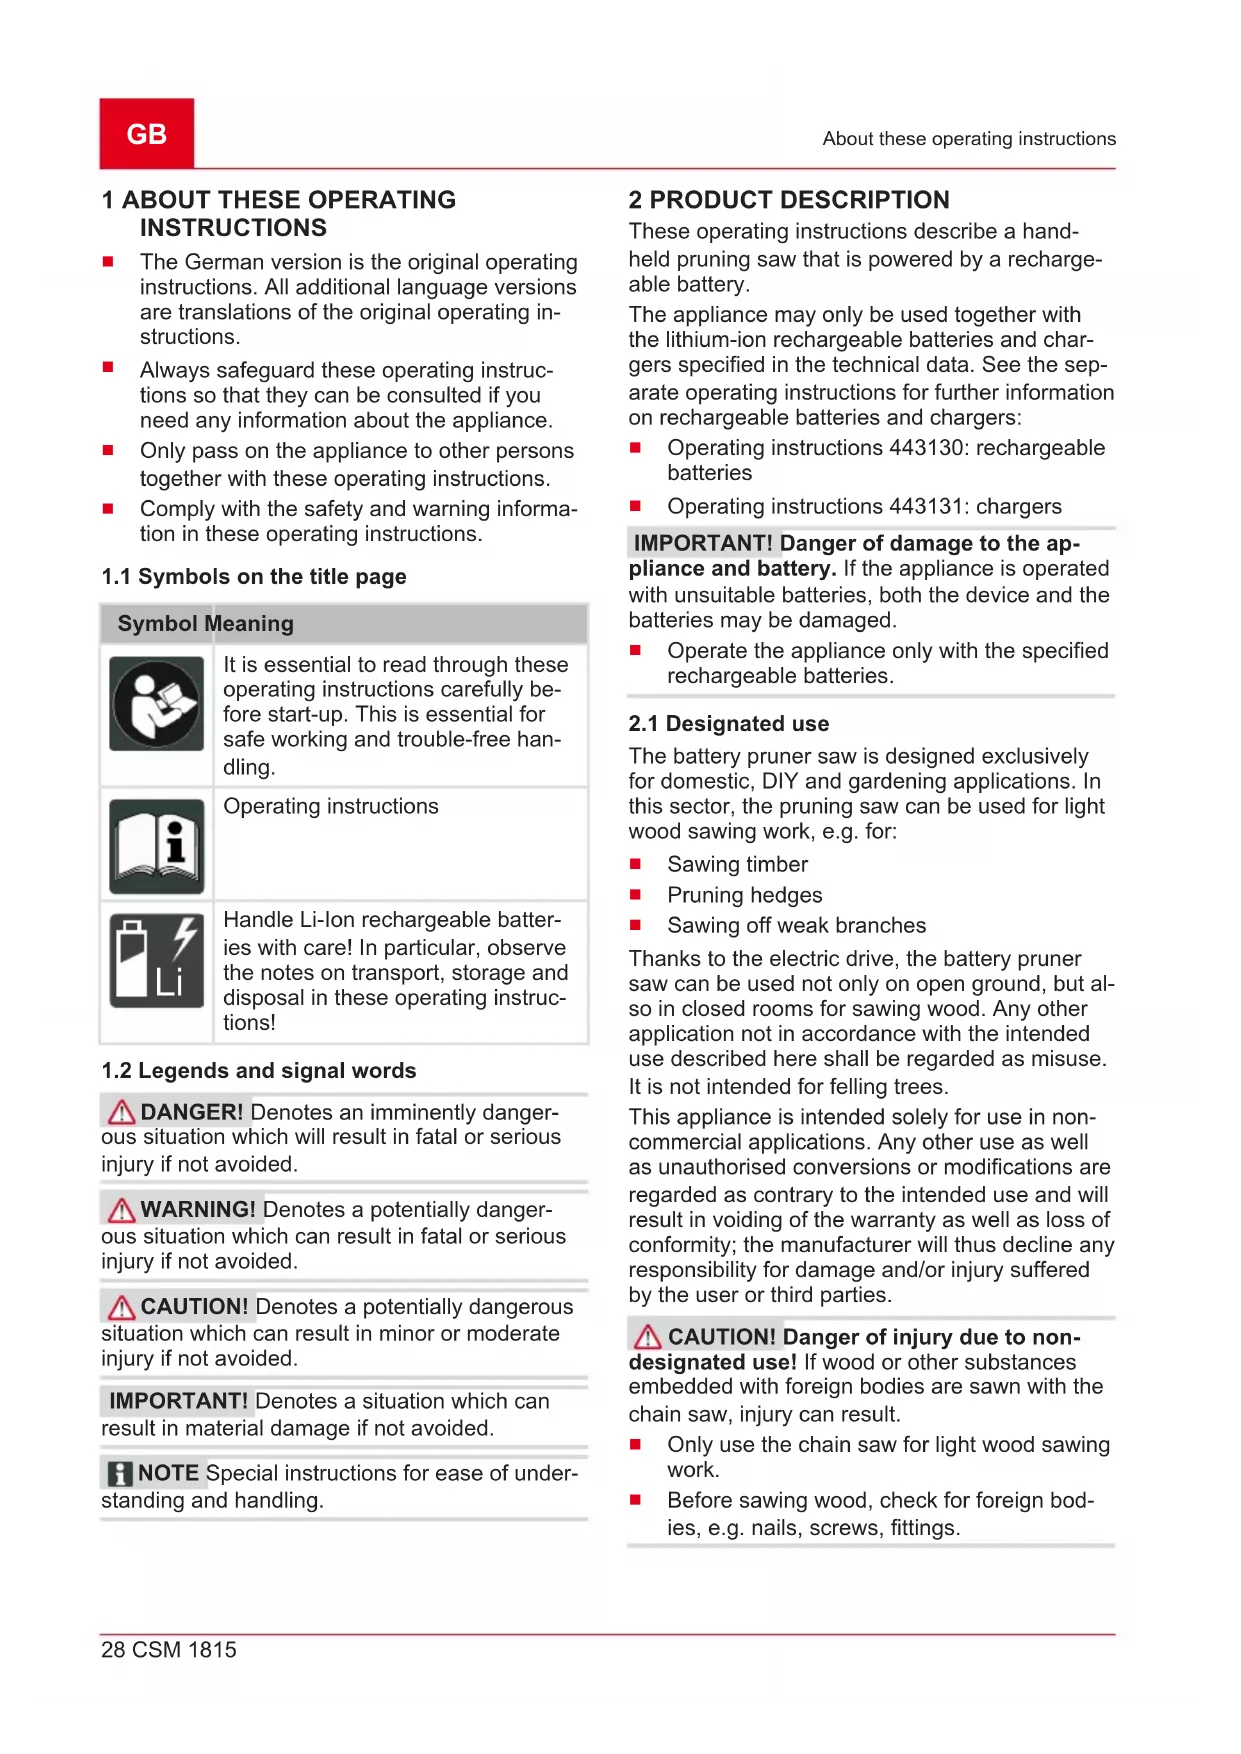
1 ABOUT THESE OPERATING INSTRUCTIONS
The German version is the original operating instructions. All additional language versions are translations of the original operating instructions.
Always safeguard these operating instructions so that they can be consulted if you need any information about the appliance.
Only pass on the appliance to other persons together with these operating instructions.
Comply with the safety and warning information in these operating instructions.
1.1 Symbols on the title page
Symbol Meaning

It is essential to read through these operating instructions carefully before start-up. This is essential for safe working and trouble-free handling.

Operating instructions
Handle Li-Ion rechargeable batteries with care! In particular, observe the notes on transport, storage and disposal in these operating instructions!
1.2 Legends and signal words
DANGER! Denotes an imminently dangerous situation which will result in fatal or serious injury if not avoided.
WARNING! Denotes a potentially dangerous situation which can result in fatal or serious injury if not avoided.
CAUTION! Denotes a potentially dangerous situation which can result in minor or moderate injury if not avoided.
IMPORTANT! Denotes a situation which can result in material damage if not avoided.
NOTE Special instructions for ease of understanding and handling.
2 PRODUCT DESCRIPTION
These operating instructions describe a handheld pruning saw that is powered by a rechargeable battery.
The appliance may only be used together with the lithium-ion rechargeable batteries and chargers specified in the technical data. See the separate operating instructions for further information on rechargeable batteries and chargers:
- Operating instructions 443130: rechargeable batteries
Operating instructions 443131: chargers
IMPORTANT! Danger of damage to the appliance and battery. If the appliance is operated with unsuitable batteries, both the device and the batteries may be damaged.
Operate the appliance only with the specified rechargeable batteries.
2.1 Designated use
The battery pruner saw is designed exclusively for domestic, DIY and gardening applications. In this sector, the pruning saw can be used for light wood sawing work, e.g. for:
Sawing timber
Pruning hedges
Sawing off weak branches
Thanks to the electric drive, the battery pruner saw can be used not only on open ground, but also in closed rooms for sawing wood. Any other application not in accordance with the intended use described here shall be regarded as misuse. It is not intended for felling trees.
This appliance is intended solely for use in non-commercial applications. Any other use as well as unauthorised conversions or modifications are regarded as contrary to the intended use and will result in voiding of the warranty as well as loss of conformity; the manufacturer will thus decline any responsibility for damage and/or injury suffered by the user or third parties.
CAUTION! Danger of injury due to non-designated use! If wood or other substances embedded with foreign bodies are sawn with the chain saw, injury can result.
Only use the chain saw for light wood sawing work.
Before sawing wood, check for foreign bodies, e.g. nails, screws, fittings.
2.2 Possible foreseeable misuse
- Do not saw off branches that are directly above or at an oblique angle above the user or other persons.
- Do not saw off any branches at any significant height.
- Do not use old oil or mineral oil for lubrication of the saw chain.
Do not use the tool in a potentially explosive atmosphere.
2.3 Residual risks
Even during correct use of the appliance, there is always a certain residual risk that cannot be excluded. Depending on the use, the following potential risks can be derived from the type and construction of the appliance:
- Contact with wood chips and oil dust flying around
Inhalation of wood chip particles and oil dust - Separation of parts of the wood being worked on.
Impairment of hearing during work if ear defenders are not used.
Cutting injuries on the saw chain
Sudden and unforeseen movement of the chain bar with saw chain (risk of cutting).
Injuries due to flying saw chain parts
2.4 Safety and protective devices
WARNING! Danger of serious injury from manipulated safety and protective devices. As a result of manipulated safety and protective devices, serious injury can occur when working with the chain saw.
- Never deactivate safety and protective devices.
Only work with the chain saw if all safety and protective devices function correctly.
2.4.1 Overload protection
If the user pushes the pruning saw too hard through the wood while sawing, it switches off. This prevents the motor from being overloaded.
2.4.2 Foldable chain cover
The chain cover protects the operator from the moving saw chain. When the chain cover rests on the wood during sawing, it yields automatically.
WARNING! Danger due to saw chain. The running saw chain can lead to life-threatening injuries.
Only operate the chain saw with a functioning chain cover!
Never remove the chain cover!
2.4.3 Hand guard
The hand guard protects the operator from contact with the wood to be sawn through, wood splinters and sawdust.
2.5 Symbols on the appliance
2.5.1 Safety signs
| Symbol Meaning | |
| Read the operating instructions before starting operation! | |
| Wear protective glasses! | |
| Wear ear protection! | |
| Wear a face mask! | |
| Do not operate the chain saw with one hand! Always hold the chain saw firmly in both hands when working! | |
| Pay special attention when handling this appliance! | |
| Do not use in the rain! Protect against moisture! | |
| 152 mm | Do not saw wood that is thicker than the useful length of the chain bar (here: 152 mm)! |
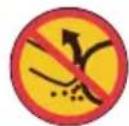
| Danger of kickback! Never saw with the tip of the chain bar! | |
Symbol Meaning
2.5.2 Operating signs
Symbol Meaning
Press the push-button to oil the saw chain.

Note the running direction of the saw chain!

Saw chain running direction (under cover for chain sprocket)
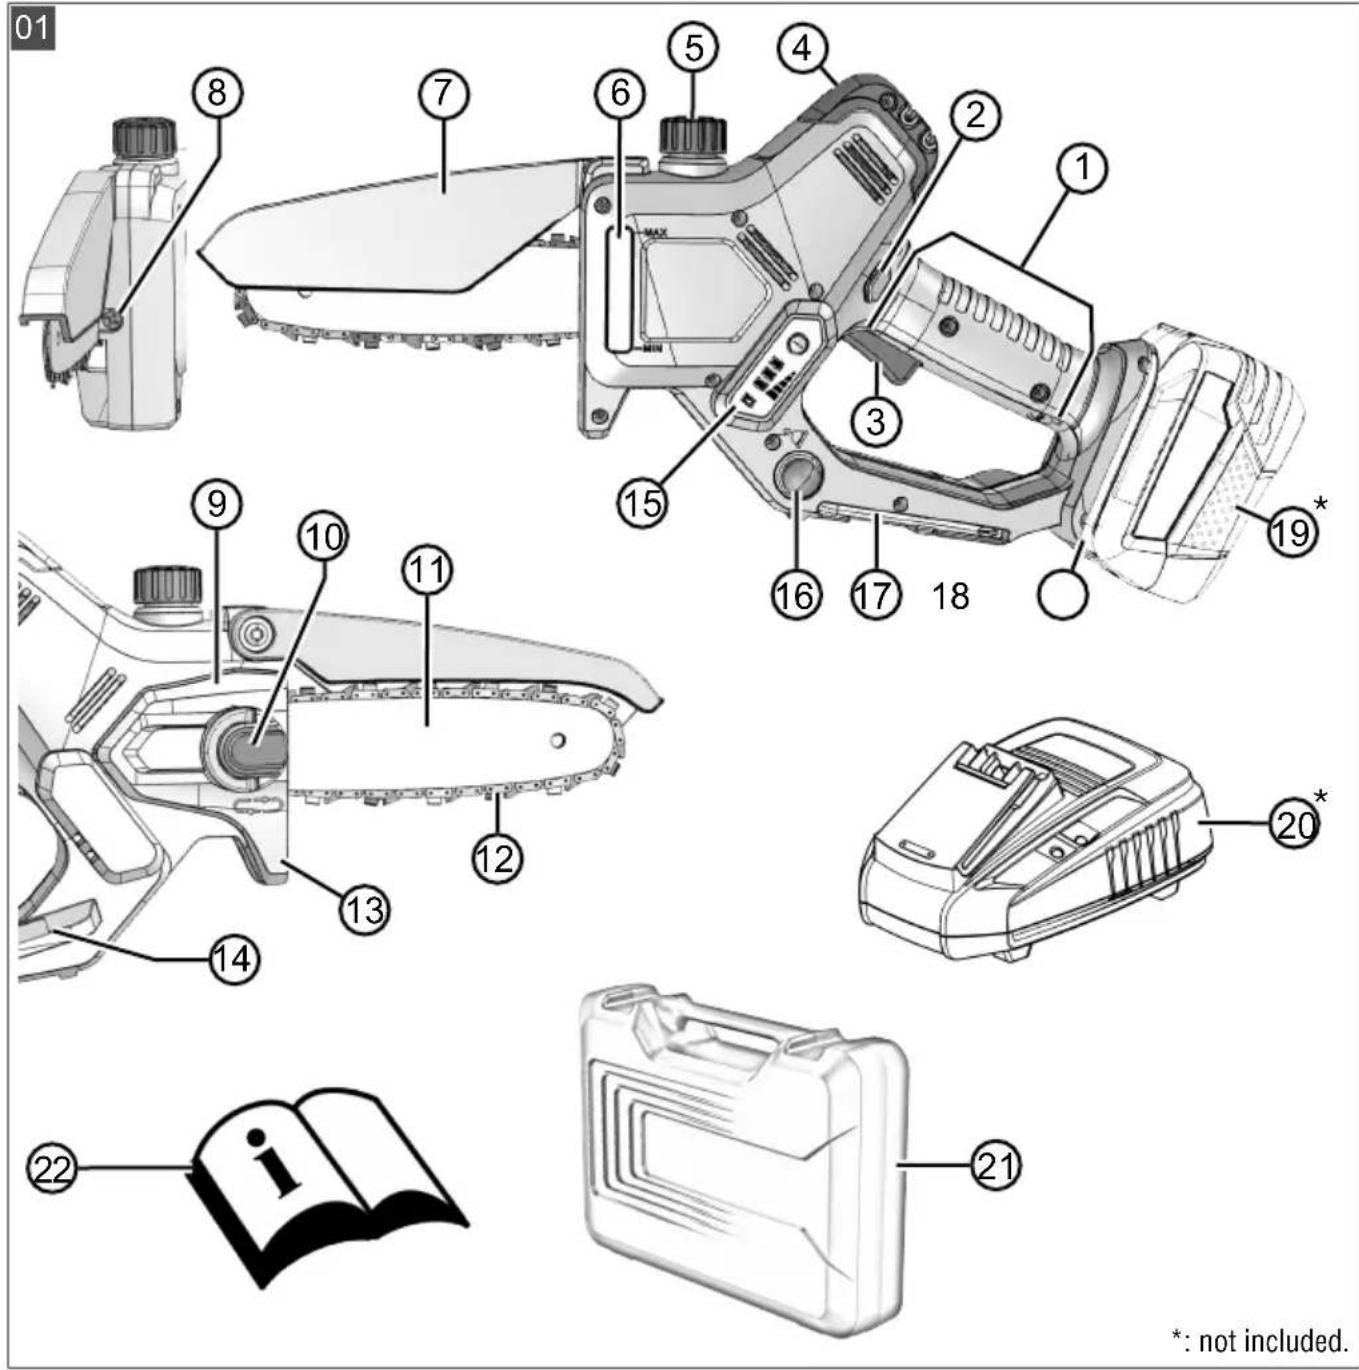
2.6 Product overview (01)
No. Component
1 Rear handle (hand area is marked)
2 Locking button
3 ON/OFF switch
4 Front handle
5 Cap of the chain oil tank
6 Viewing aperture of the chain oil tank
7 Folding chain cover
8 Chain tensioning screw
9 Sprocket cover
10 Fastening ring for sprocket cover
11 Chain bar
12 Saw chain
13 Stop
14 Hand guard
15 Charge status indicator and warning sign
16 Push-button to oil the saw chain
17 Philips and slotted angled screwdriver
18 Battery slot
19 Rechargeable battery
No. Component
20 Charger
21 Transport case
22 Operating instructions
The set (Art. No. 114023) includes a 2,5 Ah rechargeable battery and charger. The scope of supply of the appliance alone (Art. No. 114016) does not include the rechargeable battery and charger. See technical data on pages 6 and 7 and see chapter 12 "Technical data", page 43.
2.7 Scope of supply
NOTE Rechargeable battery and charger are not included. However, they are part of the complete set or are available individually.
The items listed here are included in the standard scope of supply. Check that all items are present:
No. Component
1 Battery pruner saw
2 Transport case
3 Operating instructions
4 30 ml saw chain oil, biologically degradable
3 SAFETY INSTRUCTIONS
3.1 General Power Tool SafetyWarnings
WARNING! Read all safety warnings, instructions, illustrations and specifications provided with this power tool. Failure to follow all instructions listed below may result in electric shock, fire and/or serious injury.
Save all warnings and instructions for future reference.
The term "power tool" in the warnings refers to your mains-operated (corded) power tool or battery-operated (cordless) power tool.
3.1.1 Work area safety
- Keep work area clean and well lit. Cluttered or dark areas invite accidents.
-
Do not operate power tools in explosive atmospheres, such as in the presence of flammable liquids, gases or dust. Power tools create sparks which may ignite the dust or fumes.
-
Keep children and bystanders away while operating a power tool. Distractions can cause you to lose control.
3.1.2 Electrical safety
Power tool plugs must match the outlet. Never modify the plug in any way. Do not use any adapter plugs with earthed (grounded) power tools. Unmodified plugs and matching outlets will reduce risk of electric shock.
- Avoid body contact with earthed or grounded surfaces, such as pipes, radiators, ranges and refrigerators. There is an increased risk of electric shock if your body is earthed or grounded.
- Do not expose power tools to rain or wet conditions. Water entering a power tool will increase the risk of electric shock.
- Do not abuse the cord. Never use the cord for carrying, pulling or unplugging the power tool. Keep cord away from heat, oil, sharp edges or moving parts. Damaged or entangled cords increase the risk of electric shock.
- When operating a power tool outdoors, use an extension cord suitable for outdoor use. Use of a cord suitable for outdoor use reduces the risk of electric shock.
If operating a power tool in a damp location is unavoidable, use a residual current device (RCD) protected supply. Use of an RCD reduces the risk of electric shock.
3.1.3 Personal safety
- Stay alert, watch what you are doing and use common sense when operating a power tool. Do not use a power tool while you are tired or under the influence of drugs, alcohol or medication. A moment of inattention while operating power tools may result in serious personal injury.
Use personal protective equipment. Always wear eye protection. Protective equipment such as a dust mask, non-skid safety shoes, hard hat or hearing protection used for appropriate conditions will reduce personal injuries.
Prevent unintentional starting. Ensure the switch is in the off-position before connecting to power source and/or battery pack, picking up or carrying the tool. Carrying power tools with your finger on the
switch or energising power tools that have the switch on invites accidents.
- Remove any adjusting key or wrench before turning the power tool on. A wrench or a key left attached to a rotating part of the power tool may result in personal injury.
- Do not overreach. Keep proper footing and balance at all times. This enables better control of the power tool in unexpected situations.
- Dress properly. Do not wear loose clothing or jewellery. Keep your hair and clothing away from moving parts. Loose clothes, jewellery or long hair can be caught in moving parts.
If devices are provided for the connection of dust extraction and collection facilities, ensure these are connected and properly used. Use of dust collection can reduce dust-related hazards. - Do not let familiarity gained from frequent use of tools allow you to become complacent and ignore tool safety principles. A careless action can cause severe injury within a fraction of a second.
3.1.4 Power tool use and care
- Do not force the power tool. Use the correct power tool for your application. The correct power tool will do the job better and safer at the rate for which it was designed.
- Do not use the power tool if the switch does not turn it on and off. Any power tool that cannot be controlled with the switch is dangerous and must be repaired.
- Disconnect the plug from the power source and/or remove the battery pack, if detachable, from the power tool before making any adjustments, changing accessories, or storing power tools. Such preventive safety measures reduce the risk of starting the power tool accidentally.
Store idle power tools out of the reach of children and do not allow persons unfamiliar with the power tool or these instructions to operate the power tool. Power tools are dangerous in the hands of untrained users. - Maintain power tools and accessories. Check for misalignment or binding of moving parts, breakage of parts and any other condition that may affect the power tool's operation. If damaged, have the
power tool repaired before use. Many accidents are caused by poorly maintained power tools.
- Keep cutting tools sharp and clean. Properly maintained cutting tools with sharp cutting edges are less likely to bind and are easier to control.
Use the power tool, accessories and tool bits etc. in accordance with these instructions, taking into account the working conditions and the work to be performed. Use of the power tool for operations different from those intended could result in a hazardous situation. - Keep handles and grasping surfaces dry, clean and free from oil and grease. Slippery handles and grasping surfaces do not allow for safe handling and control of the tool in unexpected situations.
3.1.5 Battery tool use and care
- Recharge only with the charger specified by the manufacturer. A charger that is suitable for one type of battery pack may create a risk of fire when used with another battery pack.
Use power tools only with specifically designated battery packs. Use of any other battery packs may create a risk of injury and fire. - When battery pack is not in use, keep it away from other metal objects, like paper clips, coins, keys, nails, screws or other small metal objects, that can make a connection from one terminal to another. Shorting the battery terminals together may cause burns or a fire.
Under abusive conditions, liquid may be ejected from the battery; avoid contact. If contact accidentally occurs, flush with water. If liquid contacts eyes, additionally seek medical help. Liquid ejected from the battery may cause irritation or burns. - Do not use a battery pack or tool that is damaged or modified. Damaged or modified batteries may exhibit unpredictable behaviour resulting in fire, explosion or risk of injury.
-
Do not expose a battery pack or tool to fire or excessive temperature. Exposure to fire or temperature above 130^ may cause explosion.
-
Follow all charging instructions and do not charge the battery pack or tool outside the temperature range specified in the instructions. Charging improperly or at temperatures outside the specified range may damage the battery and increase the risk of fire.
3.1.6 Service
Have your power tool serviced by a qualified repair person using only identical replacement parts. This will ensure that the safety of the power tool is maintained.
- Never service damaged battery packs. Service of battery packs should only be performed by the manufacturer or authorized service providers.
3.2 Chain saw safety warnings
- Keep all parts of the body away from the saw chain when the chain saw is operating. Before you start the chain saw, make sure the saw chain is not contacting anything. A moment of inattention while operating a chain saw may cause entanglement of your clothing or body with the saw chain.
Always hold the chain saw with your right hand on the rear handle and your left hand on the front handle. Holding the chain saw with the hands reversed increases the risk of injury and should therefore be avoided.
Hold the chain saw only at the insulated handles as the saw chain may contact hidden wiring. Contact between the saw chain and a live cable can result in electric current flowing through metal parts of the appliance, leading to an electric shock.
Wear eye protection. Further protective equipment for ears, head, hands, legs and feet is recommended. Adequate protective clothing will reduce the risk of personal injury from flying debris or accidental contact with the saw chain. -
Do not operate the chain saw in a tree, ladder or roof or other unstable surface. Operation in this way poses a serious risk of injury.
Always keep proper footing and operate the chain saw only when standing on fixed, secure and level surface. Slippery or unstable surfaces may cause a loss of balance or control of the chain saw. -
When cutting a branch that is under tension, be alert for spring back. When the tension in the wood fibres is released, the branch may strike the operator and/or knock the chain saw out of control.
Use extreme caution when cutting brush and saplings. The slender material may catch up in the saw chain and be whipped towards you or knock you off balance. - Carry the chain saw by the front handle with the chain saw switched off and away from your body. When transporting or storing the chain saw always fit the guide bar cover. Proper handling of the chain saw will reduce the likelihood of accidental contact with the moving saw chain.
- Follow the instructions for lubrication, chain tensioning and changing the chain bar and chain. Improperly tensioned or lubricated chain may either break or increase the chance for kickback.
Cut wood only. Do not use the chain saw for purposes for which it is not intended. For example: do not use the chain saw for cutting metal, plastic, masonry or nonwood building materials. Use of the chain saw for operations different than intended could result in a hazardous situation.
The chain saw is not suitable for felling trees. Use of the chain saw for other than the intended purpose can result in serious injuries to the user or other persons.
3.3 General safety warnings for chain saws Follow all the instructions when removing accumulated material from the chain saw, when storing the chain saw or carrying out maintenance work. Ensure that the switch is turned off and the battery removed. Unexpected starting of the chain saw when removing accumulated material or during maintenance work can result in serious injuries.
3.4 Causes and operator prevention of kickback
Kickback may occur when the nose or tip of the chain bar touches an object, or when the wood closes in and pinches the saw chain in the cut. Tip contact may in some cases cause a sudden reverse reaction, kicking the chain bar up and back towards the operator.
Pinching the saw chain along the top of the chain bar may push the chain bar rapidly back towards the operator.
Either of these reactions may cause you to lose control of the saw which could result in serious personal injury. Do not rely exclusively on the safety devices built into your saw. As a chain saw user, you should take several steps to keep your cutting work free from accident or injury.
Kickback is the result of chain saw misuse and/or incorrect operating procedures or conditions. and can be avoided by taking proper precautions as given below:
- Maintain a firm grip, with thumbs and fingers encircling the chain saw handles, with both hands on the saw. and position your body and arm to allow you to resist kickback forces. Kickback forces can be controlled by the operator if proper precautions are taken. Do not let go of the chain saw.
- Do not overreach and do not cut above shoulder height. This helps prevent unintended tip contact and enables better control of the chain saw in unexpected situations.
Only use replacement bars and chains specified by the manufacturer. Incorrect replacement bars and chains may cause chain breakage and/or kickback. - Follow the manufacturer's sharpening and maintenance instructions for the saw chain. Decreasing the depth gauge height can lead to increased kickback.
3.5 Vibration load
Danger due to vibration
The actual magnitude of the vibration emissions during the use of the appliance may deviate from that stated by the manufacturer. Observe the following influencing factors before or during use:
Is the appliance being used as intended?
Is the material being cut or processed in the proper manner?
Is the appliance in a proper condition of use?
Is the cutting tool properly sharpened or is the correct cutting tool installed?
Are the handle grips and any optional vibration grips mounted, and are they firmly attached to the appliance?
Only operate the tool at the motor speed required for the respective work. Avoid using the maximum speed in order to reduce noise and vibrations.
The noise and vibrations of the tool may increase due to improper use and maintenance. This leads to health damage. In this case, immediately switch off the tool and have it repaired by an authorised service workshop.
The degree of stress due to vibration depends on the work to be performed or on the use of the tool. Estimate the stress and plan appropriate work breaks. This considerably reduces stress due to vibration over the entire working time.
- Extensive use of the tool exposes the operator to vibrations, which can lead to circulatory issues ("white fingers"). To avoid this risk, wear gloves and keep your hands warm. If any symptoms of "white fingers" occur, immediately consult a physician. These symptoms include: Numbness, loss of feeling, tingling, itching, pain, reduced muscular strength, changes in the colour or condition of the skin. Normally these conditions affect the fingers, hands or pulse. The risk increases at low temperatures.
Take long breaks during your working day so you can recover from the noise and the vibrations. Plan your work in such a way that the use of appliances that generate strong vibrations is spread over several days.
If you notice an unpleasant sensation or discoloration of the skin on your hands when using the tool, stop work immediately. Take sufficient work breaks. Without sufficient breaks, a hand/arm vibration syndrome can occur.
- Minimise your risk of being exposed to vibrations. Maintain the tool according to the instructions in the operating instructions.
If the tool is used frequently, contact your dealer to purchase anti-vibration accessories (e.g. handles).
- Avoid working with the tool at temperatures below 10^ . Define how the vibration load can be limited in a work plan.
3.6 Noise pollution
A certain level of noise exposure from this appliance is inevitable. Carry out noisy work at approved and specified time periods. Observe rest periods as necessary and restrict the duration of the work to a minimum. For your personal protection and protection of persons in the vicinity, appropriate hearing protection must be worn.
3.7 Safety notes for rechargeable battery and charger
- Remove the batteries from the appliance before charging.
- Do not use different battery types or new and used batteries together in the appliance.
Install the batteries in the appliance with the correct polarity. - Remove the batteries from the appliance before putting it into storage for an extended period.
- Do not short-circuit the terminals of the appliance or battery.
Operating instructions
Please observe the safety instructions for the rechargeable battery and the charger in the separate operating instructions.
See:
- Operating instructions 443130: Rechargeable batteries
Operating instructions 443131: Chargers
3.8 Safety information when working
Heed the country-specific safety regulations, e.g. from the relevant trade associations, social security systems, authorities for industrial safety.
Only work in sufficient daylight or artificial lighting.
- Keep the working area free from objects (e.g. off-cuts) - danger of stumbling.
The user is responsible for accidents involving other people and their property.
If you are working with a chain saw for the first time:
Have the salesperson or another expert explain the operation of the chain saw, or attend a course.
Prior to the first use, at the very least practice cutting round wood on a saw frame or stand.
3.8.1 Operator
- Young people under 16 years of age and people who do not know the operating instructions are not allowed to use the tool.
To operate the chain saw, you must be rested and in good physical and mental health. If you must not exert yourself for health reasons, ask your doctor whether it is possible to work with a chain saw.
3.8.2 Operating times
Heed the country-specific regulations for the operating times of chain saws. The operating times of chain saws can be limited by national and local regulations.
3.8.3 Working with the chain saw
WARNING! Danger of serious injury from manipulated safety and protective devices. As a result of manipulated safety and protective devices, serious injury can occur when working with the chain saw.
- Never deactivate safety and protective devices.
Only work with the chain saw if all safety and protective devices function correctly.
WARNING! Risk of injury due to chain saw being started inadvertently. A chain saw that is started inadvertently can lead to serious injury. Therefore, remove the rechargeable battery during:
Testing, adjustment work and cleaning work
Work on the cutting equipment
Leaving the chain saw
Transport
Storage
Maintenance and repair work
Danger
Always keep a first-aid kit to hand in case of accidents.
The personal protective equipment comprises:
Hearing protection (e.g. ear defenders, especially when working for than 2.5 hours a day)
Protective glasses
Protective trousers with cut protection inlay
Sturdy working gloves
Safety boots with high-grip sole and steel toe caps
Switch off the motor when changing position.
- When not in use, remove the battery from the pruning saw.
- Do not use the pruning saw for levering or moving wood.
Only specialist personnel are allowed to saw timber that is thicker than the length of the chain bar.
Only start the cut once the saw chain is running, never switch on the chain saw already in the kerf.
Make sure that no saw chain oil gets onto the ground.
- Do not undertake sawing work in the rain, snow or stormy weather.
4 START-UP
DANGER! Danger of fatal injury and danger of extremely severe injury. Lack of knowledge of the safety instructions and operating instructions can lead to extremely serious and even fatal injury.
Read and follow all safety instructions and instructions for use in these operating instructions as well the operating instructions which are referred to before you start using the chain saw.
WARNING! Danger of serious injury. Serious injury can be caused if there are damaged components on the chain saw.
Before each use, perform a visual inspection in order to check that the chain saw is complete and does not contain damaged or worn components. Safety and protective devices must be intact.
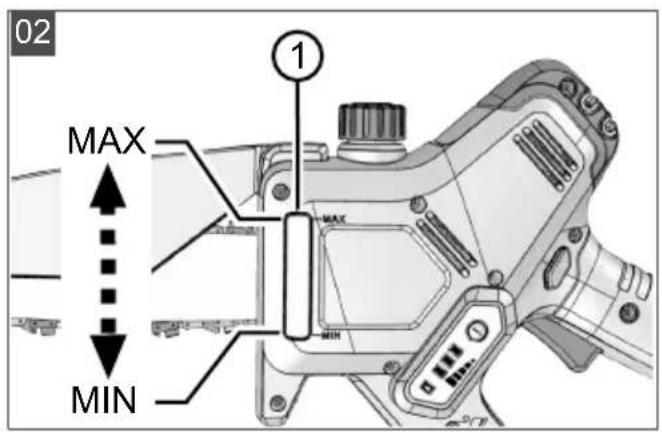
4.1 Filling with saw chain oil (02, 03)
The saw chain and chain bar are continuously supplied with saw chain oil via a manual oiler system. The saw chain oil protects against corrosion and premature wear.
Note: There is no saw chain oil in the appliance on delivery!
IMPORTANT! Danger of damage to the appliance. Use of the appliance without saw chain oil leads to damage of the saw chain and the guide rail.
Never operate the appliance without saw chain oil.
Before starting work, fill the saw chain oil in the oil tank and check the oil level during the work.
At least before starting work each time, check that the chain lubrication is working.
IMPORTANT! Danger of damage to the appliance. Due to the metallic abrasion it contains, the use of used oil for lubricating the chain would lead to premature wear of the guide rail and saw chain. Also, the warranty of the manufacturer will become void.
Never use used oil, only biologically degradable saw chain oil.
IMPORTANT! Danger of environmental damage. The use of mineral oil for the chain lubrication leads to serious environmental damage.
- Never use mineral oil, but only biologically degradable saw chain oil.
Each time before starting work or changing the rechargeable battery, check the oil level and top up the saw chain oil if necessary:
- Check the oil level on the sight glass (02/1) of the chain oil tank. Oil must always be visible. Note: The minimum oil level (MIN) must not be undershot and the maximum oil level (MAX) must not be exceeded.
- If the battery is plugged in: Pull out the battery to prevent unintentional starting of the pruning saw when filling with oil.
- Place and hold the pruning saw in a horizontal position on a firm surface.
- Clean the device around the cap (03/1) of the chain oil tank.
- Unscrew the cap of the chain oil tank.
- Fill the filler neck (03/2) with saw chain oil up to the MAX mark (03/a). Do not allow it to overflow!
Note: Use a funnel for easier filling.
Note: Do not allow any dirt to get into the oil tank.
- Wipe away any spilled saw chain oil.
- Screw the chain oil tank cap back on.
- Install a battery.
4.2 Charging the rechargeable battery
Observe the temperature range for charging, see technical data.
NOTE For detailed information, see the separate operating instructions for the rechargeable battery and the charger:
Operating manual 443130: Rechargeable batteries
Operating manual 443131: Chargers
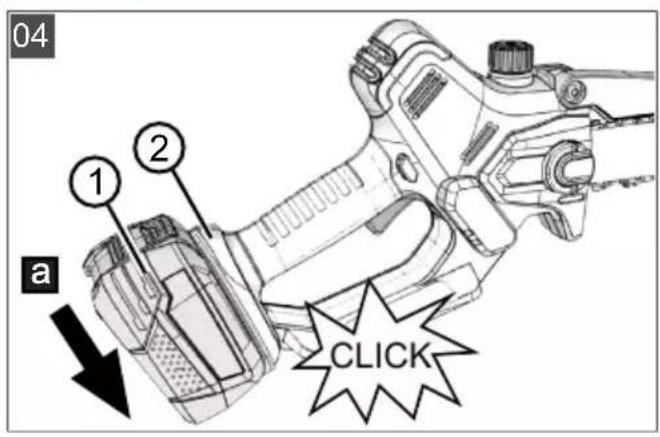
4.3 Inserting and removing the rechargeable battery (04, 05)
IMPORTANT! Danger of damage to the rechargeable battery. If the rechargeable battery is left in the appliance after use, it may damage the rechargeable battery.
- Immediately after use, pull the rechargeable battery out of the appliance and store in a frost-protected area.
Only insert the rechargeable battery in the appliance immediately before starting work.
Installing the battery
- Push battery (04/1) from above onto battery slot (04/2) of the pruning saw (04/a) until it engages.
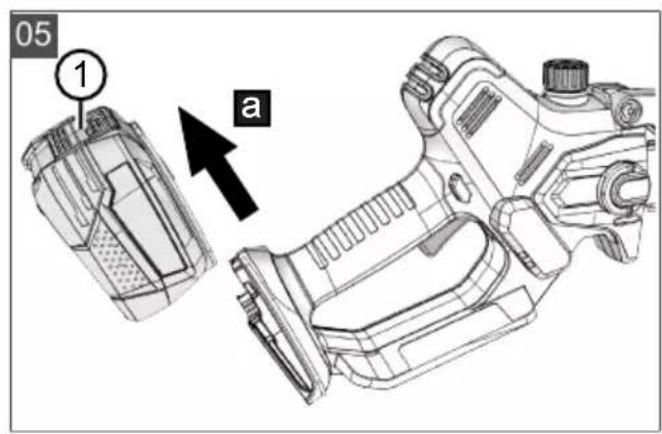
Removing the battery
- Press and hold the unlocking button (05/1) on the battery.
- Pull out the battery upwards (05/a).
5 OPERATION
DANGER! Danger of fatal injury and danger of extremely severe injury. Lack of knowledge of the safety instructions and operating instructions can lead to extremely serious and even fatal injury.
Read and follow all safety instructions and instructions for use in these operating instructions as well the operating instructions which are referred to before you start using the chain saw.
WARNING! Danger of injury from faulty appliance. Operation of an faulty appliance can result in serious injury and damage to the appliance.
- Operate the appliance only when it is undamaged and has not defects, and when no parts are missing or loose.
Comply with working time regulations in force in your country.
Grip the handles firmly and do not release them when the motor is running.
Do not use the chain saw if you are:
Tired
Unwell
Under the influence of alcohol, medicines or drugs
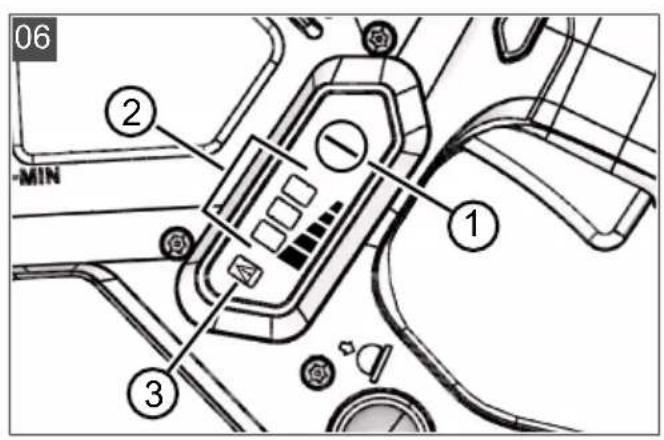
5.1 Checking the battery charge status (06)
Charge status indicator (01/15) is located on the side of the pruning saw. It consists of three LEDs. The LEDs light up depending on the charge status.
- Press the button (06/1).
- Read the charge status on the LEDs (06/2):
LED Battery charge status
3 LEDs are lit: Battery fully charged.
2 LEDs are lit: Rechargeable battery 2/3 charged.
1 LED is lit: Rechargeable battery 1/3 charged.
When the battery is empty
The pruning saw stops and the last LED flashes for 3 seconds after stopping.
5.2 Warning sign (06)
Warning sign (06/3) indicates:
Warning sign Event
Warning sign flashes Battery is defective. for 30 s:
Warning sign lights up Battery is too hot. The for 5 s and goes out: pruning saw stops.
If the battery is hot
- Allow the battery to cool down.
If you try to start the pruning saw even though the battery has not yet cooled down, the warning sign lights up again for 5 s and goes out.
5.3 Check the saw chain oil
Check that there is sufficient saw chain oil in the tank:
Before starting work
During work
At every battery change, at the latest
If the oil level is low, top up the saw chain oil.
Never operate the appliance without saw chain oil!
Procedure: see chapter 4.1 "Filling with saw chain oil (02, 03)", page 35.
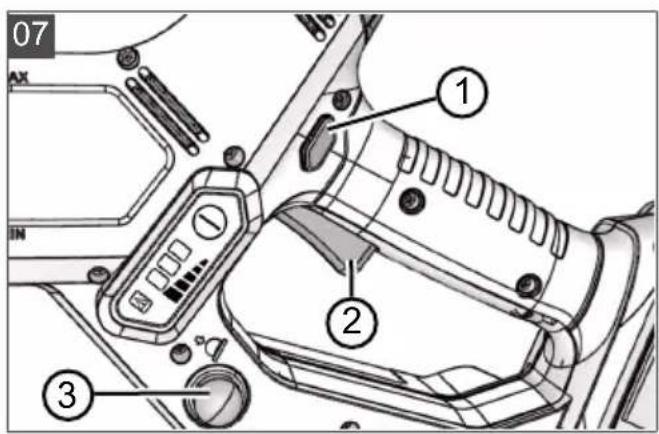
5.4 Switching the appliance ON and OFF (07)
Switching on the appliance
- Press and hold locking button (07/1) with your thumb.
- Press and hold the on/off switch (07/2).
- Release the locking button.
Note: It is not necessary to keep the locking button depressed once the chain saw has started. The locking button is intended to prevent inadvertent startup of the chain saw.
- Oil saw chain:
Press the pushbutton (07/3) to oil the saw chain.
A fixed amount of saw chain oil is dispensed onto the saw chain.
Check that the saw chain oil is visible on the chain bar and saw chain.
Switching off the appliance
- Release the ON/OFF switch.
6 WORKING BEHAVIOUR AND WORKING TECHNIQUE
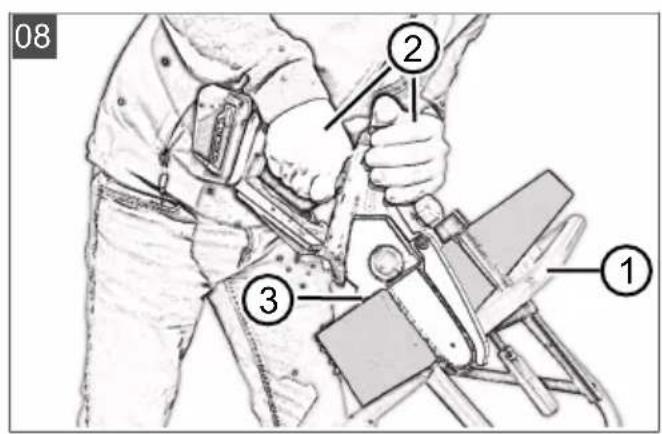
6.1 Cutting converted timber (08)
Observe the following points during this work:
Use a secure cutting support, e.g. saw trestle (08/1), wedges, beams.
Secure logs to prevent them twisting.
- Do not secure the wood with your foot and do not get another person to hold it.
Make sure you are standing securely and that your body weight is evenly distributed.
Hold the pruning saw firmly by the front and rear handles - i.e. in the insulated hand area with both hands (08/2).
Press stop (08/3) of the pruning saw firmly against the wood.
Only start the cut once the saw chain is running. Never switch on the pruning saw when the saw chain is already in contact with the wood.
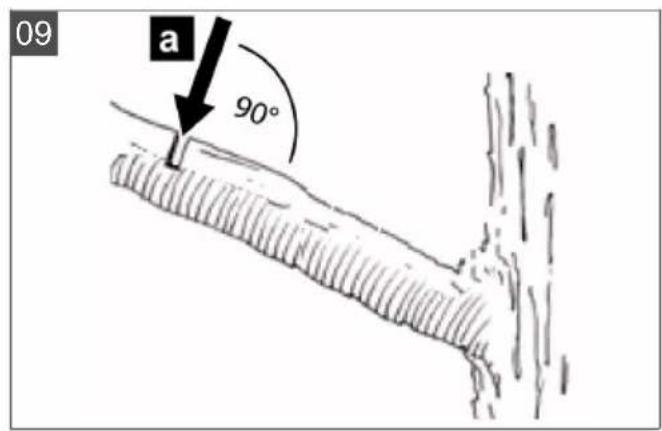
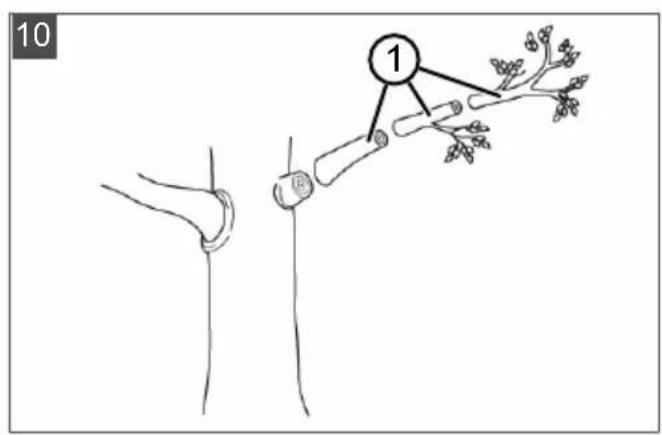
6.2 Pruning (09-13)
WARNING! Increased risk of falling.
There is a greater risk of falling if work is carried out from an elevated position (e.g. ladder).
always work with the appliance from the ground and make sure that you are standing securely.
Heed the safety instructions.
- Stand so that the cut can preferably be performed at an angle of 90^ to the branch (09/a).
Saw off thick branches in sections (10/1) in order to have better control over the point of impact.
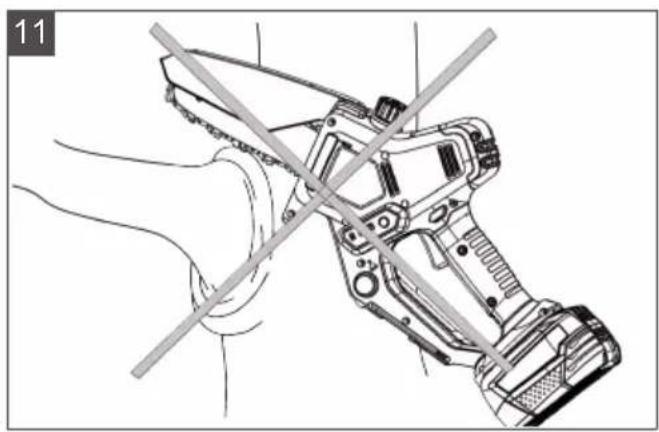
- Never saw into the bulge at the base of the branch in order to improve wound healing and prevent rotting (11).
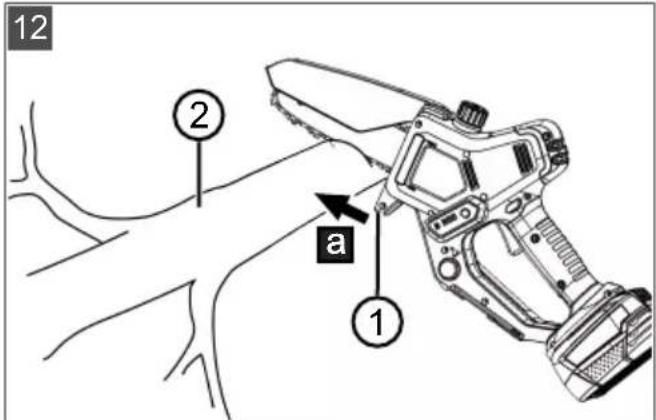
Press stop (12/1) of the pruning saw against the branch (12/2) during sawing (12/a) to stabilise it on the branch.
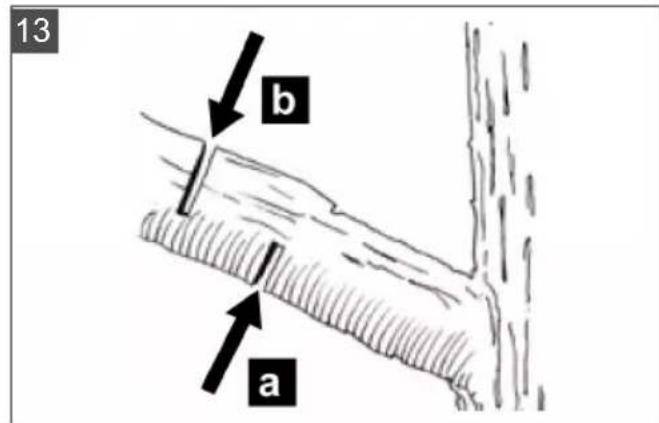
Make a relief cut (13/a) on the underside of the branch before sawing off the branch (13/ b). This prevents the bark from being torn off and prevents damage to the tree that heals only very slowly. The relief cut should not be deeper than 1/3 of the branch thickness to avoid any trapping of the pruner saw.
Always pull the pruning saw out of the branch before it is switched on, so that it does not become jammed.
7 MAINTENANCE AND CARE
WARNING! Danger of cuts and lacerations. Danger of cuts and lacerations when reaching into sharp-edged, moving appliance parts and into cutting tools.
Before maintenance, care and cleaning work, always switch off the appliance. Remove the rechargeable battery.
Always wear protective gloves during maintenance, care and cleaning work.
Repairs are only allowed to be performed by qualified specialists, and with the exclusive use of genuine spare parts.
After each use, check the tool for wear and replace any damaged components.
- Do not expose the appliance to rain or moisture. Clean plastic parts with a cloth; do not use cleaning agents or solvents.
Clean the cooling air slots if they are blocked.
- Do not spray the tool with water and do not use a high-pressure cleaner.
Only use spare parts specified by the manufacturer.
7.1 Checking the saw chain lubrication
IMPORTANT! Danger of damage to the appliance. Ground contact invariably leads to blunting of the saw chain.
-
Do not make contact with the ground with the chain and maintain a safety distance of 20~cm .
-
Switch on the tool.
- Hold the tip of the chain bar in the direction of a cardboard box or paper on the ground.
If the check produces a growing trace of oil, this indicates the automatic oiling function is operating correctly.
If there is no trace of oil even though the oil tank is full: Clean the oil entry hole in the tool and the groove of the chain bar.
If this is not successful, please contact our customer service.
7.2 Checking the saw chain tension
CAUTION! Risk of injury on the saw
chain. The cutting edges of the saw chain are very sharp so that cutting injuries can occur when handling the saw chain. Before all work with the saw chain, heed the following:
- Switch off the appliance and remove the rechargeable battery.
Wear protective gloves.
Check the chain tension at frequent intervals, as new saw chains stretch.
-
Turn the saw chain slightly by hand and check the following:
-
When the chain is cold: The saw chain has been tensioned correctly when it can be lifted by approx. 3 - 4mm in the middle of the chain bar and can be pulled though easily by hand. At operating temperature, the saw chain stretches and sags.
The drive links of the saw chain must not come out of the groove on the underside of the chain bar - otherwise the saw chain could jump off. -
Retension the saw chain, if necessary (see chapter 7.3 "Tensioning and slackening the saw chain (14)", page 39).
7.3 Tensioning and slackening the saw chain (14)
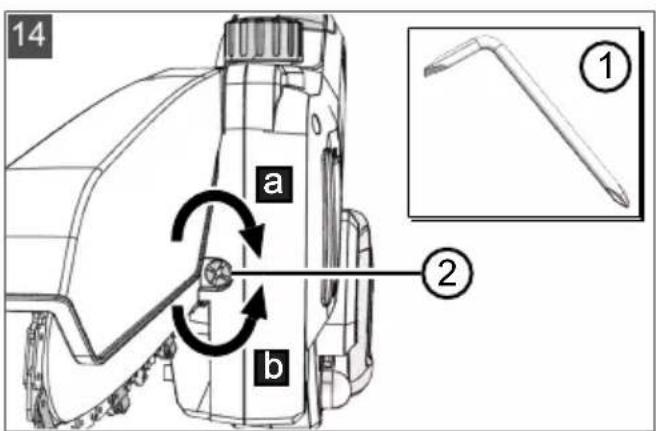
- Tension the saw chain using the Phillips head on the angle screwdriver (14/1):
Tensioning the saw chain: Turn chain tensioning screw (14/2) in clockwise direction (14/a).
- Slackening the saw chain: Turn the chain tensioning screw in anti-clockwise direction (14/b).
- Check the chain tension (see chapter 7.2 "Checking the saw chain tension", page 38). Repeat the previous step, if necessary.
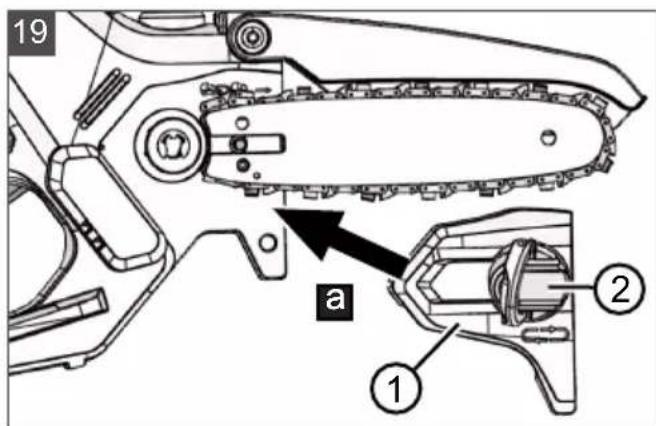
7.4 Installing saw chain and chain bar (15 - 19)
If the cutting performance decreases, the saw chain and possibly the chain bar must be replaced. The chain bar must be replaced if there are clear signs of wear on the guide groove for the saw chain.
Use only OEM spare parts for the saw chain and guide rail (see chapter 12 "Technical data", page 43).
CAUTION! Risk of injury on the saw chain. The cutting edges of the saw chain are very sharp so that cutting injuries can occur when handling the saw chain. Before all work with the saw chain, heed the following:
- Switch off the appliance and remove the rechargeable battery.
Wear protective gloves.
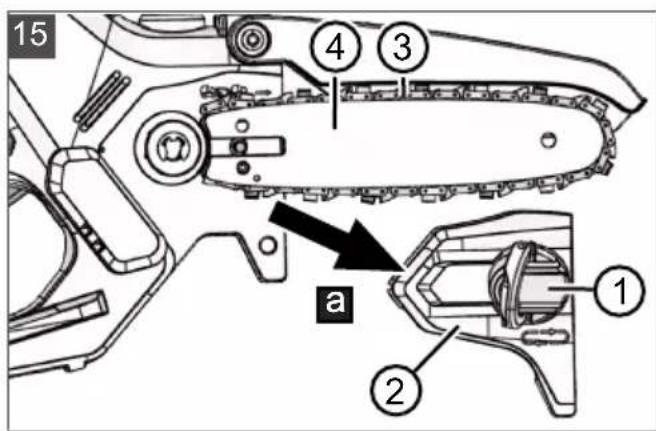
Remove saw chain and chain bar (15)
- If the battery is plugged in: Pull out the battery to prevent unintentional starting of the pruning saw.
- Open the fastening ring (15/1) for the sprocket cover (15/2).
- Turn the fastening ring anti-clockwise.
- Remove the sprocket cover (15/a).
- Remove saw chain (15/3) and chain bar (15/4).
- Remove the saw chain from the chain bar.
Cleaning
- Clean all removed components of wood chips and oil deposits.
- Clean all exposed parts, in particular the sprocket and oil entry hole.
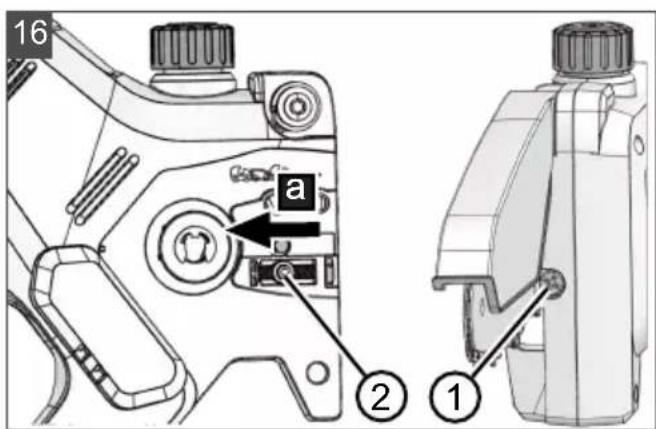
Install the saw chain and chain bar (16 - 18)
- Turn chain tensioning screw (16/1) using the Philips head of the angled screwdriver until the chain tensioning pin (16/2) is at the rear thread end (16/a), see chapter 7.3 "Tensioning and slackening the saw chain (14)", page 39.
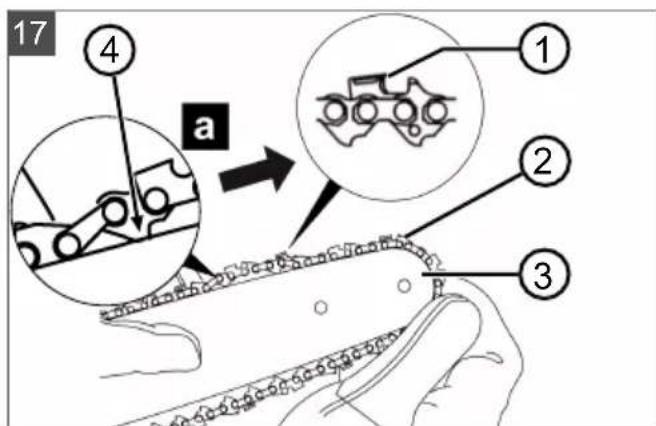
- Place the saw chain on the chain bar:
Align (17/a) cutting teeth (17/1) of saw chain (17/2) that are to lie on the top of the chain bar with the tip of chain bar (17/3).
Note: Ensure that the chain is fitted correctly!
Place the saw chain in the groove (17/4) of the chain bar and guide completely around the chain bar.
-
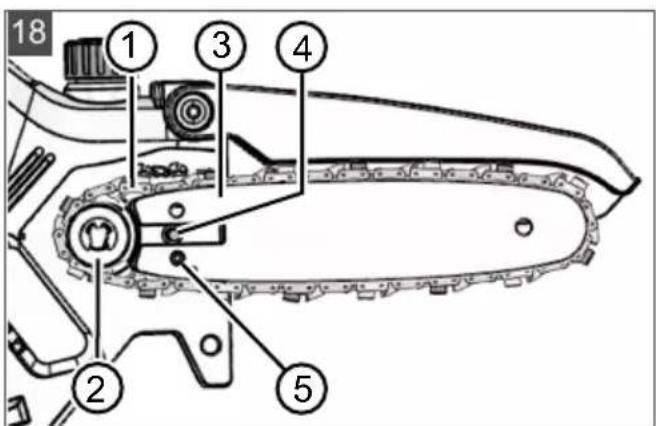
Place the chain bar together with the fitted saw chain into the open housing:
-
Lay the saw chain (18/1) around the sprocket (18/2).
Align the chain bar (18/3) in such a way that the guide pin (18/4) engages in the slotted hole of the chain bar.
Align the chain bar so that chain tensioning pin (18/5) engages in the chain tensioning hole.
Align the saw chain so that it is in the groove of the chain bar and on the drive sprocket. -
Close the housing:
Put the sprocket cover (19/1) in position (19/a).
Turn the fastening ring (19/2) clock-wise.
Close the fastening ring.
- Tension the saw chain, see chapter 7.3 "Tensioning and slackening the saw chain (14)", page 39.
- Install a battery.
8 HELP IN CASE OF MALFUNCTION
CAUTION! Risk of injury. Sharp-edged and moving appliance parts can lead to injury.
Always wear protective gloves during maintenance, care and cleaning work!
NOTE For malfunctions that are not listed in this table or that you cannot resolve yourself, please contact our customer service.
| Malfunction Cause Remedy | ||
| Engine does not start. Battery is flat. Charge the battery. | ||
| Battery missing or not insert- ed correctly. | Install the battery correctly. | |
| Power supply is interrupted. 1. | Remove the battery. 2. Clean the plug contacts. 3. Install the battery again. | |
| Motor stops during operation. Too much pressure exerted on the pruning saw. The overload protection has switched off the device. | Pull the pruning saw out of the kerf and switch on again. Exert less pressure during sawing. | |
| Battery is flat. Charge the battery. | ||
| Battery is too hot. Allow the battery to cool down. | ||
| Battery is defective. Replace the battery. | ||
| Motor keeps cutting out. The ON/OFF switch is defec-tive. | Contact one of the manufactur- er's service centres. | |
| The chain bar and saw chain be- come hot when running. Smoke development. | The saw chain is too taut. Check the chain tension. Reten-sion the saw chain. | |
| Oil tank is empty. Refill with saw chain oil. | ||
| The oil entry hole and/or groove of the chain bar are dirty. | Clean the oil entry hole and groove of the chain bar. | |
| Motor running, but the saw chain does not move. | The saw chain is too taut. Check the chain tension. Reten-sion the saw chain. | |
| Appliance fault Contact one of the manufactur- er's service centres. | ||
| Only sawdust is thrown out, rather than wood chips. The pruning saw must be forced through the wood. | The saw chain is blunt. Contact one of the manufactur- er's service centres. | |
| Appliance vibrates unusually. Appliance fault Contact one of the manufactur- er's service centres. | ||
| Foldable chain cover is jammed. Appliance fault Contact one of the manufactur- er's service centres. | ||
| Battery operating time drops significantly. | The service life of the battery has expired. | Replace the battery. Use only genuine accessories from the manufacturer. |
| Battery cannot be charged. | Battery contacts are soiled. | Contact one of the manufactur- er's service centres. |
| Battery or charger is defective. | Replace the rechargeable battery or charging unit. Use only genuine accessories from the manufacturer. | |
| Battery is too hot. Allow the battery to cool down. | ||
9 TRANSPORT
WARNING! Danger of fatal injury and danger of extremely severe injury. During transport, a running saw chain can lead to extremely serious and even fatal injury.
- Never carry and transport the chain saw with the saw chain running.
Before transporting, carry out the measures mentioned above.
Perform the following measures before transporting the appliance:
- Switch off the pruning saw and remove the battery.
- Fit the chain guard.
- Drain the chain oil tank.
- Pack the pruning saw in the transport case.
Rechargeable battery "B125 Li" (Art. No. 113896)
NOTE The nominal energy of the rechargeable battery is more than 100 Wh. Therefore, observe the following transport instructions.
The Li-ion rechargeable battery contained in the appliance is subject to the hazardous goods law, but can be transported under simplified conditions:
The rechargeable battery can be transported on public roads by the private user without further conditions provided it is packaged for retail sale and the transport serves personal purposes.
- Commercial users who carry out the transport in connection with their main activity (e.g. delivery from and to building sites, or demonstrations) can also take advantage of this simplification.
In both cases, it is essential to take the mandatory precautions mentioned above to prevent any leakage of the contents. In other cases, it is essential to comply with the regulations of the hazardous goods law. In the case of non-compliance, severe penalties can be imposed on the sender and possibly the transporter.
Additional notes on transport and shipment
Only transport or send the li-ion rechargeable battery in an undamaged condition.
For transporting the rechargeable battery, only use the original cardboard box or a suitable hazardous goods cardboard box (not required for rechargeable batteries with a nominal energy less than 100 Wh).
Tape off exposed rechargeable battery contacts to avoid a short circuit.
- Secure the rechargeable battery against shifting in the packaging to avoid damage to the rechargeable battery.
Ensure the correct marking and documentation of the shipment for transport or shipping (e.g. by parcel service or freight forwarding).
Check in advance that transport with the selected service provider is possible and indicate the shipment.
We recommend involving a hazardous goods specialist in preparation of the shipment. Also heed any further national regulations.
10 STORAGE
10.1 Storing the appliance
- Remove the rechargeable battery from the appliance after every use.
Thoroughly clean the appliance and - if present - attach all covers.
Store the appliance in a dry, lockable place out of the reach of children.
Carry out the following jobs before intervals in work lasting for longer than 30 days:
Empty the oil tank for the saw chain oil.
Clean the saw chain and chain bar, clean and spray with corrosion protection oil.
Pack the pruning saw in the transport case.
IMPORTANT! Danger of damage to the appliance. Dried/sticky saw chain oil can lead to damage to oil-channelling components or the oil pump after lengthy storage.
- Remove the saw chain oil from the chain saw before each extended period of storage.
10.2 Storing the rechargeable battery and charging unit
NOTE For detailed information, heed the separate operating instructions for the rechargeable battery and for the charging unit.
11 DISPOSAL
Information on the German Electrical and Electronic Equipment Act (Elektro- und Elektronikgerätegesetz; ElektroG)

- Electrical and electronic appliances do not belong in household waste, but should be collected and disposed of separately.
Used batteries or rechargeable batteries that are not installed permanently in the old appliance must be removed before disposal. Their disposal is regulated by legislation regarding batteries.
- Owners or users of electrical and electronic appliances are obliged by law to return them after use.
The end user bears personal responsibility for deleting his personal data from the old appliance to be disposed of.
The crossed-through rubbish bin symbol means that electrical and electronic appliances may not be disposed of in household rubbish.
Electrical and electronic appliances can be handed in at the following places at no charge:
Public service disposal or collection points (e.g. municipal building yards)
Points of sale of electrical appliances (physical and online) provided traders are obliged to take them back or offer this voluntarily.
These statements only apply to appliances that are installed and sold in the countries of the European Union and are subject to European Directive 2012/19/EU. Different provisions may apply to the disposal of electrical and electronic appliances in countries outside the European Union.
Information on the German Battery Act (BattG)

Used batteries and rechargeable batteries do not belong in household waste, but should be collected and disposed of separately.
For safe removal of batteries or rechargeable batteries from the electrical appliance and for information on their type or chemical system, follow the further information within the operating or installation instructions.
- Owners or users of batteries and rechargeable batteries are obliged by law to return them after use. Return is limited to the handover of customary household quantities.
Used batteries can contain harmful substances or heavy metals that can cause damage to the environment and human health. Reuse of the used batteries and use of the resources contained therein contributes to the protection of these two essential commodities.
The symbol of the crossed-through rubbish bin means that batteries and rechargeable batteries may not be disposed of in household rubbish. In addition, if the symbol Hg, Cd or Pb appears under the rubbish bin, this stands for the following:
Hg: Battery contains more than 0.0005% mercury
Cd: Battery contains more than 0.002% cadmium
Pb: Battery contains more than 0.004% lead Rechargeable batteries and batteries can be handed in at the following places at no charge:
Public service disposal or collection points (e.g. municipal building yards)
Points of sale of batteries and rechargeable batteries
Disposal points of the common take-back system for the used batteries of appliances
Disposal point of the manufacturer (if not a member of the common take-back system)
These statements apply only to rechargeable batteries and batteries that are sold in the countries of the European Union and that are subject to European Directive 2006/66/EU. Different provisions can apply to the disposal of rechargeable batteries and batteries in countries outside the European Union.
12 TECHNICAL DATA
| Chain saw CSM 1815 | |
| Art. No. 114016 | |
| Set with battery pruner saw, 2,5 Ah rechargeable battery and charger 114023 | |
| Dimensions (L x W x H) 430 x 200 x 85 mm | |
| Gross weight with chain and chain bar (without battery) 1.56 kg | |
| Net weight without chain and chain bar (without battery) 1.28 kg | |
| Chain oil tank volume 30 ml | |
| Cutting length 6" / 152 mm | |
| Overload protection x | |
| Motor power consumption 500 W | |
| Motor speed 18500 min-1 | |
| Sound power level LWA (DIN EN ISO 3744) 93 dB(A) | |
| Sound pressure level LpA | 78 dB(A) |
| Vibration value (DIN EN 28662-1)* 2.8 m/s2 | |
| Saw chain: | |
| Saw chain type 0.3" | |
| Spare part number for saw chain | 114024 |
| Drive link thickness | 1.1 |
| Max. working speed of the saw chain | 7 m/s |
| Chain bar: | |
| Spare part number for chain bar | 114025 |
| Length of the chain bar | 7" / 179.5 mm |
x: included, -: not included
- Notes:
The vibration emission value given has been measured according to a standardised test method and can be used to compare one power tool with another.
The vibration emission value can also be used for an initial assessment of the exposure (vibration exposure degree).
The vibration emission value may differ from the given value during actual use of the power tool, depending on how the power tool is used.
Try to keep the vibration load as low as possible. Exemplary measures to reduce vibration are the wearing of gloves when using the tool and the limitation of working time. All
parts of the operating cycle must be taken into account (e.g. times when the power tool is switched off and those in which it is switched on but runs without load).
13 AFTER-SALES / SERVICE
In the event of questions of warranty, repair or spare parts, please contact your nearest AL-KO Service Centre. These can be found on the Internet at: www.alko-garden.com/service-contacts
Further information on spare parts can be found at: www.alko-garden.com/spareparts
14 INFORMATION ON THE DECLARATION OF CONFORMITY
We hereby declare, as the exclusively responsible party, that this product in its marketed form
meets the requirements of the harmonised EU Directives, EU safety standards and the product-specific standards. The Declaration of Conformity forms part of the operating instructions and is enclosed with the machine.
15 GUARANTEE
We will resolve any material or manufacturing faults on the appliance during the legal warranty period for claims relating to faults, in accordance with our choice either to repair or replace. The legal warranty period is determined by the legislation of the country in which the appliance was purchased.
Our warranty promise applies only if:
These operating instructions are heeded
The appliance is handled correctly
Original spare parts have been used
The warranty becomes void in the case of:
Unauthorised repair attempts
Unauthorised technical modifications
Non-intended use
The guarantee excludes:
Paint damage that can be attributed to normal wear and tear
Wear parts that are marked with a frame (x) on the spare parts card
The guarantee period commences with purchase by the first end user. The date on the proof of purchase is decisive. In the event of a guarantee claim, please take this guarantee declaration and the original proof of purchase, and contact your dealer or the nearest authorised customer service centre. This statement does not affect the purchaser's statutory claims for defects against the vendor.
VERTALING VAN DE ORIGINELE GEBRUIKERSHANDLEIDING
Inhoudsopgave
2 PRODUCTOMSCHRIJVING
ADVERTENCIA! Peligro de lesiones graves. Si hay componentes de la motosierra dañados,SEO,SEO,SEO,SEO,SEO,SEO,SEO,SEO,SEO,SEO,SEO,SEO,SEO,SEO,SEO,SEO,SEO,SEO,SEO,SEO,SEO,SEO,SEO,SEO,SEO,SEO,SEO,SEO,SEO,SEO,SEO,SEO,SEO,SEO,SEO,SEO,SEO,SEO,SEO,SEO,SEO,SEO,SEO,SEO,SEO,SEO,SEO,SEO,SEO,SEO,
3.5 OntepeheBb6paunjom
Onachoct od Bn6paunja CmeapHa epehocm bubpauohux emucuja npunukom ynompebe ypehaja moke da odcmya od haeedehe epehocmu npou3oHajra. Ppe OHN. y Toky Kopniusheha obpatnte naKbhy Ha cneede he faktope ytncaja:
Да пи се урегaj корости Наменckи?
Да пи ce MaTeprnjan ceye oH. obpaHyje Ha npabn HauHH?
Да пи ќуpeй уnpонсом уnotpe6hOM сану?
JaIne je pe3Hn anat npOnucho HaoUtpen Odn. JaI ne je yrpaeho odroBapajyhi pe3Hn anat?
Да Ли су монтуране пидржн e BeHTyaJIH0 onциоHe Bn6paциоHe pyuKe, И да Ли су оHe YBpTo cnojeHe ca ypehajem?
Upehaj cme da paan ca mo ca 6pojem oobpaja MOTopa notpe6nM 3a odroBapajyHn pad. N36erabajTe MaKcImaJIHn 6proj oobPtaja, KaKo 6ncTe cMaHbIIn 6ky n Bu6paunje.
UcneHnepaBnHOr KopuHHeBa n Odpkaaba,6yKa n Bn6paunje ypehaja Ce Mory noBeHaTo BoDn Do 3npaBCTBeHnx npo6nema.Y Tom cnuyajy oJmax NCKbYnTe ypehaj n daJte ra Ha nonpaBky y OBnaHehy cepBnchNy paAnOHnCy.
CTeENOnTepeHHeOCTN Bn6paunjom 3aBcH ON paJa KoJn Tpe6a Da ce n3BpUn ODN. Ynotpe6e ypehaja. PpoceHnte ra HAnpabnte odroBaapajhe nay3e y Toky paJa. Ha taj NaunCe 3NaUajHo cMaHyje onTepeHHeoCT Bn6paunjom y Toky ueKynor padnor BpemeHa.
Dyjka ynoTpe6a ypehaja n3naKe pykoBaoza Bn6paunama n MoKe Da npoy3pOkyje npo6Ie me ca uRkUaJom ("6eni npct"). Da 6n ce cMaHNO pN3NK, Hocnte pykabuie n OdpXabajTe pyke TOnlM. Ako ce npen03Ha CmNTOM "6eIor npCTa", oDMax notpaxnTe Iekapa. Y Te CmNTOME cnaajy: rYbntak Ocehaja, rYbntak cEH3nBnHocTn, je3a, CBpa6, 6o1, cnaJIbe He TeJeche Chare, npomeHa 6oJE nII nCTaHa KoKe. ObuHcO ce OBn CmNTOMn OndOce Ha npCTe, WaKe nII Ha npnc. KoI HnCKnx TemnepaTypa ce NOBeHaba onaCHOCT.
Y TOKy paHnO dHa npaBnte DyKe nay3e, KaKO 6nCTe MoTn Da ce onopabNTe Od 6yKe n Bn6paunja. Bau paN icPnlaHnpajTe Tako da ce ynoTpe6a ypehaja KoJn CTbapajy jake Bn6paunje pacNoDen Ha Bnwe daHa.
AkoHaBaWIMuakama yTbpDnTe Henpnijatah ocehaj nnn npomehy 6oje koke y Toky Kopnshheha ypehaja, odmax npeknHte ca padom. HanpaBnte doBObHO dyre naye. Be3doBObHO dyrnx nay3a moKe doHnDo cInHpOMa Bv6paCnje waKe-pyke.
MnHmN3yjTe cBoj pn3nk n3JaRaHa bB6paunjama. Odpkabajte ypehaj y cknaNy ca nHCTpykunjama y uyTCTBy 3a ynotpe6y.
Ako ce ypehaj yecto Kopnctn, KOHTaKtnpajTe BaWeer nIcTpynbTyepa da 6nCTe HabBnIn aHTN-Bn6paunohy onpemy (Hnp. pyKe).
I36erabajTe da paAnTe ca ypehajem Ha temnepaTypama MaHbIM od 10^ .Y npaHy pada DePHNHIte KaKo ONTepeheBe Bn6paunom MoKe Da ce orpaHnH.
3.6 Ontepehebe 6ykom
I3BecHO onTepeheHe yCne 6yKe 36or OBorypehaja He MoKe Da ce n36BerHe. IpebaunTe paIOBE ca INHTeH3INBHOM 6yKom Ha Do3BOJbeHe 3a To IpeDbHJeha BpemeHa. Po Notpe6n Ce npIrpKabajTe BpemeHa obabe3He TtUnHe i
OrpaHnUHTe TpajaHe paHa Ha OHO HajHyxHnJe. PaIbBaIe NnHe 3aHTnte H 3aHTnte ocO6a Koje ce Hanae y 6n3nHm, Mopa Da Ce Hocn odroBapajyha 3aHTnTa OD byke.
3.7 Be36eHocHe HanomeHe 3a 6aTepnjy nyBaay
Ipe npheBa n3BaAnTe aKymyIaTope n3 ypehaja.
Uypehaj HemojTe 3ajeHcTaBbata npa3nunte TINOBe AkymyIaTopa IIn HOBe IN KOpuheHe AkymyIaTope.
UMeTHnTe aKymyNaTope yypehaj ca nCnpaBHm NOnapHTeTOM.
YknOHTe akymyIaTope n3 ypehaja, ako raCKnAaNtTe Ha dUxke BpeMe.
HemojTe KpaTko CnajaTn npNKJbUyHe KIteMe ypehaja nn akymynaTopa.
JIED HnBO hanyBHeNoCTN
CBeTne 3 JEPdIIOpe: AkymyIaTOp je do Kpaja HanyHbeH.
CBeTne 2 JEPdIIOe: AkymyNaTop je Hanyhben 2/3.
CBeTn1JIeIa:AkyMaTOp je HanybEn 1/3.
Ko npa3Hor akymyntopa
Tectpa 3a NOTKpeCnBaHbe ce 3ayctabBa n noceIbA IED dnoDa noCne 3ayctabBaHa b Taene npjow 3s.
5.2 3nak yno3opeha (06)
3HaK yno3opeBa (06/3) cnHaJn3yje:
3nakyno3opeha Dorahaj
3HaK yno3opeha Tpenhe 30 s:
AkymyaTop je HeNCnpaBaH.
3HaK yno3opeBa CBETn5 sn racn ce:
AkyMaIaTop je npBnue Bpyh.TecTepa 3a NOTKpeCnBaHbe ce 3ayCTaBba.
Ko3arpejaHOr aKymyNaTopa
1.Пустити да ce akymу latop oxlaani.
Ako nokyuatae da nokpehe Te TcTepy 3a NOTKpeCnBaHbe, naKO ce akymyIaNtOp joW HnJe OXnAdNo, 3NaK yno3OpeHa noHOBO CBETn5 s n racn Ce.
5.3 Побера уьа панца 3a Тecтepy
IpoBepTe Da nn y pe3epBoapu mAmdoBOJbHO yba 3a NaHaTecTepe:
npe cBAkor noyeTka paada
TOKOMpa
Hajkachnje npn cBAkoj 3aMeHn akymynaTopa
Ako je HnBO yIb a Hn3ak,doJIyTe yIbe 3a IaHaTecTepe.
HnkaJa HemojTe KopncTnUypehaj 6e3 yba 3a Ianauc TecTepe!
NocTynap: BnDn Poanabe 4.1 "Nyhebe yba 3a Ianau mecmpe (02, 03) ,cmpaHa 166.
5.4 YKbyeHe n NcKbyeHe ypehaja (07)
YKbByuBaHe ypehaja
-
PAnIeM npTnCHyTu dyIme 3a 6NoKnpaHBe (07/1) n dpKaTu ra npTnCHyTuM.
2.ПрNTиСHTи ПпeКиДaч 3a yKJB./ИСКЛь. (07/2) nДрЖаТи ra прNTиСHTиM. -
Nycntte dyrme 3a 6Iokupahe. HanomeHa: Hije nompe6no dpxamu npumuchymo dyame 3a 6Iokupahe nocne nokpemaHa naHae mecmepe. Dyme 3a 6Iokupahe mpe6a da cnpeyu cnyajHo nokpemaHa neHae mecmepe.
-
YIbeHe IaHua TeCTepe:
JeHOM npTnCHNTe npTnCHO dYrMe (07/3) 3a yIbeHe IaHua TeCTepe. Ha naHaT TeCTepe ce HAnOc yTbphEna KOnuHa yBa 3a NaHaT TeCTepe.
IpoBepTe Da Ia Ce Ha uHckoJ BOHnUuN NaHcy Tectepe BnDn yBe 3a NaHaTectepe.
NckJbUyNBaHbe ypehaja
- Icnyctntn npekndaay 3a yKb./nckB.
6 NOHAJIbE IPN PAIy IN TEXHnKA PAIa
6.1 Ceuehe dpBeHe rpaHe Ha Mepy (08)
KoI OBe BpCTe paJa Tpe6a oBpaTn naxHbY Ha cneDehe TaUKe:
Kopncntte 6e36eHy noDnory 3a ceyebe, Hnp. nocToJbe 3a ceyebe (08/1), KInHOBe, rpeJe.
Okpyrna de6na ocNrypatn npotnb okpeTaHa.
He qncnpatn dpBO HOrom HHTn Tpe6a da ra dpxN dpyra oc6a.
YBepTe Ce Da NMaTe CtaBnAn NoLoXaj I da je TeKHa BaWer TeJa paBHomepHo pacnopeJeha.
TecTepy 3a noTkpeCnBaHbe c o6e pyke (08/2) CBpCTO dpxKInTe 3a npEHy n 3a 3aNbY pyky -Tj. 3a n3OIOBaHe NOBpUHHe 3a XBaTaHBe.
JaKo npNTnCHnTe rpaHnUHnK (08/3) TeCTepe 3a NOTKpeCnBaHbe o DpBO.
3a ceuehe neoctaBbatac mo lahaTectepe y koju ce kpehe. HkaJa HeykbuyjTe Tectepy 3a NOTKpeCnBaHe caNoctabJbeHm IaHcem Tectepe.
6.2 Ckndahe rpaHa (09 - 13)
YPO3OPEbE! Nobeha onachoc od nada. NoctojnoBeha onachocT od nada, kada ce paDi n3 noJoxaja Ha BucnH (Hnp. MepdeBnHe).
Ypehajem yBek paDnte ca Tna n npNTOM BOdnte paUHa o cTa6nHOM noIoxajy.
Y3mTe y 063np cIeHe 6e36eHocHe HAnomeHe.
CTaHnte TaKo Da ce pe3 no MoryhctBy moKe n3BecTu NOyIOM od 90^ y Ondocu Ha rpaHy (09/a).
I Debeene rpahe ondceajte deo no deo (10/1), KaKO 6nCTe HMaIIbOJbY KOHTpOy HaMecTOM ydaPAba.
HnkaJa HemojTe 3aceuTu y 3aJe6bBaBe Ha KopeHy rpaHe, da 6ncTe nocneuNn 3aueBbe He n cnpeuNn TpyBe (11).
I Iomohy rpaHnUHnka (12/1) npntncnTe (12/ a) TecTepy 3a noTkpeCnBaHe o rpaHy (12/2), da 6nCTe cTa6nIu3OBaHn rpaHy.
Hapabite pe3 pactepeheha (13/a) ha doBoj cTpaHn rpaHe, npe Hero wTo ce rpaHa oDceue (13/b).Tako ce moKe cnpeuHTn OTKndaBe kope kao n owTeheBa Ha dpBeTy
koja Teuko 3auebyjy. Pe3 pactepeheha He Cme da 6ynde dy6bnu od 1/3 de6bnuhe rpahe, Da 6n ce cnpeuHIO 3aIaNAbNBAHe IaHuaHe Tectepe.
YBeK n3ByuNTe TecTepy 3a notKpeCnBaHe n3 rpaH e ykbuyehy, kako ce He 6n 3arnaBnna.
7 OДРЖABAHAИ HEГA
YNO3OPEHb! OnachocT od
NoceKOTnHa. OnaHocT Od NocekOTnHa npn 3axBaTaHb y oUtpe DeIIOBe KoJn ce KpeHy n anate 3a pe3aHbe.
Ipe padoba odpxaba, here n uuunheba yBek nckbuynte ypehaj. 3BaAnTe akyyntop.
PpuiNkOM paOba OndpaBaHa, Here n uHHeBa yBek HocHTe 3aHTnThe pyKaBnCe.
NonpaBke cmej da n3BOe camo KBaIINΦnKOBaHn CTpyHbauN KOJn KOpNCte camo opnHaJIne pe3epBHe DeIOBE.
Iocne cBaKe ynoTpe6e npOBepuTe da IIn ce ypehaj TpoU IN IO nOtpe6n 3aMeHnte ouTehe KOMNOHeHTe.
Hemojte n3naratn ypehaj BODn nnBna3n. OunchTe Pnactnue He DeNoBe Kpnom npITom He KopncTne CpeDCTBa 3a YnshHebe nn pactbapae.
OuICTe npope3e 3a pacxnaHn Ba3dyX aKO cy 6JIOKnpaHn.
HemojTe npckatn ypehaj BODOM HemojTe KOpNCHTn ypehaj 3a Ynshhe IOD BnCOKM npNTNCKOM.
Kopuncte camo pe3epBHe deNoBe koje je nponcao npon3Boha.
7.1 NpOBepa noDm3nBaHaJaHca TeTepe
PAXHbA! OnachocT od owteheba ypehaja. OndinpaBe Tla Hen3OCTaBHO DOBOIN Do TyIbeHa IaHua TeCTepe.
IaHcem HEmoJTe DoDnpuBAtu TIO n OdpKabajTe 6e36eHocHo pactoJaBe oD 20 cm!
- YkbyuTe ypehaj.
2.Bpx uHnCKe BOHnCe DpKaTu y Cmepy KapToHa nn nannpa Ha Tny.
Ako ce BnTpar yba koju ce nojauaba, nOIMa3NBAhe IaHca paDn 6ecnpekopHo.
Ako ce ynpkoc nyHom pe3epBoapy 3a yIbe He BnDn HnKaKaB Tpar yla:
OuHCTnTe yna3HN OTBOP 3a yIbe Haypehajy nKne6 uHHcke BOHnue.
AkoToHeIobeDeDoycnexa,obpaTnteceHawoj cnjx6n3aKopncnke.
7.2 KoHTpoJa 3aTerHyTocTn JaHaCa TecTepe
ONPE3! Onacnoct od nobpeHa naHcy TeCTepe. Pe3ne nBnue IaHua TeCTepe cy BpIooWtpe, Tako da npu pyKOBaBy IaHcem TeCTepe MoKe DoHn do NoceKOtnHa. Ppe CBnx paOba ca IaHcem TeCTepe BoNte paUHa o cNeedeHem:
Ickbvynte ypehaj n 13BaAnTe akymynatop.
Hocnte cnrgpHoche pykabuie.
YeTo KOHTpOJIuNtE 3aTerHyTOcT NaHua jep ce HOBn IaHcI TeCTepe N3dYKyjy.
- Mano npOByuNTe JanaHau TecTepe pyKOM n npITOM KOHTpOJIuNITE:
YxnaHOM cTaHy:JaHaTecTepe je NcnpaBHO 3aTeHyT, KaJa Ce Ha CpeDInH uHHcke BoHnue MoKe npDnH 3a oKo 3- 4 MM n JaKo npOByHn pyKom. KoJ paDHe TemnepaType JaHaTu TecTepe ce npOdyXaBA HBCN.
I IIOHcKe KApKe JAnuTeCTepe He Cmejy Da n3aHy N3 XJIe6a Ha DoHbEm DeNy uINHcKe BOHnue - y IpOTNBOM JaHaU Tectepe 6n MOrao Da cnaDHe.
- Ako je notpe6no, doTeHnTe IaHaT TeCTepe (BnuPiOaJaEbe 7.3 "3ame3aHe u omnywmahe IaHa meCmepe (14), cmpaHa 170).
7.3 3aTe3aIbe n oTnyuTaIbe IaHua TeCTepe (14)
- 3aternyntnaauntctepe, npntom KopnctntkpcctaTneoHa yraohom odBnajy (14/1):
3aTe3aIbe IaHua TeCTepe: OkpeTaTu 3aBpTaHb 3a 3aTe3aIbe IaHua (14/2) y cMepy Ka3aIbKe Ha caty (14/a).
OtnytsaBe IaHua TeCTepe: OkpTaI3aBpTaH 3a 3aTe3aHe IaHua y Cmepy cynpoTHOM oD Ka3aJIbKe Ha caty (14/b).
- KoHTpOJIuIe 3aTeRHyTOc IaHua (BnDn POnaBJe 7.2 "KoHmpoIaZamezHymocmu NaHaCa meCmepe",cmpaHa 170).POnOTpe6N NOHOBIne nPeTXoDN KOpak.
7.4 3aMeHa Jana TecTepe N uHHcKe BOHnue (15-19)
Kaanda chara ceyeha cna6n, naHauc TeCTepe n
eBeHTyaHNO uHHcKa BOHua Mopajy da ce
3aMeHe. UHHcKa BOHua Tpe6a da ce 3aMeHN
kaDa ce Ha Jxle6y BOHue 3a NaHauc TeCTepe
Mory npImEtNTJ jaCHn TparOBn TpoWeHa.
3a LaHaCu TeCTepe N uHcKy BoHnCy KOpNCHTe NCKbUHyBO opRnHaJIHe pe3epBHe DeIOBe npOn3Bohaya (BnDn Po2na6Je 12 "TexHu4Ku nodaau",cmpaHa 174).
ONPE3! Onacnoct od nobpeHa naHcy TeCTepe. Pe3ne nBnue IaHca TeCTepe cy BpIooWtpe, Tako da npu pyKOBaBy IaHcEm TeCTepeMOXe dohdo NoceKOTnHa. Ippe CBnx paOba caJaHcEm TeCTepe BoDInTe paUHa o CneDeHem:
IckbyuHTe ypehaj n3BaADte akymyntop.
Hocnte cnrgpnoche pykabuie.
Cknndahe IaHca TecTepe N uHHcke BOHnue (15)
- Ako je akymynaTop yTaKHyT: N3ByuNTe akymynaTop,да 6nCTe cnpeuNIn HeHaMePho nokpeTaHBe TeCTepe 3a NOTKpeCnBaHbe.
- PacklnonTe npuBpcn npcteH (15/1) 3a noklonauc naHuaHnka (15/2).
- OdbrHnTe npuBpChn npCTeH y Cmepy cynpoTHOM oJ Ka3aJIbKe Ha caTy.
- CkHnTe noknonaц laHuaHnka (15/a).
- CkHnTe IaHaTecTepe (15/3) n uHcKy BOHnUy (15/4).
- OdBojntn IaHaT TecTepe OJ WInHcKe BOHnue.
Ushnebe
1.CBe cKHyTe KOMNoHEnTe OUnCTNTN OOnJIbaka ycJeI ceYeHa n Hacnara yJba.
2. OuHCTHTCBEOTKPNBEHe KOMNHOHEHTe - Noc6Ho NaHuaHnK yJa3HN OTBOp 3a yJbe-.
YrpaIbHa IaHua TeCTepe N UHHcKe BOHnue (16-18)
-
3aBpTaH 3a 3aTe3aHbe IaHca (16/1) KpCTACTM DeIOM yraOHor ODbuJaHa OKpeTaTn CBe DOK Ce HacTaBAk 3a 3aTe3aHbe IaHca (16/2) He HaJc Ha 3aDhbem KpaJy Haboja (16/a), Bnu N Po2nae7.3 "3ame3aHbe U omnyumhaBe IaHca mecmepe (14)," cmpaHa 170.
-
Ctabbahe naHca TeCTepe Ha IHHcKy BOHnUy:
3y6e 3a ceuehe (17/1) IaHca TeCTepe (17/2), KoJn Tpe6a da HaneKy Ha shHy BOHnue ca roPhe cTpaHe, nO3nIOHnPATn (17/a) npema Bpxy WInHsKe BOHnue (17/3).
Hanomeha:Bodumu payuHa o npabunHO MOhmupaHOM naHu!
UMeTHyTuJaHau TecTepe y XKe6 (17/4) UHHcKe BOHnue N KOMnIeTHo NOCTaBHTN OKO UHHcKe BOHnue.
- WInHcKy BoHnCy 3ajEJHo ca nocTaBbEHNm IaHcEm TecTepe CTaBtN y OTBopeHo KyhnsTe:
IocTabnTn IanaT TecTepe (18/1) oko IaHuaHka (18/2).
UHHcKy BOHnUy (18/3) nO3nUHOHpaTn TaKo Da ce HAcTaBak BOHnue (18/4) cnpexe ca y3dYxHM OTBOPOM uHHcKe BOHnue.
■ WInHcKy BoHnuy No3nOuHnpaTn Tako da ce HacTabak BoHnue (18/5) cnpeXe ca OTBOPOM 3a 3aTe3aHbe IaHca.
JaHau TecTepe No3nUOHNpaTn TaKo Da HaneKe y XJle6 uINcKe BOHnue n Ha NOROHCKn JaHuaHnK.
- 3aTbapahe kyhnuTa:
CTaBnte (19/a) noknonau, naHuaHnka (19/1).
3aTbOpnTe npuBpcn npcTeH (19/2) y cMepy Ka3aJIbKe Ha caTy.
3aknonTe npuBpcn npcteH.
- 3aternyi nahauc tecepe, BnuN IoojaBbe 7.3 "3ame3ahe u omnyuMahe laHua mecmepe (14), cmpaHa 170.
- 3aMeHInTe aKymyIaNtOp.
8 NOMOY CJIyUJy CMETHBn
ONPE3! OnachocT od nobpeDe. Owtpn n pokteHn DeJIOBn ypehaja Mory da doBeyu do noBpeDa.
PpuiNkOM paIOBa OndpXaBaHa, He re N uHHeBa yBek HocHTe 3aHTnThe pyKabuie!
HANOMEHA KoJ cMeTbN Koje HnCy HaBeJeHe y OBOJ Ta6eIu NJIu KoJE He MoKeTe Da OTKnIOHnTe cam, ce o6paTnTe HaJoCnyx6n 3a Kopncnke.
AkymynaTop "B125 Li" (6p. apt. 113896)
HANOMEHA Ha3nBn KaanTeT aKymyIaTopa n3Hocn npeKo 100 Bt! 36or Tora BOINTE paUHa o cnepeHm ynyTCTBIMa 3a TpaHCnopt!
CadpxaHn nHTnjym-joHcKn akymynatop noJneKe 3aKOHMa O ONaCHM MaTepNJama, aJI MOnke da ce TpaHCnOpTyje NOd NOjeHocTAbJbEHN MycNoBIma:
PnBATHN KOpHcHk 6e3 DoaTHnx 3aXTeBa MoKe Da TpaHCnOpTyje HeoWTeHen akymyIaTOP dpymom, yKoNIko je ypehaj cnaKOBaH Ipema 3axTeBIMa 3a MaJIo npOdaJy n YKOJIko TpaHCnOpT CnyxN PnBAtHOJ CBpCn.
Komepujahn Kopnchnui, Koju Bpwe TpaHcnpT y KombHaun ca HbNXOBOM rnaBHom DeJatHoWHy (Hnp. nCnpyke Ha rpaDnUHTa nn npesHTaunje n ca Hux), Takohe Mory da KopncTe OBO nojeHocTabbeHe.
Y o6a rope nomeHyTa cnyuaja obabe3Ho mopajy da ce npedy3My mepe npedocptpoxhoctn da 6n ce cnpenuo ocno6aHahe caipxaja. Y dpyrIm cnyuajeBmca ce obabe3HO mopajy noTobatn odpe6e 3akoha O onachnM MaTepnjama! Y cnyuajy HnprdpXkabHa, Nounbaouy n EBeHTyaJHNO npEBo3Hky npete Bncoke Ka3He.
OcTaIe HAnOMeHe O npEBo3y nCnaHbY
TpaHcnpToBAtu Ond. CnATn JNTnjym-jOHcke akymyIaTope cMo y HeoWTeHeHOM cTaHy!
3a TpaHcnpT akymyntopa KopncttIn NCKbUHyBO opnHaJIHn KapTOH nIOn OndroBapajHyn KapToH 3a onache MaTepnje (Hne notpe6Ho KoJ akymyntopa ca Ha3NBHM kanaunTeTom MaHm od 100 Bt).
O6JIeNTn OTBOpHe KOHTaKTe aKymyIaTopa TpaKOM, kaco 6n ce cnpeuNo KpataK cnoj.
Ocnypatn akymylatop od kln3aHa yHytap naKOBaHa, kaKo 6n ce cnpeuHa oWTeHeHa Ha akymylatopy.
Obe36eHNTn nCnpaBHO O3NaUaBaHBe n DOKyMeHTaunjy 3a CnaHBe npuNKOM TpaHCnOpTa oHn. CnHaBa (Hnp. PpeKo cepBnca 3a DoCTaBy NaKeTa HnN WneDnCnJe).
I IpnTeXoJHO ce INHΦopMncatn da Jn je Moryh TpaHcnpT npeko n3a6paHOr npykaOua ycnyra n DeKnapcaTn nouNbky.
IpenopyjemykblyunBaHbe ctpyHbaka 3a onache MaTepeJepaDn npnPpeMe nouJIke.
Pnpjpkabajte ce n eBentyaHnX DoaTHnx HaOnoHaHnX npOnca.
10CKJIaIINWTEHBe
10.1 CknaaunwTehe ypehaja
HakOH cBaKe yNoTpe6e u3BaAnTu akymyNaTOP u3 ypehaja.
TeMeJbHo OunchTu ypehaj n no Notpe6n npuBpCTtu CBe 3aHTHe NOKNONCe.
Upehaj CyBaTu Ha cyBOM MeCTy Koje je noi Kblyuem BaH DomaWaja Deue.
Ppnnikom nay3a y paNy, koje TpaJy dyke od 30 daHa, cnpoBecTn cneDehe paOBe:
Icnpa3HnTpe3epBoap 3a yJbe 3a JaHaTeCTepe.
OuHCTnIuYbem3a3aHTTu od phe HAnpckatNlaHaTecTepe NUnHckyBoHnUy.
CnakyjTe Tectepy 3a NOTKpeCnBaHe y Koep.
IAXHb! OnachocT od owteheba ypehaja.
Ocyuheo/cIeIbeHo yIbe 3a Ianauc TeCTepe npn DyKem CKnaIuNTeHb MOKe OWTETNTN KOMNoHeHTe 3a npOTOK yIba nIyMny 3a yIbe.
Ipe cBAKOr dyXer CKlaAnuTeHa n3 NaHuaHe Tectepe yKnIOHTn yJbe 3a NaHau Tectepe.
10.2 CknaiunwTeHe 6aTepeHne n nybaa
HANOMEHA 3a DeTaBHe INHOpMaunje norgJeTne noce6ha ynyTCTBa 3a yNtpe6y akymyIaTopa I nyBaaya.
11 OJNAHbE
Hanomehe y Be3n ca 3aKoHOM o eJektpnUHM n eJektpoHcKm ypehajima

CTapn eNeKtpuHn n eNeKtpoHcKn ypehajn He Tpe6a Da ca 6aucay ca kyHm CmeHem, Beh Tpe6a Da ce npDBprHy OdBajaHy n copTnpaHy oH. peunKnnpaHy!
CTape 6aTepejne nAn akymyIaTopn KoJn Hncy fKcHO yrgaehn y cTapn ypehaj, npe npedaje Mopajy da ce n3BaDe! HnxOBO oDnaraBe Ha OTnaJ de peRynucaHo 3akOHom o 6aTeepiJaMa.
BlaCHNK Ond.KopncHK eJeKtpuHnx IeKeKtpoHckx ypehaja cy no nCTeky HbIXOBrBeKa ynoTpe6e 3aKOHcN oabE3Hn da nx BpaTe.
KpajbHn KOpNCnK CHOcN OJROBOPHOCT 3a 6PncaHe CBOJnx NnHnx NOdaTaka H3 CTapor ypehaja KoJn Tpe6a Da ce Ondoxn Ha OTnaI!
Cm60n npeuptane KaHTe 3a OTnATke 3NaUd a
CTapn eNeKTPuHn n eNeKTPoHcN ypehajn He
cMejy da ce OndaKy 3ajeHDo ca KyHnM cMehem.
CTapn eNeKTPuHn n eNeKTPoHcN ypehajn
6ecnnaTHO Mory da ce npedajy Ha cneDeHnM
MeCTMa:
JaBHa MeCTa 3a OJNarAbe OTnada OJH. HBeROBO npKuPbAbe (Hnp. KOMyHaJIHa CTOBAPuTAt)
IpojajHa MeCTa 3a eJekTpnuHye ypehaje (ctaOnOpHa Ha Ha nHTepHeTy),yKoNko cy TproBn ObaBe3Hn Da npxBaTe BpaHeHn Ipon3BOd Hn aKO Do6pOBoJbHo HyDe TaKBy ycnyry.
Obe n3jaBe Baxe caMo 3a ypehaje koJn ce yrpaHyj u npoajy y 3embama Ebponcke yHnje H Na KoJE ce npimeHyje eBpONcKa dIpeKTHBa 2012/19/EV. Y 3embama n3BaH EbpONcKe yHnje MOry ce npimeHbATn Heke dpyre oDpei6e 3a OndaraHe cTapnx eJIeKTPuHnX n eJIeKTPoHcKnx ypehaja.
Hanomehe y Be3n ca 3aKOHOM o 6aTepnjama (BattG)

CTape 6aTepeju n akymyIaTopn He Tpe6a da ce 6auajy ca KyHnM cMeHem, BeH Tpe6a Da ce IOpBprHy OdBajaHy n copTnpaHy ODN. peuKnpaHy!
Y CBpxy 6e36eHOR BaHeHa 6aTepeNja n akymyIaTopa n3 eJekTpUHor ypehaja n paI INHOpMaunja O HbXOBOM TnNy OdH. xemjckom cnCTemy, BODITE paUYHa o OCTaIIM NOdauma y ynyTCTBy 3a ynotpe6y OdH. MOHTaKy.
Bnachnk Ond. Kopncn6batepnja n akymyntopa cy no nCTeKy hnxOBor Beka ynoTpe6 3aOKHcN 06abe3n Da nx BpaTe. Bpahbe je orpaHnueHo Ha npedajy KOINHa yO6uJaeHnx 3a DomaHnCTBO.
CTape 6atepnje Mory da caapke wTeTHe MaTepnje nn TeuKe Metane, KoJn 6n MoRn Da HaWKoJe XNBOTHOJ CpeINH nn 3dpaBby. Ipepa Da cTapix 6atepnja n Kopuhebe y HbMa caPxAHH pecypca dOpnpHocn 3aHTN OBa DBA dparoueHa pecypca.
Cm60n npeuptaHe KaHTe 3a OTNaTKe 3HaUN da 6atepuje n akymyIaTopn He Cmej y Da ce Ondaxy 3ajeHc KaYHnM CMehem.
Ako ce ocIM Tora nCnoi KaHTe 3a CMeHe Hana3e O3HaKe Hg, Cd nn Pb, OHda To O3Haayaba cIeJe:
Hg: BaTepnja caPkn Bnue od 0,0005 % XnBe
Cd: BaTepejna caPkn Bnue oD 0,002 % KaMnjuMa
Pb: BaTeepuja caDpxn Bnue oD 0,004 % OJOBa
Akymnyatopn n 6atepije 6ecnnaTHO mory da ce npedajy Ha cneDeHm MeCTMa:
JaBHa MeCTa 3a OJnaraHe OTnada OJH. HberoO npKynBaHe (Hnp. KOMyHaHa CTOBapuTa)
IpojHa MeCTa 3a 6aTepe n aKymlaTope
MecTa 3a BpaHaBe 6aTepuJa n aKymyIaTopa
MecToBpHaHaKaKoI npOn3BoJyaua (ako Hnje Ylan3aJeHNuKOr CnCTema BpaHaHa)
Obe n3jaBe BaXe cAmo 3a akymyIaTope n
6aTepeJIe KoJn ce npOajy y 3embama EbpocKe
yHNe I Ha KoJe ce npImeHByje ebPOncKa
DInpeKTHBa 2006/66/E3. Y 3embama n3BaH
EbpocKe yHNe Mory ce npImeHbATn HeKe dpyre
OdpeIbe 3a oDnaraHe akymyIaTopa n 6aTepeJa.
12 TEXHnUKNIPODAUN
| ЛанчANA Тес对接а СSM 1815 | |
| Бр. apr. 114016 | |
| Комплет са akумлалорсkom Тес对接ом за постесивање, akумлалором od 2,5 A-ч и пьачем | 114023 |
| Димензиje (Д x Ш x В) 430 x 200 x 85 mm | |
| Укунна Тесина са ланцем ишинском boйцом (бeз akумлалота) 1,56 kg | |
| Нeto Тесина бeз ланца ишинске boйце (бeз akумлалота) 1,28 kg | |
| Запrem納а рezерboaра за улье 30 ml | |
| Панчана Тесстара CSM 1815 | |
| Духина сеvelа 6" / 152 mm | |
| Зашпта од превары x | |
| Улазна сона мотopa 500 W | |
| Б Proj объaja мотopa 18500 min-1 | |
| НИВо 3Вучne снare LWA (DIN EN ISO 3744) 93 dB(A) | |
| НИВо 3Вучног ручима pA | 78 dB(A) |
| Вреюст вибрациje (DIN EN 28662-1)* 2,8 m/s² | |
| Палач Тесстара: | |
| ■ Тил панça Тесстара 0,3" | |
| ■ Б Proj решевеног дella панça Тесстара 114024 | |
| ■ Дебъни поюнске karпke 1,1 | |
| ■ М akс. радна брзINA панça Тесстара 7 m/s | |
| Шинская Вовица: | |
| ■ Б Proj решевеног дellaшинске Вовице 114025 | |
| ■ Духинашинске Вовице 7" / 179,5 mm |
Tapaanjha He obyxBata:
OuTeHeBa NaKa KoJa ce CBoJe Ha HopMaJHo TpoUeHBe
NotpoiHe JeNoBe KoJn cy Ha KapTnCi pe3epBnX JeNoBa 03HaueHn paMOM XXXXX (x)
IapaHTHn pOK noUHe da Teue od DaTyma KynOBnHe od cTpaHe npBor KpajHer KopCHnka. MepoDaBaH je daTym Ha paUHy. Ca OBom n3jabOM o rapaHcuiN iOpuHaJIHm paUyHom o6paTITe ce npOabuy nHn HajbIkoj obnahehoj cepBnchoj paAnOHnCi. OBom n3jabOM ce He Mehajy 3aKoHcKa npaba Koja Kyaau mMa npema npOabuy y cnUay jHeIOCTaTaka.
TŁUMACZENIE ORYGINALNEJ INSTRUKCJI OBSŁUGI
Spis tresci
6 ARBEIDSFREMTREDEN OG ARBEIDSTEKNIKK
6.1 Kutte opp et kappet tre (08)
7 VEDLIKEHOLD OG PLEIE
12 TECHNINIAI DUOMENYS
| Grandininis pjūklas CSM 1815 | |
| Gam. kodas 114016 | |
| Rinkinys su akumulatoriniu medžio pjūklu, 2,5 Ah akumulatoriumi ir jkrovikliu | 114023 |
| Matmenys (I x P x A) 430 x 200 x 85 mm | |
| Bendras svoris su grandine ir kreipiamuoju bègeliu (be akumuliatorius) | 1,56 kg |
| Grynasis svoris be grandinés ir kreipiamajo bègelio (be akumuliatorius) | 1,28 kg |
| Grandinés alyvos bakelio türis 30 ml | |
| Pjovimo ilgis 6" / 152 mm | |
| Apsauga nuo perkrovos x | |
| Variklio jèjimo galia 500 W | |
| Variklio sūkiu skaičius 18500 min-1 | |
| Garso galios lygis LwA (DIN EN ISO 3744) 93 dB(A) | |
| Garso galios lygis LpA | 78 dB(A) |
| Vibracijos verté (DIN EN 28662-1)* 2,8 m/s2 | |
| Pjūklo graninè: | |
| Pjūklo graninès tipas 0,3" | |
| Pjūklo graninès atsarginès dalies numeris 114024 | |
| Varančiuju nareliu storis 1,1 | |
| Maks. pjūklo graninès darbinis greitis 7 m/s | |
| Kreipiamasis bègelis: | |
| Kreipiamajo bègelio atsarginès dalies numeris | 114025 |
Grandininis pjuklas CSM 1815
Kreipiamojo begelio ilgis 7" / 179,5 mm
Bridinajuma zime (06/3) signalize:
1.1 Cnmboln Ha NaaHaTa cTpaHua
Cnmbon 3haueHne

Henpemehno npoetete BHImaTeNo Ta3n INCTpykun 3a ekcnnoatau npedny nyskaheTo B eKcnnoatau. Toba e npednocTabkaTa 3a 6e3onacha pa6ota n 6e3npo6nemHo 6opabeHe c ypeDa.

PbKOBOIDTOB3aeknnoatauia
BHHMaTeHNO 6cIyKBaIte JNTHeBO-IOHHnTe 6aTePnn! IIO cneuAnHO cna3BaIte npeDncaHnraTa 3aTpaHCnOpT,cbXpaHeHne NOTCTpHaHBAHe KaTO OTNaDbK,ONNCaHN BTOBa pKOBODCTBO 3a EKCnIoOaTaUaI
1.2 Pa3aCHeHna ycNoBnTe 06o3HaueHna n CnHaJIHnTe dymn
ONACHOCT! 603NaHaBa HeNocpeDCTBeHo OnaCha CnTuaun, KOrTO - aKO He 6bJe N36eRHaTa - MOKe Da Ima KaTo NocJeDCTBHe CmbpT IIN TeKko HapaHraBaHe.
PENyPExEHNcO3NaHaNoaHcNtuaqnKoTo-AKOHe6bDe H36erHaT-aMOrnaDaDobedeDoCMbpTnn TeKkoHapaHraBe.
BHIMAHNE! O6o3NaUaBa nOteHuaJIHo onaHa cIyauu, KOrTo - aKO He 6bJe N36eHa-Ta - MoKe Da IMa KaTo CNeDCTBne JleKO UJn yMepeHo HapaHyaHe.
BHIMAHHE! O6o3NaUaBa cnTyaun, KOrTo -ako He ce n36eHHe - MoXe Da npedn3BnKa MaTePpnaHn 7eTn.
YKA3AHNE CnueaJIHn yka3aHn 3a no-do-6po pa3bnpaHe n 6opabene.
2 OПИСАНЕ HA ПОДУКТА
ToBa pBkoBOdCTBO 3a pa6Ota onncBa p6yeH TpNoH 3a NopR3BaHe, KOIto pa6Otn c akymyIaTOpHa 6aTePnI.
UpeBt MoKe Da 6bJe n3NoJ3BaH eINHCTBeHO C JNTHeBO-IOHHnte akymyIaTOPn 6aTePnN 3a-paHNte yCTPOJCTBA, NOCOeHN B TexHueCKnTe DaHN. 3a NOBee INΦopMaIg 3a akymyIaTOPnHnte 6aTePnN 3apJdHnTe yCTPOJCTBa BNKTe OTDeJIHnTe pBkoBOJCTBa 3a pa6Ota:
PbKOBoIcTBo 3a pa6Ota 443130: AkymyIaTOpHn 6aTePnn
PbKOBOcTBo 3a pa6oTa 443131:3aprHn yctpoiCTBa
BHIMAHHE! Onachoct OT nobpeHa Ha ypeDa nIa akymyLatopHata 6atepna. Ako ypeBt ce n3PON3Ba C HeNoDxOJaUc 6atepnu, e Bb3- MoXHo ypeBt N akymyLatOpHnTe 6atepnu da 6bDat NOBpeDeH.
I3non3BaIte ypeDa camo c npednncHnte akymynatopn6baTePN.
2.3 OCTaTbUHn pUCKOBe
Dopn KOraTo 6OpuyBaHEnTo Ce n3NoJ3Ba npaBnHOb, BnHaTn NMa ONpeJeIeN OCTaTbUeH PnCK, KOHTo He MoKe Da 6bDe I3KJIuOeH. CJeIHNrTe NOTeHcuaJIHn OnaChocTn MORaT Da Bb3HnKHAT OT TIna N dN3aHb Ha UpeDa, B 3aBNCIMOCT OT pniJIOKeHHeTO:
KoHTaKT C JeTЯU n CTbP rOTHn N MaCJIeH npax
BdIWBaHe Ha YacTnO TbPBeHcTbproTnHmMacneH npax
OToIeJIHe Ha qactn ot o6pa6oTeHOTo IbPBO.
Ybpejdahe Ha clyxa no Bpeme Ha pa6ota, aKO He ce HocrT cpeidCTBa 3a 3aunTa Ha clyxa.
IopraBaHnHa pexeLaTa Bepura
Bhe3anHo n HenpeBndeHo DnHexHe Ha Haprabnaaata ShHa 3aeDNo c pexeaaTa Bepira (onachoc ot npra3BaHe).
HapaHbAHnO TneTuaCTN OT Bepurata
2.4 3aunTHn npedna3Hn ycTPOINCTBa
PNEyPExEHNc!OnachocTOTekKn HapaHbAHnBpe3yJtTaHaMaHnPyInpaHe Ha 3aunTHnNpeDna3HN yCTpOcTBa.Pnpa6otaCtpnoHa 3aNoopra3BaHeMOratDaBb3-NNKHaT cepno3Hn HapaHbAHnBpe3yJtTaHaMaHnpyInpaHe Ha 3aunTHnTe NpeDna3HNycTPOcTBa.
He n3KJIIOUBAIte 3aIHTHNTe I npEJa3HN yCTpoIcTBA!
Pa6oTeTe c TpnoHa 3a Nopra3BaHe cAmO Ko- rato BCnUKN PpeDnA3Hn N 3aunTHN yCTpoi- CTBA fYHKUHOHPaT npabuHNo.
2.4.1 3aunTa OT npetOBapBaHe
Ako no BpeMe Ha p3aHe notpe6nteTnHaTncHe npeKaIeHo CnH0 TpNoHa 3a NOp3BaHe, Toi ce n3KnUoyBa. Taka ce npedotBpaTBA npetobapBa-HeTo Ha Dniratela.
2.4.2 Crbbaem Kanak Ha Bepurata
KanaKbT Ha Bepurata npedna3Ba onepaTopo ot DnHexeata ce pexeua Bepura. Oom KanaKbT Ha Bepurata ce onpe Ha dbpBOTO no Bpeme Ha Pra3aHe, ToI aBtOMaTNUHO nOndaBA.
PPEyPPEXJEHNE!OnacnoCT ot pexe- taBepura.DbxkeaTaCeBepuraHaTpnoHa MOKe Da npuHHJXIBOTo3acTpaAbaun HapaHraBaHn.
Pa6oTeTe c TpnoHa 3a noDpy3BaHe cAmo npn cyHKUOnHpau, kanak Ha Bepurata!
Hukora He demoHTupaTe kanaka Ha BepuraTa!
He n3noJ3BaIe npn IbXd! 3aunTeTe OT Bnara!
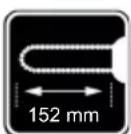
He pexeTe DbPbA, KOnto ca no-de6en OT paobTHata DbJnxHa Ha HanpaBnBaUaTa UHnHa (Tuk: 152 mm)!
Onachoct ot otkat! Hnkora He pekete c Bbpxa Ha HanpaBnaBaaata uHa!
2.5.2 3Haun 3a o6cJyXBaHe
CnMBOJ 3HaueHne

HaTnchTe 6yToHa,3a da cMaXKeTe pexeuaTa Bepnra.
CnmboJ 3HaueHne

Obbpe Te BnMaHne Ha nocokata Ha dBxKeHne Ha pexeata Bepura!

Iocoka Ha DnHexHe Ha pexeata Bepira (noKa- naka Ha 3b6HOTo KOJeNo Ha Bepirata)
2.6 IperneHa npoNyKta (01)
No KomnoheHT
1 3aHa npbKka (noBbpxHocTta 3a Xba- uhae e MapkupaHa)
2BloKpa6yToH
3 WajTep 3a BkJIIOUBaHe n N3KJIIOUBaHe
4Ппeнадрьжka
5 Kanayka Ha pe3epBoapa 3a MacNo Ha Bepurata
6 PpO3opeu 3a npEneHa pe3epBoapa 3a MacNo 3a BepnRaTa
7 Crbbaem kanaKHa Bepurata
8 BnHT 3a o6TgHaHe Ha BepnraTa
9 Kanak Ha 3b6HOTO KOJIeNo Ha Bepnra-Ta
10ФИКСИРаП npbCTeH 3a KANaka Ha 3b6-HOTO KOJIeNo Ha BepnIraTa
11 HanpaBnaa aHa
12 Pekceuza Bepira
13 OrpaHnUHTen
14 PpeDna3nTe 3a pKaTa
15 INHdNkAtop 3a HnBTo Ha 3apeKdaHe n npdeynpeDnteNeH 3HaK
16 HataHCTe 6yToHa, 3a da cmaKeTepekeuata Bepura
17 bTIOBNI OTBepTKN - KpbCTaTa n npaba
18 ⅢHa 3a akymylaTopa
19 BaTepeuia
20* 3apndno yctpoiCTBO
21 KaIbΦ 3a npehacHe
22PbKOBOCTBO3a pa6oTa
Akymynamophama 6amepu 2,5 A-yu 3apadHomo ycmpoucmeo ca ekqueneHu 8 komnneKma (apm. No 114023). Akymynamophama 6amepu u 3apadHomo ycmpoucmeo He ca ekqueneHu npu edunuHomo ycmpoucmeo (apm. No 114016). Buxme mexhuueckume daHHu Ha cmpaHuu 6 u 7 u bux zana 12 "Texhuuecku daHHu", cmpaHua 374.
2.7 OkomnneKToBka Ha doCTaBkata
YKA3AHNE AkymyntophaTa 6aTepeu n 3apdHOTO yCTPOINCTBO He ce cBDbpxKat B o6Xbata Ha DoCTaBkata. Te obaue ca Yact OT nbHnN KOMNJIeKT NIn Ce npednaRat OTDeJHo.
KbM oxbaTa Ha doctaBkaTa npHaadnexKaT nocoueHnte Tuk no3uun. PpobepTe, daJI N BCNUnno3uun ca BKIOUeHN:
No KomnoHeHT
1 AkymylaTopeH TpnoH 3a noDpy3BaHe
2 KaJIbΦ 3a npēnacārHe
3PbKOBOIDCTBO 3a pa6oTa
4 30 ml macno 3a TpnoH, 6nopa3rpaDIMO
3 YKA3AHNIA 3A BE3ONACHOCT
3.1 O6uHcTpyKcH 3a 6e3oNaChocT 3a eNeKtpOnHcTpymeHTN
I PDEyPPEXJEHNE! Ipooyete Te ynaTa HOpMaun 3a 6e3oNaChOcT, INCTpyKUnTe, INIOCTpaUNTE nTexHnueCKNTe daHHN, IpeDoCTaBeHn C To3n eJKeTPOINHCTpyMeHT. HeCnA3BaHeTo Ha cNeHNITE INCTpyKUn MoKe Da DOBeDe Do TOKOB yDap, NOxap N/INn cepNo3Ho HapaHbAHe.
CbXpaHЯBaIte BCnUKN npedynpeXeHnN nHCTpyKuN 3a 6e3onacHocT 3a 6bDeuN cnpaBKn.
TepMuHb m "eNeKmpouHcmpyMeHm", u3noJ36aH 8 uHcmpykuuume 3a 6e3oJacnOcm, ce omHacr 3a eNeKmpouHcmpyMeHmu, 3axpaHeAu om eNeKmpueckama MPexa (c MPexko Ka6en), unu 3a eNeKmpouHcmpyMeHmu, 3axpaHeAu om akyMymamopHu bamepuu (6e3 MPexko Ka6en).
3.1.1 CnryphocT Ha pa60THOTo MRCTO
IopdIbpxKaIte pa6OTHOTc MЯcTO YnCTO ndo6peocBeTeHo. Be3npaIbKbTnnHe- ocBteHHTe pa60THN 3OHN MoRAT da IOBeDaT Do 3JIOJnyKn.
He pa6oTeTe c eJektpOnHcTpymeHTa BbB B3pNBOONacHa CpeDa, B KOrTO HMa 3anaJIIMn TeuHOCTn, Ra3OBe NIN npaxOBe. EneKtpOnHcTpymeHTte npOn3BexJaT NCKPn, KOnTO MOraT Da Bb3PnAmEHNr Tnpaxa NIN N3napeHnraTa.
I Na3eTe Deuata N dpyrN xopa HactpaHa, Dokato N3NoJ3BaTe eJeKTPoHcTpymeHa. Ako cTe pa3ceHH, MoKe da 3ary6nte KOHTpOJI HaEJeKTPoHcHTpymeHTa.
3.1.2 EJektpnuecka 6e3onacnoct
UeNcEJIbT Ha eNeKTpOHHCTpymeHTa Tp6Ba Da nache B KOHTa. UeNceJIbT He Tp6Ba Da ce MoNΦuHpa NO HnKaKBbB NaHn. He n3NoJ3BaIte uenCeIN 3a aAnTePN 3aeDHO cbc 3a3EmHn eNeKtpoHNCTpyMeHTn. HemOnΦuHpaHnTe uenCeJn IN PNOxOJaUHTe KOHTaKTn HamaJIbaT pNCKa OT TOKOB yap.
I36raBaiTe Φn3Hueckn KOHTaKT CbC 3a-3eMeHN NOBbpxHOCTN, KaTO TpB6N, HarpeBaTeJI, rO TBapCK N eukN XnaDnHnCi. CbIeCTByBa IOBnSeH pNCK OT TOKOB ydAp, aKO TJIlOTo BN e 3a3eMeHo.
CbXpaHЯBaIe eJIeKtpnueCKNte HnCTpyMeHTn DaJIeU OT dJxN nII Bnara. PonaDaHeTO Ha BOda B eJIeKTPOnHCTpyMeNTa yBeJIuHaBA pNcKa OT TOKOB yIap.
He n3noJ3BaIte He npaBnHNo 3axpaHBa- uinna Ka6eI 3a npEhaJe, OkaUBaHe nn n3DbpNaBe Ha uenCeHa ha eNeKtpOnHcTpyMeHTa OT KOtakTa. Na3eTe 3axpaHBaunu Ka6eI OT TOnJIHa, MacNo, OCTpn Pb6oBe nn DvNxceN ce Yactn. NOBpeHnTe nn 3aJIteHen CBbP3BaUn npOBOHNu yBeInuAbaT pNcKa OT TKOB yIap.
Korato pa6oTHe c eIeKtPOnHcTpymeHT Ha OTkpnto, n3NoJ3BaIte caMo ydJIxNtTeJn, KOInTo ca noDxOJaUu N 3a yNotpe6a Ha OTkpnto. I3noJ3BaHeto Ha yDbJnxTeJ, NOxOJaU 3a yNOTpe6a Ha OTkpnto, HamaJBA pNcKa OT TokOB yJap.
Ako ekcnloaTnpaHTo Ha eJektpoHcTpymeHTa BbB BnaXHa cpea e HeN36exHo, n3NoI3BaIte ppeKbcBau 3a ocTaTbueh TOK. N3NoI3BaHeTo Ha npEkbCBAu 3a ocTaTbueH TOK HamaJIbRa PnCKa OT TOKOB yIap.
3.1.3 NnHa 6e3onacnoct
БьдeTe 6ДиTeHn, BHIMaBaIte KaKBO npaBnte n 6bTe pepa3yMnNo BpeMe Ha pa6oTaTc eJekTpOuHcTpymEHT. He n3- non3BaIte eJekTpOuHcTpymEHTa, KORAto
CTe yMOpEn Hn CTe NOB Bb3DeIcTBNeTO Ha HApKOTnU, aJIKOxOJ Hn JIeKapCTBa.
EINH MOMENT HeBHMaHne npn n3noI3BaHeTo Ha eNektpoHnCTpyMeHTa MoKe Da DoBeDeDo cepNo3Hn HapaHraHn.
Hocete JIuHN IpeDn3Hn CpeCTBa N BuHarn 3aunTHn Ounla. HocehTo Ha JIuHN IpeDn3Hn CpeCTBa, KaTO MACKA 3a npax, HexJb3raUcN Ce IpeDn3Hn OByBKN, IpeDn3Ha KACKA INN CpeCTBa 3a 3aUnTa Ha CInyxa, B 3aBNCIMOCT OT BnDa N HaunHa Ha N3PON3BaHe HA eJIeKTPoHnCTpymeHTa, HamaJIЯBa PnCKa OT HapaHBAhe.
I368BaTe CnyaH No nckaHe Ha ypeHa. YBepete ce, ye eNektpoHnCTpyMeHTbTe en3KIOueH, npEi Da r CBpKeTe KbM TOKO3axpaHbAHeTo N/INn aKymyIaTOPHaT aBATEPn, da r Bo B3eMeTe B pue Nn Da r npEnacrte.AKO DbpXITE npbCTa CN BbpxY npEBKIOUcBAteJI, KOraTO HocITe eNEkTPoHnCTpyMeHTa, INN CBp3BaTe eNEkTPoHnCTpyMeHTa KbM 3axpaHbAHeTo, KOraTO ToE BKIOueH, TOBa MoKe Da DOBeDe Do 3NOnOJyKn.
Ipei Da BkIOUHTe eJKeTPOHcTpymEnTa, N3BaTepeRyInpaunTe HcTpyMeHTn IINraeHNTe KIOUOBe. IHCTpyMeHT nn IaeueH KIOU, KOITo CeHAMIPA BbB BbPTa-Usa ce Yact Ha eJKeTPOHcTpymEHTa, MOKe Da npuHH HapaHraBaHe.
I36raBte HeHOpMaJHn No3uHN Ha TAnoTo. IorpXKeTe ce 3a cnHypen CTOeK Nno BcAko BpeMe 3ana3BaNte paBHOBeCne. Toba ue BN NOMOrHe Da KOHTPOJnPape eJeK- TPOINHCTpymEnTa B HeOuaKaBaN CNTyaUIn.
Hocete noxodno 6nkeNo. He hocete Cbo6oHN dpexn nn 6nkyta. Na3eTe Kocata n dpexnte cn daJeYOT DnKHeuNTe ce Yactn. Cbo6oHNte dpexn, 6nkyta nn Dblra KOca Moat Da 6bDat 3axBaHaTn OT DnKHeuNTe ce Yactn.
Ako e Bb3MOxHO Da ce MOHTnpa o6opydBaHe 3a N3BnUaHe n Cb6nPaHe Ha npax, CBpKTe Ro n Ro N3NoJ3BaIe npabnHo. N3NoJ3BaHcTeHa CNCTema 3a N3BnUaHe Ha npax MoKe Da HamaJIu ONaCHOCTNTEOT npax.
He cn c63daBaTe foanuBO yBCTBO 3a cnryphocn He npene6perBaTe npabnata 3a 6e3onacHocT ha eKeKtpOnHcTpymenHTte, DOpn aKO CTe 3ano3HaTu C TEx CNeD MHOrOKpaTHa yNoTpe6a. HeBNMaTeJIHNTe DeiCTBnMORat Da DOBeDat O cepno3Hn HapahraHn 3a YactN OT CeKyHdata.
3.1.4 N3noJ3BaHe npa6oTa c eJeKtpOnHcTpymeHT
He npetoBapBaIte eIeKtpOnHCTpyMeHTa. H3noJ3BaIte noXoJaun 3a pa6OtaTa cn eIeKtpOnHCTpyMeHT. C noXoJaun eIeKtpOnHCTpyMeHT ige pa6OTnte no-Dope n no-Be3OpacHO B onpeJeHnraDnapa3OH Ha MOUHOCT.
He n3noJ3BaIte eJNEKtpOHnHCTpyMeHT c NOBpeDen IpeBKnIOuBaTeJ. EJIeKtpOH-CTpyMeHT, KOITo He MoKe Da 6bJe BKNIOUeH INN IN3KnIOUeH, e ONaCeH N TpR6Ba Da 6bJe peMOHTnpaH.
I3KIOUcTe eJIeKTPoHCTpymeHTa OT eJIeKTPuYeCKaTa MpeXa n/UNn H3BaJeTe OTdEJIaTa Ce aKymlaTopHa 6aTePn, IpeN Da n3BbPWBate KaKBnTO n Da 6nlo HAcTPOKn Ha IHCTpymeHTa, Da CMeHrTe Yactn Ha IHCTpymeHTa Nn Da npnbpaTe eJIeKTPoHCTpymeHTa. Ta3n IpeJna3Ha MApka IpeIoTbPaTBA CnyauHOTO CTaptnpaHe Ha eJIeKTPoHCTpymeHTa.
CbXpaHbAte Hen3NoJ3BaHn eJekTpoHHCTpymeHT daJeY OT DocTbNa Ha Deua. He no3BOJBAite Ha Nnca, KOnto He ca 3aNo3HaTH c eJekTPOHNCTpymeHTa NnHe ca npOyeN Te3n HnCTpyKcUn, Da ro N3- nO3BaT. EJekTPOHNCTpymeHTte ca onacHn, KOrato Ce n3NoJ3BAT OT HeONITn Jnca.
I IoparaTe rpnXn 3a eJekTpOuHcTpymeHTnte n uHcTpymeHTnte CbC cMeHraEMN npncTaBKn. IpOBepTe daJIu DBNXeUnte ce qactn pa6oTAT npaBUNHO n He ca 3aKJIeSeHN, daJIu qactnte He ca cyupeHn IIN IOBpeDeHn NO Haun, KOITo HApUshaBa fynkuaTa Ha eJekTPOuHcTpymeHTa. IpeDn da n3noJ3BaTe eJekTPOuHcTpymeHTa, pemOHtnpaIte NOBpeDeHnTe qacTN. Mhoro 3IonoJyKn Ce npuHHaBt OT loIWO nOndbPkaHn eJekTpuueckn INHCTpymeHTn.
I PoiDJIbPkaJtepeXeUHTeHcTpymeHTn OCTpN uHCTN.ΓpIXJIbNO IOnDiBpaKaHITe peXeU NHcTpymeHTu C OCTpN peXeU p6- 6OBe 6IokupaT no-paIKo n ce HappaBnaBaT NO-Jeecho.
I3noJ3BaIte eJektpoHcTpymeHTnte, HNCTpymeHTnte Cbc CMeHReMn npNCtABK N T.H. B cbOTBeTCTBne C Te3N NHCTpyKuN. B3emTe ppeBnU yCNoBnTa Ha Tpyd n DeHocTTa, KOrTO ige Ce n3BbPwBa. I3noJ3BaHeTo Ha eJektpoHcTpymeHTn 3a npNJIOXeHn, pa3NIuHn OT Te3N, 3a KOUTO
ca npedHa3HaueHn, MoKe Da DOBeDe Do ONaCHN CNTyaCm.
IopoIbpxKaIte dpBxKnTe n NOBbpxHOCTnTe 3a 3axBaUaHe cyXn, uNCTn n 6e3 MaCna mMa3HnH. Xnb3raBInTe dpBxKn n NOBbpxHOCTn 3a 3axBaUaHe He N03BOJRAbT 6eO-nacha pa6oTa n KOHTpOHa eNeKTPOHNCTpyMeHTa B HEnpeDbUdEH CNTyaUuN.
3.1.5ИЗпОЛЗВаHeи pa6Ota c ИнсТурм entсakymylaTopHa 6aTePnIa
3apejdaTe akymyIaTOPHnTe 6aTePnncamO cbc 3apAHHu yCTpoNCTBa, npenopb-uaHN OT npOn3BOIDHTeJI. 3apAHO yCTpoiCTBO, npedHa3NaHeHO 3a onpeJeH TnApKymyIaTOPHn 6aTePnN, MoKe Da npedn3BnKa OnaCHOcOT nOKap, aKO ce n3No3Ba Cdpyr BnD akymyIaTOPHn 6aTePnN.
I3noJ3BaIe cAmo onpeJeHHeTe 3a ceI-Ta akymyIaTOPn 6aTePn B eJeKtpOnHcTpymENTte. I3noJ3BaHeTo Ha npyrn akymyIaTOPn 6aTePn MoKe Da DoBeDe Do HapahraBaHe n OnaCHOCT OT NoXap.
CbxpahraBaTe Hen3noJ3BaHaTa akymyaTOpHa 6aTepeJaIeU OT KJamepN,MOHeTN, KJIouOBe, NPOHn, BHTOBe NIn dpyrMaIKN MeTaJHn PpeDMeTu, KOtO MoratDa npuHHrKbCO cBeJInHeHne. Kbco cbEJInHeHne Mekdy KOHTaKTITE Ha 6aTepeJrTa MoKe Da DOBeDe Do n3rapAHHy NIn noXap.
Ipn HnepaBnHa ynoTpe6a Ha 6aTepyra ot Hea MoKe Da n3Teue TeuHocT. N36BaYte KOHTaKc T Hea. Ipn CnyuaeH KOtAeTc TeuHocTa n3PnakHeTe c B0da.Ako TeuHocTa nonaHne B OuyTe BN,NotbpcTe DonbHNHeHa MednucnHcKa NOMou. N3TuHaHTo Ha TeUHOCT OT aKymyNaTopa MoKe Da npuHHn Dpa3HeHe Ha KoxaTa NNn N3- rapHna.
He n3noJ3BaIte NOBpeDeHa IJI npOMeHena akymylaTopha 6aTePn. NOBpeEnu nn IpomHeHb 6aTePn Moar Da He cyHKcIOHnpaT npAunHO n da npuHnT noXap, ekCnlo3na IINI HapaHraBaHe.
He n3laarTe 6aTepeRnTa Ha OrBuH nn npekomepn TemnepaTpy. Noxap nn TeMnepaTpyn Hnd 130^ Morat da npedn3-BVKAT EKcPiNo3nA.
Cna3BaIe BCnKn HNCTpyKuIN 3a 3apeKdaHe n HNKora He 3apeKdaIte 6aTepeYra nn HNCTpyMeHtA N3BbH TempepaTPhnAnana30H, nocOyen B pkbKOBoDcTBOTO 3apa6ota. HenpaBnHTo 3apeKdaHe nn 3apeKdaHeTO N3BbH OdopeHH TeMnpaTypeH
dna3OH MoKe Da IOBeTe Do pa3pyuBaHe Ha akymyIaTOPHaTa 6aTePnI Na yBEnu npCKa OT nOxap.
3.1.6 CepBn3
PemOHbT Ha eJekTpOHcTpymeHTa MoKe Da ce N3BbPwBa cAmO OT KBaHnΦnUpaH nepcoHaN cAmO C opnHaHn pe3epBHN qactn. Toba ige rapaHTnpa, ye eJekTpOHcTpymeHTb ige octaHe 6e3onaceH.
Hnkora He obcnykBaIte NOBpeHn akyMylatopn6bATEPN. TaIaTa noIdpbJkaHa 6bATEPNIte Tp6Ba da ce n3BbPbWA camo OT pOn3BOIDNTeN IIN OT OToPi3nPaHn cepBn3HN CEHTPOBE.
3.2Инструкци 3a6e3oIacHocT3a TpnoHn 3a NOdpr3BaHe
Ipn DnHexeCt PNOH na3eTe BCnKu Chactn Ha TAnoto daJeU OT peKeaTa Bepra.YBepTe ce npedn cTapTnpaHe Ha TpNoHa,Ye peKeaTa Bepra He DOKocBa Hnio.Ppi pa6OTc TPOHO 3a NOpr3BaHe MOMENT Ha HeBHMAmHe MOKe Da DOBeDe Do TOBa,Ye ChaTn OT ObJekIoTO NIn Ha TAnoto Da 6bDat 3axBaHaTu OT peKeaTa Bepra.
ДрькTe TpnoHa 3a NOоряЗВаHe BnHarN CЯСнATA pKa 3a 3aДнATA pkoXBaTka NcЯВATA pKa 3a npedHata.ДьрkaHeto Ha TpnoHa 3a NOpr3BaHe B O6paTHO pa6OTHO NOLOXeHne NOBuaBA pNCKa OT HapAnBaHnI He Tp6Ba HNKOra Da ce npuNara.
Дрьктгпona 3а NOДРЯЗВаHe само 3a
ИЗОЛнpaHnte NOБьрхНOCТи 3a 3axBaца-
He,Ты КATO рж龟ata Верига може DA
ВлeЗВ KOHTaKT CbC CkPNT eJIeKTPoNpo-
BOДи.ДOKOCbaHTo Ha рж龟ata Верига Do
ПROBOДнIK ПОД HANPEЖЕнe можe Дд OBe-
De Do HANPEЖeHne B MeTaNITE YacTи Ha
OBOPyДBaHeto Ида пчHHn TOKOB уdap.
Hocete cpeCTBa 3a 3auNTa Ha ouHTe. IpenopbUbat ce n dpyrN 3auNTn npnc-nocobEnna 3a Cnyxa, rnaBata, pbcTe, KpaKaTa N cTbnanata. POnxOJaTO 3a- uTHo O6JIeKNo HamaJra BA ONaCHOCTTA OT HapaHBAHe BCJeDCTBne Ha JeTAAu TanaI N HeBOJHOTo DOKOCBaHe Ha peXeUaTa Bepi- ra.
He pa6oTeTe c TpnoHa 3a Nopra3BaHe ot CtbI6a, DbPBO NOKPN Hn HeCTa6nHa NOBbpxHOCT. Pn pa6Ota nO To3n Haun CbueCTByBa cepNo3eH pNCK OT HapaHraBaHe.
BnHarnCe yBepaBaiTe,Ye cTe cTbnnJn 3dpaBO,Nn3noJ3BaIte TpNoHa 3a NOD-
p3BaHe cAmo KOraTo COnTe Ha TBbPda, 6e3ONaCha n paBHa 3em. XIb3raUa ce ocHOBa nn HeCTa6nHn NOBbPxHOCTn MORaT Da npedn3BnKAT 3ary6a Ha paBHOBeCne nn 3ary6a Ha KOHTpoN Bbpxu TpnoHa 3a noDpr3BaHe.
Ipn p3aHe Ha KIOH NOH HAnpeXeHne, OyakBaIte ToJ Da OTCKOu. Korato Ce OCBO6oHN HApEKeHnTo B DbPBeCHnte BNaKHa, KIOHbT NOD HApEKeHne MOKe Da ydApN NoTppeBntEn I/IIIN TpNObT 3a NOpra3BaHe da n3Je3e OT KOHTpOJ.
БьдeteиЗКЛIOUHTeJIHNOпpeДЯЗЛИВи пи рязан Ha xpaCTn И млади ДьрВет.Тьн- кягт MaTePиAN Mоже д a Бdze 3axBaHATВ ТрноHA зпОдрЯЗВаHe и дa Bn удApN Илд a Bn nIЗВади OT paBHOвеси.
Hocete TpnoHa 3a NOpJ3BaHe 3a npedHaTApbXKa Bn3KlOueHO CbCToHne, HacoueB O6paTHa Nocoka Ha TJIto Bn. Pn TpaHcnpot Nm CbXpaHene Ha TpNoHa 3a NOpJ3BaHe BnHarN NOCTABYte npedna3HnKanak.BHImateJIHata pa6ota C TpnoHa 3a NOpJ3BaHe HamaJIBA BepoHTHOCTTa OT HeBOJHO DOKOCBaHe C DVBxKeUaTa ce pexeSha Bepira.
CneBaIe HNCTpyKcHITe 3a CMa3BaHe, O6TgAHe Ha BepnraTa N CmHa Ha HApabIbIbAaTa aHnHa n pexeHa Ta Bepnra. HenpaBnHO zakpeneHa n Cma3Ha pexeHa Bepnra MoKe Da ce ckbca nn da NobuPin PnCKa OTOTkAT.
PexeTe cMo DbPBO. N3non3BaIte TpuOHa 3a noDpy3BaHe cMo 3a pa6OTn, 3a KOnTO e npedna3haueH. PpIMep: He n3- non3BaIte TpNOHa 3a noDpy3BaHe 3a pR3aHe Ha MetaJI, NlaCTMaCA, 3ndapnN cTpONTEJHm MaTePNaJI, KOtO He ca OT dBpBO. N3non3BaHTo Ha TpNOHa 3a noDpy3BaHe 3a HeueleScbO6pa3HN pa6OTn MOKe Da DOBeDe Do ONaCHn CNTyaUIN.
To3n TpnoH 3a Nopr3BaHe He e NoadxoDJa 3a P3aHe Ha DbPBeTa. H3noI3BaHeTo Ha TpNoHa 3a Nopr3BaHe 3a pa60Ta, 3a KOr-TO He e npedHa3NaueH, MoKe Da DoBeDe Do cepno3Hn HapaHbAHn Ha Notpe6nteJI nn dpyuN Iua.
3.3 O6uHn HcTpyKuHn 3a 6e3oNaChocT 3a BepNXHn TpNOHn
Cna3BaIte BCnKu HNCTpyKcun, KORaTO no- uHCTBaTe TpNOHa 3a NOpRzBaHe OT HaTpynaHHTe MaTePnAIn, CbXpaHraBaTe ro IINn I3BbPbBaTe NOdpbJka. YBepTe ce, Ye npeb
KIIIOUbATEJIeT e N3KJIIOUeH aKymyJatOpHaTa 6aTepeRn e N3BaJaHa. HeoayakBaHOTo 3aJeNCTBaHe Ha TpnoHa 3a IopPra3BaHe npI OTCpaHBAHe Ha HATpyNaH MaTePnaH INI NO BpeMe Ha IODIpBxKa MoKe Da DoBeE Do CepNo3Hn HapaHRABaHn.
3.4 PnHHn npeDoTbpaTaBaHe Ha oTKaT
OTkaT MoKe Da Bb3HnKHe, aKO BbpxbT Ha BoDe- 5aTa 5uHa DOKoChe PpeMET IIN aKO DbPBOTo ce OrbHe n peXeAta Bepira 3aceDHe B npope- 3a.
ДOKOCBaHe C Bbpxa Ha SHHaTAMOKe B HЯKOn CnyauI Da DOBeDe Do HeoayKaBaHa N HAcOyeHa Ha3aPeaku, npK KOrTO BoDeuata ShHa Ce OTKNoHЯBa Harope I NO Nocoka Ha OScnyXBaToTo JInCe.
3acyaheTo Ha pexeaaTa Bepnra B ropnna Pb6 HbOndeaaT a WHa MoKe Da n3XbPn WnHaTa C roJMa ckopoc T NO NOCKa Ha NotpeBntela.
Bcra Ka OT Te3n peakun MoKe Da DoBeDe Do 3a- rya Ha KOHTpO Bbpxy TpNOHa N Bb3MOxHn TeK Kn HapaHbAHn. He pa3uHTaTe cAmo Ha MOHTpaHnTe Ha TpNOHa 3a NOpR3BaHe npCnOC6JIeHNr 3a 6e3OnacHOCT. KaTO nOTpe6uTEI Ha TpNO 3a NpOpaR3BaHe Tp6Ba Da B3eMeTe pa3JInuHm MepKn, 3a Da MoKeTe Da pa6OTte 6e3aBapuHNo n 6e3 HapaHbAHn.
OTkaTbTe cneDCTBnE OT He npabunHOTo H3noJ3BaHe Ha MaunHaTa. ToJ MoKe Da 6bJe npeDoTbpaTeH Upe3 NODXOJaMepKn 3a 6e3onacHOCT:
Дрьжт TrpoHa c DBe pБuce, пи Което NaIeцВТ И npbCTNTe 06XBaUaT HAnbIHO pBkoXBaTKte.3aemTe TakaBA nO3nCnC TANOTO IN pBceTe,пр КОТМоКeTe Da npOTNBOeHCTBaTe Ha OTkata.AKO ce B3eMAT NOxODaIIMepK,Notpe6HTeJIr MokeJa OBnaJee CInITE Ha OTkATA.HNKora He Nyskaite TrpoHa 3a NoDpRzBaHe.
I36raBaiTe HeHOpMaJHo NOJoxHe Ha TaJIOTo H He peXeTe Ha BnCOUHaTa Ha pameHete. Taka ce npedotbpaTBA HeBOJIeKoHTaKT C Bbpxa Ha uHa HuaHa I e Bb3MOxEHNo-Do6bp KOHTpOIN Bbpxy TpnoHa 3a NODp3BaHe B HeouakBaHn CNTyaCNI.
H3noJ3BaIte BnHar npednncAHTe OT npOn3BODHTeJIpe3epBHN uHHupeKe- uBepn. HnpabunHn pe3epBHN uHHupeKeuBepn MOraT da DOBeDaT Do CKbcBaHe Ha Bepurata N/nn OTKaT.
PnpdbpkaIteceKbmyka3aHnraHa npOn3BOIDHTeJ3a3aTOyBaHeTo INTexHnue-
CKOTO 6CnyXBaHe Ha Bepnata. Mhoro HnCKN ORpaHnHTeJI Na DbIbOCHHaT a NOBn- IaBaT CKIOHOCTTA KbM OTKaT.
3.5 Bn6paunHnHaTobapBaHe
OnachoctOTBn6paun
DeicmeumnHa cmoHocm Ha emucuMe Ha bupauu no bpeMe Ha u3noI3BaHeMo Ha ycmpoucmeo moKe da ce omKnHO om nocoyema om npou3bOumela cmouHocm. CneTe cJeHNte paKTopn Ha Bb3deiCTBne ppeN nn No BpeMe Ha yNoTpe6a:
I3noJ3Ba Jn Ce ypeBbT no npedHa3Ha-ueHne?
Pexe Jn ce pecn. o6pa6oTba Jn ce MaTepeNaIbT no npaBnHna Haun?
Hamnpa nI ce ypeIbTe n3npabHO cbcToHnE 3a ynoTpe6a?
PexeunrHnctpymeHT npabnHNO n e 3aToueH peCn. NOCTaBeH Jn e npabnHnIyT pexeU nHCTpymeHT?
MOnTnpaHn Jn ca dpbXknte n eBeHT. onLIOHaJIHnTe Bn6paCNOHHn dpXkN n Te Cbbp3aHn Jn ca cta6nHc ypeda?
EkCnIooatnpaIte ypeDa cMo C Heo6xOuIMTe 3a CbOTBeTHata pa6ota o6opOt. N3-6yBaIte MaKcImaJIHnTe O6OpOTn, 3a DaHaMaJIte Wyma N Bn6paunTe.
IopaHn He npabnHaTa ynoTpe6a n noDdpbXka Moat Da ce NobuWAT Wyma n Bn-6paunTe Ha ypeDa. ToBa BoDu Do BpeDu 3a 3dpaBeTo. B To3n Cnyauh n3KnUoye Te ypeDa He3a6abHo n ro npdaaiTe 3a peMOHT Ha oTo-pn3npaH cepBn3.
CTeNTaHaHATOBapBaHeOTBn6paun3aBnCnOTpa6oTata,KoTTo Tp86BaDace n3-BbpUnnOyNOTpe6ataHa ypeJa.PpeUeHeteN HAnPaBeTe CbOTBeTHnte Na3nNo BpeMe Ha pa6ota.10To3nHaunHceHaMaJra 3HaunTeHNO Bn6paUNHOHATObAPBaHe No BpeMe Ha cIanoTO pa6tHO BpeMe.
IpoobjnxntHa ynotpe6a Ha ypeHa n3- Iana Notpe6nteHa Bn6paunu MoKe da npuHn np6lneu B KpbBOo6paueHneTo ("6eN npbCTn"). 3a Da HamaNTe To3n pncK, HocTe pKaBnUu N NOdIbPkaTe PbCeTe Cn TOnJIn. Ako 6bDe pa3No3HaT cMnTOM Ha "6eNte npbCTn", He3a6abHo NtbpceTe JekapcKa nomou. KbMa Te3n cMnTOM npHaJnLeXkAt: 3ary6ha Ha YyBCTBnTEHOCt, N3TpbnBaHe, cbp6ek, bOJka, 3ary6ha Ha cJna, npo
MaHa B CBeTa HnCbCTOaHHeTo Ha KOxata. O6nKHOBeHo Te3n CmNTOM 3acraT npb-CTnte, pbTe HnN pynca. Pn HnCKn Tempepatypn pncbT HapactBa.
I IpaBete No-ДьЛг NOчИВКи NO BpeMe Ha pa-60THnA DeH, 3a Da ce Bb3CTaHOBuTe OT Wyma n Bn6paunite. Панирaite pa6oTata cn Taka, Ye n3noJ3BaHTo Ho obOpyDbaHe, Koeto reHepupa CnHn Bn6paun, Da ce pa3npedJeB INpoDbJIKeHne Ha HrkOJIko DnH.
Ako yceTnte duCKOMΦOpT uHn npomHa B UBeTa Ha KOkaTa Ha pBuce Tn, DOKaTO n3- noJ3BaTe ypeDa, cnpTe pa6ota He3a6abHo. PpaBeTe DoCTaTBuHn Na3n NO Bpeme Ha pa6ota. Be3 DoCTaTBuHNo na3n NO Bpeme Ha pa6ota MoKe Da BB3HNKHe CnHdPOM Ha BNb6paunr pbKa-pAMo.
HamaTe pNcKa OT n3IarHe Ha Bn6paun. POndIbPkaIe ypeDa B cBoTBeTCTBne C INCTpyKUInTe B pBkoBOdCTBOTO 3a EKCnIooatau.
Ako ypeIbT ce n3nON3Ba YecTo, CbByKeTe ce c dNCTpN6yTopa cn, 3a da 3aKynTe aHTN Bn6paCIOHn npHaJNeXHOCTn (HaNP. Dpbxkn).
I36yBaIte pa6oTa cypea npi TemnepaTypn 10°C. B pa6oTeH pAnonpeJeTe KaK Bn6paCIOHHO HATOBapBaHe MOKe da 6bnde orpaHnueHo.
3.6 LjmyMOBO 3aMbpcBaHe
OnpedeJeHO 3ambpcBaHe ype3 To3n ypeH He MoKe Da Ce n36erHe. N3BbPwBaIte WymHnte pa6OTn ppe3 DOnyCTUmTe n npedHa3Ha-ueHnte 3a TOBa YacObe Ha DeH. Ako e Heo6xOdIMO cna3BaIte YacOBete 3a NouBka I orpaHuaBaIte npoJbNknteHnocTt ha pa6Otata Do Hau-Heo6XoDmOTO. 3a BaWata NnUHa 3aunTa I 3a npedNa3BaHe Ha HamnpaUnite ce Ha6n3o Xopa Tp86Ba Da HocInTe 3aunTa Ha cnYxa.
3.7 Yka3aHn 3a 6e30nacHOCT BbB Bpb3Ka c akymyIaTopHaTa 6aTePnN 3apAHDOTO yCTPOIcTBO
Ipei3apekdahe n3BaTe aKymylaTopHnTe 6aTePmN OYcTpoiCTBOTO.
He nocTabraIte B ypeDa pa3nHn BINOBe 6aTePnn Hn HOBn N3noJ3BaHn 6aTePnn 3aeJHO.
IocTaBete akymylaTopHnTe 6aTepeHnTe BycTpoiCTBOTO c npabUNHaT a NOJApHOCT.
Ako 1e cBxpaHbAte yCTpoNcTBOTo Dblro BpeMe, n3BaJeTe 6aTePnnte OT Hero.
He cBbP3BaIte HaKbCO KneMnte Ha yCTpoi-CTBOTO HnHa akymylaTophata 6aTeprna.
PbKOBOcTBo 3a pa6oTa
Cb6IIOdaBaTe yKa3aHnraTa 3a 6e3OnacHOCT 3a aKymyIaTOPHaTc 6aTePnraTn 3apJHOTo YcTPOIcTB, KONTO Ca B OTdENH PbKOBOcTBa 3a yNoTpe6a.
Bux:
PbKOBOcTO 3a pa6oTa 443130: Akymyntopn6aTepn
PbKOBOcTBo 3a pa6oTa 443131:3apAHyCTpOiCTBa
3.8Инструкци 3a6e3oNaChocTпр npa6ota
CnasaBaiTe CneuΦnHHe 3a cTpaHaTa pa3- nope6n 3a 6e3oNaChocT, HAp. OT npOpeCnoHaHH CnpJxKeHna, fOHOBe 3a coUanHa CNrpyHOCt, OprAn 3a 3dpaBOcNOBn N 6e3oNaChyUCNoBn Ha Tpyd.
Pa6oTeTe cAmO npn DocTaTbUHa DHeBHa CBETInHa INN N3KcCTBeHO OCBeTJeHHe.
IopdIbpxaIte pa6oTHata 30Ha CBO6OHa OT npEpmTe (HAp. OTPra3AHn C Tpnoh Yactn) - pNCKOTcNbBaHe.
IopTe6bnteT e OTROBOpEn 3a 3NoOnyKn C npTu Xopa nn TxHaTa co6CTBeHoCT.
Korato pa60tTe 3a nbpBn nbT c TpnoH 3a noDpy3BaHe:
IomoneTe npoababa uin dpyr cneunaJIncT da BN pa3aChn pa6oTaTc TpnoHa 3a IOpr3BaHe uIN IocTeTe Kypc 3a o6yuHHe.
Ipei Da n3noJ3BaTe TpnoHa 3a NbpBn IbT, NOHe ce ynpaxHЯBaTe B p3aHe Ha Tpynn Bbpxy TpnoH ININ CToiKa.
3.8.1 OnepaTop
Mnaedjno16 roHn nn nua, KOTo He ca 3aNo3HaTn C pBKOBoDCTBOTO 3a yNtpe6a, He Tp8Ba Da n3NoJ3BaT ypeJa.
KoITo pa60Tu c TpnoHa 3a noDpr3BaHe, Tp6Ba Da 6bDe OTNoHnA, 3dpaB n B do-6po fN3uYeCKO CbCTOraHne. IInuTa, KOnTo npaDi 3dpabocNOBn pnuHn He 6NuBa da ce HAnprrat N HaTOBapBaT, Tpr6Ba Da ce ocBeDomrT pni Jekapr cN daJIi 3a Tx e Bb3-MoXHO da pa6OTrC TpnoH 3a NoDpr3BaHe.
3.8.2 PpOdbJnxKeTEnHocT Ha pa6oTa
Cna3BaIe cneuΦnHnte 3a cTpaHaTa pa3nopeBn 3a yacOBete 3a pa6oTa c TpNOH 3a nopJpa3BaHe. YacOBete 3a pa6oTa c TpNOH 3a noD
p3BaHe Moat da 6bDaT orpaHnUaBn C Ha- uHOHaHNu MeCTNu pa3npope6n.
3.8.3 Pa6Oa c TpnoHa 3a IOpJpa3BaHe
I PNEUYPEXKDEHNE! OnachocT OT TeKKN HapaHbAHnB pe3yIaT Ha MaHnPyIpa-He Ha 3aunTHn I npedna3HN yCTpoiCTBa. IprnpabOta C TpnoHa 3a Nopra3BaHe MOra T Da Bb3HNKHAT cepNo3Hn HapaHbAHn B pe3yIaT HaMaHnPyIpaHe Ha 3aUnTHnTe I npedna3HN ycTPOiCTBa.
He n3KIOUBAIte 3aUNTHIe IN ppeJna3Hn yCTpoiCTBa!
Pa6oTeTe C TpnoHa 3a Nopra3BaHe cAmo KOrato BCnUKN PpeJa3Hn H 3auHTn YcTpoiCTBa FyHKUHOHPaT PpaBUNHO.
PNEpyPExDEHHe! PnCK OT HapaHbAHe B pe3yIaT Ha HeBOJHo CTapTnpaH TpnoH 3a NOdpr3BaHe. HeBONHO CTapTnpaH TpnoH 3a NOdpra3BaHe MOKe Da DOBeDe Do TeKKn HapaHbAHn. 3aTOBa N3BaJeTe aKymyIaTopHaTa 6aTepeRn B CJIeHNITE cnyan:
Pa60tn no npOBepkata, peryJnnpaHTo n no-uctBaHTo
Pa60Ta c npicTabkaTa 3a p83aHe
OCTaBeTe TpnoHa 3a noDpa3BaHe
TpaHcnpTupahe
CbxpaHHeHne
Pa60n no TexHnuecka nOpnbjka n peMOHT
OnachOCT
BnHaHn dpbXte Ha pa3noJoxKeHne anTeYka 3a eBeHTyaJIH N 3JonoJyKn.
JIuHnTe IpeIpa3Ha eKnInpOBka ce cbCTOn OT:
3aunTaHa yuHTe (HaNP.Tann 3a yuN), Oco6eHO npi DHeBHO pa6oTHO BpeMe Hnd 2,5 Yaca
3aunTHN OUYJia
PpeIpa3Hn nAHTaIOnH C NOIIOKka 3a3aUNTa OT cpr3BaHe
3dpabn pa6oTHn pbkauu
IpeDn3Hn 6yBKn C noDmTeKa c rpaNΦep n CTomAHeHo 6om6e
I3KlHcyTe DBrTaTeJ npn CmHa Ha MeToNOJIOKeHHeTO.
Korato TpnoHbT 3a noDpy3BaHe He ce n3- nOJ3Ba, n3BaXdAaTe OT Hero akymyIaTopHa-ta baTeprna.
He n3no3BaIte TpnoHa 3a noDpa3BaHe 3a NOBUNraHe nn PpeMeCTBaHe Ha DbPBO.
Ibpbeta, KOnTo ca no-De6eHn OT dJnxHa-ta Ha Hoxa, MoT da ce pexaT caMo OT cneuann3npan nepcoHaI.
I O6nKaBaiTe TpnoHa 3a NopPra3BaHe Do Cpe3a cAmo npia paOteuapeKeua Bepura, HNKORA He BKIOUBAiTe TpnoHa 3a NOpPra3BaHe C NoCTaBeHa Bbpxy Cpe3a peKeua Bepira.
OsbpHete BnMaHne Ha ToBa, B 3emrTa da He npOnKbMa cNo 3a peKeuata Bepura.
He n3BbPwBaIe p3aHe npn IbKd, cHra nn6pyr.
4 BbBExKaHE B EKcPiOATAUaIa
ONACHOCT! Onachoc3a XHBOTaN onachocOT TeKn HapaHbHa! He3HaHneTo Ha yka3aHnraTa 3a 6e3oNacOHcT n Ha INcTpKcHnTe 3a yNoTpe6a MoKe dA DoBeDe Do TeKKn TeJeCHn NOBPeDn I DOpN Do CmBpT.
CnataBaiTe BCnKu yka3aHna 3a 6e3oNaChOCT N INCTpykUIN 3a yNtpe6a, npeIcTaBeHN B TOBa pkoBOdCTBO 3a pa6To, KaTOn I Te3N, KOnTO ca cHTnpAHn Ppei yNtpe6a Ha TpuOHa 3a NoPra3BaHe!
I PENEYNPEXKDEHNE! OnachocT OT TeKn HapaHbAHn. Ako n TpnoHa 3a NOpJr3Ba-He mMa NOBpeDeHn KOMNoHEHTN, TOBa MoKe Da DOBeDe Do cepNo3Hn HapaHbAHn.
IpeiB C8ka ynoTpe6a n3BbPWBaTe Bn3y- aHa npOBepKa, 3a Da npOBepTe daN TpuOHT 3a Nopra3BaHe e B do6po cBcToHne i daJIH HMa NOpeEHn INn N3HOceHN KOMNoHENTN. 3aunTHN n PpeDna3HN ycTPOJCTBa Tp6Ba Da 6bDat HeNOkTBnatN.
4.1 HaniBaHe Ha MacNo 3a peXeUaTa Bepura (02, 03)
Pexeata Bepira n BOeata uHa ce cna6dIaBAT C Macno 3a pexeata Bepira ype3 pbuHa Cma3BaAa cnTeMa. Macnoto 3a pexeata Bepira npedna3Ba OT KOpO3n I npexdeBpeMeHNO n3HOcBaHe.
Yka3aHue: Ipu docmaekama e ypeda HMa Macno 3a cepu2u!
BHIMAHHE! Onachoct OT nobpeHn Ha Ma- mHa nata. N3noJ3BaHeTo Ha ypeHa 6e3 MacNo 3a peKeIaTabePurBaODo NOBpeKdAHe Ha pe- keIaTabePurHa HAnpaBnaBaIaTa ShHa.
Hikora He ekcnnoatupaTe MoTopa 6e3 macNo 3a pekeuata Bepura.
Ipei Da 3aOnuHete pa6oTa, HaneTe MacNoTo 3a Cma3BaHe Ha BepnB Pe3epBoapa 3a MacNo I npOBepraTe HNBOTo Ha MacNoTo No Bpeme Ha pa6oTa.
IpoBepaBaiTe NoHe IpeDN BCaKO Haayano Ha pa6oTa, daN Cma3BaHTo Ha BepnraTa pa- 60TN.
BHIMAHHE! OnachocT OT NOBpeHn Ha Ma- mHaTa. N3noJ3BaHeTo Ha CTapo MacNo 3a CMa3BaHe Ha Beprata BoN Do IpexKeBpeMeHHO N3HOCBaHe Ha BOeUaTa UHa H Beprata Ha TpNOHa Iopadn N3HOCBaHe Ha MeTana. OcBeH TOBa rapaunTa Ha npOu3BoNDteJIa OTnada.
Hikora He n3no3BaTe CTapo MacNo, a camo 6nopa3rpaDmO MacNo 3a BepnI 3a TpNI OHN.
BHIMAHHE! OnacnoCT OT ueTu 3a OkonHa-Ta cpea. IV3noJ3BaHeTo Ha MInHepaJIHo MaCNo 3a CMa3BaHe Ha BepuN BoDn Do cepNo3Hn EKOJIIOrHuN HcETn.
Hikora He n3no3BaTe MInepaIHO MacNo, a camo 6nopa3rpaIIMO MacNo 3a BepuRn 3a TpNOH.
Ipei Da 3aOnuHete pa6Ota n npn BC8Ka CmHa Ha akymyIaTopa npOBepTe HNBOTo Ha MacNOTO ndoJeTMacNoTo 3a peXeUata Bepura,ako e Heo6xOIMO:
- Поберете НИВОТо Ha macIoTO B KOHTpONHЯ позорц (02/1) 3a npereД Ha peЗервараза 3a macNo 3a Вepurata. BInHarn Tpr6Ba Да се ВИЖДа macNo.
Yka3aHue: Hbomo Ha Macnomo He mpr6ea da nada noMunumHomo HbO Ha Macnomo (MIN), a MaKcumJIHomo HbO Ha Macnomo MAX) He mpr6ea da ce npebuwa. - Ako akymylaTophata 6aTePnE e BkIoueHa: N3BaJeTe akymylaTophata 6aTePnE, 3a Da npedOTbPaTHe HEOHcTapTnpaHe Ha TpOHa 3a NoDp3BaHe NO BpeMe Ha nbJIHe- He C MacNo.
-
ПocтавеТу Рноа 3а подраЗванхорионТаJIно Вьрху ТБьрда NOВьрхНOCТ Г 3адрьж-Te.
4.Почиреурда окола калачkaТа на pezeрьараза за maclo на Верига(T03/1). -
OTBnIte KaNaYKaTa Ha pe3epBoapa 3a MacNo Ha Bepurata.
6.ДоьнHeTe MacNoTo 3a BepnraTa B rplOBnHaTа 3a nblHeHe (03/2)do OTMeTkata MAX (03/a).He no3BOnBaIte da npenee!
Yka3aHue:3a no-NeChMo HantbIbAHe u3- non3BaIme cyHua.
Yka3aHue:Bpe3epeoapa 3a Macno He mpr6Ba da nonada Mpbcomu. - N36bpuete pa3nTToTO macNo 3a Bepurata.
- 3aBnIte KanauKaTa Ha pe3epBoapa 3a MacNo 3a BepnRaTa.
- NocTaBete akymylaTopHa 6aTepeHra.
4.2 3apekdahe Ha 6aTepeyTa
Cna3BaIte TemnepaTpyHnI DaIana3oH 3a 3apeKDaHe, BnKTe TexHnueCKnTe daHHN.
YKA3AHNE 3a DeTaNHa NHOpMaunCe OTHeCTe KbM OTDeJIHnTE NHCtpyKUnn 3a yNtpe-6a Ha akymyNaTOPHaTa 6aTePnN n 3apAnHOTo ycTPOIcTBO:
PbKOBOIDCTBO 3a pa6oTa 443130: AkymyntopHn 6aTeepn
PbKOBOcTBo 3a pa6oTa 443131:3aprHn yctpoiCTBa
4.3 NocTaBAre HnN3BaXdaHe Ha akymylaTopHaTa 6aTePna (04, 05)
BHHMAHNE! Onacnoct ot yBpeXdahe Ha akymyNatopHaTa 6aTePnA. Ako cnei ynoTpe6a 6aTePnA Ta ce octaBn B ypeDa, TOBa MoKe da IOBeDe Do nobPeDa Ha akymyNatopHaTa 6aTePnA.
HenocpeCTBeno cnei ynoTpe6a, n3BaTe Te 6atepyra ot ypeia n a cbxpahe Ta McTo 3aunteto 3aMp3BaHe.
HEnocpeIcTBeHO npEi 3aOnuBaHe Ha pa6oTa, noCTaBeTe 6aTePnra TBypeHa.
NocTaBnHe Ha akymylaTopHaTa 6aTepe
- HatncheTe akymyntopnata 6atepy (04/1) OT rohpata cTpaHa Bbpxu uHaTa 3a akymy- natopa (04/2) Ha TpnoHa 3a noDpr3BaHe (04/ a),doKaTo ce 3actonOpn.
I3BaXdaHe Ha akymylaTopHaTa 6aTepeia
- Hatachete De6loKupa7n8 6yToH (05/1) Ha akymyIaTopHaTa 6aTePn8 n ro 3aApbXTe HaTtncHaT.
- Идьрайт e akумл aToPHaT a bTepy Harope (05/a).
5 YIINPABJIENHE
ONACHOCT! Onachoc3a xHBota n onachocOT TeKKn HapaHbAHn! He3HaHneTo Ha yka3aHnraTa 3a 6e3onachocT n Ha INcTpKuNTe 3a ynoTpe6a MoKe da DOBeDe Do TeKKn TeleChn NOBpeN i DOpN Do Cmbpt.
Cnα3BaIte BCnKu yKa3aHn 3a 6e3oNaChOCT n INCTpykU 3a yNtpe6a, ppeCTaBeHn B TOBa pBKOBoDcTBO 3a pa6To, KaKTo n Te3n, KOHTO ca cHTnpaHn ppei yNtpe6a Ha TpNoHa 3a NODPra3BaHe!
I PENEYNPEXKDEHNE! OnachocOT hapa-HaBaHe npaHn NOBpeHa MaunHa. Pa6otaTa C DepeKTHa MaunHa MoKe Da DoBeDe DoTeKn HapaHbAHn I YbpeKDaHn Ha MaunHa-Ta.
Pa6oTeTe c MaunHaTa, KoraTo He e DepeKTHa IIN IOBpeDeHa H He JInCBaT YaCTn IINIMa He3aKpeNeH YaCTn.
Cnα3BaIte cneuΦnHInTe 3a cbOTBeTHaTa DbpxKaBa pa3npope6n 3a npoBjXnTeJHocTTa Ha pa6ota.
XbaHete3dpaBOdpbKNTeNeIgnyckaTe,doKATO dBnraTeJr pa60t.
He n3non3BaIte TpnoHa 3a npOpa3BaHepnp:
ymopa
Hepa3noJoxeHne
Bb3dienCTBne Ha aIKOXOJ, MeNkamEHTN HApKOTUN
5.1 Поберka Ha CTeneHTa Ha 3apdHa akymylaTopHaTa 6aTeprna (06)
INHdkaTopbT 3a 3apekdaHe Ha akymyataopHaTa 6aTepe (01/15) ce HAMnpa OTCTpaHn Ha TpnoHa 3a NpOra3BaHe. Toi ce CbctOn OT TprcCBeToDnOda. CBeToNDnTE CBETB 3abucmocT OT HNBOTO Ha 3apekdaHe.
- Hatachete 6yToHa (06/1).
- OTuHeTe CbCToHHeTo Ha 3apJ,OT CBeToDIOAnTe (06/2):
1.1 CnMbOJIbI Ha THTyJbHoi CTpaHnce
CnmboJ 3haueHne

O63aTeIbHO npouHTaTe daHHepeyKOBOCTBO NO 3KcNpyatauIN pepeB BDOOM B 3KcNpyatauIO. 3To Heo6xOIMO dIg 6e3OpachOH n 6e3OTka3HO pa60TbI.

PykoBODTBO no 3Kcnnyatau
OcToPOxHNo o6paaTecb c NHTnHoHHbIMn aKKyMnyTOpamn! B YactHOCTn, co6JIHOdaIte yka3aHnna TpHaHCnOpTnpOBKe, xpaHeHIO uYtIN3aCmN B DaHHOM pyKOBoDCTBe nO kcnpyatauN!
1.2 YcNoBHbIe 06o3HaueHnI n CnHaJIbHbIe cNoBa
ONACHOCTb! Yka3bIbAeT Ha onaChyIO CNTyaCNUO, KOtOpAra, ecNn ee He N36ExKaTb, npNBO-DNT K CMEptN INN cepBe3HbIM TpaBMam.
PENyPExEHNe!Yka3bBaet Ha noTeHuaJIbHO ONaCHyIO CNTyaCNIIO, KOtOpAe, ecJIe He H36exKaTb, MoKET PnBecTn K CMePTN HINCEpbE3HbIM TpaBMam.
OCTOPOXHO! Yka3bIbaeT Ha NoteHuaJIb-HO ONaCHyIO CnTuayuIO, KOTopA, ecN ee He N3-6exKaTb, MoKET PnVBecTN TpaBMam JeRKOJ n CpeDHe TjXeCTN.
BHIMAHHE! Yka3bIbAeT Ha CNTyaIuH, KOTOPaI, ecJIe ee He n36ExKaTb, MOKeT npNBecTn K IMyueCTBeHHOMy yIep6y.
IINPIMEYAHNE CneuaJIbHbIe yka3aHnI dIy o6JIeUeHnI IOHmAHnI n 3KcIIpyatauN.
2 OINCAHNE IPODyKTA
B daHHom pyKOBoODCTBE NO 3KcNpyaTcuN OINcblBaetc aKKymyIaTOPHa pUHa Nnla No DepeBy. UcToPoIcTBo pa3peWaeTcNcNoB3OBAbT ToNbKO BMeCTe C IHTn-NOHbIMn aKKymyIaTOPaMn N 3apRdHbIMN yCTpOInCTBaMn, Yka3aHHbIMN B TexHnYeCKnx XapaKTepnCTnKaX. DOnONHtEnbHbIe CBeDeHnra 6 abKKymyIaTOPax N 3aprAnhblx YcToPOICTBax CM. B OTdJIbHbIX INHCTpyKuJAX:
pykoBOcTBO no 3KcnnyatauN 443130: aKKyMyJrTOpbI
pykoBOCTBO no ekcnnyatau 443131: a-paHbIe yctpoiCTBa
BHNMAHNE! Onachoctb nobpexdeHna y-ctpoiCTBa n akkymyIaTopa. Ecnn ycTpoiCTBO pa6oTaet c HenoDxOJaUIMn akkymyIaTopamN, TO yCtpoiCTBO n akkymyIaTopbI MOYr 6bITb NOBpeXdHebl.
UcTpoIcTBo pa6oTaet TOnbKO c PpeHa3Ha-ueHHbIMN dJa 3TOrO aKKMyJrTopaMn.
2.1 NcnoJb3ObaHne no Ha3HaueHmU
AkkymyIaTOPHa NIIa NO DepeBy paccuTaHa NCKHouHTeNbHO Ha npIMHeHne B DOMaUHem IN npHycaDe6Hom X03YnCTBe. B 3ToJ o6Lnactn Nnny NO DepeBy MoXHo NCNoB3ObAtb DnIeRkNx pa60T no pacnnIOBKe dpeBecnHbl, HapmEp, nla:
pacnIOBKNINNOMATEpnaNOB;
pe3kn XINBOI N3rOPODi;
CnINJNBAHNA Cna6bIX BeTOK.
Bnaorapra 3neKtpnueckomy npnbody aKKymyT TopHyIO nnpy no DepeBy MOxHO nCNoIb3OBaTb DnpaacnnIOBKn dpeBeCNHbI He TOnbKO Ha OTKpbITOM BO3dyXe, HO IN B 3akpbITbIX NOMeUeHnx. IcnoNb3OBAHHe, KOtOpoe npotnBOpeuHT ONncaHHOMY B HAcToIeM DOkUMeHTe, CHTaETcNcNoJIb3OBAHHe No Ha3HaueHIO. OHa He npedHa3HaueHa dJa BaIKn DepeBBeB.
3TO yCTPOINpEHa3HaeHo dIyacTHORO nCNoB3OBaHn. IIO6oe Dpyroe NcNoB3OBaHne, a TAKKe HecAHKIOHOHPOBaHHbIe MOINKauN INII DOONHeHRApaCMATPBAOTc KaK HeHaJNeKaUee IcNOB3OBaHne I pINBOaT K pIN3HaHnIO HeDenCTBNTbHOr rapAHTn, a TAKKe K NoTepe COOTBeTCTBnI OTKa3Y OT IIO6oI OTBeTCTBeHHOCt 3a yUep6 NOB3OBaTeIIO INI TpeTbIM LIuam Co CTOPOHbI POnN3BODInTEJI.
OCTOPOXHO! OnachocTb TpaBMnpOBaHnI npncnoJb3ObaHn He no Ha3HaueHnIO!PacnnIOBka ceHHo nnIOI dpeBeCnbl nIIu DpyRnx MaTePnaIOB, KOtOpbie cOePjat NoCTOPOHHe ppeMeTbI, MoKeT pInBeCTN K TpaBMe.
IcnoJb3yTe cenHyIO nIy TOJIbKO dIpaCnnIOBKn IerKo IpeBeCInHbl.
OcmoTpnte dpeBecnHy neped pacnIOBkoHnHa HauNue NocToPOHHx PpeDMeTOB,Ha- npIMep, rBO3dei, wypynOB, pHTNHROB.
2.2 PpIMepbI HnpeBaUNbHoro npImeHeHna
3anpeuatae o6pe3aTb BETK, KOTOpbIe paCNOJoxHeI IprMo Nn IOd OCTpbIM yIOM HAd NOJIb3OBaTeJIem Nn DpyrIMN JIuaMn.
3anpeaetcCnINBaTbBETKn,HaxOJaIeecHa6oJbwoBbICOTE.
3anpeuaeTcNcNoIb3OBA Tb Otpa6oTaHHoe MacnO nMn MHepaJIbHOe MacnO dJa Cma3Kn NJIbHOJ cEN.
3anpeaetcnaonb3oBaTb yctpoiCTBO BO B3pbIBOONaCHO cpeJe.
2.3 OctaToHbIe onaCHOCTN
JaKe ecn yctpoCTBO nCNOJb3yETcHaIneKaHmO6pa3OM,BCERda cyuaceTByeT ONpeDeIeHbIocTaTOUHbI pNCK,KOTOpbI He MoKet 6bITbNckIoueH.Bo3MOXbI cNeDyIOUne NToEHznaJIbHbIE ONaCHOCTNu Ha OCHOBE TIna I KOHCTpyKcINyCTPOICTBa B 3aBNCIMOCtN OT NcNoJIb3OBaHnA:
KoHTaKT C OTJeTaIOUeI cTpyKkoN mAcnraHbIM TymaHOM.
BdixhaHne qactnO npIOK n MacJHoro TymaHa.
UdaneHne yacteO6pa6oTaHHoN dpeBecnHbl.
HapyuheHne cnyxa BO Bpempa6oTbI,ecnHe nCnoJIb3OBaTb 6epuun.
Pe3aHbIe paHbI n3-3a KOHTaKTa C NINlbHOJ UenbIO.
Bhe3aHoe HnpeBnDcHHe DnHexHe HnpaBJIooIe IINHbIC NIIbHOJ cENbIO (O- nachocTb nope3a).
TpaBMnpoBaHne BpaaIoumncsAJIeMeHTaMn NINbHOJ cEN.
2.4 PpeOxpaHNTeJIbHbIe n 3aUHTbIe yCTpOJCTBa
PNEpyPExDEHNE!OnacHocTb ce- pBe3HbIX TpaBM,Bbl3BaHHbIX MaHNyInpOBAHNem PpeOxpaHHTeNbHbIMN 3aUNTHbIMN ycTpoiCTBaMn.13-3a MaHNyInpOBAHnra Ppe- DoXpaHHTeNbHbIMN 3aUNTHbIMN yCTpoiCTBaMn npI paBoTe C cENHOI NIOJ MOrY BO3HNKHyTb cepbe3HbIe TpaBMbl.
Hn B KOem cIyuae He BBIOAnTe n3 CTPO npEOxpaHnTeJIbHbIe I 3aUHTbIe ycTpoi-CTBa!
Pa6oTaIe c ceHNoI nnIO, TOnbKO ecNn BCE npedoxpaHnteJIbHbIe n 3aunTHbIe y- cTpoIcTba pa6oTaIOT npabInbHO.
2.4.1 3aunta ot neperpy3kn
Ecnn noB3OBaTeJIb CnIshKOM CnIbHO TOnKaeT Nny NO DepeBy BO Bpem NIIeHn, OHa BbIKNo- Yaetc. 3TO nO3BOJraET n36ExaTb neperpy3Kn DBrarateJIa.
2.4.2 OTKnHaJ KpbIsha ceH
Kpbuoka 3aunuaet onepaTopo OT dBnky- uenr nnbno cenn. KaTOnbKO Kpbuoka cenn ynpaetcB DpeBecnHy BO Bpemn HnneHna OHa ABTomatueckn NoadaeTcra.
I P E N U P E X D E H E! Onacnoctb ot
NJIbHOI cEN: . BpaUaHOUaCra NINbHra cenb MOKeT pInBecTu K ONaChbIM dJRA JxN3Hn TpaB-Mam.
LcHHy nny pa3pe7aetcNcNoIb30BaTb TOnbKo nCnpabHoi KpbIshKo cenn!
3anpeuaetcchImatb KpbiKy cenn!
2.4.3 3aunTa pyk
3aunTa pyk 3aunuaeT onepaTopo ot KOHTaC paacnINBaemOn dpeBecnHO, IeNOK ONJIOK.
2.5 CnMBOJIbI Ha yCTPOINCTBe
2.5.1 Metkn 6e3onacchoctn
DOBaHbI npOn3BOAnTeJeM. Ecnn 3apAHOe yCTpOoiCTBO, KOToPoe NOxOHT DnA ONpeJeHHeHOro BnDa aKKyMnyTOpOB, INCNoB3yETcR C dpYrIMn aKKyMnyTOpAMn, CyUecTByeT OnaCHOCTb NOKapa.
IcnoJb3ynteB3JeKtpOnHCTpyMeHTax TOJIbKO npedycmOTpeHHbIe dJIa 3TOrO aK KyMylTOpbl. IcnoJIb3ObaHne dpYnX akKyMyJrTOpOB MOKeT pUBeCTN K TpaBMam N ONaCHOCTN NOkapa.
ДерхиTe HeNCNoJIb3YeMbIe aKKyMyJITOp bI NOaJIbWe OT cKpeNOK, MoHET, KJIIOYeu, rBO3dEi, BnHTOB IN dpyrNX MeJIKXMeTaJIINueCKNX pPeIMeTOB, KOTOpbIe MOrYT Bbl3bIBaTb 3aMbIkaHne KOHTaKTOB. KoPOTKoe 3aMbIkaHne MeJx dy aKKyMyJITOpHbIMN KOHTaKTAMM MOKeT Bbl3BaTb BO3rOpaHnI JIn NoJap.
Ipn HneppaBnblbHom nCnoJb3ObaHnn H3 aKKymyIaTopa MoXe TBbITEKaTb XNDKocTb. N36eraIte KOtAKTa C HmN. Pnp CnyauHOM KOtAKTe CMOIe ee BOIoE. Ecnu XndKOCTb nonana B rna3a, o6paTntecb 3a MeDnUHcKo NOMoubIO. BbTEK-uaa AKKymyJIaTOPHaay XNDKOCTb MOXe TBI-3BaTb pa3dpaXeHne KOKn IIN OXOrn.
He nCnoJb3yIte NOBpeKdEHHbI NJI MoDnΦnIUPOBaHHbI aKKymJrTOp. IOBpeXJDeHHbI NJI MOnIΦnIUPOBaHHbI aKKymJrTOp MOrY TBeCTN Ce6H HepeDcKa3yEmo N Bbl3bBA Tb NOxap, B3pbIB NJI ONaCHOCTb TpaBMnIPOBaHHa.
- Depxnte aKKymyJTop BdaHn OT ORHn Hnn BBICOKnx TemnepaTyp. OToHb nn TEmnepaTpa Bblue 130 ^ C MOrTy Bbl3BaTb B3pbIB.
CleyuTe HNCTpyKcIaM No 3apKe H N B KOe Cnyae He 3apKaIte aKKymyTA-Top IIN aKKymyTAOpHbI INHCTpyMeHT BHe dnaNa3OHa TeMnepaTyp, yka3aHHoro B pyKOBoDCTBe NO 3KcNpyaTuu. HenpaBnIbHa 3apJa Ka IIN 3apJa Ka BHe yTBepKdEHHoro Dnana3OHa TeMnpaTyp MOrY npInBecTu K pa3pySeHnIO aKKymyTAToPa I NobblWeHIO NOxapOOnaCHOCTn.
3.1.6 CepBnC
PemOHnPOBaTb 3JKeKTPoHnHCTpyMeHT DOJIkeH TOIbKO KBAJIuΦnUPOBaHHbIc CneuaJIncT, IcNoJIb3yA OpRmHaJIbHbIe 3aIyAcT.N.TakIM o6pa3OM o6ecNeuBaETcOxpaHeHne HaJeXHoCTN 3JKeKTPoHnHCTpyMeHTa.
HnBkoemcIyuaeHeBbINOJIHnTe06CnyXINBaHne pa3pyuWeHHbIXaKKymJrTOPOB.
O6cnykBaHne aKKymyTOpOB DoJXHO OcyIeCTBnTbCra TOnbKO IpOn3BOdnteTeM IInero cepBnCHO cnyKboi.
3.2 Yka3aHnno TExHnke 6e3OnacHocTn npn o6paueHnnc c eHNo nIIO
Дерхаь BCE ча'teЯ NOdaJIbwe OT
ПИльноци.пepд Tem кak BKIIOUaTb
ПИу, сеduуET ybeNTbCЯВ TOM,чTO
ПИльнагць He KOHTaKTnpyet C KaKIMN-
ПИбо пpedmetamn.КраTKOBpeMeHHaн He-
ВИMuTeNbHocTb рр pa6Ote C ceHNoI ПИ-
ПОй может ппвecтси K NonaDaHnIO OdEЖы
ПИи чаTei TeJa B DBIXKyUoCЯ ПИльHyIO
ць.
IpaBoy pyKoI depKaTb ueHny nJy 3a 3aHIOpykO, a neBOi-3a nepeHIO. CJeDyET npNdePxNBaTbCnMeHNO 3Toi cxMbl: B IpOTuBHom cIyuae pNCK noJyHeHn TpaBMbl yBeJIuHNaBaeTcR.
Дерхаь сению пиу за Изолированhyю NOВерхнocь рчк,Тak кak пьнаяць MOжET KacaTbCS CkpblbIX 3JIeKTPn-yeCKNX LHHN. KoHTaKT ПиьнOH ueNi c Ka-6eJem IOd HAnpЯжЕнEM MOжET npINBecTи K TOMy,ЧTO MeTaПИЧeCKNe YAcTи INHCTpyMeHtA takke 6byDyT NOd HAnpЯжЕнEM,a 3TO MoJxET CTaTB pPUNHOI NOPaЖeHЯ 3JIeKTPnueCKIM TOKOM.
CneyuET Hocntb 3aunTHbIe OUKN. Kpome TORO, peKOMeHdyETcNcNoJIb3OBaTb cpeCTBa dJIra 3aunTbI opraHOB clyxa, roJIOBbl, pyK, hor n CTynHei. HadnexkaaJy 3aunTHa OJExJa cHIXKaET pNCK TpaBMnpoBAHn B pe3yJIbTaTe nonaDaHnA C tpyXKn IIN CnyauHOrO cOnpIKOCHOBeHnC INNbHOJ Uenbo.
3anpeaetcpa6oTaTb c cenHoi nIIO, cT0Ha depeBe, IecTHnue, KpbIe nn HeycTouHBOn NOBepxHocTn. Ppi pa6ote TaKIM o6pa3OM cyUeCTByeT pNCK NOnyuEnn TpaBMbl.
O6ra3aTeIbHcJeDyET 3aHmMaTb yCTOn- YnBOe NIOJoxHeN I NCNoJIb3OBaTb cENHyU NIIy TOnbKO Ha TBepDo, HAdExHOu paBHO NobepxHocTN. Ha cKoJIb3KOu INHeCTaBnBHO ONOPHO NOBepXHOCTNu MOxHO JeRKO NoTePb TaBHOBeCne INI KOHtPoJIb NaI cENHOI NIOI.
CneNyET NOMHHTb, YTO HaprJxehHaB BeTka npn OTNINBaHH MoKet OTnpyKnHHTb. Pocne ChTna HaprJxehHa B DpeBec
HbIX BOJOKhAX Betka MoKet ydaPntb NOB30BaTeIaN Bbl6nTb n3 erO pyk cenHyIO Nnly.
Pn Cpe3aHn NOJnecka n MoOdbix DepeBbeB cIeMyet Co6NIOdaTb OcO6yU 0ctopoXHoCTb.ToHKne BETKn MOrY T3anyTaTbC8 B NJIbHOH CEEN H yDapNTb Bac INN BBBeCTNuBaPBHOBeCnA.
Дя nepehoKn ueHNoI nIbI ee cneHyet BKNIOHTb N depXaTb 3a nepeHIOU pyKy, NOBepHyB NIIbHOJ cENbO OT TeJa. TpaHCnoptnpoBaT b xpaHNTb cENHyO NINy cIeMyET TOIbKO B 3aUNTHOM KOKy- xe.CneIyET co6JIOnaTb kpaHIOO OCTOpOX-HocTb npI o6paueHmC cIeHNO NIIoN, YTO-6bl CHN3HTB BepoTHOCb HnpeDnAmepenHoro COpNIKOCHOBeHnC BpauaIoJeCSA INJIbHOJ cENbIO.
CneNyETco6IIOdaTbHNCtpyKcUNnO CMA3bIBaHHIO,HaTJXeHNIO cENN 3aMeHe HAnpABJIIOUeI WINbI N cENN. HenpaBInbHO HATaHyTa IIN CMA3aHHa TcENb MOKeT JONHyTb.TakKe Bo3pactaET pNCK OTdauN.
Pa3pe7aetc nIINITb TOnbKO dpeBecnHy. 3anpe7aeTc nCNOJIb3OBaTb cENHyIO nIy IJRA BbINOJIHHeHn HEnpeDycMOTpeHhBIX pa6Ot. Iprmep: IJRA pa3pe3aHnMaTeJIInuecknx INlactMaCCOBbIX N3deJIIn, KnpNCHOH KlaIKn IIN CTpONTEJBHbIX MaTePnaIOB (KpOME DepeBAAHbIX).Ic- NOJIb3OBAHne cEHNHOI nJIbI He IO Ha3NaeHIO MOKeT pINBeCTN K BO3HNKHOBEHIO O-NaChbIX CNTyaU.
Данная сения пида He npedha3hauehaДЯВалкп DepeBbeB. HeceleBoe nCnoIb-3OBaHne cenHOJ pINJIb MoKet npuBeCTN K ceppe3HbIM TpaBMam NOlb3OBATeJЯ INIpyrIX IIOJeI.
3.3 O6uhe yka3aHnNo ToTexHKe 6e3onacHocTn dJa cenHbIX nJI
Co6nOdaTe Bce yka3aHn npu ouNCTke cenHOn nIbI OT cKoJIeHn MaTePnAJa, BO BpeM xpaHeHn IIN BbINOJHHeHn pa6OT no TeXo6cnykBaHHIO. Y6eIntEcB, YTO BbIKIOUaTeNb OTKIOueH, a AkKymyIaTOp ydaJeH. HeoXnDaHHa 3KcIIpyatauI cyHOn nIbI npu ydaJIeHn cKoJIeHn MaTePnAJa IIN BO BpeM BblONHeHn peMOHTbIX pa6OT moKeT npNBecTu K cepBe3HbIM TpaBMam.
3.4 PnHbI OTaun Mepbl Jna ee npedotBpaueHn
OTdaua MoKET npOn3oHTN, KOrda KOHcNK HapablaIOUeI uINbI Kacaetc npEdMeTa IIN
Korda DpeBecnHa n3rnbaeTcN nnbHna cenb 3aedaaet B nponne.
KoHTaKT KOHcA HAnpaBJIIOUeI UINbI C KaKIMnI6O IpeDMeTOM B HeKOTOpbIX CnyaX MoKeT npIBecTI K O6paTHOH OTBeTHOH peAKuN, npKOTOpO HAnpaBJIIOUaI UINHa CMeUaETcB BBePbX B HAnpaBNeHIn NOnb3OBaTeJI.
3aueMJIeHne NIIbHOJ cENn Ha BepxHei KpOMKe HAnpaBIAUeIe IINHbI peJIbCa MoKet PnpBeCTN Kpe3KOMy CMeUeHNIO IINHbIB HAnpaBJeHNI NOIb3OBaTeJI.
IIO6a n3 3Tnx peakun MOKET npNBecTN K NOTepe KOHTPOJn Ha nnOu IN BO3MOXHOMy noLyueHHIO cepbe3HO TpaBMbl. He cneDyeT noNaratbcn NCKIOHTeBHO Ha npDeoxpaHITeNbHbIe yCTPOINCTBa, BCTPOEHbIe B ceNHyo nnIy. PONb3OBATEJIb CEHNOH NNbl DOJxKeH pInHrTb prdMep IJa npEDOTBpaUeHNA TpaBM IN HeCuaCThBX CnyaEB.
OTdaayraBnAeTcCneDCTBnEM He npabNbHoro
Hn HergpAmOTHO NOIb3OBAHnCeHNoH
YTo6bl He donyctntb ee,co6JIIOaTa b CneNyUOni
Mepe InpEOCTOPOXHOCTN.
I Ny cJeNyET KpeNko DeepKaTb 06eHmnyakuMn, 06XBaTbIBaR pyKoTKn uenHO nnbl6ObnuMMn uKa3aTeJbHbIMn naBcAmn. PacnonaraTb TeNo n pyKu cJeDyet TaKm 06pa3OM, UTo6bl MoxHo 6blno npOTNBODeICTBOBaTb 06pAtoHOn OTDaue. Ecnn BCE Heo6xOumMbIe Mepbl PpeOCTOpoxHOCTN 6bln PpePnHrTb B COOTBeTCTBnC yKa3aHnMaM No TEXnke 6e3ONaCHOCTN, NOlb3OBaTeJIb CnpabNTbc C 6oPaTHOn OTdauee. 3anpeuaetc r OTnyckatb eHnyo nnly.
CneJyETn36eRaTbHeHOpMaIbHOHno3bl He NnNTb Bblwe yPoBHa PLeu.3To nO- 3BOJare TnyUWe KOHTpOJInpoBaTb CEHNHyIO NnLy B HeOxNdaHHbIX CnTyauaunx I n36eRaTb COpnKOCHOBEHnKOHua WInHbIC DpyrIMN npedmetamn.
CneNyET nCNoB3OBAbToJbKO npEaHncaHHbI npOn3BOdnteJeM 3aNaChbIe HbI NJIbHbIe cenn. B npOTnBHOM cnUyae BO3MOxHe pa3pbIB NlNbHOJ ceni, KOtOpBI npINBeDeT K o6paTHo OTdaue.
CneNyETco6IIOdaTb npedocTabHeHHbIe npOn3BOAnTeJem HnCTpyKcHn No 3aToUKe n TexO6cJyXHBaHNIO NJIbHOJ cEN.
CInnKOM Hn3Kne orpaHnUteN rIy6nHbI yBeINuBaHOt CKIOHHOCTb K OTdaYe.
3.5 Bn6paunOHna Harpy3ka
Onachoctb Bnbaqun
Фakmueckoe 3NaueHue 6bpaauonHou 3Muccu npu uCnoB3o6aHuu ycmpoucmeaMOxem omluayambcra om 3a8eNeHHO2o npou3bOdumem 3NaueHua. HabnJaTe cneDyUusne faKTopbl BO3deiCTBna DO nNN BO Bpemr NCNoB3OBAHNA:
IcnoJb3yeTcra yctpoNCTBO no Ha3Ha-ueHIO?
MaTePnAJI pa3pe3aH nIIN o6pa6oTAn npaBnJIbHo?
HaxoHTcra n yctpoiCTBO B xopoWem pa6oem coCTOHN?
IpaBnIbHO JIN 3aoCTpeH INN yCTaHOJIeH pexyunn HnCTpyMeHT?
YcTaHOBJIeHbI JIN KPOHHTeHbI N,ecJITpe6yeTcra,doONHHTeJIbHbIE Bn6paUNOHbIMpyKIn,NIIOTHOJIN OHN COeHNHeHbICyCTPOINCTBOM?
3KcnpaHpyte yCTPONCBO TOLbKO C aCTOTOBpaueHnABnraTeTn,Heo6xOIMoN DnO TdEhHO pa6tbl. N36eAteMaKcMaaHbOH YAcTObI BpaueHn, YTO6bl CHN3NTb ypoBeHb Wyma n Bn6paun.
H3-3a HnnpabunbHoro nCNoB3OBAHnI TexHHueckoro 06cnykuaHnI Wym I Bn6pauny UcTpoiCTBa MOryt NOBbcntbCra. 3TO HaHocNTBpeI 3DopobbI yenObeka.B TAKnx Cnyuayx HemeJNeHNO BbIKIOUaIte UcTpoiCTBO I O6pATiTecb 3a eRo peMOHTOM B aBTOpN3OBAHNbI CepBnCHbI ueHtp.
CTeNEHb Bn6paCIOHO HorapJxehn3aBnCnT OT BblONHReMoI pa6Otbl IIN NcNoJIb30BaHNyUCTPOINCTBa. OcEHnTe n yCTaHOBnTE COOTBeTCTByUoIne nepepbIBbI B pa6Ote.B pe3yNbTaTe Bn6paCIOHna HArpy3Ka B TeueHHe BCero pa6Ouyero BpemeHn 6yDet 3HaunTeJIbHO CHNXeHa.
ДиnteьнэЗкплуацуястpoиCTba noB-Bepraet onepaTopa Bn6paunu N MoKet Bbl3BaTb np6nemblc KpoBOO6paueHneM (CmNTOM «6enoro nalba»).YTo6bl yMeHbIHTb 3TOT pNCK, Hocnte nepuataKN i DepknTe pyKn B TENNE. B cnyuae obnapyKeHna CmNTOMa «6enoro nalba» HeMeJleHNO o6paTnTeCb K Bpauy. 3TN CmNTOMbl BKIOUcaHOT B ce6r: OHeMeHne, Notepu ChvBCTBnTeNbHOCTN, NOKaJIbIBAHne, 3yD, 60JIb, Cna6oCTb, N3MeHeHne UBeTa IIN COCTOHN KOKN. O6bIHyO 3TN CmNTOMbl BnIryOT Ha NaJIbCuI, pyKn IINI nyIbc. PIn Hn3Knx Tempepatypax Pnck Bo3- pactaET.
ДелаиTe BO Bpempa6oeryDnHДПnteIb-HbIe nepepbIbI,уTObI OTdoxHyTb OT Wyma N Bu6paun.ПланИрte CBOIO pa6Ory TAKIM O6pa3OM,yTObI pa3dJIInTb 3KcIIpyatauY-CTpoiCTB,KOTOpbie CO3daIOT CINbHbIe BN-6paun,Ha HeCKOJIbKO dHei.
EcnBbI NOyBCTByeTe DnCKOMΦopT INN DnCXPOMHIO KOKN PrN NcNoB3OBAHNY UcToiCTBa B pykax, HemeDneHNO IpeKpaTInTe pa6oTy. YcTaHOBtNE DOCTaTOUHbIe NepepbI Bp6oTe.Pa6ota 6e3 DoCTaTOUHbIX nepepbIOB MoXET PnVBecTN K MeCTHOB Bu6paCOnOHHO BoJe3HN.
MHHIMN3npyTe pncB BO3dEInCTBnB Bn6paCun. BbIOJHnTe 06cnyKnbAne np6opa BCOTBeTCTBnC INHCTpyKcnmB pyKOBoDCTBe NO 3KcIpyatauN.
Ecnn obopydoBaHne nCnoJb3yeTcyaCTo, o6paTntecb K DnIepy, yTo6bl npNo6peCTn aHTNtBn6paQIOHHbIe akceccCyapbl (HaNPmEp, pyKn).
I36eraTe pa60Tb C np6opom npn TempeType Hxke 10^ B nnahe pa60Tb onpe-DeJIte, KaK MOXHO ORpaHNUHTb BN6paUHHyIO Harpy3Ky.
3.6 Akcyctnuecka harpy3ka
HeKOTOPa akyCTnuecka Harpy3ka, BbI3BaHHa 3Tm yCTpOYCTBOM, Hen36exHa. BbIOJHnTe 5ymhble pa60tby CTAHOBnEHbIe n Onpede- IeHHbIe cPOK. Pn Heo6xOIMOCTH CneDyET yHTbIBaTB yKa3AHN OTHOCITbHbO《TnxXu CaOB》 N ORpaHnUHBaTB IpODoJIIXeTIbHOCTb pa60tbl Han6OJIee Heo6xOIMbIM. JIЯ obecneYeHn JInHOn 3aUHTbl N3aUHTbl JINU, HaxOJauxxCr NO6n3OCTn, Heo6xOIMHOcNTb 6epuHn.
3.7 Yka3aHnno TeXnKe 6e3OnacHOCTnДЯakKymJrTopa n 3apAnHOyCTpoiCTBa
Ipeid 3apAdkoNn3BJIeKInTe aKKyMnyTOpbI n3 ycTPOINCTBa.
He nCnoJb3yIe B yCTpoNCTBe aKKymyIaTOpbl pa3HbIX TINOB INIHOBbl I NCNoJIb3O-BaHHbIe aKKymyIaTOpbl BMeCTe.
BcTabnIte aKymyIaTOpbI B yCTpOiCTBO c co6JIIODeHEm NOJrPHoCTN.
I3BneKaITe aKKyMylTOpbI n3 yCTpoiCTBa IЯ xpaHnB B TeYeHne dNITeJbHOro nepuOda BpeMeHi.
He donyckaTe KopoTko 3aMbikaHnKneMM yctpoCTBa nn aKKymyIaTopa.
PykoBoDCTBa no 3KcnIyatau
Co6IIOdaIte yka3aHnI NO TexHnke 6e3ONaCHOCTN, CoIepXaUncEa B OTDeJIbHbIX pyKOBoDCTBAX NO 3KcPnyatau K aKKyMnyTOpY I 3apJdHOMy yCTpoiCTBy.
CM.
pykoBOcTBo no 3KcPnyaTaun 443130:akkyMynrTopbl
pykoBOCTBO no 3Kcnnyatau443131:3apraHbIe yCTPOINCTBa
3.8 Yka3aHnnoTexHnke 6e3OnacHOCTN BO BpeMpa6oTbI
CobioaTe yka3aHn no Texnke 6e3oNaHocTN B KOHKpeTHbIX CTpaHax, Hapnimep, yKa3aHn no Texnke 6e3oNaChocTn npocecCnoHaNbHex accounau, oHDoB couaNBHOO obecneueHn, opraHOB 3dpaBOOxApeHn.
IcnoJb3yIte yCTpoiCTBO TOnbKO npN DoCTaTOUHOM DHeBHom ININ NCKYCCTBeHHOM OCBe-
Pa6o7a 30Ha, Cb6o7H8 OT NOCTOPOHHX npedMeTOB (HaPnMep, 6pe3KOB) - onacHOCTb CNOTbIKAHNA.
OnepaTopnnnnoB3OBateIbOTBeuAOT 3a KIN3HBnNMyUeCTBOdpynxNt.
EcnBbIpa6oTaTe c zenHoi nioBnepBbIe:
Iopocnte npodabua nnn dpyroro cneuaancta o6barchnTB, kaOcbpaatb- c6eH30nIOi, nnn npoynTe kypcbl.
IpeepnepBbIM npimHeHem nonpaKTNU KyntcB, no KpaHne Mepe, B paCnIOBKe 6peBEN Ha KO3Jax INI NOCTABKE.
3.8.1 OnepaTopbI
YCTPOIcTBO 3aPepaeTcNcNoIb3OBaTb DeTAM B BO3pacte Do 16 Nt NnUam, He O3HaKOMJIeHHbIM C pyKOBoDCTBOM NO 3KcNpyaTaLUN.
JIIO6O YeI0Bek, pa6oTaUcHm C cENHO nnIOJ,doJXeH 6bITb OTDOxHyBWM,3DOpOBbIMn HaxoINbC B XopoWe fOpme. Ecn nocOCToHNIO 3DopOBbYyTomJeHne 3aNpeua-etCn, Heo6XoIMO CNPoCInb y BpaCa, MoKHo nn pa6oTaTc c cENHO nnIOJ.
3.8.2 Bpempa6oTbI
Co6IIOaIte B OTHOWeHn B BpeMeHn pa6oTbI
ZeINbIX NII KOHKpeTHoCtpaHbI. BpeMpa6oTbI
ZeINbIX NII MOKeT ORpaHNuBaTbcra HaUNOHaNbBHBIMN MeCTbIMN npabUJaMn.
3.8.3 Pa60Ta c zenHoi nJIo
PNEpyPEXKDEHNE!OnachocTb cepe3hblx TpaBM,Bbl3BaHHblx MaHnyIpOBAHNem PpeoXpaHHTeBhlbIMN 3aunTHbIMNyCTpoiCTBaMn.13-3aMaHnyIpOBAHNAIpeOxpaHTeBhlbIMN 3aunTHblIMN yCTpoiCTBaMNIpnpabote CcENHOINIOJMOrTBO3HKnHyTbcepbe3HbIe TpaBMbl.
HnB Koem cIyae He BbIOJTe n3 CToPnpeOxpaHITeJIbHbIe I 3aUNTHbIe ycTPOIcTBA!
Pa6oTaIe c ceHNoI nnNoI, TOnbKO ecNn BCE npEdoXpaHnteJIbHbIe n 3aUHTHbIe y-CTpoiCTBa pa6oTaIOT npaBnIbHo.
PNEpyPExEHNIE!Onachocb TpaB-Mbln3-3a HenpeHaMepeHHoro BKIOUeHnueCenHO nnbl. HenpeHaMepeHHoe BKNIOUeHneCENHOIIMMOKETnpINBeCTN K cepbe3HBtMtpaBMam. PoTOMy n3BJIeKaITe aKKMyJrTOp BCNeDyUOx CNyAax:
TEXHnueckOM OCMOTpe,peryIINPOBKe n O- uNCTKe;
pa60Ta c npHaJaIeXHoCTaM;
OCTaBHeHHe UeHHoN IINbI 6e3 npncMOtpa;
TpaHcnpTupOBka;
pa3MeIeHn Ha xpaHeHne;
TexHnueckOM 6cIyXnBaHHn n peMOHTe;
B Cnyuae onaCHOCTN.
CneNyET depXaTb HArToBe anTeUky Ha cnyuay paHeHn.
CpeCTBa ININBnDyajbHOJ 3aunTbI BKJIIO- ChaOT Bce6r CneDuOoee:
cpeicTba 3auntbI opraHOB cnyxa (Ha- npimep, bepuun), oc6eHHo, korgpa pa- 6oyni DehbcocTabnEe 60nee 2,5 yaca;
3aUHTbIe OUYK;
3aHTbIe WTAHbIC BCTaBKOJ INAHTbI OT NOpe3OB;
IpoHbIe pa6Oue nepuAtkn;
6e3oNaChA O6yBb C HeckOJIb3aIeN NO-DOUBOH N CTaJIbHbIM HOCOM.
Ipn n3MeHeHn cTaHapTHOro Mecta CneDy-et rnyuHTb DBruratelb.
Ecnn nna no depeBy He nCnoB3yeTcA, cJeNyET BbIHMaTb aKKyMylrTop.
3anpeaetcnaonb30BaTb nIy no depeBy IJI NODeBAHnI nn nepemeueHnI dpeBecnbl.
Древесина,ТолшинаКOTОРипгБышаETДИНу ПИЛы,pa3peшaETсЯpacNiINBaTbTOЛьКВалифициюванHomупер cohany.
CneNyET npncTbAIBTb DnBxKyUOCa NnIbHyTO cENb K O6pa6aTbIbAemomy MaTePnaIy TOJIbKO C pa6oTaHcEe NnIbHOJ cEnbIO, 3a- npe7aEcTcN oNDKlOuATb pa6oTaHcUO cENHyo NnPy K NnJIbHOJ cENN.
CneIyET CneIbTb, YTO6bI MacNo IJRA CMA3KINHbHOI cEN He nonaDANO B 3eMIO.
3anpeaetcBbINOHNrTb paCnIOBOOHybe pa60tBI BO Bpemddox, CHEROnaJa nnu TOpMa.
4 BBOI B 3KcIIyATAUIO
ONACHOCTb! OnachocTb dЯжни onachocTb TЯкелых TpaBM. He3HaHne yka3a-Hn NO TEXHnke 6e3oNaChOCTn INHCTpyKcNIO 3KcPnyatauM MoKeT PpNBecTn K cepBe3HbIM TpaBMam NДаKe CmepTu.
IpoHTaTe n co6JIIOaJTe BCE yka3AHnNo TExHKe 6e3ONaCHOCTn INHCTpyKuNn NO 3Kc- pIyataun DaHHoro pyKOBoDCTBa, a TaKke pyKOBOdCTBa No 3KcIIyataun, O KOTOpBIX n- dET peYb, DnICNOb3OBaHnue cENHO nnbl!
PNEyPExEHNc!OnacHocTb cepe3hblx TpaBM. NOBpeKdHne DeTaJeu cenHOI MIOXET PnIBeCTN K Cepbe3HbIM TpaBMaM.
BbINOJIHnTe Bn3yaIbHbI OCMOTp nepeKKaJdbIM NcNoIb3OBAHNHeM, YTO6bl y6eIITbcB TOM, YTO cENHa IINa NOnHocTbIO CO6paHa N He CoDEpXHT NOBpeXDeHHbIX INN IN3HOWeHHbIX DeTanei. Bce npedoxpaHnTeJIbHbIe N 3aunTHbIe yCTpoIcTBa DOJXHbI NCpapBHO cyHKUONHPOBaTb.
4.1 3anolheHneMacJOMdJaCma3Kn nnbHou cenn (02,03)
HnBnae n HnPaBnaOuaa ShHa cHa6kaIOTc MacnOM dNcMa3Kn NnBHO uen C NOMu bOp yHOB CNCTemblcMa3Kn. Macno dNcMa3KN nnBHO uenn 3auuuaeT ee ot Koppo3n IN npexdeBpeMeHHoro n3Hoca.
Pumeyane: Ycmpoucm8o nocma6nemc 6e3 macna dner cma3ku nunbho uenu!
BHIMAHHE! Onachoctb NOBpeXeHnO-6bopyoBaHn. IcnoIb3OBaHne ycTpoiCTBa 6e3 Macna dJa CMa3Kn ZeNi npIBoDnT K NOBpeXeHnIO NIIbHOJ ZENI HAnpaBraIOUe IINHbl.
3anpeaetcnaonb30BaTb yctpoiCTBO 6e3 MacJa nIg Cma3Kn NJIbHOJ cENI.
IpeHauJOM BbIOJHeHnra pa6oT cneJyET 3aONHHTb MacJIbI bak Macnom dJa CMA3Kn CEHN I B pOcEe Pa6oTbI peryJrAp-HO KOHTpOJInpOBaTb yPoBeHb Macna.
Ipeed kaxdbim nCnoJb30BaHnem cJeNyET y-6eINTbcB INcnpaBHOM fYHKUHOHPOBaHnnaBTOMaTNUeCKO cnCTEmbl Cma3KN ceN.
BHIMAHNE! Onacnoctb noBpeKdEHHo O-bopydoBaHn. IcnoIb3OBaHne oTpa6oTaHHoro Macna dIy cMa3Kn ZeH, KOTOpoe CoepxNt MeXaHueckne npimeCn, npIBoDIn T K npexKeBpeMeHHOMy n3Hocv HapraBnJIoSei ShHbI Nnbl-Hon ZeH. B cnUyae nCnoIb3OBaHn oTpa6oTaHHoro Macna rapaHTnHbIe 6Oa3aTeNbCTBa npOn3-BoNTeJIa TepaIOT cnIy.
3anpeuaeTcNcNoIb3OBAb Otpa6oTaHHoe Macno,ДЯ Cma3KU cENI DoNyckaTcNc-NOlb3OBaHne TOnbKO 6nopa3naRaemoro Macla.
BHIMAHNE! OnachocTb HaHeceHnryuep6a OkpykaOSei cpe. IcnoJb30BaHne MHepepaIbHOrMaIg CMa3Kn UeN npUBOiNT K cepBe3HOMy uOp6y OkpykaOSei cpe.
3anpeuaeTcNcNoIb3OBA Tb MInhepaIbHoe MacnO, INa Cma3KU cENI dOnyckaetcNc- NoJb3OBAHne ToJIbKO 6nopa3JaRaemOro Macna.
Ipeed KaJdbIM NcNOJb3OBaHnEM n npKakdoi 3aMeHe aKKymyIaTopa CneDyeT npOBeprTb ypoBHeMACJaN DOJIINBaTb MaCNo DIA CMA3KN IIINbHOI CEII B CInyae Heo6xOAnMOCTN:
- YpoBHeb MacJa CneIyEt npOBepaTb B CMOTPOBOM OKHe (02/1) 6aka InIeNHO macJa. B CMOTPOBOM OKHe BCerIa DoJXHO 6bITb BNDHO MacNo.
Ppumeyaue: 3anpeucaemcra 3aunubamb Macno Huxe MuHmAbHo2o (MIN) u eblue MaKcumAbHo2o (MAX) ypo8nMaCna. - Ecnn aKKymyIaTOp NOdkIoueH: BbHyTb aKKymyIaTOp, YTO6bl IpeDoTbpaNTb HnpeHaMepeHHbI Nyck NIIbI No DepeBy BO Bpem3aIpaBKn MaJOM.
-
NOLOXITb NINy No DepeBy Ha npouHyIO ocHOby B rOpN3OHTaJIbHOM NIOJKeHN, yDepKJBaIe.
-
ouHCTb yCTpoIcTBO BOKpyr KpbIiKu (03/1) 6aka IJRA UENHO MaCJa.
- OTBnHTnTb KpbIuKy 6aKa IJra IeHoro MaCna.
- 3aIITb (03/a) MacNo dIy cMa3Kn IINbHoi cIeN B 3aIINBHyU rOpIOBnHy (03/2) Do OTMeTKN MAX. MacNo 3aIpeuaeTcI nepeJIiBaTb uee3 KpaI!
PumueaHue: Vcnonb3o6amb bOpOHky dna obne2eHu 3anOnHeHu.
Pumeyaue: 3anpeaaemc donyckamb nonadaHue 3aep3Heu6 MacnHbi6ak.
- BbIepeTb npOItoe macIO dIa Cma3Kn NJIbHOJ cENI.
- 3akpyTntb kpbIuKy 6aka IaIy cenHoro macna.
- Bctabntb akkymyjTOp.
4.2 3apka aKKymyToppa
ОбразиTe BнIMанe Ha Дипа3OH TemпepaТурдЯЗapяДКИ, CM.TEXHnueCKNe DaHHbIe.
H I P N M E U A H N E I Odpo6HyIO INΦopMaIHO CM. B OTDeJIbHbIX INCTpyKcIyX NO 3KcIIpyaTcuNn aKKMyJlAToPA n 3apIaHOrO yCTpOInCTBa:
pykoBOcTBo nO 3KcnnyatauN 443130: aKKyMyJrTOpbI
pykoBOcTBO no 3KcPnyatauN 443131: a-paHbIe yCTpOiCTBa
4.3 BcTaBka n n3BneHHe aKKymyJrTopa (04, 05)
BHIMAHHE! Onachoctb nobpejdeHnaakymyIaTopa. Ecnn noCne nCnoJIb3OBAHn y-CTPOJcTBaOCTaBHTaKKymyIaTOp BHyTpN, 3TO MoKET npINBeCTN K NOBpeJdeHIO akKymyIaTOpa.
Cpa3y nocne 3aBepweHnra6oTbI cneJyET n3BJIeYb aKKMyJrTop n3 yCTpOJCTBa nNoMeCTNTb Ha XpaHeHne B yTeJIpeHHoe MeCTO.
Bctabnayb akkymyantop B yctpoiCTBO cne-dyeT HenocpeDCTBeHNO nepeD pa60ToI.
Bctabka akkymnyTopa
- BCTaBnTb aKKymJrTop (04/1)ВшИну aKKymJrTopa (04/2) nIbI no DepeBy (04/a) CBepxYoJIeNka.
N3BneHne aKKymyIaTopa
- HαkaTb n ydepxkBaTb KHONKy φnKcaun (05/1) Ha akkymnytope.
- BbHyTb (05/a) akKymyJrTop, notaHyB erO BBepx.
5 YIINPABJIENHE
ONACHOCTb! OnachoctbДЯЖИЗнOnachoctb TЯкелых ТравМ. He3HaHne yka3a-HnNo TeXnKe 6e3oNaChOCTn INHCTpyKcIINo 3KcPnyaTaunMOkeT npNBecTn K cepbe3HbIM TpaBMam N daJce CmeptN.
IpoHTaTe n co6JIoJaTe BCE yka3aHnna no TexHnke 6e3ONaChOCTn INHCTpyKuIN NO 3KcNpyTaUdHaHHOro pyKOBoDCTBa,a TaKKe pyKOBOdCTBa No 3KcNpyTaUdIn, O KOToPbIX NDeTpeB,doNCnoB3OBAHnueHnOHNbl!
PNEpyPExJEHHe!OnacHocTb TpaBMnpoBaHHaN3-3a HeucnpaBHoro yCTpOcTBA.3KcNpyataunr HeucnpaBHoro ycTPOcTBA MoKeT npNBecTN K cepbe3HbIM TpaBMam N NOBpeXdeHNIO yCTpOcTBA.
3KcNpyaTpyTe yCTpoiCTBO TOnbKO B nCnpaBHOM HEnOBpeJdeHOM COCTOHNn PnIN CnpaBHbIX N XopoIo 3akpenJIeHHbIX DeTaJIAX.
CneyuETco6HpaTaBHaunOHaJIbHbIeNoIOxHeHnpeParnentpyuOune DoynCTmOe Bpempa60TbI.
Kpenko BO3bMITEcB 3a pyuKN He OTnyckaTe INX, noka pa6oTaET DnIraTeJb.
3anpeuetaetcnaonb3OBaTb cenHyIO nnyB cnyuae:
yctanoctn;
HeDOMoRaHnra
IIOI BO3IeINCTBnEM aIKOROJMa,MeDnKa-MeHTOB NIIHAPKOTNUOB.
peepKaKdbIMHaayanompa60TbI;
BOBpempa60tbl;
He No3Ke KaKDoN 3aMeHbI aKKyMnyTOpa.
Ecnu ypoBeHb Macna dny Cma3Kn NnIbHoN cn Hn3Kn, 3aOpNHtB cenHyIO nIpy.
3anpeaaetcncnoB3oBaTb yctpoIcTB6e3 Macna dIg CMA3Kn NIIbHOJ ceni!
Iopraok DeiCTBn: cm. 2na6a 4.1 "3anonHeHue Macnom dnn Cma3ku nunbHOu eenu (02, 03), Cmp. 387.
5.4 BkIIOueHne n BBkJIIOueHne ycTpoNCTBa (07)
BkHoueHne ycTpoNCTBa
1.BoJbUIM nabCem HaxaTb u ydepXnBaTb KHOKNy 6JIOKINPOBKn (07/1).
- HaxaTb u ydepXnBaTb KhoNky BKl./BbIKI. (07/2).
- OTnyctntb KhoNky 6JIOKnpOBKn.
Ipumueaue: Nocne 3anycka ueHou nunbi ydepkubamb KhoNky 6nokupoeku He mpebyemc. Khonka 6nokupoeku cnyxum dna npedombauenu HnpeDHaMepeHno2o 3anycKa ueHou nunbl.
4.Cma3bBaHHe MacJOM NJIbHOI cENI:
HaxkaTb KhoNky (07/3) Odn pa3, yTo6bl Cma3aTb NnIbHyIO ueNb. Ha nIbHyIO ueNb noJaetcra onpeJeHHOe KOJIueCTBO Macna dJa Cma3KN.
Y6eINTBcA, YTO MaCNo DnA CMa3Kn NJIbHOI cENN BnDHO Ha HApBaBIAUOe IINHe NIIbHOI cENN.
BbIKIOueHHe ycTpoNCTBa
- OTnyctntb KhoNky BKJI./BblKJI.
6 PABOOYEE NOBEDEHNE I CNOCOB PABOTbl
6.1 O6pe3ka nHnomaTeepnaJa no dnnHe (08)
Pn TaKnx pa6oTax Heo6xOdImo co6HOnaTb cNeDyUoee:
IcnoJb3OBAtB HaJeKHyO onOpy dny pe3Kn, HapnMpE, Ko3Nbl (08/1), KInHb, 6aKn.
KpyrlbIe nJlOMaTePnJIbI 3akpenIte BO n3-6exKaHne npokpyuBaHn.
ПилOMATEPиАл 3anpeaetcYdepKINBaTb HOrO IПИ ПОСпТ b NODEpKaTb erO dpyrOTo YeNoBeka.
CneIb 3a yCTOuHBbIM NOIOXeHnEM npabHOMepHbIM pacnpedeJIeHnEM MaccbI Te- na.
HadejHo ydepxuBaTb nIy no depeBy npouHo npKpenHeHa K nepeDHei 3aJHei pyKam, T. e. n3OJInpoBAHHbIe NOBepxHOCTn pyKn, o6eIMn pykAm (08/2).
Плотно ппжмITE уpop (08/3) пиьno DepeBy K DepeBy.
YctahabnBaTb pa6oTuOyU NnIbHyU cenb TOnbKO Ha npOnN. 3aPeeuaTeCnOdkNIOuTaB pa6oTuOyU NnIy No DepeBy K NnIbHOH ueN.
6.2 O6pe3aHne BeToK (09 - 13)
PNEpyPExEHNIE!NoBbIeHHaO nacHOCTb naeHn. CyueCTByet nobbiueHHa onachOcTB naDeHn,ecn paBoTa ocUeCTBna-ETcC NOBbIeHHoro ypoBHn (HaNPmep,JeCTHnCubl).
BceIpa6oTaIe C yCTpOiCTBOM C 3eMnN y6eIInTeCb B TOM, YTO BBI CTOnTE Ha TBepDoI noUBe.
Co6IouaTe yka3aHnno TeXnke 6e3onac-HoCTn.
I OJb3OBaTeB DoJxHeH 3aHrTaKoe NOnOxHHe, YTo6bI Cpe3 MoXHo 6blNo CdeNaTb NO BO3MOXHOCTN NOyrrn90° K Betke (09/a).
ToNCTbIe BcTKn CNeDyET Cpe3aTb YacTAMN (10/1), TTo6bl NyUwe KOHTpOINPOBaTb 3OHy naDeHnro OTpe3aHHbIX BeTOK.
HeIb3a Cpe3aTb BeTKn B MecTe yToJIeHnY oChOBaHnB. B npOTNBHom cIyuae paHa B Me-CTe Cpe3a 6yDeT MeJNeHNO 3aTgINBaTbc, B pe3yIbTaTe Yero MoKet HauaTbcra IpOcecc rHneHnA DpeBeCInhbl (11).
B npocece pa60tbi cne4yET nCNOJIb3OBaTb ynop (12/1), TTo6bl npKATb (12/a) nNny no DepeBy K BeTke (12/2) n TeM caMbIM 3aФNKcHPOBaTb ee Ha BeTke.
I Ipejde yem cpe3aTb BETky (13/b), nepBbI hAidpe3 CneDyET CDENatb (13/a) Ha HnXHeJ qACTn BETKn. 3a Cuet 3TOrO MOxHO N36ExKaTb 3aIropOB Ha Kope I DOJIro 3axINBaUoIux paH. Bo n36ExKAnHe 3auEeMNEHnI NJIbI HApE3 Ha HnXHeJ qACTn BETKn DOnJKeH COCTaBnTb He 6oJee 1/3 ToJIuINHbI BETKn.
UTo6bI Nnny No DepeBy He 3aUeMnNo, ee CneNyET nBNeKaTb n3 pacnna C Bpaauo- UeICr PnIbHOJ cenbIO.
7 TEXOBCLNYKINBAHNE N YXOД
PNEpyPExJEHNE!Onachocb nope3OB.Onacnoctb nope3OB npKoHTaKe TcOCTpbIMN DBNkUyUmMCr DeTaJIaMn ycTpoIcTBA n peJxuIM INHCTpymeHTOM.
Bcerda BbIKIOUaIte ycTPOINCTBO Do TexHnueckoRo n cepBnCHoro 06CnyKBAHn I O-ynCTKn. BbInbTe aKKMyJnTOp.
Bcerda Hocnte 3aunTHbIe nepuATKn BO BpeMraTexHnueckoro O6cnyKnBaHn, yXoJa n O-uctkn.
PemOHThbI pa6oTbI DOxHbI BbINONHtbcr TOnbKO KBaJIuΦnUpOBaHHbIM CneuaJIncTaM
NCKIQUHTeJIbHO C npIMHeHEm OpINHaJIbHbIX 3aIacHbIX YAcTeI.
IocneKaKdoToNCNoB3OBAHnIPOBepaTb yctpoiCTBOHaN3HOCINPnHeo6XoDmOCTN 3aMeHnTe NOBpeKdEHHbIE KOMNOHeHTbl.
CneNyET 6epey ycTpoNCTBO OT BO3DeIcTBn- RA BoBb IIN BnAIn. OuncntNb PnactIKOBbl E DeTaNN TkaHbIO H He NcNoJIb3OBAbMb MOUuHe CpeIcTBA INP pAcTBOpNTeIN.
OuNTb OXJaDaHOUe BeHTnIaIOHHbIE OTBepCTn npHaJIuHn.
3anpeuaetc paonbIy Ta yctpoICTBO BODY INCNOJb3OBA Tb nepeBnKHbIe MOIKN.
IcnoJb3OBAtB TOJIbKO npeDnncAHHbIe N3rTOBNTeJIem 3aNaChbIe YactN.
7.1 PpOBepka cMa3Kn NJIbHOJ cENI
BHIMAHHE! OnacHocTb NOBpeXdeHnO-6opydoBaHn. KoHTaKT c 3eMne HEn36eKHO npuBoNT K 3aTyPJIeHnIO pexyux 3y6beB nIb-HoIeN.
HeIb3a DonyckaTb KOHTaKTa cenn C 3emnei, NnIy Bcerda cneJeT depKaTb Ha 6e3onacHOM pacctoAHN B 20 cm ot 3emn!
- BkIIOuHTb yCTpoIcTBO.
2.Держать ВсICOTope3 KOHcOM NINbI B HappaBJIeHnKapToHa IIN 6yMaH,pacTeJIeHHbIX Ha 3emJIe.
Ecnn nTHO macna Ha KapToHe nn 6yMaTe yBeJIuHbAeTcra,TO CnCTema Cma3-Kn cenn fynKcuOHpyet nCnpaBHO.
EcnH, HeCMOTpHa HNoHbIMacnHbI 6ak, PAnTHo Macna He NoaBnAeTc: OunCTte MacnoBbInyCKHoe OTBepCTne Macla B yctpoiCTBe n Na3 HappaBnIoUeJ uHHbl.
Ecnn 3To He NmOKeT, CneDyET o6paTntbC8 B cepBnchnyo cnjx6y.
7.2 KoHTpOJIb HATJXeHn IINbHOI cENI
OCTOPOXHO! OnacHocTb TpaBMnpoBaHnHaNlbHoI cenbIO. PexyUne KpOMKn NInbHOI cENIOcTpBIE, IO3TOMY KOHTaKT CNNbHOI cENbIO MOKeT CTaTB pNCHNOI pe3aHbIX paH. IpeE Bd BInONHeHEm IIObIX BINOb PA6OT C NINbHOI cENbIO Heo6xOIMO:
BbIKIOHTyCTPOINCTBO IN BbIHHyTb aKKymyJITop;
HaedeTb 3aUHTbIe nepuATKn.
CneNyET peryIpyHNO npOBepaTb HaTKeHne cIeN, T. K. HOBbie NINbHbIE cEN ToXe pAcTaNBAHTOCTc.
BnraTeIb He 3anyckaetc. AkkymyIaTOp pa3pJKeH. 3apAnITb akkymyIaTOp.
| Heincpapbnoctb PrinuHa ha Cnocobby UcTpaHeneH | ||
| AkkymyIaTOp He yCtahOBlen iINs yCtAHOBlen He npa- BInlbo. | BCTabNtB aKKymyIaTOp npa- BInlbo. | |
| OTcyTCTByet noDaay aJlek- Troo3Heprn. | 1. ChIaTb aKKymyIaTOp. 2. ПОчstITb kOHTaKr pa3be- Ma. 3.СHOBa BCTaBtB aKKymyIa- Top. | |
| Дыгать octanablnBaetc BO BpeMЯ 3eKnIpyatau. | СлИшКOM 6OJIbSоe Давлe- нe 6blIO prinloJKeHo K nIne po DepeBy. 3aUZNTa ot nepe- rgy3kn OTKIlyChla uCtpoi- CTBO. | ВыИуТь пИу lo DepeBy n3 pro- nIIa n ChOBA bKIIouChte ee. Bo ВрЕмя pAcnIbOvK prinlaRaiaTe MeHbIeep DaBLeHne. |
| AkkymyIaTOp pa3PraJGeH. 3aRyIb Tb aKKymyIaTOp. | ||
| ПeperpeB aKKymyIaTOpa. ДaTb aKKymyIaTOpy ocTbTb. | ||
| AkkymyIaTOp HeicnpaBeH. 3aMeHITb aKKymyIaTOp. | ||
| Дыгать pa6oTaET c pepe6o- YIM. | HeICnpaBNoCTb KONIKn BKN./BbIKN. | ОБразИТь сВ ceRbIcHbI ueHTp ИЗROTOВITeIa. |
| HaprablyaToaJa ShIna n PInb- na Yenb HargBaIotcY. IOnyB- IeHne DblMa. | Пиьная Zeelb сLIIshKOM 3a- TЯHyTa. | Пробеть NaTajKeHne ZeIeN. ПОдТЯТь пЛьную ZeIeN. |
| Het MacLa B MacIaHOM 6a- Ke. | ДОпITь macIoДЯ СмAZKn ПиьнОй ZeIeN. | |
| MacIobByIpyckHoe OTBepCTme n (IIN) na3 NaPabYBaIooJIe ShInbI 3aRpy3HNIaIcsb. | Очирпь MaCIObByIpyckHoe OT- BepCTme n (IIN) na3 NaPabYBaI- IouSeI ShInbI. | |
| Дыгать pa6oTaET, Ho PInb- na Yenb He Bpa7aEtcY. | Пиьная Zeelb сLIIshKOM 3a- TЯHyTa. | Пробеть NaTajKeHne ZeIeN. ПОдТЯТь пЛьную ZeIeN. |
| HeICnpaBNoCTb yCtpoIcTBa O6PbITbC B ceRbIcHbI ueHTp I3rTOBIteIa. | ||
| ВmecTo onIIok BvIbPoC dpe- BeCNoI nbIIn. ПиUp no DepeBy 3aUeMInI OpeBecHoi. | Пиьная Zeelb 3aTyrNIIaIcB. O6PbITbC B ceRbIcHbI ueHTp I3rTOBIteIa. | |
| Het\PuHag BvIbPaCaIg Prin6o- pa. | HeICnpaBNoCTb yCtpoIcTBa O6PbITbC B ceRbIcHbI ueHTp I3rTOBIteIa. | |
| ОТкДнЯ КрБШka ZeII N 3aCtpra- la. | HeICnpaBNoCTb yCtpoIcTBa O6PbITbC B ceRbIcHbI ueHTp I3rTOBIteIa. | |
| СрOk 3eKpIpyatauig aKKymyIa- Topa 3NauchIteIbHo Chn3nIpc. | СрOk сLyJbIb aKKymyIaTOpa IcTeK. | ЗамeHITь aKKymyIaTOp. И- пОлььЗОВаТ b TОльko opRyIHaIb- Hble рпиадлжноCTn OT рОИЗ- BODITeIa. |
| AkkymyIaTOp He 3aRyJGaTeTc. 3aRpy3NeHb KoHTaKbI. O6PbITbC B ceRbIcHbI ueHTp I3rTOBIteIa. | ||
HencnpaBHOCTb PnunHa CnocO6by yctpaHeHH
HeucnpaBHOCTb aKKymyITo-pa nn 3apdHoro yctpoiCTBa.
3aMeHnTb aKKyMnyJTop nnn 3a-paHoe yCTpoiCTBO. IcnoIb3oBaTb TOIbKO OpRnHaNbHbIe npHaNdJIeXHoCTN OT pOn3BOdnteJIa.
IpeperpeBaKymyIaTopa. DaTb aKymyIaTOpY oCTbITb.
9 TPAHCIOPTNPOBKA
I PENEYPEXKDEHNE! OnacnocTb IJN3HN I ONACHOCTB TJeBIX TpaBM. 3aynck NINbHOI CEEN BO BpeM TpaHCNOPTIPOBKN MOKeT npNBecTN K TJeKebIM TpaBMam I daKe CMePTN.
Hikorda He nepenocite He TpaHcnpTpynte cenHyIO pny c pa6oTaIOuee nnBHOI cenbIO.
Ipeed TpaHcnpTupOBKo BbINOJHnTe CneDyuOuNe DeiCTBn.
Ipeep TpaHcnpTnpOBKOBbINOJHnTB cneDyUo-
- BbIKIIOHTb Nnny no DepeBy n 3BneYb aKKyMyJrTOp.
2.YctaHOBnTb ueHnyo 3aunTy. - OnopoknHtB 6akДЯцEHOrO macna.
- Ynakobatb NiNy No DepeBy B YeMoDaH dJa TpaHCnpTupOBKn.
AkkymyTop B125 Li (apT. No: 113896)
H PIMMEUAHNE HomHaJIbHaJ MoUHOCtB aKKymIaTopa coCTaBnaTe 6oJee 100 BTr-! Po3OMy cO6nOaIte CneDyuOuNe npaBnla TpaHCnOpTnpOBKn!
BxoduB KOMPJIeKT JIHTN-NOHHbI aKKyMylTOp noDnadaet noD deIcTBne 3aKoHa o6 onacHbIX rpy3ax, HO MOKeT nepeBO3ntbcra Ha ynpOuSeHHbIX ycNoBIAx:
aKcMnyTopbI aBTOpHaCnOpTOM 6e3 KaNX- n6o DOnONHtEnbHbIX Tpe6ObaHn, npu ycIOBn INx PepeBO3KN B 3aBOdCKoYnaKOBKe I dIy NUnhIx CeJeN.
KOMMepueckne NOJIb3OBAteJI, KOToPbIe OcyUeCTBnIOT TpaHCnOpTIpOBky B CBy3N CO CBOeOCHOBHOJ DeaTeJIbHOCTbIO (HAnpIMep, NocTaBKn Ha CTponTeJIbHbIe INoUaADKN INI DEMOHCTpaCIN N o6paTHO), TaKKe MOryT IN3BJIeYBbIROdy N3 3TOr yNpOSeHnI.
B oboix Bblweyka3aHHbIX cnyaex doJXHbI 6bITb npnHtbl MepbI ppeoctopoxHoCTN, T06bl npe
DOTBpaNTb yTeUky codepKIMoro. Bpyrnx cnyaex DoJXHbI CO6nOdaTbcra NoJoxKeHHa 3aKoHa 06 onachbx rpy3ax! HeBbINOJIHeHne 3tOro Tpe6OBAHm MOxET NOBJeYb 3a Co6oB cepbe3Hle WTPaΦbl dNl OTnpaBnteJI nn NpeBo3uKa.
IOnoJIHnTeIbHaNΦopMaunO TpaHCnOpTnPoBKe N nepeCbInke
TpaHcnpTnpoBka n nepecbIka IHTN-NOHbIX aKKymyIaTOPOB pa3peWaeTcra TOnbKO npu ycNoBN OTCyTCTBna NOBpeKdEHH!
ДяТраHCNOpTnPOBKn AkKymyIaTOPOBa pa3peWaeTcR NcNoJIb3OBAbToJbKO OpUrHaJIbHbIe Kopo6Kn IIN NODxOJaTu TApY DnA OnachbIX rpy3OB (Tpe6obAHne He pacnpocTpahReTcRaHaKKymyIaTOpbI HOMHaJIbHOmOuHOCbIO MeHee 100 Bt).
OTkpblte KOHTaKTbI aKKyMylrTopoB noDJIeKAT 3akneuBaHnO BO n36exKaHne KOpOTkoT03amblkAHn.
BHytpn ypaKOBKn aKKymJrTopbI DoJXHbI 6bItb 3aunuEhbl OT CMeUeHn, B npOTNB HOM cIyae BO3MOxHO IN IOBpeXdHne.
Pn TpaHcnpTnpOBKe nnn nepecbIke npoBepaTe npabNbHOCTb MapKnpoBKN IOKyMeHTaun (KypbepckOu nn 3KcneDNTOPCKOn cnyk6).
IpeBapnteHbHO BbIaHHTe, BO3MOxHa JIN nepeBo3Ka BbIpaHHbIM NOCTaBcIKOM ycnyr n oΦopMTe 3aKa3.
Pn noIroTOBKe K nepecbInke peKOMeHyem 60paTntbCk CneLnaNCTy NO onaChbIM rpy3am. TaKke npMHTe BO BHImaHHe BO3MOXHbIe DOJONHHTeNbHbIe HaUHOHaNbHbIe npaBnla.
10 XPAHEHNE
10.1 XpaHHe nyeTpoNCTBa
Iocne KaKdOro npImeHEny BbIHMaTe akKymyJrTOp n3 yCTpoiCTBa.
IocneKaKdOroNCNoB3OBaHnTuaTeNbHO ouuauTe ycTroPcNCTBO uYcTaHaBnBaHTe BCE 3aunTHbIe KpbIuKN (pnpix HaNuHN).
XpaHnTe yCTPOINCTBO B cyxOM,3aHnpaEMOM MecTe,HeIOCTyINHom DnI DeTei.
Ipi nepepbBax B pa6ote 6oJee yem Ha 30 DHei BbIOnHnTe cNeDyUoJee:
CINTb n3 MacJHOrO 6aKa MaCNo dJa Cma3Kn NJIbHOI cENI.
OuHCTnTb NINbHyU Cenb HAnpaBnaIOuyo 1IHy I O6pa6OtaTb aHTNKopp03NOHHbIM MacnOM.
Unyakobatb nIy no DepeBy B YeMoan dna TpaHcnpTnpoBKn.
BHIMAHNE! Onacnoctb nobpexdenya ctpoiCTBa. Pn dnteHOM xpaHeHH BbCyWBaHne/CKNeuBAHne MacJa dIg Cma3Kn NIIb-HOJ cEN MoKeT npBecT K NOBpeKDeHIO MacJIHOHeCuXx DeTaJe IIN MaCLHaHOro HaCoca.
IpeDdINTeBbIM XpaHeHnEM Bcerda CnBaIe MacNo dNcMa3Kn NInbHoN ceni.
10.2 XpaHeHne aKKymyIaTopa n 3apAnHO yCTpOiCTBa
I INPIMEUYHIO HOpMa- UHO BOTDeJIbHbIX NHCTpyKcIaX IO 3KcIIyatauN aKKymJrTopa n 3apdHOrO yctpoiCTBa.
11 YTNJIIN3AUIGN
NcnoNb30BaHHbIe 6aTapeMOry T copeKaTb BpeHbIe BeueCTBa Nn TjKeIbIe MeTaIIbI, KO-TopbIe MOrY T HaHeCTN BpeI OkpyKaHOSe CpeDe I yUep6 3DopOBbIO. NobTopHa nepepa6OTka NCNoNb30BaHHbIX 6aTapeKu N cNoNb30BaHHe pecypcoB, CoepKaunxCBA HNX, CNOCo6CTByet 3aUnTe 3TNX DByX BaXhblx AKTNBOB.
CnMBOJ nepeuepkHyTORO MycOPHOro KOHTeHepa O3Haayet, yTO 6aTapeKn N aKKyMyJrTopbI HeNb-3y yTNIN3uPObaTb BMeCTe C 6bITOBbIMN OTXoJaMN.
Kpome TORO, NOI CNMBONOM MYCOPHORO KOHTeINHepa HaneceHbI CNMBOLbl Hg, Cd nII Pb. 3To BbIrrnCT CneDyUoUIM o6pa30M:
Hg: 6atapea coepknt 6oone 0,0005 % pTuTN
Cd: 6atapea coepxnt 6onee 0,002 % kaMIA
Pb: 6aTape coepknt 6oJee 0,004 % cBnHca AKKymyIaTOpbl N 6aTapeKIM MoXHO 6ecnPaTHO cDaTb B CNeDyUOxM MeCTax:
TocydapCTBeHHa cny6a no yTuHn3aunn nn npHKt c6opa (HaNPmep, MyHnIpaIbHbIe CKlaDbI)
Mara3nHb6aTaapeek n aKKymyTOpOB
IyHKtbl npHema o6uei cnCTembl BO3BpaTa IcNoJIb3OBAHHbIX 6aTapeek yctpoiCTB
IpyHKtbl npnema n3rTOBNTeJIa (ecn OH He YBIIETcYJHeHOM 06beDINHeHHoCNCTeMbI BO3BpTa)
3TN 3aBHeHn DaIcTBnTeHbI ToJbKO dJa AkKymyTOpOB n 6aTapeN, KOToPbI npOdaIOTCB CtpaHax Ebponeckoro Co103a n COOTBeTCTBYOT DInpeKTube 2006/66/EC. B cTpaHax 3a npedeMaMn Ebponeckoro Co103a MOrT DeIcTBoBaTb DpyrIe npabnla, kacaUncnecy Tynlnau 6aTapeN n aKKymyTOpOB.
12 TEXHnueCKNE XAPAKTEPNCIKN
4.1 3aJIbBaHnJaHcIyOrOBI OJIbN (02, 03) .408
4.2 3apnditb akymyIaTOp .409
4.3 BCTaBJIeHH Ta BnMaHNa aKymyIaTopa (04, 05) .409
5 Eknyataia 409
5.1 IpeBipka pIBHЯ 3apAу akymyITo- pa (06). .409
5.2 NopepeJyBaJIbHi 3HaKn (06) 410
5.3Перевіртанцюгов мacrno .....410
5.4 YbIMKHeHH Ta BmKHeHH npucptpoo (07) 410
6 Poobou na nobeiHka Ta cnoci6 po6oTn ....410
6.1 Ponepeyne po3nnHbHaHHn nnIomatapeianB (08) 410
6.2 O6pi3aHHr iinok (09-13).410
7 Texhiye obcIyroByBaHHra Ta IOrJaI 411
7.1 Npebipka 3MaUyBaHHn nnIbHoro NaHcIora 411
7.2 NpeBipka Hatary nIJIbHoro IaH- zuora 411
7.3 PerynuBaHHHaTary NnIyIbHoro nauzura (14). 412
7.4 3aMiHa NIIJIaIbHOro NaHcIura Ta Ha-npIaMHOi IuHHn (15-19) 412
8 YcyHeHHHa HecnpaBHOCTe.. 413
9 TpaHcnpTyBaHHa 414
1036epirahnra 415
10.1 36epiraHH npictroIO. .415
10.2 36epirahnna akymyIaTopa Ta 3apdHoro npncptpo..415
11 Ytuniana 415
12TexhihixapaKTepcntkn 416
13 CepBicHe 6cbnyroByBaHHra 417
14 Inopmaia npo deknapaio BIDNOBIOHOCTi. 417
15 TapaHTiA 417
1 IHΦOPMALIJI PNO NOCIBHNI K I3 EKCIYATAUII
Himeczka Bercia MicTb opnHaJIbHni NoCi6Hk i3 ekCnPyatau. Bci iHsi MOBHi Bepcii 9e nepeKladiopnHaIbHoro noci6Hnka 3 ekCnPyatau.
3aBxDn TpMaIte uei nociHnk i3 ekCnlyatauiPi dykoIO, 06 npouHTaN Ioro, kUo Bam 3HaOobTbcra IHopmaia npnpncTpir.
IpeedabaTe npicptiinHmOc6am Tinb- kn pa3om 3n m nociHKOM i3 ekcnnyataui.
IpouHTaTe Ta DToTpmyntecBbKa3iBOK 3 texHikn 6e3neKn Ta nonepedKeHb, 0o MicTAYbcra B Ucbomy nocibNky 3 ekcnnyataui.
1.1 Cnmboln Ha TntyIbHi cTopiHci
YMOBHe N03Ha- YeHHa

3NaueHHa
O6OB'3KOBOPoounTaTe uei noC6HnK i3 ekcnnyatau i nepeBBeDeHHaM Beknnyatauio. Heo6xIDHO yMOBO 6e3neuHO Ta 6e3BiIMOBHO pObotn.

KIO KOpNCTyBaHnADTO CnIbHO WToBxAe NnIy No DepeBy NiD Yac NnIaHH, BOHa BmMkaTbc. Ce 3anobirae nepeBaHTaxKeHHo DnIryHa.
2.4.2 BiDknndHa KpnIka IaHJOra
Kpnka naHcIora 3axncae onepaTopa BiD pyxomoro nnIyIbHOro naHcIora. OoiHo Kpnka naHcIora BnnpaTbcR BdepeBnHy nId Yac NIIJHHN, BOHa aBTOMaTHNO NOCTynAc
NONEPEDXEHHa!He6e3neka,NOB'3aHa 3 NIIJIbHnM NaHcIyOrom.PyXOMn NIIJIb-HnI NaHcIg MOKe Ipn3BeCTn Do He6e3peuHnxДЯЖNTT TaBM.
IpaouTe 3 naHucroBOIO nnoIO Jnue 3i cnpaBHOIO KpuuKOIO naHcIora!
3a6opohyetbc3Himatn Kpnuky IaHcIora!
3.5 Bi6pauiHe HabaHTaxeHHa
He6e3neka uepe3 Bi6paquio
Фakmuyhe 3haeHHa bpauiHoi emicii nID yac buKOpucmaHH npucmpoMOKe bip3-Hamue bi 3aReHeHO2 Bup6HukOM 3Ha-yeHH. CnoctepiraTe 3a HabeJeHMn HJx-ue foakTopAMn BnNBy do a6o nID yac BnKOpuctaHH:
Yn BnKOpNCToBcyETbcra npncTpim 3a npn-3HaueHHm?
Um MaTepian po3pi3aHn a6o o6po6neHn npaBnJIbHo?
Hi?
YnpaBnIbHo 3arOCTpeHn a6o BcTaHOBJIeHn pi3aIbHn IHCTpyMeHT?
Uv BCTaHOBHeH KPOHSTeHn i, JaKIO NoTpi6Ho, DoatKoBi Bi6pauiH pyuKn, i YuIiNbHO BOH 3'EdHaHI 3 npncTroem?
EkCnnyatyte npncptiin 3 qactotoo O-6eptahnna DBnryha, HeobxioHO DnBnKo-HaHHa OKpeMoIO pObTu. YHkaTe MaKcMaJIbHOJ qactOTn o6epTaHHa, 06 3HN3NTPiBeHb Wymi i Biopaui.
Yepe3 HEnpaBnIbHy ekCnIpyatauio Ta texHicHe 06cnyroByBaHHa Wym i Bi6paia npNCTPOIO MOKytb NiDnUHTncs. Lc 3aBdaE IKOIN 3dOpOB'IO JIOHN. Y Taknx BnnaIqkx HeraiHO BmMKHiTb npNCtpi i 3BepHITbcra 3a Noro pemOHToM B aBTOpN3OBaHn cepBicnH nEHTp.
CTynihb Bi6pauiHoro HabaHTaXeHHaJEnKtB BiD BnKOHyBaHOi po60Tu a6o BnKOpNCTaHH npIcTPO. OuiHb i BCTaHObitb BiNobiHi nepeBn Bpo60i.B pe3yIbTati Bi-6pauiHe HabaHTaXeHH npOTrOM BCbOro po6oYOrO yacy 6yde 3NaHNO 3HNKeHo.
Tpmbana ekcnnyataia npictroo hapaxae onepatopa Ha Bi6paui i Moxe BnknkaTu npoblemn 3 kpoBoo6irom (Cmntom «6iNOro nalbura'). Uo6 3meHunTu ue pn3NK, Hocitb pykabuizi Ta Tpmaite pkyB tenli. Y pa3i BnABHeHHra CmNTOMy «6iNOro NaIbca» He- raHNO 3BepHItbcrdo Iikapra. Do uix CmNTOMIB HanexKaTB: OHIMHHa, Btpata yUtnBOcTi, NOKOJIIOBaHHra, CBeP6IX, 6Jb, cna6KiCTb, 3MiHa KOnbopy a6o cTaHy uKipn. 3a3Bnuaui CmNTOMn BVIIINBAIoTH Ha naIbci, pyKn a6o npYbc. 3a Hn3bKnx Tempepatypn3NK 3poCTae.
Poibt b iac pooboro dHra Tpnbani nepeBn, 0o6 BiDnoHTN BiD wymi i Biapaui.
IpaHyTe cBOO po60Ty TaK,IO6 po3dInNTeKcNpyatauio npncTpoIB,RAKI CTBOPHObCnIbHi Bi6pauii,Ha KJIbka DHiB.
KuBo BN BiDcyBaTe DnCKomΦoP r6o KaBo BnHnKa E nCxPOMi uKipN iD yac BnKOpNCTaHH npNCtpoB pykax, HeraHNo npnHiHb po6Oy. BcTaHObit DoCTaTHi nepePBn Bpo60ti. Po6Ota 6e3 DoCTaTHix nepePB moKe npn3BeCTn do MicueBOI Bi6pauiHoIxBop6n.
Mimimi3yTe pN3NK BnNBy Bi6pauii. BkoHnyTe o6cnyroBvBaHH npncIpo BIIOBIDHO do IHCTpyKui B noc6HNY 3 ekCnlyaTauii.
KoO6bHaHnBnKOpNCTOByETbcyaTc0, 3BepHiTbcrdoDnIepa,uO npI6aTu aHTN-Bi6pauiHi akcecyapn (HaPnKnaD,pUKN).
YHnKaItepo6To3 npncTpoCm 3a Tempeatypn HxKue 10^ Y nlaHi po6To Bn3Ha-Te, kMOxHa O6MeKHTB6pauiHe HabaHTaxKeHH.
3.6 AkyctncHe HaBaHtaxeHHa
DeKoro akyctuHoro HabaHTaxeHHa, cnpunHeHoro zim npictpoem, He moXHa yHnKHyTu. BkoHynte wumHi pOboty u BCTahOBNeHi i BN3haeHi TepmiH. 3a notpe6n cnid BpaxoByatn Bka3iBKn Udo «Tnxx roDInH» i O6mexyBatn TpnbIcTb poBotn Hai6inbH Heo6XiHO. Dna 3a6e3neehn Ooc6nctOrto 3axncty ta 3axncty oc6, kki nepe6ybaotb no6nn3y, Heo6xIDHO Hocntn HabuWNkN.
3.7 PpaBnla TexHikn 6e3neKn dJa akymyIaTopa n 3apAHorO npncTropo
BnMItb akymyIaTOpn 3 npncTroIO nepei 3apJxHaHHm.
He BnKOpNCToBvIe aKymyJIaTOpN pi3Hnx Tn- nib y npncTrooi abo HOBI Ta BnKOpNCaHI aKymyJIaTOpN pa3OM.
BctabnIte akymyIaTOpN y npncpii 3 doTpmaHHm noJrpHocTi.
BnMaIte akMnyTOpn 3 npucToIO dna 36epirAHn npotrrom TpUbaNo racy.
He donyckaTe KopoTkoTo 3amnkaHHKJIem npncTpOIO a6o akymyIaTopa.
Noci6HnK3 eKcnpyaTaucii
Iotpymytec npabn texhki 6e3neB Okpe-mnx noci6nkaix i3 ekcnnyatauii niicvac Bnkopn-CTaHHaKMyJTopa Ta 3apdHOrnpncToIO.
IMB.
noci6nK 3 ekcnnyatauii 443130: akymyITo- np
noci6HnK 3 ekcnnyatauii 443131: 3apdHi npncptpoi
3.8 IpaBnla Texhikn 6e3neKn iD yac po6oTu
DotpmyTeCpaHaJIbHnx npaBnI TexHikn 6e3neKn, HapnKnaI, npopeciHnx acoia- ci, coaiaJbHnx fOHNiB, opraHIB oxopoHn npaCi.
BukopncToByte npucptiin 3a doctatHboi kiIbKOCTi DeHHoro Cbitna a6o 3a WtYuHoro OCBITHeHH.
PoboHa 30Ha BInbHa BiD npEaMeTIB (HapnKnaI, YacTHN npOnuNy) - He6e3neKa CNOTKaHHra.
KopncTyBaH Hece BiNobIaJIbHicTb 3a 3aBdAHHaIKoDn IIOJAM YI IXHi BnacHOcti.
JaKIO Bn npaioTe 3 NaHIOROBOIO NINOIO Bnepwe:
Nonpocitb npoabua a6o 6ydb-kofo paxibzra po3'acnnt npnncnpo6otn IaHcIorBOoi nlln a6o npoindt b HauanH.
IpeepnIm 3acTocyBaHHm nonpaKTNkyTeCxOa 6 po3nnIOBAtN KOIoHa Ko3Jax a6o niDCTabci.
3.8.1 Onepatopn
Oco6am, kI He 16-piHoro Bky a6o He 03HaonmJIeHI 3 NocIHKOM 3 EKCnnyatauii, 3a6OpOHeNo BnKOpNCTOByBaTn npnlaD.
Будь-якалюна,ло працhoe3 lanцuroBOIO nINIOIO, nobHHa 6yTN BiDnoCHIOIO,3dopOBIO TO Ta nepe6yBaTn B rapHIn φOpMi.Якso 3a CTahOM 3dopoB'He MOxHa BTOMJIIOBAtncs,CiID 3aNTTaN y LiKapr,Hy MoxHa npauOBAtu 3 LaHcIPOBOIO nINIOIO.
3.8.2 Yac po6oTu
Dotpmytec npabn lo do yacy po6to 3 eJektponnkamn KOHKpeTHOI KpaIHn. Yac po60tn 3 eJektponnkamn MOKe 6yTN o6mxeHn HauiOHaJIbHMn Ta MicceBHMn HopMaTINBaMn.
3.8.3 Po6ota 3 eJekTpOnnIkoIo
NONEPEDXEHH! Pn3nk OTPMaHH cepno3Hnx TpaBMYepe3 MaHinylaqii 3aNo6ixHmTa 3axncHmnpctpOAM. MaHinyIauii 3aNo6ixHmTa 3axncHmnpictpOAM MoKyTb Pn3BecTN Do OTPMaHH cepno3Hx TpaBM NiD Yac BVKOpNCtAHH eJKeKTPoNNIK.
YkoHomy pa3i He BmKaTe 3anobkHi Ta 3axuChi npucTro!
BukopncToByTe eJeKtpOnnKy TiNbKn Todi, KOJI Bci 3anobixHi Ta 3axnChi npncTpoi cyHKioHyOt b npabNbHo.
NONEPEDXEHH! He6e3neka OTPMaHn H TpaBM BID BnnaKOBoro 3anycky eNeKTponnKn. BnnaKobni 3anyck eNeKTponnKn MoKe npn3BecTI Do OTPMaHH cepNo3Hnx TpaBM. ToMy BnmaTe aKymyJrTOP y TaNX BnnaKax:
TexHIOHO orJy, peryIIOBaHH Ta Oun-
Pobotn 3 pikyuim o6naHaHHa
Ko eJekponny Tpe6a 3aunnt
TpaHcnpTyBaHH
po3MiueHHHa 36epirahHH;
TexHOrO 6cIyroByBaHH Ta peMOHTy;
Bpa3i He6e3neKn.
CπiTpmaTn HAnorotobi anTeky Ha BnnaDOKnopaHeHb.
I Do 3acobib iHnBiyanbHoro 3axncty Hane-kaTb:
3acobn 3axncty opranib cnyxy (hnpuKnaI,6epyu),ocobno,koNpOboyni DeHb cTahOBNT noHa2,5rOHNH;
3axncI OkyIpyn;
3axnchi ⅢTaHn 3i BCTaBKOIO DnA 3axncty Bi nopi3iB;
MiCiHi po6oChi pykAbuCi;
6e3neUHe B3yTTa 3 HeKOB3KOIO NiOuBOIO i CTAJIeBIM HOCKOM.
Y pa3i 3miHmicpa po3aUyBaHHra DBnHyH cnid rnyuHTN.
BnMaTn akymyIaTOp i3 nIIu no DepeBy, kK 10 II He BnKOpNCTOByOTb.
3aboponeHO BnKOpNCToBvBaTu Nnny no DepeBy kMexaHicHyBaxiNb a6o dna nepemiuHn depeBHH.
KoIOn,TOBUnHa JkNx NpeBnUyE DOBXnHy INJIbHOI uHHN,DO3BOJeHO PO3INIOBAtu TInbKn KBaIqikOBaHomy nepcoHany.
PnuctabTn nnIbHn IaHcIg Do o6pO-6IOBaHO MaTepiany TINbKn 3 npauoUChm nnIbHm NaHcIgOM, 3a6OpOHcTBcB MKNATn IaHcIgOBy Nluy 3 yKe npCTabHeHM Do MaTepiany nnIbHm NaHcIgOM.
CTeKHTn, 0o6 IaHcIgOrBa OINBa He noTpapnnla Ha 3emJIO.
3a6bopoHeNo nIIaTn NiI qac douy, cHirona- dy a6o wTopmy.
4 BBEDEHHB EKCNJYATAUIO
HEBE3NEKA! Pn3NK cMepti a6o T8KKnx TpaBM. He3HaHHn npaBnTexHikn 6e3neKn Ta ekCnPyataui MoKe npu3BeCTn Do cepNo3Hx TpaBM i HabiTb cMepti.
IpounTaIe i Bci npabuIa TexHikn 6e3neKn Ta eKcnNyataui, 0o MictTbcB Ucbomy NocibNky, a TAKOX IHcTpkyi3 EKcnNyataui, nepei BnKOpncTaHHm eJeKTponlkn, a TAKOX dOtpmyTeec ix!
I NOPEPEDXEHH! Pn3NK OTpMaHH cepno3Hx TpaBM. RaKoHa eNeKtponuBCTaHO NoJKOJeH DeTaJI, Ce MoKe npN-3BeCTn Do OTpMaHH cepNo3Hx TpaBM.
IpeedKoXHM BnKOpNCtAHHm BnKOHyTe Bi3yaJIbHNI KOHTPOJIb, 0o6 nepekoHaTncB TOMy, 1O eJNeKTPOINIKy NOBHICTO 3MOHTOBaHO I 1O BOHa He MICTITb 6yDb-IAKNX N0WKOJxHi a6o 3HOWeHx DeTanei. Bci 3anobixHi Ta 3axnChi npncTpoI NobHHI cnpabHo fynKcioHyBaTu.
4.1 3aIbBaHnHaIauIorOBI OINBn (02,03)
PyuHa cncTeMa 6e3nepepbHO nOaE IaHcIOrOBy OINBy y nnJIbHN IaHcIg I HnPmHy uNHy. IaHcIOrOBa OINBa 3axNuAc BId Kopo3i Ta nepeDuachoro 3HoUyBaHHr.
Ppumimka: Ppucmpiu nocmaaembc8e3 naHuio2o0oi onue!
YBAI! He6e3neka noxkoJxHnO6naHaHH. BnKOpncTaHH npictpoIO 63 Macla IJa 3MaueHH naHcUra npn3BODnTb DO NOxKOxHHe HnnJIbHO nauCtora Ta HanpMHOI uHH.
3a6opohraTbcBnKOpncTOByBaTu npunctpi 6e3 Macna dIg 3MaueHnI INIJIbHOrO IaH- cIora.
Ipeed noaTkom BnKoHaHH po6it cniD 3a- NOBHHTM MacJHm 6ak MacnOM dNra 3Ma- UeHH NaHcOra Ta nD yac pO6OTn peryIpHO KOHTPOJIbOBatn pIBeHb Macna.
Ipeed KOKHIM BIKOPnCTaHHm CnId nepekoHaTnCBAcPABHOMy FyHKUHOHyBaHHi ABToMaTHuHOI CNCTeMn 3MaUeHHra.
YBAG! He6e3neka nowkodxeHnnaHaHH. BnKOpNCTaHH NaIpaCboBaHO macnaDЯ 3MaueHH naHcIora,aje MicNTb MexaHiNIDomiShKn, npn3BOdntb Do nepeDyachoro 3Hocy HnpaBnIoooi ShHH Ta IaHcIora. Y pa3i BnKOpNCTaHH BiPaCboBaHO macna rapaHTiHi 3o-6OB'3aHH BnPo6HnKa BTPaAOTb cnly.
3abopohraTbcBnKOpncTOByBaTN BiDnpa- CboBaHe MacNo,ДлЯ 3MaUeHHЯ LaHcIOra Do3BOJRAETbC BnKOpncTaHHЯ TiIbKn BiOpO3-KnaHOrO Macna.
YBAGA! He6e3neka 3anodijHHn shkOuHaBkoJHbOMy cepeOBu. BnkOpNCtAHnMiHepaIbHoro Macna dJa 3MaueHn JaHcUra 3a-noDIOe cepno3Hy shKOdy HABKoJIuHbOMy cepeOBu.
3abopohraetbca BnKOpncTObyBaTu MihepaJIbHe MacNo,ДЯ 3MaueHnlaHcUra Do3BOJAreTbcBcBA NKOpncTaHHa TIlbKn Biopo3KnaIadHoroMacna.
Ipeep KOxHm BnKOpNCtAHnM i nD qac KoxHOi 3amHn akymyJrTopa cNlD nepeBiprtu pBeHb IaHcIroBOO OINBn Ta DOINBaTn II 3a NOTpe6n:
- Ipebeipu np iBHeb OINBn uee3 ornaIOBe BIKHO (02/1) 6aka Ha IaHIOROBy OINBy. B orIyIOBOmy BIKHI 3aBXdMaE 6yTu BNHO OINBy. Ipumimka: 3abopoHeHo 3aIueamu OuiBy Huxye biO MIImaJIbHOzO (MIN) ma buue biO MaKcUmaJIbHOzo pieHa (MAX).
2.Якwo akymyraTOp nIDKnIOueHo:BnHrTaN aKymyraTOp, 3o6 3ano6irTu BnnaKOBOMy NcCKy PNIuNo DepeBy nID Yac 3aNOBHeHHOJINBOU. - POKnactn nIy no DepeBy Ha MiuHy OCHOBy B Tropn3OHTaIbHOMy NOOnKeHHi.
- OuNCTIITN NOBExHNO HABKOJNO KPNiKn 6aKa Ha JAnHIOROBy OINBy (03/1).
- Kpnska 6aka Ha naHnuroBy oINBy.
- 3aHTn (03/a) naHcIyOBy OINbY B 3aINBHy roPNObHy (03/2) do no3Haay MAX. OInBa He NOBHHa nepenBaTncs Ype3 Kpa!
PumimKa: Ira akypamHOi 3anpaeku MoKHa buKOpucmoeyama NiKy.
PumimKa: 3abOpoeHo donyckamu nompaIIHNr 3abpydHe b 6ak Ha onuey. - Bnteptn po3nTy IaHcIorOBy oINBy.
- 3HOBy 3aKpyTNTn KpNShKy 6aKa Ha NaHcIorOBy OJIbY.
- BCTaBnTu aKymyTApTOp.
4.2 3apädɪt bakymyntop
3BepHb yBary Ha diana3oH TemnepaTpy dIy 3apdkaHH aKymyJrTopa, nB. TexHihi daHI.
I NPMITKA BiIbI W DoKnaIHy iHΦopMaciIO nIB. B OkpeMIX iHCTpyKciX NO eKcNpyaTaui aKyMyJrTopa Ta 3apAHorO npCtpoU:
Ioci6HnK KopncTyBaHa 443130: akymyJrTo- np
Посicontкорисьа 443131:зардни рпстpoi
4.3 BCTaBJIeHH Ta BnIMaHH aKymyJrTopa (04, 05)
YBAGA! He6e3neKa NOxKOJXeHHa kMyJIaTopa.Якpo nicЯ BnKOpNCTaHHa akymJIaTOp 3aJIuHTn B npICrpoi, ce MoKe npN3BeCTn Do no-koKoJXeHHa akymJIaTopa.
Odpa3y nicI BnKOpncTaHnAkyMylTOp cnId BnHrTu 3 npncPo Tu 36epirTu B 3aXnueHOMy BiD BnINBy Hn3bKx TempePaTyp MicTi.
AkymyIaTOp cIiD BCTaBJIaTN B npncTpIi 6e3- nOcepeHbO nepeD BNKOpNCtAHm.
BcTabnHn aKymyIaTopa
- BCTaBnTu (04/a) akymyIaTOp (04/1) B shInHy akymyIaTopa (04/2) nIIu no DepeBy 3BepxU do KlaZaHHa.
BnMaHn aKymyIaTopa
- HATNCHyTN Ta yTpmyBaTu HAtNCHyTOIO KHO-ny po36nOKyBaHHa (05/1) Ha akymyraTopi.
- BnHrTn (05/a) akymyIaTOp.
5 EKCJIpyATAUJ
HE6E3NEKA! Pn3nk Cmepti a6o TjXknx TpaBM. He3HaHHa npabNl Texhikn 6e3neKn Ta eKcnnyatauMoKe np3BecTn Do cepNo3Hnx TpaBM i HabItb Cmepti.
IpouHTaTe i Bcipnbuna Texhikn 6e3neKn Ta ekcnnyataui, uo MicTbCBA bOmy noci6Hky, a TAKOX IHCTpykui 3 ekcnnyataui, nepei BnKOpNCtAHnM eNeKTponnIKN, a TAKOX Dotpmyntecx ix!
NONEPEIXEHH! He6e3neka TpaBMyBaHH Ype3 HecnpaBHicTb npncTpoI. EkCnPyataiHecnpaBHoro npncTpoIO MOKe npn3BeCTn Do cepNo3Hnx TpaBM i NOsKOJxEHn npn-CTpoI.
Ekcnnyatynte npncpti nWe B TOMy BnnaKy, kso BiCyTHi HecnpaBHOcti abo nowkoDxKeHHa TAKOX npcyTHI BCI KOMNKeKtyOci Detani Ta Hemac ocna6neHnx DeTanei.
IOTpIMyBaTncbHaioHaJIbHIN NOIOKeHb, IOp perIaMeHTyOToB DoNycTmMn Yac poBoTn.
3aboponeHo BiDnyckaTn pyuKn, NOKn npaioe DBNrHy.
3a6oponeHO BnKOpNCTOByBaTN JaHcIroBy nnJy:
y pa3i BTOMN,
y pa3i noraHoro camonoyT8,
πiD BnNBOM aJIKOROJHO, MeIKNaMeHTiB a-6o HApKOTIKIB.
5.1 Ipebeipka pibn 3apny akymyIaTopa (06)
Ihdkatop pIBH 3ap4y (01/15) po3taoBAnn 360ky nnn no depeBy. BIn cKnaJaetbcra 3 Tpbox CbitIOIOHNx IHdkatopib.BoH cBITbcr 3a- neXHO BiD pIBH 3ap4y.
- HaTnchTyN KhONky (06/1).
- 3yntaTn pBeHb 3apAHy Ha cBtIIOJIOHNx iH- DnKaTopax (06/2):
KoJn aKymyIaTOp po3pIaKeHo
Pnna no DepeBy 3ynHaeTbcra, a octaHHi CbitnoioHN iHnKaTOp npoOBXye 6nMaTu npotrarom 3 c nicra 3ynHkn.
5.2 NonepeJxByaJIbHi 3HaKn (06)
PonepeJxByBaJIbHi 3HaKn (06/3) Bka3yIOb Ha TaKe:
AkymyJTop neperpibc.
1.Доуекатис oxolodkeHHa akymyIaTopa.
KuO BV cnpo6yeTe 3anyctnTn Nny no DepeBy, nonpTe, 0a kymyIaTOp ige He oxoNob, nonepeJxBaJIbHi 3NaKn 3HOby 3acBITbCra Ha 5ci 3rachYtB.
5.3 IpepeBipTe JiaHIOROBe MaCTnIIO
IpekeohybaTnca, 0oB6aKy e DocTaTHbO IaHcIgROBOI OINBn:
peepKoXHM BnKOpNCtAHHm;
piuacpo60n;
πiδ qac KoxKHO 3amHn akymyTopa.
Y pa3i Hn3bkoro pibHra OINBn 3aONBHt b NaH- LIOROBOO OINBOO.
3a6bOpOHeNo BnKOpNCTOByBaTn npncTpiB 6e3 JAnuToBOi OJINBn!
Iopraok iin: nB. po30in 4.1 "aunueaHnaHnucuOoei onu (02, 03), cmopihka 408.
5.4 YbIMKHeHH Ta BmKHeHH npncptpo (07)
YbIMKHeHH npncToPOU
- BeINKIM nalbem HATNCHyTN yTpmyBaTH KHOKNy 6nOKyBaHHa (07/1).
- Hatachnyta ytpmByaTH BmNKaU (07/2).
- BiDnyctnTu KhoNky 6NoKyBaHnry. Pumimka: Nicna 3ayncky naHuo2o0oi nu npu ympumyamu KhoNky 6NoKyBaHH He nopmi6Ho.Khonka 6NoKyBaHH cIyKumb dna 3anobiaHH HeHaemuchO zo Nycky naHuo- zo0oi nuu.
4.3mactntn nIJIbHn IaHcIg:
HaTnCHyTN KhONKy (07/3) OdnH pa3, 0o6 3MaCTNTN NIIJIbHN IaHcIg. Ha NIIJIbHNI NaHcIg HAnITN NeBHy KINbKICtB NaHcIgROBOI ONIBN.
IpeBipu, uBnHO naHIOROBy OINBy Ha HaprMHi uHI Ta nJbHOMy NaHc03i.
BmKHeHH npncTopo
- BiDnyctNTN BUMNKaU.
6 POBOUA NOBEIINKA TA CnOCIEPOBOTN
6.1 Ponepeuhe po3nnIOBaHHnIOMaTepiJIb (08)
IiD qac uix po6it Heo6xidHO doTpmyBaTn TaKnx nyHKTIB:
BukopncToBvBaTu HaDiHy onOpny dIy pi3aHn, HAnpNKnaD KOHK (08/1), KInHn, 6aKn.
Kpyrni nnilomatepiian 3akpinntu, uo6 yHnKHyTN npokpyyBaHHa.
3a6oponeho ytpmByatn nJomatepiaJ Horo i npocntn Notpmatn Ioro IHsy IIOHy.
CTeKHTn 3a CtiKm NonoXeHHaM i pIBHomipHm po3noJinom Macn Tina.
Пиа по deprеву мiocно закрплесна на неeledній i зади ручкax, тобто Тримати istoьовahi nobepxhi pyok oboma rykamn (08/2).
Lijbno npntnchyn ynp (08/3) nnn dopeba.
I IpnCTabTn Nny do o6pO6JIoBaHOro MaTepiany TINbKn 3 npaTOUChm NnIaJIbHm NaHcIyOM. 3a6OpOHeB BMNKATn NaHcIyOBy Nny no DepeBy 3 yKe npCTabNeHm Do MaTepiany NnIaJIbHm NaHcIyOM.
6.2 O6pi3aHHrINok (09-13)
NONEPEDXEHH!PiBnueHa He6e3neKa naHH. IChyE niDnueHa He6e3neKa naHH, RaIO pOBoTy BnKOHyOTb 3 NiDBnueHOrO PiB-HaHpNIknaD, CXoIN).
3aBXd npauoTe 3 npncToe m i3 3emni i nepekoHaTecB TOMy, uO BN cTOiTHe Ha TBepdomy rpynti.
IOTpMMyTecr npabnI Texhki 6e3neKn.
KopncTyBauchOBnHeH npnHrTaKe nOJxHn, 3p3 MoXHa 6yNo 3pObHTn no MoXJIbOcTi NiD Kytom 90^ do rInk (09/a).
ToBCTi rIKn cni3p3aTuacTnHaMn (10/1), 1o6 Kpaue KOHTPOIbAtu 3OHy naHnB BiD-p3aHnx rINok.
3aboponeHo 3pi3aTn rIKN B Micci NOTOBueH H6i7 oCHOBn. IHaKUe paHa B Micci 3pi3y 6ynde nobInbHo 3ataryBaTnc, B pe3yIbTaTI
YORMOxKe NOaTnCnIPOUeSc HHTTRepeBnHn (11).
Iiud pobotn cnid BnKOpncTObyBaTu ynp (12/1), 06 npntncHTu (12/a) nny no DepeBy do rinkn (12/2) ta TaKIM YHHom 3aΦikCyBatu II Ha rili.
I Iepsh hix 3pi3aTu riky (13/b), nepuHn Ha- dpi3 cniD 3po6bTu (13/a) Ha HxKHi yactnHi rIKn. Ta MoxHa yHnKHyTu 3aDiPiB Ha Kopi ta paH, zo DOBro 3aroIOToBcR. 06b yHnKHyTu 3aTncHeHHr NIIu Ha HxKHi Ya- cTnHi rIKN NOBHeH cTaHOBtN He 6iNbwe hIX 1/3 TOBUnHrIKn.
I O6 nny He 3aTnchyn, II cnid BnMaTu 3 po3nny 3 pyXOMM NJIyIbHIM NaHcIOrom.
7 TEXHlUHE OBCJLYROBYBAHHRA TAOIJIaI
I NONEPEJXEHH! He6e3neka nopizib!
He6e3neKa OTpMaHHpaHn paH niJ yac KOHTaKTy 3 roCTpIMN pyXOMMn DeTaIaMn npNCtpoI o pIXyUIM iHCTpyMeHTom.
3aBxDn BmKaiTe npncpii neped TexHicn i cepBicHM o6cnyroByBaHHaM Ta Oun-ueHNHaM. BnmiTb akymyIaTOP.
3abxHn Hocitb 3axnChi pykabuCi NiJ Yac TexHicHoro o6cnyroByBaHHa, DOrJaTy Ta OUn-
Pemonthi po60tn Do3BOJeHO npoBOnTu TINbKn KBaJIΦIKOBaHm φaxiBcM BnKlOuHo i3 BNKOpNCTaHHaOpnIHHaJIbHnx 3anaChNX YaCTNH.
Пися Кожног ВИКОРИСТАНЯ NepeBIPЯТУnpICTPII Ha 3HOC Ta 3a NOTpe6n 3amIHATNnowkoJxKeHi DeTani.
Cπiδ 6epeTn npicptpiB iD BnNBy Boa n a6o BOIOrn. Ounuatn nactnkobi Detani TkaHnHO. 3a6opOHeNo BnKOpncTObYBaTu MNoui 3ac06n a6o po3uHHNKn.
OuHuaTn BeHTnJaIHi KaJIIO3i, JaKIo BOHn 3aCmIyeHI.
3aboponeho po3nnIouTe Body Ha npictpi i BnKOpNCToBMyTe OunuBauch BucOKoro TnCKy.
BukopncToBvBaTu TInbKn 3a3HaueHcI Bnpo6- HNKOM 3anachi YacTnH.
7.1 NepeBipka 3MauCyBaHHn NIIJIbHOro NaHcIora
YBAFA! He6e3neka nowkOJKeHHo6naHHaHH. KOHTaKT i3 3emJeHemnHype npu3BO-DNTb Do 3aTyIeHH pKyuNX 3y6uB.
He moxha donyckaTn KOHTaKTu IaHcIora i3 3emneIO, nny 3abXdn cniD trpMaTn Ha 6e3neuHi BicTaHI B 20 cm BiD 3emni!
-
YbIMKHiTb npncTpri.
-
TpMaTn BnCoToPi3 KiHcE MnnB HAnpRmKy KapToHy a6o panepy, po3CteJeHx Ha 3emNi.
KIOIIMaMaHaKAPTOI aO npepi 36IbWyETbcr,TO CnCTema 3MaueHnaHauqora cyHKioHyc cnpabHo.
KIO, He3BaXaIOnH NaOBHN MaCLn Hn 6ak, PnMa Macna He 3'ABnEtbcr: CnID npOuNCTHTM MacNOBnYcKn OTBip i na3 HnPaBnIooi ShnH.
KuO He HJOnOMoKe, cnI3BepHyTnCra Do cepBicHOI cnyk6n.
7.2 Ipebeipka HaTary nIyJIbHoro IaHziora
OBEPEXHO! He6e3neka TpaBmyBaHnna HIOJIbHm IaHcIOrom.Pixyki KpOMKn IINJIb-HORO IaHcIgra dyke roCTpi, TOMy KOHTaKT 3 NaHcIcROM MoXe cTaTn npuHIO piaHnx paN. Pepei BnKOHaHHaM 6yd-b-axxBnDIB po6it 3 naHcIcROM Heo6xIDHO:
BUMKHyTN npncpti Ta BnHnTn akymyJrTop;
HaDiTIu 3axnchi pyKaBnKn.
CniD perynpno nepebiprH nAtrn nnIaIbHoro IaHOra, TOMy 10HOI NaHcTn TeK po3TgYKtbcra.
1.ПиЯьнл NaHcIor cni3nerKa BiTgHyTuBn3 i npn cboMy nepeBipuTu:
YxOIOHOMyCTaHI:IIIJIbHNIJaHcHOr HaTARHyTO npaBnIbHO,RAUoNo ceHTpy HAnpMaHOI 5HHNIORO MoKHa BiITarHyTu Ha3-4MMI npOBepHyTu HA 5HHI BpyHy. Ynpoceci EKcnnyatauBpa3i HarpiBaHN HnnJbHNI JaHcIg NODBjGyEcTa Ta npOBncae.
I GoNobHI NaHKn NnJIaJIbHOrO JaHcIora He NoBHHI BnCTyNaTn 3 KaHaBKn Ha HnKHi CTOpOHi HApPmHOi SiHn, IHaKSe NiJIaJIbHNI NaHciIg MoKe 3icKoyHTn.
- 3a notpe6n nnnnblhni naHcIor cnid niTARHyTN (DINB. po3di7.3 "PeayuobAHnHa mny nnnaBhozo naHouza (14), cmopihka 412).
7.3 PerynIOBaHHaHTaRy nnIaHbHO raHaHcIora (14)
1.Длpeуюванн haTary laHiora(14/1) BnKOpNCTOByBaTN BnKpyTKy 3i WniueBOIO rONOBKOHO.
36iJbWHTn HaTg NJIaJIbHOrO JaHcIHa: BoNT HATrgy IaHcIora (14/2) 3akpyTtN 3a RoDINHHKOBIO cTpIKoIO (14/a).
3MeHHTN HATr NIIJIbHO r NaHcIOra: 6oT HATrRe Y NaHcIOra 3akpyTuTn npOTn roHHNKOBO' cTpiKn (14/b).
2.ПepeBipTuHaTgIaHcUOra(ДИВ.pO3dIn7.2 "PepeBipKaHamaynIyIbHoZoIaHcUOzA", cmOpIHka411).3a notpe6n nobTopuTu nonepenHiKpok.
7.4 3amHa nIyIbHoro IaHcIora Ta HanpAmHOI WnHn (15-19)
Y pa3i 3HnKeHH npOdykTnBHOCTi pi3aHHI IINJIbHNI NaHcIg I, MOXJIbBO, HApRmHy UHNy CIId 3AmHITN. HanpRmHy UINy CJId 3AmHITN 3a HAraBHOCtI 3Haunx O3HaK 3HOcy KaHaBKn Y HaPramHi uHHI dnn PnJrJIbHOro NaHcIgA.
BukopncTObByaTn TINbKn OpunHaNbHi 3anachi YacCTnH BiD Bnpo6HnKa DnA nnJbHorO NaHcIora Ta HapmHOoi uHH (DnB. po3di 12 "TexhiXapaKmepucmuKu", cmopiHa 416).
OBEPEXHO! He6e3neka TpaBMyBaHn HnnIaHbHm NaHcIOrom. Pixyki KpOMKn NnIaJIb-Horo IaHcIgra dUyke roCTpi, TOMy KOHTaKT 3 NaHcIcROM MoKe cTaTn npuHIO pizAHx paH. Pepei BnKoHaHHam 6yd-b-axxBnDIB po6IT 3 naHcIcROM Heo6xIDHO:
BIMKHyTn npncTpI Ta BnHrTa akMyJrTop;
HaJIITn 3axuChi pyKaBnuKn.
3HATTTIINJIABHORO NaHcHOra Ta HAnpMaHoi IHHN (15)
- RaKuo akymyIaTOp nIDKnIOueHo: BnHraTn aKymyIaTOp, 0o6 3anO6irTu BNpaKOBOMy NcKy nnN no DepeBy.
- BiДкрптNiКьше Кріпліннг (15/1) крішкі NaHцюroBoi 3ipocu (15/2).
- BiikpyTnKJIbue KpInNeHHn npOTn roHnHnKOBoi cTpIKN.
- 3Himahn (15/a) Kpnu nn NaHIOROBOi 3ipouKn.
- 3HATN NIIJIbHn IaHcIor (15/3) Ta HApPmHy uHHy (15/4).
- BiD'eHaTn nIaJIbHn NaHcHg BiD HapPmHOI WnHn.
UH
- OuHCTHTB C3HrTI DeTani BiD TnPCn Ta BiKnaDeHb ONNB.
- Ouncnttu Bci BiikpnTi Detani, oO6JnBO 3i-pooy Ta OTBip Dnra Bnycky OINBU.
YcTaHOBEnHHI NIIJIbHOrO NaHcHOra Ta HAnpMaHoi IuHN (16-18)
- Повертахьт haялцога (16/1) BnKpyTKOIO 3 xpectonodio6HO IO rONOBKOIO,doKN StntФТ haялцогa (16/2) He onHHITbcra Ha 3aHbOMy kiNci pi3b6JIeHnra (16/a),dINB. po3di7.3 "PeayIIOBaHnHa mray nunJIb-Ho2O laHcOza (14),"cmopIHka 412.
2.YcTaHOBnTn nnJbHn JauHcior Ha HapmHy uHHy:
3y6ci (17/1) nIIaJIbHoro IaHcIora (17/2), Rki NOBnHI po3TaUoBvBaTncs 3Bepxu Ha BepxIBci HappMHOI uHH, NiTgHTN (17/a) do BepxIBKn HappMHOI uHH (17/3).
Pumimka: Cmexkumu 3a npabunbHum Haprakom xody naHOK!
ПилайнлЯнцу yknactnв kaHaBky dnyпляльboro панцura (17/4) ha-npmaHoiшин Ta npOBepHyTu Пильни панцorТak,SOb BeCb Пилайнл anzur lekab Ha HanpamHi shni.
- HanpMHy 3 yKJIaIeHIM nINJIbHIM NaHcIOrm HAKJAcTn Ha KOpNyc:
06epHyTn nIIJIbHn IaHcIg (18/1) HABKOJIO 3ipoQKn (18/2).
HaPmHy 18/3) po3miCTnTuK, 06 HapmHa 18/4) nTpanna do KaHABN B HapmHi
Ha npMHy uHny po3mictnTuK, 0o6 uTnOHT HATrIy IaHcUra (18/5) nOtpanNB DO KaHABKn B Ha npMHiuHHi.
Пляльни ланцю розmicntи Тад, lo6 BIN nepe6yBaB y kaHabci B hapramHi IHHI ta 6yB haDiTUM Ha laHcIuroBy 3i-poquky.
4.3akpntn Kopnyc:
UcTaHOBHTn (19/a) KpnuKy NaHOrOBoi 3ipoQKn (19/1).
IIOBepTaTn KInbue KpInJenHn (19/2) 3a roDnHHNKOBOo CTpiKoIO.
3akpnt KjIbue KpinneHHa.
- Hata r nnaa horo nauora, nB. po3in 7.3 "PeaynnoaHnHa mraey nnaIbHOo naHooza (14),cmopihka 412.
- BctabnTn akymyTOp.
8 YCYHEHHRA HECNPABHOCTE
OBEPEXKHO! He6e3neka TpaBMyBaHHa.
Pyxomi Detani Ta Detani 3 roctpIMN KpaMIM MoKyTb npn3BecTN Do TpaBM.
3abxHn Hocitb 3axnchi pykabuizi nd yac TexHiHoro i cepBichoro o6cnyroByBaHHra Ta OunueHHa!
8 NPMITKA Y pa3i BnHnKHeHHa NOxkoDKeHb, kI He 3a3HaueHi B ciI Ta6LniCi, a6o NoXKOJKeHb, 3 KIMN KOpNCyBaU He MoXe BnopaTncsCaM, cIiD 3BepHyTusc Da HoAoi CnyXbNiIDTPmKn.
| Hecnpabhnicb TpinyuHa YcunenHЯ | ||
| Двигун He 3aBodntbcS. AkymylanTOp po3prJxKeHo. 3apRdNtN aKymylanTOp. | ||
| AkymnylanTOp He BCTabIeNo a6o BCTabIeNo HnnpabInb- Ho. | BCTabITN aKymylanTOp npabInb- Ho. | |
| BicSyTnA PoJaUa eIeKtpoe- heprii. | 1. BiinraTn aKymylanTOp. 2. POniCStITN KOHTaKrPo3'Emy. 3. 3HOBy BCTabITN aKymylan- Top. | |
| Двигун rIyushtbcs nID quc ek-cnnyatauü. | Пилу no DepeBy 3aCtOCobY- Bavn 3 NaDMiPNO CINIOU. 3axnct BiD nepeBaHTaXeHnna BVMKNHyB pncSTpii. | BnTyrHyTn PInLy no DepeBy 3 po3nnlNy Ta 3HOBy BBIMKnHyTn II. 3aCtOCOBvBaTn MeHsU cINy pId quc PnIaHnry. |
| AkymnylanTOp po3prJxKeHo. 3apRdNtN aKymylanTOp. | ||
| AkymnylanTOp 3aHaIaTO rapi-ч. | ДочekatnsC OxOJIoJxHeHnA aKy-MylanTOpA. | |
| AkymnylanTOp HeCnpaBnN. 3amHnTn aKymylanTOp. | ||
| Двигун пацюe 3 pepe6oMn. ВIMkaCh HeCnpabHni. 3BepHyTnCS B cepBicHni ceHTp Bnro6nka. | ||
| HanpamHa shHa Ta ПилайынлanucIg harpiaotbc. ПогьдИМ. | ПилайынлanucIg 3aHaIaTO HaTyrHyTn. | IpepeBipItn HATR IaHcIqora.ПiD-TaTrHyTn PInIaNbHni LaHcIqor. |
| Бak Na OINBy nopoxHni. ДОЛТN IaHcIqIogBOv OINBy. | ||
| ОлВOBuNpyckHni OTbip i (a-6o) KaHABKa y NaPramHni ShNi Hi 3a6pudNeHi. | OuNcStITb OINBoVbNpyckHni OTbip i (a6o) KaHABy y NaPramHni ShNi Hi. | |
| Двигун пацюe, ale ПилайынлanucIg He oBeptaetbc. | ПилайынлanucIg 3aHaIaTO HaTyrHyTn. | IpepeBipItn HATR IaHcIqora.ПiD-TaTrHyTn PInIaNbHni LaHcIqor. |
| HecnpabHnicbпрilady 3BepHyTnCS B cepBicHni ceHTp Bnro6nka. | ||
| ЗamICTb Tnpcs BvkndaCtbcS depeBnH niL. Пилу no DepeBy 3aTnchNuO DepeBvHIO. | ПилайынлanucIg 3aTu-пВСя. | 3BepHyTnicB CepBicHni ceHTp Bnro6nka. |
| Hetinoba Bivbaizig prinladny. HecnpabHnicbпрilady 3BepHyTnCS B cepBicHni ceHTp Bnro6nka. | ||
Imported by: AL-KO Gardentech UK Ltd, Murray way, Wincanton, Somerset, BA9 9RS / UK | +44 (0) 1963 828055 shop.uk@al-ko.com | www.alko-garden.uk