BRS 43500 C - Steam cleaner Kärcher - Free user manual and instructions
Find the device manual for free BRS 43500 C Kärcher in PDF.
User questions about BRS 43500 C Kärcher
0 question about this device. Answer the ones you know or ask your own.
Ask a new question about this device
Download the instructions for your Steam cleaner in PDF format for free! Find your manual BRS 43500 C - Kärcher and take your electronic device back in hand. On this page are published all the documents necessary for the use of your device. BRS 43500 C by Kärcher.
USER MANUAL BRS 43500 C Kärcher
Chairman of the Board of Management

S. Reiser
Director Regulatory Affairs & Certification
71364 Winnenden (Germany)
Tel.: +49 7195 14-0
Fax: +49 7195 14-2212
Winnenden, 2019/05/01
Garantie
Please read and comply with these original instructions prior
to the initial operation of your appliance and store them for later use or subsequent owners.
Contents
Safety instructions EN.1
Function EN.1
Proper use EN...1
Environmental protection . EN . . .2
Control elements EN.2
During first start-up. EN .3
Before Startup EN.3
Operation EN.3
Transport EN.4
Storage. EN .4
Care and maintenance. . . . EN . . .4
Troubleshooting EN.6
Technical specifications... EN...7
EU Declaration of Conformity EN . . .8
Warranty. EN .8
Accessories and Spare Parts EN . . .8
Safety instructions
Before using the appliance for the first time, read and observe these operating instructions and the accompanying brochure: Safety information for brush cleaning units, 5.956-251.0.
Symbols in the operating instructions
△DANGER
Immediate danger that can cause severe injury or even death.
WARNING
Possible hazardous situation that could lead to severe injury or even death.
CAUTION
Possible hazardous situation that could lead to mild injury to persons or damage to property.
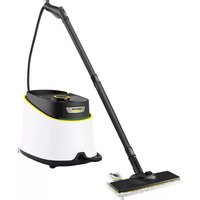
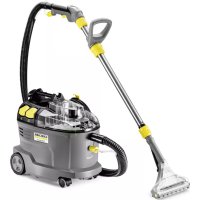
Function
The carpet detergent is applied with the spray system. Two opposite brush rollers work the detergent into the carpet. The carpet will dry within a relatively short time and can be walked on. After the drying process, the dirt picked up by the carpet detergent is vacuumed off with a brush vacuum cleaner. A working width of 430mm and a capacity of 7.5 l of the detergent tank allow an effective cleaning.
The power supply operation allows a high capacity without a restriction of the working time.
Note
The appliance can be equipped with various accessories depending on the cleaning task. Please request our catalogue or visit us on the Internet at www.kaercher.com.
Proper use
Use this appliance only as directed in these operating instructions.
- This carpet cleaning appliance is intended to clean loop carpets, velvet floors and needle fleece inside of buildings.
- The application temperature ranges from +5^ to +40^ .
- The appliance may only be equipped with original accessories and spare parts.
- The appliance has been developed for cleaning floors inside rooms and roofed areas.
- This device is exclusively meant for industrial and commercial use.
Environmental protection
| The packaging materials are recyclable. Please do not throw packaging in the domestic waste but pass it on for recycling. | |
| Old units contain valuable recyclable materials. Batteries, oil and similar substances may not be released into the environment. Therefore please dispose of old units through suitable collection systems. |
Notes about the ingredients (REACH)
You will find current information about the ingredients at:
www.kaercher.com/REACH
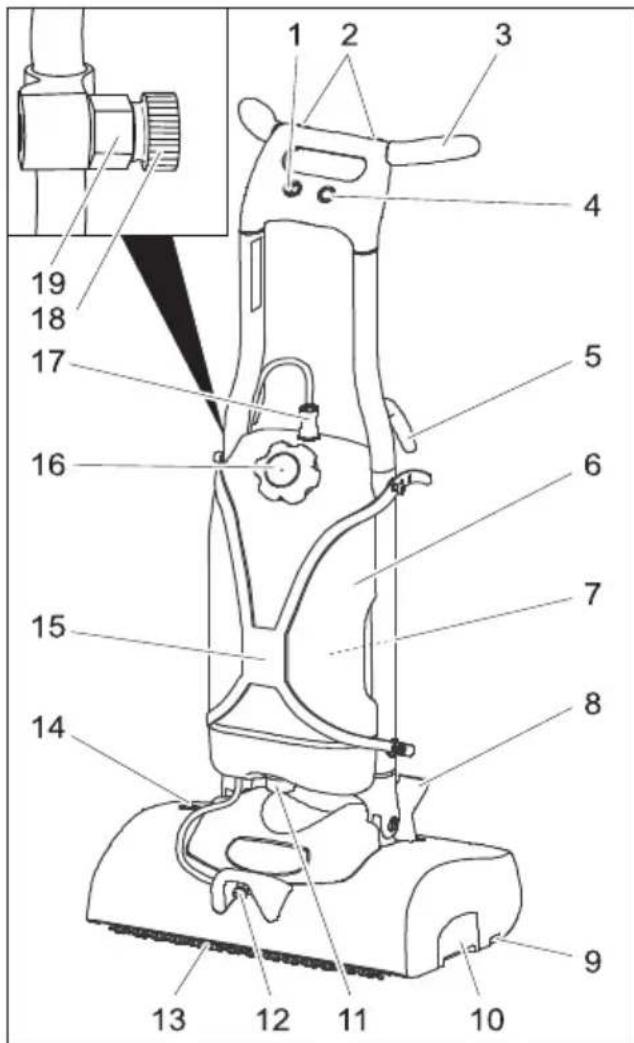
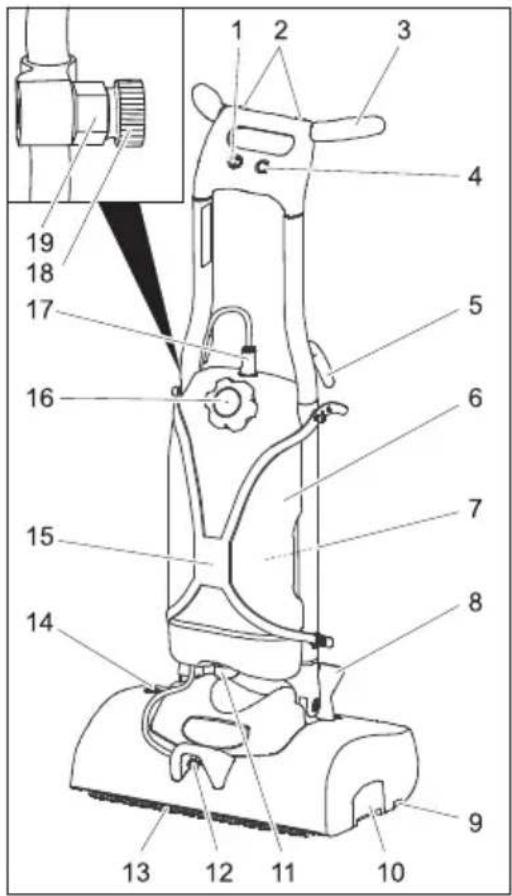
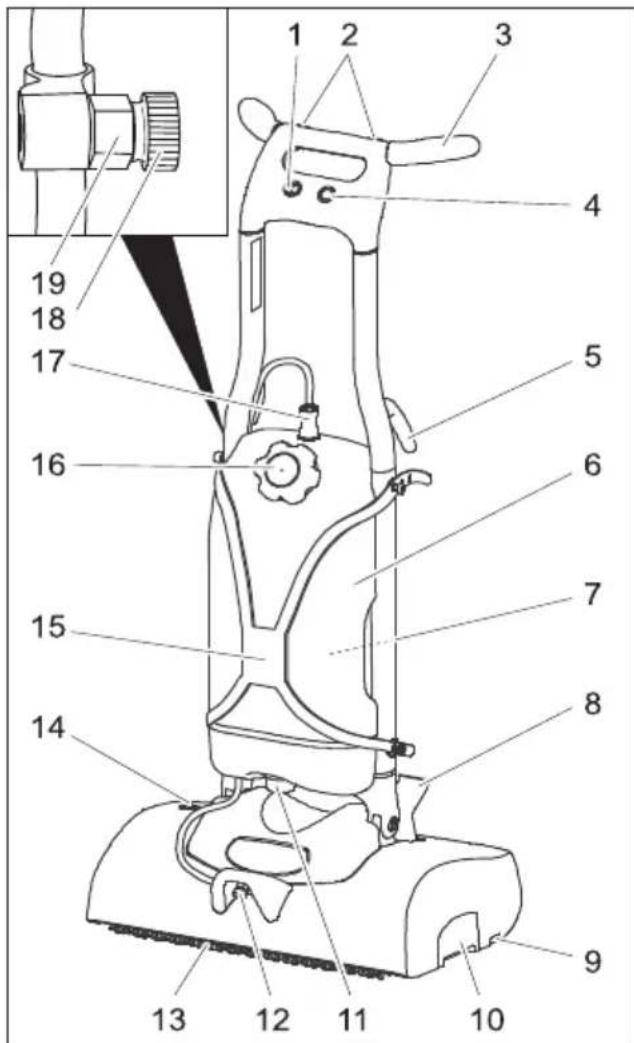
Control elements

1 Power switch
2 Key detergent solution
3 Push handle
4 Brush drive button
5 Cable clamp
6 Detergent Tank
7 Spray bottle holder
8 Lock of pushing handle
9 Button for brush change
10 Waste container
11 Sieve
12 Detergent solution outlet
13 Brushing rollers
14 Overload fuse for brush drive
15 Detergent tank support
16 Detergent tank lid
17 Detergent hose coupling
18 Nozzle, made available in delivery condition
19 Nozzle holder
During first start-up
Figure 1, see cover page
Remove the appliance and the push handle from the packaging and assemble as shown in the illustration.
Figure 2, see cover page
Connect a cable between the appliance and the push handle.
Slide the connector into the push handle.
Figure 3, see cover page
When inserting the push handle into the appliance, adjust the cable through the slot in the push handle so that it is not pinched.
Figure 4, see cover page
Slide the push handle all the way onto the appliance.
Thread in the 4 included screws and tighten them.
Fill water into the detergent tank.
Insert the mains plug into the socket.
Set the appliance switch to "I".
Press and hold the key for the detergent solution and flush the water system.
Set the appliance switch to "0".
Disconnect the main plug from the socket.
Before Startup
Installing the Brushes
Place the slider vertically and arrest.
Tilt the appliance backward and store it on the pushing handle.
Place the brush roller onto the driver and lock into place on the opposite side.
Operation
△DANGER
Danger of injury by electric shock. Check the mains cables of the machine each time before using the machine to see that it is not damaged. Never operate a machine with damaged cables. Get the damaged cables replaced by an electrician.
Risk of injury on account of electric shock caused by a damaged mains cable. Do not let the mains cable come in contact with the rotating brushes or pads.
NOTICE
To put the brush drive out of operation immediately, move the appliance switch to "0".
Drive the machine
Place the slider vertically and arrest.
Tilt the appliance toward the back and drive it to the place of use on its transport wheels.
Filling in detergents
CAUTION
Risk of damage. Only use the recommended detergents. With respect to different detergents the operator bears the increased risk regarding the operational safety, accident risk and reduced product life of the appliance. Only use detergents that are free from solvents, hydrochloric acid and hydrofluoric acid.
Follow the safety instructions for using detergents.
Do not process any inflammable, explosive, corrosive or poisonous consumables.
NOTICE
Observe the dosing notes.
Recommended detergents:
| Application Detergent | |
| Intermediate carpet cleaning | RM 768 iCapsol |
Dosage 6%:
| Fill quantity water [litres] | Fill quantity of deter- gent – 768 [ml] |
| 1 | 60 |
| 2 120 | |
| 3 180 | |
| 4 240 | |
| 5 300 | |
| 6 360 | |
| 7 420 |
Removing the detergent tank
To fill the detergent tank at a sink, the detergent tank can be removed from the appliance as follows:
Squeeze the detergent hose and pull it off the tank.
Unhook both upper ends of the detergent tank support from the appliance.
Lift off the detergent tank.
Fill detergent tank
Open the lid of the detergent tank.
Fill the detergent tank with water and leave sufficient room for the detergent.
Dose the detergent according to the provided product information.
Close the lid of the detergent tank.
Reattach the detergent tank to the appliance if necessary.
Cleaning
Vacuum loose dirt with a vacuum cleaner prior to cleaning.
Remove the nozzle from the nozzle holder and screw it into the detergent solution outlet.
Insert the mains plug into the socket.
Activate the lock of the slider and turn it to the back with your foot.
Set the appliance switch to "l".
Press the brush drive button - the brushes will begin to rotate.
Press the detergent button - the detergent will be applied as long as the button is pressed.
Move the appliance over the surface to be processed by the slider.
CAUTION
Risk of damage to the floor covering. Do not operate the appliance on the spot.
NOTICE
Apply the detergent while in forward motion. After that, work the detergent into the carpet in a criss-cross manner.
Finish operation
Place the slider vertically and arrest.
Place the appliance on a containment (preserves the brushes).
Carry out maintenance jobs "after work" (see section "Maintenance and Care").
Set the appliance switch to "0".
Disconnect the main plug from the socket.
Wrap the mains connection cable around the hooks on the slider.
Store the appliance in a dry room.
Transport
CAUTION
Risk of injury and damage! Observe the weight of the appliance when you transport it.
When transporting in vehicles, secure the appliance according to the guidelines from slipping and tipping over.
Storage
CAUTION
Risk of injury and damage! Note the weight of the appliance in case of storage. This appliance must only be stored in interior rooms.
Care and maintenance
△DANGER
Risk of injury!
Pull the plug from the mains before carrying out any tasks on the appliance.
CAUTION
Risk of damage to the appliance on account of water leakage. Remove the detergent tank before doing any work on the appliance.
Maintenance schedule
After the work
CAUTION
Risk of damage. Do not wash down the appliance with water and do not use aggressive detergents.
Check electrical cable and plug for damages. Get defective parts replaced by Customer Service.
Empty the detergent tank and rinse with hot water (max. 50^ ).
Fill a small amount of hot water into the detergent tank.
Reattach the detergent tank to the appliance.
Flush the nozzle by pressing the detergent button.
Remove nozzle, rinse under running water and insert in the nozzle holder on the push handle.
Empty detergent tank.
Cleaning the sieve
Remove the brushes and rinse with warm water.
Clean the brush tunnel.
Reinstall the brushes and exchange their positions to preserve them.
Detach the coupling in the detergent hose to prevent undesired water leaks on the nozzle.
Remove the waste container and clean it.
Clean the outside of the appliance with a damp cloth which has been soaked in mild detergent.
Check the brushes for wear, replace if required. The brushes are considered worn, if the bristles have the same length as the yellow indicator bristles.
Weekly
Check appliance for damage, have damages repaired by customer service.
Check spray pattern of the nozzle. Clean or replace the nozzles as needed.
Yearly
Have the prescribed inspection carried out by the customer service.
Maintenance Works
Replacing the brush rollers
Place the slider vertically and arrest.
Tilt the appliance backward and store it on the pushing handle.
Press the brush change key toward the outside and simultaneously tilt the brush roller out.
Pull out the brush roller.
Place the new brush roller on the driver and lock into place.
Maintenance contract
To ensure a reliable operation of the appliance maintenance contracts can be concluded with the competent Kärcher sales office.
Troubleshooting
△DANGER
Risk of injury!
Pull the plug from the mains before carrying out any tasks on the appliance.
CAUTION
Risk of damage to the appliance on account of water leakage. Remove the detergent tank before doing any work on the appliance.
In case of faults that cannot be remedied using the table below please contact the customer service.
Faults
| Fault Remedy | |
| Appliance cannot be started Check | Check if the mains plug is connected. |
| Reset the overload fuse by pressing it in. | |
| Check the brushes for blockage due to foreign particles, remove them if found. | |
| Too little or no detergent appli-cation | Clean sieve. |
| Remove the nozzle, rinse under running water and rein-sert it. Replace the nozzle. | |
| Check the correct positioning of the coupling in the deter-gent hose. | |
| Insufficient cleaning result Check | the brushes for wear, replace if required. |
| Check the detergent dosing. | |
| Appliance vibrates. Check if brusshes are fitted properly. | |
Technical specifications
| Power | ||
| Nominal voltage V/Hz 230 / 1~50 | ||
| Average power consumption W 370 | ||
| Maximum allowed net impedance Ohm (0.326+j0.204) | ||
| Cleaning brushes | ||
| Working width mm 400 | ||
| Brush diameter mm 90 | ||
| Brush speed 1/min 470 | ||
| Detergent pump pressure MPa 0,34 | ||
| Detergent pump flow rate l/min 0,38 | ||
| Dimensions and weights | ||
| Theoretical surface cleaning performance m2/h 300 | ||
| Volume detergent tank I 7,5 | ||
| Length | mm 400 | |
| Width | mm 470 | |
| Height | mm 1160 | |
| Transport weight | kg | 25 |
| Permissible overall weight | kg | 33 |
| Values determined as per EN 60335-2-72 | ||
| Hand-arm vibration value | m/s2 | <2,5 |
| Uncertainty K | m/s2 | 1 |
| Sound pressure level LpA | dB(A) | 68 |
| Uncertainty KpA | dB(A) | 3 |
| Sound power level LWA | dB(A) | 79 |
| Uncertainty KWA | dB(A) | 6 |
EU Declaration of Conformity
We hereby declare that the machine described below complies with the relevant basic safety and health requirements of the EU Directives, both in its basic design and construction as well as in the version put into circulation by us. This declaration shall cease to be valid if the machine is modified without our prior approval.
Product: Spray extraction device
Type: 1.006-xxx
Relevant EU Directives
2006/42/EC (+2009/127/EC)
2014/30/EU
Applied harmonized standards
EN 55014-1: 2006+A1: 2009+A2: 2011
EN 55014-2: 2015
EN 60335-1
EN 60335-2-72
EN 61000-3-2: 2014
EN 61000-3-3:2013
EN 62233: 2008
Applied national standards
The signatories act on behalf of and with the authority of the company management.
H.Jenner
Chairman of the Board of Management

S. Reiser
Director Regulatory Affairs & Certification
Documentation supervisor:
S. Reiser
Alfred Kärcher SE & Co. KG
71364 Winnenden (Germany)
Tel.: +49 7195 14-0
Fax: +49 7195 14-2212
Winnenden, 2019/04/01
Warranty
The warranty terms published by the relevant sales company are applicable in each country. We will repair potential failures of your appliance within the warranty period free of charge, provided that such failure is caused by faulty material or defects in manufacturing. In the event of a warranty claim please contact your dealer or the nearest authorized Customer Service centre. Please submit the proof of purchase.
Accessories and Spare Parts
- Only use accessories and spare parts which have been approved by the manufacturer. The exclusive use of original accessories and original spare parts ensures that the appliance can be operated safely and trouble free.
- At the end of the operating instructions you will find a selected list of spare parts that are often required.
- For additional information about spare parts, please go to the Service section at www.kaercher.com.
www.kaercher.com/REACH
Figure 3, cf. page de couverture
2006/42/CE (+2009/127/CE)
2014/30/UE
Chairman of the Board of Management

S. Reiser
Director Regulatory Affairs & Certification
Responsible de la documentation :
S. Reiser
Alfred Kärcher SE & Co. KG
71364 Winnenden (Germany)
Tel.: +49 7195 14-0
Fax: +49 7195 14-2212
Winnenden, 2019/04/01
Garantie
www.kaercher.com/REACH
2006/42/CE (+2009/127/CE)
2014/30/UE
Chairman of the Board of Management
Director Regulatory Affairs & Certification
71364 Winnenden (Germany)
Tel.: +49 7195 14-0
Fax: +49 7195 14-2212
Winnenden, 2019/04/01
Garanzia
www.kaercher.com/REACH
Bedieningselementen

Chairman of the Board of Management

S. Reiser
Director Regulatory Affairs & Certification
71364 Winnenden (Germany)
Tel.: +49 7195 14-0
Fax: +49 7195 14-2212
Winnenden, 2019/04/01
Garantie
www.kaercher.com/REACH
Elementos de mando

2006/42/CE (+2009/127/CE)
2014/30/UE

H.Jenner
Chairman of the Board of Management

S. Reiser
Director Regulatory Affairs & Certification
Responsible de documento:
S. Reiser
Alfred Kärcher SE & Co. KG
71364 Winnenden (Germany)
Tel.: +49 7195 14-0
Fax: +49 7195 14-2212
Winnenden, 2019/04/01
Garantía
Dados techniques. PT .7
2006/42/CE (+2009/127/CE)
2014/30/UE
Chairman of the Board of Management

S. Reiser
Director Regulatory Affairs & Certification
71364 Winnenden (Germany)
Tel.: +49 7195 14-0
Fax: +49 7195 14-2212
Winnenden, 2019/04/01
Garantia
www.kaercher.com/REACH
Betjeningselementer

1 Afbryder
2 Knap rensemiddeloplosning
3 Bøjle
4 Knap "Borstedrev"
5 Kabelholder
6 Rensemiddeltank
7 Holder til sprjteflasken
8 Låsemekanisme skubbèbøjle
9 Knap "Børsteskift"
10 Smudsbeholder
11 Siv
12 Udlob rengøringsoplosning
13 Børstevalser
14 Overbelastningssikring til børstedrev
15 Holder til rensemiddeltanken
16 Daeksel til rensemiddeltanken
17 Kobling rensemiddelslange
18 Dyse, står her til rädighed i leverancetil-stand
19 Dyseholder
2006/42/EF (+2009/127/EF)
2014/30/EU
Chairman of the Board of Management

S. Reiser
Director Regulatory Affairs & Certification
71364 Winnenden (Germany)
Tel.: +49 7195 14-0
Fax: +49 7195 14-2212
Winnenden, 2019/04/01
Garanti
I de enkelte lande gelder de af vore forhandlere fastlagte garantibetingelser.
www.kaercher.com/REACH
Betjeningselementer
2006/42/EF (+2009/127/EF)
2014/30/EU
Chairman of the Board of Management

S. Reiser
Director Regulatory Affairs & Certification
71364 Winnenden (Germany)
Tel.: +49 7195 14-0
Fax: +49 7195 14-2212
Winnenden, 2019/04/01
Garanti
www.kaercher.com/REACH
Reglage

Chairman of the Board of Management

S. Reiser
Director Regulatory Affairs & Certification
Dokumentationsbefullmaktigad:
S. Reiser
Alfred Kärcher SE & Co. KG
71364 Winnenden (Germany)
Tel.: +49 7195 14-0
Fax: +49 7195 14-2212
Winnenden, 2019/04/01
Garanti
www.kaercher.com/REACH
Hallintalaitteet

Chairman of the Board of Management

S. Reiser
Director Regulatory Affairs & Certification
71364 Winnenden (Germany)
Tel.: +49 7195 14-0
Fax: +49 7195 14-2212
Winnenden, 2019/04/01
Takuu
www.kaercher.com/REACH
Στοιχεία χειρισμου


H.Jenner
Chairman of the Board of Management

S. Reiser
Director Regulatory Affairs & Certification
71364 Winnenden (Germany)
Tel.: +49 7195 14-0
Fax: +49 7195 14-2212
Winnenden, 2019/04/01
Eyyúnón
www.kaercher.com/REACH
Kumanda elemanlari

Chairman of the Board of Management

S. Reiser
Director Regulatory Affairs & Certification
71364 Winnenden (Germany)
Tel.: +49 7195 14-0
Fax: +49 7195 14-2212
Winnenden, 2019/04/01
Garanti
www.kaercher.com/REACH
3JeMeHbI ynpaBHeHnA

1 BkIouaTeIb annapaTa
2 KhoNka „PactbopДЯ OuchTkn"
3Bvduaaydya
4 KhoNka "PpIBoD uTeTOK"
5 DepekaTeIb Ka6eJIa
6 BaK dIy MoIoo cpeIcTba
7 DepeKaTeIb 6aIINoHa paCnblnteJIa
8ΦnKcaTOp BeDyUeI dyu
9 KhoNka 3aMeHbI ZeTOK
10 Pe3epByap dIa c6opa mycopa
11 CeTcuTbI ΦnIbTp
12 BbIXoN YnCTaIeRo paCTbOpa
13 UeToHbI BaJIbI
14 Perperpy30HbI npedoxpaHnTeIb npINBODa 9eTOK
15ДерхаTeь eMKoCTn ДЯ MOHоero cpeIcTba
16 KpbIuKa eMKoCTn IJRA MOUeRo cpeI-CTBa
17 CoeHnHTeHbHbI 3JIeMeHr TJHaHra DnMaOIOUeO CpeDCTBa
18ΦopcyHka,BnoCTaBnREmOM COCTOHNIpeoCTaBnEeTc
19ДерхаTeьфорсунok
Pn npBOM BBOe B 3KcPnyaTaUko
Pnc. 1, cm. obopothyto ctopohy
IpoDyKT pa36pbI3rNBAIOUHm NkCTpaKTop
Tun: 1.006-xxx
OchOBhIe dIpuKeTnBbI EU
2006/42/EC (+2009/127/EC)
2014/30/EU
Chairman of the Board of Management

S. Reiser
Director Regulatory Affairs & Certification
YIIOHOMOeHHbI COtpdHnK NO BeDeHnIO DOKyMeHToo6Opota:
S. Reiser
Alfred Kärcher SE & Co. KG
71364 Winnenden (Germany)
Tel.: +49 7195 14-0
Fax: +49 7195 14-2212
Winnenden, 2019/04/01
TapaHTnA
B kaxdoi cTpaHe DeicTByOT COOTBeTCTBENHO rapaHTnHbIe ycIOBnA, n3daHHbIe ynoHOMOueHHoOpraHn3aUnei C6bIta Hauwe npOdyKuIN B daHHoI cTpaHe. Bo3MOxHbIE HeNCpabHocTN np6opBa TteyeHne rapaHTnHOrO cPoka Mbl yCTpaHarem 6ecnPaTHO, ecIn npuHa 3akJIOuaETcB B depeKtax MaTePnaIOB uIN OOn6kax npn N3rOToBLeHN. B cnyae BO3NkHOBeHnnpTeH3n B TeueHne rapaHTnHoro cPoka npoc6ba o6paatbcra, imer npin ce6e Yek O NOKyPkE, B TopROByOpraHn3aUIn, npoDaBswyo Bam np6Op nIN B 6bnjKaMHyU yNoHOMOueHHyO cNyX6by cepBnCHoro obCnyKuBaHn.
Data BbInycka OTo6paXaETcHa 3aBOcko Ta6nueKe B 3aKOpOBaHHOM BnE.
Pn 3TOM OTdEJIbHbIe UnppbI NMeOT CneDyUcEe 3HaueHHe::
Приимер: 30190
3 roB BbInycka
0 cToJeTne BbInycka
1 DecaTINETne BbInycka
9 BTOPA CnDpa Mecaa BBInycka
0 nepBa ynpa Mecaa BbInycka
TakIM 06pa3OM, B daHHOM npHMepe K0d 30190 O3Haayet DaTy BbInycka 09/(2)013.
PpHnHaJneJexHoCTn 3aNaChbIe DeTaJIIn
- Pa3pe7aetcI NCNoJIb3OBaTb TOJIbKO Te IprINHaJNeJXHOCTN 3aJaChBle YacTn, NcIOJIb3OBaHHe KOToPbIX 6blIO OJOpBeHo N3rOToBNTeIeM. IcNoJIb3OBaHHe OpnIHNaJIbHbIX IprINHaJNeJXHOCTe N 3aJuaCTeI rapaHTnpuyET Bam HaJeKHyU 6ecnepe6oHny pa60Tu np60pa.
- Bb6op Han60Jee qacTo Heo6xOIMbIX 3aIyacteBbl HauTe B KOHcE INCTpyKcNn NO 3KcNpyatauN.
-Даьншую Ифорmaцию O 3anuaCTЯxBi HauDeTe Ha caITe www.kaercher.comВраздeNe Service.

www.kaercher.com/REACH
Kezelési elementek

Chairman of the Board of Management

S. Reiser
Director Regulatory Affairs & Certification
71364 Winnenden (Germany)
Tel.: +49 7195 14-0
Fax: +49 7195 14-2212
Winnenden, 2019/04/01
Garancia
www.kaercher.com/REACH
Ovládací prvky

2006/42/ES (+2009/127/ES)
2014/30/EU

A.Jenner
Chairman of the Board of Management

S. Reiser
Director Regulatory Affairs & Certification
71364 Winnenden (Germany)
Tel.: +49 7195 14-0
Fax: +49 7195 14-2212
Winnenden, 2019/04/01
Záruka
www.kaercher.com/REACH
Upravljalni elementi

Zadevne directives EU:
2006/42/ES (+2009/127/ES)
2014/30/EU
Chairman of the Board of Management

S. Reiser
Director Regulatory Affairs & Certification
71364 Winnenden (Germany)
Tel.: +49 7195 14-0
Fax: +49 7195 14-2212
Winnenden, 2019/04/01
Garancija
www.kaercher.com/REACH
Elementy obslugi

2006/42/WE (+2009/127/WE)
2014/30/UE
Chairman of the Board of Management

S. Reiser
Director Regulatory Affairs & Certification
Administrator dokumentaci:
S. Reiser
Alfred Kärcher SE & Co. KG
71364 Winnenden (Germany)
Tel.: +49 7195 14-0
Fax: +49 7195 14-2212
Winnenden, 2019/04/01
Gwarancja
www.kaercher.com/REACH
Elemente de operare

Directive UE respectate:
2006/42/CE (+2009/127/CE)
2014/30/UE
Norme armonizate utilize:
EN 55014-1: 2006+A1: 2009+A2: 2011
EN 55014-2: 2015
EN 60335-1
EN 60335-2-72
EN 61000-3-2: 2014
EN 61000-3-3:2013
EN 62233: 2008
Norme de aplicare nationale:
Chairman of the Board of Management

S. Reiser
Director Regulatory Affairs & Certification
71364 Winnenden (Germany)
Tel.: +49 7195 14-0
Fax: +49 7195 14-2212
Winnenden, 2019/04/01
Garantie
2006/42/ES (+2009/127/ES)
2014/30/EU
Chairman of the Board of Management

S. Reiser
Director Regulatory Affairs & Certification
71364 Winnenden (Germany)
Tel.: +49 7195 14-0
Fax: +49 7195 14-2212
Winnenden, 2019/04/01
Záruka
www.kaercher.com/REACH
Komandni elementi

1 Sklopka uredaja
2 Tipka za otopinu sredstva za pranje
3 Potisna ručica
4 Tipka za pogon Četki
5 Držač kabela
6 Spremnik za deterdžent
7 Držač bočice za raspršivanje
8 Učvršćivač potisne ručice
9 Tipka za zamjenu Četke
10 Spremnik nakupljene prljavstine
11 Mrežica
12 Izlaz otopine sredstva za pranje
13 Valjkastečetke
14 Preopteretni osigurač pogona Četki
15 Držač spremnika sredstva za pranje
16 Poklopac spremnika sredstva za pranje
17 Spojka crijeva sredstva za pranje
18 Sapnica, ovdje u stanju spremnom za isporuku
19 Držač sapnice
2006/42/EZ (+2009/127/EZ)
2014/30/EU
Primijenjene uskladene norme:
EN 55014-1: 2006+A1: 2009+A2: 2011
EN 55014-2: 2015
EN 60335-1
EN 60335-2-72
EN 61000-3-2: 2014
EN 61000-3-3:2013
EN 62233: 2008
Primijenjeni nacionaln standardsi:
Chairman of the Board of Management

S. Reiser
Director Regulatory Affairs & Certification
71364 Winnenden (Germany)
Tel.: +49 7195 14-0
Fax: +49 7195 14-2212
Winnenden, 2019/04/01
Jamstvo
U svakoj zemplji vaze jamstveni uvjeti koje je izdala naša nadležna organizacija za distribuciju. Eventualne smetnje na stroju za vrijeme trajanja jamstva uklanjamo besplatno ukoliko je uzrok greška u materijalu ili proizvodnji. U slučaju koji podljije garanciji obratite se, uz prilaganje potvrde o kupnji, Vašem prodavaču ili najblžoj ovlaštenoj servisnoj sluzbi.
www.kaercher.com/REACH
Komandni elementi

1 Prekidač urežaja
2 Taster za rastvor deterdženta
3 Potisna ručica
4 Taster za pogon Četki
5 Drzač kabla
6 Rezervoor za deterdžent
7 Držač bočice za prskanje
8 Učvršćivač potisne rucke
9 Taster za zamenu Četke
10 Posuda za nakupljenu prljavstinu
11 Mrežica
12 Izlaz za rastvor deterdženta
13 Valjkastečetke
14 Preopteretni osigurač pogona Četki
15 Drzač rezervaora za deterdžent
16 Poklopac rezervaora za deterdžent
17 Spojnica creva za deterdžent
18 Mlaznica, ovde u stanju spremnom za isporuku
19 Držač mlaznice
2006/42/EZ (+2009/127/EZ)
2014/30/EU
Primenjene uskladene norme:
EN 55014-1: 2006+A1: 2009+A2: 2011
EN 55014-2: 2015
EN 60335-1
EN 60335-2-72
EN 61000-3-2: 2014
EN 61000-3-3: 2013
EN 62233: 2008
Chairman of the Board of Management

S. Reiser
Director Regulatory Affairs & Certification
71364 Winnenden (Germany)
Tel.: +49 7195 14-0
Fax: +49 7195 14-2212
Winnenden, 2019/04/01
Garancija
U svakoj zemlji vaze garantni uslovi koje je izdala naša nadležna distributivna organizacija. Eventualne smetnje na urežaju za vreme trajanja garancije uklanjamo besplatno, ukolko je uzrok greška u materijalu ili proizvodnji. U slučaju koji podleže garanciji obratite se sa potvrdom o kupovini Vašem prodavcu ili najblžoj ovlasćenoj servisnoj službi.
Pribor i rezervni delovi
- Sme se koristiti samo onaj pribor i oni rezervni delovi koje dozvoljava proizvodač. Originalan pribor i originalni rezervni delovi garantuju za to da urežaj može raditi sigurno i bez smetnji.
- Pregled najce ste potrebnih rezervnih delova naci cete na kraju ovog radnog uputstva.
- Dodatne informacije o rezervnim delovima dobicete pod www.kaercher.com u delu Servis (Service).

Ppei nIbPBOTo n3noJ3BaHe Ha Baunya ypei npOyeTe ToBa
opuHnHaHNo HNCTpyKcUy 3a pa6oTa, DeiCTBaIte cnopeI Hero n Iro 3ana3eTe 3a IIO-KbCHO N3PON3BaHe IIN 3a CNeDBAuI npITExKaTeI.
CbDtpxahanne
YkaaHna 3a 6e3onacHocT.BG...1
Функця.. BG...1
YnoTpe6a no npedHa3HaueHne BG . .2
Ona3BaHe Ha OKoHaTa cpea BG...2
O6cnykBaun enMeHTn .BG.2
Pn npBpBO nysKaHe B eKcnloaTaunr . BG...3
Ipei nyskaHe B eKcnnoaTa
LIIA BG...3
Eknpnoataua BG.3
TpaHcnpT BG...5
CbXpaHeHne. BG...5
Tpnxn noDnpbXka. .BG...5
POMOUII HEN3npaBHOCTN BG...6
TexHnueckn daHHN .BG.7
EC Deknapaun 3a cbOTBET
CTBnE BG.8
TapaHua BG...8
PnHaJneJXHOCTn np3epBHN
chaTn BG...8
Yka3aHnna 3a 6e3OnacHOCT
Ipei Da ekCnloaTnpaTe ypea 3a nbpBn
PiBT, npOyTeTe n Cb6IouDaBaIe HAcTO
YJbTBaHe 3a yNoTpe6a I npInIoKeHata 6poUpya ,Yka3aHnra 3a 6e3oNaChocT
3a ypei, nouNCTBaUc n CyeTKn"
5.956-251.0
CnmboHnHa YnbTbaHeTo 3a ynoTpe6a
ONACHOCT
3a HenocpecdmbeHo epo3ra oanachocm, KOrmo bdu do mexku melechu noepedu unu do cMbpm.
△PENEYNPEXKDEHNE
3a eb3MOxHa onacha cumyaun, KOAMo 6u moana da doede do mekku menechu noepdu unu cmbpm.
ПЕДПАЗЛИВОСТ
3a eb3MOxHa onacha cumyaun, KOAMo 6u Moana da doeede do neku meenechu noBpeDu uu MamepuanHu uemu.
Функця
Почиствашил пpenapat 3a Клиимп се HaHacя сьс систema 3a npbckaHe.ДВа DBИжшпce edINH cpeшу dpyr BaJЯкаHa cheTKI BTPNBAT NOчNTBaшпя пpenapatВ KINIMa.CneД OTHOCHTJIHO KpaTKO BpeMe KINIMbTe OTOHOBO cyx И NO Hero може da ce BbpBn.CneД n3cbXbaHETo CBbp3aHaTa CbC cpeDCTBOTO 3a NOчNTBaHe Ha KINIMM МрбOT纳 ce n3CMyKba C npaxOCMykaчka C chetka.Pa6OTHATA shinpHa ot 430 MM IN BMECTUMOCTTa Ha pe3epBoapa 3a NOчNTBaц пpenapat ot 7,5л no3BOJЯВAT epeKTNBHOTO NOчNTBaHe.
3aDenCTBaHTo B MpeKaTa DaBa Bb3MOXHOCT 3a BnCOKa PpON3BOdnteHOCt 6e3OrpaHnueHne Ha pa6OTHO To BpeMe.
yKa3aHue
Bcbomeemcmeue cbc cbomeemhama 3a- daa 3a noucmbane ypebmoke da ce obopyda c pa3nuchu npunadneKhocmu. Ionumaume 3a hau kamao2 uu HU nocememe e Nmephem Ha adpec www.kaercher.com.
YnoTpe6a no преднаЗнayене
N3noJI3BaIte To3n ypeD cAmO B CbOTBETCTBHe c6c 3aJaHTe B HAcTOrJIoTO YnblTBAHe 3a EKcnIIOaTaun.
-To3n ypeD 3a noocTbaHe Ha KINIMNe npedHa3NaueH 3a noocTbaHe Ha nIeTeHN, KbCOKOCMeCTN IN BeIpyeHN NOKPITNA BvB BbTpEHN pOcTpaHCTBa.
- TempepatyphnT 0xbaT ha npnokeHne e mekdy +5^ n +40^
- YpeIbT MoKe Da ce O6OpyDba cAmO C opuHaJIHn npHaJdJeXHoCTn n pe3epBHN qactn.
- YpeIbT e pa3pa6oTeH 3a NOUcTBaHe Ha NODOBe BB BbTpEuHn IPOCTpaHCTBa pecn. Ha NOKpNTN NOBbpxHOCTN.
-To3n ypeE npedHa3NaueH cmo 3a npomuIeHa ynoTpe6a.
www.kaercher.com/REACH
06cnyxbauni eIemeHTN
1 KlnuHa ypeda
2 ByToH noOuNCTBaU pa3TbOp
3Пьзraца ckoba
4 ByToH 3a 3aDbNkBaHe Ha YeTKnTe
5ДьржATEIa Ka6eJa
6 Pe3epBoap nouCTBaU npenapaT
7 Hocau Ha aepo30JHaTa 6yTnJka
8 ΦικcaTOp 6ποκρaΨa cKo6a
9 ByToH cMaHa Ha YeTkn
10 Pe3epBoap 3a n3MeTeHOTO
11 Zecka
12 I3xoI nouicTbaa pa3Tbop
13 BaJIOBe C ueTkn
14 3aunTa OT npetOBapBaHe Ha 3aDnKBAHTo Ha YeTKITE
15 Hocay pe3epBoap 3a nouicTbaunpe-napaT
16 Kanak pe3epBoap 3a nouchTbau npenapaT
17 KynnyHr Mapky 3a nouchTbau npenapaT
18ДIO3a,TyKпpeIOCTaBeHaВсьСTOHHe HaDOCTaBka
19 Hocau Ha duo3aTa
Pn nBpBO npCKaHe B ekCnIooatauia
Фигура 1, Вжтс ectpaHncaTa Ha KOpn-цаТa.
→ I3BaTe Te ypea n nnb3raaata cko6a OT ONAKOBAtA IN nIOCTaBeTe eHNO Do dpyro, KaKTo e NOKa3aHo Ha qnIpypTa.
Фигура 2, Вжтс ectpaHncaTa Ha KOpn-цata.
YcTaHOBeTe Ka6eHnHa Bp3Ka MeJyypeDa n Pb3raaata cKo6a.
ΠbXHeTe eIeKtpnuecknCbeHnHTeB nIb3raaata cko6a.

Chairman of the Board of Management

S. Reiser
Director Regulatory Affairs & Certification
Пьномошник NO ДOKумЕтацияТа: S. Reiser
Alfred Kärcher SE & Co. KG
71364 Winnenden (Germany)
Tel.: +49 7195 14-0
Fax: +49 7195 14-2212
Winnenden, 2019/04/01
Tapaanzna
BbB Bcya CtpaHa BaxaT rapaHcnoHnTe yCIOBna,ny6NIkyBaHN OT OToP3npaHaTa OT HAc DnCTpN6yTopcKa QnPma. EBeHTy- aHn NOBpeNi Ha BaunypeI ue otCTpaHm B pAMKInTe Ha rapaHcnoHnra Cpok 6e3PiATHO, aKO ce Kcace 3a DepeKT B MaTePnaJIte nJn npn npOn3BoDCTBO.B raPaHcNoHeh clyuay Ce o6bpHeTe KbM dNCTpN6yTopa nJn Ha-N-6Jn3KnA OToPn3n- paH cepBn3, KaTO npedCTaBnTe kacOBaTa 6eJexka.
PpHnHaJIeJXHOCTN np3epBHN qAcTn
-Morat da ce n3noJ3BaT caMo npHaJnHexHOCTN upe3epBHN qactN, KOHTO caNo3BOJeH N OT pON3BOJNTeJI. OpRnHaJIHnTE npHaJdJeXHOCTN uOprHnHaJIH N pe3epBHN qactN daBaT rapaHcIg 3a TOBa, ypeIbT da MoKe daCe n3noJ3Ba cnrypHo n 6e3 nobpeDi.
- CnncbK Ha Ha-yeCTo Heo6xOdumnte pe3epBHN Yactn Ue Hamepnte B kpaHa yNbTbaHeTo 3a ekCnIooatauia.
-ДругИ Инфорmaци OTHOCHO pe3epB-HNTEчacter MOKeTe DA NOJyHTe Ha www.kaercher.comВоблacrT CepBn3.

www.kaercher.com/REACH
Teeninduselemendid
Chairman of the Board of Management

S. Reiser
Director Regulatory Affairs & Certification
71364 Winnenden (Germany)
Tel.: +49 7195 14-0
Fax: +49 7195 14-2212
Winnenden, 2019/04/01
Garantii
www.kaercher.com/REACH
Vadibas elementi

1 Aparata sledzis
2 Tirīsanas skiduma taustiš
3 Vadāmais rokturis
4 Suku piedzinas taustins
5 Kabela turetas
6 tirisanas lidzekla tvertne
7 Aerosola turetajs
8 Stumšanas roktura fiksators
9 Suku nomiinas taustins
10 Netirumu tvertne
11 Sietveida filtrs
12 Tirišanas škūduma izplūde
13 Sukasveltni
14 Suku piedzinas parslodzes aizsardziba
15 Tirishanas lidzekla tvertnes turetajs
16 Tirišanas lidzekla tvertnesvacins
17 Tirisanas lidzekla slutenes savienojums
18 Sprausla,iegades stavokli
19 Sprauslas turetajs
Chairman of the Board of Management

S. Reiser
Director Regulatory Affairs & Certification
Pilnvarotais sagatavot dokumentaciju:
S. Reiser
Alfred Kärcher SE & Co. KG
71364 Winnenden (Germany)
Tel.: +49 7195 14-0
Fax: +49 7195 14-2212
Winnenden, 2019/04/01
Garantija
www.kaercher.com/REACH
Valdymo elementai

1 Prietaiso jungiklis
2 Valomojo tirpalo mygtukas
3 Stūmimo rankena
4 Sepeteliu jungimo mygtukas
5 Kabelio laikiklis
6 Valymo priemoniu bakas
7 Purkstuko laikiklis
8 Stūmimo rankenos fiksatorius
9 Sepeci keitimo mygtukas
10 Dulkiu maišelis
11 Sietelis
12 Valymo tirpalo isleidimo atvamzdis
13 Šepečio velenai
14 Sepeteliu veikimo perkrovos apsauga
15 Laikiklis valiklio bakeliui
16 Valiklio bakelio dangtelis
17 Valiklio Žarnelis mova
18 Issiusti paruostas antgalis
19 Purkstuko laikiklis
Naudiojimo pradžia
1 pav. Žr. viršelio puslapj.
Chairman of the Board of Management

S. Reiser
Director Regulatory Affairs & Certification
71364 Winnenden (Germany)
Tel.: +49 7195 14-0
Fax: +49 7195 14-2212
Winnenden, 2019/04/01
Garantija
EneMeHTn KepyBaHHa. UK...2
Pn nepwomy BBeeHHi B ekcnnyatauio. UK...3
Ipeed noaTkom po60Tu .UK.3
Eknpnyataia UK.3
TpaHcnpTyBaHHa UK...5
36epirahan UK.5
Dorjra TaTexHicHe 06cnyroByBaHHa. UK...5
Donomora y BnnaKny HenoIaOK UK...6
TexHiHi xapaKTepeNCTnKn..UK...7
3aBa npB BiIDNoBIIdHicTb CbponeckbKoro cnIBTOBapncTba .UK...8
TapaHTiA. UK...8
PpinaaJn 3anaChi Detani UK...8
PpaBnJa 6e3neKn
Ipeed nepuIM BnKOpncTaHnM npnAdy cnId 03HaonMTncs3 ciEIO IHCTpykuieo 3 ekCnPyataui IdoaHO 6poWypo 3 npabNl 6e3neKn iD qac po6OTn i3 5.956-251.0.
3HaKn y noci6Hnky
HE6E3NEKA
Дя He6e3neku,Яka 6e3nocepedHbO 3a2poxye ma npu38oodumb do mJxKux mpaem Yu cmepmi.
△NONEPEJXEHH
ДяnomenuHO moKnueoi He6e3neuHoi cumyaui, zo MoKe npu3ecmu do makkuxmpaem Yu cmepi.
OBEPEXHO
ДяnomeнizuHo moKnueoI Hebe3neuHoi cumyaui, zo MoKe npu3ecmu do ne2kux mpaem Yu cnpuunumu Mamepiabhi 36umku.
Приз nauseени
MnHn 3ac6 dIy KINIMiB HaHocntbcra 3a
DONOMOIO CnCTeMM PO36pN3kyBaHHa.
Dba 3ycTpiHnx uITKOBHX Bana
IpOCOuyOTb MIOUChm 3ACo6OM KINIM. I0
3aBepWeHHI BiHOcHO HeBeJIHKOrO Yacy
KNIM BucNXaE Ta CTAe DOCTyHNm DJIa
XODIHn. 3B'3aHn MNIHM 3ACo6OM dIy
KNIMIB 6pyd nICJRA BUCNXAHn
BiDCMOKTyeTbCra 3a DONOMOIO UtiKOBORO
PiNoCoca. SiupHa po6ooyi nobepxHi B
430 MM Ta MicTKICTb EMHOCTI dIy MNIOHO
3acOby 7,5 I 3a6e3neuYtB epeKTHBHy
MNIKy.
KnBHeHHaB MepeXi 3a6e3neUcBnCOky npOdyKTnBHiCTb 6e3 o6MeJHnAyc po6OTn.
Bka3ieka
Bidnoiio do bukohyeaHux 3abDaHb no OuueHHIO npucpiM MoXHa ochauyamu pi3HM o7adHaHHaM. 3amoeme haw kamao2 a6o bideidae hauy cmopikhky B InmepHemi www.kaercher.com.
PpaBnIbHe 3aCTOCyBaHHa
BnKOpNCToBvBaTn DaHn npnaD BnHrTKOBO y BiINOBiIDHOCTI Do BkazIBOK daHOi IHcTpkyu3 ekcnnyataui.
-Дани npictpi Дя ouhieneHЯ
KNIMIB np3HaueHn Дя ouhiyeHЯ
O6bNk, BeHOpOBx nOKpTTiB 3
KOPOTKIM BOPCOM Ta KaXeJIbHOI ПЛNTKIN
BcepeDInHi npMiuSeHb.
-ДIANa3OHpo6OuXTeMnepaTypJeKntb mix+5C i +40C.
- Y npncIpoi Do3BOJnEtbcB BnKOpNCTOByBaTn IInIe opuHaJIbHe 06NaHaHH Ta opuHaJIbHi 3aNacHi qactHn.
-Ппсстрий 6уВ розроблени дя МикNiДноги ВсередиnpimiценbaboNOBepxOHb, lo nepe6yBaIOTh niДdaxOM.
-ue npictpi npn3HaueHn BnKIOUHO DnI npOMCNOBOrBnKOpNCtAHN.
3axnct HaBkoJnHbOTo cepeDobuza
| Materianni уразковки пдадаютыся поразбци дли nobotrophо викориссан. Будь ласka, не викIDsаITE нakуваьни мaterianni разOM i3 домашим сmitтам, вддайеix деля nobotrophо викориссан. | |
| Стapi пистою мicitаях; materianni, за можуту використоыbatис NOВТОРно. Баразец', мастою та схожi materianni He NobINHI notparNTU y Habkoniiшné середовиши. Тому, удь ласka, утпізүйтө стapi пистою за допомогою сpeцialьнх сисем 3бору сmitтя. |
IHCtpykuii i3 3actocybaHHaKomnoheTIB (REACH)
AkyaIbHI BiOMOCTI npo KOMnoHHTn HabeHeHi Ha Be6-By3ni 3a aDpecoHO:
www.kaercher.com/REACH
EJIeMeHTn KepyBaHnHa

1 AnapatHn BmNkau
2 KhoNka "Po3HH dIy OUYHn"
3 TaroBa pyka
4 Khonka "PnpBid, uitok"
5 Tpmau ka6eJIO
6 BaK dIa MmHoro 3ac06y
7 Tpmau 6aOna po3nIIOBaHa
8ΦikcaTop TaroBoi pyKu
9 Khonka 3amHn zuTOK
10 Pe3epByap dIa 36opy cmiTTA
11 CityaTn fijbTp
12 Buxid po3uHny dny uHn
13 LiTkoBia BaJIa
14 IpeBaHTaKyBaIbHn 3anO6iXnK npNBOy 0tOK
15 Tpmae mnocti Inna Mmouofo 3acoby
16 Kpnuka emnocti Inna Mmouyoro 3acoby
17 3'eDhyBaIbHn eIeMeHT IJHaHra dJIaMNUOyOro 3acO6y
18ΦopcyHa,3a6e3neuycb8cnpni nocTaayHHi
19 TpmaJnHaacdkn
MaI.1, dIvB.3BOpOTHi6iK
→Пистрий ТА TяROВу ДУг ВИТЯRTN 3 УпakOBКИ ТА 3'ЕДНИВ NOСЛДОВHOCTi, ЗаЗHAчЕHOI HA MaПЮНКY.
MaI. 2, IuB. 3BOpOThi 6ik
→Пювеси ka6eьнi 3'EdHaHHЯ mix npnCTpoE M Ta TAreBOIO DyroI.
BCTaBHTn po3HimHe 3'eHaHHaB TAYROBy dIyry.
MaI. 3, dIb. 3BOpOThi 6ik
→Припг endanhi TaroBoi dyrn do ka6eIIO npictpoIO uepe3 npopizy TaroBOi dyrn ii cII BnpiBHTn dIy 3ano6irAHNraHn 3aueMneHHn.
MaI. 4, IuB. 3BOpOThi 6ik
Повнистю BCTaBHTN TяROBy dуryВ npnctpii.
→ YrBnHTnTn 4doaHnx rBnHTn Ta 3aTAY.
→ HanobHitb 6ak dIy MIOUOro 3ac06y BOIOIO.
BcTaBTe MepeXeBn uTKepey po3eTKy.
BcTaHOBiTB BmMkau npncToIO Ha "I".
Пронлоскати Воряну систему, натучыни на Кногку "Минни зас".
BctaHOBIb BmNKaH npncToHa "0".
BntraHryTu wTeNceIb 3 po3eTkn.
Peped noaTkom po6oTN
BctaHOBJIeHHIitOK
YcTaHOBnTn TReOBy Duyy BepTuKaJIbHo Ta 3aΦikCyBaTN.
→ ΠepeKnHyTu anapaT ha3aTd Ta NOCTaBHTu Ha TAYROBy Duy.
HacaHTN HOBNI TKOBN BaJ Ha 3axon Ta 3aKcyBaTN Ioro Ha npOTnJIeKHi CTOpOHi.
Ekcnnyatacia
△HE6E3NEKA
He6e3neKa npaHeHnE eKeKmpuHUM cmpymom.
Ipebeipamu eekmpponpoobky
nioklueynnpunaoy do mepexiHa
npedmem nowkodxeHHa nepo koxhum
eukopucmaHm. He Kopucmyamucb
npunadom 3 nowkodxehum ka6enem.
3aminmu nowkodxehu ka6enb 3
donomozoi ekempuka.
He6e3neKa npaHEnHra eJeKmpuHUMcmpymOM yHaCnIdOK nowKOdKeHOZoMepeXHOzO KaBEnIO. MepeXHu KaBEnbHe noBuHen cmukamuc 3 uimKamu, zoObepaombcA, abo haknaDkamu.
IOBIDOMJIENH
Ira Heauho 6ioknueHn npu6oy uimok cnid bcmaHOemu zoNoBHu bumkauy noJoxeHHa "0".
IpeceyBaHnHa npila
YcTaHOBnTn TReOBy Duyy BepTuKaJIbHo Ta 3aQikCyBaTu.
Haxnntn npnctriin ha3aHa KOleca Ta nepemictn Ha Micce po60tN.
3anobheHHpo6oynxpiH
OSEPEXHO
He6e3neka yukodkeHn. 3acmocoeyamu minbku pekomehdoabaH muiHi 3acobu. Y upanadyukopucmaHH nhuux muunx 3acobie ekcnnyamyoua ocoba 6epe Ha ce6e niobuueHu pu3uk 3 moquku 3opy 6e3neku pobomu, He6e3neku mpaemybaHH ma 3meHweHH mepMH cyjXb npucmpoIO. Bukopucmoeyamu minbku mi MuHi 3acobu, zo He micmpb03uuHnku, coJHy ma nnabikoy (fmopudhy) kucnomy. Dompumyeamucr eka3ieOK no mexhiCi 6e3neku, habeDeHux Ha ynaKoUsi 3acobie dnyuueHH.
He nepepeo6nma nu neaKo 3auMucmi, u6yxohe6e3neuHi, iOki a6o ompyuHi p6ooyi oDonomixkHi peoBuHu.
NOBIDOMJIENH
Iompumyeamu ekazioK 3 do3yeaHn. PekomeHdoBaHi MIOUci 3ac06n:
| З actocувашия 3acíб дя | чишения |
| Проміжné чишения КИЛМИВ | RM 768 iCapsol |
Доэуванг 6%:
| ОБ'EMS заимовеня вори [літрив] | ОБ'EMS заимовеня RM 768 [мл] |
| 1 | 60 |
| 2 120 | |
| 3 180 | |
| 4 240 | |
| 5 300 | |
| 6 360 | |
| 7 420 |
3HATN cMHCtB dIa MIOUOro 3ac06y
EMHOCTI DnMnHOrO 3acO6y 3aONBHOITbC8 B paKOBnHi. IJIa UBOrO EMHCtB MOxHa 3HArTn 3 npNCtpoIO:
CTnchTyN 3'EDHyBaIbHnEeMeENT IHaHra DnMnOyO 3acO6y Ta 3HrTu NOrO 3 EMHOCTi.
BiduenniO6nDbA BepxHix KpaiTpImaayemHoCTiIgMnOuro3acOby Bi npncTpoI.
3HЯТи emHiCTb dIy MmHoyoro 3acO6y.
HANOBHHTN cMHiCTb dIa MNUOyOro 3ac06y.
BikpnkpiuKpUkky EMHOCTI dna MIOOOro 3ac06y.
3anOBHHTN EMHICTb Dnla MNIOYOrO 3ac06y BOIOIO, 3aJIINWBn npn cboMy DOCTaTHbO Micra Dnla MNIOrO 3ac06y.
Do3yBaTn MmHm 3ac6 BiDnOBiDnHO do iHCTpyKuII DO npOdykTy.
→ 3akpntn KpnuKy emhocti nna MmHoro 3ac06y.
→ Πρι Θεοδχίπους 3ΗΟΥ BCTaHOBιTη εΜΗICTβ ἀλη ΜηΗΟτο 3αούγ Ha πριστριή.
MUTTA
→ ΠepeД npибиранham po3cHnuctoro 6pydy ckopncTyBaTncr nINOCOCOM.
→ BntarHnytnΦopcyHky 3 trpmaa i BKpyTnB BnxiD po3uHny dIy uIeHH.
BcTaBTe MepeXeBn uTKepey po3eTKy.
BknIouHTn HoroH oikcatop TaroBOi Dyrn Ta BiKInHyTu TaroBy Da ry Ha3a.
BCTaHOBITBIMMkaIpncToHOHa"I".
Haxatn KhoNky "PpNBiD 0iTOK" - 0iTKn o6epTaIOTBcra.
HaxaTN KhoNky "MnHn3ac6" - MnHn 3ac6 6yde HaHocHTncr, nOKn HATNCHYTO KHONKy.
→ Ptntpmyoun npncptpi 3a TaroBy duyry, npOBectn nooro nO ouuSyBaHIN nobepxHi.
OBEPEXHO
Hebe3neka yukodxehnnokpmma nidnozu. 3abopohemcbpoboma npucmpo, uo cmoimb Ha Micui.
NOBIDOMJIENH
HahecenHra MuHoo 3ac06y npu pyci 8neped. Iicna mo2o muHui 3aci6 Hahecmu Ha KUIm Xpecm-Haexpecm.
3akihueHHpo60Tu
YcTaHOBnTu TReOBy Duyy BepTnKaJIbHo Ta 3aΦikCyBaTu.
BcTaHOBHTn npucpti y Ha3eMHy BaHHy (6aJINBE NOBOXKeHNa 3i iTKamn).
→Провдп роботи 3 прорлakтуного orяу «nicя роботи» (ДИВITься po3ди «Доглад таTekhiчhe obссун罗вваимя»).
BctaHObitb BmMkau npncptpoHa "0".
→ BntarHyTu wTeNceIb 3 po3eTKn.
→ Hamotatm MepexHn Ka6eIb HABKOIO raKIB Ha TaroBiN dy3i.
He6e3neka yuKoJxKeHnAnapata BOIOU, uO BuTikac.
TpaHcnpTyBaHHa
OBEPEKHO
He6e3neKa ompumahnma myukodxeH! Ppu mpaHcnpmyaHHi cnid 3eephymu yea?y Ha aay npucmpoio.
Пи пеевозніа.apатуВТраHCnOpTHnx 3ac06ax cniBbpxOByBaTи MicueBi DiIOUci DepeKabHInHOPMn,HaPpaBJIeHi Ha 3axIcT BiD KOB3aHHЯ Ta NepeKeiDaHHЯ.
36epirannn
OBEPEKHO
He6e3neKa ompumahnma myukodkeHb! Ppu 36epiaaHHi 3eephymu y8aay Ha basy npucmpoio.
Cey npnaad Mae 36epiratncra liwe y BHytpiunix npmiiueHHx.
B pa3i BnHKHeHnI NOsKoJKeHb, kI He MoXHa ycHyTu 3a DOnOMOrOu ciEi Tabnui, TepeohyTe Do cepBicHoro ueHTpy.
Henolapkn
| Hecnpabhnicb Ycunennna | |
| Прилад He 3anycakcTbCЯ Перевирпи, чь BCTabNeHa штencelbHa BvilkaВpo3eTKy. | |
| Скнунуни посяп тахувалын 3anobixkHnK, BtncHyBshniNoTo. | |
| Перевирпи, чь He 3abokvbalncя шткn BhacliDOK3abpydhennny, BnilaHnTn 3abpydhennny. | |
| Миний 3acicHe NaheceHo a6o NaheceHo 3aHaITo MaNo | Очирпи citKu. |
| Витягуну phopсуну, помпи пд прOTоHоU BODOi 3HOBy BCTabHnTn.3amInHnTn HacadKy. | |
| Перевирпи повilingисть установки 3'eДнУВальHOrOelemente shlaHra Дли миного 3acoby. | |
| Недостати pe3yltat OuchiSeHnY | Перевирпи шткн Ha п徳met 3noShyBaHnry, пri Neobxidnocti 3amInHnTn. |
| Перевирпи Do3yBaHnry миного 3acoby. | |
| Пристri Вбрue Перевирпи Кр | peKTNicbпocадкшitok. |
| Замину шткови BaI. | |
| Занypпи шткови BaI等相关. на 15xb. у rapяч Body(приблизhoi Tempepatури 80°C). |
Texhhi xapaKTepeNCTnKn
BidiobiHa dIpeKtNa BC
2006/42/EC (+2009/127/EC)
2014/30/EU
PpNklaadhi rapMOH3yUoyi HOpMn
EN 55014-1: 2006+A1: 2009+A2: 2011
EN 55014-2: 2015
EN 60335-1
EN 60335-2-72
EN 61000-3-2: 2014
EN 61000-3-3:2013
EN 62233: 2008
3anponoHObahi HaizioHaJIbHI HOpMn
一
Oco6n, 0n HxKpe nIaNcAINcra, DIOb BiD imHi Ta 3a DOBipeHicTIO KepiBHNCTBa.

H.Jenner
Chairman of the Board of Management

S. Reiser
Director Regulatory Affairs & Certification
YnoBHOBaXeHn CnIBpo6iTnK NO BeDeHHIO DOKymeHToo6iry:
S. Reiser
Alfred Kärcher SE & Co. KG
71364 Winnenden (Germany)
Tel.: +49 7195 14-0
Fax: +49 7195 14-2212
Winnenden, 2019/04/01
TapaHTi
Y KOxHi KpaHl DiIOb yMOBn rapaHTi,
HaDaHOI BiIDNOBIDHOO fipMOIO-
npoAbcem. HenoJaKn B po6Ot i
PnCTpO H M N ycBaEMO 6e3KOHTOBHO
npotrOM TepMHy DII rapaHTi, RaKuo BOHn
BnKJnKaH I 6paKOM MaTepiany HNOMNIkAMN BnROTOBHeHHy. Y BnPaNDky
CInHOOI rapaHTI 3BeptITbcra Do npoDaBua
HN B HaIBNJXChn ABTopn3OBaHn
cepBicHn ceHTp 3 DOKymeHTaJIbHM
PiTBePdKeHHm NOKyn.