Xpert HS 71 - Lawn mower Wella - Free user manual and instructions
Find the device manual for free Xpert HS 71 Wella in PDF.

| Product type | Professional hair clipper |
| Brand | Wella |
| Model | Xpert HS 71 |
| Power supply | Mains (100-240 V) and rechargeable lithium-ion battery |
| Battery | Model 1531582, rechargeable, charging time 3.5 h |
| Cut length adjustment | Lever 3 positions (0.5 / 1.5 / 2.5 mm) + attachments 4, 8, 12, 16, 20 mm |
| Cutting head | Removable, cleanable, and oilable |
| Noise level | ≤ 70 dBA (at 1 m) |
| Vibrations | 3.98 m/s² (total value) |
| Safety | Start lock, prohibited near water |
| Warranty | 2 years manufacturer (wear parts excluded: battery, cutting head) |
| Accessories included | Attachments 4/8/12/16/20 mm, cleaning brush, oil bottle, charging station, power adapter, cable |
| Spare parts | Battery (1531582), cutting head, attachments, power adapter (152920) |
| Maintenance | Daily cleaning of cutting head, oiling, cleaning contacts with alcohol |
| Usage | Professional hairdressing salon |
Frequently Asked Questions - Xpert HS 71 Wella
User questions about Xpert HS 71 Wella
0 question about this device. Answer the ones you know or ask your own.
Ask a new question about this device
Download the instructions for your Lawn mower in PDF format for free! Find your manual Xpert HS 71 - Wella and take your electronic device back in hand. On this page are published all the documents necessary for the use of your device. Xpert HS 71 by Wella.
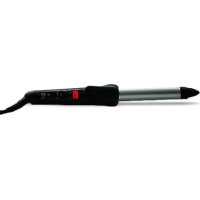
USER MANUAL Xpert HS 71 Wella
Xpert - the hair clippers by Wella
The Wella Professionals Xpert reflects the state-of-the-art, is innovative and design-oriented. During development, the requirements on professional hair clippers in a hairdressing salon were considered.
1 Safety
Please read the instructions carefully, especially the chapter on "Safety", before using the Wella Professionals Xpert. Keep these instructions in a safe place for future reference. If you pass on the appliance to someone else, be sure to hand over these instructions as well.
- Please check whether the mains voltage corresponds to the voltage specified on the type plate.
- Do not use this appliance close to baths, showers, washbasins or other receptacles containing water.
- Keep this appliance, the battery charger and the connector cable away from moisture, water and other liquids, and do not operate it with wet hands.
Additional protection is afforded by installing a residual current device with a rated tripping current of less than 30mA in your home electrical system. We recommend you get an electrician to install a
residual current protection system to protect the circuits.
- Regularly check the power cord for damage.
- Do not wind the power cord around the appliance. (Danger! Risk of cable break!)
- This appliance can be used by children aged 8 years and up and by individuals with reduced physical, sensory or mental capabilities or a lack of experience and/or knowledge if they are supervised or have been trained in the safe use of the appliance and have understood the resulting dangers. Children must not play with the appliance. Cleaning and user maintenance must not be carried out by children without supervision.
- Ensure that the plug-in power supply device cannot be plugged in again during cleaning.
-
Use only the original battery 15 (Model: 1531582) for this appliance.
-
Never short-circuit the battery. The contacts on the dismounted battery must not be connected by metal objects (e.g. hairpins, scissors, tail comb).
- Do not subject the battery to extreme temperatures (under 0^ or above +40^ ). For example, avoid close proximity to heaters direct sunlight.
- Charge the battery 15 (Model: 1531582) only in the appliance with the original accessory parts (plug-in power supply device 10 (Model MN/UK: 152920) or in the battery charger 8) and do not mix up the connections when doing so.
- Charge the battery in dry rooms only and never in close proximity to acids or easily inflammable materials.
- After dismounting the battery, you must neither connect the appliance to the connector cable 11, nor place it on the connected battery charger 8. Both can lead to the electronics being destroyed.
| Specifications according to Machinery Directive 2006/42/EC |
| A-weighted emission sound pressure level at workstations at a distance of 1 m, LpA ≤ 70 dBA |
| Measured maximum noise emission value including uncertainty of measurement according to EN ISO 4871. Determination of the values according to EN 60704-2-9 with reference to EN 60704-1 |
| Vibration total value to which the hand-arm system is subjected, ah = 3.98 m/s2 |
| Measured maximum vibration total value including uncertainty of measurement. Determination of the values according to EN ISO 5349-1/2 |
Designation of the Parts
1 Socket for the connector cable on the appliance (for cable mode)
2 Charge contacts on the appliance 3 On/Off button
4 Cutter head
5 Adjustment lever to set the cutting length
6 Charge status display / battery status display
7 Charge contacts on the battery charger
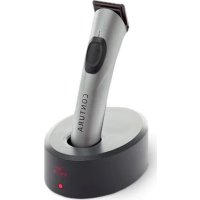
8 Battery charger
9 Comb attachment holder
10 Plug-in power supply device (Model MN/UK: 152920)
11 Connector cable for battery charger and cable mode
12 Bottle of oil
13 Cleaning brush
14 Comb attachments 4,8,12,16, 20 mm
not visible:
15 Battery (Model: 1531582)
2 Preparation
2.1 Charging process
The appliance is not yet ready for use in battery mode when delivered. However, you can immediately use the appliance in cable mode (See "Cable mode" on page 10.).
Before first use (without cable), the appliance should be charged for 3.5 hours. "Overcharging" the appliance is not possible.
NOTE:
If you are also using an older model alongside the new Wella Professionals Xpert in your salon:
- You can also charge the new appliance in the older battery charger. However, the charging time then increases by approx. 20 minutes.
- You can also charge the older appliance in the new charger. This however does not shorten the charging time.
- Image A: before charging for the first time, remove the battery charger 8 from the comb attachment holder 9.
- Check whether the mains voltage agrees with the voltage specified on the type plate (on the plug-in power supply device 10).
- Image B: plug the connector cable 11 into the battery charger and the plug-in power supply device 10 into a power socket.
- Position the battery charger on an even surface.
- Place the appliance onto the battery charger.
NOTE: you can also charge the appliance by connecting the power cable directly to the appliance (See "Cable mode" on page 10.).
Image C: the charge status display 6 shows the charge status. You can identify the charge status from the segments of the charge status display:
a) The battery is empty and must be recharged.
b) More segments being displayed corresponds to the battery having more charge.
c) Battery is fully charged.
2.2 Stow away the connector cable
Image D: if you do not need the full length of the connector cable, it can be partly stowed away in the cable storage under the battery charger 8.
2.3 Store comb attachments
Image E: the comb attachments 14 can be stored clearly in the comb attachment holder 9.
3 Operation
3.1 Operation lock
On delivery the appliance is protected against accidental switching on. You can also switch on this operation lock, e. g. if you want to transport the appliance.
Disabling the operation lock:
- Place the appliance in the connected battery charger 8 or connect it with the connector cable.
The charge status display 6 flashes initially and then lights up permanently. The operation lock is disabled.
Enabling the operation lock:
- Use the On/Off button 3 to switch the appliance on.
- Press the On/Off button 3 again and hold for approx. 4 seconds, until the charge status display 6 goes off. Using the On/Off button now does not have any effect.
3.2 Cable mode
If required, you can also use the appliance with a cable.
- Pull out the plug of the connector cable 11 from the battery charger 8 and stick it directly into the appliance.
- Image F: insert the plug-in power supply device 10 into a power socket.
3.3 Switching ON/OFF
- In order to switch the appliance off, press the On/Off switch 3. The charge status display 6 lights up.
- In order to switch the appliance off, press the On/Off switch 3 again. The charge status display 6 goes off.
3.4 Adjusting the cutting length
The cutting length can be set to three levels.
Image G: push the lever 5 into the desired position:
I:0.5 mm
II:1.5mm
III: 2.5 mm
3.5 Comb attachments
The comb attachments 14 with the lengths 4, 8, 12, 16 and 20mm can be put on the cutter head 4.
Please observe: the cutting length of the comb attachment and the cutting length set on the appliance are added up together.
Example: comb attachment 20mm and lever 5 on position III (2.5mm) result in a cutting length of 22.5mm .
- Image H: switch off the Wella Professionals Xpert and push the desired comb attachment onto the cutter head 4.
- Then you can cut hair as usual with the Wella Professionals Xpert.
4 Cleaning and care
CAUTION:
To ensure faultless operation the cutter head must be regularly cleaned and oiled in the appropriate places. If you do not regularly clean the cutter head, this leads to an increased wear of the cutter head and motor.
Cleaning the cutter head
With regular use the cutter head 4 should be cleaned thoroughly once a day.
- Switch off the appliance.
- Image I: from above, press against the cutter head and remove it from the hair clippers.
- Carefully remove the hair with the cleaning brush 13.
- Image J: press the upper and lower knife slightly apart and remove the hair in the gap using the cleaning brush.
NOTE: the lever 5 for the cutting length adjustment allows you to move the upper and lower knife away from each other.
Oiling the cutter head
In order to preserve the cutting performance of the cutter head 4 as long as possible, the cutter head must be oilied regularly - ideally once a day.
- Remove the cutter head.
- Image K: oil the areas where the bottom and top shear blades touch.
- To allow the oil to spread well, let your Wella Professionals Xpert run for about 20 seconds. - You can continue to work while doing so!
Putting on the cutter head
- The appliance must be switched on.
- Image L: first, place the cutter head with the bottom part first into the appliance and then press it upwards with one swivel movement. Do not use force. The engagement of the cutter head must be audible.
Cleaning the appliance
- From time to time, wipe the appliance with a slightly moistened cloth, then rub dry.
Cleaning the charge contacts
If the charge contacts 2 on the appliance or the charge contacts 7 on the battery charger are dirty, the charging may be interrupted or obstructed.
- Clean the contacts with a piece of cotton wool or cloth, dipped in alcohol or methylated spirit.
5 Replacing the battery
- If the capacity of the battery 15 is reduced, you can reorder a new battery from the Wella customer service and exchange it for the old one.
- Only use the original Wella battery 15, which you can order from the Wella customer service.
- When disposing of the old battery, take note of the disposal regulations (See "Disposal" on page 12.).
CAUTION:
The connector cable 11 must under no circumstances be plugged into the appliance, when you are replacing the battery 15.
- Image M: loosen the screws next to the socket 1 on the bottom side of the appliance.
- Image N: push the cover off the appliance.
CAUTION:
Do not pull the cables. In order to disconnect the plug connection, grip the plug.
3. Image O: remove the old battery 15 from the appliance and carefully pull out the small plug upwards.
CAUTION:
Without a battery, you must neither connect the appliance to the connector cable 11, nor place it on the connected battery charger 8. Both can lead to the electronics being destroyed.
4. Image P: carefully stick the small plug of the new battery 15 into the appliance so it fits into the respective connection.
5. Place the new battery 15 into the appliance, push the cover onto the appliance and retighten the screws.
6 Disposal
This electrical appliance contains a lithium-ion rechargeable battery pack. The battery must be removed for disposal (See "Replacing the battery" on page 12.). The battery must under no circumstances be disposed of in the household waste disposal bins.
Li-ion
If the electrical appliance is no longer to be used, it must be handed over to the shop or to the special collection point of the relevant public waste disposal authorities (recycling centre, materials recovery centre etc.).
7 Service
Given the present state of the art, components of electrical appliances are subject to a certain degree of wear over time.
In order to ensure proper functioning and safety of the appliance, a regular check must be performed in accordance with the country specific legal provisions - though at least once every 2 years.
8 Two-year guarantee
As manufacturer we offer you a two-year guarantee from the date of purchase for our products with regard to all deficiencies which are caused by material or manufacturing errors. If contrary to expectations a deficiency of this appliance occurs within our guarantee period, we will, at our discretion, either repair the faulty product or provide a replacement. These services are only provided against presentation of the original invoice or receipt.
Keep the receipt for proof of the date of purchase.
Excluded from the warranty are damages caused by incorrect operation and normal wear and tear. The guarantee obligation is also void in the case of incorrect interference with the product by unauthorised persons or use of third-party products during assembly.
Deficiencies which have little significant effect on the value and serviceability of the appliance are not covered by the guarantee.
Wear parts are excluded from the guarantee. Typical parts, which are subject to wear and thus are not covered by our guarantee, are the battery and the cutter head.
This manufacturer's guarantee does not affect your contractual and statutory claims against the vendor. In the case of a claim under the guarantee, please contact the nearest authorised Wella customer service centre.
The address and phone number of the nearest Wella customer service centre which is responsible for you can be found at www.wella.com.
1:0.5mm
II:1.5mm
III:2.5 mm
3.5 Sabots
II:1.5mm
III: 2.5 mm
3.5 Kamopzetukken
15 Bacteria (model: 1531582)
2 Priprava
2.1 Nabijanie
Pri dodani nie je pristroj pripraveny na prevadzku s batériou. Pristoj však možete použivat ihned's káblom (pozri, Prevadzka s káblom" na strane 82).
Pred prvym pouzitim (bez kábla) by sa pristroj mal 3,5 hodiny nabijat'.
"Prebite" pristroja nie je moźne.
UPOZORNENIE:
Ak vo Vaşom salone použivate okrem nového pristroja Wella Professionals Xpert aj starşi model:
- Pristoj mozte natijat aj na starsej nabijacej stanici. Doba nabijania je vskv takom pripade o cca 20 minut dlhsia.
- Starši pristroj tiež možete nabijat' v novej stanici, co však naskrát dobu nabljania
- Obrázok A: Pred prуym nabijáním odoberte nabijaciu stanicu 8 z držiaka hrebečovych nastavcov 9.
- Skontrolujte, ci sie'tové napatie zodpovedá napatiu uvedenému na typovom stitku (na sie'tovm zdroji 10).
- Obrázok B: Pripojovaci kabel 11 pripoje k nabijacej stanici a siefy zdroj 10 zapoje do zasuvky.
- Nabijaciu stanicu postavte na rovnu plochu.
- Pristroj postavte na nabijaciu stanicu.
UPOZORNENIE: Pristroj mozete nabijat'aj tak, ze sie'tovy kabel pripojite priamo k pristroju (pozri Prevadzka s kablom na strane 82).
Obrázok C: Indikátor stavu nabitia 6 zobrazije stav nabitia. Segmenty indikátorastavu nabitia udávajú stav nabitia;
a) Baturia je vybita a musi sa nabit.
b) Cím viac segmentov sa zobrazujé, tím viac je báteria nabita.
c) Baturia je kompletne nabita.
2.2 Odlozenie pripojovacieho kábla
Obrazok D: V tripade, ze nepotrebujete celu dlzku kábla, mozte pripojovaci kabel uskladn't v odkladacom priestore kábla pod nabijacou stanicou 8.
15 Akumulator (model: 1531582)
2 Priprava
2.1 Postopek polnjenja
1:0.5 mm
II:1.5mm
III:2.5 mm
3.5 Ipooθηκεs X Tevos
Oi trooNke 14 o nKoc 4,8,12,16 ka 20 mm mtropov va totoeTn-Boov Tavw OTnv KepaJn Kottnc 4.
Iapakaloume TPOOEGTe: To uKos KOtns TnTPOoNkns Xtevas KAI TO uKos KO tns TIOEVEI PUsoiotei OTN OuaKeun aPoioVotai.
He e Bb3MOXHO HaXbPnHa He 3apAHHa KaauTeT Ha ypea.
YKA3AHNE:
Ako BvB BaWncaIOnHm3NON3BaTe KaKTo HOBaTa WeLa ProfessiOnals Xpert, Taka n IpeDxOeH MoEJI:
Moxete da 3apekdaTe HOBn ypei n B NOCTaKata 3a 3apeXdaHe Ha no-CTapn moen. BpeMeTo 3a 3apeXdaHe ce yIbIJIkaBa c OKIO 20 MNHTN.
Moxete Da 3apeDnte No-CTapn ypei B HOBaTn oCtBa KaTO TOBA He CbKpaUba BpeMeTo 3a 3apeKdaHe.
1.ФИR.A:ПрEDI ПьВОТоЗApExJaHe N3BaTe NOCTaBkATo 3a 3apExJaHe 8 otДьрЖач 3a ппстбКATA rpe6eH 9.
2.Поверете Ддп ЗханьшоTo HanpexeHne CBOTBcTBAHa HanpexeHMeTO,пocусно Вьрху TmnoBaTа TabeNKa (Ha aanTepa 10).
3.ФИR.B:Пoctabete 3axpaHbauIgKa6e11Bnoctabkata 3a 3apeKdaHe IN BKNIOUte aanTepe10B KONTAKT.
4. NocTabete NoCTaBkata 3a 3apeKdaHe Bbpxy paBHa NOBbpxHOCT.
5. NocTaBete ypeDa Ha noCTaBkata 3a 3apeKdaHe.
YKA3AHNE: Mojete da 3apeiTe ypeJa, KaTo BKNIOHTe Ka6ena DnpeKTHo KbM ypeJa (BnKeT ePa6oTa c Ka6en"Ha cTpaHua 125).
ΦnR.C: INHnKaTOpbT 3a 3apeXdaHe 6 noka3Ba cIcToHnEto Ha 3apeXdaHe. CerMeHTnTE Ha INHnKaToppa 3a 3apeXdaHe Bn noka3Bt cIcToHnEto Ha 3apeXdaHe.
a) Akymyataopnata 6aTepe n npaaHa n Tp8Ba da 6bde 3apeDeHa.
b)KoIkoTo NOBueCe rEmHTe Ce NOKa3BaT,TOKOBa NOBue HaNpeDba 3apeXkaHETO Ha akymylatopHaTa 6atePnA.
c) AkymynaTophata 6aTepn e HantbIHO 3apeHeHa.
2.2 Pnp6bupahe Ha 3axpaHbauinKa6eI
ФИг. D: Ако He Bn e HEOбхДмma ПьнHATA nБПКИнHa Ka6eNa,ЧАТ OЗраанВаши КаБЕ може Да ce рибебе В оТделенNETO 3a Ka6eNa nOД noctabkata 3a 3apexJaHe 8.
2.3 CbXpaHrBaHe Ha npCTaBknte rpe6eH
ФИг.Е:ПпставкITE rpe6eH 14 MOraT yIodHo DA ce cIxpaHЯВAT B dIbpxka7a 3a nprictabkata rpe6eH 9.
3 Ynotpe6a
PpMep: PpncTabka rpebeH, 3aadaeHa Ha 20 mm. n noct 5 Ha no3nna III
(2,5mm) daBaT BnCOUHa Ha IODCTPnRBAHe ot 22,5 mm.
1.ФИR.H:ИЗКIOUчЕ Wella Profesionals Xpert n npITnCHe IpncTbKaTa rpe6EH bpyrIJIaBATA Ha HOKOBete 4.
2. CnE ToBa c Wella Professionals Xpert MoXeTe Da NODCTPnRbTe Kocata KaKTo 06MKNOBHeO.
4 NocBaHe n rpnKn
BHIMAHHE:
3a 6e3npoBnemHa paOta rnaBaTHa HoXOBeTe TpRbBa peDobHO da bDe NoCTBaHa HamaCJrBAHa Ha CbOTBeTHITE MecTa. AKo HE NOCTBaTe peDobHO rnaBaHa HoXOBeTe, TOBa BOnDo IOBNIeHo N3xa6BaHe Ha rnaBaTa Ha HOXBete N HA MOTopa.
NoHCTBaHe Ha IJaBaTa Ha HOXOBeTe
PpnpepoBHO H3N03BaHe rnaBaTa Ha HOXOBeTe 4 Tpr5Ba Da ce NocCTBa OC-HOBHO BeHbK DHeBHO.
1.ИЗкtnуеурда.
2.ФИr.I:HATiCHeTe OT rOPhaTcTpaHa cpeuY rnaBaTa Ha HOxKoBeTe I aN3BaTeOT MaWHNKATA 3a NODCTPnRBAHe.
3. OCTpaHete BHHMaTeNHO KOCMnTe C YeTkata 3a NOHCTBaHe 13.
4.ФИR.J:CHaTnCKaHepa3daneHete roPHmO TOnHnHOKcYeTKaTa 3a NOUCTBaHE OCTpaHeTe KOCMTe B MEXDHHOTIOPOCTPAHCTBO.
YKA3AHNE: C nocta 5a peryimpahe BncounHaTa Ha noctprrBaHe Moxete da pa3MeCTBaTe rOpHnI nDOnHnHOK.
HamaçnlaBaHe Ha rnaBata Ha HOXOBete
3a da noIbIbPkaTe cNoOc6HOctTa Ha pr3aHe Ha IraBaTa Ha HOXOBETe 4 KOnIKOTe bB3MOxHO NO-1bIro, IraBaTa HA HOXOBETe Tp8Ba peIOBHO-HaN-dO6pe exEHEBHO -da 6de HamaCJIBAHa.
- ⅢBaTe rIaBaTa Ha HOxKoBeTe.
2.ФИ.K:HamacneTe MecTaTa, KbTeTo ce DOKOCBAT DOHNHT ITOPHNHT HOK - 3a da moke macnoTo da ce pa3npeDeni do6pe, octabeTe BaWata Wella Professionals Xpert da pa6oTu OKONo 20 cekyHd.. - Cera cnokoHo mokeTe da npodbNxite da pa6oTte!
NoctabrHe Ha rJaBaTa Ha HOKOBete
- YpeBbT Tp8Ba Da 6bDe N3KnIOueH
2.ФИr.LPbPoNoctabeteTnabaHTaHOxKOBETBDoHnHaKpaHa ypeHa HAChcHete C bPteNtBu DmKeHe HaroPe. He m3non3BaIte cna.TnabaTa HaHXKOBETe Tpr6Ba Da ceΦHKnPcBa 3Byk.
IouncBahe Ha ypea
- 136bpcbaTe Bauny ypeD cAmO C BnaxHa Kbpna n CneD TOBa rO noCywaBaIte.
IOnCTBaHe Ha KOHTaKTtTe 3a 3apeXdaHe
KORAto KOHTaKTnTe 3a 3apeXdAe 2 Ha ypeDa uH N KOHTaKTnTe 3a 3apeXdahe 7 Ha nocTaBaKaT a 3apeXdaHe ca 3AmbpcEn, pnoecbHa 3apeXdaHe MoKe da 6BeInepeKcbchat Hn HApuyHe.
IOnCTBaTKe KOHTAKTITe C HATOEN B AANKOXON IIN CNPT NaMyK INK KbPna.
5 CmHa Ha akymylaTopHaTa 6aTepe
Korato KanaunTebHa akymyIaTOPHa 6aTeepn15 OTCna6He, MoKeTe da nOpHate HOBa akymyIaTOPHa 6aTeepnO Tcepn3 Ha Wella m Da 3aMeHInTe cTAPATA.
I3no3BaTe cAmOpRnHaHa akymaTOpHa 6aTePna 15 Ha Wella, KoraTo MoKeTe da nopBcTaBe C cepBm3a Ha Wella.
- PnN 3xBbPnHTo Ha cTapaAkyMylatopHa 6aTepeu Cna3BaIe TpeDnica-HnTa 3a TpeTpHa Ha OTNaDbu (BnKTe N3xBpIHe KaTO OTNaBk"Ha cTpaHua 127).
BHIMAHHE:
3axpaHbAaHTKa6e11B HnKakBa CnyaHa He Tp6Ba Da e NocTaBeH Bypea, KOrato CMeHrTe AkyMylaTOpHata BaTePna 15.
1.ΦM.M:Pa3BnTe BnHTa Do 6yKcata 1OTdoHnTa CtpaHa Ha ypeJa.
2.ФИR.N:ИЗВадete cпьзгане Kanaka ot ypeda.
BHIMAHHE:
HeIbpaIte 3a Ka6ena. XBaHete 3a Iencena, 3a Ia ocBo6oJnte IencenHata Bp6ka.
3.ФИR.O:ИЗВаДЕТСТAPATA AkymуТаРнaТаБаTEРЯ 15 OТ ypeDA N BHMaTeIHO ИЗБpЯТe МАКПЯ УЕСЕН HArope.
BHIMAHHE:
Korato ypeBt e 63 akymnatopHata 6aTePn, He TpBa da ro CbP3BaTe KbM 3xaPaHaun Kaen 11 HTO da ro NoCTaRte Ha BKNIOHeHATA NoCTaBA 3a 3apezdahe 8. Te3n DBe DeIcTBnMORat Da DoBeDat do pa3BaIhre Ha eNkTPOHnKata.
4.ФИR.P:ПОТавETe BHHMaTeHNO MaNKnI Ha HOBaT aKymyNaToPHa 6aTepeN 15B ypeDa Taka, Ye da NaChE B CbOTBeTHM N3BOD 3a CBbP3BaHe
5. NocTabete HOBata akymytaTopha 6aTepeRn 15 B ypeDa, NocTabete Kanaka Bbpxy ypeDa Ype3 Pntb3raHe n 3aTeHETe OTHOBO BNHTA.
6 N3xBpIHe KaTo OTNaIbK

BTo3n eIeKtpnueckn ypeD nMa JInTHeBO-NOHHa akyMynatOpHa
6aTepeRn. Pnir nXbBpIRe HKeT OtnaDbk AkyMynatOpHata 6aTepeRn Tp8Ba Da 6bDe n3BaDeHa (BNKTc CMHa Ha akyMynatOpHata 6aTepeRn Ha cTpaHnca 126).AkyMynatOpHata
6aTepeRn B HmKaIbCnUyHa He Tp8Ba Da 6bDe n3XBpPneHa B KOHTeHepa C 6tTOBa CMeT.
Ako eIeKtpnuecknT ypeH nHa da 6bJe n3non3aH noboe, ToT pRBa Da 6bJe BbPHT Ha MRCTO H a NOKyNkA INN B CneuAnen NyKT 3a PnpMaHe Ha cBtBeTHa MeCTHa o6cTeBHea CnyK6a 3a ynpabNHe He OtnAdbu (3a peKnnpaHe, 3a BTOpHnC cyOboHH n T.H.).
706cnyXBaHe
Yactnte Ha cBbpeMeHHnTe eNeKtpoTexHmueckyypeDn noDnEkatdo n3BeCTHa CTenEH Ha 13HcOBAHe C TeeyHne Ha Bpemeto.
3a Da 3ana3nTE 6e3nypeHOTo FyHKUONHPaHe N 6eONACHOCTT Ha BaAunna yep, peOBHO Tp8Ba da npabNE IpoBepKa Ha cbctOHNrMo YcBfNaCHO cneuHnHTe 3a CTApaHATA 3aKohOBn PaaNOpeBD -Nohe HA BCEKn 2 rOdnH.
8Ды roDHH rapaHua
KaTo npOn3BODInI Hne npEoCTaBme DBe-roDmHa rapaHnra 3a npOyKTnTe CN, KOrTo 3AnOyBa Da Teue OT DaTata Ha NOKynkata I NOKPbBA BCNHN MaTepnAHH n PpON3BODCTBENH DeEeKt. Ano, pOtnBHO Ha OaKaBHnra, B pAMKHe Na To3n IepNoi Bb3Hnke DeEeKt No ypeDa, Hne Ce aHraJxnpame, No hau W36Op, INI DA pEmOHnPaMe ypeDa, INI DA TO 3aMeHIMC dpyr ypeD 6e3 DeEeKtN. Te3n CynTy e M3BbPbWbAT CpeSy npEcdTaBnHe Ha opRnHaHa fakTypa INI DOkyMeHT 3a NOKynkata.
Na3eTeDOKyMeHa 3aNOKynKaTa KaTo Doka3aTeNCTBO 3a DaTAt Ha NOKynKa.
OT rapaHnIyraTa ca n3KJIIOUeHn IeTn, KOITo Ca Bb3HNkHaIN OT hENpaBnIHn yNtpeBa 6a n cteCTBeHO n3OcBAHe. PedeocTabeBHata rapaHnIg OTIaJa, aKO NO pOpykTA ca npdnpMaHn DeCTBnI OHEOTOpn3pAHH cepBnI INn Ako pN MoTHaKa ca n3NOPTBAHn YvDkIn pNDyTKn.
IepeKTN, KOITOBINrT He3HauHTENHO Bbpy CTOnHOCTTa INPuroHOCTTA 3a I3- non3BaHe Ha npOyKTa, He ca OxbaHATn OT rapaHnraTa.
H3HOCBaUHTe Ce YACTn Ca N3KJIUYEHN OIT rapaHuaTAta.TININHYNactn, KONTO Ca NOIIOXeHN Ha peoBHO H3HOCBaHe InpaND ToBA He Ca 06XBHaTHO NT HAaTa rapaHcYra, Ca No-CneuaHNO AkyMnyaTophata Batepna I nlaBata HHOKOBete.
Upe3 TaHr rapaHnHa npOuBOnTeIe BaWnte dorOBOpHn 3aKoHObnpaba Cnpmo npOaBaHa He ce 3acraT. B clyuaHn Ha rapaHIOHNO cbNTne Ce CBpKeTe c Otopn3npAHHa OTen 3a 06cnyXbaHe Ha KIneHTn Ha Wella, HAMpaUce B 6bn3OCTdo Bac.
AnpcbT n TepeHnHr Homep Ha Ha-5n3Ko pa3noJoxeHn DO Bac otDen 3a
06cnyBaHe Ha KIneHTn Ha Wella ue HamePnte Ha www.wella.com.
Xpert - MaunHkaДЯСтпЖьВОЛСOT
MaunHKa dna ctpnKKn BONoc Weia Professionals Xpert cooTBeTcByet COBpeMeHOMy yPBOHO PA3BNTM RAeTNK,OTNtuaeTC HINBOALMOHHO KOHCTpyKmIe Nd3aiHepCKM MOnlHeHem. B npoucece ee papa60TK bInIyTeHbI Tpe6oBAHN, KOTOpbe InpDeBpaHTORC K npOpeccnoHaJIbHbIM MaunHKam dna ctpnKKB Bonoc B napkMaxepCKX caNoHax.
1TexHnka6e3onacHOCTN
PepnnoB3oAHmem Tpmmepa Wella Professionals Xpert BHMMateNo npOHTTE HACTOUYIOHCTpykUIO NO EKCNyATAuIN,OCOeHNO pa3dEJ(TexNHka 6e0anachocTN).CoxpaHNTe HactouyIOHCTpykUIO.Bcnyae nepedaunnpb6oA DpyrmyNpB3oBATEIO nepedaIte BMeTe C HmHactouyIOHCTpykUIO IO 3KcnNyatauIN.
- Y6eIITecb, yTO HAnpJxHHe, yKa3aHHoe Ha 3aB0DcKoT a6JIuUKe, COOTBeTCTByeT HAnpJxHnIO 6bIToBOi 3JIeKTPOcETn.

He noJIb3yITeCb npI6Opom pIOM C BaHbIMN, dyUeBbIMN KaUNHAMn, paKOBINHAMn IN dpyrnx EMKOCTaMn C BODoI.
- He xpaHnTe np6op, 3apdHa8 cTaHcNia n CoednHnTeIbHbI npoBOB BO BnaXhBIX NOMeUeHnAx, He DOnyckaIte NpOaHaHnHa HnX BoDbI INpyrNX JnDkoCTe, He npKacaiTecb K HmM OkpbIMn pykam.
-Дононтьнога 3aиnta obecneuBaetcnoCpeDCTBOM yCTaHOBKN B DOMaSHIOU 3JIeKTPoCETbYCTPOICTBA 3aHTHOrO OTKIIOHeHnC HOMHaJIbHbIM TOKOM OTKIIOHeHn MeHee 30 mA.Mbl peKoMeHnyem Bam NopyuTb yCTaHOBky YCTPOICTBa3aHTHOrO OTKIIOHeHn CNeuaJIInCTy.
- Perynpho npOBepaTe coeHHTbHbI npOBOD Ha hAnuHe NobpeKdEHH.
- He hamatbai Te coeHNHTeHbI npoBOD Ha npibop. (Onacnoctb nobpeXdEHHa npoBoda!)
Пользоватся даннбим пибором рашиаетсдетамстарше 8летилцamс орранчehнblIMNФИЗЧЕСКIMN,CEHCOPHBIMNЛП NCSNXUeCKIMNBO3MOXHOCТМN ПИУСLOВИ,ЧTO 3a HUMN OCYISECTBJIЯETCЯ hab3Op.празвартелбно Heo6xOДМО поизвесгп ИНСТPyктж NOбezоганOMYИСПОЛБ3OBAHIO пибopa.He paoшaite detamIrpaTb c пиборom. He paoшaite detam caMo-
CTOATEIbHO npOn3BOIDITb YNCTKy N Texo6cnyKINBaHne np6opa.
- PpocJIeIte 3a Tem, YTo6bI cTeBOi WTeKepe He 6bln BCTaBHeN B pO3eTKy BO BpeM yIcTkn npIbopa.
- IcnoIb3yIte dIaHnOro npi6opa TOnbKO opuRHaIbHbI aKkyMylTOp 15 (MoIeIb: 1531582).
He 3ambkaIte aKKymyIaTOp hakopotko. He DonnyckaIte cOnpIKOCHOBENr KOHTAKTOB DeMOHTnPOBaHHOro aKKymyIaTopa C MeTaJIINueCKIMN ppeMTeAMN (HaNPmEp, WIIINbKaMn DJIa BOJIOc, HOXHNUaMn, paCyeCKoN c pyKoN).
He noDBepraTe aKKyMylrTop BO3DeICTBnIO 3KCTpeMaJIbHbIX TempeParyp (Hxke O ^ C nIN Bblwe +40^ Hanpimep, He nCnoJb3yIte erO pyaOM c HarpeBaTeJIbHbIMn np6opamn nIN He noDBepraTe BO3DeICTBnIO pRMO rCOJHeuHO r3JyuHeNIA.
3apkaTe aKcymyIaTOp 15 (MoIeIb: 1531582) TOnbKO B np6ope C opuHaJIbHbIMN npHaIeJX-HocTAMN (CeTeBbIM uTeKePOM 10 (MoJeIb MN/ UK: 152920) nIi Ha 3apAnHOI cTaHcUN 8) n He dOnyckaiTe HnpaBnIbHOrO nOdkIouHeHn.
3apnyakmylATopa Heo6xOIMO npOn3BODntb BCyHX NOMEUeHnX, pnp 3TOM pIOM He DOJXHbl HaxODNTbcra KNCLOTbl IIN JERKO BOCPnAmEHIOUneCMATePnaIbI.
- После демонтая Akумл对接а He pa3peшаetс рибоедиять пибор к coeINHTelbHOMy Ka6elen 11 И CTaBnTB erO Ha NOdkIQUeHHyIO 3apdHyTO CTaHcNIO 8. 3To MoKET pInBeCTN K NOBpeJdeHIO 3JIeKTpOHNKI.
PnHHeo6XoDMocTn PnBOp MOxHO HcNoJIb3OBaTb C Ka6eJEM.
- BbHbTe WTeKeP coeMHHTeBHorO Ka6eIa 11 u3 3apAHO tAnu8 n npu-coeHNHTe ero HnocpeCTBeHHo K np60py
2.PnC.F:BCTaBbTe cTeBOI uTeKepe10Bpo3eTky.
3.3 BkJIIOUeHnE N BbIKIIOUeHne
- BkIIOUeHn N BbIKIOUeHn np6Opa Heo6xOIMo HaxaTb Ha BbIKIOHaTeNb (BKn./BbIK).3. Hdkatop 3apda 6 ropnt.
- BbIKIOHn np6opba HeoXOIMO eue pa3 HaxaTb Ha BbIKIOATeB (BKn./BbIK.) 3. INdkatop 3apra 6 rachet.
3.4 PerynpoBka nnHbI cTpNk
HnHa cTpnKnnpeRyInpyeTcno TpmcTynenm.
Pnc.G:IpepeMeCTe pbyar 5 B HxHHe NOIOXKeHne:
I:0,5 MM
II:1.5 MM
III:2.5 MM
3.5 Hacaikn-rpe6n
Hacaikn-tpe6Hn 14nnHoi4,8,12,16 n 20 MM MoXHO HaeBaTb Ha HOKeByo roNoBky 4.
CneNyET NMeTb B BVNu: DnHa CtpnxKn HacaKn-tp6Hn DnHa, yctaHOBHeHnHa Hnpu6ope, cymmnpyOTc.
PpIMep: pnp nCIOB3OBAHn HacAdKn-rgbHr 20 MM yCTaHOBKe pbHaRa 5 B noLOXKeHHe III (2,5 MM), DnHnPe3Kn CoCTaBNT 22,5 MM.
- Pnc.H: BbiknOHTe MaunHky dIa CTpmKb BOIOc Wella ProfessioNs Xpert nHaedeHbTe HxKyIO hAcAky-rgbeHb Ha HOKeBvIO rONOBky Do 4.
- Пocге STORO можно CTPчь BОLOсь C NOMOцьо MaшинКИ Wella Professionals Xpert, кak obtuHo.
4 NcTka n yxOa
BHIMAHHE:
IJIy 6eCnepeboHoi pa60tBe Heo6xOIMO TuataeBHO YHcTeNTb HOKBeYIO rONOBKY mC3a3bIaBte B o BPeJeHHbIX MeCTa. OTCytCTBepyEnpHOr hNCTkIN pNBODHT N KOBIIeEHHomY M3HOcy HOKBeYrONOBKN iDvIATePN.
YHCTKa HOXeBOI rOIOBKn
PnpeynpHOMNcnoJIb3OBaHmHEo6xOJIMTOIaTeNbHOuCTNTb HOKeByHOToIOBky 4 OIN pA B DeHb.
1.BbIKIOHmTe npn6op.
2.Pnc.I:HaxMNTeHaBepxHIOUaCTbHOKeBOIROJOBKNICHIMNTEeeMaunHKINDACTPMKKNBOJOC.
3.YdaIte BOIOcBi C NOMOUIBIO UeTKN IINr YnCTKn 13.
4.Pnc.J:CnEka pa3BnHbTe BepxHm HmKm HOxN m N pmoIbO uETKn ydaJInte OCTaBWeceMEXyHmN BOIOcbl.
YKA3AHME:Pa3dHHTbBepxHn HnKHNHOxN MOxN pnp NOMOu pbyara DnpeyIINPOBKn DnIHb CTpIKKn 5.
Cma3ka HOXeBOI ROJOBKN
TOb6bI coxpaHnTB pexyUky CnOc0bHocTh BHOJEBOI rOJOBKN 4 KaK MOXHO DOnbIe, Heo6xoJIMIO peYJIaRHO - JyUwe BCero exEJeHNBHO - CM3bIBaTb ee. 1.CHMHTe HOKEBYIO FOJOKBY.
- Pinc. K: CmaKbTe Te MeCTa, B KOTOpbIX Bbl npNKacaeTecb K HxHemy IN BepXHEMy HOxAM.
3.Дихopoшero paCpeDeneHmnaO hOToJnKHO cTeKaTb WellaProfessionalsXpert pIpu6Bm3nteHbHO B TeChEne 20 cekyHd.-B 3TO BpEmBaBMOjete CnOKoHIO pOdoNtBpa6Oly!
YCTaHOBKa HOXeBOr JONOBKn
- PnB6Op DOnJKeH 6bItb BbIKIIOUeH.
2.PUC.L:BCTabTe HOJeBByIO TOnOBky B PnIbOp CN3y, a3aTeM NOBOpOTbIM DINKHeHMe NpeMeUaTe ee BBepx. He NaHmMaTe Ha He cNtWkoM CnLbHO. O npABInbHOYcTahOBKe HOXeBOr IOTOBKe CBiDteNbCTByET UeHKnO
UncTka np6opa
- PnHc6xOJIMOCm npoTpTe npu6op BnaXHo TpIKNo, a 3aTeM BbITpuTe Hacyxo.
Ynctka 3apdHbIX KOHTAKTOB
3aŋpərənne 3apənHbIX KOHTaKToB Ha npi6ope 2 mHa 3apənHO CTaHcN 7 MoKeT npuBeCTn K nepepbBy mH npuSyHeMIO pOcecca 3apJKN.
CMOHTBE BATHBI TAMIOH INI CAIPOETKY BCIMPTE IN OYMCNTTE KOHTAKTBI.
5 3aMeHa aKKyMnyTopa
- Pn CHKJHm EMKoCTN AKKyMnyTOpA 15 MoXHO 3aKa3aTb HOBbI AKKyMnyTTOB B CEPBCHOH cIyK6e fHpMbI Wella n yctaHOBtB eR O BMEcTo CTAPOrO.
IcnoB3yIe TOIbKO opnHnHaBbIaKkyMnyTOp Wella 15, KOTOpbIMoXHO 3aKa3aTb B cepBmChOH cIyK6e dpMbI Wella. - Pn yTmIm3aun Otpa6oTaHOrO akKMyJrTopo co6IIOaIte IpeDmcaHnno yTmIm3aun (cM. «YTmIm3aun》,cTp.133).
BHIMAHHE:
3anpeaaetc BCTaBnTb COeHHTeIbHbIKa6eJIb 11B npN6Op BO BpEm 3aMeHbI aKKyMyIaTopa 15.
1.Puc.M:OTkpyTHTe BnHT pAOM C rHe3Dm 1 Ha HnKHei CTOpOe np6opa.
2.PnC.N:CdBnHbTe KpbIkwny npmbopa.
BHIMAHHE:
He TnHTe 3a Ka6eB. Pna pa3beHHeHH HTeKePHoro coeHHeHH IepKHTecb ToIbKO 3a TeKeP.
3.PnC.O:N3BNEKNTe N3 np6opa CTapbI aKKyMyTAp0 15 n aKKypaTHo BbITHnTe MaIbI WTEKeP BBepx.
BHIMAHHE:
B3ekyMnIpyoHaepaTeTcPnHCOeHNHTbPnHOBK COeHNHTeHbOMy KaBeNo1 11 nCTaBtB eRo Ha NpOKnIOueHHyO 3apRdHny CTaHcNIO 8. 3To MOKeT pNPBECTN K NOBPEXDeHIO 3NEkTOPHNIKI.
4.PnC.P:Akkypatho BCTaBbTe B Pnpob MaIbI WTeKepe HOBOr aKKymyTopa 15, TAK YTO6bI OH BXOIN B COOTBeTCTByIOUe ee OTBepCTme.
5.BctabTe HObBn AKKMyJrTop 15 B npH6op,3aDbNtte KpbIuKy n 3aTHe BnHT.
6yttnnaa
MOHBI NITINAR
B DAHHom 3JNEKTPONPHOpe yctaHOBHeN IHTM-HOHbIy AKKMyIITOP. TnYTHIN3aUIMN AKKMYIITOP Heo6XoIMMo DEMOHITPOBaTb (CM. «3aMeHa AKKMyIITOpA, ctp. 132). 3anpeuaetc Bbl6paCbI-BaTb AKKMyIITOP B KOHTHeP dIg 6blTOBbIX OTxODOB.
OTcnykBwCBOcPck3eKTpOpi6Op Heo6xOIMMo CdaTb B nyHK TnpDAKINB CNEUAnbHbN PyHK TpHMe COOTBeTCTBYIOIeMOeTHORypeXdEHN,OTBETCTBeHHOro 3aYTNIm3aUNO OTOxoOB (eHTp BTOpHOnH nepepaBOTcBpBn T.D.)
7 CepBnC
B COOTBECTBNN C COBPEMHHbIM ypOBHem TEXHNKOMKHOHeHTb 3NeKTPoTeXHnYeCKNX pNip60pOB B ONpeJeHNo CTeneHm NOpBepKeHbI 13Hocy C TeeHNMeBPEHMn.
Длгобсчеснгбспсрьбоиногpa60tbyи6e3oanacHcStyyctpoiCTBa Heo6xO-IMMOperJnRHO(HepekeOdHOrpasaB2Toa)npOBeprtberoBcoOTBeTcTBmC HopmatNBbIMNNOLOXEHNAIM,DeyCTByUOUMN BCTpaHe,fdeOHO3KcNpyATpyetc.
8Два roda rapaHTM
PpOIN3BODNTJIb DaET rapaHTIO cPOKOM Ha DBA rOda C MmOHeTaNOKynkNHa BCE HEnCnPAHOCCTN, BbI3BaHHbIe DepeKTAMM MaTePnAJa NIN IN3rTOBnEHN. EcJIN BONPEK OXkUdAnR M TceHeMe 3OTOr cPoka BO3HnKaOT HEnCnPAHOCCTN yCTPOICTBA, MlIg RAPaHTpyEm, YTO NO CBOeMy BbIbOpy IpnO3BeDem PemOH NTIN 3aMeHy YCTPOINCTBA, 3TN YcCyfN OkAzBbaOTc npNycOBn INpeDbYBHeHnOpINHnAbHHO CteTa NIN NHeKa HA NoKny
CoxpaHnTe Yek dIy noTbEpKdEHHaDaTb NOKynKn.
IapaHTnHe paCnpocTpaHReTcHa NoBpeXeHnH, Bb3BaHHbIe HeHaIeXaUeN 3KcNlNyatauue N eCTeTBHeHbIM N3HOCOM. IapaHTnHe DeIeCTByET TaKeB Cnlyae BbIOnHeHnEpaBOT Ha YcTPOCTBe HBeAUPTO3OBaHHbIMM MaCTepCKMN IN McNlB3OBAHN DaMOHTaKa DetaTeNe CTOpOHNX npOn3BOITeNe. V3 cpeBJIeDeCTBnRpaHTmNkNIOAOAE DdeFeKTb, He OKa3bIAoUne CyueCTBEHNHO BnHnHnHa CTouMOCTb YcTPOCTBA N erpMROHOctb K ekCnPyTAUIm.
IapaHTnHa paacpOcTpaHReTc Ha 6bICTpon3HaWNBAKUeCer deTaHn. IapaHTnHa paacpOcTpaHReTc HAKOMIOHeHTb, KOTOpBie NODBepraOTcpeyIaPHOMy HOCy, B aactHOCTn, Ha AKkyMylrTop N HOKeBYIO TOLOBKy.
DAnHHa rapaHTnI pOn3BOUInTeHa He 3aTpaRnBaE tpeDyCMTopeHHbIX DOrOBoPOM NIN 3aKHOHaOteBCTBOM PpeTeH3N, IpeJbYBnReMbx K perNoHaJIbHOMy DNLepy. Pn HAcTyPiNeHN rapaTHmHorO cnya o6paAaTeCb B 5nXkauyO abTopn3OBaHHy o cepBnCHy O cyx6y Wella.
Anpes Hmep TeneoHa 6nKaiuee KOMneTeHTHO cepBcHoi Cnyx6bI Wella MoXHO HauTHa caTe www.wella.com.
Xpert - MaunHKa dIy nIDCTpRanHb BOIOcc BiD Wella
Wella Professionals Xpert BIDNIOBIAc cyAChOMy PBHIOPO3BNTKY TEXHIKB, BTIIOE iHOBAUHHI PO3P6KNa TA MaC PnIBaBnIMn DzAHIN. PIJ CAC PO3P6Kn BrAPXOBYBAHNICBMOND NOpOPECiINHX MaUNHOK DNICTPNIGHA BOLOCCs, 100 BUKOPNCTOBYOTBCr y npkykapcbknx CaNoHax.
1 PpaBnlaTexhikn 6e3neKn
YbKaHNo npOHTaIte IHCTpyKUIO 3 EKCNyATAuI Ta 3BepHtB OC6nMy yBaIy ha poZdIN I'PabNIA TeXHHN Be3eNeKn" nepeo NaTcOM PoBToN 3 npnAdom Wella Professians Xpert. 36epeXitB IO HCtpyKUIO 3 EKCNyATAuI Dn NoDaNBoR BOKOpNCaTHHa Y paasi, kauo npnad 6yde nepeado H TpTei OocDi, Do HbOro CnD oDoan tio IHCTpyKUIO 3 EKCNyATAuI.
-Перед пдкюechнм пиладу до мерекиpepekoHAITEcя,ю Вka3aHa Ha HbOMy HanpyraBIDNOBidae Hanpy3i eJekTpomepexi.
He Kopnctyntec npnnapom no6n3y BaHHnx kIMHaT, dyuOBnx, 6iPaKOBnH 6yNb-aynx iHxN xMHOCTe 3 BOIO.
-ObepiraTe npnilad,3apdHn npicTpT Ta 3'6dHyBaIbHn Ihyp BiD BOJOrn,BOiTa IHuNX piINrTa He TopKaItec npnilady BOJOrMn pykAmN.
Дяза6e3neueHЯdoaTKOBOrO 3axncty peKOMeHNdyCTbCBy BCTaHOBHTu BHyTpiiShHi
npoBODJI npnCTpiINDfepenHIO 3axNCTy3 HOMHaJIbHIM HylboBIM CTpyMOM He HIXue 30 mA.MI peKomeHdyEmo Bam 3BepHyTncrdo Cneuiiicta eJektpnka Dnra BCTaHOBHeHHy y eJektpnHomy KOHTypi BcInx 6e3NeKn pnicToIO 3axNCHOrO BMnKaHH.
- Perynpho nepeBiprTe 3'edHyBaIbHni npoBiHa HaraBHicTb NOsKOJxHeB.
He o6mOtye npnlaH hypom KnBleHnna. (He6e3neka nozkodxehnKa6eIIO!)
-Пилад можуть ВИКОпСТОВВаТи ДITN CTAPшI 8 рOKIB i OCOБи 3 оБм_EXЕнМи ФiЗчHIMN, CEHCOPHIMN YI PO3yMOВIMN 3Дi6HOCТЯМn a6O OCOБи,як He MaHTb DOCTaTHBO DOCBIDY Ta 3HaHB,ЯKIO 3a HIMN BeDEtbcr HarJr QI IM HaDAHO BIDNOBIDHi BkA3iBKN CTOCOBH0 6e3NeuHOrO ВИКОпСТАНЯ Пиладу I BOH N 3pO3yMInNo'B'3aHy 3 Hm He6e3neky. He Do3BOЛЯnte DiTAMбabNTINc3
npnanaom.He 03BOJnTe dITm YnCTNT Ta 06cnyrobyBatn npna, kUO 3a HmN He BeDeTbcn HaJIaI.
- IpekehauTeC, 10 nIac uHueHHa TeKepe He BBIMKHeHn y pO3eTKy.
Bukopustoyte Iiwe opurihbni akymyIaTOp 15 (MoJeIb: 1531582) dIpy zuoro npnna.
Hikon He 3akopoyte akymyIaTOp. KohtaTn 3HrTOrO akymyIaTopa hikOn He cIiD 3'EDHyBaTn MeTaJIeBIMn npEdMeTamn (HaNPKnaI, IINbKaMn, HOXNUaMn, rpe6IHcEM).
He nidaabaTe akymyJrTop iE kCTpeMaIbHIX TemnepaTp (Hxue 0 ^ C abo Bnue +40^ He 3aIIuaiTe akymyJrTop no6n3y dxkepeI TeINa a6oPi npAMMN COHnHMn Ipomehm.
3apjkaaTe akymyTOp 15 (Moelb: 1531582) BKNIOUHO y npuJADI 3 opnirHbHMKOMNKeKTyOChMn DeTaJAMN (WTeKeP10 (Moelb MN/UK: 152920) a6o 3apJdHOMy npncTrooi 8) Ta He pnyTaIte npu cBOMy KJIeMn.
3apjkaTe akyMylTOp BnKlHoy cyxnx npimiueneHHx Ta hiKoJI He 3apjkaTe no6JIn3y KncIOT uN IeRko3aMmCTnx MaTepiAIB.
- RaKIO BV BnHnAkyMnyTOp, He MoXHa nID'EDHyBaTN npNlaD IO 3'EDHyBaJIbHOrO Ka6eIIO 11 a6o CTaBNTn Ha NiD'EDHaHn 3apdHn npicTpii 8. Ze MoKe npu3BeCTn Do NOwKOJxEHn BHyTpiiHboi eJeKTPOHIKN.
3.3 BBIMKHeHH i BIMKHeHH
- 106 BBIMKHYTN pnpia, HATNCHITb KHONKY BBIMKHEHHB/BUMKHEHHA 3. Indkatop 3apny 6CBITnbca.
- ⅢO6 BmKHyT npnA, Ⅱe pa3 HaTncHtB KHONky BBIMKHeHHBIMKHeHH 3. HndkaTOp 3ap4y 6raca.
3.4 BCTaHOBJIeHHI DOBXHnI CTpIXKnI
IOBXKHy CTPNKKMOKHa BCTaHOBHTNa Htpi3Hi pIBHi.
MaHIOHOK G: NpecyHbTe pykoTky 5 y 6aKaHe noIooXeHHA:
I:0,5 MM
II:1.5 MM
III:2.5 MM
3.5 Hacaikn 3 rpe6iHcem
Hacajn 3rpe6iueM 14 DOBXNHO 4,8,12,16 Ta 20 MM MOXHa BCTaHOBTn Ha rojIKy HOxA 4.
3BepHb ybary: DOBKnHa cTpNKn HacaKn 3 rpe6iHcE M Ta DOBXnHa cTpKKn, BCTAHOBHeHa Ha npnadi,doaioTbcra.
Пиклад: Habacika 3 rpe6iHcE M 20 MM Ta pykoTka 5 B NOIIOKeHHI III (2,5 MM) daHTb DOBXINH cyKKN 22,5 MM.
- ManhoHok H: BmKHTb Wella Professionals Xpert Ta haIbaIte o6paHy hacaiky 3 rpeIHcEM Ha roNobky HOka 4.
- 3peWToH, Bu MoKeTe NiDcTpRaTn BOnocca 3a Donomoro Wella ProfessiOnals Xpert, Ra 3a3Bnuay.
4 OunueHHra dOrrna
YBAGA:
Ig 63nepebHoi pOoTHn Heo6xHNO perynpHOn OuHuaTn rONIBK HoKa Ta 3MaUyBaTu y BiNobiHNix Micx. KaHc HcOnuTa n rONIBK HoKa peynpHo, 1e npN3BODHTb Do 3HOwBuHHraonBKN HOKa Ta DBUYHa.
UHHeHHrToIbKnHOxHa
Pn perynphomv BnKOpuctaHHi roNIBky HOxa 4 Tpe6a peTeNbHO uCTNTu OIN pa3 Ha DeHb.
1.BmKHiB npnna
- ManIOHOK I: HATNCITb 3Bepx y HanpMky BID rONIBK HOxA Ta 3HIMtB II 3 MaunHKn dIy nIcTpIraHHBOIOCCr.
3aJnI 36epexehnB 6bnb Tpmbaoi pixyoh 3daTHoCTI rOIBKn HOxA 4, II cII peryIpaHO -Kpaae uOHa -3MaUyBaTN.
-
3HIMITb roJIBKYHOXA
-
ManIOHOK K: 3MaCTITb Micu, B RkNt TOPKaOTbcra BepxHi Ta HIXHI HOKI HOKmUb.
jLjLjLjLjLjLjLjLjLjLjLj
8 j 11
a
.
4 Jauill jiey jaiy jaiy aaiy
Wella Professionals Xpert jj yj 2

4
J 1
1.
j 2
gai jill
8
j 1
4 1 1
1
J 1
jao jao jiljwaill jolajy jall jalal no bannn p:100.2
.
13 3 3 3 3 3 3 3 3 3 3 3 3 3 3 3 3 3 3 3 3 3 3 3 3 3 3 3 3 3 3 3 3 3 3 3 3 3 3
Lagai jie lai lai jia jial gail jai jai jai jai jai jai jai jai jai jai jai jai jai jai jai jai jai jai jai jai jai jai jai jai jai jai jai jai jai jai jai jai jai jai jai jai jai jai jai jai jai jai jai jai jai jai jai jai jai jai jali jali jali jali jali jali jali jali jali jali jali
ailll lal jalilal alll
Wella Professionals 3
Jg Jaaal 20 20 Xpert
jaiil 1 jaii 2 jaiil
7
iia 11 aie! iay jy Sll jaiil piai jaiil jaiil jaiil aaiii aiial aaiii aiial aaiii aiial aiial aiial aiial aiial aiial aiial aiial aiial aiial aiial aiial aiial aiial aiial aiial aiial aiial aiial aiial aiial aiial aiial aiial aiial aiial aiial aiial aiial aiial aiial aiial aiial aiial aiial aiial aiial aiial aiial aiial aiial aiial aiial aiial aiial aiial aiial aiial aiial aiial ai
a 1 a 1 1 1 1 1 1 1 1 1 1 1 1 1 1 1 1 1 1 1 1 1 1 1 1 1 1 1 1 1 1 1 1 1 1 1 1 1 1 1 1
a 1 a a a a a a a a a a a a a a a a a a a a a a a a a a a a a a a a a a a a a a a a a a
al jlll jlll jlll lalalalalalalalalalalalalal
J 10000000000000000000000000000000000000000000000000
aasaaasaaasaaasaaasaaasaaasaaasaaasaaasaaasaaasaaasaaasaaasaaasaaasaaasaaasaaasaaasaaasaaasaaasaaasaaasaaasaaasaaasaaasaaasaaasaaasaaasaaasaaasaaasaaasaaasaaasaaasaaasaaasaaasaaasaaasaaasaaasaaasaaasaaasaaa
Procter & Gamble
Sulzbacher Str. 40-50
65824 Schwalbach
Germany