CFX3 45 - Refrigerator DOMETIC - Free user manual and instructions
Find the device manual for free CFX3 45 DOMETIC in PDF.
| Product Type | Compression Cooler |
| Brand | Dometic |
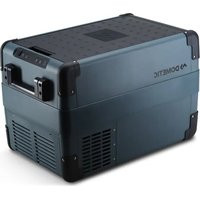
| Model | CFX3 45 |
| Dimensions (L x D x H) | 398 x 694 x 476 mm |
| Weight | 18.7 kg |
| Power Supply | 12/24 V DC (cigarette lighter plug) and 100-240 V AC (mains) |
| Rated Current (12 V) | 8.2 A |
| Rated Current (24 V) | 3.5 A |
| Rated Current (100 V~) | 0.96 A |
| Rated Current (240 V~) | 0.40 A |
| Temperature Range | +20 °C to -22 °C |
| Climate Class | N, T (ambient +16 °C to +43 °C) |
| USB Port | 5 V ⎓, 2 A (charge small devices) |
| Connectivity | Bluetooth and WiFi built-in, control via CFX3 app |
| Functions | 3-level battery protection, digital display, screen lock, automatic defrost, ice maker (not on this model) |
| Refrigerant | R134a, 42 g |
| CO2 Equivalent | 0.060 t |
| Warranty | Statutory, contact retailer |
| Cleaning and Maintenance | Clean with a damp cloth, do not immerse, defrost regularly |
| Optional Accessories | Protective cover (CFX3 45PC), drawer slide (CFX3 SLD3545) |
Frequently Asked Questions - CFX3 45 DOMETIC
User questions about CFX3 45 DOMETIC
0 question about this device. Answer the ones you know or ask your own.
Ask a new question about this device
Download the instructions for your Refrigerator in PDF format for free! Find your manual CFX3 45 - DOMETIC and take your electronic device back in hand. On this page are published all the documents necessary for the use of your device. CFX3 45 by DOMETIC.
USER MANUAL CFX3 45 DOMETIC
natural_image
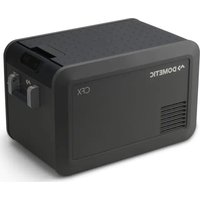
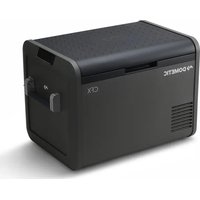
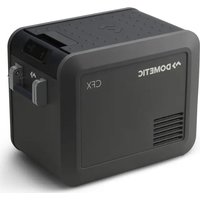
Collection of black industrial electronic enclosures with visible internal components (no text or symbols)CFX325, CFX335, CFX345, CFX355, CFX355IM, CFX375DZ, CFX395DZ, CFX3100
EN Compressor Cooler Operating manual 18
© 2023 Dometic Group. The visual appearance of the contents of this manual is protected by copyright and design law. The underlying technical design and the products contained herein may be protected by design, patent or be patent pending. The trademarks mentioned in this manual belong to Dometic Sweden AB. All rights are reserved.
1


natural_image
Line drawing of a rectangular electronic device with ventilation slots and a side panel (no text or symbols)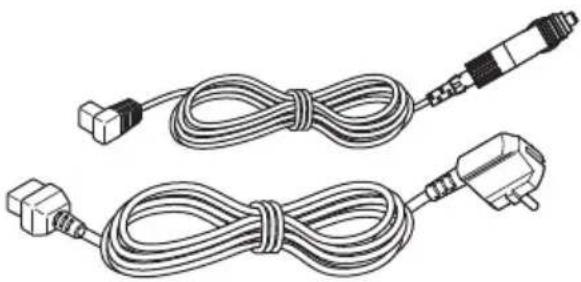
natural_image
Two types of cable connectors with connectors and connectors, no text or symbols presentCFX3 55, CFX3 55IM, CFX3 75DZ, CFX3 95DZ, CFX3 100
2
CFX3 25,
CFX3 35, CFX3 45
natural_image
Line drawing of a device with a black arrow indicating rotation or change, no text or symbols present1
natural_image
Line drawing of a box with an arrow indicating rotation, no text or symbols present3
CFX3 25, CFX3 35, CFX3 45, CFX3 55, CFX3 100
CFX3 55 IM
CFX3 75DZ, CFX3 95DZ

4
5
natural_image
Isometric illustration of an open storage or filing box with a curved arrow indicating rotation (no text or symbols)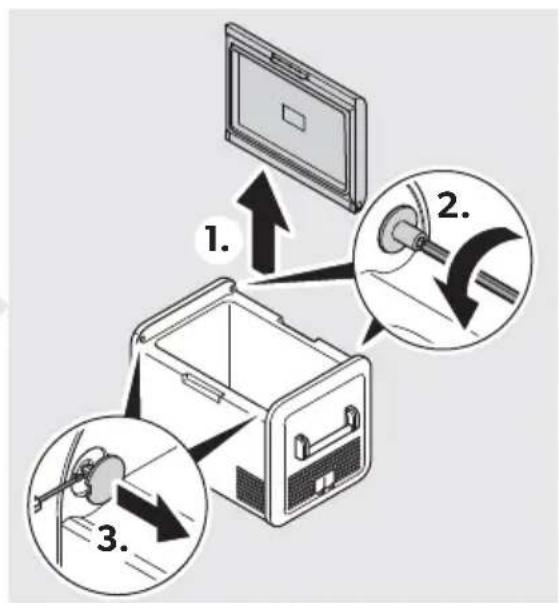
natural_image
Isometric illustration of a file organizer with an arrow indicating rotation (no text or symbols)6
natural_image
Illustration of a closed storage case with an open lid and internal compartments, showing a curved arrow indicating rotation (no text or symbols)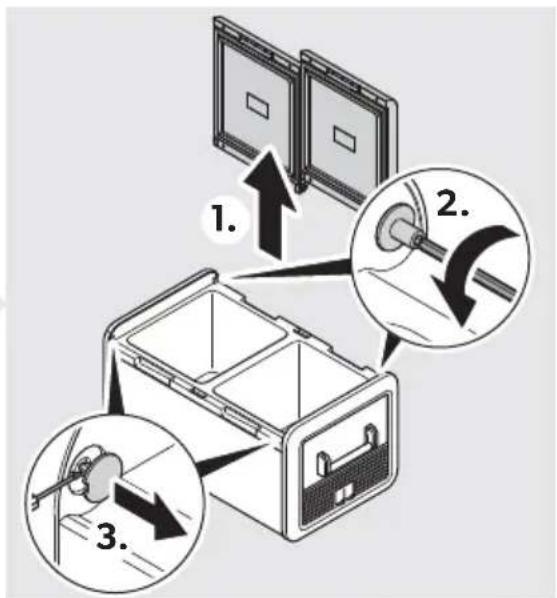
flowchart
graph TD
    A["Power Supply"] --> B["Battery"]
    B --> C["Switch"]
    C --> D["Car Battery"]
    D --> E["Solar Panel"]
    E --> F["Switch"]
    style A fill:#f9f,stroke:#333
    style B fill:#ccf,stroke:#333
    style C fill:#cfc,stroke:#333
    style D fill:#fcc,stroke:#333
    style E fill:#cff,stroke:#333
    style F fill:#ffc,stroke:#333
8

flowchart
graph TD
    A["Component A"] -->|rd| R1["15A 15A"]
    B["Component B"] -->|rd| R2["15A 15A"]
    R1 -->|bk| E["Power Supply"]
    R2 -->|bk| E
    E --> F["Device"]
    subgraph_Panel_1["Diagram: Panel 1.1"]
        G["Computer Display"] --> H["Switch 1.1"]
        I["Switch 2.2"] --> H
    end
    subgraph_Panel_2["Diagram: Panel 2.2"]
        J["Switch 1.2"]
        K["Switch 2.2"]
    end
| EN | DE | FR | ES | PT | IT | NL | DA | SV | |
| bk | Black | Schwarz | Noir | Negro | Preto | Nero | Zwart | Sort | Svart |
| rd | Red | Rot | Rouge | Rojo | Vermelho | Rosso | Rood | Rød | Röd |
| NO | FI | PL | SK | CS | HU | HR | |
| bk | Svart | Musta | Czarny | Čierna | Černá | Fekete | Crna |
| rd | Rød | Punainen | Czerwony | Červená | Červená | Piros | Crvena |
| TR | SL | RO | BG | ET | EL | LT | LV | AR | |
| bk | Siyah | Črna | Negru | Черна | Must | Maúpo | Juoda | Melna | Åسود |
| rd | Kırmızı | Rdeča | Roşu | Червена | Punane | Kókkivo | Raudona | Sarkana | Åحمر |
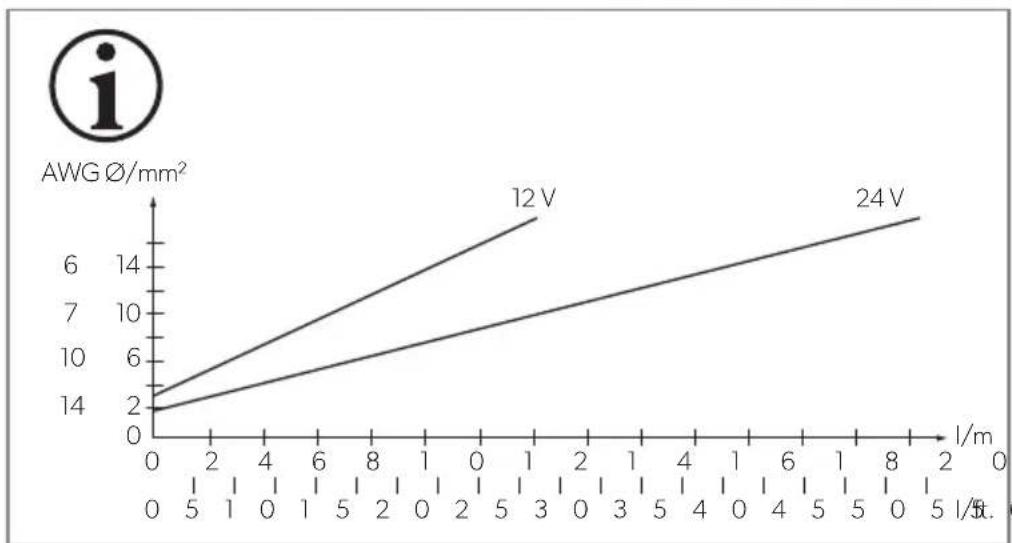
line
| I/m | 12 V | 24 V | | --- | --- | --- | | 0 | 2 | 2 | | 5 | 4 | 4 | | 1 | 6 | 6 | | 2 | 8 | 8 | | 3 | 10 | 10 | | 5 | 12 | 12 | | 1 | 14 | 14 | | 2 | 16 | 16 | | 5 | 18 | 18 | | 1 | 20 | 20 | | 2 | 22 | 22 | | 5 | 24 | 24 | | 1/ft. | — | — |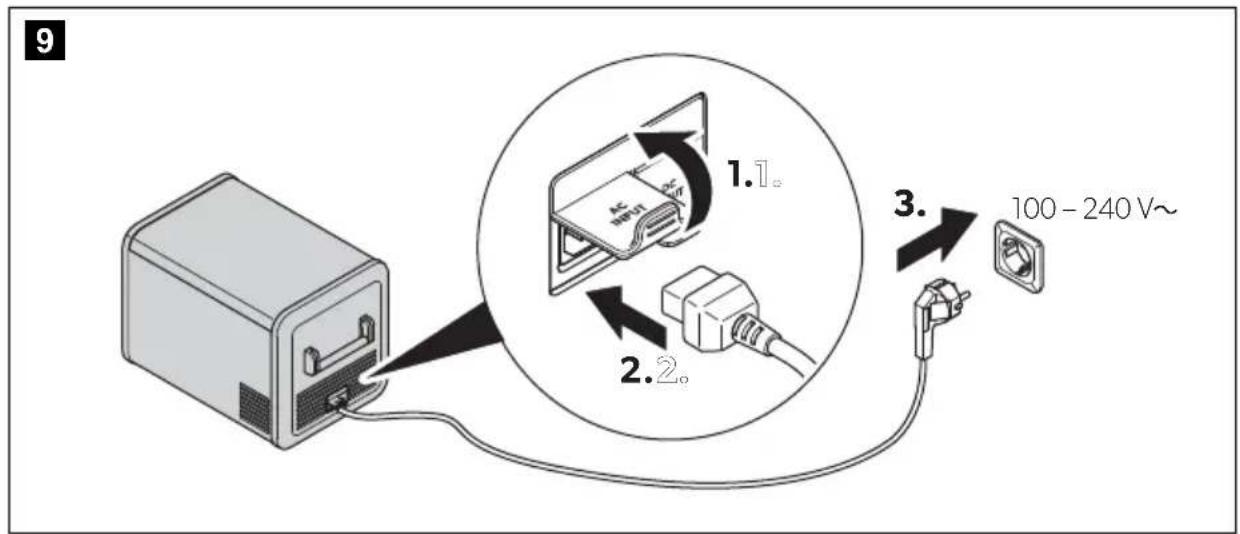
11
12
A

natural_image
Simple gray background with a small white snowflake icon in the top-left corner (no text or symbols)B
C
13
CFX3 25/CFX3 35/
CFX3 45/CFX3 55/
CFX3 100

CFX3 55IM


CFX3 75DZ/
CFX3 95DZ

14
flowchart
graph LR
    A["Clock with lock icon"] --> B["DCV 11.8"]
    B --> C["3 sec"]
    C --> D["DC 11."]
    D --> E["-8 °C"]
    style A fill:#f9f,stroke:#333
    style B fill:#ccf,stroke:#333
    style C fill:#cfc,stroke:#333
    style D fill:#fcc,stroke:#333
15
flowchart
graph TD
    A["DCV 11.8"] --> B["Display Temp units"]
    B --> C["Celsius Fahrenheit"]
    C --> D["Temp units"]
    D --> E["Celsius Fahrenheit"]
    E --> F["Output"]
    B --> G["OK"]
    C --> H["OK"]
    D --> I["OK"]
    E --> J["OK"]
    style A fill:#999,stroke:#333
    style B fill:#ccc,stroke:#333
    style C fill:#ccc,stroke:#333
    style D fill:#ccc,stroke:#333
    style E fill:#ccc,stroke:#333
    style F fill:#ccc,stroke:#333
    style G fill:#fff,stroke:#000
    style H fill:#fff,stroke:#000
    style I fill:#fff,stroke:#000
    style J fill:#fff,stroke:#000
16
CFX3 25/CFX3 35/CFX3 45/CFX3 55/CFX3 55IM/CFX3 100
flowchart
graph TD
A["DCV 11.8°C"] --> B["Set temp"]
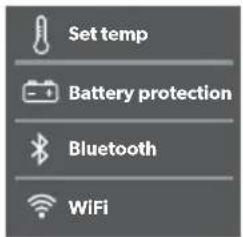
B --> C["Battery protection"]
B --> D["Bluetooth"]
B --> E["WiFi"]
C <--> F["Set temp"]
D <--> G["Set temp"]
E <--> H["Set temp"]
F --> I["-6°C"]
G --> J["-6°C"]
H --> K["OK"]
CFX3 75DZ/CFX3 95DZ
flowchart
graph TD
    A["DCV 11.8 8°C -12°C"] --> B["Set temp -126°C"]
    B --> C["Set temp -126°C"]
    C --> D["Set temp -128°C"]
    D --> E["Set temp -128°C"]
    E --> F["Set temp -128°C"]
    F --> G["Set temp -108°C"]
    G --> H["Set temp -108°C"]
    H --> I["Set temp -108°C"]
    I --> J["Set temp -108°C"]
    J --> K["Set temp -108°C"]
    K --> L["Set temp -108°C"]
    L --> M["Set temp -108°C"]
    M --> N["Set temp -108°C"]
    N --> O["Set temp -108°C"]
    O --> P["Set temp -108°C"]
    P --> Q["Set temp -108°C"]
    Q --> R["Set temp -108°C"]
    R --> S["Set temp -108°C"]
    S --> T["Set temp -108°C"]
    T --> U["Set temp -108°C"]
    U --> V["Set temp -108°C"]
    V --> W["Set temp -108°C"]
    W --> X["Set temp -108°C"]
    X --> Y["Set temp -108°C"]
    Y --> Z["Set temp -108°C"]
    Z --> AA["Set temp -108°C"]
    AA --> AB["Set temp -108°C"]
    AB --> AC["Set temp -108°C"]
    AC --> AD["Set temp -108°C"]
    AD --> AE["Set temp -108°C"]
    AE --> AF["Set temp -108°C"]
    AF --> AG["Set temp -108°C"]
    AG --> AH["Set temp -108°C"]
    AH --> AI["Set temp -108°C"]
    AI --> AJ["Set temp -108°C"]
    AJ --> AK["Set temp -108°C"]
    AK --> AL["Set temp -108°C"]
    AL --> AM["Set temp -108°C"]
    AM --> AN["Set temp -108°C"]
    AN --> AO["Set temp -108°C"]
    AO --> AP["Set temp -108°C"]
    AP --> AQ["Set temp -108°C"]
    AQ --> AR["Set temp -108°C"]
    AR --> AS["Set temp -108°C"]
    AS --> AT["Set temp -108°C"]
    AT --> AU["Set temp -108°C"]
    AU --> AV["Set temp -108°C"]
    AV --> AW["Set temp -108°C"]
    AW --> AX["Set temp -108°C"]
    AX --> AY["Set temp -108°C"]
17
flowchart
graph LR
    A["DCV 11.8"] --> B["Set temp"]
    B --> C["Battery protection"]
    B --> D["Bluetooth"]
    B --> E["WiFi"]
    C --> F["Battery protection"]
    D --> F
    E --> F
    F --> G["High"]
    F --> H["Medium"]
    F --> I["Low"]
    G --> J["Battery protection"]
    H --> J
    I --> J
    J --> K["High"]
    J --> L["Medium"]
    J --> M["Low"]
    K --> N["..."]
    L --> N
    M --> N
    N --> O["OK/←"]
    O --> P["OK/←"]
    P --> Q["..."]

natural_image
Simple electrical circuit diagram showing a battery connected to a switch and a battery cover (no text or symbols)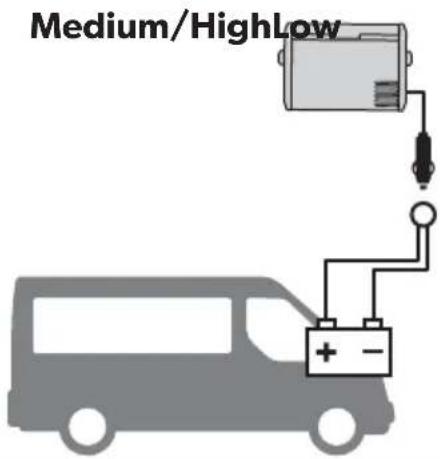
| Low | Medium | High | ||
 |  | 10.1 V | 11.2 V | 11.8 V |
 | 11.4 V | 12.2 V | 12.6 V | |
| 24V |  | 21.5 V | 24.1 V | 24.6 V |
 | 23.0 V | 25.3 V | 26.2 V |
18
flowchart
graph LR
    A["DC V 11.8"] --> B["-8 °C"]
    B --> C["Display Temp units"]
    C --> D["OK"]
    D --> E["Display"]
    E --> F["Display"]
    F --> G["..."]
19
CFX3 75DZ/CFX3 95DZ
flowchart
graph TD
    A["DCV 11.8"] --> B["Display"]
    B --> C["Zone control"]
    C --> D["Zone control"]
    D --> E["Zone control"]
    E --> F["..."]
    B --> G["Temp units"]
    G --> H["OK"]
    C --> I["Both On"]
    C --> J["Large On"]
    C --> K["Small On"]
    D --> L["Both On"]
    D --> M["Large On"]
    D --> N["Small On"]
    B --> O["OK"]
    style A fill:#f9f,stroke:#333
    style B fill:#ccf,stroke:#333
    style C fill:#cfc,stroke:#333
    style D fill:#fcc,stroke:#333
    style E fill:#cff,stroke:#333
    style F fill:#ffc,stroke:#333
    style G fill:#cfc,stroke:#333
    style H fill:#cfc,stroke:#333
    style I fill:#cfc,stroke:#333
    style J fill:#cfc,stroke:#333
    style K fill:#cfc,stroke:#333
    style L fill:#cfc,stroke:#333
    style M fill:#cfc,stroke:#333
20
CFX3 55 IM
flowchart
graph LR
    A["DCV 11.8"] --> B["Display"]
    B --> C["Ice maker"]
    C --> D["Ice maker"]
    D --> E["Display"]
    style A fill:#f9f,stroke:#333
    style B fill:#ccf,stroke:#333
    style C fill:#cfc,stroke:#333
    style D fill:#fcc,stroke:#333
    style E fill:#ffc,stroke:#333
21

22
flowchart
graph TD
    A["DCV 11.8"] --> B["Set temp"]
    B --> C["Battery protection"]
    B --> D["WIFI"]
    C --> E["OK"]
    D --> F["OK"]
    G["DCV 11.8"] --> H["Set temp"]
    H --> I["Battery protection"]
    H --> J["WIFI"]
    I --> K["OK"]
    J --> L["OK"]
    M["Bluetooth ON OFF PAIR"] --> N["ON"]
    M --> O["OFF"]
    M --> P["PAIR"]
    Q["Bluetooth ON OFF PAIR"] --> R["ON"]
    Q --> S["OFF"]
    Q --> T["PAIR"]
    U["Smart Device"] --> V["DCV 11.8"]
    V --> W["-8°C"]
    W --> X["Set temp"]
    X --> Y["Set temp"]
    Y --> Z["Battery protection"]
    Y --> AA["WIFI"]
    AB["OK"] --> AC["OK"]
    AD["OK"] --> AE["OK"]
23

flowchart
graph TD
    A["DCV 11.8 -8°C"] --> B["Set temp"]
    B --> C["Battery protection"]
    B --> D["Bluetooth"]
    B --> E["WiFi"]
    C --> F["OK"]
    D --> G["OK"]
    E --> H["OK"]
    F --> I["WiFi ON OFF RESET"]
    G --> J["WiFi ON OFF RESET"]
    H --> K["OK"]
    I --> L["OK"]
    J --> M["OK"]
    K --> N["WiFi ON OFF RESET"]
    L --> O["WiFi ON OFF RESET"]
    M --> P["OK"]
    N --> Q["OK"]
    O --> R["OK"]
    P --> S["WiFi Are you sure want to reset? No Yes"]
    Q --> T["WiFi Are you sure want to reset? No Yes"]
24
flowchart
graph LR
    A["DCV 11.8°C"] --> B["3 sec"]
    B --> C["Factory RESET"]
    style A fill:#f9f,stroke:#333
    style C fill:#bbf,stroke:#333
25

flowchart
graph TD
    A["Component 1"] --> B["Component 2"]
    B --> C["Component 3"]
    C --> D["Component 4"]
Please read these instructions carefully and follow all instructions, guidelines, and warnings included in this product manual in order to ensure that you install, use, and maintain the product properly at all times. These instructions MUST stay with this product.
By using the product, you hereby confirm that you have read all instructions, guidelines, and warnings carefully and that you understand and agree to abide by the terms and conditions as set forth herein. You agree to use this product only for the intended purpose and application and in accordance with the instructions, guidelines, and warnings as set forth in this product manual as well as in accordance with all applicable laws and regulations. A failure to read and follow the instructions and warnings set forth herein may result in an injury to yourself and others, damage to your product or damage to other property in the vicinity. This product manual, including the instructions, guidelines, and warnings, and related documentation, may be subject to changes and updates. For up-to-date product information, please visit documents.dometic.com, dometic.com.
Contents
1 Explanation of symbols ..... 18
2 Safety instructions....19
3 Scope of delivery 22
4 Accessories 22
5 Intended use 23
6 Function description.... 24
7 Operation 26
8 Cleaning and maintenance.... 34
9 Troubleshooting 35
10 Warranty 37
11 Disposal.... 38
12 Technical data.... 38
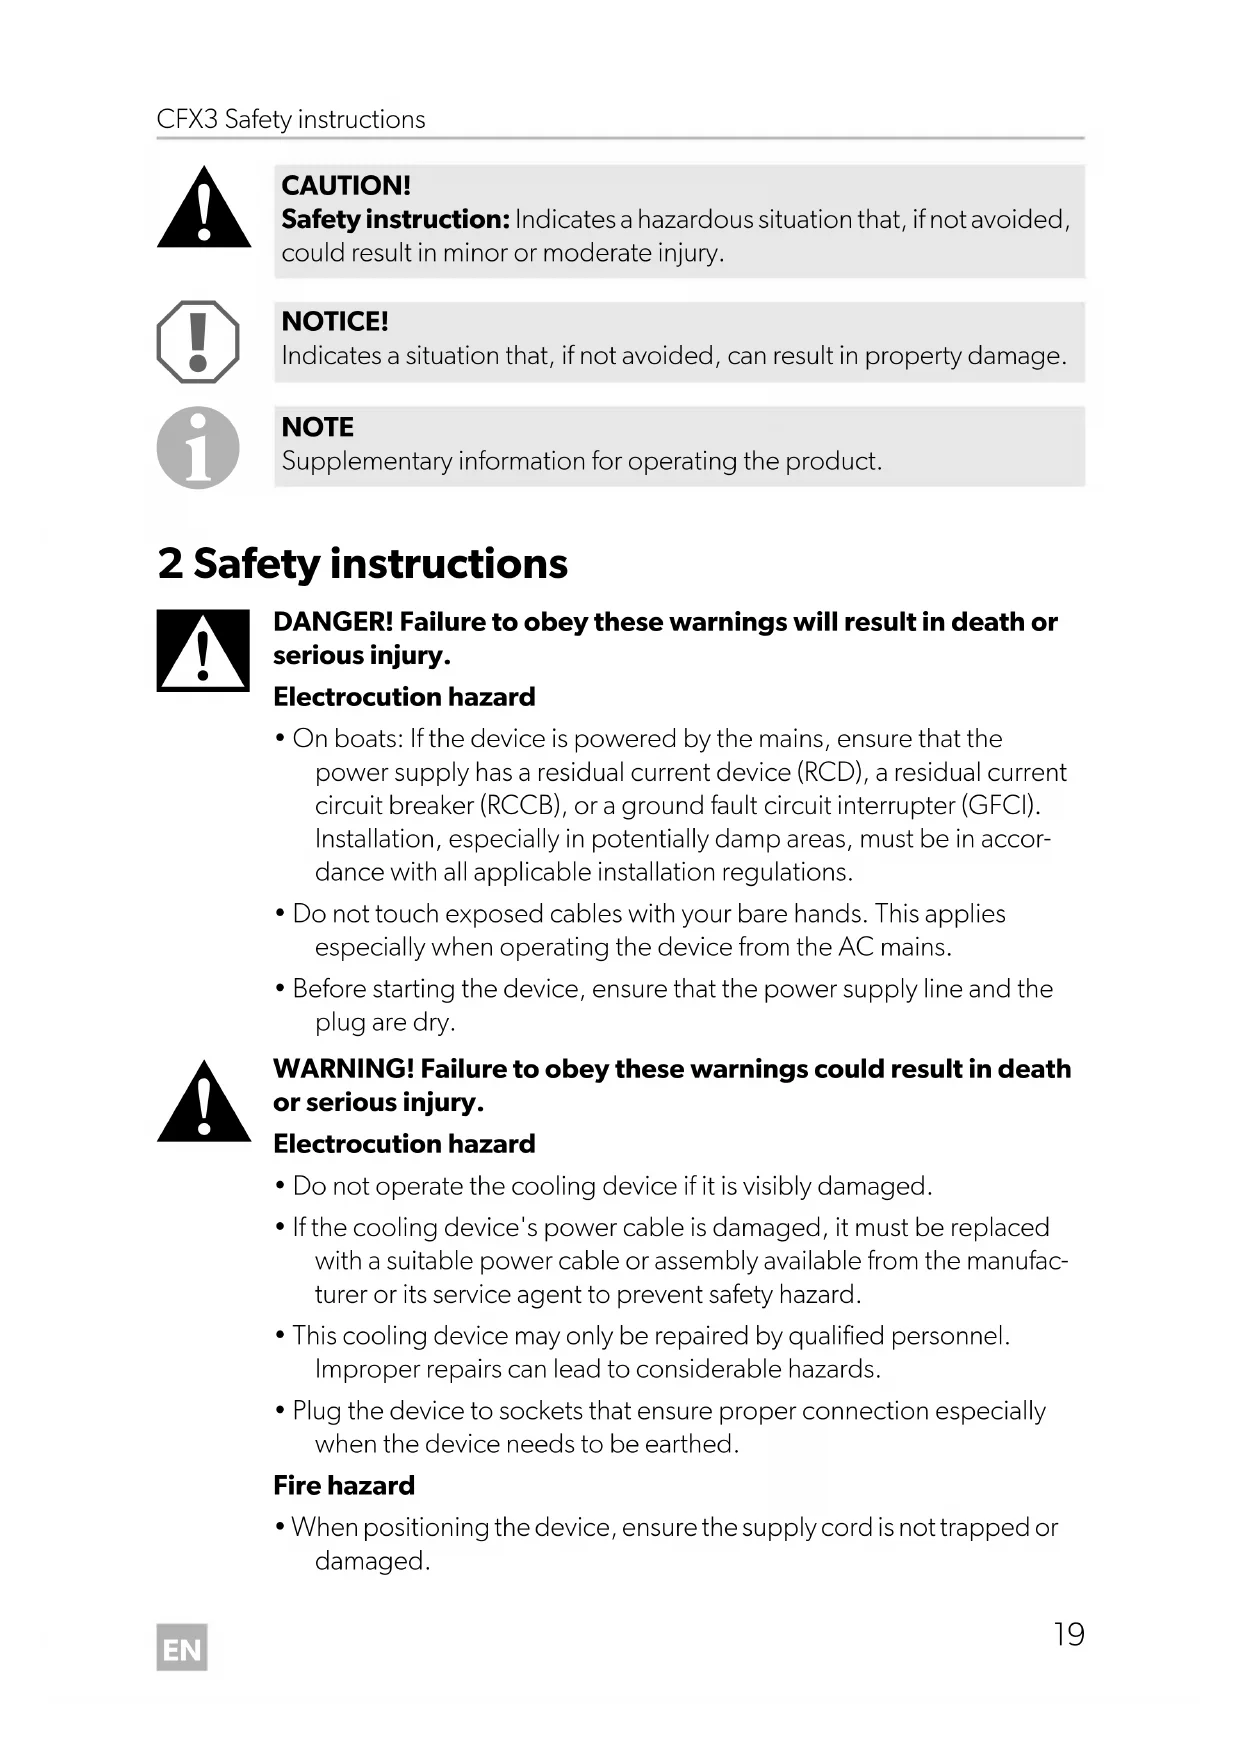
1 Explanation of symbols

DANGER!
Safety instruction: Indicates a hazardous situation that, if not avoided, will result in death or serious injury.

WARNING!
Safety instruction: Indicates a hazardous situation that, if not avoided, could result in death or serious injury.

CAUTION!
Safety instruction: Indicates a hazardous situation that, if not avoided, could result in minor or moderate injury.

NOTICE!
Indicates a situation that, if not avoided, can result in property damage.

NOTE
Supplementary information for operating the product.
2 Safety instructions

DANGER! Failure to obey these warnings will result in death or serious injury.
Electrocution hazard
- On boats: If the device is powered by the mains, ensure that the power supply has a residual current device (RCD), a residual current circuit breaker (RCCB), or a ground fault circuit interrupter (GFCI). Installation, especially in potentially damp areas, must be in accordance with all applicable installation regulations.
- Do not touch exposed cables with your bare hands. This applies especially when operating the device from the AC mains.
- Before starting the device, ensure that the power supply line and the plug are dry.

WARNING! Failure to obey these warnings could result in death or serious injury.
Electrocution hazard
- Do not operate the cooling device if it is visibly damaged.
- If the cooling device's power cable is damaged, it must be replaced with a suitable power cable or assembly available from the manufacturer or its service agent to prevent safety hazard.
- This cooling device may only be repaired by qualified personnel. Improper repairs can lead to considerable hazards.
- Plug the device to sockets that ensure proper connection especially when the device needs to be earthed.
Fire hazard
- When positioning the device, ensure the supply cord is not trapped or damaged.
- Do not locate multiple portable socket-outlets or portable power supplies at the rear of the device.
- Keep the ventilation openings on the device housing or in installations free of obstructions.
- Do not use any mechanical objects or other means to speed up the defrosting process, unless they have been recommended by the manufacturer for this purpose.
- Do not open or damage the refrigerant circuit.
- Do not use electrical devices inside the cooling device unless they are recommended by the manufacturer for that purpose.
Health hazard
- This device can be used by children aged from 8 years and above and persons with reduced physical, sensory or mental capabilities or lack of experience and knowledge if they have been given supervision or instruction concerning use of the device in a safe way and understand the hazards involved.
- Children aged from 3 to 8 years are allowed to load and unload cooling devices.
- Children must be supervised to ensure that they do not play with the device.
- Cleaning and user maintenance may not be carried out by unsupervised children.
Explosion hazard
- Do not store any explosive substances such as spray cans with a flammable propellant in the cooling device.

CAUTION! Failure to obey these cautions could result in minor or moderate injury.
Electrocution hazard
- Before starting the cooling device, ensure that the power supply line and the plug are dry.
- Disconnect the cooling device from the power supply
- Before each cleaning and maintenance
- After every use
Health hazard
To avoid contamination of food, observe the following instructions:
- Check if the cooling capacity of the device is suitable for storing the food to be cooled.
- Food may only be stored in its original packaging or in suitable containers.
- Opening the cooling device for long periods of time can cause significant increase of the temperature in the compartments of the device.
- Clean regularly surfaces that can come in contact with food and accessible drainage systems.
- If the device is left empty for long periods:
- Switch off the device.
- Defrost the device.
– Clean and dry the device. - Leave the lid open to prevent mold developing within the device.

NOTICE! Damage hazard
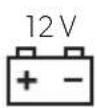
- Check that the voltage specification on the data plate corresponds to that of the energy supply.
-
Only connect the cooling device as follows:
-
With the DC connection cable to a DC power supply in the vehicle
-
Or with the AC connection cable to an AC power supply
-
Never pull the plug out of the socket by the cable.
- If the cooling device is connected to a DC outlet, disconnect the cooling device and other power consuming devices from the battery before connecting a quick charging device.
- If the cooling device is connected to a DC outlet, disconnect the cooling device or switch it off when turning off the engine. Otherwise the battery may be discharged.
- The cooling device is not suitable for transporting caustic materials or materials containing solvents.
- The insulation of the cooling device contains flammable cyclopentane and requires special disposal procedures. Deliver the cooling device at the end of its life-cycle to an appropriate recycling center.
- Do not place the cooling device near naked flames or other heat sources (heaters, direct sunlight, gas ovens etc.).
- Risk of overheating!
Ensure at all times that there is a minimum of 50 mm ventilation on all sides of the cooling device. Keep the ventilation area free of any objects that could obstruct the air flow to the cooling components. Do not use or store the cooling device in closed compartments or areas with none or minimal air flow.
- Do not fill the inner container with ice or fluids.
- Never immerse the cooling device in water.
- Protect the cooling device and cables against heat and moisture.
- The device shall not to be exposed to rain.
3 S c o p e o f d
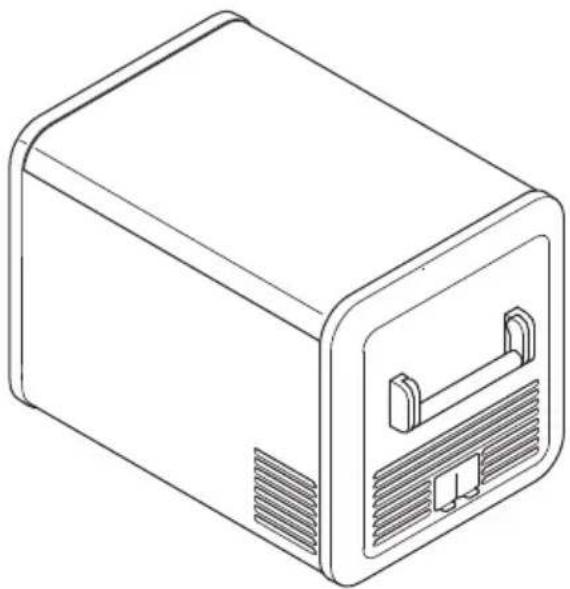
Item in
fig. 1,
page 3
Quantity Description
11 Cooler
21 Connection cable for DC connection
31 Connection cable for AC connection
4 A c c e s s o r i
Available as accessory (not included in scope of delivery):
Designation Ref. no. Model
| Protective cover | |
| CFX3 25PC 9600028749 CFX3 25 | |
| CFX3 35PC 9600028455 CFX3 35 | |
| CFX3 45PC 9600028456 CFX3 45 | |
| CFX3 55PC 9600028457 CFX3 55 | |
| CFX3 55IM | |
| CFX3 75PC 9600028458 CFX3 75DZ | |
| CFX3 95PC 9600028459 CFX3 95DZ | |
| CFX3 100PC | 9600028460 CFX3 100 |
| Fridge slide | |
| CFX3 SLD3545 | 9600028548 CFX3 35 |
| CFX3 45 | |
| CFX3 SLD55 | 9600028549 CFX3 55 |
| CFX3 55IM | |
| Designation Ref. no. | Model |
| CFX3 SLD75 9600028550 CFX3 75DZ | |
| CFX3 SLD95100 9600028551 CFX3 95DZ | |
| CFX3 100 | |
| CFX3 app – suits all models | |
| PLB40 9600012878 suits all models | |
Note that the CFX3 app may not be available in your country.
5 Intended use
The cooling device is suitable for cooling food. The cooling device is designed to be operated from a DC on-board power supply of a vehicle or boat, from a DC auxiliary battery or from an AC power supply.
The cooling device is suitable for camping use.
The cooling device is intended to be used in household and similar applications such as
- Staff kitchen areas in shops, offices and other working environments
- Farm houses
- Clients in hotels, motels and other residential type environments
- Bed and breakfast type environments
- Catering and similar non-retail applications
This product is only suitable for the intended purpose and application in accordance with these instructions.
This manual provides information that is necessary for proper installation and/or operation of the product. Poor installation and/or improper operating or maintenance will result in unsatisfactory performance and a possible failure.
The manufacturer accepts no liability for any injury or damage to the product resulting from:
- Incorrect assembly or connection, including excess voltage
- Incorrect maintenance or use of spare parts other than original spare parts provided by the manufacturer
• Alterations to the product without express permission from the manufacturer - Use for purposes other than those described in this manual
Dometic reserves the right to change product appearance and product specifications.
6 Function description
A low maintenance refrigerant circuit with compressor provides the cooling. The generous insulation and powerful compressor ensure efficient and fast cooling.
The cooler is portable.
The cooler can withstand a short-term inclination of 30^ .
6.1 Scope of functions
- Power supply with priority circuit for connecting to the AC power supply
- Three-level battery protection to protect the vehicle battery
- Display with temperature gauge in ^ and ^
• Temperature setting in steps of 1^ C ( 1^ F) - Integrated WiFi and Bluetooth function hence controllable using an app
- Foldable carrying handles
- USB charger for portable devices such as mobile phones
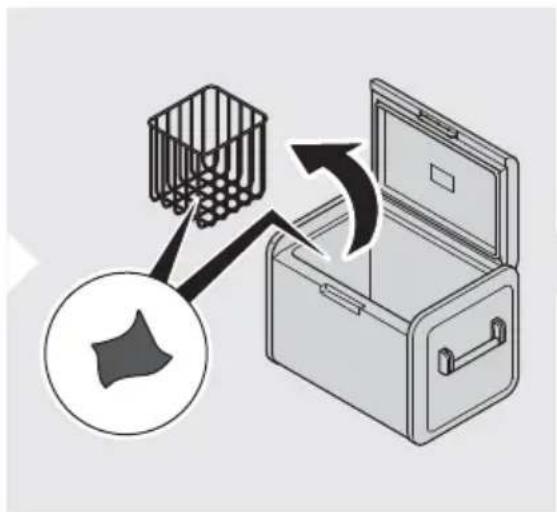
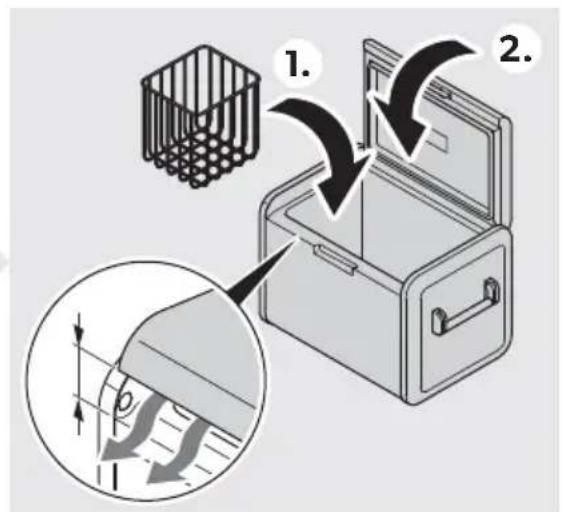
- Removable wire basket
• CFX3 55IM only: Ice maker
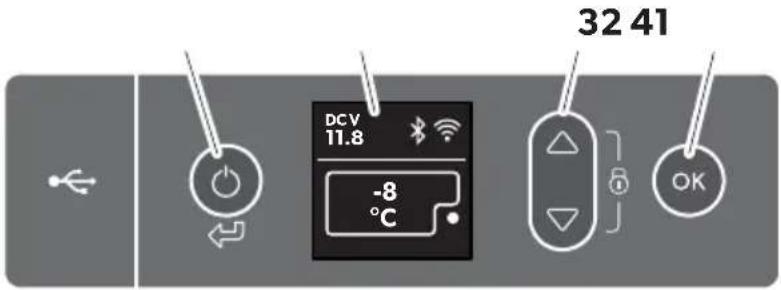
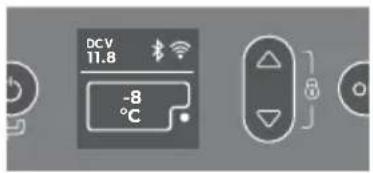
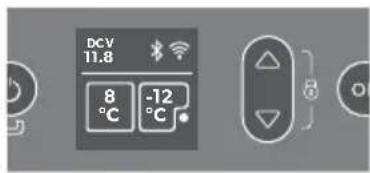
6.2 Operating and display elements
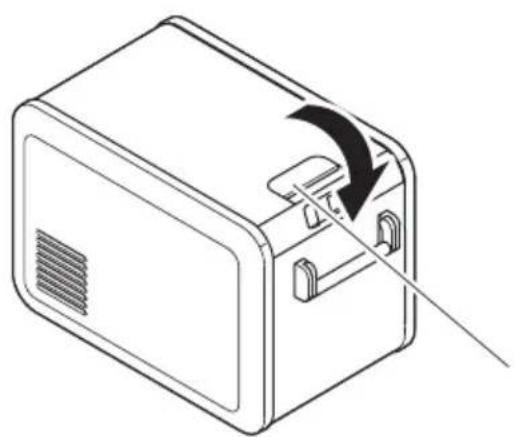
Latch for lid: fig. 2 1, page 3
Operating panel (fig. 3, page 4):
Item Description Explanation
| 1 Switches the cooler on when the button is pressed brieflySwitches the cooler off when the button is pressed for three secondsReturns to the previous menu |
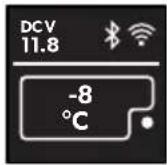
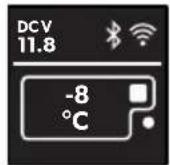
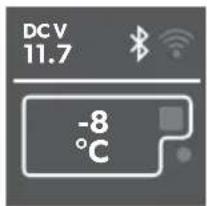
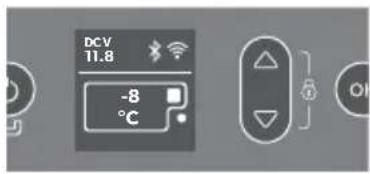
2 Display Shows the information
AC : AC power supply is connected
DCV: DC power supply is connected
* : Bluetooth is activated
WiFi is activated
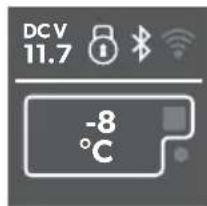
: Display is locked
• : Compressor is working
■ : Ice maker is working (CFX3 55IM only)
3

Press to navigate upwards or to increase the selected value.
Press to navigate downwards or to decrease the selected value.
Press and simultaneously for 3 s to lock or unlock the display.
4 Press to select a menu or to save the selected value.
OK
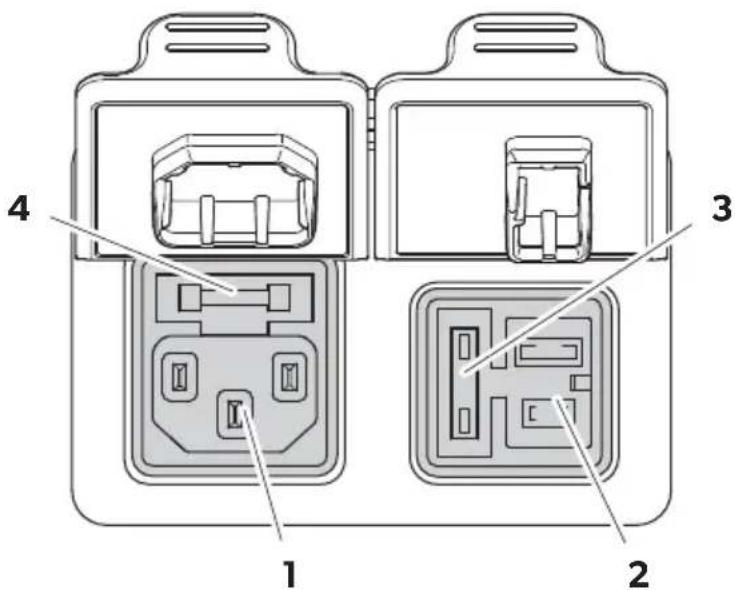
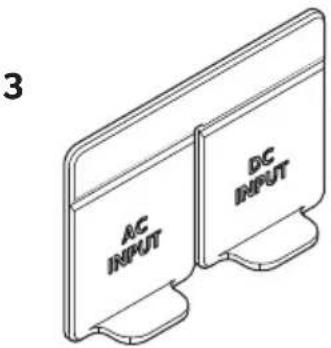
Connection sockets (fig. 4, page 4):
Item Description
1 Connection socket AC voltage supply
2 Connection socket DC voltage supply
3 DC Fuse holder
4 AC Fuse holder
7 O p e r a t i o n
To avoid food waste, note the following:
- Keep temperature fluctuation as low as possible. Only open the cooling device as often and for as long as necessary. Store the foodstuff in such a way that the air can still circulate well.
- Adjust the temperature to the quantity and type of the foodstuff.
- Foodstuff can easily absorb or release odor or taste. Always store foodstuff covered or in closed containers/bottles.
7.1 Before initial use

NOTE
Before starting your new cooler for the first time, you should clean it inside and outside with a damp cloth for hygienic reasons (please also refer to the chapter "Cleaning and maintenance" on page 34).
7.2 Saving energy
- Choose a well ventilated location which is protected from direct sunlight.
- Allow warm food to cool down first before placing it in the cooling device to keep cool.
- Do not open the cooling device more often than necessary.
- Do not leave the cooling device open for longer than necessary.
- If the cooler has a basket: For optimal energy consumption, position the basket according to its position on delivery.
- On a regular basis, make sure the lid seal still fits properly.
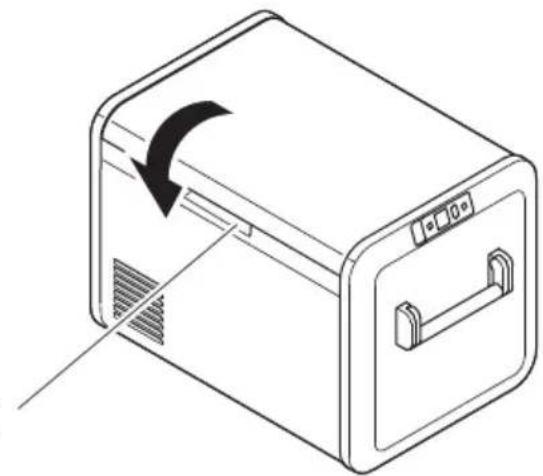
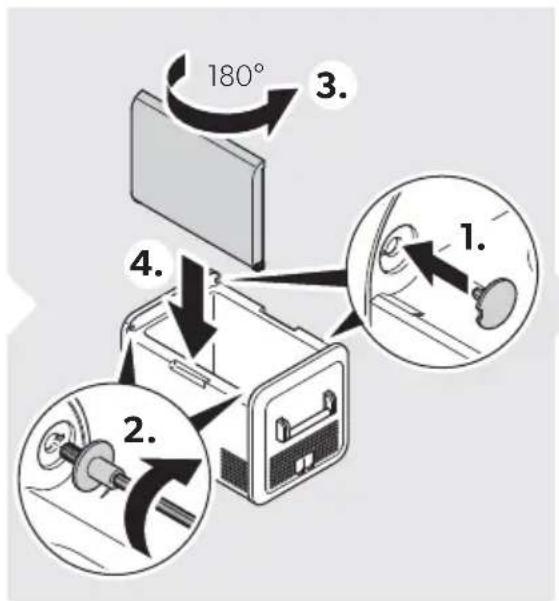
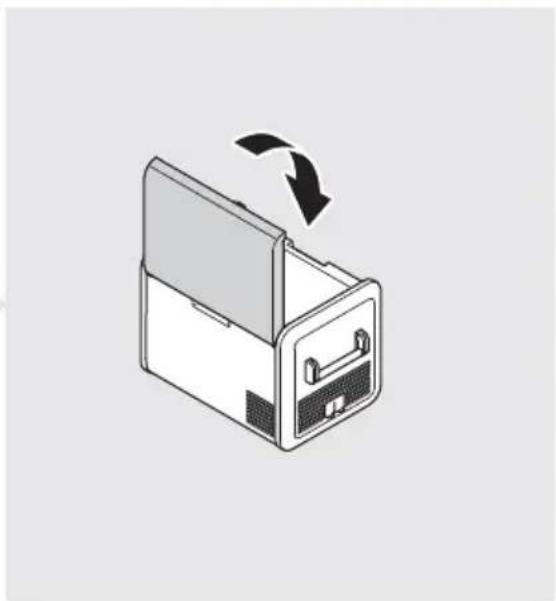
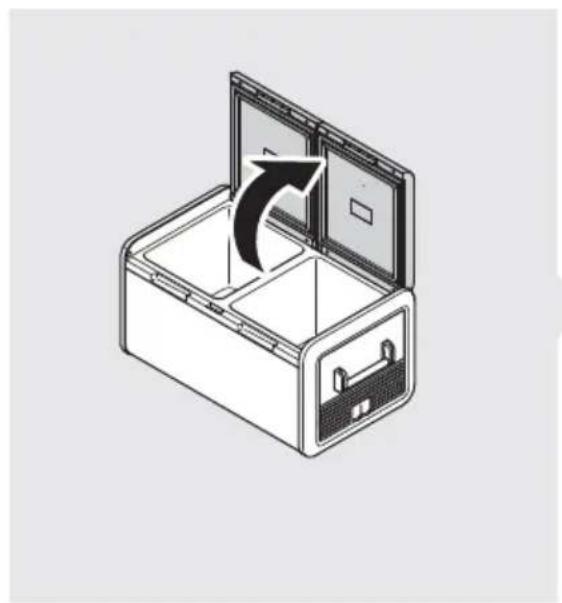
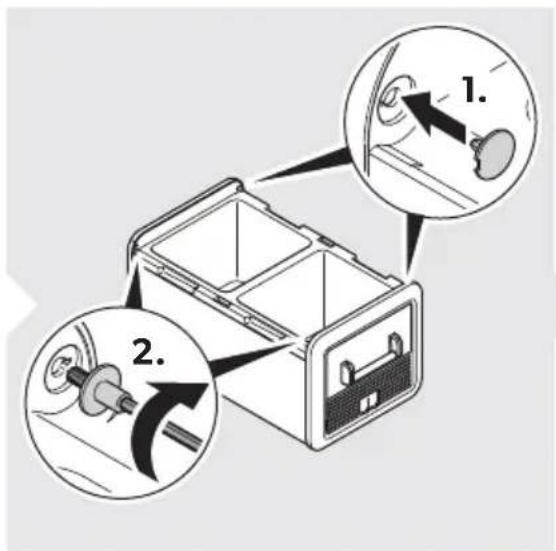
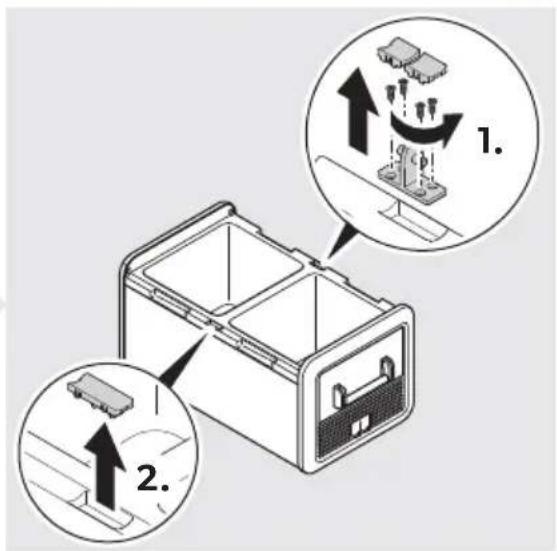
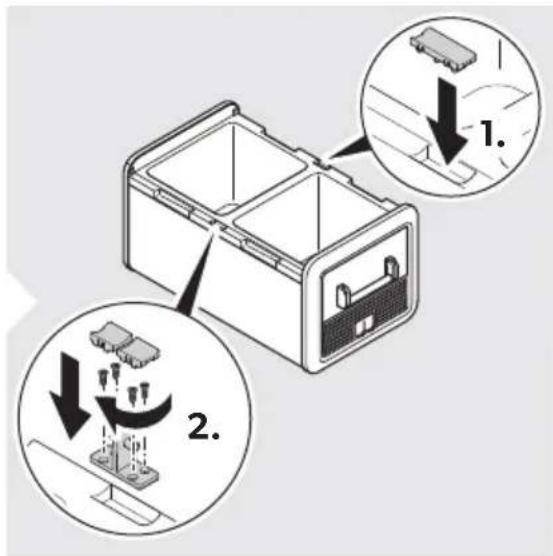
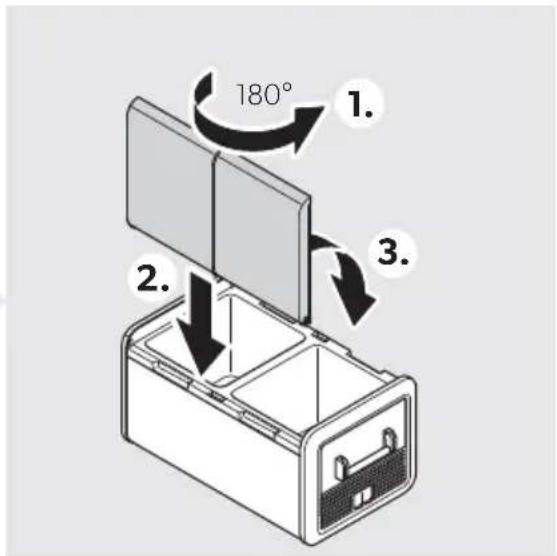
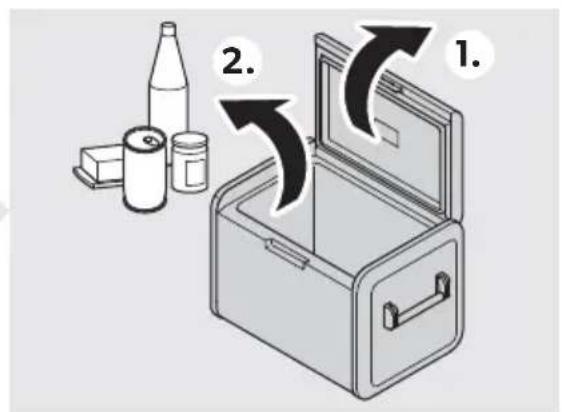
7.3 Reversing the lid opening direction
CFX3 55, CFX3 55IM, CFX3 100
▶ Proceed as shown (fig. 5, page 5).
CFX3 75DZ, CFX3 95DZ
▶ Proceed as shown (fig. 6, page 6).
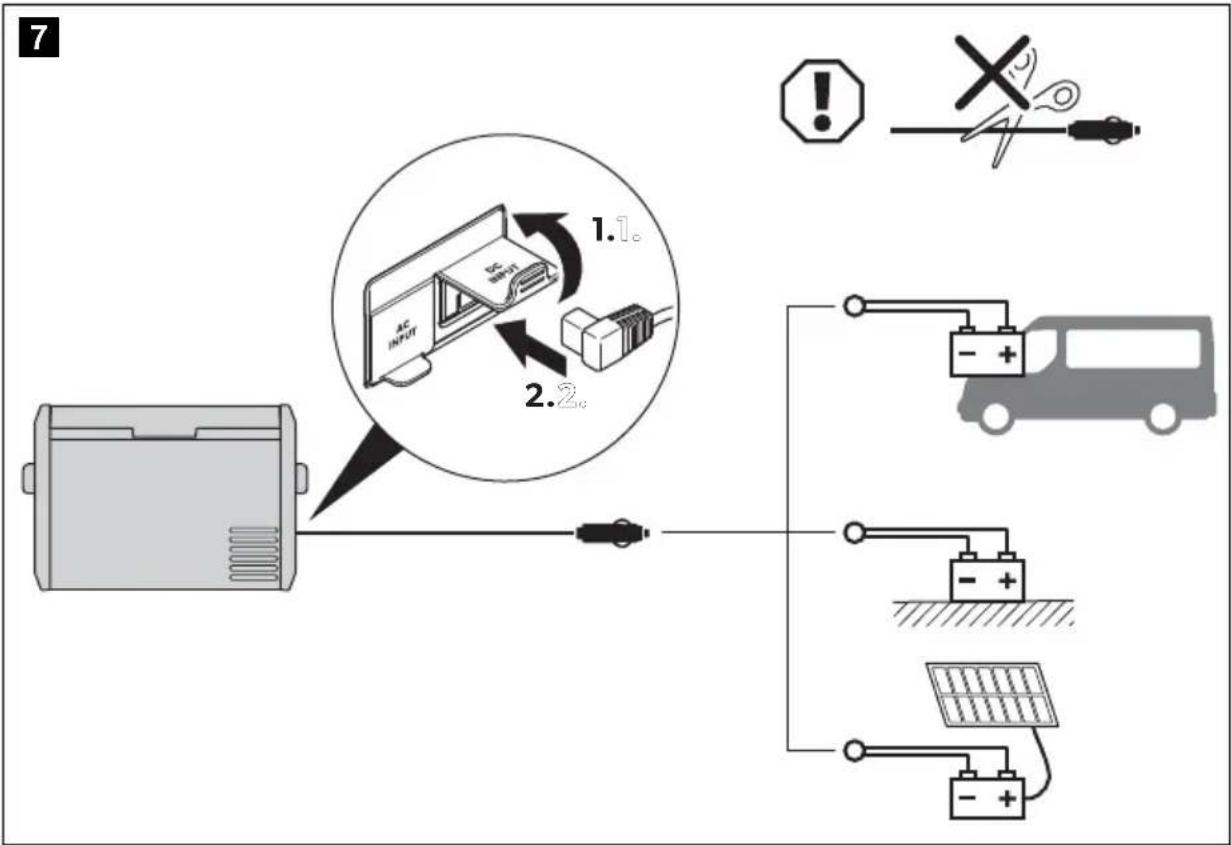
7.4 Connecting the cooler

NOTICE! Damage hazard
- For protection of the device the DC cable supplied includes a fuse inside the plug. Do not remove the fused DC plug. Only use the DC cable supplied.
- Disconnect the cooler and other consumer units from the battery before you connect the battery to a quick charging device. Overvoltage can damage the electronics of the device.
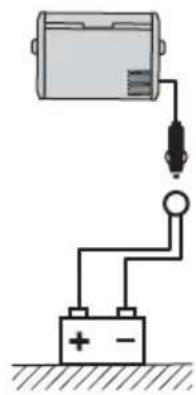
Connecting to a battery
▶ Proceed as shown (fig. 7, page 7).
Connecting via extended DC hard-wiring (only CFX3 100)
▶ Proceed as shown (fig. 8, page 8).
Connecting to an AC power supply

DANGER! Electrocution hazard
- Never handle plugs and switches with wet hands or if you are standing on a wet surface.
- If you are operating your cooler on board a boat from a AC power supply, you must install a residual current circuit breaker between the AC power supply and the cooler. Seek advice from a trained technician.
▶ Proceed as shown (fig. 9, page 9).
7.5 Using the cooler

NOTICE! Risk of overheating
Ensure at all times that there is sufficient ventilation so that the heat that generated during operation can dissipate. Ensure that the ventilation slots are not covered. Make sure that the device is sufficiently far away from walls and other objects so that the air can circulate.

NOTE
When operating with the battery, the display switches off automatically if the battery voltage is low.
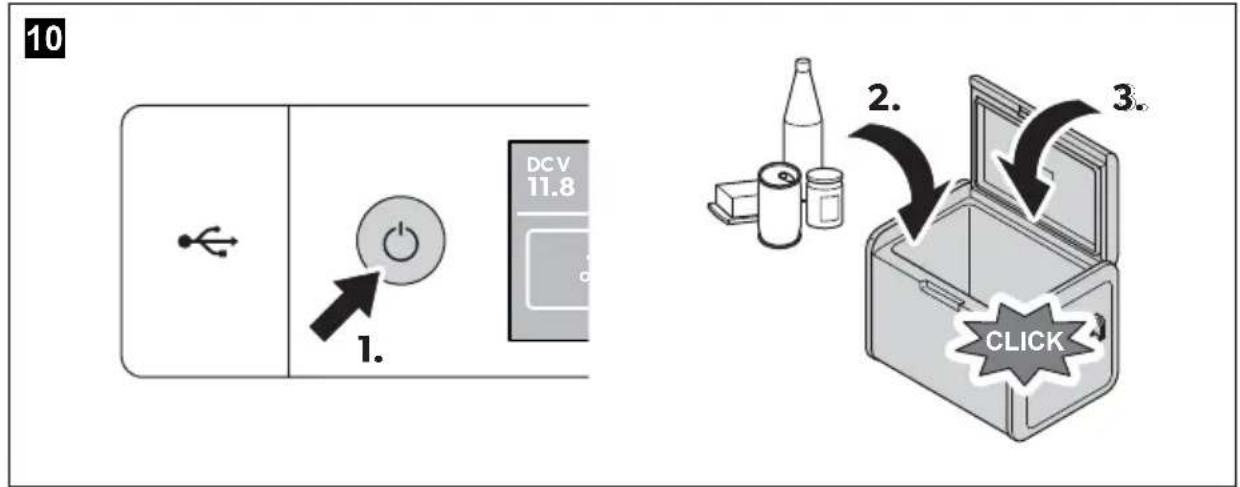
- Switching on the cooler: fig. 10, page 9
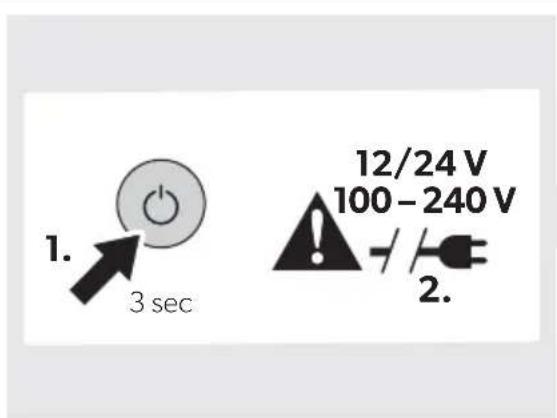
- Switching off the cooler: fig. 11, page 10
7.6 Using the display
Display states (fig. 12, page 10)
| Item Description |
| A Stand by |
| B l d l e |
| C Locked |
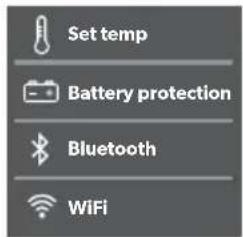
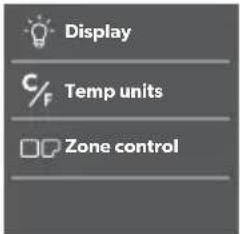
Display overview: fig. 13, page 11
Navigating through the menus
The highlighted menu is selected.
▶ Press to navigate upwards.
▶ Press to navigate downwards.
Choosing a menu
▶ Pressok to select the required menu.
Changing settings
The highlighted value or setting is selected.
▶ Press to increase the selected value or to choose the previous setting.
▶ Press to decrease the selected value or to choose the next setting.
Returning to the previous menu
▶ Press to return to the previous menu without saving.
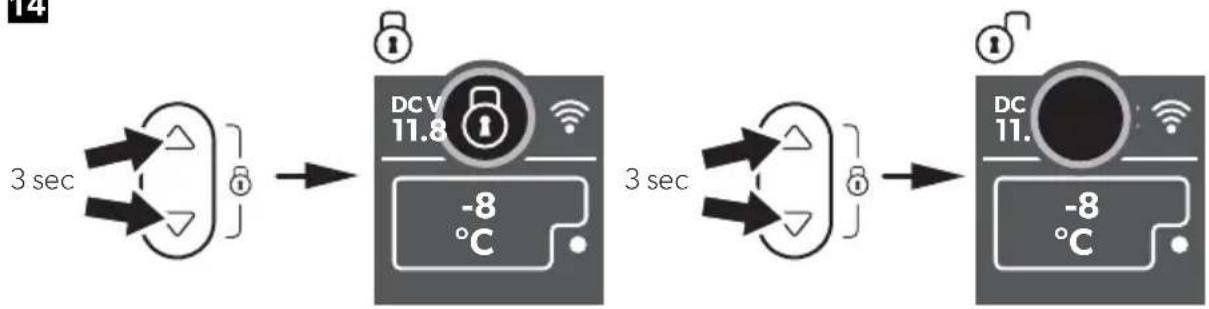
7.7 Locking/unlocking the display
▶ Press △ and ▽ simultaneously for 3 s to lock or unlock the display (fig. 14, page 11).
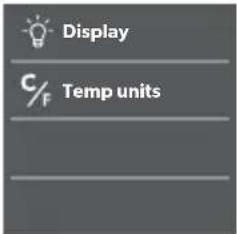
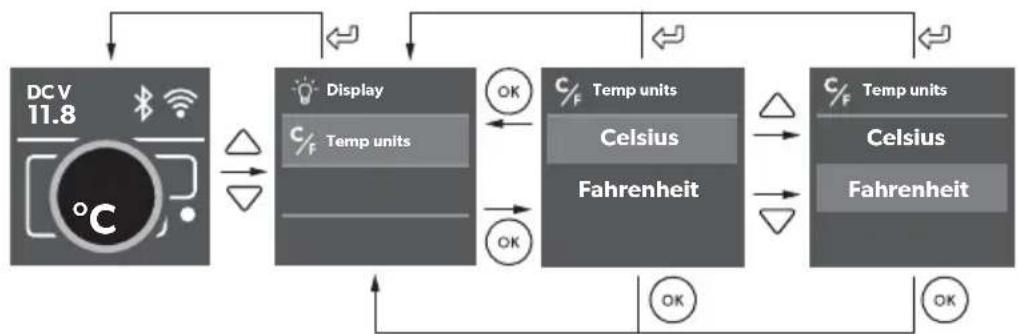
7.8 Selecting the temperature units
▶ Proceed as shown (fig. 15, page 11).
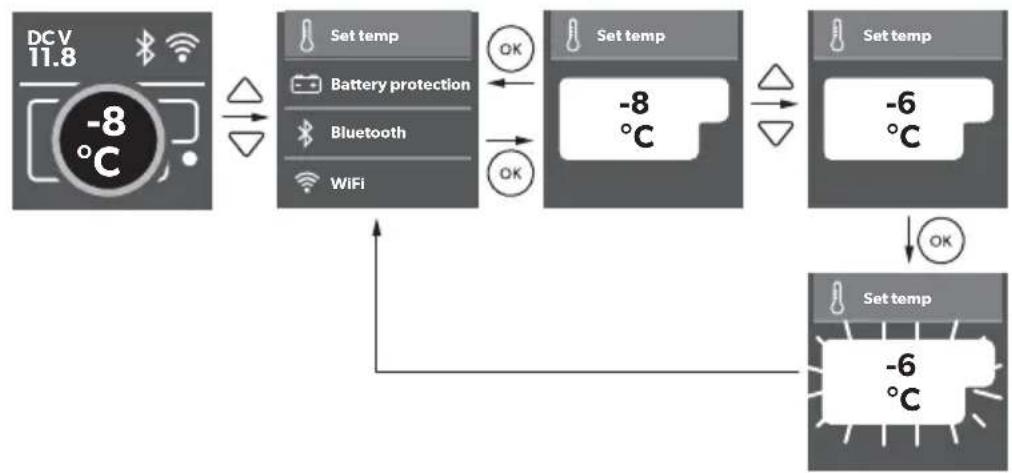
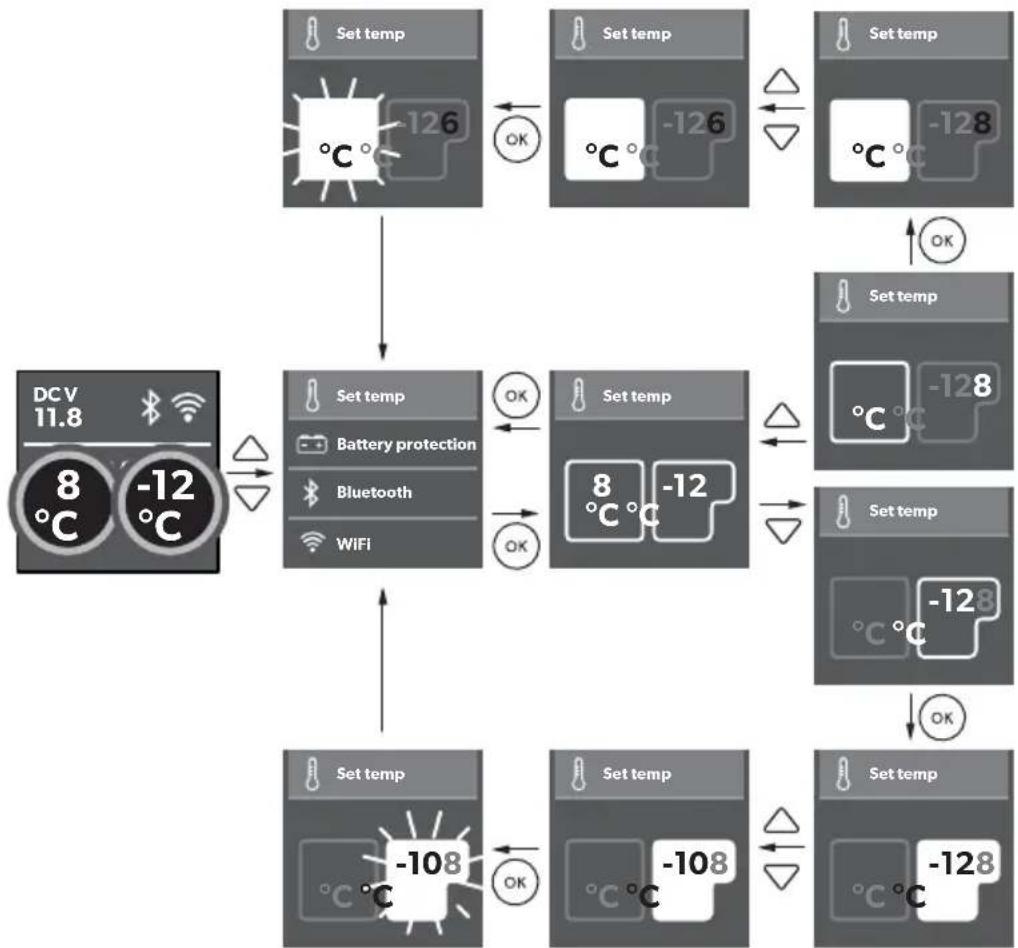
7.9 Setting the temperature

NOTICE! Damage hazard from excessively low temperature
Ensure that only those objects are placed in the cooler that are intended to be cooled at the selected temperature.
▶ Proceed as shown (fig. 16, page 12).
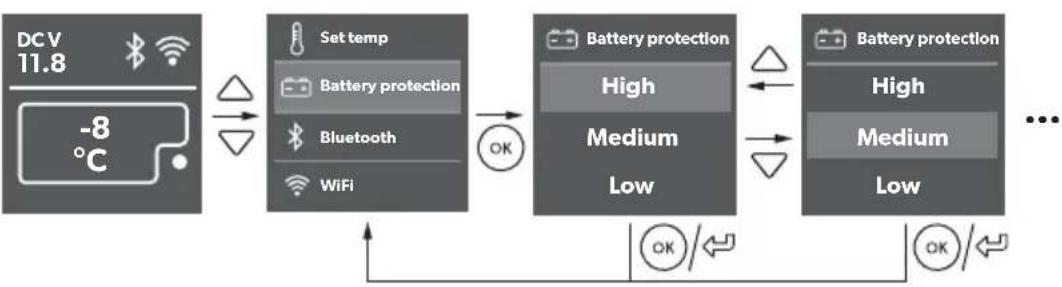
7.10 Using the battery protection
The device is equipped with 3-stage battery protection. The battery protection prevents excessive discharging when the device is connected to a vehicle starter battery or maximises the use of a supply battery.
If the cooler is operated when the vehicle ignition is switched off, the cooler switches off automatically as soon as the supply voltage falls below a set level. The cooler will switch back on once the battery has been recharged to the restart voltage level.

NOTICE! Damage hazard
When switched off by the battery protection, the battery will no longer be fully charged. Avoid starting repeatedly. Ensure that the battery is recharged.

NOTE
When the cooler is supplied by a starter battery, select the battery protection mode "MEDIUM" or "HIGH". If the cooler is connected to a supply battery, the battery protection mode "LOW" is ideal.
▶ Proceed as shown (fig. 17, page 13).
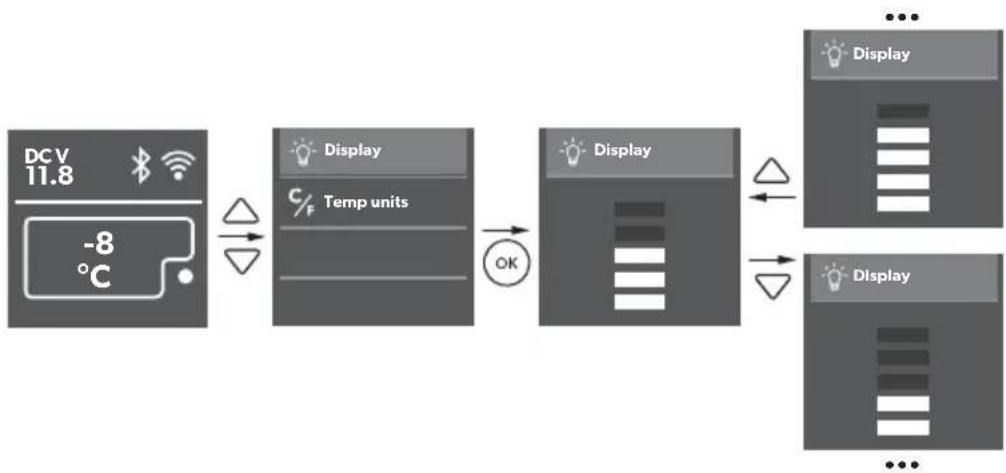
7.11 Setting the display's brightness
▶ Proceed as shown (fig. 18, page 13).
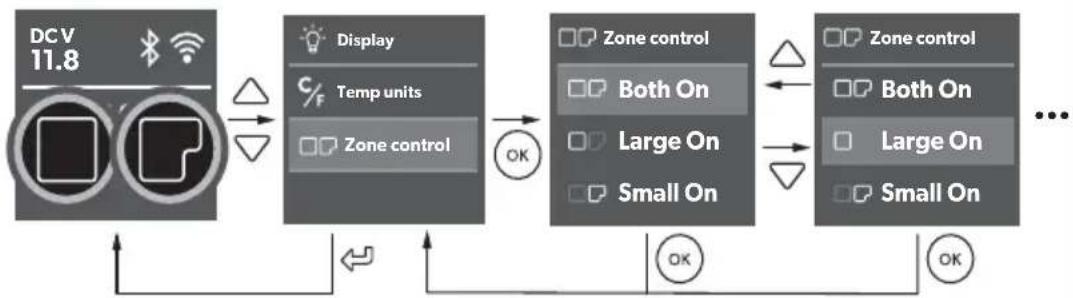
7.12 Switching on or off the compartments (only CFX3 75DZ, CFX3 95DZ)
You can activate each zone individually or both of them.
▶ Proceed as shown (fig. 19, page 14).
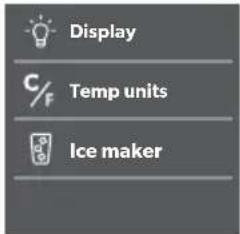
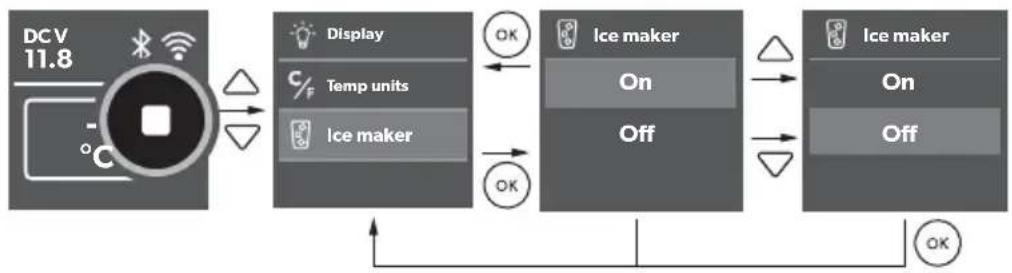
7.13 Using the ice maker (only CFX3 55IM)

NOTE
- Independent of the main compartment's temperature setting, the ice maker zone is designed for making ice cubes if the ice maker is switched on.
- The cooler's energy consumption increases with ice maker on. Therefore you should switch off the ice maker if it is not needed.
- The factory setting for the ice maker is OFF.
▶ Proceed as shown (fig. 20, page 14).
Filling the ice trays with water
- Remove the ice trays (fig. 21 1, page 15) from the ice maker housing (fig. 21 2, page 15).
- Remove the ice tray covers, fill with clean water and re-fit the cover, taking care to press the edge seal all the way around.
- Re-position the ice trays in the ice maker housing and close the lid.

NOTE
Dry any water spillage from under the ice trays. This will reduce ice build up under the trays and make removal easier.
Removing the ice cubes
▶ Open the ice maker housing lid and lift under the front of the ice trays.

NOTE
Removal may require additional force using two hands in high humidity conditions which may create an ice bond underneath the ice trays.
▶ Remove the ice tray covers and twist trays to release the ice cubes.
Removing the ice maker housing
The ice maker housing can be removed for cleaning or when not in use to increase usable space inside the cooler:
▶ Lift the housing at one end until the lug unclips, then remove.
▶ Reverse procedure for re-fit, pushing down on lugs to snap into position.
Tips for using the ice maker
- The ice maker makes ice fast for a number of hours after switching on and then automatically goes into an ice maintenance mode to reduce energy consumption. If multiple batches of ice are required as quickly as possible, switching the ice maker off and back on will set it back into fast ice making mode. Repeat as required.
- Low freezer temperature settings in the main compartment may not be maintained in high ambient temperature conditions with the ice maker switched on.
Cleaning and drying the ice maker
When not in use clean and dry the ice trays and inside the ice maker housing to prevent mould.
▶ Following extended periods of non-use clean the inside of the ice trays with a mild dish washing solution and rinse with clean water prior to use.
7.14 Downloading the CFX3 app
The cooler can be monitored and controlled via Bluetooth or WiFi using an app that you can install on a compatible device.
▶ Download the CFX3 app from App Store or Google Play:


Note that the CFX3 app may not be available in your country.
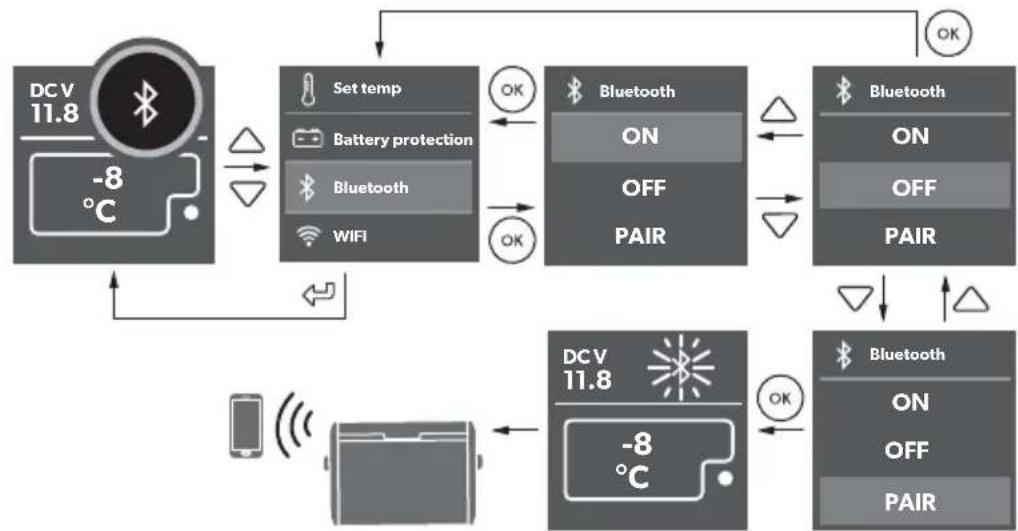
7.15 Setting the Bluetooth signal and connecting to the app
The cooler can be monitored and controlled via Bluetooth. To do so, you have to pair the cooler with your Bluetooth device.

NOTE
- Pairing must be done within the CFX3 app, not in device settings.
- There is no password required for Bluetooth connection.
▶ Proceed as shown (fig. 22, page 15).
7.16 Setting the WiFi signal and connecting to the app
The cooler can be monitored and controlled via WiFi direct to cooler or via a WiFi network.
▶ Proceed as shown (fig. 23, page 16) to turn WiFi on.
For WiFi direct to cooler, go to device settings and select your cooler.
- The WiFi name of your cooler begins with "CFX3".
- The preset password is "00000000".
- You can personalise the WiFi name and the password in the CFX3 app.

NOTE
For connection via WiFi network, go to "network connection" in the app SETTINGS.
7.17 Changing CFX name and password in the app
- You can personalise the name of your CFX in the app.
- The same name applies to both Bluetooth and WiFi.
- You can also personalise your password in the app -applicable only to WiFi.
▶ Proceed to "CFX name and password" in the app SETTINGS.
7.18 Resetting the app password (WiFi only)
You can reset the app password to the factory setting "00000000".
▶ Proceed as shown (fig. 23, page 16).
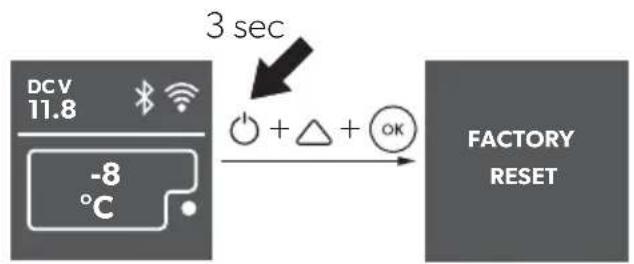
7.19 Resetting to factory settings
The reset function changes all display menu and app fields to the original factory settings.
▶ Proceed as shown (fig. 24, page 16).
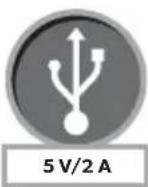
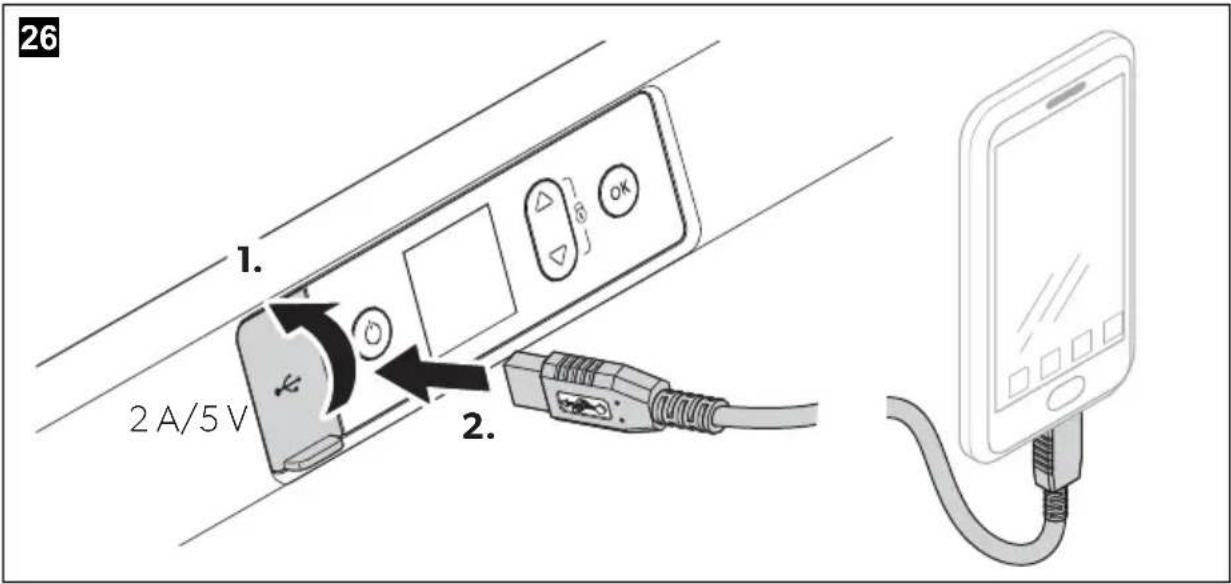
7.20 USB port for power supply
The USB port allows you to charge small devices like mobile phones and mp3 players.

NOTE
Ensure that any small device connected to the USB port is compatible with 5 V/2 A operation.
▶ Proceed as shown (fig. 26, page 17).
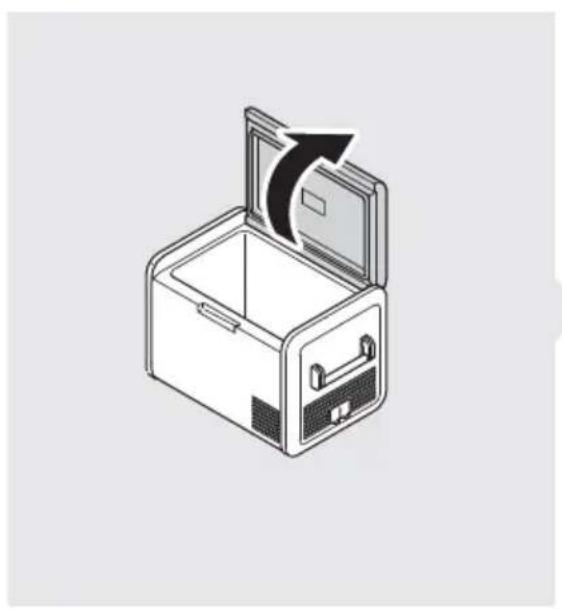
7.21 Defrosting the cooler
Humidity can form frost in the interior of the cooling device or on the evaporator. This reduces the cooling capacity. Defrost the device in good time to avoid this.

NOTICE! Damage hazard
Never use hard or pointed tools to remove ice or to loosen objects which have frozen in place.
To defrost the cooler, proceed as follows:
- Take out the contents of the cooler.
- If necessary, place them in another cooling device to keep them cool.
- Switch off the device.
- Leave the lid open.
- Wipe off the defrosted water.
7.22 Replacing the AC fuse

DANGER! Electrocution hazard
Disconnect the power supply and the connection cable before you replace the device fuse.
- Disconnect the power supply to the device.
- Pull out the connection cable.
- Pry out the fuse insert (fig. 4 4, page 4) with a screwdriver.
- Replace the defective glass fuse with a new one of the same type and rating (Fast Acting, 4 A, 250 V).
- Press the fuse insert back into the housing.
- Reconnect the power supply to the device.
7.23 Replacing the DC fuse
- Pry out the fuse cover (fig. 4 3, page 4) with a screwdriver.
- Reverse the fuse cover and use hook to remove the defective blade fuse.
- Push in a new fuse of the same type and rating.
- Re-fit the fuse cover.
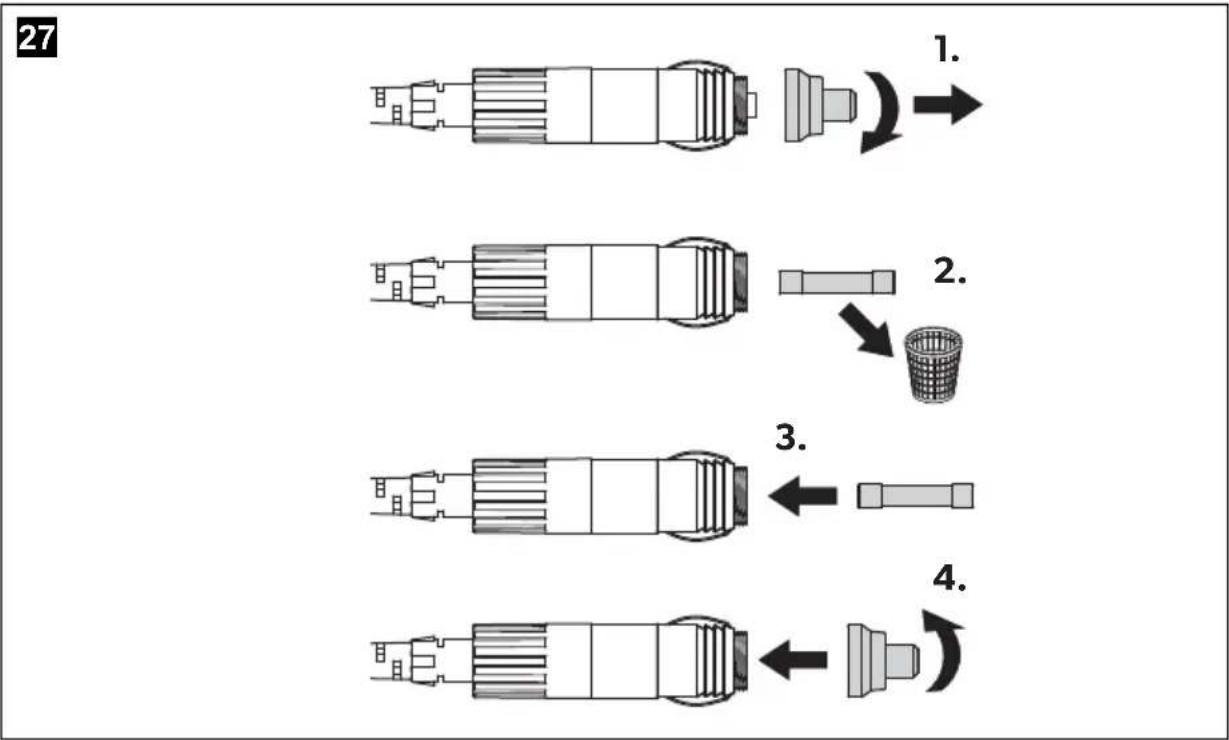
7.24 Replacing the DC plug fuse
- Replace the defective fuse with a new fuse of the same type and rating.
- Proceed as shown (fig. 27, page 17).
7.25 Replacing the light PCB

NOTICE! Damage hazard
The lamp can only be replaced by the manufacturer, a service agent or similarly qualified person to avoid hazard.
8 Cleaning and maintenance

NOTICE! Damage hazard
- Never clean the cooling device under running water or in dish water.
- Do not use abrasive cleaning agents or hard objects during cleaning as these can damage the cooling device.
▶ Occasionally clean the cooling device interior and exterior with a damp cloth.
▶ Make sure that the air inlet and outlet vents on the device are free of any dust and dirt, so that heat can be released and the device is not damaged.
9 Troubleshooting
| Fault Possible cause Suggested remedy | ||
| The device does not function (DC mode, ignition on). | No voltage was detected in the DC power outlet. | ► In most vehicles the ignition must be turned on before power will be supplied to the DC power outlet. |
| The DC outlet is dirty. This results in a poor electrical contact. | ► If the plug of the device becomes very warm in the DC outlet, either the DC outlet must be cleaned or the plug has not been assembled correctly. | |
| The fuse of the DC plug has blown. | ► Replace the fuse in the DC plug, see chapter “Replacing the DC plug fuse” on page 34. | |
| The device DC fuse has blown. | ► Replace the device DC fuse, see chapter “Replacing the DC fuse” on page 34. | |
| The vehicle fuse has blown. | ► Replace the vehicle’s DC outlet fuse. Please refer to your vehicle’s operating manual. | |
| The device does not function (AC mode). | No voltage present in the AC voltage socket. | ► Try using another plug socket. |
| The device AC fuse has blown. | ► Replace the device AC fuse, see chapter “Replacing the AC fuse” on page 33. | |
| The integrated AC adapter is defective. | ► This can only be repaired by an authorised repair centre. | |
| The display does not respond to keystrokes. | The display is locked. | ► Unlock the display, see chapter “Locking/unlocking the display” on page 28. |
| The app cannot control the device. | Bluetooth or WiFi is not connected. | ► Connect Bluetooth, see chapter “Setting the Bluetooth signal and connecting to the app” on page 31, or Connect WiFi, see chapter “Setting the WiFi signal and connecting to the app” on page 32. |
| The display shows an alert message or warning code. | - ► See table below. | |
Alert messages
E.g. see fig. 25 A, page 16.
| Alert message | Description | Possible cause | Suggested remedy |
| !ALERT - Lid open >3 min | Lid open more than 3 minutes | ·Lid not fully latched ·l n t e r n a inspection required t | ▶ Check lid latched fully ▶ Authorised repair centre |
| !ALERT - Voltage low | The device has stopped working on DC due to low voltage | ·Insufficient supply voltage ·Battery voltage is too low ·Battery protection is set too high | ▶ Check voltage drop from battery to power outlet and increase wiring gauge if necessary ▶ Test the battery and charge as needed ▶ Select a lower battery protection setting |
| The device has stopped working on DC due to abnormally high voltage >31.5 V (unlikely event – for electronics protection only – uses same alert message as low voltage above) | ·Wrong DC supply voltage specification ·Faulty supply voltage ·l n t e r n a | ▶ Ensure DC supply voltage specification matches CFX3 product rating label ▶ Check DC voltage supply & repair or replace if faulty ▶ Authorised repair centre inspection required |
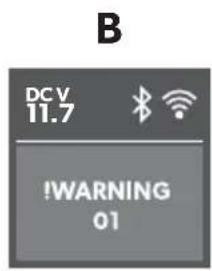
Warning codes
E.g. see fig. 25 B, page 16.
| Warning code | Fault | Possible cause | Suggested remedy |
| !WARNING 32 | Fan over-current | Internal fault. | ▶ Turn off the device for at least 5 mins., then restart. If the problem persists, authorised repair centre inspection required |
| !WARNING 33 | Compressor start fail | ||
| !WARNING 34 Compressor speed low | ·High ambient temperature·Air vent blocked or insufficient clearance·l n t e r n a l f a u l tAuthorised repair centre inspection required | ►Turn off the device for at least 30 mins., or move to a cooler location, then restart►Clear the vents Authorised repair centre inspection required | |
| !WARNING 35 Controller over-temperature | |||
| !WARNING 01 NTC open circuitSZ & DZ LARGE | Internal fault Authorised repair centre inspection required | ||
| !WARNING 11 NTC open circuitDZ SMALL | |||
| !WARNING 02 NTC short circuitSZ & DZ LARGE | |||
| !WARNING 12 NTC short circuitDZ SMALL | |||
| !WARNING 09 DZ valve or IceMaker valve faulty | |||
| !WARNING 03/43 | Communication error | ||
10 Warranty
The statutory warranty period applies. If the product is defective, please contact your retailer or the manufacturer's branch in your country (see dometic.com/dealer).
For repair and warranty processing, please include the following documents when you send in the product:
• A copy of the receipt with purchasing date
- A reason for the claim or description of the fault
Note that self-repair or non-professional repair can have safety consequences and might void the warranty.
11 Disposal

WARNING! Risk of child entrapment
Before disposing of your old cooling device:
- Dismantle the lid.
- Leave the baskets in place so that children may not easily climb inside.
Recycling packaging material

Place the packaging material in the appropriate recycling waste bins wherever possible.
Recycling products with non-replaceable batteries, rechargeable batteries or light sources
If the product contains any non-replaceable batteries, rechargeable batteries or light sources, you don't have to remove them before disposal.
If you wish to finally dispose of the product, ask your local recycling center or specialist dealer for details about how to do this in accordance with the applicable disposal regulations.
The product can be disposed free of charge.
12 Technical data

NOTE
The minimum temperature shown in “Cooling capacity” cannot be attained if the ambient temperature is above 32 ^ ( 90 ^ ) for models CFX3 25/35/45/55/55IM/100 or the ambient temperature is above 30 ^ ( 86 ^ ) for models CFX3 75DZ/95DZ (set small -22 ^ /large +4 ^ ).
Test/certificates:


| CFX3 25 CFX3 35 | |||
| Connection voltage: 12/24 V---100-240 V~ | |||
| Rated current: | 12 V---: 6.5 A24 V---: 3.2 A100 V~: 0.90 A240 V~: 0.38 A | 12 V---: 7.5 A24 V---: 3.3 A100 V~: 0.94 A240 V~: 0.39 A | |
| Cooling capacity: | +20 °C to -22 °C (+68 °F to -8 °F) | ||
| Climate class: N, T | |||
| Ambient temperature: | +16 °C to +43 °C (+61 °F to +110 °F) | ||
| USB charging port: | 5 V---, 2 A | ||
| Frequency range: | WiFi: 2412 MHz - 2472MHz/2422 MHz - 2462MHzBluetooth/BLE: 2402 MHz - 2480 MHz | ||
| Frequency band (WiFi): 24 GHz | |||
| RF output power: WiFi: 16.62 dBm (802.11b),16.23 dBm (802.11g),16.45 dBm (802.11n20),16.02 dBm (802.11n40)Bluetooth: 8.31 dBmBluetooth LE: 6.67 dBm | |||
| Refrigerant quantity: 32 g | 38 g | ||
| CO2 equivalent: | 0.046 t | 0.054 t | |
| Global warming potential (GWP): | 1430 | ||
| Dimensions(W x D x H) in mm(including handles): | 342 x 569 x 420 | 398 x 694 x 407 | |
| Weight: | 12.7 kgCFX3 45 CFX3 55 | 16.9 kg | |
| Connection voltage: 12/24 V---100-240 V~ | |||
| Rated current: | 12 V---: 8.2 A24 V---: 3.5 A100 V~: 0.96 A240 V~: 0.40 A | 12 V---: 8.7 A24 V---: 3.7 A100 V~: 0.98 A240 V~: 0.41 A | |
| Cooling capacity: | +20 °C to -22 °C (+68 °F to -8 °F) | ||
| Climate class: N, T | |||
| Ambient temperature: | +16 °C to +43 °C (+61 °F to +110 °F) | ||
| USB charging port: | 5 V---, 2 A | ||
| Frequency range: | WiFi: 2412 MHz - 2472MHz/2422 MHz - 2462MHzBluetooth/BLE: 2402 MHz - 2480 MHz | ||
| Frequency band (WiFi): 24 GHz | |||
| RF output power: WiFi: 16.62 dBm (802.11b),16.23 dBm (802.11g),16.45 dBm (802.11n20),16.02 dBm (802.11n40)Bluetooth: 8.31 dBmBluetooth LE: 6.67 dBm | |||
| Refrigerant quantity: 42 g | 45 g | ||
| CO2 equivalent: | 0.060 t | 0.064 t | |
| Global warming potential (GWP): | 1430 | ||
| Dimensions(W x D x H) in mm(including handles): | 398 x 694 x 476 | 720 x 455 x 480 | |
| Weight: | 18.7 kg | 20.4 kg | |
| CFX3 55IM CFX3 75DZ CFX3 95DZ | |||
| Connection voltage: 12/24 V---100 - 240 V~ | |||
| Rated current: | 12 V---: 8.9 A24 V---: 3.8 A100 V~ : 1.00 A240 V~ : 0.42 A | 12 V---: 9.6 A24 V---: 4.2 A100 V~ : 1.12 A240 V~ : 0.47 A | 12 V---: 10.4 A24 V---: 4.6 A100 V~ : 1.22 A240 V~ : 0.51 A |
| Cooling capacity: | +20 °C to -22 °C (+68 °F to -8 °F) | ||
| Climate class: N, T | |||
| Ambient temperature: | +16 °C to +43 °C (+61 °F to +110 °F) | ||
| USB charging port: | 5 V---, 2 A | ||
| Frequency range: | WiFi: 2412 MHz - 2472MHz/2422 MHz - 2462MHzBluetooth/BLE: 2402 MHz - 2480 MHz | ||
| Frequency band (WiFi): 24 GHz | |||
| RF output power: | WiFi: 16.62 dBm (802.11b),16.23 dBm (802.11g),16.45 dBm (802.11n20),16.02 dBm (802.11n40)Bluetooth: 8.31 dBmBluetooth LE: 6.67 dBm | ||
| Refrigerant quantity: | 45 g | 59 g | 67 g |
| CO2 equivalent: | 0.064 t | 0.084 t | 0.096 t |
| Global warming potential (GWP): | 1430 | ||
| Dimensions(W x D x H) in mm(including handles): | 720 x 455 x 480 | 892 x 495 x 472 | 962 x 530 x 472 |
| Weight: | 21.3 kg | 27.8 kg | 29.8 kg |
| CFX3 100 | |
| Connection voltage: 12/24 V--- | 100 - 240 V~ |
| Rated current: | 12 V---: 10.8 A24 V---: 4.8 A100 V~: 1.28 A240 V: 0.53 A |
| Cooling capacity: | +20 °C to -22 °C (+68 °F to -8 °F) |
| Climate class: N, T | |
| Ambient temperature: | +16 °C to +43 °C (+61 °F to +110 °F) |
| USB: 5 V---, 2 A | |
| Frequency range: | WiFi: 2412 MHz - 2472MHz/2422 MHz - 2462MHzBluetooth/BLE: 2402 MHz - 2480 MHz |
| Frequency band (WiFi): 2.4 GHz | |
| RF output power: WiFi: 16.62 dBm (802.11b),16.23 dBm (802.11g),16.45 dBm (802.11n20),16.02 dBm (802.11n40)Bluetooth: 8.31 dBmBluetooth LE: 6.67 dBm | |
| Refrigerant quantity: 60 g | |
| CO2 equivalent: | 0.086 t |
| Global warming potential (GWP): | 1430 |
| Dimensions(W x D x H) in mm(including handles): | 962 x 530 x 472 |
| Weight: | 29.6 kg |
The coolant circuit contains R134a.
This product contains fluorinated greenhouse gases.
The cooling unit is hermetically sealed.
The radio equipment Dometic CFX3 25 to CFX3 100 complies with the requirements of the directive 2014/53/EU. You can find the Declaration of Conformity of the device on documents.dometic.com.
▶ Download de CFX3-app in de App Store of Google Play:

Ele- men Apraksts ts
Ele- men Apraksts ts
A Gaidstāve
B N e a k t i v s C B l o k ē t s
dometic.com/sales-offices