
CS 3630DA - Saw HiKOKI - Free user manual and instructions
Find the device manual for free CS 3630DA HiKOKI in PDF.
| Product type | Cordless chainsaw |
| Brand | HiKOKI |
| Model | CS 3630DA |
| Rated voltage | 36 V |
| Chain type | 91PX-45XJ, pitch 9.5 mm, gauge 1.3 mm |
| Guide bar | P012-50CR, max cutting length 300 mm |
| Chain speed at no load | 8.3 m/s |
| Oil tank capacity | 80 ml |
| Weight (with battery) | 4.3 kg |
| Compatible battery | BSL36A18 (36 V / 18 V, 2.5 Ah / 5.0 Ah) |
| Charger | UC18YSL3 |
| LED lighting | Integrated white LED |
| Chain brake | Yes, emergency stop device |
| Intended use | Pruning, felling, wood cutting |
| Sound pressure level | 87 dB(A) |
| Sound power level | 100 dB(A) |
| Vibration (total value) | 4.7 m/s² |
| Supplied accessories | Hex key, chain cover |
Frequently Asked Questions - CS 3630DA HiKOKI
User questions about CS 3630DA HiKOKI
0 question about this device. Answer the ones you know or ask your own.
Ask a new question about this device
Download the instructions for your Saw in PDF format for free! Find your manual CS 3630DA - HiKOKI and take your electronic device back in hand. On this page are published all the documents necessary for the use of your device. CS 3630DA by HiKOKI.
USER MANUAL CS 3630DA HiKOKI
The following show symbols used for the machine. Be sure that you understand their meaning before use.
| CS3630DA: Cordless Chain Saw | |
| To reduce the risk of injury, user must read instruction manual. | |
| Do not use a power tool in the rain and moisture or leave it outdoors when it is raining. | |
| Only for EU countries Do not dispose of electric tools together with household waste material! In observance of European Directive 2002/96/EC on waste electrical and electronic equipment and its implementation in accordance with national law, electric tools that have reached the end of their life must be collected separately and returned to an environmentally compatible recycling facility. | |
| Read, understand and follow all warnings and instructions in this manual and on the unit. | |
| Always wear eye, head and ear protectors when using this unit. | |
| It is important that you wear the protective clothing for feet, legs, hands and fore-arms. | |
| Warning, kickback danger. Be careful of possible sudden and accidental upward and/or backward motion of the guide bar. | |
| This chain saw is for use by trained tree service operator only. | |
| Chain oil fi II | |
| Chain oil delivery rate adjustment | |
| Light switch | |
| Battery level indicator switch | |
| Disconnect the battery |
WHAT IS WHAT? (Fig. 1)
A: Switch: Device activated by the fi nger.
B: Lock-off button: Button that prevents the accidental operation of the trigger.
C: Chain brake: Device for stopping or locking the saw chain.
D: Spiked bumper: Device for acting as a pivot when in contact with a tree or log.
E: LED light: Light that illuminate the cutting edge.
F: Oil tank cap: Cap for closing the oil tank.
G: Oil sight glass: Window to check chain oil amount.
H: Front handle: Support handle located at or towards the front of the main body.
I: Battery: Power source to drive the unit.
J: Rear handle (Top handle): Support handle located on the top of the main body.
K: Hook: Tool for hanging the unit with rope etc.
L: Tension dial: Device for adjusting tension of saw chain.
M: Knob: Knob for securing tension dial and side cover.
N: Saw chain: Chain, serving as a cutting tool.
O: Guide bar: The part that supports and guides the saw chain.
P: Side cover: Protective cover to the guide bar, saw chain, clutch and sprocket when the chain saw is in use.
Q: Charger: For charging the battery.
R: Oil feeder: Container for oil
S: Chain case: Case for covering the guide bar and saw chain when the unit is not being used.
T: Bolt: Bolt for fixing the side cover in place.
U: Hexagonal bar wrench: Tool for loosening and tightening the bolt.
WARNING
This chain saw (CS3630DA) is designed especially for tree care and surgery. Only persons trained in tree care and surgery may use this saw. Observe all literature, procedures and recommendations from the relevant professional organization. Failure to do so constitutes a high accident risk. We recommend always using a rising platform for sawing in trees. Rappelling techniques are extremely dangerous and require special training. The operator must be trained in and familiar with the use of safety equipment and working and climbing techniques. Always use the restraining equipment for both the operator and the saw.
GENERAL POWER TOOL SAFETY WARNINGS
WARNING
Read all safety warnings and all instructions.
Failure to follow the warnings and instructions may result in electric shock, fire and/or serious injury.
Save all warnings and instructions for future reference.
The term "power tool" in the warnings refers to your mains-operated (cored) power tool or battery-operated (cordless) power tool.
1) Work area safety
a) Keep work area clean and well lit.
Cluttered or dark areas invite accidents.
b) Do not operate power tools in explosive atmospheres, such as in the presence of flammable liquids, gases or dust.
Power tools create sparks which may ignite the dust or fumes.
c) Keep children and bystanders away while operating a power tool.
Distractions can cause you to lose control.
2) Electrical safety
a) Power tool plugs must match the outlet.
Never modify the plug in any way.
Do not use any adapter plugs with earthed (grounded) power tools.
Unmodified plugs and matching outlets will reduce risk of electric shock.
b) Avoid body contact with earthed or grounded surfaces, such as pipes, radiators, ranges and refrigerators.
There is an increased risk of electric shock if your body is earthed or grounded.
c) Do not expose power tools to rain or wet conditions.
Water entering a power tool will increase the risk of electric shock.
d) Do not abuse the cord. Never use the cord for carrying, pulling or unplugging the power tool. Keep cord away from heat, oil, sharp edges or moving parts.
Damaged or entangled cords increase the risk of electric shock.
e) When operating a power tool outdoors, use an extension cord suitable for outdoor use.
Use of a cord suitable for outdoor use reduces the risk of electric shock.
f) If operating a power tool in a damp location is unavoidable, use a residual current device (RCD) protected supply.
Use of an RCD reduces the risk of electric shock.
3) Personal safety
a) Stay alert, watch what you are doing and use common sense when operating a power tool. Do not use a power tool while you are tired or under the influence of drugs, alcohol or medication.
A moment of inattention while operating power tools may result in serious personal injury.
b) Use personal protective equipment. Always wear eye protection.
Protective equipment such as dust mask, non-ski safety shoes, hard hat, or hearing protection for appropriate conditions will reduce personal injuries.
c) Prevent unintentional starting. Ensure the switch is in the off position before connecting to power source and/or battery pack, picking up or carrying the tool.
Carrying power tools with your finger on the switch or energising power tools that have the switch on invites accidents.
d) Remove any adjusting key or wrench before turning the power tool on.
A wrench or a key left attached to a rotating part of the power tool may result in personal injury.
e) Do not overreach. Keep proper footing and balance at all times. This enables better control of the power tool in unexpected situations.
f) Dress properly. Do not wear loose clothing or jewellery. Keep your hair, clothing and gloves away from moving parts.
Loose clothes, jewellery or long hair can be caught in moving parts.
g) If devices are provided for the connection of dust extraction and collection facilities, ensure these are connected and properly used.
Use of dust collection can reduce dust related hazards.
4) Power tool use and care
a) Do not force the power tool. Use the correct power tool for your application.
The correct power tool will do the job better and safer at the rate for which it was designed.
b) Do not use the power tool if the switch does not turn it on and off.
Any power tool that cannot be controlled with switch is dangerous and must be repaired.
c) Disconnect the plug from the power source and/or the battery pack from the power tool before making any adjustments, changing accessories, or storing power tools.
Such preventive safety measures reduce the risk of starting the power tool accidentally.
d) Store idle power tools out of the reach of children and do not allow persons unfamiliar with the power tool or these instructions to operate the power tool.
Power tools are dangerous in the hands of untrained users.
(e) Maintain power tools. Check for misalignment or binding of moving parts, breakage of pad and any other condition that may affect the power tools' operation.
If damaged, have the power tool repaired before use.
Many accidents are caused by poorly maintained power tools.
f) Keep cutting tools sharp and clean.
Properly maintained cutting tools with sharp cutting edges are less likely to bind and are easier to control.
g) Use the power tool, accessories and tool bits etc. in accordance with these instructions, taking into account the working conditions and the work to be performed.
Use of the power tool for operations different from those intended could result in a hazardous situation.
5) Battery tool use and care
a) Recharge only with the charger specified by the manufacturer.
A charger that is suitable for one type of battery usepack may create a risk of fire when used with another battery pack.
b) Use power tools only with specifically designated battery packs.
Use of any other battery packs may create a risk of injury and fire.
c) When battery pack is not in use, keep it away from other metal objects, like paper clips, coins, keys, nails, screws or other small metal objects, that can make a connection from one terminal to another.
Shorting the battery terminals together may cause burns or a fire.
d) Under abusive conditions, liquid may be ejected from the battery; avoid contact. If contact accidentally occurs, fl ush with water. If liquid contacts eyes, additionally seek medical help.
Liquid ejected from the battery may cause irritation or burns.
6) Service
a) Have your power tool serviced by a qualified repair person using only identical replacement parts.
This will ensure that the safety of the power tool is maintained.
PRECAUTION
Keep children and infirm persons away.
When not in use, tools should be stored out of reach of children and infirm persons.
CHAIN SAW SAFETY WARNINGS
A. t keep all parts of the body away from the saw chain when the chain saw is operating. Before you start the chain saw, make sure the saw chain is not contacting anything. A moment of inattention while operating chain saws may cause entanglement of your clothing or body with the saw chain.
- Always hold the chain saw with your right hand on the rear handle and your left hand on the front handle. Holding the chain saw with a reversed hand configuration increases the risk of personal injury and should never be done.
English
-
Hold the power tool by insulated gripping surfaces only, because the saw chain may contact hidden wiring. Saw chains contacting a "live" wire may make exposed metal parts of the power tool "live" and could give the operator an electric shock.
-
Wear safety glasses and hearing protection. Further protective equipment for head, hands, legs and feet is recommended. Adequate protective reduce personal injury by flying debris or accidental contact with the saw chain.
-
Do not operate a chain saw in a tree. Operation of a chain saw while up in a tree may result in personal injury.
-
Always keep proper footing and operate the chain saw only when standing on fixed, secure and level surface. Slippery or unstable surfaces such as cause a loss of balance or control of the chain saw.
-
When cutting a limb that is under tension be alert for spring back. When the tension in the wood fibres is released the spring loaded limb may strike the operator and/or throw the chain saw out of control.
-
Use extreme caution when cutting brush and saplings. The slender material may catch the saw chain and be whipped toward you or pull you off balance.
-
Carry the chain saw by the front handle with the chain saw switched off and away from your body. When transporting or storing the chain saw always fit the guide bar cover. Proper handling of the chain saw will reduce the likelihood of accidental contact with the moving saw chain.
-
Follow instructions for lubricating, chain tensioning and changing accessories. Improperly tensioned or lubricated chain may either break or increase the chance for kickback.
-
Keep handles dry, clean, and free from oil and grease. Greasy, oily handles are slippery causing loss of control.
-
Cut wood only. Do not use chain saw for purposes not intended. For example: do not use chain saw for cutting plastic, masonry or non-wood building materials. Use of the chain saw for operations diff erent than intended could result in a hazardous situation.
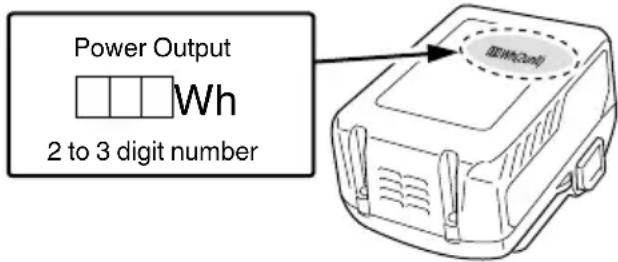
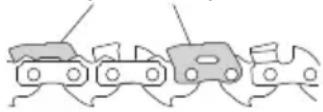
Causes and operator prevention of kickback: (Fig. 2)
Kickback may occur when the nose or tip of the guide bar touches an object, or when the wood closes in and pinches the saw chain in the cut.
Tip contact in some cases may cause a sudden reverse reaction, kicking the guide bar up and back towards the operator.
Pinching the saw chain along the top of the guide bar may push the guide bar rapidly back towards the operator.
Either of these reactions may cause you to lose control of the saw which could result in serious personal injury. Do not rely exclusively upon the safety devices built into your saw. As a chain saw user, you should take several steps to keep your cutting jobs free from accident or injury.
Kickback is the result of tool misuse and/or in operating procedures or conditions and can be avoided by taking proper precautions as given below:
- Maintain a firm grip, with thumbs and fingers encircling the chain saw handles, with both hands on the saw and position your body and arm to allow you to resist kickback forces. Kickback forces can be controlled by the operator, if proper precautions are taken. Do not let go of the chain saw.
Do not overreach and do not cut above shoulder height. This helps prevent unintended tip contact and enables better control of the chain saw in unexpected situations.
Only use replacement bars and chains specified by the manufacturer. Incorrect replacement bars and chains may cause chain breakage and/or kickback.
Follow the manufacturer's sharpening and maintenance instructions for the saw chain. Decreasing the depth gauge height can lead to increased kickback.
ADDITIONAL SAFEY WARNING
-
Work without pressure. In addition, always keep your body warm.
-
Before commencing work, reflect fully on the work procedures involved and work to avoid accidents, otherwise injury may occur.
- Do not use in the event of bad weather, such as strong wind, rain, snow, fog, or in areas prone to rockfall or avalanches. In bad weather, judgment may be impaired and the vibration may result in disaster.
- When visibility is poor, such as during bad weather or night, do not use the unit. In addition, do not use it in rain or in a location exposed to rain.
Unstable foothold or loss of balance may result in an accident.
- Check the guide bar and saw chain before starting the unit.
- If the guide bar or saw chain is cracked, or the product is scratched or bent, do not use the unit.
Check if the guide bar and saw chain are securely installed. If the guide bar or saw chain is broken or dislodged, this may result in an accident. - Before starting work, check to ensure the switch does not engage unless the lock-off button is pressed.
If the unit does not working properly, immediately stop using and request repair from your HiKOKI Authorized Service Center.
-
Install the saw chain properly, in accordance with the instruction manual. If installed incorrectly, the saw chain will come off the guide bar and injury may occur.
-
Never remove any of the safety devices equipped on the chain saw (brake lever, lock-off button, chain catcher etc.). In addition, do not alter or immobilize them. Injury may occur.
-
In the following cases, switch the unit off and ensure the saw chain is no longer moving:
- When not in use or being repaired.
When shifting to a new work location. - When inspecting, adjusting or replacing the saw chain, guide bar, chain case and any other part.
When refilling the chain oil.
O When removing dust etc. from the body. - When removing obstacles, trash or sawdust generated from work from the work area.
- When you take off the unit, or when you get away from the unit.
- Otherwise, if you sense danger or anticipate risk.
If the saw chain is still moving, an accident may occur. - Work should generally be performed individually. When multiple individuals are involved, ensure sufficient spacing between them.
In particular, when felling standing trees or working on a slope, if you anticipate trees falling, rolling or sliding, ensure there is no danger to other workers.
- Remain more than 15m away from other people. In addition, when working with multiple persons, remain 15m or more apart.
There is a risk of impact with scatters and other accidents.
Prepare a whistle alert etc. and determine appropriate contact method for other workers beforehand. - Before felling standing trees, ensure the following:
Determine a safe evacuation location prior to felling.
Remove obstacles (e.g., branches, shrubs) in advance.
Based on a comprehensive evaluation of the state of the tree to be felled (e.g., trunk bend, tension of branches) and the surrounding situation (e.g., state of adjacent trees, presence of obstacles, terrain, wind), decide on the direction in which the standing tree will fall and then plan the felling procedure.
Careless felling may result in injury.
- When felling standing trees, ensure the following:
During work, be very careful of the direction in which trees fall.
-
When working on a slope, ensuring the tree will not roll, always work from the uphill side of the terrain.
-
When the tree starts falling, switch the unit off, alert the surroundings, and immediately retreat to a safe location.
During work, if the saw chain or guide bar become entangled in the tree, switch off and use a wedge.
- During use, if the unit performance deteriorates, or you notice any abnormal sound or vibration, immediately switch off and discontinue use, and return to your HiKOKI Authorized Service Center for inspection or repair.
If you continue using, injury may occur.
- If the unit is accidentally dropped or exposed to impact, inspect carefully for damage or cracks and ensure there is no deformation.
If the unit is damaged, cracked or deformed, injury may occur.
- When transporting the unit by car, secure the unit to prevent it moving.
There is a risk of accident.
- Do not switch the unit on while the chain case is attached.
Injury may occur.
- Ensure there are no nails and other foreign objects in the material.
If the saw chain impact on the nail etc., injury may occur.
- To avoid the guide bar becoming entangled with the material when chopping on a verge or when subject to the weight of material while cutting, install a supporting platform close to the cutting position.
If the guide bar becomes entangled, injury may occur.
- If the unit is to be transported or stored after use, either remove the saw chain, or attach the chain cover.
If the saw chain comes into contact with your body, injury may occur.
- Adequately care for the unit.
To ensure work can be performed safely and efficiently, care for the saw chain to ensure it provides optimal cutting performance.
-
When replacing the saw chain or guide bar, maintaining the body, fliling oil etc., follow the instruction manual.
-
Ask the shop to repair the unit.
-
Do not modify this product, since it already complies with the applicable safety standards.
Always refer to your HiKOKI Authorized Service Center for all repairs. Attempting to repair the unit yourself may result in an accident or injury.
-
When not using the unit, ensure it is properly stored. Drain off the chain oil, and keep in a dry place out of reach of children or a locked location.
-
If the warning label is no longer visible, peels off or is otherwise unclear, apply a new warning label.
For the warning label, refer to your HiKOKI Authorized Service Center.
-
When working, if local rules or regulations apply, comply with the same.
-
Do not use the product if the tool or the battery terminals (battery mount) are deformed.
Installing the battery could cause a short circuit that could result in smoke emission or ignition.
- Keep the tool's terminals (battery mount) free of swarf and dust.
Prior to use, make sure that swarf and dust have not collected in the area of the terminals.
During use, try to avoid swarf or dust on the tool from falling on the battery. - When suspending operation or after use, do not leave the tool in an area where it may be exposed to falling swarf or dust.
Doing so could cause a short circuit that could result in smoke emission or ignition.
PRECAUTIONS FOR BATTERY AND CHARGER
- Always charge the battery at an ambient temperature of -10 - 40^ . A temperature of less than -10^ will result in over charging which is dangerous. The battery cannot be charged at a temperature greater than 40^ . The most suitable temperature for charging is that of 20 - 25^ .
- Do not use the charger continuously.
When one charging is completed, leave the charger for about 15 minutes before the next charging of battery.
- Do not allow foreign matter to enter the hole for connecting the rechargeable battery.
- Never disassemble the rechargeable battery or charger.
- Never short-circuit the rechargeable battery. Short-circuiting the battery will cause a great electric current and overheat. It results in burn or damage to the battery.
- Do not dispose of the battery in fire.
If the battery is burnt, it may explode. - Using an exhausted battery will damage the charger.
- Bring the battery to the shop from which it was purchased as soon as the post-charging battery life becomes too short for practical use. Do not dispose of the exhausted battery.
- Do not insert objects into the air ventilation slots of the charger. Inserting metal objects or flammable into the charger air ventilation slots will result in an electrical shock hazard or damage to the charger.
CAUTION ON LITHIUM-ION BATTERY
To extend the lifetime, the lithium-ion battery equips with the protection function to stop the output.
In the cases of 1 to 3 described below, when using this product, even if you are pulling the switch, the motor may stop.
This is not the trouble but the result of protection function.
- When the battery power remaining runs out, the motor stops.
In such case, charge it up immediately. - If the tool is overloaded, the motor may stop. In this case, release the switch of tool and eliminate causes of overloading. After that, you can use it again.
- If the battery is overheated under overload work, the battery power may stop. In this case, stop using the battery and let the battery cool. After that, you can use it again.
Furthermore, please heed the following warning and caution.
WARNING
In order to prevent any battery leakage, heat generation, smoke emission, explosion and ignition beforehand, please be sure to heed the following precautions.
- Make sure that swarf and dust do not collect on the battery.
During work make sure that swarf and dust do not fall on the battery.
English
- Make sure that any swarf and dust falling on the power tool during work do not collect on the battery.
- Do not store an unused battery in a location exposed to swarm and dust.
Before storing a battery, remove any swarf and dust that may adhere to it and do not store it together with metal parts (screws, nails, etc.). - Do not pierce battery with a sharp object such as a nail, strike with a hammer, step on, throw or subject the battery to severe physical shock.
- Do not use an apparently damaged or deformed battery.
- Do not use the battery in reverse polarity.
- Do not connect directly to an electrical outlets or car cigarette lighter sockets.
- Do not use the battery for a purpose other than those specified.
- If the battery charging fails to complete even when a specified recharging time has elapsed, immediately stop further recharging.
- Do not put or subject the battery to high temperatures or high pressure such as into a microwave oven, dryer, or high pressure container.
- Keep away from fire immediately when leakage or foul odor are detected.
- Do not use in a location where strong static electricity generates.
- If there is battery leakage, foul odor, heat generated, discolored or deformed, or in any way appears abnormal during use, recharging or storage, immediately remove it from the equipment or battery charger, and stop use.
- Do not immerse the battery or allow any fluids to flow inside. Conductive liquid ingress, such as water, cause damage resulting in fire or explosion. Store your battery in a cool, dry place, away from combustible and flammable items. Corrosive gas atmospheres must be avoided.
CAUTION
- If liquid leaking from the battery gets into your eyes, do not rub your eyes and wash them well with fresh clean water such as tap water and contact a doctor immediately.
If left untreated, the liquid may cause eye-problems.
- If liquid leaks onto your skin or clothes, wash well with clean water such as tap water immediately.
There is a possibility that this can cause skin irritation.
- If you find rust, foul odor, overheating, discolor, deformation, and/or other irregularities when using the battery for the first time, do not use and return it to your supplier or vendor.
WARNING
If an electrically conductive foreign object enters the terminals of the lithium ion battery, a short-circuit may occur resulting in the risk of fire. Please observe the following matters when storing the battery.
- Do not place electrically conductive cuttings, nails, steel wire, copper wire or other wire in the storage case.
Either install the battery in the power tool or store by securely pressing into the battery cover until the ventilation holes are concealed to prevent short-circuits (See Fig. 3).
REGARDING LITHIUM-ION BATTERY TRANSPORTATION
When transporting a lithium-ion battery, please observe the following precautions.
WARNING
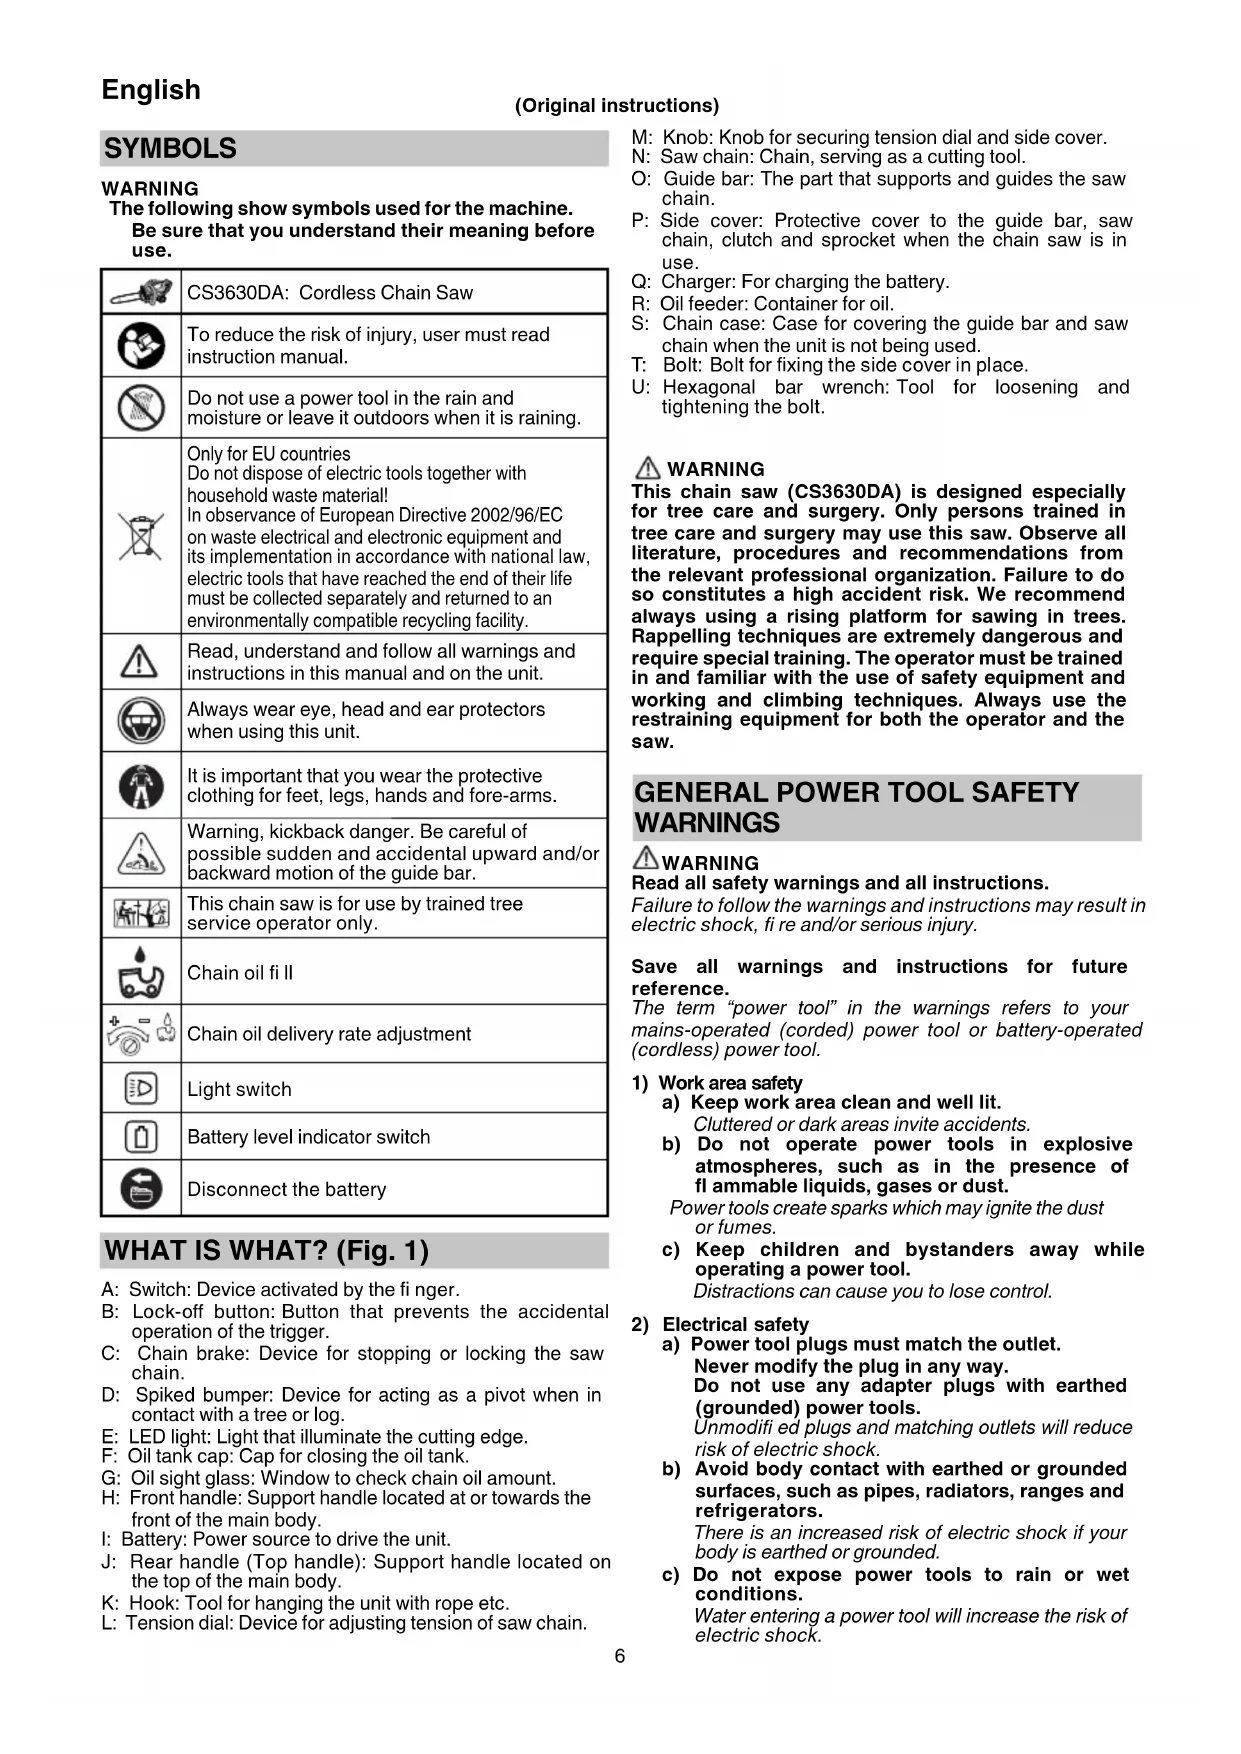
Notify the transporting company that a package contains a lithium-ion battery, inform the company of its power output and follow the instructions of the transportation company when arranging transport.
Lithium-ion batteries that exceed a power output of 100Wh are considered to be in the freight classification of Dangerous Goods and will require special application procedures.
For transportation abroad, you must comply with international law and the rules and regulations of the destination country.
USBa DEVICE CONNECTION PRECAUTIONS (UC18YSL3)
When an unexpected problem occurs, the data in a USB device connected to this product may be corrupted or lost.
Always make sure to back up any data contained in USB device prior to use with this product.
Please be aware that our company accepts absolutely no responsibility for any data stored in a USB device that is corrupted or lost, nor for any damage that may occur to a connected device.
WARNING
Prior to use, check the connecting USB cable for any defect or damage. Using a defective or damaged USB cable can cause smoke emission or ignition.
- When the product is not being used, cover the USB port with the rubber cover. Buildup of dust etc. in the USB port can cause smoke emission or ignition.
NOTE
There may be an occasional pause during USB recharging.
- When a USB device is not being charged, remove the USB device from the charger.
Failure to do so may not only reduce the battery life of a USB device, but may also result in unexpected accidents.
- It may not be possible to charge some USB devices, depending on the type of device.
DESCRIPTION OF NUMBERED ITEMS (Fig. 2-Fig. 47)
| ① | Battery | ⑯ | Sprocket | ⑰ | Switch | ⑱ | Brake band chamber |
| ② | Latch | ⑰ | Blade direction | ⑱ | Battery level indicator switch | ⑲ | Chain oil spout |
| ③ | Ventilation holes | ⑱ | Bolt | ⑲ | Battery level indicator lamp | ⑳ | Groove |
| ④ | Terminals | ⑲ | Bolt hole | ⑳ | Hook | ⑴ | Oil hole |
| ⑤ | Battery cover | ⑳ | Increase the tension | ⑵ | Actuation | ⑵ | Wear limit |
| ⑥ | Insert | ⑴ | Decrease the tension | ⑶ | Release | ⑵ | Nail of carbon brush |
| ⑦ | Pull out | ⑵ | Drive link | ⑷ | Spike | ⑵ | Protrusion of carbon brush |
| ⑧ | Rear handle (Top handle) | ⑵ | Fasten | ⑸ | Rear handle (Top handle) | ⑵ | Brush cap |
| ⑨ | Charge indicator lamp | ⑵ | Chain brake | ⑹ | Front handle | ⑵ | Contact portion of brush tube |
| ⑩ | Knob | ⑵ | Pull | ⑴ | Round fi le | ⑵ | Chain tensioner hole |
| ⑪ | Tension dial | ⑵ | Chain oil | ⑴ | 1/5 of diameter of fi le | ⑵ | Chain tensioner boss |
| ⑫ | Side cover | ⑵ | Light switch | ⑵ | Depth gage jointer | ⑵ | Hexagonal bar wrench |
| ⑬ | Saw chain | ⑵ | Oil sight glass | ⑵ | Flat fi le | ||
| ⑭ | Guide bar | ⑵ | Oil pump adjuster | ⑴ | Protruding depth gage head | ||
| ⑮ | Guide bar tip | ⑵ | Lock-off button | ⑵ | Round off |
SPECIFICATIONS
POWER TOOL
| Model CS3630DA | |
| Voltage 36 V | |
| Saw chain | Type: 91PX-45XJ Pitch: 9.5 mm (3/8") / Gage: 1.3 mm (0.05") |
| Guide bar | Type: P012-50CR Size: 300 mm (Max. cutting length) |
| Sprocket Number of teeth: 6 / 9.5 mm (3/8") | |
| No-load chain speed 8.3 m/s (500 m/min) | |
| Chain oil tank capacity 80 ml | |
| LED light White LED | |
| Battery available for this tool* BSL36A18 | |
| Weight** 4.3 kg (With BSL36A18 attached) |
- Existing batteries (BSL3660/3620/3626, BSL18xx series, etc.) cannot be used with this tool.
** Weight: According to EPTA-Procedure 01/2003
BATTERY
| Model | BSL36A18 |
| Voltage | 36 V / 18 V (Automatic Switching*) |
| Battery capacity | 2.5 Ah / 5.0 Ah (Automatic Switching*) |
| Available cordless products** | Multi volt series, 18V product |
| Available charger | Sliding charger for lithium ion batteries |
- The tool itself will automatically switch over.
** Please see our general catalogue for details.
CHARGER
| Model | UC18YSL3 |
| Charging voltage | 14.4 V – 18 V |
| Weight | 0.6 kg |
STANDARD ACCESSORIES
In addition to the main unit (1 unit), the package contBnires using the power tool, charge the battery as follows.
the accessories listed on page 387.
Standard accessories are subject to change without notice.
OPTIONAL ACCESSORIES (sold separately) (Page 388)
Optional accessories are subject to change without notice.
APPLICATIONS
Cutting of timber/logs
O Pruning, felling of garden trees
BATTERY REMOVAL/INSTALLATION
1. Battery removal
Hold the housing tightly and push the battery latches to remove the battery (see Fig. 4).
CAUTION
Never short-circuit the battery.
2. Battery installation
Insert the battery while observing its polarities (see Fig. 4).
CHARGING
- Connect the charger's power cord to the receptacle.
When connecting the plug of the charger to a receptacle, the charge indicator lamp will blink in red (At 1-second intervals).
- Insert the battery into the charger.
Firmly insert the battery into the charger as shown in Fig. 5 (on page 2).
- Charging
When inserting a battery in the charger, the charge indicator lamp will blink in blue.
When the battery becomes fully recharged, the charge indicator lamp will light up in green. (See Table 1)
(1) Charge indicator lamp indication
The indications of the charge indicator lamp will be as shown in Table 1, according to the condition of the charger or the rechargeable battery.
Table 1
| Indications of the charge indicator lamp | ||||
| Charge indicator lamp (RED/ BLUE/ GREEN/ PURPLE) | Before charging | Blinks (RED) | Lights for 0.5 seconds. Does not light for 0.5 seconds. (off for 0.5 seconds) | Plugged into power source |
| While charging | Blinks (BLUE) | Lights for 0.5 seconds. Does not light for 1 second. (off for 1 second) | Battery capacity at less than 50% | |
| Blinks (BLUE) | Lights for 1 second. Does not light for 0.5 seconds. (off for 0.5 seconds) | Battery capacity at less than 80% | ||
| Lights (BLUE) | Lights continuously | Battery capacity at more than 80% | ||
| Charging complete | Lights (GREEN) | Lights continuously (Continuous buzzer sound: about 6 seconds) | ||
| Overheat standby | Blinks (RED) | Lights for 0.3 seconds. Does not light for 0.3 seconds. (off for 0.3 seconds) | Battery overheated. Unable to charge. (Charging will commence when battery cools) | |
| Charging impossible | Flickers (PURPLE) | Lights for 0.1 seconds. Does not light for 0.1 seconds. (off for 0.1 seconds) (Intermittent buzzer sound: about 2 seconds) | Malfunction in the battery or the charger | |
(2) Regarding the temperatures and charging time of the rechargeable battery The temperatures and charging time will become as shown in Table 2.
Table 2
| Charger | UC18YSL3 | ||||||
| Battery | Type of battery Li-ion | ||||||
| Temperatures at which the battery can be recharged | -10°C - 50°C | ||||||
| Charging voltage V | 14.4 18 | ||||||
| Charging time, approx. (At 20°C) | BSL14xx series BSL18xx series | Multi volt series | |||||
| (4 cells) (8 cells) (5 cells) (10 cells) (10 cells) | |||||||
| (BSL1415S: 15 BSL1415 : 15 BSL1415X: 15 BSL1420 : 20 BSL1425 : 25 BSL1430C: 30 | BSL1430 : 20 BSL1440 : 26 BSL1450 : 32 BSL1460 : 38 | BSL1815S : 15 BSL1815 : 15 BSL1815X : 15 BSL1820 : 20 BSL1825 : 25 BSL1830C : 30 | BSL1830 : 20 BSL1840 : 26 BSL1850 : 32 BSL1860 : 38 | BSL36A18 : 32 | |||
| USB | Charging voltage V | 5 | |||||
| Charging current | A 2 | ||||||
NOTE
The recharging time may vary according to the ambient temperature and power source voltage.
-
Disconnect the charger's power cord from the receptacle.
-
Hold the charger firmly and pull out the battery. NOTE
Be sure to pull out the battery from the charger after use, and then keep it.
Regarding electric discharge in case of new batteries, etc.
As the internal chemical substance of new batteries and batteries that have not been used for an extended period is not activated, the electric discharge might be low when using them the first and second time. This is a temporary phenomenon, and normal time required for recharging will be restored by recharging the batteries 2-3 times.
How to make the batteries perform longer.
(1) Recharge the batteries before they become completely exhausted.
When you feel that the power of the tool becomes weaker, stop using the tool and recharge its battery. If you continue to use the tool and exhaust the electric current, the battery may be damaged and its life will become shorter.
(2) Avoid recharging at high temperatures.
A rechargeable battery will be hot immediately after use. If such a battery is recharged immediately after use, its internal chemical substance will deteriorate, and the battery life will be shortened. Leave the battery and recharge it after it has cooled for a while.
CAUTION
If the battery is charged while it is heated because it has been left for a long time in a location subject to direct sunlight or because the battery has just been used, the charge indicator lamp of the charger lights for 0.3 seconds, does not light for 0.3 seconds (off for 0.3 seconds). In such a case, first let the battery cool, then start charging.
- When the charge indicator lamp flickers (at 0.2-second intervals), check for and take out any foreign objects in
the charger's battery connector. If there are no foreign objects, it is probable that the battery or charger is malfunctioning. Take it to your authorized Service Center.
Since the built-in micro computer takes about 3 seconds to confirm that the battery being charged with UC18YSL3 is taken out, wait for a minimum of 3 seconds before reinserting it to continue charging. If the battery is reinserted within 3 seconds, the battery may not be properly charged.
INSTALLING (REPLACING) SAW CHAIN
WARNING
To prevent accidents, always switch the unit off, and remove the storage battery.
- Don't use the saw chain or the guide bar other than those specified in "SPECIFICATIONS".
CAUTION
Wear gloves and be careful to avoid injury with the saw chain.
NOTE
- When removing the saw chain, remove sawdust from the oil spout, oil hole, and guide bar groove.
If sawdust accumulates, this may cause the unit to fail.
Use the correct type of saw chain in accordance with the specifications.
If you install the wrong type of guide bar, the saw chain may come off and injury may occur.
-
Removing the side cover (Fig. 6)
(1) Rotate the knob once to loosen it.
② Rotate the tension dial half a turn to loosen it.
Using the supplied hexagonal bar wrench, loosen the bolt until there is no resistance.
④ Turn the knob and remove the side cover. -
Removing the saw chain and guide bar (Fig. 7)
- Remove the saw chain and guide bar in the direction indicated by the arrow.
- Engaging the new saw chain in the sprocket (Fig. 8, 9)
Engage the saw chain at the guide bar tip with attention to the direction of the saw chain, and then properly engage the saw chain with the sprocket.
4. Installing the side cover
① Align the bolt with the bolt hole (Fig. 10)
② Adjust the tension dial of the side cover so that the chain tensioner boss is inserted into the guide bar chain tensioner hole, and attach the side cover. (Fig. 11)
③ Rotate the knob once to temporarily fix it. (Fig. 12)
5. Adjusting the saw chain tension (Fig. 13)
While lifting the guide bar tip, turn the tension dial to adjust the saw chain tension.
Turn the tension dial to the right to increase the saw chain tension, and to the left to decrease it.
6. Checking the saw chain tension (Fig. 14)
Adjust the saw chain tension so that the gap between the saw chain drive link and the guide bar is 0.5 to 1mm when you lift the saw chain slightly near the center of the guide bar.
- Securing the knob (Fig. 15)
① When adjustment is complete, lift up the guide bar, and fully tighten the knob.
② Make sure the bolt is firmly tightened.
WARNING
After adjusting the saw chain tension, ensure the knob is fully tightened.
If it is loose, injury may occur.
INSPECTION AND PREPARATION PRIOR TO USE
Prior to use, make the following inspection and preparation. WARNING
To prevent accidents, always perform steps 1 to 4 ensuring the storage battery is removed from the body.
Do not secure the lock-off button while it is pressed.
If the switch is accidentally engage unexpectedly start and injury may occur.
1. Ensuring the switch is off
If you insert the storage battery without knowing whether the switch is engaged, the unit may unexpectedly start, which may result in an accident.
- When the switch is engaged while pressing the lock-off button, the unit switches on, and when the switch is released, the unit switches off.
2. Checking the saw chain tension
If the saw chain tension is incorrect, there is a risk of damage to the saw chain or guide bar and malfunction. Referring to steps 5 to 7 "Installing (replacing) saw chain," ensure an appropriate tension is set.
While the saw chain is still new, it is particularly stretchy, so periodically check the tension and adjust as required.
Also check the knob is securely tightened.
3. Checking operation of chain brake (Fig. 16) WARNING
Although the chain brake is an emergency stop device, this is not completely reliable. Operate carefully to avoid the risk of kickback.
The chain brake is intended for use in emergencies and when starting up. Do not use it indiscriminately.
To avoid impaired movement of the chain brake due to buildup of sawdust etc., clean regularly.
The chain brake is an important component to ensure safe use.
If you have any concern regarding the brake operation, request repair from your HiKOKI Autho Center.
The chain brake is an emergency stop device that stops the saw chain when the unit is subject to kickback etc., to reduce risk.
(Refer to "Causes and operator prevention of kickback.") When activating the chain brake by pushing the brake lever forward, the saw chain stops moving.
If you pull the brake lever toward you, the brake is released.
When confirming the operation of the chain brake, always switch the unit off, remove the battery, activate the brake lever and pull the saw chain by hand.
If the saw chain does not move, this means the chain brake is activated.
NOTE
Always wear thick gloves for this task.
Since the saw chain blade is very sharp, pulling it hard risks injuring your fingers.
4. Checking the chain oil
This unit is delivered without chain oil inside. Ensure the oil tank is filled with the chain oil provided before use. (Fig. 17)
Periodically check the oil sight glass during work and replenish oil as required.
When you press the light switch on the switch panel, an LED light turns on and the internal light improves visibility. (Fig. 18)
(Check this in step 6.)
- If the chain oil supplied runs out, use HiKOKI chain oil sold separately or equivalent chain oil on the market.
The chain oil lubricates automatically.
The discharge rate for auto lubrication is factory preset to the maximum. To reduce the discharge rate, turn the oil pump adjuster on the rear of the body clockwise. (Fig. 19)
NOTE
The oil tank capacity is about 80ml
Even if overfilled, excess oil will escape from the overfl ow spout.
We recommend that you stock up with chain oil.
If you continue working without chain oil, the saw chain may burn through, or the motor may fail.
O t be careful to avoid dust or other foreign matter from entering the oil tank.
If dust and other foreign matter enter the oil tank, the unit may fail.
- Chain oil left in the tank may leak due to the structure of this unit. Although this does not indicate a malfunction, it may soil the storage location, so be careful.
When storing, empty the oil from the oil tank, and place an item under the main body which can absorb any leaks.
5. Installing the storage battery (Fig. 4)
As shown in Fig. 4, push firmly until it clicks into place. CAUTION
Securely attach the storage battery.
If the storage battery is not securely attached, it may come off and injury may occur.
6. Checking if the LED light works (Fig. 18)
- When you press the light switch, the LED light turns on and when released, the light goes out.
The LED light illuminates the cutting edge section.
It lights up the inside of the oil sight glass to facilitate checks of the remaining oil level.
NOTE
If the light is dirty, carefully wipe with a soft cloth etc., to avoid damaging it.
If the light is damaged, this will reduce the brightness.
7. Checking brake is engaged
- When the switch is engaged while pressing the lock-off button, the unit switches on, and when the switch is released, the unit switches off.
(2) In addition, 1 to 3 seconds after releasing the switch, the unit applies a brake to stop the rotation of the saw chain.
Before using, check to ensure brake is engaged.
CAUTION
Be careful of the repulsive force when the brake is engaged.
If you drop the unit, injury may occur.
8. Checking chain oil discharge (Figs. 19, 20)
- When switching the unit on, chain oil automatically lubricates the saw chain and guide bar.
If oil does not seem to emerge 2 to 3 minutes after the unit starts, check if any sawdust has accumulated around the oil spout.
(Refer to "Cleaning the chain oil spout.")
(Refer to "Checking the chain oil."
Switch operation
When the switch is engaged while pressing the lock-off button, the saw chain rotates. (Fig. 21)
Unless the lock-off button is pressed, the switch cannot be engaged.
After the switch is engaged, the saw chain continues rotating as long as it is pressed down. In addition, the LED light remains lit up.
When the switch is released, a brake is applied to stop the saw chain rotation.
WARNING
Do not secure the lock-off button while it is pressed.
If the switch is accidentally engaged unexpectedly start and injury may occur.
Using the hook
Pull out the hook from the unit, to which a rope etc. can be tied to suspend the unit. (Fig. 23)
WARNING
When using the hook, ensure the unit is securely suspended to avoid the risk of falling.
If the unit falls, an accident may occur.
REMAINING BATTERY INDICATOR
You can check the battery's remaining capacity by pressing the remaining battery indicator switch to light the indicator lamp. (Fig. 22, Table 3)
The indicator will shut off approximately 3 seconds after the remaining battery indicator switch is pressed.
It is best to use the remaining battery indicator as a guide since there are slight differences such as ambient temperature and the condition of the battery.
Also, the remaining battery indicator may vary from those equipped to a tool or charger.
Table 3
| State of lamp | Battery Remaining Power |
| Lights;The battery remaining power is over 75%. | |
| Lights;The battery remaining power is 50% - 75%. | |
| Lights;The battery remaining power is 25% - 50%. | |
| Lights;The battery remaining power is less than 25%. | |
| Blinks;The battery remaining power is nearly empty. Recharge the battery soonest possible. | |
| Blinks;Output suspended due to high temperature. Remove the battery from the tool and allow it to fully cool down. | |
| Blinks;Output suspended due to failure or malfunction. The problem may be the battery so please contact your dealer. |
As the remaining battery indicator shows somewhat differently depending on ambient temperature and battery characteristics, read it as a reference.
NOTE
Do not give a strong shock to the switch panel or break it. It may lead to a trouble.
To save the battery power consumption, the remaining battery indicator lamp lights while pressing the remaining battery indicator switch.
CUTTING PROCEDURES
WARNING
Prior to operation, ensure that chain brake works.
During use, grip the handle securely with both hands.
- When cutting timber from the bottom, ensure the saw chain does not impact with the timber.
If the unit is pushed back, injury may occur.
During work breaks or after work, always switch the unit off, and remove the storage battery from the main body.
Always monitor the workplace and surrounding area, ensure there are no objects which could cause injuries, accidents or failure, and if any are present, remove them in advance.
In particular, when establishing a foothold for working, ensure there is no instability or any object which could be tripped over.
When felling standing trees, always pay careful attention to the direction in which the tree will fall or roll, and determine a safe evacuation area and escape route for yourself in advance.
① Ensuring the unit is switched off
If the storage battery is inserted while the switch is unknowingly engaged, the unit may unexpectedly start, which may result in an accident.
② Installing the storage battery (Fig. 4)
As shown in Fig. 4, push firmly until it clicks into place.
③ Engaging the switch
Ensuring the saw chain is not in contact with the timber, engage the switch, and start cutting when the saw chain speed has increased.
CAUTION
- When switching the unit on, ensure the saw chain does not contact with material or anything else.
During use, be careful to ensure the saw chain does not contact with other material or object. In particular, when you have finished cutting, be careful to ensure it does not touch the ground.
NOTE
Refill the oil tank early to prevent the unit running out of oil.
1. General cutting procedures
(1) Switch ON the power while keeping the saw slightly away from the wood to be cut. Start sawing only after the unit has reached full speed.
(2) When sawing a slender piece of wood, press the base section of the guide bar against the wood and saw downward as shown in Fig. 24.
(3) When sawing a thick piece of wood, press the spike on the front section of the unit against the wood and cut it with a lever action while using the spike as a fulcrum as shown in Fig. 25.
(4) When cutting wood horizontally, turn the unit body to the right so that the guide bar is below and hold the upper side of the front handle with your left hand. Hold the guide bar horizontally and place the spike that is on the front of the unit body on the lumbar. Using the spike as a fulcrum, cut into the wood by turning the rear handle to the right. (Fig. 26)
(5) When cutting into wood from the bottom, touch the upper part of the guide bar to the wood lightly. (Fig. 27)
English
(6) As well as carefully studying the handling instructions, ensure practical instruction in the operation of the chain saw prior to use, or at least practice working with the chain saw by cutting lengths of round timber on a sawing trestle.
(7) When cutting logs or timbers which are not supported, support them properly by immobilizing them during cutting using a sawing trestle or other proper method.
CAUTION
When cutting wood from the bottom, there is a danger that the unit body may be pushed back toward the user if the chain strongly impacts with the wood.
Do not cut all the way thorough the wood by starting from the bottom since there is the danger of the guide bar flying up out of control when the cut is finished.
Always prevent the operating chain saw from touching the ground or wire fences.
2. Branch cutting
(1) Cutting branches from a standing tree:
A thick branch should initially be cut off at a point away from the trunk of the tree.
First cut in about one third of the way from below, and then cut off the branch from above. Finally, cut off the remaining portion of the branch even with the trunk of the tree. (Fig. 28)
CAUTION
Always be careful to avoid falling branches.
Always be alert for chain saw recoil.
(2) Cutting branches from fallen trees:
First cut off branches that do not touch the ground, then cut off those which touch the ground. When cutting thick branches that touch the ground, first cut in about half of the way from above, then cut the branch off from below. (Fig. 29)
CAUTION
- When cutting off branches which touch the ground, be careful that the guide bar does not become bound by pressure.
During the final cutting stage, beware of the log suddenly rolling.
3. Log cutting
When cutting a log positioned as shown in Fig. 30, first cut in about one third of the way from below, then cut down all the way from above. When cutting a log that straddles a hollow as shown in Fig. 31, first cut in about two thirds of the way from above, then cut upward from below.
CAUTION
Ensure the guide bar does not become bound in the log by pressure.
- When working on inclined ground, be sure to stand on the uphill side of the log. If you stand on the downhill side, the cut-off log may roll toward you.
4. Felling trees
(1) Undercut 1 as shown in Fig. 32):
Make undercut facing the direction in which you want the tree to fall. The depth of the undercut should be 1/3 of the tree's diameter. Never fell trees without proper undercut.
(2) Back cut (2 as shown in Fig. 32):
Make a backcut about 5cm above and parallel to the horizontal undercut.
If the chain becomes entangled during cutting, stop the saw and use wedges to free it. Do not cut thorough the tree.
CAUTION
Trees should not be felled in a manner that would endanger any person, strike any utility line or cause any property damage.
- Be sure to stand on the uphill side of the terrain as the tree is likely to roll or slide downhill after it is felled.
Precaution for cutting work
For large-scale operation or non-stop work
To protect the motor and electronics contained in this unit, if it is exposed to high temperature, this is signaled by a flashing LED light.
If you cut or push forcibly with a high load or non-stop, the motor and electronics will heat up and the LED light will flash.
NOTE
If the LED light flashes, stop using and please allow the unit to cool sufficiently. If you continue to use it, the unit may sustain damage.
In addition, if you work non-stop, when replacing the battery, please allow the unit to cool down for at least 15 minutes.
In addition, when work is interrupted, if the LED light flashes when you turn the switch back on, this means the unit has not cooled sufficiently, so please all longer downtime before switching back on.
Gripping/pushing force of chain saw
Always grip the chain saw securely.
In addition, do not force the chain saw more than necessary. When cutting, additional force exerted on the chain saw will not accelerate the cutting speed. This will strain the motor, impair the performance, and damage or cause malfunction of the motor or guide bar. Use the unit in the range where the saw chain is at a reasonable speed.
In particular, when the saw chain stops (becomes jammed) due to the excessive force, it may cause an injury or failure of the unit.
Chain catcher
The chain catcher is located on the power head just below the chain to further prevent the possibility of a broken chain striking the chain saw user.
- When the saw chain is cut, replace it with a new one referring to "Installing (replacing) saw chain".
SHARPENING OF THE CHAIN BLADE
WARNING
To prevent accidents, always turn off the switch and remove the storage battery from the main body.
In addition, when using saw chains, always wear thick gloves.
NOTE
Sharpen the saw chain and adjust the depth gage at the central position on the guide bar, with the saw chain attached to the main body.
When the sharpness of saw chains deteriorates, the motor and each part of the body are burdened and the efficiency declines.
For optimal performance of the unit, frequent maintenance is necessary to keep the saw chain sharp.
1. Blade sharpening
The round file should be held against the chain blade so that one-fifth of its diameter extends above the top of the blade, as shown in Fig. 33. Sharpen the blades by keeping the round file at a 30^ angle in relation to the guide bar, as shown in Fig. 34, ensuring that the round file is held straight, as shown in Fig. 35. Ensure that all saw blades are filed at the same angle, or the cutting efficiency of the tool will be impaired. Appropriate angles for sharpening the blades correctly are shown in Fig. 36. (Round file is sold separately.)
2. Adjustment of depth gage
WARNING
- Do not sand the top part of the bumper tie strap and guard drive link, nor cause the shape of said parts to deform.
Adjustment of depth gages must be in line with the predetermined dimensions and shapes, otherwise the risk of kickback may increase, causing an injury.
Bumper tie strap
Guard drive link
Depth gages shall be all lined up in the same manner because they are used to adjust depth at the position where the cutter inlays into the wood.
When sharpening the saw chain, be sure to check the depth gage every two or three times.
Place a depth gage jointer on the saw chain, leave the gage visible at the groove, and use a flat file to bevel the portion out of the depth gage jointer. (Fig. 38) (Depth gage jointer and flat file are sold separately.)
After filing away the depth gage, round off the front side of the depth gage as it was. (Fig. 39)
After sharpening the saw chain, place it into chain oil to wash off the filings.
If filings are not cleaned off, the saw chain and guide bar will quickly wear while in use.
ABOUT USB DEVICE
O Charging a USB device from an electrical outlet. (Fig. 48-a)
- Charging a USB device and battery from an electrical outlet. (Fig. 48-b)
O How to recharge USB device. (Fig. 49)
When charging of USB device is completed. (Fig. 50)
MAINTENANCE AND INSPECTION
After operation, perform inspection and maintenance of each part when storing the unit.
WARNING
During maintenance and inspection, always switch off the unit and remove the storage battery from the main body. In addition, disconnect the power plug of the charger from the outlet.
1. Inspection of saw chains
Occasionally inspect the saw chain. In the event of any abnormality, replace it with a new one referring to "Installing (replacing) saw chain".
Inspect the chain tension and check If it is correctly tightened.
- Stop using the unit when the saw chain becomes blunt and sharpen it referring to "Sharpening of the chain blade".
After use, carefully lubricate the saw chain and guide bars with oil for rust-proofing.
CAUTION
Wear gloves to avoid injury while using a saw chain.
2. Cleaning the side cover and brake band chamber (Figs. 40, 41)
Clean and remove any sawdust left inside the parts.
NOTE
When cleaning the side cover, brake band chamber, chain oil spout, and side bar, see the procedure "Installing (replacing) saw chain" and remove the saw chain.
3. Cleaning the chain oil spout (Fig. 42)
Before cleaning the chain oil spout, remove the side cover and guide bar.
4. Cleaning the guide bar (Figs. 9, 43)
When sawdust and similar become clogged in the groove of the guide bar or oil spout, the oil may not flow, which may result in the unit failing.
Remove the guide bar and clean any sawdust clogged in the groove after use and when replacing the saw chain. (Refer to "Installing (replacing) saw chain.")
5. Inspecting the carbon brushes (Fig. 44)
The motor employs carbon brushes which are consumable parts. Since and excessively worn carbon brush can result in motor trouble, replace the carbon brush with new ones when it becomes worn to or near the "wear limit". In addition, always keep carbon brushes clean and ensure that they slide freely within the brush holders.
NOTE
When replacing the carbon brush with a new one, be sure to use the HiKOKI Carbon Brush Code No. 999068.
6. Replacing carbon brushes
Take out the carbon brush by first removing the brush cap and then hooking the protrusion of the carbon brush with a slotted head screw driver, etc., as shown in Fig. 45.
When installing the carbon brush, choose the direction so that the nail of the carbon brush (see Fig. 46) agrees with the contact portion of brush tube. Then push it in with a finger as illustrated in Fig. 47. Lastly, install the brush cap.
CAUTION
Be absolutely sure to insert the nail of the carbon brush into the contact portion of brush tube. (You can insert whichever one of the two nails provided.)
Caution must be exercised since any error in this operation can result in the deformed nail of the carbon brush and may cause motor trouble at an early stage.
7. Inspecting the mounting screws
Regularly inspect all mounting screws and ensure that they are properly tightened. Should any of the screws be loose, retighten them immediately. Failure to do so could result in serious hazard.
8. Maintenance of the motor
The motor unit winding is the very "heart" of the power tool.
Exercise due care to ensure the winding does not become damaged and/or wet with oil or water.
9. Inspection of terminals (tool and battery)
Check to make sure that swarf and dust have not collected on the terminals.
On occasion check prior, during and after operation.
CAUTION
Remove any swarf or dust which may have collected on the terminals.
Failure to do so may result in malfunction.
10. Cleaning of the outside
When the chain saw is stained, wipe with a soft dry cloth or a cloth moistened with soapy water. Do not use chloric solvents, gasoline or paint thinner, for they melt plastics.
11. Storage
When storing the unit, perform cleaning and maintenance of each part and mount the chain case to the guide bar.
Store the chain saw in a place where the temperature is less than 40^ and out of reach of children.
NOTE
Storing Lithium-ion Batteries
Make sure the lithium-ion batteries have been fully charged before storing them.
Prolonged storage (3 months or more) of batteries with a low charge may result in performance deterioration, signifi cantly reducing battery usage time or rendering the batteries incapable of holding a charge.
English
However, significantly reduced battery usage time may be recovered by repeatedly charging and using the batteries two to five times.
If the battery usage time is extremely short despite repeated charging and use, consider the batteries dead and purchase new batteries.
CAUTION
In the operation and maintenance of power tools, the safety regulations and standards prescribed in each country must be observed.
SELECTING ACCESSORIES
The accessories of this machine are listed on page 388.
Important notice on the batteries for the HiKOKI cordless power tools
Please always use one of our designated genuine batteries. We cannot guarantee the safety and performance of our cordless power tool when used with batteries other than these designated by us, or when the battery is disassembled and modified (such as disassembly and replacement of cells or other internal parts).
GUARANTEE
We guarantee HiKOKI Power Tools in accordance with statutory/country specific regulation. This guarantee does not cover defects or damage due to misuse, abuse, or normal wear and tear. In case of complaint, please send the Power Tool, undismantled, with the GUARANTEE CERTIFICATE found at the end of this Handling instruction, to a HiKOKI Authorized Service Center.
Information concerning airborne noise and vibration
The measured values were determined according to EN60745 and declared in accordance with ISO 4871.
Measured A-weighted sound power level: 100 dB (A)
Measured A-weighted sound pressure level: 87 dB (A)
Uncertainty K: 3 dB (A).
Wear hearing protection.
Vibration total values (triax vector sum) determined according to EN60745.
$$ \mathbf {a} _ {\mathrm {h}} = 4. 7 \mathrm {m} / \mathrm {s} ^ {2} $$
Uncertainty K = 1.5m / s^2
The declared vibration total value has been measured in accordance with a standard test method and may be used for comparing one tool with another. It may also be used in a preliminary assessment of exposure.
WARNING
The vibration emission during actual use of the power tool can differ from the declared total value depending on the ways in which the tool is used.
- Identify safety measures to protect the operator that are based on an estimation of exposure in the actual conditions of use (taking account of all parts of the operating cycle such as the times when the tool is switched off and when it is running idle in addition to the trigger time).
NOTE
Due to HiKOKI's continuing program of research and development, the specific cations herein are subject to change without prior notice.
TROUBLESHOOTING
Use the inspections in the table below if the tool does not operate normally. If this does not remedy the problem, consult your dealer or the HiKOKI Authorized Service Center.
- Power tool
| Symptom Possible | cause Remedy | |
| The motor sounds but the saw chain... ○ does not move ○ does not move freely | The chain brake may be activated. Release by | pulling the brake lever toward you. |
| The saw chain tension is excessive. Check the | saw chain tension, and if it is too tight, loosen the tension. | |
| Saw chain comes out of the sprocket. Remove | the side case, and check the saw chain is properly engaged on the sprocket. | |
| Inside the side case... → sawdust is jammed → foreign matter is trapped | Remove the side case and clean the chain cover. | |
| In the guide bar groove... → sawdust is jammed → oil does not flow | Clean the guide bar groove and the oil hole. Make sure there is oil in the oil tank, and replenish as required. | |
| Poor sharpness The saw chain | chain... → is worn out or the blade is broken → is rusted | Sharpen the saw chain. If the wear or breakage is very severe, replace with a new saw chain. |
| The direction of the saw chain is reversed, Re- | attach ensuring the correct direction. | |
| Saw chain tension is loose. Check the saw chain | ain tension and tighten if it is loose. | |
| Chain oil ○ is slow-fl owing ○ does not come out (seizes up) | Lack of chain oil in the tank. Replenish with chain | chain oil. |
| Chain oil spout is clogged. | Clean the chain oil spout. | |
| Battery cannot be installed. | Attempting to install a battery other than that specified for the tool. | Please install a multi volt type battery. |
- Charger
| Symptom | Possible cause | Remedy |
| The charge indicator lamp rapidly flickers purple, and battery charging doesn't begin. | The battery is not inserted all the way. | Insert the battery firmly. |
| There is foreign matter in the battery terminal or where the battery is attached. | Remove the foreign matter. | |
| The charge indicator lamp blinks red, and battery charging doesn't begin. | The battery is not inserted all the way. | Insert the battery firmly. |
| The battery is overheated. | If left alone, the battery will automatically begin charging if its temperature decreases, but this may reduce battery life. It is recommended that the battery be cooled in a well-ventilated location away from direct sunlight before charging it. | |
| Battery usage time is short even though the battery is fully charged. | The battery's life is depleted. | Replace the battery with a new one. |
| The battery takes a long time to charge. | The temperature of the battery, the charger, or the surrounding environment is extremely low. | Charge the battery indoors or in another warmer environment. |
| The charger's vents are blocked, causing its internal components to overheat. | Avoid blocking the vents. | |
| The cooling fan is not running. | Contact a HiKOKI Authorized Service Center for repairs. |
English
| Symptom Possible | cause Remedy | |
| The USB power lamp has switched off and the USB device has stopped charging. | The battery's capacity has become low. Replace the battery with one that has capacity remaining. | |
| USB power lamp does not switch off even though the USB device has fi nished charging. | The USB power lamp lights up green to indicate that USB charging is possible. | This is not a malfunction. |
| It is unclear what the charging status of a USB device is, or whether its charging is complete. | The USB power lamp does not switch off even when charging is complete. | Examine the USB device that is charging to confirm its charging status. |
| Charging of a USB device pauses midway. | The charger was plugged into an electrical socket while the USB device was being charged using the battery as the power source. | This is not a malfunction. The charger pauses USB charging for about 5 seconds when it is diff erentiating between power sources. |
| A battery was inserted into the charger while the USB device was being charged using a power socket as the power source. | ||
| Charging of the USB device pauses midway when the battery and the USB device are being charged at the same time. | The battery has become fully charged. This is not a malfunction. The charger pauses USB charging for about 5 seconds while it checks whether the battery has successfully completed charging. | |
| Charging of the USB device doesn't start when the battery and the USB device are being charged at the same time. | The remaining battery capacity is extremely low. | This is not a malfunction. When the battery capacity reaches a certain level, USB charging automatically begins. |
SYMBOL
WARNING
VEILIGHEIDSWAARSCHUWINGEN VOOR DE KETTINGZAAGMACHINE
VOORZORGSGMAATREGELEN AANSLUITING USB-APPARAAT (UC18YSL3)
OVER HET USB-APPARAAT
En好吗, some dispositives.
DESCRIPCION DE ELEMENTOS NUMERADOS (Fig. 2 - Fig. 47)
HVAD ER HVAD? (Fig. 1)
4. Faelding at traeer
VEDLIKEHOLD OG INSPEKSJON
IPOΦYΛΑΞEΙΣ Σ'YNΔΕΣΗΣ ΣΥΣKEYΗΣ USB (UC18YSL3)
OTav eufaviotei kanoio anpoosoknto npoBma, mopei va apouv n xaovu ta v oia ouakeun USB nou evai ouvdsesevn e auto to npoiov. Na povticéne na'tva va avitypaa aoaalieac twv w v nov peipalaabovvtai otn ouokeun USB npiv ano tn xphon me auto to npoiov.
Napakaoue lae tntn n taepia ma c ev
fepeia kaiia anoutw eunv yia tuxov d0eva
nou eiva anoekueva oia oukeun USB ta onoi
kataopouv naoov, oute ia onoiadhnote baa
nou mopei va ephiaviotei eia uvedeltaevn oukeun.
IPOEIAONOIHEH
O Pniv ano tn xpnon, eEyEe To ouvdeTko kaawdo USB yia tuxov eaattwmuata n 3aBn. Xpnoonoiwvtac eva eaaTomegaTKo n 0thapuevo kaawio USB mnpoei va npokn9ei ktnounnkarnvou n avaphx
O Otav to npoiov 6v xpoiouoieitai, va kaunTe Tn Upa USB 6r To eAotiko kaumu. Suowpeuon oKovnc Ktλ. stn Upu USB mnpei va npokaEeikoumknantou avaEeN.
ZHMEIΩsH
Mnpεi va unapEi μia περισαίκη παύη katá ην επavaΦόptiΩ USB.
O 'Otav FOptiZetai ia oukeun USB, aphipeote Tn ouokekun USB ano tov FOptiotn.
Av dev to kave auto, evexetai oxi movo va ealtwo i n diapkeia zwns tnc matapiaac mias ouokunc USB, aaaa mnpei enianc va odnynoe ie anpooboknta atuxmuata.
Evexetai va nv eival duvatn npoTion opouevw voukeuwv USB, avaoya me tov tuno tn oukeunc.
NEPII P A H APIOMHMAN N TEMAXI N (Eik. 2 - Eik. 47)
7. Checking brake is engaged
2. Introduceti accumulatorul in incarcaor.
Introduci corect accumulatorul in incarcator, conform Fig. 5 (la pagina 2).
3. Incarcare
Cand introduci un accumulator in incarcator, indicatorul luminos de incarcare va clipi in culoare albastra.
Atunci cánd accumulatoral se incarcac compleit, indicatorul luminos de incarcare va lumina in culoare verde. (Vezi Tabelul 1)
DODATNA VARNOSTNA OPOZORILA
OBsI MEPH3A B630NACHOCT IPN PABOTA C EJEKTPUYeCKH HHCTPYMEHTN
NPEADYNPEHDAEHNE
Ipooyete Te BCnHn HnCTpyKun n npdeynpeHdEHN 3a6e3onachocT.
Hecna3BaHeTo Ha HnCTpyKunTe n PpeynpeKeHnra MoKe Da DoBeDe Do eJeKTPnueeKn ydap, NoJap Nnn cepNo3Hn HapaHaBAHn.
3ana3eTe n cxbpaHЯBaIte HnCTpyKuHnTe 3a nocJeDbaUc npaBn n npJIOKeHne.
TepMHbT ,eJIeKtpNueeCN HCTpyMeHT B npEynpeHdEHNrTa Ce OTHacr Do BAaHn eJIeKtpNueeCN (KaBeIeH) nn akymyNaTopeH (6e3HneH) HcTpMeHT.
1) Be3onachocHa pa60hTo MRCTo
a) PoiDbpHaIte pa6oTHOTo Macto nppeHOn I do6pe ocBeTeHO. Pa3XbPJIHN Hn cna6 ocBteHn pa6oTHn MeCTa ca npednoCTaBkA 3a nHcndENTn.
b) He n3noJ3BaIe eJektpnueChn HnCTpyMeHT BBB B3pHBOOAncHa Cpea, npn HaJIuYe Ha 3anaJIMN TeUHOCTn, ra3 nJn npax.
EneKtpueecknte HnctpyMeHTN npOn3BExKaT
NCHPN, KOINTOMORAT Da IOBedaT Da Bb3JIaMeHRAHe.
c) He no3BOJBAaTe DocTbN Ha cTpaHnHn Hnca n Deca npn pa60ta c eJeKtpnueckn HHCTpyMeHTn.
HeBHMaHne IIO BpeMe Ha paBoTa MoKe Ja DOBeDe Do 3ary6a Ha KOHTpol Bbpxy npoueca.
2) EJENTPnuecka 6e30nachOCT
H3noI3BaIe Ka6eI, NoIXOJx 3a BbHsHn YcNoBn, KOITo HAMJIBA pUcKa OT eJeKtpNueCKn yIap.
f) Aho e HaIOHHTeJIHO n3NoJ3BaHeTo Ha eIeHTpHuecKn HhCTpyMeHT BbB BnaHH yCIOBn, n3NoJ3BaHTe ypeN C dInepeHuaHa 3aunTa (RCD) cpeu yTeuHa.
H3noI3BaHeTo Ha yCtpoiCTBO 3a DnΦepeHuaIIHa 3aunTa (RCD) HamaJIyBa pNcKa OT eJeKtpuYeCKn ydap.
3)Лична6e3oNaChocT
a)БbTe 6dTeHn, BHMaBaIte B DeIcTBnTa cn n N3NoJ3BaIte pa3ymHO eIeHTpNueCknte HhCTpyMeHTn.
He n3noI3BaIte eIeKtpnueChn HNCTpyMeHT, KOraTO cTe N3MOpEHN, IIN NOB BInraHneTo Ha JeHaApCTBeHN cpeDcTBa, aIKHOJI INI ONHaTH.
Bcako HeBHMaHne npn pa6ota c eJeKtpnueckn HNCTpyMeHTN MOHe Da DOBeDe Do cepNo3HN HapaHaBaHna.
b) H3noJ3BaIte JnUHn npEpa3HN cpeIcTba. BnHaHn Hocete 3aunTHN OuHa nMaCKa.
3aunthnte cpeCTBa, KaTo npotnbonpaxoMaCKa, 3aunTHn ObyBn C yctOuHBa Ha Nb3raHe NOmETKa, KACKa HnAHTnFOHn, CNopeYcNOBnTaHa paBota, HamaJIbaT onaCHOCTTA OT HapaHBAhe.
c) PpeDoTbpaTaBaHe Ha CnyaHNO BkIIOUyBaHe. YBepete ce, ye 6yToHbT 3a CTapr Ha ypeDa e B n3KIIIOyeHO NIOJOKeHne, npEn Da CBbpHKeTe eJeKTPnueChn HNCTpyMeHT KbM N3TOuHH Na 3axpaHaBe H/nn 6aTeprn, KaHTo N npEn da ro B3eMeTe nn npenacTe.
IpehaHTo Ha HCTpyMeHTn C npbCT Ha CTapT 6yToHa, Hn Ha NpeBnIOBaTeJHa 3axpaHbaHeTO, HOCn ONaCHOCT OT INuJeHTN.
d) OTepaHete BCnHn raeuHn n Dpyr HIOObe, npedn da BKnOHTe ypeda.
Fauehen KIOUH NIN NHCTpyMeHT, 3a6paBEN B POtauONHH KOMNOHEHTN Ha eNEKTPUeCHN INHCTpyMeHT, MOKe Da IOBeDe DO HapaHBAHe.
e) He ce npecraaTe. Ppe3 uHIoTO BpeMe Tp6Ba Da HMaTe Cta6nHa Onopa N da NODbPkaTe 6aHaHC Ha TJIATO.
Toba OcnrypRaNo-IO6bP KOHTPOB BbpxyeIeHTpuYeCKHTE HNCTpyMeHTn Pn N3BbHpEdHN CNTyaun.
f) Hocete noxdxoadno 6nleKn. He hocete npekaleHo wnpokn dpexn nn 6nHyta. Na3ete hocata, dpexnte n pbaHbNcnte cn ot noDBHHN KOMTOHEHTN.
Unpohnte dpexn, bkyta n dIgna Koca Morat da 6bda3axbaHATN OT NOdBUNHHTE KOHNOHEHTN.
g) Ako ca ocHrypeHn ycTpoHCTBa 3a Cbbp3BaHe c npaxoyIOBHTeHN HNCTaIauHN, yBepeTe ce, Ye Te ca Cbbp3aHN Ce n3NoJ3BaT npabNJHO.
N3noJ3BaHeTo Ha npaxoyIOBteIu uKHOH MoKe Da HAmJI CBpb3aHHTe Cbc 3aMbpCBAHoTe pUcKObE.
4) Ehcnpnoataaia n npdpbHha Ha eJeHTpueechn HHCTpyMeHTN
a) He hacnBaIte eIeHTpNueChnTe nHcTpymeHTn. H3noJ3BaIte noxOJaU eIeHTpNueChn HHCTpyMeHT 3a cBOTBeTHnTe ceJIi.
Iopxoadytnr eektpnueckn HcptymENT Ocnrypba no-do6pa n no-cnpyha pa60ta npn npedBndeHHTe HOMHaHnnpaMeTpN.
b) He n3no3BaIte eIeHTpHuecKnT HNCTpyMeHT, aHO He MoHe Da 6bDe BHNIOUeyen HIN H3KNIOUeyo OT CbOTBeTHnCtAP T 6yTOH HnN NpeBKnIOuOBATeI.
BceK eIeKtpnueckn HNCTpyMeHT, KOHTo He MoKe Da ce KOHTpOIpa OT cnycbKa, e OnaceH IIOJIeKHa peMOHT.
c) N3HIOUeTe 电eHa HNCTpyMeHTa OT N3TOUHHa Ha 3axpaHbAe H/INn OT 6aTePnIra, INpeDN Da N3BbPbWbATE HaCTpOHN, INn CMAHa HA INPCtABKN INn INPN CBxPaHeHne.
Te3n npedna3Hm MepKn HamaJraBt Pncha OTo CnyaHNO HekelaHO BkIIOvBaHe Ha eJeKtpnueckn HhCTpymENT.
d) CbXpaHbAaTe Heu3nO3BaHHTe eIeKtpnueckn HHcTpymEnTn daJeY OT DocTbn Ha Deua N He No3BOJBAaTe Ha IInca, He3aNo3HaTHn C HauHb Ha pa60Ta c IHcTpymEnTHe, n C Te3n HHcTpkyuH, da pa60rTc Tx.
Enektpnuechnte HNCTpymEnTH npedctabIraBAt ONaCHOCT BpbTeHa HeONHTH Nla.
e) NopdbpHaIte eJHcTpPcHnTe HNcTpymEnTH. IpOBepaBaIte cHTpObHata n 3aKpenBaHeTo Ha NOpBnHHnTe Yactn, IpOBepaBaIte 3a NobpeHn Yactn n dpyr n cbctoHn, KOHTo MORaT da ce Otpa3rHa pa6oTaTa Ha eJekTpPcHnTe HNcTpymEnTH.
Ako yctaHOBNTe NOBpeH,OTcTaHete Tn npedn da n3NoJ3BaTe eJeKtpueeCHTE HhCTpyMeHTN. MHoro 3IIONoJyKn Ce IbJIHaT Ha IooHa IopApbHHa Ha eJeKTPueeCHNTe HhCTpyMeHTN.
f) IopdIbpaHte peKeuHTe HhCTpyMeHTn HatoyeHN uHCTN.
IpaBnHNO NOIbPkaHnte peKeu INHCTpyMeHTN, C HatoeHN peKeu n EmeHTN, ce ynpablaBaT N KOHTPOIpaT No-JeCHO.
g) H3noI3BaIte eIeKtpnueChn IHcTpymEnTH, npHCTaBHN n aKcecoapn, H T.H., CbflaCHO Te3N INHCTpyKUHN, KaTO B3EmTe ppeBND pa60THTE ycIOBn H BnDa pa6OTn, KOHTO ue ce N3BbpWBat.
H3no3BaHeTo Ha eJKeTprueeCKn HNCTpyMeHTn He NO npEHa3HaueHne MOKe Da DOBeGe Do IOBnWeH pNCH N ONaCH CNTyaCNI.
5) EKnIooataaun H noDpBHHHa Ha eJeHTpnueckn HHCTpyMeHTn 3axpaHbAHn OT 6atePN
a) 3apeHdaTe ypeDnte cMo cbc 3apAHDHTe ycTpoNCTBa, nocouehn OT npOn3BOJNTeJI.
3apn yctponCTBO, noDxOJa 3a eHN Tnnp Batepnn, MoHe Ja cB3dae pnck OT noHap npn n3no3BaHe C dpyr Tn6 batepnn.
b) H3noI3BaIte eJEnKtpnueeCKnte HNCTpyMeHTncamO C nocouHn 3a Tx TIN 6aTePn.
H3noJ3BaHeTo Ha np Tn 6aTeepu Cb3daBa pck OT HapaHaBaHe N noKap.
c) Horato 6aTeepHnTe He ce n3noJ3BaT, Te He Tp8Ba Da ce CbXpaHnBAT B 6n3oCT Do dpyrM MeTaJIHn NpeDMeTH HaTO HJaMePn, MOhetN, KIOOObE, INPOHN, BNHTOBe HIN dpyrM MaJIH M TaJIH NpeDMeTH, KOHTO MORaT Da OcbIeCTBt HOHTaHT MeHdy KJIeMnTe HM.
HONTAKMeKdY KHeMHTe Ha 6aTeepHTe MoKe da DOBeDe OT UcKn Hn Nn NaKap.
d) Ipn HenoDxOJaun ycNoBna Ha cbXpaHeHne, 6aTeepnnte Morat Da N3TeKaT; N36aRbaIte HOHTaNT. AHO CnyauHNO BJe3eTe B KOHTc C eJeKTPoNTHaTa TeuHOC, N3PNaHHeTe O6NJHO C BOda. AHO nonaHe eJeKTPoNt B OuyTe, N3PNaHHeTe O6NJHO nOTbpcTe MeDuNCHka NOMOu.
EneKToPOnnTbT Ha 6aTePNrTe MoKe Da npuHHBb3pnaJIeHHe Hnn H3rapAHH.
6) 06cnyHbAHe
a) 06cIyHbAHeTo Ha eIeHTpUeCKnTe HhCTpyMeHTn Tpa6Ba Da ce N3BbPwBa cMo OT KBaJIHΦHnpuHN cepBn3HN pa6OTnHn, npn H3NoJ3BaHe Ha opRnHaJHn pe3epBn YacTn.
Toba ue rapaHTnpa 6e3onacHocCTTa npn paBota c eJeHTpuecknte INHCTpyMeHTN.
BHIMAHNE
He donyckaIte B 30HaTa Ha pa6Ota deua H Bb3pacTHn Xopa.
Horato He H3noI3BaTe eJenKtpnueeCKnte HHcTpymENTn, cbxpaHraBaIte rN daJeY OT DOCTbN Ha deua N Bb3pacTHN Xopa.
БЕЗПАСНСТ ПИРABAБOTA CBEPINKEH TPNOH
-
PanaTe BCnHn Yactn OT TAnoTO CNOT BepnHHnTpnoH, KOrato ToJ paBoTH. IpeDn Da BnIouHTe BepnHHnTpNoH, Ce yBepTe, Ye BepnRaTa He Ce DoNIPA HNKbJe. EINH Mnr HeBHMaHne No Bpeme Ha paBoTa C BepnKeH TpNoH MoKe Da DObEe Do 3aKaHaHe Ha BepnRaTa B dpexnte nn TAnoTO BN.
-
BnHaH npbXte BepnHexnTpnoH c dChnTa pKa 3a 3aHaTa pKoXBaTHa n C JraBaTa pKa 3a npedHaTa pKoXBaTKa. Hkora He pa3MeHnTe N03uNTe Ha pBcTe, Tb Hato TOBa yBeJIuYaba Pncha OT HapaHBAhe.
3.ДрьнTeурEDAcamo3aH3OJIIPAHNTEpbKoxBaTHN, 3aUToBepnraTAMOHe Da BNe3e B KOHTaKT CbC CKpNTn npOBOnHnIu.AKOpeHexaTaBepnaBNe3e B KOHTaKT CnpOBOnHnIPOHnEHaHAnpeHexHne,OTKpNTnTe MeTAJINHuaCTnHa eJeKTPnuecknIHcTpymeHT MoRaT Da CTaHaT TOKOpOBOnmNnDa npUnHrT TOKOB ydap Ha ONEpaTopa.
- Hocete npedna3Hn OuHa n ClyxOba 3aunTa. PpenopbUba ce DonbInHteHa 3aunTHa eKINnPobKa 3a rIaBaT, pBcTe, KpaKaTaNCTbPaJaTa.
Iopxodyto 3aunTHO 06leKIO ige HamaHapahraHnraOT JeTnnapeTa NIN OT CnyuAeH KOHTCpeKeuataBepira.
-
He pa6oTeTe C BepnKeH TpnoH Na DbPBO. Pa6oTaTc BepnKeH TpnoH DoKaTo CTe KaueHn Ha DbPBOTo MoKe Da DOBeHe Do HapaHaBaHe.
-
BnHa n oDbpyKaHte npaBnHa no3uHna Ha KpaKaTa n pa6oTe C BepnKnnr TpnoH CTbnnn Ha CtaBnHa, cnypHa n paBHa NOBbpxHOCT. Xb3raBn nn HeCTabnHn NobbpxHOCTn, KaTO HApnpMeP CTbIb6, Moat Da npedn3BnKAT 3ary6a Ha 6aHaC n Ha KOHTpoN Bbpy BepnKnHn TpnoH.
-
Korato peKHeTe KIOH, KOITo e eoHappeKeHne, BHIMABaIte 3a o6paTeH yAp. Korato HAPpeKeHneTO B DbPBOTo CE OCBoODoN, KIOHbT MoKe Da OTCKOu N Da BN yApn Nnn Da n3BaAnBepnKHHn TpnoH OT KOHTpOJ.
8.БbTeI3KIOHHTeJIHO BHIMaTeJIHN, KORATOpeKeTe XpactNnΦIaNHKn.TbHKNTe MaTePnaIIMoKe Da CE 3aKaayat BbB BEpHHNr TpNoH n Da Cb3daIaT KaMUnHeYdap Nn Da HApUwAT BaJahCa BN.
-
HocTe BepnXnHn TpnoH B n3KIOUeHO CbCTOARHe, 3a npEHaTa pBkoXBaTKa H a pa3cTOrHne OT TAnoTo cN. Korato TpaHCnOpTnPaTe nn Pnp6uPate BepnKHHn TpnoH, BNHarNoCTaBnTe KaIbFa Ha BOdeuata WnHa. PpaBnHOTo bopabeHe C BepnKHHn TpnoH ige HaMaJIb BEporTHOCTTa 3a ClyuAeH KOHTaKT C DBNKeUaTa ce Bepira.
-
Cna3BaIte HNCTpyKUInTe 3a Cma3BaHe, o6TraHa He BepnIata N CmHa Ha aKceCoapIte. Bepira, KOrTo He e npabINHO ONbHATA Nn Cma3aHa, MoKe Da ce ChbCa NN da yBeLInu PNCKa OT ObpaTeH yAp.
-
PdIbpaKeIpepbKoXBaTKHe cyxN uHCTn OT MacNo, Ipec n dpytn 3aMbpCraBaHHA. Ako pbKoXBaTKHe ca omacJIeHN, Ie 6bDat Xlb3raBn N Ie 3aIy6nte KOHTpOJ.
-
PeKHe cAmO dIbPBO. He n3NoJI3BaIte BepnHnH TpnoH 3a HnpeBnDEH uen. HanpImep: He n3NoJ3BaIte BepnHnH TpnoH 3a pr3aHe Ha INaCTMaCa, 3ndapn nn HeNbPBeH CTponteHn MaTepaHn. n3NoJ3BaHeTo Ha BepnHnT pnoH He no npedHa3NaYeHne MoKe Da DoBeDe Do NobuWeH pNCK n ONACHN CNTyaQun.
PpunHHn HauHHn 3a npedotbpaTBAHe Ha o6paTeH ydap: (Φnr.2)
ObpaTeH yIap MoHe Da ce NoJyH, KOraTo HocbT, NnBbPxbT, Ha BOeUaTa uHa DoKoCHe ppeMeT, NnKOraTo IbpbTO Ce HaKIOHn 3aUne Beprata Bcpe3a.
B HrkOn CnyuAn DonnpaHTo Ha BbpXa MoHe Da npNHN BHe3aneH ObpaTeH yap, pN KOnTO WHaTa da 6bJe OTBbChata Harope N KbM OepaTopa.
PnTnckHaTe Ha Bepnata npn Bbpxa Ha BOeuaTa HINHa MoKe Da OTTlaChe HINHata 6bp3o Ha3aJ KbM OpepaTopa.
BbB BceKn OT Te3n Cnyan MoKe Da 3aRy6nte KOHTpoJI NaTpnoHa N DaNocTpaJaTe cepNo3Ho. He pa3uYtaIe cAmo Ha BrpaJeHIne B TpNoHa 3aUnTHN yCTpoJcTba.
Bne, kato onepaTop Ha BepnKeH TpNoH, Tpr6Ba Da npednpnemete HraKoIHO CTbKn 3a PpeDToBpaTBAHe HA INUdENTN.
Былгарский
06paTHnT ydapee3yIITaT OT HnPaBnHO n3noJ3BaHe Ha ypeDa NnHn HnPaBnIHn HaunHn nnycIOBnaHa pa6OtaN MoKe da Ce n36erHe npn cna3BaHe Ha CJIeHNTe ppeNa3Hm MepKn:
O Dpbjhte BepnHn H TpnoH 3dpaBO, C DBe pbcue, Oxbaauk npbKoXBtKaTa C naleu N npbCTN cpeyIPOLOXHO, KaTO TlOTo N pbcTe BN Ca pa3noIOKeHN NOIOxOJaHauHn 3aIpoTINBOeJCTBHe Ha cnlaTHa OBpaTHn ydap. CnlaTHa OBpaTHn ydap MOKe Da ce KOHTpOInpa OT ONepaTopa, Ako Ce cna3BaT IpeDnA3HnTe MEPKn. He nyckaiTe BepnHn H TpnoH.
He ce npotrae HnepekeTe HaBncounHaTa H a pameheTe cn. Toba ue NOMORHe da ce n36erHe cIyaueh KOHTaKT Ha Bbpxa IIO3BOJRA BaNo-dO6bp KOHTpOHa BEPHHHN TpnoH B HeoayKaBaHN CNTyaUIN.
O H3noJ3BaIte cAmo NocOeHn OT npOn3BoDInTeJIpe3epBHN uHHN u BepuN. H3noJ3BaHeTo Ha HeNoJxOJaU p3epBHN uHHN u BepuN MoKe Da DOBeDe Do CKbcBAHe Ha BepuRaTa u/nnn ObpaTeH yap.
CnataBaiTe HNCTpyKunTe Ha npOn3BOJNTeIa OTHOCO 3aToUbaHeTo I NOdPbXKaTa Ha peKeuTa Bepira. HamaJIbaHeTo Ha BucOyHnHa Ta Ha orpaHnHTeJIte Ha noDaBaHTo MoKe Da yBeLnu CnyaHtE Ha o6paTeH yDap.
ДОПьЛНITEЛНИ ПРЕДУПЕЖДECHNЯ 3A БE3ОПАСHОCT
- Pa6oTeTe 6e3 HApEKeHne. BnHar n noDbPkaIte TAnlOTo cn TonIO.
- PpeHn Da 3aOnOHTe pa6oTa, nomCInTe KaKBO BkIOUba Tn n Cna3BaNTE MepKnTe 3a 6e30NaCHOCT, 3a Da n36ErHete HnDnDEHTn HapaHBAHn.
3.He paBoTeTe npn looBpeme (CIneH BAtbP, DByKd, CnR, MByIa) nIIN npn ONaCHOCT OT NaDaun KaMbHN NIM CBlauNtua. Pnp IIOso BpeMe pneueHKata BN MOKe da 6bDe HapyuSha HnBnBaunTE MoRaT Da npnuHrT Heaacteh Cnyaai. - He n3no3BaIte ypea npn cna6a BnIMoCT (npn looBpeMe IIN HOeM). Cbso taKa He n3no3BaITe ypea nO BpeMe IIN CIEd IbXd. Hecta6nHata onopa IIN 3ary6ata Ha paBHOBecne MORat da DOBeaTdo INUIndHT.
- Поберете ВODEца ТИн ha И БеригаТа,прд n da BKNIOHTe ypeda.
Ako uHaTa HnBepurata ca nponykaHn, nHn aHO mHa 3dpackBaHe nn H3KpNBraHe, He H3NoI3BaIte ypeDa.
O Ybepete ce, ye uHaTa n BepraTa ca HaedHO MOHTnpaH. Ako npu uHaTa nn BepraTa mAc CyynBaHe nn pa3MeCTBaHe, e Bb3MOKeH HnDcENT. - Ппени за започеюта, се уBEReTe, che cnyckbT He ce 3aJeIcTBa, aKO OTHJIIOUBAuINr 6yToH He e HATnCHaT.
Ako ypeBbT He pa6OTn npaBnHIO, He3a6abHO cnpete Da ro n3noJ3BaTe Iro daIte Ha peMOHT B OTOpN3npaH cepBn3eH ceHTbp Ha HiKOKI.
- MoHTnpaHte Bepurata npabnHO, KaTO cna3BaTe HNCTpyKUInTE B pBkoBOdCTBOTO 3a EKcnIooTaunr. Pn HnpepaHne MOHTax Bepurata ue ce n3BaAn OT BOeuaT a WnHa N e BB3MOxHO HapaHbaHe.
- HnKora He cBaJIaIte HnKoe OT 3auNTHtE yCTpoiCTBa Ha BepNHHa TpNoH (Cnpaeh loct, OTHIOuBaU 6yToH, BepuOyoBnteI np.).
He npaBeTe H3MeHEnn no Tax He rN HeyTpapan3npaIte.
Bb3MOxH0e HapaHbAhe.
- B cIeHnTe cIyuaI n3KIIIOHe Te ypeJa I ce yBepTe, Ye Beprata e cnpraIa da ce BbptN:
O HoraTo He ce n3noJ3Ba nn Ce peMoHTnpa.
Korato cmeHrTe mrcTOTO ha paBota.
O Korato npOBepBaTe, peryInpaTe mCMeHrTe Bepurata, BOeIaTa 1nHa, KaIbΦa 3a Bepurata NIN dpyra Yact.
O Horato doniBaTe BepnKHO MacNo.
O Horato OTCpaHbATE npax n dp. OT TJIOTO.
O Horato npemaxBaTe npenTCTBn, OTnAdbuN nn DpbBeceH npax Ot pa6oTHata 30Ha.
O Horato octabraye ypea nn ce otdaeneabaTe oT Hero.
Ako yceTne nn npedBnKdTe onaCHOCT.
AkoBepnraTa npoDbJIHH da ce DbHn, e Bb3MOKeH INHcNDeHT.
10. No npnucn c ypea ce pa6oTH camocToTeJHO. Korato B pa6oTaT a yactBt noBeue xopa, MeHdy TxAx Tp6Ba da nMa DoCTaTb4H0 pa3cToHHe.
Oco6eH npn nobalna He Ha Dbpbeta nI npabota Ha NaHIOH ce norpnxte naaunTe nI IN TbpkaIaInte Ce Dpbeta Da He Cb3daT onachoc 3a dpyrntepa6oTHn.
11. CToIe Ha noBue oe 15 m ot dpyru xopa.
OcbEN TOBa BCNUK pa60THNt Tp6Ba Da 6bDaT Ha noBeue ot 15 m eINH OT dpyr.
CbueCTByBa pnck ot ynap ot napyeta n npyrn HnndHTn.
O IpeBapTeJHO yToHHe T HauHa 3a npedynpexKaBaHe Ha dpyrrte pa60THnCn (cbc CBnPKa n dp.).
12. Ппени поалаяни дьрета нанравete следно:
O OnpeJeIe Te KbIe Ie Ce OTdpbHHeTe npdIN NOBaJIaHTo.
O MaxHeTe npenTCTBnraTa (HaNP. KIOH, xpaCTn) npedBaPHTeJIHO.
O HanpaBeTe NbHa OueHka Ha CbCToHneTo Ha DbPBOTo 3a NOBaJIaHe (Hanp. HAKIOH Ha CTBOLA, HANpeXeHne B KIOHOHTe) IN OKOIHOCTTa (Hanp. CbCToHne Ha CbCeHNte DpbBETA, HAIuHne HA PpenrTCTBnA, TepeH, BRTbp) IN HA Ta3N 6a3a ONpeDeJeTe NocOKaTa HA NaDaHe Ha DbPBOTo IN NlaHnpaTe pa6oTaT a No NobaJIaHETo My.
Бe3OTROBOPHO TO NOBaJIHe Ha IbPBeTa MoJHe Da IOBeDe Do HapaHRAHe.
13. По Врeme Ha NOBaJIrHe Ha IbPBeTa HAnpaBete CneIeHOTo:
O Np BpeMe Ha pa6oTa BHIMabaTe MHOro B KaKBa NOcOKa ige naHHe IbPBOTo.
O Korato pa60tne Ha haHIOH n CTe B3eJn MepKn DbPBOTo Da He ce N3TbPKaJI, BNHaI n CTOITE OT RopHaTa cTpaHa.
O Korato dbpBOTO 3anoue He da naHa, nKIOUeTe ypeDa, CnHaNIm3npaIte Ha OKoJInHe Xopa n He3a6abHo ce OTdpbHHeTe Ha 6e3OnacHO MAcTo.
O Np Bpeme Ha pa6oTa, aKo BepnraTa HIN shHata ce 3aKInHrT B DbPBOTo, IN3KIOUcTe ypeDa n IN3I0JI3BaIte KInH.
14.Ako no Bpeme Ha ynoTpe6a pa6oTaHa ypeda ce BLOUH NIN 3a6eJEnHe HeoBuHaen Uym NIN BN6paun, He3a6abHO INKIIouTe ypeDa, cnpTe Da ro H3NoI3BaTe Iro 3aHeceTe 3a npOBepKa INn peMOHT B OToPi3uH cepBn3eH ueHbP ha HiKOKI.
Ako npodbJnHTe da ro n3noJ3BaTe, mHa onaCHOCT OT HapaHraBaHe.
15.Ako ypeBbT 6bIe n3nycHa Tnnn n3noKeH Ha yap, npOBepTe BHNMaTeJHo 3a NOBpeN nn NpKHaTnHn I ce yBepeTe, Ye Hma deOpMaun.
Ako ypeBt e nobpeDeH, nponykaH nIeΦopMnpaH, mHa onaCHOCT OT HapaHbAHe.
- Korato TpaHcnpOpTnape Typea c Kola, Tp86Ba da ro 3aKpeNITE HeNoDvNHO. Ima onaCHOCT OT INUdENT.
- He BkIIOUbaIte ypeia,doKaTo BepnraTa e c KaIbΦ. Bb3MOxHO e HapaHBAhe.
18.YBepete Ce,Ye B DbPBeHMaTepeHaJI Hama NipOnn I pyuYyKdI TeJa. Ako BepnraTa ydpn NiPoH n dp.,e Bb3MOKeHNHcNDHT.
19.3aIaI36erHete 3aKJIINHbaHe Ha BOeUaTa 7nHa B MaTePnaIa, KOraTO peKeTe KbM KpaI IIN KOraTO CTe N3IOJKeH Ha TeKeCTT a Ha MaTePnaIa, INCTaIInpAITe NOIbPkaIa IIaTΦOpMa 6JIIn3O Do MAcTOTO Ha PRA3aHe.
Ako Bodeaata uHa ce 3aKlnHn, e Bb3MOxHO HapaHbaHe.
- Ako Ⅲe TpaHcnpopate Hn np6npate ypea cneI ynoTpe6a, Hn MaxHe T Bepurata, Hn n CNoKeTe KaIbphi.
При Контан На Бернага ТялOTO Иma onaCHOCT OT HapaЯBaHe.
- Frnke te ce do6pe 3a ypeda.
O 3a da cn ocHypnTe 6e3oNaChHa n eFHKachHa pa6oTa, ce rpnKeTe DObpe 3a peKeuata BepuRa, TaKa Ye Ta da pa6oTu ONTImaJIHo.
O Pn CmHa Ha BepuraTa HIn BOeUaTa UHnHa, npn NOdPbXKa Ha TAYIOTo, NbJIHeHe Ha MacNo I dp. Cna3BaIte INCTpyKuINTe B pBKOBOcTBOTO 3a EKcnloaTaun. - HocTe ypeDa Ha cepBn3.
He MoiHnIuPauTe npOdyKaTbKATO ToBBeYe OTROBaPaHa npHIOXHMITE CTAHdApTu 3a 6e0NaChocT.
3a BCnHKn peMOHTn pa6Otn ce 6pbuaTe KbM OTOpN3npaH cepBn3eH ueTbp Ha HiKOKI.
Onntte da pemontipate ypeda camn Mohe da DOBeDaT DO INHUnDeHT HApaHaBaHe.
- CbXpaHЯBaTe HaJIeJxHo ypeDa, KOraTo He ro H3NoI3BaTe.
H3ToeTe BepKHOTo MacNo I ro np6epeTe (n 3aKnIOyTe) Ha cyXo MRCTO, HeOCTbNHO 3a Deua.
24.Ano npedynpednteHnrrCTnKepece n3Tpnn,ObenI IINIOBpeDNI NO Dpyr HaHH, CLOXeTe HOB.
3a npdeynpeinteHH CTnKeepCe o6bPHeTe KbM OToPiuPAH cepBn3eH ueTbp Ha HiKOKI. - IIO BpeMe Ha pa6oTa cna3BaIe TepnIOHXMITe MeCTHINpaBnla Hn pa3nope6n.
- He n3noJ3BaIe npOdyKta, aKO ypeBt nn KJIemnte Ha 6aTePnra (3a MOHTaH Ha 6aTePnra) ca DeΦOpMnpaHn.
IocTabraHTo Ha 6atepnaTa MoKe Da npuHHn Kbco CbeDHeHne, KOeTO MoKe Da DOBeDe Do NOBa Ha dIM IIN 3anaJbAHe.
27.ПдьрнaiteКлемпeHaИнстум enta(3aMOHTaHабatepnta)чNTNOTnpbCTn npax.
O Ipei npa6oTa ce yBepeTe,ue B 30HaTa Ha KJIemnte HMa HATpyNaHn npax N CTpyKKn.
O No BpeMe Ha pa6oTa ce ONnTbaIe Ta n36ErHete nonaHaTeTo Ha cTpkyKnn nn npax Bbpxy 6aTepyra.
O npn npekpataBaHe Ha pa6oTa nIn cIeN yNoTpe6a He OCTABHTE HnCTpyMeHTa Ha MRCTo, KbTeTO MOKe Da 6bJe n3IOJKeH Ha npax n CTpyKKn.
HecnasaheTo Ha ToBa MoKe Da npuHH Kbco CbeHNHeHne, KOeTO MOKe Da IOBeDe DO NOBa Ha dIM nIIN 3anaIbAHe.
ПЕДПАЗНМЕРН3A BATEPЯТИЗAPДHOTO YCTPOICTBO
- Binhari 3apeKdaIte 6atepIra npn oKOJIHa TEMpepaIpyoT-10-40°C.AHO TEMpepaIpyaTe eoHcKaOT-10°C,TOBaJe DOBeJe Do npesapeKdaHe, KOeTo e ONaCHO.BaTepeIra He MoKe da 6bDe 3apeKdAna npn TempepaTypn HAd 40^
Ha- noxoadaata temepaupa 3a 3apeHdahe e 20- 25^ - He 3nOJ3BaITe 3apJHOTo yCTPOIcTBO HENpeKbCHaTO.
Korato eHNO 3apeXdaHe npHKlnOHy, ocTaBeTe 3aprHOTo yCTpoiCtBO 3a OKoJIO 15 MNHyTN ppeN cIeBbUTo 3apeXdaHe Ha 6aTePn.
3.He onyckaTe HabIn3aHeTo Ha yHKn TeLa B OTbopa 3a Cbbp3BaHe Ha aKymlaTopn6aTepn. - HnKora He pa3rIIO6BaIte anMyIaTOPHITe 6aTePN nn 3apAHOTo yCTpOcTBO.
- Hnkora He daBaIte Ha Kbco aKymlaTopHnTe 6aTePN. Kbco cBeINHeHne MoKe Da npuHHr TOrJMa eEeKtpnueckn ToK n pperpaBaHe. Toba moKe da doBede Do nobpeDa Ha 6aTePnra.
6.He n3xBpIyTe 6aTepeH BOrbH.
Ako 6atepna TaH3ropn, TMy MoKe da eKcnloDnpa.
- Изпольвано на ИЗTOоне Ha 6aTeря се порду Зардно устpoиCTBO.
- BbPheTe 6aTePnra Ta Mmara3Ha, OT KOTo e 3aKynHeA, BeHara CneI KaTO uKbJa Ha JHBOT Ha 6aTePnraTa CTaHe IpeKaJIeHO KbC, 3a Da ce H3NoJ3Ba. He N3XBpJIrTe N3TOUeHN 6aTePnN.
9.He nocTabrIte npEMeTH BbB BeHTnlaUHnHTe OTBOpHa 3apAHDTo yCTpoiCTBO.
BkapbaheTo Ha MeTALH NIN 3aNAJIIMN IpemETN BvB BEHTnlaUHOHHTE OTBOPN Ie DOBeDe Do ONaCHOCT OT eNEKTPuYeCKN yDap INI Nc Ne NOBpeJr 3apAHDOT yCTpOInCTBO.
ПЕДУПЕЖДECHИЗА 3A ЛNTHEBO-NOHHATA BATEPINA
3a da ydbjHKHe KHBOTA Ha JNTheBO-NOHHa 6aTePn, TnMma 3aunTHa FyHKcN 3a npeKbcBaHe Ha noDaBaHeTo H3apd.
B clyuante 1 do 3, onncn no-dony, korato n3noI3BaTe TOBA n3dene, dopn npn HATNCKaHe Ha cnycbKa, MOTOpT MOKe da cnpe. TOBa He e B cIeDCTBne Ha nobpea, aHa 3aunTHa fynKcui.
- Korato pa3pndbT ha 6aTePnra HamaJIee 3HaHTeJIHO, MOTOpbT cnpa.
B TaKbB Cnyaay 3apeTe 6aTepeYTa He3a6abHo.
- Ako INHCTpyMeHTe 6nI npTeOBapeH, MOTOpbT MOKe Da cnpE. B To3n CnyaA, OCBO6OJeTe cnYcbHa n OTcPaHeTe npuHaTa 3a npTeOBapBaHe. CneTToBA MOKe Da N3NOJ3BaTe ypeA OTHOBO.
- Aho 6aTeepnra Ta e npErpna npn npTeOBapBaHe, TMOKe Da OTKaKe Da pa60Tu.
BTo3nClyaH, CnpTe H3NOJ3BaHeTO n, n oCTaBeTe Da ce OxlaDi. CneD TOBa MoHe da H3NOJ3BaTe ypeDa OTHOBO.
OcBeHToBa,MOJIa3BaIe CJIeHNITe IpeDyPpeJDeHnI. PEPDyPPEKDEHNE
3a da npedotbpatnte pa3peJdahe Ha 6atepnaTa, 3aqrbahe, noraHa dIM, 3anaIbAne n EKcnIO3n, yBepete ce, ye cna3BaTe yKa3aHnTa 3a 6e3oNaCHOCT.
1. YbepeTe ce, Ye no 6aTepeYra He ce HaTpynBaT npax nCTpyKKn.
O Panaete 6aTepeRnTa OT npax n CtpyKn no BpeMe Ha pa6oTa.
Блгарский
He donyckaIte no 6aTeepnraTa da ce HATpynBaT npax nCTpyKnn NO BpeMe Ha pa6Ota.
He cbxpaHbAaTe Heu3noJ3BaHnTe 6aTePnHa MeCTa, KbTeO Ca N3IOKeHn Ha Bb3JeICTBnETo Ha npax n CTpyKKn.
O PpeHn Da npnbepete 6aTepeHraTa, OCTpaHete eBentyaHNO HATpynAHn CTpyHKn INpax, IN He dpbKHe Ha eHNO MRCTO C MeTALHN PpeDMETN (BNHTOBE, INPOHn n dp.).
2. Na3eTe 6aTeepnTa OT npo6nBaHe C ocTpnppeMeTn KaTo rBOzDen,OT yAp C uK, HAcTbNaHe, INI O T cnJIen fH3NueCn yAp.
3. He n3no3BaIteBvDnMo IOBpeDeHa NIn DeΦopMnpaHa 6aTePnIy.
4. He n3noJ3BaIte 6aTepeTc o6paTeH noJIpyntET.
5.He cBbP3BaIe 6aTeepnTa DnpeKTHo KbM eJektpnueckn H3TOuHnU, NJIH KbM KynnyHra Ha 3anaikata B Jeka KOJa.
6. He n3noI3BaIte 6aTepeIraTa 3a ceJIH, pa3JIuHn OTo npedHa3NaueHHeNoT My.
7. Ako 6atepnaTa He MoHe da Ce 3apeHnBJIHo, DOpN CteI KaTo H3TeHe npenopbHaHnepnoD OT BpeMe, He3a6abHO npeKpaTeTe nocJeBaun OOnTHa 3a 3apeXdaHe.
8. He n3laaTe 6atepTa Ha BnCOH TeMtnepaTpy HnHaIraHe, He NoCTaBMyTe B MmKpOBbHOba FypHa, CyuINHn KoHTeHepn NOD BnCOKo HaIraHe.
9. Pn yCTaHOBBaHe Ha Teu HnHnepnTHa Mnpn3Ma OT 6aTepeyTa, He n3JaarYe Ha Bb3JeNCTBnETo Ha CNHa TOnnHa HnO TkPHTn NlaMbU.
10.He 3nol3BaIte 6aTepeHra B MeTa, KbTeTo ce reHeepipa CNIHO CTaTHNO eNeKtpnueCTBO.
11.Ako 6atepnaTeue, HMa HnnpnTHa Mnpn3Ma, 3aqrba nIc oBe3uBETn IdeOpMnpa, nIaKo Ce nOraBt HeobuaHn npn3Haun No BpeMe Ha ynoTppe6a, npe3apeXdaHe nIc bXpaHHe, He3a6abHO r N3BaTe OT o60pyDbaHTo nIb OT 3aprHOTO yCTpoiCTBO n He n3IOJ3BAHTe.
12.He notanrnte 6aTepeHra n He no3BOJIbAte HABIN3aHTo Ha TeuHOCTn B He. IpOHKBAHeTO Ha npOBOMN TeUHOCTn KaTo HApIMep BOda, MoKe Da DOBeDe Do NobpeDen N da PnUnHn NoJap Nn EKcnIO3H.N CbxpaHraBte 6aTepeHra Ha XJaHO n Cyxo MRCTo, daJeY OT rOpHMn JleCHO3aNaJIMM MaTepeHaJN. H36BaIte aTMocFepn c Kopo3NBn ra3OBe.
BHIMAHNE
- Ako eIeKToJIrOT 6aTepeHra TnJaHe B OChTE, He rTbPkAaTe, a N3PJIaKHeTe 06NlHO C YnCTa, HApP. YeShMaHa, BOa n NtBpCeTe He3a6abHo Jekapcka NOMOu.
Ako He ce B3eMaT MepKn, eIeKtpoNtBt MoKe da npuHn Ouyn npo6JIemn. - Ako eIeKtpoIIT O6aTepeRnTa IOnaIHe Bbpxy KOKata nn dpexnte, He3a6abHo N3MnIte C YnCTa, HAp. YeIIMHa, Boda.
Bb3MOxHo e eJeKtpoJNTbT da npuHn KOxHO Bb3paleHne.
3.AKOp npn pBpBOTo n3NOJ3BaHe Ha 6aTePnraTa 3a6eJIeKHTe pbJda, HENpNrTeH MnpuC, IpePRABaHe, OBe3cBETBAHe, DeOpMnpaHe N/INn DpyrN HepeDHOCTn, He a N3NoJ3BaIte N BbPheTe Ha DOCTaBvNka INTbProBeUca, OT KOITo CTE J 3aKyNiln.
PDEyPExKdEHH
Ako ToKoIPOBOIDM UyHn IpEaMeT nonaHHe B KOHTaKT C KJIeMITE Ha IITHeBO-IOHHaTa 6aTePn, MoKe Da Ce NOlyuN KbCO CbeHNHeHne, KoTo Da Cb3dae OnaCHOCT OT NOKap. MoN, cna3BaIte CJeDnTE MepKn PnCbXpaHHe H a 6aTePnTa.
He cIaraiTe ToKOnpOBoDMn napyeTa, npoHn, CTomAHeHa, MeHa Hn Dpyra TeB KyTnTa 3a cbxpaHenHe.
O Hn cNoHeTe 6aTePnTa B ypea, Hn npn6epete, Kato NpBPO NOCTaBnTE KanaHa N, Taka Ye BEHTnlaUHOHHnTE OTBOpN Da ce ChPnT, 3a Da npedOTbpaNTe Kbco CbeDnHeHne (BNhte Phr. 3).
OTHOCHO TPAHCIOPTA HA JIHTHEBO-NOHHA BATEPNA
PtpraHcnpTupane Ha JntHeBO-IOHHa 6aTeprn, MoJcna3BaIte CLEHNTE npedNa3Hm MepKn.
PNEyPEXDEHNE
YBeDomete TpaHCnOpTHaTa KOMnHn, Ye npaTKaTa CbDbpKa JNTHeBO-IOHHa 6aTePnI, INHOpMnPaIte KOMnHnraTa 3a HeHnTa N3XoJHa MOuHocT n Cna3BaIte HNCTpyKunTe Ha TpaHCnOpTHaTa KOMnHn, KOraTo ypeXdAte TpaHCnOpTa.
O JInTHeBO-IOHHTe 6aTePN, KOINTo HADBnIaBaT n3XoJHa MoUHOCr OT 100 Wh, ce CHTaT 3a TpaHCnOpTHa KaTEROpNr ONaCHn CTOKn N I3NCbAT npNJraHaTeHO Ha CneuHaJIHn pOueDyPn.
O 3a TpaHcnpTnpe B UyKbHa Tp6Ba Da CnAaHTe MeJHyHApOdHnTe 3aKOHn IN paBnla n pa3nope6n Ha CTpaHaTa, Do KOrTo Ce TpaHCnpTnpat.
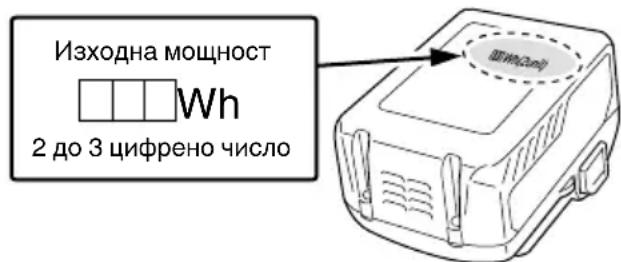
ПЕДПА3НМЕРН 3A CBьP3BAHE HA USB YCTPOИCTBO (UC18YSL3)
PnBb3HnKBaHe Ha HeoayKaBaan PpO6Jem, DaHHnte B USB yctpoNCTBO, Cbbp3aHO KbM To3n IpOdyKT, Moar Da 6bDat NOBpeDeHN HIN 3aRy6eHN. BuHaR OcNpyraBae Pe3epBHO KOJIe HA BCNUHdAHNN, CbDpbHauNi Ce B USB yctpoNCTBOTo, NpeDN N3NOJ3BaHETo Ha To3n IpOdyKT.
MoI, mMaIte npEdbN, Ye Haaata KOMnHaHne Hocn OTROBOPHOCT 3a DaHHnte, CbXpaHeH N USB yCTpoiCTBO, KOINTO ca NOBpeHn HIN 3aYb6Hn, HHTO 3a NOBpeDa, KOARTO MOKe Da Bb3HNKHe B Hero.
PNEyPENKDEHNE
O Ipeyn ynoTpe6a npOBepTe cBbP3Baunr USB Ka6eJ 3a deEKeTN nn NOBpeN.
N3nOJI3BaHeTo Ha DepeKeTEn NIN NOBpeDeH USB Ka6eI MoKe Da IOBeTe Do NOBaTa Ha Dm NIN Da npHuHn 3anaJIbaHe.
O Horato npoodykTbThe ce n3noJ3Ba, noCTaBeTe rymeHn Kaanak Bbpxy USB nopTa.
HaTpynBaHéTo Ha npax I pyrN OTnaIbU USB nopTa MOKe Da IOBeDe Do NOBaTa Ha dIM NIN Da npuHHI 3anaJIbaHe.
3A6EJIEXHA
O Bb3MOHHO e USB 3apeXdAHeTo Da npeKbcBa Ha MOMeHTH.
O N3BaTe USB yCTpoHCTBOTO OT 3aprHOTo, HoraTo He ce 3apeKda.
B npTnBEH cIyau JHBOTbHa 6aTepeYra Ha USB yCTpOIECTBOTo MOHe Da Ce CkbcN, KaKTo N da Ce CTnHRe Do HeoayKaBAHN INUdEHTN.
O Bb3MOHHO e da He MoKeTe da 3apeIte HAKON USB yCTpOINCTBA, B 3aBNCIMOCT OT Tnna yCTpOINCTBO.
ONICAHNE HA HOMEPIPAHITE ELEMHTN (Фиг. 2 - Фиг. 47)
Hnkora He daBaIte HaKbCo 6aTepyra.
2. NocTabaHHe Ha 6aTePnIa
CLOXHeTe 6aTepeRnTa, KaTO BHNMaBaTe 3a NOJIocHTe (BnKTeΦn.r.4).
3APEKDAHE
IpeNi Da H3NoJ3BaTe eJeKtpNueCKnT INHCTpyMeHT, 3apeJeTe 6aTePnTa KaKTo CJIeDba.
- CbbpHeTe Ka6eJa Ha 3apHnOTo yCTpoNCTBO KbM HOHTaHT.
Korato BHHOHTe Ka6eHa Ha 3apHnTo yCTpoNCTBO B KOHTAHT, CBeTOHNHnKaTOPbT 3a 3apJI ige Mnra B YepBHeHO (Ha HHTepBaHn OT 1 cekyHda).
- NocTaBeTe 6aTePnTa B 3apAnHO yCTpoNCTBO. BkapaTte 6aTePnTa PbTHo B 3apAnHO yCTpoNCTBO, KaKTo e NOKa3aHo Ha Phr. 5 (Ha cTpaHnua 2).
3. 3apeHdaHe
PnnoocTaBHe Ha 6aTePnB 3apAnHTo yCTpOHTBO, CBETOHNkAToPbT 3a 3apJd Ie MnRa B CnHbO.
Korato 6aTePnra Ce 3apeHn HnBJIHO, CBToHnDnKaTOpbT 3a 3apJd 7e CBeTH B 3eJIeHO. (BnXrTe Ta6nca1)
(1)Инданацин ha CBeToHДиКaTopa 3a 3apA
HnHaunHe CBeToHNHaKAtopa 3a 3apJ, Otpa3BaUNCbCToHHeTO Ha 3apJHOyCTPOIcTBO Nn AkyMylaTopHaTa 6aTepe, ca noka3aHn B Ta6nua 1.
Ta6nua 1
| Инданаи на сбетонддатора за зард | ||||
| Светонддатор Зд зард (СВЕРBEО/ СИНьО/ 3ЕЛЕО/ ЛИЛАBO) | Преши заржданe | Мira (ЧЕРBEО) | Сбетва за 0,5 сени. He с Bretи за 0,5 сени. (изгасва за 0,5 сени) | Свързано Кьм Источник на зухсанвache |
| Посваме на заржданe | Мira (CINHьО) | Сбетва за 0,5 сени. He с Bretи за 1 сени. (изгасва за 1 сени) | КалачтET на батерия по 50% | |
| Мira (CINHьО) | Сбетва за 1 сени. He с Bretи за 0,5 сени. (изгасва за 0,5 сени) | КалачтET на батерия по 80% | ||
| С Bretи (CINHьО) | С Bretи несякъсато | КалачтET на батерия на 80% | ||
| Завлшени заржданe | С Bretи (ЗЕЛЕО) | С Bretи несякъсато | ||
| (Проблажаленею 3вук на зумeper: okolno 6 сени) | ||||
| Реким �отовноct поради празгеляе | Мira (ЧERBEО) | Сбетва за 0,3 сени. He с Bretи за 0,3 сени. (изгасва за 0,3 сени) | Пergая в сатерия. Зaperжданeto не в Вьзменно. (Зaperжданeto по замочné след охлajданe на сатерия) Повера в сатерия по затерияу Загандоту устристvo | |
| Невшико заржданe | Мira (ЛИЛАBO) | Сбетва за 0,1 сени. He с Bretи за 0,1 сени. (изгасва за 0,1 сени) (Проблажа suspendи 3вук на зумeper: okolno 2 сени) | ||
(2) OTHOCHO TEMNEPATypaHa BpeMeTo 3a 3apeKdaHe Ha aKymlaTOpHata 6aTePnra TemnepaTypaHa BpeMeTo 3a 3apeKdaHe 6bDaT Te3n, NOKa3aHH B Ta6Iina 2.
Ta6nua 2
| Зарадно | UC18YSL3 | ||||||
| Бастен | Наржение ри заразданe | Li-ion | |||||
| Температури, пriи Конто бастени ta може за съде зараздениa | -10°C - 50°C | ||||||
| Вид сьастен V 14,4 18 | |||||||
| Пробл transitno вке за заразданe (пri n 20°C) | Мин. | Серия BSL14xx Серия | BSL18xx | МуливOLTOBи серий | |||
| (4 кletки) | (8 кletки) | (5 кletки) | (10 кletки) | (10 кletки) | |||
| BSL1415S : 15 | BSL1430 : 20 | BSL1815S : 15 | BSL1830 : 20 | BSL36A18 : 32 | |||
| BSL1415 : 15 | BSL1440 : 26 | BSL1815 : 15 | BSL1840 : 26 | ||||
| BSL1415X : 15 | BSL1450 : 32 | BSL1815X : 15 | BSL1850 : 32 | ||||
| BSL1420 : 20 | BSL1450 : 32 | BSL1820 : 20 | BSL1850 : 32 | ||||
| BSL1425 : 25 | BSL1460 : 38 | BSL1825 : 25 | BSL1860 : 38 | ||||
| BSL1430C : 30 | BSL1830C : 30 | ||||||
| USB | Наржение ри заразданe | V | 5 | ||||
| Зардан ToK A | 2 | ||||||
3AEBJEEHHA
Bpemeto 3a 3apeKdahe MoKe da Bapnpa cnopeD OKoJHaTa TemnepaTypa n H3TOHnKa Ha HanpeXeHne.
-
Pa3kaheTe 3axpaHbuaaHa Ka6e Ha 3apdHOTO yCTpOietBO OT KOHTaKTA.
-
XbaHete do6pe 3apdHOTO yCTpOHCTBO n 3dbpnaTe 6aTePnTa.
3ABEJIEXHA
YBepTeCe,YeCTeH3BaIINI6aTePnIaOT3apJHOTO yCtpoiCTBO CneIyN0Tpe6aIra3ana3eTe.
OTHOcHO eIeKtpnueckHTe pa3pRAn npn HOBn 6aTePN H.
TbH KATO BbTpewHnrt XMMNueckn CbCTab Ha HOBNTe 6aTePN HIN 6aTePN, KOHTO He Ca 6NII NOJ3BaHN Dblr BOpeMe, He e AKTNBnpaH, ENEKTPnueeCKnRT pa3prd MOHe Da e HNCbK PnP NpBPa N BTopa yIOTpe6a. ToBa e BpeMeHHo RBlHeHne HOpMaJIHOTO BpeMe 3a 3apeJdahe ue 6bDe Bb3ctaHOBeHo, KaTO npE3apeDnte 6aTePNtte 2-3 nbTH.
HaJa yIbJIHHte pa6oTaTa Ha 6aTePNHe.
(1)Ipe3apeHdaTe 6aTePnnte, npEn Da ce n3TooJr HAnbIHO. Korato yceTne, ye MoUHocTTa Ha ypeDa HamaJIyBa, cnpeTe ynoTpe6a u 3apeDeTe 6aTePnTa. Ako npOdbJIHKnte pa60Ta c ypeDa u n3xa6nte eEKeTpueeCHn TOK, 6aTePnTa MOHe da Ce NOBpeDi N KHBOTbT N ue 6bDe no-KpaTbK.
(2) 3apejBaTe npesapejHahe npnBncoHn Te mnepeaTyprn. 3apejDaemata 6atepna 6bDe ropeua Behdara cIe ynoTpe6a Ako B TOBA cbCToHnne 6atepnaTa ce npe3apeiBedhara cIeD ynoTpe6a, BbTpewHnrt H xIMnueChn CbCTaB ige Ce BLOuH N KINBOTbT Ha 6atepna Ta ige ce cKbcN. OctabeTe 6atepna Ta n Ja 3apeTe, cIe D KaTo e h3ctnHana 3a H3BeCTHO BpeMe.
BHIMAHNE
O Ako 6aTeepnraTa ce 3apeJda B 3aRpTo CbCToHne CNeI npOdbJHKnteJIHO n3JaRaHe Ha npKa CbHueBa CBETnHa Hn CNeI HeNocpeCTBeHo N3NoJ3BaHe, CBETOHNKAtOpBt 3a 3apJn Ha 3apJnHOyctpoICTBO CBETBa 3a 0,3 ceKyHn n n3racBa 3a 0,3 ceKyHn (n3KnUoyen 3a 0,3 ceKyHn).B TaKbB clyu, nbpBO OCTaBeTe 6aTeepnraTa da ce oxlaDu n CNeI TOBA 3anOuyHeTe 3apeJdaHeto.
O Korato CBETOHINHKAToPbT 3a 3apn Mna (Ha INHTepBaHn OT 0,2 cekyHn), npOBepTe 3a yJkN TeNa B KOHEKTopa 3a 6aTePN Ha 3apnHOTo yCTPOICTBO n rN OTcTaPahete. Ako HMa YJKn TEJa, BEpOHTHO 6aTePNrTa Hn 3apnHOTo yCTPOICTBO ca NOBpeHn. 3aHeCte rN B OTOPIHn cepBnEh ueHTbp.
O TbH KaTO ca Heo6xODHMn OKoI0 3 cekHyHnHa BRpaDeHn MInKpOKOMNtBp, 3a Da NOTBbPdN, Ye 6aTepeHnTa, 3apeKDaHata CUC18YSL3 e n3BaDeHa, n3yakaiTe NOHe 3 cekHyHn IpEeN da JnoCTaBnTe OTHOBn Da npOdbJHKnTe 3apeKdaHeto. Ako 6aTeepnTa 6bDe NoCTaBeHa IpEeN da MNHat 3 cekHyHn, MoKe Da He 6bDe 3apeDeHa npabuHIO.
MOHTAK (CMRAHA) HA BEPNFATA
IPEDyIPEXDEHNE
O 3a da npedeTbpaTne HnUdEHTN, BnHa n3KIOuBaIte ypeDa n 3BaKaJaTe 6aTePnTa.
He n3noJ3BaIte dpyrn Bepnrn nn BOeun uHNOCBeH nocOueHnTe B.CNEUΦNHAUN".
BHIMAHNE
HocTe pKaBnU n BnMaBaIte da He ce HapaHnte ot BepnraTa.
3ABeJIeHHKA
O Korato cBaJIte Bepurata, noUHCTe Te IbpeChn npax OT MacHeHaTa IIO3a, MacHeHn OTBOp N KaHala Ha BODeuata WnHa. HatpynBaHTo Ha DbpeCen npax MoKe Da nobpeynypeda.
Былгарский
O H3noJ3BaIte npaBnIHnTn BepnA B CbOTBeTCTBne Cbc CneuKauNTe.
Ako mOnTnpaTe nOrpeWeH Tn BOeUa UHa, BeprTaMoKe Da ce N3BaN I Da npuHn HapaHbAhe.
1. CbajHe Ha cTpaHnHnHa nak (Φnr. 6)
① 3aBbptTeΦnKcaTopa BeHbH, 3a Da ro pa3XJIa6Nte.
② 3aBbptTe o6TgAunn npbCTeH C NOIOBN H O6oPOT, 3a da ro pa3xna6nte.
③ C npedocTaBeHn WecToPamEn KInou pa3xna6eTe 6oT Ta DOKpaJ Do OTCbCTBne Ha CbnpOTNBleHne.
④ 3aBbptTeΦHKcaTopa N MaxHeTe CtpaHnHnKa nA
2.ДemonHTnpaHeHaBepnraTaNBODeuataWHa(ФИr.7)
I3BaTe Bepurata I BOeuaTa 1nHa B nocokata, yKa3aHa CbC CTpeJIkaT.
- MoHTnpaHe Ha HOBaTa Bepnra Bbpxy BepHHoTo 3b6Ho KOJIeNo (Φnr.8,9)
MOHTnpaTe BeprataHa BbpxHa 申HaT, KaTO BHIMBaTe 3a Nocokata Ha Beprata, n CJIeT TOBa J MOHTnpaTe Bbpxy BepnKHO T6HO KOJIeI.
4. NocTabaHHe Ha npedHnKaIak
① Hanachete 60Tata OTbopa 3a 60Tta (Фиг.10)
② HarlaCeTe 06TgAun npbCTeH, pa3nOJKeH Bbpx Cy TaPAnuHN H KanaK, TaKa Ye UuΦTbT Ha O6TeraHa Da BJe3e B OTBopa 3a OBTeRa, pa3nOJKeH Ha BODeUaTa WnHa, N MOHTnpaIe CTpaHUnH N KaN. (Фиr.11)
③ 3aBbptTeΦHcTaTopa BeHbK, 3a Da ce 3actonopn BpemeHHo. (ФИr.12)
5. PerynnpaHe Ha onbHa Ha Bepurata (Phr. 13)
O NobdHnHeTe Bbpxa Ha BOeuaTa 3nHa n 3aBbptete OStraun npbcTeH, 3a da perylnpaTe onbHa Ha Bepnrata.
O 3aBbptete o6Tgauin npbCTeH HAnrCHO, 3a Da yBeIuHTe OINbHa Ha BepnraTa, Hn HAlrBO, 3a da ro HAmaiHTE.
6. IpoBepHa Ha onbHa Ha BepHraTa (ΦnR. 14)
PerynnpaTe onbHa Ha Bepnata, TaKa Ye pa3cToHHeTO MeKdy BOeUTo 3BeHo N uHHaTa Da 6bDe oT 0,5 do 1 MM, KOrato IeHO NOBnIraTe Bepnata npN6JIn3nTEJIHO nO cpeDaTa Ha uHHaTa.
7. 3actonopbahe Ha hncatopa (Hnr.15)
① CnEi KaTo npKIOUHTe peryInpaHeto, NOBnHETe HnHaTa n 3aTeHETe DOkpaNkCaTopa.
② YbepTeCe, Ye 6oJIbT e 3aTeHaTdoKpa.
PNEyPENKDEHNE
CleI KaTo peryIinaPe OIbHa Ha BepnraTa, ce yBepTe, Ye fHKCaTopbTe 3aTeHrTaDOKpaI.
Ako e pa3xa6eH, HMa onaCHOCT OT HapaHraBaHe.
ПОВЕРHA И NOДГOTOBHA ПЕДИУNOTPEБА
Ppeyn ynoTpe6a HnpaBete cIeHaTa npOBepKa nNoDROTBka.
PPEyynPEXDAEHNE
O 3a Da npedotBpaTne HnHnDeHTn, BnHaN n3bJIHraBaIe CTbIKN OT 1 do 4 npn I3BaJeHa 6aTePn.
He hncpaTe OTHIOUbaun 6yToH B HATnCHaTO CbCTOHNHE.
Ako cnycbkbT ce 3aednCTBa cnyauHo, ypeDbT MoKe Da ce BHLIOH N da npuHn HapaHaBaHe.
1. Поверпа за Изкlioуен сисьн
Ako nocTaBnTe 6atepnaT, 6e3 da 3haete daNn CnycbkBT e 3aedcTBaH, ypeDbT MOKe da Ce BKnOuH HeoayKaBaHO n Da pniunHn HnndeHT.
O Korato HaTnchete CnycbKa npHaTnCHa TOnHIOUcbu 6yToH, ypeBbT ce BKNIOUba, a KOraTo OTnycHeTe cnycbKa, ypeBbT ce N3KIOUba.
2. Поберka Ha onbHa Ha Bepurata
O Ako ONbHbT Ha Bepurata He e ONTMaJIeH, HMa pNCH OT NOBpeHa Ha Bepurata NIN BOJeUaTa WInHa. BnKTe CTbHNOT 5 Do 7 B, MoHTaH (CMHa) Ha Bepurata"3a NOCTHraHe Ha ONTMaJIeH ONtBH.
HOBNTe BepnCa Oco6eHo eJactuHn, 3aTOBa Tpr6Ba Da ce npOBepRaT peoBHO n da ce npaBt HyHNTe KopeKun.
Cbto taka ce yBepTe, ye fHKcatOpbTe haedHNO 3aTeHaT.
(BnKTe ,PnpuHn HauHH 3a npedotbpaTbaHe Ha o6paTeH yap".)
Korato 3aDeyCTBaTe BepnHHaTa CnpaHa, HATNCKaKN CnpaHnJIOCT HAnpei, BepnRaTa Cnpa Da ce DBNKn.
Ako dpbHHeTe cnpaHnJIOCT KbM ce6e cn, cnpaKaTa ce ocbo6oKdaba.
Korato npoBepBaTe pa60TaHa BePnKHaTa cnnpaKa, 3aDbJNKeIHo n3HIOUeTe ypeDa, n3BaTe Te batepnaTa, 3aDeiCTBaIte CnpauHHra loCT n dpbHHe BepnRaTa c pbKa.
AkoBepnraTa He NompbDba,TOBa O3Haayaba,Ye BepnKaHaTa cnnpaKa e 3aDenCTBaHa.
3ABEJIEXHA
BnHaHn HocTe De6eHn pKaBnU 3a Ta3n 3aDaay.
OcptneTo Ha Bepnata e MHoro OCTpo H CnHOTo My DbPnaHe MoKe Da HapaHn PpCTNTe BN.
4. Поберва на Бернното MacNo
O YpeBc Ce DoCTaB 6e3 3apeDeHO BepHHo MaCNo. PpeN yIOTpe6a HAnbHHeMaCJIeHnpe3epBoap C OcnIpyehoTo BepHHo MaCNo. (ФИr.17)
O No Bpeme Ha pa6ota nepnoDnHNo npOBepraBte npo3OpqTe 3a MacIto N DoJIbAHTe NO Heo6xOdMocT.
O Korato Hatachete KIOUa 3a lamnata, pa3noJHOeH Ha HndkaTopnna NaHeI, ce BkIOuBa LED lamna, KOrTo IIOO6pRABa BNIMOCCTTa. (Phr.18) (PpoBepTe TOBa B CTbnKa 6.)
O Horato OcnHpyeHTo BepnHc MacNo Cbbpwn, n3noJ3BaIte BepnHc MacNo HiKOKI (npoJaBa ce OTdeJIHO) JIN EKBnBaJeTHO BepnHc MacNo.
Cma3BaHeTO C BepnHHO MacNo CTaBA aBTOMaTHNO. ChopocTtHa NoJaBaHe Ha MaCIO 3a aBTOMaTHHO Cma3BaHe e a6pnuHo HAcTpOeHa Ha MaKcMaJHa CTenEh.
3a Da HamaJIne CCHOpocTTa Ha NOdaBaHe, 3aBbPteTepeRyIaTopa Ha MacIeHaTa NOMna, pa3nOIOKeH OT3aHa TAnTo, No YacOBHnKOBaTa CTpeNka. (ФИr.19)
3ABEJIEXHA
KanaHTeTbHa MacJeHnpe3epBoap eOHO 80 ml. Pn npEnbIbAHe n3JIuHOTo MacNo Ue n3Jle3e npes npelNBnka.
IpnopbVbme da ce 3anacnte C BepnHIO MacNo. AHO npoDbJHHTe da pa6oTne 6e3 BepnHIO MacNo, BepnRaTa MOKe da npepee HIn DBNrAteJIrT da ce NobpeNi.
He donyckaIte nonaDahe Ha npax nIu pyrN yHKn TeJa B MacLeHnpe3epBoap. AkoB MaCleHnpe3epBoap nonaHaT npax N dpyrN yHKnTeJa,ypebT MoKe Da Ce nobpeDi.
O OctaBeHTo B pe3epBoapa BepnH0 MacNo MoKe Da npotee nopadN KOHCTpyKuYra Ha ypea. ToBa He e npn3HaK 3a NOBpeA, HO MRCTO, KbDeTo CbxpaHbATE ypeA, MOKe Da ce H3cana, 3aTOBa 6bTeTE BHMaTeJIH.
Horato npn6npaTe ypeDa, n3npa3HeTe MacJeHna pe3epBoap u cNoKeTe noD ypeDa napcaI, KOITo Da InoEme eBENTyaJIHn TeOBe.
5. NocTaBHe Ha 6aTepeHra (Φn.r.4)
HaKTo e noka3aHo Ha Hr. 4, HATnCHTe 6aTePnTa CnIHo, Taka Ye Da 3aUpaKHe Ha MRCTO.
BHIMMAHNE
BatepraTpa6Ba da Bile3e nIbTHO.
Ako He nocTaBnTe 6aTePnraTApaBnHIO, Tm MoKe da ce N3BaDu I da NoCneDba HapaHraBaHe.
He fHKcnpaTe OTKJIIOUbaunB 6yTOH B HATNCHaTO CbCTOHHue.
Ako CnycbKbCT ce 3aedcTba CnyauHNO, ypeDbT MOHe da Ce BkIOUH N da npuHn HapaHBAhe.
YnOTope6a Ha Kykata
N3BaTe KyKaTa OT ypea - 3a Hea MoKe Da ce 3aKaHbHe N Dp. 3a OKaUBaHe Ha ypea. (Фиr. 23)
PDEyPExKDeHNE
Horato n3no3BaTe KyKaTa, ce norpnKeTe ypeBt da 6bJe HaeJdHO Okaeh, 3a Da He NaHe.
AkoypeBt naHe, e Bb3MOxHnHcndeHT.
Инднатор 3A HNBOTO HA BATEPURA
MoKeTe Da npOBepHe octaBaunKaNaUHT Ha 6aTePnTa KaTO HATNCHe TpeBKLIOuBaTeJHa HnDnKaTopa 3a HNBOTo Ha 6aTePnTa, 3a Da CBETHe HNDnKaTOpHata lamna. (ΦIr.22, Ta6JInuca 3)
HnDnKaTOpBtIe Ce n3KIOUcN CneO kOJIO 3 cKeYnCneJ KaTO ppeBKnIOyBaTeJIa H a HnDnKaTopa 3a OCTaBaunr 3apRd ObDe HaNTCHaT.
Ha-Do6pe e da n3no3BaTe HnDnKaTopa 3a HNBOTo Ha 6aTepeTa 3a cnpaBka, Tb' KaTO hMa MaJka pa3JInKa, KaTO HanPmep OKoJIHata TempepaTypa n CbCTOaHneTo Ha 6aTepeTa.
OcbEN TOBa HNdkaTopbT 3a HNBOTO Ha 6aTePnraTa MoKe Da ce pa3JIuYaba OT Te3N, KOnto Ca B KOMJIeKT C INHCTpyMeHT NIN 3apJHO yCTpOietBO.
Ta6nua 3
DolnBaIteMacNoCBOEbpemHNO,3aDaHeCECBpwn.
1. 06u npoceypn 3a p3ahe
(1) BkIIOUeTe 3axpaHbAHeto, DbPKeHN TpnoHa JeHO HAcTpaHa OT dPbBOTO 3a P3aHe. 3aOnuHete pr3aHTo YAK CNeI KaTO ypeBbT DOCTnHRe IbJIHa cOpocT.
(2) Horato peke Te TbHKo napye IbPBO, ONpeTe OCHObaTa Ha WnHaT B DpBOTO n peKeTe B NOCKa HADJy, KaKTo e NOKa3aHO Ha 24.
(3) Korato pekeTe De6eNo napue DbPBO, onpeTe B Hrero rpe6eHa, pa3noIooKeH OTnpEi Ha ypeDa, n peKeTe Ha loCTOB npHcHn, n3noI3BaHn rpe6eHa KaTo ONOPHa TOUka Ha 3aBbptAHe, KaT0 e noka3aHO Ha r.25.
(4) Korato peke Te xopn30HTaJIHO, o6bpeTe ypeHa HADACHO, Taka Ye uHATA Da e OTDOJy, IN dpbXTE rOpHaTa YAcT Ha npeHaTa pbKoXBaTHa C IABaTa CN PbKa. DpXTE uHATA XOpN3OHTaJIHO N OnpTe rpe6eHa (pa3noIooHe OTnped Ha ypeHa) B MATEpHaJa. 3nON3BaIte rpe6eHa KaTO onOPHa TOka Ha 3aBbPtaHe n peKeTe dpbBOTo, 3aBbPTaIKN 3aHtA pKoXBaTKa HADACHO. (Φnr.26)
(5)Horato pejheTe IbpbO OToIy, onpeTe Jeko rOpHaTa. 1act Ha uHaTbBpBOTo. (27)
(6)Преди pa6oTa ce 3an03HaIte noDpo6Ho c HNCTpyKcHnTe n IpemHHeTe pAaTnuecko ObyeHne nIIN IOHe ce ynpaXHbAte C pR3aHe Ha Tpynn Bbpxy Marape.
(7) Korato pehete Tpynn nHn DbpbBHeMaTeepnaH, KOHTo HmAt onopa, oCnHypeTe NOxOJaHa onopa, KaTo r3aKpenTe HeNoDBeHHHO Bbpxy Marape nHn no dpyr NaHH.
BHIMAHNE
O Horato peKeTe DbPBo OTdony, HMa onaChoc tyeBt Da OTCHOu KbM Bac, aHO Bepurata ydapn CnHNO DbPBOTo.
He peKhe Te DOKpaI bPBoTo, 3anoYbaHKn OTdOly, TbN KaTO HMa ONaCHOCT WHaTa Da OTXBpBkHe Harope 6e3KoHTpoHIO, KOrATo 3aBbPsInTe pR3aHeTo.
He donyckaTe BkIIOyeHa Bepira Da BJe3e B KOHTaKT CbC 3emrTa Nn C TeJeHa Orpda.
2. P83aHe Ha HIOHn
(1) PǎzáHe Na KIIOHn O T IpaB o D bPBO:
Ie6eJIte KIOHNI PbBOHaJauHc ce peKaT OT ToUHa, KOaTo e Ha pa3CToRHe Oe CTBoJa Ha dPBoTO.
IbpbO OTepeKeTe OKoIo eHa TpeTa OTdoNy, a CneTOBa OTepeKeTe HantbInHO KIOHa OTrope. HAppaOTpeKeTe OCTaHaNaTa Yact OT KIOHa, HapaBHO CbCTBOJa Ha IbpbTO. (Phi r. 28)
BHIMAHNE
BnHaHc ce na3eTe ot nadaun KIOHN.
BnHaHn 6bTe HaapeK 3a OTKaT Ha Bepurata.
(2)РЯразнон OT OTceундрета:
IbPBO OTpeKeTe KIOHnTe, KOtO He DoNnpaT 3emrTa, a CneToBa OTpeKeTe Te3n, KOtO JaOnnpaT. Korato peKeTe De6eJI N KIOHn, KOtO DoNnpaT 3emrTa, IbPBO OTpeKeTe NOIOBnHaTa OTrope, CneT ToBa CEJINa KIOH OTdOly. (Φnr.29)
BHIMAHNE
O Korato peKeTe KIOH, KOHTO DoNIPA T3eMaTa, BHIMaBaIte WHaTa Da He Ce 3aKJIHH OT HaTnCKa.
B nocleHnnaeTnHa p3aHeTo BHMmaBaiTe Tpynt Ha DbpbTO Da He Ce N3TpkoJIN Bhe3aIHO.
3. PǎzáHe Ha Tpynn
Korato pekeTe Tpynn, pa3noJooKeHn no HauHna, nokaahn Ha 30, npBPO cpeKeTe OKoNo eHa TpeTa OTdOly, cneT OBa OTpeKeTe DOKpAoi OTrope. Korato peKeTe Tpyn, KOHTO e npocTprn HAD BdNb6HaTHHa, KaKTo e NOKa3aHO Ha 31, npBPO cpeKeTe OKoNo DBe TpeTN OTrope, cIeT ToBa peKeTe HArope ot DOJIHaTcTpaHa.
BHIMAHNE
BHHMaBaIte WHaTa Da He Ce 3aKJIINH B DbPBOTo OT HATnCKa.
O Korato pa6OTHe Ha HAKIOH, BUNHn 3actaBATE O T rohpata cTpaha Ha Tpyntte. Ako 3actaHete OTdoHaTa cTpaha, OTP3aHtTe Tpynn MoKe da Ce n3TbPKaJIaT KbM Bac.
4.ПовалянеHaДьрВета
(1)3aceK(HaΦnR.32):
Harpabete 3aceka OT ctpaHaTa, B KOrTo Nocoka. nCKate Da NaDHe DbPBOTO.
Дьбоинота Ha 3aceKa Tpr6Ba Da 6bJe 1/3 ot
Дnametbpa Ha 7pbBTo. Hnkora He NOBaIaIte
ДрВета, 6e3 da CTe HanpaBnI NpOxOJa 3aceK.
(2) 3aJen cpe3 (2HaΦn.r.32):
Ha npabete 3aen Cpe3 OKoI0 5cm HaD xOpn3OHTaIIHn3aceK uCnpopeHn H Hero.
AkoBepnraTaCe3aKlnHnNo BpeMeHa p3aHeTo, Cnpete TpnoHa N3nOJ3BaIte KInHOBe, 3a Da Ra OCBO6OJTHe. He peKeTe npe3 DpbTO.
BHIMAHNE
O NobaJHeTo Ha IbPBeTa TpI6Ba Da CTaBa No HaUH, KOITo He Cb3DaBa OnaCHOCT 3a Xopa, Bb3dUHn npOBOnHn Hn HaHaCraHe Ha MaTePnaJIHN UeTn.
O 3aIbJIHnTeJIHO cToIe OT rOpHaTa CtpaHa npi HauKIOHe Tepen, Tb Kato DbpBOTo BepoTHO ue Ce N3TbPkAJIa CneI NOBaJIaHETo My.
Ppepa3Hmepn npn pa3aHe
Maanza6Hn onepaunn nn HnpeKbchata pa6oTa
3a da ce npednana n DnraTeJrT n eIeKtpoHkata Bypeda, aHO Toi 6bJe H3IOKeH Ha BnCOKa TeMpepaTypa, LED lamnata uie CnHaun3npa c MmraHe.
Ako peKeTe Nn HaTnCKaTe CnHn Onn 6e3 npeKbcBaHe, ce neNoLyuBnCOHOHaTObApBaHe, DnRaTeJIrT n eEeKTPOHHaTa ue npperpert n LED lamnata ue 3anoue He da Mna.
3A6EJIEXHKA
AkoLED lamnata Mira, cnpete pa6oTa n octaBeTe ypeDa da ce oxlaNIOCTaTbHNo. Ako npOdbJHKHTe pa6oTa, ypeBt MOHe da ce nobpeHn.
O Ocben ToBa, aKo pa60Tne 6e3 npeKbCbaHe, KOraTo CMeHrTe 6aTePnTa, ocTabete ypeDa da ce OxJaNi NOHe 3a 15 MNHyTN.
Cbio TaKa, aKo CneIc cnipaHe n IOBTOpHO BkHIOUbaHe Ha ypea LED lamnata npOdbNkaBa Da Mura, TOBa O3HaYabe, ye ypeBbT He ce e oxlaDn DOCTaTbHIO Tp6Ba da 34aHaKeTe OSe, ppei Da rO BkHIOuHrTe.
3axBaT/HaTnCH BbPxy BepnHHn TpnoH
BnHaHn DpBkTe BepnKHHN TpnoH 3dpaBO.
OcBeH TOBa He npInaraiTe No- roJAM OT Heo6xOuIMnHaTnCK. DOnbInHtEnHaTa Cnla, npInarara Hbpxy BepNHHn TpnoH NO BpeMe Ha p3aHe, HMa Da yBeIINn cKOpocTtHa p3aHe. ToBa ige npTeOBapn DBnraTeJI, ige BLOIN eΦeKTNBHOCTTa n ige npInHHIOBpeDa Ha DBnraTeJI INI INHAta.
I3noJIbAaTe ypeDa, KOrato Bepnata pa60tn cymepeHa ckopocT.
No-KoHKeTHO, KOrato Bepurata cnpe (3aceye) npaI npekomepeH HaTnCK, MoKe da npedn3BnKa HapahBaHe nnIOBpeDa Ha ypeDa.
BepnroyIOBHTeI
O BepiroyIOBHTeJIeT e pa3nIOJKeH Ha OCHOBHOT TIO TOHNO IOD BepURA, KaTO fYHKUraMy e Da npednaOn OepaTopaJa He 6bJe ydapeH OT cKbCaHa Bepira.
O Horato Bepurata ce ckbca, Cmehete a C HOBa cb6pa3Ho INcTpykunnte B ,MoHTaK (cmHa) Ha Bepurata.
3ATOUBAHE HA BEPHATA
IPEdynPEXHEHNE
3a Da n36eHHeTe HnCnDEHTN, BnHaRn N3KlOuBaYTe ypeDa n 3BaKaJaTe 6aTePnraTAt OTOCHOBHOTo TAnIO.
OcBeH TOBa, KOraTo n3nol3BaTe BepuKHN TpnoHn, BuHaH Nocete De6eJn pKaBn.
3ABEJIEXKA
3aToyete BepnraTaNperynpaTe OpranuHTeHa HnOdaBaHTo, KOITcpe NaDa B cHTbPa Ha WnHaTa, KOraTO TRe MOHTnpaHa KbM OCHOBHOTO TJIIO.
Korato Bepurata Ce 3aTbnn, DnBraTeJIaT N BCraKa YacCT OT TJILOTO CE HATOBaPBat N eΦNkAcHOCCTTa HamaJIaBa.
OnTImaHaTa paOta Ha ypeDa n3nCBA YecTa noDpBHKa Ha BepiRaTa 3a noDlbPkaHe Ha OCTpoTaI.
1. 3aToUbaHe Ha octPneTata
Kpbrlata nla Tp6ba Da 6bde DbpKaHa CpeuCy BepnHHTO OCTPne NO TaKbB HaunH,Ye edHa neTa OT HeHHa DNAmetbp Da N3JIN3a HaN Bbpxa Ha OCTPneTO, KaTc e NOKa3aHO Ha Phr. 33.3aToyete OCTPneTaTA, DpbKeHN KpbIATA Nla NoD bfl ot 30^ cnpyMO WnHata, KaTc e NOKa3aHO Ha Phr. 34, I aDpBHTe npaba, KaTc e NOKa3aHO Ha Phr. 35.3aToyBaNTe BCNUOCTPneTa NoD edH NcbUn, B IpOTnBEH clyuae efHKacCHOCTTa Ha p3aHe ue ce HapuHn.
PpabnHnte bTn 3a 3aTOUbaHe Ha oCTpneTaTa ca noka3aHn Ha Pnr. 36. (KpbIATA nnla ce npodaBa OTdJIHo.)
2. Perynpahe Ha cTbNkata Ha noDaBaHe INPEyINPEXHEHNE
He 7aepnTe ropnata 3act Ha 6yepnTe CBbp3Baun 3BeHa n 6yepnTe BOeun 3BeHa n He DonyckaNte DeOpMnpaHe Na Te3n Yactn.
O Ipn orpaHnHTeJIHe Ha noDaBaHeTo Tp6BaJa ce Cna3BaYcTaHOBeHIne pa3Mepn HOpMn, TbN KaTO B npOTHBEN ClyuMa MoKe Da Hapache OnaCHOCTTa OT ObpaTeH ydAp n HapaHraBaHe.
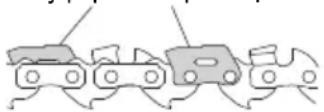
ByΦepHo CbP3BaIo 3BeHo
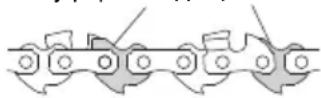
Byepno BOeio 3BeHO
OrpaHnHTeJIte Ha nOdaBaHeTo Tp86Ba Da 6bDaT NOpeDeHn eHaKBO, TbN KaTO Te OnpedeJrT KOIO MaTePnaI Da ce NoEme OT rOpHn p6 Ha 3b6a npn PRA3aHe.
Korato 3aToyBaTe Bepurata, 3aDbJHHTeJHO npOBepraBaTe OpaHHTeJIte Ha nOdaBaHeTo Ha BCEKN DBA-TPn PbTN.
CLOxHeTe 3a orpaHnHTeIN Bbpxy Bepurata, OCTabeTe orpaHnHTeJ Da ce BNkDa B KaHaJa N3nnIeTe NodaBaJAta Ce ot 3a opaHnHTa C nlocka nnla. (38) (38)
Cne KaTo 3aHInTe orpaHnHTeJIa 3aKpbIteTe npedHaTa My Yact Do npeHnHOTo CbCTOHRHe. (Фг.39)
Cle3aTOUBaHETo CIOKHe TepBepnraTa BbB BepnHO MacNo, 3a Da OTMNETe CTpyHKHTe.
Ako He OTMnTe CTpyKHTe, BepnraTa N IINHata 6bp30 ue ce n3HOcrt.
3A USB YCTPOICTBO
O 3apeHdahe Ha USB yCTpoiCTBO oTeIeKtpueckn H3TOUHN. (Φnr. 48-a)
O 3apeHdahe Ha USB yCTpoiCTBO n 6aTeprn oT eJIeKtpuYeCKn H3ToUHnK. (Φnr.48-b)
O KaK ce npe3apeHda USB yctpoiCTBO. (Φnr. 49)
O Pn3aBbPwBaHe Ha 3apeKdaHe Ha USB yctpoiCTBO. (Фиr.50)
IODAPbXHKA IN IPOBEPHA
Cne pa6oTa npOBepTe BcRA qact n N3BbPwTe CbOTBeTHnTe DeIcTBnA NO NODpBxHnA TnpEi np6bpAHe Ha ypea.
PNEyNPEXDEHNE
IIO BpeMe Ha npOBepHnTe n paOToTne NO noDnPbHKaTa BnHaRn N3KNIOuBaHTe UpeDa N 3BaKJaTe 6aTepeNrTa OT OCHOBHOTo TJILO. OCBEN TOBa N3KNIOuBaHTe 3apAnHOTo yCTpOnCTBO OT KOHTaTa.
1. Поверка на Всрг范围内
O IepnoDnHNO npOBepBaIte Beprata.B cnyaHa aHOMaJIIN CMeHTe BepraTa C HOBa CbO6pa3HO HNCTpyKUnTE B,MOHTaJc (CMraHa) Ha Beprata".
O PpOBepeTe onbHa Ha BepnraTa n ce yBepTe, ye e npabHIO o6TerHaT.
Cnpete da n3noJ3BaTe ypeda, KOrato Bepurata ce 3aTbnn, I a 3aTOeTe Cbo6pa3Ho INHCTpyKunnte B "3aToHaHe Ha Bepurata".
CneIynoTpe6a BHNMaTeIHO CmaKeTe BepnRaTa HocelaaTa IINHa CpeuO6pa3yBaHe Ha pbJka.
Български
BHIMAHNE
Horato pa60ntte no Bepurata, HocTe pBkabu, 3a da n36BerHeTe HapaHbAhe.
2. NocnCTBaHe Ha CtpaHnUHnHa KaHn HAmepaTa Ha cnnpaHata JeHTa (ΦnR. 40, 41)
NoCTe ⅢaTeJIHO DbPBeCHnI npax OT YactHr.
3ABEJIEXKA
Horato nochctBaTe cTpaHnHnKaHa, KaMepaTa Ha cnnpaHATAJeHTa, MacJIeHATAIO3aN WInHaTa, BnKTe npouedypataB MoHTaK (cMaHa) Ha Bepurata" n CBaIeTe Bepurata.
3.ПоинсТВанeHaMaCJIeHaTaNIO3a(ФИr.42)
IpeNi noUcTbaHe Ha MacJeHaTa IIO3a DeMOHTnpaTe CTpaHnHnKaNaK N uHaTa.
4. NocntBaHe Ha Boeataa HnHa (Hr. 9, 43)
Horato KaHaJIbT Ha WInHaTa NIN MacIeHaTa IIO3a Ce 3AmbpcrT C nbpBeceH npax N noD06H, OmacJIraBaHeTo MOKe Da 6bDe Bb3PpenTCTBaHO N ypeDbT MoKe Da ce NOBpeHi.
CneI ynoTpe6a n npn CMraHa Ha BepnraTa H3BaHdaJTe 1uHaTa I NOChCTBaHrTe DbPBeCHnI npax OT KaHaJa. (BnKTe ,MoHTaX (CMHa) Ha Bepnrata"
6. CmraHa Ha KapboHOBn YeTHN
N3BaTeKap6oHOBaTaYETKa,KaTO NpBPOOTcPaHITe KanaTeToNCIeTobaNODXBaHETeYETKaTcNIOCKa OTBePTKaININDPyTRNHCTpyMeHT,KaKTO e NOKa3aHOHaΦnR.45.
Korato cnaata KapboHObata yeTka, n36epete NocOKaTa Taka, ye KOHTaKTHaTa I npyKnHa (BnKTe r.46) da CbBnaDhe C KOHTaKTHaTa NOBbpxHocT Ha rHe3dOTo 3a YeTKaTa.CJeI TOBa J HAtncHe T c npbct, 3a Da Bkapate B rHe3dOTo, KaKTo e NOKa3aHo Ha r.47.Hakpa, MOHTnpaTe o6paTHo KanaqKaTa Ha yeTKata.
BHIMAHNE
O YbepeTe ce, Ye cTe NOCTaBnI IN KOHTaKTHaT a npyHnHa Ha Kap6oHObata YeTHa B KOHTaKTHaT a qACT Ha rHe3dTo 3a YeTKaT a.(MoKeTe Da n3NoJ3BaTe KOrTO n da e OT OCNrpyeHNTE DBe KOHTaKTHN pnyHHN).
OБдerte BHIMATEJIHn,TbI KaTO rpeUHO NOCTABRHe MOKe Da DOBeTe Do DeΦOpMauHa HA KOHTaKTHaTa npyJINHa Ha Kap6oHOBaTa YETKa N IpexKDeBpEmHH npo6JIeMn C DBIrataJI.
7. Поберва мотаяхнite вHTOBe
PeIOBHO HNCNEKTHaPae BCNUKN FHKcnpaUN BnHTOBe n ce yBpeTe, ye ca Do6pe 3aTeHnat. Ako yCTaHOBNTe pa3Xla6EH BnHT, He3a6abHOr 3aTeHHe. B IpOTNBEN cIyua Ce Cb3daba PnCK OT cepNo3HN 3IIOJOLyKn.
8. NpdpbKaHa MoTopa
HaBnraTeIca"Cbpeto Ha eNktpuecknIHCTpymEnT.
YnpaHnBaIte OcObeHO BnMaHne KbM HAMOTKe, TbKATO MORAT Da CE NOBpeJr OT NOnaJaHe Ha BlaRa I/INMaCIO NO T'AX.
MoIy, BnHaHn 3nOJ3BaIte HaIITe OpiHnHaJIHn 6aTePnn. He rapaHTnpame 6e3oNacHocTt a pa6oTaTa Ha ypeDa, KOrato Ce n3nOJ3Bat 6aTePnn, pa3nUHNOT NOCOeHNTe OT HAc, INI KOrato Ca npaBeHn npOMEHN NO 6aTePnTE (KATO pa3rIIO6BaHe n IOmHa Ha KJIeTKHTE INI dpyuBbTpEHHN KOMNOHEHTN).
TAPAHUN
Ipeoctabme rapaunna 3a EeKtpnueckn Hhctpymentn HiKOKI cbrlacho CneuqHnTe MeCTeHN 3aHOdaTeJICTBa Ha cBoTBETHnte DbpKaBn. HactouaTa rapaunna He nokpNaBa DeFeKTn NIN NOBpeDn, npuHHeHn OT He npaBnIHO NIN HeOpEHHO N3NOJ3BaHe, KaKTo n DbJkaun Ce Ha o6nuHaN O3HOCBaHe Ha KOMNoHEHTte. B CnyauHa peKlamaun, MoJn, N3npaTeE EeKtpnuecknT INcTpyment, B Hepa3rlo6eH BnD, C TAPAHUOHATA KAPTA, npoOBOJCTBeHa B KpaH Na HhCTpyKUnTe, Ha OToPn3npaH cepBn3eH ueHTbp Ha HiKOKI.
Hhopmaa3a wmoBO 3ambpcBaHe n Bn6paun
I3MepeHnTe CToHOCTH OTOBAPr Ha I3NCHBaHnTa Ha EN60745 n CbOTBeTCTBaT Ha ISO 4871.
IImpeHObA-npTeTJIeHO UyMoBO HnBO: 100 dB (A)
H3mepeHo HnBO Ha A-tpeTeJIeHO 3ByKOBO HaJIraHe: 87 dB (A)
HeToHocK:3dB(A).
HocTe aHTnfoHN.
O6u n cToHocTn Ha Bn6paunn (BeKTopHa cyMa) onpeJeIeHN CbIaNo EN60745.
a_h = 4,7 M/ceK.2
HeToUHOCT K =1,5 M/ceK.2
EknapnapHnte 06u n CTOHOCHT Ha Bn6paunn ca H3MpeHn CbflaCHO cTaHdapTHNTe MeToHn Ha N3NITBaHe H MOrat Da 6bDat N3NOJ3BaHn 3a CpabHeHne MeKdy pa3JIHnHTe INCHTpymeHTn.
OcbEN TOBa CTOnHOCTnTe MORaT Da ce H3NoI3BaT 3a npedBapuTeJIHa OueHka.
PPEyPPEXDEHNE
O Bn6paunnte no BpeMe Ha DeIcTBnteHa ynoTppeBa HA HnCTpyMeHTa MORaT Da ce pa3InuBaT OT DeKJIapnpaHnTe OoN CTOnHOCTn B 3aBNCMOCT OT HaUNHa Ha N3IOJ3BaHe Ha HnCTpyMeHTa.
O Mepnnte 3a 6e3oNaChocHa onepaTopa Tp8bda da ce 6a3npaT Ha OceHHa Bb3deiCTBneTO B peaHn ycIOBna (KaTO Ce B3eMe IpeDbNd CEJIINr pa60Te HIKbI - BpeMeTo, Ipe3 KOeTO ypeDbT e HATOBapeH nn pa6OTn Ha npa3eH XoD, IN BpeMeTo, Ipe3 KOeTO e N3KJIIOUeH).
3A6EJIENHKA
HiKOKI npoBeJda HnpeKbchata nporpama 3a npoyuBaHn n pa3BNTne, 3aTOBa NocOeHNTe Tyk CneUΦnKaunn POnLeKaT Ha npOMraHa 6e3 npedn3BecTne.
OTCTPAHRABE HA HEN3INPABHOCTN
N3noJ3BaIte HnCneKuInTe B Ta6nUcaTa no-dOly, aKO INCTpyMeHbT He fynKUHOHa HopMaJIHo. AKO C TOBa npo6JeMbT He 6bJe OTCpaHe, O6bpHeTe Ce KbM BaIIp IIN KbM OTOpn3npaHra cepBn3eH ueTbp Ha HiKOKl.
- EneKtpnueckn HcTpymeHT
| Симпом Вьзмохна пооча OTстраявае | |
| Двигаелей работи,но вига});... He se дVINн; He se дVINк; Cбобдо; | Вьзможно eда e заideйствае вигинна}); спирачка. |
| Верига});e пекално ольна. | |
| Верига});e пекално ольна. | |
| Верига});e n3baЖда oт вигинно 3ьбно кoleл. | |
| Поверete оръна на вига});Я отпунсны,aco e пекално ольна. | |
| Сва);eстанчни Кадak и поверete дали вига});e павлино мостира; Вьрух вигинно 3ьбно кoleл. | |
| Поверete оръна на вига});я вига});a. Калл);e nOчпду С; Калл);e nOчпду С. Калл);e nOчпду С. Калл);e nOчпду С. Калл);e nOчпду C. Калл);e nOчпду C. Калл);e nOчпду C. Калл);e nOчпду C. Калл);e nOчпду C. Калл);e nOчпду C. Калл);e nOчпду C. Калл);e nOчпду C. Калл);e nOwch); Калл);e nOwch) Калл);e nOwch) Калл);e nOwch) Калл);e nOwch) Калл);e nOwch) Калл);e nOwch) Калл);e nOwch) Калл);e nOwch) Калл);e nOwch) Калл);e nOwch) Калл);e nOwch) | |
| Затлая因为我们 Рожецata | Верига)... e n3noce ha ял ostepnieto e cuypeho e рьждяcala |
| Посока);н вигога});e obprha); | |
| Верига});e ndoctaын ольна. | |
| Веригн); Maclo О пол);Бавно О неизл); (спira) | Нама вигинно maclo в pezeрвoga. |
| Масен});dIO3a e 3anycheha. | |
| Баерята He може DA бъде ИсталURA; | При onit DA noctabinte batepna,разlinч; OT ta3N 3a Иструmenta. |
2.3apndno yctpoiCTBO
| СимпTom Вьзмо | Инождата Ламма За зард мirdа Брзо в ллалуо, ho заржданeto на akumylatopa He залоча. | Актуларыт bte He e noctabent ДOKраи. | Поставete akumylatopa Stabilno. |
| Има чундд тела в Клиема на akumylatopa ил Кддут akumylatopb t e prikppenen. | Остразене Вьншине п徴metи. | ||
| Инождата Ламма За зард мirdа В черва, но заржданeto на akumylatopa He залоча. | Актуларыт bte He e noctabent ДOKраи. | Поставete akumylatopa Stabilno. | |
| Актуларыт bte epereplan. | Актуларыт abTomatnyhocke zanuchne da ce zapekdla, akо Tempepatypata садду, HO TOBA hamajbaхinotya my. Прекьчелно e prdeep zupekendahe akumylatopa dce oxlaadi na doxbpe побетрино място, далуot OT ряka сльнчева сvetлina. | ||
| В体现在 на Изponлбане на akumylatopa e крато, макар ида e在其цяло зареду. | ЖИBOT bT ha akumylatopa e zablpши. | Заменete akumylatopa c nob. | |
| Актуларыт bte с hyнддд OT Mного врeme 3a заржданe. | Temperapatypata Ha akumylatopa, зардноту усторстvo по okolната срда e песалени Ho ncka. | Зардente akumylatopa Ha zakprno по dpyra no-ternla creda. | |
| Вentnilашинite kahandi Ha akumylatopa ca bokiparani, koetop pruchnhaba прера conventа Ha bbytpeushite kompoentn. | Избягайte bokiparetiHa Kahandite. | ||
| Олладшит вентлalot He paobtu. | Свржete ce c otropиизран сөрвizэн центыр Ha HiKOKI за_nonрави. | ||
| Лампата за USB Зарpanване e在其лочец и USB усторстbero He ce зареду. | Зардыт ha akumylatopa e пон检uten. | Заменete akumylatopa c duуг, ковTo Иma octabaц kanaatchet. | |
| Вклочete уреселу Ha zaporно uc'troch BO e lek'tpichneckn konhtak. | |||
| Лампата на USB Зарpanване To He ce и Злочьа, Вьп配电ич e Зарршillo заржданeto и USB усторстbero. | Лампата на USB зарpanванeto CBETN Заржданeto Ha USB. | Тoba He OЗнача, Ye Иma HeIN3npabHOCCT. | |
| HeЯ сны кась e staytsb T ha zapexдд na USB усторстbero In Дами неюл STAZEДANe e priknlquhilo. | Лампата за USB зарpanванeto He ce иЗлочьа, дори korato зхарhanbaHETO priknlquhni. | Поставete USB усторстbero, koetO ce zapekdla, 3a da NOTbprdite HerOBria statyc Ha zapekdlae. | |
| Заржданeto Ha USB Усторстbero спра р no ср dedуа. | Зардnoto усторстvo bo BKluyeho B eelenktrpvchecn kontant, dokato USB uсторстbero ce zapewda,在其лочьд akumylatopa kato ИЗТочник Ha Зхарhanbae. | Тoba He Oзнача, Ye Иma HeIN3npabHOCCT. Зардnoto усторстvo prpekblcva Заржданeto Ha USB 3a okol0 5 sekydni при пreamинаве мени puazlinch ИЗТочни Na STAZPANBAe. | |
| В зардnoto усторстvo bo BKluyeho akumylatop, dokato USB uсторстbero ce zapewda,在其лочьд akumylatop kato ИЗТочник Ha STAZPANBAe. | |||
| Заржданeto Ha USB усторстbero празьсва no creduда, korato akumylatopb T and USB усторстbero ce зарpondд по ednoи и сь上诉 Врeme. | Актуларыт bte habллho zardeeн. | Тoba He Oзнача, Ye Иma HeIN3npabHOCCT. Зардnoto усторстvo prpekblcva USB Заржданeto 3a okol0 5 sekydni, dokato побетява дalingи akumylatopb T e zardeeн усту. | |
| Заржданeto Ha USB UstorystboTo празьсва no creduда, korato akumylatopb T and USB усторстbero ce зарpondд по ednoи и сь上诉 Врeme. | Оставиитуkanuzitet ha akumylatopa e иЗлочьд.Telino Hncb. | Тoba He Oзнача, Ye Иma HeIN3npabHOCCT. Ногато калцитсту Na ekumулатoga достигг He onpelelenho Nibro, USB Заржданeto ZanochBa ABtomatunho. |
OZNAKE
UPOZORENJE
Ovde su prikazane oznake koje se koriste na masini. Postarajte se da razumete njihovo značenje pre upotrebe.
BnKOpNCaHH iHwix KOMJIeHTiB 6aTapeM MoHe BnHJNkATn TpaBMn a6o NOHeKy.
c) HoH KOMnJIeHT 6aTapeH He BnHOpNCTOBycTbCa, 36epiraTe Horo nOaI BiD MeTaJIeBHX npedMeTIB, TAKNX JHK CHPINHN, MOHeTN, HIOUci, cBAXN, 6oJTH N IIni Dpi6Hi MeTAJIeBI npedMeTNI, AHI MOHyTB 3'EDHaTH DBA BHXOHN.
3aMnKaHHBnXoJb 6aTapei MoKe BnHnKaTH onIKn a60 noKeHy.
d) Pn DyHe HecnpaTnBux yMObax 3 6aTaape MoHe BNTiHaTH pIDHnA. YHHaHTe KOHTaHTy 3 HeIO. Pn HOtAHTI 3 pIDHIO npOMNHTe BOIO. Pn NotpanJAAHHi B Ooi 3BepHITbcn Do liKapra.
PidnHa, 0BNTiKae 3 BaTapei, MoKe BnKlnKaTu pO3dpaTyBaHH a6o onik.
6) 06cIyroByBaHHa
a) 06cIyroBvBaTH Baw aBTOMaTHHn IHCTpyMeHT MoHe INe He KBaIiΦIOBaHN TexHI, 3amIHIOUHy DeTaJI INe Ha iDeHTNuHi.
LapeaHTyBaTHMe 6e3neKy aBTOMaTHHOro IHCTpyMeHTa.
3ACTEPEXHEHH
He niDnychaiTe do iHCTpymEnTy ditei HENOBHocnpabHNX oci6.
Holln IHctpymeHTOM He KopncTyIOTbcra, Noro cIid 36epiratn B Micqax, HedeocTyHNHX dIa Ditei Ta HenoBHOcnpabHNx OCI6.
TEXHIKA BE3NEKN KOPNUCTYBAHNAJAHUCIOROBOIO NNJIHOIO
- Ipaiooyn 3 nIko, He iDnOte JaHcior 6IIN3bKO do 6ydb-RAHX YactTH Tila. Nepu Hix yBIMKHyTN nnky, nepebiTe, Hn IaHcior He Topkaetbcra RnXocb npedmetiB. HaimeHa W HeyBaXHiCTb NiJ qac BHKOpNCtAHNr nnIKMOKe npn3BeCTn Do 3aTAYBaHH OJary LaHcIOrM nnIK a6o Do TpaBMyBaHH.
2.ПиИку cIi3aBxHn TpIMaTn npaBOIO pyKOIO 3a 3aIHypyKy i IiBOHO pyKOIO - 3a nepeDHIo. IpOToJIeXHa KOHphiIpyaIpydYTpPmYBaHHN PnIKn HEnpInyCTMa, OcKiIbKn Ze NiIDBnUye pn3NK TpaBMyBaHH KOpNCtYBaA.
- TpmaTe eIeKtpoiHCTpyMeHT Inue 3a BiIOBIDhi pyuKn 3 iOJauieIO, OCKJIbKn icHye pn3NK, 10 NiNka MoKe 3aueHNTn npnxOBaHI eIeKtpuHi dpOTn. LaHcIor NNIKN MOKe TOPKHTncs dpoTIB nID HApYRO, BHACIIIDOK YORo BIDKpNTi MetaJIeBi qACTHN TaKOH ONHHaTbcN iD HanpyRO i MOKyTB CTaTN pPunHOO ypaKeHHraEIEKTPnuHm cTpymOM.
- OndraTe 3axnchi OkyIpaN Ta yymonorlnHaJIbHi HabyuHKn. PeKOMeHDoBaHO taKoBn BnKOpNCToByBaTn 3axncHe cnpdKeHH nI rOIOBn, pyK Ta Hr. HaJeHHn 3axnchOn oJr 3MeHUnTb pn3NK TpaBMvBaHH Tpickamn, 0o po3JIaTObC, a60 BHacLiIDOK BnnaDkoBOrO DOTnky Do BBIMKHeHOI NJIkn.
- He BnKOpNCTOByIte IaHcIgOBy nIIKy, BnJI3uHa depeBo. Po6oTa 3 IaHcIgOBOIO IIINHO Ha IepeBi MOKe 6yTu npUHHOTo TaBMyBaHHa.
- 3aBKn D6aIte npo CTiIKicTb NOLOKeHH i KopnCTyntec LaHIOROBOO NIIKOIO NIIe KOJI TBePDo CToITe Ha HepyXOMi, pIBHi Ta MiCiHI NOBepxHi. CIn3bKi Ta HeCTiIKI NOBepxHi, Taki JK dpabHa, MOKHyTB CTATN PnPHNO BTPaTI pIBHOBaru a60 BTPaTI KOHTPOIO HA NaHIOROBOO NIIKOIO.
- Pikhyu oBbAkhHiy rIKy, 6yDbTe oBepeKHi, ockIbKn nicra 3pi3aHH BOHa MOHe BiXnHITncb Ha3aJ. KoJN 3 rIKn 6yde 3HrTo 3aBy Bary, BOHa MOHe Bac BdapNTu Ta/a6o BiKHyTu YbIMKHeHy nnKy.
- Bybte 0co6nbo 0epeKHi, 0tHnaOuN Kyu ta MoIodJepeBa.ToHKr aLy3Kn MOKytb 6yTu 3aTMyTi B IaHcOr NnIKn i NotIM BnIeTItu y BaU 6iK a6o BnBeCTNu Bac i3 pIBHObaru.
- NpeHocHTIaHIOrOBy nHky cIi3a nepeDnO pyKy, oOB'3KOBO BIMKHeHO Ta Ha NEBHi BiCTaHI BiCbe6. Pid Yac nepeBe3eHHa 60 nepeHeceHHnNkn 3aBKn OJraTHe Ha WnHy KOxYx. HaleKHe NOBoHKeHH 3 NIKIO 3MeHNb IMoBipHicTB BNpaKOBOro KONTaKTy 3pyXOMM LaHcIOrom.
- DToPmMyTecb BkazIBOK 3MaUyBaHHa HataRaHn LaHzIgraTa 3MiHa akcecyapib. HenpaBnBHO HataRHyTuH HeIOCTaTHBo 3MaueHn LaHcIg MoKe npBaTnc a6o 36ilbWHTn IMOBipHicb 3BOpOTHO ydApy.
11.Ciikkynte,06pykniHctpymenta 6yln cyxNMn, nCTMnTa 6e3 3aIIuKIB MaCTnla.Y pa3i NotpanJHH Ha HnX MaCTnla pykni CTAIOB CIN3bKMn, 5O MOHe cnpuHHnBpATy KOHTPOJIO HA NIKHO. - La nllka npn3haeHa Iwne dI pyi3aHnHepeBHH. He BnKOpNCTOByTe Nllky He 3a npn3haeHHam. Hanpknlaad: He BnKOpNCTOByTe Nllky dI pyo3pi3aHHn PnaCTMaCn, KameHIO a60 He DepeB'rHnx 6ydiBeJIbHnx MaTepiJiB. BnKOpNCtAHnHn NllKn He 3a npn3haeHHm MOKe cnpuHNHT TpaBMvBaHH.
PpHnHH 3BOpOTHoro ydapy Ta 3ac06n Horo yHNKHeHHa: (MaI.2)
3BOPOTHn ynap BNHHaε, KOJI NKeIeCb ⅢINH NIIHN HaTHNHaETbcra Ha neBHn npedMeT a6o KOJI NaHcIg 3actprrac B depeBnHi.
3iKHeHH KINH NINN 3I CTOPOHIM npeDMETOM y DeAHX BnAnhax MOHe CnpuHHTn p3ky 3BOpOTHy peAIO, BHACNIOK JKOJ WnHa BiHNdaetbC Rbpy i Ha3aD y 6IK KopNCtYBaA.
3actpraaHnaHIOgA B3doBbBepxhboiYacTHHH mOKe p3ko BiUToBxHyTu WnHy B6ik KopncTyBaHa.
OsbDi ci peaHcMoHyb npn3Bectn Do BtpaTH KOHTPOIO HAD NIIKOIO i cepno3HOrTO paBMyBaHH. He noKlaadaiTecn Ha 3axNCi MexaHI3MN, B6yDobAHIBNkY. KopnCTyUOChb IaHIOROBOI NIIKOIO, Notpi6HO BHNBaTN BiINOiDNHX 3axoIDB DIA 3an06irAHHNeuacHM BnnaHkAm Ta TpaBMyBaHHIO.
3BOPOTHn ynap e HacIiKOM HenpaBnBHoro BHKOpNCtAHn IHCtpMeHTa a60 npOeDyp nY mOB EHCnlyataii; Nomy MoKHa 3anO6iTn, DoTpmyOuHcB BKNlaDeHNx HnXue npaBn 6e3neKn.
yKpaIHcbKa
MiHOr TpHMaTe NnIky, O6Oma pyKaMn 0xONNBn pyKn. Pn ZbOMy NIOJKeHHr TiJa i pyK Mae 3a6e3neuBaTH MoJIINBicTh b ONOpY 3BOPOTHomy ydApY. 3a yMOBN dOtpnMaHHra IpaBnI 6e3neKn KopNCtYBaH MOKe KOHTPOJIIOBaTH 3BOPOTHn ydAp. He BnPyCKaTe 3pyk pyKn nIIkn.
He TarrhItbcraJaIeKO Bnepei He pike Bnue pibHra Ineue. TaKIM YINHom Bn 3MOKeTe 3aNo6irtn 3ITKHeHHIO KInu PNIJKN 3I CTOPOHIMn PpeMTeAMn i Matmete 3Mory Kpaue KOHTPOJIOBaTH NIIky 3a HenepeD6aueHx OcbTaNH.
O BnKOpncToByTe 3amHn IuIe Bka3aHi BnPo6HnKom UHH Ta LaHcUOr. HeBIDNOBidiH 3MiHHI UHH Ta LaHcUOr MOKyb CnpNCHHTn P03PnB LaHcUOr Ta/a6o 3BOpOTn yIap.
O DToPmMyTeCb BkAzIBOK Bnpo6HnKa 0oDo roCTpiHH Ta o6cIyROByBaHH NaHzIora PnIKN. 3MeHsEHH BnCOTn O6MeKyBaHa rIb6HN H36Ib7ye MoBipHiCTb Ta cnly 3BOpOTHOrO ydApY.
ДОДATHOBI 3ACTEPEЖЕHHЯ 3 БE3ПЕНI
- ПрациTe He HanpyKyuOuHcB. Kpim TOro, OJaRaTecb TaK, UsoB Bam He 6yINo XOIoJHO.
- Ipeed noaTHOM pO60TH 3 iHCTpyMeHTOM peTeIbHO o6dymaiTe npoceDpy pO60TH i B npoeci pO60TH doTPMMyTEcB npaBn 6e3neK, 106 3anobirn TpaBMyBaHHIO.
3.He KopnctyTecr IHCTpyMeHToM 3a norAHx noroDHnx yMOB: niac cnIbHoro BiTy, DoUy, CHiRy, TymHy, a TaKoJy Micux, De MOHJIbI KAM'YHi O6BaJIu NcCHIROblabHH. IoraHa norOda 3aBaKaae 3oCepeHITncra, a pi3Ki NOtOBxN MoKyTB cPnPunHHTn PhaTaJIbHI HAcJIdKn.
4.He BnKOpNCTOByTe IHCTpymeHT B yMOBax 6MeJHeHOI BnIMOCti,3OKpeMa B nOraHy nOroHy nBHOi. TaKoX He BnKOpNCTOByTe IHCTpymeHT iD doUcEM. HecTmKiCtB onOpn i BtpaTpa pIBHOar moKe npN3BecTn Do HeuacHOro BNnAdKy. - Npeed yBIMKHeHHa m IHcTpymeHTa nepeBipTe uHny nnIKN.
O RaKuo Ha uHnHi Yn Ha IaHcIpy E TpiuHN, NOpRnHN a6o 3rHH, He BnKOpNCTOByTe IHCTpyMeHT.
O NpeebipTe, YI WnHa i IaHcIg nnIKn HadiHo 3akpinJIeHi. JkIo WnHa a6o IaHcIg 3JaMaHi a6o 3MiueHi, icHyE pn3NK TpaBMyBaHHa. - Npeed noaTkom poobtn nepebipte, qn nepemHKay He cnpa2bOBye, nOKn He HATNCHYTO KHOKNy po36IokyBaHHraio hCTpymEnr He npaioe HaJIeKHM uHOM, HeraHIO 3BepHITbcrdo ABTopu30BaHOro cepBicHOro ueHTpy HiKOKl Ira BnKoHaHHpeMOHTy.
- BcTaHOBJIIOJTe IaHOr NINIKI BiIDNOBIIDHO Do BKa3iBOK y noci6nky.
RkIo IaHOr BCTaHOBJIeHO HeHaJIeHHM YHOM, BIH MOKe 3ickOHTN 3 uHHI cnpuHHITn TpaBMyBaHHa. - Y JHOHOMy pa3i He 3HimaTe BCTaHOBLeHnx Ha HNIJIcI MEXaHI3MIB 6e3neKn (raIbMbIHoro BaKeJr, KHOHN po36NoKyBaHHo, O6MeHXyBaHa JaHcIORa ToIO). He BVIO3MIHOITe Ta He 6NoKyIte ix. IHaKHe icHyE pN3NK TpaBMyBaHHr.
- Y nepeiuehenx HnKcE BnAaKax BmNkaTe iHCTpyMeHT i3ynHnIe IaHcUg nnIK:
O KOJIN iHCTpyMeHT He BHKOpNCTOByeTbC a60 BHKOHyETbcra Ioro peMOHT;
O neped nepexoom Ha iHwy po6oy dIJIaHKy;
O nepeB BnKoHaHHM OrlAHy, peRyIIOBaHH a60 3aMIH NaHcUra, uHHN, KOxHyXa NaHcUra yu iHux DeTaeJ;
O nepeD 3aJIbBaHHM MaCTnla IJlaIaHcIora;
O nepeq HnueHHm Kopnyc IHctpymeHTa;
O nepei npn6npaHHp o6ooi iJHKn Bi3aBnx npedmeti, CmTT Ta TnpcN;
O nepu Hix 3nTn iHctpymeHT a6o BiiTu BiHboro;
O RkUo BN BiDyBaTe NMOBipHicTb 6yDb-RAKOI iHWOI He6e3neKn.
KaIIO 3aIIINHTI INIKy 3pyXOMM IaHIOROM, Ie MOKe npN3BecTN DO Heuachoro BnnaKy.
10.Ян павило,po60Tu Mae BnKoHbATn OHa JIoDHa. 阿么 npaioe KilbKa IIOde, cIiD dOTpIMyBaTncB 6e3neuHOДИCTAHJI.
3okpema, nid yac 3pi3aHHn Depeb a6o nid yac po6otn Ha cxnli (Koln DepeBO MoHe Bnactn a6o NOKOTNTcR) nepekoHaTeCn y BiDCyTHOCTI 3arpo3n dny iHux npaicBnIKIB.
11. Yu padiyci 15 M HaukoIo Bac He Mae 6ytn IHnx Oci6.
Ikuo npaioe Kilbka IIOdeN ODHocHO, TAKOJ
36epiraTe BiDcTaHb 15 M a60 biJbwe BiD IHnx.
IHaKwe icHye pn3nK TpaBmYbHn ChaJkAmToIo.
O PiIroTyIte nonepeJxHyBaJIbHn CBnCTOK i HanepeD DOMOBTEc npo cncic6 KOMyHika3 iHsHMn npaizIBHKamn.
12. Ppep 3pi3aHHm DepeB BnKoHaTe TaKi dii:
Bn3HaTe Micue Ia 6e3neHoi eBaKayauii;
O Haneped ycyhTe nepeuKoNi (riJn, KUji);
O peteIbHo OuiHbUH CTaH DepeBa, RaKe noTpi6HO cnHJrTH (HaPnKlaad, CTOB6yp HaxnHeHH, rIKn HAnpyKeHi), Ta HABKOINHIO CHTyaCiHc (CTaH cyciDHX DepeB, HABHICtB NepeWkoD, NaHuaΦT, HAnpMOK BITpy), Bn6epiTb HAnpMOK nJaPiHHaDepeBa Ta cNlaHyTe npoceDpy 3piAHH; He6aJIcTb MOKe CTaTH pInuHIO TpaBMyBaHH.
13.Y npoeci 3pi3aHHA DepeB DoTpMMyTec TaHx BmOr:
O niD yac po60TH peTeIbHO Bn6HpAaTe HAnpAMOK nadinHnApeBa;
O niD yac po6oTn Ha cxuIi, uo6 3py6aHe DepeBO He NOKOTINOCr, NOHnHaTe po6oTy Bnue DepeBa;
O KOJIepeBO NOUHAc NaadATN, BIMKHiTb IHCTpyMeHT, nonepaTe OTOuyuOx i HeaHOBiDinITb y 6e3neHHe Micue;
OЯкшо пд час рбгл силанцогaboшн a6o shnHa nllkn 3actprHyb y depebi, BIMKHiTb iHCTpymEnI i CKOpNCaITeC8 KINHOM.
14. RaHIO B npoeci pO60n npOyKTHBHCt b IHCTpyMeHTa noripWyeTbCn a6o IHCTpyMeHT BnDAe HETNNOI 3ByHN uB6pyE, HeraiHo BmKHiB NOrO, npuHHiB po6Ot y i 3BepHITcNo ABTOZOBAHOro cepBICHO CEHTpy HiKOKI dI npoBeDeHHrTexOrJMy Ta peMOHTy RaHIO BN npOoBHNTe KopNCTyBaTncn IHCTpyMeHTOM, To pn3NkyTe TpaBMyBaTncn.
15. RaHIO ihCTpyMeHT BnnaIKOBO Bnab a6o 3a3HaB yDapy, yBaJHO OrlJIbTe, YN He 3'RAINcR Ha HbOMY NOWKOKeHH, TpiuHN Yu DeOpMauii. RaHIO IHCTpyMeHT MaE NtWkoJKeHH, TpiuHN Yu DeOpMauii, ICHyE pnsIK TpaBMYaHH.
16. Ha yac TpaHcnpOpTyBaHHI hCTpyMeHTa B aBTOMo6iHaJIHO 3aΦIKCyIte IHO.IhaKwe icHyE pN3NK TpaBMyBaHHI.
17. He BmkaIte IcTpymeHT, nOKn npNKpInJeHO KOJHyX naHcIora. Ihakwe icHy e pN3NK TpaBMyBaHHa.
18. NpeBipTe, Hn Ha MaTepiAni, 0o O6pO6JIaTmMeTbcra, Hemae UBXIIB YH INHIX CTOPOHHX INpeDMETIB. RaHIO LaHIOI PNIJKn HAHTOBXHeTBcRA Ha CBx a6o IHIN INpeDMET, CE MOKe CnpNHNHT TpaBMyBaHHA.
19. yHnKHyT 3aTnCKaHHa HnH nNKn iD qac po3pi3aHH KIoO a60 nI BARoIO DepeBa, po3TaWyTe npuy p6oOro Micu onipHy nIaTfOpMy. RaHcO uHy nIKN 3aTncHe, ce MoKe npn3BecrDo TpaBMyBaHH.
20. Raio nica BnKOpncTahHn IHcTpymeHTa BN nlaHyTe TpaHcnpTyBaTu Horo a6o BiKnactn Ha 36epiraHH, 3HIMtB IaHcIor i3 WnHn a6o OJrHITb Ha HbOrO KOxYX.
BnnaKOBOTopKHyBwnCb IaHOra, MoKaHa TpaBMyBaTnCra.
- HaneknHm YINOM dOgIaJTe 3a iNCTpyMeHToM.
OДЯ 6e3neKn Ta efeKTHBHOi PO60TN IHCTpyMeHTa HALEKHNM YHOM DOrJaDaIe 3a LaHcIyOM NINKN, IIO6 NiITpMByaTN IORO ONTImaJIbHi pIaJIbHI xapaKTepNCTnKN.
O 3amHIOUOn IaHcIg a6o WnHy PnIKn, BnKOHyIOuN TexorJIa KOpNcy a6o 3anpaBIAIOu N MaCTNILO, DToPmMyTEcBkA3IBOK y Noc6Hnky.
22.ДЯ BIKOHaHHpeMOHTHnx po6it 3BepTaITeCya cepBicnIeHTp.
He 3iHIOTe HoDnHex MoNphiKaui IHcTpymeHTa, OckIbKn BIn BiIOBidae BN3HaueHm CTaHdapTaM 6e3neKn.
OДЯВИKHOHЯpeMOHTHnxpo6IT3aBHN3BepTaITeCBABTOpN3OBaHHcePbICHHueHTp HiKOKI.
Cnpo6a BnKoHaHHpeMOHTy camOCTiHOMOHe npu3BecTn Do TpaBMyBaHH a6o HeueaCHO RbnaDky.
- Koln ihctpymeH He BHKOpncTOByeTbcra, BiH Mae HaneHHM YHOM 36epiratncr.
3nIte MaCTnIO iNoklaIb IHcTpymeHT y cyxe Micce, HeNoocTynPHe dIaITei.
24. RaKuo nonepeDkyBaIbHa HauKeNka Buropila, BiDkLeIOeTbcq HnHnC Ha Hi i3 iHux npuHn He YHTaETbcq, pNpKpinItb HOBy HauKeNky.
OToPMaTH nonepdKyBaIbHy HaKJIeKy, 3BepTaIteCBy B aBTOpN3OBaHn cepBicHn ceHTp HiKOKI.
25.Якopo BnKOpncTaHn HcTpymeHTa peryIIOeTbcra neBHMn MicceEBHMn HOpMaMn Yn npaBnIamn, doTPmYntecbix.
26. He BnKOpNCToBnyTe Bnpi6 y pa3i DeΦopMauii ihCTpyMeNTa a6o KOHTaKTiB 6aTapei (KpInJIeHHa 6aTapei).
YcTaHOBLeHHaBaTape MoKe CnpuHHTN KOpOTKe 3aMkaHHa,Ke MOKe np3BeCTn Do NpOBn dMy a6o 3aTopHHa.
27.CiKnyTe 3a TMM,06 Ha KOHTaKTax iHCTpyMeHTa (KpinJIeHHI 6aTapei) He 6yNo MeTAJIeBOI cTpyHKn I NIIJY.
O Npeed BHKOpncTaHHm nepekoHaTecra, 0o B 30Hi KOHTaKTiB Hema MeTaJIeBOI CtpyKKn IINJy.
OПд уас ВИКОРиCTAHнЯ HabmaIITeCSункATN naHnHaMeTaJIeBOI cTpyKKn a6o ПИЛу 3 iHcTpymENTa H6atapeIO.
O y pa3i np3yHHHnHO60n a6o nICJN BHKOpNCaHHHe 3aIIuAte iHCTpyMeHT y Micx, De Ha HbOROMOKyTb NOTpANrTH MeTaJIeBa cTpyKHa a6o nI.
LcMoHe CnpuHHHTK KOpOTke 3aMHKaHH,Ke MoHe np3BecTH Do NOBb DmMy a6o 3aropHH.
3ACTEPEXHEHЯ LIOO BATAPEI TA 3APYHOrO PnCTPOIO
- 3aBxHn 3apJHnAte 6aTapeo 3a HABKOLNlHbOi Tempeatpyr -10-40°C. Tempepatypa, Hxu -10°C, npn3BeJe Do npeBaHTaKeHH, 0c E He6e3NeuHm. He 3apJHnAte 6aTapeo 3a Tempepatypn noHaJ 40°C. Haikpaae IJIy 3apJHnAHH NIXOXOHTb Tempeatypa 20-25°C.
- He BnKOpNCToBvIe 3apAHy npiNCTpi 6e3nepepBHO. Koln 3apAka oHiei 6aTapei 6yde NOBHCIO 3aBepSeHa, Heo6xioHO 3aIINHT 3apAHy npiNCTpi I y BmKHeHOMy CTAHI np6JIn3HO Ha 15 XbNInH, nepe THM JN pNCTyNTn Do 3apAHy HAcTyNHO i 6aTapei.
- He do3b0jIte cToPOHHim peOBOHnAM nOTpAnTn B OTBip Ira niKIIHOeHHa kMyJrTOpHOi 6aTapei.
-
Hikoli He po36bpaTe akymyIaTOpHy 6aTapeIo Ta 3apAHH npHcTpiI.
-
Hikoln He 3amHaIte aKymyIaTOpHy 6aTapeo HAKOPOTko.
3aMnKaHH 6aTapei HApOpOTKo npu3BePe Do pi3Koro 36iNbWeHH CTpyMy i nepeRpiBy. Y pe3yJbTaTi 6aTapee 3rOpHTb a6o 6yde nooKOJKeHa.
- He KndaTe 6aTapeo y BoroHb.
3ACTEPEKHEHNAOIO PIiHKJIIOUeHHN PnCTPOIO USB (UC18YSL3)
PnBHHHHeHH Hepe6aeho np6bemn, iHOpmaia, 30 3haxoJrbcB npcIPOI USB, nikNoeyHomy do zuboro npodykTy, MoKe 6yTN noKoHeHa abo Btpaeha.
O6OB'3KOB0 3po6iB pe3epBHy KOIIIO daHIX, IO MICTbCnHa zbomy USB npncTroI, nepeTm Tm BHKOpNCTOByBaTN 3 cIM pOdyKTOM.
3ayBaHKe, 0o Haa Komnai He 6epe Ha ce6e Hooi BiinobiaIbHocti 3a 6yB-ki NooKoJxHei a6o Btpaehi daHI, 36epiraOtbcR B npictpoi USB, a TAKOH 3a 6yB-ky WKOdy, kHa MoHe 6yTu 3aBdaHa NiKnIOueHOMy npictpoI.
NONEPEDXENH
O Npeep BnKOpNCTaHHm nepeBipTe 3'EDHyBaJIbHn Ka6eJb USB Ha BiDcyTHiCt b 6yNb-RAKO deΦeKTo Yn NOIHKoDKeHH.
BnKOpNCTaHH Ka6eHIO USB, RaH MaE DeΦeKTn YI NOxKOJKeHH, MoKe Ipn3BecTN Do NOBn DmMy a60 3aRopHH.
O Koln Bnpi6 He BnKOpncToByeTbcra, 3aKnIte npT USB rymoBOIO KpNIshKOIO.
HaKoHcyBaHHnIy ToIO B nOpti USB MoKe npN3BecTn Do NOABn DmMy a60 3aRopHH.
PIMITHA
OПд уac nepe3apdkaHHA USB moKe BnHnKHyTN BnnaKOBa nay3a.
O Koln npnctpi USB He 3apdHaetbC, BnMiTb npnctpi USB i3 3apdHoro npnctpoI.
HexTyBaHHI ciEO IHcTpKciEO MoKe He TlBKn 3MeHnTn TepMn CnyK6n BaTapei npncTpoU USB, aJe TaKoK MoKe PnBeCTn Do HeoukiyBaHnx HeuacHx BnapKnIB.
O 3apAnHn Hn DeaKnx npncTpoIB USB HeMOHnBe (3aJIeHNb BiD TnNy npncTpoIO).
ОПИС ПО"HUMEPOBAHINXЕLEMENTTIB(MaI.2-MaI.47)
CTAHДAPTHI AHCECYAPN
Ochim OCHOBHORO npncTpoo (1 npncTpi), DO KOMnIeHTy BXOJrB aKceCyapn, nepeJIk RKnX PpeCtABJeHO Ha cToPiHci 387.
KOMnIeKT cTaNapTHOrO npHaADMa MoHe 6yTu 3MiHeHn 6e3 nonepdHexHH.
Koln 6atapere nobHicTIO 3aprntbCRA, iHdkatop 3apdkaHHNoUHe CBiHTNc3eJeHM. (INB. Ta6Jn10 1)
(1) NokaahHЯ iHdNkaTopa 3aprKaHHa
Ioka3aHn IhikKaTopa 3apJkaHH HaHaHO B Ta6n1i 1, BiINObIIdHO Do cTaHy 3apJHoro npncTroH O akymyIaTOpHO6atapei.
Ta6n1a 1
4. BctaHOBLeHH6iHooIkpIshK
① BupiBnHrTe 6oJI t3 OTBOPOM Ia 6oJIta (MaI.10).
② NObepHITb peryIaTOp HaTMy Ha 6iHy HKnPsU TaKIM YINOM, 0o6 KOHTaHTHa DInrHkmaexAH3My HaTAYBaHHaHaYBaIuA yBiiWLa y BiIDNoBIdHm OTBip Ha WnHi, i npNkpinitb 6iHy KpnKky (Ma1.11).
③ OdHH pa3 nobepHiTb rBnHT, 106 TmUacOBO NOro 3aKpInTu (MaI.12).
5. PerylloBaHHaHTary IaHcIora (MaI. 13)
O PiHbBn Bropy KHeCb WHH, nobepHiTb peryIaTOp HaTary, 0o6 BiDperYIOBaTH HaTg IaHcOra.
O NobepTaIepepyIaTOpBnpaBOIJI36IbWeHHHaTAY IaHcIOraIBIIO-BJIA3MeHWeHH.
6. Ipepebipha hatay nahucora (Ma1. 14)
BidperyioHe HATr IaHIOra TAK, 0o6 7IINHa MIX npNBIHOIO I aHHIOI pN IeKOMy PIDHImaHHI IaHOra Hd cepEDINO WHNCTAHOBnla BID 0,5do1 MM.
7. 3aKpyUyBaHHr rBnHTa (MaI.15)
① 3aBepuBwn peryIOBaHHn, nHIMiTb Bropy KHeCb
② BoNT MaE 6yTu NaDiInHO 3aKpyeHn.
NONEPEDXHEH
Iicna peryIIOBaHHHaTary IaHcIora nepeBipTe, YI BnHT NOBHCtTO 3akpyeHn.
HEnOBHCIO 3aKpyeHn rBnHT MoKe CTaTn npuHIO TpaBMyBaHH.
OgI I IITROBHA DO BnKOpNCTAHH
IpepeBnKOpNCtAHNMaBnKOHaTe HAcTyNHy nepeBipKy Ta niDROBHy.
NONEPEDJHEH
O Lio6 3an06irtn HeuacHIM BnnaKam, 3aBKnBnKOHyTe D1-4 i BNMaITe 3 iHCTpyMeHa aKymyJrTop.
He iKcyTe KHOHy po36IOkyBaHHa HATnCHyTOMy CTaHI.
KIO nepemikau BnnaKOBO yBIMKHeTbC, IHCTpyMeHT MoKe HeoHiYBaHO 3aNyCTNTNc i CnpuHHTN TpaBMyBaHH.
1. Ipepebipte, qH BnMKHeNo nepemnkau
O RaHIO Bn BCTaBIAIITMImTe aKMyIJIaTOp, He 3HaIOU, YI nepemHKaayYbIMKHeHO, IHCTpymeHT MOKe HeoHiKyBaHO 3aNyCTNTnC HcPnHHHTn TpaBMyBaHH.
O RaKIO yBIMKHyTn nepemHKaU, OJHOaCHO HaTHCKaOuH KhoNky po36loKyBaHHI, IHCTpyMeHT yBIMKHeTBcA, a nICJIa BiDnyCKaHHN nepemKKaHa BUMKHeTBcR.
2. Ipebipha Hatary lahiora
O KaHnHaTnHaHOra He BIDperyIbObaHo HaJIeHHM YHOM, icHyc pn3NK NowKOJKeHHa NaHOra a6o WnHN Ta BnXoY IHCTpyMeHTa 3 JaDy. BiDperyIIOte HATr IaHzOra BiINOBiDHO Do KpOKIB 5-7 po3diny «BCTaHOBLeHHa (3amHa) LaHzOra nnKn»
O IOnn IaHIOr HOBN, BIn IeRHO PO3TgYcTBcR, TOMy HATrI cnId peryIraHPO nepeBiprTa Ta 3a Ntpe6u KopurBaTuN.
Kpim toro, notpi6Ho nepeBiprTn, nu HaDiHoo 3aKpyeHO TBnHT.
3. Ipebipka ralbma lanuora (Ma1. 16) NONEPEDHEHHA
O XoayraIbMo IaHcIora e MexaHi3MOM abapiHoi 3yINHHN, NOKlaIaTnC JIiue Ha HbOrO He MOxHa. IpaIOte 3 iHCTpyMeHTOM oBepeKHO, Uo6 yHNKHyTN pN3IKy 3BOPOTHO ydApY.
O TaIbMo IaHcIora npn3HaueHe dIe BnKOpNCtAHNBA bApaiHnx CHTyauijx i nD ac 3anyChy IHCTpyMeHTa. He BnKOpNCTOByIte HOrO 6e3 NOrpeBn.
O Iio6 HakoOnuHe TaPcA He 3aBaKaJa pyx yraBMa IaHIOrA, peryIpaHO uCTbTe iHCTpyMeHT.
OraIbMo IaHcIora e BaKJIbHM KOMNoHErTom, 0rapaHTye 6e3neky BnKOpNCtAHr IHCTpyMeHTa. RaIIO Bac He BnaIaTobYe pObTa raJIbMa, 3BepHiTbcB B aBTOpN3oBaHm CepBicHm cEHr HiKOKI dIa BnKoHaHH OrJy Ta peMOHTy.
Talbmo IaHcIora - ue MexaHi3M abapiHoi 3yINHKI IaHcIora IIIKN Ha BnnaDOK 3BOpOTHO ydApY TOIO.
(ДиВiTbCЯ «ПиЧИН 3ВОРТHorO уdApу Ta 3acobи ИюункHeHnR»).
BhaclioK 3aiaHHraIbMa IaHcIgraNoTTOXOM BaKeIe BnepeJ aHcIg nnIKn 3yINHReTbcR.
Iio6 BiDnycHTn ralbmo, NotraHITb BaKilb ralbMa do ce6e.
Ioo nepeBipnT cnpaBHicTB ralma IaHIOra, oob'3KOBO BIMKHITb IHCTpymeHT, BINMITb aKMyJrTOp, HATNCHITb Ha raJIbMIBHn BaXilb i NOTaHITb IaHcIg BpyHy.
KaHJnHaHJr He pyXaTmEtbcra, ce O3Haayatme, 0rTaJIbMo npauoe.
NPMMITHA
Дя Виконань сiei npoцeдурп 3abKdN ODAraTe cynki 3axnchi pykabuci.
OcklbKn Ie3o IaHcIora dyKe roCTpe, Ioro He MoKHa p3KO TgHyTN-Bn pn3NkyTe TpaBMyBaTH nlaBci.
4. IpebipHa MaCTnla JaHcIora
O IHCTpyMeHT npoJaetbc8e3 MaCTnla BCEpeDNIH. Nepu HIX KopNCtYBaTnca IHCTpyMeHTOM, 6OB'ra3KOBHO HanOBHITb 6ak dIy MaCTnla (MaI.17).
O y npoueci pobotn vac BiD yacy DnBiTbcra Ha BikoHcE KOHTpOIOPiBHa MaCTnla i DOJIbBaIte NOro 3a notpe6n.
O RaHcHaTnCHyTH nepemHKaH nIDCBiTKn Ha naHeJI nepemHKaYIB, yBIMKHeTBcR CBITIOJIOI BHyTpIHn iDCBITKa (MaI.18). (NIBITcR KpOK6).
O RaHIO MaCTnIIO, 10o Doaetbcn Do IHCTpyMeHTa, 3aIKHHTbCn, BN MoKeTe OKpeMo npD6aTn MaCTnIo HiKOKI a6o 6yDb-RAH NOro aHaIor.
O LaHOr 3MaUyETbcr aBTOMaTHuHO.
y 3aBOcBki KOHphiIpypaii BCTaHOBJeHO MaKcMaJIbHN O6Cn IODaYi MaCTNla dIa BTOMaTHOHO 3MaUyBaHH.
Uo6 3MeHUnTHn 06cI nOaHi MaCTnla, NOBepHiTb peryIaTOp MaCTnIbHOI NOMn Ha 3aHi ni NaHeJI Kopnyca 3a RoDHHNKOBIO CTPIKIO (MaI.19).
DPMMITA
O EmHicTb 6aKa IJRA MaCTnla npIbI3HO 80 Ml. Y pa3i nepenOBHeHHa 6aKa 3aIBe MaCTnIO BNTeue uepe3 OTBip nepeJIbY.
O PaIMMo Bam 3aBKnM aTN 3anac MaCTnla IJI JaHcIora. RaIIO npoDBKyBaTN BHKOpNCTOyBaTN IHCTpyMeHT 6e3 MaCTnla,JaHcIg MOKe neperopitn abO dBHyH MOKe BnITn 3 JApY.
Cnikkynte,io6 nni nn iHni cTOpOHnippeMeTHne NotpannB 6ak dna MaCTnla. RaNIO NNI nn iHni cTOpOHnippeMeTNOTpannTy bak dIy MaCTnla,ue MOKe CNpnuHHTn Bxixi IHcTpymeHa 3 naNy.
O CtpyKtypia iHcTpymeHTa no6ydoBaHa TaK, 0o 3aJIiNkMactnla MoKyTb BntiKaTHn 3 6aKy. Xoayue Hne He HeCnpabHicTIO, MaCTNILO MOKe 3a6pydHHTn MicCe 36epirAHn PnIKN, TOMy 3BaJauTe Ha ue.
Ipeed BIDKlaedeHHa IHcTpymeHa Ha 36epiraHna, 3nnte MaTIno i NOKlaiB IHcTpymeHT Ha MaTepiA, 10 MoKe IOTINHaTH 6yDb-RAkN BNTIK pIHn.
5. BctaHOBHeHH 3miHHoro aKymyIaTopa (MaI. 4)
BCTaBTe aKymyIaTOp, RaN poka3aHo Ha Man. 4, i npHTnCHiTb Do KlaaHHa.
OBEPEXHO
HaJInHO fikcyte 3miHHn aKymyIaTOp.
JaKIO 3mHHN aKymyIaTOp HeHaJIHO 3akpInJeHNI,
BiH MoKe BnnaCTn i 3abDaTH TpaBMn.
6. IpepeBipka cBtIIOjOda (MaI. 18)
○KaHnCHytn nepemHKaay niDCBtHN, yBMKHETbcra CbitIOiO; KaIO nepemHKaay BiNcyTHTN, CbitIOiO BIMKHeTcR.
CbitnoiooocBtHoeiHkypiKyuOkaIOnnk.
TaKoB BIn NiDcBiYe BiKOHue KOHTpOIO pIBH MaCTnla 3cepeHHI JIN POKpaUeHHB NIMOCTI.
DPMITHA
Jkuo lamnoka 3a6pydHnTbcra, obepeXHO npoTpIb II M'koHO raHupKOIO, 0o6 He NpOKnOHTN.
Kkuo lamnoouKa NOnKOJNTbCra,TO CBITNTIME MeHs RCKpabo.
7. Ipebipka raIbma
O RaKIO yBIMKHyTn NepemHKaU, OJHOaCHO HaTHCKaOuN KHOKNy po36LOkyBaHHn, IHCTpyMeHT yBIMKHeTBcA, a NiCJI BIDNYCKAHH NepeMKaHa BUMKHETbCra.
O Kpim toro, yepez 1-3 cekyHn nicIaBnyckaHHn nepemHKaHa IHcTpymeHT 3aJIOE rAJBMO dIa 3ynHHn IaHOra.
O Ipeep BnKOpNCaHHm IHcTpymeHTa nepeBipTe, 3aiaHO raIbmo.
OBEPEKHO
3BaHaIte Ha cnIy BiIaTobXbAHHn npn 3aIaHHi ralbMa.
IaHHH IHCTpymeHTa MOKe Ipn3BecTH Do TpaBMyBaHH.
8. Ipebipha BntpaTH MaCTnla (MaI. 19, 20)
O PicIy BBIMKHeHHH iHCTpyMeHTa MaCTnIO NOUHae aBTOMaTHUHO 3MaUyBaTn JaHcIOr Ta UINHy PNIJKN.
O RaKuo MaCTnlo He 3'RBNTbcra Ypee3 2-3 XBUNHn NiCJr 3anycky IHCTpyMeHTa, npeBipTe, Hn HABKOLO JIOLO6Ka Npaui MaCTnla He HAKONNUINACr Tnpca.
(ДИВ.«Чишени Кюлбкдлma Мactиla»).
(ДиВ.«ПepeBipka MaCTnla LaHcIOra»).
Po60Ta nepemnkaa
Ka yBIMKHyTN nepeMnKaU, OHOaCHO HATNCHAIOH KNOHky PO3bOkyBaHHaHcIg NINIKI 06epTaTHMeTbCRA (MaI.21).
KHONKy po36IokyBaHHHe HaTnCHyTo, yBIMKHyTN nepemHKaHemOJKINBO.
Iicra BBIMKHeHHnpeMnKaaHaHcIg npoOBHyoe 6eepTaTHcR, nOKn Bn He BiDnyCTnTe nepeMnKa. PnU cybOMy TaKOH CBITNTbcr CBITIOJIO.
Iicra BiDnyckHnnepeMnKaaCnpaBoBye raBmo,
JKe 3ynHRe 06epTaHH NaHcUra.
NONEPEDXEHNA
He ikcyTe KHOINy PO36IOkyBaHHB HATNCHYtOMy CTaHI.
JaHIO nepemHKaay BnnaKHOYBIMKHeTbCra, IHCTpyMeHT MoKe HeOuyiKyBaHo 3anyCTNTncr i CnpuHHTn TpaBMyBaHH.
BnKOpncTaHHHa Hapa6iHa
BntraHitb kapa6ih i3 Kopnyca iHcTpymeHa t npncTe6HtB horo do MOTy3KN, pemeHr ToO (MaI.23).
NONEPEDJHEH
BnKOpNCTOByOuH Kapa6iH, nepeBipTe, qH INCTpyMeHT HadiH No 3aKpInIeHn, 0o6 3anobirtn Pu3NHy Ioro naHHra.
IaHHH IHCtpMeHa MoKe np3BecTn Do TpaBMyBaHHA.
IHДИKHATOP 3АЛПШУ 3APЯДУ BATAPEI
Moxha nepeBipu 3apRd 6aTapei, kHn 3aHnBcR, HATNCHyBnnepeMnKau iHNKaTopa 3aNnKy 3apRdy, Uo6 yBMnKHyTu INDnKaTOpHy lamny. (MaJ.22, Ta6nuc3) IHnKaTOp BmKHeTbCn np6n3HO uepe3 3ceHyn nicra HaNTsCKAHn nepeMnKaay iDNkAToP a 3aNnKy 3apRdy 6aTapei.
Haikpae BHKOPNCTOBByBaTH INHkAToP 3aHnKhy 3apyD 6aTapei B HOCTI opiHTnpa, OCHJbKn MOKyTB 6yTH HeBeNki BiDMHHOCTI, HAnpknla, Ypee3 Tempeatypy HABKOLHbOrO cepedOBuTa Ta CTaH 6aTapei.
Kpim TOrO, IHdNkAToP 3aIiNkHy 3apRy 6aTapei MoKe BiDpi3HrTnC8 BiD Tnx, RaKIMN O6laJHaHO IHCTpyMeHT a6o 3apRdHNI pNcTpiI.
Ta6n3
② BctaHOBLeHHra3miHoro aKymyIaTopa (MaI.4)
BctaTe aKymyIaTOp, RaN noka3aHo Ha Man. 4, i npHTnCHiTb Do KlaaHHa.
③ YbIMKHeHHnepemHnau
IpeBipnBwn, 0o IaHJor nNkHe TOpKaetbcr depeBa,yBIMKHiTb nepeMnKau i pO3NoCHiTb pi3aHHra KOJI nnHcIg Habepe WbnKocti.
OSEPEKHO
O Npeed yBIMKHeHHm IHcTpMeHt a nepeBiPeTe, YI NaHucIg NIIKN He TopKaETbCra CTOpOHHix PpeMeTIB MaTepiAIB.
OПд уac poBOTи CTeKTe,лболанцor nHн He TOpKaBcrtopoHHixпрdmetIBЧИ MaTePiaJIb.3OKpema,nicIa 3aBepWeHnpoBotn He KnaDiITb IHCtpymeHT TaK,лболanuHcTOr TOpKaBc3eMJI.
#
3aBvacHO 3aINBaIte B IHCTpyMeHT MaCTHIO, 3o6 3ano6irtn Ioro NOBHOMy BnuepnaHHIO.
1. Tinnovi po6oju npoeypn
(1) YbIMKHiTb HnBHeHnHa IHCTpyMeHTa, TpMaOnu NnIky Ha neBHn BiDcTaHI BiD DepeBa. Po3NoHaTe Pi3aHHn IInue nicra TorO, Ra IHCTpyMeHT 3anpaUoe Ha NobHn WBNDKoCTi.
(2) P03nHIOUOHToHKy DepeB'rybanky, noCTaTHe HHHO qactHy WHHN BnPntTyI Do depeBHN i nJIraTe B HAnpRmKy DOHN3y, RIK NOKa3aHO Ha Man. 24.
(3) Po3nHIOUOu TOBCTy 6aIky, noCTaBte 3y6uATn ynop Ha nepeHni qactHNI IHCTpyMeHTa BnpTuJ Do DepeBHH i nnJIte 3a npHcNtOM BaKeJI, BIKOpNCTOBYOu3y6uATn yNOP y JKOcTI TOKn OnOpn, RIK NOKa3aHO Ha Man.25.
(4)Пидчac ropn3oHTaIbHOro po3nHIOBaHHNoBepHITb KOpNyc IHcTpymeHTa BnpaBO,Tak 106 WHa NINKnPo3TaWOByBaIacb 3HN3y,ITpImaTe IIBOpyko3a BepxHIO qactHy biHoi pyKn. TpImaTe WHy ropn3oHTaIbHO,a 3y6chatny ynop Ha nepeDHI qactHi IHcTpymeHTa NOCTaBTE Ha DepeBNHy.BNKopNCtOByQOny 3y6chatny ynop y JAKOTI TOOKn OONpN, Bpi3aTecb y DepeBnHy, NOBepTaOCh pyKIO BnpaBO (MaI.26).
(5) Bpi3aHcNcb y DepeBnHy 3Hn3y, 3nerKa TOpKaTecr DepeBa BepXbOIO YacTHNOIO WmHN (MaJ.27).
(6) Okpim peTeJIbHOrO BnBcEHHI INCTpyKciI, nepW HIX NOHaTIN KOpNCtYBaTINCIA INCTpyMeHTOM, NoppaTKHyIeTcA 3 NIIKOIO, HApNkLAd, PO3NIJIIOUHO KOJIoN Ha KO3JIax Ia pyHOrO PO3NIJIIOBAHH.
(7) 3a6e3neyuTe HaneKHy niTpMky 6aIOK Ta KOIOpepeo3nIOBaaHm. FiICyIte ix 3a DOnOMorOIOKO3JIb a6o IHnx BiIDNObiDHNx 3ac06IB.
OBEPEKHO
OПд уac po3nHOBaHHK OLOДN 3H3yВ pa3i CnIbHOrO 3ITKHeHHЯ LaHcIgra 3 DepeBUNHOIO icHye pN3NK 3BOpOTHOrO ydApY i BiDHTOBxvBaHHI HCTpyMeHTa B 6iK KOpNCtYBaHa.
O He po3nIIOte KOLOHy NOBHCIO 3HN3y Doropn, ockilbKn B TaKOMy pasi icHy e He6e3neHa HEOKHTpoJIbOBAHOro KNDka WInHn Bropy nicJra 3aBepweHHa po3nIy.
3anobiraTe doTOpky BBIMKHeHOI NIIKN Do 3emni YI 3aropoxi 3 dpOraHOI ciTKN.
2.06pi3aHHr rilok
(1) O6pi3aHHr rIOK Ha JINBOMy DepeBi ToBCTy rIKy cIiD cNouATHy o6pi3aTH Ha neBHn BiD CTOBbypa DepeBa.
Cnoaaty po3nnnIe npn6n3HO TpeTHy diaMeIpa rInk 3H3y, a Notim dopixTe II 3ropn. Iicra zboro o6piKe 3aIIwO rInk npn cTob6pyi (Ma.n.28).
OBEPEXHO
O BybTe o6eepHi, 0o6 rIka He Bnala Ha Bac.
3aBKn 3BaKaHte Ha IMOBipHicTb 3BOpOTHoro ydapy.
(2) O6pi3aHn rilok3i 3pi3aHnx DepeB CnoyAtHy o6piaaTe rilln, kI He TOpHaOTbc3eMli, a Notim Ti, 10 TopHaOTbcra. O6piaaOnu ToBcTy rIlHy, 10 TopKaETbC3eMli, cNepWy po3nnJrte II Do NIOOBHH 3ropn, a Notim DonnJaTe 3HNsY (MaI. 29).
OBEPEKHHO
O6p3aHr iHKn, 10 TopKaHOb8c 3emni, 6yDbTe o6eepKHi, 106 uHa nIKN He 3irHyJaac nHaTnCKOM.
Ha 3aBepaaHbHomy etani o6pi3aHHraIOKbpaxOByTe, IIO KOIOna MoKe paTTOBO NOKOTINcR.
3. Po3nnIIOBaHHH KOIoA
PiJ yac po3nHOBaHHKoIOni,po3TaWBOHaOJI,RA K nokaHO Ha Man.30, cNoatHy po3nHJaTe TpeTHy diAMetpa KOLOdN 3HN3y,a NotIM DonnIe II 3ropN. PiJ yac po3nHOBaHHKoLOdN,IO MaE npOHHHy,RA nokaHO Ha Man.31, cNoatHy po3nHJaTe DbI TpeTHi N diAMetpa KOLOdN 3ROPn,a NotIM DonnIe II 3HN3y.
OBEPEKHHO
O IpaioTe ObepeHIO, 0o6 uHa nHnHe 3irHyIacrPiD HATNCKOM BCEpeHi KOIoN.
O Ppaioohn Ha cxnJI, 3aBKn n CTIne Bnue KOIOJN. RaKIO CTOrTHn HnKHe NO CXnJy, BiDpi3aHa YacTnHa KOIOJMOHe NOKOTNTnC y BaWOMy Hapmky.
4. 3pi3aHHa depeB
(1) 3po6itb niDnNIOBaHHa (1)K NOKa3aHO Ha Man.32): 3po6itb niDnNIOBaHHa B TOMy HAnpMky, y RkOMy notpi6Ho 3BaJNTn DepeBO. TIn6Ha niDnNIOBaHHa MaC cTahOBHTn 1/3 diAmETpa CTOB6pya. He 3pi3aIte DepeBO, He 3po6NBn NiDnNIOBaHHa.
(2)3po6iNbHaDiPi 360ky, npOTnHJHOro naDHHIO depeBa (2K NK Oka3aHo Ha Man.32): 3po6iNbHaDiPi 360ky, npOTnEHHORo HApRMHy naDHHA DepeBa, Ha 5 cm Bnue i npapJeBHO do Tropn3OHTaIbHoro NiDnJIIOBAHH. Raio NaHcIg 3acptpRHe B DepeBnHi niD yac CnNIOBAHH, 3ynHITb NnKy i BNTarHtB II 3a DonOMrOIO KInHIB. He npOnNIHOte cTob6yp 3a diAMetPOM BiD NOATy DO KINu.
OBEPEXHHO
O DepeBa notpi6Ho 3pi3aTH TaK, uo6 ix naHHe cTaHOBnIO Hebe3neHN IJIAIIOeT Ta 3arpo3N noHKoDKeHHa LiHi eEeKTPonepeDaY HInx 06'ekTIB.
O IpaunouHa cxnI, CTte Bnue depeBa, Ocklbnn nicnaHHapeBO MoKe NOKOTNTNCBHN3.
3axoDi 6e3neHn iD qac po60Tu
Дл рб it BeHko 06cary a6o noCTiHoi p60tN
3axncty DBNrhyHa Ta eJeKTPoHHxCxem IHCTpymEnta y pa3i Noro neperpiBaHHnoHnae 6JIIMATN CBITIOJIOJ.
KIO IHCTpyMeHT BHKOPNCOTByeTbC3 BEINHM HabaHTaKeHHa a6o 6e3 nepepB, DBNyH Ta eJeKtpoHHi CXEM HarpibaOtbcra, BHacnIOK Yoro noHaac 6NIIMaTH CBITIOJIoD.
IPMIMITA
O Y taKOMy pa3i npnHHiB KopnctyBaHH iHCTpymeHTOM i daIte Homy NOBHCIO OxIoHOHTN. RaIIO npoDobHNtN BHKOpNCaHHH IHCTpymeHTa, BIN MOKe BInTu 3 JaNy.
O TaKoJ y pa3i 6e3nepepbBHOI po60Tu nicJr 3aMIHn aKymyIaTopa daIte iHCTpyMeHTy OxIoHOHTn npHaMHi 15 XBNIHN.
O RaKuo ihcTpymeHT yBIMHHeHO nICRA DeaHOI nepepBN Bpo60i, aJe CbITIOJIO npoOBHXye 6nMaTH, cE O3Haaye, 0io IHCTpyMeHT HeoCTaTHbO OxOIOHBcI I NOro Notpi6HO BmMHHyTN ue Ha DeaKN Yac.
TpmaHHaTOBxAHHaHcIOrBOi nnK
3aBKnHaDiInHo yTpmynte nnky.
Kpim TOrO, nIac KOpncTyBaHn HnIKoIO He DOKlaaTe 3aBnx 3ucnlb. PnHLaaHOnn HaDmipHy CnIN Do IaHcTOBOI NIKN, BN He 36ilbWNTe WBNKOCTi pi3aHH. Lc IInse cnpuHHntb 3aIBe HabaHTaKeHH Ha DBnYH, nepeWKoJHaTHe mpeoTi Ta npn3BeDe Do NOJOMKn DBrgamma a60 uHHn NIKN.
BnKOpncToByIe iHcTpymENT i3 paioHaJIbHOIO WBNDKICTIO.
3okpema, kkuo nnka 3ynnHtbc8 (3acTprHe) BhaCIIIOK HAdMIPHO rO 3ucNIIa, ce MOKe npN3BecTI DO TpaBMyBaHH KOpNCTyBaHa a60 BNXOdy IHCTpyMeHTa 3 naHy.
YIOBIOBAuJaHcIora
O YIobJIIOBau IaHIOra po3TaUOBaHH Ha npIBoHi roIiBci 6e3nocepEhbo NiI IaHIOrOM dIy 3anObirAHn MOJIINBOCTI TpaBMyBaHH KOpNCtYbAa IaHIOROBoI IIJKn PO3IPBAHIM LaHIOrOM.
O y BnnaKy po3pny LaHcHora nnIkn 3amHitb Ioro HOBHM, 3BepHyBwHcB do po3diy «BctaHOBHeHHa (3amHa) laHcHra nnIkn».
TOCTPIHЯJI3JIAHIOIgA
NONEPEDJHEH
IIO6 3aio6iHTn HeuacHbM BnnaKam, nepeD cIM 3aBKn BmNkaTe IHCTpymeHT Ta BnMaTe aKyMyJrTOP.
Kpim toro, npaiooun 3 lauorom, 3abKn OraTe cyuhi 3axnci pykabui.
PIMITHA
TocpiIb IaHIOr i perynIOte 06MeHyBaay rIn6HH NocepeHNi WHN, He 3HimaOOn JAAIOr i3 IHCTpyMeHTa. HoJI NaHIOr NINIKI 3ATyNIIHOeTBcR, 36IbUyeTbcra HabaHTaeHHe Ha DBuRyH Ta iHwi DeTani IHCTpyMeHTa i noripuVETbc eEeKTHBHCbPobOTn.
IJIa 3a6e3neueHH ONTHMajbHOIO npOdyKTINBHOCTI IHCTpyMeHTa peryJnPHo roCTpiTb IaHcIg NIIKN.
1. TocpiHnIe3
Kpyrln HauNIOK Tpe6a npNKlaCTn Do Ie3a IaHcIora TaHm YHOM, Oo6 OHa n'raTaNHO NOrO diaMeTp a BnCTyPnA Ha Bd BepXbOo YacTHNOIe3a, Rn oKa3aHO Ha Man. 33. Foctpitb Ie3a, TpmaOnu Hpyrnn HauNIOK NiD KytOM 30^ BiD WnHn, Rn oKa3aHO Ha Man. 34. Pn CbOMy KpyrIn HauNIOK CliD TpMaTn npAMo, Rn oKa3aHO Ha Man. 35. Yci Ie3a IaHcIora Oob'RAKOBO C1iD RoCTpTN iD OHaKOBIM KytOM, IHaKHe eEeKTHBHCtB pOBoTI IHCTpyMeHTa noripwnbcR. BiNoBIDHI KyTn 3arOcTphOBaHHN Ie3 BkAsHO Ha Man. 36. (KpyrIn HauNIOK npOdaetbcR OKpeMo.)
2. PeryIIOBaHHa 6mEHXyBaHa rIi6Hn HNONEPEDHEHHA
He 1yIeBexHn yopnX3eHyBaHnx i 3axnHx npBIDnX IaHOK Ta o6epiraTe ci deTal BiD 6ydb-koROPOdydeOpmaui.
O PeryIIOBaHHo6MeHyBaHIB rIi6HNH MaE 3diIChIOBaTHcB iDIOBIDHO do po3MipIB Ta fOpM MaTepiAIB, IHaKHe MOHe 36IbUNTHcH IMOBIPHCtB 3BOPOTHO ydApY, UO MOHe npn3BeCTn Do TpaBMyBaHH.

YnopHa 3'eHyBaIbHa IaHka
3axncha npnbHa naHka
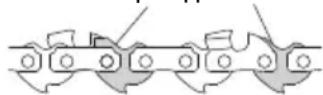
O6MeJyBaichi nn6HnCII BnpiBnTn OHaKOB0, OckIbKn BOHn BNkOpNCOTByoTbcr DJIpeRyIOBaHHa 3aIIN6JeHHnnB DepeBHy.
Haroctpiouyn Launog nniln, nepebipnye o6mexybaq rln6Hn KOHN dpynn nn Tpeti pa3.
Po3micTItb 3'EnHyBauchyobMeKyuBcIB rIn6HnHa IaHucry TaK, uOb oMeKyuBaCi 6yNo BnDHO B K0Io6Ky, i 3a Donomoro nnackoro HnHnHa BupiBnTe YacTuHy, 1o BnCTynae 3a MeKi 3'EnHyBaCu (MaI.38) (3'EnHyBauchyobMeKyuBaICB rIn6HnHa Ta nnackn HanNIOk npoiaotbc OKepeMo).
NicnniHOBaHHo6MeHyBaayr6nHH,3aKpyrntb Ioro nepeHIO qactnHy, k6ylo do zuboro (MaI. 39).
Iicra roctpiHHaHciora 3aHypitb Horo B MaCTnIO dna IaHciora, uo6 3mTN Owypkn.
KIO OwypKn He 3MHTn, IaHcIor i WnHa NINKN WBNKO 3HOWyBaTMyTbCra.
IHΦOPMAZIJI PPO IPNCTPIJ USB
O 3apAka npncptpo USB BiD eIeKtpnHoi MpeXi. (MaJ.48-a)
O 3apnka npnctpoIO USB i 6aTaapei Bi d eIeKtpnHoi MepeKi. (MaI. 48-b)
O IpaBnla 3apAKn npncTpo USB. (MaI.49)
O Kolni 3apny npuctroo USB 3aBepseHo. (MaI. 50)
TEXHICHE OBCJLYTOBYAHHJI INEPEBIPHA
IicJI BnKOpNCTaHHBnKoHaIte OrlJ Ta 06cLyroByBaHH KOKHOI DeTani nepe36epiraHHM IHCTpyMeHTy.
NONEPEДЖEHHA
Ipeed Texo6cnyroByBaHHnMa Ta ORJyOM 3aBHN BmHKaTe npncTpi Ta BmMaTe Noro aKymyIaTOp. Kpim TOrO, BmMaTe wTeNceJIb 3apHOrO npncTpoIO 3 po3eTKn.
1.OrnaIaHcIora
O NepioDnHOr OrJaIaIe IaHIOr. RaIO 3 IaHIOrOM Uocb He TaK, 3aMHiTb Iro BoIbNOBIdHO Do BKa3IBOK y po3dini «BcTaHOBLeHHra (3aMiHa) IaHIOrA nnKnI>.
O NpebipnTe HATr IaHcIora i HaDInHicTb Noro KpinnHeHH.
O PpnnnHtB KopnctyBaHH IHCTpyMeHToM, RkIo NaHcIg 3AtynHbC, I Harocptb NOro BiNobiHO Do Bha3iBOK y po3di «FoctpHHJe3 LaHcIgra».
O PicLa BnKOpNCtAHHInCTpyMeHTa 3MaUyTe LaHcTg Ta uHHy NIIJK MaCTNIOM dIra 3anobirHn Kopo3ii.
OBEPEKHO
Ppauiooun 3 IaHciorom, OJraIte 3axnci pyKaBnci, 06 3ano6irtn TpaBMyBaHHIO.
2.Чишина 6iHоI Кршни Ta BiDciHy raIbMbHoi cTpiHn (MaI.40,41)
Bntpiitb 6ydb-jaKi 3aJIuShKn TnpCn Ha DeTaJax iHCTpyMeHTa.
IPNMITHA
Ipeed uenueHnem 6iHoo KpnKu, BiDckiy raBmbHOI cTpiKn, JIOo6Ka ImaTnla i HnHn nnHn 3Himitb laHpor BIDNOiHO do BkazIBOK y po3diJI «BctaHOBHeHH (3amHa) naHOra nIKN».
3. YnueHH HKOLO6Ha pI MaCTHna (MaI. 42)
Ipeed qHHeHHm JQIO6Ka dIg MaCTnla 3HiIMt b 6iHy KpUkky Ta uHy nIKN.
4. YnueHHa Hnnn nnKn (MaI. 9, 43)
HKIO Tnpca 3aKynopntb na3 wHHn a6o KJIO60kIy MaCTnla, MaCTnlo He IODaBaTmEeBcra, 1O MoKe np3BeCtNo BxOdy IHCTpyMeHTa 3 NaHy.
Pnicra BnKOpNCtAHH IHcTpymeHTa Ta nD Yac 3amHN LaHOra 3HIMITb UHHy I BnDaJIITb BCIO TnpCy, UO HAKoNCHNACb y na3i. (DnBiTbcr «BCTaHOBJeHHA (3aMiHa) LaHOra nnKn»).
5. OrnaBryilbHnx zuToK (MaI. 44)
B DaHOMy DnRhyHi BnKOpNCTOBytcb ByrIbHi ⅢTkn,
JiE BnTpAaHmM MaTePiaJAmN. OckIbKn HaMpH0
3HOWeHi ByrIbHi ⅢTkn MoKyTb npn3BeCTn Do
HeCnpabHocTi DnRhyHa, 3amHItb ix HOBmN ⅢTkAmN,
KoJIu BOHn 6byTyb 3HOWeHi 6In3bKO Do “MeXi
3HOUyBaHHra'. Kpim TORo, 3aBXdN TpMaJte ByrIbHi
ⅢTkn B YnCTOTI Ta nepeBipJNe, ⅢOb BOHn BilbHo
nepeMiUyBaJnca BCEpenHi depKaikB.
DPMITHA
IiD yac 3amHH ByrIbHnx 06OB'3KOBO BnKOpNCTOBy Te ByrIbHi HiKOKI 3 KOJOBNM HOMEPOM 999068.
6. 3amHa ByrilbHnx uitok
BHTARHITbByrIbHy 91Tky, cnoatKy 3nRbwn KpnuKy 91Tkn, a NOTIM 3aehnBwn BnCTyn ByrIbHOi 91Tkn nIOCKOIO BnKpyTKoIO, TOIO, kNOKa3aHO Ha MaI.45. BCTaHOBIOUOHN BYrIbHy 91Tky, BN6epitb HAnpMOK, 3a JKO rINpPyHHENH N KOHTAeT ByrIbHOI 91Tkn (DNB. Man.46) 36iraTmEhCBr i3 dJIraHKOHO KOHTAKTy 3OBHI 91TkoBOi rIB3N. Notim npoToBXHITb II NaIbueM, ROKoKa3aHO Ha Man.47. IicJzboro BcTaHOBIbHa 91Tky KOBNaOH.
OBEPEKHO
O6oB'3KOBO BCTaBTe rOLKy ByrIbHOi uITKn BCEpeHHy NOBepxHi KOHTaKTy 3OBHIuHBoi Tpy6Kn uTKn. (MoJHa BCTaBHn ODHy 3 DBOX HAABHNX rOLOK).
O NpTi6Hb 6yBAAHHM, OCKIbKn 6yDb-RA NaOMnIKA nID Yac ciEi ONEpaui MoKe CnpuHHTN Do DeΦOpMaui IOLKN ByrIbHOI UITKn Ta npIN3BeCTn Do HecnPabHOCTI DBnryHa Ypee3 KOpOTkn Yac.
7. IpepeBipKa MOHTaHHNX TBHNTIB
PeryIpaHNo nepeBipnTe BcIMoHTaXHi rBnHTn i CTeKHe 3aTMM,IO6 BOHN 6yIn HAIDIHO 3aTARHyTI. JHKU BOHN Nocla6nncra, HeraHNO 3aTARHITb IX 3HOBy. JHKU cboRo He 3po6nTu Ka He6bAnictb MoKe npu3BeCTn Do Heueachnx BnnaikIB.
8. Texhuihe 06cnyrobyaHHa DnHyHa
TOLOBHMM KOMNOHEHTOM eJeKTPoIHCTpyMeHTy o6MOTKa DBrHyHa.
PnpndjIaTe HaneJxHy yBary TOMy, 06 06MOTky He 6yNo NOWKoJxHe O Ta/a6o Do He NoTpanuNo MaCTnlo a6o Boda.
9.OrJaH KOHTaKtIB (iHCTpyMeHIT i6aTape)
BnKoHaIte nepeBipKy, uO6 nepeKoHaTncy y BiDcyTHocTi MeTaJIeBoI cTpYHKN NnLy Ha KOHTaKTax. Yac BiD acy BnKoHnyTe nepeBipKy Do, nId Yac Ta nicJra po60Tu.
OBEPEKHO
Budaiitb 3 KOHTaKITb ycIO MetaJIeBy cTpyKHy nII. HeBnKOHaHHra uei BnMOrn MoKe npN3BeCTn Do HecnPapBHOctI.
10.3OBHIIuHryOuHCTHa
KaHIO LaHcIOrOBA nnka 3a6pydHnTbCra, npoTpiB II M'RAKO cyXHO raHcIipKO a60 raHcIipKOIO, 3BOLOKeHO B MnJIbHOMy po3HNi. He BnKOpNCTOByTe dIra CboRO XIoPHi po3HHNKn, 6eH3IN A60 po3HHNKn DIA φap6, OCHJIbKn BOH MoHyTB NOWKODHTn PIACTMaCOBI qACTHNI.
11.36epirahn
IiJVac 36epirahHInCTpyMeHTy BnHOaTe OunueHH Ta ObcIyROByBaHH KOHIO DeTaJI Ta BCTaHOBITKoKyx IaHIOra Ha SHHy NIIKN.
36epiraTe NaHcIOrOBy NnKy No3a MeHaMn DocAnHocTi DiTei 3a Tempepatyp He Bnue 40^
NPMMITHA
36epirahnioHHo-JiTieBx6aTapei.
Nepsh Hix BiHnactn ionHo-nitiebi 6atapei Ha 36epirahn, yneBHITbcra, 10 BOHN NOBHCIO 3apdkeni. Tpmbane 36epirahn (3 mica a6o DOwe) 6atape i3 Hn3bKIM 3apdOM MOKe Pn3BecTNI O noripueHH ixHX xapaKTepncHK, 3OKPema cyTTeBOrO CKOPoehHH Tpmbalocti eKnlyataaii 6atape a6o K He3daTHocTI 6atape ytpmyBaTu 3aprd.
PpoTe 3apAHHH I BnKOpNCtAHNb 6aTapei Dba-n'rtb pa3IB nocnil npn3BOIDnB Do BiHOBJIeHHa Cacy BnKOpNCtAHNb 6aTapei.
JHKUO JN NOBTOPHe 3apdKaHnH I BNKOpNCaHH 6batae He Donomarae i Yac BNKOpNCaHH 6batae yce HADTo KOPOTKn, ue O3Haue, eo IXHi pecypc BnepNaHO i cnid npnd6aTH HOBI 6bataei.
O6EPEKHO
IiHacpo6oTHiDorJyCJIId6paTHdoYbarNmicueBi HOpMn iCTaHdaptN.
BHBIP ARCECYAPIB
Ipeiik akcecyapib daHoro npnctroBka3aHO Ha ctopiHci 388.
BauHbBa iHopmaui npo 6aapei dna 6e3dpoTOBnX eIeHTpOIHcTpymeHTi HiKOKI
3aBKn BnKOpncToByTe fipMObi 6atapei, npn3HaeeHcame dIaHoro IHCTpymeHTy. MHe rapaHTyEmo 6e3neKy iФyHKUioHyBaHHHaUNXeNEKtpoIHCTpymeHTIB npn BnKOpncTaHHI 6atapei, BNTOBJIeHNx He HaWOIO KOMNaHIEO, a60 K PO3i6paHnx i MoDnΦIKOBaHNX 6atapei (B RkNx 6yIn N DEMOHTOBaHI Ta 3aMHeHi raIbBAHHi eIemEHn 6atapei a60 IHwi BHYTpiiHni deTaji).
TAPAHTI
Mn rapaHTyemo, 0o ABTomTuHi iHCTpyMeHTn HiKOKI BnroTOBJIeHI 3rIDHO MICueBHX Bka3iBok. Lra rapaTir He po3IOBcOHyEcTBcHa DeFeHTn a6o NOnKoJKeHHaYepe3 3IOBxuBaHHa, HEnpaBnIbHe KOpNCTyBaHHa 6yNb IacKa, HadiuNt b AToMaTHn IHCTpyMeHT, He po36paHou Nioro, i3 FAPAHTIHIM CEPTNΦIHATOM, Jknn 3haxoDnTbcB KInci IHCTpyKcii, Do ABTopn3oBaHorocepbicHoro ceHTpy HiKOKI.
InΦopmaia npo wym ta Bi6paio
BmipnHBeJnHHn BN3HaYeHi 3riJHo EN60745 i BN3HaHO TaKIMN, 0o BiIIOBIdaOTb ISO 4871.
BmipraHn pibEnb NotyKHOCTi 3ByKy B cnIBBiIDHOweHHI A: 100 dB (A)
BmipraHHPiBeHb TnCHy 3ByKy B cnIBBiIDHOweHHi A: 87 d6 (A)
TOnHbKa K: 3 dB (A).
OdaIte HabyuHnKn.
IobHe 3HaueHHa Bi6pauii (BeKToPHa cymMa TpnaKciAibHoro) Bu3HaueHa 3riJHO EN60745.
ah=4.7M/C2
Ioxn6kaK=1,5M/c2
3a3haeHn pibHe B6paui 6yB BmipHnn 3rIHO cTaNapTHoro Tecty i 6yB BHKOpNCTaHn npn nopIBHHH IHCTpyMeHTIB MIX CO6Oo. BiH MOKe BHKOpNCTyByBaTnca DnI NEPBHHORO BN3HaueHHBnINBy.
NONEPEJXEHNA
O Bi6pauii niD yac cnpaBHHbOro KOpNCyBaHHr MoKe BIdpi3HrTnCRI BID 3aRbIeHO, 3aJeKHO BID cnocoby 3actocyBaHHr IHCTpyMeHTy.
O Bn3haitb 3axoyn 6e3neKn IyIonepaTopa 3riHOn npaKTHHOro 3actocyBaHH (6epyN Do yBarN Bci YacTHn pobOyoro uKny, Taki Jk BmNKaHH IHcTpymEnTy i NOro pObotn BXoJocTy Ha DoaTOK Do BnKOHaHH po6OuX 3aBdaHb).
NPMMITHA
Yepe3 noctiHi DocIiDHEHH I pO3BnTOK, Rki 3diNCHIO HiKOKI, TexHHi XapaHTepnCTnKN MOHyTb 3MiHOBATnC8 be3 nonepdHexHH.
UCYHEHRA HECNPABHOCTE
JaHIO nIac po6Otn IHCTpymeHTa BnHnKaIOb He3BnuaHi O3HaKn, BnKoHaTe diI nepeBipKn IHCTpymeHTa, nepeJIueHi B Ta6Nlci HnKHe. JaHIO np6JIeMy He BdAcTbc8 ycHyTu, 3BepHiTc8 do dInlepa a60 yNoBHOaKeHOrO cepBicHOrO ceHTpy HiKOKI.
- EnektpoiHctpymeHT
He nCnoIb3yIte 3JeKTHpOHnCTpyMeHT, KOrda Bby yctaII HnHaxoIITecb NOD BnHnEM HApKOTnHOB, aIKOROJIa Hn IeHapCTBeHHbIX npenapaTOB.
MrHOBeHHa NOTepB BHmAHn BOBpMa 3KcIyatauN 3JIeKTPOHCTpyMeHTOB MOKeT npBecTu K cepbe3HO TpaBMe.
b) HcnoIb3yIte HNDNBUdyaJIbHbIe cpeIcTBA 3auntbl. Bcerda HaedeBaIte cpeIcTBA 3auntbl I rla3.
3aunTHoe cnapKHeHne, HapnMep, npOTNBONbIeBOe peCnnpaTOp, 3aunTHaO6yBc HeCKoJIb3KOJ NOoWBO, 3aunTHbI WlEMKa KaHn CpeCTBa 3auntbOprAHOB Clyxa, NcNoJIb3yEmbIe DnA COOTBeTCTByIOuNX yCNOBn, yMeHbMaT TpaBMbl.
c) H36eraTe HenpeDhamepeHHoro BHLIOueHnraDBIgatela.Y6eDITecbBTOM,HTOBBbIKIOUaTeJIb HaxoINTcB NOLOHeHn BBIKHOueHn nepei NODHMaHem, nepeHoCKo nnnoDCoeDInHeHem K CeTeBOJ po3eThe n/HnnpotaTHBOMy 6aTapeHOMy hCTOuHNHy nHTAHn.
Ipehenocka 3eHTponHCTpyMeHTOB, KOrda Bbl naLeu DepKHe Ha BbIKNoyateNe, NnN NOcoEINHEHe 3eKTPoHNCTpyMeHToB K CeTeBOI POsetHe, KOrda BblIOUaTeJIb 6yDet HaxOHTbcB B INOJOHeHH BHIIOHeHra, PpIBoNT K HeCuaCThbIM CnyaM.
d) ChHmnte BCE perylnpoBOHbIe IINraeuHbIe KJIIOUnepeBHKIOueHHeM3JIeHTpOHnCTpyMeHTa.
FaeHbI nn peYnnpoBouhI KIOU, OCTaJIeHHbI npKpeNHeHHbIM K BpaauOuecA DeTaN 3JeKtpOnHCTpyMeHTa, MoKeT npNBecTu K NOJyehHIO TpaBMbl.
e) He TepaTe yctOuHBOcTb. Bce Bpemn HmeTe ToHy onOpbl n COxpaHnTe paBHOBeChe.
TO NOMOHe IyUe ynpabTb 3JIeKTPoHnHCTpyMeHTOM B HeIpeBnDeHHbIX CHTyaJnx.
f) OdEBaHTecb HAdIeHaaUM 6pa3OM. He HAdEBAHTe NpocToPhyO ODeHdy Hn HOBEnPbHe N3deJInA. DepeHNTe BOIOcbl, OeHdy IN nepaATKn KaH MOHH DaJIbWe OT DBNHyuxxCaCTeN.
Ipoctopnag OeHda,IOBelenpHbIe N3JeNna NNn HHHbIE BOIOcbl MoryT nonactb B DnKyuueceyactn.
g) Ecn npedymotpehby yctpoicTba n npncoeunHeHn npncnoc6leHn dIy OTbOa H c6opa nbHn, y6eHTecb B TOM, YTO OH npncoeunHeHn HcnoJb3yOTcH NaJIeKaUHM o6pa30M.
HcnoB3ObaHne daHHbIX yCTpoNCTB MOKeT yMeHbWHTb ONaCHOCTN, CBA3aHHbIe C NblbIO.
4) 3KcNlyataunn n 06cnyHbAHne 3JIeHTponHCTpyMeHTOB
a) He neperpyhaTe 3JIeKTPoHnCTpymeHT. IcnoJb3yIte HAdJIeXaUnn DnA BaWero npImeHeHHaJIeKTPoHnCTpymeHT.
HaJIeKaun 3JIeKTPoHnCTpyMeHT 6yJeT BbIOJNHaTB pa6O TY LyUWe HaJeXHeE B TOM peKeHme pa6Otbl, Ha KOTOpBn OH paccuHaH.
b) He nCnoB3yIe 3JeKtpOnHCTpymeHT C HEnCnpaBHBIM BbIHJIIOHaTeIeM, ecJN C erO NOMOuBIO HeJIb3A 6yDet BHIOUHTb N BbIKIOUHTb HHCTpymeHT. KaHdbI 3JeKtpOnHCTpymeHT, KOtOpbIM HeJIb3A yIpaBIAITb C NOMOuBIO BbIHJIIOHaTeIe, 6yDet npEiCTaBIAITb ONaCHOCTb, I eR O6yDet HEo6XoIIMO OTpeMOHTnPOBaTb.
c) OToCoeHNHe TTeNceBHyIO BnIHy OT HCTOuHNka NHTAHN N/INN NOPTaTNBbIb 6aTapeHbI NCTOCHN KNTAHN OT 3JeKTPoHHCTpymeHTa Neped Haayanom BbINOJHEnHa KaOH-Jn60 N3 peryJnPoBOh, nepeD CMeHO npHnAdJIeXHoCTe INH XpaHeHHem 3JeKTPoHHCTpy MeHTOB.
Takne npofnuantuechne Mepbl 6e3oNaCHOCT yMeHbwaT ONaCHOCTb HnpeHaMepeHHoro BHIOUeHn DBuRaTeJIa 3NeKTPoIHNCTpyMeHTa.
d) XpaHnTe HeNCNoJIb3YeMbIe 3JIeKTHpOHnHCTpyMeHTbI B HeJoCTyINHOM dIa JTei MeCTe, H He pa3peWaaHTe IIOJAM, He 3HaIOUIM KaK O6paUaTbCra C 3JIeKTHpOHnHCTpyMeHTOM NIIH He N3yUHBWHM daHHoe pyKOBoODCTBO, pa6oTaTb c 3JIeKTHpOHnHCTpyMeHTom.
3NeKtpOnHCTpyMeHtI npedCTaBnIOT onaCHOctb B pykax HenoIroTOBnEHHbIX NOIb3OBaTeJeN.
e) CoepKHTe 3JIeKTPoHnHCTpyMeHTbI B HcnpaBHOCTN. PpOBepbTe, HeT JH HeCOOCHOCTN HJN 3aEdaHHa DBNHYuNXcA YacteN, NOBpeKHeHHa DetaleN HJN KaKOro- INo6 OpyrO O6ctOaTeNbCTBa, HOTOpoe MOxET IOBnHa Ha yHHcHOnHpOBaHne 3JIeKTPoHnHCTpyMeHTOB.
Pn HauHn NOBpeKdEHHN OTPeMOHTnpynte 3JeKtpOHnCTpymENT nepeedero 3HCnlyaTaunne. BoJIbOoe KOINueCTBO HecuaTbIX CnyaEB CBra3aHO C nIOXm 06ClykHBaHNEM 3JeKtpOHnCTpymETOB.
f) CoepKHTe peHcyuue HHCTpyMeHTbIO octpo 3aTOOeHHbIMN NCHCTbIMN.
HaJIeKaUH M 6pa3OM cOpEkaUneC B HcnpaBHOCTn peKyuIe NHCtpymENTbIC OCTpbIMn peKyuIuMn KpOMKaMn 6ydyT MeHbWe 3aeDaT b 6byT IerYe B yypaBLeHH.
g) IcnoIb3yTe 3JeHTpOHNCTpyMeHT, npHnHaJIeKHOCTH, HacaIK N T.I. B COOTBETCTBn C DaHHbIM pyKOBOdCTBOM, npHnMaB BO BHnMaHHe ycIOBnN O6bEm BblINOJHReMoPa6Otbl.
HcnoB3ObaHne 3JIeKTPoHHCTpyMeHTa DnBbIIOJIHeHn paBOT He nO npMOMy Ha3HaueHnIOMOKeT pInBeCTn K ONaCHO CITyaauu.
MEPA IPEIOCTOPOXHOCTN
AepHnTe nodaIbwe OTeN HEMoUHbIX IIOeN.
Ecnn HnCTpyMeHbI He NcNoB3yIOCTc, Hx CneJyET XpaHNTb B HeOCTynHom dJIa DeTeN HEmoUhbIX IIOeMecTe.
ПРавиЛАТEXнИКИ БЕЗОПACHEСТДЛЯЦЕПОН ПИЛbl
- DepeHnTe BCE qactn TeJa Ha ydaJIeHN nO t cENHOI NJIbI BO Bpemr ee pa6oTbI. Ipeed 3anyckOM cENHOI NJIbI y6eINTEcB, YTO OHa Hn C yEM He COpNIKACAeTCa. KpaTKOBpeMeHHa HEBHIMATEJIbHOCtB BO Bpemr pa6oTbI cENHOI NJIbI MOKeT pINBecTn K TOMy, YTO ODeJda HIn TeNo nonaTy B Hee.
- 063aTeJIbHO DePKeHrTe cENHyIO nIy npABoI pyKoI 3a 3aDIO pYKOHTKy, a IeBOI pyKoI 3a nepeDIOO pyKoTky. EcII NIIy DePKaTb pyKaMn HAObOpT, 3TO yBEnuHBaET ONaCHOCTb TpaBMbl, NO3TOMy HIKOrDa He JeJaTe 3Toro.
3.Дернite 3JIeKTPoHnCTpyMeHT TOnbKO 3a H3OINPOBaHHbIe NOBepXHOCTn 3axBaTa, TaK KaK cENHaJ NIIa MoKeT COpNIKOCHyTBcR Co CkPbITOn IpoBOJHO. CoPNIKOChOBeHne ZenHOI INJIbI C npOBODm "NOd HAnpRAHeHEm" MOKeT pNBEcTN K TOMY, YTO OTKpbITBe MeTaJIINueCHe qAcTH nJIeKTPoHnCTpyMeHTa 6ydyT "IOd HAnpRAHeHEm", n 3TO MoKeT pNBeCTn K NopaaHeHIO ONEpaTopa 3JIeKTPuHeCKHM TOKOM. - NcnoJb3yIte 3aunTHbIe OUKN 3aunTy dJa opraHOB cLyxa. PeKoMeHdyETcR NcNoJIb3OBAtB DOIOJIHNTeJIbHbIe CpeCDTBA 3aunTbI dJa rIoBObl, pyK, HOr n CTynHei. HAdJeHaaJAR 3aunTHaR ODeHda yMeHbShaet ONaCHOCT b TpaBM OT JeTAAIX OCHOJIHOB IN HepeDbUdEHHbIX KOHTAKTOB C cENHOI NIIIOI.
- He nCnoIb3yIte 3JIeKTPnueckyIO cENHyIO NnIy Ha depeBbIax. Pa6Ota C 3JIeKTPnuecko IeHNHO nIIIO npn HaxOHdHnn Ha dpeBe MoKeT pINBeCTN K TpaBMe.
- O6ra3aTeIbHo 06cepebTe HaJIeJHaUyO onOp yIra HOr n pa6oTaIe C 3JIeKTPnuECKo 9enHOn IINIO ToIbKO CToR Ha yCToYuBO, 6eONacHO u POBHO NOBepxHOCTn. Ppi pa6oTe Ha cKOB3kNx INI HeycToHNBbIX NOBepXHOCTax, HApIMep, JecTHNuax, MOHHo NOTepaTb paBHOBecne INI 3a KOHTpOlb 3JIeKTPnuECKO 9ENHO INIOI.
- Pn pe3ke HanpJKeHHbIX Bcok onacaiTecb nx 6paTHoro BbIPrMaHEnra. Pn BBICBO60KDeHN HaTKeHNA BOLOKOH DpeBecHHbl BbIPrMAIOUneCe BETKN MOryT ydapntb OepaTopa H/nn PnpBeCTN K NOTEpe KOHTPOJRA 3a ZENHOI NIOJ.
8.БyTe OcOeHb BHIMaTeIbHbI nppe3Ke KcyTapHKnOB MIOJIObIX DepeBbeB. H6Kne MaTePnaJIb MOrY T nonJaTb B ueHHy IO NnIy N ydApNTb Bac nIIN pInBeCTN K IOTepe paBHObecnra.
9. Ppi nepehocke ueHnHnPiIbI depKHTe ee 3a nepeedHOpykoTHy B BblIOueHHOM COCToHn H Ha pacctoHnOT TeJa. Ppi TpaHcnpTnpOBKe IIN XpaHeHN ueHNOIbIbO6ra3aTeBHO NcIOJIb3yIte KpbIshky HanpaBIAIOUeIINbI. PpaBnBHOe ObaPeHne C cHNoH nIOJmyEnbShaET BepoTHOCTb HEOKndaHHOro KOHTaKTa C DBNkuEeNnHbOH ueBIO
10. CneyuTe yKa3aHnM nO cMa3He, HataKeHIO nIbI n 3ameHe npHaJleXHoCTe.HenpaBnIbHO hTaHyTaN IIN cMa3aHHa YcENb MOKET CLOMaTbCn IIN yBeJIuNHTB BepoTHOCTb OTdauN.
11. DepeHnTe pyKoAeTKn cyxImn, YIcTBIMn H CBO6OaHbIMn OT Macna n KInpa. HInpHbIe, MaCJIaHbIe pyKoAeTKn CKoJIb3KHe, YTO npINbOaNT K NToPepe KOHTPOJIa.
12. PeKbTe TolbKO DepeBO.He HcNoJb3yIte cenHyIO Nny dIe HnpeDHa3HaeyHbIX ceJeI.HanpImep:He IcNoJb3yIte cENHyIO Nny dIe pe3Kn PJIaCTMaCCbl, KaMeHHo KlaKn IIN He DepeBAAHbIX CTPONTbHbIX MaTePnaIOB. IcNoJb3OBAHne cENHOI NIIbI dIg ONepaun, OTInuAIOUxCOr OT pPeHa3HaueHHbIX, MOKeT npNBecTI K ONaChbIM CITYaAqJam.
PnunHbOtdaun 3aunTaOT Hee onepatopa: (Pnc.2)
Otdaay MoKet npOn3oHTN, KOrDa nepeHnra Yactb Nn HakoHeuHK HanpaBraIOUeI uINbI KacaETcnpedMeTa, Nn KOrDa dpeBecHa np6JIuaeTcN 3aueMReT nIbHyIO cenb npn pe3Ke.
HOHTaHT HAKOHeHHKa B HEKOTOpbIX CnyyAax MOHcET Bbl3BaTb BHe3aHHyO o6paTHyO peaKuHIO, PnIBoDraUyIO K OTdAye HApabJIooSei WInHb BBepx N Ha3ad B HApabJIeHNI ONepaTopa.
3aueMJIeHne NIIbHOI cENBMeCTe C HakoHeYHKOM HappaBIAIOUeI 5HHb MoKHeT 6bICTpo OTKHNyTB HappaBIAIOUyO 5HHy Ha3aD B HappaBJIeHNI ONepaTopa.
JIIO6a H3 3THX peakun MOKeT npNBecTN K NOTepe KOHTPOJRA 3a NINo, YTO MOKeT pNIBeCTN K cepbe3HO TpaBme. He noIaraiTeCB ype3MepHO Ha npDeoxpAHNTeHbHe IyCTPOINCTBa, BCTPOeHNbIE BCamy NIny. KaK noJIb3OBaTeIIO NINbHO UEN, Bam Heo6xOIMo pINHrTB ONPeJeHHbIE JeINCTBnA DIA npDeOTBpaueHnreHcYacTHbIX ClyuaeB IN TpaBM BO BpemraPabot nO pe3Ke.
Otdaaya YBIAETCA pe3yIbTaOM HnpaBnIbHOro
NCIOJIb3OBAHN INCTpyMeHTA N/INn HnPaBnIBHbIX
npoeDyp NIN yCIOBn pa60TBI, N 3TORO MOHHO
N36eKaTb, BblIOJHRA COOTBetCTBYIOUHe MEPbl
npedocTOPoHHoCTNI, pInBeDEHHbIE HnKe:
O Obecneythe HadeKhbl 3axBaT, 06XBaTHB 60JIbHIM PaJIbIeM N OCTaJIbHbIMn PaJIbIaAMn pyKOarTKI cENHO IINbI, DEpHXac OBeHMpyKaMn 3a INLy n paCNOJIOHN BTeIO npKTH, YTObIb 6bITb yCTOuHBbIM K CINAm OTdauN. CNbIOTDAuN MOrYT KOHTPOJINPOBaTBcA ONepaTOPOM, ECIN BbINOJIHeHBI COOTBETCTBYUOnne MEPblnpEOctOpOHNoCTn. He donyckaiTe CBO6oHoro DBNXKeHNAIIbHOH cENI.
He npnIaIbIaIte Ype3MepHbIe yCUNIaI HpeKbTe Bblwe yPOBHNIIeU. 3To NOMORAET PpeDToBpaTHTb HeHyXhBI KOHTaKT C HAKOHeYNIKOM I OBeCEneHBAET LyuHm KOnTpOJIb 3a CEINHO INIOB B HeoKnDaHHbx CNTyaunx.
OДЯЗAMeHbI HcNoJIb3yIte ToJIbKO WInHbI N cENH, yKa3aHHbIe npOn3BOJnteIem. HenpaBnJIbHa 3aMeHa WInHbI INI NcEN MoKET npINBeCTN K NOJOMHe cENN I/ INIOTdaue.
O BbINOJIHnTe yka3aHnI npOn3BOJNTeIaNo 3aTOUKe n yxOy 3a nnIbHOu cIbIO. YMeHbIeHne BbcOTbl rIy6HOMepa MoKet pINBecTn K ycHHeHHo OTdaYe.
ДОПОЛНТЕЛьнbie ПРЕДУПЕЖDEHNY NO 6E3ОПАСHOCTN
- Pa6oTaIe 6e3 HapRjHEnH. KpOme TOrO Bcerda depKHTe TeIO B TeJIe.
2.перд haayalom pa60tI NOHOCtbIO obdymaTe Heo6xOIMbIe pa6OHyne npOueDpybI n pa6OtaIte TaK, YTObI He dOnyckaTb npOncseCTBnA, HnAYe MoJcET npOn3OHTn TpaBMa.
3.He nCnoBzYnTe npn nIoxoN norOe, Hnnpmep, npn CnIbHOM BcTpe,doKJe, cHRe, TymHe, ININ B MeCTax, rDe yacto 6bIBaIOT kAMHeNaDbI ININ O6BaIbl.
B nIIOxyIO norOy MOKeT 6bITb CHNKeHa cNoCo6HOCTb K npINHrTIO npaBnIbHbIX peWeHn, a Bn6paunr MOKeT npINBeCTN K HecCaTbIO.
4.Пи nIloxoBnDnMocTn,HanpImep,B nIoxyo norOdy HIN HOybIO,He NCNoJb3yIte INCTpyMeHT. Kpome TOrO He NcNoJIb3yIte erO BdoJb HIN B MeCTax, NOdBepKeHHbIX BO3dEInCTBnIO DoJDA.
HeycToHnBaonopaIHa Hor n noTepe paBHOBecn MoryT pNBecTN K HeCAcTHOMy CnyHaHO.
5. Ipeed hauaIom paobtI npoBepTe HappaBIAIOUO uHHy NnIbHyU cenb.
O Ecn HnnpabIIOUa IINHa NIN NINbHAne TpeChyIn, INN IN3dEInne NOcapanaHO INN CORHyTo, He NCnOJIb3yIte erO.
O PpOBepbTe HaJeKHOCTb yCTaHOBKn HAnpaBJIIOUeI WnHbI NIIbHOJ cEN. EcNn HApBaJIIOUaJ WnHa IINI INIbHa JcENb CLOMaHbI INIcMeUeHbI, 3TO MOKeT npNBecTI K HeCHAcTHOMy clyuAo.
6.перд НаалOM pa6oTbI y6eHITecb, YTO pepeKIOUaTeJIb He cpa6aTbIBaET, noka He 6ydeT HaKaTa KHOJa Ka 6JOKuPOBKn.
EcIn yCToBTO pa6oTaT He npaBnIbHo, HEmeJleHNOpeKpaTnte NcNoJIb3OBAHne N O6paTntEcB 3apeMOHTOM B yNOnHOMOueHHbI YeHTp TEXHueCKORO 06cJIyXnBaHHaHI KOKI.
- IpaBnIbHO yCTaHOBnTE nIbHyIO ceNb B COOTBcTcBnC pyKOBOcTBOM NO 3KcIyatauH.
Pn HnnpaBnBHOYcTaHOBKe NnBbHaN cenb BbIeT n3 HanpaBIAIOUe WnHbI N 3TO MOKET PnBeCTN K TpaMe. - Hn B KOem clyuae He ydaJIaTe HNKaHne npedoxpahnteIbHbIe ycTpoNCTBa, KOTOpbIMN OchaueHa cENHaa PIIa (Topmo3HO pblar, KHOJa 6loKnPOBKN, fHKCaTOP cENn n dp.).
Kpome TOrO He H3MeHrIe N OTHIOuAaTe INX. 3TO MoKeT npBecTn K TpaBMe. - B cIeNyUOxN Cnyuax BbIKIOUHTe INHCTpyMeHT uyeiTEcB, YTO NIIbHaA Zenb 60JIbWe He DnHexTcA:
O KOrda OHa He NcNoJIb3YeTcH JIN BO BpeMpeMOHTa.
OПипелремшенкHOBOMYMeCTypa60TbI.
O Bo Bpemr npOBepHn, HacTpoNn nn 3aMeHbI nIbHOI cenn, HanpaBnIOUeJ uINhbl, fytlaPa ceNn nn dpynx qacteI.
O Pn 3aJIbKHe MacJa dIy cIeH.
O Pn ydaJIeHnn nbIIN np. c KOpnyca.
O Pn ydaJIeHnn n3 pa6oey ObIaCTn npenTCTBn, Mycopa nn ONIIIOK, 6pa3OBaBuxxC8 BO BpeMa pa6oTbl.
O KOrda BbI OTKlaIbIbAeTe HNCTpyMeHT NIN OTxOJNTe OT Hero.
O Hn He ecn Bbl yBCTByeTe onaCHOctb nn OKn daTe yrpo3y.
Ecnn nIbnae enbe eae DBNKeTc, MoKeT npOn3oHTn HeCuaCThbl CnyaH.
10.B 6eem cnyae pa6Oy CJeIyET BbIOJHrTb HINBnDyaJIbHO. Ppi BBIOJHeHn pa6Otbl HeCKoJIbKIMNIIOJbMNI OecneYbTe DOCTaTOHoe npocTpahCTBO MEJdy HmN.
B yactHOCTn, npny6he cTOnux DepeBBeB nn pa6ote Ha cnlohe, ecnn Bbl npednojaraete, yTO depeBbya YnaYr, noHaTcR NIN COCKOJIb3HyT, y6eIntecb, yTO 3TO He npedctabJreT onaCHOCTn IIN dpyrnx pa6oTHNKOB.
- CoxpanHne He MeHee 15 M Do DpynX IIOJe. Kpome Toro npn pa6ote HeCKOJIbKHX IIOJe coxpanHne 15 M nIN 60JIbWe MeJdy HIMN.
O CyueCTByeT onaHocTb ydapa npn paKnDbIbAHnn n Dpynx npOnCseCTBnAx.
O 3apahee noIroTOBbTe CnHaJIb CBNCTKOM n np. n onpeJeIte COOTBeTcTBYIOUne CNOCObI KOHTaKTa C dpyrIMn pa6oTHiKaMn. - Ipeed py6koI CToIux X DepeBbeB BbINOJIHInTe CLeDyUoIe JeCTBnR:
O Do haHaIpa y6Kn OnpeJeINTe 6e3oNaChyIO 3BaKaYauNIO.
O 3apahee y6epnTe npenrTCTBna (HaNPmep, BeTKN, KycTbl).
Ha ochobAHn BCECTOPOHHe OeHKn COCTOHN HaepBBeB Dnpy6Kn (HaNPmEp, HAnIOHa CTBOJa, HaTJKeHne BETBei) OKpyKaHOSei CHTyaUHN (HaNPmEp, COCTOHNc COCEHNx DepeBBeB, HAnuNpEnrTCTBn, peIbeFa MeCTHOCTN, BeTpA), ONpeJeNte, Kyda 6ydyT NaaTb CToJIune DepeBBa, a 3aTem Bbipa6oTaIne IpoueDpy py6Kn. Be3OTBeTCTBeHHa py6Ka MoKet PnPBecTH K TpaBMe.
13.Bo Bpemr py6kntoAUXx DepeBbeB BbINOHNTe CneDyUOuNe JeCTBnR:
Bo Bpempa6oTb6yDbTe OHeHb BHIMaTeIbHbIOTHOCHTeIbHO HApPaBJIeHHN, B KOTOpOM NaadAOTdepeBBJ.
O Pn paBoTe Ha cKIOHe y6eHntecb, YTO DepeBO He NOKaHTcra, Bcerda paBoTaIte Ha cKIOHe, NdyuSema BBepx.
Korda depeBO HaHT NaaTb, BbIKHOnTe HcTpymeHT, OCMOTpNTecb BOKpyr HemeJeHHO yndTe B 6e3oNaCHOE MecTo.
O Bo Bpempa6oTbI, ecn nHbHa cenb nn HappaBIAUaA uHa 3acTpyHT B DepeBe, BbIKIOHTe INHCTpyMeHT NcNOJb3yHTe KInH.
14.BoBpemHnCNOJb3OBaHHn,ecn npOn3BOJTeJIbHOCTb HNCTpyMeHTa yxuJhaeTc, nIN Bbl 3aMeTHNI Heo6bIyHbI 3ByK nINn BN6paunIO,HeMeJLeHNO BblIKJIOHTe NHCPTpyMeHT nPpeKpaTne IcNoJIb3OBAHne, nBepHNTe erO BynolHOMOeHHbI ueTp texHueCKoro 0cbNyHXBaHHaHiKOKI dRn BblONHeHHn npOBepKn nIn pemOHTa. Ecn Bbl npOdoJHKte nCNOJb3OBaHHne, MoKeT npOn3OHTn TpaMa.
15.EcnHcTpyMeHT CnyaHNO ynaTe HnNoDBeRHeTcY
yDApy,TuaTeIbHO npOBepbTe erO Ha HaNue He
NoBpeKdEHN Nn TpeuH N y6eINTecb B OTCyTCTBn
DeOpmaun.
EcIn HNcTpyMeHT NOBpeKdEHN, IMeET TpeuHbI Nn
DeOpMnPOBaJIcH, MoKeT pOn3oITn TpaBMa. - Pn TpaHcnpTnpOBKe IHCTpyMeHTa Ha aBTOMoBnIe 3aKpeNITe erO, YTObI He OJNYCtNTb erO nepeMeueHn. CyueCTByeT onaChocTh hechacthoro clyuHa.
- He BkHouaIte HNCTpymeHT, noka npHKpeJIen FyTJAp cenn. 3TO MOKET pNBecTN K TpaBME.
- Y6eHNTecb, yTO B MaTePnaIe HeT rBO3deN I pyrnx NOCTOPOHnIX npeDMETOB. EcIn NIIbHaA ueB yApNTcR O rBO3Db N T.I., MOHeT npOn3oHTn TpaMa.
19.Bo n36eHAnHe 3acTpeBaHnHa HnpaBnIooJe
HnHb B MaTePnaIe npn O6py6Ke Ha KpaIO IIN npn
HaBnCaHnMaTePnAba BO BpeM pe3Kn yCTaHOBnTe
NoDnepKnBaIOuOyIO pNaTΦOpMy PpOM C MeCTOM
pe3Kn.
EcIn HnPaBnIoUa IINHa 3acTprHET, MoJcET
npOn30HT TpaBA.
20.При Heo6xOIMOCTHn TpaHCNOpTnOBKN INXpAHeHINHCTpyMeHTa NocIe IcNoJIb3OBAHNJ IN6O ydaJIInTe NIIbHyU cENb, IIN6 OpiKpeNITe cyTIAr pCENn. KOHTaNT INIbHOJ cENN C TeIOM MoJET PnIBeCTn K TpaBMe.
21. YxahnBaIte 3a INHCTpyMeHToM HndJeKaUIM O6pa3OM.
O Dnna oecneueHn Hnboe 6e3onachoro n 300fKeTnBHO BbINOHeHn pa6oTb yXaHNBaNTe 3a nnlbHOI cENbIO, YTo6bl oecneHTb ONTMaJIbHbIpeKHyuie XapaKTepnCTnK.
O Pn 3aMeHe NJIbHOI CEHN HAnpaBIAIOe IINHbI, TEXHuecHOM O6CJyHXIBAHIN KOpNycA, 3aJIbHE MaCna n dp. CNeDyTe pyKOBODCTBy NO 3KcNlyaTaunn.
22. 06paTntecb B mara3nH dIy peMOHTa INHCTpyMeHTa.
He MoHnΦnpyuTe 3To n3dJIne, TaK KaH OHO yKe yDObIeTBOpReT npImeHmblM CTaHApTaM 6e3oNaChOCTN.
OДЯ BbINOLHHeHn BCEx BnIOB peMOHTa O6ra3aTeNbHO
O6paIaJIteCb ByNoIHomOueHHbI YeHTp TexHueCKOro
06cnyKbAHnHiKOKI.
IOnbITka CamOCToTaeHbHoro peMOHTa HnCTpyMeHa
MOKe TnpBeCTn K HechAcTHOMy CnyaHo NII TpaBMe.
23. Korda nHcTpymeHT He nCNoIb3yETcra, xpaHnTe ero HndJeKaunm o6pa3om. CneIte MacIO IyIa cENI NOMeCTHTe B cyXoe MeCTO BHe DOCTyNa DeTeN HIN B 3anepTOE MecTo.
24. Ecn npdeynpeKdaOuHnKaIeNky 60JIbwe He BnDHO, CHIMITE ee nnn ydaTIte DpyrM CnOCoBOM, a 3aTeM HaKeIeTHe HOyIO npdeynpeKdaOuHnHaKLeNHy. IIN POnyuEHn NpdeynpeKdaIOUe HnKaIeKNo 6paTInTECB ynoHOMOeHHbI ueHTp TexHueCKoro 6cbNyKBaHHa HiKOKI.
25. Ppi pa6oTe co6IIOJaIe COOTBeTCTByIOJIe MeCTHbIe npabNla I NOIOKeHHJ.
26.He HcnoIb3yIte yCtpoIcTBO, ecIn HHCTpyMeHT nn KOHTaHTbl 6batapei (KpeJIeHne 6batapei) DeΦOpMnPOBaHbl. YcTaHOBka 6batapei B INHCTpyMeHT MOKeT pINBecTI K KopoTkOMy 3aMbIkaHNIO, KOtOpoe MOKeT CTaTb PpUHHoN DblMOBblJeHENr NIN BOcIIaMeHENr.
27.ДаJIЯnte CTpyKHy I nbIb C KOHTaKTOB INHCTpyMeHTa (KpeJIeHHe 6aTapeN).
O Ipepe HcnoJb3oBaHnem y6eHntecb B OTCyTCTBm MeTaJIInueckOHTpyHKN INblIN B oBlaactu KOHTaKTOB.
Bo Bpemn HcnoIb3OBaHn CtapaNtEcB n36eRaTb nonadHn MeTaJIInuecko CTpyKKn NIN nbIIN C HHCTpyMeHTa Ha 6aTapeHO.
O Pn npnoctaHOBHe pa60tI IIN NocLe HcNoJIb3OBAHn He OCTaBIAIte INCTpyMeHT B MeCTax, rJe Ha Hero OceDaTb CTPyKHa IIN IIbIb. 3TO MOKeT pInBeCTn K KopoTHOMy 3aMbIKAHIO, KOToPoE MOKeT CTaTB pInuHOn IbIMOBbIeJIeHn IIN BOCnIaMeHeHn.
MEPbI INPEdoCTOPOHHOCTNДЛЯ BATAPEN I 3APrAnHOYUCTPOIcTBA
- 3apKaIte 6aTapeo npn OkpyKaIOSei Tempeatype -10-40°C.Tempeatypa Hnke -10°C npnbEdet K Upe3MepHOH 3apJKe, YTO npedCTabJIeT ONaCHOCTb. BaTapeo HeBO3MOHHO 3apJHaT npn Tempeatype, npebblauOSei 40°C. Hanbolee 6laIaropnTHaH Tempeatypa IJIa 3apJdKn 6aTapeu coCTabJIeT OT 20°C Do 25°C.
-
He nCnoIb3yIte 3apJdHoe ycTpoiCtBO He nppepbIBHO. KOrda 3apJdHa OJHO B6aTapen 6yDet NOLHOCTbIO 3aBepseHa, Heo6xOIMO OCTaBnTB 3apJdHoe ycTpoiCTBO B BBIKIOHeHHOM COCTOAHN INPImePHo Ha 15 MInHyT, nepeD TeM KaK pNcTynITb K 3apJdHe cJeDuOuE 6bTapen.
-
He no3B0JIaTe NOCTOpOHnIM BeueCTbAM nonaTaTb B OTBepCTne IINIOHJIIOUeHENIAKKMyIaTOPHOb aTapeu.
- HnKOrda He pa3bnpaIte aKKyMylrTopHyIO 6aTapeHO 3apRdHoe yCTpOJCTBO.
- HnKOrda He 3aMbIkaIte aHHyMylTOpHyIO 6aTapeIO HaKOpOTko.
3ambikaHne 6atape HnKOpOTNO npBBeTe K pe3kOMy yBeIuHEnIO ToKa n NpeIepReBy. B pe3yIbTaTe 6atape croPIT nn 6byTe NOBpeKdHa.
- He 6pocaiTe 6aTapeIO B OOrHb.
IIOOHOHKeHHa 6aTapee MoKet B3OpBaTbCra. - Испόльзоваиме отравочиьатуг по ветдд К поврждению заюногу усточь.
- OthecnTe nCnoJb3ObaHHbe 6aTapeu B MaRa3H, rDe OHn 6blnn npNo6peTeHb, eCIn cPoK cnYkb6bl 6aTapeu Nocne 3apAKn CTaHET CImWKOM KOpOTHM dJa IN npakTtueckoro nCnoJb3ObaHHa. He yTnIIN3npyTe OTPa6oTaHHbe 6aTapeu CamOCToTeNbHO.
9.He BCTaBnTe KaOH-Jin6o NoctOpHnnpdMeT B 电IIN BO3DyWHO BEHTNIAuN 3aprHOrO yCTpOnCTBa.
IonoaHHe MeTaJIInuecknX npedMeTOB IJIeKOBocIIaMeHraOuXcMaTePnaIOB B ⅢeJIb BO3dyUHoi BeHTnJIaCIN 3aprAnHO yCTpoiCTBa MOKeT IpiBecTn K NopAkeHIO 3JeKtpueeChm TOKOM IJI K IOBpeJdeHIO 3aprAnHO yCTpoiCTBa.
MEPbI INPEdoCTOPOJXHOCTN INPOOBPAUeHn C NOHNO-JINTHEBOIAKKUMyJIaTOPHOJ BATAPEEIN
C zelbIO npodHeHcpoKa clyk6bl HNOHHO-lNTneBa 6aTapeOcHaueHa fYHKuEe3aunTbI dIpaNOCtAHOBKn pa3pndK.
B clyuayx 1-3, onncahhblx Hnke, npn nCnoIb3ObaHnn daHHoro npdykta, MOTOP MOKeT OCTaHOBNtbcra, daKe ecIn Bbl HaKImaeTe BbIKIOaTeInb. 3TO He RbIeTcR HeNCpabHocTbIO, TaK KaK 3TO CJIeCTBHe Cpa6aTbIBAHN HfHKUIN 3aUHTbl.
- Korda moaHocTb 6atape npoDolkae T CHHaTbca, DBnraTeIb BbIKIOHaeTc.
B 3TOM cIyae Heo6xOIMo HEmeIeHHO 3apAITb 6aTapeIO. - EcIn INHCTpyMeHT nepepyKeH, DBnIaTeJIb MOHeT OCTaHOBNTbCra. B TAKoN CNTyaUIN Heo6XoDnMO OTNyCTNTb BblIKIOuTaJIb INHCTpyMeHTa N yCTpaHNTb npuHHbI nepepy3Kn. PocJe 3TOrO MoKHO npoDoJHKNTb pa60Ty.
- EcIn 6atape npepeIacb npn neperpy3Ke, 6atapeHoe nHTaHHe MOKET 3aKOHHTbcra.
B TaKOM cLyuae, npeKpaTnTe NcNoIb3ObaTb 6aTaapeo I daIte eN ocTbITb. Pocne 3TOrO, MoKeTe BHOBb eE NCNoJIb3ObaTb.
Kpome TOrO, pIpmnte BO BHNMaHne cJeDyUoJne npedynpejckdEHHN npeDocTepeXeHHN.
PNEyynPEXDEHNE
Bo n36eKaHHe yTeuKn 3apraJa 6aTapeu, TeIIOo6pa3OBAHnI, DbIMOBblJeLHeNn, B3pbIBa N 3aropAHnI, y6eINTecb, qTO CO6JIOpAOTcra CneDyUOJNe Mepbl npedocTopoKHOCTn:
- Y6eIITecb B TOM, YTO Ha 6aTapee HeT MeTaJIInuecHOn CTpyKHN IIblIN.
O Bo Bpempaobtby6eHNTecb,yToHa6aTapeIO He HaceLaMeTaJIINueckaCTpyKKaIbJIb.
O y6eHITecb,HToHa6aTapeHHe HaceLaMeTaIINuecka CTpyKHa HbIb, KOtOpaaNoIaAet Ha 3apJHoe ycTpoiCTBO BO BpeMa pa60Tbl.
He xpaHnte HeNCNoJIb3OBAHHy 6aTapeo B MecTe, OTHpBtOM dIg MeTJIHuecKo CTpyKHN IIbln.
O Ipeed XpaHeHnem 6aTapei npoTpnte Bc0 MeTaJIInueChyIO CTpyKHy INbIbB MeCTe ee XpaHeHn H He XpaHnte 6aTapeIO BmecTe C MeTaJIInueCheKHMn IpeMeTamN (6oJTamN, TBO3dAmN n T.D.)
2. He npokalbIbaiTe 6aTapeIO ocTpbiIMn ppeMeTaMn, Hapnpimep, rBO3dEm, He 6eHTe MOlOTKOM, He HAcTyNaIte Ha Hee, He BbIKNbIbAIaIe N He IOnDaBaIte 6aTapeIO CInhBbIM MexaHnueChm ydapaM.
3.He nCnoIb3yIte BHO NOBpeJDeHHbIE 1eΦoMpOBoAHbIe 6aTapeN.
4. He nCnoJb3yIte 6aTaapeIO, nImMeHra IOnJIpaHocTb.
5. He coeHnHrTe HEnocpeDCTBeHHO C 3JeKTPnueckHMn BbIXoJamN NIN MaUHHbIMN po3eTKaMn DJI npHKypNBHaHr CNrapeT.
6.He nCnoJb3yIe 6aTapeo c ueJIbIO, KOToPA npOTnBOpeuHT yKa3aHHbIM.
7. EcHHe ydaetc npOn3BecTn 3apAnHy 6aTapen daKe no HCTeHm ONpeJeIeHnHO BpeMeH nIpe3apAnH, HEmdIeHNO pKeKpaTHTe DaJIbHeNuyIO nepe3apAnHy.
8. He nomeuaiTe Hne noDBepraIte 6aTapeIO BO3dEiCTBnIO BbICOKHX TEMpepaTyp NIN BBICOKOTo DaBJIeHnRA, TaIKX KaK B MmKpOBIoHOBOI NeHN, CyUINHe NN KoHTeHHepe BbICOKO To DaBJIeHnRA.
9.ДернITEВдал�OTOrHЯ,OCO6eHHNoocIeOBHApUHeHn yTeuK3apraJaNIINoCTOpOHReTo 3anaXa.
10.He nCnoB3yIe T B NOMEueHnX, rIe BbIpa6aTbIBaETcR cnIbHOe cTaTHueCKoe 3JIeKTpUYeCTBO.
11.Bcnyae yTeuKn 6aTapei, nocToPOHrero 3anaxa, TeNIOO6pa3OBaHHn, BbIeBtAHn IIN DeOpMaunn, IIN KaKHX-JIn6 aHOpMaJIbHbIX PpI3HaKOB BO BpeMn HCNoJIb3OBaHHn, Nepe3apJdKn IIN XpaHeHNr HEmdJeHNO ydaJIte 6aTaapeo C npIbopa IIN 3apJdHOrO yCTpoiCTBa N He HcNoJIb3yIte ee B daJIbHeHWeM.
12.He norpykaIte aKHyMylrTOPHyIO 6aTapeIO B Body H He DOnyckaIte IonoJaHn JNkIOCTn. IonoJaHne npOBoJusEe JNkIOCTn, HApPImep, BOdb MoKeT CTAb T npUHHoN IOBpeKdEHn, KOTOpoe npNBedeT K NOXapy HIN B3pblBy. XpaHnte aKKMyJIrTOphyIO 6aTapeIO B CyXOM npoxlaHOM MeTe, BdaJIn OT rOpOuNX IN IerKOBocrIamaHeHIOxxCra MATEpnaJIoB. CJeDyET N36eRaT b CpeDb cHaJInuHem arpeccNBbIX ra3OB.
OCTOPOXHO
- BcnyaeecnJHKIOCTb, KOtOpaB bIteKaeT c6aTapeN, nonaAet B rna3a, He Tpnte INx, a npOMoIte INx YHCTOBoDOn, HApnpMep, IpTOUHO, N He3aMeDJIHTeJIbHO 6paTInTeCb K BpaCy.
Ecn He npHrTb Mepbl, HnDkoCTb MoKeT Bbl3BaTb rna3HbI np6JIembl. - EcIn Hnndoctb nonadaet Ha KOny IIN OJeKdy, He3aMeIInTeJbHO XopoIo npOMoIte INX YNCTO BODoHapnpMep, npOTouHoN.
CyueCTByeT BO3MOXHOCTb NOBJIeHn pa3paKeHn Ha KOHe. - EcIn BO Bpem npBoro nCnoB3ObaHn6bTapeBbl 06hApyKHTe pKaABHy, NOCTOPOHn 3anax,peperpeBaHne, o6ecuBeuBaHne, deOpmauIO u/nnIpyrue OTHLOHeHn, PpeKpaTHe NCNoJb3ObaHne INBepHnte ee CBOeMy NoCTaBunHy nnnpoDaBu.
IPEDyPPEXDEHNE
Pn nonaHnn npoBraXn HhOpDhIX TeHa nOJIoc 6aTapeu BO3MOHXo KopoTHKe 3aMbIkaHne, YTO MoKHe npNBecTN K NOxapy. CJeIeTe 3a 3TNm npn XpaHeHHn 6batapeu.
He xpaHnte npoBOAnuI cyO,CTpyHHy, rBO3n, CTaJIbHyIO nII npyryIO npoBOIoHy B OdHO yNaHOBHe C NHCtpyMeHToM.
Bo n36eKaHHe KOpOTHO 3aMbIHaHn yCTaHOBHTe 6atapeIO B 3JIeHTpOHHCTpyMeHT HIN, npH OTCyTCTBm BEHTnIaHIOHHbIX OTBepCTn, XpaHNTe eB ByynakOBHe. (Cm.Pnc.3)
OTHOCHTeJIbHO TPAHCNoPTnPOBKn INTN- HOHHO BATAPEI
Pn TpaHcnpTnpOBHe IHTN-NHOHHo 6aTapeu co6JIOdaIte CJeDyUOune MepbI npedocToPOxHOCTH.
PNEyPENKDEHNE
YBeIDOMTe TpaHCnOpTHyIO KOMNaHIO, YTO ynaKOBKa
CoDEpHHT LINTN-NOHHyO 6aTapeIO, COObUHTe
KOMNaHn ee BbIXoNDHyIO MOuHOCTb N CLeDyIte
HNCtpyKuJnM TpaHCnOpTHoN KOMNaHn np OpraHn3aCNI
TpaHCnOpTnpOBKn.
OЛNTH-NONHBIE 6aTapeN, KOtOpBie npeBbIaIOT MOUHOCTb 100 Bt.4., CHTaIOTcno KlaCnHkaunrpy3OB pInHaJedEkaunM K ONaChbIM TObApam NTpe6yIOT npImeHeHH cneuaJIbHbIX npOceDyp.
OДЯТранспортувиЗа Граниу Heo6xOДИМOC6IIOdaTbMeHJyHapOДHOM3aKHOДaTeJIbCTBeHOPMbI NIOLOXeHnCtpaHbI Ha3HaueHn.
BbIXoHaMaMOsHOCtB

2-3-3HaHbI HOMep
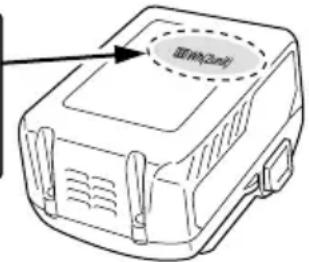
MEPbI INPEAOCTOPOXHOCTN IPNIPODCOEINHEHNN YCTPOICTBAUSB (UC18YSL3)
Pn BO3HKnHOBHeHn HeoJnDaHHo Npo6IeMbI DaHHbIe Ha yCTpOyCTBe USB, NOCDoeHNHeHOM K 3TOMy H3DeJIIO, MOYr 6bITb NOBpeKJeHbI IIN yTeprHbI. O6ra3aTeJbHo BcERda DeJaTe pe3epBHyIO KOJIIO JIO6bIX daHHbIX, KOtOpbie CoedePKHT yCTpOyCTBO USB, nepei HCNoJIb3OBAHHem C 3TNM I3DeJIeHM.
PnMNTe K CBeHeHIO, YTO HaWa KOMNaHn He Hecet a6COJIIOTHo HnKaKoN OTBcTCTBEHHOCTn 3a JIObIe DaHHbIe, COxpaHeHHbIe Ha yCTpOcTBe USB, KOtOpbIe RBAJIOTcN IOBpeJKeEHbIM NInyTEpAHHbIM,a TaKHe 3a JIOboy uεep6,KOTOpBIM MOHET PpON3OHTn C NOKnIOUeHHbIM yCTpOcTBM.
PNEyPENKDEHNE
O IpeepnOJIb3OBaHHe m npOBepbTe CoeHNHTbHbI USB-Ka6eJIb Ha JIO6bIe DeΦeHTbI NIN NOBpeKdHn. IcnoJb3OBaHne DeΦeKTHO rN NIOBpeXdEHnO R USB-Ka6eJIa MoKeT Bbl3bBaTb Opa3OBaHne DbIMa NIN BOCnJIaMeHeHHe.
O Korga n3dene He nCnoB3yETc, 3akpoTe USB-nopt pe3nHOBOK KpbIshKoN.
KoPJIeHneIbIInnT.D.BUSB-NopTy MoJcT npJBecT N 6Opa3OBAHnIO DbIMa IINBocNJaMeHeHIO.
ПРИМЕЧАNH
O TaKHe MoKeT cIyHITc naY3a BO BpeM 3apRdN USB.
O Ecn yctpocTBO USB He 3apnHaetc, n3BneKeHte yctpoNCTBO USB n3 3apnHoro ycTpoNCTBa.
HecobIIOeHHe 3Tnx MEP MOKeT npBecTn He ToIbHO K cokpaueHnO cPoka 3KcNpyaTaun aKKMyJrTopa yCTpOHTBa USB, H0 N K HEnpeBnDEHHbIM abapnM.
O Bo3MOxHNO, HeIb3B 6yIeT 3apAINb HeKOTOpbIe USBYcTPOIcTBA B 3aBnCmOcTn OT Tnna yCTpOcTBA.
Описане НумЕРОВАньIX ПЕДMETOB (Pnc. 2 - Pnc. 47)
CocTaN TIN DOONHHTeBbHX PnHaJNeKHOCTe MoKeT 6bITb N3MeHeh Be3 PpeBaPHTeBHOr OyBeDoMJIeHn.
HA3HAUEHNE
O Pe3ka dpeBecnbl/JeComaTePnaIOB
O6pe3ka,py6ka caIIOBbIX DepeBbeB
CHATNE/YCTAHOBKA BATAPEN
1. ChTne 6aTaPeu
IyuaJIeHnAHHMyJITopApKpeNkoCoKMnTe KOpNyc BpyKe HauKMITE Ha 3aueJIKN (CM.Pnc.4).
OCTOPOKHO
Hnkorga He 3aMbikaTe 6atapeio Hakoptko.
2. YctahOBha 6aTapeN
BctaBbTe 6aTapeIO, co6JIIOJa eE nOJIaPHOCTb (cM. Pnc.4).
3APДHA
Ipeed nCIOJIb3OBAHHeM 6ecnpoBOdHorO 3JIeHTpOHnHCTpyMeHtA 3apJrTe 6aTapeEO CJeDyUOuMM 06pa3OM.
- NoidhIouHte 3apAHOe yCTpoIcTBO H po3etHe cETN NHTAHNR C NOMOsbIO CHIOBORO Ha6eJI.
Iocne noDCoeHNHeHn WTeNCeJ 3apdHorO yctpOCTBa K cTeBOJ po3EKe IaMna INHdkatopa 3apdKn 6ydt MrrA Tb KpaCHbIM (c INHTepBaIOM B1 ceHyNDy).
- BCTaBbTe 6aTapeIO B 3apnHoe yctpoNCTBO.
ПлOTHOBCTaBbTe 6aTapeIO B 3apAHOE yCTPOINCTBO, KaH NOKa3aHO Ha PnC.5 (Ha cTp.2).
- 3apnka
Iocne nomeueHn6aTapeB 3apRdHoe yctpOcTBo Iamna INDnKaTopa 3apRdKb 6ydt Mrratb CINHM CBETOM.
Kak Tolbko 6aTape N0HocTbO 3apnTcR, lamna HndkaTopa 3apnKn 3arOpNTc 3eJeHbIM cBeTom. (Cm. Ta6nuy 1)
HaedeknO npnkpeNte aKkymyIaTOp.
Ecln aKHyMyIaTOp npKpeIeH He HadeJHo, OH MOKeT OTBaJIITbCn MoKeT pOn3OHT TpaBMa.
6. Поберна pa60ы CBeTOdHODHON NOcBETN (Pnc.18)
O Ipn HaKaTn NepeKluOaTeIa CBeta CBeToIONoHaN POnCBeTKa 3aropaETc, a npn ero OTnyckAHN POnCBetKa rachet.
CBeToIIOHnA NOcBcTeKa OcBeuaeT yAcToK paa pe3Kn.
O OHa roput BHytpn OKoUka ypOBH MaCna dIy oBecneueHH npOBepKn OCTabUeROcYpOBH MaCna.
ПОНМЕЧАНЕ
EcnnoDCBETKa TEMHAR, TuaTeNbHO npoTpnte ee MAnKoTpaNko N T.I., YTObI He DonyCTnTbe ee NOBpeKeDeHHa.
EcnI NOcBtKa NOBpeKdeHa, 3To yMeHbIIT RaKoCTb.
7. Поберka pa60тbi Topmo3a
O KOrda nepeKIOUaTeIb npNBedeH B DeNCTBne npn HauKaToi KHOJIke 6JIOKIPOBKN, INHCTpymENT BHLIOUaETcA,a KOrda nepeKIOUaTeIb OTnyCKaETcA, INHCTpymENT BblIOUaETcA.
O Kpome Toro, B TeueHne 1-3 ckyHn nocJe OTnyckHaHn nepeKIOUcATEI INCTpyMeHT IcNOJIb3yeT TOPMO3 DIA OCTaHOBKn BpaueHn nnJbHOJ ceHN.
O Npeed nCnoJIb3OBaHnem y6eIHTecb, TTO TOPMO3 pa6oTaET.
OCTOPOKHO
БудTe BHMMaTeIbHbI,Тak KaK npn 3anyCte TopMo3a BO3HnKae TcIa OTdauN.
EcnBby ypoHHTe HnCTpyMeH, 3TO MOKeT npNBecTn K TpaBMe.
② YcTaHOBbAaKKMyJrToPa(Pnc.4)
KaK nokaHa Ha Puc. 4, cnIbHo HaKImaTe Ha Hero, noka OH He 3aueJIHKHeTcH Ha MeCTe.
③ PnBVeDHe NpeHJIIOuTeIaB DneCTBHe
Y6eINBUNcB , YTO NINbHnA Zenb He COnpNkAcaeTcC DpeBecnHO, PnIBeNTe NepeKIOuATeIb B DeIcTBne HauHnTe pe3Hy, KOrda CKOpOCTb NINbHn Zenn yBEJIuHTcR.
OCTOPOKHO
O Pn BkIIOHEn HNHCpMEnTa y6eINTEcB, YTO NIIbHaJ TcENb He COpnKacaeTcR C MaTePnaIOM NIn Yem-JIb6o eEe.
O Bo Bpemn HcnoB3OBaHn 6yDbTe oCTopoHNbI, TTo6bl NJIbHaar cenb He CoPnKacanacb C DpyrMM MaTePnaJamn nn PpeMetamn. B yactHOctn, npn 3aBepWeHHn pe3Kn 6yDbTe BHIMaTeJbHbI, TTo6bl OHa He KocHylaCb 3emn.
ПРИМЕЧАНЕ
3a6laorobpeMeHHo 3a0nHHTe MacIaHbI 6aK, YTO6bl He dOnyCTHTb NOLHO I3pacXoOBAHnMaCLa B HnCtpyMeHTe.
1. 06üne npoçéydþpe3kN
(1) BkIIOHHe NTaHne, yIepKINBaI NnIy Ha He6OJIbWOM YdaJIeHNOT DpeBecInHbI, KOtOpYIO HJXHO pe3aTb. HaunHaIte NNITb TOJIbKO NocJe TOrO, KaK INCTpyMeHT Na6epET NOIHyo CKOpOCTb.
(2)ПипileнкуckaДревсиНь He6oIbIoro DnAmetpa HAnmaiTe OCHOBHyO YacTb HanpaBIAHOe IINHbI Ha dpeBecHy N INInTe BHN3, KaK NOKa3aHo Ha Pnc.24.
(3)Пи ИлЕнн ToHOrO KcKa ДрБecnHbI HaKIMaTe OCTPmE H NapeDHeY qAcTn INHCTpyMeHTa Ha DpBeCHy N peKbTe ee DeNCTBnEM pbUra, INCNoJIb3y OCTPne KaH TOHky ONOpbl, KAK NOKa3aHo Ha Pnc.25.
(4)Ipn ropn30HTaJIbHOBpe3Ke dpeBecnHbIOBepHNTe KOpNc HnCTpyMeHTa HAnpaBO TaK, YTO6bl HApPABJIOUaJ 5INHa 6bIa CHN3y, IN DePHNTE BepXHOU qAcTb NpeDHeJ pyKoRTKn JLeBOI pyKO. IepHNTe HAnpABJIOUO UINHy rOpN30HTaJIbHO IN paCNOLOHNTe OCTpne TaK, YTO6bl OHO 6blIO HA nepeDHeJ qAcTb KOpNyca HnCTpyMeHTa Ha nOraChnue. IVcNoIb3yO OCTpne B KaHeCTBe TOCHN OOnpbl, peKbTe dpeBecnHy, NOBopaHBAJ 3aDHOIO pyKoRTKy HAnpaBO (Pnc.26)
(5) Pn pe3Ke IpeBecHy Cn3y IeRHO KacaIteCb IpeBecHbI BepxHeuacTbIO HappaBIAIOUeI UINHbI. (Pnc. 27)
(6) NocIe BHNMaTeJIbHOrO H3yueHnI INHCTpyKcnn I NO EKcnIyatau, nepeN cNoJIb3OBaHHeM NOJyHTe npakTtueChne INHCTpyKcnn No pa6ote C nIIbHOJ cIbIO, IIN, no KpaIHeN Mepe, nOTpeHnpYITecb pa6oTaB c IIbHOJ cIbHOJ OTe3aJ KyCn KpyrIoJ dpeBeCNHbHa KO3JaX dJa pyHOn paCnIOBKn.
(7)PnpeKe HEnoDepKHNBaEMbIX 6peBENHIN DpeBecnHbI oecneYbTe Iy HNx HAdJeKaUyIOpeKHy, 3aΦHKcnpOBa IN B HEnoDBNKHom COCTOHN BO BPeM pe3Kn C NOMOsbIO KO3IOB Iy pyHOn paCNIIOBKN IIN dpyrIM NOXODAUI CMOCOBom.
OCTOPOKHO
O Pn pe3Ke dpeBecnHbI cH3y cyuEcTByeT onaCHOCTb, TTO KOpNyc HnCTpyMeHTA 6yDet OToPoWeH Ha3aD B HapBaJIeHN N0JIb3OBaTeJIa, ecIn Zenb CnJIbHO ydApReTcO dpeBecHy.
He peKbTe Ha noJHyo rIy6nHy dpeBecnHbI, HauHHa CHN3y, TaK KaK cyueCTByET onaCHOCTb BbIXOJa HapBaBraIOUeJ WInHbI N3-NOd KOHTpOJI npn 3aBepWeHN pe3Kn. 3
O Bcerda npHnMaIte MepbI, He dOnyckAIOUne copnKoCHOBeHHra pa6ToaIOuei cENHO nJIbIC 3emJe nnnpoBOIoHbIMn peWetKaMn.
2. Pe3Ha BeTOK
(1) Pe3ka BetOK OT CTOJIeRO DepeBa: ToIcTbIe BETKn Heo6XoIMMo ChauJa OTe3aTb Ha ydaJIeHnOT CTBOJa DepeBa. ChauJa OTepeKbTe OHy TpeTb CHN3y, a 3aTeM oTeKbTe BeTHy CBepx.y. B KOHcE OTeKbTe OCTaBswIOcraCTb BETKn DaHe CO CTBOJOM DepeBa. (Pnc.28)
OCTOPOKHO
O OnacaiTecb naaouux BETOK.
O OcteperaTecbOTcH0a cENHOIINJIbl.
(2) Pe3ka BetoK c NOBaJIeHHbIX DepeBbeB:
Chauana OTpeKbTe BeTKn, KOTOpBHe He KacaIOTc3emn, a 3aTeM OTpeKbTe KacaIOuNecr 3emn. Ppnepe3Ke ToIcTBx BeTBei, KacaIOuNxCr 3emn, Chauana cpeKbTe pnpMePHO NOIOBHy CBepxy, a 3aTeM cpe3aIte BeTKy CHN3y. (Pnc.29)
OCTOPOXHO
O Pn pe3Ke BETOK, KacaUxxC3eMNI, 6yDbTe octopoXHbI, YTO6bI HApBaJIoua JINHa He 3aKaJalacb OT daBHeHna.
Bo Bpem3aKnHouTEnbHoro 3TaNa pe3Ku OCTeperaTecb BHe3aHOrO KaueHn IeComaTepeHaIOB.
3. Pe3Ha IecomaTepeHaNob
Pn pe3Ke IecOMaTepeNaIOB, paCNOIOKeHHbIX TaK, KaK nOKa3aHO Ha Pnc. 30, cHaCaJa OTpEeKbTe npImepHo ODHy TpeTb CHN3y, a 3aTeM peKbTe NOJHOCtBu Cbepy. Pn pe3Ke IecOMaTepeNaIOB, KOtOpbie pAcTHyTbIB Hn3nHe, KaK NOKa3aHO Ha Pnc. 31, cHaCaJa peKbTe npImepHO DBe TpeTn Cbepy, a 3aTeM peKbTe CHN3y BBepx.
OCTOPOKHO
O y6eHntecb,HTo HnpaBnaIOuaa UHa He Cn6aETcBJIeComaTePnIax OT daBHeHH.
O Ppi pa6ote Ha HauHIOHHo 3eMne o6ra3aTeIbHO CToIte Ha Ndyuei BBepx CTopoHE IecomatepnaiOB. Ecln Bby cTOnTE Ha Ndyuien BnH3 CTopoHe, OTpe3aHHbIe IecomatepnaIbI MoryT NOKaHTbcra Ha Bac.
4. py6ka depeBbeB
(1)Подрзka(1),Кан рokаЗанHa PnC.32): Bыннгийподрзky,СТОВ HANpaBHeHIN,B KOTOpOMdoJHKHO yNactb DepeBO. Iy6nHa ПодрзнДOLJHnCoCTaBnTb 1/3ДиAmEtpa DepeBa.HnB Koem Cnyuae He py6nte DepeBbR 6e3 NaIeKaUe NpOdPzKn.
(2) Bpy6 (2), KaK noka3aHo Ha Puc. 32): DeIaIte Bpy6 Ha pacCToHnn npIMepHO 5 cm n npapIeJIbHO rOpI3OHTaJIbHO NOppe3Ke. EcIn cIeNb 3aUeMJIeTcB BO BpeM pe3Kn, OCTaHOBNTe IINy INCIOJIb3yIte KInH, YTO6bl OCBO6OJNTb ee. He peKbTe NOIHOCtBu DEpeBO.
OCTOPOXHO
O He cIeJyET py6ntb DepeBb TaKIM CnOCOBOM, YTO6bl OHN pIpeCTaBJIIN ONaCHOCtB dJIa JHOeN, COpNIkacAICIb C JINHJMI 3JIeHTPOITAHN IINI npuHHJI KAKOI-JIb6O yUep6 Co6CTBeHNOCTN.
O Y6eHITecb, TTO Bbl cTOnTe Ha nIyUeB BBepx CToPoHE MecTHOCTH, TaK KaK DepeBbY O6bIuHO ChaTbIBaOTcA HIN COCKaJIb3bIBaIOT BHN3 NocJe py6Kn.
Mepbl npedoctopoHoctn nppe3Ke
MaaTa6Hbix onepaun nn 6ecnpepbIBHO pa60tbl
Дя 3aunTbI DnurTaTeN I 3JeKTPoHKn, NMeIOUeNcB 3TOM INCTpyMeHTe, ecIn INHCTpyMeHT NOdBepraeTCBbICOKO TemnepaType, TO O6 3TOM CnHnHn3npyETMIRaHne CBETOINOHOI NOCBETN.
EcBpexe HnHaKMaete npHyntTeHc 60bwo Harpy3kO Hn63 octaHOKn, DBNrTaTb n 3JIeKToPOHka MOrTy HarpeTbCra, n 6yDet MmRaTb CBETOIOHnHOODCBETKa.
ПРИМЕЧАНЕ
Ecn Miraet CBeToHNoHa H NoCBeTHa, npeKpaTHe NcNoB3OBAHne H daTe NHCTpyMeHTy OCTbITb B DOCTaTOHOr CTeneHN. Ecn npoDOnHnTb NCNoB3OBA Tb erO, INCTpyMeHT MoJYHTb NOBpeHHdeHne.
K TOMy JKe, npn HnpepbBHO pa6Ote BO Bpemr 3aMeHbI aKKMyJITopAp, NOKaIyNCTa, daITe INHCTpyMeHTy OxlaIITbCra, no KpaHHeMpe, 15 MInHyT.
K ToMg JHe, KOrJa pa60Ta npepbIbAeTcR, ecIn Mnraet CBeToNDnHAn NOCDBETKa Pn NOBTOPHOM BKNIOUeHNn BbIKJIOuHaTeJIa, 3TO O3NaHaeT, yTO INCTpyMeHT He OXlaHnCBA DOCTaTOOH CTeneHN, IO3TOMy DaITe Emy BoIbIe BpemeHn nepeN IOBTOPbIM BKIOUeHEm.
3axbaT/ToKKaHne cenHOH nJIbI
O6raTeNbHo HadeJHoo 3axBaTbIbAite cenHyIO nIy. DonolnHtteNbHO, He npKnaIbIbAite K cENHO nIe 60JIbwe ycINn, yem 3TO Heo6xOmo. PpN pe3Ke DOnOLHtteNbHaCnla, npKnaIbIBaEmaK cENHO nIe, He yBcInuHT cKOpocTB pe3Kn. 3To nepeHarpyKaet DBrataTeB, ocna6IaReT npOn3BOIDnteBHOCTb I NOBpeKdaET nI IN pNBOITK HeNCnPabHOCTH dBnraTeIe Nn HAnpaBIAUoIe WnHbl. IcNoJIb3yIte IHCTpyMeHT B Dnana3OHe, B KOTOPOM nIIbHaI cENb IMeET npneMJeMy CKOpocTB. B qactHocTH, kOrDa nIIbHaar cenb octaHaBlnBaETCAkInnHbAeTCa) H3-3a Ype3MePHoro ycINn, 3TO MOHET Bbl3BaTb TpaBMy IIN C60B Pa6ote HHCTpyMeHTa.
ZenHoi orpaHnHTeIb
O ZenHOn OpraHnHTeJIb HaxoINTCa Ha ZnnHdJIbHOI roIOBKe, ToUHO NOJ cENbIO, I npEeTCTByET yApy ZenbIO onepaTopa ZenHOn NIIbI B Cnyae eoe o6pbBa.
O KOrda nIbHa nEbn o6pe3aHa, 3aMeHnTe ee Ha HOByIO B COOTBeTcTBn C pa3dELOM YcTaHOBka (3aMeHa) NIIbHOJ cENN
3ATOUKAJIe3BnA LcENI
PNEyPENKDEHNE
IpyaHbX CnyaeB 63aTeBHO BbIKIOuayte NpeKIOUoateB NydaJrTe aKHyjTOp n3 OCHOBHOrO KOpnyca.
Kpome TOrO, pN HCNoJIb3OBAHm NIIbHbIX cenei 63aTeBHO HadeBaHTe TOJICTbI pyKaBnbl.
ПРМЕЧАНЕ
3aToUHTe NIIbHyIO cIeNb HAcTPOTe rIy6HOMep B CEHTpAlbHOE NOLOXHeHne Ha HAnpaBIAHOe IINHe, KOrDa NIIbHaA cIeNb PnIKpeJIeHa K OCHOBHOMy KOpNcy.
Korda ocptota nIbHOn ue nn yxuAaetc, DnIraTeNb I BCE qactn Kopnyca Harpykaotc, N eΦeHTNBHOCTb naaet.
Для NOЛуеня ONTUMaJIbHOI npOn3BOJTeJIbHOCTN INHCTpyMeNTA Tpe6yETcY qAcTOe TEXHnueCkOe 06cIyKINBaHne, YTO6bl NODepKINBaTb OCTpOTy INlbHOI cENI.
1. 3aToUHaJIe3BnA
Kpyrbln HannlbHnK Heo6xOIMO npIIOHNb K
JIe3BnIO ue TAKIM 06pa3OM, yTo6bl Onda nTae
Yactb erO dnaMeTpBa BICTynala HaB BepxHeu YacTBIO
JIe3BnR, KaN oKo3aHO Ha Pnc. 33. 3aTOUHeJe3BnR,
ydepHnBa Hpyrbln HannlbHnK NOd yrIOM 30^ no
OTHOWeHIO K HAnpaBIAHOe WInHe, KaN oKo3aHO
Ha Pnc. 34, y6eNBUnCb, yTO Kpyrbln HannlbHnK
pacnoLOXeH npRAMO, KaN oKo3aHO Ha Pnc. 35.
y6eNTecb, yTO BCE NIIbHbIe Ie3BnR 3atauHBaOTcra
NOd OOnHaKObbIM yrIOM, INaue 3ΦΦeKTINBHOCTb
pe3Kn IHCTpymEHTa Bydet OcIa6IeHa. NoxDon
YrIbI DnI npaBnIbHO 3aTOUKN Ie3BNI NOKa3aHbI Ha Pnc.36.(KpyrIbI HAnINbHKn IpOdaTcN OTdeJIbHO).
2. HactpoKa rIy6HOMepa IPEdYIPeHXDEHNE
He 3aunuTe BepxHIOU qactb CoeHHTeJbHO MyoTbI amOpTu3aTopa N npBOHOH pbUar HnnpabJIIOuei, TAK KaK 3TO MOKeT pNBeCTN K DeΦopMaUN 3aunuEHHbIX qACTe.
O HactpoHa rIy6HnHomepa DoJIxHa 6bITb Ha OJHOJINHH C 3apaHee ONpeJeEHbIMPa3MepaMn IΦOpMaMn, INaue MoKeT yBeJIuHTbCRA ONaCHOCTbOTdauN, pInBODJaEe K TpaBMe.
CoeHHTeJbHaMyΦTa amOpTH3aTopa
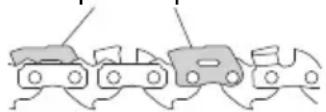
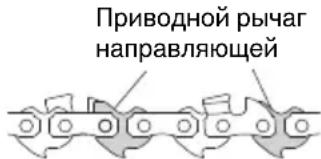
Tny6HOMepbl BCE DOJIHHbl 6bItb BbIpaBHeHbl OINHaKOBbIM CNOCOBOM, TAK KaH OHN NcNoJb3yOTCA DIA NaCTpOHNrIy6HbIB NOIOXKeHN, B KOTOPM pe3aK BXoNTB DepeBO.
Pn 3aTOUHe nIIbHOu cENn O6Ba3aTeJbHO npOBepaTe rIy6HOMepeKaKdble Dba HIN Tpu p3a.
IomeCTHe 7a6JIoH rIy6HOMepa Ha nIbHOI cenH, OCTaBbTe H3MepnteB BnIMbIM NaI npope3bIO I NCIOb3yIte PIOCKn HAINbHK DIA CKaUNBaHNr Yactn 7a6JIOHa rIy6HOMepa. (Pnc.38) (IIa6JIOH rIy6HOMepa I NIOCKN HAnNbHK IpOdaOTcR OTdJIbHO.)
Iocne BbInnHbAHn rny6nHomepa cKpyrnte nepedHOu yactb rny6nHomepa TaK, YTO6bl OH CTaJI, TaKIM KAK 6bl. (Pnc.39)
Iocne 3aTOUKN NINbHOJ cENN NOmecHTe ee B MacNo dJa cENN, YTO6bl CMBITb ONNIKN.
EcnOnnKn He OunchTb, NnBHa Zenb HnnpaBIAOuaa WnHa 6yDyT 6bICTpo n3HaWNBaTbc npnncNtobAHnn.
INHΦOPMAÇNЯ OБ YCTPOДCTBE USB
O 3apAka yctpoiCTBa USB ot 3JIeHTpHuecKoI cETn. (Pnc.48-a)
O 3apAka yctpoiCTBa USBn6aTapeoOT 3JIeKtpnuecko ceTu. (Pnc.48-b)
O Iopraok 3aprAny yctpoNCTBa USB.Pnc.49)
O Ito 3aBepseHn 3apAKn yCTpoNcTbA USB. (Pnc. 50)
TEXHnueCHOE O6CJIyJHKINBAHNE N OCMOTP
Iocne pa6oTb I BblOnHnTe npOBepy n TexHnuecKoe 06cLyHNBaHne KaHDoY aCTn INHCTpyMeHTa nepeD TeM, KaK y6paTb ero Ha xpaHeHne.
PDEyPEXEHENE
Bo Bpemr TexHnuecKOrO 6cbLyKHBaHm Hn npOBepKn 0b3aTeIbHO BbIKIOuAte HNCTpyMeHT ydaJIaHTe aKKMyJATOp I3 OCHOBHOrO KOpTyCa. Hpome TOro OTcoeINHInTe CeTeByIO BnIKy 3apdHOrO yCTpoiCTBa OT pO3ETKn.
1. Поверка пььнбix сени
O IepnoDnueckn npOBepaTe NnIbHyU cenb. B cnyuae HapyuHn 3aMeHInTe ee Ha HObyU B COOTBeTCTBnC pa3dELOM "YcTaHOBka (3aMeHa) NnIbHoN cENN".
O PpOBepbTe HaTKeHHe cenn H onpeJeNTE, npaBnIbHo nn OHa HATyTa.
O PpeKpaTHTE HcNOJIb30BaHHe NHCtpyMeHtA B Clyuae 3aTyIeHn IINbHOJ cENn H 3aTOUHTe ee B COOTBETCTBnC pa3DeJOM "3aTOHaJe3BnA cENn".
O Nocne HcnoJb30BaHn TuaTeIbHO CmaHbTe IINbHyIO cTb HnPaBIAHnue WnHbIC NOMoBIO Macna dIa3aUNTbOT Koppo3NI.
OCTOPOXHHO
HaedeBaIte pyKaBnCbl IJI npEdoTbpaueHn TpaBM npu nCNoB3OBaHHn NlNbHOJ cEN.
2. Ouchtha 6okoboi KpbIuHn HaMepbI TopMo3HOJ IeHTbl (Pnc.40,41)
OuHCTnTe H ydaJIte BCE OONIKN, OCTaBUnHeCRA BHyTpN YacteN.
ПОНМЕЧАНЕ
Pn YNCTke 6OKOBOKpblk, KaMepb TOPMO3HOJLeHTbl, RopblIka dIy Macla ceHn HAnpaBIAIOe WINHb CM. PPOeDpy «YcTaHOBKa (3aMeHa) NInlbHOIeHN" n UdaJIte NINbHyIO cENb.
3. OuHCTHa rOpIbIa Ka Macna dIa cenn (Pnc. 42)
IpeD OCHCTKoR rOpbluHa Macla dJa cen CHIMTe 6okobyk KpbIkuHn HapBaJIouyU uHy.
4. OuHcTHa HnPaBIAIOe IINHbI (Pnc. 9, 43)
Horda onnIkn n noo6hble BeuecTba HakaanlnaIOTcB npope3n HanpaBraIOUe WINbI NIN B rOpbluKe Macna Iy cEN, MACNO MOKET He BbITEKaTb, YTO MoKET npNBecTn K C6OIO B paBoTe INCTpyMeHTa.
YdaJInte HnpaBIAIOUyIO UINHy IOHCTNTe BCE ONIIK, CKONIBWNECEB NPOPE3N, NOCNE IcNOJb3OBAHHI INI npn 3aMeHe NIIbHOJ cEN. (O6paTNTecb K «YCTAHOBKa (3aMeHa) NIIbHOJ cENN".)
5.OcmToP yroIbHbIX ΚeToK (Pnc. 44)
B dBiratene HcnojIb3yIOTc yrolbHbIe 8ETKn, KOTOpbIe NOCTeEHNO h3HaunBaIOTc. TaK KaK Ype3MepHO n3HOweHHa YroJbHra 8ETKa MoKET npNBecTN K HEnCnPaBHocTH NBRaTeJIa, ZameHrTe N3HOweHHbIe yrolbHbIE 8ETKn HObbIMN, KOrDa OHN DOCTHHT COCTOHHA, 6bn3koro K «PpeJeY n3HOca’. Kpome TORO, Bcerda CoepKInTe yrolbHbIe 8ETKn B YnCTOTE I O6R3aTEbHO CJIeINTE 3a TEM, YTO6bl OHN MOrJIN CBO6oHDHO CKOB3HTB 8ETKOedePKaTeJAX.
ПРИМЕЧАNH
Pn3aMeHe yrolbHOn 8eTKn HOBOy rO1bHOJ 8eTKoN O6ra3aTeJIbHO NcNoIb3yIe yrolbHyIO 8eTKy HInpMb HiKOKI, KOD No 999068.
6. 3aMeHa yroIbHbIX uTeTOK
BbInbTe yroIbHyIO uTeKy, CnR B ChauJaA KpbIuKy uTeKN, a 3aTEM 3aCenNB BbCTynaiOuYo YacTb yroIbHoi uTeKN pN NOMOUI OTBePTKn C NIOCKIM Je3BnEM n T.I., KaK NOKa3aHO Ha Pnc.45.
Pn yCTaHOBKe yroIbHOn ΜeTKN BbICTyn Ha ΜeTKe DOLKHeC OONPKaCaTBcC KOHTaKTHO NOBepxHOCTbIO rHe3Da dIa ΜeTKN (CM.Pnc.46).BCTaBBte ΜeTKy B rHe3do, KaK pOKa3aHo Ha Pnc.47. Iocne 3tOrO yCTaHOBnTE KOLNaOH ΜeTKN.
OCTOPOXHO
O A6coIIOTHO TOHNO y6eINTEcB TOM, YTO BCTaBnIN NOnpyKHeHHbIK KOHTAHT yroJIbHOU ΜEKN B yAcTOK KOHTaKTa Chapyn ΜeTOHOr rJb3bl. (Bbl MOKeTe BCTaBNTb IIO60 ODN H N3 DByX ppeDyCMOTpeHHbIX NOnpyKHeHHbIX KOHTaKToB.)
O Heo6xOaMo CO6IIOaTb OCTOpXHOCtB, NocKOBky IIO6a OUI6Ka PnB BbIOJIHeHN 3TOI ONepauN MoKeT npINBeCTN K DeOpMaUu NODpyKInHeHHOro KOHTaKTa yroJbHOI UeTKN IN CTaTB PnUHOn IOBpeKDeHnIBnTaTeHa paHHe cTAuN.
7. OcmOTP KpeenHbIX BNHTOB
PeryIpaHb BbIOJIHnTe OCMToP BcEx KpeNeHHbIX BNHTOB IN PPOBepaIte IN HAJIeHaUyO 3aTAAKHy. PIn OcIaN6JIeHN KaINx-JIb6o BVHTOB, HEmeJIeHHO 3aTAHITE IN NOBTOpHO. HeBbIOJIHeHHe 3TORO Tpe6OBaHnMoKET pINBeCTN K cepbe3HOJ OnaCHOCTN.
8. 06cIyHbAHaHe IbHaTeJIa
O6MOTka DBrIaTeJI npedCTaBJIeT c6oJ "cepIe" 3JIeKTPoHnHCTpymEHTa.
CobIouaTe HaJIeKaUne MEPbI IpeIOCTOPKHOCTN 1A3aUNTbIOBMOTHN OT NOBpeJDeHn H/INI INOJaHaHa Hee BlaRn, MacJa NIn BObl.
9. OcmOTP KOHTaKTOB (HHCtpymeHTa N 6aTapen)
Y6eNTecb B OTCyTCTBnN CTpyHKn Ha KOHTaKTax.
IepnoDneChn npOBepRnTe Do, BO BpeM n NocJe onepaun.
OCTOPOXHO
YdaIte BcO CtpyKHy nn nblb, CKONNBlyIOc H a KOHTaHTax.
HeBbIOJIHHeHne 3TOrO Tpe6oBaHHaMOKeT pINBeCTN HeNCpapBHOCTn.
10. Hapykha ouhctka
EcnHn Hnna 3arp3HnTcBbITpHTe ee MKarO cyxoh TkHaHbIO nn TkAhbIO, CMOeHHoMbIbHO BDOi. He nCnoNb3ynte pactBopnteIN, codepKaune XLOp, 6eH3nHnn pa36aBnTeJIb IJa KpaCHN, TaK KaK OHmOryt pactBOpNTb IINaCTMaCCy.
11. XpaHeHne
Pn nomeeHnn HhctpyMeHTa Ha xpaHeHne BbINOJIHnTe 1nCTHy nTexHueCKoe O6cLyHbAHne KaHDoYacTn I npKpEnIte FytIep cENn K HanpaBIAIOUeJ UINHe.
XpaHnte cenHyo nny B MeTe C TempePaTpo, He npBbIaUoSe 40°C, n BHe DoCTyna DeTei.
PIMMEUHNE
XpaHeHne HNOHO-JInTneBbIX 6aTapei.
Y6eHNTecb, YTO HONHO-INTHeBbIe 6aTapeN NOHOCbIO 3apRKeHbI nepeD TEM, KaH y6paTb Nx Ha XpaHeHne.
XpaHHe 6aTapeB TeeHne IINTeIbHoro npomeKytKa BpeMeHN (3 Mecau HIn 6oJeepn HN3KOM ypoBHe 3apraMoKeT PpNBecTH K yxUdWeHHO XapaHTepNCtHK, 3HaHTeJIbHOMy COkpaueHHIO BpeMeHN HcNoJIb3OBaHnR 6aTapeN a TaKKe MoKeT CTaTB HeBO3MOKHa Nepe3aprKa.
OHaKo 3NaHTeJIbHO yMeHbUWBueecB BpeM NcNoJIb3OBaHH6BaTapeu MoHeT 6bITb BOCCTaHOBJeHO npNIOBTOPHO3apJKe HcNoJIb3OBaHH6BaTapeu OT DByx Do nIpa3.
EcnBpemnnoB0aHn6bapen qpe3blyaHo KOpOTKoe,HeCMOTpyHa NOBTOPHU 3aprky NcNoB3OBaHne,cpoK clyh6bl 6bapen nCTeK, npno6peTHTe HObIe 6bapen.
OCTOPOXHO
Pn HcnoJb3OBAHnn nn Texo6CnyKHBaHHN HhCTpyMeHTa BcERda CJIeINTE 3a BblIOJIHeHEm BCEx npabn HOpM 6e3ONaCHOCTn.
BbIBOP PnHADJIeXHOCTEi
Cnncok npHaJeHHoTei daHHoMaHbI yKa3aH Ha cTpaHnce 388.
Baxnna Hhopmaun O 6aTapex dI86cnpoBOHbIX 3JeHTponHCTpymEnTOB HiKOKI
Bcerda nCnoIb3yIte 6aTapeH, npedHa3HaueHHble HMeHHO DnAHHoro nHCTpyMeHTa. Mbl He rapaHTnpyEm 6e3OnacHOCTb n fYHKUHOHPoBaHne Haix XeHTPOINHCTpyMeHTOB npn HCNoJIb3OBAHHn 6aTapei, n3ROTOBJIeHHbIX He Hawe KOMNaHne, IIN Jpe pa30paHHbIX mODInΦuHpOBaHHbIX 6aTapei (B KOToPbIX 6blnn DeMOHTnpoBaHbl N 3aMeHeHbl RaJbBAHNueckne 3JIeMeHTbl 6aTapeH IN dpyrHe BHYTpEHnE Detan).
TAPAHTN
Mbl rapaHTnpyem COOTBETCTBHe aBTOMaTHuecknX HNCTpymENTOB HiKOKI HopMaTHNBHbIM/HaCuHOHaJIbHbIM NOLOKeHNiM. DaHHa rapaHTn He pacnpoCTpaHareTcHa DeΦeKTBtI NII yUep6, Bo3HKnW BCLeDCTBne HEnpabNlBHorO nCNoJIb3OBAHne NII HeHaJdJeKaUeRo 0bpaSeHnA, a TAKHe HOpMaJIbHoro N3HocA. B Cnyuae IOnaH JAno6bOtnpabJIte ABTOMATueckn INHCTpymENT B Hepa3O6paHHom COCTOARHN BMeCTe C FAPAHTNIHbIM CEPTINΦIKATOM, KOtopbi HaxODITbcB KOHcE INCHTpYHKUN No oboaeeHIO, B ABTOPIN3OBaHHbI ueTp 0cbNyKHBaHHaHIKOKI.
Hhopmaun, hacaouaacn co3daBaemoro yuma n Bn6paun
H3MepReMbIe BELINHbI 6bln ONpeJeHbB COOTBeTCTBnC EN60745 n 3aRbHeHbB COOTBeTCTBnC ISO 4871.
I3MepeHHbI CpeAHeB3BeWeHHbI ypoBeHb 3ByKOBOI MoUHocTn:100 d5(A)
I3MepeHHbI cpeHBeB3BeWeHHbI ypoBeHb 3ByKOBOrO daBHeHn:87 d6(A)
NorpewHocTb K:3d5(A)
HaedeBaIte HayuHnKn.
O6uHe 3NaueHn Bn6paun (cymma BeKTopoB TpnaKcnalbHoro Ka6eJ) OnpedeJIaOTcB COOTBeTCTBn c EN60745.
ah=4,7M/c2
IorpeuHoctbK=1,5M/c2
3aBHeHoe CymMapHoe 3aueHne Bn6paunn 6bIIO n3MepeHO B COOTBeTCTBUN CO CTaHApTHbIM MeTOdom hCbITAHNI MOKeT PnIMeHrTbcra DnA CpABHeHn HcHTpymENTOB.
OHO TANKHe MOKe HcNoB3OBaTbCra IJI ppeBapHTeHbHOI OueHKn BO3DeiCTBn.
PNEyIPEKDAEHNE
O YpOBeH Bn6paunn BO BpeM aKTHueckoro HcNoIb3OBaHnna 3JIeKTPoHnHCTpyMeHTa MOKeT OTJNaTbCnOT 3aBJIeHHOrO CymMapHO 3HaueHn, B 3aBNCnMOCTn OT cNOc6a HcNoIb3OBaHnMaunHbl.
O npedeIb Mebp IpeoctopOHocTH, YTO6b3aunTb OepaTopa, KOtOpBie OCHOBaHb Ha paChTe BO3dEnCTBn Pn PaKTUeCKHX yCIOBnX NCNoJIb3OBaHn (PpHHMaBO BHIMAHne BCE nepn Odbu KINKla 3KcNlyaatauN KpOME BpemeHN 3aNycka, TO eCTb KOrda INHCTpyMeHT BbIKInueH, pa6OtaET Ha XOIOCTOM xOy).
ПРИМЕЧАНЕ
Ha OCHOBaHnIOCTOAHhBIX npoPamM NCCJeOBAHn H pa3BHTn, HiKOKI OCTaBnIOT 3a c06o IpaBO Ha n3MeHeHne yKa3aHHbIX 3deCb TexHnueChnx DaHHbIX 6e3 npedBaPnteJbHO rOyBeDOMJIeHNr.
HENOJIaIKN IN CnOCOB INX UCTPAHEHNA
PnB O3HNIKHOBEHN HEnOJaOK npr pa6oTe TpMMepa Nol3yIeTcB cneDyIOe Ta6JIuee: EcN, Nol3yRcTa6JIuee, ycTpAHITb HEnOJaIKYe ydaIOcb, ObpaNTecB BAETOpN3OBAHHb CEpBHCbl ueHTp KOMNaHNN HiKOKI.
- 3JIeKtpoHHCTpyMeHT
| CS3630DA 1 | 1 | 1 | 1 | 1 | 1 | |
| CS3630DA (NN) | - | - | - | - | - | - |
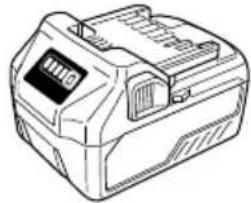
BSL36A18
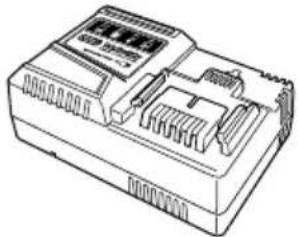
UC18YSL3
(14,4V- 18V)
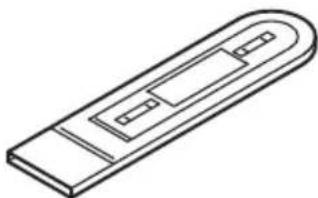
6699116/6685439
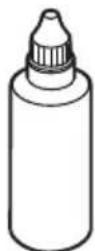
957681
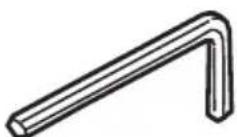
944458
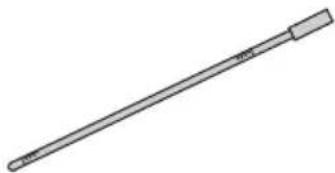
6698688
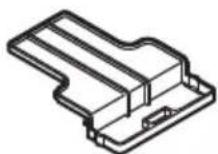
329897 999068

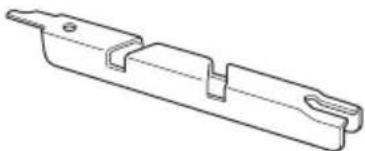
6697724
| English Dansk Romänä | |||
| GARANTIE CERTIFICATE | CARANTIBEVIS | ||
| 1 Model No. | 1 Model No. | 1 Model nr. | 1 Model nr. |
| 2 Serial No. | 2 Serial No. | 2 Nr. de série | 2 Nr. de série |
| 3 Date of Purchase | 3 Date of Purchase | 3 Data cumpàrã¡i | 3 Data cumpàrã¡i |
| 4 Customer Name and Address | 4 Kunders navn og adresse | 4 Numele与此 adresa clientului | 4 Numele与此 adresa clientului |
| 5 Dealer Name and Address(Please stamp dealer name and address) | 5 Forhandlers navn og adresse(Indsøt stempel med forhandlers navn og adresse) | 5 Numele与此 adresa distributorului(Vå rugam aplicatiø stampila cu numele与此 adresa distributorului) | 5 Numele与此 adresa distributorului(Vå rugam aplicatiø stampila cu numele与此 adresa distributorului) |
| Deutsch Norsk Slovenëna | |||
| GARANTIESCHEIN | GARANTISERTIFIKAT | ||
| 1 Modell-Nr. | 1 Modellnr. | 1 Št. modela | 1 Št. modela |
| 2 Serien-Nr. | 2 Serienr. | 2 Serijska št. | 2 Serijska št. |
| 3 Kaufdatum | 3 Kjøpsdatum | 3 Datum nakupa | 3 Datum nakupa |
| 4 Nome und Anschrift des Kunden | 4 Kundens navn og adresse | 4 Ime in naslov kupca | 4 Ime in naslov prodajalca |
| 5 Nome und Anschrift des Handlorders(Bitte mit Namen und Anschrift des Handlordersabstemeln) | 5 Forhandlers navn og adresse(Vennligst stemple forhandlerens navn og adresse) | 5 Ime in naslov prodajalca(Prosimo vitsinete zig z imenom in naslovprodajalca) | 5 Ime in naslov prodajalca(Prosimo vitsinete zig z imenom in naslovprodajalca) |
| Français Suomi Slovenëna | |||
| CERTIFICATE DE GARANTIE | TAKUUTODISTUS | ||
| 1 No. de modele | 1 Malli nro | 1 Č. modelu | 1 Č. modelu |
| 2 No. de série | 2 Sarja nro | 2 Sériève Č. | 2 Sériève Č. |
| 3 Date d'achat | 3 Ostopäävamãäră | 3 Datum nakúpenia | 3 Datum nakúpenia |
| 4 Nom et adresse du client | 4 Asiakkaan nimì ja osoite | 4 Meno a adresa zážaknika | 4 Meno a adresa zážaknika |
| 5 Nom et adresse du revendeur(Cachet portant le nom et l'adresse du revendeur) | 5 Myjyjan nimì ja osoite(Leimaa myjyjan nimì ja osoite) | 5 Názhov a adresa predajcu(Pecîatka s názvom a adresou predajcu) | 5 Názhov a adresa predajcu(Pecîatka s názvom a adresou predajcu) |
| Italiano Eλλινίκα Βυρarски | |||
| CERTIFICATE DI GARANZIA | ΠΙΣΤΟΙΗΝΙΚΟ ERΓΥΗΝΗΣ | ||
| 1 Modello | 1 Ap. Mòvtěλου | 1 Modell N# | 1 Modell N# |
| 2 N"di seriée | 2 Aúθεν Ap. | 2 Cérien H# | 2 Cérien H# |
| 3 Data di acquisto | 3 Ohtepoŋnuia αγορά | 3 Datum za kúmpa | 3 Datum za kúmpa |
| 4 Nome e indirizzo dell'acquirente | 4 Ovoja kai δειδύνημι πελάτη | 4 Ime i adresa kupca | 4 Ime i adresa kupca |
| 5 Nome e indirizzo del rivenditore(Si prega di apporre il timbro con quosti dati) | 5 Ovoja kai δειδύνημι μεταπωλήτη(Πρακαλόμεν αν χρησιμοιηβει αφραγίδα) | 5 Názhov a adresa predajcu(Pocitka s názvom a adresou predajcu) | 5 Názhov a adresa predajcu(Pocitka s názvom a adresou predajcu) |
| Nederland Polski Srpski | |||
| GARANTIEBEWIJS | GWARANCJA | ||
| 1 Modellnummer | 1 Model | 1 Br. modela. | 1 Br. modela. |
| 2 Seriennummer | 2 Numer serjyny | 2 Serijski br. | 2 Serijski br. |
| 3 Datum van aankoop | 3 Data nakupa | 3 Datum kupvine | 3 Datum kupvine |
| 4 Naam en adres van de gebruiker | 4 Nazwa kialenta i adres | 4 Ime i adresa kupca | 4 Ime i adresa kupca |
| 5 Naam en adres van de handelaar | 5 Nazwa dealera i adres | 5 Ime i adresa prodavca(Molimo da stavite pećat na ime i adresu trgovca) | 5 Ime i adresa prodavca(Molimo da stavite pećat na ime i adresu trgovca) |
| Stempel a.u.b. naam en adres vande dehandelaar) | |||
| Espanol Magyar Hrvatski | |||
| CERTIFICADO DE GARANTÍA | GARANCIA BIZONYLAT | ||
| 1 Nstreamo de modele | 1 Tipusszám | 1 Br. modela. | 1 Br. modela. |
| 2 Nstreamo de seriée | 2 Sorozatszám | 2 Serijski br. | 2 Serijski br. |
| 3 Fecha de adquisión | 3 A vásárlas dátuma | 3 Datum kupnje | 3 Datum kupnje |
| 4 Nombre y direccion del cliente | 4 A Vásárió neve és cime | 4 Ime i adresa kupca | 4 Ime i adresa kupca |
| 5 Nombre y direccion del distribuidor(Se ruega poner el sello del distribuidor con su nombre y direccion) | 5 A Kereskedó neve és cime(Kerjukide elihelyezni a Kereskedó névnek és címènek pecsétjét) | 5 Ime i adresa trgovca(Molimo stavite pećat na ime i adresu trgovca) | 5 Ime i adresa trgovca(Molimo stavite pećat na ime i adresu trgovca) |
| Portugues Cesina Yükrainchyni | |||
| CERTIFICADO DE GARANTIA | ZÁRUÇNI LIST | ||
| 1 Nstreamo do modele | 1 Model ě. | 1 Nstreamo | 1 Nstreamo |
| 2 Nstreamo do seriée | 2 Série Č. | 2 Nstreamo | 2 Nstreamo |
| 3 Data de compra | 3 Datum nakupa | 3 Datum prudibianha | 3 Datum prudibianha |
| 4 Nome e morada do cliente | 4 Jméno a adresa zážaknika | 4 Ime i adresa kúltenga | 4 Ime i adresa kúltenga |
| 5 Nome e morada do distribuidor(Per favor, carimbe o nome e morada do distribuidor) | 5 Jméno a adresa prodejce(Prosimé o razitko se jménem a adresou prodejce) | 5 Ime i adresa kúltenga(Bydčlácka, noctabte neuţa kniemei imehem i adrescoю dinépa) | 5 Ime i adresa kúltenga(Bydčlácka, noctabte neuţa kniemei imehem i adrescoю dinépa) |
| Svenska Türke | Ruscký | ||
| GARANTICERTI KAT | GARANTI SERTI KASI | ||
| 1 Modellnr | 1 Model No. | 1 Modell N# | 1 Modell N# |
| 2 Serienr | 2 Seri No. | 2 Serińh N# | 2 Serińh N# |
| 3 Inkópsdatum | 3 Satin Alma Tarihi | 3 Datum nočkunny | 3 Datum nočkunny |
| 4 Kundens namn och adress | 4 Müntéreri Advi Adresi | 4 Hăzbanne i adresa zážaknika | 4 Hăzbanne i adresa zážaknika |
| 5 Försäljarens namn och adress(Stámpla försäljarens namn och adress) | 5 Bayi Advi Adresi(Lütfen bayi adini ve adresini kaşе olarik basin) | 5 Hăzbanne i adresa dinépa(Plönájústcta, bvescinte našavanne i adresc dinépa) | 5 Hăzbanne i adresa dinépa(Plönájústcta, bvescinte našavanne i adresc dinépa) |
HiKOKI
| ① | |
| ② | |
| ③ | |
| ④ | |
| ⑤ |
HiKOKI Power Tools Europe GmbH
Siemensring 34, 47877 Willich, Germany
Tel: +49 2154 49930
Fax: +49 2154 499350
URL: http://www.HiKOKI-powertools.de
HiKOKI Power Tools Netherlands B.V.
Brabanthaven 11, 3433 PJ Nieuwegein, The Netherlands
Tel: +31 30 6084040
Fax: +31 30 6067266
URL: http://www.HiKOKI-powertools.nl
HiKOKI Power Tools (U.K.) Ltd.
Precedent Drive, Rooksley, Milton Keynes, MK 13, 8PJ, U.K.
Tel: +44 1908 660663
Fax: +44 1908 606642
URL: http://www.HiKOKI-powertools.co.uk
HiKOKI Power Tools France S.A.S.
Kjeller Vest 7, N-2027 Kjeller, Norway
Tel: (+47) 6692 6600
Fax: (+47) 6692 6650
URL: http://www.HiKOKI-powertools.no
HiKOKI Power Tools Sweden AB
Rotebergsvagen 2B SE-192 78 Sollentuna, Sweden
Tel: (+46) 859899900
Fax: (+46) 859899940
URL: http://www.HiKOKI-powertools.se
HiKOKI Power Tools Denmark A/S
Lillebaeltsvej 90, 6715 Esbjerg N, Denmark
Tel: (+45) 75143200
Fax: (+45) 75 14 36 66
URL: http://www.HiKOKI-powertools.dk
HiKOKI Power Tools Finland Oy
Tupalankatu 9, 15680 Lahti, Finland
Tel: (+358) 207431530
Fax: (+358) 207431531
URL: http://www.HiKOKI-powertools.fi
HiKOKI Power Tools Hungary Kft.
1106 Bogancsvirag U.5-7, Budapest, Hungary
Tel: +36 1 2643433
Fax: +36 1 2643429
URL: http://www.HiKOKI-powertools.hu
HiKOKI Power Tools Polska Sp.z.o.o.
Modricka 205, 664 48 Moravany, Czech, Republic
Tel: +420 547 422 660
Fax: +420 547 213 588
URL: http://www.HiKOKI-powertools.cz
HiKOKI Power Tools RUS L.L.C.
Kashirskoe Shosse 41, bldg. 2, 115409, Moscow, Russia
Tel: +7 495 727 4460
Fax: +7 495 727 4461
URL: http://www.HiKOKI-pt.ru
HiKOKI Power Tools Romania S.R.L.
Ring Road, No. 66, Mustang Traco Warehouses, Warehouse
No.1, Pantelimon City, 077145, Ilfov County, Romania
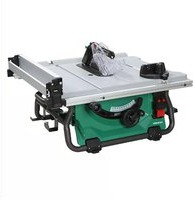
- WHAT IS WHAT? (Fig. 1)
- WARNING
- GENERAL POWER TOOL SAFETY WARNINGS
- CHAIN SAW SAFETY WARNINGS
- English
- Causes and operator prevention of kickback: (Fig. 2)
- ADDITIONAL SAFEY WARNING
- PRECAUTIONS FOR BATTERY AND CHARGER
- CAUTION ON LITHIUM-ION BATTERY
- CAUTION
- REGARDING LITHIUM-ION BATTERY TRANSPORTATION
- USBa DEVICE CONNECTION PRECAUTIONS (UC18YSL3)
- NOTE
- STANDARD ACCESSORIES
- OPTIONAL ACCESSORIES (sold separately) (Page 388)
- APPLICATIONS
- BATTERY REMOVAL/INSTALLATION
- Battery removal
- Battery installation
- CHARGING
- INSTALLING (REPLACING) SAW CHAIN
- Installing the side cover
- INSPECTION AND PREPARATION PRIOR TO USE
- Ensuring the switch is off
- Checking the saw chain tension
- Checking operation of chain brake (Fig. 16) WARNING
- Checking the chain oil
- Installing the storage battery (Fig. 4)
- Checking if the LED light works (Fig. 18)
- Checking brake is engaged
- Checking chain oil discharge (Figs. 19, 20)
- Switch operation
- REMAINING BATTERY INDICATOR
- CUTTING PROCEDURES
- General cutting procedures
- Branch cutting
- Log cutting
- Felling trees
- Precaution for cutting work
- For large-scale operation or non-stop work
- Gripping/pushing force of chain saw
- Chain catcher
- SHARPENING OF THE CHAIN BLADE
- Blade sharpening
- Adjustment of depth gage
- ABOUT USB DEVICE
- MAINTENANCE AND INSPECTION
- Inspection of saw chains
- Cleaning the side cover and brake band chamber (Figs. 40, 41)
- Cleaning the chain oil spout (Fig. 42)
- Cleaning the guide bar (Figs. 9, 43)
- Inspecting the carbon brushes (Fig. 44)
- Replacing carbon brushes
- Inspecting the mounting screws
- Maintenance of the motor
- Inspection of terminals (tool and battery)
- Cleaning of the outside
- Storage
- SELECTING ACCESSORIES
- Important notice on the batteries for the HiKOKI cordless power tools
- GUARANTEE
- Information concerning airborne noise and vibration
- TROUBLESHOOTING
- SYMBOL
- VEILIGHEIDSWAARSCHUWINGEN VOOR DE KETTINGZAAGMACHINE
- VOORZORGSGMAATREGELEN AANSLUITING USB-APPARAAT (UC18YSL3)
- OVER HET USB-APPARAAT
- HVAD ER HVAD? (Fig. 1)
- Faelding at traeer
- VEDLIKEHOLD OG INSPEKSJON
- IPOΦYΛΑΞEΙΣ Σ'YNΔΕΣΗΣ ΣΥΣKEYΗΣ USB (UC18YSL3)
- ZHMEIΩsH
- Introduceti accumulatorul in incarcaor.
- Incarcare
- DODATNA VARNOSTNA OPOZORILA
- OBsI MEPH3A B630NACHOCT IPN PABOTA C EJEKTPUYeCKH HHCTPYMEHTN
- NPEADYNPEHDAEHNE
- БЕЗПАСНСТ ПИРABAБOTA CBEPINKEH TPNOH
- Былгарский
- ДОПьЛНITEЛНИ ПРЕДУПЕЖДECHNЯ 3A БE3ОПАСHОCT
- ПЕДПАЗНМЕРН3A BATEPЯТИЗAPДHOTO YCTPOICTBO
- ПЕДУПЕЖДECHИЗА 3A ЛNTHEBO-NOHHATA BATEPINA
- Блгарский
- BHIMAHNE
- PDEyPExKdEHH
- OTHOCHO TPAHCIOPTA HA JIHTHEBO-NOHHA BATEPNA
- PNEyPEXDEHNE
- ПЕДПА3НМЕРН 3A CBьP3BAHE HA USB YCTPOИCTBO (UC18YSL3)
- PNEyPENKDEHNE
- 3A6EJIEXHA
- NocTabaHHe Ha 6aTePnIa
- 3APEKDAHE
- 3apeHdaHe
- 3AEBJEEHHA
- 3ABEJIEXHA
- OTHOcHO eIeKtpnueckHTe pa3pRAn npn HOBn 6aTePN H.
- HaJa yIbJIHHte pa6oTaTa Ha 6aTePNHe.
- MOHTAK (CMRAHA) HA BEPNFATA
- IPEDyIPEXDEHNE
- 3ABeJIeHHKA
- CbajHe Ha cTpaHnHnHa nak (Φnr. 6)
- NocTabaHHe Ha npedHnKaIak
- PerynnpaHe Ha onbHa Ha Bepurata (Phr. 13)
- IpoBepHa Ha onbHa Ha BepHraTa (ΦnR. 14)
- 3actonopbahe Ha hncatopa (Hnr.15)
- ПОВЕРHA И NOДГOTOBHA ПЕДИУNOTPEБА
- PPEyynPEXDAEHNE
- Поверпа за Изкlioуен сисьн
- Поберka Ha onbHa Ha Bepurata
- Поберва на Бернното MacNo
- NocTaBHe Ha 6aTepeHra (Φn.r.4)
- BHIMMAHNE
- YnOTope6a Ha Kykata
- PDEyPExKDeHNE
- Инднатор 3A HNBOTO HA BATEPURA
- 06u npoceypn 3a p3ahe
- P83aHe Ha HIOHn
- PǎzáHe Ha Tpynn
- 4.ПовалянеHaДьрВета
- Ppepa3Hmepn npn pa3aHe
- Maanza6Hn onepaunn nn HnpeKbchata pa6oTa
- 3A6EJIEXHKA
- 3axBaT/HaTnCH BbPxy BepnHHn TpnoH
- BepnroyIOBHTeI
- 3ATOUBAHE HA BEPHATA
- IPEdynPEXHEHNE
- 3ABEJIEXKA
- 3aToUbaHe Ha octPneTata
- Perynpahe Ha cTbNkata Ha noDaBaHe INPEyINPEXHEHNE
- 3A USB YCTPOICTBO
- IODAPbXHKA IN IPOBEPHA
- PNEyNPEXDEHNE
- Поверка на Всрг范围内
- Български
- NocnCTBaHe Ha CtpaHnUHnHa KaHn HAmepaTa Ha cnnpaHata JeHTa (ΦnR. 40, 41)
- 3.ПоинсТВанeHaMaCJIeHaTaNIO3a(ФИr.42)
- NocntBaHe Ha Boeataa HnHa (Hr. 9, 43)
- CmraHa Ha KapboHOBn YeTHN
- Поберва мотаяхнite вHTOBe
- NpdpbKaHa MoTopa
- TAPAHUN
- Hhopmaa3a wmoBO 3ambpcBaHe n Bn6paun
- PPEyPPEXDEHNE
- 3A6EJIENHKA
- OTCTPAHRABE HA HEN3INPABHOCTN
- OZNAKE
- UPOZORENJE
- TEXHIKA BE3NEKN KOPNUCTYBAHNAJAHUCIOROBOIO NNJIHOIO
- yKpaIHcbKa
- ДОДATHOBI 3ACTEPEЖЕHHЯ 3 БE3ПЕНI
- 3ACTEPEXHEHЯ LIOO BATAPEI TA 3APYHOrO PnCTPOIO
- 3ACTEPEKHEHNAOIO PIiHKJIIOUeHHN PnCTPOIO USB (UC18YSL3)
- NONEPEDXENH
- PIMITHA
- CTAHДAPTHI AHCECYAPN
- BctaHOBLeHH6iHooIkpIshK
- PerylloBaHHaHTary IaHcIora (MaI. 13)
- Ipepebipha hatay nahucora (Ma1. 14)
- 3aKpyUyBaHHr rBnHTa (MaI.15)
- NONEPEDXHEH
- OgI I IITROBHA DO BnKOpNCTAHH
- NONEPEDJHEH
- Ipepebipte, qH BnMKHeNo nepemnkau
- Ipebipha Hatary lahiora
- Ipebipka ralbma lanuora (Ma1. 16) NONEPEDHEHHA
- NPMMITHA
- IpebipHa MaCTnla JaHcIora
- DPMMITA
- BctaHOBHeHH 3miHHoro aKymyIaTopa (MaI. 4)
- OBEPEXHO
- IpepeBipka cBtIIOjOda (MaI. 18)
- DPMITHA
- Ipebipka raIbma
- OBEPEKHO
- Ipebipha BntpaTH MaCTnla (MaI. 19, 20)
- Po60Ta nepemnkaa
- NONEPEDXEHNA
- BnKOpncTaHHHa Hapa6iHa
- IHДИKHATOP 3АЛПШУ 3APЯДУ BATAPEI
- ② BctaHOBLeHHra3miHoro aKymyIaTopa (MaI.4)
- ③ YbIMKHeHHnepemHnau
- OSEPEKHO
- #
- Tinnovi po6oju npoeypn
- 2.06pi3aHHr rilok
- OBEPEKHHO
- Po3nnIIOBaHHH KOIoA
- 3pi3aHHa depeB
- OBEPEXHHO
- 3axoDi 6e3neHn iD qac po60Tu
- Дл рб it BeHko 06cary a6o noCTiHoi p60tN
- IPMIMITA
- TpmaHHaTOBxAHHaHcIOrBOi nnK
- YIOBIOBAuJaHcIora
- TOCTPIHЯJI3JIAHIOIgA
- TocpiHnIe3
- PeryIIOBaHHa 6mEHXyBaHa rIi6Hn HNONEPEDHEHHA
- IHΦOPMAZIJI PPO IPNCTPIJ USB
- TEXHICHE OBCJLYTOBYAHHJI INEPEBIPHA
- NONEPEДЖEHHA
- 1.OrnaIaHcIora
- 2.Чишина 6iHоI Кршни Ta BiDciHy raIbMbHoi cTpiHn (MaI.40,41)
- IPNMITHA
- YnueHH HKOLO6Ha pI MaCTHna (MaI. 42)
- YnueHHa Hnnn nnKn (MaI. 9, 43)
- OrnaBryilbHnx zuToK (MaI. 44)
- 3amHa ByrilbHnx uitok
- IpepeBipKa MOHTaHHNX TBHNTIB
- Texhuihe 06cnyrobyaHHa DnHyHa
- 9.OrJaH KOHTaKtIB (iHCTpyMeHIT i6aTape)
- 10.3OBHIIuHryOuHCTHa
- 11.36epirahn
- O6EPEKHO
- BHBIP ARCECYAPIB
- BauHbBa iHopmaui npo 6aapei dna 6e3dpoTOBnX eIeHTpOIHcTpymeHTi HiKOKI
- TAPAHTI
- InΦopmaia npo wym ta Bi6paio
- NONEPEJXEHNA
- UCYHEHRA HECNPABHOCTE
- ПРавиЛАТEXнИКИ БЕЗОПACHEСТДЛЯЦЕПОН ПИЛbl
- PnunHbOtdaun 3aunTaOT Hee onepatopa: (Pnc.2)
- ДОПОЛНТЕЛьнbie ПРЕДУПЕЖDEHNY NO 6E3ОПАСHOCTN
- MEPbI INPEdoCTOPOHHOCTNДЛЯ BATAPEN I 3APrAnHOYUCTPOIcTBA
- MEPbI INPEdoCTOPOJXHOCTN INPOOBPAUeHn C NOHNO-JINTHEBOIAKKUMyJIaTOPHOJ BATAPEEIN
- PNEyynPEXDEHNE
- OCTOPOXHO
- IPEDyPPEXDEHNE
- OTHOCHTeJIbHO TPAHCNoPTnPOBKn INTN- HOHHO BATAPEI
- MEPbI INPEAOCTOPOXHOCTN IPNIPODCOEINHEHNN YCTPOICTBAUSB (UC18YSL3)
- ПРИМЕЧАNH
- HA3HAUEHNE
- CHATNE/YCTAHOBKA BATAPEN
- ChTne 6aTaPeu
- OCTOPOKHO
- YctahOBha 6aTapeN
- 3APДHA
- Поберна pa60ы CBeTOdHODHON NOcBETN (Pnc.18)
- ПОНМЕЧАНЕ
- Поберka pa60тbi Topmo3a
- ② YcTaHOBbAaKKMyJrToPa(Pnc.4)
- ③ PnBVeDHe NpeHJIIOuTeIaB DneCTBHe
- ПРИМЕЧАНЕ
- 06üne npoçéydþpe3kN
- Pe3Ha BeTOK
- Pe3Ha IecomaTepeHaNob
- py6ka depeBbeB
- Mepbl npedoctopoHoctn nppe3Ke
- MaaTa6Hbix onepaun nn 6ecnpepbIBHO pa60tbl
- 3axbaT/ToKKaHne cenHOH nJIbI
- ZenHoi orpaHnHTeIb
- 3ATOUKAJIe3BnA LcENI
- ПРМЕЧАНЕ
- 3aToUHaJIe3BnA
- HactpoKa rIy6HOMepa IPEdYIPeHXDEHNE
- INHΦOPMAÇNЯ OБ YCTPOДCTBE USB
- TEXHnueCHOE O6CJIyJHKINBAHNE N OCMOTP
- PDEyPEXEHENE
- Поверка пььнбix сени
- OCTOPOXHHO
- Ouchtha 6okoboi KpbIuHn HaMepbI TopMo3HOJ IeHTbl (Pnc.40,41)
- OuHCTHa rOpIbIa Ka Macna dIa cenn (Pnc. 42)
- OuHcTHa HnPaBIAIOe IINHbI (Pnc. 9, 43)
- 5.OcmToP yroIbHbIX ΚeToK (Pnc. 44)
- 3aMeHa yroIbHbIX uTeTOK
- OcmOTP KpeenHbIX BNHTOB
- 06cIyHbAHaHe IbHaTeJIa
- OcmOTP KOHTaKTOB (HHCtpymeHTa N 6aTapen)
- Hapykha ouhctka
- XpaHeHne
- PIMMEUHNE
- BbIBOP PnHADJIeXHOCTEi
- Baxnna Hhopmaun O 6aTapex dI86cnpoBOHbIX 3JeHTponHCTpymEnTOB HiKOKI
- TAPAHTN
- Hhopmaun, hacaouaacn co3daBaemoro yuma n Bn6paun
- PNEyIPEKDAEHNE
- HENOJIaIKN IN CnOCOB INX UCTPAHEHNA
- HiKOKI
- HiKOKI Power Tools Europe GmbH
- HiKOKI Power Tools Netherlands B.V.
- HiKOKI Power Tools (U.K.) Ltd.
- HiKOKI Power Tools France S.A.S.
- HiKOKI Power Tools Sweden AB
- HiKOKI Power Tools Denmark A/S
- HiKOKI Power Tools Finland Oy
- HiKOKI Power Tools Hungary Kft.
- HiKOKI Power Tools Polska Sp.z.o.o.
- HiKOKI Power Tools RUS L.L.C.
- HiKOKI Power Tools Romania S.R.L.
Brand : HiKOKI
Model : CS 3630DA
Category : Saw