AMD50E - Air Conditioning DURACRAFT - Free user manual and instructions
Find the device manual for free AMD50E DURACRAFT in PDF.
| Product type | Monoblock mobile air conditioner |
| Brand | Duracraft |
| Model | AMD50E |
| Cooling capacity | 2.4 kW |
| Annual energy consumption (cooling) | 586 kWh |
| Noise level | 56 dB(A) |
| Water tank capacity | 5 L |
| Operating modes | Cooling (COOL), Dehumidification (DRY), Ventilation (FAN) |
| Functions | Timer (1-24 h), Sleep function, Automatic oscillation of air outlet grille |
| Power supply | Single-phase, grounded, mains voltage (230 V ~ 50 Hz) |
| Air exhaust hose length | 45 to 180 cm (extendable) |
| Filter type | Washable air filter |
| Water drainage | 5 L tank or external drainage via flexible hose (diameter 12 mm) |
| Recommended cleaning | Daily (tank) and weekly (filter and surfaces) |
| Safety | Overflow protection, automatic shutoff if tank full, do not use without filter |
Frequently Asked Questions - AMD50E DURACRAFT
User questions about AMD50E DURACRAFT
0 question about this device. Answer the ones you know or ask your own.
Ask a new question about this device
Download the instructions for your Air Conditioning in PDF format for free! Find your manual AMD50E - DURACRAFT and take your electronic device back in hand. On this page are published all the documents necessary for the use of your device. AMD50E by DURACRAFT.
USER MANUAL AMD50E DURACRAFT
GB PORTABLE AIR-CONDITIONER User instructions
DE MOBILES KLIMAGERAT Gebrauchsanweisung
FR CLIMATISEUR MOBILE Mode d'emploi
NL MOBIEL AIRCONDITIONINGSTOESTEL Gebruiksaanwijzing
ES CLIMATIZADOR MOVIL Instrucciones de uso
APARELHO PORTATIL DE AR CONDICIONADO Manual do utiliser
CLIMATIZZATORE TRASFERIBILE MONO-TUBO Istruzioni d'uso
SE FLYTTBART KLIKMATAGGREGAT Bruksanvising
NO MOBILT KLIMAAPPARAT Bruksanvising
DK MOBILT KLIMAAPPARAT Betjeningsvejledning
FI LIIKUTELTAVA ILMASTOINTILAITE Kayttoohje
PL KLIKATYZATOR PRZEWOZNY Instrukja obstugi
TR SALON TIPI MOBIL KLIMA CIHAZI Kullanim Talimatlari
HU MOBIL KLIMAKESZULEK Hasznalatiutasitas
CZ MOBILNI KLMATIZACNI PRISTROJ Navod k pouziti
HR PRIJENOSNI KLIMATIZACIJSKI UREDAJ Upute za uporabu
SI PRENOSNA KLIMA NAPRAVA Navodilo za uporabo
RU MOBnIbHbIM KOHNMOHEP PYKOBODTO NO 3KCNIVATALINN
GR KIVNTO KAIJIATIOTIKO OAHIGE XPHES
SA Jaiil aynil jgs
AMD-50E
CONTENTS ENGLISH
IMPORTANT SAFETY INSTRUCTIONS
Read through all the instructions before starting to use the air-conditioner. Keep this manual in a safe place for future reference.
- Supervision is needed when the air-conditioner is used anywhere near children.
- Do not use the air-conditioner outdoors.
- Stand the air-conditioner upright on a firm, even surface. Make sure it is standing securely so that it cannot tilt or fall over. Water can damage furniture and floor-coverings.
- Unwind the power cord completely. An incompletely unwound power cord can lead to overheating and cause a fire.
- Do not use an extension cord or a variable speed controller. This can lead to overheating, fire or electric shock.
- Only connect the air-conditioner with a single-phase earthed power socket with the current stipulated on the type plate.
- Switch the air-conditioner off and always pull the power plug out of the power socket when the air-conditioner is not in use, or when it is moved, handled or cleaned. Do not tug at the cord when disconnecting the power plug.
- Do not point the air-outflow opening (2) directly at people, walls, plants or objects.
- The air-conditioner functions best at room temperatures of up to 35^
- Do not use the air-conditioner near easily inflammable gases or materials, near an open fire, or in a location where oil or water could splash. Do not spray insecticides or similar substances onto the air-conditioner. Make sure that the air-conditioner is not exposed to direct sunshine. Do not operate the air-conditioner in a hothouse or a laundry, or near a bathtub, a shower or a swimming-pool.
- The air-conditioner is intended only for domestic use indoors, in accordance with the user manual, and is not intended for industrial use.
- Before starting to operate the air-conditioner, make sure that the air-inflow grating (7) and air-outflow grating (2) are open. The air-conditioner must not be positioned behind curtains or drapes, or behind other objects or obstacles which could hinder the air circulation. Make sure that no objects can get into the air-inflow grating (7) and air-outflow grating (2), as this can lead to overheating, fire or electric shock.
- Do not remove the water tank (5) when the air-conditioner is in use.
- Do not pull the power plug out of the power socket when the air-conditioner is in use. First press the power key (15) to the OFF position.
- After switching the air-conditioner off, wait for 3-5 minutes before switching it back on again, as the compressor could otherwise be damaged.
- Do not immerse the air-conditioner in water or any other liquids and do not pour water or any other liquids over the unit or into the air-inflow grating (7) or air-outflow grating (2).
- Clean the air-conditioner regularly by following the cleaning instructions.
- When you take the air filter (9) out of the air-conditioner, make sure that you do not touch any metal parts. These are sharp-edged and could cause injury. Do not use the air-conditioner when the air filter (9) and air-inflow grating (8) are not installed.
- If the power cord of the air-conditioner is damaged, it must be repaired by a workshop that is approved by the manufacturer, as special tools are needed.
- Always transport the air-conditioner in an upright position. If this is not possible, lay the unit on its side and stand it upright as soon as you reach your destination. Wait at least 4 hours after transporting the unit before starting to use it.
- Do not operate the air-conditioner if it is damaged or looks as if it might be damaged, or if it is not working properly. Pull the power plug out of the power socket.
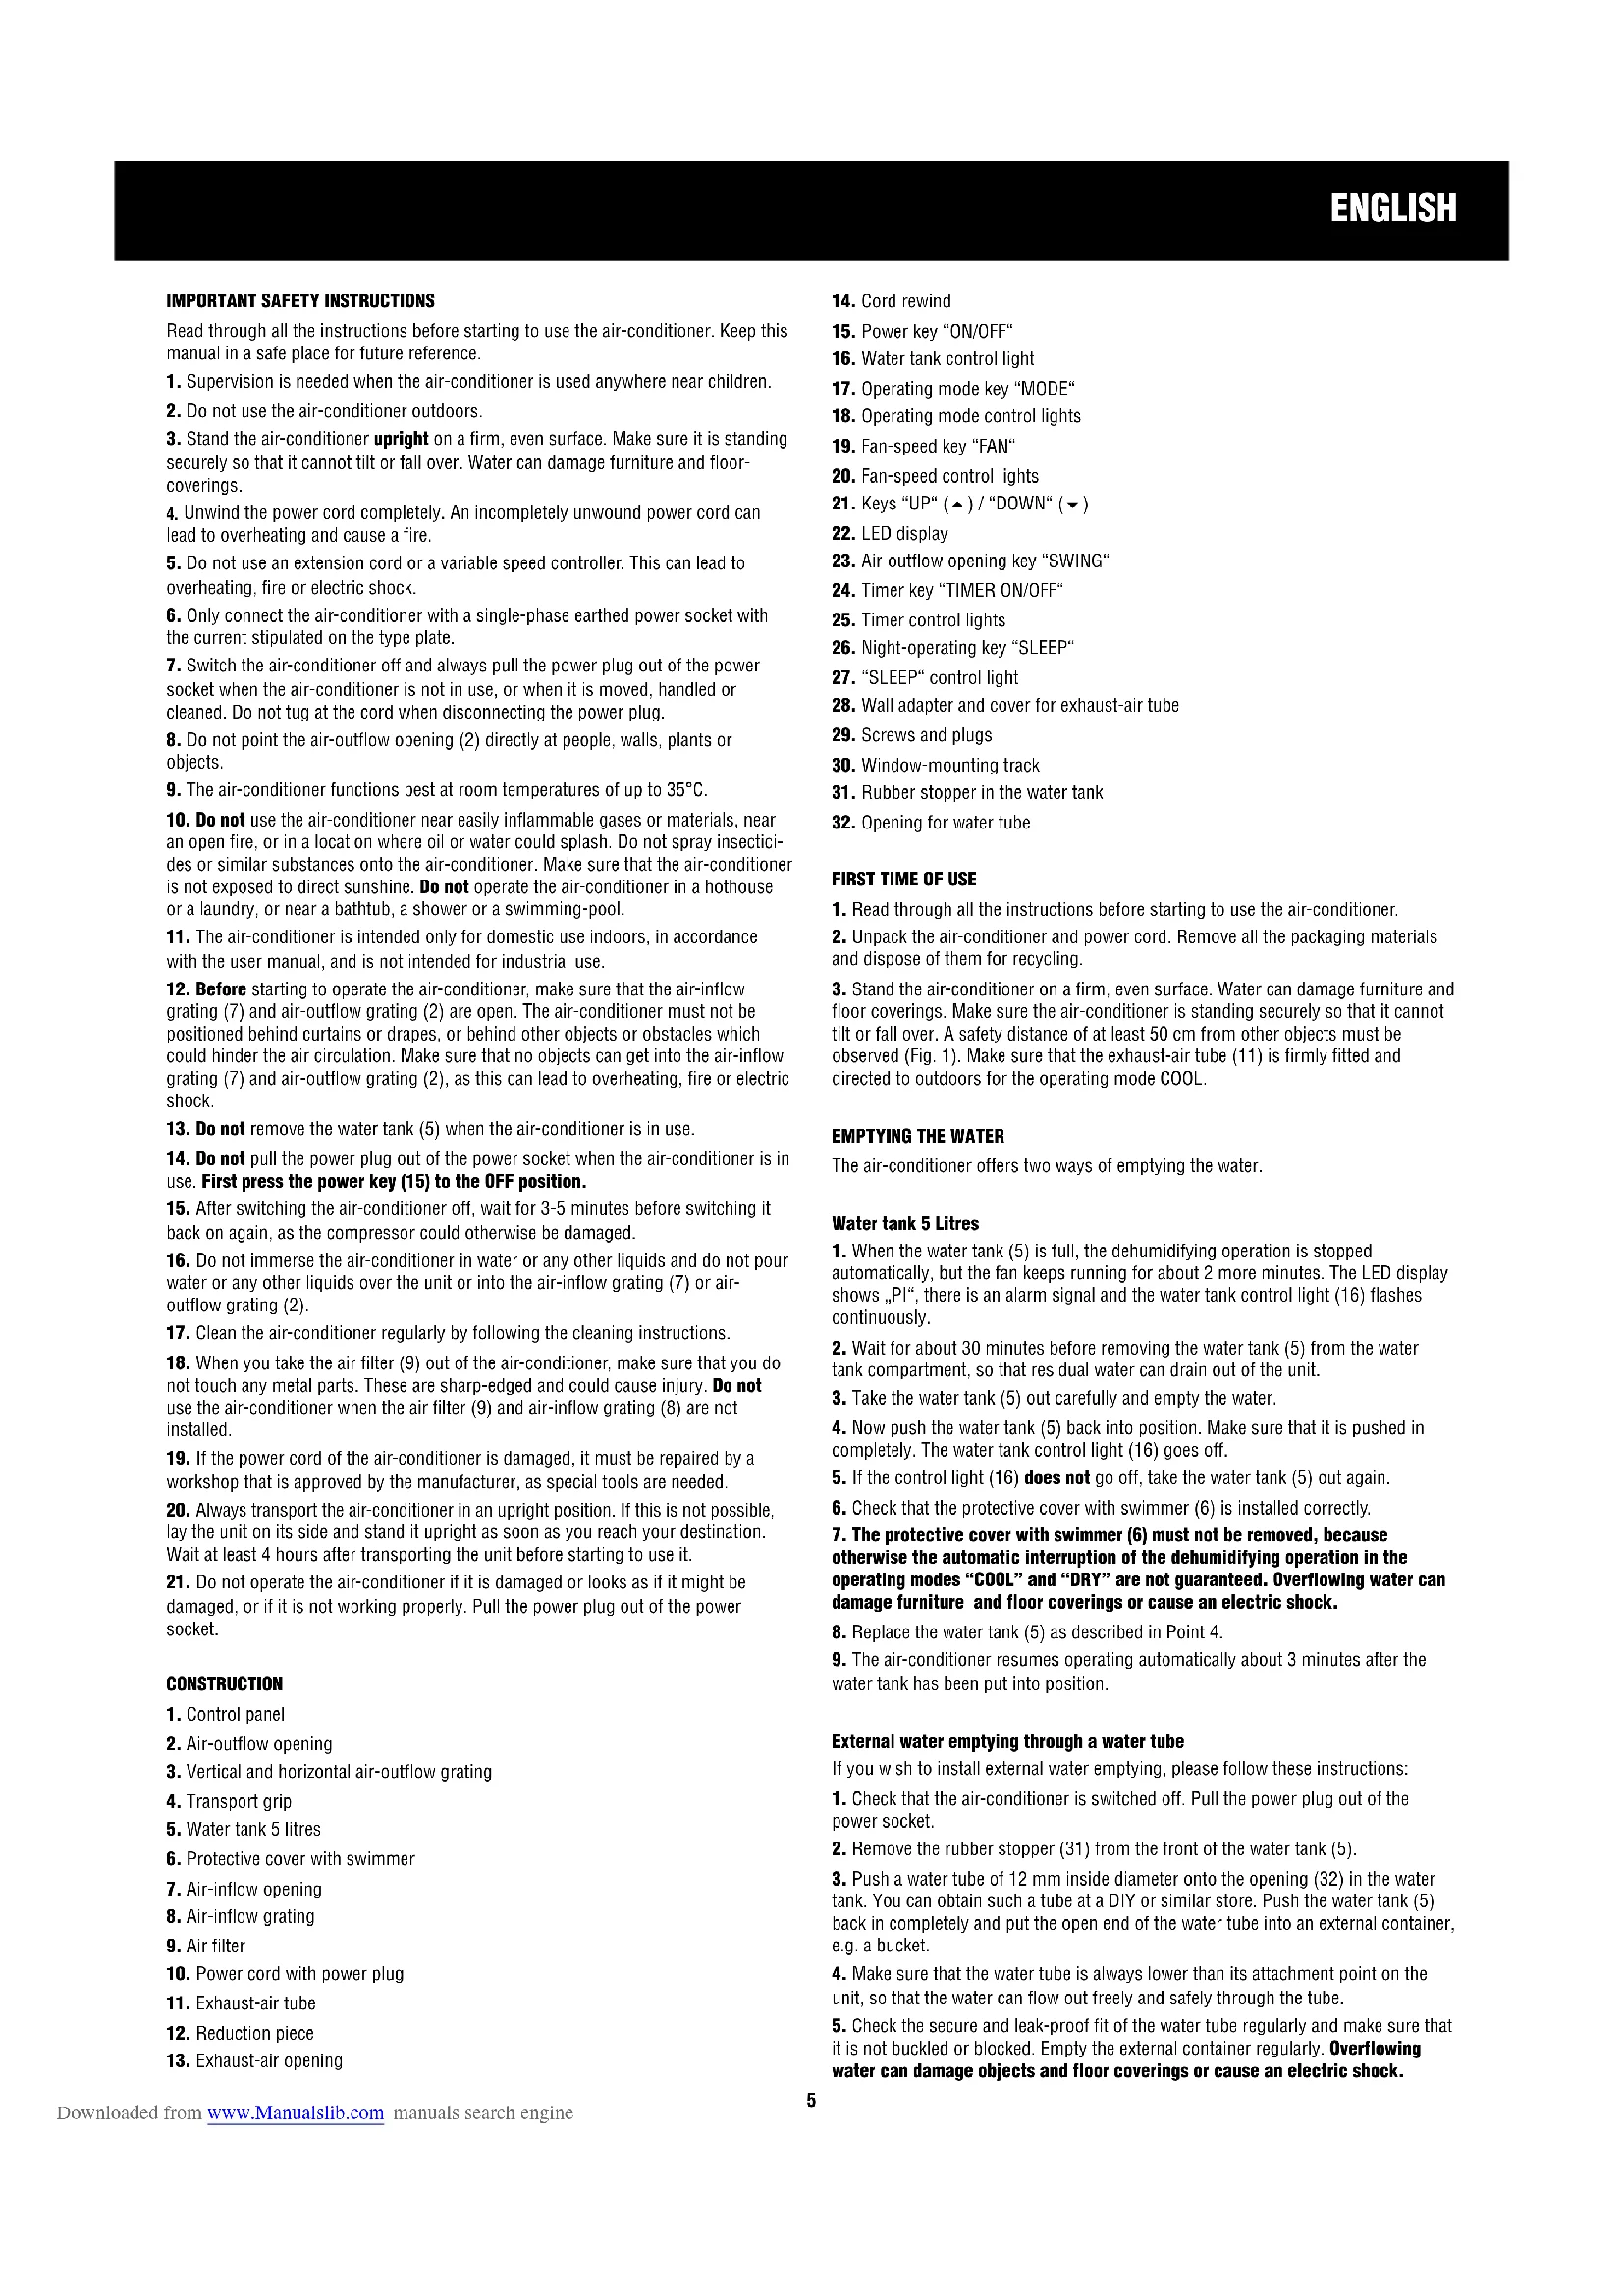
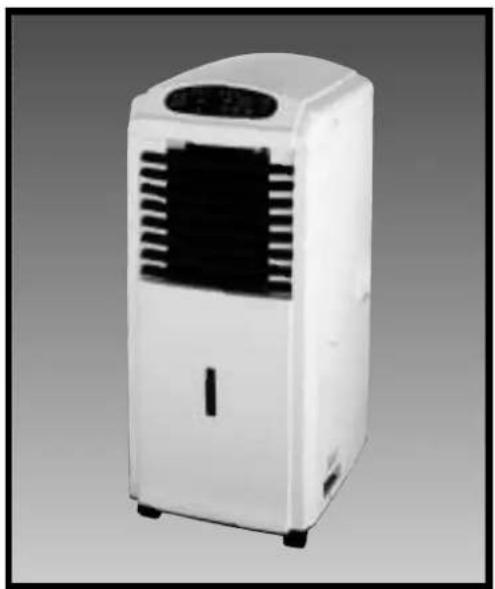
CONSTRUCTION
- Control panel
- Air-outflow opening
- Vertical and horizontal air-outflow grating
- Transport grip
- Water tank 5 litres
- Protective cover with swimmer
- Air-inflow opening
- Air-inflow grating
- Air filter
- Power cord with power plug
11.Exhaust-air tube -
Reduction piece
13.Exhaust-air opening -
Cord rewind
- Power key "ON/OFF"
- Water tank control light
- Operating mode key "MODE"
- Operating mode control lights
- Fan-speed key "FAN"
- Fan-speed control lights
- Keys "UP" (▲) / "DOWN" (▼)
- LED display
- Air-outflow opening key "SWING"
- Timer key "TIMER ON/OFF"
- Timer control lights
- Night-operating key "SLEEP"
- "SLEEP" control light
- Wall adapter and cover for exhaust-air tube
- Screws and plugs
- Window-mounting track
- Rubber stopper in the water tank
- Opening for water tube
FIRST TIME OF USE
- Read through all the instructions before starting to use the air-conditioner.
- Unpack the air-conditioner and power cord. Remove all the packaging materials and dispose of them for recycling.
- Stand the air-conditioner on a firm, even surface. Water can damage furniture and floor coverings. Make sure the air-conditioner is standing securely so that it cannot tilt or fall over. A safety distance of at least 50~cm from other objects must be observed (Fig. 1). Make sure that the exhaust-air tube (11) is firmly fitted and directed to outdoors for the operating mode COOL.
EMPTYING THE WATER
The air-conditioner offers two ways of emptying the water.
Water tank 5 Litres
- When the water tank (5) is full, the dehumidifying operation is stopped automatically, but the fan keeps running for about 2 more minutes. The LED display shows "PI", there is an alarm signal and the water tank control light (16) flashes continuously.
- Wait for about 30 minutes before removing the water tank (5) from the water tank compartment, so that residual water can drain out of the unit.
- Take the water tank (5) out carefully and empty the water.
- Now push the water tank (5) back into position. Make sure that it is pushed in completely. The water tank control light (16) goes off.
- If the control light (16) does not go off, take the water tank (5) out again.
-
Check that the protective cover with swimmer (6) is installed correctly.
-
The protective cover with swimmer (6) must not be removed, because otherwise the automatic interruption of the dehumidifying operation in the operating modes "COOL" and "DRY" are not guaranteed. Overflowing water can damage furniture and floor coverings or cause an electric shock.
-
Replace the water tank (5) as described in Point 4.
- The air-conditioner resumes operating automatically about 3 minutes after the water tank has been put into position.
External water emptying through a water tube
If you wish to install external water emptying, please follow these instructions:
1. Check that the air-conditioner is switched off. Pull the power plug out of the power socket.
2. Remove the rubber stopper (31) from the front of the water tank (5).
3. Push a water tube of 12mm inside diameter onto the opening (32) in the water tank. You can obtain such a tube at a DIY or similar store. Push the water tank (5) back in completely and put the open end of the water tube into an external container, e.g. a bucket.
4. Make sure that the water tube is always lower than its attachment point on the unit, so that the water can flow out freely and safely through the tube.
5. Check the secure and leak-proof fit of the water tube regularly and make sure that it is not buckled or blocked. Empty the external container regularly. Overflowing water can damage objects and floor coverings or cause an electric shock.
MOUNTING THE EXHAUST-AIR TUBE
(Operating mode COOL)
The air-conditioner offers two ways of mounting the exhaust-air tube. The exhaust-air tube can be pulled out to a length of between about 45 and 180~cm However, for best performance the length should be kept to a minimum.
IMPORTANT: Do not stretch or bend the exhaust-air tube (Fig. 6).
Temporary mounting
- Push the exhaust-air tube (11) onto the attachment on the exhaust-air opening (13) at the back of the air-conditioner and press it downwards until it is completely and tightly fitted onto the air-outflow opening (13). Leave the styrofoam ring and the black rubber washer in the exhaust-air tube (11), so that it is sealed and leak-proof.
- Make sure that the reduction piece (12) is mounted securely on the other end of the water tube (11).
- Lead the exhaust-air tube (11) with the mounted reduction piece (12) through an open window to outdoors. Make sure that the exhaust-air tube (11) and reduction piece (12) are at a height of at least 30cm up to a maximum height of 120cm as measured from the surface on which the air-conditioner is standing (Fig. 4+5).
- If you no longer wish to use the air-conditioner, pull the exhaust-air tube back into the room.
Permanent mounting
- Push the air exhaust tube (11) onto the attachment on the air exhaust opening (13) at the back of the air-conditioner and press it downwards until it is completely fitted onto the exhaust-air opening (13). Leave the styrofoam ring and the black rubber washer on the exhaust-air tube (11), so that it is sealed and leak-proof.
- Drill a hole of 140 - 145mm diameter through an outside wall. Make sure that the hole is at a height of at least 30cm up to a maximum height of 120cm as measured from the surface on which the air-conditioner is standing (Fig. 5).
- Push the adapter (28) into the hole and secure it to the wall with the four plugs and screws (29) provided.
- Push the exhaust-air tube (11) without the reduction piece (12) into the adapter (28)
- If you do not wish to use the air-conditioner, pull the exhaust-air tube (11) out of the adapter (28) and close the adapter with the cover (28).
WINDOW-MOUNTING TRACK
The window-mounting track can be mounted horizontally or vertically in most sash or sliding windows. See Fig. 7 for minimum and maximum window openings.
INSTRUCTIONS FOR USE
- Check that the air-conditioner is switched off. Plug the power plug into the power socket. Do not touch the power cord with wet hands.
- Stand the air-conditioner on a firm, even surface. Make sure the air-conditioner is standing securely so that it cannot tilt or fall over. A safety distance of at least 50~cm from other objects must be observed. Make sure that the exhaust-air tube (11) is firmly mounted for the COOL operating mode.
- Make sure that the air-inflow grating (7) and air-outflow grating (2) are open and that the exhaust-air tube (11) is mounted and leads to outdoors for the COOL operating mode.
- Press the power key (15) to (ON) to start operating the air-conditioner.
- Press the operating key "MODE" (17) to the desired operating mode
COOL
DRY
FAN
The corresponding control light comes on.
Operating mode (COOL)
Press the keys "UP" (▲) (higher) or "DOWN" (▼) (lower) (21) to set the desired room temperature to between 16^ and 32^ . The chosen temperature appears on the LED display (22). Press the key "FAN" (19) to set the fan-speed - "HIGH" - "MED" - "LOW". The corresponding control light (20) comes on. Make sure that the exhaust-air tube (11) is mounted according to the instructions in the section on
"Mounting the exhaust-air tube", and that it leads to outdoors. When you switch this operating mode off, wait for at least 3 minutes before switching this mode back on again, as otherwise the compressor could be damaged.
Operating mode (DRY)
In this mode the air-conditioners runs at a preset speed which cannot be adjusted. The temperature cannot be selected on the control panel (1). Keep doors and windows closed to enable the best dehumidification performance. Do not lead the exhaust-air tube to outdoors. When you switch this operating mode off, wait for at least 3 minutes before switching this mode back on, as otherwise the compressor could be damaged.
Operating mode (FAN)
Press the "FAN" (19) key to set the fan-speed "HIGH" - "MED" - "LOW". The corresponding control light (20) comes on. "F" appears on the LED display (22). The temperature cannot be selected. Do not lead the exhaust-air tube (11) to outdoors.
6. Timer function
The timer function allows you to choose the time at which the air-conditioner is to switch on or off automatically (between 1 and 24 hours). The set time is not real time, but represents the period of time that is to elapse before the unit switches itself on or off automatically. The functions can only be programmed separately. The timer control light (25) comes on.
The air-conditioner is switched off:
Press the key "TIMER ON/OFF" (24). Press the keys "UP" ( ) (higher) or "DOWN" ( ) (lower) (21), to program the time after which the air-conditioner is to switch itself on automatically. Press the time key (24) again to cancel the timer setting. The air-conditioner is switched on:
Press the key "TIMER ON/OFF" (24). Press the keys "UP" ( ) (higher) or "DOWN" ( ) (lower) (21) to set the timeframe after which the air-conditioner is to switch off automatically. Press the time key (24) again to cancel the timer setting.
7. Night set-up SLEEP
The "SLEEP" function is for an automatic night set-up. Switch the air-conditioner on as described in the section "Operating mode COOL". Press the "SLEEP" key (26). After one hour's running time the programmed temperature rises automatically by 1 ^ C and after a further hour it rises again by 1^ . After seven hours total running-time the air-conditioner switches itself off automatically. To deactivate the "SLEEP" function, press the "SLEEP" key (26) again, or press the power key (15).
8. Panning the air-outflow grating
The airflow direction of the horizontal grating (3) can be adjusted manually. Take hold of the grating and move the slats to the desired position. The position of the vertical grating must only be changed when the automatic panning function for the vertical grating is switched off.
Press "SWING" key (23). The vertical air-outflow grating (3) pans automatically from left to right. Press the SWING key again to stop the panning. Do not try to adjust the vertical grating manually, as this could damage the motor.
9. Water tank control light
When the water tank (5) is full, "PI" appears on the LED display (22), there is an alarm signal and the water tank control light (16) flashes continuously. Follow the instructions describes in the section on emptying the water.
10. If the air-conditioner is not needed, or before it is moved or cleaned, press the power key (15) to "OFF" and pull the power plug out of the power socket.
CLEANING, MAINTENANCE AND STORAGE
We recommend that you clean the air-conditioner frequently. Please follow the instructions for cleaning, maintenance and storage in order to avoid disrupting the functioning of the air-conditioner.
Daily cleaning
- Before you start cleaning the air-conditioner, press the power key (15) to "OFF" and pull the power plug out of the power socket.
- Empty the water tank (5) as described in the section "Emptying the water".
- Rinse the water tank (5) thoroughly with tepid water.
- Wipe the outer surfaces of the water tank (5) with a soft, damp cloth.
- Resume using the air-conditioner as described in the „Instructions for use“.
Weekly cleaning
- Before you start cleaning the air-conditioner, press the power key (15) to "OFF" and pull the power plug out of the power socket.
- Empty the water tank (5) as described in the section "Emptying the water".
- Clean the water tank (5) with a domestic dish-washing liquid. Rinse the tank thoroughly several times with warm water.
- Clean the outer surfaces of the water tank (5) with a soft, damp cloth.
- Remove the air-inflow grating from the air-conditioner and take the air filter (9) out of its slot. Clean it gently with the brush attachment of your vacuum cleaner. If the air filter is very soiled, clean it carefully by hand in warm water (about 40^ ) with a domestic washing-up liquid. Rinse the air filter thoroughly and allow it to dry completely. Do not dry the air filter in the sun. Remount the air filter (9) on the air-inflow grating (8) and push the grating (8) back into the air-conditioner until it clicks into place.
- Wipe all the outer surfaces of the air-conditioner with a soft, damp cloth. Do not use any petroleum, thinner or other chemicals to clean the unit.
- Resume using the air-conditioner as described in the „Instructions for use“.
Disinfection
- Every two weeks, following the cleaning, you should additionally disinfect only the following part of the air-conditioner: inside the water tank (5).
- Use a domestic disinfectant on an alcohol basis or high percentage alcohol for this purpose. This large-surface disinfectant is an alcohol mixture which you can buy at any chemist's or drugstore. Both substances are harmless if rinsed off thoroughly with plenty of water.
- Wipe all the outer surfaces with a soft, damp cloth.
- Resume using the air-conditioner as described in the „Instructions for use“.
Maintenance and storage
- If you do not wish to use the air-conditioner for a longer period (a week or more), please clean it as described in the sections „Weekly cleaning" and „Disinfection".
- Allow the air-conditioner and all its components to dry completely.
- The air-conditioner must not be stored with a soiled air filter (9), or when there is water in the water tank (5).
- Store the air-conditioner standing upright in a cool, dry place.
TROUBLESHOOTING
| Fault | Possible cause | Problem solving |
| The air-conditioner does not work | 1. The power plug is not in the power socket. 2. The power socket is faulty. 3. The time set with the timer has not yet elapsed. | 1. Plug the power plug into the power socket. 2. Check your fuse box or ask an expert. 3. Wait until the time has elapsed or deactivate the timer. |
| The unit does not work when it is switched on and off with the ON/OFF key. | 1. The water tank light is flashing; the water tank is full. 2. The 3 minutes have not yet elapsed since the unit was switched off. 3. The room temperature is lower than the programmed temperature (operating mode COOL). | 1. Empty the water tank. 2. Wait until the 3 minutes have elapsed. 3. Reset the temperature. |
| Poor cooling performance | 1. The programmed temperature is too close to the room temperature. 2. The air filter is blocked. 3. The air-inflow or air-outflow opening is blocked or covered up. 4. The room is very warm. 5. Doors and/or windows are open. | 1. Pre-select a lower temperature. 2. Cleansse the air filter. 3. Make sure that air-inflow or air-outflow opening is free. 4. It takes longer for the room to cool down. 5. Close doors and windows. |
| Loud noises or vibration | The unit is not standing on an even surface. | Stand the unit on an even surface. |
CONDITION OF PURCHASE
As condition of purchase the purchaser assumes responsibility for the correct use and care of this KAZ product according to these operating instructions. The purchaser or user must himself or herself decide when and for how long this KAZ product is to be in operation.
IMPORTANT: IF PROBLEMS ARE WITH THIS KAZ PRODUCT, PLEASE OBSERVE THE INSTRUCTIONS IN THE GUARANTEE CONDITIONS. DO NOT ATTEMPT TO OPEN OR REPAIR THIS KAZ PRODUCT YOURSELF, AS THIS COULD LEAD TO TERMINATION OF THE GUARANTEE AND CAUSE DAMAGE TO PERSONS AND PROPERTY
Technical modifications reserved
| Energy Manufacturer Outside unit Inside unit | kaz AMD-50E |
| More efficient A B C D E F G Less efficient | E |
| Annual energy consumption kWh in cooling mode | 586 |
| (Acualt consumption will depend on how the applnca is used and climate) | |
| Cooling output kW | 2.4 |
| Energy efficiency ratio (EER) At full load (The higher the better) | 2.0 |
| Size Cooling only Cooling/ heating | ← |
| Air cooled Water cooled | ← |
| Heat output kW Heating performance: | |
| A: more efficient G: less efficient | |
| Noise [dB(A) re 1 pW] | 56 |
| Further information is contained in product brochures Norm EN 14511 Air-conditioner Energy label Directive 2002/31/EC | |
Driftlage VENTILATION (FAN)
Tryck pa tangenent "FAN" (19) for att stalla in flakthastigheten HIGH (Hog) - MED" (Medel) - LOW" (Lag). Resp. kontrollampa (20) tand. I LED-lysdioddisplayan (22) visas ,F." Temperaturen kan ent iyalas. Avluftningsliangen (11) skil inte leda utat.
6. Timerfunktion
3aropaetc cootbetctbyoua mHdkkaTopha lamna.
Pekmmpa6oTbOXLJAXKDEHME(COOL)
Hakimate Khoikn "UP" (▲) (yBemHTb) mN "DOWN" (Y) (ymEhmtb) (21), 706bl yctahobnt b jemaemy To temepatpyo nomee HnpeJeaox o 16 °C do 32 °C. BbopaHHa
TMMepatypota OT6bpaactaHa CBeToDMHom HnDnKatope (22).HaxMMAte KONKy FAN" (19), YTObIy cYATAOBHTcKOPOCTb BEHTINATOPa-HIGH"(BbCOKa)-MED" (cpeHNAR-“LOW" (HNI3KA), 3AorapTaee COOTBETCTBYOua HmIKAKTOPHAA NAMMa (20).Y6BDITeB, YTO BtTRKHOI WAnhr (11) yCTAHOBHeN H bItaEn HApKyU BoCOTBCTBmC yKa3AHHM, nPMBeEHBMIM B p43ene "MOHTAX BtTAHXORo WnHaRa. E.Cm Bbl BkNIOAHm 3OT pEXIM pa60Tb, NOJOKNTe He MeHEE 3 MmHT, PpEXDe YEM CHOB OcUeCTBnRTs peryNJPOBKN 3TOrO peKIMa, TAK KAK B npOTMBHOM CNYae BO3MOXHO NOBpeKdHeNE KOMPpeccopa.
Pekmpa60tbyOCUJEHNE (DRY)
B 3TOM pexmme paobtby bENTILNTOP aobotae T cnpbapntelno 3aadaHNO ckopoctbko, KOTopyo Heh33 mMeHnTB. Temepatypa He b6npaetca H naheHn ynpabEHHA (1). DnI IOCTHXHn ONIMALBOH PAOBtO NO ocuynHO dREp IN OHKHe Oe6xOIMO depXATb 3akpBTBMn. He BbIOdTe BbTRXHO WAnlHApNy. EcnN Bbl BkIOuHIN 3TO tP exMM paobtbo, ndooxnTe He MeHne 3MHNY, npzde YcH Cnoaa OcyueCTBnB perynpoBKM 3TORO pexMna, TAK KAK B npOTMBHOM CNYae BO3MOKHO NOBpeKdHHe KOMPeCCopa.
Pekim pa6o7bI BEHTUNJIOBAHNE (FAN)
HaxhMnIe KhoNkY“FAN"(19),T0b6IyctaHOBtckOpoCTbBeHTINrTOpa-HIGH"(bICcKa) -MED"(cpEHNH)-LOW"(HsKsA).3aRaPaeTcCooTeBCTcyUOaIar INdKATOPHn lamna(20). HBa ceroIOxIDOM INdKATOpE (22) NOBnBETcR,F". Tempepatya He BbIpaTaCRe. He BbBOJnte BByTRKHOJ 11H npKy.
6.ФункuaTаймера
Функлайтаймра поьоггет вам заль врму ATOMTINHECKORO BKIOHCHMIMN BИВKIOHCHMIMN pRbOPa(B npredanet 1do 24 cahoc).YctahOBENHOe MNO COOTBETCTBYET He (akTNHECKOMY BpEMen cyTOK,a INTEPaeany BpEMnO,NpoIPOECTBVIKOTOPORo PPOICXODIT ABOTAMTINHECKOE BKIOHCHMIMN WnB KIOHCHMNE NpRbOPaMMpyOTCR TOnbKOHe3ABNCIMDOpyOr dpyra.3aropaETC INDikKatophar lamma taiMepa(25).
KoHdMIOHeP BbIKIyHc:
HaxMnTe KhoNkY"TIMER ON/OFF"(24).HaxMmaTe KhoNkU"UP"(yEnNHMb)HIN "DOWN"(↑)(yEmhBmU)(21),TQb63I zanrpoPamMPoBAtp npOcEMKytOK BPEMeH,NO pnoeCTBHe KOtIOHO pONKHO pONKHO aTOMaTHeCKOE BKIOHKeKOH KOHNJIOHePA TOpTOphOE HAXATNE KhoNkTu Taimepa(24) 06paCbaPTae nPoRpaMPoBHaHE TaIIHepe.
KoHdIIOHOHeBkIOHeH:
HaxMMte KhoNkY "TIMER ON/OFF" (24). HaxMMaTe KhoNkn "UP" () (yEnHHMb) INH "DOWN" () (ymEnbMnBt) (21), YTObIz bAorpamMMPoBaBt npOMeKytOK BPEMeH, no pOwaeCTBM KOTOPKO nONKHO npOn3HT ABOMaTHeCKoe BbIKNOK KOHNIOHePA. BoTOpHOc HAXATNE KhoNko Taimepa (24) cpaCbaBn npOrpaMMPOBaHne TaIMepa.
7. HocHoeB BKIOOHeHNE SLEEP
Функлser Sleep FbIreTcA abOTOMaTHeCKM HOnHbIM BkIOHHeHM. BkIOHHTe KOHNaUMoHEp, KaK 3TO otucaHb aPazdene · PExKIM paObToB OXIAJXDEHVE*. HAcKMITE KHOKNy "SLEEP" (26).No npOoieCTBnO OJHO caca paOToB 3AnpOrrpaMMoBaHnA TEmpePaTy aOBtOMaTHeCKN NObBuHaTaC hA 1^ , aIO npOioCTBnE uoe OJHO rOACA ue ha 1 C. Iocne cemH acob paOToB KOHNaUMoHEp abOTOMaTHeCKN bblKnIOaHTe. 406b OTKIOQHTb FyHKUIO "SLEEP" . HAcMITE eue pa3 KhONky "SLEEP" - (26) mN KHOInKy (15).
TpOToC eIoupyiae AEPIsMOE (FAN)
Pntate to PAnkpo "FAN" (19), yia va putheta Me tyxutma tou aveipnpa "HIGH" (Yywn) -MED"Meon) -LOW"Xaun).Φwiizetai n avtioan luxvia eevxou (20). Tny Evdiux Luxviw (22) epaviotai F. H Bepopkaia dev evia emeigm. Mny obnyite tov eukamto aAynva eepaou pnc ta eEw.
6. Aeitoupyia xpovoeptnn
H aeitoupyia xpvovetpnnt aoc tpoapepei n duvatotnva etinieEte T npovikn atiyun kata tvn otoia n ouakeun tpokeita va tebeia autogata evtoc n EKTOCS AEIOUPOYIAC (avapeo 1e 1 KAI 24 wpeC). O pubuuevoc apBIOc dev avtiatoei atnytpayatki npaa alla oTo xpvokio diaotma peta to to otoio n ouakeun tha TEBE autoMATA EVTON EKTOS LEIOUPAYC. O AIEOTUPOYIE autc uTOpouv va tpoypaupaiotou mvo aveapnta n ia atro tvn aaan. H auviia eevxou tou xpvovetpnnt (25) qwiTEci.
To kaipatiotiko eivai EKtos Aetoupyias:
Pntate to PAnktpo "TIMER ON/OFF" (24). Pntate ta PAnktpa "UP"(Aun) n "DOWN" () (Meiwan) (21), yia va Tpovpaumatiote to xpvikoi diaatma, metarto tootoio pokeiata va teei autopata evtoc aeitoupyiac to kaiatiatiko. Me ek veou tnatma tou nnkpou xpovotpnn (24) o Tpoypaumoioc tou xpovotpnn oBvetai.
To kaiapntikó eivai evtos λeitoupyia;
Pntote to pAnktoo "TIMER ON/OFF" (24). Pntote ta pAnktpa "UP" Aueon) n "DOWN" () (Meiwn) (21), ia va npypapamiatoe to xpvikoi diaatma, metao totoio npoketai va teei autouata ktoiaotupyiaot kaianatiko. Me ek vouu tana Tou nkprou xpovotpn (24) o npovpauanoc tou xpvoueptnn ahtveai.
7. Nuxtepiiv Aetioupyia SLEEP
H Ieiouyia Sleep eivai ia autouatn aeioupyia yia m vixta. Oeate to KIJIaTIOKIO AEIoEUPYIA,OTUc TEPNpApTei OT,TOIOc AeIOUYPiAc SYEH).Pntate to PAnkto PO "SLEEP".Meta ato ia wpa aeIOUYPiAc n TPOpyaJauoJeuVn Bepuokpaia ouavetai autOuaTata kato 1°C KaI meta ato ia akoun npwapauagavetai gava kato 1°C.Meta ato auvoiA krrta WpEs aeIOUYPiAc TO KIJIaTIOKIO TIBeTA autOUpaTe EKTOC aeIOUYPiAc. TnaTV atevepyoToiOnn nLs aeIOUYPia "SLEEP", pntate ek veou to PAnktpo "SLEEP" (26) n To PAnkto PAnIOUYPiAc (15).
8. Taλavteuən tou nλeμaros εδδou āpa
Tyn kateuuvan pnc aepa twv opioovniw eaouatw(3) nvy aalaege me to xepi. Niaute ta eauayata kai qepte ta atnv entBuntn thee. Ipoeitee ae metaoae ts nce an twv eaouatw atokkeiota oar to autoata taoveua tau kaidou taneyauoc elav atteyepeyoantnevo.
Pnntote to nKtpo SWING20KaTeo TLeyua E6ou aepa 3) tAAvateuetai autopata ato apiaetpa TPOC TA EIGA. PnTATEEK VOU TO nKtpo,VA vtauoeTo taVauveua.MNv TPOOTaeite va metapuaierte To KaTeo TLeyua ME To XePI, DIOT ETAI MTOpe VA UTOATEI BAnO KIVNTpoc.
9. Auxvia eEyxou daeuevnc vepou
Otro doxieio vepou (5) eivai ymuato, n evdiin luxviwv (22) deixvePi akouyeta eva onua ouvaepou kai n luxvia elvyou tou doxieiou vepou
(16) avoaojnei diapkwc. Eapapoe Tc odnyie otwS TEpiypovtaI OTO "EKKevwn vepou".
- EAV TO KLIAMATIKO DE XPEIAZETAI, NPTPOU TO METAKIVNETEH TO MAcEVETE, FEPTE TO TNIKTPo AEITOUPIAC (15) OTN BEOAN "EKTOS" OFF" KAtpaBNTeTo PIs aTTO IV TPIca.
KAOAPIMOE,NEPIIOIHKAI ANOOHKEYSH
Uviotoue TAKIKO Kaaipio TOU KIAIATIOKOU. Ipoc aTOOuyn duaiitoupyiwv Tou KIAIATIOKU TAPAKAOUE VA EApapOcETE Tc Odbnyies KaBapoiou, TepinoiOns Kai atoNKeuangs
yliang yilao (5) cull yglue1.3
JIOO 50
"Jy 150000000000000000000000000000000000000000000
y
..(Off) (15) 1
"clllg g jy 5) clllg j
clay aiey 1 y aeae eee eae (5) cllle glae 3
JIOO 5(5)cllo
5
e 1 g 1 1 1 1 1 1 1 1 1 1 1 1 1 1 1 1 1
a 40
(8)(9)
sillil
al gai i jil 1gaii y. ljdyao oaoa oai jyogao jydi jiaill kill jayl jaii6
jieell 1
"Jgull Cldu J" 10000000000000000000000000000000000000000000000
jgbi
1 1
(5)
oJue gao juyi bill ola. Jgssll jia yjle ayu yjusll jyssll jyssll gill yjzall yjzill sla glaeul.2
1 1
pally 12y jwll dss
13
"Jglll 14
jia jia liai
Jill 1
"1111111111111111 1
a a a a a a a a a a a a a a a a a a a a a a a a a a a a a a a a a a a a a a a a a a a a a a a a a a a a a a a a a a a a a a
.(15) (26) "SLEEP"
8.
g 3)
1gbi 3) (23)"SWING"JgIgai
sallslg aai 9
Ls. jy (22) 5yS yIe pla aiele yai (5) cll e Lgay laia s gicn aiai I gil .E lal n nn baa yag aie (16) clal e g aie Jy aed
"lll
15) 15
Jyall Jn Jaaal 1aal (Off)
j 1
y 1
1
.(Off)(15)
a 115 11 11 11 11 11 11 11 11 11 11 11 11
(11)p(2)g(7)g(3).
(ON)(15)
150 17)MODEJgjz
$$ \begin{array}{r l} \Delta_ {i j} & = \text {C O O L} \cdot \ \Delta_ {i j} & = \text {D R Y} \cdot \ \Delta_ {i j} & = \text {F A N} \cdot \end{array} $$
SOLALIy 1 yaiiial aal
(COOL)
JL 121)DOWN"V) (sJz)"UP"△) JI J I J
JLJ L32 16 16 16
"HIGH"-AeRbUa(19)"FAN"JzJleIgaii.(22)LiBcKgtaiaiaiaiaiaiaiaiaiaiaiaiaiaiaiaiaiaiaiaiaiaiaiaiaiaiaiaiaiaiaiaiaiaiaiaiaiaiaiaiaiaiaiaiaiaiaiaiaiaiaiaiaiaiaiaiaiaiaiaiaiaiaiaiaiaiaiaiaiaiaiaiaiaiaiaiaiaiaiaiaiaiaiaiaiaiaiaiaiaiaiaiaiaiaiaiaiaiaiaia
(DRY)
6.54 6 (6) aol galy ygall lal 61.6
J 7
4 aJ 100000000000000000000000000000000000000000000000000000000
clll aegb jy bocclll yj
yLaLalSsLallgjllgjjnss
J 1
(5) clal ceg jao (31) aIballe 2aIaI I
© 2004 Duracraft is a trademark of Kaz, Inc., Hudson, New York, 12534 USA