AMD-67E - Dehumidifier DURACRAFT - Free user manual and instructions
Find the device manual for free AMD-67E DURACRAFT in PDF.
| Product type | Mobile dehumidifier (reversible air conditioner) |
| Brand | DURACRAFT |
| Model | AMD-67E |
| Power supply | Single-phase, 220-240 V ~ 50 Hz |
| Operating modes | Cooling, dehumidification, ventilation |
| Cooling temperature range | 16 °C to 30 °C |
| Timer | Programmable up to 24 hours |
| Lower oscillation | Automatic (left-right) |
| Fan speed | 3 levels (low, medium, high) |
| Permanent drainage | Yes (via hose) |
| Air filter | Activated carbon filter + dust filter |
| Filter cleaning | Every 2 weeks |
| Minimum distance from walls | 50 cm |
| Minimum ambient temperature for cooling | 16 °C |
| Connection | Standard single-phase socket |
| Safety | Automatic shut-off when tank is full, overheating protection |
| Maintenance | Clean the housing with a soft damp cloth |
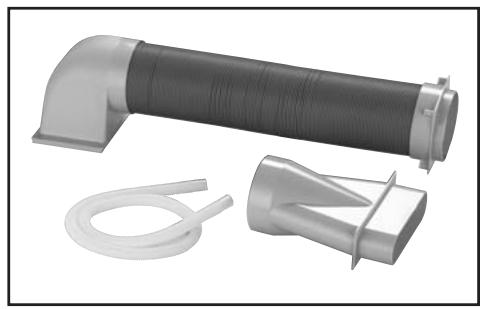
| Included accessories | Air exhaust hose, adapters |
| Use | Indoor only |
Frequently Asked Questions - AMD-67E DURACRAFT
User questions about AMD-67E DURACRAFT
0 question about this device. Answer the ones you know or ask your own.
Ask a new question about this device
Download the instructions for your Dehumidifier in PDF format for free! Find your manual AMD-67E - DURACRAFT and take your electronic device back in hand. On this page are published all the documents necessary for the use of your device. AMD-67E by DURACRAFT.
USER MANUAL AMD-67E DURACRAFT
SISALLYSLUETTELO 35 SUOMI
SPISTRESCI 38 POLSKI
TARTALOMJEGYZÉK 41 MAGYAR
OBSAH 44 CESKY
SADRZAJ 47 HRVATSKI
VSEBINA 50 SLOVENSKO
SISUKORD 53 EESTI
TURINYS 56 LIETUVIU
SATURA RADITAJS 59 LATVIESU
FIHRIST 62 TURKCE
CODEPKAHNE 65 PYCKN
NEPIEXOMENA 68 EAAHNIKA
71
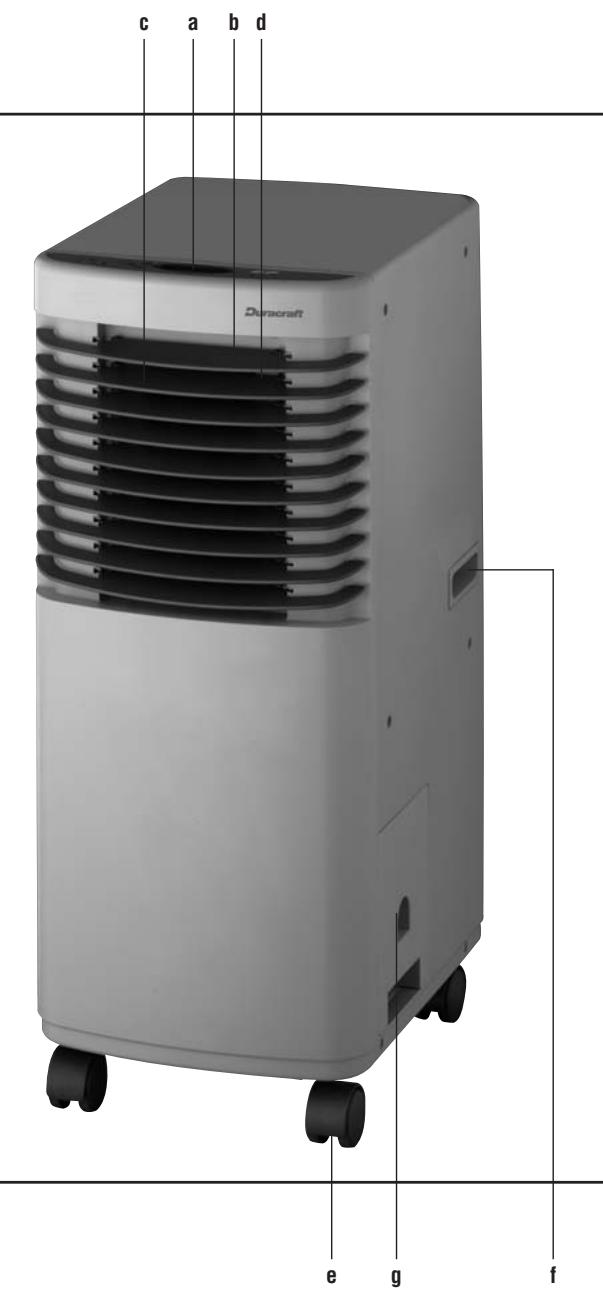
Fig. 1
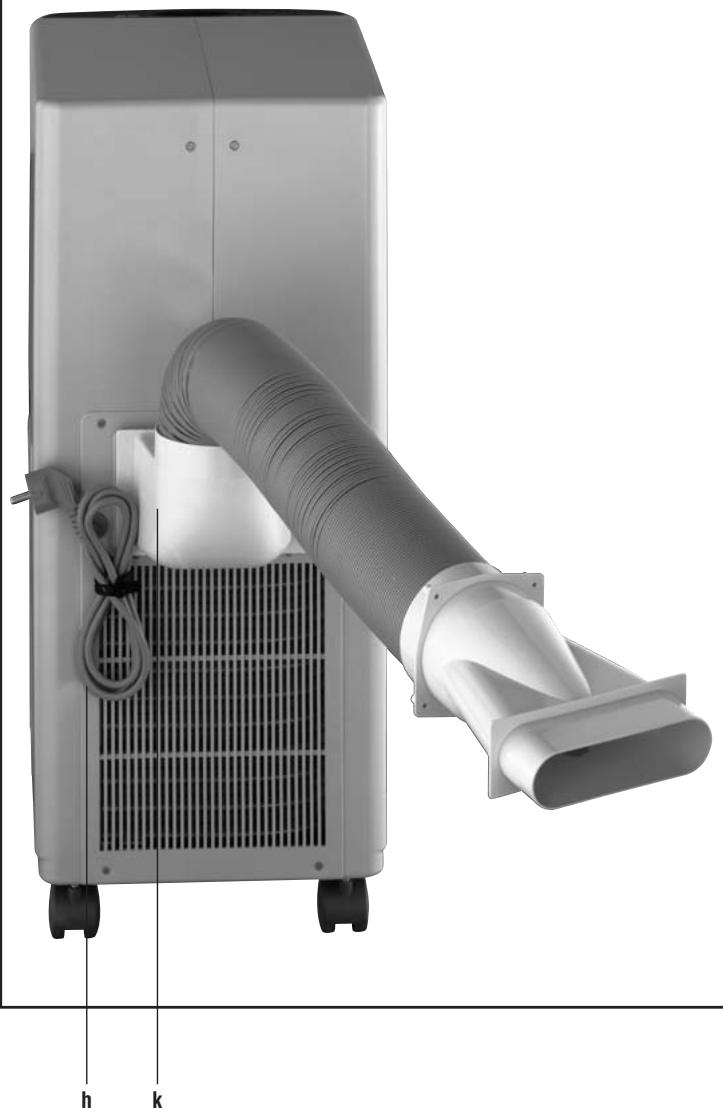
Fig. 2

IMPORTANT SAFETY INSTRUCTIONS
Please read through all the instructions before starting to use the air-conditioner. Keep this manual carefully.
- Install the air-conditioner in a place which is inaccessible to children.
- Do not use the air-conditioner out-of-doors.
- Place the air-conditioner upright on a firm, even surface. Make sure it is standing securely so that it cannot tip over or fall. Water can damage furniture and floor coverings and cause an electric shock.
- Unwind the cable completely. If the cable is not completely unwound, it can overheat and could start a fire.
- Do not use an extension cable or an adjustable speed controller. This could cause overheating, fire or an electric shock.
- Attach the air-conditioner only to a single plug with the same voltage as that given on the type plate.
- Always unplug the air-conditioner if it is not in use, or before it is moved or cleaned. Do not pull at the cable to unplug the appliance.
- Do not point the air-vent (d) directly at people, walls or objects.
- The air-conditioner operates best at a room temperature of between 17^ and 35^ in the operating modes „COOL“ and „DRY“. Above or below this temperature zone there can be operational disturbances in this mode.
- Do not use the air-conditioner anywhere near inflammable gases or materials, near an open fire, or where oil or water could splash. Make sure that the airconditioner is not exposed to direct sunlight. Do not use the air-conditioner in a sauna, or near a bathtub, shower or swimming-pool.
- Check that the air vents (l/m) (in) and (d) (out) are opened before the air conditioner is switched on. The air-conditioner must not be located behind curtains or other objects or obstacles which could restrict the circulation of air. Make sure that no objects can get into the air-vents in (l/m) or out (d), as this could lead to overheating, fire or electric shock.
- Do not unplug the air-conditioner while it is switched on. You must first switch the power switch (a) to OFF.
- Wait for 3 to 5 minutes after switching the air-conditioner off, before switching it back on.
- Do not immerse the air-conditioner in water or any other fluid, and do not pour water or any other fluid over the appliance or into the airvents (l/m) and (d).
- Clean the air-conditioner regularly following the cleaning instructions in the manual.
- If the power cable of the air-conditioner is damaged it must be repaired by a workshop approved by the manufacturer, as special tools are required.
- Always transport the air-conditioner in an upright position. If this is not possible, lay the appliance on its side and return it to its upright position as soon as you arrive at your destination. After each transportation wait for at least 60 minutes before using the appliance.
- Do not use this air-conditioner if it is damaged or shows any signs of damage or is not working properly. Unplug the appliance from the power supply.
ASSEMBLY INSTRUCTIONS
Front (Fig. 1)
a) Control panel
b) Air deflector (up / down)
c) Air deflector (left / right)
d) Supply air deflector
e) Wheels
f) Handle
g) Water tank
h) Supply cord
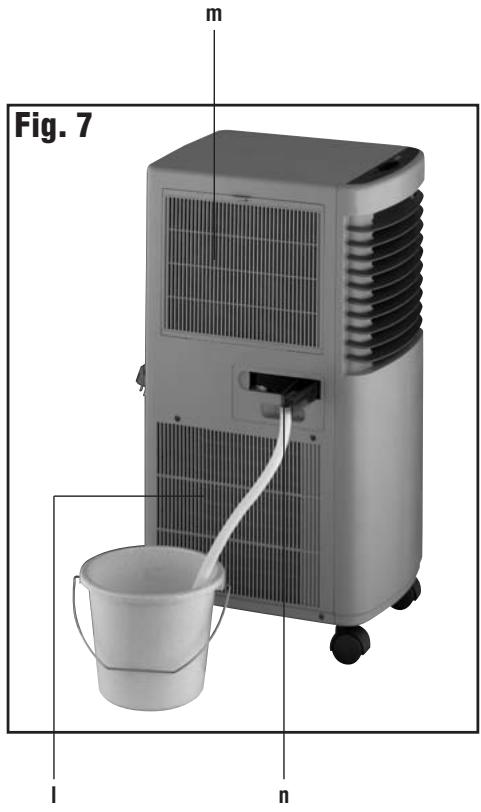
Back (Fig. 2 + 7)
k) Exhaust air grille
1) Return air grille
m) Return air grille
n) Permanent condensate water drain
- Only use for permanent water draining
- Only pull out the water drain for this purpose - otherwise it becomes leaky.
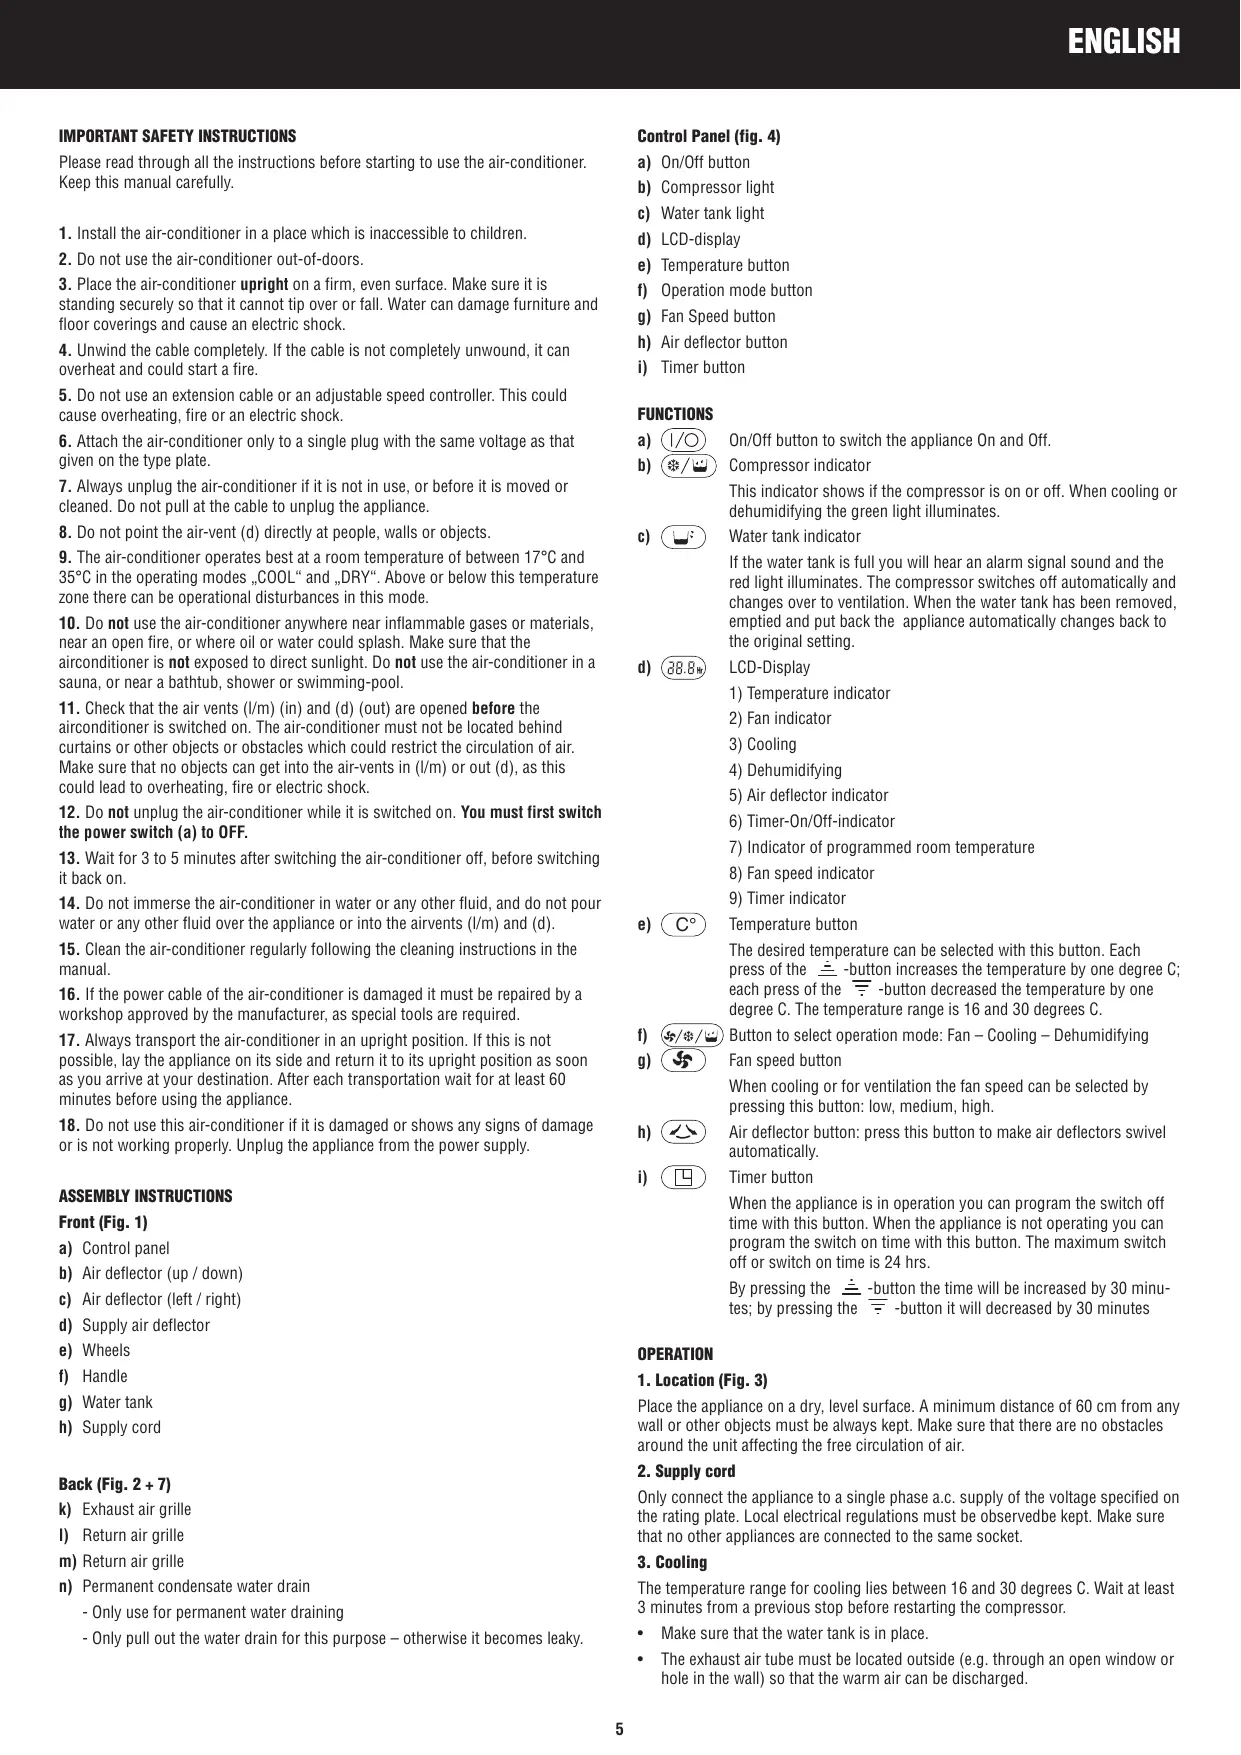
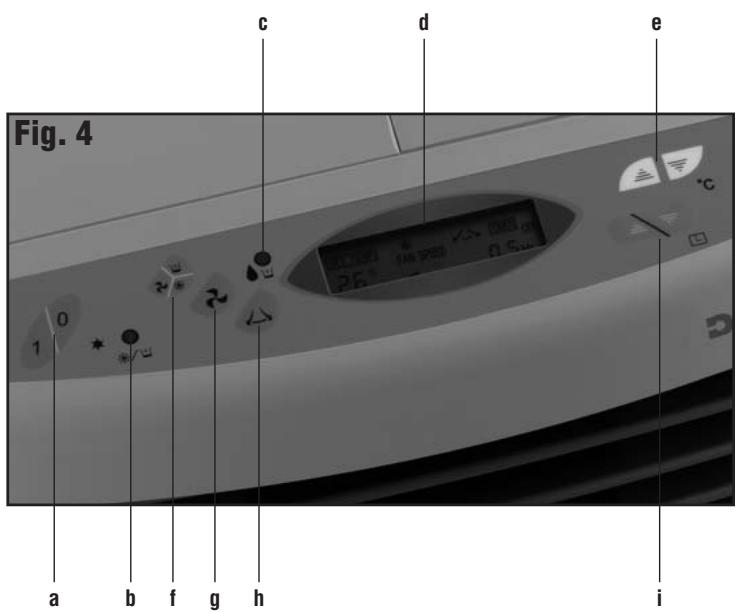
Control Panel (fig. 4)
a) On/Off button
b) Compressor light
c) Water tank light
d) LCD-display
e) Temperature button
f) Operation mode button
g) Fan Speed button
h) Air deflector button
i) Timer button
FUNCTIONS
a) 1 / 0 On/Off button to switch the appliance On and Off.
b) Compressor indicator
This indicator shows if the compressor is on or off. When cooling or dehumidifying the green light illuminates.
c) Water tank indicator
If the water tank is full you will hear an alarm signal sound and the red light illuminates. The compressor switches off automatically and changes over to ventilation. When the water tank has been removed, emptied and put back the appliance automatically changes back to the original setting.
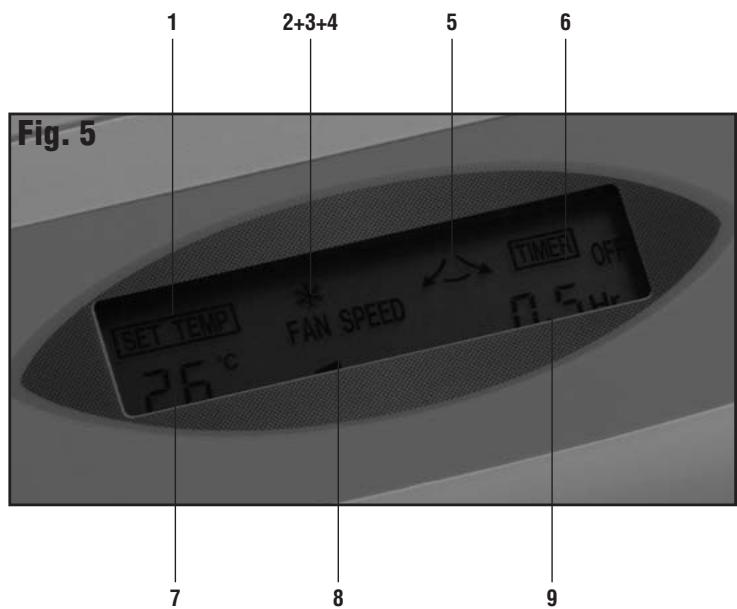
d) 8.8^* LCD-Display
1) Temperature indicator
2) Fan indicator
3) Cooling
4) Dehumidifying
5) Air deflector indicator
6) Timer-On/Off-indicator
7) Indicator of programmed room temperature
8) Fan speed indicator
9) Timer indicator
e) ^ Temperature button
The desired temperature can be selected with this button. Each press of the ±± -button increases the temperature by one degree C; each press of the -button decreased the temperature by one degree C. The temperature range is 16 and 30 degrees C.
f) 53 / 12 Button to select operation mode: Fan - Cooling - Dehumidifying
g) Fan speed button
When cooling or for ventilation the fan speed can be selected by pressing this button: low, medium, high.
h) Air deflector button: press this button to make air deflectors swivel automatically.
i) Timer button
When the appliance is in operation you can program the switch off time with this button. When the appliance is not operating you can program the switch on time with this button. The maximum switch off or switch on time is 24 hrs.
By pressing the ±± -button the time will be increased by 30 minutes; by pressing the -button it will decreased by 30 minutes
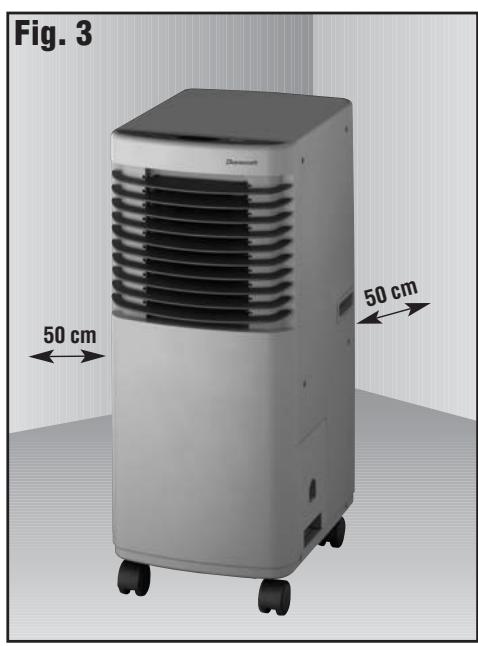
OPERATION
1. Location (Fig. 3)
Place the appliance on a dry, level surface. A minimum distance of 60~cm from any wall or other objects must be always kept. Make sure that there are no obstacles around the unit affecting the free circulation of air.
2. Supply cord
Only connect the appliance to a single phase a.c. supply of the voltage specified on the rating plate. Local electrical regulations must be observed be kept. Make sure that no other appliances are connected to the same socket.
3. Cooling
The temperature range for cooling lies between 16 and 30 degrees C. Wait at least 3 minutes from a previous stop before restarting the compressor.
Make sure that the water tank is in place.
- The exhaust air tube must be located outside (e.g. through an open window or hole in the wall) so that the warm air can be discharged.
- Press the ^( c) /( s/w) button until the cooling mode is shown is the LCD-display
- Select the desired fan speed by pressing the "⑤" button (low, medium, high).
- If the room that is to be cooled down is being exposed to sun close the curtains. Place the air conditioner far from any other heat source.
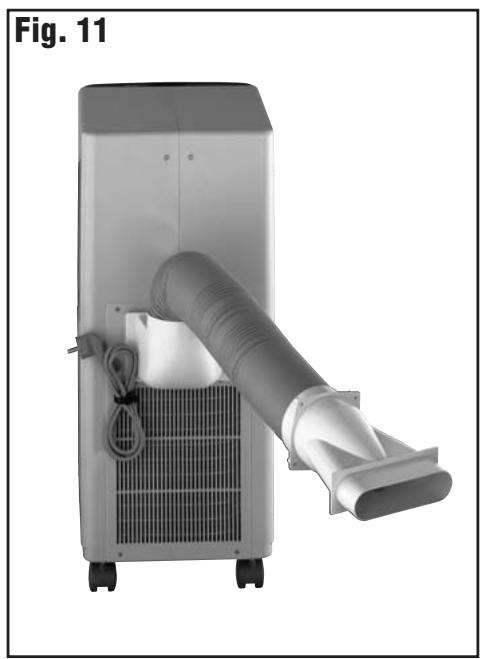
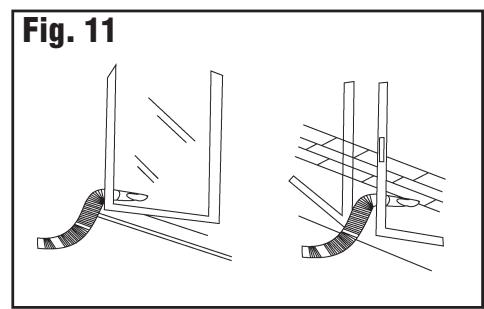
Assembly instructions for exhaust air tube and nozzle (Fig. 11)
- Slide the exhaust air hose onto the connector at the back of the appliance.
- Put the hose through an open window to the outside. Close the window as much as possible.
- If you would like to install the hose through the wall, drill a hole of 131mm diameter through the wall and push the hose through the hole to the outside.
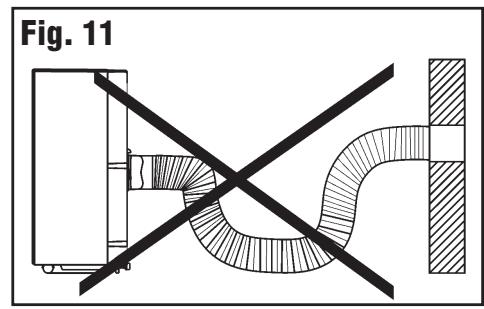
- The exhaust air hose can pulled and turned in almost any direction.
4. Dehumidifying
- Keep doors and windows shut to improve the dehumidifying performance.
- Make sure that the water tank is in place.
- Select the dehumidifying mode by pressing the n symbol illuminates in the LCD display.
- The exhaust air tube must be located outside (e.g. through an open window or hole in the wall) so that the warm air can be discharged.
5. Ventilation
- Select the ventilation mode by pressing the [n]12 · 12 · 12 button until the [n]12 · 12 symbol illuminates in the LCD display.
- Select the desired fan speed by pressing the "⑤" button (low, medium, high).
6. Timer function and setting
- When the appliance is off but the supply cord is plugged in press the "回" button. "Timer On" is being shown in the LCD-display. Select the desired time by pressing the "三" or "四" buttons, e.g. 6 hrs. The appliance automatically starts operating after 6 hrs.
- When the appliance is operating press the "□" button. "Timer On is being shown in the LCD- display. Select the desired time by pressing the "□" or "□" buttons, e.g. 2 hrs. The appliance automatically stops operating after 2 hrs.
7. Automatic oscillation of air deflectors
- When the appliance is operating press the "按钮" button until the "symbol" is shown in the LCD display. The vertical air deflectors start oscillating from left to right. Press the "button once again. The symbol disilluminates in the LCD display and the air deflectors stop oscillating.
8. Water tank
- When operating the appliance in dehumidifying or cooling mode condensate water is being drained into the water tank. If the tank is full an alarm signals sounds and the red light illuminates. The appliance stops operating after 3 minutes. Empty the water tank and put it back.
Caution: Do not remove the water tank when dehumidifying or cooling. If doing so the alarm signal will sound and the compressor stops working.
If you would like to empty the tank before it is full switch off the appliance. Wait at least 3 minutes before removing the tank to avoid condensate water enter the appliance.
9. Constant water draining (Fig. 7)
- Pull out the constant water drain at the side of the appliance. Do only pull it out for this purpose as otherwise it becomes leaky. Make sure that the drain is not clogged.
- Hold the drain firmly and slide the condensate water tube onto the drain.
Make sure that the tube is not bended.
Caution: When the appliance is operating or has just been switched off the constant water drain must not be pulled out as it could be full or water.
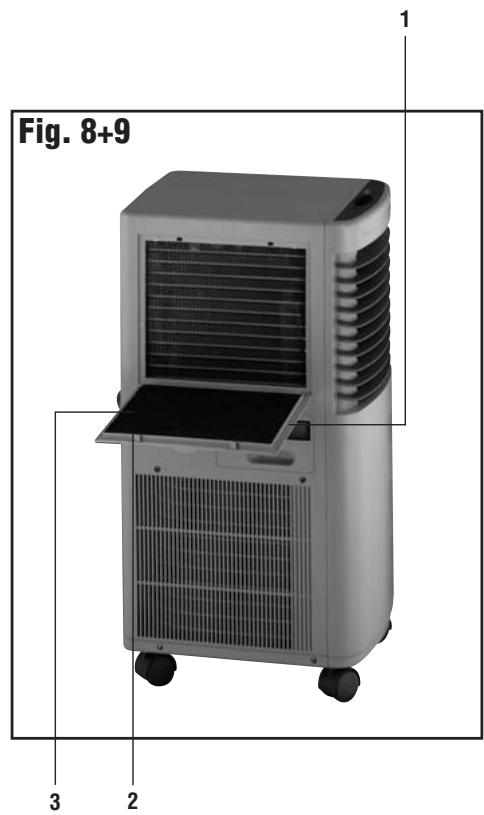
10. Air Filter (Fig. 8)
The air inlet grille is equipped with an active carbon and dust filter.
- Grille
- Dust filter (filters dust from the air)
- Active carbon filter (filters odours from the air)
CLEANING AND STORAGE
- Before cleaning switch off the appliance and unplug the appliance.
- Do not use petrol, paint thinner or other chemicals to clean the appliance.
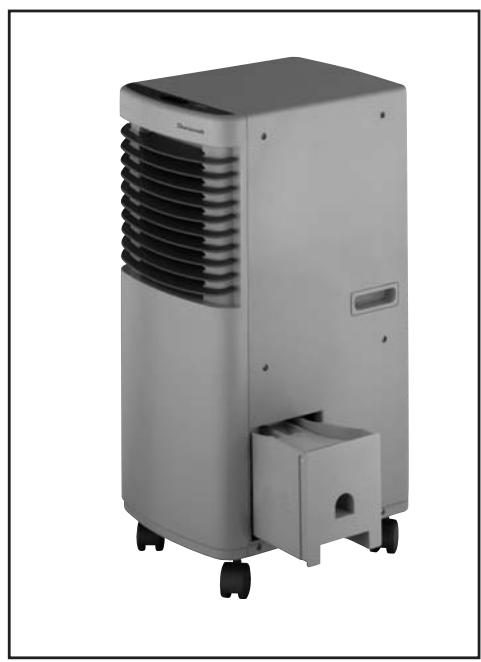
Cleaning of the body (Fig. 10)
- Only use a soft, damp cloth to gently wipe the appliance clean and dry it with soft cloth.
Air filter (Fig. 9)
- Clean the filter once every two weeks.
Pull out the grill at the handle, pull it up and take it out. - Carefully take off the 6 plastic plates and remove the filter from the grille.
- Gently wash the filter in 40 degree warm water with a neutral detergent. Let the filter thoroughly dry; do not expose to sunlight when letting it dry.
- Put the dry filter carefully back in place and fix it to the grille with the six plastic plates.
Water tank
- Remove the water tank, empty it and wash it with approx. 40 degree warm water. Fully dry the tank and put it back in place.
Storage
- Empty and dry the water tank.
- Remove the stopper from the water tube inside the appliance. Let the water fully drain and replace the tube back into the appliance.
Clean the appliance as described above. - After draining the water operate the appliance in ventilation mode for several hours to thoroughly dry it.
- Fold up the supply cord and tighten it at the back of the appliance.
- Cover the appliance with a plastic bag.
Disposal

This symbol on the product or its packaging indicates that the appliance cannot be treated as normal domestic trash, but must be handed in at a collection point for recycling electric and electronic appliances.
Your contribution to the correct disposal of this product protects the environment and the health of your fellow men. Health and the environment are endangered by incorrect disposal.
Further information about the recycling of this product can be obtained from your local town hall, your refuse collection service, or in the store at which you bought the product.
This regulation is valid only in EU member states.
TROUBLE SHOOTING
| Trouble | Reason | Measurement |
| The appliance is switched on by the "On/Off"-button but it does not work | 1. The plug is not plugged in. 2. The water tank is full. 3. The water tank is not in place. | 1. Plug the appliance in. 2. Empty the water tank. 3. Put the water tank in place. |
| The indicator shows an operating mode but the appliance does not work. | The timer has been programmed. | The appliance will automatically switch on after the set time. |
| The "cooling" mode has been selected but the appliance does not cool. | 1. The room temperature is below 16 °C. 2. There is frost on the evaporator (based under the air filter). | 1. The appliance will start working when the temperature is above 16 °C. 2. Defrost the evaporator; the compressor will then start working |
| The "dehumidifying" mode has been selected but the appliance does not blow cool air. | There is frost on the evaporator (based under the air filter). | Defrost the evaporater; the compressor will then start working. |
| The air volume is too little. | The air filter is dirty. | Clean the air filter. |
| The noise level is very loud and the appliance vibrates. | The appliance is uneven. | Place the appliance on a level, dry surface. |
CONDITION OF PURCHASE
As condition of purchase the purchaser assumes responsibility for the correct use and care of this KAZ product according to these user instructions. The purchaser or user must himself or herself decide when and for how long this KAZ product is in use.
WARNING: IF PROBLEMS ARE WITH THIS KAZ PRODUCT, PLEASE OBSERVE THE INSTRUCTIONS IN THE GUARANTEE CONDITIONS. DO NOT ATTEMPT TO OPEN OR REPAIR THE KAZ PRODUCT YOURSELF, AS THIS COULD LEAD TO TERMINATION OF THE GUARANTEE AND CAUSE DAMAGE TO PERSONS AND PROPERTY.
Technical modifications reserved.
Air deflector button: press this button to make air deflectors swivel automatically.
i)
Timer knop
Manoverpanel (figur 4)
a) TILL/FRAN
b) Kompressorindikering
c) Vattentanksindikering
d) LCD-display
e) Temperatur
f) Driftsatt
g) Ventilatorhastiget
h) Lameller
i) Timer
BESKRIVNING AV KNAPPARNAS FUNKTION
VEDLIKEHOLDELSE OG PLEIE
Bagside (Fig. 2 + 7)
OLULISED OHUTUSJUHISED
aiaaii iiaii aaiyaiyaiyaiyaiyaiyaiyaiyaiyaiyaiyaiyaiyaiyaiyaiyaiyaiyaiyaiyaiyaiyaiyaiyaiyaiyaiyaiyaiyaiyaiyaiyaiyaiyaiyaiyaiyaiyaiyaiyaiyai
j 1
jlll 10 aaaa Jaaa jai lal jao gglg
1 1
gill jol calil.
.
J 1
y/0/0 1 jll lgl baiuill Jn jn jn jn jn jn jn jn jn
aaii 1
jai.(blll gddalil jia)aia 1ggljggs
.
agally aggill .0
jgl jgl jgl jgl jgl jgl jgl jgl jgl
1
()
aaiy
四
413 111111111111111111111111111111
aaii iiaii iiaii iiaii iiaii iiaii iiaii
j 1
S_ OBC = 12 · OB · BC = 12 × 2t × 5
y
y
jll jll kll lll J 2 jll jll n nn jll e jll jll
jij1Jae
jglll Jae JbIg jIe / 1
1/0 ()
bcwlall sjw
()
aI aI Jai Jai bcl all j5 Ii loc jll lla
aall aag aag aagall no salll g yol y
yall yj
1 1jzj
Siall clal jaiwal jaliill baa piai - aclj lsc sall liq baeclll jz
Jiei
1/(1)
bcolla jlrj()
山
jaii(心
aJ11 aJ2
1
1
aill 1
1 0
j5i / 12is cii jll eLw sJlu
Lw Lw Lw Lw Lw Lw Lw Lw Lw Lw Lw Lw Lw Lw Lw Lw Lw Lw Lw Lw Lw Lw Lw Lw Lw Lw Lw Lw Lw Lw Lw Lw Lw Lw Lw Lw Lw Lw Lw Lw Lw Lw Lw Lw Lw Lw Lw Lw Lw Lw Lw
aagaae aee
gill aLw sL 19
aJd aJd j(L
山
aagaaeeyj
j 1
1j
J 1
JbA 1.
.2
baww g g w no y baww y S, jkssll cwi 1gai. ciu wul 1e gaa uauu uauu uauu 3
a
4
.
5
a
46e 800000000000000000000000000000000000000000000000000000
b7 = 1 - 2t
4 1