USER MANUAL DD-TEC10E DURACRAFT
INNEHALLSFÖRTECKNING 33 SVENSKA
INNHOLDsFORTEGNELSE 37 NORSK
INDHOLDSFORTEGNELSE 41 DANSK
SISALLYSLUETTELO 45 SUOMI
SPISTRESCI 49 POLSKI
TARTALOMJEGYZEK 53 MAGYAR
OBSAH 57 CESKY
SADRZAJ 61 HRVATSKI
VSEBINA 65 SLOVENSKO
SISUKORD 69 EESTI
TURINYS 73 LIETUVIU
SATURA RADIITAJS 77 LATVIESU
FiHRIST 81 TURKCE
CODEPKAHNE 85 PUCCKM
NEPIEXOMENA 89 EAHNIKA
98
IMPORTANT SAFETY ADVICE
Read through all the instructions before starting to use the dehumidifier. Keep this instruction manual in a safe place for future reference.
- Supervision is necessary when the dehumidifier is used near children.
- Do not use the dehumidifier outdoors.
- Place the dehumidifier on a firm, even, waterproof surface. Make sure it is standing securely so that the dehumidifier cannot tip over or fall down. Water can damage furniture and floor coverings.
- Unwind the cord completely. An incompletely unwound cord can lead to overheating and cause a fire.
- Do not use an extension cord, a multiway connector, or a continuously adjustable speed controller. This can cause overheating, fire, or electric shock.
- Connect the dehumidifier only to a single-phase socket with the supply voltage as stated on the type plate.
- Always switch the dehumidifier off with the power key (2) and always disconnect the plug (13) from the power socket when the dehumidifier is not in use, or when it is moved, handled or cleaned. Do not tug at the cord to disconnect the plug. Do not disconnect the plug when the dehumidifier is running. Always first switch the dehumidifier off with the power key (2).
- The dehumidifier functions optimally at a room temperature of between 13^ and 35^ . Optimal dehumidifying performance is only achievable in the higher temperature range (from 22^ ) and with higher room humidity (from 70% ).
- Do not use the dehumidifier anywhere near easily inflammable gases or substances, near an open fire, or at a location where oil and water could splash. Do not spray insecticides or similar substances onto the dehumidifier. Make sure that the dehumidifier is not exposed to direct sunlight. Do not use the dehumidifier in a hothouse or near a bathtub, shower or swimming-pool. Do not put any hot or heavy objects on the dehumidifier.
- The air intake and air outflow vents (9 + 10) must always be kept open during dehumidification. Make sure that no objects can get into the air intake or air outflow vents (9 + 10) . This can lead to overheating, fire or electric shock. The dehumidifier must not be installed behind curtains, drapes or other objects and obstacles which could impair the air circulation. A safety distance of at least 50~cm from other objects must be maintained. In addition, a safety distance of at least 60~cm from wet areas such as showers, washbasins, sinks, bathtubs etc. must be maintained. A safety distance of 120~cm from the water supply, e.g. a water tap, is necessary.
-
Do not remove the water tank (15) while the dehumidifier is running. Water can damage furniture and floor-coverings and cause an electric shock.
-
Wait for 3 - 5 minutes after switching the dehumidifier off before you switch it back on again.
- Do not dip the dehumidifier into water or any other liquids and do not pour water or any other liquids onto the appliance or into the air intake and air outflow vents (9+10).
- Clean the dehumidifier regularly, following the cleaning instructions.
- Always transport the dehumidifier in an upright position. Before using the dehumidifier for the first time, leave it standing in an upright position for 24 hours. Always stand the dehumidifier in an upright position immediately after transporting the appliance, and wait for at least 60 minutes before switching it back on. The water tank (15) must be emptied every time before transport.
- The dehumidifier must always be operated according to this instruction manual. Non-observation of these instructions can lead to injuries, a fire, electric shock or faults in the appliance.
- The dehumidifier is designed for private use indoors and is not intended for commercial use.
- If the power cord of the dehumidifier is damaged, it must be replaced by the manufacturer or a repair shop authorized by the manufacturer or by similarly qualified persons in order to prevent damage.
- Do not use the dehumidifier if it is faulty or could show signs of damage, or if it is not functioning correctly. Disconnect the plug from the power socket.
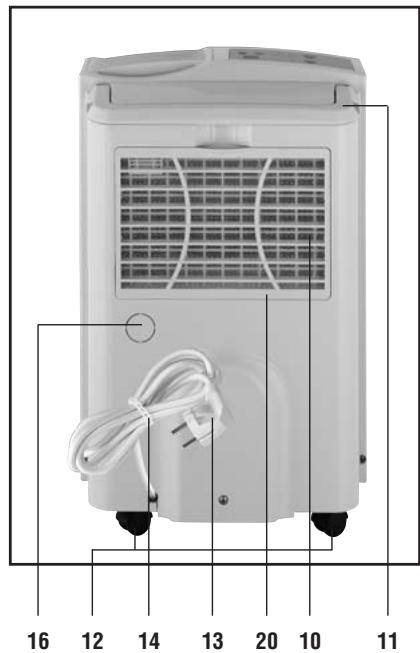
CONSTRUCTION
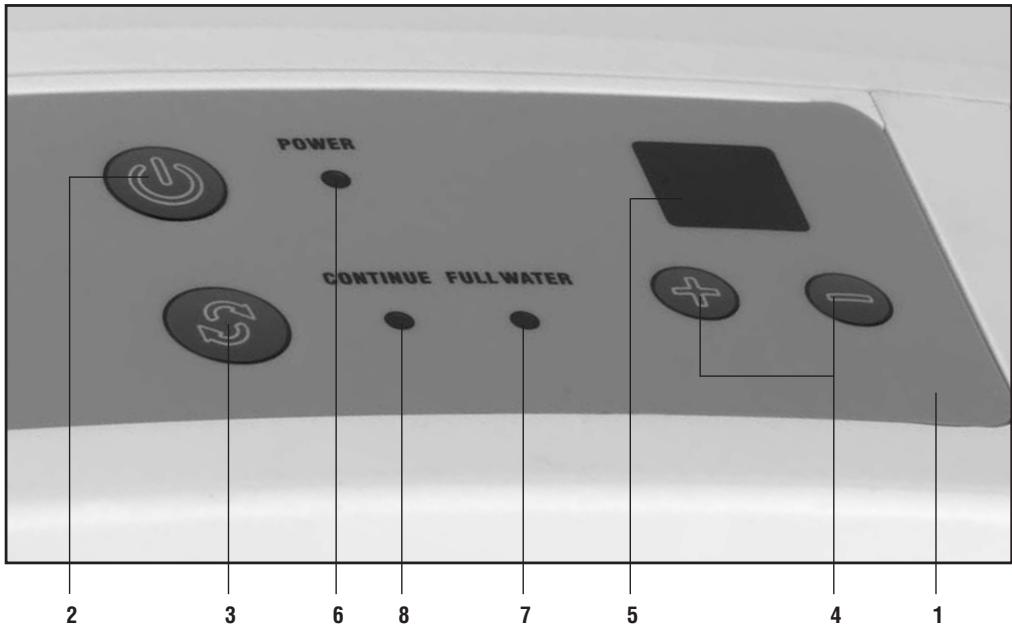
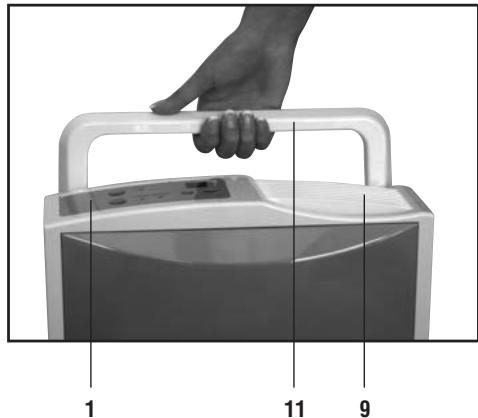
1 Control panel
2 Power key
3 Key for continuous use
4 Keys for degree of humidity /
5 Display
6 Power lamp
7 Water tank control lamp
8 Control lamp continuous use
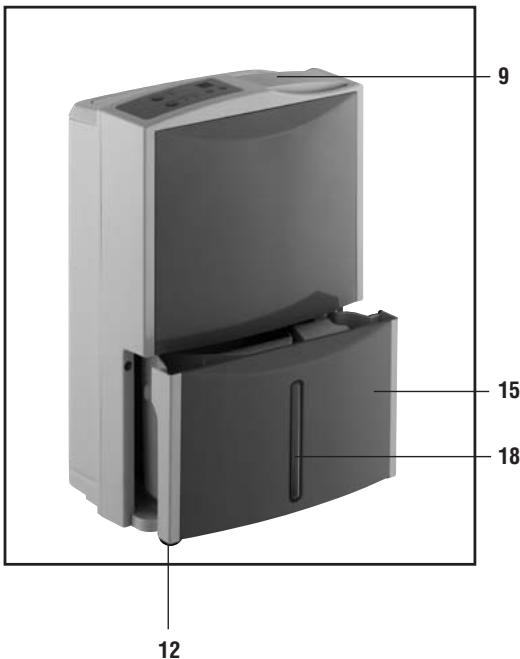
9 Air outlet opening
10 Air intake opening
11 Transport handle
12 Transport castors
13 Power cable with power plug
14 Cord holder
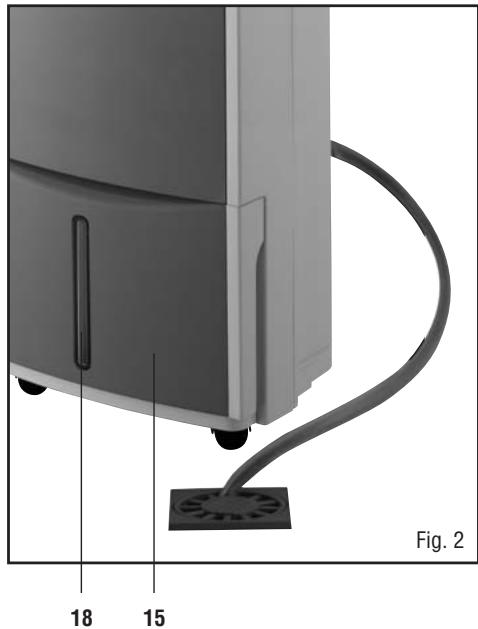
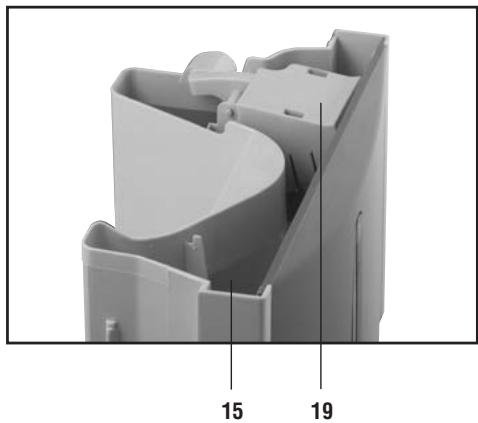
15 Water tank about 2.9 liters
16 Opening for water drainage tube
17 Water connection
18 Water level indicator
19 Swimmer
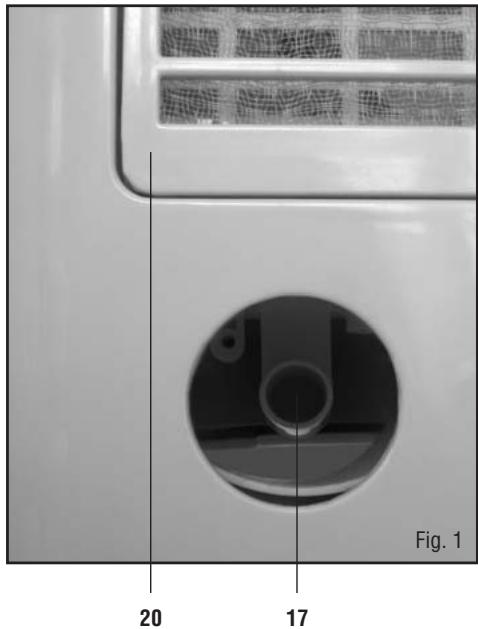
20 Air filter
FIRST TIME OF USE
- Please read through all the instructions before starting to use the dehumidifier.
- Unpack the dehumidifier. Remove all the packaging materials and dispose of them for recycling.
- Place the dehumidifier on a firm, even, waterproof surface. Water can damage furniture and floor coverings and lead to fire or electric shock. Make sure the dehumidifier is standing securely so that it cannot tip over or fall down. Observe the safety distances as given in Point 10 of "Important safety instructions".
WATER DRAINAGE
The dehumidifier provides two ways of emptying the water. PLEASE NOTE: Do not reuse the collected distilled water.
Water tank, 2.9 liters
- When the water tank (15) is full, the control lamp (7) flashes. The dehumidifying operation is stopped automatically.
- Wait for about 30 minutes before removing the water tank (15), so that the remaining water can drip down into it. Hence do not remove the water tank when the dehumidifier is in use or has just been switched off.
- Take hold of the two cavities on the sides of the water tank (15) and pull it out carefully with both hands. "P2" appears on the display (5).
- Empty the water only on the side opposite the swimmer (19).
- Now push the water tank (15) back into its original position with both hands until you hear it click into place. The control lamp (7) goes off. The relative humidity appears on the display (5).
- If the control lamp (7) does not go off, pull the water tank (15) out again.
- Check that the swimmer (19) is correctly installed. The swimmer must not be removed, because otherwise the automatic interruption of the dehumidifying operation is not guaranteed. Overflowing water can damage objects and floor coverings or cause an electric shock.
- Now replace the water tank (15) as described under Point 5.
Continuous water drainage
If you wish to install continuous water drainage, please proceed as follows. Please note: The dehumidifying opera
tion is not interrupted in this kind of water drainage.
- Make sure that the dehumidifier is switched off. Disconnect the power plug from the power socket.
- Carefully remove the cover of the opening (16) on the rear side of the appliance with a pair of pliers or a similar tool. (Fig. 1)
- Remove the water tank (15). Push the water tube (inside diameter 16mm ) through the opening (16) and push it in. Press the water tube firmly onto the water connection (17) in the appliance. Make sure that the water tube is firmly fixed to the water connections and cannot become detached. (Fig. 2)
- Put the water tube directly into a water drain. Check that the pipe is sloping downwards throughout its length, and is not buckled, knotted or blocked, so that the water can drain off freely. Check the safe and leakproof position of the water tube regularly.
- Push the water tank (15) with both hands into its original position until you hear it click into place.
INSTRUCTIONS FOR USE
- Push the power plug into the power socket. Do not touch the power cord with wet hands. The power control lamp flashes.
- Make sure that the air intake and air outlet openings (9 + 10) are open. The air intake and air outlet openings must always be open during the dehumidifying operation.
- Press the power key (2) to start using the dehumidifier. The power control lamp (6) lights up. The degree of relative humidity actually present in the room appears on the display.
- The dehumidifier is programmed ex factory to a relative humidity of 60% . To lower the degree of relative humidity, press this key (4); to raise it, press this key (4). You can select between 35 and 80% RH.
- When the dehumidifier has reached the programmed humidity, it interrupts the dehumidifying operation and only resumes it when the relative humidity in the room exceeds the programmed value.
- To allow the dehumidifier to operate continuously, press this key (3). The relative humidity can be programmed with these keys: and (4).
- Use the transport handle (11) and the transport castors (12) to transport the dehumidifier.
-
To support the dehumidifying achievement, close windows and doors in the room in which you are using the dehumidifier. When it is used e.g. in the laundry room, make sure that no water can drip onto or into the dehumidifier and observe the safety distances as described under "Important safety instructions".
-
Before moving or storing the dehumidifier, press the power key (2) to the OFF position and remove the power plug from the power socket. Empty the water tank (15) every time before transport.
- This dehumidifier is equipped with an automatic deicing function. This switches on at room temperatures below 5^ to prevent ice formation. The dehumidifier operates cyclically and switches itself on and off.
CLEANING; MAINTENANCE AND STORAGE
We recommend you to clean the dehumidifier regularly. Follow the instructions for cleaning, maintenance and storage, so as not to impair the dehumidifier's functioning.
Daily cleaning
- Before you start cleaning, press the power key (2) to the OFF position and pull the plug out of the power socket.
- Empty the water tank (15) as described under „Drainage".
- Rinse the water tank (15) out carefully with lukewarm water.
- Clean the outer surface of the water tank (15) with a soft, damp cloth.
- Resume using the dehumidifier as described under "Instructions for use".
Weekly cleaning
- Before you start cleaning, press the power key (2) to the OFF position and pull the plug out of the power socket.
- Empty the water tank (15) as described under „Drainage".
- Clean the water tank (15) with a domestic washing-up liquid. Rinse it several times with clear water. Clean the outer surfaces of the water tank (15) with a soft, damp cloth.
- Pull the air filter (20) out of its slot and clean it with the brush attachment of your vacuum cleaner. If it is very soiled, you can use a domestic washing-up liquid and clean the air filter (20) in lukewarm water at a maximum temperature of 40^ . After that you should rinse the air filter (20) several times with warm water. Allow it to dry completely before you put it back into the dehumidifier.
- Push the air filter (20) and the water tank (15) back into their original position.
- Clean the outer surfaces of the dehumidifier with a soft, damp cloth and dry it with a dry cloth. Do not use any benzenes, thinners or other chemicals.
- Resume using the dehumidifier as described under Instructions for use
Disinfection
- Every two weeks you should also disinfect only the following part of the dehumidifier after cleaning: the water tank (15).
- For this, use a domestic disinfectant on an alcohol base, or high-percentage alcohol. This surface disinfectant is an alcohol mixture that you can obtain in a spray bottle at any chemist's. Both substances are harmless if they are rinsed off carefully and thoroughly.
- Wipe all the outer surfaces with a soft, dry cloth.
- Resume using the dehumidifier as described under Instructions for use
Maintenance and Storage
- If you do not wish to use the dehumidifier for a longer period (a week or more), clean the dehumidifier as described under „Weekly cleaning“ and „Disinfection“.
- Allow all the parts of the dehumidifier to dry completely.
- Wind the power cord (13) and fix it onto the cord holder (14).
- The dehumidifier must not be stored with a soiled filter (20) and as long as there is any water in the water tank (15).
- Always store the dehumidifier in an upright position at a cool, dry location.
TROUBLE-SHOOTING
| Problem | Possible cause | Solution |
| The dehumidifier won't work. | 1. The appliance is not plugged in.
2. The power socket is faulty.
3. The water tank control lamp (7) lights up.
4. The water tank (15) is not installed correctly.
5. The automatic defrosting function is activated. | 1. Connect the plug to the power socket.
2. Check the fuse box or ask an expert.
3. Empty the water tank (15).
4. Check that the water tank is installed correctly (15).
5. After defrosting, the appliance resumes functioning automatically. |
| The dehumidifier produces little or no condensation water. | 1. The air intake or air outflow vent (9,10) is blocked or covered up.
2. The air filter (20) is blocked.
3. The doors and windows in the room are open. | 1. Make sure that the vents (9,10) are free.
2. Clean the air filter (20) as described under „Weekly cleaning“.
3. Shut the doors and windows. |
| The dehumidifier makes a lot of noise. | 1. The dehumidifier is not correctly installed or is tilted or unsteady.
2. The air filter (20) is blocked. | 1. Stand the dehumidifier on a firm, even surface. Put padding material under the dehumidifier to reduce the noise level.
2. Clean the air filter (20) described under „Weekly cleaning“. |
Disposal

This symbol on the product or its packaging indicates that the appliance cannot be treated as normal domestic trash, but must be handed in at
a collection point for recycling electric and electronic appliances.
Your contribution to the correct disposal of this product protects the environment and the health of your fellow men. Health and the environment are endangered by incorrect disposal.
Further information about the recycling of this product can be obtained from your local town hall, your refuse collection service, or in the store at which you bought the product.
This regulation is valid only in EU member states.
CONDITION OF PURCHASE
As condition of purchase the purchaser assumes responsibility for the correct use and care of this KAZ product according to these user instructions. The purchaser or user must himself or herself decide when and for how long this KAZ product is in use.
WARNING: IF PROBLEMS ARE WITH THIS KAZ PRODUCT, PLEASE OBSERVE THE INSTRUCTIONS IN THE GUARANTEE CONDITIONS. DO NOT ATTEMPT TO OPEN OR REPAIR THE KAZ PRODUCT YOURSELF, AS THIS COULD LEAD TO TERMINATION OF THE GUARANTEE AND CAUSE DAMAGE TO PERSONS AND PROPERTY.
Technical modifications reserved
ELIMINATION DES DEFAULTS
OLULISED OHUTUSJUHISED
Enne ohukuivati kasutuselevotmist lugege kok juhised labi. Hoidke kaesolev kasusujuhend hoolkalt alles.
pacCTOHHne IOpIpyHn IpeMToOB DoJIxHO 6bITb He MeHee 50 CM. KpOme TOrO, MInHMmaJIbHOe pacCTOHHne Do IcTOUHNKOB BlaIaN, TaIKX KaK dyu, MybBaJIbHnK, paKOBHa, BaHHa N T. n., DoJXHO 6bITb He MeHee 60 CM. PacCTOHHne Do MeCnJIbHoro BblXoDa BoIbIdo JOnxHO 6bITb He MeHee 120 CM.
- He ydaiyte emkocbI dny BoDy (15) npi pa6oTaouem OcyuHTe ne Bo3dyxa. BOa moKet NOBpeNTb Me6eBn NOKpbTne dIy IOna IIIN pNBeCTN KnpaKeHIO TOKOM.
12.Послve BbKIOHEnH OcUHTeN Bo3Dyxa nOdoxndTe 3-5 MHyT,прждчЕнгero ChOBa BKIOHAtb.
- He norgykaite ocyuhtelb Bo3dyxa B O body nI npyrne KJNDKCTn I He pa3JImbaTe NaI np6Opom B Ody, nHe HAIINBaTc BO BXOHDHIE N BbIXoHbIe OTBepCTna I Jn B03dyxa (9 + 10) BO dyin npOue XIKKOCTn.
- PeryIpaHNO npOIM3BOIDnTe UcNCTky OcUIMTeIa BO3dyxa, cIeDy npn 3TOM pyKOBODCTBy NO pIOBedeHIO UcNCTkn.
15.TpAHCnOPTNPOBKa OcUHITeIb BO3DyXa BcEJa IpnO3BODNTCB BYBETNKaJIbHOM NIOJoxEHNI. Ipeep IepBbIM BBOIDom B 3KcIIpyaTALIO DaIte OcUHITeIb BO3DyXa NOCToRb 24 Yaca B BEPTNKaJIbHOM NIOJoxEHNI. IocNe IIO6oB TpaHcNOpTIPOBKn He3aMeIINTeJIbHO UCTAHOBt EOCUHITeIb BO3DyXa B BEPTNKaJIbHoe NIOJoxEHNI eNoOxHITe He MeHee 60 MInY, IpeXeJe Yem erO CHOba BKIOCHITb. Ipeep IIO6oB TpaHcNOpTIPOBKn OOnOPOXHnTe EMKOCTb DnI BODI (15).
- OcyuTeIb BO3dyxa MOxHO NcIOJIb3OBA Tb TOJIbKO B COOTBETCTBm C yka3aHnAMM, INPBEeHNbIM B DAHHo IHCTpyKUIM NO 3KcIpyaTAm. B cIyae Heco6IIODeHnA 3Tnx yka3aHn BO3MOXHb TpaMbI, POxap, YdAp 3JIeKTPnueckm TOKOM IIN HEnCnpABHOCTn Pnp6opa.
- OcyuHntelb Bo3dyxa npedHa3NaeHcNkIouHtBelnDnAaCTHOcNpOb3OBaHnB BO BHyTpEHnx PomeHnx, HO He dIpyoMbIeHHOrO cNpOb3OBaHnA.
- B cnyaee noBpeJednKa6eIe CteBOrO nITAHN OcyuTeJI B03dyxa BO 136exae Hye yUep6a dner ero 3ameHb Heo6xOIMo opaTtbc K IpnO3BOUTeIIO INB IMEIOyHO OT npO3BOUTeJI Ha npOBeDeHne TAKORO pOda paobT MaCTeCKyIO INI K KBaIIINPcipOBaHOMy CneuaJIACTy.
- 3anpeaetcBkIouaTbOcUHTb Bo3dyxa npn ero nOBpeJedHm IIN NOBbHm NOBpeJedHm, a TAKKe npn ero HnePabInbHO pa6Te. BbTaunite cTeByIO wTeNCbHyIO BnIKy n3 po3ETKn.
KOHCTPYKUIA
1 nahanb ynpabneHn
2 KhoNka pexkma pa6oTbi
3 KhoNkaДиNTeHbHoro pexMma pa60tbl
4KHOKNCTENEHBNBlaJXHOCTN /
5dmcnn
6 KOthpnoBna CnHbna JAMNoCHa pexima paobToI
7 INDINKATOPHNA JAMNA EMKOCTN DnBBOBb
8 KOHTPOJIbHaCnIHaJIbHaJ IaMIOHcKa dIITeJIbHOpeXIMMa pa6OtBi
9 OTBepCTNe DnIa BbIXOa BO3NuXa
10 otBepctne dIra NoCTynIeHn BO3dyxa
11 TpaHcnpTnpoBouHaar pyuKa
12 TpaHcnpTnpoBouhIbIe Koneca
13 Ka6eBcTeBOrO NtTaHnC O StTceBHO BnIKoN
14 Čeρχaṭeŋb kαβεη
15 emKocTb Ia BOBJI pImeHPO Ha 2,9IHTPOB
16 otBepctne dnn CnmbHoro shaHa
17 noDvoB BObl
18yka3aTeIb ypOBH B0dbI
19 nonnaBOK
20 B3DyUHbIΦnJIbTp
IEPBOHAAJIbHbI BBOID B3KCIJIYATAUIO
1.пегд nachanom Ислбзовань Oсуштеля ВОЗдуха почитугЕ ВСЕ Нeo6хдмье ТЕХИЧЕСКЕТ rpe6obavnHЯ.
2. Pacnakyte ocuntenb Bo3dyxa, ydaIne BCE ynaKOBOchble Maepnblu n ytnin3npyte IN, He 3aqrpaHn OkpyxauoCpey.
3. UCTAHOBITE OCUWITIEL BO3dyxa Ha POBYU, PPOHYU, BOOyONOPHYU NOBEPXHOCTb. BODa MOKET NOBpeNTb Me6JIb IN NOKpbIte IINI NII CTaTb PNCHINHIO NOXAPA IN NOPAXEHN TOKOM. O6paauTe BHNMAHHe HA YCTOHINBOCTb NIOXEHN, YTO6bl OCwITIEL BO3dyxa He MO ONPOKHHTbCn IIN yNACTb. Co6NIoJaTIe 6e3OpanChbE paCtOHaHn, KAK 3TO OINCAHO B «BaxHbIe yKa3aHnno TEXHnke 6e3onacNoCTn», NyHKT 10.
CJIMB BObl
CyueCTByeT DaB aBaPnHaTc CInBa B0Db B OcUShTeNe B03dyxa. YKA3AHNE:YIOBLeHnHa B0a He NIOIeXnT IcNIOJIb3OBAHnO.
2,9 NITPOBAЯ EMKOCTb DnI BODbl
- EcmE MOKoCTb DnB OBObl (15) 3aONJIHeHa, MIRaet KOHTpOJIbHAR CmHahBa HamaOnOka (7). Pekim ocUweHnA abTomTuWeckn npepbIbaTeCra.
2.ПОДЖДТЕ РИМЕРНО 30 MнУТ,пелд Tem КAK BыHуТь EMKOCTь ДЯВОБь (15),чTOБь OCTaTKI BOБь мOrЛС TсЧь E BMKOCTь ДЯВОБь.ПиЗТOM He BыTACKINBAITE EMKOCTь ДЯВОБь,ЕСЛ OCUштIELB O3dYxa HaxOДITСВ RApoTe NIIb TOnbKо TTo BByKJIIOUCHEN.
- Bo3bMInTeCb 3a 60KOBbIe XeJIo6a EMcOCTn IINr BODbl (15) IN octoPoxHO BItaunTe ee oBeIMn pykamn. Ha Dicnnee (5) NOBnAETcR "P2".
-
OnopoxHnTe BoDy TOnbKO C npOTMBONIOXHOI OT nOJIaBAka (19) cToPOhbl.
5.TenepbCHOBAObeMNpykamN BCTaBnIteEMKocTbIINBOdbI (15)BNCXoHNOeNoIOKeHne,NOKA OHa HE 3aueJIKNHETcN.
VHdkaTophna lamna(7) rachet.Ha dncnlee(5) noRbIReTcN
OTHCNTbHbA BlaxHoCTb BO3dyxa.
-
Ecm INMdkatopnna lamna (7) He rachet, Choba BbHbTe EMKoctb dIa BObl (15).
7.Поберытправиьнocьуctановки nonлавка (19). 3anpeaetca ydanaTb nonlaBOK, tak kak npekpatntca abTomatueckoe nepbivbanhe peximma ocuyehnI. Пeрелишаясуез Краи BOДA может NOT nobpeDITb peDMeTb I NOKpbITNЯ ДИ NOla ИИnpBecNTK npopaxeHIO anekTpUceKIM TOKOM.
- 3aHOBO BCTaBbTe EMKOCbI INA BOIbI (15), KAc 3TO OINCAHO BnyHKTe 5.
HnpepbIbHbN CnB B0dbI
EcBbXtOHTyCtAHOBITb HnpepbIBHbI CnIB B0dbI, DeiCTByTEcNeDyoUIM oBpa3oM: Yka3aHHe: Ppi 3TOM cNoObe cInBa B0dbipexMM ocUeHnHa He npepbIbaETc.
1.Поберьт,чTOOCyWnteBbO3dyxaBbKlnoueh.Быtaunite ceTeByIu WTeNCJIbHyIO BnIKY n3 pO3ETKN.
2. Ostopokho ydaInte IuIuIaMIM INI CXOXIM INHCTpyMeHToM KpbIshky OTBepCTn (16) Ha o6paTHo CTopoHE yCTPOIcTBA. (Pnc. 1)
3. BbInbTe EMMKoCTb IaI B0BbI (15). BToNkHnTe IaHaH nIaB0Bd (BHTpeHH nnAmeTp 16 MM) CKBo3b OTBePctne (16) N BBeHNte erO BHytp. B UcTpoiCTbe KpeNKo HaNehbTe IaHaH NaIOBbO B0Bd (17). IpOBeBte, TTObI ShnAhr IaB0BbI bJl KpeNKo CoeINHeN c NoBDOOM BOBbI, n erO coeINHeHne He MOrIo ocNa6Hyb. (Pnc.2)
4.BBeDITeIaHrIINB0bIHeNoCpeAdTbeHNO BBOOCTOK. IpoBepTe,HTo6bIaHaHrIOBcEi CBoEiIINHEIMEN HAKNOH, He cRnBaJcH,He 6blCBra3AHy3lOM,HTo6bI B0daMOrTaCTeKaTb 6ecPiPAnTCTBEHNO.PeyIarHPO npOBepAte HaedXHOCTb INNtHOCTb NocaKn WlaHaRa IIN B0bl.
5.CHOBAOeMIMpykAMBIbTaNITeEMKOTBnIBObl(15)B nCXoHoeNoIOXeHHe,POKA OHa He 3aueKHeTcN.
PYKOBODCTBOI03KCNJYATAUIM
1.BCTabBe cTeByIO wTeNceBHyIO Bnky Bpo3EtKy.He npKacaiTecb K KabEnIO cTeBOrO nTuHnM OMKpbIMyKaAMo KoTHpOBHa CmHbHa NAmNoHcpeXIma pa60tbi MnaeT.
2.Y6eintecb,yTOOTBepCTnIyNoCTynJIeHnN BbIXoDa BO3dyxa (9+10)OTKpbTb.BoBpeMa pexIma OcyHema OTBepCTnIy NoCTynJIeHnN BbIXoDa BO3dyxa DOJXhbl 6bTb BcERda OTKpbTbI.
3. Haxmte Ha KhoNky pexkma pa60tby (2), 7O6bI BKNIOHTb OcuynteB Bo3dyxa. 3aoropaetcKoTHpOBHn CnHahBnA JAMNOUka pexkma pa60tby (6). Ha nCnnee noBnErc TcTeHb OTHOCHTeBHO BnaXHOCTn BO3dyxa, HaxOJaEroCn B daHbI MOMENT B NOMESeHIN.
4.OCyuHTeB Bo3dyxa Ha 3aBoTe 3aPOrpaMMpOBaH Ha OTHOCITeBHyBOJaxHOCTb BO3dyxa 60% .IJa yEmbSeHnI CTeHEN OTHOCITEbHO BJIaxHOCTn BO3dyxa HAXMITE KHOIKy (4);UTo6bl ee yBeINuHTb,HAXMITE KHOIKy (4). Bbl MoKeTe BblBupTa MeKdy 35 - 80% OTHCOTeBHO BIAxHOCTn.
- По досточенocуштelenь ВОДуха зарогрмимрованнов Влжнои ВОДуха, OH перьILAET ржим OCUWEHЯ N BKJIOUaTe erToTBJKO TOrda, KOrda OTHOCHTIELHЯ ВЛжнСТь ВОДуха BnomeшennpeBsIaeaT zaporpaMMPOBAHHOE 3haueHne.
6.ДЯТOROTTO6bIocTABITbOCyWITeNB03dYxaB DnITeNBHOM pEXMMEpaObTb,hAXMMTeKHOKNky(3).OTHOcITeNBaHARBnaXHOCTb BO3dyxaHEMOxET6bITb3aNpOrpAMMPOBaHa KHOKNkAMn n (4).
7.ДлгТранспортуровань OCUштель ВОЗдуха ВОСильзуITEcь.Tранспортуровочи рунков (11)И ТранспортуровчыIMKonecamn (12).
8.Ди радерхани ппоьдтелбнctи ocушени зakpoite OKHA nDbepnВ nOmeшени,B KOTOPOM bbl NCIOJIb3yTe OcUHIN TeB 0B3dya.Ipi nCIOJIb3OBaHH,HaNPIMeP,B DOMOBI npaueHNO 6bpaTne BHNMaHne,yTObHa OcUHInTeB 0B3dya He KaNala BOda,I co6IIOJaIte 6e3OanChbIe paCtOAnHn,KaK 3To OINCAHO B «BaxhBiye yka3AHn IO texHnke 6e3OanachCTn".
9.Пелед Tem Кak Пелевиньт bин убраь осушtenь bo3dya xусановпесхатим колку ржima pa6obtь (2)На ВblКЛ n BыtaшпесетeByIO wTeNCelbHyIO bINky n3 po3eTkn.Пелдлioбоу ТраансOptionovkoOnОpopoknite EMKoCTь ДЯ BObl (15).
- 3TOT ocuHntelb Bo3dyxa obOpdyoban abTomatuecko fynKneI NO yctpaHEnIO o6NeDeHEnr. OHa BkLIOyaeTc npi TempeAType B NOMeUeHN HnKe 5°C, YTObbl BocPENaTCTBOBaTb opa3OboHn Pbda. OcuHntelb Bo3dyxa paOtaeT uKlnueckn n nepnoDnueeCKN BkLIOyaeTcN bBkLIOyaeTcN.
SUVEXNc EKKEVWON VEPOU
TnV npintwnou Εeλe va Eykataohtoe ma ouvexi EKKevwn Tou vepou, npoxwpnte napakaawc EInc. Ytodien: H aivoupyia Tns apuypavonc de diaokntetai ae autn T mopnp n ts EKKevwns Tou vepou.
- EλεγεTε, ὄτιο αφυγραντήρας του ερα εἰναι anενεργοποιημενος. TραβήεTε το φις andη τὴν πρία του ρεύματος.
2.Anoaakpuve mua taunida n eva npoio epyaleio npoektka to kaluma tou aoviymuotc (16) 0tnv niow nleupa Tns oukeu. (Eik.1)
3.Apaipote to doxieio tou vepou (15).NpwiTe evav eukampto oawiva vepou (eawetpiidiaepoc 16 mm) meow tou aoivmuoC (16) kai onnynte tov npoc ta mea. PteTov eukampto oawlya staepapn avw otu uveo (17) otu oukeun. EelyTe, otu eukamptoc owlaVAC vepou cival otaepa uuvdeevoc me tou vepou kai dvmopei va luhei. (Eik.2)
4.Obnyotevukamto owlva Tou vpou kateuovia
mu anppoVPOEAVO EAEYET,av O EukamtonowlvaeXei O
OToTu mKocma KLion,0vEvai Taaioevoc
kouiaouvoC npayveoc,Etai wTe To vepo va ntopei va
xuvtea avmnoiota kai oivoupA.EeYcTakikn oiyoup
kai oteyan pooapoyntouukamttouwlna Tou vpou.
- Σπρωξετο δόχειον του ερού (15) με τα δύο χερία σην αρχικήτου θέση, ωποῦν ας φαλίσει με το χαρακτηριστό ἡχο.
O△HΓIE∑ ΛΕΙTOΥΡΙA∑
Lia KAZ 1aii i 1aui 1ai 1ai 1ai 1ai 1ai 1ai 1ai 1ai 1ai 1ai 1ai 1ai 1ai 1ai 1ai 1ai 1ai 1ai 1ai 1ai 1ai 1ai 1ai 1ai 1ai 1ai 1ai 1ai 1ai 1ai 1ai 1ai
KAZ 150000000000000000000000000000000000000000000000000000000000
aaii i jaiii Jai
Jaaal 1g aagaaa (2) Jaaai jz jge I gaaia aagaa all j jjagaaa J.1
.
"clllle 15 (15) cllll 2
J 15 (15)cll cgl gbl.4
"Jaii 5
jss 1 (2) jss r j gle lgsal a ygl al j jg cslit s .1
.
"all 150 g jai" 6i ioo 8o LS (15) all 150 g jai.2
m = 311
a 1
(15) a : a x,y,z
oJue a oia juaill ola. Jusll n aiele Ayyi yj Jusll nn jn jyall jyill ola glaioi 2
Jnndall nla Ls Juaal Jy j 0e j y e aal all na Ia Jaaal Siay, Jyaal na bai j
aLLL jgeall 1111 1111 1111 1111
.3
"Jilililililililililililililililililililililililililililililililililil
jzda yia
a a a a a a a a a a a a a a a a a a
yagabgj yagagagagagagagagagagagagagagagagagagagagagagagagagagagagagagagagagagagagagagagagagagagagagagagagagagagagagagagagagagagagagagagagagagagagagagagagagagagagag
.(4) jll bblal aill llll yllblll jlll jllj (4) 0jll blll aill
jlll (15) clll e & cull (7) aill lall g aal lalil 6.6
a 19) aol gll j 7
a 1 a
( x - 1) ( y - 2) = 0
.5aBaa aagaa aas 15 aaa (15) cll ae e .8
plall jainwail gj
a 1
a a a a a a a a a a a a
J 1
Aailll aalaae bae baeiell al gaae jnlaasii gaae yall all j1jgsj.2
J 3
y 1
10 1aaii iiaaiiaiaiaiaiaiaiaiaiaiaiaiaiaiaiaiaiaiaiaiaiaiaiaiaiaiaiaiaiaiaiaiaiaiaiaiaiaiaiaiaiaiaiaiaiaiaiaiaiaiaiaiaiaiaiaiaiaiaiaiaiaiaiaiaiaiaiaiaiaia
aaii iagoo
1 1
a 1
1.1
g 1 1 1 1 1 1 1 1 1 1 1 1 1 1 1 1 1 1 1 1 1 1 1
y
.
Jn Jn Jn Jn Jn Jn Jn Jn Jn Jn Jn Jn Jn Jn Jn Jn Jn Jn Jn Jn Jn Jn Jn Jn Jn Jn Jn Jn Jn Jn Jn Jn Jn Jn Jn Jn Jn Jn Jn Jn Jn Jn Jn Jn Jn Jn Jn Jn Jn Jn Jn
a 1
6 6
jbjbll aajglgclg cagauuaai gjjy
j0 (13)wlll laI y wgl (2) jz jz jz bizblly llz jz jz jz jz all jz jz lal 7
y 1