
H41MB2 - Hammer HiKOKI - Free user manual and instructions
Find the device manual for free H41MB2 HiKOKI in PDF.
| Product type | Demolition hammer |
| Brand | HiKOKI |
| Model | H41MB2 |
| Shank | SDS max |
| A-weighted sound power level | 101.9 dB(A) |
| A-weighted sound pressure level | 87.9 dB(A) |
| Vibration emission value (chiseling) | 9.0 m/s² |
| Uncertainty K (vibration) | 1.5 m/s² |
| Main applications | Concrete breaking, chiseling, grooving, bar cutting |
| Low vibration handle | Yes (LVH) |
| Electric class | II (double insulation) |
| Included accessories | Plastic case, SDS max bull point, side handle |
| Safety | Wear ear protectors, use auxiliary handle, RCD recommended |
| Carbon brush maintenance | Check regularly and replace if worn near limit |
| Grease replacement | Every 6 months of use |
| Warranty | In accordance with national regulations |
Frequently Asked Questions - H41MB2 HiKOKI
User questions about H41MB2 HiKOKI
0 question about this device. Answer the ones you know or ask your own.
Ask a new question about this device
Download the instructions for your Hammer in PDF format for free! Find your manual H41MB2 - HiKOKI and take your electronic device back in hand. On this page are published all the documents necessary for the use of your device. H41MB2 by HiKOKI.
USER MANUAL H41MB2 HiKOKI
(Original instructions)
GENERAL POWER TOOL SAFETY WARNINGS

WARNING
Read all safety warnings and all instructions.
Failure to follow the warnings and instructions may result in electric shock, fire and/or serious injury.
Save all warnings and instructions for future reference.
The term "power tool" in the warnings refers to your mains-operated (corded) power tool or battery-operated (cordless) power tool.
1) Work area safety
a) Keep work area clean and well lit. Cluttered or dark areas invite accidents
b) Do not operate power tools in explosive atmospheres, such as in the presence of flammable liquids, gases or dust. Power tools create sparks which may ignite the dust or fumes.
c) Keep children and bystanders away while operating a power tool. Distractions can cause you to lose control.
2) Electrical safety
a) Power tool plugs must match the outlet. Never modify the plug in any way. Do not use any adapter plugs with earthed (grounded) power tools. Unmodified plugs and matching outlets will reduce risk of electric shock.
b) Avoid body contact with earthed or grounded surfaces, such as pipes, radiators, ranges and refrigerators. There is an increased risk of electric shock if your body is earthed or grounded.
c) Do not expose power tools to rain or wet conditions. Water entering a power tool will increase the risk of electric shock.
d) Do not abuse the cord. Never use the cord for carrying, pulling or unplugging the power tool. Keep cord away from heat, oil, sharp edges or moving parts. Damaged or entangled cords increase the risk of electric shock.
e) When operating a power tool outdoors, use an extension cord suitable for outdoor use. Use of a cord suitable for outdoor use reduces the risk of electric shock.
f) If operating a power tool in a damp location is unavoidable, use a residual current device (RCD) protected supply. Use of an RCD reduces the risk of electric shock.
3) Personal safety
a) Stay alert, watch what you are doing and use common sense when operating a power tool. Do not use a power tool while you are tired or under the influence of drugs, alcohol or medication. A moment of inattention while operating power tools may result in serious personal injury.
b) Use personal protective equipment. Always wear eye protection. Protective equipment such as dust mask, non-skid safety shoes, hard hat, or hearing protection used for appropriate conditions will reduce personal injuries.
c) Prevent unintentional starting. Ensure the switch is in the off position before connecting to power source and/or battery pack, picking up or carrying the tool.
Carrying power tools with your finger on the switch or energising power tools that have the switch on invites accidents.
d) Remove any adjusting key or wrench before turning the power tool on.
A wrench or a key left attached to a rotating part of the power tool may result in personal injury.
e) Do not overreach. Keep proper footing and balance at all times.
This enables better control of the power tool in unexpected situations.
f) Dress properly. Do not wear loose clothing or jewellery. Keep your hair, clothing and gloves away from moving parts.
Loose clothes, jewellery or long hair can be caught in moving parts.
g) If devices are provided for the connection of dust extraction and collection facilities, ensure these are connected and properly used.
Use of dust collection can reduce dust-related hazards.
4) Power tool use and care
a) Do not force the power tool. Use the correct power tool for your application. The correct power tool will do the job better and safer at the rate for which it was designed.
b) Do not use the power tool if the switch does not turn it on and off. Any power tool that cannot be controlled with the switch is dangerous and must be repaired.
c) Disconnect the plug from the power source and/ or the battery pack from the power tool before making any adjustments, changing accessories, or storing power tools. Such preventive safety measures reduce the risk of starting the power tool accidentally.
d) Store idle power tools out of the reach of children and do not allow persons unfamiliar with the power tool or these instructions to operate the power tool.
Power tools are dangerous in the hands of untrained users.
e) Maintain power tools. Check for misalignment or binding of moving parts, breakage of parts and any other condition that may affect the power tool's operation.
If damaged, have the power tool repaired before use.
Many accidents are caused by poorly maintained power tools.
f) Keep cutting tools sharp and clean. Properly maintained cutting tools with sharp cutting edges are less likely to bind and are easier to control.
g) Use the power tool, accessories and tool bits etc. in accordance with these instructions, taking into account the working conditions and the work to be performed. Use of the power tool for operations different from those intended could result in a hazardous situation.
5) Service
a) Have your power tool serviced by a qualified repair person using only identical replacement parts. This will ensure that the safety of the power tool is maintained.
PRECAUTION
Keep children and infirm persons away.
When not in use, tools should be stored out of reach of children and infirm persons.
DEMOLITION HAMMER SAFETY WARNINGS
- Wear ear protectors.
Exposure to noise can cause hearing loss.
- Use auxiliary handle(s), if supplied with the tool.
Loss of control can cause personal injury.
- Hold power tool by insulated gripping surfaces, when performing an operation where the cutting accessory may contact hidden wiring or its own cord.
Cutting accessory contacting a "live" wire may make exposed metal parts of the power tool "live" and could give the operator an electric shock.
ADDITIONAL SAFETY WARNINGS
- Ensure that the power source to be utilized conforms to the power requirements specified on the product nameplate.
- Ensure that the power switch is in the OFF position.
If the plug is connected to a receptacle while the power switch is in the ON position, the power tool will start operating immediately, which could cause a serious accident.
- When the work area is removed from the power source, use an extension cord of suffi cient thickness and rated capacity. The extension cord should be kept as short as practicable.
- Do not touch the bit during or immediately after operation. The bit becomes very hot during operation and could cause serious burns.
- Before starting to break, chip into a wall, floor or ceiling, thoroughly confirm that such items as electric cables or conduits are not buried inside.
- At the start of work, confirm screw tightening.
- When working at a highly elevated location, pay attention to articles and persons below.
- Wear protective shoes to protect your feet.
- Wear a dust mask.
Do not inhale the harmful dusts generated in chiseling operation. The dust can endanger the health of yourself and bystanders.
- Mounting the tool
To prevent accidents, make sure to turn the switch off and disconnect the plug from the receptacle. - When using tools such as bull points, cutters, etc., make sure to use the genuine parts designated by our company.
Clean the shank portion of the bull point. Then smear the shank portion with the grease or machine oil. - Be sure to grip the handle and side handle or cylinder case cover during work. Do not hold by the grip during work. If you pull it by mistake, the bull point could jump out.
12 RCD
The use of a residual current device with a rated residual current of 30mA or less at all times is recommended.
NAMES OF PARTS (Fig. 1 - Fig. 10)
| ① | Tool Shank |
| ② | Front Cap |
| ③ | Grip |
| ④ | Grip (B) |
| ⑤ | On-lock Switch |
| ⑥ | Trigger Switch |
| ⑦ | Handle |
| ⑧ | Nameplate |
| ⑨ | Brush Cap (Inside the Tail Cover) |
| ⑩ | Set screw (Under the Plate) |
| ⑪ | Plate |
| ⑫ | Tail Cover |
| ⑬ | Housing |
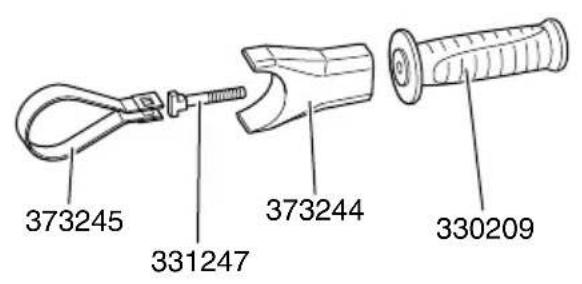
| ⑭ | Side Handle |
| ⑮ | Cylinder Case Cover |
| ⑯ | Band |
| ⑰ | Handle Bolt |
| ⑱ | Mount |
| ⑲ | Band attachment area |
| ⑳ | Carbon brush |
SYMBOLS
WARNING
The following show symbols used for the machine. Be sure that you understand their meaning before use.
| H41MB2 : Demolition Hammer | |
| LVH | Low Vibration Handle |
| To reduce the risk of injury, user must read instruction manual. | |
| Only for EU countries Do not dispose of electric tools together with household waste material! In observance of European Directive 2002/96/ EC on waste electrical and electronic equipment and its implementation in accordance with national law, electric tools that have reached the end of their life must be collected separately and returned to an environmentally compatible recycling facility. | |
| V | Rated voltage |
| P | Power Input |
| Bpm Full-load impact rate | |
| kg | Weight (According to EPTA-Procedure 01/2003) |
| I | Switching ON |
| O | Switching OFF |
| Disconnect mains plug from electrical outlet | |
| SOS max | SDS max shank |
| Class II tool | |
| Prohibited action | |
STANDARD ACCESSORIES
In addition to the main unit (1 unit), the package contains the accessories listed in the below.
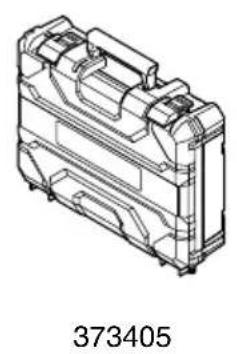
Plastic Case 1
Bull Point (SDS-max shank) 1
O Side Handle 1
Standard accessories are subject to change without notice.
APPLICATIONS
Demolishing concrete, chiseling off concrete, grooving, bar cutting.
Application examples:
Installation of piping and wiring, sanitary facility installation, machinery installation, water supply and drainage work, interior jobs, harbor facilities and other civil engineering works.
SPECIFICATIONS
The specifications of this machine are listed in the Table on page 5.
NOTE
Due to HiKOKI's continuing program of research and development, the specific cations herein are subject to change without prior notice.
MOUNTING AND OPERATION
| Action Figure Page | ||
| Installing the side handle 2 | 2 | |
| Inserting SDS-max tools 3 | 3 | |
| Removing SDS-max tools 4 | 3 | |
| Deciding working position of tool 5 | 3 | |
| Switch operation 6 | 3 | |
| Locking-on the On / Off switch 7 | 4 | |
| Releasing the On / Off switch 8 | 4 | |
| How to use the demolition hammer* 9 | 4 | |
| Replacing carbon brushes | 10 | 4 |
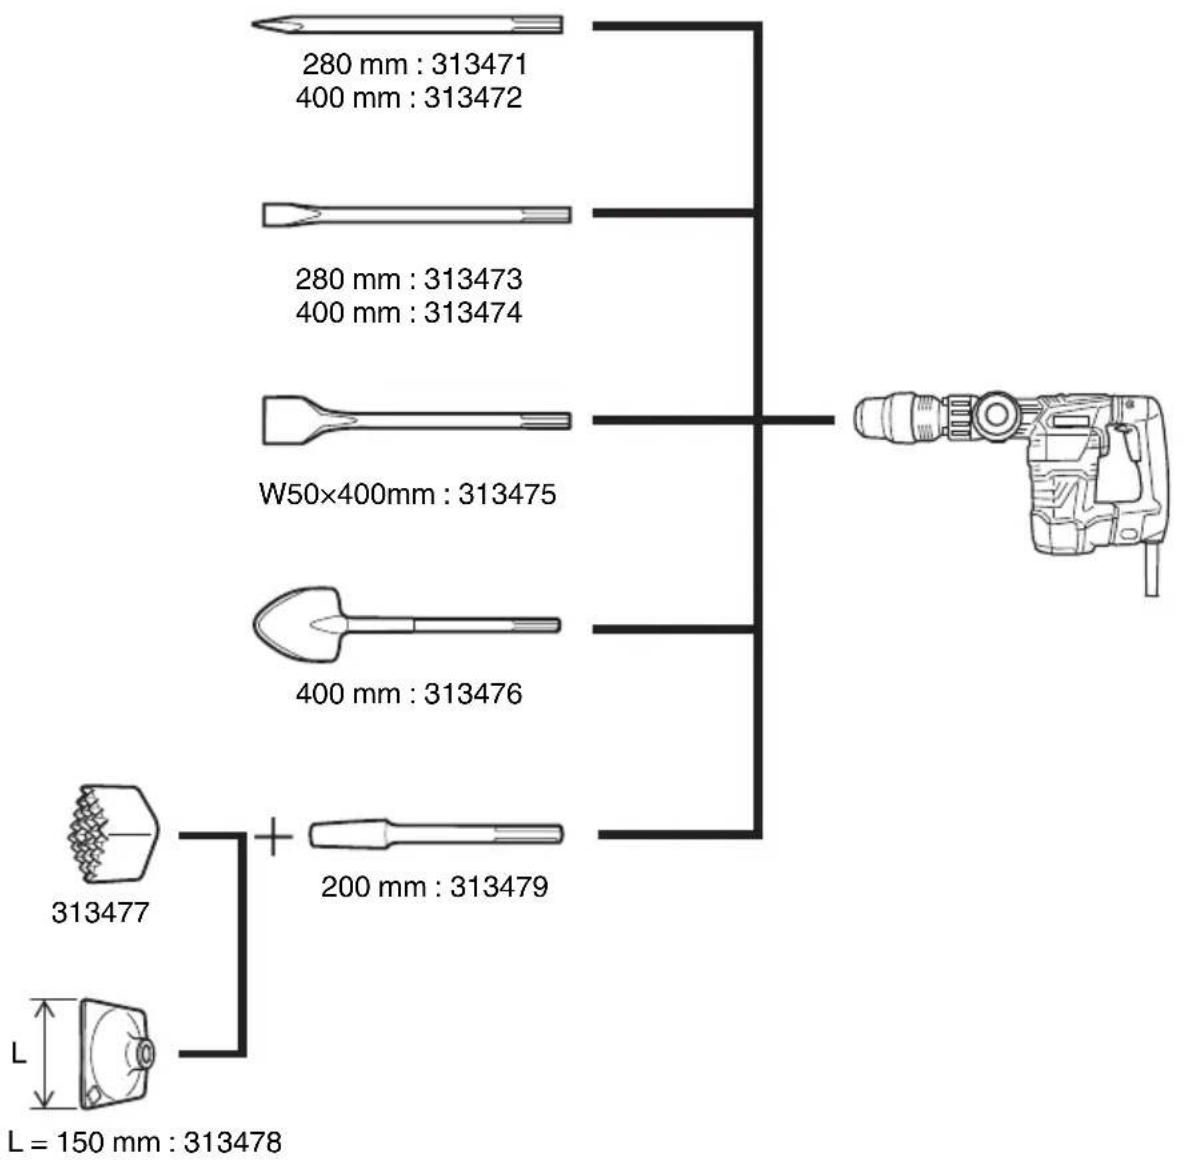
| Selecting accessories | - | 103 |
- Operate this Demolition Hammer by utilizing its empty weight. The performance will not be better even if it is pressed or thrust forcibly against the work surface. Hold this Demolition Hammer with a force just sufficient to counteract the reaction.
Warming up (Fig. 9)
The grease lubrication system in this unit may require warming up in cold regions.
Position the end of the bit so makes contact with the concrete, turn on the switch and perform the warming up operation. Make sure that a hitting sound is produced and then use the unit.
GREASE REPLACEMENT
This Demolition Hammer is of full air-tight construction to protect against dust and to prevent lubricant leakage. Therefore, this Demolition Hammer can be used without lubrication for long periods. Replace the grease as described below.
Grease Replacement Period
After purchase, replace grease after every 6 months of usage. Ask for grease replacement at the nearest authorized Service Center.
MAINTENANCE AND INSPECTION
CAUTION
Be sure to switch OFF and disconnect the attachment plug from the receptacle to avoid a serious accident.
1. Inspecting accessories
Since use of a dull accessory, such as a bull point, a cutter, etc. will degrade efficiency and cause possible motor malfunction, sharpen or replace with a new one as soon as abrasion is noted.
2. Inspecting the mounting screws
Regularly inspect all mounting screws and ensure that they are properly tightened. Should any of the screws be loose, retighten them immediately. Failure to do so could result in serious hazard.
3. Maintenance of the motor
The motor unit winding is the very "heart" of the power tool. Exercise due care to ensure the winding does not become damaged and/or wet with oil or water.
4. Inspecting the carbon brushes (Fig. 10)
The Motor employs carbon brushes which are consumable parts. When they become worn to or near the "wear limit" , it results in motor trouble.
When an auto-stop carbon brush is equipped, the motor will stop automatically. At that time, replace both carbon brushes with new ones which have the same carbon brush Numbers ⑥ shown in the Fig. 10. In addition, always keep carbon brushes clean and ensure that they slide freely within the brush holders.
5. Replacing carbon brushes (Fig. 10)
Loosen the two set screws and remove the plate and the tail cover. Remove the brush caps and carbon brushes. After replacing the carbon brushes, do not forget to tighten the brush caps securely and to install the plate and the tail cover.
6. Replacing supply cord
If the replacement of the supply cord is necessary, this has to be done by the manufacturer of this agent in order to avoid a safety hazard.
CAUTION
In the operation and maintenance of power tools, the safety regulations and standards prescribed in each country must be observed.
GUARANTEE
We guarantee HiKOKI Power Tools in accordance with statutory/country specific regulation. This guarantee does not cover defects or damage due to misuse, abuse, or normal wear and tear. In case of complaint, please send the Power Tool, undismantled, with the GUARANTEE CERTIFICATE found at the end of this Handling instruction, to a HiKOKI Authorized Service Center.
IMPORTANT
Correct connection of the plug
The wires of the main lead are coloured in accordance with the following code:
Blue: — Neutral
Brown: — Live
As the colours of the wires in the main lead of this tool may not correspond with the coloured markings identifying the terminals in your plug proceed as follows:
The wire coloured blue must be connected to the terminal marked with the letter N or coloured black. The wire coloured brown must be connected to the terminal marked with the letter L or coloured red. Neither core must be connected to the each terminal.
NOTE
This requirement is provided according to BRITISH STANDARD 2769:1984.
Therefore, the letter code and colour code may not be applicable to other markets except The United Kingdom.
Information concerning airborne noise and vibration
The measured values were determined according to EN60745 and declared in accordance with ISO 4871.
Measured A-weighted sound power level: 101.9 dB (A)
Measured A-weighted sound pressure level: 87.9 dB (A) Uncertainty K: 1.8 dB (A).
Wear hearing protection.
Vibration total values (triax vector sum) determined according to EN60745.
Chiselling:
Vibration emission value a_h CHeq = 9.0~m / g
Uncertainty K = 1.5m / s2
The declared vibration total value has been measured in accordance with a standard test method and may be used for comparing one tool with another.
It may also be used in a preliminary assessment of exposure.
WARNING
The vibration emission during actual use of the power tool can differ from the declared total value depending in the ways in which the tool is used.
- Identify safety measures to protect the operator that are based on an estimation of exposure in the actual conditions of use (taking account of all parts of the operating cycle such as the times when the tool is switched off and when it is running idle in addition to the trigger time).
NOTE
Due to HiKOKI's continuing program of research and development, the specific cations herein are subject to change without prior notice.
VOORZORGSGMAATREGELEN
VEILIGHEIDSWAARSCHUWINGEN SLOOPHAMER
VEDLIKEHOLD OG INSPEKSJON
FORSIKTIG
TENIKE Σ ΠPOEIΔΟΙHΣΕΙΣ AΣΦΑΛΕΙAΣ TOY HΑEKΤΡΙΚΟΥ EΡΑΛΕΙΟΥ
IPOEIAOIOIH
Mny TponoioeT note to fic mE onoiovnnote npno.
Mx npoioeite fic npoapoync yieva nAektpka epyaia.
1) Be3onachOCT Ha pa60THOTo MRCTO
a) POndIbPkaHte pa60THOTo MRCTO NOppeNo I do6peOCBeTeHO.
Henoppehen nn He do6pe ocbeteHN paobTHn Mecta Cb3daBAT npednoCTaBA 3a HnndeHTN.
b) He n3noJ3BaIe eIeKtpnueChn HnCtpymeHT BBB B3pHBOONacHa Cpea, npn HaJIyHe Ha 3anaJIIMN TeYHOCTn, ra3OBe nn npax.
EneKtpnuechnte HNCTpyMeHTn npov3BekdaT NCKPN KONTO MOraT Da IOBeDaT Da Bb3IJaMeHraBaHe.
c) He no3BbAaTe DoctbHa CtpaHn Hnca n Deua npu pa6oTa c eIeHTpueechn HnCTpyMeHTn. HeBHMaHne IIO BpeMe Ha pa6oTa MoKe Da IOBeDe do 3aY6a Ha KOHTPOBbPx npOceca.
He n3noI3BaIte eIeKtpnueeCKn HNCTpyMeHT, KOrato cTe N3MOpEHN, NIn NOd BnHnHneTo Ha JeHApCTBeHN CpeDCTBa, aNHOxOJ nn yNoIbauN BeIeCTBa.
BcHKe HeBHMaHne np paBoTa c eIeKtpnueChn HNCTpyMeHTN MOHe Da IOBeDe I O CepNo3HN HapaHraBaHH.
b)Използваiteлчнnpe徳па3нсpeдсва. BnharuHocete 3aunTHN OUHa nMacka.
3aunTHnTe cpeCTBa, KaTo peCnnpaTopHa MaCKa, CneuHaHn ObyKn C yToHnBa Ha NDoXNb3BaHe NOmETKa, KACKa, Hn aHTnfoHN, N3NoJ3BaHn CnopeJyCNOBnTa Ha pa6ota, Ie HaMaJrT ONaCHOCTTA OT HapaHBAHe.
c) PpeoTbpaTbaHe Ha cIyauHbBnIOUbaHe Ha ypeHa. YbepTe ce, ye cTapt 6yToHa Ha ypeHa e B n3KIOUeHO NOLOKeHHe, Ppeu Da CBbpKeTe eJeKTPnueChn HNCTpyMeHT KbM n3TOuHN Ha 3axpaHbAhe n/nn 6aTePn, KaTOn n Ppeu da Ro B3emTe nn npehacate.
IpehaHTo Ha HCTpyMeHTn C npbCT Ha CTapT 6yToHa, HnHa npBkUOyBaTeNa Ha 3axpaHbaHeTO, HOCn OnaCHOCT OT HNcUdENTn.
d) OtcpaHete BCnHn raeuHn Hpyr n HIOObe, npedn da BkHIOUHTe ypeDa HbM 3axpaHBAHeTo.
Fauehen KIOU HIN NHCpMeH, 3a6paBEN B potaHONHN KOMHOHeHT Ha eJEnKTPnueckn INHCpMeH, MoHe Da DOBeDe Do HapaHraBaHe.
e) He ce npecaraTe. Ppe3 qraIto BpeMe Tp6Ba Da IMaTe cta6nHa onopa H da noDbPkaTe 6aHaHC Ha TaIoto.
Toba OCHyprBa NO-Do6bP KOHTpO Bbpxy eNEKtpnuecknte INHCTpyMeHTn npn H3BbHpeHN cnTuayu.
f) Hocete noxdxoadno 6nleKn. He hocete npekaIeHO shnpHn dpexn nn 6nHyta. Na3eTe Kocata, dpexnte n pBkABnTne CH OT NOdBHNKHN KOMNOHEHTN.
Unpokhte dpexn, 6kkyta n Dblra Koca MoraT da 6bDat 3axBaHaTHN OT NOBvHHTe KOMNOHEHTN.
g) Ako ca ocHrypeHH yCTpoHCTBa 3a npncbEdnHBAHe KbM npaxoyNOBHTeHH HHCTaHaauHH, yBepTe ce, ye ca npabHNo MOHTnpaHH.
H3noJ3BaHeTo Ha npaxoyIOBHTeN u cIKHOH MoHe Da HamaJIu Cbbp3aHHTe Cbc 3aMbpcRABaHEt pNCKOBe.
4) EHCnIooataun H noDpBHHa Ha eJeHTpHuecHnHCTpyMeHTn
a) He hacnBaIte eIeHTpueechHte HcHCTpyMeHTN. 3noJ3BaIte nOxOJaEeHTpueechn HHcTpyMeHT 3a CbOTBeTHnte cJI.
IopxOaHnT eJektpueechn HcTpymENT OcnrypRa 6e3oNaCHO n NO-dObpe CbbpueHa paBota npn ppeBvndHeHnte HomHaJIHn npaMeTpN.
b) He n3noI3BaIte eIeKtpnuecknT HNCTpyMeHT, aHO He MoHe Da 6bDe BKNIOUeH NIN N3KNIOUeH OT CbOTBeTHnA CTapT 6yToH INI IN PpeBKnIOUBATeJ.
BceKn eIeHTpUeCKn HcTpyMeH, KOTo He MoKe Da ce KOHTpOInpa OT cTapT 6yToHa, e OnaceH n NODJIeHN Ha peMOHT.
c) N3KIOUeTe ⅢeCEna Ha HnHCTpyMeHTa OT n3TOuHNka Ha 3axpaHbAne H/nn O6aTePnIra, npEi Da n3BbPwBaTe HacTpoHn, CMHa Ha npNCtABHn Hn nn CpXpaHeHne.
Te3n npedna3HmepKn HamaJraBat pncA OT ClyuayHO HekelaHO BkIIOUbaHe Ha eJeKTPnueckn INCTpymeHT.
d) CbXpaHbAaIte HeH3nO13BaHHTe eIeKtpnueckn HNCTpyMeHTn DaIeY OT DOCTbN Ha DeuHa He N03BOJBAaTe Ha Iuua, He3anO3HaTHc HauHHa Ha pa6ota c HNCTpyMeHTnte, n C Te3n HNCTpyKun, da pa6oTATC TAX.
EneKtpnuecknte HNCTpyMeHTn NpeDctabJrBaT onaCHOCT B pBteHa HeONNTHn Iuca.
e) NpOdIbPHaHte eJEnHTprueChnTe HNcTpymeHTn. PpOBepraBaIte cHETPOBhata n 3aKpenBaHeTo Ha NOBnHHnTe Yactn, pOBepraBaTe 3a NoBpeHn Yactn, KOnTO MoRat Da ce OTPa3rT Ha pa6oTaHa eJEnHTprueChnTe HNcTpymeHTn.
Ako yctaHOBHTe NOBpeHn,OTCTpaHete rN npedn da N3noJ3BaTe eEeKtpueeCKHe t HcTpymeHTn. MHoro 3IIONoLyKn Ce IbJIHaT Ha loWa nOdpbHKHa eEeKTPueeCKHe t HcTpymeHTn.
f) IopdIbpaHaepeKeHeuTe npncTabHN HaToueHN uNCTn.
PpaBnHO NOdIbPHaHIne peKeu npCTaBn, C HatoyeHn peKeu elemEnTH, Ce ynpablaBaT N KOHTPOHpaT No-JeCHO.
g) H3noI3BaIte eIeHTpUeChn HNCTpyMeHTn, npHcTAbHN n aHceCoapn, n T.H., CbIaCHO Te3n HNCTpyKuNN, KaTO B3EmTe NpeBnD pa60THTE yCIOBn n BnDa pa60TN, KOHTo ige Ce n3BbpWbAT.
N3noJ3BaHe Ha eIeKtpnuecknte NHCTpymeHTn 3a pa6oTH, pa3nnuHN OT Te3N, 3a KOnTO ca npdeBnDeHN INHCTpymeHTnte, MOHe Da DOBeE Do NOBnWeH PnCH H ONaCHn CNTyaun.
5) 06cIyHbAHe
a) 06cIyHbAHeTo Ha eIeHTpuYeCKnTe HhCTpyMeHTn Tpa6Ba Da ce N3BbPbWA caMo OT KBaJIHΦHnPaHn cepBN3HN pa6OTnU, npn H3NoJ3BaHe Ha opRnHaJIH pe3epBHN qAcTn.
Toba ue rapaHTnpa 6e3oNaChocCTT npn paBota c eIeKtpuecknte INHCTpyMeHTN.
BHIMAHNE
He donyckaIte B 30HaTa Ha pa6Ota Deuca N Bb3paCTHn Xopa.
Horato He n3noI3BaTe eJeKtpuYeCKHe HnCtpyMeHTn, cbxpaHraBaIte rN daJeU OTo DocTbN Ha Deua N Bb3pactHN Xopa.
NHCTPYHcHn 3A B63OpACHOCT 3A KbPTaU
1. Hocete aHTnfoHN.
H3naraHeTo Ha Bb3dEiCTBHeTo Ha Wym MoKe Da DOBeNe Do 3ary6a Ha cIyxa.
- H3noJ3BaIte DOnbJIHHTeJIHaTa pBkoXBaTHa(II), aHO ca npedocTabeHN cypeja.
3ary6a Ha KOHTpOIN Bbpxy ypeMa MoHe Da DoBede Do HapaHBAhe.
- EInktpnuecknT INHcTpymENT Tp6Ba Da ce DbpKn 3a H30InpaHNTe 3axBaTHN NOBbpxHOCTN, KOraTO pa6OTnte C Hero B Cnyaaypepeheuata npucTaBAh BAe3e B KOHTaKT Cbc CKnPTO Oka6JeBaHe Hnn Co6CTBeHHn CN 3axpaHbaa Ka6eJ.
KoHTaKT Ha peKeu npHCTaBn C OKa6eJIraBe NOd HAnpeKeHne, MoHe Da IOBeDe Do npOTnuAHe Ha TOK npe3 eIeKTPnueckn INHCTpyMeHT N TOKOB yJap Ha OIepaTopa.
ДОПьЛНITEЛНМЕРКИЗАБЕЗПАСHOCT
- YBepeTe ce, Ye N3ToCHNkBt Ha 3axpaHbAHe, KOITo N3IOJ3BaTe, OTROBapra Ha N3NCKBAHnTa, NOCOeHN Bbpxy INHBENTapHaTata6eJIka.
- YbepeTe ce, ye cTap6yToHbTe bNo3nua N3KJI. Ako 6bJe BHLIOueH uenceLa KbM KOHTaKaTa, ypeBt ige 3anOuHe da pa6oTH BeHaRa, np6yTOH bNo3nua BHJ., Koeto MoKe Da DOBeDe Do cepno3Hn HUdEHTN.
- Korato pa6oTHaTa nIoUaJa e DaIeue OT n3TouHnK Ha 3axpaHbAHe, n3NoJ3BaIte yIbJIHKTeI C DCtA TbHa De6eJInHa HOMHaJeH KanauTeT. YIbJIHKTeJIHNrT Ka6eI Tp6Ba Da 6bIe Bb3MOxHO HAI-Kbc.
4.He DoKocBaTe HaKpaHnHa No BpeMe Nn HEnocpeDCTBeHO cIePa6Ta. IIO BpeMe Ha pa6Ota HaKpaHnHKbT Ce HarpBa npekOMepHo MoKe Da npuHH cepNo3HN n3rapHHa. - Ппдддддддддддддддддддддддддддддддддддддддддддддддддддддддддддддддддддддддддддддддддддддддддддддддддддд徳н.TaBaH,HaBJIHo ce yBepTe,Ye B TЯx HЯMa BrpaDeHH eJekTpueckn KaBeJIu NII npOBoDHNU.
- Ппени заимочьни на павotas ce ybepeTe, ue boJTOBete ca 3aterHaTH.
- Korato pa60nte Ha roJlma BncoUHa, BnHmabaiTe n na3ete IucaTa H npedMeTne noBac.
- Hocete npedna3Hn 06yBkn 3a 3auTHa KpaKaTa.
- HocTe npOTnBONpaxOba MacKa.
He BnBaaTe BpeHnna npax, KOTo ce o6pa3yBa npn KbptHe. PpaxbT MoKe da 3aCtpaun BaWeTo 3dpabe, KaHTo NTOBa Ha OKOJIHnTe.
- NocTabrHe Ha HnCTpymENT
O 3a Da npedOTbpaTHTe HnUdENTn, nKIOuBaTe npekcbcaay nueceJa OT KOHTaTa.
O Korato noI3BaTe ypeu KaTo dIeTa, pe3u H T.H. ce yBepTe, ye pa3noJaIate C opnHaJIH Yuactn, npOn3BeHeN OT HaWATA KOMNaHn.
O NocTe ONaKata HaJeTTo.CeToBa HamaKeTe OaKata C rpc Hn MaHHHO MacNo.
11. YBepete ce, Ye IbpKHTe 3dpabo PbKOXBaTHaTn CTpaHnHaTa PbKOXBaTKa HIN CUNHnHDPnuHaTa YacT Ha KAnaka no BpeMe Ha pa6oTa. He dpbKHe 3a PbKOXBaTKa NO BpeMe Ha pa6oTa. Ako n3DbpNaTe 6e3 da NcKaTe, DlNETOTOMOKe Da N3CKOn.
12.Диференцанна зашита (YДЗ)
IpeipobyBa ce 3nIOJI3BaHTo Ha yCTpoNCTBa 3a DnΦepeHuaJHa 3aunTa (YD3) ot 30 mA nnn noHNCKa, npeszraIto Bpeme.
CTOHOCT Ha emncn Ha Bn6paun a,h, CHeq = 9,0 M/ceK2 HeTOHOC T K = 1,5 M/ceK2
DeklapnapHte 06u CToHocTn Ha Bn6paunn ca n3MepeHN CbIaCHO CTaHdapTHHe MeTOJn Ha n3NTBaHe N MOrat Da 6bDat N3NOJ3BaHn 3a CpabHeHne MeJdy pa3JIuHHTe IHCTpyMeHTN.
OcbEN TOBa cToHOCHTe MORaT da ce n3nON3BaT 3a npedBapNTeHa OueHka.
PNEyPENKDEHNE
O Bn6paunte no BpeMe Ha deNCTBntHa ynoTpe6a Ha HnCTpyMeHTa MORa Da ce pa3JNuBaT OT DeHApnpaHnTe 06u CTOHOCTn, B 3aBNCMOCT OT HaUNHa HA N3NOI3BaHe Ha HnCTpyMeHTa.
O IeHTnHmUpaHe Ha MepKnte 3a 6e3OnacHocT 3a OnepaTopa, Bb3 OCHOBa OceHkHa HbB3dEiCTBnETo npn DeIcTBnTEJIHN YCIOBnHa N3NOL3BaHe (KaTO CE B3EmAT PpeBnD BCuHn EJEMeHTn OT pa6OTnur cKbI, KaTO NepNoHn Ha BkJIouBaH nN3KlIOUbaHe, KaKTO np60Ta Ha npa3Hn O6OpOTn HENOCpeCTBeHO npedn CJIed MOMeTA Ha N3NOL3BaHe).
3A6EJEKHA
Iopadn HnpeKbChaTTo pa3BNTHe Ha HayHo-pa3BOHHaTa nporpama Ha HiKOKI, daeHnte Tk CneuHkaun ca npedmet Ha npomraHa 6e3 yBeDOMJIeHne.
(Prevod originalog uputstva)
OPŠTA BEZBEDNOSNA UPOZORENJA ZA ELEKTRICNI ALAT
UPOZORENJE
ODRžAVANJE I PROVERA
OPREZ
Obavezno ISKLJUCITE uredaj i izvucite nastavak iz stezne glave kako biste spreci ili ozbilnej nesrece.
1. Provera pribora
3AΓΑЛbHI IHCTPyHcIi Be3NEHn EJIΕΚΤΡινΗΟ ΙHCTPyMΕHTY
NONEPEJHEHHA
IpoHTaTe Bci npabHla 6e3neHn Ta Bha3iBn.
HeBnKoHaHHaNX npaBNI Ta IHCTpyKuIM MOHe npn3BeCTN Do ydApy CTpyMOM, NOKeHJI Ta/a6O cepNo3HOITpaBMN.
36epexiB Cci iHCTpyKcii Ta npabnla dIra noaJbwoKOpNCTyBaHH.
TepmiN "eNEKtpuHn IHCTpyMeHT" y npaBnax nO3Haayae Baw eNEKtpuHn ABTomAtuHn IHCTpyMeHT, 0o npaioe BiD MepeKi (3 dpOTom), a6o eNEKtpuHn IHCTpyMeHT, 0o npaioe Ha baTaapeHkax (6e3dpoTOBn).
1) Be3neka po6ochoro micra
a) CTeHTe 3a YnCTOTOIO i npabunbHm ocBtIeHHam po6oYoro Micra. 3axapaueHi a6o TeMHI dIJIaHNr TaK i «YeKaIOTb» Ha Heuacn BUNaIOK.
b) He npaioHe aBtOMaTHHMM IHCTpMeHTaMn TaM, de Nobitrpa Hacuhe Bn6yXoHe6e3neHHMM peOBoHNHAM, TAKHM RA ROPUciPiHN, Ra3n a6o nn. ABToMaTHHi IHCTpMeHTn BuciHaOTb icKPN, BiD RKNX MOkyTb 3aHHTncn A6o BuNapn.
c)Пдчacpo6OTn ABToMaTHUHm IHCTpyMeHTOM He nIiynychaHTe Do ce6e dTei I npocTo 6baHaOuHx NOINBHTncr Ha BaWy po6OtY. RaIO BAC BiBOJIkAHTMb, BN MOKeTe BTPaTHTN KOHTPOJIb HAd IHCTpyMeHTOM.
2) Be3neHa eIeKToPnPncTpoIO
a) ⅢTeNceIbHa BnIeJIHa aBToMaTHuHOro iHCTpyMeHTy MycHTb NiIXoJNTn Do po3etKn eJeKtPoMepeHi.
Hiokn HiaHm YHOM He 3miHOnTe BnDEnKy. He KopnCTyTEcra HoDHMn HacaHaMn- aanTepaMn dA 3a3eMLeHnx ABTomaTHNHX IHCTpyMeNTB. He3mHeHi wTeNCelbHi BnDEnK Ta BiJNOiDi Hi m po3eTKn 3MeHsuOyToB pN3NK yDapyeEKeTPOCTpyMOM.
b) He TopkaItecT iIom 3a3eMJIeHnx npEMeTIB a6o nobepxohb, TaHH Xn Tpy6n, 6atapei onaIeHH I xOLOHNBHN. KIOBtOPKHeTeC TIOm 3a3eMJIeHoro npEMeTy, ue 36ilbWy e pN3NK ydpay CTPYMOM.
c) He donyckaHTe, 0o6 Ha aBTOMaTHUH iHCTpyMeHTn notpanJaan DoU a6o BOJORA. Boda, kKa noTpaNHa do aBTOMaTHUHO iHCTpyMeHTa, nIDBnue pnsuK yapy CTpyMOM.
d) O6epeHNO NOoBbTc3i Whypom. HioHn He Hecitb IHCTpymeHT Ha wHpyi, He BOJouItb Noro 3a whyp i He BntraIte wTeNCelbHy BNDenHy 3 po3eTHN, TARHYu 3a whyp. BepeHITb wHyp BiD Tenla, OJIi, roCTpnx nobepxohb Ta pyxomnx DeTalei. NowkOjHeI abo 3aIyTaHI wHpyn 36ilbWuytbpN3K UpaKeHH eNEKTPOcTPyMOM.
e) Ipaioouy anbOMaTHHIM IHcTpymENTOM npocTo He6a, KopnCTyIteCnIOOBHyBaaymnpNCTOBOAHMN dN 3actOCyBAHH npocTo He6a. KopnCTyBaHH Hypom, nPcTocOBAHM do KopnCTyBaHH npocTo He6a, 3HnHyE pN3NK ypaKeHH CTpymOM.
f) Kho He yHKnHyTn po60Tu y BOJoromy cepeoBnui, KopncTyTEcA DHepeLom HNBJIeHHa i3 npNCPTPOem 3axNCTy BiD 3amHKaHHa Ha 3emJIIO. Pnucpi 3axNCTy BiD 3amHKaHHa Ha 3emJIIO 3HNKHyE pU3NK yDapy CTpyMOM.
3) Oco6ncta 6e3neHa
a) He Btpaayte nIbHocTi, CTeHTe 3a THM, IIO po6nte, i KopnctyItec3dOpOBm rIy3dOM niJ cac po60TH ABTomATuHm IHCTpymeHTOM. He npauoHTe ABTomATuHm IHCTpymeHTOM, KOHN Bn BTomJIeHi a6O 3haxODHTecr Ni dicHO HApKOTnKIB, aNkoTIOo a6o NIKIB. MItb HeyBaHn nIq cac po60TH ABTomATuHm IHCTpymeHTOM MOHe CNPUNHHITn BaHKy TpaBMy.
b) Kopnctyntec 3ac06amn iHdNBIyuaIbHoro 3axncty. 3abKdn Kopnctyntec 3ac06amn dna 3axncty oue. 3acobn iHdNBIyauhoro 3axncty, TaKi JHK pecnipatop, YpeBnKn i3 npoteKTOpamn, KaCk a6o bepuui y BiIOBIDHX yMOBAX 3MeHwaTb pN3NK TpaBMvBaHHa.
c) 3anobiraTe BnnaHOBomy yBimKHeHHIO. NpepeHaTecra, zo nepeMnKaay 3haxoNDtbcB B noLoXeHHI «BnMKHeHO», nepu HIX niHIOHTNcdo DkepeJAAHBLeHHa/a60 aKymyIaTopa, B3aTncs3a iHCTpyMeH a60 nepeHoCHTN Ioro. Kpo nepeHoCHTNuABTomatNHy IHCTpyMeHTu YbIMKnHeHMn a6o TpMaIOU NaIaeBa Ha nepeMnKaui, ce MoKe cTaTu npuHNO HeuaCHOrO BnnaDky.
d) 3Himitb 6ydb-aki peryniooyi KIOUa 6loHaTopn, nepu HIX BMNHATN IHCTpymeHT. Ka o peyniouyn KIOU a6o 6lokaTOp IINHTn npKpInIeHm Do qactnH INCTpymeHTa, RaKa oBepTaetbcr, ce MOKe cnpuHHHTn TpaBMy.
e) He TaHrHiTbcra I He nepexnIaItecra, npauOIOUH 3 IHCTpyMeHTOM. 3aBKn HaIiHO CTiTe Ha Horax i 36epiraTe pIBHObary. LHe Hadae Kpaun KoHTpoJIb HaI aBTOMaTHHM IHCTpyMeHTOM Y HecNoIDaHaHX CUYaIIX.
f) Hocitb npabunbHn pobouH oJr. He hocitb shnpOH nOar a6o 1OBenipHi npnKpacn. TpMaHTe BOLOCC, OJAR i pyHABuHN noaJI BiDpyXOMNX YACTNH. LInpOKnOJAR, IOBENIPHi npnKpacn a6o DObre BOLOCC MOHe NOTpaNHTu DO pyXOMHX YACTTH.
g) RaHIO y HaABHocTi e npncTpii dIa 36npaHHnIy, cHOpNCtuytecra Hm 3a yMOBn, IIO BIN npabNlbo NidKluoyehn i npauo. HopncTsyBaHH npncTpoem IJI 36npaHH nIy MOKe 3Hn3HTn Hebe3neKn, NOB'aHi i3 NaKoJIuHeHHM nIy.
4) EKnnyataucia i DOrIa 3a aBTOMaTHHMM HcTpymeHTOM
a) He 3actocobyte HAdmipHy cnly do abTOMATNHO IHCTpymeHTy.ДЯ BUNOHAHHpi3HHx BnIDIB po6IT ni6bpaTe BiNOBiHi IHCTpymeHTn. IpaBnIbHo NiIbpaHn ABtOMaTHHn IHCTpymeHT Kpaue BnKoHae po60Ty i rapaHTyBaTMe 6JIbSe 6e3neKn.
b) He HopnctyIteca aBTOMaTHUHM iHCTpyMeHTOM, Akuo nepemukau He npauoe. Bydb-yn aBTOMaTHUHN IHCTpyMeHT, kHm HEMOJINBO KOHTPOJIIOBAtu nepemukayem, e Hebe3neHUM. Noro cnD noJaroDHTN.
c) BiKnHouItb BnDeyKy 3 DHepeLa HnBJIeHHa I/a6o anMyJrTop Bi aBTOMaTHUHO IHCTpyMeHTy, nepw Hix 6yDb-uo peryNIOBaTH, 3mIHOBaTH aKceCyapn a6o 36epiratn ABTomaTHHi IHCTpyMeHTn. Lz 3axOuN 6e3neKN 3HNHyOtB pu3NK BnPaIHOBO yBIMKHHTn ABTomaTHUHHI IHCTpyMeHT.
d) 36epiraTe ihctpymeHTn y Micx, Heoctynnx dIa Itei, i He do3BOJnTe IIOyM, He O3HaOMJIeHMM i3 aBTOMaTHUHMN IHctpymeHTamn i cHmH IHctpyKlAmm, KOpNCyBaTnca ABtOMaTHUHM mIHctpymeHTom. ABtOMaTHHi IHctpymeHTn e He6e3neuHMM B pykax HeniDrTOBAHNX KOpNCyBaHiB.
e) DOrnJaIte 3a eEnktpnHmN iHcTpymEntamN. Npebiprnt, uH He 3cyhynnci HHe 3irHylnnc pyxomi qactnH, uH He 3lamalnnc Okpemi Detani, a TaHOH uH He TpanHIOcR RHNXOCb He6aHaHnx 3min, kH MoKytB nOraHO BnInHyTH Ha po60ty iHcTpymEnta.
Hko aBtOMaTHHH IHCTpyMeHT NOxHOJHeH, Ioro cIiD noLaOHTn nepei NOdaJIbShM KOpNCyBaHHaM.
Barato HeuacnX BnnaKIB TpannaetbcraYepe3 noraHn DOJRA 3a ABTomTuHHMn IHCTpyMeHTAMN.
f) Buacho YnctbTe i 3aroctpioNe iHcTpymEnTH IaIpaHHa.
IhctpymEnT nI pyi3aHH, 3a KIMN npabunbHO dOJIydaIOt b i Aki BvachO NiITOuyIOB, pIDwe 3rHAIOBcA, iX IeWe KOHTPOJIOBAtN.
g) HopncTyuTecn ABTomuHm IHcTpymeHTOM, ancecyapamn i hacaHamn 3riH0 uNX IHctpyHciBpaxOByouh po6oHi yMOBn Ta 3aBdaHH.
3actocobyte pi3hi aBTOMaTHuHi iHCTpyMeHTn Ipa pi3hNxBIDIB pObit. HeBIOBicHicTb iHCTpyMeHTa 3actocyBaHH MoHe CTBOpHTu He6e3neHy CNTyauiio.
5) 06cIyroByaHH
a) 06cIyroBbATn Baw aBTOMaTHHn IHCTpyMeHT MoHe IINWE KBaJIΦIKOBaHN TexHIk, 3amIHIOUOn DeTAli Nwhe Ha iDeHTNCHI.
LapeaHTyBaTHe 6e3neHy aBTOMaTHHORO iHCTpyMeHTa.
3ACTEPEXEHHH
He niDnyckaIe do iHCTpyMeHTy dTei HENOBHOCnpabHNX oci6.
Holln IHCTpymEHTOM He HOPNcTyOITbC, Noro cIid 36epiratn B Micqax, HeDocTyHNHX dIra ditee Ta HENOBHocnpabHNX OCI6.
INPABNIA B3NEHN ODOBHKOPNCTAHN BIDBIHOROMJLOTKA
- BnKOpncToBnyTe npNCTocyBaHHa 3axncty cnIxy.
BnIINB Iymy MoKe Ipn3BeCTn Do BtpaTn Cnyx.
- BHKOpHCTOByIte DoaTHOBy pyHOrTHy(-H), RnUo NOCTABJIeTBcra pa3OM 3 IHCTpyMeHTOM.
BtpaTkoHTpOJIIO MOKe Ipn3BeCTn Do TpaBM.
- TpmaTe eIeKtpoHCTpyMeHT ImHe 3a BiIDNoBIdHi pyuHN 3 iOJnucIO, OCHINbHN pIHyua HacaHa MOHe 3aueHNT npHXOBaHI eIeKtpnHi dpOTn a60 BJaacHNI shyp HNBJIeHHr.
Pn KOnTaKti piKyuOi HacaKn 3 npoBODHO, 10 3haxoHTbcra NiHappyroHO, Hei3OJbObaHi MeTaeBi YactHH eIeKtpoIHCTpymeHTy MoHyTb npoBOHTn eIeKtpuHn CTpym, AKN II pN3BeDe Do ypaKeHHa ONepaTopa.
ДODATHOBI ПРавиJA Б3пЕн
-
NpekehaiTecra, 0o DKepeNo KnBHeHHa Hb6yTeKOpNCTyBaTHcra, BiNobiJae BmOram Do KnBHeHHa 3a3HaueHnMa Ha HkLeuHa Kopnyci BnpOby.
-
IpepeHOHaTecra, 0 npemnau HINBJIeHHa3HaxOHTbcra BnoJooKeHHI BIMKHEHO.
KuTcBnKa nIckHueHa Do po3eKn, KOJI nepemHKa 3haoDntbC B NoIOJKeHHI YBIMKHEHO, IHCTpymENT HeraHNOUHe npauOBaTu, a ue MoKe npn3BeCTn DO HeuacHO BnnaHy.
- HoJI npO6OaNoBepxH3hAxOOnTbCraJaIeKO BiD JHepeLa HnBJIeHH, KopNCTyItecra NIOOBHyBaYem DOCTaTHBoI TOUHNi I HomHaJIbHOI NOTyHKHOCTI. NIOOBHyBaY MyCNtB 6ytu HacKiJIbKn KOpOTHM, HAcTIbKn I pAaTKHMM.
- He TopkaTecra CBePnla nIac poBToN iBiDpa3y nicna II 3aHHeHHra. CBePnO cnIbHO HarpBaetcra nIac poBToN i MoKe CTaTI npuHNO cepno3nHex onikIB.
- Npeep TmJn noaTpyHyBaTn, DOb6aTn CTHy, nIyory a6o CTeJIIO, o6OB'3KOBO nepeKHOaTEcB TOMy, IO BCEpeDNIH He npOKlaJeHO eJeKTPuHi Ka6eJI a6o BODonpoBIDH Tpy6N.
- Npeed noaTkom po60Tu nepeBipTe 3aTayBaHHraHTIB.
- Прп роботи на високу пднесенhi побайтпpo 6e3neky Лodeй i п徝дmeti, як MOжуть 3нхоДNTИСВиЗу пд робочим мicсem.
- OyaTe 3axnche B3yTTa 3axncty Baunx Hir.
- Hana raie pecnipaTOp.
He BuxaTe WkIDINBn nn, RnYyTBOpIOETbCn NiJ Yac DO6BaHH. Nn MoKe CTAHOBHTN He6e3neKy dIa BaWoRo 3DopOB'Ta 3DopOB' OTOuyOHyX.
10.YCTaHOBJIeHHIhCTpyMeHTa
O yHnKHyTN HeaChnx BnnaKIB, nepeKoHaTecraB TOMy, 10 NepeMnKaU BmKHeHn, a TTeNcJIbHa BInka BiEHaHa BID po3eTKn.
O PnBnKOpNCtAHHi TaHx IHCTpyMeHTiB, RnipamidaIbHI DOJToA, p3aJIbHe npNlaTTOIO, yneBHITbcra, 0 BnKOpNCtOByTe OpiHaJIbHi 3anachi YactHHN, BN3HaueHi HAIJOIO KOMNaHIEIO.
O NoCTbTe XBOCTOBHK nipamidaJbHoro DoJota. NotIM 3MaCTiTb XBOCTOBHK 3MaUyBaJbHNM MaTepiAnOM a60 MAuHHHM MACTNJOM.
11.ПдчсpoьнобвякobO MIцHo TprMaHTe pyKoTHy Ta 6iHy pyKoTHy abO KPNHky cNIIHdPrHoro KOpNcy. He 6epiTbCra 3a pyKoTHy Pdчac poBTo. JOM MOHe BnCKOHIn, RAUO BN NotrHete NOr OmNHIOBO.
12.Ппстризхиctу BiДЗамнkaHHЯHa 3eMЛIO
PekomeHdoBaHO 3aBKn BnKOpNCTOByBaTH npncTpi3axNCTy BiD 3amHKaHH Ha 3emIIO 3 HOMHaJIbHM 3aINIKOBIM CTpyMOM 30 mA a6o MeHue.
HA3Bn KOMNOHEHTIB (maI.1- maI.10)
| ① | Хвостовникinchtpу金融市场 |
| ② | Передна Кршka |
| ③ | Зат生态系统ларон |
| ④ | Зат生态系统ларон (В) |
| ⑤ | Перекиочькоувannah |
| ⑥ | Курковий лерекиоч |
| ⑦ | Руковая |
| ⑧ | Заворсka Табличka |
| ⑨ | Кobачок утки (В地看着自己) задьою Кршки |
| ⑩ | Perugювальский Гинт (пд пленною) |
| ⑪ | Пл actina |
| ⑫ | Задна Кршka |
| ⑬ | Кожух |
| ⑭ | Бiocа руковая |
| ⑮ | Кршka сизлийдричною корпунусу |
| 16 | Пасок |
| 17 | Фінсанійни 6олт |
| 18 | Нakладka |
| 19 | Miц节能环保я пасka |
| 20 | Byrig淋巴аartzika |
CHMBOJN
NONEPEDJHNA
HnXue HabeedeHO CmB0N, aKi 3a3HaayoTbCn Ha npuctpoi. Nepw hix KopncTyBaTncn npuctpoem, BN NOBHHi po3ymItx 3Haayehn.
CTAHДAPTHI AHCECYAPN
Ochim ochoBHO npncTpo (1 npncTpi),do KOMnIeHTy BXoAaTB akcecyapn,nepeJIik kHx npeCTabHe HNKe.
OПлacrKOBaBaJI3a...1
O PikoOno6Hn pi3eB (3 XBOCTOBHKOM SDS-max) 1
O BiuHa pyKoTka 1
KomnneKT cTaHapTHOro npHaIaIaMoKe 6yTu 3MiHeHn 6e3 nonepdKeHH.
OBJIACTI 3ACTOCYBAHH
PyHyBaHH 6eToHy, DOB6aHH 6eToHy, NiIroTOBka KpOMKn, o6pi3Ka.
PnKlaIaN 3acTocyBaHHr:
PpoklaadaHn Tpy6oNpOBOy Ta eNeKtpoNpOBOHn, MOHTaKy caHITapHO-TexHiHNx Cnpoyd, yCTaHOBmMEXaHIHorO 06laHaHH, npOKlaDaHH BODOpOBdy i DpeHaHnX po6it,po6i BCEpeHNI npMIueHH, 6yDIBHnTBA NOPoBHX cnpoyd ta IHsIX 6yDBeIbHnx po6it.
TEXHICHI XAPARTEPHCTIKN
TexhiHxapaKTepeNCTnHaHO npCtpoHo HaBeJeHO B Ta6nui Ha cTOp.5.
IPMIMITHA
Yepe3 noctiHi DoCNIIXeHHI i po3BnTOK, kI 3diNCHIOKOMnaHir HiKOKI, TexHIuHi XapaKTepnCTnKIMOHyTB 3MiHOBaTnC6e3 nopeJKeHH.
6. 3amiha shhpya HnBJIeHHA
Uo6 yHnKHyTn He6e3neKn TpaBMyBaHHa 3amHa Whypa KINBJIeHHN NOBnHHa NpOBOJNTnC BnPo6HnKOM UbOro eIemEHTa.
06EPEKHO
IiI qac po6oTu i dOrnAdu cIId 6paTu Do yBaru MicueBi HOpMn i CTAHapTu.
TAPAHTI
Mn rapaHTyEmo, 10 aBTOMaTHHi IHCTpyMeHTn HiKOKI BnROTOBJIeHI 3rIDHO MicueBHX BkAzIBOK. Lra rapaHTiHa P03NOBcIOJHyETbcH Ha DeΦeHTn a60 NtIKOJHeHHaYepe3 3IOBKnBaHHa, HEnpaBnIbHe KOpNCTyBaHHa 60 3BnuAHe CnpauOBaHHa. RaMu MaTe ckapn, 6yNb NaCka, HadiuNtB abTOMaTHHm IHCTpyMeHT, He po3bpaIOH NiO, i3 rAPAHTIHHM CEPTNIKHATOM, RkH 3hAxOJNTbcB KInCi IHCTpyKci, Do aBTOpN3OBaHOrO cepBichoro ceHTpy HiKOKI.
Ihopmaia npo wym ta Bi6paio
BmipnHBeJnHHn Bn3haeHi 3riHo EN60745 i BN3HaHO TaKMM, zo BiIIOBIDAOTb ISO 4871.
BnMipHnPiBeHb NoTyXHocTi 3Byky B cnIBBiHOWeHHI A: 101,9 d5 (A)
BmipHn pBeHb TcKy 3ByKy B cNIBBiHOWeHHi A: 87,9 D5 (A)
Ioxn6ka K:1,8dA
HociTb npncptpi 3axncty opraHB cyxy.
Nobhi 3haeHHra Biopaui (TpnaKciaIbHa BeKTOpHa cyMa) Bn3haueHo 3riDHO 3 EN60745.
Budob6yBaHHb6eToHy:
3HaueHnB i6paui āh, CHeq = 9,0 M/c2
Poxn6Ka K=1,5M/c2
3a3haeHHPiBHe B6paui 6yB BmipHn 3rIHO CTaHdAPTHORo Tecty i MoKe 6yTH BNKOpNCtAHN npi NopIBHHHi IHCTpMeHTiB MiK CO6O.
BiH MoHe BnKOpNCTOByBaTnCra DnIe NepBnHHoro Bn3HaueHHr BnJIbY.
NONEPEDXENH
O Biopaia iid yac cnpaBHHbOro KOpNCtYBaHHr MoHe BIdpi3HrTnCBA 3aABLeHO, 3aJIeKHO BID cnocoby 3actocyBaHHIhCTpyMeHTy.
O Bn3HaTe 3axoDn 6e3neKn DnI neepaTopa 3riHOnpapKTHORo 3actocyBaHH (6epyu Do yBaHnBci YacTHnPiobOOro UHKLy, TaKi Rk BmNKaHHIHcTpymEnTy i HrO pOBOTn BXOLOCTy Ha DoaTOK DoBnKOHaHHpo6OuNx 3aBdaHb).
NPMMITKA
Yepe3 noctiHi DocJIiHexeHH i po3BHToK, Rki 3diNCHIOc Komnai HiKOKI, TexHicHi xapaKTepnCTuH MoHyt6 3MiHOBaTNC 6e3 nonepeHKeHH.
OBUHE INPABNIA BE3OINACHOCTH INPN PABOTE C 3JIERTPOINHCTPYMEHTOM
IPEyIPENKDEHNE
IpnouTHe Bce npabHna 6e3onacHOCTn HNCHpyKcHn. He BbINOHNHeNe npaBnI INHCTpyKcHm MOKeT pInBeCTn K nopAKeHIO 3JIeKTpNUeCKHM TOKOM, NOKApY HNNCEpcbe3HOITpaBMe.
CoxpaHnTe Bce npabnla n Hnctpykun Ha 6yduuee.
TepMH «JIeKTPoHCTpyMeHT» B KOHTeKCTe BCEx Mep npEOCTOPoHHOCHTN OTHOCNTC K 3HCnJIyATpMyEMOMy BaMn JIeKTPoHCTpyMeHTy C NITaHEm OT CeTN (C CTeBbIM UHypOM) HIN 3JIeKTPoHCTpyMeHTy C NITaHEm OT AKKymJIaTOPHOb6aTapen (BeCnpOBoHOMy).
1)БezonacHOCTbHa pa6ooyMeCTe
a) POndepKnBaIte YNCTOTy n XopoOee OCBeUeHne Ha pa6ooyem MecTe. BeCnpAdoK n IIOXoe OCBeUeHne npNBODT K HeCyactThbIM CnyaM.
b) He nCnoJb3yIte 3JIeKTPoHnCTpyMeHTbI BO B3PbIBOONaChbIX OKpyHaIOUHX ycNoBnX, HApHmep, B HenocpeDCTBeHHo6IIN3OCTN orHeonacbIX HnIDHOCTe, rOpHoux Ra3OB NIn IerKOBOCnIaMeHIOSeC nbln. 3JIeKTPoHnCTpyMeHTbI INOPOHDAIOTHNCpbl, KOTOpbIE MOrYT BOCnIaMeHHTb IIbl NIN NCnapeHn.
c) DepeHnTe DeTeu Ha6JIIOJaOuX Ha 6e3oNacHom pacCToAHN BO Bpemr 3KcnIyataunn 3JeHTponHCTpyMeHTa. OTBLeueHne BHIMaHm MOKeT CTaTb JIg Bac npuHOn noTpEn ynpabNeHn.
2) 3NeKtpo6e3oNaChocTb
a) CeTeBbI BnIKN 3JIeKTPoHnCTpyMeHTOB DOnHHbI COOTBeTCTBOBaTb CeTEBOI po3eTHe. HnHorda He MoHnΦnHiPyIe WTeNCeIbHyIO BnIKy HnHOIM O6pa3OM. He nCnoJb3yIte HnHaKHe aDaNTepHbIe nepexOHNHn C 3a3eMJIeHHbIMN (3aMHHyTbIMN Ha 3emlIO) 3JIeKTPoHnCTpyMeHTAMN.
HemOnnPobAHbIe TcNbHbIe BNIKN COOTBeTCTByIOJIne Hm CeTeBbIe PO3ETKN yMeHbWAt ONaCHOCTb IopAKeHHaEHTpueeCKHM TOKOM.
b) He npHKacaiTecb TeLOM K 3a3eMJIeHHbIM NOBepxHocTAM, HAnpHMep, H Tpy6oNpOBoaAM, paHaTOpam, HXYOHhbIM NNHTaM H XOIOINbHNHAM. EcnBaIe TEIo COpNIKOCHETcC 3a3eMJIeHHbIM NOBepxHocTAM, BO3paCTeT ONaCHOCTb IopaJKeHnA 3JIeHTpUyeCKHm TOKOM.
c) He noDBepraTe 3JIeHTpOHHCTpyMeHTbI DeiCTBnIO BObl HnBnArH.
Pn nonaHn BOdbi B 3JIeKTPoHCTpyMeHT BO3pactET OnaCHOCTb NopaxHeHNA 3JIeHTpueckm TOKOM.
d) PpaBnIbHo 6paaaiTecb co shypom. HnkOrda He nepenocte 3JeKtpoHnCTpymEnT, B3A8Wncb 3a Whyp, He TAHnte 3a Whyp n He depraite 3a Whyp c ceJbIO OTCOeDnHeHHN 3JeKtpoHnCTpymEnTA oT CeTeBOI po3EtHN. PacnoIarate Whyp nOdaJIbwe OT hCtoUHKnOB TENla, HeFTeNoPdyKTOB, npeMeTOB C OCTpbIMN KpOMkAMn N DBNHyuXxCr DeTaJIeN.
IobpeHdEHHbI nn 3aNyTaHHbIe HHypbI yBeJIuHBAIO TOnaCHOCTb NopaKeHnA 3JIeKTPnueckHM TOkOM.
e) Pn 3KcNllyataunn 3JeHtpOnHCTpyMeHTa BHe NOMeueHn HCNoJb3yIte yDInHNTeNbHbIu Whyp, npedHa3HaeeHHbI dIra HcNoJIb3OBAHnB He NOMEueHn.
NcnoB3OBAHne Uhypa, npedHa3NaeHHoro dIpa60bI BHe NOMEueHn, yMeHbWNT ONaCHOCTbNopaeHn 3JIeKTPnuyeCKM TOKOM.
f) Pn 3Kcnnyataun 3neKtpoHnCTpyMeHTa BO BlaaHHo Cpege HcNoIb3yIte yCTpoNCTBO 3auntHOrO OTHJIOUeHn HcTOHNHa NITAHN.
NcnoB3OBAHne yCTPOYCTBa 3aunTHoro OTKIOUeHn yMeHbIINT ONaCHOCTb NopaxHeHn 3JIeKTPuYeCKIM TOKOM.
3) JIyHn8 6e3oNaChOcTb
a) BydbTe rOToBbI K HeoHnHaHHbIM CNTyaUHM, BHMaTeJIbHO CJIeINTe 3a CBOHM DeIcTBnMRn pyKOBODCTByTEcB 3dPaBbIM CMBICOM npn 3KcnNyatauN 3JeHTPOHNCTpyMeHTa.
He nCnoIb3yIte 3JeHTpOHHCTpyMeHT, KOrda Bbl yCTaII HNI HAXODITecb IOD BnIHHEm HApHOTIKOB, aNHOJRA NII JeHapCTBeHHbIX npenapaTOB.
MrHOBeHHa NOTePBAHMaHNA BO BpeM 3KcIyatauN 3JIeKTponHCTpyMeHTOB MOKeT npBecTu K cepbe3HO TpaBMe.
b) NcnoIb3yIte HnHnBHyaIbHbIe cpeCTBa 3aunTbI. Bcerda HaneBaIte cpeCTBa 3aunTbI rna3.
3aunTHoe CHapRHeHne, HApnMep, npOTNBONbIeBOe peCnHpAToP, 3aunTHaO6yBb C HeCKoNb3KoN NOoWBOH, 3aunTHbI WJIEMKa NN CpeiCTBa 3aunTbOprAHOB Cnyxa, NcNoNb3yEmbIe DnA COOTBeCTByIOuix YcNoBn, yMeHbWa TpaBMbl.
c) 36eraTe HnpeDnHapepeHHoro BkIIOUeHn ABnIaTeJIy. Y6eINTEcB TOM, yTO BbIHIOuHaTeJIb HaxoINTcB NIOIOKeHHN BbIKIOUeHHN nepei NOHNMaHem, npeHoCCHo HnN NOcOeHNHeHem K cTeBOH po3eTHe WnN NOPTaTHBOMy 6aTapeHOMy HcToHnHy NTaHn. IpeHocKa 3NEKTPoHHCTpyMeHTOB, KOrda Bbl DEpHITe NaIEc Ha BbIKIOUaTeJIe, NnN NOcOeHNHeHne 3NEKTPoHHCTpyMeHTOB K cTeBOH po3eTke, KOrDa BBIKIOUaTeJIb HxOHTcB NIOLOKeHHN BkIOUeHHN, PnIBODNT K HeCuaCTHBIM Cnyqam.
d) CHIMITE BCE perylnipoBOHbIe HnI raeHbIE KIOHnpeBnHIOueHHem3JIeKTPoHNCTpyMeHTa. Raeyhni nII nperylnpoBOHyB I KIOU, OCTaBJeHHbI npHKpeJIeHHbIM K BpaAioUeNcA DeTaJI N 3JIeKTPoHNCTpyMeHTa, MoKeT npNBecTI K IOJyueHIO TpaBMbl.
e) He TepaTe yToHbOcTb. Bce BpeMa HMeTe ToHy onOpbl n CoXpaHnTe paBHOBeCne.
3TO I OMOKeT lyuwe ynpabnTb 3JIeKTPoHnHCTpyMeHTOM B HeIpeDbUdEHHbIX CNTyauJx.
f) OeBaItecb HaJIeHaaUM o6pa3OM. He HaeBaIte npocToPHyO OeHdy HnIOBeJIInpHbIe N3dJIINJ. DePKeHTe BOLOcbl, OeHdy n nepaTHN KaK MOHHO daJIbWe OT DBNHyuxxCaCTeI.
IpoctopnHa OeKa,IOBEnpHbIe N3dEINN IIN DHHbIE BOIOcbl MOrT IOnaCTb B DBNKyuNeCRA actn.
g) Ecn npedyucmOTpeHb ycTpoNCTBa dnn npncoeDHeHH npncnOco6LeHH dnn OTbOa n c6opa nbIHN, y6eHTecb B TOM, YTO OH npncoeDHeHb N HcNoB3yOTcHaJeKaUIM o6pa30M.
NcIOb3OBaHne daHHbIX yCTpOyCTB MOKET yMeHbWHTb OAnCHOCTU, CB3aHHbIe C IIbIbIO.
4) 3Kcnnyataunn H o6cnyHbAHne 3JIeHTponHCTpyMeHTOB
a) He neperpykaTe 3JeHTPOHcTpymeHT. HcnoIb3yIte HaJIeHaaIIN DJIa BaUero npIMHeHNAJETPOHcTpymeHT. HaJIeHaaIIN 3JEKTPOHcTpymeHT 6yIDeT BbIIOJIHrTa paOTo JLyUWe I HaJeKHeE B TOM peKHMpeoTbI, Ha KOTOpBn OH paccuHaH.
b) He nCnoB3yIe 3JeHTpOHcHtpymENT c HEnCnpaBHBIM BbIKIOUateJIem, ecIIc Cero NOMOuBHeB3A 6ydt BKNIOUHTb H BbIKIOUHTb INCTpyMeNT. KaJdbIy AEKTOPHcHtpymENT, KOToPbIM HeIb3A yIpaBJIaTb C NOMOUsb BBIKIOUaTeJIa, 6yDet npEcdTaBJIaTb ONACHOCTb, Iero 6ydt HEo6XoHMO OTPMOHTnPOBaTb.
c) OToCoeHHHe TTeNceBHyIO BnIHy OT HCTOuHNKa NHTAHN N/IN NOPTaTHNBHbI 6aTapeHbI NCTOCHN KNTAHN OT 3JeHTponHCTpyMeHTa nepeH HauJOM BbINOJIHeHNAKOH-JN60 N3 peryJInpOBOK, nepeCmEHOn PnHaADJeXHOCTe INxpaHeHem 3JeHTponHCTpyMeHTOB.
Takne npoФинаKTUYeCKHe Мерbl 6e3OnaCHOCTn yMeHbWAT ONaCHOCTb HenpeHaMepeHHoro BHLIOUeHn I DBURAteJIЯ 3JIeKTPoHnCtpyMeHTa.
d) XpaHnTe HeNCNoIb3yEmblc 3JIeKTPoHnHCTpyMeHTbIBHeIOCTynHOMdIaTeJ MeCte H He pa3peWaaTe IIOJAM, He YMeIOUHM 6bpaTaBcA C 3JIeKTPoHnHCTpyMeHTom HIn He H3yHbHm DaHHoe pyKOBODCTBO, pa6OtaTb c 3JIeKTPoHnHCTpyMeHTom.
AnektpnHCTpyMeHTI npedTbAJIOT onaCHOCTB BYKAX HenoIROTOBHeHHbIX NOJIb3OBATeJe.
e) CodepkHnte 3JeHTponHCTpyMeHtbl B HcnpabBHOCTn. PpOBepbTe, HeT JIN HecooCHocTH Hnn 3aeDaHHa DBNKHyUxxCaCTeN, NOBpeHNDeTaNHe Hn HaHoro-Im6o dpyrOro 06ctOraTeNbCTBa, HOTOpoe MOHET NOBInrTa H aYHKuONHOPOBAHne 3JeHTponHCTpyMeHToB. Pn HAIChn NOBpeHNDeHn OTPeMOHTpyHte 3JeHTponHCTpyMeH T nepeed erO 3KnlyatauNei. BoIbJIOE KOJIyHeCTBO HeCuaCTHBIX CnyuAEB CB3aHo C IIOXIM OBCLyKINBaHHem 3JeHTponHCTpyMeHTOB.
f) CoepHnTe peHyuue HnCTpyMeHTbIO OCTpo 3aTOeHHbIMN uHCTbIMN. HaJIeKaUHM o6pa3OM coepKaUneCBA NCnpabHOCTn peHyuue HnCTpyMeHTbIC OCTpbIMN peHyuMM KpOMkAMn 6ydyT MeHbWe 3aeDaTb N 6byyT IerYe B ynpabLeHN.
g) HcnoJb3yIte 3JIeHTpOHNCTpyMeHT, npHnAdJIeKHOCTn, HacaIKn N T.I. B COOTBETCTBn C DaHHbIM pyKOBOdCTBOM, npHnMaB BO BHnMaHHe ycIOBnN O6bEm BblINOJHReMo pa6Otbl.
HcnoIb3OBAHne 3JIeHTpOuHCTpyMeHTa IJIa BbIOJIHeHHpa6OT He NO pPramomy Ha3HaueHnIO MOKeT npBecTu K ONaCHOn CITyaun.
5) 06cIyXnBaHne
a) O6cIyHnBaHne BaWero 3JIeHTpOHnCTpyMeHtA DOLHHO BbINoHrTbCk KBaIIHΦNcHPOBaHHbIM npeDCTaBNTeIepeMOHTHO ClyH6bl C HcNoJb3OBaHHem TOJbKO NDeHTNuHbIX 3aNaChbIX YAcTei.
3TO oBecneuT COxpaHHOCTb n 6e3OnaCHOCTb 3JIeKTPoUHcTpyMeHTa.
MEPbI IPEIOCTOPOXHOCTN
AepHnTe nOaIbWe ot DeTeu HEmoUhBIX IIOJe.
Ecnn HNCTpyMeHbI He NcNoIb3yIOTc, Hx CNeIyET XpaHNTb B HeIOCTyINHom dIa DeTe n HEMOuHbIX IIOeMecTe.
ПЕДОCTEPEЖECHЯ OT ОПACHOCKТ ПРИ NSПОЛьЗOBAHИ OTБОЙНО Г мOLЛOTHА
- OdeBaIte cpeCTBa 3aunTbI opraHOB clyxa.
Bo3dEeCTBnE Wyma MoKeT npNBecTn K nOtepe Clyxa.
2. HcnoIb3yIte BCNOMORAeIbHbIe pyKoHTKn, ecn OH npIraTcR K nHCTpyMeHTy. IOTepaYnpaBHeHn IHCTpyMeHTOM MOKeT pNBeCTn K TpaBMe.
3. Пп Вьлолонец Реташи, В Брм КOTopьх ржушаг Насада монг КНТКИРОВАБС СЧпбтОД РОВODКО ИЛ NИ WHypOM NITAHNY, DEХнITE 3ЛЕКТПОИСТРМЕNT 3a ИЗOLПОВАHHье NOBepxHOCHTN 3axBata.
Pn KOHTaKepeKyuEe HacaHcN C npOBoKn, HaxOJaIeIcN NOHapJKeHEm, HEn3OJInpOBaHHbIe MeTaNlUHeckne Yactn 3JeKTpOHnCTpyMeHTa MOryT npOBODtB 3JeKTPnuEckn TOK, KOTOpbI npNBedet K nopAkeHIO OepaTopa.
He BdbixaTe BpeHyIO nbIb, 6pb3yUOyIOcB pe3yIbTaTe DOn6IeHn. PbIb MoKeT PpeCTabJIbTo OnaCHOCTb DnBaWero 3dOpOBBy N 3dOpOBBy OKpyKaIoUxN.
10.YCTAHOBKa INHCTpyMeHTa
O Bo n36eKaHne HeCuaCTbIX ClyuaeB y6eIHTecb B TOM, YTO nepeKJIIOUaTeIb BbIKIOUyeH, a WTeNCEJbHaB BNlKa OTcoEINHeHa OT p03ETKn.
O Pn INCNOB3OBAHIN TaNX INHCTPymeHTOB, KAKNHPaMnDAIbHbIe DOJToA, peKyuIe npncnocobHeHHN T. D., 6B3aTeJIbHO INCNOB3yIte OpiInHaJIbHbIE 3aYactn, ONpeDeJIeHHbIe HaIe HOMNaHnei.
O OuHCTHTe XBOCTOBHK NHPaMnJaIbHOrO DIOJota. 3aTEM CMAKbTe XBOCTOBHK PJIaCTNHybIM Cma3OChbIM MaTEpHaJOM HIN MaUHHbIM MacJOM.
Pycckn
11.Ob3aTeJbHo depHHTecb 3a pyHy n 60KobyIO pyHy nn KpbIshky Kopnyca cunInHnpa BO BpeM pa6oTbI. He 6epHTecb 3a pyKoRTy BO BpeM pa6oTbI. Iom MoKeT BbICHOHTb, eCIN Bbl NotAHnTE erO NO OWH6Ke.
12. YcTpoICTBO 3aUHTHO OTHJIOUeHnpeKomeHnyETCBAcERda HcNOLb3OBaTb yCTpoICTBO3aUHTHO OTKJIIOUeHnH NCTOCHHa NITaHnC HOMHaJIbHbIM OCTaTOOHbIM TOHOM, paBHbIM 30 MA nINMeHee.
HANMEHOBAHNA DETAJIEN (Pnc.1-Pnc.10)
YCTAHOBHA N 3KcPJIyATAUJRA
Bbipy6ka 6eToHa: 3NaueHnne ypoBn Bn6paunn a,h,CHeq =9,0 M/c2 TnpereuHocTb K=1,5M/c²
3aBHeHoe CymMapHoe 3NaueHne Bn6paunn 6bIIO n3MepeHO B COOTBeTCTBUN CO CTaNapTHbIM MeTODOM nCnbTaHNI MOKeT PnmuHrTcR DnA CpABHeHn HNCTpyMeHTOB.
OHO TaKe MoKeT HcNoB3OBAbCra dIa IpeBapHTeHbHO OueHKN BO3DeiCTBn.
IPEdynpeXHEHNE
O YpOBeHbN6paunn BO BpeM aKTHueckoro HcNoIb3OBAHnna 3JIeKTPoHnCTpyMeHTa MoKeT OTINuATbcrOT 3aRbJIeHHORO CymMapHO 3HaueHn, B 3aBHCIMOCTHNOT CNOC6a HcNoIb3OBAHn yCTPOINCTBa.
O OnpedenTb Mepbl npedocTopoXHOCTHn 3aunTb onepaTopa, KOtOpbIe OCHOBaHbHa paChte BO3dEcnCTBnprn FakTNuecHex yCIOBnX nCNOlb3OBAHn (pHINHMAR BO BHIMAHne BCE nepnoDbI cKla 3kCnlyaT aHH, To eCTb KOrda INHCTpyMeHT BbIKluoyeh, paobTaet Ha XOLOCTOM XOy, a TaKHe BpeM 3ayncka).
PIMMEUAHNE
Ha ochobahnn noctoHHbIX nporpamM nccleobAHn y pa3BHTN KOMnHn HiKOKI octabnreT 3a co60n npabo Ha n3MeHeHne yKa3aHHbIX 3deCb TexHnuecknx daHHbIX 6e3 npedBaPnteJbHorO yBeDomJIeHn.

| English Dansk Română | |||
| GARANTIE CERTIFICATE 1 Model No. 2 Serial No. 3 Date of Purchase 4 Customer Name and Address 5 Dealer Name and Address (Please stamp dealer name and address) | GARANTIBEVIS 1 Modelnummer 2 Serienummer 3 Kebsdato 4 Kundes navn og adrasse 5 Forhandlers navn og adrasse (Indsæt stempel med forhandlers navn og adrasse) | ||
| Deutsch Norsk Sloveněna | |||
| GARANTIESCHEIN 1 Modell-Nr. 2 Serien-Nr. 3 Kaufdatum 4 Name und Anschrift des Kunden 5 Name und Anschrift des Handliers (Bitte mit Namen und Anschrift des Handler abstempelin) | GARANTISERTIFIKAT 1 Modelln. 2 Serienr. 3 Kjepsdato 4 Kundens navn og adrasse 5 Forhandlers navn og adrasse (Vennligst stemple forhandlerens navn og adrasse) | ||
| Français Suomi Slovenžina | |||
| CERTIFICATE DE GARANTIE 1 No. de série 2 No de série 3 Date d'achat 4 Nom et adresse du client 5 Nom et adresse du revendeur (Cachet portant le nom et l'adresse du revendeur) | TAKUUTODISTUS 1 Malli nro 2 Sarja nro 3 Ostopävamārā 4 Asiakkaan nimi ja osoite 5 Myjiān nimi ja osoite (Leimaa myjiān nimi ja osoite) | ||
| Italiano Eλλινίκα Βυρarcsκη | |||
| CERTIFICATE DI GARANZIA 1 Modelo 2 N"di série 3 Data di acquirevo 4 Nome e indirizzo dell'acquirente 5 Nome e indirizzo del rivenditore (Si prega di apporre il timbro con quosti dati) | ΠΙΤΟΙΟΙHTΙΚΟ ΕΥΓΗΝΕΗ 1 Ap. Mòvtéλου 2 Aùξων Ap. 3 Húcpouπγia αγοράς 4 Ovoja kai δειδύνιση πελάτη 5 Ovoja kai δειδύνιση μετατιλήτη (Πρακαλούμε va χρησιοιοιηβει σφραγιδα) | ||
| Nederland Polski Srpski | |||
| GARANTIEBEWIJS 1 Modelonummer 2 Serienummer 3 Datum van aankoop 4 Naam en adres van de gebruiker 5 Naam en adres van de handelaar (Stempel a.u.b. naam en adres vande de handelaar) | GWARANCJA 1 Model 2 Numer seryjny 3 Data zakupu 4 Nazwaclienta i adres 5 Nazwa dealer i adres (Pieczęc punktu sprozdaź) | ||
| Espanol Magyar Hrvatski | |||
| CERTIFICADO DE GARANTÍA 1Número do modulo 2Número do série 3 Fecha de achubión 4 Nombre y direccion del cliente 5 Nombre y direccion del distribuidor (Se rueqa poner el sello del distribuidor con su nome y direccion) | GARANCIA BIZONYLAT 1 Tipusszám 2 Sorozatszám 3 A vasafrásá datuma 4 A Vázario neve és cime 5 A Kereskedő neve és cime (Kárjúkide elihelyezni a Keroskedő nevēnek és ciměnek pecsétjét) | ||
| Portugues Cesina Yürscheinényi | |||
| CERTIFICADO DE GARANTIA 1Número do modulo 2Número do série 3 Data de compra 4 Nome e morada do cliente 5 Nome e morada do distribuidor (Per favor, carimbe o nome e morada do distribuidor) | ZÁRUÇNI LIST 1 Model c. 2 Série c. 3 Datum nukupu 4 Mýnéo areshá zákována 5 Mýnéo areshá prodejece (Prosime o razitko se jmídem a adresou prodejce) | ||
| Svenska Türke | Rüsskni | ||
| GARANTICERTI KAT 1 Modellnr 2 Serienr 3 Inkópsdatum 4 Kundens numm och adress 5 Försäljarens numm och adress (Stámpla försäljarens numm och adress) | GARANTISERTIFIKASI 1 Model No. 2 Seri No. 3 Satun Alma Tarihi 4 Müşteri Advi ve Adresi 5 Bayi Advi ve Adresi (Lütfen bayi adini ve adresini kaçé olarak basin) | ||
HiKOKI
| ① | |
| ② | |
| ③ | |
| ④ | |
| ⑤ |
Siemensring 34, 47877 willich, Germany
Tel: +49 2154 49930
Fax: +49 2154 499350
URL: http://www.hikoki-powertools.de
Hikoki Power Tools Norway AS
Kjeller Vest 7, N-2007 Kjeller, Norway
Tel: (+47) 6692 6600
Fax: (+47) 6692 6650
URL: http://www.hikoki-powertools.no
Hikoki Power Tools Netherlands B.V.
Brabanthaven 11, 3433 PJ Nieuwegein, The Netherlands
Tel: +31 30 6084040
Fax: +31 30 6067266
URL: http://www.hikoki-powertools.nl
Hikoki Power Tools Sweden AB
Rotebergsvagen 2B SE-192 78 Sollentuna, Sweden
Tel: (+46) 859899900
Fax: (+46) 859899940
URL: http://www.hikoki-powertools.se
Hikoki Power Tools (U.K.) Ltd.
Precedent Drive, Rooksley, Milton Keynes, MK 13, 8PJ,
United Kingdom
Tel: +44 1908 660663
Fax: +44 1908 606642
URL: http://www.hikoki-powertools.uk
Hikoki Power Tools Denmark A/S
Lillebaeltsvej 90, 6715 Esbjerg N, Denmark
Tel: (+45) 75 14 32 00
Fax: (+45) 75 14 36 66
URL: http://www.hikoki-powertools.dk
Hikoki Power Tools France S.A.S.
Hikoki Power Tools Belgium N.V./S.A.
Koningin Astridlaan 51, B-1780 Wemmel, Belgium
Tel: +32 2 460 1720
Fax: +32 2 460 2542
URL http://www.hikoki-powertools.be
Hikoki Power Tools Italia S.p.A
Via Piave 35, 36077, Altavilla Vicentina (VI), Italy
Tel: +39 0444 548111
Fax: +39 0444 548110
URL: http://www.hikoki-powertools.it
Hikoki Power Tools Ibérica, S.A.
C/ Puigbarral, 26-28, Pol. Ind. Can Petit, 08227 Terrassa
(Barcelona), Spain
Tel: +34 93 735 6722
Fax: +34 93 735 7442
URL: http://www.hikoki-powertools.es
Hikoki Power Tools Romania S.R.L.
Ring Road, No. 66, Mustang Traco Warehouses, Warehouse
No.1, Pantelimon City, 077145, Ilfov County, Romania

- (Original instructions)
- GENERAL POWER TOOL SAFETY WARNINGS
- WARNING
- 1) Work area safety
- 2) Electrical safety
- 3) Personal safety
- 4) Power tool use and care
- 5) Service
- PRECAUTION
- DEMOLITION HAMMER SAFETY WARNINGS
- ADDITIONAL SAFETY WARNINGS
- SYMBOLS
- STANDARD ACCESSORIES
- APPLICATIONS
- SPECIFICATIONS
- NOTE
- Warming up (Fig. 9)
- GREASE REPLACEMENT
- Grease Replacement Period
- MAINTENANCE AND INSPECTION
- CAUTION
- Inspecting accessories
- Inspecting the mounting screws
- Maintenance of the motor
- Inspecting the carbon brushes (Fig. 10)
- Replacing carbon brushes (Fig. 10)
- Replacing supply cord
- GUARANTEE
- IMPORTANT
- Information concerning airborne noise and vibration
- VOORZORGSGMAATREGELEN
- VEILIGHEIDSWAARSCHUWINGEN SLOOPHAMER
- VEDLIKEHOLD OG INSPEKSJON
- FORSIKTIG
- TENIKE Σ ΠPOEIΔΟΙHΣΕΙΣ AΣΦΑΛΕΙAΣ TOY HΑEKΤΡΙΚΟΥ EΡΑΛΕΙΟΥ
- 1) Be3onachOCT Ha pa60THOTo MRCTO
- 5) 06cIyHbAHe
- BHIMAHNE
- NHCTPYHcHn 3A B63OpACHOCT 3A KbPTaU
- Hocete aHTnfoHN.
- ДОПьЛНITEЛНМЕРКИЗАБЕЗПАСHOCT
- PNEyPENKDEHNE
- 3A6EJEKHA
- (Prevod originalog uputstva)
- OPŠTA BEZBEDNOSNA UPOZORENJA ZA ELEKTRICNI ALAT
- UPOZORENJE
- ODRžAVANJE I PROVERA
- OPREZ
- Provera pribora
- 3AΓΑЛbHI IHCTPyHcIi Be3NEHn EJIΕΚΤΡινΗΟ ΙHCTPyMΕHTY
- NONEPEJHEHHA
- 1) Be3neka po6ochoro micra
- 2) Be3neHa eIeKToPnPncTpoIO
- 3) Oco6ncta 6e3neHa
- 4) EKnnyataucia i DOrIa 3a aBTOMaTHHMM HcTpymeHTOM
- 5) 06cIyroByaHH
- 3ACTEPEXEHHH
- INPABNIA B3NEHN ODOBHKOPNCTAHN BIDBIHOROMJLOTKA
- ДODATHOBI ПРавиJA Б3пЕн
- HA3Bn KOMNOHEHTIB (maI.1- maI.10)
- CHMBOJN
- NONEPEDJHNA
- CTAHДAPTHI AHCECYAPN
- OBJIACTI 3ACTOCYBAHH
- TEXHICHI XAPARTEPHCTIKN
- IPMIMITHA
- 3amiha shhpya HnBJIeHHA
- 06EPEKHO
- TAPAHTI
- Ihopmaia npo wym ta Bi6paio
- NONEPEDXENH
- NPMMITKA
- OBUHE INPABNIA BE3OINACHOCTH INPN PABOTE C 3JIERTPOINHCTPYMEHTOM
- IPEyIPENKDEHNE
- 1)БezonacHOCTbHa pa6ooyMeCTe
- 2) 3NeKtpo6e3oNaChocTb
- 3) JIyHn8 6e3oNaChOcTb
- ПЕДОCTEPEЖECHЯ OT ОПACHOCKТ ПРИ NSПОЛьЗOBAHИ OTБОЙНО Г мOLЛOTHА
- Pycckn
- HANMEHOBAHNA DETAJIEN (Pnc.1-Pnc.10)
- IPEdynpeXHEHNE
- PIMMEUAHNE
- HiKOKI
- Hikoki Power Tools Norway AS
- Hikoki Power Tools Netherlands B.V.
- Hikoki Power Tools Sweden AB
- Hikoki Power Tools (U.K.) Ltd.
- Hikoki Power Tools Denmark A/S
- Hikoki Power Tools France S.A.S.
- Hikoki Power Tools Belgium N.V./S.A.
- Hikoki Power Tools Italia S.p.A
- Hikoki Power Tools Ibérica, S.A.
- Hikoki Power Tools Romania S.R.L.
Brand : HiKOKI
Model : H41MB2
Category : Hammer