USER MANUAL One+ RCS18X RYOBI
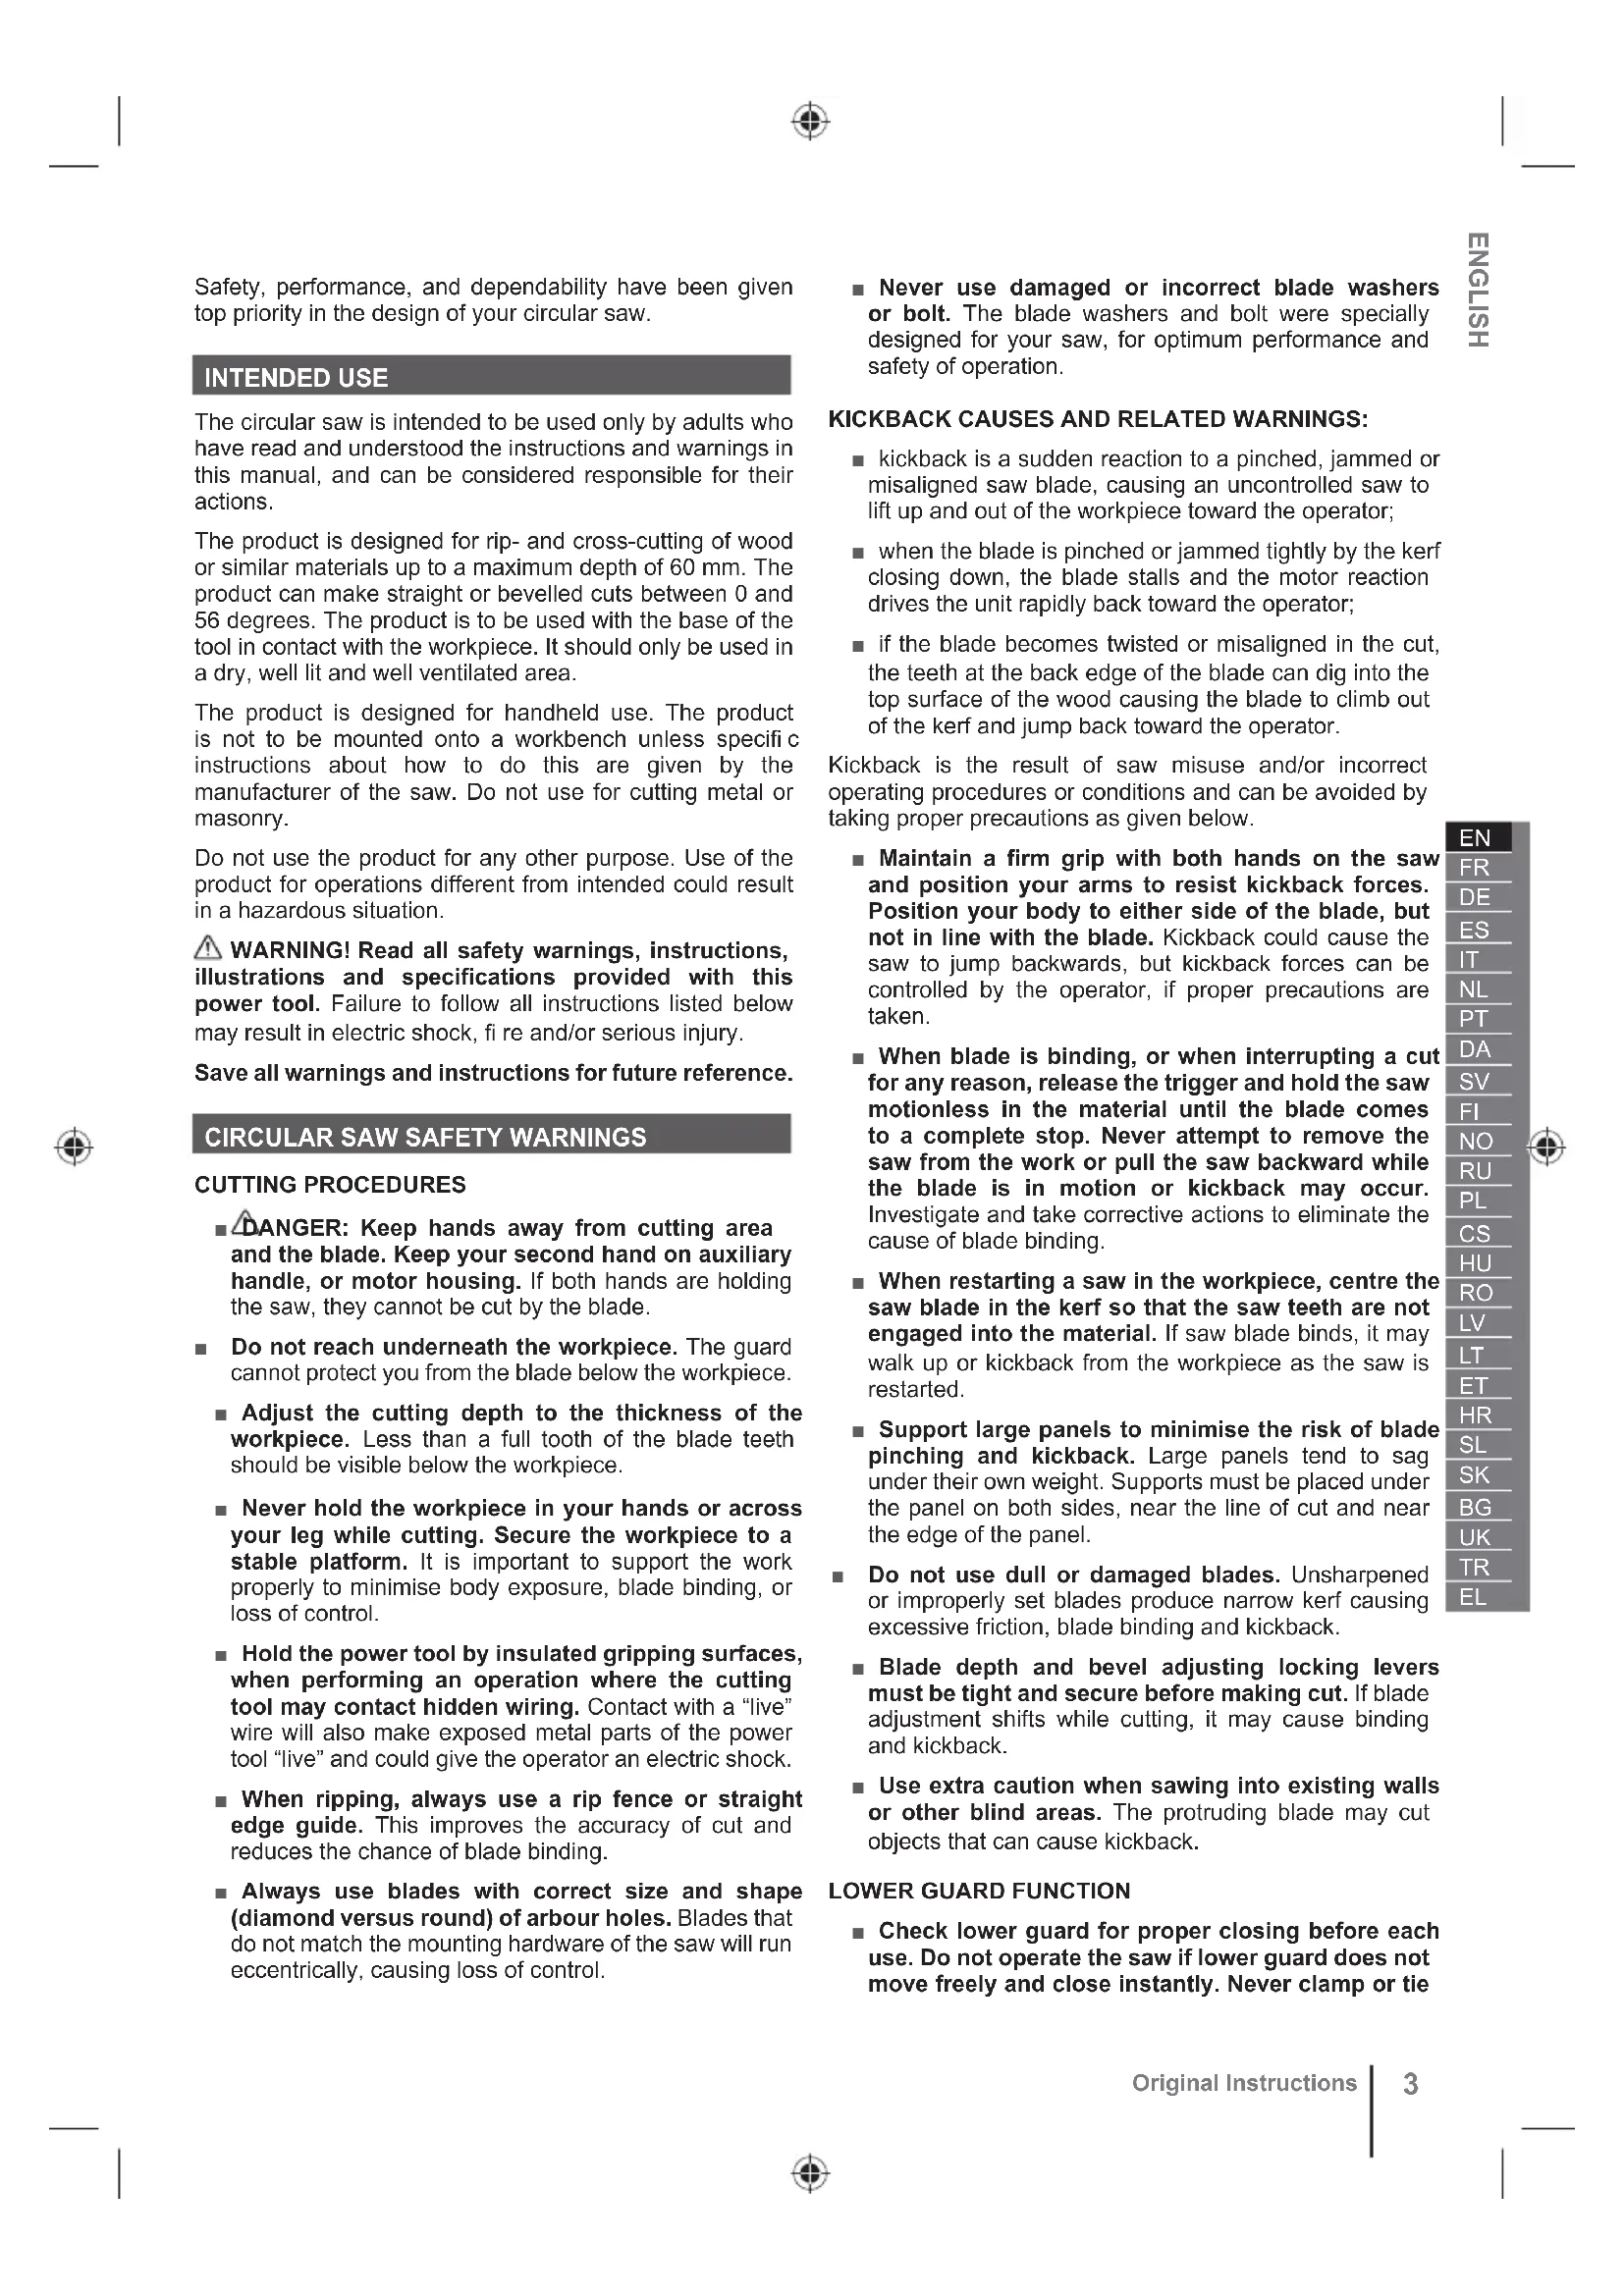
Safety, performance, and dependability have been given top priority in the design of your circular saw.
INTENDED USE
The circular saw is intended to be used only by adults who have read and understood the instructions and warnings in this manual, and can be considered responsible for their actions.
The product is designed for rip- and cross-cutting of wood or similar materials up to a maximum depth of 60~mm . The product can make straight or bevelled cuts between 0 and 56 degrees. The product is to be used with the base of the tool in contact with the workpiece. It should only be used in a dry, well lit and well ventilated area.
The product is designed for handheld use. The product is not to be mounted onto a workbench unless specific instructions about how to do this are given by the manufacturer of the saw. Do not use for cutting metal or masonry.
Do not use the product for any other purpose. Use of the product for operations different from intended could result in a hazardous situation.
WARNING! Read all safety warnings, instructions, illustrations and specifications provided with this power tool. Failure to follow all instructions listed below may result in electric shock, fire and/or serious injury.
Save all warnings and instructions for future reference.
CIRCULAR SAW SAFETY WARNINGS
CUTTING PROCEDURES
DANGER: Keep hands away from cutting area and the blade. Keep your second hand on auxiliary handle, or motor housing. If both hands are holding the saw, they cannot be cut by the blade.
- Do not reach underneath the workpiece. The guard cannot protect you from the blade below the workpiece.
- Adjust the cutting depth to the thickness of the workpiece. Less than a full tooth of the blade teeth should be visible below the workpiece.
- Never hold the workpiece in your hands or across your leg while cutting. Secure the workpiece to a stable platform. It is important to support the work properly to minimise body exposure, blade binding, or loss of control.
Hold the power tool by insulated gripping surfaces, when performing an operation where the cutting tool may contact hidden wiring. Contact with a "live" wire will also make exposed metal parts of the power tool "live" and could give the operator an electric shock.
- When ripping, always use a rip fence or straight edge guide. This improves the accuracy of cut and reduces the chance of blade binding.
Always use blades with correct size and shape (diamond versus round) of arbour holes. Blades that do not match the mounting hardware of the saw will run eccentrically, causing loss of control.
- Never use damaged or incorrect blade washers or bolt. The blade washers and bolt were specially designed for your saw, for optimum performance and safety of operation.
- kickback is a sudden reaction to a pinched, jammed or misaligned saw blade, causing an uncontrolled saw to lift up and out of the workpiece toward the operator;
- when the blade is pinched or jammed tightly by the kerf closing down, the blade stalls and the motor reaction drives the unit rapidly back toward the operator;
- if the blade becomes twisted or misaligned in the cut, the teeth at the back edge of the blade can dig into the top surface of the wood causing the blade to climb out of the kerf and jump back toward the operator.
Kickback is the result of saw misuse and/or incorrect operating procedures or conditions and can be avoided by taking proper precautions as given below.
- Maintain a firm grip with both hands on the saw and position your arms to resist kickback forces. Position your body to either side of the blade, but not in line with the blade. Kickback could cause the saw to jump backwards, but kickback forces can be controlled by the operator, if proper precautions are taken.
- When blade is binding, or when interrupting a cut for any reason, release the trigger and hold the saw motionless in the material until the blade comes to a complete stop. Never attempt to remove the saw from the work or pull the saw backward while the blade is in motion or kickback may occur. Investigate and take corrective actions to eliminate the cause of blade binding.
-
When restarting a saw in the workpiece, centre the saw blade in the kerf so that the saw teeth are not engaged into the material. If saw blade binds, it may walk up or kickback from the workpiece as the saw is restarted.
Support large panels to minimise the risk of blade pinching and kickback. Large panels tend to sag under their own weight. Supports must be placed under the panel on both sides, near the line of cut and near the edge of the panel.
-
Do not use dull or damaged blades. Unsharpened or improperly set blades produce narrow kerf causing excessive friction, blade binding and kickback.
-
Blade depth and bevel adjusting locking levers must be tight and secure before making cut. If blade adjustment shifts while cutting, it may cause binding and kickback.
Use extra caution when sawing into existing walls or other blind areas. The protruding blade may cut objects that can cause kickback.
LOWER GUARD FUNCTION
- Check lower guard for proper closing before each use. Do not operate the saw if lower guard does not move freely and close instantly. Never clamp or tie
the lower guard into the open position. If the saw is accidentally dropped, lower guard may be bent. Raise the lower guard with the retracting handle and make sure it moves freely and does not touch the blade or any other part, in all angles and depths of cut.
- Check the operation of the lower guard spring. If the guard and the spring are not operating properly, they must be serviced before use. Lower guard may operate sluggishly due to damaged parts, gummy deposits, or a build-up of debris.
Lower guard may be retracted manually only for special cuts such as "plunge cuts" and "compound cuts". Raise lower guard by retracting handle and as soon as blade enters the material, the lower guard must be released. For all other sawing, the lower guard should operate automatically.
Always observe that the lower guard is covering the blade before placing saw down on bench or floor. An unprotected, coasting blade will cause the saw to walk backwards, cutting whatever is in its path. Be aware of the time it takes for the blade to stop after switch is released.
ADDITIONAL SAFETY WARNINGS
Do not use any abrasive wheels.
Use only blade diameter(s) in accordance with the markings.
- Identify the correct saw blade to be used for the material to be cut.
Use only saw blades that are marked with a speed equal or higher than the speed marked on the tool.
Use only saw blades recommended by the manufacturer, which conform to EN 847-1, if intended for wood and analogous materials.
Wear a dust mask.
- Clamp workpiece with a clamping device. Unclamped workpieces can cause severe injury and damage.
Injuries may be caused or aggravated by prolonged use of a tool. When using any tool for prolonged periods, ensure you take regular breaks.
The product will restart automatically if stalled. Switch off the product immediately if it stalls. Do not switch on the product again while it is still stalled, as doing so could trigger a sudden recoil with a high reactive force. Determine why the product stalled and rectify this, paying heed to the safety instructions.
- Ambient temperature range for tool during operation is between 0^ and 40^ .
- Ambient temperature range for tool storage is between 0^ and 40^ .
The recommended ambient temperature range for the charging system during charging is between 10^ and 38^ .
ADDITIONAL BATTERY SAFETY WARNINGS
To reduce the risk of fire, personal injury, and product damage due to a short circuit, never immerse your tool, battery pack or charger in fluid or allow a fluid to flow inside them. Corrosive or conductive fluids, such as seawater, certain industrial chemicals, and bleach or bleach-containing products, etc., can cause a short circuit.
- Ambient temperature range for battery during use is between 0^ and 40^ .
- Ambient temperature range for battery storage is between 0^ and 20^ .
TRANSPORTING LITHIUM BATTERIES
Transport the battery in accordance with local and national provisions and regulations.
Follow all special requirements on packaging and labelling when transporting batteries by a third party. Ensure that no batteries can come in contact with other batteries or conductive materials while in transport by protecting exposed connectors with insulating, non-conductive caps or tape. Do not transport batteries that are cracked or leaking. Check with the forwarding company for further advice.
KNOW YOUR PRODUCT
See page 82.
1. Hex key
2. Depth adjustment lock lever
3. Dust port
4. Spindle lock button
5. Handle, insulated gripping surface
6. Switch trigger
7. Lock-off button
8. Front handle, insulated gripping surface
9. Bevel adjustment knob
10. Edge guide knob
11. Battery port
12. Lower guard
13. Inner flange
14. Outer flange
15. Blade screw
16. Edge guide fence
17. Blade
18. Operator's manual
19. Battery pack
20. Charger
MAINTENANCE
The product should never be connected to a power supply when assembling parts, making adjustments, cleaning, performing maintenance, or when the product is not in use. Disconnecting the product from the power supply will prevent accidental starting that could cause serious injury.
- When servicing, use only original manufacturer's replacement parts, accessories and attachments. Use of any other parts may create a hazard or cause product damage.
- Avoid using solvents when cleaning plastic parts. Most plastics are susceptible to various types of commercial solvents and may be damaged by their use. Use clean cloths to remove dirt, carbon dust, etc.
- Do not at any time let brake fluids, gasoline, petroleum-based products, penetrating oils, etc., come in contact with plastic parts. Chemicals can damage, weaken or destroy plastic which may result in serious personal injury.
For greater safety and reliability, all repairs should be performed by an authorised service centre.
SYMBOLS ON THE PRODUCT


Safety alert
No-load speed
V Volts

Direct current
min
Revolutions or reciprocations per minute

Diameter

Wood

Do not cut metals

Wear eye protection

Width of cut

Blade teeth

European Conformity Mark

British Conformity Mark

Ukraine Conformity Mark

EurAsian Conformity Mark

Please read the instructions carefully before starting the machine.
Waste electrical products should not be disposed of with household waste. Please recycle where facilities exist. Check with your local authority or retailer for recycling advice.
SYMBOLS IN THIS MANUAL

Note

Waiting time

Parts or accessories sold separately

Lock

Unlock
APPRENEZ A CONNAITRE VOTRE PRODUIT
Voir la page 82.
SYMBOLES APLIQUES SUR LE PRODUIT


Alerte de sécurité
Vitesse a vide
V Volts

Courant continu
min-1
MACHEN SIE SICH MIT IHREM PRODUKT VERTRAUT
SieheSeite82.
SYMBOLE AUF DEM PRODUKT


V Volt

Sicherheitswannung
Leerlaufdrehzahl
Gleichstrom
min
UCIOBHBIE OBO3HAUEN HA IPOODYKTE

CnHnOanOaCHOCTn

CKopoCTb Ha xOIOCTOM xOdy
V
BolbT

IOCTOHHbI TOK
min-1
OboopoTOB HIN BO3BpaTHO- NOCTyNaTeNbHbIX DnBHXeHm B MHyTy

Dnametp

Древесина

3anpeaetcpeaTbMetannbl

PpIMHeHTe CpeDCTBa 3aunIb I opraHOB 3peHn

Unpuna pa3pe3a

Yncno 3y6beB

CoOTBeTCTBnTepeBaHnMCE

3Hak COOTBETCTBnE BpOneckm CTaHapTaM
3Hak COOTBETCTBNA CTaHdapTAM BeJIko6pTuHn

3HaK COOTBETCTBnYkpanHbI

IpeepicnoB3oBaHnem npnbopa BHIMATEbHO O3HaKOMbTeCb C daHHOu HNCTpykUne.
Otpa6oTaHHa 3nEeKtpoTeXHuecka npOyKUIN D0JXHa yHNUToXKaTbCBAMeCTe C bIToBbIMN OTXdAMN. YtUN3uPyTe,ecnN NMeETcR cNeuaNBHOe TexHueCKoe o6OpyIOBaHne. IIO BOpocam yTNIN3auIN PpOKOHcyNbTpyNTecCB MeCTbIM OprAHOM Bnactn INPi npEiPnIaHTmepo3HNUHOI TropOBNI.

Pacuenitb
OB03HAUEHINB PYKOBODCTBE

Приимechание

Heo6xoDIMO IOdoJkaTb

Tnnn npnaNexKHOCTn, npno6petaembe OTdJIbHO

3aФИКСИРОВАТБ
TpaHcnOpTnPOBka:
Kateropnueckn He donyckaetcnaeHne nIIObIe MexaHnueckne BO3deNCTBnHa yNaKOBy npTpaHCnpTupOBke.
Pn pa3rpy3ke/norpy3Ke He donyckaetc nCnoJb3OBaHne JIO6OTo Bua TexHNK, pa6oTaIoUeNo npHunny 3axmua ynaKOBKn.
XpaHeHne:
Heo6xOIMO xpaHnTb B cyXOM MeCTe.
Heo6xOIMO XpaHnTb BdaIOn OT NCTOCHKOB NOBbiWeHHbIX Tempeatyp IN BO3dEINCTBnA COJIHeuHbIX Nyuei.
Pn XpaHEn HEO6xOJIMO n36eRaTb pe3KOro nepenada TempepaTyp.
XpaHHeHne 6e3 ynaKOBKn He donyckaeTcra.
Cpok cnyx6bI n3dennr:
Cpok cnjxkbI n3deJnna coCTaBnreT 5 neT. He peKOMeHnyETcK 3KcnpyatauIN no nCTeueHH 5 neT xpaHeHH C daTbI n3roTOBneHH 6e3 npedBapnteHbHO npOBepKn.
Data n3ROTOBHeHn (KoI DaTbI) OTUAMNOBaH Ha NOBepxHOCTu KOpnyca N3dJIIN.
Приимер: W17 Y2015, гд e Y2015 - рд n3rotoblenya W17 - He'dela n3rotoblenya
OnpeDenIb Mecau, n3roTOBneHn MoXHo corlacho npBeHNo Hxke Ta6nue, Ha npImepe 2015 roda.
06paTHe BHMaHne! KoJIueCTBO HeJeIb B MeCAe pa3NIuAeTcR OT rOdaB rOd.
TAIENDAVAD OHUTUSJUHISED
DODATNA VARNOSTNA OPOZORILA
PNEyPExKDEHNA B3OJACHOCT PPNPABOTACUKNPKYJPHN TPOOH
PPOUEDYPN3A PRA3AHE
ONACHOCT: DpbxTe pbcTe cn daJece ot 30HaTa Ha p3aHe n ocTpneTo. DpbXTe dpyraTa cn pbKa Bbpxy cNoMaratEnHata pbKoXBaTka Hn Kopnyca Ha dBiratena. Ako n Dbete Pbue Dbpxkat TpnoHa, Te He MOraT da 6bDaT nop3aHn OT ocTpneTO.
He noctabraye pbkata cn noD pa60THnA DeTaN. PpeNa3ntenr He moKe da BN 3aunr OTOCTPNETO noD pa60THnA DeTaN.
PerynpaTe Dbl60uHnHa Ha p3aHe cnopei De6eHHa HpaBoTHra Detain. Iod pa6oTHna DetaiI Tp6Ba Da ce BnKDa no-Manko OT cyaIata DblkHa Ha 3b6nte Ha ocTpneTo.
Hnkora He npbXTe MaTePnAna, KOnto pexTe, B pIe nn npe3 KpaKaTaN. 3akpenete pa60THN aTeaN KbM ctaBnHa nIaTfOpMa. BaxHo e da 3akpenBaTe detaa NpabuNHO, 3a Da ce HamaT Do MInHMMy PNCKbT 3a TJIIOTo, INBnBaHETO Ha OCTpneTO nn 3ary6aTa Ha KOHTpol.
ДрькTe eNEKtpueckn INHCTpyMeHT 3a N3OINpaHIne NOBbpxHOCTN 3a XBaUaHe, KOraTO N3BbPbBaTe Oepauu, npN KOrTo pExKeunrT INHCTpyMeHT MOKe Da BNe3E B KOHTAK CbC CKpNTn npOBdHn. KOHTaKTbT c npOBoHNK, no KOIto
Teue TOK,MOKe Da IOBeDe Do IpOTnUaHeTo Ha TOK NO HEn3OJIpaHIne MeTaJIHN YacTn Ha eJekTpUpeckn INHCTpyMeHT N da pNpUHH NTOKOB yIap Ha onepaTopa.
Korato npaBte HndIbXeH pa3pe3, BnHaH n3no3BaTe orpaKa 3a HaenBaHe nn npab TbrOB BODaY. ToBa noO6pRa TOHOCCTTa npn p3aHe n HAmaJIra BA B3MOxHOCTTA OT OrBaHa He Ha OCTpneTO.
Bunarnn3noJ3BaIteOcTpneTa c npabuJeH pa3Mep nΦopMa (DnAmaHTeHN nped KpbTIN) C dynKn. OctpneTa, KOINTo He CbOTBETCTBaT Ha MOHTaXHaTa paMka Ha TpNoHa, Ie pa6oTt EKCueHTpUHNO, npuHHaBn 3ary6a Ha KOHTpon.
Hnkora He n3non3BaTe NOBpeHn HnHn HnnpabunHn 6oTObE nn 7aBn 3a ocTpneTa. 7aBnTE n 6oTobEt Ha ocTpneTaTa ca HanpaBeHn CneuJHO 3a BaUN TpOH 3a ONTMaNHO N3NJIHeHne n 6e3onachOCT npu pa60ta.
PNUHIN 3A OTKAT N CBbP3AHN C TOBA PPEy- PPEKDEHNA:
OTKaTbTe BHe3aHa peaknHa Na npntncHATO,OrbHato INN N3KpNBeHO OCTPne,KoEtO BoNDo HEKOHTpOnpaH OTCKOK Ha TpNoHa OT pa60THnI DeTaIN KbM OpePaTopa;
KOratoOCTpneToe npntuChaTOIIN3DpaBO3aXbHaTO Bnpope3a,TO3acraIpeaknraTaHaMOTopa3anOvBa DaN3dbpnaUpeDaHa3adKbMonepaTopa;
Ako octpneTo ce ycye nnnn 3kpnBn B npope3a, 3b6nte B 3aHnna Kpaia OCTpneTO MoKe Da 3aNbIb6aT B rOpHaTa NOBbpxHOCT Ha DpbBOTO, KOEt ige npuHH OTCKaayHe HocptneTo OT npope3a KbM onepaTopa.
OTkaTbTe cneDCTBHe Ha HenpaBnH0 n3noJ3BaHe Ha eNeKtpnueckn HnCTpyMeHT. ToI MoKe Da 6bJe npedOTBpateH c npednpemeHa NODxOJaN npedna3HmepKn, KOnTO ca ONcaHn No-DoNy:
I OndbpxaTe 3dpab 3axBat c DBe pBce Bbpxy MaunHata n 3actaHete Taka, ye da MoKete da npotnBOcToNTe Ha OTkathnte CnN. Pa3noJoxete TAnoto CN OT KOrTO n Da e CtpaHa Ha OCTpneTo, Ho He N ycNopeDnO C Hero. OTKaTbT MOKe Da Hakapa OCTpNeTo Da OTCKOuHa3aD, Ho ONepaTopbT MOKe Da KOHTpOInpa Te3n CnN, aKO ce B3emat NOxOJaU npedna3HN MepKn.
Korato octpneTo e 3axBaHaTo HnN KOrato p3aHeto ce npeKbcHe No HkaKaBA npuHna,OCBO6oTe cnybKa H dpXkTe TpnoHa B NOKo B MaTePnAJa, DOKaTO ocTpneTo HanbIHo Cnpe. HNKora He ONNTBaHte Da N3BaXdaTe TpnoHa OT pa6OTnHn DeTaN IIN Da Ro DbPNaTe Ha3aD, DOKato ocTpneTo ce DBNX, Tb KaTo MOKe Da Ce NOnyU OTKaT. HanpaBete npOBepKa H npEπpmeTe KoprnpaUN DeICTBn, 3a Da OTCTpaHnte PpUnHaTa 3a OfBaHe Ha OCTpneTO.
Pn pectaptnpaHn TpnoHa B pa60THnA DeTaN, ceHTnpaTe OCTpneTo Ha TpnoHa B npope3a n npOBepe TaNN 3b6nte He ca 3axBaHaTn B MaTePnAna. Ako octpneTo Ha TpnoHa Ce OrHe, MOKe Da Ce N3BaDN Nm Da OTCKOuN OT DeTaJNa Pn pectaptnpaHn TpNoHa.
IpoaTbPxaIte No-rotemntaHaHEn,3a da HamaJIte pckaOT 3auunBaHe n OTkat Ha octpneTo. TOpemTe naHEnMoraTda ce ObHaT OT co6CTbeHata cn TeXeCT. TpaBa Da ce noctabrt NopnnpoNpaHena,OTDbete ctpAH,6n30do JInnraTaHa p3aHe n do pb6aHa
nahan.
He n3noI3BaIte TbIIN IIN NOBpeIeHIOCTpneTa. HenoIOCTpeHInTe IIN HENpaBUNHO NOCTaBEHN OCTpeTA npABrT TeCN IIPOe3N, KOEt IINuYNHBA INPEKOMepHO TpneHe, ORbBaHc HA OCTpNETo NOTkAT.
Perynnpaune 3aknoybaun noctobe 3a 1bIbOuHnHaTa Ha octpneTo n 3a HAKNoHa Tp86Ba da ca 3aterHaTu 3dpBO npEn Da ce npncTbn KbM p3aHe. Ako perynpaHTo Ha octpneTo ce n3MeCTn IIO BpeMa Ha p3aHe, To MOKe Da npuHHn OgbAhe N OTKaT.
Бьдete ocobeno BHHMaTeJIHn, KORato peKeTe BCbIeCTByBaUHTe CTEn NIN dpyr cIeN 3OHN. I3daJeHTo oCtPne MoKe Da cpExe npEdMeTn, KOITOMorat Da npuHnT OTkAT.
ФУHKUHAДОЛHNYPDEINA3NTEN
IpoBepBaIte DOJHnI npEpaNtEN 3a npaBnHO 3aTBapAne npEn BCaKa yNoTpe6a. He paBoTe c TpnoHa, Ako DOJHnIrpEpaN3tEN He Ce DnXn CBObOHO n 3aTBopTe BeHara ocTpneTo. HnKora He 3akpenBaIte nn He 3aBbP3BaIte DOJHnI npEpaN3tEN Taka, Ye OCTpneTo Da e OTkpnto. Ako TpnoHbT naDne cnUyauHo, DOJHnI npEpaN3tEN MOKe da ce orbHe. NobdInrHeTe DOJHnI npEpaN3tEN C npbnpaAsTa ce pbkOxBaTkna n Ce yBepTe, Ye Toi Ce DnXn CBObOHO n He DoKocBa OCTpneTo nn Dpyra qact BbB BCNU bTNI n DblboOnHH Na Cpr3BaHe.
IpoBepete pa6oTata Ha Bb3BpaTHata npyHnHa Ha doHHn npedna3nten. Ako npedna3nteJr n Bb3BpaTHata npyHnHa Ha pa6oTt npaBnHO, Te Tp6Ba Da ce cepBn3npat npedyn ynotpe6a. DOnHHr npedna3nten moKe da pa60tn 6abHo npapnIOBpeDeHn Yactn, CMOJIncTN HATpynbAHn NnHATpyNBaHe HA OTnAdbuN.
Долнгтnpedna3nte moke da ce npnbupa pbuho camo 3a cneuaJIHn pa3pe3n, kaTo hAnp. notbbaio p3aHe" n ,KOM6bHnpaHn pa3pe3n". NobdHrte doHHra npedna3nteC np6bupaata ce pboKOBatka n Korato ocTpneTO BNe3e B MaTePbHa, npedna3nteTpr6Ba da 6bde oCB06Oden. 3a BCKaBn dpyrBn BDObe p3aHe DoONHrt npedna3nte Tpr6Ba da pa60n ABOTMaTuHO.
BnHaHn Ha6JIOdaBaIe TaII D0JIHHaTnpEJa3nten NOKpIBa ocTpneTo npEn Da OCTaBIne TPOHO Ha neKa Hn Ha nDa. He3aUHTeO, pa6oTeo no INHePua OCTPne 1epuHn DnBXKeHHe Ha TPOHO Ha3aN Iue HapeXe BCNUKO NO nbTa CN. BnHMaBaTe 3a BpeMeTO, Heo6xOIMMo HA ocTpneTo da cIpe CneD OTNyCKaHe Ha npEBKlIObATEIg.
ДОПьНИTEЛHIN ПЕДУПЕХДECH3ABE3ONAC-HOCT
He n3noJ3BaIte a6pa3nBHN dNcKOBe.
I3no3BaIe cMo DnCKOBe C dNaMeTpB CbOTBeTCTBHe C MapKIpOBKnTe.
YcTaHOBeTe npaBnHnIy CnPKyIpaRc HnCK 3a MaTePnaJa, KOITpRbBa Da ce OTpexe.
N3no3BaTe cAmO CuPKyIaRPH NnCKOBe,MapKnpaHn CbC CKOpocTp,aBHa IIN No-BnCOKa O T CKOpocTTa, MapKnpaHa BbpxY INCTpyMeHTa.
I3no3BaTe caMo npenopbuaHOn OT npoN3BOUnteNa ocTpneTa 3a TpNoH, KOInTO OTROBaprHa EN 847-1, ako
ca npeHa3HaueHn 3a DbPBO NaHaJIouMnHn MaTePnaJIn.
Hocete noxdja macka npotnb npax.
3akpenete pa6oTHnA DeTaN C yCTPOINCTBO 3a 3axbaaane. He3akpenen H6pa6oTBaHn DeTaN MOrat Da npuHnAT cepno3HO HapaHbAhe NNI UETN.
IpoBJnxTeHnOTo H3noJ3BaHe Ha IHCTpyMeHTa MoKe Da IOBeDe Do HapaHbAHN INN BINOsaBaHe. Ipn 3noJ3BaHe Ha IHCTpyMeHTa 3a IpoDjXkTEnHn nepNoDi OT BpeMe npaBeTe YecTN NOUBKn.
IpoDyKTbT ige ce pectaptnpa aBTOMaTHUHO, aKO 6nOKnpa. N3KJIIOUeTe npOdykTa He3a6abHo, aKO 6nOKnpa. He BKJIOUbaIte npOdykTa OTHOBo, dOKaTo e 6nOKnpaI, TbN KaTO TOBA MOKe Da npEIN3BnKa BHe3aENOTKATC TOnJaPeAKTIVBaHcNna. OnpeJeIeTe 3aIo npOdykTBt E 6nOKnpaN n OTCTpAHeTe npuHnata 3a TOBa, KATO CE Cbo6pa3nte C INCTpyKUnnte 3a 6e30NaCHOCT.
IuaanatoHbHaOKoHnHataTeMnepaTpya npu pa6ota c HnCTpyMeHTa e MeJdy 0^ n 40^
Dnana3oHbT Ha OKJHaTa TempePaTypa npn cbxpanHeHne Ha INcTpymeHTa e Mexky 0^ n 40^
IpenopbHTeHnT Dnana3oH Ha OKoHaTaTeMnepaTpy np 3apeKdahe cbc 3apraHaTa CnCTema e mexdy 10^ n 38^
DONJIHHTEJHNIPDEUYIPEXJEHNA 3A BE30NACHOCT3A BATEPURA
3a da n36erHete onachocTta ot noxkap, npedn3BnkaHa OT Kbco CbeDInHeHne, KaKTo HapaHbAHnra T NOBpeNTe Ha npOdykTA, He NotanrTe IHCTpyMeHTA, CmehJeMaTa akMylatopHa 6atePn rnn 3apJdHoto yctpoiCTBO B TeuHOCTn n Ce nOrpNkTe BypeIte n akMylatopHnte 6atePn da He nonaDat TeuHOCTn. TeuHOCTne, npedn3BnKBaun KOp03n nn npOBexKaun eJekTpncEBo, KaTO CoJeHa BOda, ONpeJeHn XIMnKaJI, n36eJBaUN BeUecTBA INn npOdyKTn, CbDbpxKaun n36eJBaUN BeUecTBA, MoraT Da npedn3BnKAT Kbco CbeDInHeHne.
IiHaa3oHbT Ha OKJHaTa Tempeatypa npn 3nOJ3BaHe Ha 6aTepejra e MeKdy 0^ n 40^
Hnana30HbT Ha OKJHaTa TemepaTypa npn cbxpanenHe Ha 6aTepeyra e MeKdy 0^ n 20^
TPAHCNOPTNPAHE HA JNTNEBUN BATEPNI
TpaHcnpopnpaIte 6aTepeInTE B CbOTBeTCTBne C MeCTHnTe nHaunohaJIHH NOCTaHOBNeHn I pa3nopeDn.
Cna3BaIte BCnK CneuHn H3NCKBaHn 3a NaKeTnpaHe n EtNKeTnpaHe, KOrato TpaHCnOpTnpate Batepnn Ype3 TpeTo JInCe. YBepeTe Ce, He 6atePnTE He Bn3aT B KOHTAKC dpyn 6atepnn Nn npoBOmM MaTePnAn No BpeMe Ha TpaHCnOpTnpaHe, Kato npEJa3nTE OTkPnTNE KOHEKTopn C nOJaun, HnpoBOmM Kanayeta nn Nehta. He TpaHCnOpTnpaiTe 6atepnn, KOnTO ca cnYkaHN nn TeKaT. CbBpxTe ce cbc CneHaTa KOMNaHn 3a DOnbJIHnTeJeH cbBET.
ONO3HAnteBAUNI PPOyKT
Bx.cmpaHuua 82.
- Knouw cheetorpaam
-
3actonopraauioc3a perynipaneHa dbl6oynhata
-
OTBOP 3a npax
- ByToH 3a 3akIIOUbaHe Ha IINHdEJa
5.PbkoXBtKa,30nnpaHa NOBbpxHOCT 3a 3axBaUaHe
6.Cnycbk
7.ФИКСИРашБУТОH
- IpeHa pbkoXBaTKa, n30InpaHa noBbpxHOCT 3a 3axBaUaHe
- Konue 3a HacTpoiKa Ha HAKIOHa
- Konue 3a napalenb Bodau
- He3do 3a 6aTepeyra
12.Доленпеднаит end
- B'tpeWeH pnaHeu
- BbHweH pnaHeu
15.BnHT Ha znpKyIaepHnaDnCK
- OrpaHnUHTeN ha napaIeHnIbOaU
17.Octpne
- PbkoBoIDCTBO 3a onepaTopa
19.Батугя
20.3apndno yctpoiCTBO
IIOUPBbKKA
IpoDyKbT He Tp86Ba HnKora Da ce BKnIOyBa B 3axpaHbaHe, KORA TO Crlno6BaTe Yactn, npaBnTe HAcTPOiKN, NOUcTBaTe, N3BbPbBaTe NOIDpbXkA nn KOrato He To n3NON3BaTe. N3KJIOnuBaHeto Ha npOdyKaTo OT 3axpaHbaHeto Ue npedOTBpatn CnyauHo CTaptnpaHe, KoTo 6n MoTNO da npuHH cepNo3HN HapaHBAHn.
PnO6cnykBaHe n3noN3BaIte cAmo opnHaHn pe3epBn qactn, akcecoapn n CpeCTBa 3a npKpenBaHe Ha npOn3BoDnten. N3noN3BaHTo Ha npyn qactn MoKe Da Bn NoCTaBn B OnaCHOCT nn da NOBpeNi PpOdykTa.
136raBte H3no3BaHTo Ha pa3TbOpTeHn npn noHCTBaHTo Ha nlaCTMacOBte Yactn. NObeHTo nnactMaCn Ca yBCTBntEnn KbMa pa3NHyn BINOBE pa3TbOpTeHn MoKe Da ce NOBpeJr npn H3no3BaHTo Ha TaKInBa. H3no3BaIte MEKn Kbpnn 3a OTcTaHBAHe Ha 3aMbpcBaHn, BByIepOeH npax n dp.
B HnkaKb CnyaH He No3B0JBaHT nIacTMacOBte
actn Da BnI3AT B KOHTaK TcC cNpaHn TeYHOCTn,
HeptEH NPOyKTn, PpOHKBaUN Macna N T.H.
XmikanTE MoarTa NOBpeRt, OTCna6r Tnn
yHnOxKat nIaCTMaCATA, KoTo MOKe Da DoBeDe DO
cepno3Hn Cn3Hueckn HapaHbaHna.
3a no-roJMa 6e3oNaCHOCT n HAdExnHOCT BCNUKn peMOHTn Tp86Ba Da ce N3BbPWBat OT OToPi3npaH cepBn3.
CNMBOJIH HAPPODyKTA

PpeDynpexKeHHe OTHOCHO630NaCHOCTTA

CkopoctHa npa3eH xoD
V
Hansekehene

IOCTOReH ToK
min
OboopOTn HIN Bb3BpaTHo-NOCTbNaTeHIN DmNKeHn B MmHyTa

Dnametbp

ДьрBO

He pexete metann

HocTe 3aunTHn cpeCTBa 3a OUn

山pinaHa na p3ahe

3b6nHaOCTpneTo

CEcbOTBcTCTBnE

3HaK 3a CbOTBeTCTBnE C eBPoneNCKNTe H3NCKBAHNA

3HaK 3a CbOTBeTCTBnE C N3NCKBaHnraTa Ha O6eINHeHOTo KpaJCTBO

3Hak 3a CbOTBETCTBNE C N3NCKBAHHaHa YkpaHa
Ipooyete HNCTpykunTe BHIMaTeHNO, npdeJa cTaptnape MaunHaTa.
EneKtpnuecknte ypeiH He Tp6Ba Da ce n3XbPnT 3aEDHO C bHTOBnTE OTnabu. PeukknpaTe, KbTeO HMa Bb3MOxNcHOT. ObpHeTe ce 3a cBBeT no peukknpaHTo KbM MeCTHnTe Bnactn IIN pa3npocTpahnteIIne.
CNMBONN HACTOJTO PbKOBOCTBO

3a6eJekka

BpeMaHa34aKaBaHe

Yactnte nn npnaadneXHOCTte cnpodabat OTdEHHO

Klnoyajka

OTKJIOUBAHe
TolOBHmM mIPkyBaHHMa npn po3po6ci piei npkpyJapHOI nIIKn 6yIn 6e3neKa, epeKTNBHicTh ta HadiHicTh.
PNU3HAUEHH
LnpKyIpaNIIka npn3HaueHa DnBnKOpncTAHn TINbKn DopocnIMN, kni NOBHCtIO npoHTaTI Na 3pOzymiIN IHCTpykui Ta nonepdxKeHH ycbOMy KepiBnTBI i MOKyTB BBaKaTNC BiIDNOBIDAJIbHmN 3a BNaChi dii.
Pnpctpi npn3haeHn Dn p03nnHOBaHH B3doBx BOJOKOH, nonepueHoro po3nnHOBAHH DepeBHH Ta CXOXnx MATEpianib 3 MAXcIMMaIbHO rIN6NHO 60MM. 3a DonomorO npnctpo moXHa poBHT npam i a60 ckowehi Biipzni Mix 0 i 56 rpaDycm. PnBnKOpNCtAHHI nnO OCHOBa IHCTpyMeHT MaE TopKaTcR dETani, 10 o6pbloeTbcr. IHCTpyMeH CnID BnKOpNCTOByBatn Tlkbny cyxii, do6peocBtiNeH 30Hi 3 DoCTaTHbOBO BeHTnlaueio.
Pnpctpi npn3Haen n pyHoro BkOpncTaHH. Pnpctpi He MoKHa BCTaHOBnOBaTu Ha Bepctati, kUO TiNbN BnPo6Hnk npcTpoHo He dae KOHKpeTHnx IHcTpkyuip npo Te, kC 3p0bntn. He BkOpncTOByBaTu dna piaHHa Metany afo KaMHn.
He BnKOpNCTOByIe npNCTpiJ nn6yNb-kaNX iHux zinei. BnKOpNCTaHH enektpuHoro IHcTpymEnTy nna onepaui, kI BiDiPI3HnOTBCB iD npN3HaueHnx, MoKe npN3BeCtN do He6e3neHoiCITyauii.
NONEPEDXEHH! PpoHTaTe Bci npabnna 6e3neKn, IHCTpyKuii, INIOCTpaui i Cneunphiauii, 3 eJekTPOIHCTpyMeHOM. HeDToPMaHHBcix 3a3HaueHx INCTpyKuIM MOKe npu3BeCTn Do ypaXeHH eJekTPuHMM CTpymOM, NOXeki Ta/a6o cepNo3Hx TpaBM.
36epeKITb Bc i Hctpykuii i Bka3iBKn dna Ma6yTHbOro BKNOPNCtAHH.
3AXOJN B63NEKINPIKOPNCYBAHHI UPKyJIaPHOIO NIKKOIO
PI3AHH
HE6E3NEKA: TpmaIte pykn noJani BID 30HN pI3aHH Ta DnCKy. TpmaItecra DpyroTO pykoHO 3a DonomixHy pyky abo Kopnyc Motopa. KkUO TpmaTn NIKy ObOMa pykAMN, iX HEMOXNBO TpaBMyBatn pIKyHM nDCKOM.
Cniikkyte,po6pyKe He noTppannnn nid Detanb, 0o o6pO6nHOeTbcra. uNTOK He 3axnCTntb Bac BiD NICKy niD detaIIIO.
BcTaHOBIIOte rIN6Hpy p3aHHb BIDNOBDo TOBUNH Detani. Pd detanNIO, 0o 6pO6nOeTbcra, MAe 6yTN BnDHO HENOBHn 3y6eCb DnCKy.
Hikonn He BiipiaaTe 3arotibky B Baunx pykax a6o yepe3 Bauy Hory. 3akpinitb Detalb, 90 o6p6nloctbcra, Ha ctiKnn nlaTfopmi. BaxNBO npabnIbHO opraH3yBaTu po6Ty, a6n mHiImi3yBaTu pN3NK haneceHH TaBmN, 6IOkyBaHH dNCKy a6o BTPaTy KOHTPOJIHO.
■Пд уас Викогання onepaui,Вякій pixучий
iHctpymeNT moxe KOHTaK TyBaTu 3 npuxOBaHOIO
npoBodkoO, TpmaIte eNeKtpoHCTpyMeHT
Tilbkn 3a i3oJbObaHi nobepxHi. KoHTaK i3 npOTom
piHapyroTO TAKOX moxe nepeDaTu Hanpyru Ha
metanebi yactHHi KOpNCTyBaU MOxE 6yTu ypaKeHm
eNEKtpnHmCTpyMOM
Pn noobxhomy p3aHHi 3aBXnBnKOpNCTOByIte HnpanMy nHaKy a6o KocHeub. Pn cybomy niBnUyETbcr ToHcTb pi3aHHra Ta 3HNXyETbcR BiopirHCTb 3aknnHOBaHHn DnCKy.
3aBXn BnKOpncToByte DnCK 3i WnHdEhHMn OTBopam npabnlbHoro po3mipy Ta oopm (pom6obnHOI/kpyrnoi).Ne3a, kHe BiNObiAIOb MOHTaxHomy ObaHaHHIO NINKn 6dyTb npaioBatn EKCueHTpnuHO, IIO npns3BeDe Do BtpaN KOHTPOJIO.
3abopohraTbcB BnKOpncTOByBaTu NooKOJxehi abo HennpaTHi wa6u nn BoNTn KpInneHn DaNcy. Ta 6ont CneuaIbHo po3po6JeHO nna uei INIK, BOH 3a6e3NeuyOb ONImaJIbHy epeKTNBHicTb Ta HadiinCt b po6OtN.
PnHnBIDCKOKYTA BIOIBHI NONEPEJXEH
BiiDnaya -ue HecnoiBaHa peakia Ha NnIbHn, 3aTnCHytn a6o nOswKoJKeHH nDCK, 0c cnpuHnHe KHOHTpOJIbOBaHH niIDom Nnny Bld 3arOTobOK Do onepaTopa;
KONI Je3O CTNCKaETbC A60 5iNbHO 3aUeMnEbC9,3akPnBaHOn pykY,Je3o 6NoKyETbC, a DnHy H WnDko NOBepTa npucTpiJ do onepaTopa;
Kuio DNCK nepekooyetbcry y po3nni, 3y6ui Ha 3aDiH niactnHi DnCK yinnaTbcra 3a BepxHKn kpaI deTani, BHacnIOK OTO DNCK BnPnBaetbcr 3 po3nnny Ta WTOBxAe nnky B HaprrMky onepaTopa.
Bidya e Hacnikom HenpabnlbHoro 3actocybaHH enektpo hctpymEny Ta/a6o HenpabnlbHnx npoeDyp a60 yMOB ekniyyataui i MoKe 6ytu yHKHyTa 3actocybaHHaHaleKHX 3anobixkHnx 3axoib, k3a3HaYeHO HxKHe.
MiHOp TpMaIe NnKy 6ObOMa pykamn Ta pos3TaWyIteCraTak, 6o6 6yTN roTOBm Ha BnnaDOK BiDcKcy. CTabaIe TaK, 6o6 BaWe TINO 3hAxOdnoc3 Ondoro ChIn HwOro 60ky BiD ncky, a He Ha NiHII DnCKy. BiDcKOpNmuSyE NnKy pyxATncr Ha3ad, aane Ioro MoXHa KOHTPOJBOATn, kXIO 3a3daJIeIb BkNTu HAnexKHnx 3axOIB.
■ RaKIO DNCK 3aCTpA a60 J y pa3i nepePbAHNn npouecy po3nnHOBAAH3 6ydb-koI npuHHn BiDnyctITb KypOK i BTPMMyTe Nkky Do NOBHOI 3ynHKn DNCKy. HikoJn He BntraeT E NCK 3 MaTepiany i He pyxaIte Nkky Ha3ad, KOJI DNCK o6epTaCTbc: ce MoKe npN3BeCTn Do BiDcKOy. 3'acyTe, YOMy DNCK 3aCTpA r, Ta ycHybTe npuHHy.
■Pn NOBTOPHOMy 3anycky nNkN, KOJIN DnCK 3haxoNDtbcr B DeTani,po3TaWyTe nNkY TaK,06 DnCK 6yB npaJIeNBHM po3nHly,i nepeKoHaTecb, 3y6u He YinIaHTbcra MaTepiAn. JKU O nCK 3a6NoKOBaHn, BiH MoKe NiDHiMaTncs a60 BiDcKaYBaTu BiD 3arOTobKn, KOJIN Nnna 3anycKaETbcr 3HOBy.
Pn po3nnHOBaHH naHee BENKoro po3mipy 3aJy yHKHeHH 3akNHOBAHH DnCKy Ta BiDcOKy 3a6e3neYte onOp nIra naHee. BeNKi 3arOTOBMOxyTB npOrHaTNC rBnAChO Baro. Onopn Heo6xIDHO po3miuATn iD naHErMa 3 o6ox 6okIB no6JMy do JHiPi po3nnHOBAHH ta 6IJI Kpaio naHee.
He BnKOpncToByTe Tyni a6o nowkoJKeHi dNcKn.
PnB BnKOpNCaHH He3arocTpeHnx a6o HnPaBnIbHO BCTaHOBLeHn DnCKIB PO3nIb 6yde 3aHaITo By3bKnM, 10 MoKe Pn3BOuNTn Do HaMipHOro TepT, 3aKnHOBaHH DaCKy Ta BiDcOKy.
Ipepe po3nnIOBaHHm nepeKoHaTeCb, 00 Baxeni perynTOpIB rN6Hn Ta kyta pizAHHa HadiiHO 3aTyrHyTI. Jaio HaJauTyBaHHn DnCKy 6yde npuySeHo Ni dac po3nnIOBaHH, ce MoKe npu3Becn Do 3aknnIOBaHH DaCKy Ta BiDcKOy.
Bybte 06epexHmnpn po3nnuBoaHHcIH ta po6oti B Micqx 3 06mexeHO BuDmicTIO. BntyauOHy nck MOKe 3aueHNTncra 3a nepekoOn, IIO MOKe npn3BecTu DO BiDCKOKy.
HNXHI 3AXNCHI UNTOK
IpepeKoXHM BnKOpNCTaHHM nepeBipJte, 3aKpTmHnXhHi 3axnCHm 3a6bOpHReTbcK KOpNCTyBaTncn JIKOIO, kKIO HxHNI 3axnCHm 3uTOK 3actPrae a60 He fikcyTbc. 3abopOHReTbc4 fikCyBatn HxHNI 3axnCHm 3uTOK y BiDkPNTomy nOloKeHHI. RkIo nnKy BnnaAdKOBO YnCTTuHnxHi 5uTOK MoKe NOrHyTnc. PdHIMtB HxHHi 5uTOK 3a pyKuTa nepeKoHaTeCc, 10BnpyxAeTbcBnBHO iHe TOpKaeTbcAhi DnCKy, aHI 6yDb-koI IHwOI cactTHnIHCTpyMeHTy npn 6yDb-kaNX KyTAXn rInb6nHi po3nnlNOBaHH.
Ipepebipte po60ty npxHHn HxHbO raxnCHoro ⅢNTka.Y pa3i nopuyehn Bpo60ti ⅢNTka Y npyHHn nIKy cIid DoCTaBHTn Do cepBICHO ueHTpy dT EchiHOro 0cbnyroByBaHH. Iopuyehn Bpo60ti HxHbO r xITka MoKniBi yepe3 noWKoJkeHi deTani, HanuHaHH a6o HAKOnuHeHH CMITT.
D03BOJRAETCBIIBOHTN HNXHINIHTOK NIIWE DnA CNEUJIbHnx po3piIB, HANPKNAID, IPONNIIB 4nCKNaDHNX PO3NNIIB. NiHIMITb HNXHINIHTOK 3a pyuKy; AIK TINbKN DNCK YBIne B MATEPIAN, BIDNcyTtB IHTOK. B ycix IHxN BUNAdkax HNXHINIHTOK MAE INpauIOBATN ABTOMATNoHO.
■ Nepu HIX NOKnactn NnIky Ha Bepctak Yn nIiNory, nepekoHaTecra, 0o HnxHi uNTOK npKpNBac pixyyn dNcK. RaIO zuoro He 3po6ntn, npBknOueHH iHCTpyMeHTy nnka pyxatmTebca Ha3aD, po3pi3aoyn BCE Ha 7JMyx. 3ayBaXte, 0o nicra BmMKHeHH Heo6XiHNneBn yac, 0o6 Dnck 3yINHBCR NOBHCIO.
DOATKOBI 3AXOIN B63NEKN.
He BCTaHOBNIIOte Ha NnKy a6pa3nBHi NiCKN.
BnKOpncToByTe iAmEtP ne3a BiNObiHDo MapkyBaHHra.
Bn3NaTe npaBnIbHn DnCK, kN BnKOpNCToBvBaTnCnDn piaHHaMATEpiany.
BukopncToByte Nnwe nonoTHa, npn3haeHi dnn Bwdkocti, pIBHI a60 Bnui 3a Wbndkictb, no3haeHy Ha IHcTpymentI.
BnKOpNCToByIe NIIe DNCKN, peKOMeHDoBaHI BnPo6HnKOM, kI BiNObiJaIOb EN 847-1, kKIO BOHN pIn3HaueHi dJIpeEBuHn Ta aHaJorIHnx MaTepiJIIB.
Hocitb epekTNBHy macky BiD niny.
3aTnCHiB 3aROTOBky 3a DonomoroIO 3aTnCKHOrO
Pnncpo. He3aTncHeHi 3arOToBKn MoKyTB npNBecTN Do cepNo3Hx TpaBM i NOkOdKeHb.
Tpmbane BnKOpncTaHHH iHCTpyMeHTy MoKe BnKlnKaTu a6o nocnnt TpaBMn. Ppi BnKOpncTaHHi HcTpyMeHTy npotrrom Tpmbano nepioy, po6itb peryIapHi nepepbn.
Ipnctpi ABOMATNUHO nepe3anyckaetbcra, kkuo BIN rnyxhe.HeraHOBIMKHITb npctpi, kkuo kkuo BIN 3arlyx.He BMkaTe npctpi, kkuo BIN 3arLyx,ce MOKe CnpuHNHT panTOby BiDauTy Tpirepa 3 BnCOKOIO WbUdkicTIO.BNuHTe Oomy npctpi 3arLyx Ta yCyHBte ii, 3BepTaOOnOcO6nBy yBary Ha IHCTpykii 3 6e3neKn.
Diana3OH TemnepaTpyn HABKONHbOre cepeoBuaA DnI npictpoi nd yac BnKOpncTaHHB iD 0^ do 40^
Diana3OH TemnepaTpyn HABKONHbOre cepeOBuaA DnI npictpoi niJ uac 36epirAHnB BID 0^ do 40^
PekomeHDoBaHn Diana3OH TempepaTpy 3OBHIhBoro cepeDoBnua Dnna CnCTemn 3apJxHaHH nD qac 3apJxHaHHn Mk 10^ Ta 38^
TEXHIKA B3NEKN PNI EKCPIYATAUAKMYJTOPHOI BATAPEI
Длглллглглглглглглглглглглглглглглглглглглg
КорOTKOrO 3amKahHn,Травmam I NOwKOJKeHHIO
Bnpo6iB He 3aHypioTe IHcTpymeHT, 3mHHn
akymyIaTOp a60 3apdHn npicptpi y piDHy i He
donyckaIte NotpanJIHn piINH BCEpEnHy npicptpoIB
abo akmyIaTOpIB. Kopo3iHi i cTpymonpoBiDi Hi piDHN,
Taki kCoiOnH pOzHn, NEbHI ximKaTu, Bn6iNIOBaNbHi
3ac6b n abo npOdykTN, zuixMiCTaTb, MoKyTB
Pn3BeCTn Do KOPOTKOrO 3amKahHn.
Диаэон Temnéратурнивколшього cepeдовида дя akумлготopa niД уас ВИКОпстаннг mix 0°C ta 40^
Diana3OH TemnepaTp 30BhiHbOre cepenobuana nIq Yac 36epirahna kymyTota mix 0^ ta 20^
TPAHCNOPTYBAHHJIITIEBHX BATAPEI
TpahcnpotyTe 6atapeo BiNObiHO do MICeBnx Ta HauioHaIbHnX NIOKeHb Ta npaBnJ.
Dotpmytebc ycix cneiaIbHINBIMOR 0do naKyBaHH Ta MapkyBaHH np TpaHcnOpTyBaHHi 6bataei TpeTboIO CTopoHO. IpekoHaTeC, 0o 6bataei He MoKytb BCTyNat B KONTAKT 3 IHsMM 6bataeMa 60 npObiHMM MaTepiAnamn np TpaHCnOpTnpOBu, 3axuauOn BiKpnTi Po3'EMN 3IOJauHMM HEnpoBOaUMM KpuKamn a60 cTpiKo. He nepeBo3NTn 6bataei, kI MaOTb TpiUHN a60 npoteKn. KOhcybTuTEc3 ekCneDiTOPcbKOIO KOMNaHIEO dnn noJaIbWx KOhcylbTaui.
3HAHTECBIINPPOYKT
Dubimbcr cmopiny 82.
- PanaeBa npoknaKa
2.ФikcyuynBaxiNbДЯperyIIOBaHnI rIb6HH
- OTBip nny
4.БлOKуВаньншиMHнДЯн KHONky
5.Pyka,izolboBaHa nobepxHry ytpMaHHa
-
Taayek nepeemkaaya
7.Khonka6nokyBaHHa
8.передна рука,izольованоьерхдяутmaння
-
Pyka perynoHaHa KyTa
- Puyka HanpymHoi Kpaio
- Hhi3do nna akymyntopa
- Huxhhi 3axnchn koxyx
- BnTyPiHniФlaNeUb
14.3oBhiHnI ΦnaHeu
- Гинт Крпльеня поа
- lihiKa hnapmHoi kpaio
17JIe30
- KepiBnTBo 3 eknIyatauii
- AkymyIaTOPHa 6aTape
20.3apdHn npncTpi
OECJNYTOBYAHHH
IpoDyKT He NOBHeH 6Ty NiKInOHeH Do DKepeNa KINBHeHH npCknaDaHHi DeTanei, peryNIOBaHHi, NnueHHi, npOBeHHI TexHicHOro OcbNyRObYBaHHa 6o KOJI npOdyKT He BnKOpNCToBcTbcR. BiE'EnHaHHN npICrPoIO Bi MepeKi JINBHeHHa YHEMOXJMBnOe BnNAdkOBn 3anyck PnCTpO, kM MoKe cTaTn npuHNO CepNo3HOr TpaBMyBaHHa.
Ipn 06cnyrobyBaHHI BnKOpNCTOByTe TIlbKn opriHaBHi 3anachi YactHn AkceCyapn Ta 06naHaHHB iD BnPo6hNka. BnKOpNCaHn 6yDbj knx IHxN DeTaneM MoKe CTBOpNTn He6e3NeKy a6o CnpuHHTn NOWKoJKeHH NpOdykTy.
He BnKOpNCToByTe po3HHNKn DnA OCHUeHn HnactMacobnx DeTanei. BinbWicTB nIacTMAC Bpa3INBa Do pi3Hnx BNIDB KOMepuiHnx po3HHNKiB i MoKe 6ytn NoWKoDxKeHa ix BnKOpNCaHHM. BnKOpNCToByTe YnCTI rAnHipKn DnA BnDaneHHs 6pyd iy ByrInbHorO nnny.
■ Hikon He Do3BOJnTe raIbMIBHpiDnHi, 6eH3nHy, npOyKTam Ha OCHoBI HaFTN, I npOHKaHOUM MacnAm BCTynATn B KOHTaKT 3 nTACTNKOBUM DeTALmN. XiMicHi peOBOHN MOKytb N0WKOJNTN, NocNaBtN a60 3HnCHTN PAACTNK, KMI MOKe IpNBecTN Do cepNo3HOIT TpaBMn.
Дябиwoi6e3nekn i HadiHocTi, Bci peMOHTi po6oTn NOBHHI BKNOHyBaTnCBAbTOPu3OBAHOMy cepBICHOMy ueHTpi.
CIMBOJN HA IPODYKTI

PonepeJxHnHb63neKn

山BnDkiCTb 6e3 HabaHTaxeHHr
V
BONbTn

TociiHmCTpyM
min
Obeptn a6o 3bopoTHo-nocTynpaJIbHi pyxny XBUNHy

Diametp

Дерево

He po3piatm eran.

HociTb 3axnCT dJRA Oey

UmpiHa pizy

3y6ui ne3a

CEBIDNOBIDHicTb

Cbponecckn 3NaK BiNobiHocti

BpntaHcbkni 3nak BiNobiHocti
001

Bynb nacka,ybaXno npoHTaTne IHcTpKuHnpeep3anyckom npOdykTy.
BiXoOn enekTPOTEXHIOI npOdyKuII He cnID Bkndatn pa30m i3 nobyTOBmB BiXoAmN. Byb Nacka, nepepobnyTe TaM, De HABHE yCTaTKyBAHH. IpepebiTe 3 BaUM MicceBm OpraHOM BlaAn a6o npOdaBcEm dJa KOHCyIbTaui 3 npIBody nepepobKn.
CNMBONB LIEI IHCTPYKU3 EKCNIYATAU

Pnmuitka

Yac oukybaHHa

3anachi detani a60 npHnaleXhocti npoiaotbcg OKpemO

BIOKYBATN

PozhokyBatn
Doner testeremizin tasariminda en yuksek onceligi guvenlik, performans ve guvenilirige verdik.
KULLANIM AMACI
The declared vibration total values and the declared noise emission values given in this instruction manual have been measured in accordance with a standardised test and may be used to compare one tool with another. They may be used for a preliminary assessment of exposure.
The declared vibration and noise emission values represent the main applications of the tool. However, if the tool is used for different applications, used with different accessories, or poorly maintained, the vibration and noise emission may differ. These conditions may significantly increase the exposure levels over the total working period. An estimation of the level of exposure to vibration and noise should take into account the times when the tool is turned off or when it is running idle. These conditions may significantly reduce the exposure level over the total working period.
Identify additional safety measures to protect the operator from the effects of vibration and noise, such as maintaining the tool and the accessories, keeping the hands warm (in case of vibration), and organising work patterns.

AMERTISSEMENT
DeknapaHNTe 0bUc TcOHOCTn Ha 3NbYcHHe NTbpaunn Ha WIMOBITE EMNCN, NOOCHEHN B HAcTOIOTo PBKOBODCTBO, Ca 3MpeHN B CbOTBeTCTBNE cBC CTAndPHTINAPH TeTOB MeTOn I MOKe Da CE H3NON3BaT 3a CpABHeHne Ha eHN IHCTpyMeHCTpE. Te MoKe Da CE H3NON3BaT 3a NpeDbapInTeHNO OueHReBaH He BA3BdEnCTBnEO.
EknapnahntcnoHnHa nBHeHnBnBpaunnHa WMOBNTe EMNCN npndTbBnBAT OCHOBnHnPnNOKHe HnHCTpymeta. BnpekToBa, AOKo HCTpymEtBt Ce n3No3Ba 3a Pa3NJHn PnNOKHeC, pA3NJHnPnHnDfXHOCTHn Nn NOdPbKkaTa My e HeKaueCTBeHa, n3JIbYeHnTE BnPaQmN nWMOBNTe EMNCM MoFt Da ce p3AnHBat. Te3n YcNoBN MoKe 3hauHTeNo DA yBENuATn HBOTO Ha NsnaRahe npe3 cIepn CPOk Ha pa6ota. PnO ouehBaHe HA HbTO HO HA nBnArHe Ha Bnpaounn M yWM cbIo Tp8Ba da Ce 3aMe npeBDin
KONKO NTHNHTHPTMeHTB e 6BN N3KNHOAH HIN KONKO NSTe pAOBtN Ha PpaeH xOJ. TeaYcNOBMOKE 3HaNTeHNO Da HAMAnT HMBOTo HA H3nArAhe Ipe3 cENIA CPOK HA pAOBA.
OnpeIeTe DoIbIIHITENH MepK3a NpeIa3BaHe Ha onepaTopa ot eEeKtne ot Bbpaunte H yMa, KaTo HAnpHMep NoIbPkaHe HA HcHtpyMeHa nA Kccecoapnte, NoIbPbKaHe HA Pbete ToNN (B Cnyuay Ha Bbpaun), OaHnauaHa MoednTe 3a paOta.

NNEPEKEHRA
3HaeHHB B6paui TaWMy, HabeEni B cybomy KepiBnTuTBIIMPiBaNNCR BiINOBiINO DO cTaNdptn3oBAHOrMo MetOy BNpOByAHr TA MOKytB 6yTN BIKOPCTAHI DnnpopBHHN OOnHO IHcPmEHTy 3IHWM. HMMMOKHA KOpNCYBaTHC Dnne NonepeDhBoU OHkHN BnNBy.
Habeeni 3aueenra Bmipno np CTanaptni ekcnnyataui Bnpoby. Ytim
Rnio BnpiBnKopncTOByeTcIINHnN 3 HnMMn DoaTKOBMM
nptocycBaHHMn a6o Jn HnpoxOHTb HaneHoro o6cnyBoHHn, pibHI
Bbpaai Ta ymy MokyB bDpIH3rNcBd 3a3aHaeHHx. RaHacIOk, pibHI
BnNBy BnpoBx 3araBnHOpoBOO racy Moxyb 3aHNO 36InbWNTNC.
Pnou nui HpBBnBnBnBb paiaii Ta ymy cnIbpaxObyu nepiodi, konu
BnIO BmKHeHH a6o npaoe Ha xonocTHx o6eTax. RaHacIOk, pibNI BnNBy
BnpoDOB 3arabHoro po6OBO racy MOxy 3aHNO 3MeHHNTNC.
DopymyTeCn odaTkoBx 3axo1B, kki Moxytb 3axnCTnTn onepatopa Bi nBnBv B6paQI Ta ymy; niDpymyTe npctPti Ta daTkoBI npctocycBAHH y HaneXHOMy CTAI, cnIDKyTE, 06b pyk3 aHaAunnc Tennm (npn B6paJI). Ta npOyMaIte rpadik po6toN.

UYARI
In addition to any statutory rights resulting from the purchase, covered by a warranty as stated below.
-
The warranty period is 24 months for consumers and commences on the date the product was purchased. This date has to be documented by an invoice or other proof of purchase. The product is designed and dedicated to consumer and private use only. So there is no warranty provided in case of professional or commercial use. This warranty applies only on new products.
-
There is a possibility to extend for a part of the range of power tools (AC/DC) the warranty period over the period described above using the registration on the www.ryobitools.eu website. The eligibility of products for extended warranty is clearly displayed in stores and / or on packaging and is contained within the product documentation. The end user is required to register his/ her acquired products online within 30 days from the date of purchase. The end user may register for the extended warranty in his/her country of residence if listed on the online registration form where this option is valid. Furthermore, end users must give their consent to the storage of their personal data that is required to be entered online. They must also accept the terms and conditions. The registration confirmation receipt, which is sent out by e-mail, and the original invoice showing the date of purchase will serve as proof of the extended warranty.
-
The warranty covers all defects of the product during the warranty period due to faults in workmanship or material at the purchase date. The warranty is limited to repair and/or replacement and does not include any other obligations including but not limited to incidental or consequential damages. The warranty is not valid if the product has been misused, used contrary to the instruction manual, or has been incorrectly connected to a power supply. This warranty does not apply to:
-
any damage to the product that is the result of improper or lack of maintenance
-
any product that has been altered or modified
-
any product where original identification (trade mark, serial number) markings have been defaced, altered or removed
-
any damage caused by non-observation of the instruction manual
-
any product not displaying the CE approval mark on the rating plate
-
any product that has been attempted to be repaired by a non-authorised warranty service centre or without prior authorisation by Techtronic Industries
-
any product connected to improper power supply (amp, voltage, frequency)
- any damage caused by external influences (water, chemical).
shocks) or foreign substances - normal wear and tear spare parts
- inappropriate use, overloading of the tool
-use of non-approved accessories or parts
-
Power tool accessories provided with the tool or purchased separately including but not limited to screw driver bits, drill bits, abrasive discs, sand paper and blades, lateral guide, etc.
-
Components (parts and accessories) subject to natural tear an including but not limited to service & maintenance kits, carbon bearings, chuck, SDS drill bit attachment or reception, power cord, auxiliary handle, transport carry case, sanding plate, dust bag, dust exhaust tube, felt washers, impact wrench pins & springs, etc.
-
For servicing, the product must be sent or presented to a RYOBI authorised service station listed for each country in the following list of ser addresses. In some countries your local RYOBI dealer undertakes to send the product to the RYOBI service organisation. When sending a product to a RYOBI 4. service station, the product should be safely packed without any contents such as petrol, marked with sender's address and accompanied by a short description of the fault.
- A repair / replacement under this warranty is free of charge. It does not constitute an extension or a new start of the warranty period. Exchanged parts or products become our property. In some countries delivery charges or postage will have to be paid by the sender. Your statutory rights arising from the purchase of the product remain unaffected
- This warranty is valid in the European Community, Switzerland, Iceland, Norway, Liechtenstein, Turkey, Russia, and the United Kingdom. Outside these areas, please contact your authorised RYOBI dealer to determine if another warranty applies.
AUTHORISED SERVICE CENTRE
Any request or issue with the product can be addressed to your local authorised service centres (visit www.rybitools.eu) or directly to: Techronic GmbH, Max Eyth Straße 10, 71364 Winnenden, Germany. Please state the serial number and product type printed on the label.

RYOBI CONDITIONS D'APPLICATION DE LA GARANTIE
Techtronic Industries GmbH, Max Eyth Straße 10, 71364 Winnenden, Germany.
Techtronic Industries GmbH, Max Eyth Straße 10, 71364 Winnenden, Germany.
- LIOJIeBNOPEKJHENBAI, HAIHBAHBE YEHUHMH M03JECTBTHMAIM (XHHMHECKNE, FMHHECKNE, ydapb) NINN NOCTOPOHHNMI BUECTCBAM
-ecTeCTBeHHbI N3HOC 3aNaChbIX dTeTanei
tagre HecooTBETCTBYIOUee HcNOJb3OBaHHe, neperpy3Ka IHCTpyMeHTa
NCHONB03AHHeYHTBepKdeEHbIX akCEccyapOB H HeOPrHnHaJIbIbX 3anachbIX Detanei
-akceccyapbl 3neKtpomHCTpyMeHTOB, NOCTaJIReMble C HCTpyMeHTOM IIN npno6petaeMbte OTJeBHO.K 3TOMY CNCKY OTHOCATCA, HO He NcpePbIBAOT en eper cBepna WpypOBePToB, dpene, abpa3NHBle DnCKn, HaxdauHyO Hermy, ne3Bn HOKOBBe HnpabJIOUme
-KOMNHOENTbI (DetaHIN KACCEcyapb), NOBDBPKeHHbIe ECTECTBEHOMy
n3HOcY np3pBHy, BKNHOaH, Ho He ORPAHmABBaHb HAp0bI dnn
TexMHecKOrO 6cbNyKKBAHMa, YrObnbIe uteKn, NoDHNHNNK, nATPOHbI,
nepeXoHNKS SDS,KaBeJIIN NHTAHA, NOONHHTeNbHe pyuKn, FyTnRpbI dnn
TpaHcNOTpOBkN, WNIFOBAhBHeNoOoBbI, bIIENEcOHPNn, TpyKbI dnn
OToBbIbN, BOIOHOHbIaMBo, UTbpHIn pnyKbHbU yndHpBxN KIOCh I nDp.
4.Ди npoBeHnIaTexHnecKOrOobcnykBaHmN3dEne CnDyET HapabTbB aTOPO3OBAHbIe cepBnChbIe cHTpbI RYOBI, yKa3aHbIe dIa KaKdoI CTpaHbI
B TnBEBEHOM HNKe CNNCIE apcocB cTaNHm cepaCHORO 6CNyKINAHN. B HEKOtOBx CTpaHx MeCTbEs DnepbR YROBI OTnpabNIOH N3dEINB B CEPBCHIE OprnHa3auu RYOBI. Pn OTpABKe N3dEINB CpeBCHBJeHT RPOBY, N3dEIne DoXKnHO 6bITb 630NaCHOYNkAOBAHO He CoDPKATb HNKAKnx ONaCHbIX BeoCCTB, TaIKX KAK DeHN, DOJIeK Eblb NoDnCAH AnPec OTpABiTeNl nCOPOBDOATCbra KKTAMnONcAHHem HmncPABHOCTn.
5.PeMOHT /aMeHa npOoDnTcB pAMKax Hactoue JepaHTMn BecnnaTHo. OH He npOdIeBaet rapAHTHO n He HAuHHeAet HOBB npAraHTmHbN nepmoi. HrOeHHHeHbIe Detanu N HtCPyMeHTC tAnOHBOCTBaHauE Co6CTBeHHOCbTb. B HEKOTOpBX CTpAHAX OTnPaBtTeJb DOnjKeH ONNAWBAb CTOMMoCTb OTnPaBHK. Baun 3aKaOHbIe npaba, BO3HMkUne npn NOKynke HtCPyMeHTaOCTaOHTCn HEN3MeHHbIMN
6.Hactoianra rapaHTna DeHCTbENTbHa B EBponeckom CoobsectBe,
UeBnapnn, NcAanDn, HopBern, HxntHenTneHe, Typun, Pocchn n
BeNkoBPHTAHN. Bhe yka3aHHbIX TeppHTOpn oBaPaaJTEcb K CBOemy
ABTOPTO30AAHOmy DInepy RYOBI, YTObIy 3HaTb, npmEHaOTcR nn ycOBn
kakx-tn60 dpynx rapaHTn.
YINHOMOUEHHBICEPBNCBUNEHTP
ПгИВОЗHIKHOBERMирбимеNBIMeIeBouAJIeTcBБСДИМЗрIHONH3PERIOHANbHbIXb ABOTPOMOBAHbXb CEBPBCHBx CBETPOB (CM. www.ryobitools.eu) IINHAPRMyIO: Techronic Industries GmbH, Max Eyth StraBe 10, 71364 Winnenden, Germany. Yvakhta cpeBnH HOMER NTH KUZENH.YVZAKHHeN H3 tabiYIO
PL
WARUNKI GWARANCJI RYOB
UCIOBNA BAIHIOCT HA TAPAHYRA HA RYOBI
B DonbHneHe KMb 3aKOHOpCTaHOBeHHe npBa, npO3nTuAuOT ToTOnn pnpOdyt e o6xBAHTAT ORapuaHsKaKTo e n3NOKeHO no-DoJy.
1.「papuHUNOHHTPCKe 24 MeCEa 3A KNHEHTN 3AIOVABa DA TEe O TDEHa H3akynyBaHnApOyTA. TaTaN data pRb6Ba Da oKoJaCpKaTrn iDpyro DokaatentBTO 3a NOKyNA.PnpOyTBt e npEoBToH npehnaHauChen cmo 3a ToNPBe6tbncka I nnuH yonTp6Ba.CneobatoHe Cte da Bua CnyHn HnAnONBAHeOn npOceCNHOHNCTn Hn CtbPOBCaQeIe.
2.CbIeCTByBa B3MOKHOCT 3a yDfNkabaHe Ha rapAHIOHHn CpOK OT dMANOHA H raHapunraHa YEKeTPnueckn IHcTpyMeHTn (AC/DC) N3NUHAnTo HA OINCAHNA TYpe3 PERInCTPauHa HAye6 caNTAww.ryobtoilods. eu.B MarasNHnTE Mnn HA ONAKOBkATA HnBbTpe B DOkyMeH npOyKa T e NOK33HO XAO DAN INHcPTMyBtOTTOBAPn HA Yc TaKoBA YdbNkABaHa H raHApAHONHHn CpOK KpaHnRT NotpeBnTe nDa pErInCTPnpa CBOnTE HOBOpInIO6mH INCHPTpyMeHTn OHnAHn B pa 30 DNn OT DaTATA Na NKynka.KpaHnRT NotpeBnTe moKe da CE pErInCTPnpa 3a yDfNkEHa rapaHnna B dbxKabata CN Ha npe6BaBaabe, Ako BBb FOpMnyRa 3a OHnAI NErCTPAuq KATO MRCTO KbETo TAE BannHDA.OCBeH TOBA KpaHnITE NoTpeBnTe nPr5Ba Da daDat c cn 3a CbXpaHEHa H daHNHe, KOITc Ca3aNKnTeHn 3a n OHnHn, INPb8Ba Da nPemat ObUnte yCNoBn. IOnyHeHO nOTbPxDeHn 3a PErInCTPaUg, IN3pATEHO NO eNEKtPOHn NOua, INOPMHANHATA PhkTypa, NOK33BaUa DaTATA HA NKyNa, Ue cnyKAT Kato DOKaTaENCTBO 3a yDbNkHexaT aRapAHnA.
-
RapaHnIra TnOKPbBa BCmKn DepeKtn Ha npOyKaT NO BpeMe HA rapaHnOHnHa cpoK, KONTO Ce TaNkXaT Ha npO6NeMn B n3pA6OtKaTn nn MaTePA MOMEHTa H NOKynkata. RaPapHnTa e OrpaHnHeA DO pMeOTn H/nn 3AmHa H He BKIOHOB PyrN 3aDbJFKeHn, BKIOHHTeNo, HO He CaMo, INN KOCBEHN qTeN. RapaHnTa e HeBAINDa, Ako npOyKTbE HENPaBnHO Hn B npOTnBOpoeC pBkOBoCTBO C nHCTpyKuMn, KaKTo n AKO e CbBp3hAn HnpaBnHO. Ta3n RapaHnBe H Baxk 3a:
-
nno npdykta B pe3yntaHa Hnnpabunna npocnnakTnka
- npOdykTN, KOITo ca 6nHn N3MeHeHn Hn MoDnΦnUpaHn
- npodykt, npki KOIOT KIOHNHANHITME MABKIPOKBk 3a NEDHTNΦKALCA (TbPOBCKa MAPIK, CEPHEM HOMe) Ca I3PTPN, PONPEHMENI PIMEXMAH
- NOBpeHa, npnHHeHa OT HeCna3BaHe Ha pbKOBOCTBOTO C nHCTpyKUIM
- npodyt 6e3 CE mapkpobka
- npodykt, 3a ne p ebanapeo onht 3a peomto t Hkbaanf cneuaiaactn nn63 nopnaepaerntno paaspehene o Techronic Industries.
- npodykt, CbP3AH KbM HENoXdoJIAO 1eKtp03aXpaHBAHe (amnepak, BONTAK, YcctOTA)
- 贝TIN, PNIHNEH NOT BbNHNBIIHNA (XHMNHN, Fb3HUNy, ydapn)
HOPMAJIHO N3HOCBaHe Ha pe3epBn qACT
- HenoDxOyAa yNoTpe6a, npetOBapBaHe Ha nHCTpyMeHTa
-3nON3BaHe Ha HeoO6peHn akcecoap nnn Yactn
-Akcecoapnte 3a enektpnueckn HNCTpymeHT ca npedoctabeH nHCTpymeha nn Ce kynybat OTdneHO.Tsni NIKHOENH BKNOHT,HO He CAMo, HakpaHnHn 3a OTBepTKa CBpeHa, a6pa3nBHn DnCKOBe, OCTPeta, cTpaHnHuBODa
- Komnohentn (actn n akcecap), noNoxehn ha ectctbeH no3HocBaHe, BkIOHTeHHo HO He cAmO KOMNKeTm 3a 06cIyKbAe H noDpBk Kap6oHOB NcETK, naReep, natPOHNK, npCtABKa Cb CpePINO SDS pneHMOYCTPOIECTBO, zaxpaHbau kBe9, cnoMaTeHa NpkoXbTaK, Kyttn 3a TpAnCNOPTnAhe, uNfOobuHa NnactHa, Top6a 3a npax, Tpb6a OTBeXdane Ha npax, fHIOBn uHbU, uNfTObe H npyKnH 3a BnHTOBepIn H dp.
4.3a 6cbnykbahe npdykbT pr8bga Ta ce n3npaTHn mHa aHece Ha otOpn3napa Cepbn HA RYOBI, Nocooeh 3a BcKaA dbPKaBA B cneHnna HcpeBnN. B HxKoN DpJXaBN MeCTHnT TbproEe Ha RYOBI OTROBOPHOCTTA da n3npaTH npOyTKa O cepBn3en YeHTbp Ha Rn3paauhe Ha npOyKT Do cepBn3 HA RYOB1 Toi TpRbGa da 6e3onacno 6e3 onao Cho cbPkaHane, Happ. 6e3HH, Ta e MapKnpaH c anpeca Ha noDatela N pnpDpyKhen OT kPaTko ONCAnHe Na nobPeDa
5.PemOHbT/3amHATA NO CnNA Ha Ta3n rapaHcna Ca 6e3nnATn. Te He BoJrTO yIbJnxBaHBe INn POHOBBaHe Ha rapaHIOHHNc pCk. CMeHEHte Aactn INn INHCTpyMEnT CTABAT Haa COeBHeOCT. B H KON DpKabN TAOKTe 3a DOCTBAKn INn INPpaAHe TPRBa Da Ce nPaTeT OT nOATEn. 3AKoHYctAOBEHHTBE BN npaba, POnm3TuAnu O TzakynyBaHTo HO INHCTpyMeHa, OCTABAT HeacenHATn
- Ta3n rapaunu e bainHa B Epeoneckata 06hOcT, WBeueapna, NcAnDn, Hopserua, LuxTeHuaH, Typuia u O6eMHeHO tKpAnCTBO. HbN 06bnCe cBpbKeTe C yIbHNOMoUeHH TbProBEu Ha RYOB1, ycAHOBn DaJIe n pRIOXkMa Dpyra rapaHn.
YIJIHOMOJENCEPBIN3EHJENTbP
BcNKn 3aBKn INI npObnEMn, CbP3aNn C npOyKTA, MORAT Da 6bDat OTnpABHn KMb MeCTHNEYbNHOMOeHN cepBN3HN CEHTPOBE (nocetete WWW.Ry eu) INI dpeKTHo Do: Techronic Industries GmbH, Max Eyth St 71364 Winnenden, Germany. Nocoyete cepinHn Homep n Tna Ha np OTneuataHn Bpxy Etketa.
UK
TAPAHIHIYMOBNIJRYOBI
Uypa3,3aRANOM yCTAOHOBENHX 3bKOHOM npAB,0C TcOyOTBCN KOKYTNK,LJI INPCTRIKOKPNBACTCB RAPHTIO,0O3a3AHeHOHNKHe.
I. RapantHnnepeoD nnn CnoKmbaBccknae 24 Mici i noHnAeTbC3 MoMeHTy npndhaHn zuoTO npncTPO.L Da tata NobHHHa 6yTH zadoKymTeBOHa y rapaTnHOMy TaonHO aOky. L eN npCTpii 6yB po3pObeHn i np3NaeeHn Hm DnnpCNOHBoro T a npBATHORIO BnKOpCTAHn Y pasi npOpeciHoro a60 KomeepuiHoro BVkOpMCTAHn UoTO npNCToPO,BIH BTPaac rapaHTIO.
102.102.102.102.102.102.102.102.102.102.102.102.102.102.102.102.102.102.102.102.102.102.102.102.102.102 102.102.102.102.102.102.102.102.102.102.102.102.102.102.102.102.102.102.102.102.102.102.102.102.102
3. Fapantit nouiproctbHa Bci deektn npctpno npotrom rapahtnHoro TepmHy 10o HIOOTPMAHHCTaHApTIB BPO6HNTBa a6o MATEPianB Ha Tpeynn HAPANTI 6MEXyCtCB peMOHTa/ab6 3amHO, Ta He BKIOVAe B C6e6 By-ANKx IHINX 3O6OB3A2Hb, TBOMY CJI,ane HEOBMeKeHa NByABnBnKOBnX TA NOaBnBnX NNOKOKeHb.Fapantit He Die, kAno pNCTprn WOnBOyBnBCHe HENAEKNHM CHOM, BCyNEPE IHCTpykU3 E KcNpyatau1 abo 6yB HENPABnBHO nIDKnOChEN MOpeKi Dana rapaHTHne NoouipocBtHa:
-
npictroi, 60 6ynn nookdokehi y pe3ynbtaH HenpaBnIbHoro texHiHoro 6cbnyrobyBaHH;
-
npncptpoi, 00 6yin BnOo3MHeH a0 MoDnΦikOBaH;
- nprctpO, opirnHaihbe IeDIIptiKauiJIe (TOBAPHNI hAek, cepHIIN HOMep) MAPyBAHHaIKX 6IyoN ONUKIDKeHcE, 3MIHeH eA60 BuaDaneHO:
-6ydb-kyi NOwKOxKeHH, 3anOdiHi HeDOrpMaHHHm IHCTpyKJI 3 ekCnIyataqil;
- npncptpo, 00 He MaKoTb MaKyBaHHa CE;
ФИПЕРПСТЮ, с�о БУТВΙДРЕМОТΗΝΑ έΗΝΑΚΙβΙΚΟΒΑΜΗ ΦΑξΙΒΕΥ ΑБΟ 3a BIDCYTOHOTCI NOPEDEHboro DOZBOHY BID TECHNOMIC INDUSTRIES;
- p-niPCTOPI,piNkIOUeHI Do HeBIIOBIDHOro DKepeNa JKBINHeHHa (Cnla TOKY, HANpYxHENH, YACTO?);
(1) 18y-b-ki noiokxehnHc npHHeHi 30BHIHIM BnHbOM (xiMHm, HmHMM, CTp6kam Hanpyu) a6o CTOpOHIMpeOBHAM;
-HOpMaJIbHy amOpTn3aui0 3anacnHex YAcTnH;
-HeBIDNOBIDHE BUKOPCTAHHn,nepeBaHTaxeHHn npuctpo;
-BNKOPNCaHHHeiTBepeKHeHx3anachnxyactnHa6oakcecyapib;
- npnlaa Ddo eekTpoHCTpyMeHTy, 10 noctaaCTbca pa3OM 3 npncTPOeM a6o Kynnohcbk Okpmo. Taki BnHRTKn BpaXbOHytB aNe He c o6MeKeHHMn kypka n HakoHeuHciv BnkyTOK, CbePeI, abpa3NBHX nCKIB, HaxDaVHoro nanepy Ta ne3, bNHIN HapnMHNX
HHe KOMMOHEHTN(QaCTHH Ta npinaDJI 3 paxyBaHNHM HOpMaIbHorO
ObKHa 3HOyBaHHn, bpaXOBYHnAne 6e3 06MeKeHnHa KOMPJIeKN TnpoipInakTHKn
SDS TM TeHXHORO OcCJyBOyBAHHn,ByrINBI uTKn, NpUINHNNKn, nATPOHN, KpinHnHn A50 npinom SDS CBepeHn, Ka6eni XNBnEHn, IdoatKobi
6a9KOstKN, QoxNI DnI TraHCNOpTyBAHHn, WnIFyBaHbHI nNaCTHHN, MIIuKNI JI
36opy nny, trpykn BxNOnny, feproBni KInbura, wtnpi i npkynnn raIKOBepTy
iT.N.
4.ДЯOBcryroBvBaHnna, npCtpiMa 6ytu BiDpaBHeHH a6o nOaHndo bK OHorpAePm03AByHxC cepBICHX CEHTPIB RYOBi, Aki NepEnIeHHI DnKoHoi OeMaHn y HactynHOMy nepeNiky aDPEC cepBICHX CEHTPiB. Y deKaNX KpaHaxO BOCIMduNep RYOBi 3ooBbAeyctba BIDPAbNTi npCTpi Do cepBICHO
e RYOBI. Pn BiipnbeneHH npicpO 10 cepeichoro ueHTpy RYOBI, pncptpi Ma6 6ytm HauHIO ynaKoabHn 63 6ydb-RAOR He6eaneHORB MICTy, HapnKnad 6en3Hny, 3 no3aHcHoo aepcoH BiipnbAHHka Ta cynpoBOJyBATNC KOPOTNIM ONCN COM HeCnpABHOCTI.
5. Pemont / 3amHa BINOIBIOHO zo ci rapaHTI aINCHOETbCA 6eKoTBOHO.
Le He cOCHOBO DnnoNobKeHHA a0 noaHTky HOBO rapaTHHORO
nepoDy, 3AMHeH NAO pnpNaN nepeXOaTb DO bnaCHOt KOMnAHII.
Y DeKHX KpAlhax BAPITcB DoCTABN a0 NOTOBI BNTPATN NOBHNI 6yt
CnauH e HnBnHOMK 3arJIbHo BCTAHOBnei npaba NOKyIa HA nPNCPTI
Te39aMnIOBTCA HE3MIHHMM
3a 6. r aHTi e iHIO y kaihax, ynehax CC, IWeuapii, Icnanii, HopBerii, liXTeHNHeNHI, TypcHNI, Pocii ta Bennk BiPHTAHII. 3a MeKAMn cix 30n, 6by Naka, 3BepHiTbCdo ophiHoro DInepa RYOBI, 1o6 BnHaHTn, 3aactOCOBytcbI INHa rapaHTiN.
ABTOPN3OBAHI CEPBICHI LEHTPN
StraBb-ynx nTahb abo np6bneM, nob'3aHnx 3 npcTPOcM, Bn MoKeTe npOeHTyNcb Do MiueBHX ABTOH3OBAHNX cepBICHX ueHTPiB (BiDlaIe Ww. ryobitools.eu) abo Hanpmy do: Techronic Industries GmbH, Max Eyth StraBe 10,71364 Winnenden, Germany. Byb nacka, Bkakitb cepinHn Homep Ta TnnpodkyT, Bka3aHa Ha etKkeTci.
TR RYOBI@ GARANTI UYGULAMA KOSULLARI
Alimdan kaynakanan yasal haklara ekolesterol, urun asagida belirtilen kapsamindarir.
Circular Saw
Brand: RYOBI | Model number| Serial number range
We declare as the manufacturer under our sole responsibility that the product mentioned below fulfills all the relevant provisions of the following European Directives, European Regulations and harmonised standards3.
Authorised to compile the technical file:4

Scie Circulaire
DEKLARACJA ZGODNOSCI WE
Pilarka tarczowa
Vice President, Quality - Ryobi Asia
Winnenden, Dec. 08, 2020
4 Alexander Krug, Managing Director
Techtronic Industries GmbH
Max-Eyth-Straße 10, 71364 Winnenden, Germany
Manufacturer: Techtronic Industries GmbH
Max-Eyth-Straße 10, 71364 Winnenden, Germany
We declare as the manufacturer under our sole responsibility that the product mentioned below
Circular saw
Brand: RYOBI
Model number: RCS18X
Serial number range: 47547301000001 - 47547301999999
fulfills all the relevant provisions of the following Regulations: S.I. 2008/1597 (as amended), S.I. 2016/1091 (as amended), S.I. 2012/3032 (as amended) and that the following designated standards have been used:
BS EN 55014-1:2017+A11:2020, BS EN55014-2:2015, BS EN 62841-1:2015
BS EN 62841-2-5:2014, BS EN IEC 63000:2018

Todd Chipner
Vice President, Quality - Ryobi Asia
Winnenden, Dec. 08, 2020
Authorised to compile the technical file:
Alexander Krug, Managing Director
Techtronic Industries GmbH
Max-Eyth-StraBe 10,71364 Winnenden, Germany


EN RYOBI is a trade mark of Ryobi Limited, and is used under license.
© 2020-21 Techtronic Cordless GP.


Techtronic Industries GmbH
Max-Eyth-Straße 10,
71364 Winnenden, Germany
Techtronic Industries (UK) Ltd
Fieldhouse Lane
Marlow Bucks SL7 1HZ
UK
961075634-02