
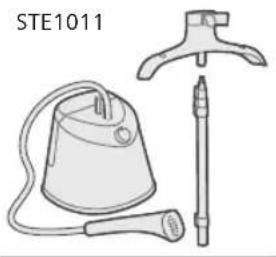
STE1010 - Steam plant PHILIPS - Free user manual and instructions
Find the device manual for free STE1010 PHILIPS in PDF.
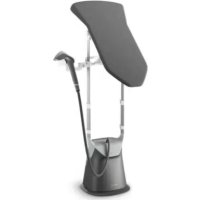
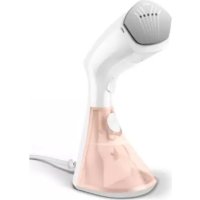
| Type de produit | Garment steamer (upright steamer) |
| Marque | Philips |
| Modèle | STE1010 (variant STE1010/75) |
| Hauteur (avec mât déployé) | Approx. 1.5 m |
| Poids | Approx. 5 kg |
| Alimentation | 220-240 V ~ 50/60 Hz, 2000 W |
| Capacité du réservoir d'eau | Approx. 1.5 L |
| Temps de chauffe | Approx. 45 s (STE1010/75: 2 min) |
| Fonctions principales | Vertical steam ironing, adjustable steam flow, continuous steam |
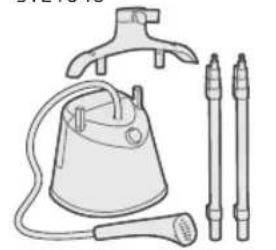
| Accessoires inclus | Hanger, support, ironing board (STE1040), cover (STE1040), mat (STE1030), brush (depending on model), glove |
| Entretien et nettoyage | Monthly descaling recommended via descaling button; clean steam plate with a damp cloth |
| Sécurité | Mast safety clips, automatic shut-off after 5 minutes of inactivity |
| Pièces détachées et réparabilité | Removable water tank, accessible limescale collector, detachable brush and hanger |
| Informations générales | 2-year warranty; serial number on the base; registration recommended at www.philips.com/welcome |
Frequently Asked Questions - STE1010 PHILIPS
User questions about STE1010 PHILIPS
0 question about this device. Answer the ones you know or ask your own.
Ask a new question about this device
Download the instructions for your Steam plant in PDF format for free! Find your manual STE1010 - PHILIPS and take your electronic device back in hand. On this page are published all the documents necessary for the use of your device. STE1010 by PHILIPS.
USER MANUAL STE1010 PHILIPS
m = 311
一
1
m = 311
1
一
1
English 6
Azorbaycanca 22
Bahasa Indonesia 39
Bahasa Melayu 56
Cestina 73
Dansk 89
Deutsch 106
Eesti 124
Espanol 140
Français 157
Hrvatski 174
Italiano 191
Latviešu 208
Lietuviškai 225
Magyar 242
Nederlands 259
Norsk 276
O'zbek 292
Polski 309
Portugues 326
Portugues do Brasil 342
Româna 359
Shqip 376
Slovenscina 393
Slovensky 410
Srpski 426
Suomi 443
Svenska 459
Tieng Viet 475
Türkce 492
Türkmenge 509
Eληνικα 526
Българскn 543
KbIprbl34a 560
MaKeDoHcKn 577
Pycckn 594
Toounk 611
YkpaHcbKa 628
Ka3aKwa 645
Ruwjntu 662
mnu 679
Johnoyn 65 696
简体中文 713
繁體中文 730
HANKOR 746
a 762
778
6 English
Introduction
Congratulations on your purchase and welcome to Philips! To fully benefit from the support that Philips offers, register your product at www.philips.com/welcome. Read this user manual, the important information leaflet, and the quick start guide carefully before you use the appliance. Save them for future reference.
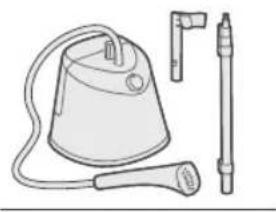
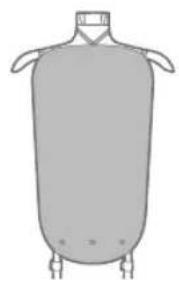
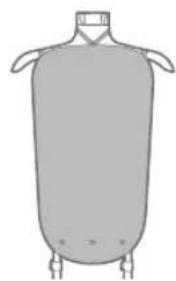
Product overview
Type of water to use
The appliance is suitable to be used with tap water. However, if you live in an area with hard water, we recommend that you mix an equal amount of tap water with distilled or demineralized water. This will prevent fast scale build up and prolong the lifetime of the appliance.
Do not add perfume, water from the tumble dryer, vinegar, starch, descaling agents, ironing aids, chemically descaled water or other chemicals, as they may cause water spitting, brown staining or damage to your appliance.
Warnings
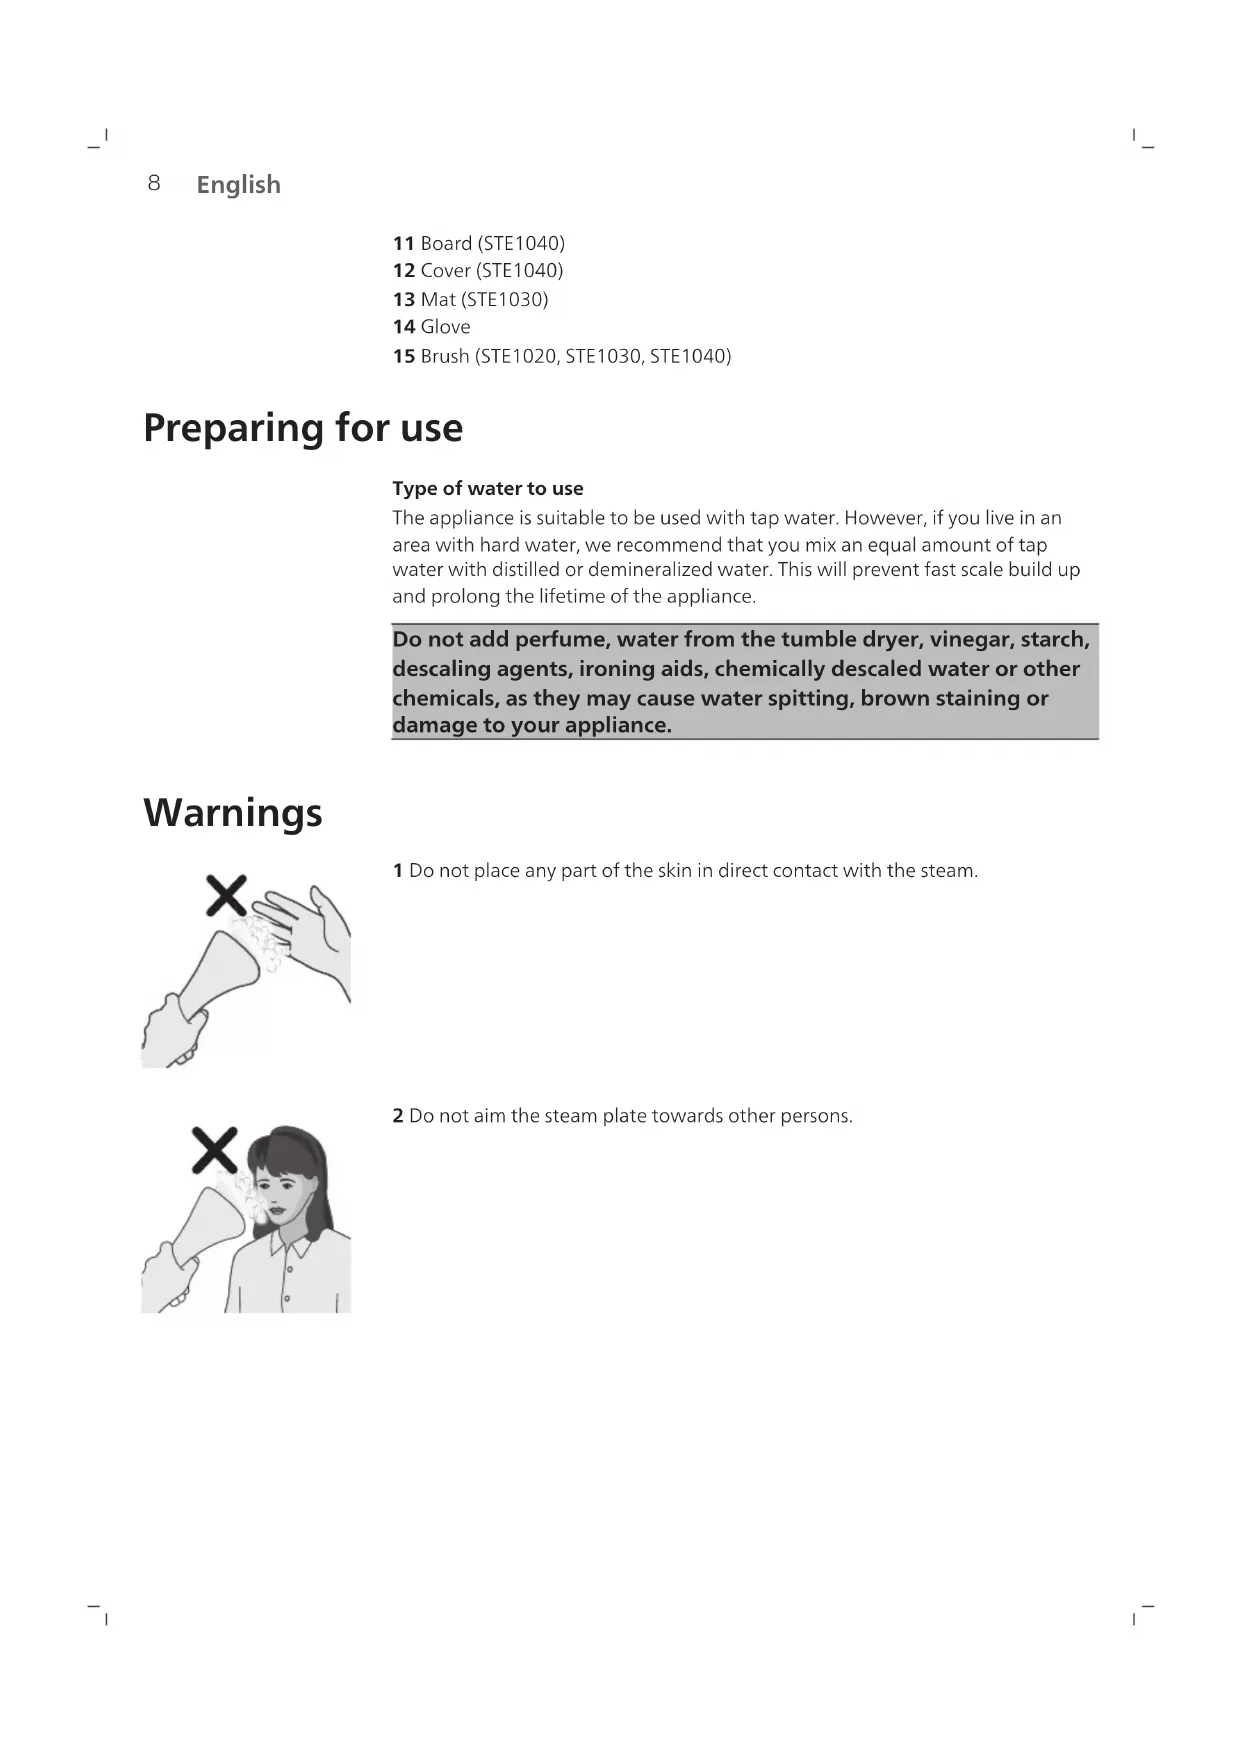
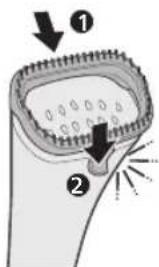
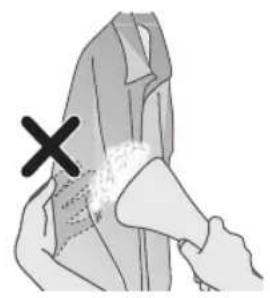
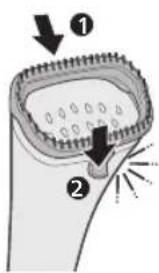
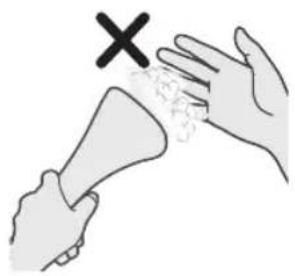
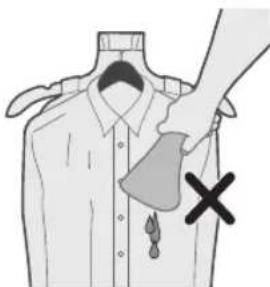
1 Do not place any part of the skin in direct contact with the steam.
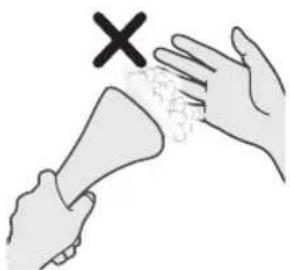
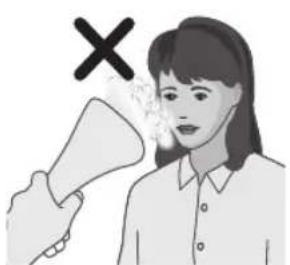
2 Do not aim the steam plate towards other persons.
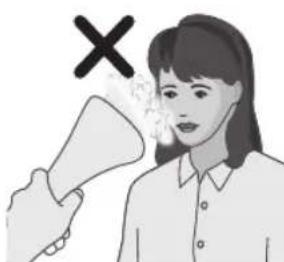
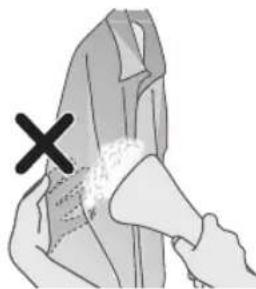
3 Do not hold your garment in a way which is in direct contact with the steam.

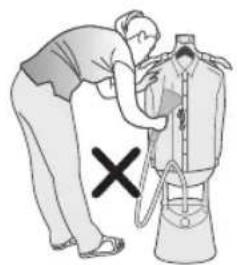
4 Do not use the steamer head in a downwards direction.

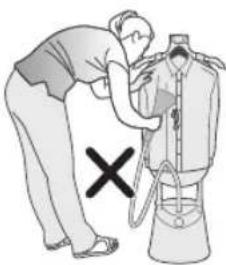
5 Do not bend the hose to steam the garment.

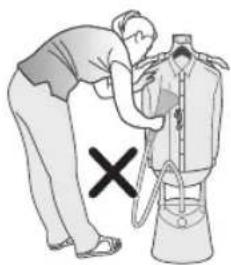
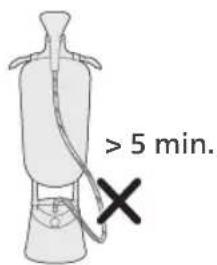
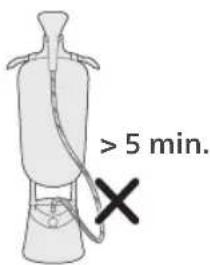
6 Do not leave the stand steamer unattended for more than 5 minutes.
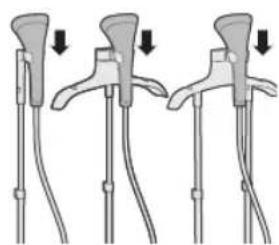
Setting up the appliance

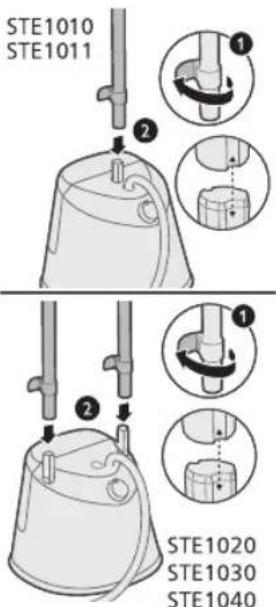
STE1010
STE1040
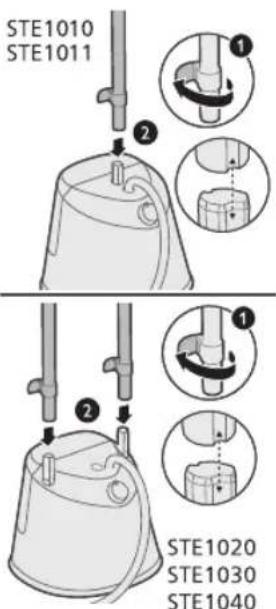
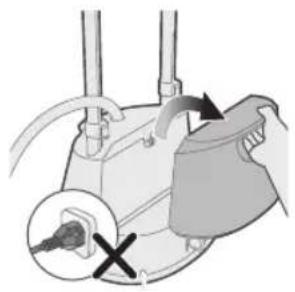
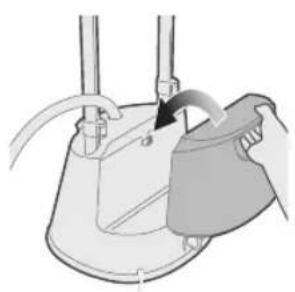
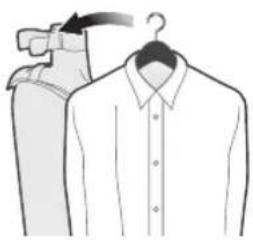
1 Take note of the parts available for your purchased appliance.
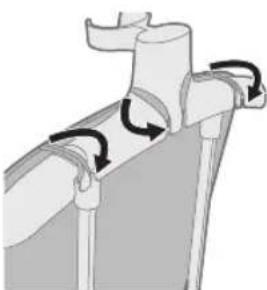
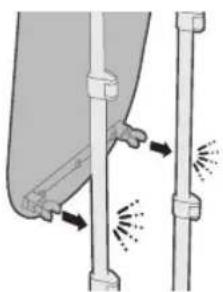
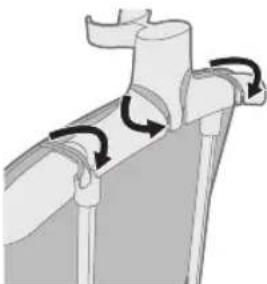
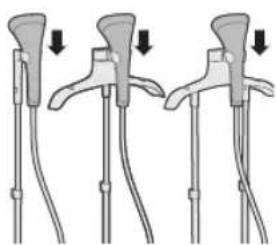
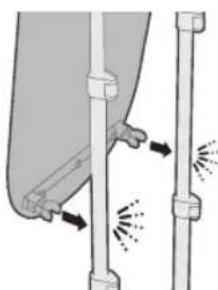
2 Unlock the bottom pole lock clips and insert the pole(s) onto the base. Ensure the profiles of the pole(s) and base pole stud(s) are aligned.

3 Lock the bottom pole lock clip(s).
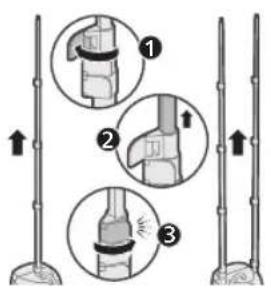
4 Unlock the remaining pole lock clips, fully extend the pole(s) upwards and lock it.

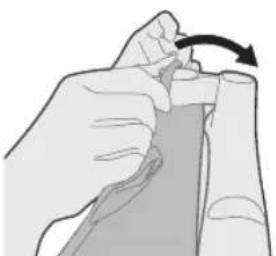
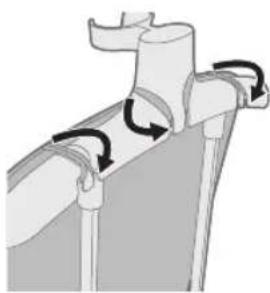
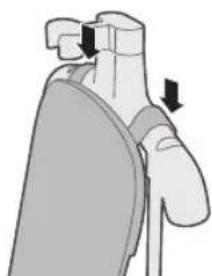
5 Insert the steamer dock onto the pole(s) until it locks in place ('click').

6 Place the steamer head onto the steamer dock.
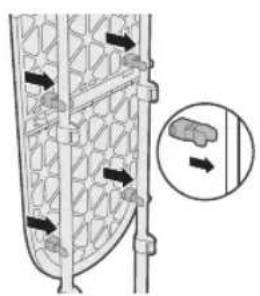
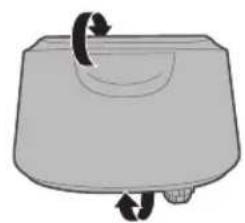
Setting up the board

1 Take note of the parts available for your purchased appliance.
12 English

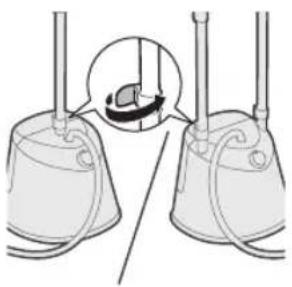
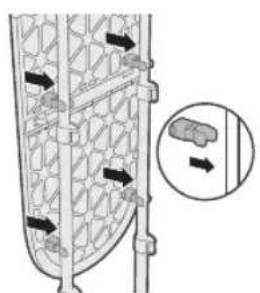
2 Align and insert the board clips until it lock in place ('click').

3 Align and insert the board cover through the board hooks.

4 Hook up the board cover straps onto the hooks at the back of the board

5 Place board onto the hanger.

6 Secure the board onto the poles until it lock in place ('click').

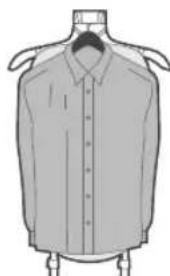
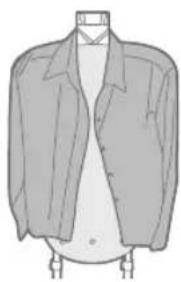
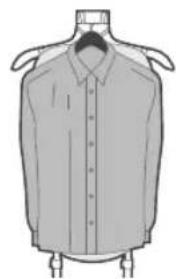
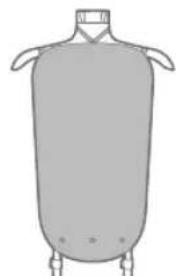
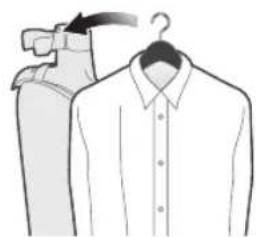
7 You can drape your clothes using the hanger.
8 You can use your own hanger and place it on the steamer dock.

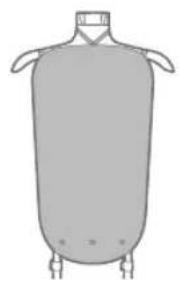
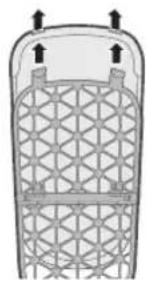
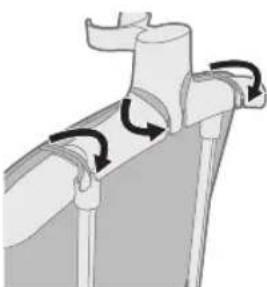
Setting the mat

1 Insert the middle strap through the steamer dock.
2 Secure the 3 straps on the hook at the back of the hanger.
14 English

3 Secure the mat onto the poles until it locks in place ('click').
4 You can drape your clothes using the hanger.

5 You can use your own hanger and place it on the steamer dock.
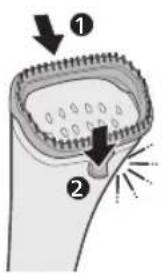
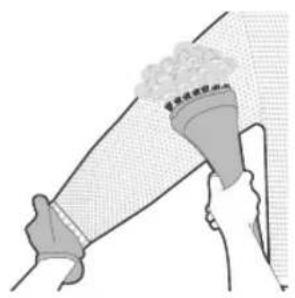
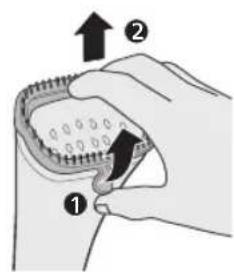
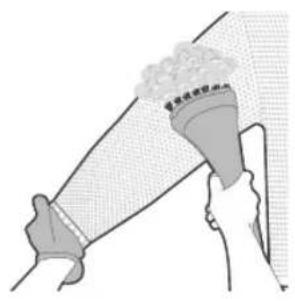
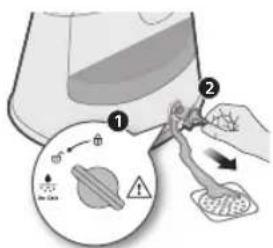
Inserting the brush
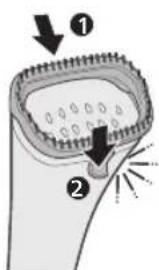
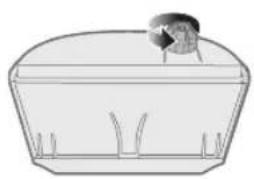
1 Align the track along the top of the steamer head and snap the catch on the bottom ('click').
2 You can wear the glove and steam your clothes using the brush attachment.

3 Grip and pull out the catch from the bottom of the steamer head to remove the brush attachment.
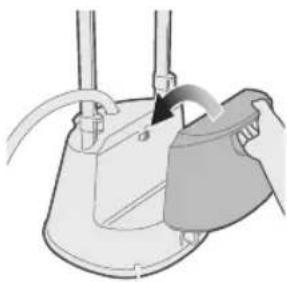
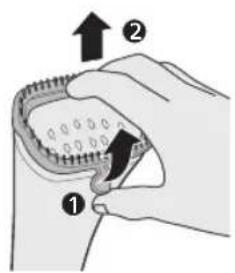
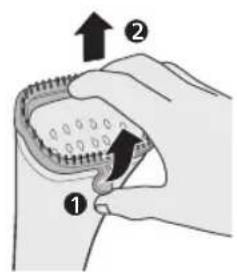
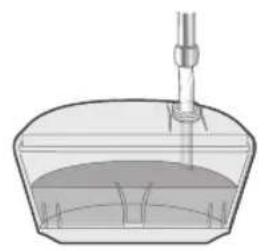
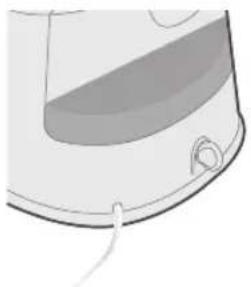
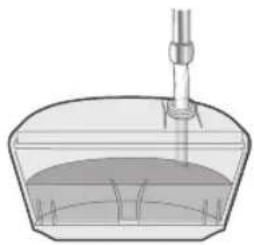
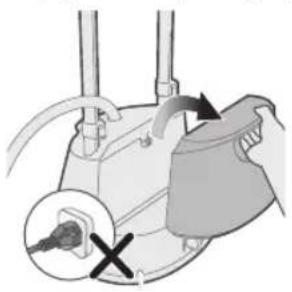
Filling the water tank
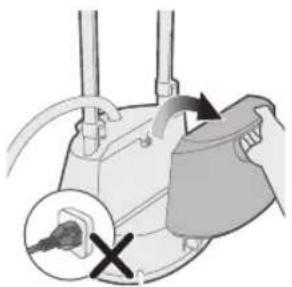
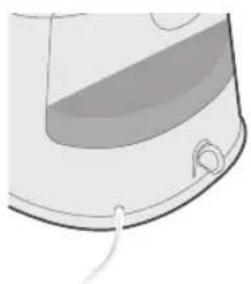
1 Do not plug in the appliance. Remove the water tank from the base.

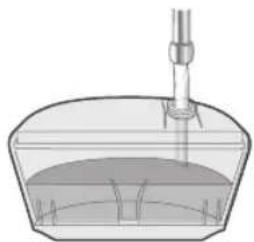
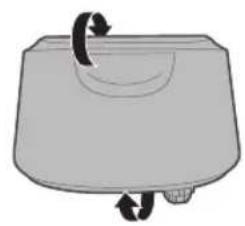
2 Flip the water tank with the water tank cap facing upwards.
3 Unscrew the water tank cap anticlockwise to remove.

16
English
4 Fill up the water tank.
5 Screw the water tank cap clockwise to tighten.
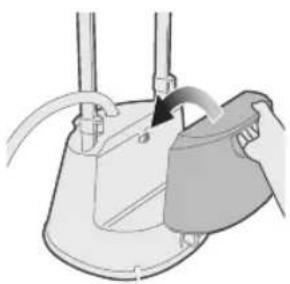
6 Align with the hook to place the water tank back to the base.
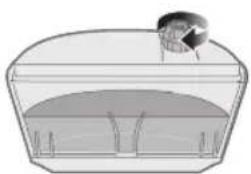
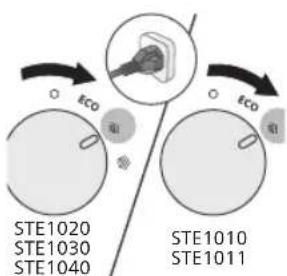
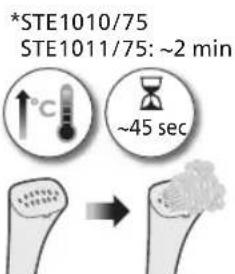
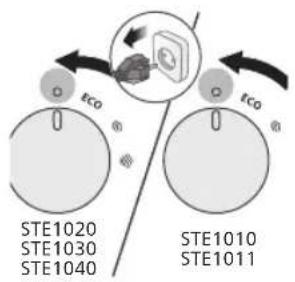
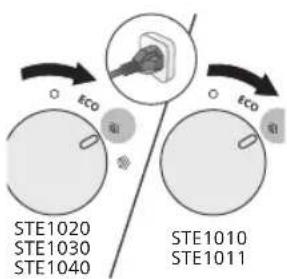
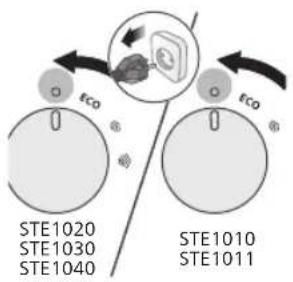
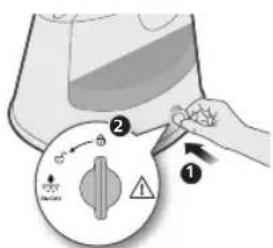
Changing the steam settings

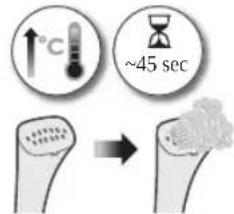
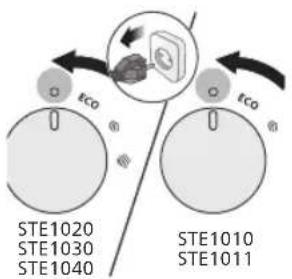
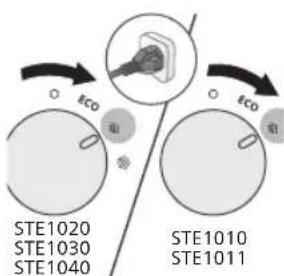
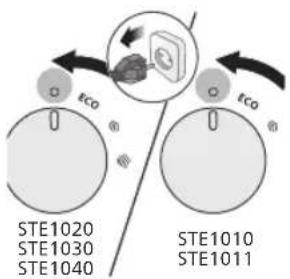
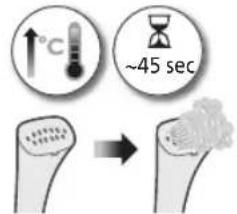
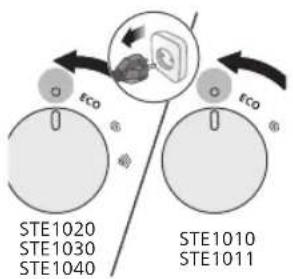
1 Ensure appliance is plugged in. Rotate the steam dial to the desired steam setting.
2 The light will turn steady to indicate the stand steamer is switched ON.

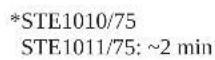
*STE1010/75
STE1011/75: ~2 min
3 Wait for about 45 seconds for the stand steamer to heat up and emit steam (STE1010/75, STE1011/75: about 2 minutes).
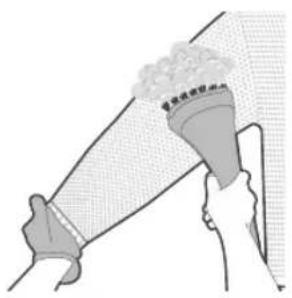
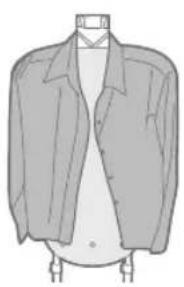
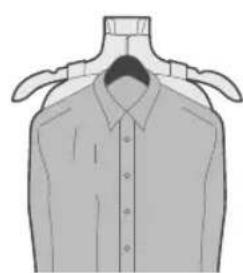
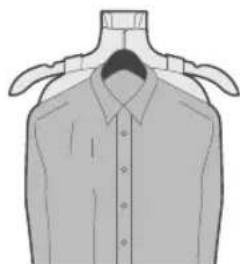
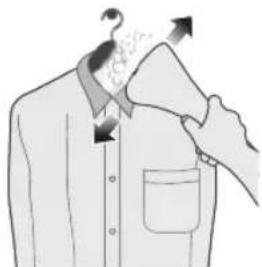
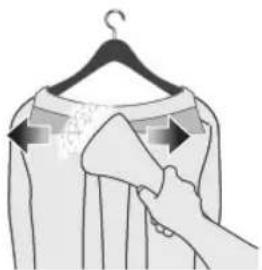
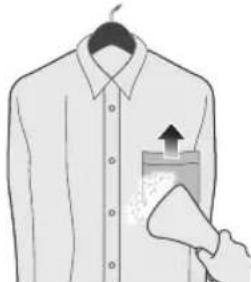
Ironing tips

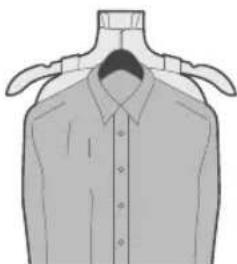
1 You can use your own hanger and place it on the steamer dock.

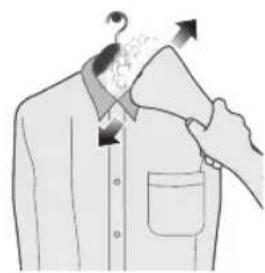
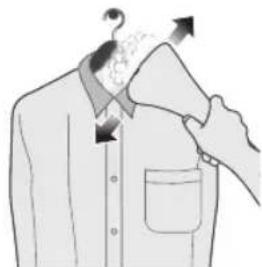
2 Move the steamer head in a parallel direction with the collar.
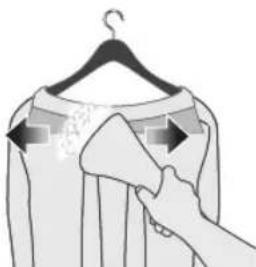
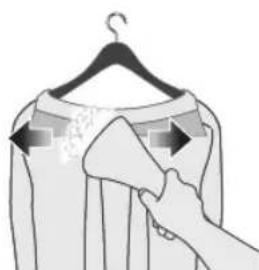
3 Move the steamer head in a horizontal direction with the yoke.
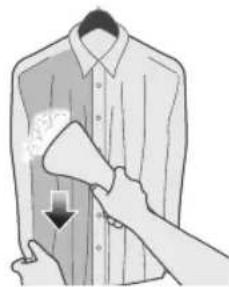
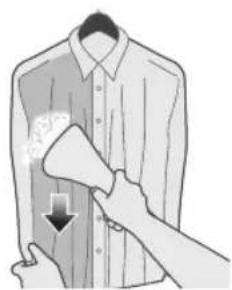
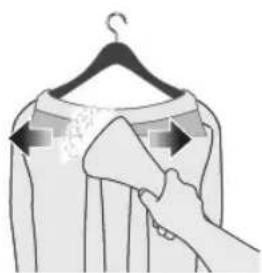
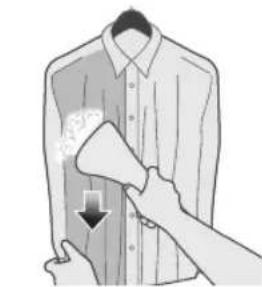
4 Stretch the garment. Move the steamer head in a downwards direction on the body front.
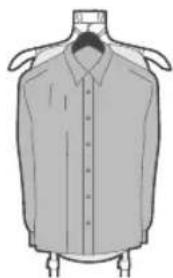
English
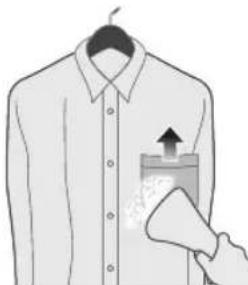
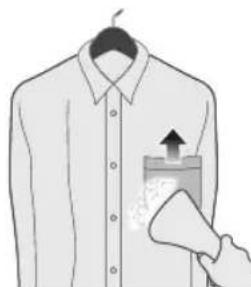
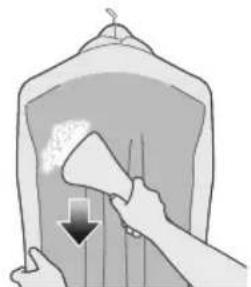
5 Move the steamer head in a upwards direction on a pocket.
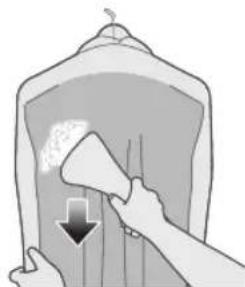
6 Stretch the garment. Move the steamer head in a downwards direction on the body back.
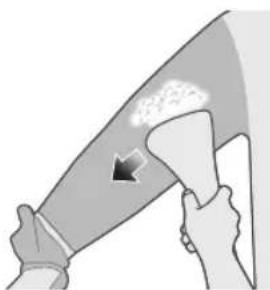
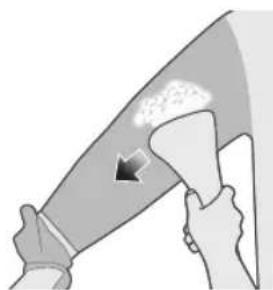
7 Stretch the garment. Move the steamer head in a parallel direction with the sleeve.
Cleaning and maintenance
Calc Collector
Your appliance has been designed with a Calc Collector system. You are recommended to do descending once a month or more. This helps to maintain a strong steam performance and prevents dirt and stains coming out of the soleplate over time.
Tip: The Calc Collector system can be used at any time. If you live in a hard water area, use the function more frequently.
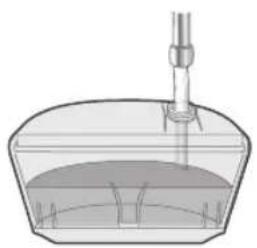
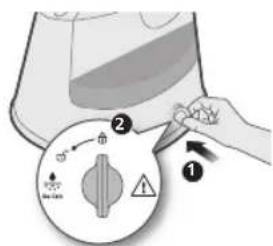
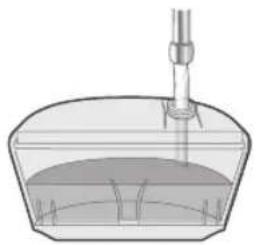
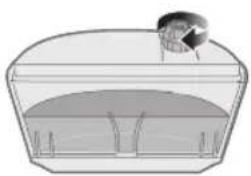
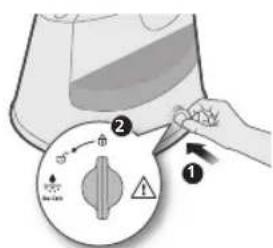
Performing the calc clean process

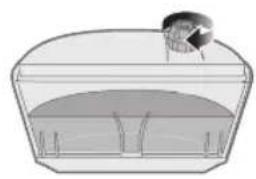
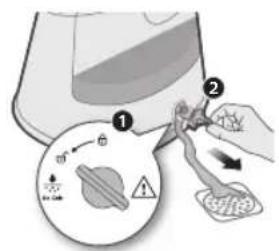
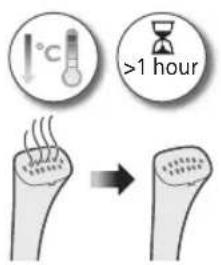
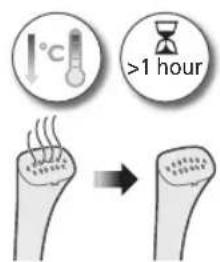
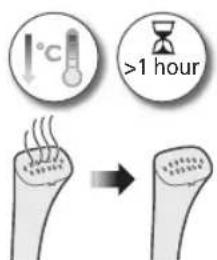
1 Ensure that the steam dial is at the OFF position and the appliance is unplugged.

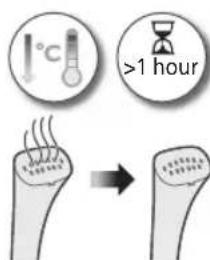
2 Ensure that the iron has cooled down completely (>1 hour).

3 Place the steamer close to a drain.

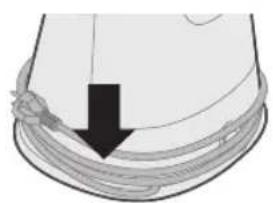
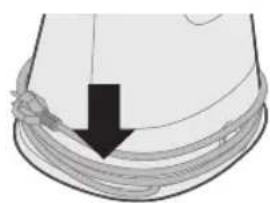
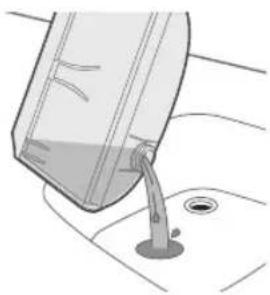
4 Turn the De-calc knob to the unlock position and remove the De-calc knob. Allow water to drain.

5 Insert and turn the De-calc knob to the lock position.
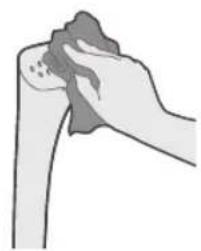
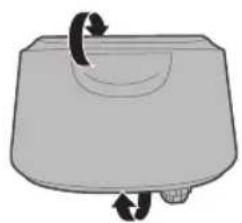
Cleaning and storing the stand steamer

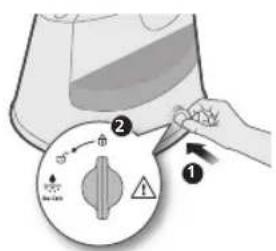
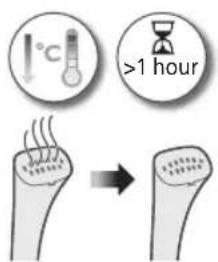
1 Ensure that the steam dial is at the OFF position and the appliance is unplugged.
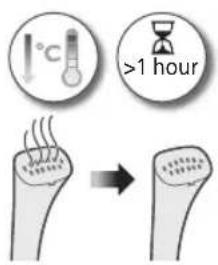
2 Ensure that the iron has cooled down completely (>1 hour).

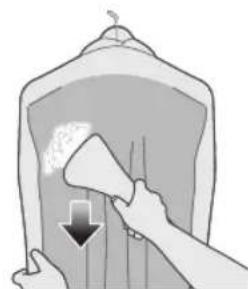
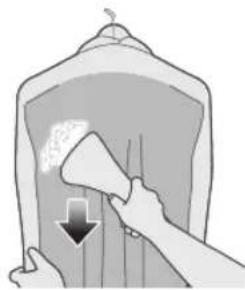
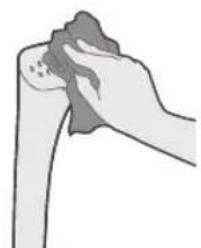
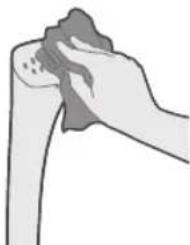
3 Wipe the steam place with a damp cloth.

4 Empty the water tank completely.
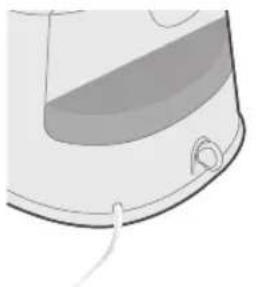
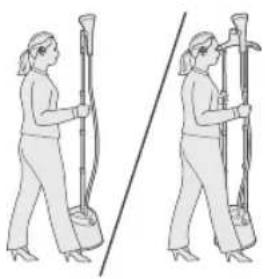
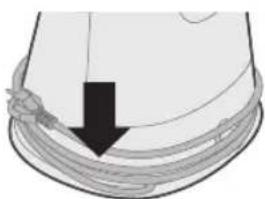
5 Wind the power cord around the base.
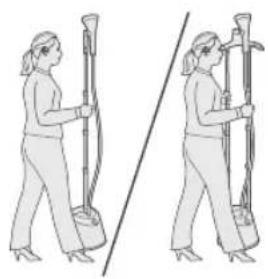
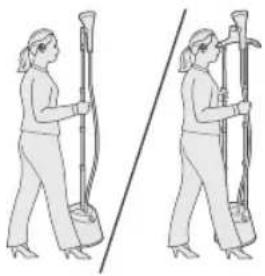
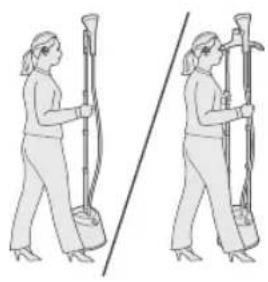
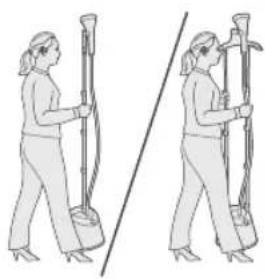
6 You can carry the stand steamer by the pole.
Trouble shooting
This chapter summarizes the most common problems you could encounter with the appliance. If you are unable to solve the problem with the information below, visit www.philips.com/support for a list of frequently asked questions or contact the Consumer Care Center in your country.
Problem Possible cause Solution
| The appliance produces no steam or irregular steam. | The steamer has not heated up sufficiently. | Let the appliance heat up for approximately 45 seconds (STE1010/75: about 2 minutes). |
| Steam has condensed in the hose. Lift the steamer head to straighten the hose vertically. This allows any condensation to flow back. | ||
| Low water level in the tank or the tank is not inserted properly. | Refill the water tank and insert it properly. | |
| Too much scale has built up in the appliance. | Perform de-calc process. Refer to Calc-Clean section. | |
| Water droplets drip from the steamer head or the appliance produces a croaking sound. | You have left the steamer head and/or the steam supply hose in horizontal position for a long time. | Lift the steamer head to straighten the hose vertically. This allows any condensation to flow back. |
| When the hose forms a U-shape, condensation in the hose cannot flow back into the water tank. | Lift the steamer head to straighten the hose vertically. This allows any condensation to flow back. | |
| An excessive amount of water drips out of the steamer head when the appliance is heating up. | The water in the appliance is dirty or has been left inside the appliance for a long time. | Perform de-calc process. Refer to the Calc-Clean section. |
| Water leaks out from the steamer base. | You have not closed the water tank cap or de-calc knob securely. The water tank is not inserted properly. | Close the water tank cap or de-calc knob securely. Insert the tank properly. |
22 Azarbaycanca
Giris
Philips-dan ali-s-vari etdiyiniz uçün sizi təbrik edirik va "Philips-oxg galmisiniz" deyirik! Philips-in taklif etdiyi dastakdān tam səkilda yararlanmaq uçün mahsulunuzu www.philips.com/welcome sahifasinda qeydiyyatdan kecirin. Cihazdan istifadayā başlamazdan avvə bul telimat kitabcasini, vacib malumatlar buketini va baslamaq haqqinda qisa talimati oxuyun. Onlari galackda istinad etmak uçün saxlayin.
Māhsul icmalī
Procedura Calc-Clean

4 Suv bakini butunlay bo'shating.
5 Asos atrofiga quvvat shnurini o'rab qo'ying.

6 Stendli bug'latkichni qutbidan ushlab ko'tarishingiz mumkin.
Nosozliklarni aniqlash
Bu bobda jihozda uchraydigan eng keng tarqalgan muammolar umumlashtirilgan. Agar quyidagi ma'lumotga asoslanib muammoni hal qila olmasangiz, savol-javoblar ro'yxati uchun www.philips.com/support manziliga kiring yoki mamlakatingizdagi mijozlarga xizmat ko'rsatish markazi bilan bog'laning.
Muammo Ehtimoliy sabab Yechim
| Jihoz bug' chiqarmaydi yoki bug' chiqishi bir maromda emas. | Bug'latkich yetarli darajada qizimayapti. | Jihozni taxminan 45 soniya qizdiring (STE1010/75: 2 daqqa vaqt olad). |
| Bug'slangda kondensatsiyalangan. | Shlangni vertical tekislash uchun bug'latkich kallagini ko'taring. Bu kondensatsiyaning qaytib oqib ketishiga imkon beradi. | |
| Bakda suv miqdori oz yoki bak to'g'ri o'rnatilmagan. | Bakni to'ldiring va to'g'ri joylang. | |
| Jihozda juda ko'p miqdorda cho'kmalar hosil bo'lgan. | Cho'kmalardan tozakash jarayonini bajaring. Qasmoqdan tozakash bo'limiga qarang. | |
| Bug'latkich kallagidan suv tomchilamoqda yoki jihoz qurillagan tovush chiqarmoqda. | Siz bug'latkich kallagini va/yoki bug'ta'minoti shlangini uzoq vaqt gorontal holatda qoldirgensiz. | Shlangni vertical tekislash uchun bug'latkich kallagini ko'taring. Bu kondensatsiyaning qaytib oqib ketishiga imkon beradi. |
| Shlang U-shaki hosil qilganda, shlangdagi kondensatsiya suv bakiga qaytib oqib tusha olmaydi. | Shlangni vertical tekislash uchun bug'latkich kallagini ko'taring. Bu kondensatsiyaning qaytib oqib ketishiga imkon beradi. |
308 O'zbek
| Jihoz qizishni boshlaganida bug'latkich kallagidan ko'p miqdordagi suv oqib tushmoqda. | Jihoz ichidagi suv ifloslangan yoki uzoq vaqtdan beri jihoz ichida qolgan. | Cho'kmalardan tozakash jarayonini bajaring. Qasmoqdan tozakash bo'limiga qarang. |
| Bug'latkich asosidan suv sizib chiqmogda. | Siz suv baki qopqog'i yoki cho'kmadan tozakash murvatini mahkam yopmagansiz. Suvi baki to'g'ri o'rnatilmagan. | Suv baki qopqog'ini yoki cho'kmadan tozakash murvatini mahkam yoping. Bakni to'g'ri joylang. |
Wstep
4 Pode passar as susas roupas utilizing o cabide.
334 Português
4 Esvazie o reservatorio de agua Completely.

Arassalamak we abatlamak
Cökündini yygnayjy
Enjamyñz cokündini yygnayjy ulgam bilen islenip duzuldi. Ayda bir gezek ya-da has kop cokündini ayyrmak maslahat berilyar. Bu enjamdan guyci bugun ondurilmegini upjun etmage we wagtyn gezmgi bilen utugin dabanyndan hapalaryh hem-de tegmilleriñ cykmagynyñ onuni almaga yardam beryar.
Maslahat: Cokündini yygnajyulgamy islendik wagt ulanyp bolyar. Yasa'an sebitinizdaki suw talh bolsa, funksiyan has yygy ulanyn.
522 Turkmence
4 He n3noJI3BaIte rIaBaTa Ha ypeJa 3a npa HApOJy.
5 He orbBaIte Mapkya, 3a da o6pa6oTne npexata cnapa.

6 He octabraye cTouype 3a rnahe c npap 6e3 nAp3op 3a noBce oT 5 MNHyTu.
Сглобаян ha ypeda


STE1010

STE1040

106bphTe BHMaHHe Ha HAnuHnTe Yactn 3a 3akynenr OTrBac ype,
2 OTKIIOUeTe DOHnTE cKo6n 3a 3akIOuBaHe Ha npbTa n NOCTaBeTe npbTa(NTe) Bbpxy OCHOBaTa. YBepTe ce, ye npOphiJIInTe Ha npbTa(NTe) n HApKaHHnCITe 3a npbTnTE Ha OCHOBaTa ca NOppaBHeHn.

3 3aKJIIOUeTe DoJHnTe cKo6n 3a 3aKJIIOUBaHe Ha npbTITte.

4 OTKHouTe octaHaJInte 3aKIOUbau n cKo6n Ha npbTnTe, n3IbPnaTHe HAnbJHo npTa(HTe) Harope u ro(ri) 3aKIOUte.

5 NocTabete noctabkata 3a ypeda 3a npapa Bbpxy npbTa(nte),doKaTo ce 3aknouHa MRCTo (C upaKbaHe).

6 NocTabeTe rnaBataHa ypeDa 3a npapa Bbpxy nocTabKaTa 3a ypeDa 3a npapa.
Crlno6yBaHe Ha Dbckata

1 06bpHHeBHHMaHHe Ha HAnuHnTe qactn 3a 3aKyueneHry OT BAc ypei.

2 IoppaBHeTe n NoCTaBeTe uINKnTe Ha nbckata, OkaTo ce 3actonoprHa Macto (c npakBahe).

3 Pnpabhe n noctabete nokpntneTo Ha nbckata npe3 Kyknte Ha nbckata.

4 3aKaHTe IeHTIe Ha NOKpNTnETo Ha IbCKaTa 3a KyKnte B 3aHaTa Yact Ha IbCKaTa

5 NocTabeTe bckata Bbpxy 3aKaaykata.

6 3akpenete nbckata KbM npbTnTe,doKaTo ce 3actonopn Ha Mmcto (C npaKaBaHe).
550
Быларскn

7 MoxeTe Da 3aKaayate Dpexnte Cn Ha 3aKaaykaTa.
8 MoXeTe n3nOJ3BaTe CBOB co6CTBeHa 3aKaUJaN i Ja IIOCTABNTe Ha nOCTAbkata 3a ypeJa 3a npa.
Crlno6yBaHe Ha noJIoXkata

1 BkapaTe cpeHaTa IeHTa npe3 NoCTaBKaTa 3a ypeDa 3a npa.

2 3akpenete 3-Te JENTn Ha kykata B 3aHaTa YacT Ha 3aKaayJaKaTa.

3 3aKpeTe nOIOXKaTa KbM npbTnTe,doKaTo ce 3aCTOnOpn Ha MmCTO (C npakBaHe).
4 MoxeTe Da 3aKaayate dpexnte cn Ha 3aKaayJaKaTa.


5 MoXeTe Ia I3nON3BaTe CBOr CO6CTBeHa 3aKaJaIka I da I nOCTaBNTe Ha nocTaBkata 3a ypeDa 3a npapa.
Посраваян ha cheTkata
1 NopapBHeTe npope3a no npoteKeHne Ha rohpHa Ta cT Ha rnaBata Ha ypeDa 3a npapa n upaKHeTe e3uHTo B DOnHaTa cT (C pKaBaHe).
552
Быларскn

2 MoXeTe Da HocHTe pBkABucaTa N da rnaIte dpexnte Cn c npa C nOMOuTa Ha YETkata.

3 XbaHete nI3IbPnaiTe e3NueTo OT dOnHaTa Yact Ha rJaBaTa Ha ypeJa 3a npapa, 3a da I3BaJnte YeTkata.
2 O6bpHeTe BOHnpe3epBoap cKaanKaTa Harope.

3 OTBnTe KaNaUkata Ha BOdHnpeepBoap no Nocoka, 6paTHa Ha YacOBnKOBaTa CTpeNka, 3a Da a CBaJIte.

4 HanbIHeTe BoDnpe3epBoap.
5 3aBnIe KaanayKaTa Ha BoDnHa pe3epBoap No NocOka Ha YacOBHnKOBaTa CTpeJIka, 3a Da a 3aTeHHeT.

6 NopapBHeTe Kykata, 3a da NoCTaBnTe BoHnpe3epBoap o6paTHo Ha OCHOBaTa.
NocTaByBaHbe Ha 7tNaTa
1 3a6eJekTe rN doCTaHnIte JeNoBn 3a KynHeHnOT anapaT.


2 IopamHeTe rH BMETHeTe rH uTnKnte 3a uTncaTa cdoKeHa eoJaT Ha CBOE MeCTO (co "KNKHyBaHbE").
3 IopamHeTe ja n BMeTHeTe ja HABlaKaTa Ha 7TncaTa npeky Kyknte Ha 7TncaTa.
4 3aKaYeTe rIJIeHTnTe Ha HABJaKaTa Ha 7TuCaTa Ha KyKInTe Ha 3aHNOr DeI O,I WtUcTa

5 CTabeTe ja wTnUcaTa Ha 3aKaayalka.

6 PnucBpCTeJe Ja StncaTa Ha dpXaHTe ce DoKeHa JoJe Ha CBOeTo MeTo (co „KNIKNHyBaHbE").

7 MoXeTe Da rN 3aKaUHTe aIiWtTa co 3aKaUAnKata.

8 MoXeTe Da KopnCTnTE CBOJa 3aKaayAka UTO MoXeTe Da ja nOCTaBnTe Ha dpXaHOT 3a anapaTOT 3a napea.
NocTaByBaHBe Ha noJlorata

1 Bmethe ja cpeHaTa IeHTa npeky npkaOT 3a anapaT0 3a napea.

2 PnucBpctTe r 3-Te JeHTn Ha KyKaTa Ha 3aHNoT JeI OJ 3aKaaAnKaTa.
3 Ipnucpcteje na noIorata Ha npkaunTe ce dokeHa eoJe Ha cBoeto MeCTO (co "KNIKNHyBaHBe").

4 Moxete Da rna 3aKaunte aIiWtata co 3aKaaykata.

5 MoKeTe Na KopnCTnTe CBoJa 3aKaaJlKa ITo MoKeTe Da ja nocTaBnTe Ha dpXkaHT 3a anapaTOT 3a napea.
BmetyBaHbe Ha yeTkata

1 Iopamhe ja uHata doJx rOpHnot dHa rIaBaTa Ha anapatot 3a napea H 3aTBopTe ro deJOT 3a npuBpCTyBaHe Ha doJHnot dE (co "KNIKNHyBaHe").
586
MaKeDoHcKn
2 Moxete da ja Hocnte paKaBuaTa n da npimeHyBaTe naea Ha o6JeKaTa co doaTOKo Tc
3 ΦaTeTe ro n ɪn3BnleyeTe ro dənelot 3a npuCbPcTyaBaHbe oD IOJIoHnO T eIHa rnaBaTa Ha anapaTOT 3a napea 3a da ro n3BnleyeTe IdoTaTOKOT CO YeTKa.
Полноа He Na pe3epBoapOT 3a BOda

1 HemojTe da ro npnKnyyBaTe anapaTOT. OToCTpaHete ro pe3epBoapot 3a BOda oOCHOBATA.

2 IpeBpTeTe ro pe3epBoaopT 3a BOda Ha HauHH Ha KojuTo KaNaYeTo Ha pe3epBoaopT 3a BOda Ke 6nJe 3aBpTeHo Harope.

3 OndBpTeTe ro KaNaeTe Ho pa3epBoaOp 3a BOda BO npaBeCnpOTnBEH Ha CTpeJIKNTE Ha YacOBHNKOT 3a Da rOOTcPaHNTe.

4 HanolheTe ro pe3epBOaPOT 3a BOJa.

5 3aBpTeTo ro kanaeTo BO npabeu Ha cTpeJknte Ha yacOBHnKOT 3a da To 3aTeHHeTe.

6 NopamHete co kykata 3a da ro nocTaBnTe pe3epBOapOT 3a BOda Ha3aHa OCHOBaTa.
MehyBaHbe Ha noCTaBKeTe 3a napea
1 PpOBepTe daJIH anapatOT e npKnyeH. PotnpajTe ro peryNatopot 3a napea Ha nocakyBaHaTa noCTabKa 3a napea.

2 CBeTJnTo Ke CBETn NoctoJaHO 3a Ja Ha3Haun DeKa CamocToeueKnOT anapat 3a napea e BKJIyUeH.
3 Nocekajte 45 ckyHn 3a camoctoeKnot anapat 3a napea da ce 3arpee n da noyHe da ncyuTa napea (STE1010/75, STE1011/75: np6nXnHO 2 MnHyt).
Cobetn 3a peIaHbe

1 MoXeTe Na KopnCTnTE CBOja 3aKaayJa KaTO MoXeTe Da ja noCTaBnTe Ha npKauyOT 3a anapaTOT 3a napea.

2 DnKTe ja rnaBata Ha anapaTOT 3a napea BO npapaneHa Hacoka co jakata.

3Дижete ja rnaBata Ha anapaTOT 3a napea BO xOpnOHTaHa HAcoka co paMeHnCtTe.
4 NcterHete ja 06nekata. DnHexe ja rnaBata Ha anapatot 3a napea HanydoJNpEHNOT dIHa TeNoTO.
5Дижete ja rnaBaTHa anapaTOT 3a napea harope Ha ue6.

6 NcterHete ja 06kekata. DnHexe ja rnaBata Ha anapatot 3a napea HdoJy doJx rp6oT.
7 NcterHete ja obJIekata.Движete ja rnaBata Ha anapaTOT 3a napea BO napaJIHa HAcOka co paKaBOT.
YncteHbE n OdpjxuBaHbe
Co6npaHа 6nroP
Baunot anapate niz3ajnupanco cnctem 3a co6npahe Ha 6nrop. Ce npenopayba da otctpaHybATE 6nrop hajmaKy eHaMmecuHo.Toa nomara BO oDpxyBaHeTo CnIeH Mna3 Ha napea HcpeyuBa NJIerEByBaHe Ha HeuCTOTNn I dAMKn Od rpejHaTAPLOa CO TEKOT Ha BpemeTo.
Cobet: CnCTeMOT 3a co6npaHbe Ha 6nroP moKe da ce KopncTn BO Koe 6nlo BpeMe. Ako XnBeTe BO noDpaJc co TBpda BOda, KopncTeJe ja yHKnJaTa INoecTo.
I3BpUyBaHBe Ha noCTaPkata 3a YnCTeHe 6nroP
1 IpoBepete dan nperylaTopoT 3a napea e ha noLox6a OFF (NCKJIyUeHO) n deka anapaToT e NCKnyuH.

2 PpOBepeTe daHn nnerlaTa ceIocHo ce oHaJa ( >1 vac).
3 CTabete ro anapaTOT 3a napea oDBOvI.
4 3aBpTeTe ro perynaTopoT 3a OTcpaHyBaHbe 6urop Ha OTKnyeHa noJox6a nOTcpanHeTe ro konHeTo 3a OTcpaHyBaHbe 6urop. OctabeTe ja BOData da nCTeue.
5 BmTeTe ro n 3aBpTeTe ro peryIaTopoT 3a OTcTaHyBaHe 6nroP ha 3aknyeHa noJox6a.
YncteHbe n cKlaIpaHbe Ha cToeuknot anapat 3a napea

1 IpoBepete dan nperylatopot 3a napea e ha noIox6a OFF (NCKJIyUeHO) n deka anapatot e NCKnyuH.
2 PpOBepeTe daHn nnerNaTa ceNocho ce OHaDnna (>1 ac).

3 N36pniueTe ja nobpunHaTa 3a napea co BnaJkaHk npa.

4 LcnoHnnpa3HeTe ropeepBoapot 3a B0da.

5 O6BnKajTe ro Ka6eIOT 3a HanojyBaHbe OKony oCHOBaTa.
6 MojkeTe da ro Hocnte cToeuknoT anapaT 3a napea 3a npkaOTo.
PeeBaHe npo6JeMn
Bo Oba norgabje ce onnshauHn HajcTe npo6JIemCo KOH MoKe Da Ce COOHTe npn KopncTeHe Ha anapatot. Ako He moKeTe Da ro peuHte npo6JIemOT Co NOMoH Na HOpMaunite HabeJeHn NoOny, nocetete ja Be6-CTpaHuaTa www.philips.com/support 3a da HajdeTe JnctHa HajcTe n paaHb a nn KONTAKTnpajTe co cHTapot 3a KopncnHka noDprkKa BO BaHaTa 3emJa.
PpO6JIeM MoXHa pRnUHa PeSeHne
| АnapатOT He npoIN3Bvdu Ba napea илпи IncpUtsa HepaMHomepHa napea. | Anapatot 3a napea He e doBoJHo Загран. | Почекajte priближно 45 секундза дд ce zarpee anapatot (STE1010/75: pri6lijxho 2 MinHyt). |
| Воцрото ce kondeHЗИралa napea. | Пожигнete ja Глвata Na anapatot 3a napea 3d Ду ичравiteцрето ВерTKalno. Ова овозможув КондeнЗИранatura TeuHocт Дд ce Врази habад. | |
| Ниско НИВо Ha BOda Bo pezeрвогot Илpezerboapot He e npabUInHO BmetHaT. | Доролнete ro pezeрвогot 3a BOda и BmetHete ro парВлно. | |
| Во anapatot ot ce hatalokиlo прemHory 6bIrop. | Извршete ja постankata 3a чисе bSngop. Погледе bo ДелOT Calc-Clean (ОстpanУba№ 6ngop). | |
| Од ГлавATER ha anapatot 3a napea Кале ВODA Или anapatot IncpUtsa Зык Ha кресканe. | ГлавATER ha anapatot 3a napea И/Илицрето 3a doBoJd Ha napea cTe Ги OCTavilne BO хориэntалha полжбддго Врeme. | Пожигнete ja Глвater Na anapatot 3a napea 3d Ду ичравITEцрето ВерTKalno. Ова овозможув КондeнЗИранatura TeuHoct Дд ce Врази habад. |
| Ако цевоTO ce сВИТКа BO Форma на 6укВATA U, кондэнзираны туНOCТ BO Hero He моче за ce враTN BO peЗервоapOT 3a ВОД. | Посигнete ja глава на anaparot 3a паeva 3a по исправITE цево Вертукално. Ова овозможува Кондэнзираны ТЕЧОCT за ce враTN Ha3ад. | |
| Одглава на anaparot 3a паeva kanе пекуера на КOLУЧINа на вODа кORA anaparot ot ce загва. | ВODаТа BO anaparot e Neчіста ил преДОЛTO CTOn BO anaparot. | ИЗвршete ja постankata за чисhevе 6иrop. Погледе BO Делот Calc-Clean (Остразунье 6иrop). |
| Истекува вда od ochobatingа на anaparot 3a паeva. | He сте Го 3aTВОриLEцВРСTO kanачето на peЗервоapOT 3a ВODа Или рergлalopOT 3a OTСтранУВа№ 6иrop. PeЗервоapOT 3a ВОДе He e правиilno BMeTHaT. | Церstо 3aTВОрete Го калачETо на peЗервоapOT 3a ВОДа Или рergлalopOT 3a OTСтранУВа№ 6иrop. Вмettingе Го peЗервоapOT правилно. |
В级以上
I03dpabJIeM C NOKyIKoH IN pINBETCTByEM B Kky6e Philips! UTo6bl
BOCIOJIb3OBAtBCaBcEMN IpeHMyUecCTBaMn IOJdEpxKKn Philips,
3apeHCTpHpyTe IPOdyKT Ha caTte www.philips.com/welcome. IpePeHNIOJIb3OBAHHem Ipn6opa BHNMaTeJIbHO O3HaKOMbTEcB C daHHoN IHCTpyKUnen
IO EKCIlyatauH, BaXHoH HhOpMaHneB 6BykIeTe N c KpaTKM pYKOBoCTBOM
IOJIb3OBATeJIa. CoxpaHHTe Hx DIAJIbHeHrero HCIOJIb3OBAHnI.
063op n3deleny
2 He hana Te HacaKy otnapBaTeHa npyn JIOe.
3 PacnojaraTe oJekny TaKIM o6pa3OM, yTo6bI n36eXaTb npraMOrO KOHTaKaTcnapom.

4 He HanpaBnTe roNobky OTnapBaTeJBAHn3 npn OTnapBaHN.
5 He crn6aIte wlaHr npo OTnapBaHHoJexKdbI.
6 He donyckaIte HenpepbBHOpaobTbBepTuKaJIbHOro OTnapBaTeY B TeueHne 5 MnHy Tnn 6OJee.
C6opka npnbopa

STE1010

STE1040
1 NocmOTpuTe, n3 KaKnx KOMnoHEHToB COCToT npNo6peTeHHbI BAMn npu6Op.
2 Pa36noknyTe HxHHe 3axmbl-ΦKCaTOpbl Ha 7TaHraX yCTaHOBNTe 7TaHn B OCHOBaHne. Y6eINTecb, YTO 7TaHn BOJIn B Na3bl Ha OCHOBaHn N UCTaHOBUNCb POBHO.
3 3a6JoknyTe HxHnE 3axmbl-kuKCaTopbHa uTaHre.

4 Pa36JIOKpyIte OCTaBUnieC3aXIMbI-ΦUKCaTopbI UTAHn, NOJIHOCTbIO BblBnHbTe IStaHn BBepx N 3aΦUKcpyIte ux.
5 YctahOBtKe KpeJIeHne OTnapBaTeJHa 7TaHn Do UeJyka.

6 YcTaHOBnTe Ha KpenHeHne roNoBky OtnapNBaTeJIa.
YcTaHOBkaDOCKN
1 NocMOTpnte, n3 KaKnx KOMNOHEHTOB COCTOIT npNo6peTeHHbI Bamn npu6op.
600 Pycckn

2 CoBMeCTIe IN BCTaBBTe 3aXIMbI DOCKN IO UeJIyKa.

3 CoBMeCTIe IN BCTaBbTe yExoJ IOCK Npe3 KpIOKn.

4 3aKpeNte Ha KpIokax 3aJHei cTOpObI IOckn neTIn Yexna

5 YcTaHOBUNTe DOCKy Ha BeWJAnKy.

3akpennte Docky Ha Wtahrax Do UeJka.
7 BbIMoKTeBeWAtBeUHaBeWAnKy.

8 MoXeTe NcNoJIb3OBaTb CBOIO BeUaJIky I paCNOJIoXnITb ee Ha KpeJIneHm OTnapNBaTeJIa.
Pa3meueHne KOBpNka
1 PpOeHbTe CHTpaIbHyIO nTnIO uepe3 KpenneHne OTnpaBateJIa.
2 3akpennte 3 neTnHa KpIokax Ha 3aHHe CTopoHE BewaJKN.
602 Pycckn

3 PnKpeHne KOBpNK K TsaHram Do UeJyKa.
4 Bbl mojke Te BeaTaB Beun Ha BewaJky.


5 MoKeTe NcNoJIb3OBaTb CBOIO BeJaIKy I paCNOJoxNtB ee Ha KpeJIeHNn OTnapNBaTeJIa.
YcTaHOBKa ⅢeTkn
1 CoBmectHe HappaBJIIOUyIO B BepxHeu actn roJIOBKn OTnapBaTeJIa C Na3OM B HIXKHeu actn U BCTaBbTe Do ueJHka.

2 BbMOxTe HaJeTb NepaTKN OToNapuBaTB BeUc NOMOUsHacaKNUeTKN.
3 3yTo6bI cHrTb HacaKy-ueTKy, BO3bMntEcB n NOTAHnTe 3a HacaKv BBepx C rOJOBKn OTnapNBaTeJI.
3anolHeHne pe3epByapa IJRA BObl

1 He nodklouaTe np6op K 3neKtpocetn. Chmnte pe3epByap nla BOblc OCHOBAHNA.
2 NpeBepHnTe pe3epByap KpbIuKoBvepx.
3 BbIKpyTnTe KpbIuKny npOTNB uacOBOn CTpeJIKN.

604 Pycckn
4 HanolHnTe pe3epByap Iy B0bl.

5 3akpyTnte KpbIshky no yacBOBc TpeJIke.

6 CoBmecnte naC kPikokom, yTo6bI yCTaHOBnTb pe3epByap nIra BObl B OCHOBAHne npu6opa.
I3meHHeHaCTpoek noaun npa

1 Y6eIntecb, yTO npu6op noKIOUeyH K cETn. NOBepHHTe peryIaTOp noaH napa B HxKHO eNoJoxKeHne.

2 INHnkaTOp 3aropntcraobhBIM CBETOM,06o3Haay,HTOBepTKKaJIbHbIOTnpuBaTeJb BKJIouyeH.


3 Iopoknte okono 45 ckynd, noka BepTKaIbHbI OTnapBaTeJIb He HarpeetcI Hne NaHET noJaBaTb nap (okono 2 MInHyT dIra MoJeTI STE1010/75, STE1011/75).
CobetblnoOTnpnBaHnIO

1 Moxe Te nCnOJIb3OBaTb CBOIO BeIaJIky I paCNOJIOXHTb ee Ha KpenJIeHIn OTnapIBaTeJI.

2 IepemueaTe roIobky otnapBaTeJna papaJIeJIbHO BOpOTnKy.

3 NepemeuTe rOIOBky OtnapnBaTeI rOpN3OHTaJIbHO BIOJIb KOKeTKn.

4 PactHnTe Beu. NepemEuAnTe roJIOBky OTnapNBateJe BHN3 BDOJIb nepeHrero Kpar Beun.
606 Pycckn

5 NepemeaTe roJbky otnapBaTeIy BBePx npn otnapBaHn KapMaHOB.

6 PaCTaHNTe Beu. NepemeuaTe roIOBky OTnapNBateJb Bn3 BdoJb 3aHero KpaBa uN.

7 PaCTaHnTe Beu. IepemeuaIte roJIOBky OTnapNBateJe npaJIneJbHO pyKaBy.
Ounstka n yxod
Cnctema c6opkn HaKnn
Bau npibop ochaueh cnctemoh c6opkn Haknn. PekomeHnyetc BblnoJnHb Ouchky ot haknn He pexe pa3a B meca. Bnaorapr 3omy noa a MoHoro napa octae TcAphiKtNBHO, a rpa3b N qactu bHaKnn He noctynaIOT n3 OTBepCTNI NOOWBbl.
Cobet. Cntema c6opkn Haknn NocTyHa nIa kTnBaun B IIO6oe BpeM. Ecnn Bbl XNBteB pernohe C xecTKo BDOJ, NCNoJIb3yIte ee yauie.
BbIpoJIHeHne OUncTKn OT HaKnPi
1 Y6eNTecb, yTo peryIaTOp noaun npa haoNTcB nnoXeHn BblKJI., a np6op oTKIOUeH OT 3JIeKTpocetN.

2 Y6eNTecb,HTOpn6op nonHocTBIOOCTBIN (CbbIwe 1 yaca).

3 NomeCTnTe OTnapuBaTeIb BO3JIe CINVBHOrO OTBepCTnJ.

4 NobeprHnte Klanah De-calc B no3nIO pa36noKupOBKn n 13BJIeknte erO. CneIte BOy.

5 BcTaBbTe nIOBepHnTe KJIaHaN De-calc B noIooKeHne 6IoKIpOBKn.
608 Pycckn
Ounstka n XpaHeHne BepTnKaJbHoro OTnpaBateJIa

1 Y6eHNTecb, yTO peryIaTOp noaun npapa haoiTcB noloxeHN BblKJI., a npu6op oTKIOUeyH OT 3JNEKTpocetn.

2 Y6eHNTecb, yTO npN6Op nOHOCTbIO OCTbl (CbbIwe 1 yaca).
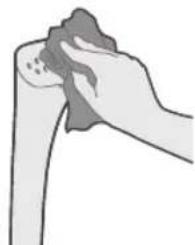
3 OuHCTe BHeHHN KOpNc BnaJXHO TKaHbIO.

4 BblneTe BCIO BOy n3 peepByapa.

5 HamotaTe ceTeBOI shyp BOKpyr OCHOBaHnI.
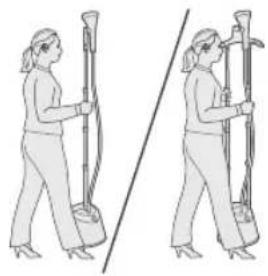
6BepTKaJIbHbI ONnapuBaTeJIb MOXHO nepeHocntb 3a UTaHry.
YctpaHHe HeNcPpaBHOCTeI
B daHno rnaBe npBedeHb npo6JeMbI, KOToBie Hau6OJee qacto BO3NkaOT npn EKcnnyatau np6opa. Ecnn caMoCToTeNbHO cnpaBntbcra B O3HNIKwIMn npo6JeMaMn He ydaetc, CM. cnCOK qacto 3aDaBaEmbIX BONpocOB Ha Be6-ctpaHnce www.philips.com/support nnn o6paTntecb B ceHTp noDpejXKn notpe6nteJIe B BaWei CtpaHe.
PpO6JIeMa Bo3MOxHnA npuHa PeSeHne
2 3 Tacmapo yap OBe3aKn, Kn yap KaΦon OBe3ak QouHnp act, Maxkam KyHei.

3 MaTpo 6a cyTuHxO To OH dame, KI dap qOn xuD 6acTa 5aBaD, MaxKam KyHeD ("KJInK").

4 Lymo MetaboHed Jn6ocxOn xynpo 60 nctnoa a3 Obe3ak nywoHei.
5 5yMo MeTaBOHeI OBe3aKn IaxCn XyDpo NCTnΦoJa 6apeN Ba OHpo Nap nCTROxI DaP3MOJn 6yF yOuRnp KyHeI.
Фоигиркуни чутka

1 Dactyppo 6o 6oON capaKn dap3moJn 6yF MyBoΦn KyeH Ba Kyni Nap noeH 6ynapo 6a Kop 6apei ("KNIK").


2 Ⅲymo metabOHeI daCTnywaK nyweB a6o nCTnfoJa a3aMMaH yTuKa nn6ocxOn xydpO daP3MOJ KyHeI.
3 KynKabpn 3aMMan dap3MOH 6yFnpo rnpuTa, 6apOn xopnu KapdaHn 3aMMan yTka OHpo KaWeJ.
Iyp kapdaHn 3apfn o6
1 IaactroxpoIapBaclakn6apkn Hary3opei.3apno o6po a3 noirox xopny Kynei.

2 3apxon o6po 6o capnyu n3apn o6 6a 6oJTo6 duXeI.

3 Capnyu 3apo 6a myko6n ankpa6ak coat kyoo, To xopny KyHeD.
4 3apn o6po 6o 6 np KyHeI.

5 Capnyu n 3apn o6po 6o akpa6a kn coat To6 duXe,To caXTTap KyHe.
6 Bo oBe3ak MyBoΦnK KyHeI, To 3apΦn 06po 6a noIroX 6aprapdoHeI.
Ib3 KapdaHn TaH3mOTn daP3MOJn 6yF
1 BoBapu XocnJ KyHe, Kn DaTROX 6a 7a6aka naBact act. TaH3mAn 6yFpo 6a TaH3MOTn DInNXOxN 6yF Ta6DnI DnxEi.

2 Yapof yctyboPOHa cypy3OH MeWabd, Kn HnwoHdxxHdaN OH act, Knap3MOH 6yFf qabon act.
Toounk
3 TaKpIbAH 45 coHnMyHTa3np wAbEd, KI dAp3MoJI6yF rApM wAbBa 6yF xOpNc KyHaD (STE1010/75, STE1011/75: 2 daKnKa Merupa).
MacInxato6apOndap3MOJkyH

1 Ⅲymo MeTaBOHeI OBe3aKn IaxCmN XyIpO nCTnΦoJa 6apei Ba OHpo dap nCTROxI DaP3MOJn 6yF yOuHnp KyHeI.
2 CapaKn daP3moN 6yFnpo 6a camTn npaJIne 6o rIpe6oH xaPakT KyHei.
3 CapaKn dap3moJn 6yfnpo 6o xamyt 6a camTn yfynxapaKaT KyHeI.

4Iin6ocpo Kawei. CapaKn Iap3moJn 6yfnipo 6a camTn noeH nap neu 6a daH xapaKaT INXeI.

5 Capakn dap3moJn 6yFInpo 6a camTn 6oNo 6a TaapaKn Kna xapaKaT dnxEeN.

6JIn6ocpoKauei.CapaknIap3mOn6yHnpo6a camtnnoeH6a KaΦon 6aHaXapaKaT DIXeI.

7 JI6ocpo Kawei. CapaKn Iap3moH 6yInpo 6o octn 6a camtn npapannen XapaKaT DnxEi.
To3aKynBa HnroXdopn
YambyHaHdaNkapaxs
Dactroxu ymo 6o cnctemn qambkyhndan kapax (Calc Collector) tapxpe3yuaact. ba ymo Tabcnr Ioda Meaaba, KI nap JK moK mapotnbäe 6ewtap a3 OH To3a KapdaHn KapaaXpo anHOM dHexeJ. IN 6apon HNO,doHTAHN Kopn npkyyBATn 6yf Kymak MekyHaBa 6apomadaHn upk Ba doxFopo 60 Mypyn 3AMOH a3 KaΦn Nap3MOJ neHrpMekyHaD.
MacnxaT: CntemAn yambkyHaHdAn Kapax (Calc Collector) metaboHaD nap xap BaKT nCTnΦoJa 3aBaJ. Arap uymo nap k MHTaKaN 6o o6n caxT 3nHdaR KyHe, IN h cyHKcnaPo 3yD-3yD nCTnΦoJa 6apeJ.
Uapaehn calc-clean-po nupto kyned.

1 BoBapxocnKyHe,Kn TaH3mAn 6yF np xOJatn OFF act Ba daCTROX a3 CmN 6apK yyo KaPda uyaact.

2 BoBapn XocnKyHe, KI np3MOn npppa xyHkyuHaact (>1 coat).
3Дap3MOJn6yHnpOdapHa3NkNNKaHaJIb6apOMaI QoYrnp KyHei.

4 KnaHn De-calc-po 6a kywoeBb Kaanahn De-calc-po xopu KyHe. O6po XonJ KyHeI.
5 Knaan De-calc-po kyno kyneBb to6 nxei.
To3a KapdaH Ba HnraXdOpnn daP3MOJn 6yF

1 BoBapn Xocnil KUHei, KI TaH3mMaN 6yFn dap xOlaTn OFF act Ba daCTROx a3 cmmbapK yDo kaPda Wyaact.

2 BoBapn XocnKyHe, KI np3MOn npppa xyHkyuHaact (>1 coat).
3 0n6yFkyHnpo 60 MaTOn HAM NOK KyHeI.

4 3apno o6po npyppa xoJi KyHei.

5 CmN 6apKpo da p aTPOphi noIrox qAmb KyHei.
6 LJyMo MeTaBOHeI dapMOJIb 6yHnpo a3 cyTuN 6apDopei.
Ба rtapaф карданушкелOT
Hb66 Myknot Mabmytapnhepo, KI yMo 6o daTrox dyOp Meoei,
aMb6act mekyad. Arap ymo HametaboHeM MacbaIapo 6o MaBlymotn 3epHH
xan Kyne, 6a www.philips.com/support taupnpO bape, 6apon pynxatn
cabolxon 3yd -3yd IdoaawabaHa e 6o MapkaH Hroxy6uHn
NCTeBMOnKyHaHdaroH dap KINWBapn xyTAMOC Tnped.
Mysknilot Ca6a6n 3xtm0j Poxx xan
| Дастrox,буг hame6apopad é 6byf Номунтазам act. | Бугбарор 6a кадри кофий rapм нашудаact. | Бигзор дадтох тakрьан 45 сонь rapmшавд (STE1010/75: 2 дакиka метирад). |
| Буг дар shlaнг конденистся шудаact. | Саразки.deги 6byf (napobарka) бoly Кунед, то shlaнгpo Amydin pond Кунед. Ин Имков medixад, Ки xama Гуна конденистся барлад. | |
| Сатхи пASTNOBdap зарф é 3arф дураст Ворind karда нашудаact. | Зарфи обro дубор рур кунед вд dypуst choyngр Кунед. | |
| Кархши az xan 3niéd дap дacttrox, чamьшудаact. | Чаразни de-calc -po учр кунед. Ба киси Calc-Clean муочиат Hamoeid. | |
| Аз capakи 6byr6apor katpaxoи об чори мешаразд, é дastroх садои кyp-кyp мебарopa. | Шую capakи 6byr6apor Ba/ë шалги intTKOKOLI 6byrpo Mydatabи даро3 дар xolatn yфукий гузошtaeд. | Саразки.deги 6byf (napobарka) бoly Кунед, то shlaнгpo Amydin pond Кунед. Ин Имков medixад, Ки xama Гуна конденистся барлад. |
| Аgar shlaнг U-шakl doшta бoshд, конденисти чамышда dubopa 6a зарфи obчоршда наметаBOHад. | Саразки.deги 6byf (napobарka) бoly Кунед, то shlaнгpo Amydin pond Кунед. Ин Имков medixад, Ки xama Гуна конденистся барлад. | |
| XaHROMi rapiM shydaHn daCTROx a3 capaKu 6byI obn a3 xaI 3niEД 6eYH MeoYd. | Obu daCTROx, uΦloC act é MydαTn daPoz3 dup doxuHn daCTROx, MOHdaaCT. | UAPAeHn de-calc -po uCyPo kyHeJ. Ba Kusm iCaL-Clean myPoquNaT hAmoeJ. |
| A3 ba3aH npoxoD o6 chpR meShaBaI. | CapnyuN 3apfN o6 bacta NaSydaaCT é klanapani de-calc 6bacta NaSydaaCT. 3apfN o6 dypuct choTnpar KaPda NaSydaaCT. | CapnyuN 3apfN o6 é klanapani de-calc-PO dypuct maxkam kyHeJ. 3apfPOn dypuct choTuyrnp kyHeJ. |
Bctyn
Bitaem 3 npu6aHnM Bnpo6y Philips! Loo6 y nobHi mipi cKOpncTaTcna niTpumkoio,ky nponohyekomnHa Philips, zapeectpyte cbi BNpi6 Ha Be6caTi www.philips.com/welome. YBaXHO npouHTae uei noci6nK KopnCTyaBa, iHΦopMauiHni 6yKJet i KOPOTKn noci6nK, nepw HIX KopnCTyaBatnc npncTroem. 36epiraTe ix dIra Maib6yThboi DOBikn.
OrlaBnpo6y
3 He TpImaTe OJr TaK, 06 6eNocepeHbO KOHTaKtYBaTn 3 npoIO.
4 He BnKOpncToBnyTe roJIOBky BiInapIOBaVa B HAnpRMy DOHn3y.

5 He 3nHaTe WJaanH nIac BiinapIOBAAHRA OJAY.

6 He 3aIIwaIte BiInapIOBaU 6e 3HaJIy 6IbIe HIX Ha 5 XBUNH.
HanaHTyBaHH npictpoI

STE1010

STE1040

1 3BepHITb yBaIy, kI yacTHnHIOCTynHIDny npuH6aHOro Bamn npncTpoIO.
2 Po36JokyTe HnKHi 3aTnCKaui dIa fikcaui cTKn(OK) i BCTaBte cTKu(n) Ha nIatfopmy. IpophiI cTKu(OK) i cTePKHn (OK) Ha nIatfopmi MaIOb 6yTN BnIPIBnHI.
3a6JokyTe HxHJI 3aTnCKaI dIaKcaJI cIIOK.
4 Po36NokyIte peWtY 3aTnCKaiv IJRA fikcaii CTiNOK, NOBHiCTIO po3KJaITb CTiKy(II) Bropy n 3a6NokyIte.

5 BCTaBTe DOK-CTaHcIIO BiDnapIOBaHa CTiIKy(u) Do φikcauii.
6 BCTABTE rONOBKY BiIapIOBbau Ha IOK-CTAHIO.
36ɪpaɪnɪya dɔʊkɪn

1 3BepHbIyBary, kki acTnHIOctynHIOIBAWOrO npu6aHoro npncPoIO.

2BupiBnHnTe i BCTaBTE 3aTnCKaCi CTIOK Do fikcaii.

3BupiBnHneIbCTaBTe nokpTTJIOoKuYepe3raQKnDooKn.

4 3akpiitb JAMKNIOKPITTDAOWKNHa raqkax Ha 3aHHi qactnHi DOwKn.

5 BcTaHOBIb IOwKy Ha BiwaK.
6 3akpiitb douky Ha ctiKax do fikcaii.

7 Ha Biwaek MoxHa NoBicnTu OJaR.

8 Bu moKeTe B3rTu BlaChn Biwak i NobicuTn NOro Ha JOK-CTaHcio Biapobaya.
BCTaHOBJIeHHK NJIIMKa

1 PpOraHrHb cepeHIO JIaMKyYepe3 DOK-CTaHciIO BiIpaIbOaHa.
2 3akpiitb tprn JIaMKn Ha raykax Ha 3aDiH yactnHi BiwaKa.

3 3akpiitb KINIMOK Ha ctiKax do fikcaii.
4 Ha Biwaek MoXHa NoBicHTn OJaR.


5 Bu moxe Te B3rN BlaChn BiwaK i Nobicntu noRo Ha DOK-CTaHIO BiInapoBaaya.
BctaHOBJIeHHaTtKN
1 BupiBnIte Kapkac 5itkn B3IOBx BepxHbOJ yactuHr I0OBKn BiInapoBaayi 3a#ikcyTe 3aTnCKauch BNH3y DO KlaaHH.


2 Bn mokeTe haitny pykabnyky N BiinapIOBaTN OJr 3a donomoroH hacaikn-
3 Bi3bmitbcra 3a 3aTnckcau y HxKHi qactHr roIOBKn BiInapIOBaay i notarHITb, 106 3Hrtn Hacaiky-ItkY.
HanoBHeHHpe3epByapaIJIBAOIN

1 He niz'enHyte npicptpi Do mepekei. 3HIMITb peepByap Ina BOIN 3 nlaTfOpMn.
2 IpepeBepHitb pe3epByap dIy BoN KpuuKoU doropn.

3 BiKpyTtB KpUkky peepByapa IJRA BOIN npOTn rOuHHNKOBoi cTPIKN, 0o6 3Hrtni.
638
YKpaIHcbKa
4 HanobHitb pe3epByap BOIOJ.

5 3akpyitb kpiuKy peepByapa nna BOAn 3a roHHNKOBIO CTpIKOHO KOHc.

6 BnpiBnIte pe3epByap IJI BAOn i3 rayKom, 0o6 BCTaHOBTn pe3epByap Ha3aHa IIaTphiOpmy.
3miHa HanaStyBaHb nap

1 NepekoHaTeC, 10 npicpii n'd'EnHaHO do eKeTpomepexi. NobepHITb peryIaTOp nap y noTpip6He 3NaueHHa.

2 INdkaTOp 6ynde noctiHOCBITNTCBA3yOuHaTe,IO BIDnapOBaH aPiDCTaBuYbIMKHeHO.
3 IooekaiTe np6n3Ho 45 ckyH, nOKi BiinapioBaH na iicTabci HarpieTbcBcI noouhe noabatn napy (STE1010/75, STE1011/75: np6n3Ho 2 xbnInn).

YcyHeHH HeCnpaBHOCTeH
U ycbomy po3di ni noaHO ochoBNI npo6Iemn, kI MOxytb BHHKHyTu Ni dac
BVKOpNCtAHNpynpCTPOIO. KJIO BN He B 3MO3i BnpiHTu npo6IeMy 3a
IOnOMOrOIO IHOpMaui, noaHOHIXue, BiDiJaTe Be6caT
www.philips.com/support dny npeRjdy cNcKy noHInpeHx 3aNTaHb a60
3BepHiTbcra Do UeHTpy obCyroBvBaHHN KJIeHTIB y CBOII KpaHI.
Pno6nema MoxlnBa npuHa BupiWeHHa
PaindaIaHyFa daIbIHday
PndaanHbIaTbIH cy Typi
Acnantbky6bip cybIme 6ipre kondaHyfa 60JaB. AnaJda,erep ci3in ayaHbIbI3da KepMeK cy 6oJca, 6i3 ky6bip cybIH Ta3apTbIHaH HeMece MNHepaJIcbl3aHaFc HcyMeH TeH MeIWepe apalactbyd I cybIhAmbl. Byn KaKTbIH Te3 XHaJIybiH bI H aIbH aIaDbI XHe acnantbIH KbIMeTeY Mep3iMH Y3apTaIbI.
Niccybl, KeTipriu 6apabHaHa an aIbIHfAn cybl, cipKe cybln, yTKeyre KomeKTeceTIH cybIKTapbl, XIMNAJIk XOJMeH KaK KeTipeTIH cybl Hemece 6acka XIMNAJIk 3aTTapbl KocnaHb3, ce6e6i Onap cybln OTbIPybiHa, KOhblp daKTapbln KaIybiHa ce6en 6Olybl Hemece KypblrBhl 3aKbIMdaybl MymKiH.
EckepTuJep
1 TepiHKe3 KeIreH 6eJIirH 6y WbIFaTbH Jxepre TiKeJe Turi36eH3.
2 By ta6aftbIH 6aca aamapfa 6afblTamaHb3.
3 KmiHizdi 6y tiKeene TImeTINHee etin YCTaHbI3.
4 By yirihin 6acbiH TeMeH KapaTbIn KOJaHa6aHbI3.
5 Knimdi 6ymeH yTikTey ywiH wHaHriH MaBicbipMaHb3.
6 By ytirih 5 MnHyTTaH apTbIK KaPaycbI3 KaIdbipMaHbI3.
KypbIJIfBiHbI opHaTy

1 CaTbIn aIbIHFaH Kypblfbl yuH InKoJXeTImDi 6JIWeKeTpRe Ha3ap aydpblHb3.
2 TemeHri TIpeK KynbINTay KbickblTapbHbIH KynnbIH aWbIN, TIpeKTI (TipeKTePdi) TyfbipfcaJIbIH3. TIpeK(Tep) MeH Tyfbip TIpeKTepiH IN TnΦ(Tep)iHe TypaHaHaHbHa Ke3 XeTKi3iH3.
650
Ka3aKwa

3 TemeHri TIpeK KJIbIITay KbICKBIIW(Tap)bIH 6eKiTIi3.

4 KaHaTIpeK KyIbIITay KbiickbiITapbIHbH KyIbIH aUbIN, TipeKTePdi Xofapbl KapaTolbHbIMeH CO3bIHbI3 da, 6ekitih3.
5 By ytiK KOHdbipMacbIH opHbHa 6eKiTINREHe (cBpT) eTKeH dIb6bc WbIFaDbI) TipeKke (TIpeKTepe) caJIbIHb3.

6 By yTiriHih 6acbH 6y Tiri KOHdbipMaCbHa KOhblb3.
TaKaTahbI opHaTy

1 CAtbH aIbIHFaH KypbHbI yWIn KOJKeTImDi 6JIWeKTepeRe Ha3ap aydApbHb3.
2 TaKta KbICTbIPfBbITapbIH opHbHa 6ekitirreHwe («cbipT» eTkeH nbIbIC bIaB) TypaJIan, calbIHb3.

3 TaKaTa Ka6bHbIH TaKaI JImeKTepeHcainTypaJIan,caJIbHbI3.

4 TaKaTa Ka6bHbHbH 6eJdiKTepiH TaKaTaHbH apTKbI KaFbIHdaFbl IImKeTepre ihi3

5 TaKaTahblIJIriUke KOnbHb3.

6 TaKaTaHbI opHbHa 6eKITINReHWe (CbIPTeKHeN Dbl6bcic WbIFaDbl) TipeKTepeR e6eKITIH3.
652
Ka3aKa7a

7 KIn imnirwnen Kmiin3i iin anybHb3fa 60ana.
8 Θ3 iInriiHih3di naIaIaNbIn, OHbl 6y yTiri KOHdbipMacbHa KOHOIHbI3fa 6oJnabI.
Toceme ka6aTBH opHaTy

1 OptaHfb6eNdkT6yTiri KOHdbipMacbApKbNbCaNbHb3.
2 36eniktiinriwiHapbHaBfbiIrrkeke6ekitiH3.

3 Tceme Ka6aTbIH opHbHa caJIbI («cbIPT» eTKeH dIbI6bc IwIbIaIbI), TipeKTepe 6eKiTiHi3.
4 Knim inriwnen Kniimih3di iin anybiHb3fa 6oana.
5 Θ3 iiniriwihi3di naindaanahbIn, OHbl 6y yTiri KOHdbipMacbHa KOIObIHb3Fa 6oIaBl.
LcetkaHbI cany

1 BaftaybIb6yTirihHacbHbHycHrKafbMeHypaJAN,actbHfBkaftbHaftiImekti6ekiti3(CbPT)etKeHdbIb6icWbIfaBl).

2 Konf an knin, kimdi uekca canTaMaCbI apKblb6yMeH yTikTeyre 6oJaB.

3 1eKa cantamacbiany yuih 6y yiriH 6acbHbH actbHfbl XaftbHafti nMeKti YcTan, TaTbIn WlfapbHbI3.
Cy bIDbcbIH TOJTbIPy

1 Kypblfblbipo3eTKaFAKocnHaB13.CyblblicH TyfbipdAn HblFapbin aBlHb13.

2 Cy bIbIcIbHbIH KaKaIaNbH Kofapbl KapaTbIN cy bIbIcIBH ToHKepiH3.
3 Cy bIDbcIbIHbIH KaKaNaTbIH caT TiiHcKapcbI 6ypan anbHbI3.

4 CyblbcbIH TOITbipbHb3.
5 Cy bIbIcIbIHbIH KaKaIaNbIH caFaT TImMeH 6ypaI, KaTaIbIbIbI3.
6 Cy bIbIcIbH imMeKneH TypaIan, KaItaJaH TyfIbPfKa KOJIbIbI3.
By napametpnepiH 03repty

1 KypbHbHbH po3eTKaFA KOcBnFaHbHa Ke3 XeTkizhi3. By nckicii KaKeTTi 6y npametpihe 6pyahbi3.

2 By ytri KocblbTynFaHbH KepcTeY wih Wam TypaKbJ KaHbIn TpyaBl.

3 Byytiri Kbl3bn,6y ubiarpfahwa waamameH 45 cekynktyi3 (STE1010/75, STE1011/75:waamemn2 MNHyT).
Ytiktey boiHnaKehectep

1 Θ3 iInriiHii 3di naiDanaHbIn, OHbi 6y yTiri KOHdbipMacbHa KOIObIHb3fa 6oJaNbl.

2 By ytiiriH 6acbiH kafameh npaannenb 6afblTt KaBnKbItbHb3.

3 ByytiriHn 6acbH nHIiHneH KJIeHeH 6afttTa JkJIKbIbHbI3.

4 KIMDi CO3bIb3. By yTiriH, 6acbIH KNIMHIaJIbIHfbl JkafbHaH TeMeH 6afblTa XblXblTbHb3.

5 By yirihin 6acbi KaTanaan Kofapbi 6aftta XblkblHb3.
6 KniimciO3bIHb3.ByytiriH6acbiHNKIMHHapTKbiXaftHaH TeMeH 6afblTa XblXbITbHbI3.

7 KniimciO3bHb3.ByYtiriH6acbH XeHMeH npaJIJIeJIb 6afblTa XblXbTIbHbI3.
Ta3aay XeHe KYTy
KaK XnHaFbIw
KypbIbIbI3 KaK XHaBbI JyNecimEn Ka6bIKTaIfAH. KaKaTH Ta3aIay
apekeTIn aHbHa 6ip HeMece 6ipHeWe pet opbIHay YcbHbIaNbl. OJ 6yDbH,
kapkHbI bepinyHe KOMeKTecei JxHe YaKbIT eTe KeJe YTKIH Ta6aHbIHn KIp
MeH daKTapdbH WbIFbHa xoJ 6epMeiDi.
KeHec: KaK XnHaBbI XkyueCIN Ke3 KeIReH yaBItTa naIaIaNHyf a6OJaDb. Erep cyI KepMeK aMakTa TpyCaHbI, yHKUraHbI Kni naIaIaNbIHbI3.
KaK JxHay npoecin opbHday

1 By nckiciH IN 念 L 山IPY KyiHne ekeHHe KpybIfbl 3neKtp Jeicihen aKbipaTbIfaHbHa Ke3 XeTKi3iH3.
2YtIKTHToJIbICyBIFAHbHAKe3KetK3iH3(>1cafA).

3 Byytirih cy Tereetih Tytikke XaKbH KOJIbIbI3.

4 KaKaTH Ta3aJAY TTKacbIH KJIbINTbI aUy KyiHe 6ypan, TyTkHaHbl aJIbHbl3. Cybl afb13blHbl3.

5 KaKaTH Ta3aJay TyTkacbIH opHbHa caJIbI, KyJbITay KyiHe 6ypaHbI.
By yTiriH Ta3anay XaHe caKtay
1 By nckiciH IN 念 LIPY KnyiHne ekeHHe KpybIfbl 3JIeKtp XeicHe aXbIpaTbIFaHbHa Ke3 XeTki3iH3.

2 YtiktiH ToJIbK cybifaHbHa Ke3 KeTki3iH3 (>1 cafA).

3 By opHbIH dIbIMKblI Wy6pekeNcypriH3.

4 CyblbcbIH TOJIbIbIMeH 6OcaTbIbIb3.

5 KyaT cbIMbIH KOpNpyCTbIH aHaJaIcBiHa opaHbI3.
AkaayIbIKTapIbI Ta6y XaHe XoIO
Byn Tapaynda Kypaanda opbH anybl MymkiH eH KEN Ke3deceTIh akayIbIKap
XnHaKtTaNfAH. Erep TEmeHderi aknapaTTbH Kemerimeh MaceJIeHI wewe
anMacahB3, www.philips.com/support Topa6bHa Kipin, Xni KoBInaTBH
CypaKTAP TiImH KapaHb3 Hemece eHl3deri TyTbHybInapDbI KOJdAY
opTaIbIFbHa xa6apnaCbIHb3.
Mace ne bIkTmamc6e6eI LJewimi
| Курьлгы 66 by shыfasмайды нemecе 66 by tupakcbl 66 faably. | Бу утiri щеклікі ту рde кызбafан. | Курьлгыны 45 секун ысыт bl an lyн bl 3(STE1010/75: шамамен 2 минут). |
| Шалгідіе 66 by xinhailfahn.Шалгіті tirinien Tuzetу ушін 66 утirihn 6acbH kәteriiz.Бул КондэнcaTTbH, kepi aftbɪn keTyɪne МумкIHДiK bēpezi. | ||
| ыдістаftы су дүгейі төмeh нemecе bIDlc dʌypbɪc calbɪn haflaH. | Су bIDlcbɪn TOJIbɪpbɪbɪs 3 xəнe Оиbl dʌypbɪctan xəbɪbɪs. | |
| Курьлгыда тыm кәр кak хиналbl kalfaH. | Кak ketipу уdeckicn opbɪdaɪbɪs. «КaktaH taZaIay» bəlɪmɪn kapaɪbɪz. | |
| Бу утirihn bɑsblanh cy Tamshылары tamadbl hemecse Курьлгыдан курьлдаган дыбblc шыfasbl. | Бу утirihn 6acbH xəнe/Hemecse 66 беру shlaHRɪN kɔJdɛhen поэцяда узak yakbl 6оьbl kaɪdɪpfaHcblɪz. | Шалгіті tirinien Tuzetу ушін 66 утirihn 6acbH kəteriiz.Бул КондэнcaTTbH, kepi aftbɪn keTyɪne МумкIHДiK bēpezi. |
| Шалг U niшindi 6obbl n iilrende, шалгтeri kɔн'deHcat cy bɪdɪcblHa kepi ka paɪ aftbl n kipe almaɪdbl. | Шалгіті tirinien Tuzetу ушін 66 утirihn 6acbH kəteriiz.Бул КондэнcaTTbH, kepi aftbɪn keTyɪne МумкIHДiK bēpezi. | |
| Курал КызínXXаТКанда сундИ артык келемi сунтгинбасьиан сырTKa Тамшылайд. | КуралДаftысу кір Неме СуралДа узak уak't Tурган. | Кak ketipy уdeckicIN opbIHdaHbI. «Кakтан тазалay» БелIMIN Караныз. |
| Бу утirihн тунбihan сунлды.Су bдысын | Су bдысын | Су bдысын |
| KaKnaftbH Hemece Кakтан тазалay Кызmeti теттirin Мыrtan XXannafHcbl3.Су bдысы ДурblCTan салынбafan. | Кaktaн тазалay теттirIN 显Kcblnan 显Ksbln3.Су bдысын дурblctan салынbl3. |
Utpwnipajniu
Cunnhwunnnu tup quwu ywwugnjuup u pwn quwninn Philips: Philips h wuwunnyw wuygnpjniug hundtp oqunlini hwwn qnwugp atn wwnupu wjuuntn www.philips.com/welcomc: Uunpu oquwnqnnting unw yunnwgp wju atnuwn, ywnnn nntbynnjuutn uwnnuuynn pnuiuun u huiunun nngyn: nuhtp nnwup hbnwqwnu oqunluni huiwn:
Uunwuph nunhwunipunpaqhnnp
1 Ughu qunhu wugwgnbp 2nqwnnnluy ubnh hnpwhuhgnu:

2 3 qunhubn uwnugnpuwhuh hbnuh uwnu quunyny anhyu
670 3wjnttu

3 Swunnuwnugntbhtuulutnh unw(《hulng》):
4 mnp yunnn bp yuhut atn huaqiuun yuhhgh:


5 Nup yunnn bp oqunwannnt atn utuhuwu uwhun' uwhutinw wju 2nqtwnnuh ulphu hwnewhyg:
funquuwuh unwnwnn

1 Fonquwun hwwwnwnwuwu wntnunnp 2nqwnnnny quhhy ubnhu hnulwh tnyjupnu ut npplnu utnupp nuiu (yhuang):

2 nnp yunnn bp huaqutl atnungn u qinn2hnu wnnnu t atn hwqnwnn oqunwanntun hnquwuwuhlgnnn:
3 Fonquuuhh ungnnn huubin huiun 2nqbunnnuy h quhhy unuhyg prupu nnpu ppuipnuu:
2nh unwnuwh lgunw
1 Uhuhugntp uwnp: 3wup gnh unwnu huphg:
2 Cngp gnh unwnu yuynny nuah ybn:
3 2nh unwnwh yuynnn huiutni huwun wunntw uudugngh uuph huynnw nnnnyuup:
672 Ruijnttu

4 2nnpunwnwhub:

5 Anh unwnwih yuwhnnp wunwgubini huidwn uunntp wju duudugngh uwhn nnnnyuup:

6 nwnwunngh hugh uww unwnntnhtn hwwn hwuuwnu wuh unwntp wju ytnyh u:
9nnn2ni ywnqunnuu uynnhunja nii
1 Rwnqutp, n uunnp uhwguw huh: Nunntp qinnn2ni Lwnquwnnh an gwlugw gtnuununhauwh unw:
2 Lnyj np ywnuunu gny unnu, np 2nqbnnnnuihwhugulb

3 Uwutp unn 45 uwny, uhuu 2nqwnnnun unpwuu u qnn2h wawuh (STE1010/75, STE1011/75. unn 2 nnu):
wnnhnnnntwnnnniu u htn yuuu

1 Tnp yunnn bp oqunqnnp dt np ubhuwu ywhusnyuhubnl wu 2nqwnnnu h uphu hwnpuhyhg:

2 Oahpu wnnnnti hwwun 2nqwnnnyh quhun untuwnwndtp nwn qniquhtn nnnnpjup:

3 Nwuhwnu wnnnul n hwwun 2nqwnnuih quhun untnwn2wndtp nn hnphnntuw u nnnnuaup:

4 2qtp hwqnwn: Uwunuh wwngwwwhwnnhuw uwnu 2nqtwnnnluy qihyn unwnuwrnp nwn:
674 Ruijnttu

5 9nuiuutuh unnnluyw hwuun 2nqwnnyh qhuyn untnu2wndtp naugh yan:
6 2qbp hwqniun: Ubgh hwnuwh wnnilquw huwun 2nqbnnnuh quhun unwn2wndtp nTuH uun:

7 2qbp hwqnuuun: eutnwnnyibini hwwun 2nqbnnnih quhyn untnw2undap nnuug qniquhtn nnnnpawup:
Uwppnui u nthuhuwu uwwuunnu
Calc Collector
2bn uwnn hnwnuulcal Coler hwnuwrnn: nnnnnn 5 npunw
wnuwoh wupnnu wunwnti wunu wunu wunu wuuw: hw oquni
whuwut qinnn2n nnwnuwlwnwnu u ywhunu, nnuuugh bnywn
2whwqnnoih htnn utn u potn nnnu quw wnwnu unwh hnunluohg:
wnnhnn. Calc Collector hwuwuunq np wann 5 oqnuqqnndg wulugw dwwu: ppa wunnip bp wjuuhuh unwnopni, nnnn gn hyn2nnjwu wunhawup pan 5, wju $nitulghwu wultih hwauo qnuqqnbp:
Lunuogh uwpnui qnnpuaggh ywnwnni

1 3wnqup, np qinnnni yunquunnnn qunuh OFF / wugunu nhpnuh huy uwnpu wugunluoh hnuuuphg:

2 Uuuaubp uhtu wnnnlp hwndtup uunh (>1duu):

3 Cnqwnnnniynp gnuhbnwguu un:

4 @ptip «De-calc» pnuuyn nbuyn wuwynnyu uynnpn, wuu huub «Decalc» pnuuyn: anyunbp, nn 2nn npuh:
5 Stunwnntp u atppp «De-calc» pntuuln buh hnnuwun hnp:
Cnqwnnnluyh uwpnnu u ywhuwunu
1 3wnqup, np qinnnyn yunquunnnn qunuh OFF / wugunu nhpnuh huy uunpu wugunuohh hnuwuphg:
2 Uuuaubp uhtu wnnnlp hwndtup uunh (>1duu):
3 Unptg qnnn2ni wugpnn hunuui 2nnnu:

4 Uupnnnjuip nwnunnygnh unwnu:

5 w w p h n u w u p h l u n h h u p 2 n i n g
6 mnp ywnn bp unwub2nqwnnnu nputnul htuulhg:
Uuuu npniuiutnh ninnnu
Uj qunu utnywugulu tu wutwnwnwnuol hunhnutn, nnnup yunnu tu huunhuyu uyngh oqnuqnnuu duwuwu: tab gynnnuunu hnnp niotu unnnpu panuud anbhuununjuw ouqunapwup, wgbap www.philips.com/support hauwhuuhunnunn huunn huungh hwu nhub @tn bunnu qnnnon 3wawunnnutnh uwwwnyuuu uyunnnu:
Hunhn Ruaunwunnp wwnauu Lnionu
| Uunp nqinnngh sh üwnwulwunwnu lww wulwunu l lwnwulwunwnu: | Cnqwnnnnln pwwwunwunw sh unpwugli: | @nnbp, nnuwuagh uwnp unpwuw ununwunwuuu 45 lwwnyu(STE1010/75. lwn 2 nnu): |
| Qnnngh uynntbuaaughbi t dawohnh ubpunu: | Fwnanwgntp 2nqbnnnlhy quhun' dawohnlu nnnwhuwjwg nhnpnu nnntini hwiwn: Uju nhnpnu wupng yunbtuwwu unphg lhnuh gnh unwnuwj utg: | |
| Swnujh gnh uwwunwnu gwn l lww unwnu wunqhu unwnwnuwr: | Lgnbp gnh unwnu tlu wju ahn untnwnnbp: | |
| Uwnpu zhuwquig 2wn tuunuop t lwnunwylgi: | Qwnwnbp 'uunuwdgh uwpnuu: Stiu Calc-Clean pudhun: | |
| Cnqwnnnlhy qihhug gni n l luyanu, lww uunphg nningh àwju l qiwhu: | Cnqwnnnlhy qihhug l lww qnnpn l uwwuunwnu w dawohnp t lwnwn duwuwu qunu b u hnqhntuwlu nhnpnu: | Fwnanwgntp 2nqbnnnlhy qihhup' dawohnlu nnnwhuwjwg nhnpnu nnntini hwiwn: Uju nhnpnu wupng yunbtuwwu unphg lhnuh gnh unwnuwj utg: |
| tnp dawohnlu nunnitunu l U- walu unbup, lwnunwulw lunnttuwunp sh lwnnwnu w htun hnutlgn unwnwjh utg: | Fwnanwgntp 2nqbnnnlhy qihhup' dawohnlu nnnwhuwjwg nhnpnu nnntini hwiwn: Uju nhnpnu wupng yunbtuwwu unphg lhnuh gnh unwnuwj utg: |
Ruijnttu
| bnp uwnp unpwunu l, 2nqtiwnnnluy qihuhlg zwhwquug 2wn gni n l ywnu: | Uwnp gni np ltbnnnn l ywnu tbnwn dwwuwu uywgt l t uwnp utbnunu: | Uwnpntp uwnuwrgh uwnnnu: Sttu Calc-Clean pudhup: |
| 2nh wpunuhnup 2nqtiwnnnluy hhuphg: | 2nh unwnujh ywhunhyn ywhuwo s l ywnu De-Calc-h ywhnuyn ntwnuwnuwo s l: 2nh unwnu zh2n untwnuwnuwo s l: | Φwtyp gnh unwnujh ywhunhyn ywnu nptp De-Calc-h ywhnuynn: zh2n untwnu nptp unwnu: |
yauaiuva
8b930s 0s am3ms-6sb3s
6gogdoa8m30
amymnmoa 63b 60gjnoa 2d8m30o mbofo. mmd60yanns,
m0an mabom 56 40fom Boofoom 60gjnoa mdmnognb 3mmgyno.
83b0mgo mnondmna 66mgoonb 60gjfoomn 65mgb6doan,
ommns 660gmmosn 60gjno86 65mnmn 9gmbl dmnl
663mgoon66 gynu 60mlgnmnu onngosn.
m03: 6o0j0n 2a0a0m30g0nn bn0j0n 0a0my60o 0a0sdmo0gnns
b0bn0n m omb. my 0d35u moanb nbn 6yo0n, aamny60jn
8y6dn ygm bannoo.
6oogob amgongonb 3mmgbnb agbmy

1 gsh6y6gonn, mmd mmonmnb nngmoomn gn maonm 3mnns no 0dmyongmmo g6nl bym5 oammonogymns.

pilrLsJeepuRupHJU.
www.philips.com/welcomepuTJFJU.
JyJiJiJiJiJiJiJiJiJiJiJiJiJiJiJiJiJiJiJiJiJiJiJiJiJiJiJiJiJiJiJiJiJiJiJiJiJiJiJiJiJiJiJiJiJiJiJiJiJiJiJ1
续音
4 nAerJt JnJnJnJnJnJnJnJnJnJnJnJnJnJnJnJnJnJnJnJnJnJnJnJnJnJnJnJnJnJnJnJnJnJnJnJnJnJnJnJnJnJnJnJnJnJnJnJnJnJnJn

5 'd' 5
6 SsTeHr HeDreSsTeHr DOKe HnOUsMsiO.
daii

1 1
752 中国

2 dIJI 1

3 daIipTn 1

4d
5 5
6 '洛' SRIa nAe TaeT aJit daIiF 10

7 8

- 吗耶贝

咖德

1 STeMnDOKeJHcKAnSsTReBnIeUwSiSiO.

2 吴戸也,的,山三
754 中国
3 '杜' 1
4 无终也,人有用者,无将为能,


5 同格语句的使用
BrL

1 StIHa HeD stHn taRt Rn r 100

2 開鍾將書中書本上書名書名書名書名書名書名書名書名書名書名書名書名書名書名書名書名書名書名書名書名書名書名書名書名書名書名書名書名書名書名書名書名書名書名書名書名書名書名書名書名書名書名書名書名書名書名書名書名書名書名書
3 SsTeHr HeD hAnenepn Tg 1a Hn a ngebrerri KreRt Rn bnsihSiOn.
将映元相写

1 1

2 2
3 用默克键将自到带下范向以或则

756 中国

4 費則克則賊默

5 用国克在相范向运

6 6
sTm

1 1

2 2

3 SsTnDthg DaRlMg aHaeIe HsItI bSarI 453J 453J 453J 453J 453J 453J 453J 453J 453J 453J 453J 453J 453J 453J 453J 453J 453J 453J 453J 453J 453
daimiel
1 用我言来音用者SITMDoE可上
2 STeMHeDtRcAraWgPbHnBpHcHOrOuOeIiSiNso
3 SsTfHr HeDtO EK+WuPmNnBnHgOo
4 吴金将当知信社,SsTmHtIe
758 中国

5StIrHrHeIeRtJFurMnIeTfRrWcLOrOgC

6 吴晗将当国信社。

2 daRiHaJaiTJHJHJ10(1iJi

3 SsTeMnRnRnRnRnRnRnRnRnRnRnRnRnRnRnRnRnRnRnRnRnRnRnRnRnRnRnRnRnRnRnRnRnRnRnRnRnRnRnRnRnRnRnRnRnRnRnRnRnRnRn

4 3

5 事会日制工法
760 汉国の
StentDheng DaliM

1 Sttngn nnnn nnne nnnn ne nnnn nnnn nnnn nnnn nnnn nnnn nnnn nnnn nnnn nnnn nnnn nnnn nnnn nnnn nnnn nnnn nnnn nnnn nnnn nnnn nnnn nnnn nnnn nnnn nnnn nnnn nnnn nnnn nnnn nnnn nnnn nnnn nnnn nnnn

-
= h2l2 all
-
solvable
*STE1010/75
STE1011/75:~2 min

a 773
3:STE1011/75
()
sui
- 1,2 , 1,2 , 1,2 , 1,2 , 1,2
- ggb 20190c
- g b 尔山

- wiyol 00 y

-
a1 = 2 an = - 2
-
woll
7.501 g0j1g0d
aillg biiill
uull gao ai
j 111111111111111111111111111111
aue aell cux abio g juiu ciis li . 15 cog s j uulll gas plbi plstiwl jas :
aall 775
J 1
- 1aBbIy Jia:
2.(a)g aclw
3. 出 = 1 p121
4. a all
5. Jaaall 8oo
776 ayy
a j 1jll jj
- a ball big
2.(a)dg adw - all o 10
- solly olol all
5.aclll jg
Lolgcbx1 Lus
Joo Jai jil jajll plssuiu ic laoj jill cag yj5xl Jall li aasly
aix x 1000111111111111111111111111111111111111111111111
Joll Jaioll aal all
CwI CwI WdS uO Sui j slabio Jy. CwI dUu UduaI wI yduai Iyduaiu cya dIiWuJ
yuyu uu uu uu uu uuuu uuuu uuuu uuuu uuuu uuuu uuuu uuuu uuuu uuuu uuuu uuuu uuuu uuuu uuuu uuuu uuuu uuuu uuuu uuuu uuuu uuuu uuuu uuuu uuuu uuuu uuuu uuuu uuuu uuuu uuuu uuuu uuuu uuu uuuu uuuu uuuu uuuu uuuu uuuu uuuu uuuu uuuu uuuu uuuu uuuu uuuu uuuu uuuu uuuu uuuu uuuu uuuu uuuu uuuu uuuu uuuu uuuu uuuu uuuu uuuu uuuu uuuu uuuu uuuu uuuu uuuu uu
YcnoBxpaHeHH,3KcNpyTaunH
Temneparypa:+0°C-+35°
OTHCnTERbHgAnaxHoCTb.20%-95%
ATMOCeepHoe daBneHne:85-109kPa
KK
Kinirihn6ynarhu
Thdipui:JAAI5B.,TycceHdmeneH4a,9206A,IpaXteH. Hnepdrnab
MnnpTayu;KocbIMuaaknapaTTKoJuaH6aJaH KapaH3.
STE1020,STE1030,STE1040:1512-1800W,220-240V,50-60Hz
TypmbctbK kaxettnikTepe ahanfah
CAaattbaactan
KoTnHaaas
CaKayuapTAPb,naaDanaHy
Temnepatypa:+0°C-+35°C
Caibicbpmaibmbnndb20%-95%
ATMOCΦepaIbIKKbcBIM 85-109kPa
HY
nnnwhuug qinn2bhuwluugnigh qgbunh huvup
Ununnnn nF.
PHILIPS and the Philips Shield Emblem are registered trademarks of Koninklijke Philips N.V. and are used under license.
This product has been manufactured by and is sold under the responsibility of Versuni Holding B.V., and Versuni Holding B.V. is the warrantor in relation to this product.
2025 © Versuni Holding B.V.
642001008786 (06/2025)


- English
- Introduction
- Product overview
- Type of water to use
- Warnings
- Setting up the appliance
- Setting up the board
- English
- Setting the mat
- English
- Inserting the brush
- Filling the water tank
- English
- Changing the steam settings
- Ironing tips
- Cleaning and maintenance
- Calc Collector
- Performing the calc clean process
- Cleaning and storing the stand steamer
- Trouble shooting
- Azarbaycanca
- Giris
- Māhsul icmalī
- Procedura Calc-Clean
- Nosozliklarni aniqlash
- O'zbek
- Wstep
- Português
- Arassalamak we abatlamak
- Cökündini yygnayjy
- Turkmence
- Сглобаян ha ypeda
- Crlno6yBaHe Ha Dbckata
- Быларскn
- Crlno6yBaHe Ha noJIoXkata
- Посраваян ha cheTkata
- NocTaByBaHbe Ha 7tNaTa
- NocTaByBaHBe Ha noJlorata
- BmetyBaHbe Ha yeTkata
- MaKeDoHcKn
- Полноа He Na pe3epBoapOT 3a BOda
- MehyBaHbe Ha noCTaBKeTe 3a napea
- Cobetn 3a peIaHbe
- YncteHbE n OdpjxuBaHbe
- Co6npaHа 6nroP
- I3BpUyBaHBe Ha noCTaPkata 3a YnCTeHe 6nroP
- YncteHbe n cKlaIpaHbe Ha cToeuknot anapat 3a napea
- PeeBaHe npo6JeMn
- В级以上
- 063op n3deleny
- C6opka npnbopa
- YcTaHOBkaDOCKN
- Pa3meueHne KOBpNka
- Pycckn
- YcTaHOBKa ⅢeTkn
- 3anolHeHne pe3epByapa IJRA BObl
- Pycckn
- I3meHHeHaCTpoek noaun npa
- CobetblnoOTnpnBaHnIO
- Pycckn
- Ounstka n yxod
- Cnctema c6opkn HaKnn
- BbIpoJIHeHne OUncTKn OT HaKnPi
- Pycckn
- Ounstka n XpaHeHne BepTnKaJbHoro OTnpaBateJIa
- YctpaHHe HeNcPpaBHOCTeI
- Фоигиркуни чутka
- Iyp kapdaHn 3apfn o6
- Ib3 KapdaHn TaH3mOTn daP3MOJn 6yF
- Toounk
- MacInxato6apOndap3MOJkyH
- To3aKynBa HnroXdopn
- YambyHaHdaNkapaxs
- Uapaehn calc-clean-po nupto kyned.
- To3a KapdaH Ba HnraXdOpnn daP3MOJn 6yF
- Ба rtapaф карданушкелOT
- Bctyn
- OrlaBnpo6y
- HanaHTyBaHH npictpoI
- 36ɪpaɪnɪya dɔʊkɪn
- BCTaHOBJIeHHK NJIIMKa
- BctaHOBJIeHHaTtKN
- HanoBHeHHpe3epByapaIJIBAOIN
- YKpaIHcbKa
- 3miHa HanaStyBaHb nap
- YcyHeHH HeCnpaBHOCTeH
- PaindaIaHyFa daIbIHday
- PndaanHbIaTbIH cy Typi
- EckepTuJep
- KypbIJIfBiHbI opHaTy
- Ka3aKwa
- TaKaTahbI opHaTy
- Ka3aKa7a
- Toceme ka6aTBH opHaTy
- LcetkaHbI cany
- Cy bIDbcbIH TOJTbIPy
- By napametpnepiH 03repty
- Ytiktey boiHnaKehectep
- Ta3aay XeHe KYTy
- KaK XnHaFbIw
- KaK JxHay npoecin opbHday
- By yTiriH Ta3anay XaHe caKtay
- AkaayIbIKTapIbI Ta6y XaHe XoIO
- Utpwnipajniu
- Uunwuph nunhwunipunpaqhnnp
- 3wjnttu
- funquuwuh unwnwnn
- 2nh unwnuwh lgunw
- Ruijnttu
- 9nnn2ni ywnqunnuu uynnhunja nii
- wnnhnnnntwnnnniu u htn yuuu
- Ruijnttu
- Uwppnui u nthuhuwu uwwuunnu
- Lunuogh uwpnui qnnpuaggh ywnwnni
- Cnqwnnnluyh uwpnnu u ywhuwunu
- Uuuu npniuiutnh ninnnu
- Ruijnttu
- yauaiuva
- 8b930s 0s am3ms-6sb3s
- 6gogdoa8m30
- 6oogob amgongonb 3mmgbnb agbmy
- 续音
- daii
- 中国
- 咖德
- 将映元相写
- sTm
- daimiel
- 中国
- StentDheng DaliM
- aillg biiill
- J 1
- a j 1jll jj
- Lolgcbx1 Lus
- KK
- Kinirihn6ynarhu
- HY
- nnnwhuug qinn2bhuwluugnigh qgbunh huvup
Brand : PHILIPS
Model : STE1010
Category : Steam plant