Book Smart - Car seat PEG PEREGO - Free user manual and instructions
Find the device manual for free Book Smart PEG PEREGO in PDF.

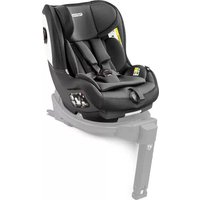
| Product type | Child car seat group 0+ for child from 0 to 13 kg |
| Brand | Peg Perego |
| Model | Primo Viaggio SL |
| Approval | ECE R44/04, universal category (belt) or semi-universal (ISOFIX) |
| Child weight | 0 to 13 kg (0-12/14 months) |
| Installation in vehicle | Rear-facing; static/retractor 3-point belt or separate base (Belted Base or Isofix Base) |
| Side protection system | Adjustable Side Impact Protection System (adjustable simultaneously with headrest) |
| Safety harness | 5-point, height adjustable (5 positions) and tension adjustable |
| Headrest | Adjustable simultaneously with harness, 5 positions |
| Carry handle | 4 positions: A (car), B (transport/base/stroller/chassis), C (rocking), D (rocking lock) |
| Hood | Removable, adjustable in 2 positions (open or closed) |
| Newborn insert | Removable anatomical cushion included |
| Safety padding material | Polystyrene (EPS) under seat, backrest and headrest |
| Cover maintenance | Removable cover; hand wash, no chlorine, no ironing, no dry cleaning, no solvents, no tumble drying |
| Plastic parts maintenance | Clean with damp cloth, no solvents |
| Spare parts and accessories | Original Peg Perego spare parts available; contact after-sales service |
| Compatibility with strollers/chassis | Mountable on Belted Base/Isofix Base and on Peg Perego strollers/chassis (Ganciomatic system) |
| Use as a baby carrier | Do not use as a carrier after child can sit up alone; do not place on elevated surfaces; not intended for long sleeping periods |
| Serial number | Located under the fabric on the front side (name, date, number); homologation label behind the backrest |
| Customer service | Peg Perego S.p.A. – Italy – Assistance: +39 039 6088213 |
Frequently Asked Questions - Book Smart PEG PEREGO
User questions about Book Smart PEG PEREGO
0 question about this device. Answer the ones you know or ask your own.
Ask a new question about this device
Download the instructions for your Car seat in PDF format for free! Find your manual Book Smart - PEG PEREGO and take your electronic device back in hand. On this page are published all the documents necessary for the use of your device. Book Smart by PEG PEREGO.
USER MANUAL Book Smart PEG PEREGO
RU INHctpyKcnn NO Nb3ObaHnIO
TR Kullanim kilavuzu
HR/SRB/MNE/BiH Upute za uporabu
EN· Spare parts available in different colours to be specified when ordering.
AaIaII g a 9.0g J no sly aiaio jie gae -AR
1111 1
The Original Accessory Peg-Perego
| EN_English | |
| Primo Viaggio SL | ·“Universal” category. ·The "Primo Viaggio SL" car seat is installed in the vehicle using the three-point seatbelt. |
| Primo Viaggio SL + Belted Base | ·“Universal” category. ·The Belted Base is installed in the vehicle using the three-point seatbelt and remains in the vehicle ready for use. ·The "Primo Viaggio SL" car seat is installed on the Belted Base and is secured with the vehicle seatbelt. ·See the Belted Base instruction manual for the vehicle installation procedure. |
| Primo Viaggio SL + Isofix Base | ·“Semi-Universal” category class E. ·The "Isofix Base" with Isofix attachment system is installed in the vehicle using the Isofix anchors located between the vehicle seat and backrest. ·The "Primo Viaggio SL" car seat is installed on the base. ·See the "Isofix Base" instruction manual for the vehicle installation procedure. |
Thank you for choosing a Peg-Perego product.
Product characteristics
- The "Primo Viaggio SL" group 0+ car seat has been subjected to all safety tests and is type approved under European standard ECE R44/04, for children weighting from 0 to 13 kg (0 to 12-14 months).
- IMPORANT: Primo Viaggio SL must be installed in a rearward-facing position on seats without airbags. Do not install it on rearward- or sideways-facing vehicle seats.
- It comes with an "Adjustable Side Impact Protection System". This offers improved protection against side impacts with the "simultaneous system" for headrest-harness adjustment.
- It is type approved for installation in vehicles without a base support or with two types of base, as required (the use of a seat base offers improved safety): "Belted Base" or "Isofix Base" (check that the vehicle is fitted with the Isofix system - a list of vehicle models fitted with the system is provided with the product).
WARNING
-
Read the instructions carefully before use and keep them in the holder provided for future reference. Failure to closely follow the car seat installation instructions will put your child at risk.
-
Never leave the child unattended.
Always use the restraint system.
The assembly and installation operations must be conducted by adults. - Avoid inserting fingers into the mechanisms.
- Install this group 0+ car seat in a rearward-facing position.
- Death or serious injury can result if this car seat is installed on seats with airbags.
- In the case of swivel or repositionable vehicle seats, only install this car seat in a rearward-facing position.
- When travelling take special care to make sure that luggage or other objects do not injure the child in the car seat in the case of accidents.
- Do not use installation methods different from those indicated. This would result in the risk of detachment from the seat.
- Car seat, group 0+, "Universal" category, type approved under European standard ECE R44/04 for children of weight from 0 to 13kg (0 to 12/14 months). Suitable for installation on the majority of vehicle seats, but not all.
- Group 0+ car seat with class E Semi-Universal Isofix base (accessory).
- The car seat can be correctly installed if the vehicle's use and maintenance manual indicates compatibility with "Universal" group 0+ restraint systems.
- This car seat is classified as "Universal" in compliance with stricter type approval criteria than previous models that do not have type approval labels.
The car seat can only be used in type approved vehicles,
fitted with static or inertia-reel three-point seatbelts, approved under regulation UN/ECE no. 16 or equivalent standards. It must not be used with two-point or lap seatbelts.
- To install the car seat, pass the three-point seatbelt through the car seat's light blue belt routers. Do not use installation methods different from those indicated. This would result in the risk of detachment from the seat.
- Ensure that the vehicle's three-point seatbelt fixing the car seat is always taut and not twisted. It should be replaced in the case of heavy stress as a result of an accident.
- Never remove the child from the car seat while the vehicle is in motion.
Make sure that the car seat is not locked by a movable part of the vehicle seat or by a door. - To avoid the risk of falling, always use the car seat harness even for transport outside the vehicle. Adjust the height and tension of the shoulder straps ensuring that they are snug to the child's body without constricting him/her too much. Check that the harness is not twisted and that the child does not release it.
- The car seat is not a substitute for a cot; if the child needs to sleep it is important to lie him/her down.
- Do not leave the car seat in the vehicle when exposed to the sun. Some parts might heat up and be harmful to the delicate skin of the child -check before placing the child in the seat.
- Do not use the car seat without its fabric cover; this must not be replaced with one not approved by the
manufacturer since it is an integral part of the car seat and the safety system.
If in doubt refer to the manufacturer or retailer of the car seat.
- Do not remove the adhesive and stitched labels since this might make the product non compliant with legal requirements.
- Do not use the car seat if it has signs of breakage or missing parts, is second hand, or if it has been subjected to violent stress in an accident, because it might have suffered extremely dangerous structural damage.
- Do not modify the product.
- For any repairs, replacement parts and information about the product, contact the after-sales assistance service. Contact information is provided on the last page of this manual.
- The use of the car seat for premature infants born at less than 37 weeks could cause respiration problems for the newborn. It is advisable to seek medical advice before leaving the hospital.
- Do not use accessories not approved by the manufacturer or by the competent authorities.
- Never leave a child alone and unsupervised in a car, not even for a short time. The temperature inside the vehicle can change rapidly and become dangerous for the child inside.
- Do not remove or replace the white polystyrene part under the seat, in the backrest and in the headrest, as it is essential for safety purposes.
- Do not use the child car seat if it is broken or if there
are missing parts, or if it has been subjected to heavy impacts as a result of accidents, as it may have suffered structural damage which is not visible but is extremely hazardous.
- If using a second-hand product, make sure it is a recent model, comes with instructions, and is fully functional in all parts. An obsolete product may not conform to safety standards, due to natural ageing of materials and updating of regulations. If you have any doubts, contact the manufacturer's customer service centre.
WARNING: FOR USE AS A RECLINED CRADLE.
- Do not use the reclined cradle once your child can sit unaided.
- This reclined cradle is not intended for prolonged periods of sleeping.
It is dangerous to use this reclined cradle on an elevated surface, e.g. a table.
Instructions for use
-
"Primo Viaggio SL" is provided with the Ganciomatic System for attachment to/detachment from an "Isofix Base" or "Belted Base" in the vehicle and Peg-Perego strollers and chassis outside the vehicle. To install "Primo Viaggio SL" (on an "Isofix Base", "Belted Base", or Peg-Perego stroller or chassis) align it with the attachment points and push down until it clicks into place.
-
To release "Primo Viaggio SL" (from an "Isofix Base", "Belted Base", or Peg-Perego stroller or chassis) raise the handlebar to the transport position, push the lever on the backrest upwards and at the same time raise the car seat.
- To engage the harness, place the two shoulder strap tongues in position and insert them into the buckle of the crotch strap until they click into place (fig. a). To release the harness, press the red button on the crotch strap buckle (fig. b) and remove the straps.
4- To slacken the harness, insert a finger through the seat opening (fig. a), keep the metal button pressed, and with the other hand pull on the straps (fig. b).
To tighten the straps until they are snug to the child's body, pull the central adjustment strap towards you (fig. c). CAUTION: Do not over-tighten the straps, and ensure you leave minimum slack.
- The harness and the "Side Impact Protection" headrest can be adjusted simultaneously to 5 different heights so as to follow the growth of the child.
To adjust the height, press the rear height adjustment button (on the car seat backrest) and at the same time raise or lower the straps and headrest to the required position, ensuring that they click into place. Slacken the shoulder straps before adjusting the height of the harness and headrest. - Adjust the height of the headrest so that the straps are just below the child's shoulders.
- The seat is equipped with an anatomic booster cushion for newborns, to be removed when the child is older.
- The car seat handlebar has four fixed positions. To
rotate it, press the two buttons on the handlebar and move this to the required angle. Ensure it clicks into position.
- Position A: the in-vehicle position;
- Position B: the position for transport by hand and for installation on a base, stroller or chassis;
- Position C: allows the car seat to rock;
Position D: stops the car seat from rocking; - To fit the hood, insert the hood attachments into the openings on the car seat and arrange the rear part of the hood behind the backrest.
Finally, fasten the elastic bands behind the handlebar.
- The hood has two possible positions, opened or closed.
To remove the hood: release the elastic bands behind the handle, lift the hood and remove it upwards. - IMPORTANT: The hood must not be used to lift the car seat because it might detach.
Instructions for in-vehicle use
- Fit the car seat with the child seated inside, remembering to secure the child with the harness.
- Fully lower the handlebar of the car seat (point 8 - position A).
Slide the vehicle seatbelt into the two guides on the car seat handlebar and buckle it, ensuring the seatbelt is taut, as shown in the figure.
- Take hold of the vehicle seatbelt again and pass it behind the backrest of the car seat, inserting it into the rear guides as shown in the figure.
Tighten the seatbelt.
Removing the soft cover
To remove the car seat cover:
- remove the hood:
- press the red button on the crotch strap buckle to release the harness.
- Remove the booster cushion, if present (Fig. a), and unfasten the elastic bands from under the handlebar (Fig. b).
- Remove the shoulder pads (Fig. a);
- Remove the straps from the backrest (Fig. b); To remove the crotch strap, slip it through the opening in the soft cover, lifting it as shown in the figure (Fig. c).
- Slide off the headrest cover from the bottom first and then, carefully, over the two sides;
BE CAREFUL NOT TO BREAK POLYSTYRENE (EPS) PARTS.
Remove the soft cover in sequence, as shown in the figure.
Maintenance of the padding
Brush the fabric parts to remove dust.
- When washing, closely follow the instructions stated on the label sewn into the cover.
- Do not use chlorine bleach.
- Do not iron.
- Do not dry clean.
Do not remove stains with solvents. - Do not tumble dry.
Replacing the soft cover
To reposition the car seat cover:
-
slide the soft cover on in sequence, as shown in the figure:
-
slide the cover on from the top
- first carefully insert the sides of the headrest
-
then slide the soft cover over the bottom of the headrest.
-
To slide on the headrest cover, start from the two sides and then slide on the bottom (Fig. a);
-
Insert the crotch strap through the opening in the soft cover (Fig. b) and slip it through the crotch strap cover (Fig. c).
-
Reposition the booster cushion (Fig. a) and fasten the hood's elastic bands behind the handlebar (Fig. b). Insert the shoulder straps into the backrest, as shown (Fig. c).
Insert the shoulder pads (Fig.d).
Engage the harness (point 3a).
IMPORTANT: The straps must not be twisted.
The Original Accessory Peg-Perego
Peg-Perego accessories are designed as a useful, practical means of simplifying the lives of parents. Discover all your product's accessories on www.pegperego.com
Serial numbers
19-A label on the front lateral side, under the fabric,
contains the following information: product name, production date and serial number (Fig. a).
The type approval label can be found on the rear of the backrest, at the top (Fig. b).
- Harness production date (Fig. c). In the event of problems with the product, these details will be of use to customers.
Product cleaning
- This product requires minimal maintenance. Cleaning and maintenance must only be carried out by adults.
It is advisable to keep all the moving parts clean. - Clean the plastic parts periodically with a damp cloth. Do not use solvents or similar substances.
- Brush the fabric parts to remove dust.
- Do not clean the polystyrene shock absorbing device with solvents or other similar products.
- Protect the product from atmospheric agents: humidity, rain or snow. Extended exposure to sunshine can cause colour changes in many materials.
- Store the product in a dry environment.
How to read the type approval label
This paragraph explains how to interpret the type approval label (orange label).
- The label is double because this car seat is type approved for two types of installation in vehicles:
-
With static or inertia-reel three-point seatbelts (the term UNIVERSAL indicates compatibility of the car seat with vehicles fitted with this type of seatbelt);
-
ISOFIX attachment systems (the term SEMI-UNIVERSAL class E indicates compatibility of the car seat with vehicles fitted with this system).
- The top of the label displays the trademark of the manufacturing company and the name of the product.
The letter E in a circle indicates the European type approval mark and the number indicates the country that issued the type approval (1: Germany, 2: France, 3: Italy, 4: The Netherlands, 11: Great Britain, and 24: Ireland). - Type approval number: if it starts with 04 this indicates the fourth amendment (the one currently in force) of Regulation R44.
Reference standard: ECE R44/04. - Production serial number: on issue of type approval each car seat is personalized with its own number.
PEG-PEREGO S.p.A.
Peg-Perego SpA adopts a quality management system certified by TUV Italia Srl in accordance with the ISO 9001 standard. Peg Perego can make changes at any time to the models described in this publication for technical or commercial reasons.
Peg-Pérego after-sales service
If any parts of the item get lost or damaged, only use genuine Peg-Perego spare parts. For any repairs, replacements, information on the products and sales of genuine spare parts and accessories, contact the PegPerego Assistance Service and state the serial number of the product, if present.
tel.0039/039/60.88.213
e-mail assistenza@pegperegoo.it
website www.pegperegocom
All intellectual property rights on the contents of this manual are property of PEG-PEREGO S.p.A. and are protected by the laws in force.
The Original Accessory Peg-Perego
The Original Accessory Peg-Perego
The Original Accessory Peg-Perego
The Original Accessory Peg-Peregoo
WAARSCHUWING: VOOR GEBRUK ALS EEN LIGSTOEL
The Original Accessory Peg-Perego
The Original Accessory Peg-Pereg
The Original Accessory Peg-Peregoo
The Original Accessory Peg-Pereg
The Original Accessory Peg-Perego
Doplny Peg-Perego su navrhnute'ako uzito'né a practilké prostriedky na ulahcenie zivota rodicov. Zoznámte sa s celou seriousi prislu'senstva pre vás produkt na strankach www.pegperego.com.
Seriove císla
The Original Accessory Peg-Peregoo
The Original Accessory Peg-Perego
HaHnUHn COMHeHn O6paTntEcB UeHTp KInHeHTCKOrO 06CnyxNBAHn npOn3BOaNTeIN N3dEIN.
I PEPDYNPEXKDEHNE: NCIOJIb3OBAHNE KPECJA B KAUCHETBE OTKNIDHOJ JIOJIbKN.
He noIb3yIeTcB OTKnIHOn IIOJIbKO, KOrDa Baw pe6eHOK yKe MoKeT cIeTeB 6e3 NOCTOpOHHe NOMOUI.
JaHHaOTKnHnAJIIOhBaHe npEHa3HaueHaIINCHAB TeueHHe pOoONKTeNbHbIX nepNOoB BpeMeHn.
- OnacHO nCNoJb3OBAb 3Ty OTKnHHy IOJbKy Ha BO3BbIeHHo NOBepXHOCTn, HAnpMep, Ha CTOJe.
BAXHO! Pemn He dOJNkbl nepeKpyuBaTbca.
The Original Accessory Peg-Perego
PpHaJnHexHocTn Peg-Perego pa3pa6oTaHb KaK
none3Hbe n npaKTnUHBe cpeCTBa dIa O6nerueHna
Xn3Hn poInTeJe. O3HaKOMbTEcB co BCEMn
PpHaJnHexHocTAmn K BaWemy IN3dEJIIO Ha Be6-caITe
www.pegperego.com).
CepnHbIe Homepa
- Ha 3nkeTke, HaxoJaeHc H na nepen6okobon CTopoHe, CoepKntCn CJeIyUOaH INHOpMaun: HaBaHne N3dJIIN, DaTa I3rTOBHeHIn cepnHbH Homep (PNC. «a>).
TabnUka co CBeDeHnMIOcePTnKAcuINn3denn HaxoNTcA Ha 3aDHe CTopoHe cNnKn, B BepxHe YaCTn (pnc. b
-ДаТИЗ�OTOBLEнЯ рЕмнeн (pс.«C»).
B cnyae BO3HKnHOBeHn npo6nem C n3dennem 3TN CBedeHn OKaKyTcH NyKhbIMn Dn NOKynatenei.
UncTka n3dennia
Baue n3dene HykaetcB HeCIOxHOM yxoJe. Onepaunn cnCTKN yXOda DOnKbI BbINONHrTb TOnbKO B3pocnble.
- PekomeHnyeTcA CoepXaTB B HnCTOe BCE DnNxyuueCn Yactn.
IepnoDnueckn OunuAte nactMaCCOBBe deTann BnaXHO TpAnKo, He Nolb3yTeCb paCTBOpNTeAMN CXOHNBMN BeueCTBaM.
-NouICTnTe 电KoN TkaHbIe aCtN, UTo6bl ydaJIbTb nBInb.
He nCTte ydaponorIouaQuee yctpoNCTBO 3 NOINCTnPOna paCTBOpNTeJMI IN CXOHN C HIMN BESECTBaM.
3aunntte n3dene ne ot aTMocephbx ocakOB-BoBb, Chera nn DoxJnIOCTOHHaN npOdoJIKHTeHbHaI NOBepKeHHOCb COHHeHbIM LyuAM MoKET BbiBaTb UBeTOBble N3MeHeHn MHOrNX MaTePnaJIOB.
XpaHnTe N3dEne B CyxOM MeCTe.
KaK uTAtb 3TuKeTy cepTuΦuKaun
B daHHOM pa3dene pa3bAChrEeTc, KaK qHTaTb 3TuKeTky ceptnФнkau (opahXeBOrO cBeta).
-3TnKeTka - DBOHnA, TaK KaK 3TO aBTOMObHOb KpeCNo yTBepXdEHO dIy DByx CnOCoob KpePHeHnB aBTOMObUne:
peMeHb C KpennHeHem B Tpx ToKax, CTaTnueckn INN C BTaRnBaHOUm yCTpoIcTBOM (HaDnncb YHINBEPCALbHOE yka3bIbaeT Ha To, YTO ABTomOboHbHOe KpeCNO MOxHO yCTaHOBnTb Ha TpaHCnOpTHbIe CpedCTBa, OCHaUeHHbIe pemHem Be3OnaCHOCTN 3TOro Tnna);
CnCTema KpeHneHnIA SOFIX (HaIINcB IONUYHIBEPCALbHOE,Knacc E yka3bIbaeT Ha To, YTO ABTomO6nblbHOE KpeCNO MOXHO yCTaHOBNTb Ha TpaHCnOpTHbe CpeCTBa,OchaueHHbte 3ToN CnCTEMo).
HaBepxHeuactn3TKeTKnPnPBOaTc3HaK3aBoaAn3ROTOBHTeNHa3BaHneN3dEIny.
- BykBa E B KpykoKYe: o6o3Haaye3Hak Ebponeckoro yTBePckDeHnA, a cHpaO b6o3HaaeT cTaHy, BbIaBswyIO yTBePckDeHne (1: TepMaHn; 2: PpaHn; 3: ITaHn; 4: HnpEpaHdb; 11: BeNko6pTaHn n 24: NpNaHn).
Homep yTBePxJHnE: Ecnn OH HauHHaETC nΦpam04 TO 3NaHT, TTO peHy NDeT O YeTBePTOn nonpaBKe (deCTByIOSeB HacToAaee BpeM) perIaMeNTa R44.
Hopmbi dnia cnpabok: ECE R44/04.
Popdkobbl HOpem BbIycka: C MmEHTa BbIaHc
cepTnKauu, ODoH3aHHO HeHTNlpyet KkDoe KpeCNO,
KOTOpoe 06o3HaaeTcCBOMC6CTBeHHbIM HOpem.
PEG-PEREGO S.p.A.
B Kompanhini Peg-Perego SpA Bhepeha cnctema ynpablenen Kaeecbom, ceptnuunpoabaHnag TUV Italia Srl no ctaHapTy ISO 9001. Kompanhia Peg-Perego nmeet npabo BHOCNTb B IIO6OIMomeHT N3MeHeHnB MoJeN, ONncaHHbe B HAcTOnIeM N3daHn, NO npUHNaM TEXHueckoro INN KOMMepeckoro XapaKTepa
Cnyx6a o6cnyxuBaHna Peg-Perego
B cnyae ytern nn nopny akceccyapOB, npmehnTe TOnbKO fnpMeHHbIe 3anaChIe qactN IpON3BOCTBa KOMnAHn Peg Pergo. IIN BblONHeHnpeMOHTA, 3aMeHb 3anaChbIX qacte N NOyueHn INfOpMaun OyCTPOINCTBe o6paauTecB Cnyk6y nocJeipOdaXHO O6cnyKbAHnep Pergo, coo6uNB, npn erO HAnuHN, cepinHbH Homep npodKyta:
CpOK cnYK6bl: 3 roda.
TapaHTnHbI cpoK:12 MecaueB
ren.:0039/039/60.88.213
caNTB INTHepHete:www.pegperego.com
COOTBETCTBYET Tpe6oBaHnA mTexHnueckoro
perJamemTa TP TC 007/2011
N3rotobntenb: PEG-PEREGO S.P.A. (Ier Nepero C.IA.); Adepoc: Via de Gasperi 50 - 20862 ARCORE (MB), Italy (Bna de Iacnepn 50 - 20862 Apkope (MB), IVtanna).
CtpaHa npOn3BODCTBa:ITanIn.

The Original Accessory Peg-Perego
The Original Accessory Peg-Peregoo
Dodaci Perego osmišljeni su kako bi se na praktičan način olakšaoživot roditeljima. Pogledajte sve dodatke iz asortimana proizvoda Per Perego na mrežnom mestreu www.pegperego.com
Serijski brojevi
- U prednjem dijelu, ispod platna, nalazi se natpisna pločica na kooj su navedene informacije o nazivu
The Original Accessory Peg-Pe
The Original Accessory Peg-Perego
Akecyapn Peg-Perego 6yn npo3p0bneH B kocti Kopnchoi Ta npakTuHOi NiTpumKn, o6 cnpoctntu KHTTBAkKepnernyBcAi akcecyapn Dna BaWoRo npodykty Peg-Perego Ha www.pegperego.it
CepiñHi Homepa
19Ha etKeTci, 30 3NaOITbcra Ha nepeHn 60Kobi yactnHi, MiCTNbca HAcTyHa iHOpMaJia: Ha3Ba Bnpo6y, data BnroTOBJIeHHI cepiHn Homep (MaI. a).
- TaBnUka 3 BiOtomocTm npo ceptnphiKauio Bnpo6y 3haxoNTbcra Ha 3aHni CTopoHi CnNHK, y Bepxhi qactnHi (maI. b).
- Iata BnroTOBdeHHra pemeHIB (MaJI. c). Li eIeMeHTn 3HaIO6JIbTcKOpNCyBaueBi y pa3i BuHNKHeHHra npOoIeM 3 BnpoOBom.
UHenn Ta Dorgn
BnpiBnmae MiHimaBHOO OcnyroByBaHH. HnueHH Ta o6CnyROByBaHH Bnpo6y Maotb BnKOHyBaTcA TINbKn DOpocnIMN.
- PeKOMeHIOBaHO TpIMaTn B uNCTOTi Bci pyxomi YactuHn.
- NepioDnHNO OUYuYTe NAACTNKOBi Detani BONORoTKAHNHO, He BNKOpNCOTByIe po3HHNkIB YI INHXnoj6HNx peOBNH.
KopntyTeca ⅢTKOIO DnBnDAneHnNny3 TKaHHHX YactNH.
He ncttb npntpiinornnnHaHnydapy 3 noicnpoly po3HHKAMN qniHnMn noi6HmpeoBnHAM.
3axuainTe Bnpi6 BiD BnNBy aTmocepHnx fakTopiB, BOIN,douy Ta CHIY; TpNBane nepe6yBaHHa HoCHIOKKe PnIBecTN DO 3MiHN KOJIbOpy 6aRaTbOx MaTePiAniB.
36epiraTe Bupi6 y cyxomy MiCui.
YK uTaN cepTuΦiKauiHy Ta6nUky
Ucbomy po3diIM MN NORCHMIO, RK YHTATN ceptnphiiaiHy tabnnky (nomapahueBa etkeTka).
Lra Tabnuka noDiHbA, ockinbKn aBTOKpICNo ceptnphiKoBaHe dna KpinneHHB aBtOMo6ini Dboma cnocO6amn:
- TPUOUKOBMN CTATNCHMN Ta IHepuINHMn peMeHARM
6e3neKn, (MapkyBaHHaUNIVERSAL (YHIBEPCAJbHE) BkA3yC Ha CymiChiBb ATOKpicna 3 aTOMO6ilmM, O6NaJHaHnMI cIMN TINAmn peMeHb 6e3neKn)
- ikcyuHmCnCTeMaMIsOFOIX (MapkyBaHHa SEMIUNIVERSAL (HANIBYHIBEPCAJIbHE),Knac E, Bka3yeHaCyMICHICTb aBTOKpICna 3 aBTOMo6iJMyN, ObnaHaHMMUcIEO CnCTeMOIO)
- Y Bepxhi 即TnHi Ta6nUKN HaHeceHO TOBapHn 3HaK Bnpo6HnKa n Ha3By Bnpo6y.
Iitepa E> y kpykeky: ue cunboeBponecboi ceptnphiakui, a biinnoiHn Hmep Bka3ye Ha kpaHy, Ka BndaIa ceptnphiKaT ha ue Bnpi6 (1: HimeyuHa, 2: PpaHiz, 3: IaIia, 4: HiepnaHn, 11: BeNkA BpntaHra Ta 24: IpnaHia).
Homep ceptniikata: kio biN nouHaetbcra 304, to ue O3Hauae, oio ce yetBepTa nonpaBka (ka diE 3apa3) pernaenty R44.
3acTOcOByBaHn CTaHdApT: ECE R44/04. - Popdkobn Hmep Bnp6y: iHnBiyan3ye KoxHe abToKpicno -nicra Buaqi ceptuqkatay KxHn Bnp6 n03HaacTbca BnaCHNM Hmepom
PEG-PEREGO S.p.A.
B Komnannn Peg-Perego SpA Bhepeha cncTeMa ynpablenna kauceTBOM, ceptnunuipobanha TUV Italia Srl no ctaHapTy ISO 9001. Peg Perego B 6ydb-kynn qac MOxe BHOCNTN 3mHN DO MOeNEi, BkazAHx B daHin IHCTpyKUJI, 3 TexHiHnx abo KomepuHINx npuHn.
PEG-PEREGO CEPBIC
KIO y npD6aHOro Bamu Tobapy Peg-Perego
NoWKoDNnCb abo 3arybUnncb JTeani, 3JiNCHIOITE
pemOHr abo 3amHy nIe opinHanBHMn 3aTACHMn
actNHAMn Peg-Perego. Y pazi Heo6xHocTi peMOHTy,
3amiHN Detanei, OtpmAHHH InOpmaJI IIpo npOdyKTn
Ta akceCyapn, 6ybN nacka, 3B'kItbcra 3 IOKaIBHM
InCTPNOTOpom Peg-Perego B YkpaHIn (3 cepiHm
HomepOM npOdyKTu Ta rapaHTINHM TaHOHOM).
TeN. +38 (050) 32-69-131, (050) 32-65-682, (044) 574-95-41
c: + 38044574 - 95 - 42
eJeKtpoHnHa nowTa info@amigotoys.com
a6o 3 cepBicHOIO CnyK6oIO Peg-Perego B Itanii tel.0039/039/60.88.213
The Original Accessory Peg-Perego
Ta aEeouap Peg-Perego exov enivonthei w, xnoiopo kai npaktio bOnenma wote va dieukoluvouv tn 0wn twyovewv. Avakalupe ola ta aEeouap tou npoiovtoc PegPerego oTo www.pegperego.com.
Apiouoc oεipac
0381 g Jia jiall jai all 2aill iao aagoo
aJw wSle1
LgjS gJ Lg j a0 Su LLa Loal o J 0
e 1
J 1 J 1
gIg..acgai,alolil"afall no oJuwuJiaobj 1
g jj j j Jlalb21 wLi - /ECE R22 aaggl gl 1
1g.(1g)15 1g
LgLSjSjSjLjLjLjLj
aill (c)1gww581) Isofix dclj + aegj Jolab21 eao
E a a b J 10 a L o L i j
Jlilai aaoaaybcljllwla Jlabe 5
aaiJg aaiJ aaii go aaij g J ciilll ayieIg piai
- aegoslj
aLalLeLg"LoLl"atall no aell l
aL aI J 2 g a L aJ jL aol
jIglc.1a# 2aiell lJyll Jlabe81 ae oiai
Jaej oK 1g aS Lw JbI aI bI cLao aOJ Iogjo ng
Joo Logals Logj 11, jUN/ECE jaiIg aLL Lao oioog .Lai
aogg jybl auiuclao aojg aoolauo yjy
J1000 10000
5j 1gbs g2 jlll jll l0jLwll aojj aegs
Juaa 1 Jaa aai
Peg-Perego 10000000000000000
glulldol
*Primo Viaggio SL" 1LJU JIaBJS aSLJ
aegg 1y jell 20 g 8g 20d 20w 20l 20s + a
(20 15
1215
aclal plaiwol j 1ncll g aabwgl .
aocie"g"aojolooiae":(Jabla aL Juae y
Lo5:IsofixpIbIa0a0aLlJ 1sifix pIbI
100 100
#
- wLi o lSO g: baiol gaii 2.
suii oioia iio aia xlo psc. jaiu w g Lg oaiu
jblxolllcb
aJg j
aJg Jg jll pki Lj5p 1
1 1
a.s.l.S.11 120g jLol Jllo
Jscolj jLjllj+acg01 Jlalbylolal1s
111 10000000000000000000000000000000000000000000000000000000000000000000000000000000000000000000000000000
Jiloe aas plssu: jie 4
02jag wglj Jabll gbiy u jyue Ll1 gll pssus 8.
aIgblcipgill gnilnnae Ll1 gll iio.
aIgbs Jcuyo dnils gaiy ocbw lc lllg
Plo 100000000000000000000000000000000000000000000000000000000000000
aLl "Primo Viaggio SL" Jalll 10000000000000000000000000000000000000000000000000000000000000000000000000000000000000000000000000000
102110gwsds
LgJSo JIeaiagssosLg
aiaalj- aogall Jauuill agwSsAasjyao 1V
aa- wlln uuslll jzgl aluej Lg - Lc ao
WJLLiwl glwll gJg Lg
fagil nsslll lco ygl aol aagjlg (a oogall) wlll iinlll
(boagall) aiaaall gdoagall anall gae aall pldrl paa.
(c oogall) nnell jnaiy gill pldl ic alsl
abajg (a oogall) gswSll paa Jai yll slwgall sclcy .
(b oogall) axolall llis ooggall glll ai jll
(c oogall) ayogall lo5 aeall gbl gaojla Jli
.(d ogall) nsslll jayu Jssl
(Ta aiaill)
The Original Accessory Peg-Pereg
yLcog aLi j Peg-Perego cJgW51 paa 2
aaii aaii iJgW51 gaiiSj JgW51 Lg08
www.pegperego.com giJgW51 gaii Lc Peg-Perego
aLwuwuJpL
aIlogell J3 aIi. 1111111111111111111111111111111111
0.2L1J1
2a_1 + a_2 + b_1 = 6
y
.(b aJgJJI) aefj JJJ JaaJl
( a,0, + 12) .( a, - 1) .( b,0, - 12)
ECE R:JooLdL J 100000000000000000000000000000000000000000
PEG-PEREGOS.p.A
TUV Italia 1o oio oio oio oio Peg Perego Spa 2000
g g f f f f f f f f f f f f f f f f f f f f f f f f f f f f f f f f f f f f f f f f f f f f f f f f f f f f f f f f f f f f f f f f f f f f f f f f f f f f f f f f f f f f f f f f f f f f f f f f f f f
Peg-Perego 55,100,100,100,100,100,100,100,100,100,100,100,100,100,100,100,100,100,100,100,100,100,100,100,100,100,10
aill iil 1000 gag aIg aIgai
J 1 J 1 J 1 J 1 J 1 J 1 J 1
1 1 1 1 1 1 1 1 1 1 1 1 1 1 1 1 1 1 1 1 1 1 1 1 1 1 1 1
Jg jj j 100 g jg o uuac . 100g j00g 100g j00g j00g j00g j00g j00g j00g j00g j00g j00g j00g j00g j00g j00g j00g j00g j00g j00g j00g j00g j00g j00g j00g j00g j00g j00g
Lai c aacg ggsaog j+0gsgggsjduu uJ 1000000000000000000000000000
y yu caba jI b0s, uU yu Lgaoa Ucbab jI yu 1
ogaa JcIcbl, yaguyu aygoyu Lyosolalol Jol g
jluwaucluL uJol yglg yu caba g g yu
. yss (yj) jI yu oJow g yu wu
0039/039/60.88.213
EN English FR Francais
Declaration of conformity
Product name
PRIMO VIAGGIO SI
Product reference number
IMSL---
Reference Standards (origin)
R44/04
Declaration of conformity PegPerego S.p.A. declares, under its own responsibility, that the item in question has undergone a series of internal tests and has been certified by external independent laboratories, in compliance with current legislation.
Date and place of issue
Arcore, March 2013
Peg-Perego S.p.A.
via De Gasperi, 50
20862 Arcore (MB), ITALY
Deutsch ES Espanol
All of the intellectual property rights for the contents of this instruction manual belong to PEG-PEREGO S.p.A. and are protected by the laws in force.
PRIMO VIAGGIO SL
Reg-Pérego