
SLL360 - Hand tool STANLEY - Free user manual and instructions
Find the device manual for free SLL360 STANLEY in PDF.
| Product Type | Self-leveling laser level (Class 2) |
| Model | SLL360 (STHT77504-1 / STHT77594-1) |
| Light Source | Laser diodes |
| Wavelength | 630 - 680 nm (visible) |
| Laser Power | ≤ 3.2 mW |
| Laser Class | 2 (IEC 60825-1) |
| Working Range | 20 m (65') or 25 m (80') depending on version |
| Accuracy | ± 4 mm at 10 m (± 5/32" at 33') |
| Power Supply | 4 AA batteries (1.5 V) - DC 3 V |
| Operating Temperature | -10 °C to 40 °C (14 °F to 104 °F) |
| Storage Temperature | -20 °C to 60 °C (-5 °F to 140 °F) |
| Main Functions | Horizontal and vertical beam projection; self-leveling and manual modes; pendulum lock for transport |
| Included Accessories | Mounting bracket with 1/4-20 thread; storage case |
| Maintenance and Cleaning | Clean with a damp cloth, dry completely; do not use solvents; store in case |
| Safety | Do not look directly into the beam; keep out of reach of children; use STANLEY approved accessories |
| Repairability | No user-serviceable parts; contact an authorized service center |
| Warranty | 2 years (parts and labor), excluding accidental damage and normal wear |
Frequently Asked Questions - SLL360 STANLEY
User questions about SLL360 STANLEY
0 question about this device. Answer the ones you know or ask your own.
Ask a new question about this device
Download the instructions for your Hand tool in PDF format for free! Find your manual SLL360 - STANLEY and take your electronic device back in hand. On this page are published all the documents necessary for the use of your device. SLL360 by STANLEY.
USER MANUAL SLL360 STANLEY
Self-Leveling 360^ Cross-line Laser
www.2helpU.com

Please read these instructions before operating the product.
Figures
Figures


Figures
F
1
2

GB
Contents
- Laser Information
- User Safety
Battery Safety - Installing AA Batteries
- Turning the Laser On
- Checking Laser Accuracy
Using the Laser - Maintenance
- Troubleshooting
Service and Repairs - Specifications
Laser Information
The STHT77504-1 and STHT77594-1 lasers are Class 2 laser products. The lasers are self-leveling laser tools that can be used for horizontal (level) and vertical (plumb) alignment projects.
User Safety
Safety Guidelines
The definitions below describe the level of severity for each signal word. Please read the manual and pay attention to these symbols.

DANGER: Indicates an imminently hazardous situation which, if not avoided, will result in death or serious injury.

WARNING: Indicates a potentially hazardous situation which, if not avoided, could result in death or serious injury.

CAUTION: Indicates a potentially hazardous situation which, if not avoided, may result in minor or moderate injury.
NOTICE: Indicates a practice not related to personal injury which, if not avoided, may result in property damage.
If you have any questions or comments about this or any STANLEY tool, go to http://www.STANLEY.com.

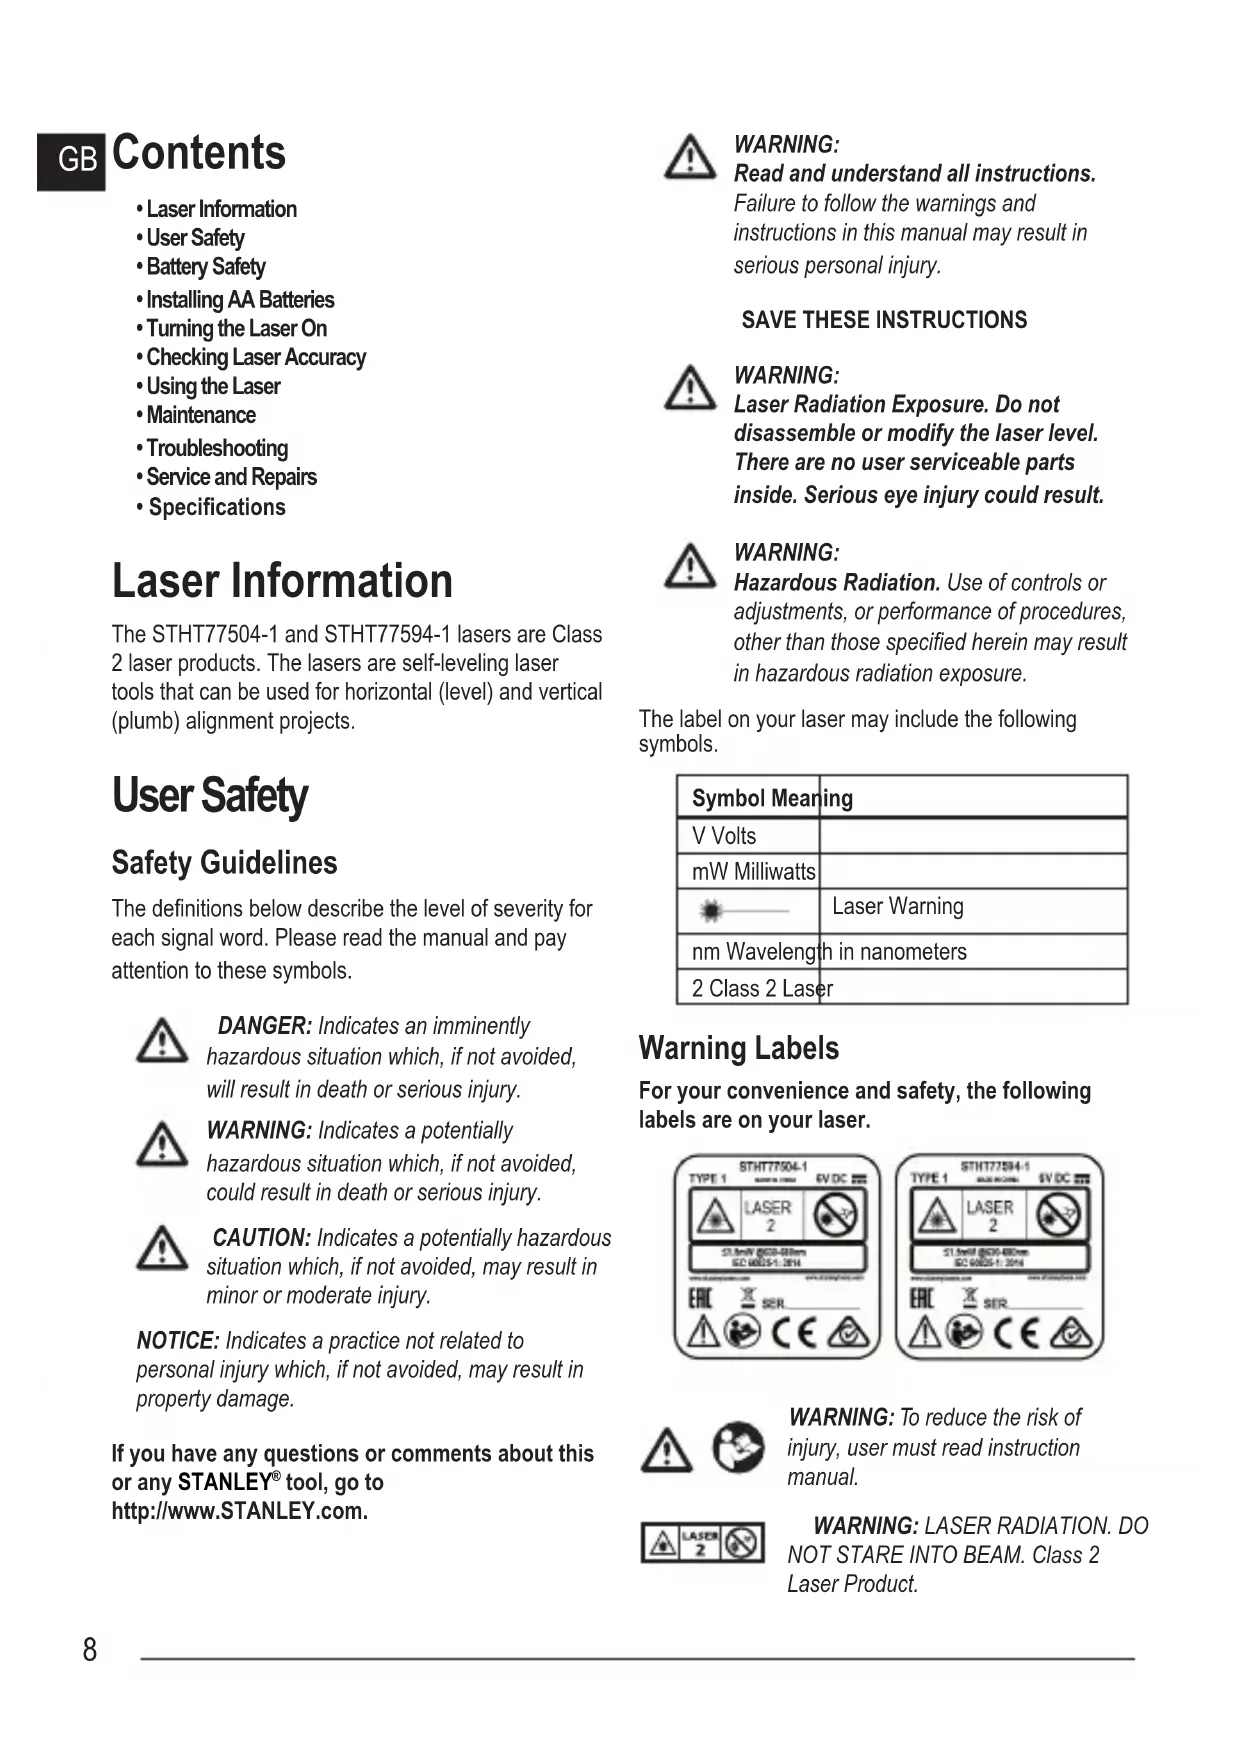
WARNING: Read and understand all instructions. Failure to follow the warnings and instructions in this manual may result in serious personal injury.
SAVE THESE INSTRUCTIONS

WARNING: Laser Radiation Exposure. Do not disassemble or modify the laser level. There are no user serviceable parts inside. Serious eye injury could result.

WARNING: Hazardous Radiation. Use of controls or adjustments, or performance of procedures, other than those specified herein may result in hazardous radiation exposure.
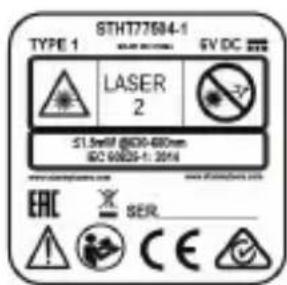
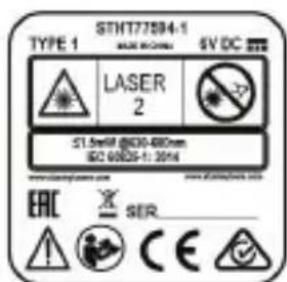
The label on your laser may include the following symbols.
| Symbol Meaning |
| V Volts |
| mW Milliwatts |
| Laser Warning |
| nm Wavelength in nanometers |
| 2 Class 2 Laser |
Warning Labels
For your convenience and safety, the following labels are on your laser.
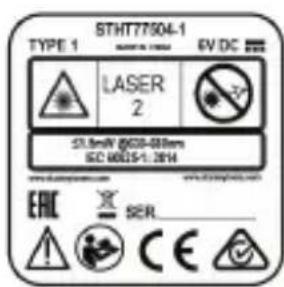
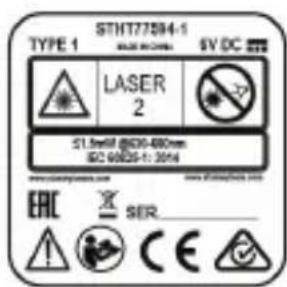


WARNING: To reduce the risk of injury, user must read instruction manual.

WARNING: LASER RADIATION. DO NOT STARE INTO BEAM. Class 2 Laser Product.
- Do not operate the laser in explosive atmospheres, such as in the presence of flammable liquids, gases, or dust. This tool may create sparks which may ignite the dust or fumes.
- Store an idle laser out of reach of children and other untrained persons. Lasers are dangerous in the hands of untrained users.
- Tool service MUST be performed by qualified repair personnel. Service or maintenance performed by unqualified personnel may result in injury. To locate your nearest Stanley service center go to http://www.2helpU.com.
- Do not use optical tools such as a telescope or transit to view the laser beam. Serious eye injury could result.
- Do not place the laser in a position which may cause anyone to intentionally or unintentionally stare into the laser beam. Serious eye injury could result.
- Do not position the laser near a reflective surface which may reflect the laser beam toward anyone's eyes. Serious eye injury could result.
- Turn the laser off when it is not in use. Leaving the laser on increases the risk of staring into the laser beam.
- Do not modify the laser in any way. Modifying the tool may result in hazardous laser radiation exposure.
- Do not operate the laser around children or allow children to operate the laser. Serious eye injury may result.
- Do not remove or deface warning labels. If labels are removed, the user or others may inadvertently expose themselves to radiation.
- Position the laser securely on a level surface. If the laser falls, damage to the laser or serious injury could result.
Personal Safety
- Stay alert, watch what you are doing, and use common sense when operating the laser. Do not use the laser when you are tired or under the influence of drugs, alcohol, or medication. A moment of inattention while operating the laser may result in serious personal injury.
- Use personal protective equipment. Always wear eye protection. Depending on the work conditions, wearing protective equipment such as a dust mask, non-skid safety shoes, hard hat, and hearing protection will reduce personal injury.
Tool Use and Care
- Do not use the laser if the Power/Transport Lock switch does not turn the laser on or off. Any tool that cannot be controlled with the switch is dangerous and must be repaired.
- Follow instructions in the Maintenance section of this manual. Use of unauthorized parts or failure to follow Maintenance instructions may create a risk of electric shock or injury.
Battery Safety

WARNING:
Batteries can explode, or leak, and can cause injury or fire. To reduce this risk:
- Carefully follow all instructions and warnings on the battery label and package.
- Always insert batteries correctly with regard to polarity (+ and -), as marked on the battery and the equipment.
- Do not short battery terminals.
- Do not charge disposable batteries.
- Do not mix old and new batteries. Replace all batteries at the same time with new batteries of the same brand and type.
- Remove dead batteries immediately and dispose of per local codes.
- Do not dispose of batteries in fire.
- Keep batteries out of reach of children.
- Remove batteries when the device is not in use.
GB
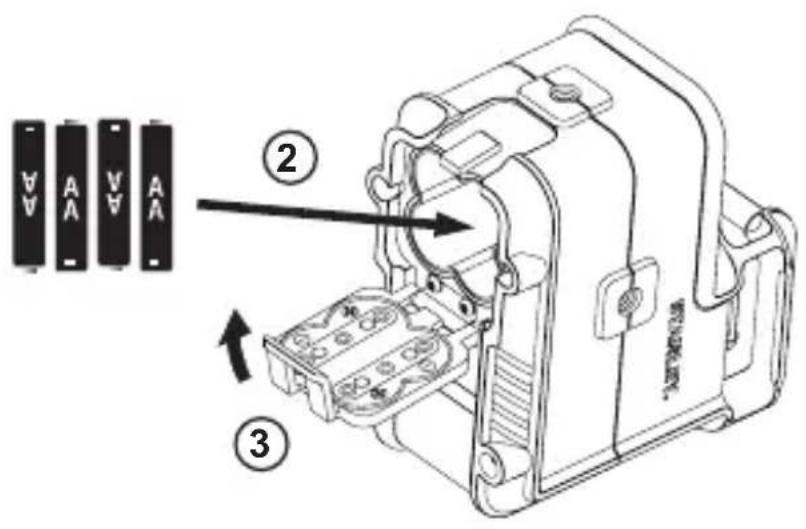
Installing AA Batteries
Load new AA batteries in the STHT77504-1 or STHT77594-1 laser.
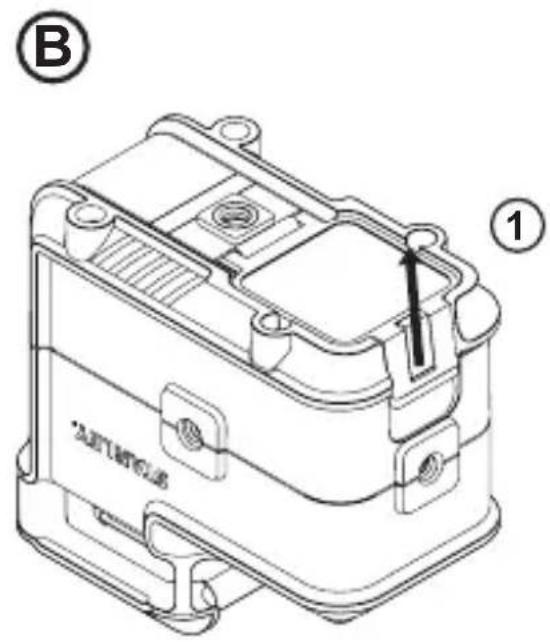
- Turn the laser upside down.
- On the bottom of the laser, lift up the latch to open the battery compartment cover (Figure B1).
- Insert four new, high-quality, name brand AA batteries, making sure to position the - and + ends of each battery as noted inside the battery compartment (Figure B 2).
- Push the battery compartment cover closed until it snaps in place (Figure B 3).
When the laser is not in use, keep the Power/ Transport Lock switch in the center (OFF) position (Figure A 2) to save battery power.
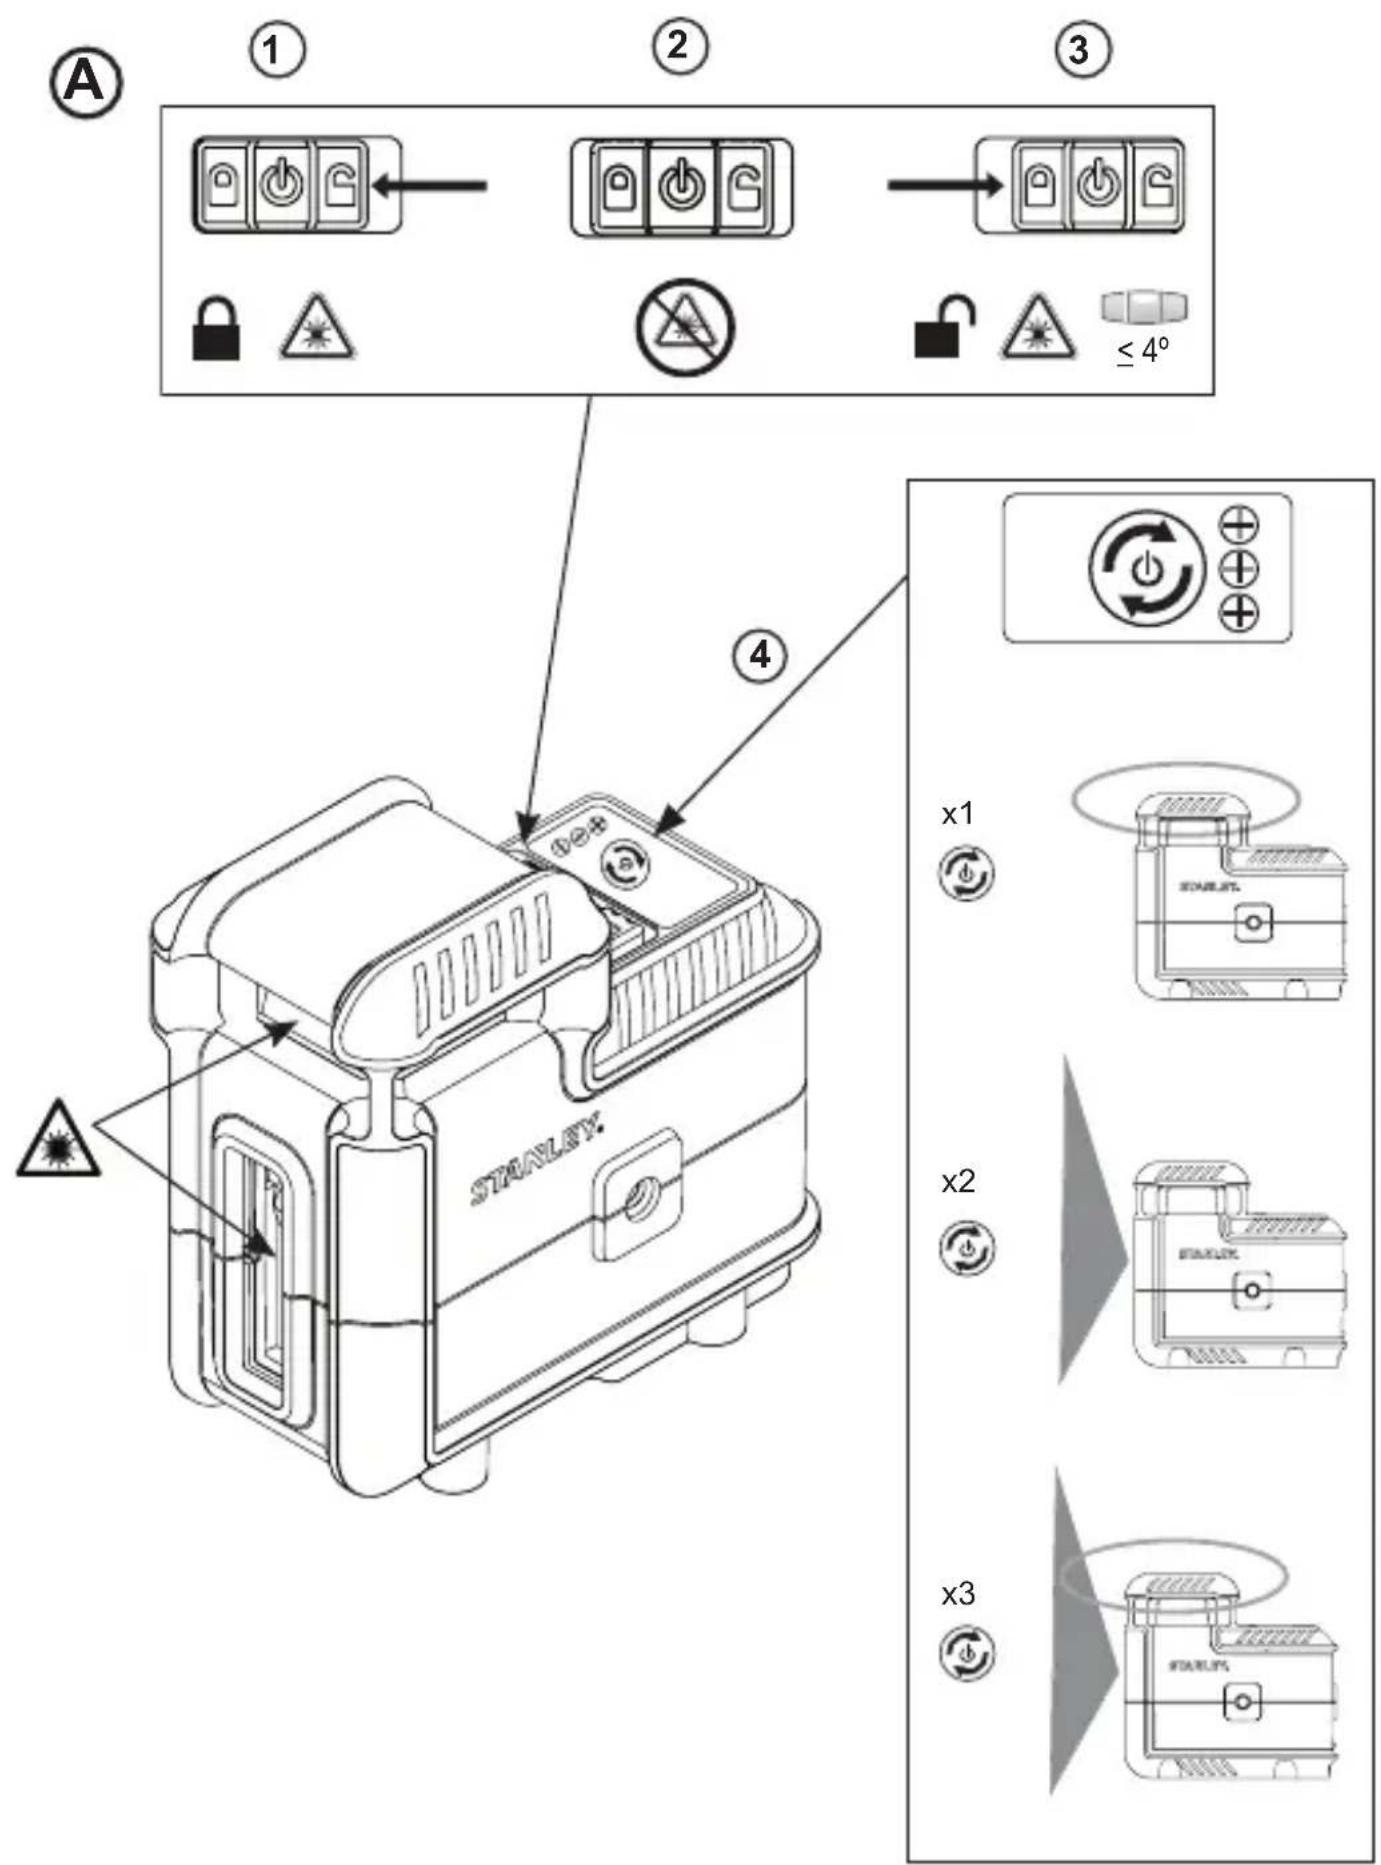
Turning the Laser On
- Place the laser on a smooth, flat, level surface, with the laser facing straight ahead toward the opposing wall (0^ position).
-
Turn the laser ON to display a horizontal laser beam. Either:
-
Move the Power/Transport Lock switch to the left to keep the pendulum locked and display the beams in manual mode (Figure A1).
-
Move the Power/Transport Lock switch to the right to unlock the pendulum and display the beams in self-leveling mode (Figure A 3).
-
Press (Figure A4) once to display a horizontal laser beam, a second time to display a vertical beam, and a third time to display both the horizontal and vertical beams.
-
Check the laser beams.
-
If the laser is tilted so much that it cannot self-level (>4^) , or the laser is not level in manual mode, the laser beams will flash.
-
If the laser beams flash, the laser is not level (or plumb) and should NOT BE USED for determining or marking level or plumb. Try repositioning the laser on a level surface.
-
If ANY of the following statements are TRUE, continue with the instructions for Checking Laser Accuracy BEFORE USING THE LASER for a project.
-
This is the first time you are using the laser (in case the laser was exposed to extreme temperatures).
- The laser has not been checked for accuracy in a while.
- The laser may have been dropped.
Checking Laser Accuracy
The laser tools are sealed and calibrated at the factory. It is recommended that you perform an accuracy check prior to using the laser for the first time (in case the laser was exposed to extreme temperatures) and then regularly to ensure the accuracy of your work. When performing any of the accuracy checks listed in this manual, follow these guidelines:
- Use the largest area/distance possible, closest to the operating distance. The greater the area/ distance, the easier to measure the accuracy of the laser.
- Place the laser on a smooth, flat, stable surface that is level in both directions.
Mark the center of the laser beam.
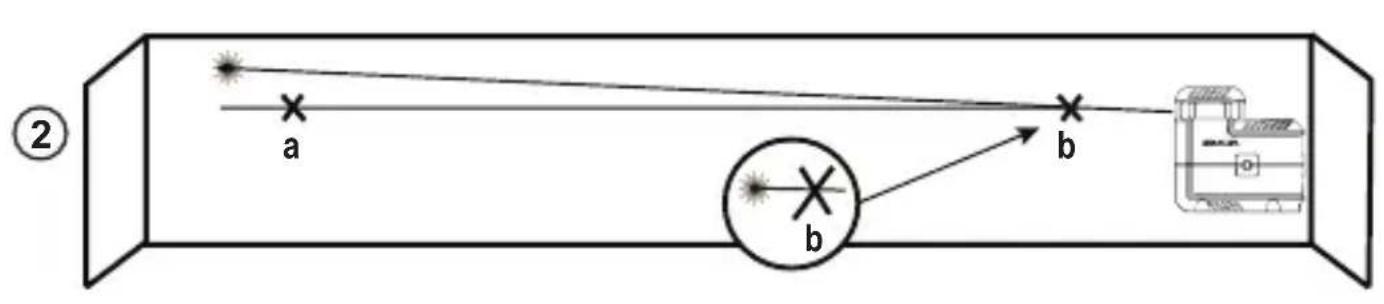
Horizontal Beam - Scan Direction
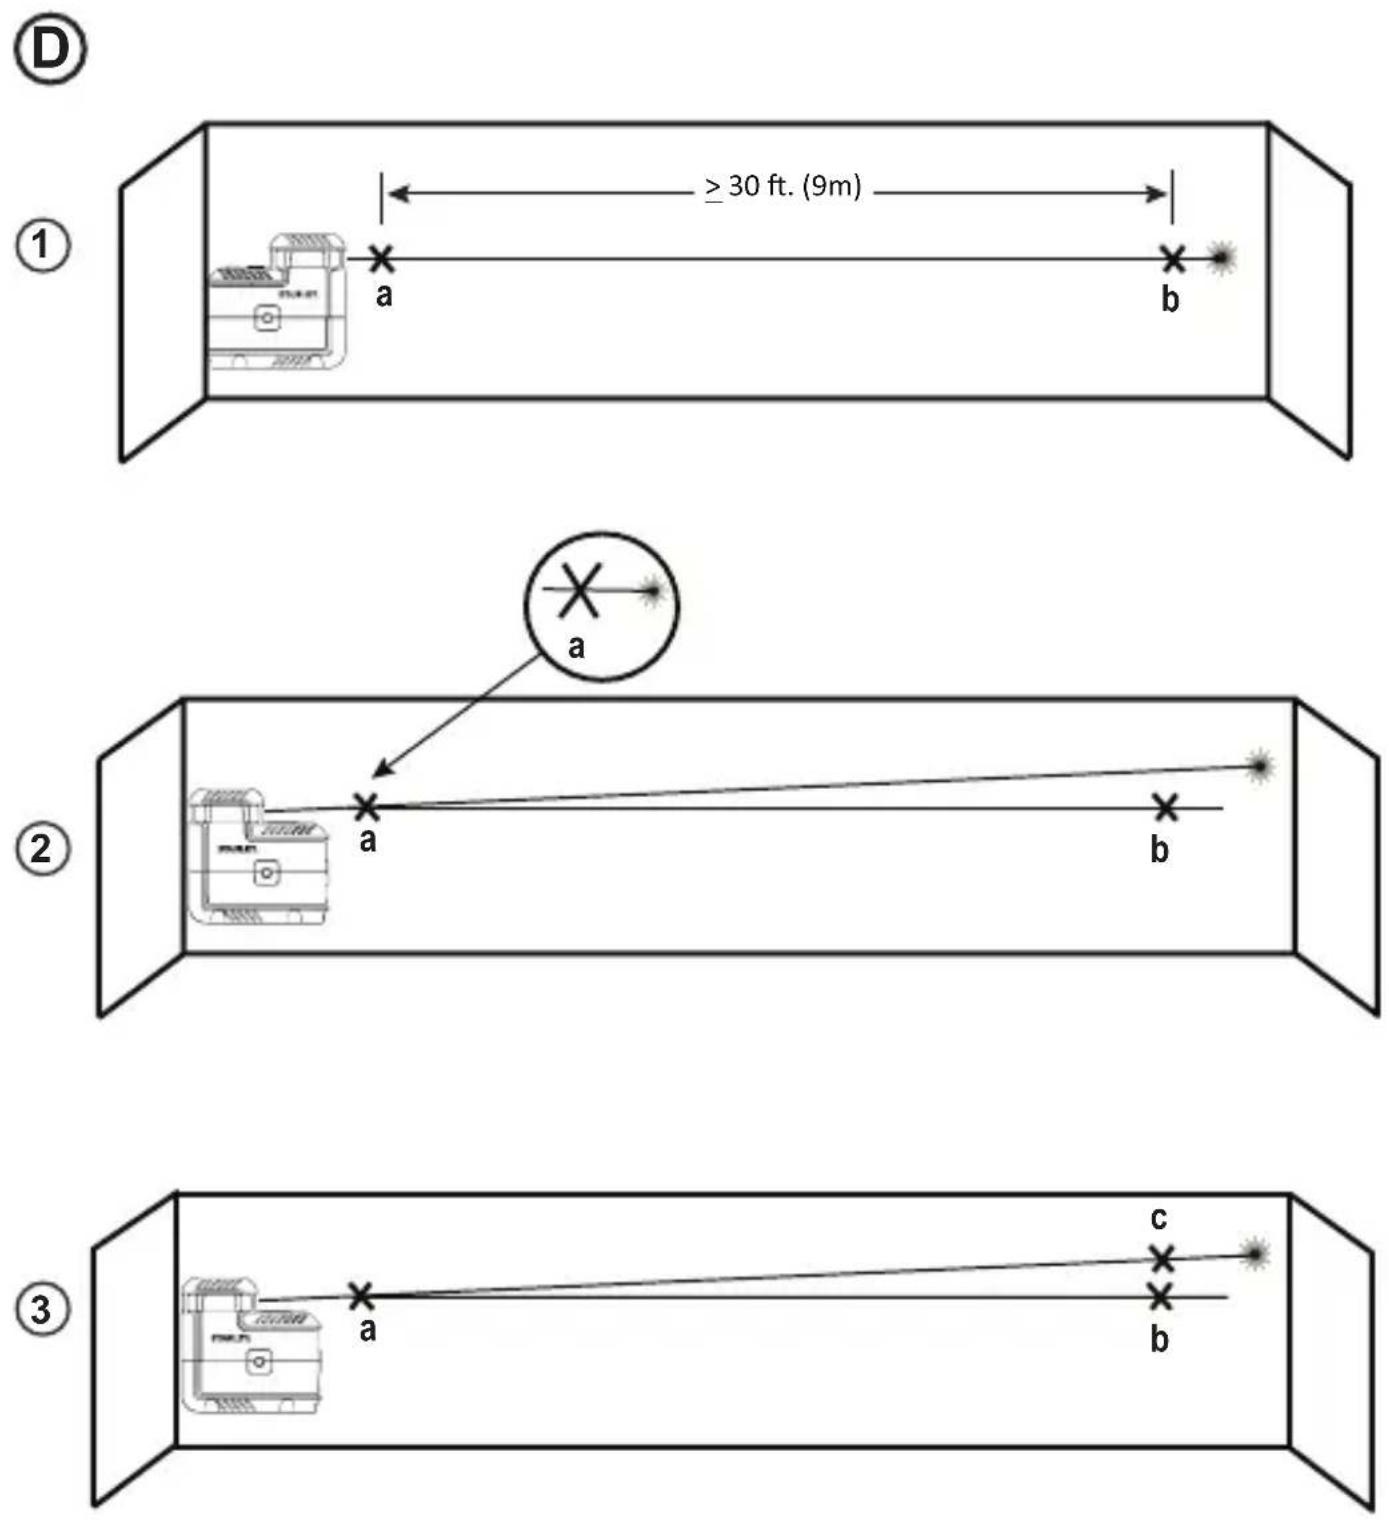
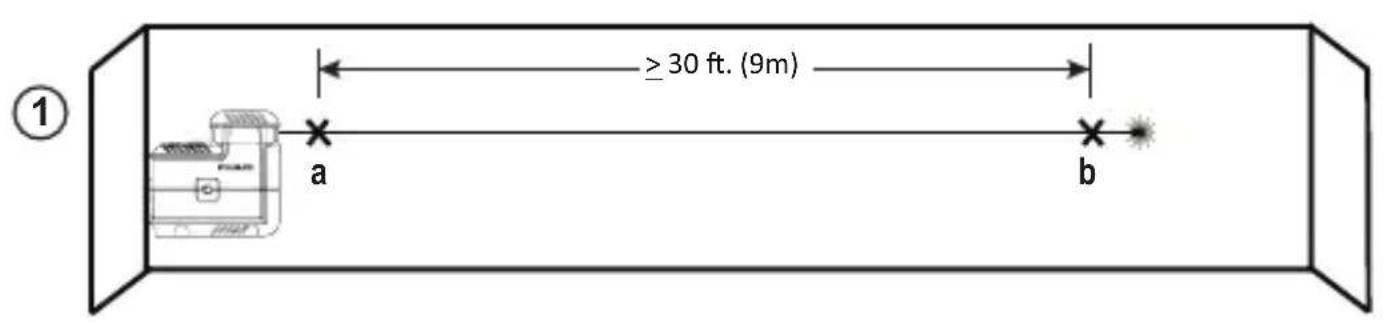
Checking the horizontal scan calibration of the laser requires two walls at least 30^ (9m) apart. It is important to conduct a calibration check using a distance no shorter than the distance of the applications for which the tool will be used.
- Place the laser against the end of the wall (Figure D ①).
- Move the Power/Transport Lock switch to the right (Figure A 3) to turn the laser ON in self-leveling mode and display a horizontal laser beam.
- At least 30^ (9m) apart along the laser beam, mark a and b
-
Turn the laser 180^ .
-
Adjust the height of the laser so the center of the beam is aligned with (Figure D 2).
- Directly above or below b, mark c along the laser beam (Figure D 3).
- Measure the vertical distance between b and c .
- If your measurement is greater than the Allowable Distance Between b and c for the corresponding Distance Between a and b in the following table, the laser must be serviced at an authorized service center.
| Distance Between a and b | Allowable Distance Between b and c |
| 30' (9m) 5/32" (4mm) | |
| 40' (12m) 7/32" (6mm) | |
| 50' (15m) 5/16" (8mm) |
Horizontal Beam - Pitch Direction
Checking the horizontal pitch calibration of the laser requires a single wall at least 30^ (9m) long. It is important to conduct a calibration check using a distance no shorter than the distance of the applications for which the tool will be used.
- Place the laser against the end of the wall (Figure E 1).
- Move the Power/Transport Lock switch to the right (Figure A 3) to turn the laser ON in self-leveling mode and display a horizontal laser beam.
- At least 30^ (9m) apart along the laser beam, mark a and b.
- Move the laser to the opposite end of the wall (Figure E 2).
- Position the laser toward the first end of the same wall and parallel to the adjacent wall.
- Adjust the height of the laser so the center of the beam is aligned with b
- Directly above or below a, mark c along the laser beam (Figure E 3).
-
Measure the distance between a and c
-
If your measurement is greater than the Allowable Distance Between a and c for the corresponding Distance Between a and b in the following table, the laser must be serviced at an authorized service center.
| Distance Between a and b | Allowable Distance Between a and c |
| 30' (9m) 5/32" (4mm) | |
| 40' (12m) 7/32" (6mm) | |
| 50' (15m) 5/16" (8mm) |
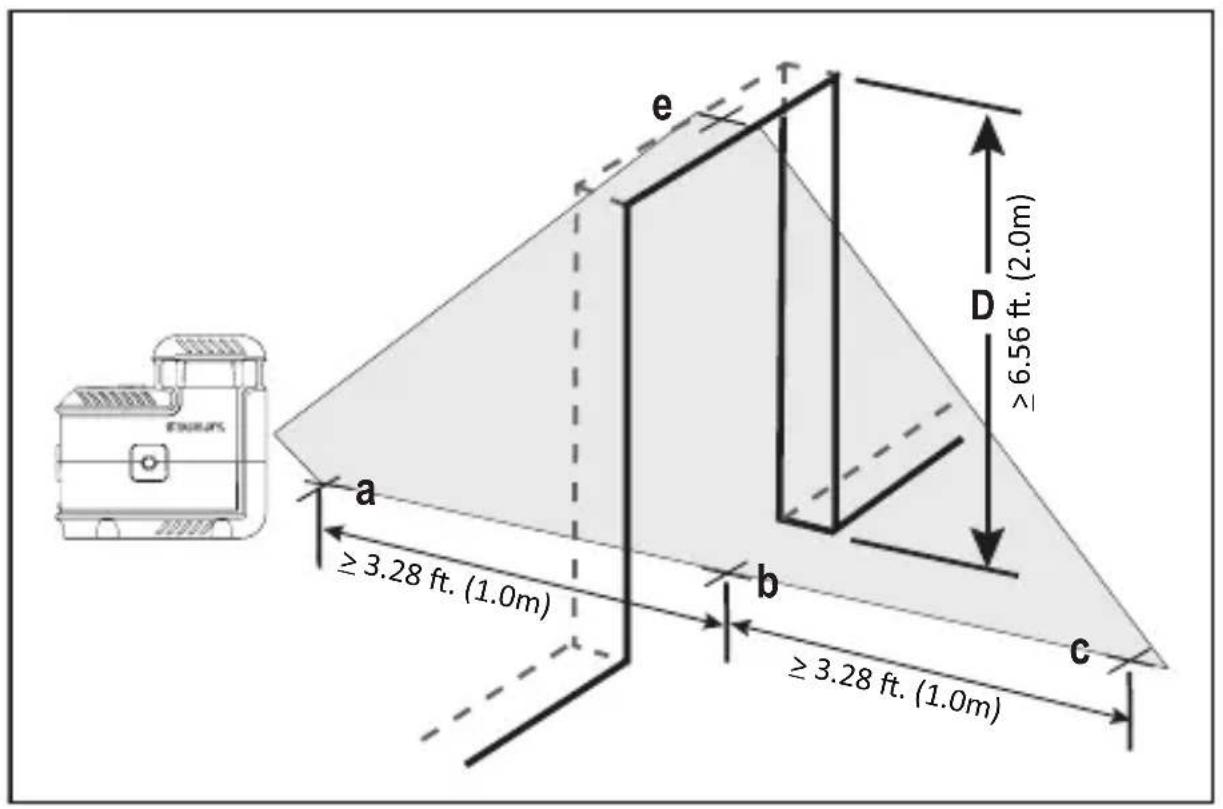
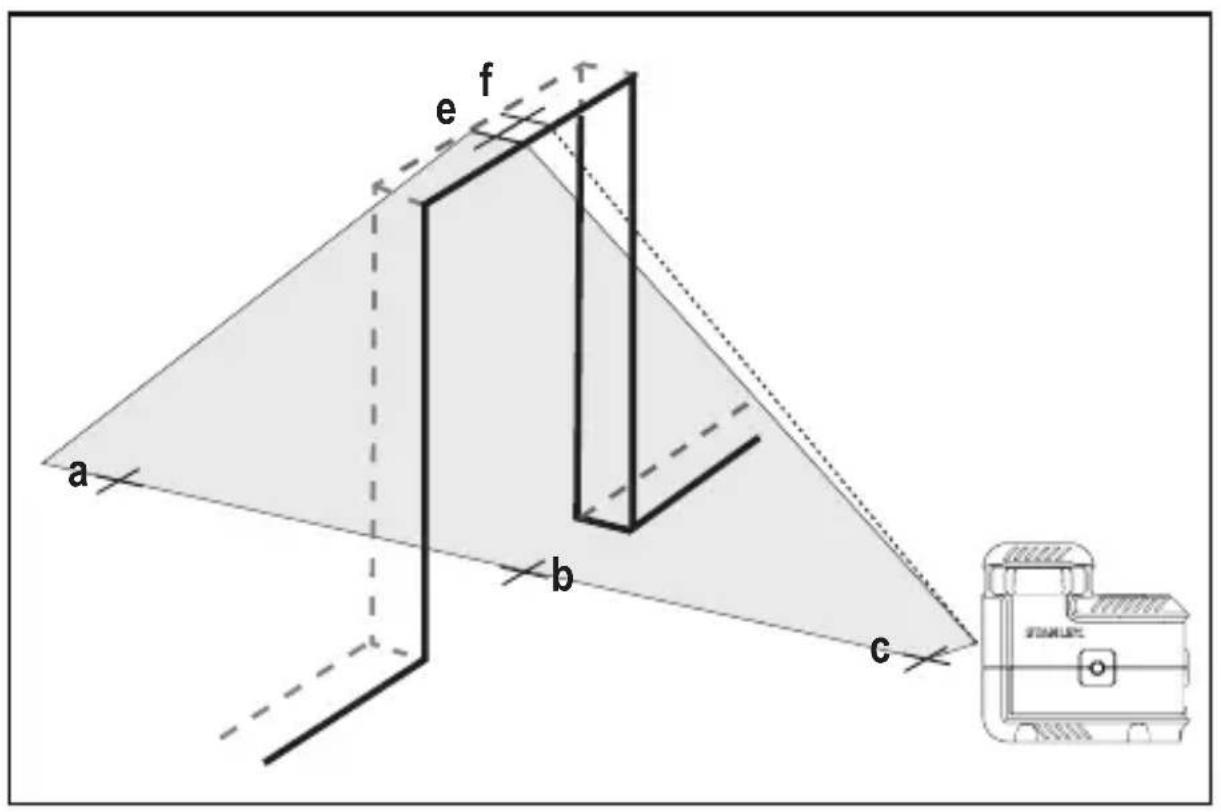
Vertical Beam - Plumb
Checking the vertical (plumb) calibration of the laser can be most accurately done when there is a substantial amount of vertical height available, ideally 30^ (9m), with one person on the floor positioning the laser and another person near a ceiling to mark the position of the beam. It is important to conduct a calibration check using a distance no shorter than the distance of the applications for which the tool will be used.
- Place the laser at least 3.28 ft (1.0m) from a door jamb (Figure F 1).
- Move the Power/Transport Lock switch to the right (Figure A 3) to turn the laser ON in self-leveling mode and display a horizontal laser beam.
- Press once to display the vertical beam.
- Aim the vertical laser beam toward the door jamb.
- Along the bottom of the laser beam, mark three locations a, b, and c where b is midway between a and c
- Where the top of the laser beam appears at the top of the door jamb, mark e
- Move the laser to the opposite side of the door jamb (Figure F 2).
Align the bottom of the laser beam with a b and c - Where the top of the laser beam appears at the top of the door jamb, mark
-
Measure the distance between e and f
-
If your measurement is greater than the
Allowable Distance Between e and f for the corresponding Height D in the following table, the laser must be serviced at an authorized service center.
| Height D | Allowable Distance Between e and f |
| 6.56' (2.0m) 1/1 | 6" (1.5mm) |
| 8.20' (2.5m) 3/3 | 2" (2.0mm) |
| 9.84' (3.0m) 1/8" | (2.5mm) |
Using the Laser
Operating Tips
Always mark the center of the beam created by the laser.
- Extreme temperature changes may cause movement of internal parts that can affect accuracy. Check your accuracy often while working.
- If the laser is ever dropped, check to make sure it is still calibrated.
- As long as the laser is properly calibrated, the laser is self-leveling. Each laser is calibrated at the factory to find level as long as it is positioned on a flat surface within average ± 4^ of level. No manual adjustments are required.
- Use the laser on a smooth, flat, level, surface.
Turning the Laser Off
Slide the Power/Transport Lock switch to the OFF position (Figure A 2) when the laser is not in use. If the switch is not placed in the OFF position, the laser will not turn off.
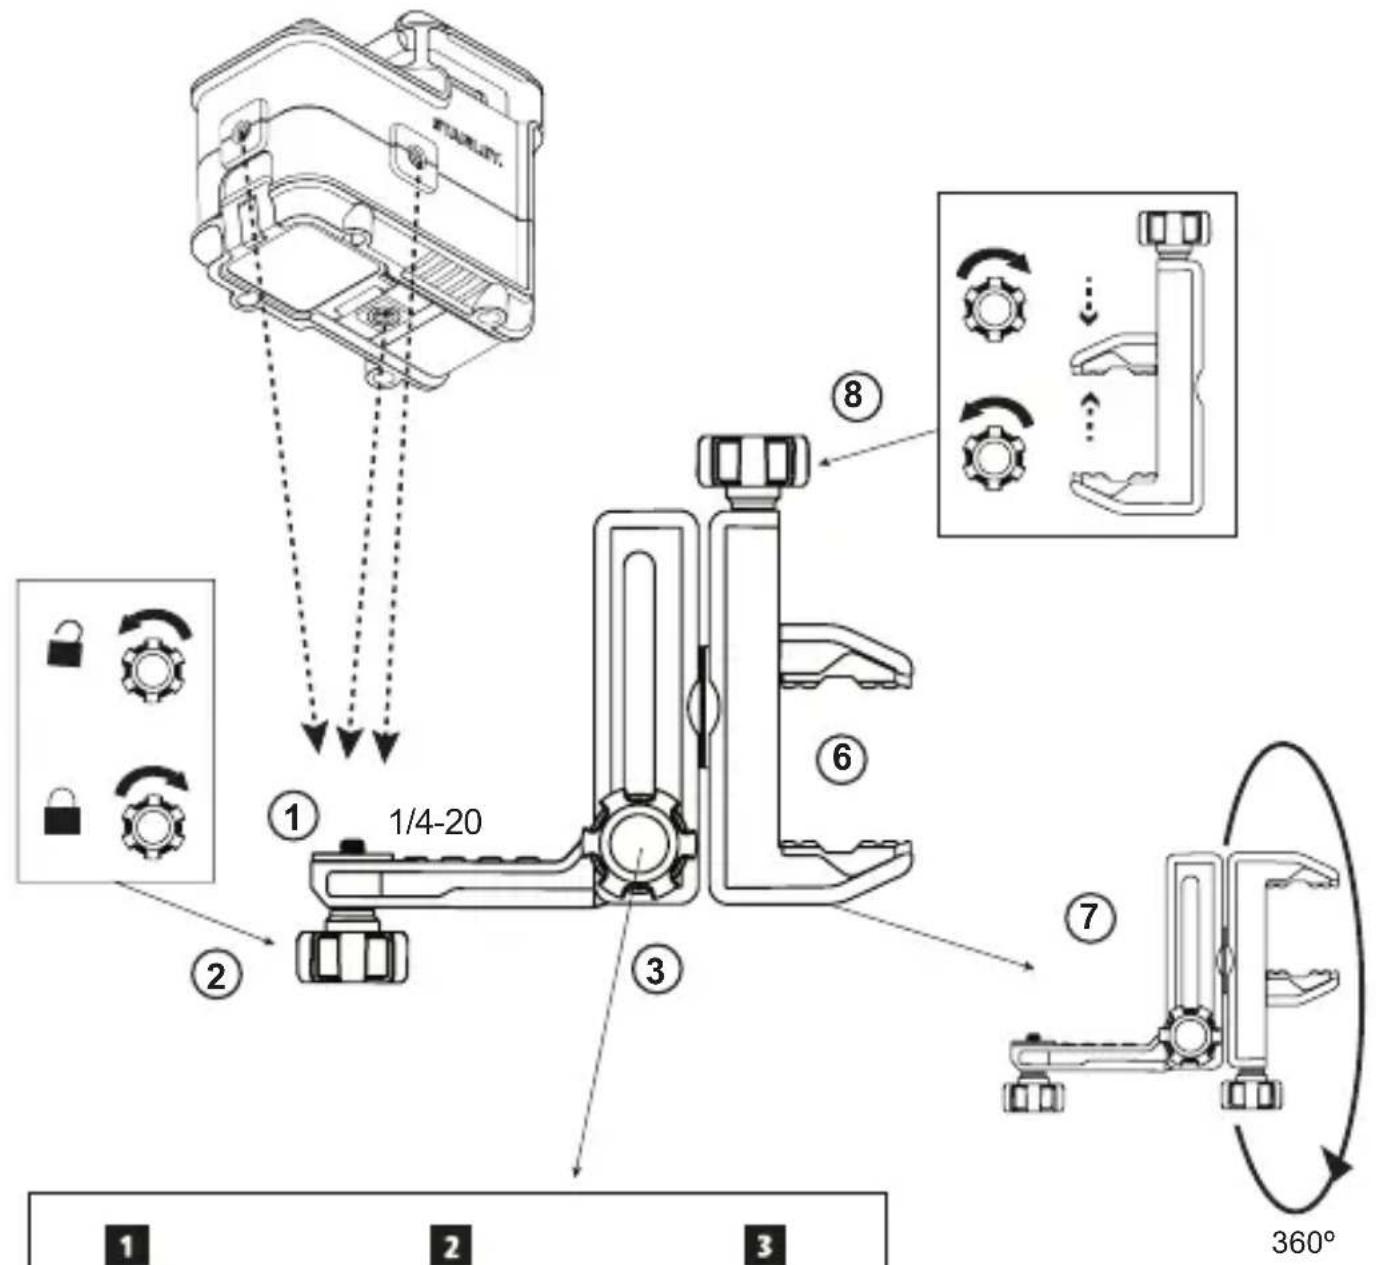
Using the Laser with the Bracket
A bracket (Figure G) is included with the laser so you can easily attach the laser to a stud, ceiling grid, or pole.
-
Securely attach the laser to the bracket.
-
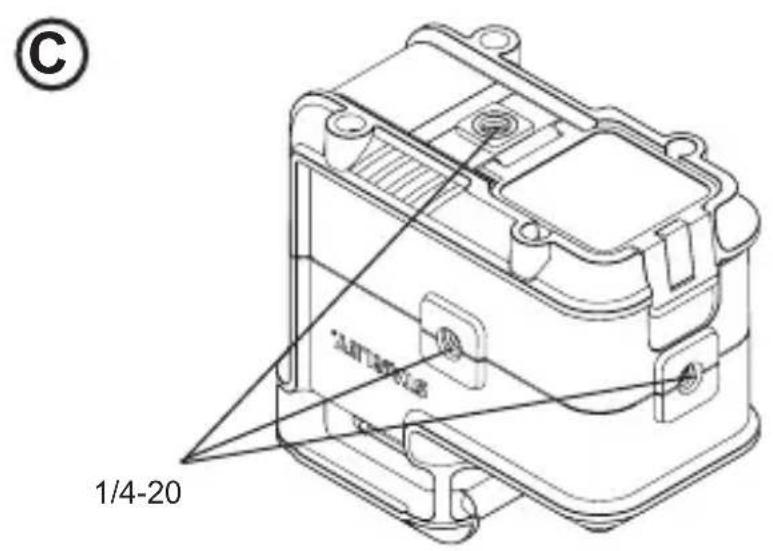
Using the 1/4-20 thread on the bottom, side, or back of the laser (Figure C), position the laser on the 1/4-20 thread on the bracket arm (Figure G 1).
-
Turn the laser knob (Figure ⑥②) clockwise to lock the laser on the 1/4-20 thread on the bracket arm.
-
If needed, change the height or position of the laser on the bracket.
-
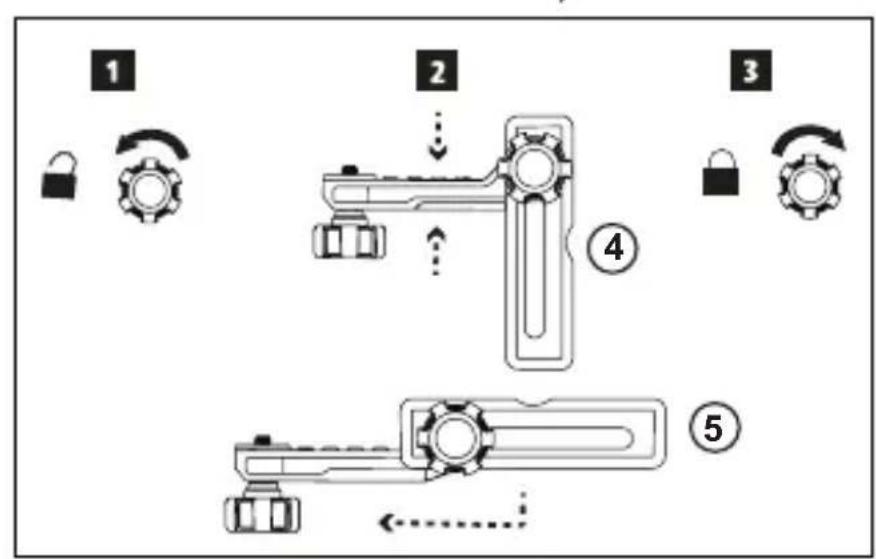
Turn the adjustment knob (Figure G 3) counterclockwise to loosen the bracket arm.
- Slide the bracket arm up or down to the desired height (Figure ④). To change the bracket from 90^ to 180^ , slide the bracket arm to the top of the bracket and then flip the arm to the right (Figure ⑤).
-
Turn the adjustment knob (Figure 3) clockwise to lock the bracket arm in place.
-
Use the bracket's clamp (Figure 6) to hold the laser in place on a stud, ceiling grid, or pole.
If necessary, rotate the clamp so it is positioned at the correct angle for attaching to the object. While holding the bracket arm with one hand, use your other hand to turn the clamp (Figure G7).
- Position the bracket's clamp around the stud, ceiling grid, or pole.
- Turn the clamp knob (Figure G 8) clockwise until the clamp is tight around the object and the bracket is held in place.
Using the Laser with Other Accessories

WARNING:
Since accessories other than those offered by STANLEY have not been tested with this laser, use of such accessories with this laser could be hazardous.
Only use STANLEY® accessories that are recommended for use with this model. Accessories that may be suitable for one laser may create a risk of injury when used with another laser.
The laser is equipped with a 1/4-20 female thread on the bottom, side, and back (Figure C) to accommodate current or future STANLEY® accessories.
Other recommended accessories for use with this laser are available at extra cost from your local dealer or authorized service center. If you need assistance locating any accessory, please contact your nearest STANLEY service center or visit our website: http://www.STANLEY.com.
Maintenance
- When the laser is not in use, clean the exterior parts with a damp cloth, wipe the laser with a soft dry cloth to make sure it is dry, and then store the laser in the kit box provided.
- Although the laser exterior is solvent resistant, NEVER use solvents to clean the laser.
- Do not store the laser at temperatures below -5^ (-20^) or above 140^ (60^) .
- To maintain the accuracy of your work, check the laser often to make sure it is properly calibrated.
- Calibration checks and other maintenance repairs may be performed by STANLEY service centers.
Troubleshooting
The Laser Does Not Turn On
- Check the AA batteries to make sure:
Each battery is installed correctly, according to (+) and (-) listed inside the battery compartment.
- The battery contacts are clean and free of rust or corrosion.
- The batteries are new, high-quality, name brand batteries to reduce the chance of battery leakage.
- Make sure the AA batteries are in proper working condition. If in doubt, try installing new batteries.
- When using rechargeable batteries, make sure the batteries are fully charged.
- Be sure to keep the laser dry.
- If the laser unit is heated above 120^ ( 50^ ), the unit will not turn ON. If the laser has been stored in extremely hot temperatures, allow it to cool. The laser level will not be damaged by using the Power/Transport Lock switch before cooling to its proper operating temperature.
The Laser Beams Flash
When in self-leveling mode, the lasers are designed to self-level up to an average of 4^ in all directions. If the laser is tilted so much that the internal mechanism cannot level itself (or the laser is not level when in manual mode), the laser beams will flash indicating that the tilt range has been exceeded.
THE FLASHING BEAMS CREATED BY THE LASER ARE NOT LEVEL OR PLUMB AND SHOULD NOT BE USED FOR DETERMINING OR MARKING LEVEL OR PLUMB. Try repositioning the laser on a more level surface.
Laser Beams Will Not Stop Moving
The laser is a precision instrument. Therefore, if it is not positioned on a stable (and motionless) surface, the laser will continue to try to find level. If the beam will not stop moving, try placing the laser on a more stable surface. Also, try to make sure that the surface is relatively flat and level, so that the laser is stable.
Service and Repairs
Note: Disassembling the laser level will void all warranties on the product.
To assure product SAFETY and RELIABILITY, repairs, maintenance and adjustment should be performed by authorized service centers. Service or maintenance performed by unqualified personnel may result in a risk of injury. To locate your nearest STANLEY service center, go to http://www.STANLEY.com.
Two Year Warranty
Stanley warrants its electronic measuring tools against deficiencies in materials and / or workmanship for two years from date of purchase.
Deficient products will be repaired or replaced, at Stanley's option, if sent together with proof of purchase to:
Stanley UK Sales Limited
Gowerton Road
Brackmills, Northampton NN4 7BW
This Warranty does not cover deficiencies caused by accidental damage, wear and tear, use other than in accordance with the manufacturer's instructions or repair or alteration of this product not authorised by Stanley.
Repair or replacement under this Warranty does not affect the expiry date of the Warranty.
To the extent permitted by law, Stanley shall not be liable under this Warranty for indirect or consequential loss resulting from deficiencies in this product.
This Warranty may not be varied without the authorisation of Stanley.
This Warranty does not affect the statutory rights of consumer purchasers of this product.
This Warranty shall be governed by and construed in accordance with the laws of the country sold where in and Stanley and the purchaser each irrevocably agrees to submit to the exclusive jurisdiction of the courts of that country over any claim or matter arising under or in connection with this Warranty.
Calibration and care are not covered by warranty.
NOTE:
The customer is responsible for the correct use and care of the instrument. Moreover, the customer is completely responsible for periodically checking the accuracy of the laser unit, and therefore for the calibration of the instrument.
GB
Specifications
| STHT77504-1 STHT77594-1 | ||
| Light Source Laser diodes | ||
| Laser Wavelength | 630–680 nm visible | 510–530 nm visible |
| Laser Power ≤3.2 mW CLASS 2 LASER PRODUCT | ||
| Working Range 20m (65') 25m (80') | ||
| Accuracy ±4 mm @ 10m (±5/32" @ 33") | ||
| Power Source 4 AA (1.5V) size batteries (3V DC) | ||
| Operating Temperature -10°C to 40°C | (14°F to 104°F) | |
| Storage Temperature -20°C to 60°C (-5°F to 140°F) | ||
Inhalt

Stanley UK Sales Limited
Gowerton Road Brackmills, Northampton NN4 7BW
Stanley UK Sales Limited
Gowerton Road
Brackmills, Northampton NN4 7BW
Stanley UK Sales Limited
Gowerton Road Brackmills, Northampton NN4 7BW
Stanley UK Sales Limited
Gowerton Road Brackmills, Northampton NN4 7BW
Colocar as baterias AA
PT
Cologne novas bacterias AA no laser STHT77504-1 ou STHT77594-1.
Stanley UK Sales Limited
Gowerton Road
Brackmills, Northampton NN4 7BW
Stanley UK Sales Limited
Gowerton Road
Brackmills, Northampton NN4 7BW
Stanley UK Sales Limited
Gowerton Road
Brackmills, Northampton NN4 7BW
Stanley UK Sales Limited
Gowerton Road
Brackmills, Northampton NN4 7BW
Stanley UK Sales Limited
Gowerton Road
Brackmills, Northampton NN4 7BW
| Høyde | Tillatt avstand mellom og f |
| 6,56' (2,0m) 1/16" (1,5mm) | |
| 8,20' (2,5m) 3/32" (2,0mm) | |
| 9,84' (3,0m) 1/8" (2,5mm) |
Bruk av laseren
Brukertips
Stanley UK Sales Limited
Gowerton Road Brackmills, Northampton NN4 7BW
Stanley UK Sales Limited
Gowerton Road Brackmills, Northampton NN4 7BW
PpOeIbOToPiNTiKecs ETEcE
Tia TnV Eukolia kai Tnv aOpaaleia oac, Tavw OTo λεiερ Utrapxouv oi napakatw ETIKETc.


IPOEIOIHsH: Ia va i o kivuoc tpaumatou, O xpnoTns npetie va diaabe to eyyxipio oyniwv.

NPOEIONOH:AKTINOBOAIA AEIZEP.MHN KOITAZETMEZA ΣTHN AKTINA.Προίνλειερ Karnyopiας 2.
Mn xnpoiouoie to aeicep oE ekpnktia nepiabalovta, onwus npoucia evkxtuv ypvv, aepiw n okovnc. Auto to epyaio evdextai va dnoupynoei otivnpec oi otoioi ptopov va npokaleouv avaAeN otn okovn n otis avuuiaceis.
Orav xpnoiomoiéTe to ,qulaoote to paKpia aio paiδia kai alaa μn ekTnaiBεuva atoua. Ta eivai einnikivovara xepia μn EKtnaiEuvw v npotwv.
To tou INPEIva i a tai 罗 o ano i e o npoosnKO EIOKEUwV. To n nouvtnponan nou diEayovta ano E\xiOikEupevo pooWNIKO mTopei va ETIpepuov OomegaIKn BlaBn. Ia va EvtonioTe to NAnoiotepo Kevtpo oepic Stanley, eTaBeite oTov 10totohttp://www.2helpU.com.
Mn xnpoiopoieite oTtka opya 6wns tnaekonio n thoobolyo ia va deire tn deogn aKtivwV aeIep. Oa mTopouoe va npokupei ooapn bAabn twv paiwv.
Mnv tootheire to aeicep oe thcog n oioia 0a mtopouoe va kavei onoiobnnote atopo va koiralei ngelneva n aetla nra anu theia c eo aotnv aktiva aeip. Oa mtopooe va npokpsi e obaip biah twv maivv.
Mnv tootheiE to Kovr a o avaklaotikn eipaveia n onioia mtopeiv a kateuovei avakaaon tnv akiva ota patia onoiouhntoe atou. Oa mnpouoe va npokyuoiopapn baoyn twv paniw.
- Anevepyooie to leiεp oav dev eviva xpon. Av afoe to leicep evpyoiomuvo, auéverai o kivouos va koitáxi kaioioc μeda stnv aktiva leiεp.
Mv npoTOnOioNoe T Kaveva TpOTo AeIeP. H npoTOnOiOn Tou epyaieou mTopei va eTIpeE EK0eON eE 1IKivovn aKtivoBoia AeiZep.
Mn xpoiopoioite to leicp ortav unapxouv yupw naiia kai mnu einnepeneva to xpnoiopoiouv naiia. Mnpei va npokanthe obaipn blaabtn wv maivv.
Mnv aphaipéire n 0eipet Tc npoEIOponiTEc EIKETc.Av aphaepoov oi EIKETc, tote oXpOTeS n aa atoua mnpei aelnta va ekEosouv touToUs eakivooia.
ToTOnoTeEitro kala otnpiyEvOe opicovia epiavia.Av TcEi to ,0a Tnopooue va npoknthetai Zmuia oTo Aeiεp n oBapoc tpaumatopoc atouw.
AtoiKn aOaλεia
Na eioe o eaypuvtvn, va npoexet i kavete kai va xpnoiopoioite tnV koivn loyik n otav xpnoiopoioite to aeIep. Mn xnpoiopoioite to aleizep otav eioe koupaoevoi n piokeote uno tnV einnpeia vapkwtikwv, oivntveupatoc n apmuakw. Mia otiyun aipooessiac kat anxpnon tou aeIep mtopei va epipeoi oobapn owatikn bAaBn.
XpnoiopoioieE oTIAOo aToPIKnC pOoataiaC. OpaTe nAvaTn pOoTaia aIwv.AvaLoya Tc ouVthkeEpyaia, n xPnAn TPOoTAeUTIKou EooAoU, otwG Maakac kata tnc oKovns, AVIOAOHTIKWuTOBnMaTsw aOpaleic, Kpavouc kai TPOoTaia c AOKs, 0a eIWoei Tc oWpatikcs Bae
Xpən kai φpovTiδa tou εpyαλεiou
Mn xponoiopoioaTe to leiεp av o diakottn TpoopooiaicAospaianc μetapopac δv to evpyoioiδev to aeepyoioi. Otoiobnte epyaioδev mnpei va eEyxetae to diakotn, εivai etikivuvo kai npenlaeuaεtai.
AkoouthetaiTcOobyiesoynEvotnTa Suvtnpon 10 npov Exyepio.HxpnunEykepivewv Eapntmuawn n nptnponTwv obyiwia Tn Suvtnpon mTPOe va POKaEoei Kivduvo nEktpoTTnxiacn Owpatiknc BaaBns.
Stanley UK Sales Limited
Gowerton Road Brackmills, Northampton NN4 7BW
H napoua Eyyunon dev kaunie EaattwmaTnou Tpokankav aTo Znue c Aoyw atuxmuotc, aTo 0opa, aTo xnoTnou dev nTav ouuwm u Tc oynie tsou kataoekuaotn n aTo m EykepiEvn aTo tN Stanley eTIOKEUn npOTTOINOn Tou poiovtoc.
H eTIOKEUn n avTKataOaOn UTo TnV TnpouoA Eyyunon EtnpeaZeI TnV Nepounvia AInCns TnS Eyyunon.
Tnv Ektaon Tou EITpETeTai aTo vOmo, n Stanley 0a Tnv EUoUVn UTO autn Tnv Eyyunon yia emuoeCn ETTAKoLauoEc aTWOIEc TPO TpokUTTouv aTO EaATWmuTa oAto Tpoiov.
H napouo Eayyunon dev mTropεi va TpOIOIOINθεi χωpi TnV EYKPION Tns Stanley.
H napoua Eyyunon Etnpeaei ta TpoBLeTOpva aTo vOo dikaiuMaTa TWV KAtavaawv Tou TPOUNeovta auto to TPOIOv.
H TnapouoA Eyyunon 0a diTetai aTcKai 0a
epunveuTai ouwva e Tou vovouc tsxwpac
TwnanCkai n Stanley kai o ayopaoTnc ouwvouv
O kaEvac ametakAnTa va utokevivai otyn
ATOKAEOTIKdikaiodooia twv dikaotpiw autnc
TNS xwpac oxetikαe OTOIAODNTOE aGioN n Thema
TPOKUeI UTO n 0e OUVDeON e autn tvv Eyyunon.
H a o n kai n o t i a kaUTTovTai aTIO EyyUnO.
ZHMEIQEH:
O TELATNG EIVAI UTEUVOG YIA TN O WOTN XPNON KAI 0PovTiOa Tou opyavou. ETINLAeov, O TELATNC EIVAI ATOKLEOTIKA UTEUVOG VA ELEYXIE TEPIOIKA TNV AKPIBcIA TNS MOVADAC LEICp, KAI EITOpEYwC YIA T N BAtmoVOpnon Tou opyavou.
PpObiaypaqes
TYTO POKNY USCHOVEJTE

VAROVÁNÍ:
Stanley UK Sales Limited
Gowerton Road Brackmills, Northampton NN4 7BW
OCTOPOXHO! JIa3EPHOE I3JIyEHNE. HE HAPPABJIaTb JIyB IJIa3A. Ja3epHoe u3denee Knacca 2.
He ucnb3yume na3ep eo e3pbieoonachou ammocpepe, Hanpumep, npu Hanpuu 2opuux kudkocmeu, a308 unu nbiu. Ppu pa6ome daHNO zuHcmpymehma Mozym noaumbcra uCKpbI, Komopbie Mozym npueecmu K BoCnnaMeHeHuO nbiu unnapo8.
XpaHume na3epHyO ycmHo6ky E mecmax, hedocmynhbix dna demeu u dpyaux HenodzomoeHHbIX nu. Na3ep npedcmaenem onachocmb 8 pykax HenodzomoeHHbIX noIb3oameneu.
TexHuueckoe 6cbnyKuaHue uHcmpymehma DOJXHO bInonnmbcra KauuupouoAHbIMU cneuaunucmamu. TexHuueckoe 6cbnyKuaHue doJxHo bInonnmbcra molbko KaunupouoAHbIMU cneuaunucmamu. HecobliodeHue 3mo20 yCnoBmu MoKem npueecmu KmpaMe. Ymobbl naMu 6nkaaWu cepuechbl ueHmp Stanley, nocemume http://www.2helpU.com.
He ucnonb3yume makue onmuyeckue uHcmpymehmbi kak meleckon unu meodolum, ymo6bl cmompemb Ha na3ephui np. 3mo moxem npubeecmu K cepbe3hbim nopejdeHuM 2na3.
He ycmahanueaime na3ephyo ycmaHOky makum o6pa30m, ymo6bI Kmo-ku6o mo2 HamepeHNO UNU HeHaMepeHNO CMompemb npMo Ha Na3epHbI Lyu. 3mo moKem npueecmu K cepbe3HbIM noepeKdeHuM 2na3.
He ycmahanabeaume na3ephyo ycmaHO6ky prdom c omppaxaoue u noepxhocmbio. 3mo moxem npueecmu K omppaxehuO na3epHO2O lyua e aana3a. 3mo moxem npueecmu K cepbe3HbIM noepeXdeHuM 2na3.
- BbIIOUaume Ia3epHyIO ycmHO8ky, Ko2da OHa He uCnoJIb3yEmc. Henb3ra ocmaBnmb Ia3ep 8KnIOueHHbIM, 3mo noeblwaem puck nonadHua Ia3epHOzO LyuA 6 2na3a.
3anpeuzaemraIIO6bIMcnocobom moduphiupo8amb na3ep. N3meHeue KOHcmpykuuu MoXem npueecmu K onachomy 803deucmbu noa3epno2o u3nyehua.
He ucnonb3yume na3ep 8 HenocpedcmbeHou 6nuzocmu om demeu u He no3BOnJume demam ynpa6Iymb na3epom. 3mo moxem npueecmu K cepbe3hblm no8pekdeHua m aHa3.
He ydaumu He cmupaume npedynpekdouue 3muemku. B cnyuae ydaenura hakneek, noIb3oamenu Moaym cnyaunho nodeepaHmbc eO3deucmeuU u3nyehua.
- YcmaHOBume Na3epHyu ycmaHO8ky Ha ycmouyu poeHyo noeepxHocmb. Ipu naheuu Na3epa 803MOXHo noepeKdeHue Na3epa unu nonyHeue mpa6MbI.
06ecneueHne nHdNvduyalbHo 6e3oNaChoctn
- Bybme eHumamehblc ompume, ymo deanaeme u He 3abbaume o 3dpabom cMbicne npu paBome c na3epom. He pa6omaune c na3epom, ecnu bI ycmau, haxodumebc e cocmohuu hapkomueecko2o, anko20nbHO2O onbHeHua nU npo 0o3deucmeuem nekapcmbeHHbx cpedme. Muhymna HEBHMamEnbHocmb npu pa6ome c na3epom moXem npueecmu K cepbe3HbIM mpaemam.
- Ucnonb3yume uHDueudyaHbIe cpecmea 3aumbl. Bceda ucnonb3yume 3auumhbIe ouku. B 3abucumocmu om ycnoBu 3Kcnnyamauu, ucnonb3oBaHue cpecmu uHDueudyaHbHou 3auumbl, maKx KaK pecnupamop, oByb c Heckonb3rae u nodowou, kcka u 3auumhbIe HayuHuku, yMeNbwaem puck nonyuHua mpaM.
IcnoJb3OBaHne nHcTpymeHTa uyxo3a Hm
He ucnolb3yume na3ep, ecnu He pa6omaem e2o BblknoyateIb nHTaHn/6lOKnpOBKn dIra TpaHCnOpTnPOBKn. IIObou uncmpymeh, KOMopbIM He603MOxHO ynpAeImb c nomoucbIO bblKNoyameJI, npedcmaIeem onachocmb u noJexum peMoHmy.
Cobnohoadme uHcmpkyuuu u3 pa3deTa TexHuueckoe 06cnykuaHue daHHo2O pyko8odcmba. Ucnno3o8aHue HeopueunHaBbIX 3anacmeu unu HecobnOdeHue uHcmpykuu no mexHuueckomy 06cnykuaHuo MoKem cmamb npuHou nopaxHeur 3neKmpomokOM unu nOnyuHen mpaM.
PykoBoDCTBO nO 6e3oNaChOcTN aKKyMylTopa

OCTOPOXHO!
Bamapeu Mozym 63opeambcra uMu moxem npouzoumu ymecka 3JeKmpoIuma,mo moxem npueecmu K nokapy. Pn CHuxeHua pucka Heo6xodmo co6liodamb cedeyioue npaeuna:
B mohocmu cneodyume uHcmpykuqumu npedynpekdeHuM Ha ynaKoEke u npIbikebamapeu.
Bce2da npabunbHo ycmhaene bueaume bamapeu, e coombeemcmeu c nojrapnoembo (+u - ) yka3aHHou ha bamapee u obopydoeaHuu.
He 3akopauueaume konhmakmbl 6amaeua.
He 3apkaume oohopa0bIe 6amaeu.
He ycmaHaBnueaume HoBie 6amapeu Bmecme co cmapbIMu.3aMeHraIme ece 6amapeu odHOepemEnHo u UcNoIb3yUme dner 3aMeHbI 6amapeu odHOzo u mozo je muna u Mapku.
He3amedunembno u38nekaume ompabomawue 6amapeu uyunuzupyume ux e coomeemcmuu c MecmhbIMU HopMaMu.
He ckuaume ompabomaeue bamapeu.
XpaHume bamaepu B mecmax, hedocmynHbix dna demeui.
- Bынmaime bamapeu, ko2da ycmpoicmeo He ucnonb3yemc.
YcTaHOBka 6aTapeek AA
BcTaBbTe HOBbIe 6aTapeKn AA B Ia3ep STHT77504-1 nnn STHT77594-1.
1.Перевернite Лазер Вьерх дHOM.
2. CdBnHbTe 3aueJky Ha Jna3epe, YTO6bl OTKpbITb KpbIuKy 6batapeHoro OTCeKa (pnc. B)1.
3. YctaHOBInTe YeTbIpe HOBbIe, BbICOKOKaYeCTBeHHbIe MapoHbIe 6aTapeKIN AA, co6JIIOJa IOnJIpaHocTb - n+, KaK OTMeueHO BHyTpN 6aTapeHOrO OTeKa (pnc. B ②).
4. HaxmTe Ha KpbIuKy 6aTapeHoro OTeKa, Noka He ycbluNTe uenqK (pnc. B 3).
Ecnn na3ep He nCnoJb3yeTcR, CdBnHbTe BbIKNIOaTeIb NITAHn/6IoknPOBKn IJIra TpaHCnOpTIpOBKn K cHTpy (BblKJI.) (pnc. A 2), YTO6bl He paCXoObaTb 3aprd 6atapeek.
BkIIOUeHne Ia3epa
- YctaHOBInTe Ia3ep Ha rIaNkyo, nIOCKyo, POBHyIO NOBepXHocTb, HAnpaBbTe erO Ha npOTIBONIOXHyO cTeHy (NOIOKeHne 0^
- BkHouHte Ia3ep, YTO6bI NOKa3aTb rOpN3OHTaJIbHbI Ia3epHbI JyU. Jn6o:
CdbnHbTe BbIKIOuOaTeIb NITaHNA/6NOKUPOBKn IJIra TpaHCnOpTnPOBKN BJeBO, YTO6bl MaTHNK OCTaBaIcra 3aΦNKcnpoBAHHbIM IN LyuO OTo6pa3nncb B pyHOM pexnme (pnc. A ①).
CdbnHbTe BblKnIOaTeIb NITaHIN/6IOKIpOBKn DJIra TpaHCnOpTnpOBKn BnpaBO, YTO6bl OCbo6OHTb MaRTNk I OTo6pa3NTb LyuB BpeXmE CaMOHNBeIInpOBKn (pnc. A ③).
- Haxmte 4 oIN pa3 nOTo6paXeHn rOpN3oHTaNbHO rIa3epHOrO lyuA, BTOPO pa3 dIy OTo6paXeHn BePTKcAlbHO rUya I TpeTNI pa3 dIy OTo6paXeHn rOpN3oHTaNbHO lyua N BePTKcAlbHO LyuA.
IcnoIb3OBAHne Ia3epa c KpoHHTeHOM
KpoHsTeHn (pnc. G) BcTpoe H bna3ep dny KpeHnHa3epa K HeoHOpOHOCTN, NotoJOnuHoi peWetke nnn uTaHre.
1. Hadejxho npikpeinte Ia3ep K kpoHteyHy.
- ПосpeдтВOM pe3b6bl 1/4-20 chn3y, c6okу Илсзади паэрpa (pnc. C),nomecnte паэрпаpe3b6by 1/4-20 ha pykoRTky kpoHHTeINHa (pnc. G 1).
- ПовернITE рукову лазера (pnc. G 2) no уасови стpeлке, утосы зафирopoны пазер на peэбе 1/4-20 на руковке кронштуна.
2. Пи Heo6xoIIMocTn OtpereyInpuYte BbICOTy Ia3epa Ha KpoHsTeiHe.
-ПовернITE руковуpeгларови(pnc. G 3) npOTnB yacobov CTpeJIKN, YTObI OCBO6OДТь pykOraTky KPOHHTeHa.
CdbnHbTe pyKoTky KpOHuTeHa BBepx nBHN3 DO HxKHO BbICOTbI (pnc. G 4).YTo6bl nepemecnttB KpOHuTeHc 90^ Ha 180^ CdbnHbTe pyKoTky KpOHuTeHa BBepx, 3aTEM OTKNHbTe KpOHuTeH BnPaBO (pnc. G 5).
- ПовернITE рукову Perулировки (pnc. ⑤) NO.Yacobov CTpeJIke, YTO6bl 3aФИКСИРОВАТ bpykOraTky KPOHHTeINHa Ha MeCTe.
3.Использу内蒙古 Кронштейна (pnc. G 6), YTO6bl 3aФИКСИРОВАТь ЛЗЕр Ha HEPOBHOCTN, NOTOLOCHN peштke NINI StTaHre.
-
Pn Heo6xOaHMOCTN NOBepHNTe 3aXIM, YTO6bl OH paONIaIarCn PoI npABINbHbIM yTlOM dIpyKpENIIeHnK O6bEkTy. PnpIepJINBaI pyKoIaTKy KPOHHTeHa OdHOJ pyKoI, NOBepHNTe 3aXIM dpYroN pyKoI (pnc. G)
-ПомecHTe 3axm KpoHHTeHa BOKpyr HepOBHocTn,notOJNoCHoR peWetKn NIN WtTaHn. -
ПовернITE рукову захима (pnc. G 8) no уасови стpenke takIM obpa3OM, уTO6bl 3axim 6bl 3aTHyT BOKpyr obbekTA n KPOHHTeHa ydepxnBaJcRaHa MeCTe.
IcnoJb3OBAHne Ia3epa c dpyrMM npHaJXHOCTaMn

OCTOPOXHO! B c8a3u c mem, ymo dononHumeIbHbIe npunadJIeKHeMu dpyaux npou3eOumeneu nomumo STANLEY He npoxodu npoeepky Ha coMecmUOCmb c daHHbIM u3deIeuM, ux uCnoJIb308aHue moxem npedcma8Iamb onachocmb.
Ucnonb3yume monbko npuHaadneKhoC Mu STANLEY, pekomehoobAHhie dny ucnolb3oahnuc daHou modeIbIO. DonlHumeNBie npuHaednHexOcmu, npuzoDbie dny odHou naepHO u ycmaHOku, mozym npedcmaBnmb onachocmb u npubecmu K mpaMe npu Ucnolb3oBaHuu dny dpy20u naepHO u cmaHOku.
Ja3ep OchaueH BHyTpeneHne pe3b6o1 1/4-20 cHn3y, c6oky n c3aui (pnc. C) dIy KpeIeHnT Ekyuix Nnn 6dyux npHaJnxHocTe STANLEY
Дугпе пинадлесхости, pekomehdobahbile KИСПОЛБЗOBAHИО C ДАньIM ЛаЗЕРOM, MOЖHO npno6peCTN 3a OTДeльHyO ПЯТУ B Вашero DINLEPERA ИИВ 6blnxkaIшЕ МсервисOM ueHTpe. Ecпn Bam HuxHa nOMOць пи посke Кakон-Лбо npinHADJIeKHOCTN, CBJXITecb C 6blnxkaIшIM cepBnCHbIM ueHTpOM STANLEY ИИ NOCETnTe HaW Be6-caT: http://www.STANLEY.com.
Ja3ep He BkIIOUaETc8
-Пюоверп Te 6aTapeиkn AA n y6eInTecsb,чTo:
Kakda 6atapeiKa npabnIbHO BCTaBneHa, cornacho MapKnipOBKe (+) n (-) BHyTpN 6atapeHoro OTeka.
- KoHTaKTbI 6aTapeek YnCTbIe n 6e3 npu3HaKOB pKaBcHbI Nn Koppo3nn.
- BaTapeiKN YBJIaHOTcHOBbIMN, BbICOKOro KaueCTBa n MapOuHbIMN, YTO6bl CHN3NTb pNCK yTeuKN.
- Y6eIntecb, yTO 6aTapeKn AA haxoJrTcB pa6ooyem coCTOHN. Pn HAIyHn COMHeHN, nonpo6yIte yCTaHOBt b HOBbie 6aTapeKn.
-Пи Испоьзовани akКуМлгТорнБIx 6aTapeek y6eДntecb,ЧTO OHI NOЛHOCtbl 3apЯЖeHbl.
-ДерхиTe ЛаЗрсухИМ. - Ecni Na3ep HarpeT Do Bblwe 120 F (50 °C), To yctpoicTBo He BKJIIOHTc. Ecni Na3ep xpaHnIc npi KpaIHe BbICOKO TempeaType, No3BOJbTe emy ocTbITb. Na3epHbI HNBeINp He 6yJeT NobpeXdEh, ecni erO BbIKNoUaTeJIb NITaHn/6IoKIpOBKn DJIra TpaHCnOpTnIPOBKn IcNOJIb3OBAtB Do OXJaXdEHn DO pa6Ouei TempeaTypbl.
Ja3epHbIe LyuN MnraIoT
B pexnme camohnBeHnPOBKn, KOHCTpyKuJa3epa npedymatpnaBaET camOBbipaBnHaHne do 4^ BO BCEx HnpaBHeHnx. EcIn Ja3ep HaKIOHeH hAcToIbKO cnIbHO, YTO BHyTpEHn MEXaHN3M He MOKeT erO BblPOBHTb (IIJn Ja3ep He BbIPOBHeB pyHOM pexnme), TO Ja3epHbIe JyHi NaHyT MIRaTb, yKa3bIBaHa NpeBbIiEHe DnAna30Ha HaKIOHa.
MIGAIOUNE JIA3EPHbIE JYUYIHE YBJIOTCJ TOPN3OHTAJbHbIMN IIN BEPTIKALbHbIMN IN HE DOJXHbI NCIOJIb3OBATbcIJa
ONPEDELEHNAIIMAPKINPOBKNYPOBNAIOTBECA. Nonpo6yTe nepectabntb na3ep ha 6ooneeropn30HTaJIbHyIO NOBepxHocTb.
Ja3epHbIe IyuH He npeKpaaIoT DnRaTbcra
Ia3ep YBnEeTc BbICOKOTOHbIM HNCTpyMeHToM.
Io3tOMy, ecnn erO He paCNOJoxMt bHa yCToUHBOi (HHeNoDbXHO) NOBepxHOCTn, To Ia3ep 6yDeT
IOCToHHo NbITaTbCn ONpeJeNTb yPoBeHb. Ecnn Lyu
He IpeKpaaaet DBNATbCn, Nonpo6ynte yCTaHOBTb
Ia3ep Ha 6oJee yCToUHByo NOBepxHOCTb. TaKke
IOCTapaTeCB y6eHTbcr, YTO NOBepxHOCTb
OTHOcHTeJIbHO plocka n rOpN3OHTaJIbHa, YTO6bl
ObecneuHTb cTa6nJIbHOCTb Ia3epa.
Stanley UK Sales Limited
Gowerton Road
Brackmills, Northampton NN4 7BW, Belenko6pntaHnra
TapaHTnHbIe o6a3aTeJIbCTBa He
pacnpocTpahnIOrTa Ha depeKtbl, CTabUHe
PnPHHO HnpeHaMepeHHORO NOBpeXDeHnRA
N n3Hoca, HeKOppeKTHoro NcNoJb3OBaHnRA ININ
camoCToTeNbHbIX MoDnΦnKauN r peMOHTa DaHHOrO
PpOdykTa 6e3 pa3peWeHnK ompanHn Stanley.
Pemont nnn 3aMeHa B paMKax Hactoaei IapaHTn. He BnnaeT ha cpoK IapaHTn.
B pamkax pa3peweHnra 3aKoHOdaTeIbCTBa KOMnaHn
Stanley He 6yDet HecTN OTBeTCTBeHHocTb 3a
KOCBeHHbI Nnn NocJeDyUOuN yUep6 Nnn NIO60
yUep6, KaKIM-JINBO O6pa3OM BbITEKaIOuN n3
NoJIb3OBaHn DaHHOr np6opa.
3aPpeucaetcBHOCTb N3MeHeHnB HAcToaIyU
TapaHTIO 6e3 pa3peSeHn Stanley.
Данная rapaHTЯ He BHOCNT N3MeHeHn B 3aKOHbIe npaba nOKyNaTeNeДaHHOrO N3dEInr.
DaHHOe rapaHTnHoe 6a3aTeBCTBO DOJHXHO peryIInPOBaTbCS n TOnKOBaTbCS B COOTBETCTBn C 3aKOHOaTeJIbCTBOM cTaPahbl, rde 6blIO npno6peTeHO daHHe u3dJIne, npu ycNoBUN yTO KaK KomnaHra Stanley, taN i NOKyNaTeNb 6e3OrOBoOpUHO corla7aIOTc NOuHNrTBcN CKNIouHTbHOJOpNCINKcN CyDOb 3ToN CTpaHbl OTHCNTeNbHO IIO6bIX pPeTeH3N IN BONpOCOB, CB83aHHbIX C daHHoR rapaHTnei.
KanibpoBka N OBCnyJbAHne He BXoJrT B rapaHTnHbIe ycNoBn.
ПОНМЕЧАНЕ.
3aHaIeXaUee IcNoJIb3OBAHne N O6CnyKINBaHne np6opa OTBeTCTBENHOCTb HecET KIneHT. BoJeetoro, KIneHT HecET IOJHyIO OTBeTCTBEHNOCtB 3a nepoJnueckyIO npOBepKy np6opa, N TaKIM o6pa3OM, 3a KaJIb6pOBky INHCTpyMeHTa.
RU TexHnueckne xapaKTepeNCTnKN
Stanley UK Sales Limited
TIETO POKNY USCHOVAJTE

VAROVANIE:
Expozicia laserovym ziarenim.
Laserovu vodovahu nerozoberajte ani ju
nemodifikujte.Vo vnutri sa nenachadzaju
ziadne diely, ktoré by si použivatel'mohol
opravit' svojpomocne.Mohlo by dojst
k zavaznemu poskodeniu zraku.

VAROVANIE:
Stanley UK Sales Limited
Gowerton Road Brackmills, Northampton NN4 7BW
Stanley UK Sales Limited
Gowerton Road
Brackmills, Northampton NN4 7BW
Ja3epbT He ce BkIIOUyBa
-
PnoBepete AA 6aTeepnnte, 3a da cTe cnpyhN, ye:
-
Bcya 6aTePnE nocTaBeHa npaBnHNo, cnopei (+) n (-) yka3aHn BbTpe B OTdJeHneTo 3a 6aTePnnte.
-БatepHHTe KOHTaKTn ca YnCTn HnMaT pXJa n KOpO3n.
BaTePnTe ca HOBn, BucOKoKaYeCTBeHn, OT yTBbpDeHa Mapka, 3a HamaJIraBaHe Ha WaHca 3a n3TuHaHe Ha BaTePnTe. -
YBepete ce, ye AA 6aTeepnnte ca B noDxOJaIpo pa6oTHo CbCToHne. Ako mATE cbMHeHne, NOCTaBeTe HOBN 6aTeepnN.
Korato n3no3BaTe npe3apeJdau ce 6aTePn, BHMaBaIte da ca HantbIHO 3apeHn.
Binharn noDbpxaIe Ia3epa cyx.
Ako Ia3epnIypeI e HarpT ha120 F (50^) , ypeIbT Hma Da ce BkIIOUH. Ako Ia3epbTe cxbxpaHraBaH npu N3KIOUHTeHNO ropeua TempepaTypa, ocTabeTe ro da ce oxlaDi. Ia3epHOTo HBO Hma Da ce NobpeDN OT n3PON3BaHeTo Ha 3aKIOUbaUnia IpEbkIOUbaTeN 3a 3axpaHbaHe/ PpeHoc., npeDN Da ce oxlaDN HoHopMaJIHaTa cn pa6OTha TempepaTypa.
Ja3epHnte JbU npncBETBaT
BpeKIM Ha camOHBeJInpaHe, Ia3epnte ca npoeKTIpaHn 3a camOHBeJInpaHe Do cpeH04° BbB BCNUKn NocOKn. Ako Ia3epbT Ce HAKNOH TOJKOBA MHORO, Ye BbTpEShnRT MExAHN3bM Da He MoKe da ce camOHBeJInpa, (IIN Ia3epbT He e HNBeJInpaH, KOrato E B pByeH peKIM), Ia3epHNTe JbUH nZe npocBETBaT, yKa3BaIKN, Ye oxbaTaHa HAKNoHa Ue 6bDe npebNIweH.
Stanley UK Sales Limited
Gowerton Road Brackmills, Northampton NN4 7BW
Ta3n rapaHcIy He NOKpNBa HeIOCTaTbCNI, pNCHHeHOT CnyaHn NOBpeDN, n3HOCBaHE, yNtpe6aB pa3pe3 c HnCTpyKuNTe Ha npOn3BOJnteJIy, IINpN HeoO6peH ot Stanley peMOHT IIN npOMHa HaTO3N PPOdYKT.
Pemont nnn 3amHa noD Ta3n rapaHcna He 3acra daTaTa Ha N3TuHaHe Ha rapaHcya.
Ioc HcHOTROBOPHOCT Taa3n rapaHua 3a npeku nn KocBeHn 3ary6n, npo3Tuauo nO nponyckn B TO3n npodykT.
Ta3n rapaHcHЯ He moKe da 6bJe npOmeHЯHa 6e3 cbrIacHeTo Ha Stanley.
Ta3n rapaHcna He 3acra 3akOHnTe npaba Ha nOTpe6nteJIte, KOnTO KynyBaT To3n IpOdyKT.
Ta3n rapaHcna Ce npilara n TbIkyBa B cbOTBETCTBne CbC 3aKOHHe Ha cTpaHaTa, KbDeTo ce npOdaBa TO3n npOdyKT, n Stanley n KyuBaCa ce cbIacraBat da ce cbo6pa3RaBt C n3KnUoyTeJHaTa IOpNCdNkCnHa HCdNlNusata Ha Ta3n DbpKabA, HAd BCEKNCK INNBbnpocn, npoN3TuHaaOn OT INN BBB Bpb3Ka C Ta3n rapaHcna.
KaIb6pnpaHTo n noDpBxKkTa He ce nokpuBaT ot rapaHnraTa.
3AБЕЛЖKA:
KJIneHTbTe OTROBOpEH 3a npaBnHOTo n3NoI3BaHe n rpnKa 3a IHCTpyMeHTa. OCBeH TOBa, KJIeHbT e HAnbJHo OTROBOpEH 3a nepnoDnHata npOBepKa Ha ToUHOCTTa Ha Ia3epHnM oMyI n CJeIOBaTeJIHO 3a KaJIb6pnpaHTo Ha ypeDa.
Cpeunopkaun
| STHT77504-1 STHT77594-1 | |
| Сbvетлиен ИЗточник Лаzerни дюди | |
| Дължина на лаzerнata вълна 630 - 680 НМ ВИДМ 510 - 530 НМ ВИДМ | |
| Моцноct на лаzerpa ≤3,2 mW KЛАС 2 ЛAЗЕРЕН ПОДУКТ | |
| РавOTEN obxbat 20 M (65') 25m (80') | |
| Точноct ±4 мM @ 10 M (±5/32"" @ 33) | |
| ИЗточник на зхсанове 4 AA (1,5V) | размер батери (3V DC) |
| РавOTNA Temпература -10°C до 40°C | (14°F до 104°F) |
| Tempepatура на съхсанове -20°C | do 60°C (-5°F do 140°F) |
Cuprins
Stanley UK Sales Limited
Gowerton Road
Brackmills, Northampton NN4 7BW
Stanley UK Sales Limited
Gowerton Road Brackmills, Northampton NN4 7BW
Stanley UK Sales Limited
Gowerton Road
Brackmills, Northampton NN4 7BW
Gowerton Road Brackmills, Northampton NN4 7BW
Ši garantija netaikoma defektams, atsiradusiems del netycinio sugadinimo, Devicejimosi, naudojimo ne pagal gamintojo instrukcijas, gaminio remonto ar modifikavimo negavirus „Stanley" leidimo.
| Yükseklik ① | İzin Verilebilir Mesafe e ve Arasinda |
| 6,56' (2,0m) 1/16" (1.5 mm) | |
| 8,20' (2,5m) 3/32" (2,0mm) | |
| 9,84' (3,0m) 1/8" (2,5mm) | |
Lazerin Kullanilmasi
Stanley UK Sales Limited
Gowerton Road Brackmills, Northampton NN4 7BW
Stanley UK Sales Limited
Gowerton Road
Brackmills, Northampton NN4 7BW
© 2018 Stanley Tools
Stanley Europe, Egide Walschaertsstraat 14-16,
2800 Mechelen, Belgium
www.2helpU.com
Made in China
N551894
January 2018


- GB
- Contents
- Laser Information
- User Safety
- Safety Guidelines
- SAVE THESE INSTRUCTIONS
- Warning Labels
- Personal Safety
- Tool Use and Care
- Battery Safety
- WARNING:
- Installing AA Batteries
- Turning the Laser On
- Checking Laser Accuracy
- Horizontal Beam - Scan Direction
- Horizontal Beam - Pitch Direction
- Vertical Beam - Plumb
- Using the Laser
- Operating Tips
- Turning the Laser Off
- Using the Laser with the Bracket
- Using the Laser with Other Accessories
- Maintenance
- Troubleshooting
- The Laser Does Not Turn On
- The Laser Beams Flash
- Laser Beams Will Not Stop Moving
- Service and Repairs
- Two Year Warranty
- Stanley UK Sales Limited
- NOTE:
- Inhalt
- Colocar as baterias AA
- PT
- Bruk av laseren
- Brukertips
- PpOeIbOToPiNTiKecs ETEcE
- AtoiKn aOaλεia
- Xpən kai φpovTiδa tou εpyαλεiou
- ZHMEIQEH:
- TYTO POKNY USCHOVEJTE
- VAROVÁNÍ:
- 06ecneueHne nHdNvduyalbHo 6e3oNaChoctn
- IcnoJb3OBaHne nHcTpymeHTa uyxo3a Hm
- PykoBoDCTBO nO 6e3oNaChOcTN aKKyMylTopa
- OCTOPOXHO!
- YcTaHOBka 6aTapeek AA
- BkIIOUeHne Ia3epa
- IcnoIb3OBAHne Ia3epa c KpoHHTeHOM
- Hadejxho npikpeinte Ia3ep K kpoHteyHy.
- Пи Heo6xoIIMocTn OtpereyInpuYte BbICOTy Ia3epa Ha KpoHsTeiHe.
- 3.Использу内蒙古 Кронштейна (pnc. G 6), YTO6bl 3aФИКСИРОВАТь ЛЗЕр Ha HEPOBHOCTN, NOTOLOCHN peштke NINI StTaHre.
- IcnoJb3OBAHne Ia3epa c dpyrMM npHaJXHOCTaMn
- Ja3ep He BkIIOUaETc8
- Ja3epHbIe LyuN MnraIoT
- Ja3epHbIe IyuH He npeKpaaIoT DnRaTbcra
- ПОНМЕЧАНЕ.
- TIETO POKNY USCHOVAJTE
- VAROVANIE:
- Ja3epbT He ce BkIIOUyBa
- Ja3epHnte JbU npncBETBaT
- 3AБЕЛЖKA:
- Cuprins
- Lazerin Kullanilmasi
Brand : STANLEY
Model : SLL360
Category : Hand tool