HS120 - Saw SCHEPPACH - Free user manual and instructions
Find the device manual for free HS120 SCHEPPACH in PDF.

| Technical specifications | Table saw, 2000 W power, blade diameter 254 mm, no-load speed 5000 rpm |
|---|---|
| Table dimensions | Aluminum table, dimensions 800 x 600 mm |
| Cutting capacity | Maximum cutting depth of 85 mm at 90°, 60 mm at 45° |
| Usage | Ideal for cutting wood, panels, and similar materials |
| Maintenance | Regularly check the blade condition, clean the table after each use |
| Safety | Equipped with a blade guard, safety switch, protective glasses recommended |
| General information | Device weight 30 kg, 2-year warranty, compliant with CE standards |
Frequently Asked Questions - HS120 SCHEPPACH
User questions about HS120 SCHEPPACH
0 question about this device. Answer the ones you know or ask your own.
Ask a new question about this device
Download the instructions for your Saw in PDF format for free! Find your manual HS120 - SCHEPPACH and take your electronic device back in hand. On this page are published all the documents necessary for the use of your device. HS120 by SCHEPPACH.
USER MANUAL HS120 SCHEPPACH
natural_image
Exterior view of a modern office building (no signage)
HS120
| DE | TischkreissägeOriginalbedienungsanleitung | 9 |
| GB | Circular table sawTranslation of original instruction manual | 23 |
| FR | Sce circulaire sur tableTraduction des instructions d'origine | 36 |
| IT | Sega circolare da bancoTraduzione delle istruzioni per l'uso originali | 50 |
| DK | BordrundsavOversættelse af den originale vejledning | 64 |
| NO | BordsirkelsagOversettelse av original-bruksanvisningen | 77 |
| NL | TafelcirkelzaagVertaling van de originele gebruikshandleiding | 90 |
| SE | BordcirkelsågÖversättning av originalbruksanvisningen | 104 |
| FI | PöytäpyörösahaKäännös alkuperäisestä käyttöohjeesta | 117 |
| SI | Namizna krožna žagaPrevod izvirnih navodil za uporabo | 130 |
| RU | Настольная циркулярная пилаПеревод оригинального руководства по эксплуатации | 143 |
| EE | laudketassaagTõlge originaalkasutusjuhendist | 158 |
| CZ | Stolní kotoučová pilaPrěklad z originálního návodu | 171 |
| SK | Stolová kotúčová pílaPreklad originálneho návodu | 184 |
| PL | Stołowa pilarka tarczowaTłumaczenie oryginału instrukcji obsługi | 197 |
| LT | Stalinis diskinis pjūklasVertimas originali naudojimo instrukcija | 211 |
| LV | Galda ripzāğisTulkojums no originālas lietošanas instrukcijas | 224 |
| HU | Asztali körfürészAz eredeti használati útmutató fordítása | 237 |
natural_image
Close-up of an electric motor with visible cooling fins and a side-mounted shaft, labeled '1a 1 2' (no other text or symbols)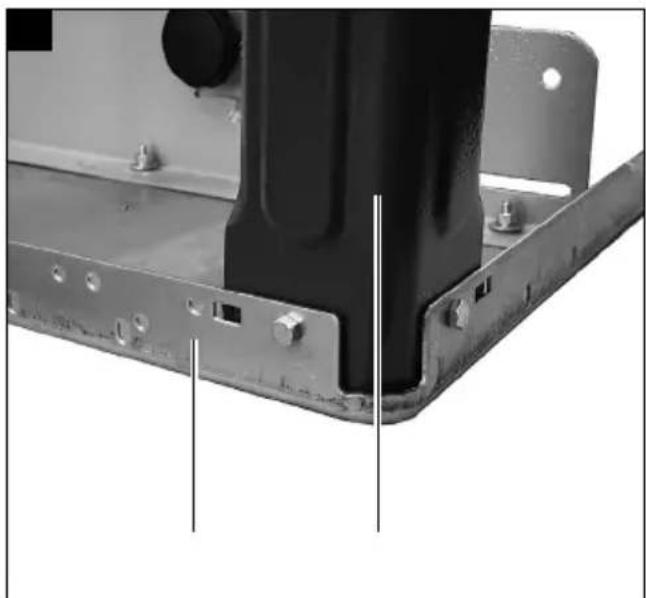
natural_image
Close-up of a metal bracket with bolts and mounting holes, no visible text or symbols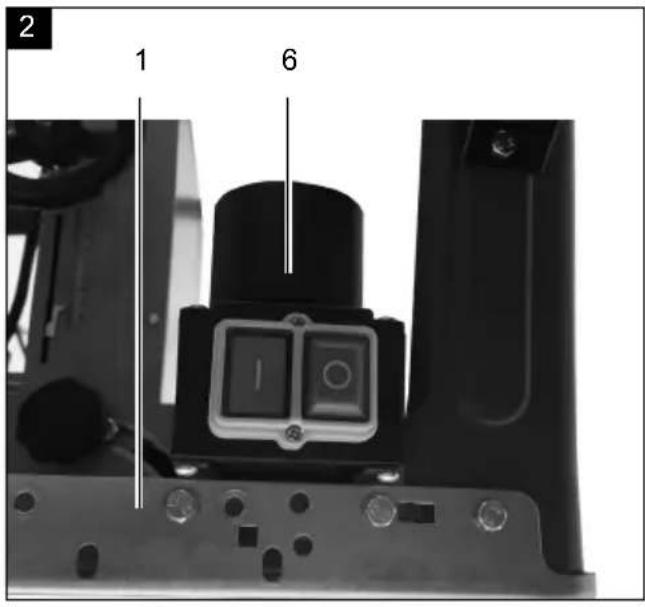
natural_image
Close-up of a black metal pipe joint with two vertical lines indicating measurement or alignment points (no text or symbols present)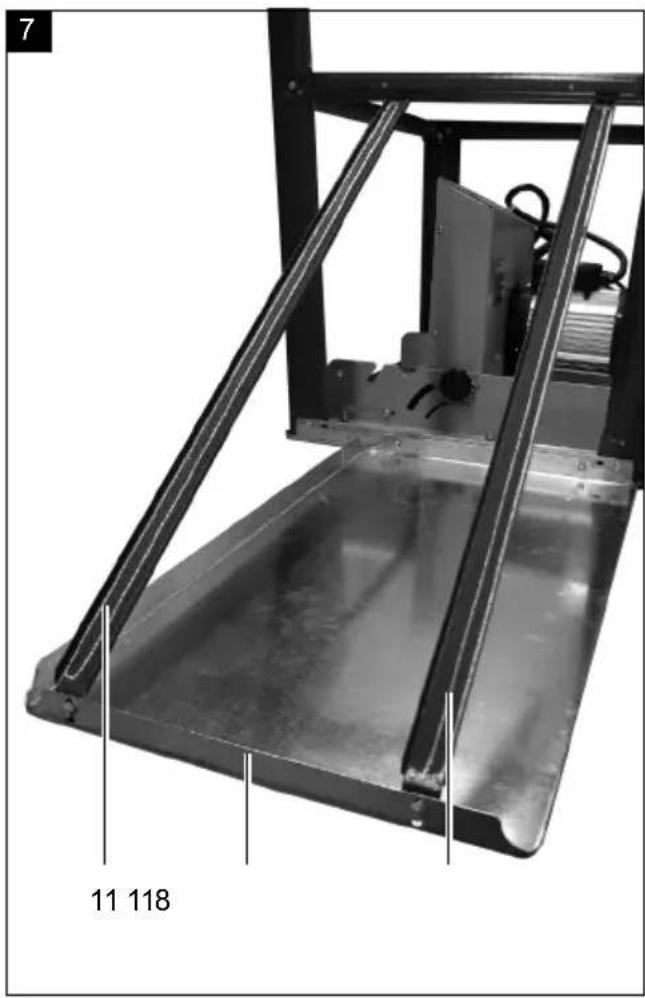
natural_image
Mechanical assembly with metal frame and structural beams, labeled with numbers 11 and 118 (no readable text or symbols beyond labels)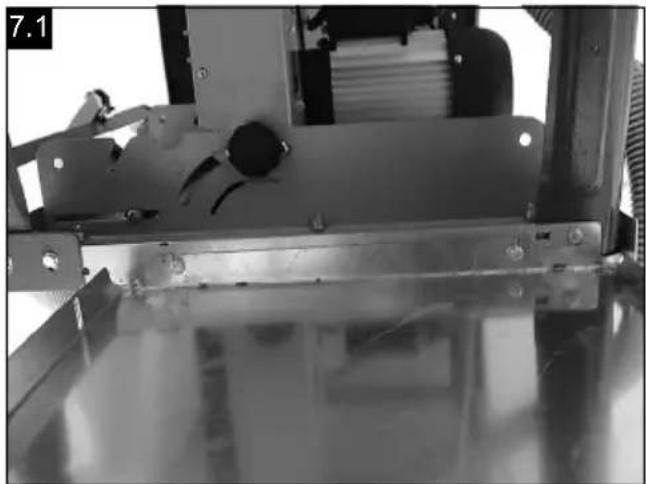
natural_image
Close-up of a mechanical assembly with metal components and bolts (no visible text or symbols)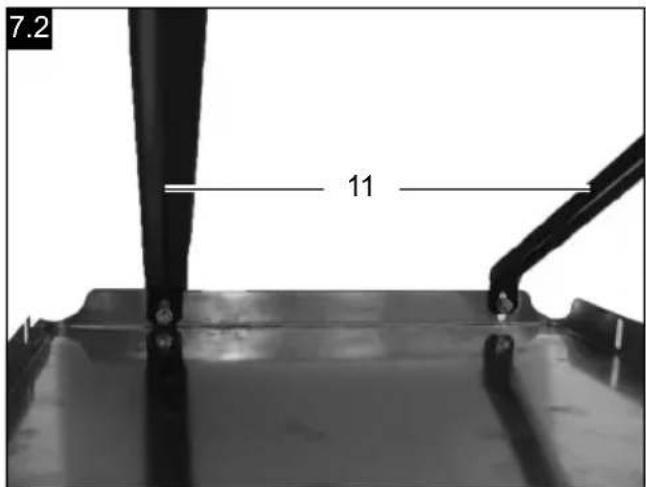
natural_image
Close-up of a black metal structure with two vertical lines and a circular component, no visible text or symbols.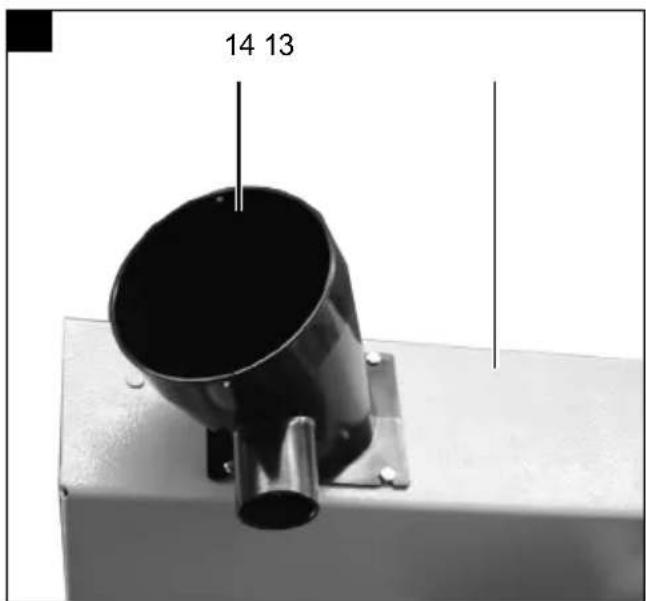
natural_image
Mechanical assembly with metal frame and mounted device (no visible text or symbols)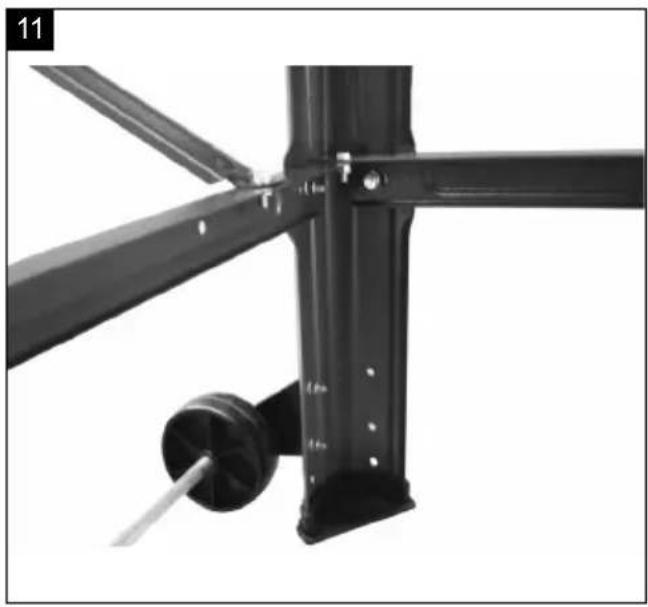
natural_image
Close-up of a black metal structural component with a cylindrical base and mounting feet (no text or symbols visible)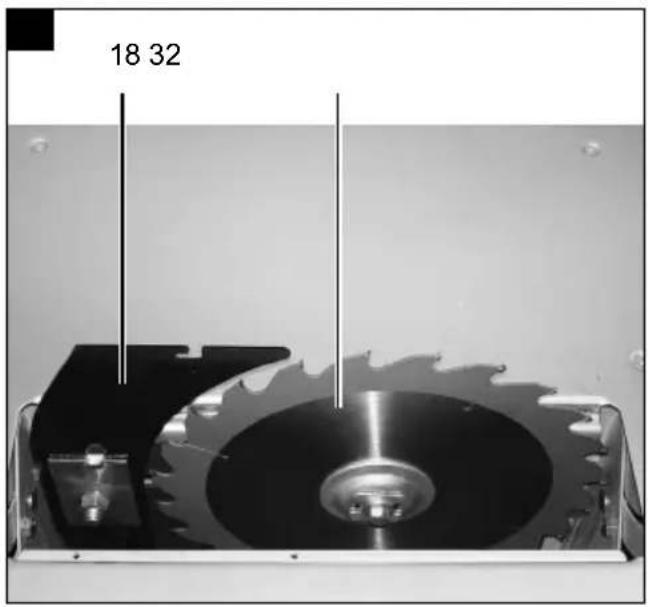
natural_image
Close-up of a black metal frame structure with visible joints and supports (no text or symbols)
natural_image
Mechanical assembly frame with visible components and wiring (no text or symbols)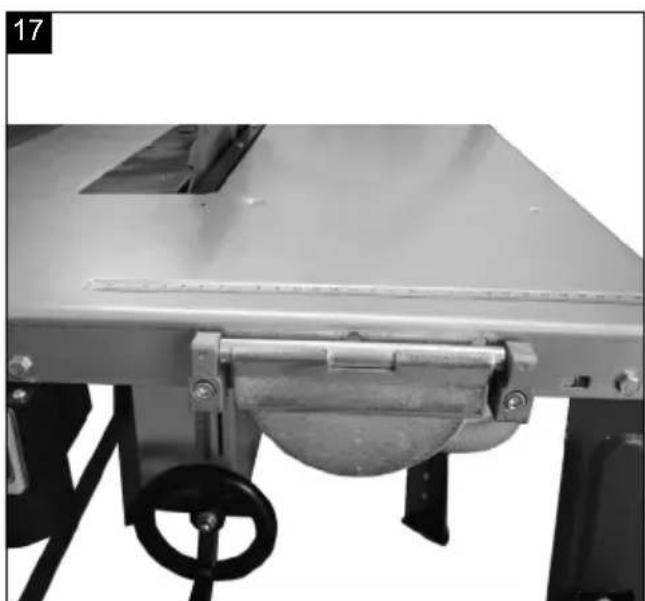
natural_image
Close-up of a mechanical frame with a metallic handle and wheels, no visible text or symbols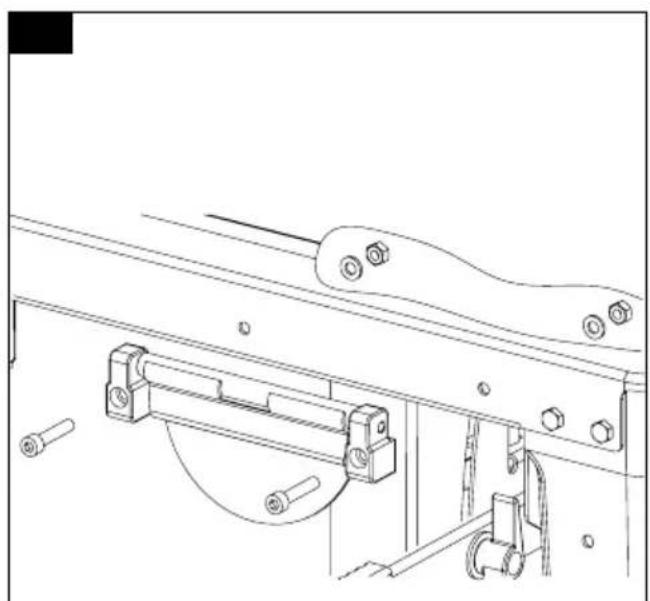
natural_image
Technical line drawing of a mechanical assembly with bolts and brackets (no text or symbols)
natural_image
Exterior view of a mechanical device with a black plastic sheet and a white housing, labeled with numbers 19 and 20 (no text or symbols on the main subject)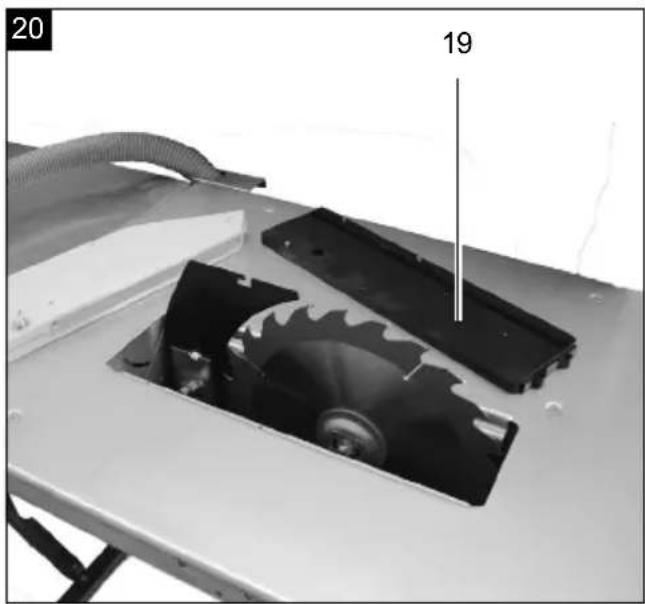
natural_image
Close-up of a mechanical device with a disc and casing, showing internal components and a numbered label (20) in the corner (no readable text or symbols on the main subject)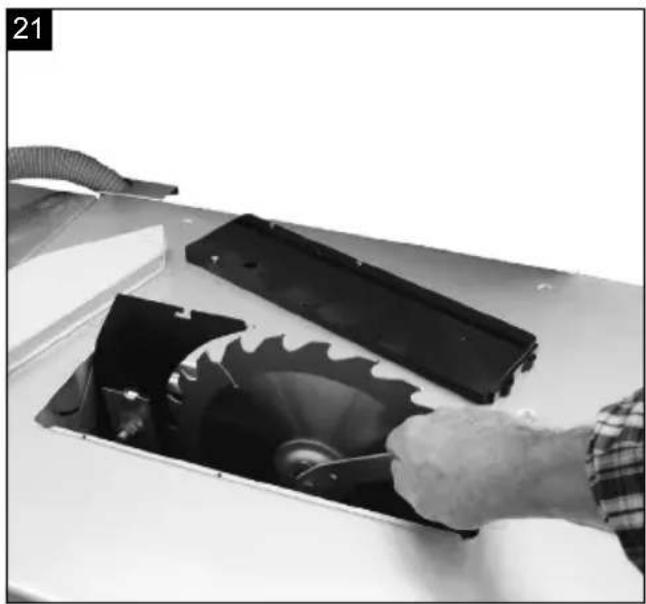
natural_image
Person using a tool to clean or adjust a circular fan component on a machine (no text or symbols visible)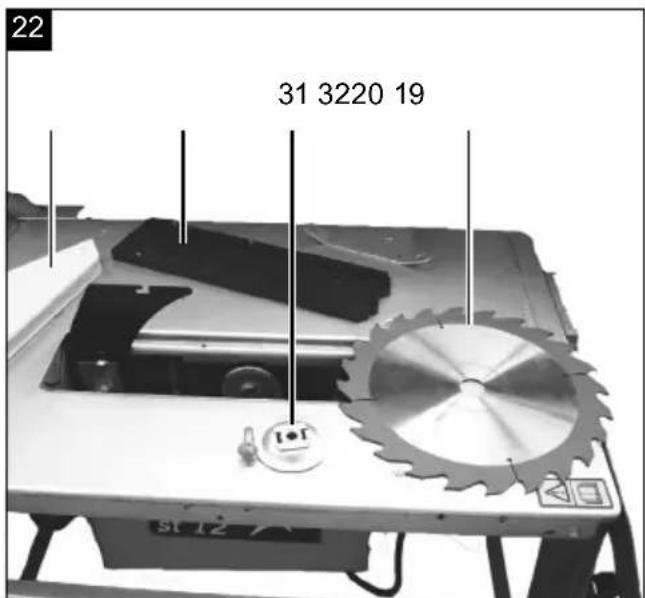
natural_image
Technical line drawing of a mechanical assembly with hands operating a workpiece (no text or symbols)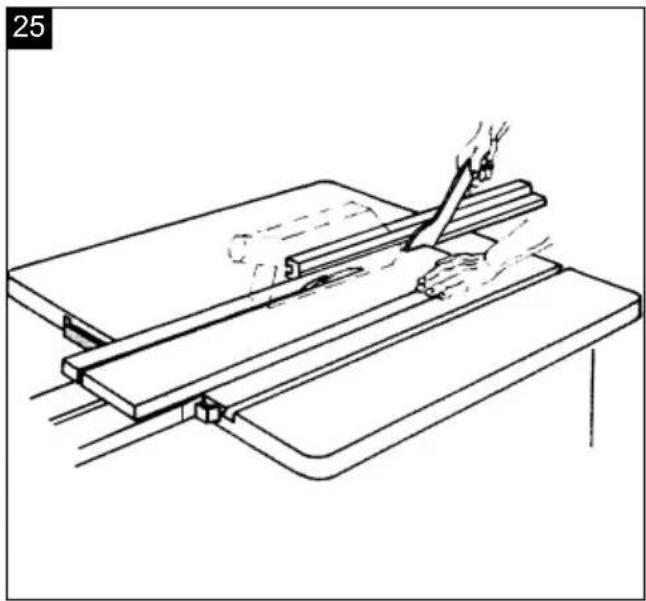
natural_image
Line drawing of a hand using a tool to cut or adjust a flat surface on a workbench (no text or symbols)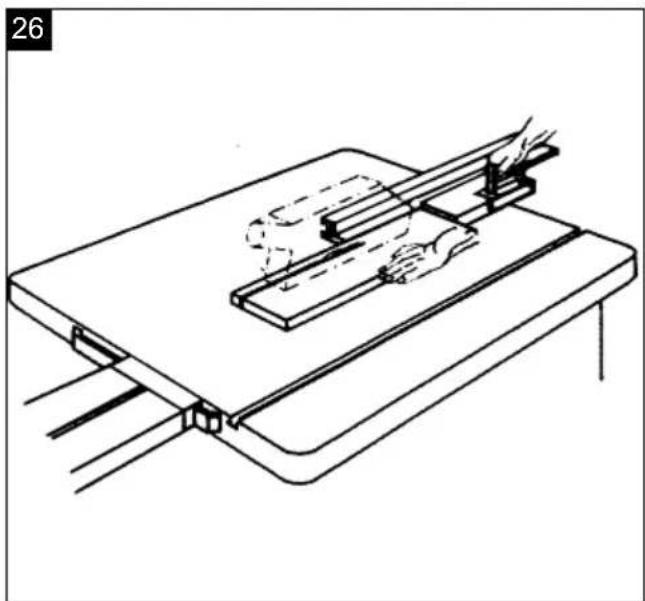
natural_image
Technical line drawing of a mechanical assembly with clamps and a base plate (no text or symbols)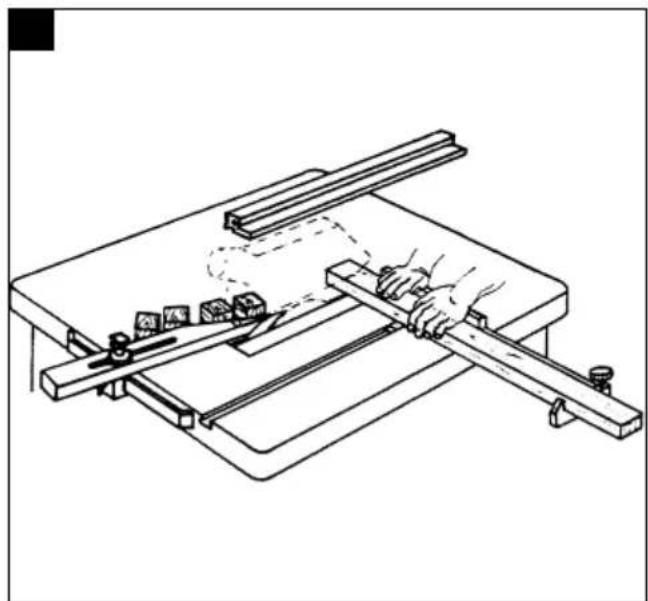
natural_image
Line drawing of a mechanical setup with a hand operating a tool on a workbench, no text or symbols presentGünzburger Straße 69
D-89335 Ichenhausen
Verehrter Kunde
Explanation of the symbols on the device
Symbols are used in this manual to draw your attention to potential hazards. The safety symbols and the accompanying explanations must be fully understood. The warnings themselves will not rectify a hazard and cannot replace proper accident prevention measures.
 | Warning - Read the operating manual to reduce the risk of injury. |
 | Wear hearing protection. Excessive noise can result in a loss of hearing. |
 | Wear a dust protection mask. When machining wood and other materials, harmful dust may be generated. Do not machine material containing asbestos! |
 | Wear eye protection. Sparks created during work or fragments, chippings and dust ejected by the device can case sight loss. |
 | Attention! Risk of injury! Do not reach into saw blade while it is running! |
| ⚠ Attention! | We have marked points in these operating instructions that impact your safety with this symbol. |
Table of contents: Page:
- Introduction....25
- Device description 25
- Scope of delivery 25
- Proper use 26
- General safety information....26
- Residual risks 29
- Technical data....29
- Unpacking 30
- Attachment and operation 30
- Transport....32
- Working instructions 32
- Electrical connection 33
- Maintenance 34
- Storage 34
- Disposal and recycling.... 34
- Troubleshooting 35
1. Introduction
Manufacturer:
Scheppach GmbH
Günzburger Straße 69
D-89335 Ichenhausen
Dear customer
We hope your new tool brings you much enjoyment and success.
Note:
In accordance with the applicable product liability laws, the manufacturer of this device assumes no liability for damage to the device or caused by the device arising from:
- Improper handling,
• Non-compliance with the operating manual, - Repairs carried out by third parties, unauthorised specialists.
• Installing and replacing non-original spare parts
• Application other than specified - Failure of the electrical system in the event of the electrical regulations and VDE provisions 0100, DIN 13 / VDE0113 not being observed
Please consider:
Read through the complete text in the operating manual before installing and commissioning the device.
The operating manual is intended to help the user to become familiar with the machine and take advantage of its application possibilities in accordance with the recommendations.
The operating manual includes important instructions for safe, proper and economic operation of the device, for avoiding danger, for minimising repair costs and downtimes, and for increasing the reliability and extending the service life of the device.
In addition to the safety instructions in this operating manual, you must also observe the regulations applicable to the operation of the device in your country.
Keep the operating manual package with the machine at all times and store it in a plastic cover to protect it from dirt and moisture. They must be read and carefully observed by all operating personnel before starting the work.
The device may only be used by personnel who have been trained to use it and who have been instructed with respect to the associated hazards.
The required minimum age must be observed.
In addition to the safety instructions in this operating manual and the separate regulations of your country, the generally recognised technical rules relating to the operation of such machines must also be observed.
We accept no liability for accidents or damage that occur due to a failure to observe this manual and the safety instructions.
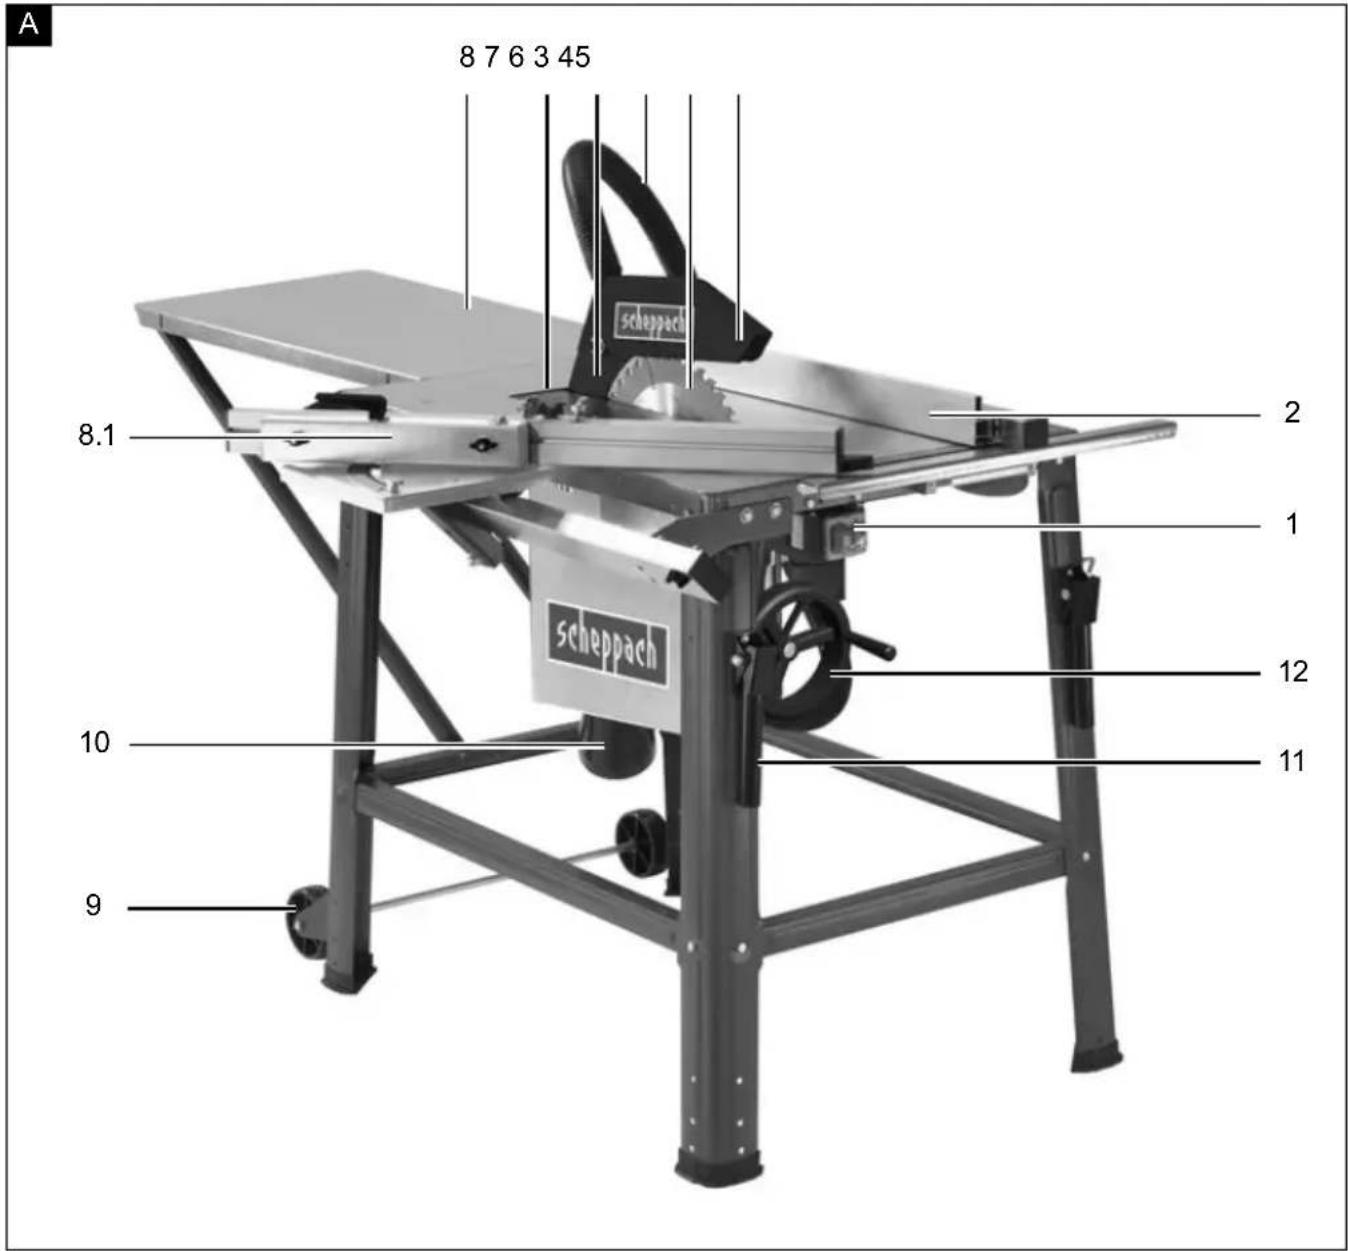
2. Device description (Fig. A)
- On/off switch
- Longitudinal stop
- Saw blade
- Protective cover
- Extraction hose
- Riving knife
- Table inlay
- Table width extension
8.1 Sliding carrier plate - Travel fixture
- Extraction port
- Transport handle
- Height adjustment
3. Scope of delivery
• HS120 circular table saw
- Longitudinal stop
- Sliding carriage with longitudinal stop and angle rail
- Saw blade guard with screw and wing nut
- Push stick
- Table extension
• 2x Table length extension supports
• 2x Table length extension supports
- Wheel and lug unit
- 4x frame feet
• 2x longitudinal struts
- 2x cross members
- Saw blade
- Saw blade key
- Suction hose with fastening clamp
- Extraction port
- Enclosed accessories bag
- Operating manual
4. Proper use
The circular table saw is used for the longitudinal and transverse cutting (only with the transverse stop) of all types of timbers, in accordance with the machine size. It is not permitted to cut any type of round timber.
The machine may only be used in the intended manner.
Any use beyond this is improper. The user/operator, not the manufacturer, is responsible for damages or injuries of any type resulting from this.
Only suitable saw blades (HM or CV saw blades) may be used for the machine.
The use of HSS saw blades and any type of cutting wheels is prohibited. An element of the intended use is also the observance of the safety instructions, as well as the assembly instructions and operating information in the operating manual.
Persons who operate and maintain the machine must be familiar with the manual and must be informed about potential dangers. In addition, the applicable accident prevention regulations must be strictly observed.
Other general occupational health and safety-related rules and regulations must be observed.
Attention!
When using equipment, several safety warnings must be observed to prevent injuries and damage. For this reason, please carefully read this operating manual / safety instructions. Keep them in a safe place so that the information is available at all times. If the device is handed over to another person, hand over the operating and safety instructions with it. We accept no liability for accidents or damage that occur due to a failure to observe this manual and the safety instructions.
The liability of the manufacturer and resulting damages are excluded in the event of modifications of the machine.
Despite use as intended, specific risk factors cannot be entirely eliminated. Due to the design and layout of the machine, the following risks remain:
- Contact with the saw blade in the exposed sawing area.
- Reaching into the running saw blade (cutting injury)
- Kick-back of workpieces and workpiece parts.
- Saw blade breakage.
- Ejection of faulty carbide parts of the saw blade.
- Hearing damage when the necessary hearing protection is not used.
- Harmful emissions of wood dusts during use in enclosed areas.
Please observe that our equipment was not designed with the intention of use for commercial or industrial purposes. We assume no guarantee if the equipment is used in commercial or industrial applications, or for equivalent work.
5. General safety information
Attention! The following basic safety measures must be observed when using power tools for protection against electric shock, and the risk of injury and fire.
Read all these notices before using the power tool and store the safety instructions well for later reference.
Safe work
- Keep the work area orderly
- Disorder in the work area can lead to accidents.
- Take environmental influences into account
- Do not expose power tools to rain.
- Do not use power tools in a damp or wet environment.
- Make sure that the work area is well-illuminated.
-
Do not use power tools where there is a risk of fire or explosion.
-
Protect yourself from electric shock
- Avoid physical contact with earthed parts (e. g. pipes, radiators, electric ranges, cooling units).
- Keep away from children!
- Do not let other people touch the tool or the cable, keep them away from your work area.
- Securely store unused electric tools
- Unused power tools should be stored in a dry, elevated or closed location out of the reach of children.
- Do not overload your power tool
- They work better and more safely in the specified output range.
-
Use the correct power tool
-
Do not use low-output power tools for heavy work.
- Do not use the power tool for purposes for which it is not intended. For example, do not use handheld circular saws for the cutting of branches or logs.
-
Do not use the electric tool to cut firewood.
-
Dress properly
-
Do not wear wide clothing or jewellery, which can become entangled in moving parts.
- When working outdoors, anti-slip footwear is recommended.
-
Tie long hair back in a hair net.
-
Use protective equipment
- Wear eye protection.
- Wear a mask when carrying out dust-creating work.
- Close the dust extraction system
- If connections for dust extraction and a collecting device are present, make sure that they are connected and used properly.
- Operation in enclosed areas is only permitted with a suitable extraction system.
- Secure the workpiece
- Use the clamping devices or a vice to hold the workpiece in place. It is thus held more securely than with your hand and allows the machine to be operated with both hands.
- An additional support is necessary for long workpieces (table, trestle, etc.) in order to prevent the machine from tipping over.
- Always press the workpiece firmly against the working plate and stop in order to prevent bouncing and twisting of the workpiece.
- Avoid abnormal posture
- Make sure that you have secure footing and always maintain your balance.
- Avoid awkward hand positions in which a sudden slip could cause one or both hands to come into contact with the saw blade.
- Take care of your tools
- Keep cutting tools sharp and clean in order to be able to work better and more safely.
- Follow the instructions for lubrication and for tool replacement.
- Check the connection cable of the power tool regularly and have it replaced by a recognised specialist when damaged.
- Check extension cables regularly and replace them when damaged.
- Keep the handle dry, clean and free of oil and grease.
- Pull the connector out of the socket
- Never remove loose splinters, chips or jammed wood pieces from the running saw blade.
- When the power tool is not in use or prior to maintenance and when replacing tools such as saw blades, bits, milling heads.
- Do not leave a tool key inserted
- Before switching on, make sure that keys and adjusting tools are removed.
- Avoid inadvertent starting
- Make sure that the switch is switched off when plugging the plug into an outlet.
- Use extension cables for outdoors
- Only use approved and appropriately identified extension cables for use outdoors.
- Only use cable reels in the unrolled state.
- Always remain attentive
⚠️ Pay attention to what you are doing. Remain sensible when working. Do not use the power tool when you are distracted.
- Check the power tool for potential damage
- Protective devices or other parts with minor damage must be carefully inspected to ensure that they function correctly and as intended prior to continued use of the power tool.
- Check whether the moving parts function faultlessly and do not jam or whether parts are damaged. All parts must be correctly mounted and all conditions must be fulfilled to ensure fault-free operation of the power tool.
- The moving protective hood may not be fixed in the open position.
- Damaged protective devices and parts must be properly repaired or replaced by a recognised workshop, insofar as nothing different is specified in the operating manual.
- Damaged switches must be replaced at a customer service workshop.
- Do not use any faulty or damaged connection cables.
- Do not use any power tool on which the switch cannot be switched on and off.
- ATTENTION!
- Exercise elevated caution for double mitre cuts.
- ATTENTION!
- The use of other insertion tools and other accessories can entail a danger of injury.
- Have your power tool repaired by a qualified electrician
- This power tool conforms to the applicable safety regulations. Repairs may only be performed by an electrician using original spare parts. Otherwise accidents can occur.
- Do not use the cable for purposes for which it is not intended.
- Do not use the cable to pull the plug out of the outlet. Protect the cable from heat, oil and sharp edges.
Additional safety instructions, safety precautions
- Warning! Do not use damaged, cracked or deformed saw blades.
- Replace a worn table insert.
- Only use saw blades recommended by the manufacturer which conform to EN 847-1.
⚠ Warning! When changing the saw blade, ensure that the cutting width is not smaller and the width of the saw blade disc is not greater than the thickness of the riving knife!
- Make sure that a suitable saw blade for the material to be cut is selected.
- Wear suitable personal protective equipment. This includes: Hearing protection to reduce the risk of hearing loss, respiratory protection to reduce the risk of inhaling hazardous dust.
- Wear gloves when handling saw blades and rough materials.
- Carry saw blades in a container whenever practical.
- Wear eye protection. Sparks created during work or fragments, chippings and dust ejected by the device can case sight loss.
- Connect a dust collecting device to the electric tool when sawing wood. The emission of dust is influenced, among other things, by the type of material to be processed, the significance of local separation (collection or source) and the correct setting of the hood/guide plates/guides.
- Do not use saw blades made of high-speed alloy steel (HSS steel).
- Always keep the push stick or wooden push block in its holder on the electric tool when not in use.
Maintenance and service
- Pull out the mains plug for any adjustment or repair tasks.
- The generation of noise is influenced by various factors, including the characteristics of saw blades, condition of saw blade and electric tool. Use saw blades which were designed for reduced noise development, insofar as possible. Maintain the electric tool and tool attachments regularly and if necessary, initiate repairs in order to reduce noise.
- Report faults on the electric tool, protective devices or the tool attachment to the person responsible for safety as soon as they are discovered.
Safe work
- Use a push rod or the handle with wooden push block in order to guide the workpiece safely past the saw blade.
- Make sure that the riving knife is always used and that it is correctly adjusted.
- Use and correctly set the upper saw blade guard.
- Only use saw blades for which the maximum permissible speed is not lower than the maximum spindle speed of the insertion tool and which are suitable for the material to be cut.
- Do not carry out rebating or grooving without a suitable protective device, such as a tunnel guard, being fitted over the saw table.
- Circular saws must not be used for slotting (groove ends in the workpiece).
- When transporting the electric tool, only use the transport devices. Never use the protective devices for handling or transport.
- Make sure that the upper part of the saw blade is covered during transport, e.g. by the protective device.
- Make sure to only use spacers and spindle rings that are suitable for the purpose specified by the manufacturer.
- The floor around the machine must be level, clean and free of loose particles such as chips and cutting residue.
• Working position always to the side of the saw blade. - Do not remove cutting waste or miscellaneous parts of the workpiece from the cutting area so long as the machine is running and the sawing unit has not yet come to a standstill.
- Ensure that the machine is always attached to a workbench or table whenever possible.
- Secure long workpieces against tipping at the end of the cutting process (e.g. with a reel-off stand or roller trestle).
⚠ Attention! Never remove loose splinters, chips or jammed wood pieces from the running saw blade.
- To rectify faults or remove jammed pieces of wood, switch the machine off. - Pull out the mains plug -
- Only carry out modifications, adjustment, measuring and cleaning work when the engine is switched off.
- Pull out the mains plug -
- Before switching on, make sure that keys and adjusting tools are removed.
⚠ WARNING! This power tool generates an electromagnetic field during operation. This field can impair active or passive medical implants under certain conditions. In order to prevent the risk of serious or deadly injuries, we recommend that persons with medical implants consult with their physician and the manufacturer of the medical implant prior to operating the power tool.
Safety instructions for the handling of saw blades
- Only use insertion tools if you have mastered their use.
- Observe the maximum speed. The maximum speed specified on the insertion tool may not be exceeded. If specified, observe the speed range.
- Observe the motor / saw blade direction of rotation.
- Do not use any insertion tools with cracks. Sort out cracked insertion tools. Repairs are not permitted.
- Clean dirt, grease, oil and water off of the clamping surfaces.
- Do not use any loose reducing rings or bushes to reduce holes on circular saw blades.
- Make sure that fixed reducer rings for securing the insertion tool have the same diameter and have at least 1/3 of the cutting diameter.
- Make sure that fixed reducer rings are parallel to each other.
- Handle insertion tools with caution. They are ideally stored in the originally package or special containers. Wear protective gloves in order to improve grip and to further reduce the risk of injury.
- Prior to the use of insertion tools, make sure that all protective devices are properly fastened.
- Prior to use, make sure that the insertion tool meets the technical requirements of this electric tool and is properly fastened.
- Only use the supplied saw blade for cutting wood, never for the processing of metals.
6. Residual risks
The electric tool has been built according to state-of-the-art and the recognised technical safety rules. However, individual residual risks can arise during operation.
• Health hazard due to electrical power, with the use of improper electrical connection cables.
• Furthermore, despite all precautions having been met, some non-obvious residual risks may still remain.
- Residual risks can be minimised if the "Safety instructions" and the "Proper use" are observed along with the whole of the operating instructions.
- Do not unnecessary stress the machine: too much pressure when sawing will damage the saw blade quickly. This results in reduced output of the machine in the processing and in cut precision.
- Avoid accidental starting of the machine: the operating button may not be pressed when inserting the plug in an outlet.
- Use the tool that is recommended in this manual. In doing so, your saw provides optimal performance.
- Keep your hands away from the work area, when the machine is in operation.
- Before maintaining or adjusting, switch off the machine and unplug the power plug.
7. Technical data
| AC motor 230 V~ 50 Hz | |
| Power 2200 W | |
| Operating mode S6 40% | |
| Idle speed 2800 min | -1 |
| Carbide saw blade ∅ 315 x ∅ 30 x 3 mm | |
| Number of teeth 24 | |
| Table size 800 x 550 (950) mm | |
| Cutting height max. 90° 83 mm | |
| Cutting height max. 45° 53 mm | |
| Height adjustment 0 - 83 mm | |
| Tilting saw blade 0 - 45° | |
| Weight approx. | 53 kg |
Technical changes reserved!
Noise and vibration
⚠ Warning: Noise can have serious effects on your health. If the machine noise exceeds 85 dB (A), please wear suitable hearing protection.
Noise data
| Sound power level L_wA | 105.2 dB(A) |
| Sound pressure level L_pA | 90.2 dB(A) |
| Uncertainty K_wA/pA | 3 dB(A) |
8. Unpacking
- Open the packaging and carefully remove the device.
- Remove the packaging material, as well as the packaging and transport safety devices (if present).
- Check whether the scope of delivery is complete.
- Check the device and accessory parts for transport damage. In the event of complaints the carrier must be informed immediately. Later claims will not be recognised.
- If possible, keep the packaging until the expiry of the warranty period.
• Familiarise yourself with the product by means of the operating instructions before using for the first time. - With accessories as well as wearing parts and replacement parts use only original parts. Replacement parts can be obtained from your dealer.
- When ordering please provide our article number as well as type and year of manufacture for your equipment.
ATTENTION!
The device and the packaging material are not children's toys! Do not let children play with plastic bags, films or small parts! There is a danger of choking or suffocating!
9. Attachment and operation
Before commissioning
- Prior to commissioning, all covers and safety devices must be mounted correctly.
- It must be possible for the saw blade to run freely.
• In case of previously machined wood, be aware of any foreign bodies, such as nails or screws, etc. - Before pressing the on/off switch, make sure that the saw blade is correctly fitted, and that moving parts run smoothly.
- Before connecting the machine, make certain that the data on the type plate matches with the mains power data.
- Only connect the machine to a correctly installed protective contact socket, with fuse protection of at least 16A.
Attachment and operation
Attention! Remove the mains plug before any maintenance, modification and assembly work on the circular saw.
Place all supplied parts on a flat surface. Group equal parts.
Note: If connections are secured with a screw (round head/or hexagon), hexagonal nuts and washer, the washer must be placed under the nut.
Insert screws each from outside to inside. Secure connections with nuts on the inside.
Note: During assembly, tighten the nuts and bolts only to the extent that they cannot fall off.
If you tighten the nuts and screws fully before final assembly, it is not possible to complete the assembly.
Fig. 1
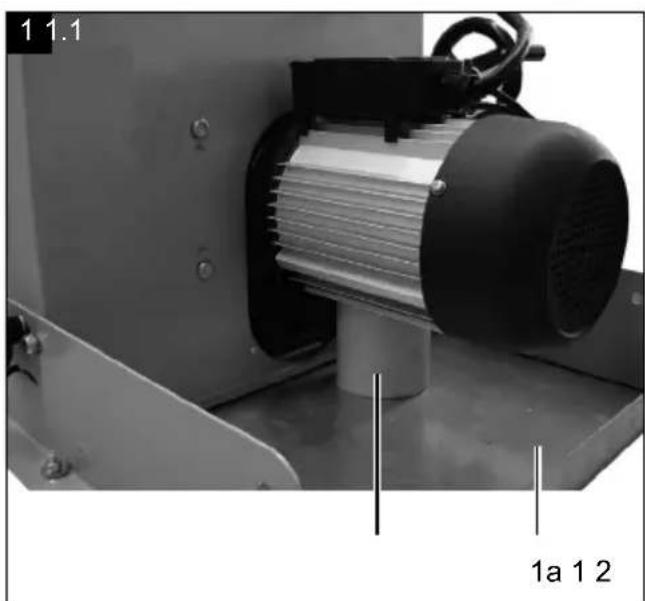
- Place the tabletop (1) on a workbench (remove packing pad (a) under the motor).
Fig. 1.1
- Mount the frame leg (2) to the tabletop (1) with 2 M6 x 16 hexagonal bolts, 2 washers 6 and 2 M6 nuts.
Fig. 2
- Mount the switch (6) to the tabletop (1) with 2 M6 x 16 hexagonal bolts, 2 washers 6 and 2 M6 nuts.
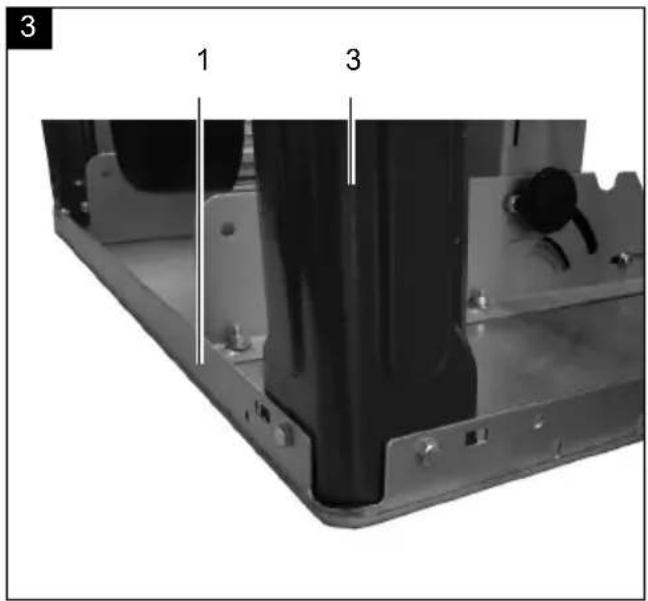
Fig. 3
- Mount the frame leg (3) to the tabletop (1) with 2 M6 x 16 hexagonal bolts, 2 washers 6 and 2 M6 nuts.
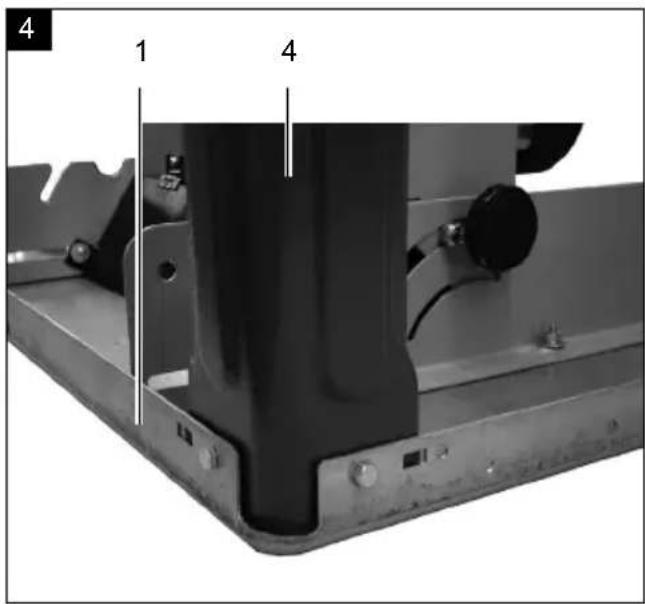
Fig. 4
- Mount the frame leg (4) to the tabletop (1) with 2 M6 x 16 hexagonal bolts, 2 washers 6 and 2 M6 nuts.
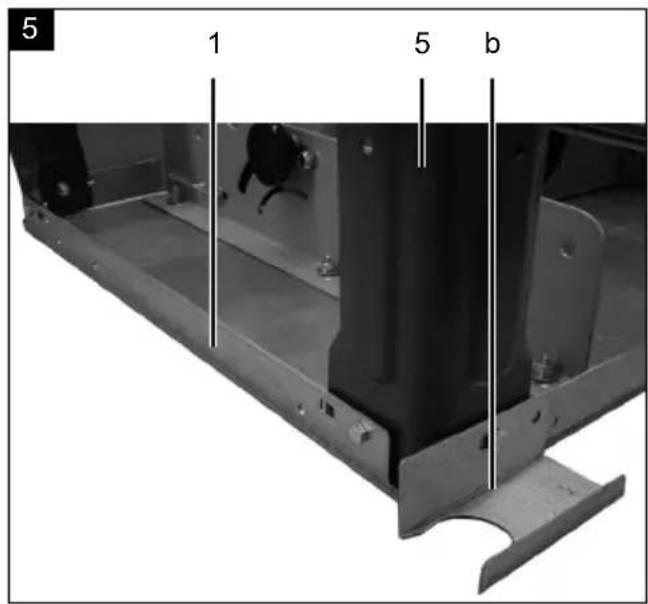
Fig. 5
- Mount the frame leg (5) and the hose holder (b) to the tabletop (1) with 2 M6 x 16 hexagonal bolts, 2 washers 6 and 2 M6 nuts.
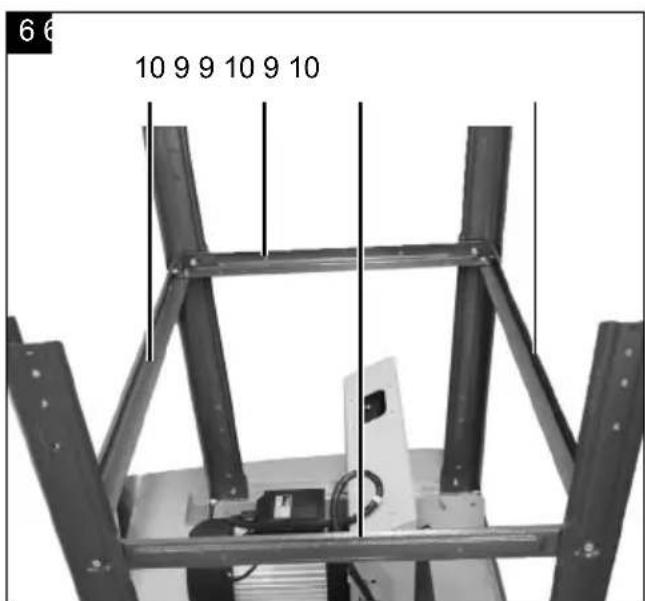
Fig. 6 / 6.1
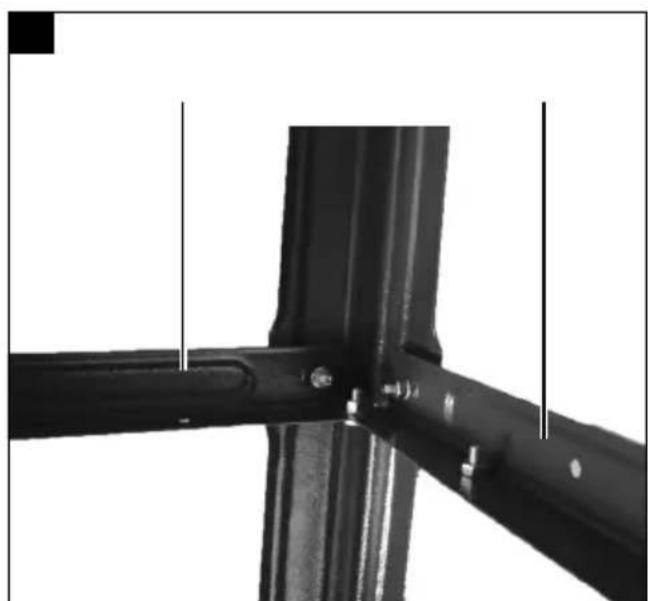
- Mount 2 longitudinal struts (10) and 2 cross members (9), to the frame legs (2, 3, 4 and 5) with 12 M6 x 16 hexagonal bolts, 12 washers 6 and 12 M6 hexagonal nuts.
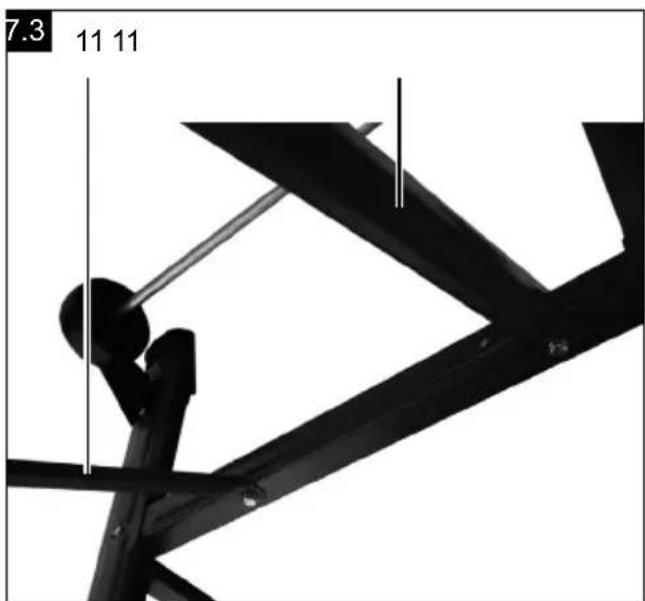
Fig. 7 / 7.1 / 7.2 / 7.3
- Mount the table extension plate (8), with two struts (11), to the tabletop and cross member with 6 M6 x 16 hexagonal bolts, 6 washers 6, and 6 M6 hexagonal nuts.
- Tighten the bolts lightly by hand. (The tabletop (8) can also be mounted laterally as a table width extension with the shorter struts)
Fig. 8
- Fit the suction port (14) to the lower saw blade guard (13) with 4 M4 x 10 hexagonal bolts and 4 x washers 4.
Fig. 9
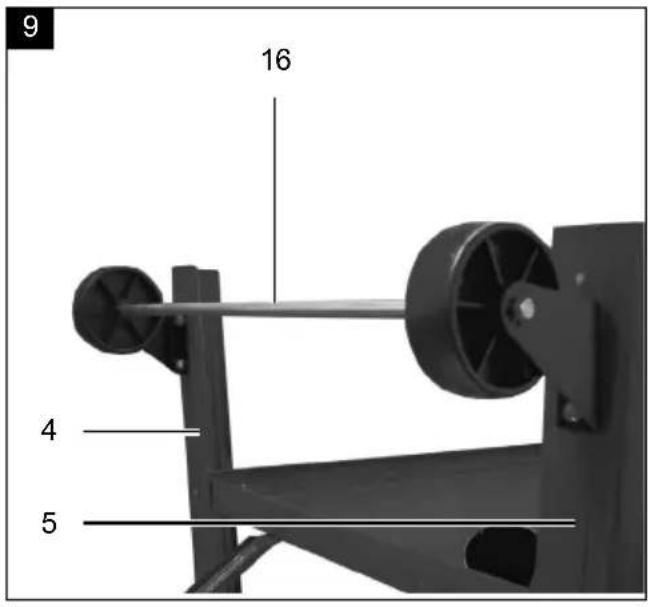
- Mount the travel fixture (16) to the rear frame legs (4 and 5) with 4 M6 x 16 hexagonal bolts, 4 washers 6, and 4 M6 nuts.
Fig. 10
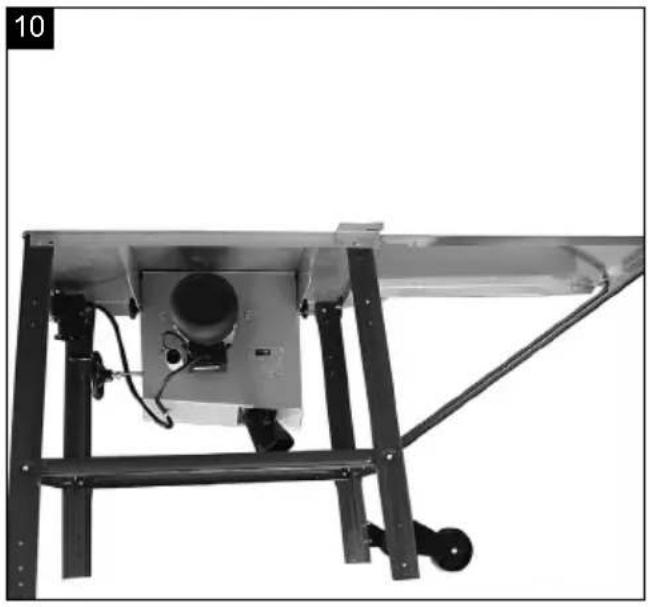
- Place the machine on its feet, tighten all screws of the table, feet and struts (except the travel fixture).
Fig. 11
- Tighten the travel fixture in position such that the wheels lightly touch the floor.
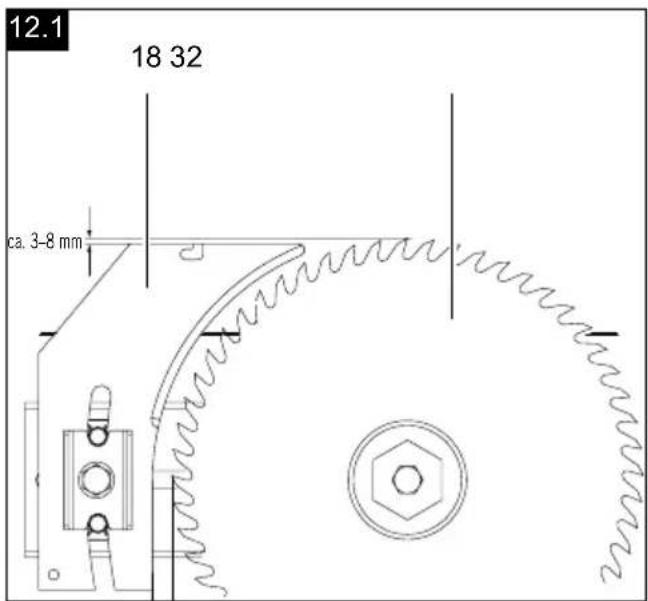
Fig. 12 / 12.1
- Mount the riving knife (18) to the saw blade (32) as described in the illustration (12/12.1).
- Loosen the screw slightly (do not unscrew it completely) and tighten it again after the adjustment. In doing so, the saw blade insert (19, Fig. 13) must be removed.
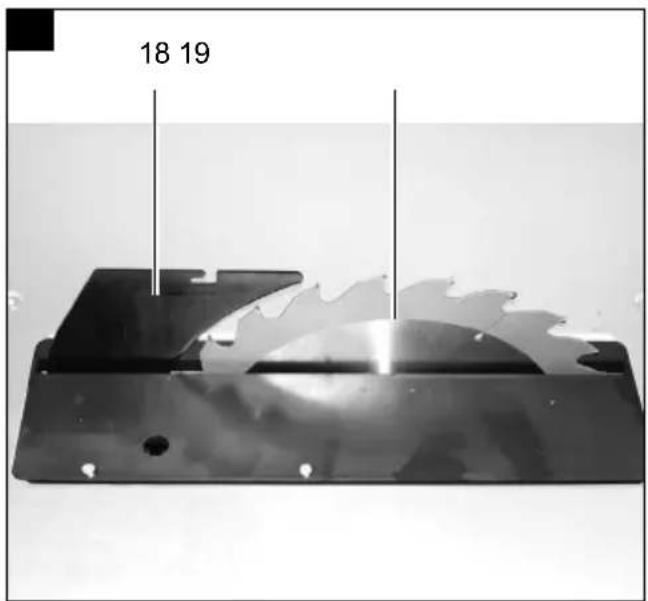
Fig. 13
• After adjusting the riving knife (18), refit the saw blade insert (19) with 4 M6 x 16 flange head screws.
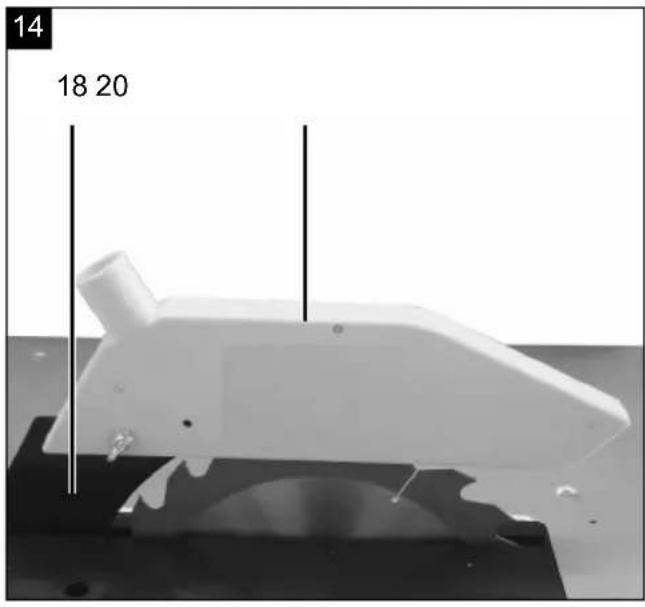
Fig. 14
- Fit the cover hood (20) to the splitting wedge (18) with a round-headed M6 x 25 screw, washer 6 and M6 wing nut.
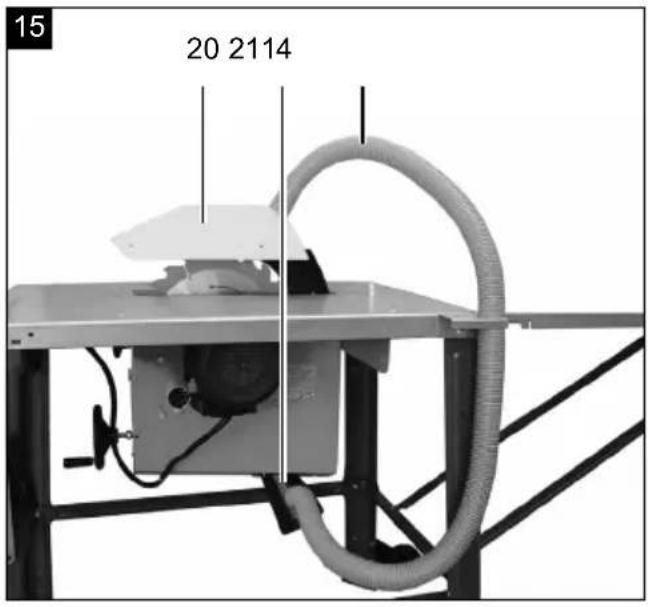
Fig. 15
- Connect the suction hose (21) to the suction hood (20) and the suction port (14).
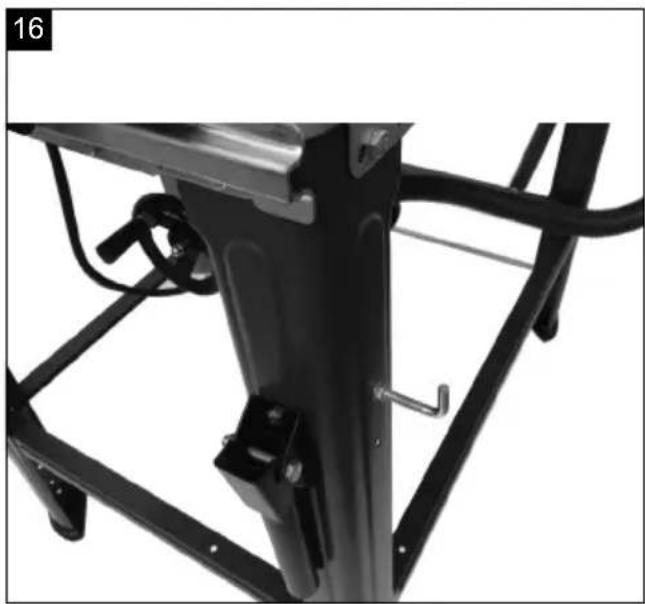
Fig. 16 / 16.1
- Fasten the hook bolt with 2 washers 6, 2 M6 nuts on the right frame leg side. The saw blade key and the push stick are hung on it.
- The two transport handles are mounted on the front of the saw, on the left and right legs with 4 M6 x 16 hexagonal bolts, 4 washers 6, 4 M6 nuts.
Fitting the longitudinal stop, Fig. 17 / 17.1
- Connect the bearing piece to the clamping plate. Mount the clamping plate to the tabletop with 2 M6 x 30 cylinder screws, 2 A 6.4 serrated washers and 2 hexagonal nuts.
Installing the stop rail, Fig. 18
- Mount the intermediate plate to the longitudinal stop with 2 M6 x 50 flat round screws, 2 A 6 washers and 2 wing nuts.
- Slide the stop rail onto the intermediate plate and clamp it with the wing nuts.
- Legend:
1 = High contact surface
2 = Low contact surface - To clamp, pull the clamping flap up; to release, press it down.
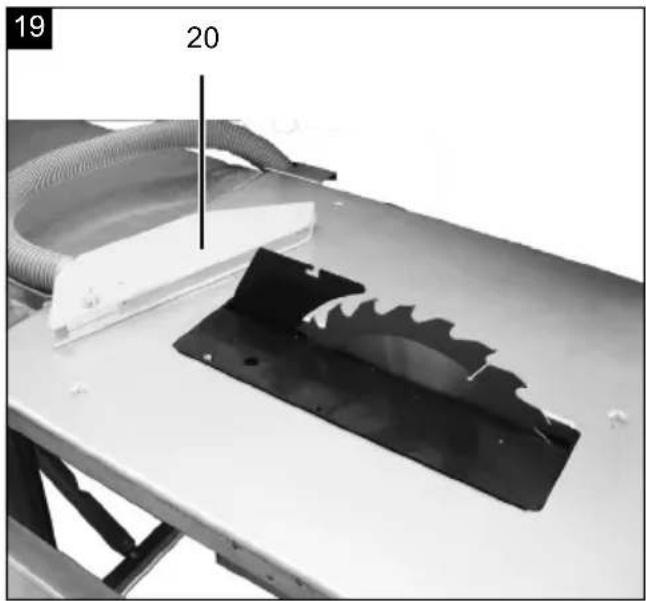
Saw blade replacement, Fig. 19
⚠ Attention! Pull out the mains plug and wear protective gloves.
- Loosen the wing screw from the suction hood (20) and remove it.
Fig. 20
- Loosen the 4 Phillips screws from the table inlay (19) and remove it.
Fig. 21
- Set the saw blade all the way up and loosen the screw with the saw blade key.
Attention! Left-handed thread
Fig. 22
- Remove the saw blade flange (31) and then the saw blade (32).
• Now change the saw blade (32). - When mounting the saw blade flange (31), pay attention to the recess.
• After changing the saw blade, check the riving knife setting and refit the table inlay (19) and suction hood (20).
Connecting the suction system (Fig. 15)
⚠ WARNING!
Danger of injury for eyes due to swirling chips
- Wear eye protection.
-
Only operate the product with a suitable chip extraction system. Do not use household vacuum cleaners.
-
Connect a suitable chip extraction system (not included in the scope of delivery) to the suction port (14).
-
Connect the suction hose (21) of a suitable chip extraction system (e.g. a multi-purpose suction device) to the suction port (14).
ATTENTION!
Check and clean the extraction channels at regular intervals.
10. Transport
By lifting at the front of the machine, it can be easily relocated in the workshop area to suit the space requirements.
11. Working instructions
After every new setting, we recommend performing a test cut, in order to check the dimensional settings.
Wait after the saw has been switched on, until the saw blade has reached full speed, before starting the cutting process.
Secure long workpieces against tipping at the end of the cutting process (e.g. with roller stand, etc.)
Be careful when cutting.
Only operate the device with an extraction system. Check and clean the extraction channels at regular intervals.
Make sure that a suitable saw blade for the material to be cut is selected.
Connect a dust collecting device to the electric tool when sawing wood.
Do not use saw blades made of high-speed alloy steel (HSS steel).
Use a push rod or the handle with wooden push block in order to guide the workpiece safely past the saw blade. Always keep the push stick or wooden push block on the electric tool when not in use.
Inclined adjustment of the saw blade
- After loosening the two clamping screws, the saw blade is continuously adjustable from 90^ to 45^ (see scale).
- Check the setting with a test cut.
• Re-adjust the set adjusting if necessary.
Height adjustment of the saw blade
The saw blade is continuously adjustable from 0 to 83 mm cutting height.
- For safe and tidy work, select a small saw blade projection to the workpiece.
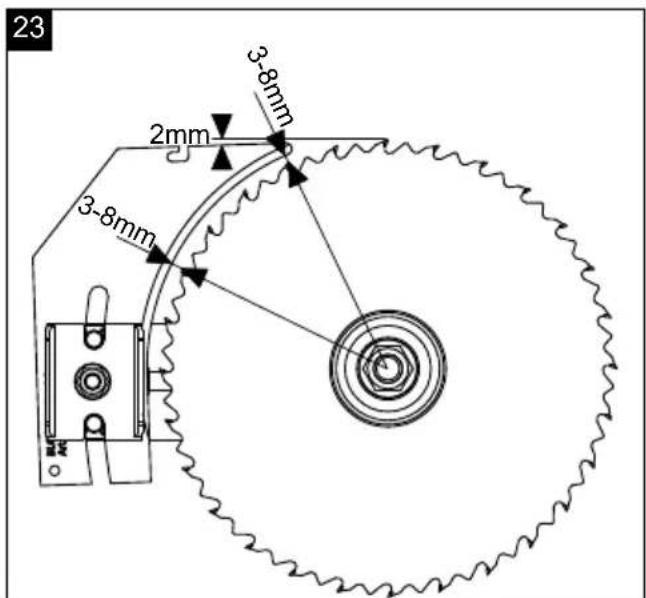
- Adjust the riving knife as shown in Fig. 23.
The riving knife is an important safety device, which guides the workpiece and prevents the kerf closing behind the saw blade and the workpiece rebounding. Pay attention to the thickness of the splitting wedge. The riving knife must not be thinner than the body of the saw blade and not thicker than its kerf width.
- Only saw blades with a diameter of 315 mm and a thickness of 2.4 mm (teeth 3.0 mm) may be used.
- Lower the cover hood onto the workpiece during every working operation. The cover hood must be horizontal above the saw blade with each working operation.
Longitudinal cuts
- For parallel cuts, use the longitudinal stop.
- Use the stop ruler with the high stop side (Fig. 18) for cutting work over 120 mm and with the low stop side (Fig. 18) for cutting widths under 120 mm. Guide the workpiece with the enclosed push stick.
Cross cuts
- Use the sliding carriage for cross cuts and angled cuts.
Working on circular sawing machines
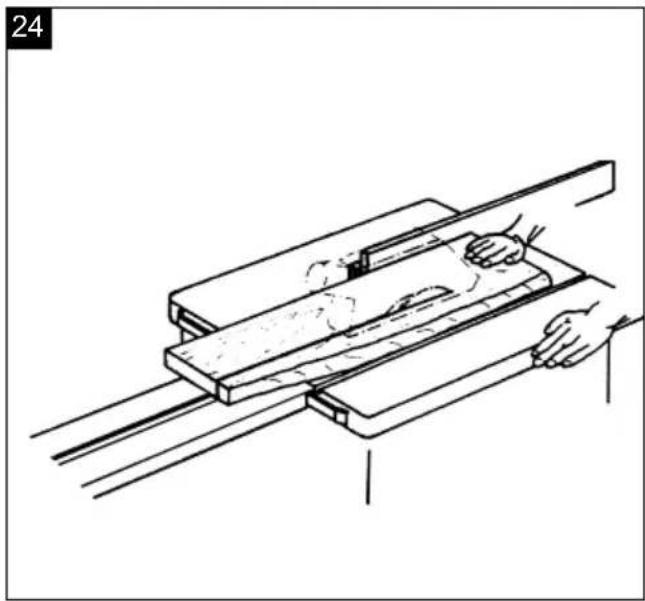
Cutting wider workpieces, Fig. 24
Width of the workpiece to be machined more than 120 mm
Work process:
- Set the longitudinal stop to suit the intended workpiece width.
-
Ensure that you have a safe hand rest.
-
If narrow workpieces are cut off by the cut, the feed is carried out in the tool area only with the right hand or with the aid of a push stick.
- If there is a risk of the workpiece jamming between the circular saw blade, riving knife and stop, the stop must be retracted to the centre of the saw blade or a short auxiliary fence must be used.
- In the pictures, the upper suction hood was only indicated, or in individual cases omitted, in order to show the work process or device more clearly.
- The upper suction hood is required for all operations shown.
Cutting narrower workpieces, Fig. 25
Longitudinal cuts of workpieces with a width of less than 120 mm must always be made with the aid of a push stick.
Push stick is included in the scope of delivery. Replace a worn or damaged push stick immediately.
- Set the parallel stop to suit the intended workpiece width.
- Push the workpiece forward with both hands, and be sure to use a push stick as a pushing aid in the area of the saw blade.
• Always push the workpiece through to the end of the riving knife.
⚠ Attention! For short workpieces, use the push stick as soon as you start cutting.
Cutting edges and strips, Fig. 26
Work process:
- Mount the longitudinal stop with a low contact surface or use an auxiliary fence.
- Push the workpiece forward with the push stick until the end of the workpiece is in the area of the riving knife.
- Secure long workpieces against tipping at the end of the cutting process with a table extension.
Carrying out cross cuts, Fig. 27
Work process:
- Adjust the deflector strip such that pieces cut off the workpiece cannot come into contact with the rising part of the saw blade.
- Feed workpieces only by means of transverse stop or transverse slide.
- Do not remove waste pieces from the area of the workpiece with your hands.
12. Electrical connection
The electrical motor installed is connected and ready for operation. The connection complies with the applicable VDE and DIN provisions. The customer's mains connection as well as the extension cable used must also comply with these regulations.
Damaged electrical connection cable
The insulation on electrical connection cables is often damaged.
This may have the following causes:
- Pressure points, where connection cables are passed through windows or doors.
- Kinks where the connection cable has been improperly fastened or routed.
- Places where the connection cables have been cut due to being driven over.
• Insulation damage due to being ripped out of the wall outlet. - Cracks due to the insulation ageing.
Such damaged electrical connection cables must not be used and are life-threatening due to the insulation damage.
Check the electrical connection cables for damage regularly. Ensure that the connection cables are disconnected from electrical power when checking for damage.
Electrical connection cables must comply with the applicable VDE and DIN provisions. Only use connection cables of the same designation.
The printing of the type designation on the connection cable is mandatory.
AC motor:
• The mains voltage must be 230 V\~
- Extension cables up to 25 m long must have a cross-section of 1.5 square millimetres.
13. Maintenance
Warning! Pull out the mains plug before carrying out any adjustments, maintenance or repair work!
General maintenance tasks
- Keep protective devices, air vents and the motor housing as free of dust and dirt as possible. Rub the device clean with a clean cloth or blow it off with compressed air at low pressure.
• We recommend that you clean the device directly after every use. - Clean the device at regular intervals using a damp cloth and a little soft soap. Do not use any cleaning products or solvents; they could attack the plastic parts of the device. Make sure that no water can penetrate the device interior.
- Oil the rotating parts once monthly to extend the life of the tool. Do not oil the motor.
Service information
With this product, it is necessary to note that the following parts are subject to natural or usage-related wear, or that the following parts are required as consumables.
Wearing parts*: Table inlay, push stick, saw blade
* may not be included in the scope of supply!
Connections and repairs
Connections and repair work on the electrical equipment may only be carried out by electricians.
Please provide the following information in the event of any queries:
• Type of current for the motor
• Data of machine type plate
• Data of motor type plate
Spare parts and accessories can be obtained from our Service Centre. To do this, scan the QR code on the front page.
14. Storage
- Store the device and its accessories in a dark, dry and frost-free place that is inaccessible to children.
- The optimum storage temperature lies between 5 and 30^ .
-
Store the power tool in its original packaging.
-
Cover the power tool to protect it from dust or moisture.
- Store the operating manual with the power tool.
15. Disposal and recycling

The device is supplied in packaging to avoid transport damages. This packaging is raw material and can thus be used again or can be reintegrated into the raw material cycle. The device and its accessories are made of different materials, such as metals and plastics.
Take defective components to special waste disposal sites. Check with your specialist dealer or municipal administration!
Old devices must not be disposed of with household waste!

This symbol indicates that this product must not be disposed of together with domestic waste in compliance with the Directive (2012/19/EU) pertaining to waste electrical and
electronic equipment (WEEE). This product must be handed over at the intended collection point. This can be done, for example, by returning it when purchasing a similar product or delivering it to an authorised collection point for the recycling of old electrical and electronic devices. Improper handling of waste equipment may have negative consequences for the environment and human health due to potentially hazardous substances that are often contained in electrical and electronic equipment. By properly disposing of this product, you are also contributing to the effective use of natural resources. You can obtain information on collection points for waste equipment from your municipal administration, public waste disposal authority, an authorised body for the disposal of waste electrical and electronic equipment or your waste disposal company.
16. Troubleshooting
The following table shows fault symptoms and describes remedial measures in the event of your machine failing to work properly. If you cannot localise and rectify the problem with this, please contact your service workshop.
| Fault Possible cause Remedy | ||
| Saw blade is loose after the motor is switched off | Fixing nut not tight enough Tighten fixing nut, right-hand thread | |
| Motor does not start | Mains fuse blown Check mains fuse | |
| Extension cable defective Replace the extension cable | ||
| Connection to the motor or switch not OK | Have this checked by an electrician | |
| Motor or switch faulty Have this checked by an electrician | ||
| Incorrect motor rota-tional direction | Capacitor defective Have this checked by an electrician | |
| Incorrect connection Have an electrician transpose the wall plug poles | ||
| Motor not supplying power, fuse tripping | Cross section of the extension cable insufficient | See Electrical connection |
| Overload due to blunt saw blade | Replacing the saw blade | |
| Burnt areas on the cutting surface | Blunt saw blade Sharpen, replace saw blade | |
| Incorrect saw blade Replace saw blade | ||
Günzburger Straße 69
D-89335 Ichenhausen
Cher client,
Günzburger Straße 69
89335 Ichenhausen
Egregio cliente,
Günzburger Straße 69
D-89335 Ichenhausen
Kære kunde,
Günzburger Straße 69
D-89335 Ichenhausen
Kjære kunde,
Günzburger Straße 69
D-89335 Ichenhausen
Geachte klant,
Günzburger Straße 69
D-89335 Ichenhausen
Bästa Kund!
Günzburger Straße 69
D-89335 Ichenhausen
Arvoisa asiakas
Günzburger Straße 69
D-89335 Ichenhausen
Spoštovani kupec,
želimo vam veliko veselja in uspeha pri delu z vašo novo napravo.
Napotek:
Günzburger Straße 69
D-89335 Ichenhausen
Günzburger Straße 69
D-89335 Ichenhausen
Austatud klient!
Günzburger Straße 69
D-89335 Ichenhausen
Vážený zákazníku,
Günzburger Straße 69
D-89335 Ichenhausen
Vážený zákazník,
Günzburger Straße 69
D-89335 Ichenhausen
Szanowny Kliencie,
Günzburger Straße 69
D-89335 Ichenhausen
Gerbiamas kliente,
Günzburger Straße 69
D-89335 Ichenhausen
Godātais klient!
Günzburger Straße 69
D-89335 Ichenhausen
Kedves Ügyfelünk!
EC Declaration of Conformity
Standard references:
EN ISO 19085-9:2020; EN ISO 19085-1:2017; EN 60204-1:2018; EN ISO 12100:2010; EN 55014-1:2017; EN 55014-2:2015; EN IEC 61000-3-2:2019; EN 61000-3-3:2013+A1
This declaration of conformity is issued under the sole responsibility of the manufacturer.
The object of the declaration described above fulfils the regulations of the directive 2011/65/EU of the European Parliament and Council from 8th June 2011, on the restriction of the use of certain hazardous substances in electrical and electronic equipment.
Subject to change without notice
Documents registrar: Dawid Hudzik
Günzburger Str. 69, D-89335 Ichenhausen
Garantiebedingungen
Revisionsdatum 26.11.2021
Homepage: https://www.scheppach.com/de/service
Apparent defects must be notified within 8 days from the receipt of the goods. Otherwise, the buyer's rights of claim due to such defects are invalidated. We guarantee for our machines in case of proper treatment for the time of the statutory warranty period from delivery in such a way that we replace any machine part free of charge which provably becomes unusable due to faulty material or defects of fabrication within such period of time. With respect to parts not manufactured by us we only warrant insofar as we are entitled to warranty claims against the upstream suppliers. The costs for the installation of the new parts shall be borne by the buyer. The cancellation of sale or the reduction of purchase price as well as any other claims for damages shall be excluded.