8in1 00012307 - Remote control HAMA - Free user manual and instructions
Find the device manual for free 8in1 00012307 HAMA in PDF.
| Product type | Universal remote control |
| Brand | Hama |
| Model | 8in1 00012307 |
| Category | Remote control |
| Power supply | 2 LR03 (AAA) batteries – alkaline recommended |
| Dimensions (approx.) | 20 cm × 5 cm × 2.5 cm |
| Weight (approx.) | 100 g |
| Compatible device types | TV, SAT, DVD, VCR, AUX, AMP, CBL, DVB-T |
| Number of built-in codes | Up to 350 codes per device type |
| Configuration methods | Direct code entry, manual search, automatic search |
| Special functions | Channel search (punch through), volume control (punch through), Macro Power, Shift mode |
| Infrared range | Standard (pointed at device) |
| Screen / Display | Red, yellow, blue, green, magenta LED (depending on function) |
| Maintenance and cleaning | Wipe with a dry cloth; do not use abrasive products |
| Safety | Do not expose to moisture or heat; keep out of reach of children |
| Recycling | Dispose of according to European Directive 2012/19/EU; do not dispose of with household waste |
Frequently Asked Questions - 8in1 00012307 HAMA
User questions about 8in1 00012307 HAMA
0 question about this device. Answer the ones you know or ask your own.
Ask a new question about this device
Download the instructions for your Remote control in PDF format for free! Find your manual 8in1 00012307 - HAMA and take your electronic device back in hand. On this page are published all the documents necessary for the use of your device. 8in1 00012307 by HAMA.
USER MANUAL 8in1 00012307 HAMA
Operating Instructions
Bedienungsanleitung
Mode d'emploi
Thank you for your decision for a Hama product Universal Remote Control (URC) Take your time and read the following instructionode List and information completely. Please keep these - This operating instructions instructions in a safe place for future reference.
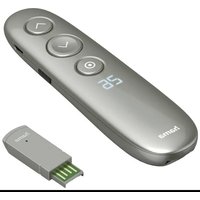
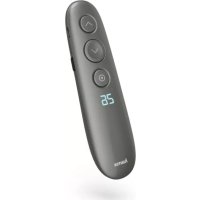
Function buttons (Models 4 in 1, 8 in 1).
- Mute Switch
- Device selection keys
- Text ON: Switch on Teletext
- Hold: Hold the current Teletext page
- Rewind/red
Play/yellow
Fast forward/blue
- Start recording
Stop/green
II Pause/magenta
- Shift key
- Menu: Open device menu
- Mode key for selection of secondary device group (only 8 in 1 model: AUX,DVBT,CBL,AMP)
- Vol+/Vol-: Volume control
- Setup: Remote control settings
- Number Keys 0-9
- Smart TV: open smart TV menu (if supported the terminal device) Shift+Smart TV: select external AV source
- APPS: open app menu (if supported by the terminal device) Shift+APPS: switch to two-digit TV station numbers
- PROG+/PROG::Programme selection up/down
- EXIT: exits device menu
- OK: Confirms a selection
- EPG: Electronic Programme Guide (if supported by selected A/V device)
- Info: On-Screen information (if supported by A/V device)
- Text OFF: exits Teletext
- Power: ON/OFF / LED indicator
1. Explanation of the Note symbol

Note
This symbol is used to indicate additional information or important notes.
2. Package Contents
Universal Remote Control (URC)
ode List
This operating instructions
3. Safety notes
Do not use the Universal Remote Control inist or wet environments and avoid spray-water contact.
- Do not expose the Universal Remote Control heat sources or direct sunlight.
- Do not drop the Universal Remote Control.
- Never open the Universal Remote Control. It contains no user-serviceable parts.
- As with all electrical devices, keep the Universe Remote Control away from children.
4. Getting started - installing the Batteries
i Note
Alkaline batteries are recommended. Use 2 "AAA" (LR 03/Micro) type batteries.
Remove the battery compartment lid on the back of your URC (A).
Check the required battery polarity and insert batteries according to the + / - marks inside the compartment (B).
Close battery compartment lid (C).
ed Note: Code saver
Any codes you have programmed remain stored for up to 10 minutes while you replace the battery. Make sure you do not press any buttons before you have placed new batteries inside the remote control. All the codes will be erased if a button pressed while there are no batteries in the remote control.

Note: Battery saving function
The remote control switches off automatically. device manufacturers in alphabetical order are when a button is pressed down for more thand by device type (e.g. TV, DVD, etc.). If 15 seconds. This conserves battery power device you want to control is covered by the c the remote control gets stuck in a positist, the Direct Code Entry is the most convenie where the buttons are continually pressed entry method. down, such as between sofa cushions.
5. Setup

Note
To obtain a proper infrared (IR) transmission, allways point your Remote control in proximate direction of the device you to control.
Press the "MODE" key to select the secondary device group: AUX, AMP, DVB-T, CBL (only 8 in1 Model).
Press the Shift key to operate the blue function keys. The Shift function deactivates by pressing the Shift key again, or automatically after approx. 30 sec. without use.
No entry for approx. 30 seconds will time on the Setup mode. The LED indicator shows six flashes and turns off.
Each device type can be programmed under any device key, i.e a TV can be programmed under DVD, AUX, etc. an
If you want to control a device, it's not possible while the Universal Remote Control is in the Setup Mode. Exit the Setup mode and select the device you want to control using the device selection keys. (PRO)
5.1 Direct Code Entry
Your Universal Remote Control Package contains a code list. The code list shows 4-digit codes for AV device manufacturers in alphabetical order are grouped by device type (e.g. TV, DVD, etc.). If device you want to control is covered by the direct Code Entry is the most convenient entry method.
5.1.1 Turn on the device you want to control
5.1.2 Press the SETUP key until the LED indicat permanently lit.
5.1.3 Select the device you want to control using the device key (e.g. TV). A successful selec is indicated by the LED with one flash followed by permanent light.
5.1.4 Check code list for brand and type of the ap- device you want to control.
a5t1.5 Enter the corresponding 4-digit code using the 0 - 9 keys. The LED indicator confirms each entered digit via a short flash and the off after the fourth digit.

Note
If the code is valid, it is saved automatic. If code is invalid, the LED indicator flashes
six times and then turns off. Repeat steps 5.1.1 to 5.1.5 or use a different code ent six method.
Manual code search
mopedUniversal Remote Control is equipped with an internal memory, which is preloaded with up 350 codes per device type for the most common AV devices. You can zap through these codes the device you want to control shows a reaction. This might be that the device you want to connectches off (POWER key) or changes the channel (PROG+/PROG- keys).
5.2.1 Turn on the device you want to control
5.2.2 Press the SETUP key until the LED indicate permanently lit.
5.2.3 Select the device you want to control using the device key (e.g. TV). A successful selection is indicated by the LED with one flash followed by permanent light.
5.2.4 Press the "POWER" or the PROG+/PROG-to zap through the preloaded codes until device you want to control reacts.
5.2.5 Press MUTE(OK) to save the code and code search. The LED indicator turns off.
Note: Scan Speed Settings
- Scan Speed Settings can be set at either key 3 seconds. The default setting for the scan time per single code is 1 sec. If this feels comfortable, you can switch to 3 sec. So time per single code. To switch between the scan times, press PROG+ or PROG- during the 6 sec. latency before Auto Code Searc starts scanning.

Note
- Internal memory limitations allow only 350 most common device codes to be loaded. Due to the extensive number of different available A/V devices on the ket, it may be possible that only the common main functions are available. In repeat steps 5.2.1 to 5.2.5 to find a compatible code. No code may be available for some special device models.
up 5.05 The LED indicator confirms each single code pre- scan with a single flash.
of 5.3.6 Press MUTE(OK) to save the code and exit code search. The LED indicator turns off.
mar-5.3.7 To stop the Auto Code Search during the process, press the EXIT key.
5.3 Auto Code Search
Auto Code Search uses the same preloaded codes as the Manual Code Search (5.2) but your Universe
Remote Control scans through the codes automatically until the device you want to control shows
a reaction. This might be that the device you The want code identification offers you the possibility, to control switches off (POWER key) or change determine an already entered code.
When all codes are searched without success, the Universal Remoote Control exits Auto Code Search and returns to operational mode automatically. Currently stored code
niversab not changed.
Codes Code Identification
The code identification offers you the possibility, determine an already entered code.
5.4.1 Press the SETUP key until the LED indicator permanently lit.
"542 Select the device you want to control using the device key (e.g. TV). A successful select is indicated by the LED with one flash followed wed by permanent light.
Section 5.3 Press SETUP key. The LED indicator flashes once followed by permanent light.
15.4.4 To find the first digit, press the numeric key to from 0 to 9. The LED indicator flashes on the indicator to indicate the first digit of the 4-digit code number.
5y4.5 Repeat step 5.4.4 for the second, third and fourth digit.
5.3.1 Turn on the device you want to control
5.3.2 Press the SETUP key until the LED indicator permanently lit.
5.3.3 Select the device you want to control using the device key (e.g. TV). A successful selection is indicated by the LED with one flash followed by permanent light. 5.4.4
5.3.4 Press the PROG+/PROG- keys or POWER to start the Auto Code Search. The LED indicator flashes once followed by permanent light.
The Universal Remote Control has a laten5y4.5 6 seconds before the first scan starts.
| CODES | |||
| TV VCR SAT | D | V | D |
| AUX AMP CBL D VBT | |||
6. Special Functions
6.1 Punch Through Channel
The Punch Through Channel allows the PROG+ PROG- commands to bypass the currently control device and switch the channels on a second of All other commands remain uninfluenced.
To activate the punch through channel setting:
- Press desired device mode key (e.g. TV).
- Press and hold "PROG+" key.
- Press desired device mode key (e.g. SAT).
- R release "PROG+" (the indicator flashes once the setting is activated).
To deactivate the punch through channel setting.
- Press desired device mode key (e.g. TV).
- Press and hold "PROG-" key.
- Press desired device mode key (e.g. SAT).
- R release "PROG-" (the indicator is flashing if the setting is deactivated).
6.2 Punch Through Volume
The Punch Through Volume allows the VOL+ or w VOL- commands to bypass the currently controlled device and adjust the volume on a second device. All other commands remain uninfluenced.
To activate the punch through volume setting:
- Press desired device mode key (e.g. TV).
- Press and hold "VOL+" key.
- P ress desired device mode key (e.g. SAT).
- R release "VOL+" (the indicator flashes once if the setting is activated).
To deactivate the punch through volume setting:
- Press desired device mode key (e.g. TV).
- Press and hold "VOL-" key.
- Press desired device mode key (e.g. SAT).
- R release "VOL-" (the indicator is flashing twice the setting is deactivated).
6.3 Macro Power
Macro Power enables you to turn two A/V devi on/off simultaneously.
To activate the macro power setting:
- Press desired device mode key (e.g. TV).
-
Press and hold "POWER" key.
-
opress desired device mode key (e.g. SAT).
- rolled release "POWER" (the indicator flashes once device the setting is activated).
To deactivate the macro power setting:
- Press desired device mode key (e.g. TV).
- Press and hold "POWER" key.
- Press desired device mode key (e.g. SAT).
- R_r release "POWER" (the indicator is flashing twice if the setting is deactivated).
Maintenance
- Do not mix new and used batteries for powering the Universal Remote Control, as old batteries tend to leak and may cause power twice drain.
- Do not use corrosive or abrasive cleaners on your Universal Remote Control.
- Keep the Universal Remote Control dust free or wiping it with a soft, dry cloth.
8. Troubleshooting
Q. My Universal Remote Control does not all!
A. Check your A/V device. If the device's switch is turned off, your URC cannot your device.
A. Check whether your batteries are inserted properly and are in the correct +/- position
A. Check whether you have pressed the ding device mode key for your device.
A. If the batteries are low, replace the Li^+
Q. If several Device Codes are listed und brand of my A/V device, how can I select the correct Device Code?
A. To determine the correct Device Code A/V device, test the codes one by one keys work properly.
Q. My A/V equipment responds only to s commands.
A. Try other codes until most keys work properly.
erly.
10. Recycling Information
Note on environmental protection:
After the implementation of the European Directive 2012/19/EU and 2006/66/EU in the national legal system, the following applies: Electric and electronic devices as well as batteries must not be disposed usehold waste. Consumers are obliged by
spon- to return electrical and electronic devices aswell as batteries at the end of their service liv
the public collecting points set up for this purp
her point of sale. Details to this are defined bynational law of the respective country. This symbson the product, the instruction manual or the
Package indicates that a product is subject to the regulations. By recycling, reusing the materials or other forms of utilising old devices/Batteries, you
are making an important contribution to protecting our environment.
9. Service and Support
If you have questions on the product, you are welcome to contact Hama Product Consulting.
Hotline: +49 9091 502-115
For further support information please visit:
www.hama.com
IpepeHaayanom 3KcIIyatauIN BHNMaTeJIbHO
O3HaKOMbTecb C HactoIe IHCTpyKcne. XpaHnte
HnCTpyKUHO B HaJeXHOM MeCTe IJIaCnpaBOK B
Oprahbl ynpablenna (MoJeN "4 B 1", "8-ByH
- BbIKJIIOuATeJIb 3Byka
- KhoNkBbIbopa yCTpoNCTB
- Text EIN: BkJIoueHne TeJeTeKcTa
- Halten: 3amopaxmbaHne Tekyuie CTpaHnCbI TeJeTeKCTa
- 6bICTpa nepemOTka Ha3a(Kpacna)
Bocnpoun3BeDeneHne (XeNTaJ)
6bIcTpa nepemOTka Bnpeid (CnHra)
BKJIIOUeyHne 3aINCN
CTON (3eJeha) II nay3a (nypnypna)
- Khoŋka Shift
- Menu: otKpbItb MeHIO yCTpoiCtBa
- KhoNka BbIbopa DoIOJHHTeJIbHOI rpynnbl yCTpOoiCTB (ToJIbKO B MoJeIN "8 B 1": AUX,DVBT,CBL,AMP)
- Vol+/Vol-: perylnipobka rpoMkoTn
- Setup: HactpoKa Iy
- Khonkn c uΦpamn 0 - 9
- Smart TV: OTKpbItb MeHc Smart TV (npn HauNCHyHKCIN B yCTPOJCTBE).
Shift+Smart TV: BBi6op NCTOuHnKa AV.
- APPS: OTKpbITb MeHIO npNJIOJKeHN
(πρι Μαληύνη φγήκιους B yστρούβε).
Shift+APPS : Перекд К ДвухразднбIM Homepaam nporpaMM. - PROG+/PROG-: nepekJIIOUeHne npoIpaMM BnpeJ/Ha3aI
- EXIT: BbIITn n3 MeHIO yCTpoIcTba
- OK: BBOД KOMaHdBi
- EPG: ŒléktrpoHná ļpɒrpamMa āpeəaŋ (πρи NaHnUyn ΦyHKuIN B AV-ycTpoiCTBe)
- Info: Бкраннай Ифорmaць (при Налунун Функци B AV-устор CTbe)
19.Text AUS: BBIKJIIOHTb TeJTeKCT - Power: BKNIOUeHne/BbIKIOUeHne NITaHn/ JAmna
1. Onicahne 3HaaykoB

Ppimechne
DOnonHnteBHa nIi BaxHa nHopMaun.
2. Komnlekt NOCTabk
BvHbepcaIbHbI pyIbT InCTaHcIOHHO ynpabJIeHnA
Cnncok KOIOB
- HacToaJuaHnCTpyKcJna
3. TexHnka 6e30nacHOCTn
- Bepernte n3dJIne ot BlaIи 6pbI3r BOIbI.
He npOBepraTe n3JeJIne BO3JeCTBnIO npAmbix coJIHeuHbIX lyuei. He pa3MeuaTe n3JeJIne pIaOM C NCTOCHKAMN TeIIa. - Bepernte n3dJIne ot yapob n naJeHn.
3aPpeaaetc pa36npaTb n3dJIne. B yCTpOInCTBe HET y3IOB, KOToPbIe npedHa3NaYeHbI IJIy Texo6CnyXuBaHnIy EKcIIyataUOHHNkOM.
He DaBaTb TeTAM!
4. 3arpy3ka 6atapei

Приимechие
PekomeHnyetc npimeHtB 7eNochbIe 6atapen. IJIy nHTAHn npimeHJOTc DBe 6atapen AAA (LR 03/Micro).
Ha 3aJHei nAHeIy yCTpoNCTBa oTKpOITe KpbIshKy OTceKa 6aTapei.
3aRpy3nte 6aTapei, co6IIOda nOJIrpHOCTb.
3akpoTe KpbIshky otceka 6aTapei.
| CODES | |||
| TV VCR SAT | D | V | D |
| AUX AMP CBL D VBT | |||
6.Дононтельныеункци
6.1ФункциЯ Punch Through npepeknoyehn nporpaMM
6bpaueHIO C 6aTapeMn, B TepMaHnBblIeHa3BaHHbI HOpMaTINBblI DeIcTByOT dIyTIN3aCmN 6batape n aKKymJyTOpOB.
Telecomando universale
| CODES | |||
| TV VCR SAT | D | V | D |
| AUX AMP CBL D VBT | |||
6.1 Punch through canale
6.2 UnPunch through volume
| CODES | |||
| TV VCR SAT | D | V | D |
| AUX AMP CBL DVB T | |||
6. Eiδikεc λειtoupyiec
6.1 Punch Through kavαλιού
Me n 1eitoupyia Punch Through kavaiou, oEvtoa. PROG+ n PROG- mnpovv va npapaKaumoovn tns oukeun kalva aalaoov ta kavalia ia iac dEutepnc oukeunc.Auto dev aphiopa oec tic aaee cEvtolec.
| CODES | ||||
| red TV VCR SAT D V D | ||||
| b | ||||
| AUX AMP CBL DVBT | ||||
6 Funkcje specjalne
| CODES | |||
| TV VCR SAT | D | V | D |
| AUX AMP CBL D VBT | |||
6. Specialis funkciok
| CODES | |||
| TV VCR SAT | D | V | D |
| AUX AMP CBL D VBT | |||
6. Zvlástni funkce
6.1 Prepinani Punch-Through
| CODES | |||
| TV VCR SAT | D | V | D |
| AUX AMP CBL D VBT | |||
6. Zvlastne funkcie
6.1 Prepinanie Punch-Through
| CODES | |||
| TV VCR SAT | D | V | D |
| AUX AMP CBL D VBT | |||
| CODES | |||
| TV VCR SAT | D | V | D |
| AUX AMP CBL D VBT | |||
| CODES | |||
| TV VCR SAT | D | V | D |
| AUX AMP CBL D VBT | |||
6. Functii speciale
6.1 Canal Punch-Through
| CODES | |||
| TV VCR SAT | D | V | D |
| AUX AMP CBL D VBT | |||
6. Erikoistoiminnot
6.1 Lahettimen lapilyonti
| CODES | |||
| TV VCR SAT | D | V | D |
| AUX AMP CBL D VBT | |||
6. Erikoistoiminnot
6.1 Lahettimen lapilyonti
IpenopbBaT ce aKanH 6aTeepn.
N3noJ3BaIte TUn "AAA" (LR 03/Micro) 2 6po
PpeMaxHeTe KaNaKa Ha 6aTeepnTa Ha TbpaHa BaWeTo DuctaHIOHHO (A).
PpOBepTe NCKaHaTa NOJApHocT Ha 6aTepeNTe I rN NoCTaBeTe CbRJaCHO OT3HaUITE ^ + / - ^ B PpeHa3HaueHOTO OTdJeHHe (B).
3aTbopeTe KaNaYeTo Ha OTdJeHneTo 3a6aTePn (C).

3a6eIexka: 3ana3BaHe Ha KoIobe
BcunKoIOBe, KOITO cTe nporpaMnpaNIOCTaBAT CbXpAHEN Do 10 MNHTI DOkATOcmHrte 6atepyTa Ha NCTaHcNOHOTO.YBepTe ce,Ye He HATnCKATE 6yTOH,NOKATOIOCTABTHe HOBtE 6atePN. BcunK KoIOBe 6bDat N3TpTN, aKO HAuChHe T HAKOIByToH No BpeMe Ha CMHaTAt.

3a6eJekka:Функця 3a
ИКОHOMЯ Na 6aTePnYTa
ДиctaHNoHHOTc n3KJIIOUBA aBTOMaTHNO, KOraTO eINH 6yToH e HaTnCHaT 3a noBuee ot 15 ceKyHdN. Toba cNeCTaBa eHeprnA, aKO dNCTaHNoHHOTe e NOCTaBeHO B N03uN, B KOrTo 6yToHnte NOCToRHHo HaTnCHaTn, HAnpIMep MeJdy Bb3rJaBHnCn Ha KaHaIeta.
5. Hactpoika

3a6eIeKka
3a Da n3no3BaTe npabnHOTOnHpaepBeHTo npedAbaHe, BnHaHnHacOyBaIe BaIeTO dNCTaHcNoHOBnp6JIn3teJHaTaNocoka Ha yCTpOiCTBOTO,KOeTO NCKATE Da KOHTpoJnPaTe.
HATINCHETe 6yToHa 3a HAcTPOiKa HapeXIMa, 3a Da n36epTe yCTpoiCTBO OTBtOpuHa rpyna: AUX, AMP, DVB-T, CBL (cAmo 3a MoJeI 8 B 1).
HaTnchete KlaBnua 3a npeBKnUoyBaHe, 3a Da onepnpate CbC cnHnte yHKuOHaJIHn KlaBn. Ta3n cyHKunCe DeakTNBnpa Ype3 HaTnCKaHe Ha cbIur KlaBn uNn aBTomatnHo cJeI okJIo 30 cek 6e3 ynotpe6a.
HeBbBexdahe Ha DaHn B npOdbJxEHe Ha OKoI0 30 cekyHn Ie OTMeHn pexIma 3a HactpoKa. LED nHdkaTopbT Ie Mura @ PbTN N Ie Ce n3KlIOuN.
Bcekn Tn np yctpoNCTBO Moxe Da ce nporpaMnpa C BcKaKbB KIOU, T.e. TeJeBn3Op Moxe Da ce nporpaMnpa C DVD, AUX n dp.
He e Bb3MOxHo Da KOHTpOJnPaTe Dpyro yCTpoIcTB0, DOkATO YHNBepCaJIHOTo INCTaHcUOnHHO e B peXIM Ha HAcTPOJka. ⅢJIe3Te OT TO3n peXIM n N36epeTe ca yCTpoIcTBOTO, KOEtO NCKaTe Da Ce KOHTpOJnPa, C NOMOuTa Ha KlaBnWnte 3a N36Op.
5.1ДиpeKTHO BbBexKaHe Ha KOD
B naketa c yHnBepcaJHo dNCTaHcNoHHO ige
HaMepnte cncsbK c KODObe. ToI NOKa3Ba
4-ncpene H KOIOBE 3a NOBeUeTO A/V
npOn3BOiNTeJI Na UcTPOINCTBa No a36yueH peI
rpyuipan No TnN UcTPOINCTBO (HaNP. TeNeBn3nA,
DVD, n T.H.). AKO UcTPOINCTBOTo, KOEt O NCKate Ja
KoHTPOInPaTe, e B CnNCbKa C KODObe, Hau-yDo6Hn
MeToD e DnpeKeTH 3aNNc Ha KODa.
5.1.1 BkIIOUeTe yCTPOiCTBOTo, KOeTO nCKaTe da KOHTPOJnPaTe.
5.1.2 Hatnche 6yToHa 3a HactpoKa, DOKaTO LED nHdkatopbT He 3aNoUHe da CBETn NOCTOHHO.
5.1.3 Ⅲ6epeTe yctpoiCTBOTO, KoTo nCKaTe da ce KOHTpOInpa (Hanp. TeJIeBn3Op), c NOMoTuHa 6yToHnte. Ppr ycneuhen 360p LED CBETlnHaTa ige CBeThe eINH nbT, cIeD KoTe T' 7e npOdbJnx Da CBETN NOCTOARHHO.
5.1.4 Пювере в сииська с Кожове за Марkaту И ТИпа на усточьOTO, КоЕТУ NGКАТЕ на KOHTРОЛINPATE.
5.1.5 BbBeTe cBoTBeTHn8 4-ncpeH KoI c NOMOuTa Ha KnaBnUHTe 0-9. LED nHnKaTOpBT 7e NtBbPjDaBa BCa Ka BbBeHa CnΦpa KaTo CBtHe eINH nT KpaTKo I 7e Ce N3KJIouH CJeI qETBbPtaTa cnΦpa.

3a6eJekka
Ako KoIbTe BaJIuIeH, ToI ce 3aIINcBa aBTOMaTnUHO.
Ako KoIbTe HeBaJIuJeH,LED uHdNkaTOpbT Mnra WecT PbTu n CJIeT ToBa ce N3KJIIOUyBa. IOBTopeTe CTbKn O T 5.1.1 Do 5.1.5 nn n3NoJ3BaIte pa3JIuYeH KOJ.
5.2 PbUHO TbpceHe Ha Koid
YHnBepcaHHTO DnCTaHcHOnHO e o6OpyDbHo C BbTpeHa NaMeT, B KOrTo NMa Do 350 KoJa 3a Hau-yeCTo CpeuHnte A / V yCTpoiCTBa. MoXeTe Da npemHeTe pE3 Te3N KoIOBe, IOKaTO yCTPOICTBOTo, KOEt OCKaTe Da KOHTPOJInpate, pearupa (HaNPmEp: yCTpoiCTBOTo ce n3KJIOnu nn npomEn KaHaJ).
5.2.1 BkIIOUeTe yCTpoiCTBOTo, KOeTo nCKaTe da KOHTPOIUPaTe.
5.2.2 HaTnCHete 6yToHa 3a HAcTpOiKa, DOKaTO LED INDnKAtOpbT He 3aNoUHe Da CBETn NOCToRHHO.
5.2.3 N36epete yctpoNCTBOTO, KOeTo nCKaTe da ce KOHTPOJnpa (Hanp. TeJIeBn3Op), c NOMOuTa Ha 6byTONHe. Pnp ycneWeH n36Op LED CBETInHaTata ige CBEThe eDINH nbT, CNeI Kq TЯ ige npOdbJxN da CBETn NOCTOARHHo.
5.2.4 HaTnCHeTe 6yToHa 3a BkJIIOUBaHe nIIN HABNraCIOHnTe 6yToHN 3a CmHa Ha npOprpaMaTa, 3a Da npemInHeTe npe3 npEiBapuTEJIHO 3aNaMeTeHnTe KOIOBe. N3BbPbBaIte TOBa DeICTBne DOkATO yCTPOIcTBOTo, KOEt OCKaTe Da ynpabJIBATe, pearupa.
5.2.5 HataHcHete 6yToHa 3a 6e3 3ByK, 3a Da 3apa3nTe KoJa N 3a Da n3Je3e Te OT TbpceHeTo My. LED nHdNkAtOpbT upe ce n3KJIIOuN.

3a6eJekka
BbtpeHa namet no3BOJyBa Do 350 ot Hau-yeCTO cpeaHnte KOIOBe Da 6bDaT npedBapntEnHO 3anncAH. 3apaHn OoHnpHn Ha pa3nUHN A / V yCTPOIcTBa Ha na3apa Ca HAIuHn Camo KOIOBeTe 3a Hau-yeCTO cpeaHnte yCTPOIcTBa. Mexdy Tx MoKe da HMa IODXODJaKoD 3a yCTpOJCTBOTO, n36paHo OT Bac.
5.3 ABTomatnHOb TbpceHe Ha Koid
A B T O M A T N U H O T O T b p c e H a K o d n3n0J3B a C b u n t e
I P e d B a p i T e J H O 3 a n i s c a H N K o d O B e K a K T O I p n
P b u H O T b p c e H a K o d (5.2), H o y h u B e p c a J H O
I n c t a H u o H H O I p e m i n H a B a I p e z K o d O B e T e
A B T O M A T N U H O DOK A T O Y C T P O I C T B O T O, K o E T O I n c k a T e
I da K o h t p o l i n p a t e, p e a r i p a. H a n p i M e p: n3KJIuOyBa
C e n I I I n p o m e h a K a H a J.
5.3.1 BkIIOUeTe yCTpoINCTBOTO, KOeTo NCKaTe Da KOHTPOINPaTe.
5.3.2 HaTnchTe 6yToHa 3a HAcTpOJa DOKaTO LED INDnKaTopbT He 3aNoUHe Da CBETn NOCToHHO.
5.3.3 N36epeTe yctpoiCTBOTo, KoTo nCKaTe Da ce KOHTpOInpa (Ha np. TeIeBn3Op), c NOMoUta Ha 6byOnHte. Pnp ycneu Hen n36op LED CBETlnHaTa ige CBtHe eDIn HbT, CJIeD KoTe Tg ige npOblxN Da CBtN NOCTOHHO.
09304 HaTnChete HABnraunOHnTe 6yToHn 3a CMHa Ha npOprpamata uHn 6yToHa 3a BKJIOUvBaHe, 3a Da npemHete KbM pexmH Ha ABTomAtnUHO TbpcHe. LED CBETlnHaTa ige CBtHe eDIn PbT, CJIeD KoETo Tg ige npOblxN Da CBtN NOCTOHHO. YHNBepCaHNo DnCTaHcUHO hMa IaTeHTHOCT OT 6 cekyHdN IppeNi HaayanoTO I nbpBOTo cKaHnpaHe.
3a6eJexka: HactpoJKN 3aCKOpocTtHa cKaHnpaHe
CkopocTTa Ha cKaHnpaHe MoKe Da ce Hactpon Da 3acnua Ha 1 nIn Ha 3 cekyHn. HactpoiKata no npOpa36npaHe cKaHnpaHe Ha BpeMeTo 3a eINn KOD e Ako To3n INTepBaI e HeyIoBeH, MoKeT npemHeTe KbM 3 cek. cKaHnpaHe 3a 3a da npEbkIIOuHTe, HATncHEte eINn8 6byOnHTe 3a HABnraun Ha npoPamnte npedn aBTOMaTHUHOTo TbpceHe Ha KOD 3aNoUHe cKaHnpaHe.
5.3.5 LED uHnKaOpbT nOTBbpxJaBa BCaKO eHocKaHnpaHe Ha KoD c eHNO npemrBaHe.
5.3.6 HaTnchete 6yToHa 3a 6e3 3ByK, 3a da 3ana3nte KOna n 3a Da n3Je3eTe OT pexm Ha TbpceHe. LED nHdNkaTopbT ue ce N3KJIIOUH.
5.3.7 3a Da Cnpete aBtOMaTHUHOTo TbpceHe Ha KOd No Bpeme Ha Ipoueca Ha cKaHnpaHe, HATNCHETe 6yToHa 3a N3XoJ.
5.4.2ИЗберетустpoиCTBOTO,KoTo nCKaTeДа ce KOHTPOJnpa(Hanp.TeJIeBn3Op),CnomOuTa Ha6byTOHnTe.IpnycneUeHn36OpLED CBETINHaTAtIe CBeTHe eDInH nbT,CLeD Koet TЯIpe npOdbJnxI Da CBETN NOCTOARHHO.
5.4.3 HatncheTe 6yToHa 3a HactpoKa DOkato 3a LED INDnKaTOpbT He 3aNoUHe Da CBETN NOCTOHHO.
5.4K.3aJaHamePteIbPbTaZnΦpa,HaTNCHe
e Da ZnΦpOBuTe KlaBnUn OT 0 Do 9.LED
IOJ.NHdNkTopbT Ue MmRHe BeDhX,3a Da
OT NtBbPdIN BbBExKaHeTo Ha IbPbTa ZnΦpa
Ha 4-μnΦpeH KOJ.
Ja5.4.5 NOBTOpeTe CTbNka 5.4.4 3a BTOpata, TpeTata n YeTBbPtaTa ZnΦpa.
| CODES | |||
| TV VCR SAT D V D | |||
| КИМ | |||
| AUX | AMP | CBL | DVBT |

3a6eJexka
Korato BCnukn KoIOBe ca cKaHnpaHn 6e3 ycIex, yHNBepcaJHOTo DnCTaHNoHHO n3JIu3a OT pexIM Ha aBTOMaTNUHO Tbp Na KOD n Ce BpbUa B OpepaTINBEH peXIM. TekyUO cbxpaHeHnT KOd He ce npOMeHn.
6.1 Punch Through Channel
ФункцяТа Punch Through Channel no3BOJЯВа прмянata Ha nporpaMaTa Ha KOHTpoJnpaHOTO НБ мОмeNTa yctpoiCTBOTO Да ce OTpa3N Ha прмянata Ha nporpaMaTa И Ha BTOpo yctpoiCTBO. ВсчКДpyгК KOMaHДN OCTaВAT HeNoBЛЯHN.
3a Да akTNBnPaTe NaCTpoNkAta punch through channel:
- HaTnchete KOnyTeTo 3a peXm Ha BaUeTo XeJahO yCTpoIcTBo (HaNP. TeJeBn3Op).
- Hatachete n 3aipbxte 6yToHa 3a npomHa Ha nporpamata Harope.
- HatncheTe KOnyeTo 3a peXm Ha BaWeTo XeJaHo yCTpoiCTBO.
- Пусhte Бутона за помяна на поррамата harope (ндкatroп Мога Beньж, akо Habстюкata eakTNBupaHa).
3a Da DeakTbBnpaTe HacToPkata punch through channel:
- H aTnchete KOnyeTo 3a peXm Ha BaWeTo XeJaHO yCTPOIcTBO (HaNP. TeJIeBn3Op).
- Hatnchete n 3a npbxte 6ytoHa 3a npomHa Ha npoPamata NaOJy.
- H aTnchete konyeTo 3a peXm Ha BaWeTo XeJaHo yCTpoIcTBO.
- П усhte 6утона 3а помяна Ha nporpaMaTa Hадoly (индИКaTOpbT MURA ДВa ПТИ, aKO HactpoиKaTae DeaKTINBIPAHa).
6.2 Punch Through Volume
ФункцяТа Punch Through Volume no3BOJBA npOMHaTа Ha 3ByKa Ha KOHTpoJIpaHOTo B MOMeHTa yCTpoIcTBOTO Da ce OTPa3n Ha CUNaTa Ha 3ByKa N Ha BTOPO yCTpoIcTBO. BcUKNДpyrK KomAHIN OCTaBaT HeNoBJIraHN.
3a da akTbupate HacTpoKata punch through volume:
- H aTnchete konyeto 3a peXm Ha BaWeTo XeJahO yCTPOIcTB0 (HaNP. TeJeBn3Op).
- Hatnchete n 3a npbxte 6ytoHa 3a npomHa Ha 3Byka Harope.
- H aTnchete konchyeto 3a peXm Ha BaWeTo XeJaHO yCTpOuCTBO.
-П усhte 6утона 3а npomЯн Ha 3Byka Harope (индikatopbt Mnga BeДньж,akO HactpoIGNkata e aKtNBupaHa).
3a Da DeakTbBnpaTe HacTroPkata punch through volume:
- H aTuschete konqueto 3a peXnM Ha BaWteTo XeJanaHO yCTPOuCTBO (HaNP. TeJeBn3Op).
- Hatnchete n 3a npbxte 6ytoHa 3a npomna Ha 3Byka HanoIy.
- H aTnchete konqueto 3a pexim Ha BaWeTo XeJaHo yCTpOuCTBO.
-П усhte 6уToHa 3a npOMЯHa Ha 3ByKa HAdOJy (ндИКаТОрьТ MИга ДВа ПБТи, aKO HAcTpOйКаTe e DeakTnBnpaHa).
6.3 Macro Power
Macro Power Bn no3B0JyBa da BkIIOuHTe/ n3KJIIOUHTe DBe yCTpOJCTBa eHOBpeMeHHo.
3a da actnbupaTe hactpoKaTa macro power:
- H aTnchete KOnyTeO 3a peXIM Ha BaUeTo XeJahO yCTpoiCTBO (HaIp. TeJIeBn3Op).
- HatncheTe n 3aДрьЖТе 6уToHa BkIIOUBaHe.
- H atnchete koncheTo 3a pexim Ha BaWeTo XeJahO yCTPOHCTBO.
- Пунсенте 6уToHa 3a ВКЛючВаHe (инДИКaTOpьТ MURA BeДнБЖ, aKO HаСтpoйКaТe e aKTINBnpaHa).
3a Da DeakTNBnHa HacToPa macro power:
- H atnchete KOnyeTo 3a peXm Ha BaWeTo XeJahO yCTpoNCTBO (Hanp. TeJeBn3Op).
H aTncheTe n 3aApbXkTe 6yToHa BKJIIOUBaHe. - H atnchete konyeTo 3a pexum Ha BaWeTo XeJaHo yCTpOuCTBO.
I ycheTe 6yToHa 3a BKJIIOUbaHe (HnDnKATOpbT Mra DBa NbTN, aKO HAcTpOuKaTa e DeakTNBnpaHa).
7. Пордрьхka
He cmeBaIte HOBN ynoTpe6yBaHn 6aTePn npn 3axpaHbAHeTo Ha yHNBepCaHOTo
pe dNCTaHcUHOH0, Tb' KaTO CTapNTe 6aTePn ca CKJIOHH KbM N3TNuHaHe.
He n3noJ3BaIe Kopo3uBHN nn a6pa3uBn nouchBaun npenapatn 3a yHNBepcaJIHOTO nCTaHcNOHNO.
-ДрьхTe yHnBepcaJHo ДИCTaHцINHо ДаJIeч OT npax KaTO rO n36bpcBaTe C MeKa cyXa Kbpna.
8. OtrtpaHbAHe Ha npo6IeMn
B. Moeto yHnBepcaJHo dNCTaHcNoHHO He pa6oTn!
O. Пювереу устpoистBOTo, KoetoTO KOHTpoJnpa. Ako OCHOBHOTMy 3axpaHBaHe e N3KJIuOyeHo, By BaSeTo ДИCTaHcNoHHO He MoKe Da To ynpaBnJaBa.
O. Поберете дали баэрпente ca поставенправлино и дали са в правлинота +/-позиця.
O. Поберета дали стейншалу Клавшиа 3a CBOTВETHЯ ржим Ha yctpoICTBO, KoETO ce KOHTPOJInpa OT ДИСТАЦИОHHOTO.
O.Ako 6atepuuTe ca n3ToUeHN, cMeHeTe rN.
B. Ako HЯково Кда са ИЗбpoeн по МарkaТа на моето кОHTрОЛпано уСтpoICTBO, KaK Mora Да ИЗбepa павилня КOD?
0. 3a Да onpeДeЛte npabUNHЯ кд 3a Baшeto yCTpoIcTBO, TeCTBaIte KODOBTe eINH no eINH IDOKATO CTINHete Do T03N, KOITO pa6OTN KopeKTHO.
B. MoTa KoHTpOJIpaHa TexHnKa OTROBaPa cAmo Ha HЯKOn OT KOMaHДnte.
O. TectBaIte npyTu KoIOBTe DOKaTO CTURHeTe Do TO3U, KOITo pa6OTu KopeKTHO
9. CepBn3 n cbnopT
3a Bbnpocn BbB Bbp3ka c npoynKa ce o6bpHn KbM OTdela 3a KOHCyItaun 3a npoynKHa Xama.
Topeu Ta TelefoHna nnHn: +49 9091 502-115 (HeMCKn/aHrnnckn)
86652 Monheim/Germany
www.hama.com