DCCSystem 00005202 - Remote control HAMA - Free user manual and instructions
Find the device manual for free DCCSystem 00005202 HAMA in PDF.

| Product Type | Camera remote control (radio transmitter/receiver set) |
| Brand | Hama |
| Model | DCCSystem 00005202 |
| Transmitter Power Supply | 2 LR03/AAA batteries (3 V) |
| Receiver Power Supply | 2 LR03/AAA batteries (3 V) |
| Number of Channels | 16 (selectable via DIP switches) |
| Maximum Range | 150 meters (without obstacles) |
| Main Functions | Remote shutter release, single shot, burst mode, BULB function, delayed shutter release (approx. 4 s) |
| Compatibility | Cameras with remote control input (adapter cable required, not included) |
| Receiver Mounting | Standard flash shoe or 1/4" tripod thread |
| LED Indicators | Transmitter and receiver status: green (autofocus), red (shutter release) |
| Materials | Plastic |
| Care and Cleaning | Clean with a slightly damp lint-free cloth, avoid harsh detergents |
| Safety | Do not use in humid environments, avoid shocks and drops, do not open, observe battery polarity |
| Recycling | Compliant with WEEE and battery directives, do not dispose of with household waste |
| Warranty | Manufacturer's warranty (conditions in manual), exclusion in case of misuse |
Frequently Asked Questions - DCCSystem 00005202 HAMA
User questions about DCCSystem 00005202 HAMA
0 question about this device. Answer the ones you know or ask your own.
Ask a new question about this device
Download the instructions for your Remote control in PDF format for free! Find your manual DCCSystem 00005202 - HAMA and take your electronic device back in hand. On this page are published all the documents necessary for the use of your device. DCCSystem 00005202 by HAMA.
USER MANUAL DCCSystem 00005202 HAMA
WirelessRemoteRelease DCCSSystemBase
Funkfernauslöser
OperatingInstructions
Bedienungsanleitung
Moded'emploi
Instruccionesdeuso
Gebruiksaanwijzing


flowchart
graph TD
    A["Device 1"] -->|ON| B["Device 2"]
    B -->|ON| C["Device 3"]
    D["Device 1"] -->|ON| E["Device 2"]
    E -->|ON| F["Device 3"]
    style A fill:#f9f,stroke:#333
    style D fill:#f9f,stroke:#333
    style B fill:#ccf,stroke:#333
    style E fill:#ccf,stroke:#333
    style F fill:#ccf,stroke:#333
natural_image
Close-up of a black cable with two connectors and directional arrows indicating cable movement (no text or symbols)Content
ControlsandDisplays....2
ExplanationofWarningSymbolsandNotes......2
PackageContents....2
SafetyNotes....2
GettingStarted....2
Operation....4
Care a ndMaintenance....4
WarrantyDisclaimer....4
ServiceandSupport....4
TechnicalData....4
Recycling Information......4
DeclarationofConformity....4
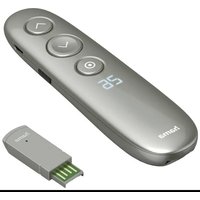
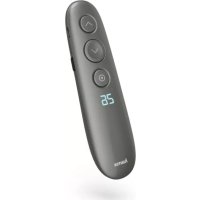
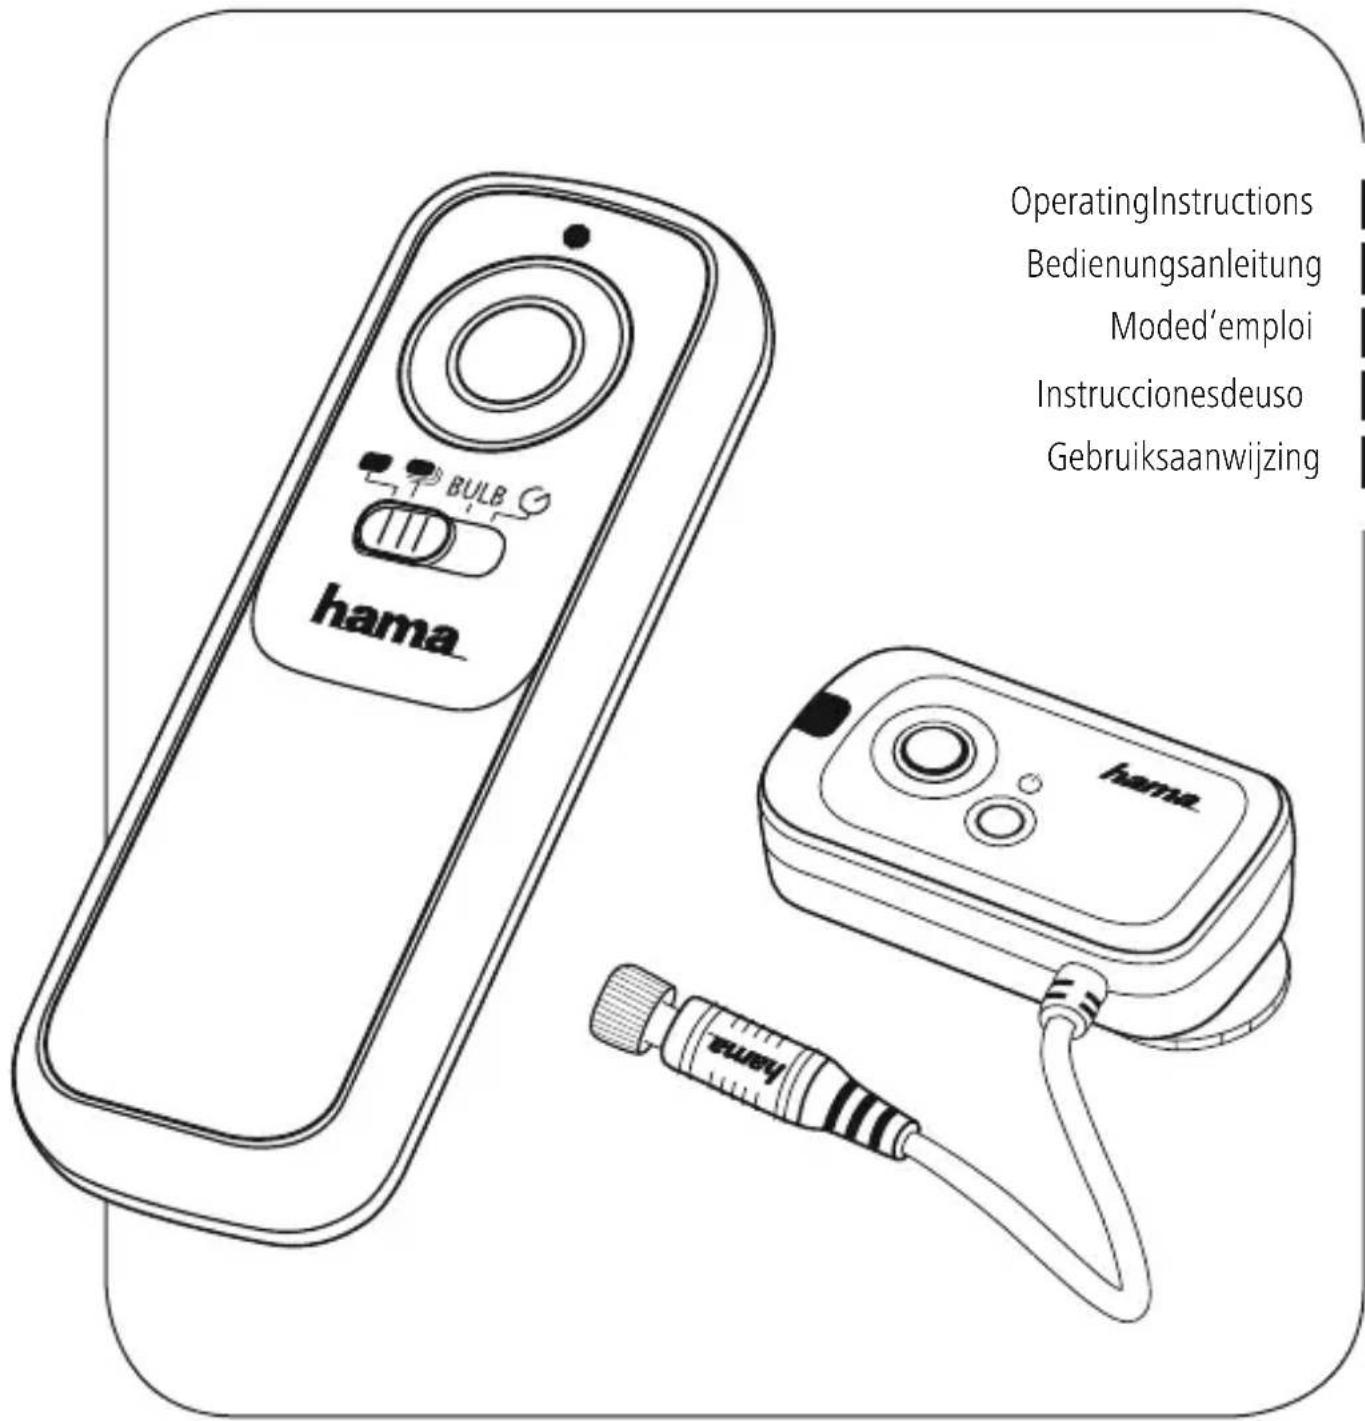
ControlsandDisplays
A W irelesstransmitter
- Wirelessstransmittershutterrelease
- WirelessstransmitterstatusLED
3.Slidecontrol
4.Single-frameshooting
5.Continuousmode
6.BULBfunction
7.Time-delayedshutterreleasefunction
B W irelessreceiver
8.Power
9. Wireless receivers shutter release
10. WirelessreceiverstatusLED
11. Standardflashshoeconnector/ 14 " thread
C C hannelselection
- DIPswitch
Thankyouforchoosinga H amaproduct.
Takeyourtimeandreadthefollowinginstructions andinformationcompletely. P leasekeepthese instructions in a safe place for future reference.
1. ExplanationofWarningSymbolsandNotes

Warning
This symbolised to indicate safety instructions ortodraw your attention to specific hazards and risks.

Note
This symbol is used to indicate additional information or important notes.
2.PackageContents
- Wirelesstransmitter
- Wirelessreceiver
• Theseoperatinginstructions
3. SafetyNotes
- Do not usetheproductinmoistenvironments andavoidsplashes.
- Do n otusetheproductintheimmediatevicinity ofheatersorotherheatsourcesorindirect sunlight.
- Do notbendorcrushthecable.
- D o n otdroptheproductanddonotexposeitto anymajorshocks.
- Do notopenthedeviceorcontinuetooperateit ifitbecomesdamaged.
- Do not use the product in areas where the use of electronic devices is not permitted.
- Do not modify the product in any way. Doing so voidsthewarranty.
- D isposeofpackagingmaterialimmediately accordingtolocallyapplicableregulations.
4. Getting Started
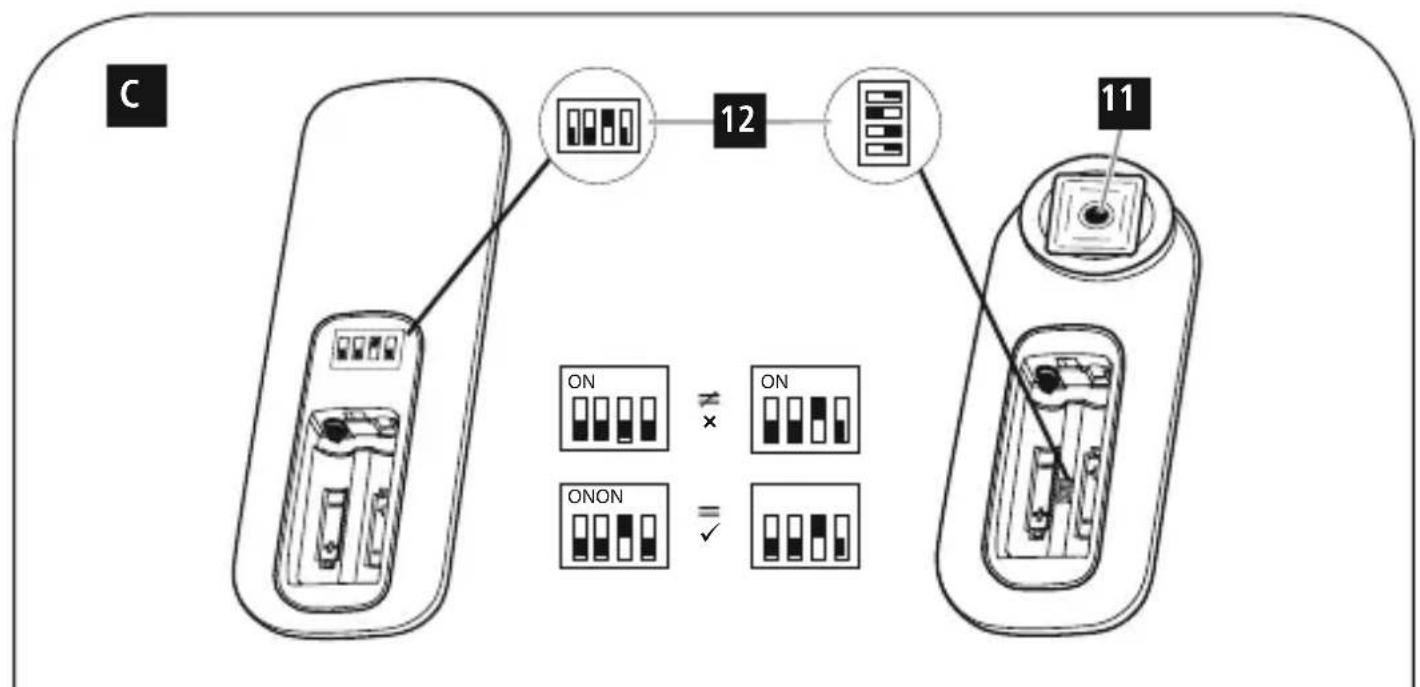
4.1 SettingtheDIPswitch:
- S etoneofthefourchannelsonthewireless transmitter(A)bymovingtheappropriateslider oftheDIPswitch(12)intheONdirection(C).
- A Isomakethissettingonthewirelessreceiver(B).

Note
- M akesure t hatthesettingsonthewireless transmitter(A)andthewirelessreceiver(B) are i dentical.
- You can apply these settings to other wireless transmitters/wireless receivers. This allows you to access to camera with multiple wireless transmitters at the same time to operate multiple wireless receivers (cameras) with one wireless transmitter.
4.2 Inserting the battery:
InserttwoAAAbatterieseachintothewireless transmitter(A)andthewirelessreceiver(B). Ensure that the polarity is correct.

Warning-Batteries
- When inserting batteries, not the correct polarity(+ and - markings) and insert the batteries accordingly. Failure to do so could result in the batteries leaking orexploding.
- A lwayschoosethebatterysizeandgradethat bestsuitstheintendedpurpose.Keep theseoperatinginstructionsina safeplace forfuture r eference,astheyprovide informationaboutchoosingtherightbattery.
- Donotmixoldandnewbatteriesorbatteries of a differenttypeormake.
- I immediately remove and dispose of dead batteries from the product.
- R emovethebatteriesfromproductsthatare notbeingedforanextendedperiod.
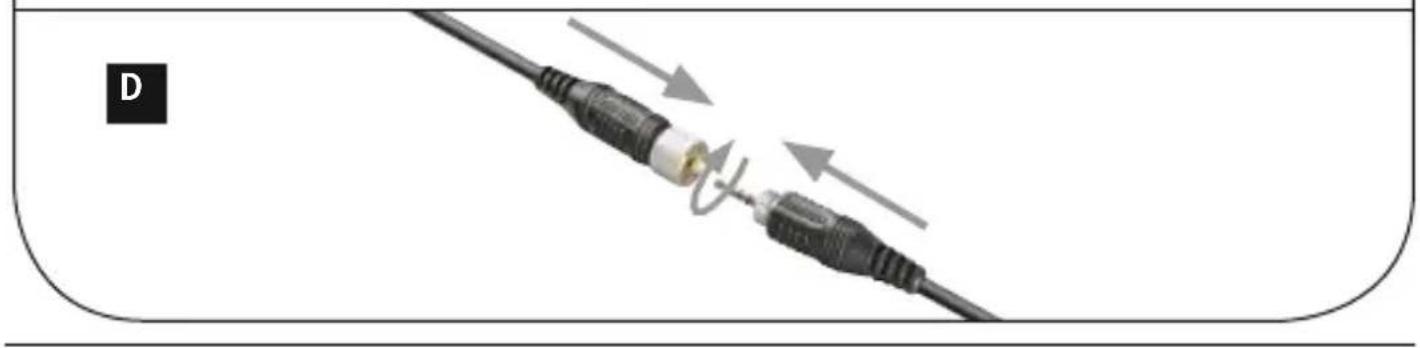
4.3 Connectingtothecamera:
Connecttheadaptercabletotheremoteinputon yourcamera.

Note- A daptercable
If you donothavethistypeofcable, we recommend purchasing an adaptercable separately. You can find an appropriate selection of Hamaproductsatwww.hama.com.
- U setheplugconnectiontoconnecttheadapter cabletothecableofthewirelessreceiver(B). Tightena s leevenutovertheconnectionuntil hand-tighttoprotecttheconnection.(D)

Note
- You can attach the wireless receiver (B) to your camera's flashshoe using the standard flashshoe connector (11).
- If you would like to use the camera's built-in flash, you can also placethewireless receiver (B) on a tripod using the 1/4 "thread(11).
- To s witchonthewirelessreceiver(B), press the on/offswitch(8)forabout3 seconds. The status LED(10)isnowred.
- The status LED (10) flashes in red when the receiverisactive.
- T o s witchoffthereceiver(B),presstheon/off switch(8)forabout3 seconds.ThestatusLED (10) flashes red three times and then goes out.
5.Operation
- P resstheshutterreleaseofthewireless transmitter(1)/wirelessreceiver(9)half-wayto automaticallyfocusonthesubjectusingthe autofocusandtheexposure meter.
- T hestatusLEDsonthewirelessstransmitter(2) andthewirelessreceiver(10)are n owgreen.

Note
You can only set this function if autofocus is activated by your camera.
- To trigger the shutter, press down the shutter release on the wireless transmitter(1)/wireless receiver (9) firmly. The status LEDs (2/10) will turned.
5.1 Useasa w irelessremoteshutterrelease:

Note- Range
Themaximumrangeinopenspacesis150 metres.ExternalinterferencesuchasWLAN, mobilephones,powerlines,etc.canlessenthe rangeconsiderably.
- U setheslidecontrol(3)toselectthevarious shootingmodes.
Single-frameshooting(4):
Thisfunctionallowsyoutopresstheshutterrelease (1)oncetotakea s inglepicture.
Continuousmode(5):
Totakemultiplepicturesinquicksuccession, press and hold the shutter release(1).

Note- R leasefrequency
Notethatthereleasefrequencydependsonthe storagemediaand/ortheshootingmodeusedon thecamera.
Alternatively, you can activate your camera's continuous shooting function and set the slide controller(3) to the BULB function.
- N owpressdowntheshutterreleaseofthe wirelessstransmitter(1)tostartcontinuous shooting.
- P resstheshutterrelease(1)againtostop continuousshooting.
BULBfunction(6):
Use the BULB function (6) to take a picture with timeexposure.
- A ctivatetheBULB/timeexposure modeonyour camera.
- N owpressdowntheshutterreleaseofthe wirelessstransmitter(1)tostartshooting.
- P resstheshutterrelease(1)againtostop shooting.

Note- Exposure time
Notethattheexposure t imemaybelimitedbythe batterycapacityofthecamera/wirelesstransmitter (A)/wirelessreceiver(B).
Time-delayedshutterreleasefunction(7):
Theshutterreleasecommandisonlysenttothe camera about 4 seconds after the shutter release (1) ispresseddown.

Note- S hootingmode
- N otethatsupportfortheshootingmodes may vary depending on your terminal device. As a result, use of the shooting modes may belimited.
- P leaserefertotheoperatinginstructionsfor theterminaldevicesused.
5.2 Useasa c ableremoteshutterrelease:
Thewirelessreceiver(B)connectedviatheadapter cablecanalsobeusedasa c ableremoteshutter release(9).

Note
Thiswirelessreceiver's (9)shutterreleasefunction canalsobeusedwithoutbatteries.
6. Care and Maintenance
Onlycleanthisproductwitha s lightlydamp,lint-free clothanddonotuseaggressivecleaningagents. Makesure t hatwaterdoesnotgetintotheproduct.
7.WarrantyDisclaimer
Hama GmbH & Co. KG assumes no liability and providesnowarrantyfordamageresultingfrom improperinstallation/mounting,improperuseof theproductorfromfailure t o o bservetheoperating instructionsand/orsafetynotes.
8. Service and Support
PleasecontactHamaProductConsultingifyouhave anyquestionsaboutthisproduct. Hotline:+499091502-0 (German/English) Furthersupportinformationcanbefoundhere: www.hama.com
9.TechnicalData
 | Wireless transmitter | Wirelessreceiver |
| Powersupply | 3 V2xAAAbatteries | 3 V2xAAABatterie |
| Numberof channels | 1616 | |
| Range | 150m (without interference) | - |
10. Recycling Information
Noteonenvironmentalprotection:
AftertheimplementationoftheEuropean Directive2012/19/EUand2006/66/EUin thenationallegalsystem,thefollowing applies:Electricandelectronicdevicesas wellasbatteriesmustnotbedisposedof
withhouseholdwaste. Consumers are o bligedbylaw toreturnelectricalandelectronicdevicesaswellas batteriesattheendoftheirservicelivestothepublic collectingpointssetupforthispurposeorpointof sale. Details to this are defined by the national law of therespectivecountry. T hissymbolontheproduct, theinstructionmanualorthepackageindicatesthata productissubjecttotheseregulations.Byrecycling, reusingthematerialsorotherformsofutilisingold devices/batteries,youare m akinganimportant contributiontoprotectingourenvironment.
11. Declaration of Conformity
CE Hereby, Hama GmbH & Co KG declares thattheradioequipmenttype[00005202] isincompliancewithDirective2014/53/EU.
ThefulltextoftheEUdeclarationofconformityis availableatthefollowinginternetaddress:www.hama.com/00005202/Downloads.
| Frequencyband(s) | 2.40–2.48 GHz |
| Maximumradio-frequency powertransmitted | 0.01mW |
Inhalt
www.hama.com/00005202/Downloads.
Bandesdefréquences
2.40-2.48 GHz
www.hama.com/00005202/Downloads.
www.hama.com/00005202/Downloads.
| Frequentieband(en) | 2.40–2 .48 GHz |
| Maximaalradiofrequent vermogen | 0.01mW |
hama®
HamaGmbH& Co KG 86652Monheim/Germany www.hama.com
All listed brands are trademarks of the corresponding companies. Errors and omissions excepted, and subject to technical changes. Our general terms of delivery and payment are applied.