
Peltor LiteCom Plus MT7H7P3E4310EU - Talkie Walkie 3M - Free user manual and instructions
Find the device manual for free Peltor LiteCom Plus MT7H7P3E4310EU 3M in PDF.
| Product type | Hearing protector with integrated radio (walkie-talkie) |
| Brand | 3M Peltor |
| Model | LiteCom Plus MT7H7P3E4310EU |
| Number of radio channels | 69 channels (LPD) |
| Radio output power | High and low (adjustable) |
| Power supply | Rechargeable lithium-ion battery pack (model ACK081) |
| Battery life | Approximately 20 hours (continuous use) |
| Main functions | Integrated radio, Surround volume (ambient sound capture), VOX, PTT, squelch, CTCSS/DCS sub-channels |
| Volume levels | 6 levels for Surround volume and radio |
| Auto-off | Adjustable (default 2 h, max 8 h, or disable) |
| Operating temperature | -20 °C to +55 °C |
| Storage temperature | -40 °C to +55 °C |
| Main materials | Stainless steel headband, PVC padding, PUR foam |
| External audio input | 2.5 mm stereo or mono connector depending on cable |
| Cleaning | Soap and warm water, do not immerse |
| Spare parts | Hygiene kit HY79, microphone MT7N-02, battery pack ACK081, cables |
| Approval | CE marking, conforms to EN standards |
| Warranty | Consult manufacturer |
| Country of origin | Germany (3M Deutschland headquarters) |
| Intended use | Hearing protection in noisy environments with radio communication |
Frequently Asked Questions - Peltor LiteCom Plus MT7H7P3E4310EU 3M
User questions about Peltor LiteCom Plus MT7H7P3E4310EU 3M
0 question about this device. Answer the ones you know or ask your own.
Ask a new question about this device
Download the instructions for your Talkie Walkie in PDF format for free! Find your manual Peltor LiteCom Plus MT7H7P3E4310EU - 3M and take your electronic device back in hand. On this page are published all the documents necessary for the use of your device. Peltor LiteCom Plus MT7H7P3E4310EU by 3M.
USER MANUAL Peltor LiteCom Plus MT7H7P3E4310EU 3M
natural_image
Illustration of hands holding a circular object with directional arrows indicating movement (no text or symbols)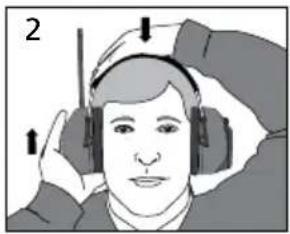
natural_image
Illustration of a person wearing headphones, with arrows indicating motion (no text or symbols)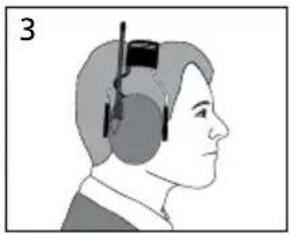
natural_image
Side profile illustration of a person wearing earphones and holding a device (no text or symbols)(E)
natural_image
Illustration of a person performing a medical or therapeutic procedure on a dome-shaped object, with no visible text or symbols.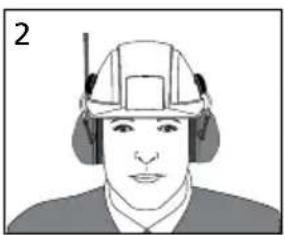
natural_image
Illustration of a person wearing a hard hat and headset (no text or symbols)
natural_image
Illustration of a person wearing a helmet and gear (no text or symbols)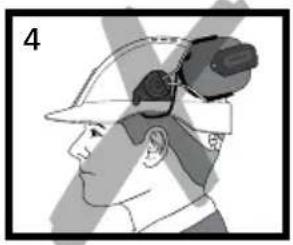
natural_image
Side profile illustration of a person wearing a helmet and glasses (no text or symbols)(G)
natural_image
Simple line drawing of a person's face with a tool near the mouth (no text or symbols)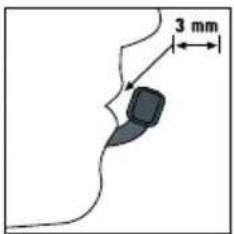
(F:1) Radio Channel Frequencies (PMR)
| Channel Frequency(MHz) |
| 1 446.00625 |
| 2 446.01875 |
| 3 446.03125 |
| 4 446.04375 |
| 5 446.05625 |
| 6 446.06875 |
| 7 446.08125 |
| 8 446.09375 |
(F:2) Radio Channel Frequencies (LPD)
| Channel | Frequency (MHz) | Channel | Frequency (MHz) | Channel | Frequency (MHz) |
| 1 433 | 075 24 433 | .650 47 4 | 34.225 | ||
| 2 433 | 100 25 433 | .675 48 4 | 34.250 | ||
| 3 433 | 125 26 433 | .700 49 4 | 34.275 | ||
| 4 433 | 150 27 433 | .725 50 4 | 34.300 | ||
| 5 433 | 175 28 433 | .750 51 4 | 34.325 | ||
| 6 433 | 200 29 433 | .775 52 4 | 34.350 | ||
| 7 433 | 225 30 433 | .800 53 4 | 34.375 | ||
| 8 433 | 250 31 433 | .825 54 4 | 34.400 | ||
| 9 433 | 275 32 433 | .850 55 4 | 34.425 | ||
| 10 433 | .300 33 433 | .875 56 4 | 34.450 | ||
| 11 433 | .325 34 433 | .900 57 4 | 34.475 | ||
| 12 433 | .350 35 433 | .925 58 4 | 34.500 | ||
| 13 433 | .375 36 433 | .950 59 4 | 34.525 | ||
| 14 433 | .400 37 433 | .975 60 4 | 34.550 | ||
| 15 433 | .425 38 434 | .000 61 4 | 34.575 | ||
| 16 433 | .450 39 434 | .025 62 4 | 34.600 | ||
| 17 433 | .475 40 434 | .050 63 4 | 34.625 | ||
| 18 433 | .500 41 434 | .075 64 4 | 34.650 | ||
| 19 433 | .525 42 434 | .100 65 4 | 34.675 | ||
| 20 433 | .550 43 434 | .125 66 4 | 34.700 | ||
| 21 433 | .575 44 434 | .150 67 4 | 34.725 | ||
| 22 433 | .600 45 434 | .175 68 4 | 34.750 | ||
| 23 433 | .625 46 434 | .200 69 4 | 34.775 |
(H) CTCSS (Continuous Tone Coded Squelch System)
| 1. | 67.0 | 8. | 88.5 | 15. | 110.9 | 22. | 141.3 | 29. | 179.9 | 36. | 233.6 |
| 2. | 71.9 | 9. | 91.5 | 16. | 114.8 | 23. | 146.2 | 30. | 186.2 | 37. | 241.8 |
| 3. | 74.4 | 10. | 94.8 | 17. | 118.8 | 24. | 151.4 | 31. | 192.8 | 38. | 250.3 |
| 4. | 77.0 | 11. | 97.4 | 18. | 123.0 | 25. | 156.7 | 32. | 203.5 | ||
| 5. | 79.7 | 12. | 100.0 | 19. | 127.3 | 26. | 162.2 | 33. | 210.7 | ||
| 6. | 82.5 | 13. | 103.5 | 20. | 131.8 | 27. | 167.9 | 34. | 218.1 | ||
| 7. | 85.4 | 14. | 107.2 | 21. | 136.5 | 28. | 173.8 | 35. | 225.7 |
(I) DCS (Digital Coded Squelch)
| 39. 023 | 53. 114 | 67. 174 | 81. 315 | 95. 445 | 109. 631 |
| 40. 025 | 54. 115 | 68. 205 | 82. 331 | 96. 464 | 110. 632 |
| 41. 026 | 55. 116 | 69. 223 | 83. 343 | 97. 465 | 111. 654 |
| 42. 031 | 56. 125 | 70. 226 | 84. 346 | 98. 466 | 112. 662 |
| 43. 032 | 57. 131 | 71. 243 | 85. 351 | 99. 503 | 113. 664 |
| 44. 043 | 58. 132 | 72. 244 | 86. 364 | 100. 506 | 114. 703 |
| 45. 047 | 59. 134 | 73. 245 | 87. 365 | 101. 516 | 115. 712 |
| 46. 051 | 60. 143 | 74. 251 | 88. 371 | 102. 532 | 116. 723 |
| 47. 054 | 61. 152 | 75. 261 | 89. 411 | 103. 546 | 117. 731 |
| 48. 065 | 62. 155 | 76. 263 | 90. 412 | 104. 565 | 118. 732 |
| 49. 071 | 63. 156 | 77. 265 | 91. 413 | 105. 606 | 119. 734 |
| 50. 072 | 64. 162 | 78. 271 | 92. 423 | 106. 612 | 120. 743 |
| 51. 073 | 65. 165 | 79. 306 | 93. 431 | 107. 624 | 121. 754 |
| 52. 074 | 66. 172 | 80. 311 | 94. 432 | 108. 627 |
(J)
natural_image
Illustration of a hand holding a small object, possibly a tool or device, with no visible text or symbols.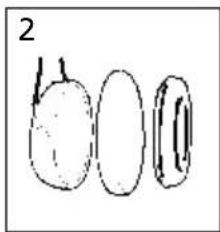
natural_image
Simple line drawing of three oval shapes with a label '2' above (no text or symbols on shapes)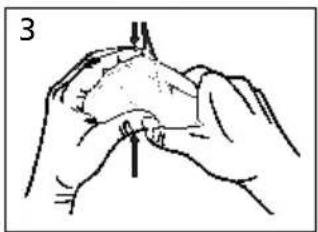
natural_image
Line drawing of a hand holding a small object with a vertical line, no text or symbols present(K:1) MT7H7A4410-EU, MT7H7A4310-EU Headband
| Frequency (Hz)1) 63 125 250 500 1000 2000 4000 8000 | ||||||||||||||||
| Mean attenuation (dB)2) 21.2 20.2 26.7 35.0 37.4 35.7 40.4 38.9 | ||||||||||||||||
| Std deviation (dB)3) 4.1 3.1 3.1 2.6 2.1 3.0 2.9 2.1 | ||||||||||||||||
| Assumed Protection Value (dB)4) 17.1 17.1 23.6 32.4 35.3 32.7 37.5 36.8 |
5)

464 g
SNR=34 dB H=35 dB M=32 dB L=25 dB
(K:2) MT7H7P3E4410-EU, MT7H7P3E4310-EU Helmet attachment
| Frequency (Hz)1) 63 125 250 500 1000 2000 4000 8000 | |||||||||||||||
| Mean attenuation (dB)2) 18.6 18.8 23.8 31.1 37.2 35.5 38.2 36.5 | |||||||||||||||
| Std deviation (dB)3) 4.1 2.5 2.0 2.6 3.1 2.0 2.1 4.2 | |||||||||||||||
| Assumed Protection Value (dB)4) 14.5 16.4 21.8 28.6 34.1 33.5 36.1 32.3 |
5)

491 g
SNR=33 dB H=34 dB M=30 dB L=23 dB
(K:3) MT7H7B4410-EU, MT7H7B4310-EU Neckband
| Frequency (Hz)1) | 63 | 125 | 250 | 500 | 1000 | 2000 | 4000 | 8000 |
| Mean attenuation (dB)2) | 20.5 | 18.3 | 24.8 | 32.7 | 36.2 | 35.3 | 39.5 | 39.4 |
| Std deviation (dB)3) | 4.0 | 3.0 | 2.8 | 2.8 | 3.6 | 2.5 | 3.5 | 2.7 |
| Assumed Protection Value (dB)4) | 16.5 | 15.2 | 22.0 | 29.8 | 32.6 | 32.8 | 36.0 | 36.7 |
5)

453 g
SNR=33 dB H=34 dB M=30 dB L=23 dB
(L)
| Criterion Levels |
| H = 115 dB(A) |
| M = 110 dB(A) |
| L = 102 dB(A) |
(M)
| RMS Voltage mV | Mean sound Pressure dB(A) | STD sound Pressure dB |
| 21,4 | 70,0 | 0,88 |
| 38,0 | 75,1 | 0,95 |
| 67,6 | 80,1 | 0,96 |
| 120,2 | 85,1 | 0,97 |
| 213,8 | 90,0 | 1,00 |
Average level / electronic input signal x = 75 mV =82 dB(A)
(P:1) The product is in conformity with the provisions set out in the following directives. Thereby it fulfils the requirements for CE marking.
• PPE directive 89/686/EEC
• R&TTE-directive 1999/5/EG
• ROHS-directive 2011/65/EU
(P:2) The product is tested and approved in accordance with following standards:
• EN 352-1:2002, EN 352-3:2002, EN 352-4:2002, EN 352-6:2002, EN 301 489-1 V1.8.1, EN 301 489-5 V1.3.1, EN 220-1 V2.3.1, EN 300 296-2 V1.2.1, EN 62479:2010, EN 60950-1:2006 +A11:2009+A12:2011+A1:2010+AC:2011
(P:3) The product has been examined by:
• Combitech AB, Änkhusgatan 9, Box 1017, SE-551 11 Jönköping, Sweden. Notified body #2279
- BACL, Bay Area Compliance Labs Corp (Shenzhen), 6/F, the 3:rd Phase of WanLi Ind Build ShiHua Road, FuTian Free Trade Zone, Guangdong, Shenzhen, China, Notified body #0313
Technical data
Frequency range: 446 MHz (PMR), 433 MHz (LPD)
Operation mode: Half duplex
Channels: Max 69
Channel raster: 6,25
Channel separation: 12,5 kHz and 25 kHz
Modulation: FM: 2,5 kHz and 5 kHz
Microphone type: Dynamic (MT7)
Receiver sensibility: Typical-122 dBm
Selective squelch: CTCSS (38 sub channels) DCS (83 codes)
Output power: High power: 200 mW
Low power: 25 mW
(MT7H7*4310-EU: 10 mW)
Range: Up to 3 km depending on conditions
Power supply: 3,7V Lilon ACK081
Power consumption: Stand-by: <59 mA
Receiving: <70 mA
Transmitting high power: <230 mA
Transmitting low power: <160 mA
Operating time: 20 hours
Operating temperature: -20^ to +55^
Storage temperature: -40^ to +55^
(N)
| 1) Helmet Manufacturer | 2) Helmet Model 3) Attachment | 4) Head size: S=small, N=medium, L=large | |
| 3M 1465 P3E NL | |||
| 3M Airstream AH1, AH4, AH7, | HT-701,HT-702, HT-705, HT-707 | P3AE NL | |
| 3M Mistral M-106, M-107, M-306, M-307 P3AF NL | |||
| 3M G500 Headgear P3E SNL | |||
| 3M G2000 P3K SNL | |||
| 3M G22 P3E NL | |||
| 3M G3000 P3E SNL | |||
| Auboueix Brennus | P3F SNL | ||
| Auboueix Fondelec | P3F SNL | ||
| Auboueix Iris | P3E NL | ||
| Auboueix Iris 2 | P3E NL | ||
| Sofop Taliaplast | Oceanic | P3E | NL |
| Sofop Taliaplast | Opus | P3E | NL |
| Berendsen Safety, | Balance HD | P3N | SNL |
| Centurion | 1125/ARCO plus | P3H | SNL |
| Centurion | 1100/ARCO type 2 | P3H | NL |
| Centurion | 1540/ARCO | P3A | NL |
| Evert Larsson | Robust | P3E | SNL |
| Evert Larsson | Balance | P3E | NL |
| Evert Larsson | Balance AC/3M 1465 | P3E | NL |
| Kemira | Top Cap | P3A | SNL |
| LAS | LP2002 | P3E | SNL |
| LAS | LP2006 | P3E | SNL |
| MSA | Super V-Gard II | P3E | SNL |
| MSA | V-Gard | P3E | SNL |
| Petzl | Vertex | P3E | SNL |
| Protector | Style 300 | P3E | SNL |
| Protector | Style 600 | P3G | SNL |
| Protector | Tuffmaster II | P3E, P3G | NL |
| Römer | Bravo 2 Nomaz | P3B | SNL |
| Römer | Marcus Top 2 Atlas Nomaz | P3B | SNL |
| Römer | N2 Atlas Nomaz | P3BB | SNL |
| Römer | Profi Expo | P3E | SNL |
| Römer | Profi Nomaz | P3E | SNL |
| Römer | Top Expo Atlas | P3B | SNL |
| Schuberth | BEN | P3BB | SNL |
| Schuberth | BER80/WPC80 | P3EA | SNL |
| Schuberth | BER S | P3E | SNL |
| Schuberth | BOP R | P3B | SNL |
| Schuberth | PIONIER | P3B | SNL |
| Schuberth | SH 91/WPL 91 | P3EB | SNL |
| Schuberth | SW1 | P3EB | NL |
| UVEX | Airwing | P3E | SNL |
| Voss | Inap 88 | P3E | SNL |
| Voss | Inap Master | P3E | NL |
| Voss | Inap Star | P3E | NL |
| Voss | Inap PCG | P3G | NL |
(0)
natural_image
Technical line drawings of mechanical components and clamps, no text or symbols present3M™ Peltor™ LiteCom Plus
| GB, IE, ZA, AE | 2-7 |
| FR, CH, BE | 8-13 |
| DE, CH, AT | 14-19 |
| IT, CH | 20-26 |
| ES | 27-31 |
| NL, BE | 32-37 |
| SE | 38-43 |
| DK | 44-49 |
| NO | 50-55 |
| IS | 56-61 |
| FI | 62-67 |
| PT | 68-73 |
| GR | 74-81 |
| PL | 82-87 |
| HU | 88-93 |
| CZ | 94-99 |
| SK | 100-105 |
| SI | 106-111 |
| EE | 112-117 |
| LV | 118-123 |
| LT | 124-129 |
| RO | 130-135 |
| RU, BY, AZ | 136-143 |
| HR | 144-149 |
| BG | 150-155 |
| TR | 156-161 |
3M™ PELTOR™ LiteCom Plus
Hearing protector with built-in communication radio, level dependent function for ambient listening and option to connect external equipment.
Read these instructions carefully before use and save them for future reference.
1. COMPONENTS
1:1 Headband (figure A)
(A:1) Headband
(A:2) Headband padding (PVC foil)
(A:3) Headband wire (stainless steel)
(A:4) Two-point fastener (POM)
(A:5) Ear cushion (PVC foil and PUR foam)
(A:6) Attenuation cushion (PUR foam)
(A:7) Cup
(A:8) Microphone for level dependent function for ambient listening
(A:9) Speech microphone (dynamic microphone)
(A:10) On/Off/Mode
(A:11) +
(A:12) -
(A:13) Antenna
(A:14) Speech microphone input (J22)
(A:15) PTT (Push To Talk button) for built-in communication radio
(A:16) PTT auxiliary. (Push To Talk button) for externally connected equipment (A:17)
(A:17) External input/output (e.g. for external communication radio, external telephone)
(A:18) Lithium-ion battery (rechargeable)
1:2 Helmet attachment (figure B)
(B:1) Cup supporting arm (stainless steel)
1:3 Neckband (figure C)
(C:1) Neckband wire (stainless steel)
(C:2) Neckband cover (POX)
2. FITTING AND ADJUSTMENT
Note! Brush aside hair around your ears so the ear cushions (A:5) fit snugly.
Spectacle frames should be as thin as possible and fit close to the head to minimise acoustic leakage.
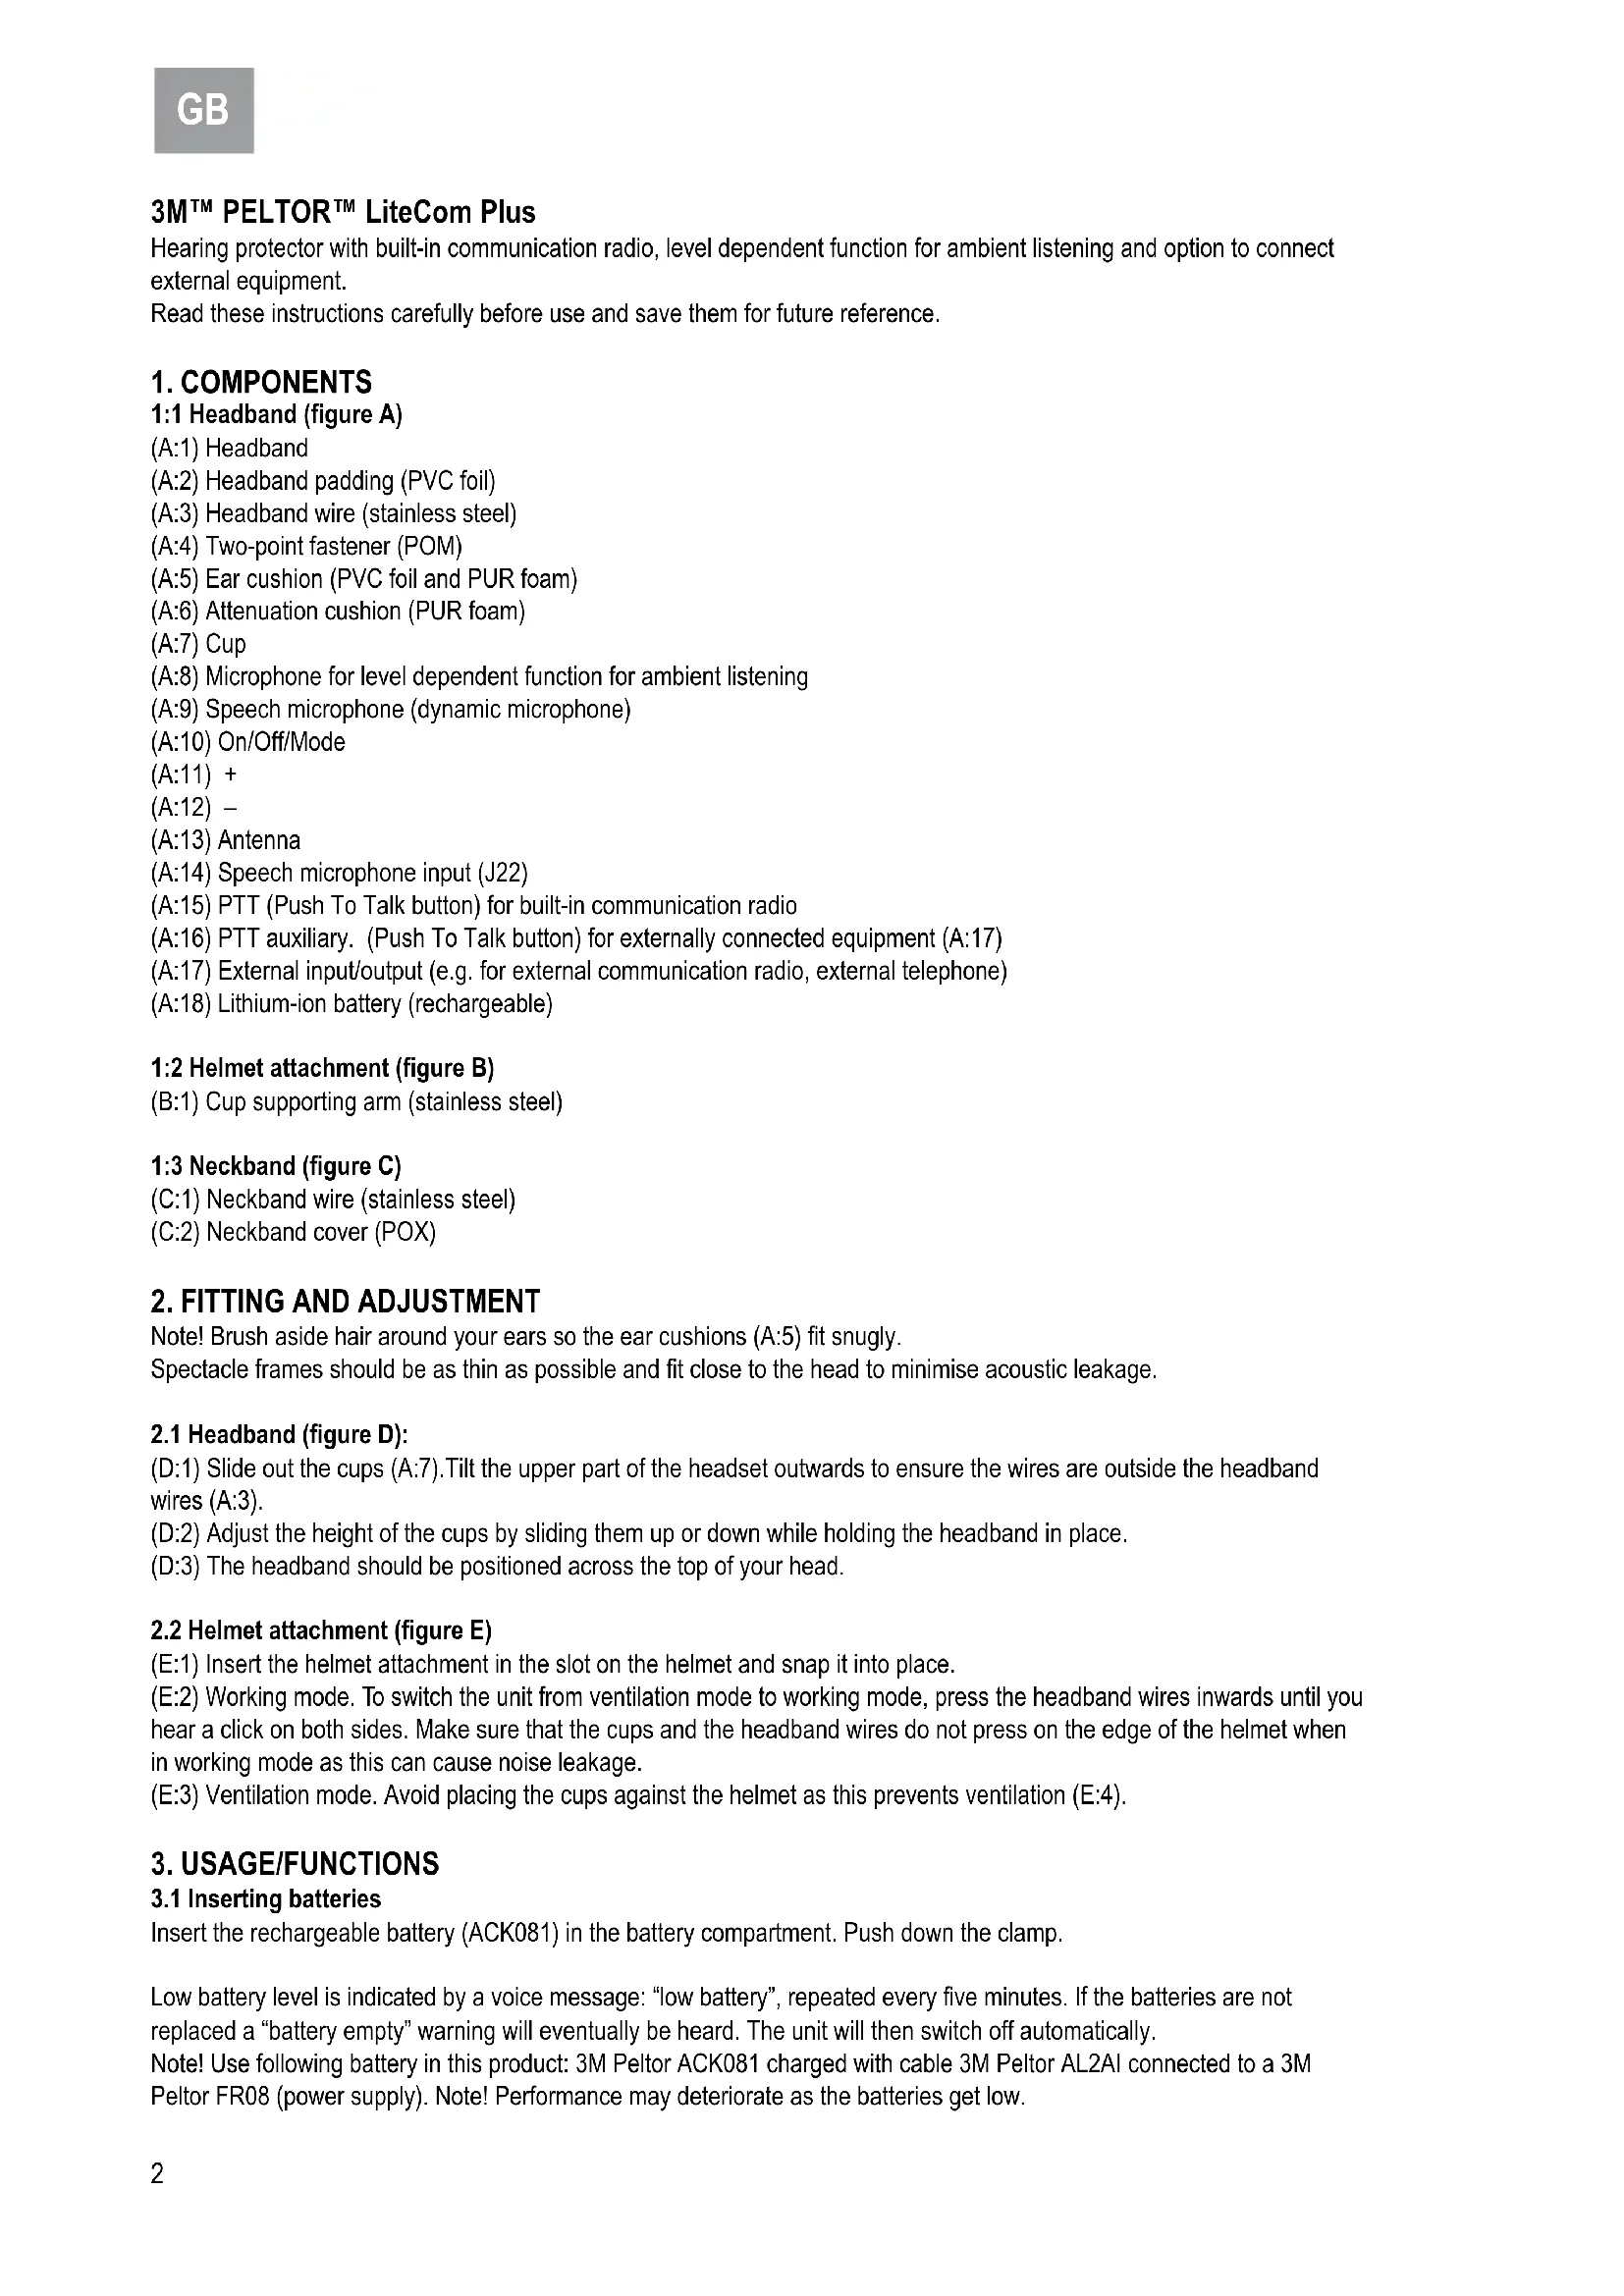
2.1 Headband (figure D):
(D:1) Slide out the cups (A:7). Tilt the upper part of the headset outwards to ensure the wires are outside the headband wires (A:3).
(D:2) Adjust the height of the cups by sliding them up or down while holding the headband in place.
(D:3) The headband should be positioned across the top of your head.
2.2 Helmet attachment (figure E)
(E:1) Insert the helmet attachment in the slot on the helmet and snap it into place.
(E:2) Working mode. To switch the unit from ventilation mode to working mode, press the headband wires inwards until you hear a click on both sides. Make sure that the cups and the headband wires do not press on the edge of the helmet when in working mode as this can cause noise leakage.
(E:3) Ventilation mode. Avoid placing the cups against the helmet as this prevents ventilation (E:4).
3. USAGE/FUNCTIONS
3.1 Inserting batteries
Insert the rechargeable battery (ACK081) in the battery compartment. Push down the clamp.
Low battery level is indicated by a voice message: "low battery", repeated every five minutes. If the batteries are not replaced a "battery empty" warning will eventually be heard. The unit will then switch off automatically.
Note! Use following battery in this product: 3M Peltor ACK081 charged with cable 3M Peltor AL2AI connected to a 3M Peltor FR08 (power supply). Note! Performance may deteriorate as the batteries get low.
3.2 Recharging batteries
Insert a blunt tool under the edge of the clamp and pull outwards/upwards. Remove the battery and charge it separately, or leave the battery in place and charge it in the hearing protector.
3.3 Switching the headset on and off
Press and hold the On/Off/Mode button (A:10) for two seconds to switch the headset on or off. A voice message will confirm that the unit has been switched on or off. The button will start to flash when switched on. The last setting is always saved when the headset is switched off.
Note! The automatic power-off time of 2 hours (factory default) can be adjusted in the set up menu.
Automatic power-off is indicated by a voice message: "automatic power off" followed by a series of short tones for 10 seconds, then the unit is switched off.
3.4 Scrolling through the menu
Press the On/Off/Mode button (A:10) briefly to browse through the menu. A voice message confirms each step.
3.5 Surround volume (level dependent function for ambient sound)
Press the + button (A:11) or – button (A:12) to adjust the ambient sound volume. Each change is confirmed by a voice message. You can choose between 6 volume levels, with level 6 allowing a maximum of 82dB.
To switch this function off, press the – button (A:12) for two seconds. When this function is switched off it is confirmed by the voice message “surround volume off”. Press the + button (A:11) to switch this function back on.
Note! When this function is switched off you will not hear any ambient sound, which could be hazardous.
3.6 Radio volume (volume of built-in communication radio)
Press the + button (A:11) or – button (A:12) to adjust the sound level. Each change is confirmed by a voice message. You can choose between 6 volume levels. To switch this function off, press the – button (A:12) for two seconds. When this function is switched off it is confirmed by the voice message "Radio volume off".
Press the + button (A:11) to switch this function back on.
Note! No radio communication can be heard when the volume is switched off.
Note! When the volume is switched off all the applicable menus are hidden
3.7 Channel (radio frequency)
Press the + button (A:11) or – button (A:12) to adjust the channel. Each change is confirmed by a voice message. The number of radio channels that can be used depends on the product. MT7H7*4410-EU = 8 channels, see table F:1 Radio channel frequencies (PMR). MT7H7*4310-EU = 69 channels, see table F:2 Radio channel frequencies (LPD).
3.8 VOX (Voice Operated Transmission)
VOX enables the LiteCom Plus to transmit automatically when sound above a certain level reaches the microphone. This allows radio transmission without pressing the PTT button (A:15).
Press the + button (A:11) or – button (A:12) to adjust the sensitivity of voice operated transmission. Each change is confirmed by a voice message. You can choose between five levels or switch this function off. When the level is low it is easier to transmit. To switch this function off, press the – button (A:12) for two seconds. This is confirmed by the message "VOX off". The PTT button (A:15) must now be used to transmit. Press the + button (A:11) to switch this function back on. Alternatively switch voice-operated transmission on or off by briefly press the PTT button twice. A voice message confirms the current VOX setting.
The radio has a BCLO (Busy Channel Lock Out) function that prevents VOX operation if the channel is being used for other transmission. An audible tone indicates that the channel is already being used.
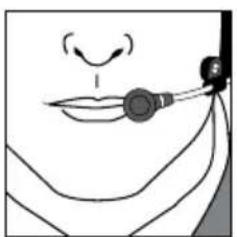
Note! To activate the VOX function the speech microphone (A:9) must be very close to your mouth, 1–3 mm (figure G). The user's voice will be heard in the headset when the radio is transmitting.
3.9 Sub menu
This gives access to settings that are only adjusted occasionally. The sub menu is accessed by pressing the + button (A:11) and – button (A:12) at the same time for 1 second. To return to the main menu, press and hold the + button (A:11) and – button (A:12) at the same time again or wait 10 seconds without pressing any button to return automatically to the main menu.
3.9.1 Squelch (hiss reduction)
"Squelch" means that background hiss in the earphones is prevented when the incoming signal is below the set squelch level.
Press the + button (A:11) or – button (A:12) to adjust the squelch level. Each change is confirmed by a voice message. You can choose between five levels or switch this function off. A low squelch level may permit longer range. To switch this function off, press the – button (A:12) for two seconds. This is confirmed by the message “squelch off”. Press the + button (A:11) to switch this function back on.
3.9.2 Sub channel (selective squelch)
When sub channel is active, an inaudible code will be transmitted with speech, and this code is used to "open" the receiver. This allows multiple groups of users to use the same channel without hearing other groups. This product supports CTCSS, Continuous Tone Coded Squelch System, (table H) and DCS, Digital Coded System, (table I) which means there are 121 codes which have been assigned the numbers 1–121. All communication on a channel can be heard if this function is switched off.
Press the + button (A:11) or the – button (A:12) to select the sub channel. Each change is confirmed by a voice message. You can choose between 121 tones or switch this function off. To switch this function off, press – (A:12) when sub channel 1 is selected or press the + (A:11) button when channel 121 is selected. This is confirmed by the message “sub channel off”. Press the + button (A:11) to switch this function back on.
Note! When the sub channel function is switched on, all other incoming radio communication will be blocked.
Note! BCLO (Busy Channel Lock Out) prevents transmission on a busy channel (see 3.8 VOX).
3.9.3 Power (radio transmitted output)
There are two output power levels, high and low. Use as low output as possible to maximise the run time. Press the + button (A:11) or – button (A:12) to set the level. Each change is confirmed by a voice message.
3.10 Set up menu (configuration menu)
The configuration menu gives access to more advanced settings for the headset. This menu is accessed in power off mode by pressing the PTT auxiliary button (A:16) and the On/Off/Mode button (A:10) at the same time. To exit the set up menu press and hold the On/Off/Mode button (A:10) for 2 seconds and the headset will be turned off.
3.10.1 BCLO (Busy channel lockout)
This menu setting let you change the way the headset reacts when you try to transmit on a busy channel.
There are two options to choose from: "carrier" and "sub channel" (code) with or without a warning tone. If you want the headset to respond to the carrier wave, select the "carrier" option; if you want it to react to the sub channel, choose the "sub channel" option. Press the + button (A:11) or – button (A:12) to select the BCLO setting. Each change is confirmed by a voice message.
3.10.2 Max transmission time
This function lets you adjust the maximum transmission time. The time can be chosen between 30 seconds up to 5 minutes and off-mode. Press the + button (A:11) or – button (A:12) to adjust the maximum transmission time. Each change is confirmed by a voice message.
3.10.3 Automatic power off
The headset is switched off automatically when there is no activity (no button is pressed or no VOX transmission) for a set time. This time can be adjusted here (maximum time is 8 hours) or this function could be disabled. Press the + button (A:11) or – button (A:12) to adjust the automatic power off time. Each change is confirmed by a voice message.
3.10.4 External mode
The external mode can be configured for different types of equipment that are connected to the headset. You can switch between external PTT mode, input source mode (e.g. FM/AM radio), phone mode (e.g. mobile phone, DECT phone), radio mode (external communication radio). Each has different functions.
Press the + button (A:11) or – button (A:12) to select the function. Each change is confirmed by a voice message.
Warning! The output of the electrical audio circuit on this hearing protector may exceed the daily threshold for sound level.
3.10.5 Microphone input (microphone type)
LiteCom Plus is supplied with a dynamic microphone (MT7) as standard. You can however use an electret microphone
(MT53) instead. The microphone setting can be changed here. It is also possible to switch off the microphone and just use the headset for listening.
Press the + button (A:11) or – button (A:12) to select the required microphone. Each change is confirmed by a voice message.
3.10.6 Microphone mute (to the external output)
When you use PTT transmission with the built in communication radio this prevents sound from the speech microphone from being sent to the external output. This menu setting lets you switch this function on or off.
Press the + button (A:11) or - button (A:12) to switch this function on or off. Each change is confirmed by a voice message.
3.10.7 External jack level control
This function permits automatic level control for the incoming signal from external equipment. Press the + button (A:11) or – button (A:12) to switch this function on or off. Each change is confirmed by a voice message.
3.10.8 Menu return
If the user does not press any button for 7 seconds the headset will return to the first menu level (surround).
This function can be switched on or off in this menu. Press the + button (A:11) or – button (A:12) to choose the desired setting. A voice message confirms the change.
3.10.9 Restore dealer defaults (resetting)
To restore the factory default settings, press and hold the PTT auxiliary (A:16) for 2 seconds. This is confirmed by the voice message "restored factory defaults".
3.11 PTT (Push-to-talk)
Press and hold the PTT button (A:15) to transmit manually using the radio. When the radio is transmitting or receiving the button (A:10) will flash rapidly. PTT transmission works at all times, regardless of the BCLO and settings (see 3.8 VOX and 3.10.1 Busy channel lockout).
4. IMPORTANT USER INFORMATION
It is recommended that the wearer ensure that:
- The ear-muffs are fitted, adjusted and maintained in accordance with the manufacturer's instructions.
- The ear-muffs are worn at all times in noisy surroundings.
- The ear-muffs are regularly inspected for serviceability.
Warning!
If the recommendations above are not adhered to, the protection afforded by the ear-muffs will be severely impaired.
- This product may be adversely affected by certain chemical substances. Further information should be sought from the manufacturer.
- Ear-muffs, and in particular cushions, may deteriorate with use and should be examined at frequent intervals for cracking and leakage, for example.
- The fitting of hygiene covers to the cushions may affect the acoustic performance of the earmuffs.
- This ear-muff is provided with level-dependent attenuation. The wearer should check correct operation before use.
If distortion or failure is detected, the wearer should refer to the manufacturer's advice for maintenance and replacement of the battery.
This ear-muff is provided with electrical audio input. The wearer should check correct operation before use. If distortion or failure is detected, the wearer should refer to the manufacturer's advice.
- Follow the advice in this manual on maintaining and replacing batteries.
Warning!
Performance may deteriorate with battery usage. The typical period of continuous use that can be expected from the ear-muff battery is 20 hours.
Warning!
The output of the level-dependent circuit of this hearing protector may exceed the external sound level.
Warning!
The output of the electrical audio circuit of this hearing protector may exceed the daily limit sound level.
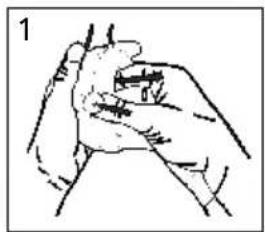
5. MAINTENANCE (figure J)
5.1. Removing/replacing ear cushions
(J:1) Slide your fingers under the edge of the ear cushion and pull straight out.
(J:2) Insert a new ear cushion by pressing until it snaps into place (J:3).
5.2 Cleaning
Remove the ear cushions (A:5) and attenuation cushions (A:6) if you have been wearing the hearing protector for a long time or if moisture has gathered inside the cups. Clean and disinfect the cups, headband and ear cushions regularly with soap and warm water. Make sure the soap is known not to be harmful to the wearer. Allow the hearing protector to dry before you use it again.
Note! Do not immerse the hearing protector in water!
5.3 Storage and operating temperature
Remove the batteries before storing the product. Do not store the hearing protector at temperatures above +55°C, (for example on a dashboard, parcel shelf or window sill), or at temperatures below -40°C. Do not use the hearing protector at temperatures above +55°C, or below -20°C.
6. CONFORMANCE STATEMENT
WEEE (Waste Electrical and Electronic Equipment) Symbol:
Below requirement applies in the European Union.

Do NOT dispose your product as unsorted municipal waste!
The crossed-out wheeled-bin symbol indicates that all EEE (Electrical and Electronic Equipment), batteries and accumulators must be disposed of according to local law by the use of available return and collection systems.
7. TECHNICAL DATA
7.1 Attenuation values, SNR (figure K)
(K:1) Headband
(K:2) Helmet attachment
(K:3) Neckband
7.2 Explanation of the attenuation data tables
- Frequency (Hz)
- Mean attenuation (dB)
- Standard deviation (dB)
- Assumed Protection Value (dB)
- Weight
7.3 Explanation of the table criterion levels (table L)
H=High frequencies
M=Medium frequencies
L=Low frequencies
7.4 Explanation of the table electrical audio input level (table M)
Gives the value, dB(A), of the mean sound pressure and the sound pressure standard deviation, dB(A), at a specified Voltage, mV RMS.
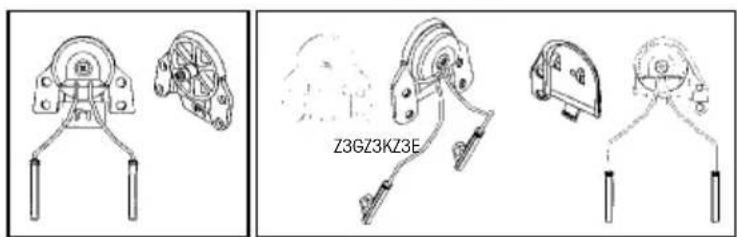
7.5 Industrial safety helmet attachment (table N)
These ear-muffs should be fitted to, and used only with, the industrial safety helmets listed in the table.
7.6 Explanation of the industrial safety helmet attachment table
- Helmet manufacturer
- Helmet model
- Helmet attachment (figure O)
- Head sizes: S = Small, N = Medium, L = Large
7.7 Explanation of the testing and approval table
(P:1) This product is in conformity with the provisions set out in the following directives. Thereby it fulfils the requirements for CE marking.
(P:2) This product has been tested and approved in accordance with following standards.
(P:3) The product has been examined by.
SPARE PARTS/ACCESSORIES
3M ^TM Peltor ^TM HY79 Hygiene kit
Replaceable hygiene kit consisting of two attenuation cushions, two foam rings and two snap-in ear cushions. Replace at least twice a year to ensure constant attenuation, hygiene and comfort.
3M™ Peltor™ HY100A Single-use protectors
A single-use protector that is easy to fit to the ear cushions. Pack of 100 pairs.
3M™ Peltor™ HYM1000 Microphone protector
Moisture-resistant and wind-resistant hygienic tape that protects the speech microphone and extends its life at the same time. Pack of 5 metres is sufficient for around 50 replacements.
3M™ Peltor™ MT7N-02 Dynamic microphone
Supplied as standard with product.
3M™ Peltor™ M42/1 Wind shield for microphone dynamic microphone
3M™ Peltor™ ACK081 Battery
Supplied as standard with product.
3M™ Peltor™ AL2AI Charging cable
USB cable connecting to ACK081
3M ^TM Peltor ^TM FR08 Power supply
Power supply for AL2AI/ ACK081
3M™ Peltor™ FL5602 External PTT
Push-To-Talk button with connection cable for external control of transmission with the built-in communication radio.
3M™ Peltor™ M60/2 Wind protection for microphones with level dependent function for ambient listening
Effective against wind noise; enhances life span and protects the microphones. One pair per pack.
3M™ Peltor™ FL6CS Connecting cable
With 2.5 mm stereo connector for use with DECT and mobile telephones.
3M™ Peltor™ FL6CT Connecting cable
Listening cable with a 3.5 mm mono connector for external equipment (e.g. communicatio radio).
3M™ Peltor™ FL6BS Connecting cable
Listening cable with a 2.5 mm mono connector for external equipment (e.g. communicatio radio).
3M™ Peltor™ FL6BR Connecting cable
With Peltor J11 connector (type Nexus TP-120) for use with a Peltor adapter and an external communication radio.
3M™ Peltor™ MT90-02 Throat microphone
Dynamic laryngophone.
Important Notice
3M does not accept liability of any kind, be it direct or consequential (including, but not limited to, loss of profits, business and/or goodwill) arising from reliance upon any information herein provided by 3M. The user is responsible for determining the suitability of the products for their intended use. Nothing in this statement will be deemed to exclude or restrict 3M's liability for death or personal injury arising from its negligence.
Peltor™ is a brand owned by 3M, St. Paul, MN 55144-1000, USA.
3M ^TM PELTOR ^TM LiteCom Plus
6. DÉCLARATION DE CONFORMITÉ
3.10.1 BCLO (Busy Channel Lockout)
3.10.1 BCLO (Busy Channel Lock Out)
3.11 PTT (Push-To-Talk) Pulsante per parlare
H = Hoge frequenties
M = Medium frequencies
L = Lage frequencies
2. PASSFORM OCH JUSTERING
3.11 PTT (Push-To-Talk, talknapp)
6. KONFORMITETSFÖRKLARING
3.8 VOX (Voice-operated transmission (Talestyret transmission))
3.11 PTT (Push-To-Talk)
3.8 VOX (talestyrt sending)
3.9 Sub menu (undermeny
3.10.1 BCLO (Busy Channel Lock Out)
3.11 PTT (Push-To-Talk)
5. VEDLIKEHOLD (figur J)
5.1 Ta av/skifte øreputer
Nettadapter for AL2AI/ ACK081
3M™ Peltor™ FL5602 Ekstern PTT
(K:1) Höfuðspöng
(K:2) Hjálmfesting
(K:3) Hálsspöng
3.10.1 BCLO (Busy channel lockout)
3.11 PTT (Push-to-Talk) Paina-ja-Puhu
3.2 Recarregar as baterias
3.11 PTT (Push-To-Talk)
3.11 PTT (Push-To-Talk)
3M™ Peltor™ ACK081 Akumulator
3.11 Tlačitko PTT (Push-To-Talk)
3.11 PTT (Push-To-Talk) (kõnenupp)
3.7 Channel (radiofrekvence)
3.8 VOX (Voice-operated transmission) (balss vadita pārraide)
5. TEHNISKÄ APKOPE (J attëls)
5.1 Austinu spilventinu nonemšana/nomaina
3.11 PTT (Push-To-Talk)
3.11 PTT (Push-To-Talk (Bas-Konus)
3M Australia Pty. Limited
Building A, 1 Rivett Road
North Ryde, N.S.W. 2113
+61 1800 024 464
Austria
3M Österreich GmbH
"BRIDGE Plaza" 4th floor,
12 Bakikhanov street Baku AZ 1065
+994 12 404 5050
Belarus
3M Belarus Representation Office
Mogilevskaya str 18, office 4220007
Minsk
+375 172 22 97 90
Belgium
3M Belgium N.V. / S.A.
Hermeslaan 7
1831 Diegem
+32 2 722 53 10
Bulgaria
3M Bulgaria Representation Office
1715 Sofia, Mladost 4 Business Park, sgrada 4
+359 2 960 19 11
China
41/F, Maxdo Centre, No.8 Xing Yi Rd.,
Hong Qiao Development Zone Shanghai,
200336 China
+86 021 22103047
Croatia
3M Croatia Representation Office
19th Floor, Maadi, Cairo
+2 02 2525 9007
Estonia
3M Eesti filial
Mustamäe tee 410621 Tallinn
+372 6 115 900
Finland
Suomen 3M Oy PL 90,
Lars Sonckin kaari 602601
Espoo
+358 9 52 521
France
3M France
Bd de l'Oise
PLC3M Centre, Cain Road Bracknell,
RG12 8HT
+44 870 60 800 60
Greece
3M Hellas Limited
Corporate Office, Concorde Block, UB City,
24 Vittal Mallya Road Bangalore - 560001
+91 80 665 95 759
Ireland
3M Ireland
3M House, Adelphi Centre,
Upper Georges Street Dun Loaghaire,
Co. Dublin
+353 1 800 320 500
Israel
הכלההוּרָהִיַעְבָהִיַעְבָהִיַעְבָהִיַעְבָהִיַעְבָהִיַעְבָהִיַעְבָהִיַעְבָהִיַעְבָה
הכלה 2042.7.91
Italy
3M Italia S.p.A.
Loc. San Felice-Via San Bovio 3
20090 Segrate (MI)
+39 800 802145
Kazakhstan
3M Kazakhstan Representation Office
3M Morocco La Colline II, N°33 Rdc,
Route de Nouasser, Sidi Maarouf
Casablanca
+212 22 977 977
Netherlands
3M Nederland B.V.
Industrieweg 24
2482 NW Zoeterwoude
+31 071 5 450 450
New Zealand
3M New Zealand Limited
94 Apollo Drive, Rosedale, AUCKLAND 0632
+64 (0)800 364 357
Norway
3M Norge A/S,
Avd. Verneprodukter, Postboks 100,
3M Pakistan (PVT) Ltd.
Islamic Chamber of Commerce Building ST-2/A,
Block 9, KDA Scheme 5,
Clifton-Karachi 75600
+ 92 21 111 2255 36
Poland
3M Poland Sp. z o.o.
Aleja Katowicka 117, 05-830 Nadarzyn
Bucharest Business Park,
Krylatsky Hills Business Park,
Krylatskaya st., 17, bldg. 3
121614 Moscow
+7 495 784 7474
Serbia
3M Representation Office
Beograd Milutina Milankovica 2311070
Novi Beograd
+381 11 3018459
Slovakia
3M Slovakia Representation Office
Obchodné zastupitel'stvo
Vajnorská 142, 831 04 Bratislava
+421 2 491 05 211
Slovenia
3M (East) AG
3M Singapore Pte Ltd
3M Technologies (Singapore) Pte Ltd
1 Yishun Avenue 7
Singapore 768923
(65) 6450 8888 (Yishun)
Sweden
3M Svenska AB
Bollstanäsvägen 3
191 89 Sollentuna
+46 8 92 21 00
Switzerland
3M (Schweiz) AG
Eggstrasse 93,
Postfach 8803 Rüschlikon
+41 1 724 92 21
Taiwan
3M Taiwan
6F, NO. 95, Dunhua S. Rd.,
Sec. 2 Taipei, Taiwan
886 2 27049011
Turkey
3M Sanayi ve Ticaret A.Ş
3rd floor, Kyiv, 03680,
+380 44 490 57 77
United Arab Emirates
3M Gulf Ltd
P.O. Box 20191 Building 11,
Third Floor, Dubai Internet City,
Deira
+ 971 4 367 0777
3M
3M Svenska AB
Box 2341
SE-331 02 Värnamo
Sweden
Phone: +46 (0) 370 65 65 65
Fax: +46 (0) 370 65 65 99
Email: peltorcommunications@mmm.com
Internet: www.3M.com/Peltorcomms
Please recycle. Printed in Sweden.
© 3M 2013. All rights reserved.