
CDM1122P - Electric drill Ferm - Free user manual and instructions
Find the device manual for free CDM1122P Ferm in PDF.
| Product Type | Cordless Drill Driver |
| Brand | Ferm |
| Model | CDM1122P |
| Battery Voltage | 18 V |
| Battery Type | Li-ion 2.0 Ah |
| Chuck Capacity | 1.5 - 13 mm |
| Number of Speeds | 2 (0-400 rpm and 0-1,400 rpm) |
| Adjustable Torque | 23 positions + drilling mode |
| Rotation Direction | Reversible (left/right) |
| Weight (with battery) | 1.59 kg |
| Charging Time | Approximately 1 h 12 (max 70 min) |
| Sound Pressure Level | 66.40 dB(A) |
| Sound Power Level | 77.40 dB(A) |
| Vibration (screwdriving) | 0.846 m/s² |
| Vibration (metal drilling) | 1.843 m/s² |
| Power Source | Rechargeable battery 18 V |
| Charger | Input 230-240 V ~ 50 Hz, output 10.8-18 V DC 2 A |
| Intended Use | Drilling in wood, metal, plastic; screwdriving/unscrewing |
| Safety | Double insulation (class II), overload protection |
| Included Accessories | Battery, charger, belt hook, work light |
| Maintenance | Clean with a soft cloth; do not use solvents |
| Warranty | See warranty certificate provided separately |
Frequently Asked Questions - CDM1122P Ferm
User questions about CDM1122P Ferm
0 question about this device. Answer the ones you know or ask your own.
Ask a new question about this device
Download the instructions for your Electric drill in PDF format for free! Find your manual CDM1122P - Ferm and take your electronic device back in hand. On this page are published all the documents necessary for the use of your device. CDM1122P by Ferm.
USER MANUAL CDM1122P Ferm
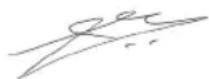
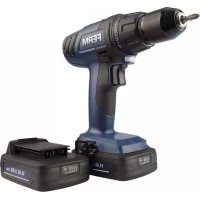
Cordless Li-Ion Drill 14.4V / 18V CDM1121P / CDM1122P
Thank you for buying this Ferm product. By doing so you now have an excellent product, delivered by one of Europe's leading suppliers. All products delivered to you by Ferm are manufactured according to the highest standards of performance and safety. As part of our philosophy we also provide an excellent customer service, backed by our comprehensive warranty. We hope you will enjoy using this product for many years to come.
1. SAFETY INSTRUCTIONS

Read the enclosed safety warnings, the additional safety warnings and the instructions. Failure to follow the safety
warnings and the instructions may result in electric shock, fire and/or serious injury. Save the safety warnings and the instructions for future reference.
The following symbols are used in the user manual or on the product:

Read the user manual.

Denotes risk of personal injury, loss of life or damage to the tool in case of non-observation of the instructions in this manual.

Risk of electric shock

Variable electronic speed

Rotation, left/right

Do not use in rain

Indoor use only

Class II machine - Double insulation - You don't need any earthed plug.

In case of failure, the transformer is not dangerous

Max temperature 40^

Do not throw the battery into fire.

Do not throw the battery into water

Do not dispose of the product in unsuitable containers.

Separate collection for Li-ion battery.

Time-lag miniature fuse-link

The product is in accordance with the applicable safety standards in the European directives.
Additional safety warnings for drills and screw drivers
a) Wear ear protectors when impact drilling. Exposure to noise can cause hearing loss.
b) Use auxiliary handle(s), if supplied with the tool. Loss of control can cause personal injury.
c) Hold power tool by insulated gripping surfaces, when performing an operation where the cutting accessory may contact hidden wiring or its own cord. Cutting accessory contacting a "live" wire may make exposed metal parts of the power tool "live" and could give the operator an electric shock.
Battery tool use and care
a) Recharge only with the charger specified by the manufacturer. A charger that is suitable for one type of battery pack may create a risk of fire when used with another battery pack.
b) Use power tools only with specifically designated battery packs. Use of any other battery packs may create a risk of injury and fire.
c) When battery pack is not in use, keep it away from other metal objects, like paper clips, coins, keys, nails, screws or other small metal objects, that can make a connection from one terminal to another. Shorting the battery terminals together may cause burns or a fire.
d) Under abusive conditions, liquid may be ejected from the battery; avoid contact. If contact accidentally occurs, flush with water. If liquid contacts eyes, additionally seek medical help. Liquid ejected from the battery may cause irritation or burns.
Service
a) Have your power tool serviced by a qualified repair person using only identical replacement parts. This will ensure that the safety of the power tool is maintained.
For the charger Intended use
Charge only 14.4V or 18.0V MAX 2.0Ah Li-ion type rechargeable battery packs. Other types of batteries may burst causing personal injury and damage.
a) The appliance is not to be used by persons (including children) with reduced physical, sensory or mental capabilities, or lack of experience and knowledge, unless they have been given supervision or instruction
b) Children being supervised not to play with the appliance
c) Do not recharging non-rechargeable batteries!
d) During charging, batteries must be placed in the well ventilated area!
Residual risks
Even when the power tool is used as prescribed it is not possible to eliminate all residual risk factors. The following hazards may arise in connection with the power tool's construction and design:
a) Health defects resulting from vibration emission if the power tool is being used over longer period of time or not adequately managed and properly maintained.
b) Injuries and damage to property to due to broken accessories that are suddenly dashed.

Warning! This power tool produces an electromagnetic field during operation. This field may under some circumstances interfere with active or passive medical implants. To reduce the risk of serious or fatal injury, we recommend persons with medical implants to consult their physician and the medical implant manufacturer before operating this power tool.
Power cord replacement
If the supply cord is damaged, it must be replaced by the manufacturer, its service agent or similarly qualified persons in order to avoid a hazard.
2. MACHINE INFORMATION
Intended use
This cordless drill is intended for driving in and loosening screws as well as for drilling in wood, metal and plastic.
Technical specifications
| Model No CDM1121P CDM1122P | ||
| Charger CDA1080S | ||
| Input of charger 230-240 V ~ 50Hz 45W | ||
| Output of charger 10.8-18V DC 2A | ||
| Rechargeable Battery pack | 14,4V=18V=Li-ion 2.0Ah Li-ion 2.0Ah | |
| Battery charging time | 1.2 hour | |
| Chuck capacity | 1.5-13 mm | |
| Torque settings 23 + Drill mode | ||
| No load speed | ||
| Position 1: | 0-400 /min | |
| Position 2: | 0-1400 /min | |
| Weight (incl. battery) | 1,54 kg | 1,59 kg |
| Sound pressure level LPA | 66.23 dB(A)K=3 dB(A) | 66.40 dB(A)K=3 dB(A) |
| Sound power level \( {\mathrm{L}}_{\mathrm{{WA}}} \) | 77.23 dB(A) K=3 dB(A) | 77.40 dB(A) K=3 dB(A) |
| Hand-arm vibration \( {a}_{h} \) (screwdriving without impact) | \( {0.627}\mathrm{\;m}/{\mathrm{s}}^{2} \) \( \mathrm{K} = {1.5}\mathrm{\;m}/{\mathrm{s}}^{2} \) | \( {0.846}\mathrm{\;m}/{\mathrm{s}}^{2} \) \( \mathrm{K} = {1.5}\mathrm{\;m}/\mathrm{s} \) |
| Hand-arm vibration \( {\mathrm{a}}_{\mathrm{h},\mathrm{D}} \) (Drilling into metal) | \( {1.454}\mathrm{\;m}/{\mathrm{s}}^{2} \) \( \mathrm{K} = {1.5}\mathrm{\;m}/{\mathrm{s}}^{2} \) | \( {1.843}\mathrm{\;m}/{\mathrm{s}}^{2} \) \( \mathrm{K} = {1.5}\mathrm{\;m}/{\mathrm{s}}^{2} \) |
Vibration level
The vibration emission level stated in this instruction manual has been measured in accordance with a standardized test given in EN60745; it may be used to compare one tool with another and as a preliminary assessment of exposure to vibration when using the tool for the applications mentioned.
- Using the tool for different applications, or with different or poorly maintained accessories, may significantly increase the exposure level.
- The times when the tool is switched off or when it is running but not actually doing the job, may significantly reduce the exposure level.
Protect yourself against the effects of vibration by maintaining the tool and its accessories, keeping your hands warm, and organizing your work patterns.
Description
The numbers in the text refer to the diagrams on pages 2-4
Fig. A
- Machine
- Battery
- Battery unlock button
- Battery charge indication
- Charger
- Charger LED indicators
- Chuck
- Gear selection switch
- Direction switch
- On / off switch
- Torque adjustment ring
- Work light
- Belt hook
Lithium-Ion technology
The batteries provided with this machine have Lithium-Ion technology.

One advantage of using Lithium-Ion batteries is that, until the battery is almost empty, hardly and power fading is noticeable. The machine can be used until you start noticing that the power of the drill is elapsed. The battery is discharged now and needs to be charged.

Another advantage is that Lithium-Ion batteries have no memory effect. Therefore they can be charged at any moment without degrading, independent of the charging state of the battery.
3. OPERATING

The battery must be charged before first use.
Removing the battery from the machine Fig.B
- Hold the machine (1) firmly with one hand
- Push down the battery unlock button (3) located on the rear side of the battery (2) with the other hand.
- Keep pushing this button (3) down and slide the battery backwards out of the machine, like shown in Fig. B.
Inserting the battery into the machine Fig.B

Ensure that the exterior of the battery is clean and dry before connecting to the charger or machine.
- Hold the machine (1) firmly with one hand
- Insert the battery (2) into the base of the machine as shown in Fig. B.
- Push the battery further forward until it clicks into place.
Checking the battery charging status
Fig. C

The included battery is delivered in partly charged condition.
- To check the battery charge status, push the button (4) on battery shortly.
The battery has 4 lights indicating the charge
level, the more lights that burn, the more charge the battery has left.
- When the lights are burning RED it means the battery is empty and must be charged immediately.
Charging the battery (with the charger) Fig. D
Take the battery (2) from the machine
- Turn the battery (2) to upside down position and slide it onto the charger (5) as shown in Fig. D.
- Push the battery until it is fully pushed into the slot.
- Plug the charger plug into an electrical outlet and wait for a while. The LED indicators on the charger (6) will lighten up and show the charger status.
LED indicators (6) Fig.D
The charger has 2 LED indicators (6) which indicate the status of the charging process:
| Red LED status: | Green LED status: | Charger status |
| Off Off No power | ||
| Off On | Standby mode:-No battery is inserted or,-Battery inserted but charging has finished more then 2 hours ago | |
| On Off Defective battery | ||
| Blinking Off Battery charging in progress | ||
| Off On | Battery charging finished, battery fully charged | |
| On On | Battery is too hot, charging progress is on hold. Charging will start automatically after the battery has cooled down. |
- Fully charging the battery may take up to 70 minutes.
After the battery is fully charged remove the charger plug from the outlet and remove the battery from the charger. - The battery can be stored or directly installed on the machine.

Lithium-iron cells can be stored for a long period without losing much of their charge. When the machine is not being used over a longer period of time it is best to store the battery in charged condition.
Fitting and removing drills or screwdriver bits Fig. E

Always remove the battery before mounting an accessory.
The drill chuck (7) is suitable for drills and screwdriver bits with round shaft as well as hexagonal shaft.
- Hold the machine firmly with one hand
- Open the drill chuck (7) by rotating the chuck sleeve (8) with your other hand in clockwise direction until it is opened far enough for the bit to slide in.
- Insert the shaft of the drill or screwdriver bit
- Tighten the drill chuck again by firmly rotating the chuck sleeve (8) counterclockwise.
- Check if the bit is centered well by shortly activating the machine's on/off switch.
Adjusting the gears Fig.F

Never switch gears when the motor is running, this will damage your machine.

Never put switch in the middle between both positions, this will damage your machine
The machine has 2 drill speeds, which can be adjusted by sliding the gear switch (9) forward or backwards. The number on the gear switch (9) shows which position is chosen.
- Position 1: For slow drilling, large drilling diameter or screw driving. The machine has high power at a low speed.
- Position 2: For fast drilling or small drilling diameter
Adjusting the direction of rotation Fig. G
- Set the direction switch (10) to position “←” in order to drive screws or to use it for drilling.
- Set the direction switch (10) to position “→” in
order to remove screws
Switching the machine on and off Fig. G
The on/off switch (11) is used for activating the machine and adjusting rotation speed.
- Pressing the on/off switch (11) will activate the machine, the further the switch is being pushed, the faster the drill will turn.
- Releasing the on/off switch (11) will stop the machine.
- Move the direction reversing switch (10) to the middle position to lock the movement of the on/off switch. It cannot be activated in this position.

Only lay down the machine when it has stopped running completely. Do not place it on a dusty surface as particles of dust could get into the mechanism.
Adjusting the torque Fig. G
The machine has 23 different torque settings and a special drill mode to set the power being transmitted to the chuck.
By rotating the torque adjustment ring (12), screws can be driven to a predetermined depth, which is ideal for repetitive work. The higher the number, the more torque will be transmitted.
- Select a low setting for small screws or soft work material.
- Select a high setting for large screws, hard work materials and when removing screws.
- You should preferably choose a setting as low as possible when driving screws. Select a higher setting if the motor slips before the screw is fully tightened.
- For drilling, turn the torque adjustment ring (12) to the setting for drilling by fully turning it counterclockwise.

Ensure that the direction switch (10) is always set to during drilling.

The machine is equipped with electronic overload protection function. When the machine gets overloaded it will shut down automatically. When this happens,
please wait for at least 5 seconds to let the overload protection reset itself.
Work light (13)
Fig. A
The machine is equipped with a work light to illuminate the work location.
- It automatically switches on when the on/off switch is being pressed.
- It automatically switches off when the on/off switch is released again.
Belt hook (14)
Fig. A
The machine is equipped with a belt hook for hanging the machine to your belt during use.

Always switch the direction switch (10) to middle position to avoid accidental startup of the machine.
- When delivered, the belt hook (14) is assembled to the left side of the machine.
- It can easily be removed by removing the screw on the hook and taking it off.
- It can be assembled on the right side of the machine when this is preferred.
User tips
When driving screws into wood, metal and other materials:
- Before using the appliance check if the drill or screw bit is properly fitted and centered inside the drill chuck.
- Screw bits are available in several shapes and dimensions. When unsure, always try if the bit fits on the screw head without any free play before using the machine.
- Make sure the machine is not running when it contacts the screw. A rotating bit may slip. This could result in damage to the work piece.
When drilling into wood, metal and other materials:
- With small diameter drills use a high drill speed. For large diameter drills use a low drill speed.
- For hard materials, select a low drill speed, for soft materials select a high drill speed.
Fix the work piece properly, preferably by using a clamp or vice.
During drilling draw back the drill out of the
hole frequently so swarf or drill dust will be removed.
When drilling in metal:
- Use a metal drill (HSS). For the best results you should cool the bit with oil.
Metal (HSS) drills can also be used drilling into plastic.
4. MAINTENANCE

Before cleaning and maintenance, always switch off the machine and remove the battery pack from the machine.
Clean the machine casings regularly with a soft cloth, preferably after each use. Make sure that the ventilation openings are free of dust and dirt. Remove very persistent dirt using a soft cloth moistened with soapsuds. Do not use any solvents such as gasoline, alcohol, ammonia, etc. Chemicals such as these will damage the synthetic components.
WARRANTY
The warranty conditions can be found on the separately enclosed warranty card.
ENVIRONMENT

Faulty and/or discarded electrical or electronic apparatus have to be collected at the appropriate recycling locations.
Only for EC countries
Do not dispose of power tools into domestic waste. According to the European Guideline 2012/19/EU for Waste Electrical and Electronic Equipment and its implementation into national right, power tools that are no longer usable must be collected separately and disposed of in an environmentally friendly way.
The product and the user manual are subject to change. Specifications can be changed without further notice.
Specifications techniques
Rotation,vanster/hoger

Använd inte i regn

Trådløs litium-ion-boremaskin 14,4V / 18V CDM1121P / CDM1122P
2. INFORMACE O NARADI
Urcené pouziti
Modela Nr. CDM1121P CDM1122P
Ladetajs CDA1080S
Ladetajaieejas jauda 230-240 V 50 Hz 45 W
Ladetajaizejas jauda 10,8-18 V d.c.2A
| Uzladejams akumulators | 14,4 V---Litija jonu2.0 Ah | 18 V---Litija jonu2.0 Ah |
| Akumulatora uzladešanaslaiks | 1.2 stunda | |
| Spilpatronas platums 1,5-13 mm | ||
| Griezes momenta iestatijumi 23 + urbsanas režims | ||
| Âtrums bez noslodzes | ||
| 1. pozćija: | 0-400 /min | |
| 2. pozćija: | 0-1400 /min | |
| Svars (ar akumulatoru) 1,54 kg 1,59kg | ||
| Skanas spiediena liimenis LpA | 66,23 dB(A)K=3 dB(A) | 66,40 dB(A)K=3 dB(A) |
| Skanas jaudas liimenis LwA | 77,23 dB(A)K=3 dB(A) | 77,40 dB(A)K=3 dB(A) |
| Plaukstas-rokas vibracijaan (skrušësana bez triecena) | 0,627 m/s2K=1,5 m/s2 | 0,846 m/s2K=1,5 m/s |
| Plaukstas-rokas vibracijaan (urbësana metalã) | 1,454 m/s2K=1,5 m/s2 | 1,843 m/s2K=1,5 m/s2 |
Vibraciju limenis
2. INFORMATICCU PRIVIRE LA MASINA
Atunci cand gauriti in metal:
B clyuae HeucnpaBHOCTn TpaHcfoMpAtoP He onaceH.

MaKcImaJIbHaI TeMpepaTpa 40^

He 6pocaIte 6aTaapeIO B oroHb.

He 6pocaiTe 6atapeIO B Body.

Bb6paCbBaIte n3dJIe TToIbKO B npEHa3HaueHHbIe IJRA 3TOrO KOHTeHepbl.

HONHO-JINTNHeBbIe 6aTapeu HxKHO yTNJIN3NPOBaTb OTJeJIbHO.

Ppepnolaraemoe ncnb30baHne
Дя 3aunTbI OT Bn6paunN NOdepxNBaIte HnCTpymEnT I npHaJNeXHOCTN B XopoWem COCTOHN, He daBaIte pyKaM Mep3HyTb I opraHn3yIte peKIM pa60TbI.
Onncahne
LINΦpbl B TeKCTe OTHOCaTcK CXeMaM Ha CTpaHnuax 2-4
Pnc.A
1.3neKtpoHnCTpymENT
2. Batapea
3.KhonkaΦnkcaun6aTapeu
4.ИнданkaTOp 3aMeHbI 6aTapeN
5.3apraHoe yctpoCTBO
6. CBeToIIOHbIe INIaKTopbI 3apAnHOro
ycTpoIcTbA
- CbeprnIbHbI naTPOH
9.Переключateьскорoctи - NpeeknouateIb HanpaBneHn
- BbiklouaTeIb
- Kolbpo peryunipovkn kpytraero MOMeHTa
- Pa6oynΦoHapNK
14.ФИКСАТОРДЯ рЕМЯ
I3MeHHeKpyTaeo MOMeHTa Pnc.G
HnctpymehT nmeet 23 pa3hbx npaMeTPOB KpyTaeo MOMeHTa N ocobiy peXIM CBepneHnI dI nepeaun KpyTaeero MOMeHTa Ha naTPOH.
PnBvBopaunBaHmUwpyuOB BdepeBO,MeTaNIN npOue MaTeepaJIbI:
-пегд Tem Кк пимеHTь n3delenye ybeintecb,чTo npHaJIeXHocTb NaIeXaIIMобразOMyCTaHOBNeHaВ naTPOH.
HacaKnI JnI yypnoB ImeoTcpa3hbxΦopm npa3mepob.Ecn BbI He ybepeHbIBnpaBnIbHOCTN Bb6opa HacaKn,BCTaBBte ee
B ⅢJЯКУ I y6eIITecb, YTO OHa nOxOuT 6e3 3a30pa.
- INHCTpymEnHT He DoJXeH BpaaTaTbC8 BO BpemcOcnPKoCHOBeHnC WypynOM. Bpaauoaaer HacaKa Moxet COCKOJIb3HyTb. 3TO MOxET PnVBecTN K NOBpeKdEHHo pa6Oyero MaTePnAna.
PnBbICBePJIbAHmN OTBepCTnB DepeBe, MetaIe n npOuNX MaTePnaIax:
-Дя CBepI MaIoro ДИaMeTp a NcNoIb3yIte BbICOKyIO cKOpOCTb CBepJIeHnI.ДЯ CBepI 6OJIbIwOro DInaMeTp a NcNoJIb3yIte MaIyIO cKOpOCTb CBepJIeHnI.
ДлгТВердьхМATEриаловИСпОЛьзУTe МалуюСКОРOCТсВЕрлесня,aДлЯМЯrknx-60льшую.
- HānlejαuM o6pa3oM 3aKpeŋIηPe pa6oyn MaTePuaJ, HanpUmeP, B TnCKax.
BoBpMa CBepHeHnpeNoDnueckn n3BJIeKaIte CBePIOuN3 OTBepCTNu, YTO6bI n36aBHTbcraOT CBePNIbHOH nbIN.
PnBbICBePJIbAHN OTBepCTN B MeTJIe:
- IcnoIb3yIte cBepna n3 6bIcTpopeKyuIe HnCTpyMeHTaJIbHOI CTaII (HSS).ДЯ HAnlyuXnx pe3yIbTaTOB dIra OXlaJKeHnA CNeDyET IcNoIb3OBAt b MacNo.
Cbeprna n3 6bICTropexyucei HnCTpyMeHTaIbHOI cTANI (HSS) TaKke MOxHO NcNoJIb3OBAtB JIЯ BBICBePJIuBaHIN OTBepCTN B PnactMaCCOBbIX MaTePnAax.
4. OBCJNYXINBAHNE

Ipeo ouctkoi oocnyxuBaHneM Bcerda OTKIOUaTe 3JIeKTPoINHCTpyMeHT U n3BLeKaTe aKKyMyJrTOpHyIO baTapeio.
PeryraHOp OunuauTe KOpnyc 3JeKTPoINHCTpyMeHTa MmKoN TprnKoN, XeJIaTeJIbHO, NocLe KaXDoRo NcNoJb3OBaHn. Y6eIInTecb, YTO BeHTnJIaUNOHhBle OTBepCTnA YnCTbl OT nbIIN rpa3n. IyraYdaJeHnOOCo6o CnIbHbIX 3arpa3HeHn INcNoJIb3yUte MrgKyIO TpAnkCy cMbInbHoN peHn. He nCnoJIb3yIte pactBopnteIN, TaKne KaK 6eH3nH, CnIpt, aMMnak N T. D. XmMueckne BeueCTBa NOBpejr CTnHTeTNUeCKNe KOMNOHeHTbl.
TAPAHTN
TapaHTnHbIe yCIOBn npNBeDeHbHa OTdJIbHOM TapaHTnHOM JInCTe.
OKPYXAI0UCA CPEDA

HeicnpaBhIe 3JIeKtpnueckne n 3JIeKTPoHHbIe N3JeJIIN HeO6XoIMMO CdaBaTb B COOTBeTCTByIOUne IyHKtbl yTNJN3aUN.
ToIbko IJIa cTpaH Ebponeckoro 3KOHOmNueckoro COO6uectBa
He Bb6paCbBaIte 3JIeKtpOnHCTpyMeHTbIB
06bUHbIe MycOpHbIe KOp3nHbI. B COOTBeTCTBnC EbponeckOu NpuKeTbOoB 2012/19/EU o6
yTuIN3aUu OTpaboTaHHoro 3JIeKtpueckoro u
3JIeKtpOnHoro 6OpuyOBaHnra N ee peaIN3aUu
B rOcydApCTBeHHOM 3aKOHOdaTeNbCTBe
3JIeKtpOnHCTpyMeHTbI, KOToPbIE 6OJbSe
He MOryT IcNoJIb3OBAtbcra N O Ha3HaueHIO
Heo6xOIMo IOBepRaTb yTuIN3aUu
dpyXeCTBeHHbIM NO OTHOseHIO K OkpyXaUoUeN
cpeDe cnOCO6OM.
B n3dene npykoOoCTBO noIb3OBaTeJn MOrY 6bITb BHeceHb I3MeHeHn. CneuNkauu MoYr 6bITb I3MeHeHb 6e3 npedBaPntbHoro onObueHn.
TexvoLoyia 1iou-ovtwv
Oi natapiocouovodeuuv auto to uXavnaexouv texvoLoyia iioiu-ovtwv.

Eva nEvoktna Tc xponc mataiwv
Aioov-ovtwv eiva ot ecwocotou exi
eavntneoi oxodov teaiwc n matapia,
delta npesitai oxedov kaia
eaoevnon tnc napexoevnc ioxuoc. To
unxavma unopei va xonoiomoinei ewc
otou apxioetve npatnpieote otixe1
wnoabmuotie i oxc toudeltaanavou.
TOTn matapia eiva anoopoptiouevn
kai xpeiazetaiv a optiotie.
Eva aallo nIeovektnma evai oni
natapiEc iiou-ovtwv napaTnpesitai paivoEvO pvnnc.
EnoEvwC, npopoov va optioov
onoiadnoTE otiyun, xwoic auto va tic lanTei, aveapntna ano tnV kataoan
ofoTnic touc.
3. AEITOYPTIA

H npatapia npenei va optioe i npiv tnv npwtn xprn.
Apaipocn Tnc matapiaac ano to nxavna Eik. B
KpatnoTe to unxavna (1) oTaepa eTo eva xepi
Me to aALo xepi,piote npoc ta kATW to koupti anaosfaianc mnatapiac (3) nou p i o k e t a l OTNV NIOw PEAUPa TNC mnatapiac (2).
KpatntoTo koupi (3) natnevo npoc ta katw kai nepaote Tnv mnatapia npoc ta niow EKTOC TOU mnxavnmuotc, onwc faivetai OTNV Eik.B.
Eioayyn tnC mnatapiaoc oTo mnxavna EIK.B

YnoB6Eic yia to xpnoTn
OTAV biδwveTe Ε Εuλo, μεtaλo kai aλλa uikα:
Piv xpoiooioeTn oukeun eEyEav to tpuavi n mtn kataoiou exi TOnoetn0e i ootai kivcpapioevo/ npca oTo Took Tou dpanavou.
Mutec kataoabiou diatietvtae noa oxnmuata kai diaotace.Av deviotebetaiaio raiaivn awotn mtn,piiv xpanoionoe To unxavma,doikapote av n mtn eapucxi wpic tcoyo oTo kepaaltnic bidac.
Bepaiwtheta ot to npxavma devival o Kivnon otav epoie o e npn m Tn iia nepiotpeoevn uut n npoei va yioptnoA Auto 8a npopoue va exei w anotel6u a nmu o Tepaio Epyaia.
'Otav npaypatotoleitedeltaipnon oE ulo, etaalokai aalua uuka:
Me TpuTavia uikpotepcn ciaepptou, xpoiooiote uynn tauxnta diatpnoc. Iia TpuTavia ueyalnc diaeTpou, xpoiooiote xamn tanxutnta diatpnoc.
- Ia oK npa uiká, eIiEeTe xuŋnλntaxutnta diatpnoanc, yia paakac uiká eIiEeTe uynnλntaxutnta diatpnoanc.
Tepeewete To Teuaxio epyaiaoc ootc, kata npotiunon e xpiono ophiKTnpa n eyyevnc.
Kata tn diatpnon va avaupete ouxva to Tpuanavi ano tn v onn wote va anopakpuovtai Ta npioviia n n okovn nov napayovtal kata tn diatpnon.
Kata diatpnoon oE eTaA:
Xpnoiponoioote rpunavi yia metaalaa (HSS). Tia ta kautepa anotetaeopata 0a npenie va to tpunavi e i
Ta tpuanavia yia taalaa (HSS) mnpouv va xpanoionoioov kai yia diatpnoon e nlaotiko.
4. ΣYNTHPHΣH

PivTovKathetaioukai TOnovtnpOAn, naVa aaneVepyonoieTe to uXavma kai va aphiiteTo naketo mntapiaac ano to uXavma.
Kaθapiετa περιβλημata tov μnxavημatoc
takikα ενa μalakο navi, kata πpotiμon
ετa ano kαθε xρησ. Na βεβaiwveoté oti ta
aoviyμata aεpiouδ εival ελεuθερa ano σκovn kai
akaθapoiεc. Aφaipeite kaθε επiμovn akαθapoia
με tn xρησ ενος μalakou naviou nou to exεte
uvpavei με σαπωvδiáμa. Mn xρησιοηiε έοιονδηnotε δiautn onwc βενζivn, oivontueμa,
aμωvia κλπ. Ta xημika autou tou εisouc θa
προενησουν ζημia στα συθετικα εαρtnμata.
ETTYH2H
Mnopeite va 3peite tic npounoeoeic tnc Eyyunongc otn xwpiotn eowkleeotn kapta Eyyunongc.
IEPIBAMON

O nEeKtpiokc n eKtpovikoc EoIaouoc n o npovoiadci Iabn n exei ooe i oTo TELOC TNC wefalunc cwnc Tou npenv va npapabiestai otic katalnnec tonoeioec avakukwongc.
Móvo yia xωpεc EK
Mnv anoppiTTe ta nEKTPIKA epyaia
Ota oikia k anoppimuata. uuphiwa u Tnv
EupwnaiKn obnyia 2012/19/EU nepi aonBntwv
nEKTPOK ou k nEKTPOVIOK U EONIAOou KAI Tnv
EFAPoyn Tou OTO eVIKodeltaio, ta nEKTPIKA
epyaleia Nou dEv mTOpov va xnooiOnoiou
Ieov npenla va ouLeyovtai Exwpiotka
va anoppiTovtai Me TpOTo fIKo Poc to
πepiBalov.
To npoiov kai to eyxepidio xpnotn unokivtau o aalayn. Oi npodiaypapc mnpei va aalaouv xwpi c alnn eidooinon.
a
18/14,4
CDM1122P / CDM1121P
o 10000000000000000000000000000000000000000000000000000000000000000000000000000000
a
.1
aLl a jg g aagall aalll 1j
aJyIg y JyIg ll .cayllg ayIy
/ajyIg S aas sgsy d cayllg aywll
aLl a jyIg kai. oJyIg y /g yJy
gaii gaiinai gai jai jai jai ai

a 1
a_i Q. y S u .
a. ,
Jy
jda 1
Laii
sll 2 -gjzjj-aaai jai jai jai
- jbs jgsall 2. jbsall
40 40


J 1
aalalalalalalalalalalalal
auiiae ie cglg gaiil no valii
J 1
a a a a a a a a a a a a a a a a a a a a a a a a a a a
iie 1
olally wally 1iie (ibid) yjy AuaaXll Cia 11 g. AuaaXla
sulalil bla, jyell Jlll aolal y
j 1
a
CDA1080S
jaii jiaabi,45ji 日 5 0
4.1.1
a
olly aoLg lalil Jaaa aee
a. jil: y8
Jalil
y
15 1.5 j 18.0 j 14.4 a
a aaa a a a a a a a a a a a a a a a a
(a)
1aaley yaiy jie ayjlln 2 (c
(1)
a_i a b a^ a^
a a a a a a a a a a a a a a a a a
Jalilll luii i aaiil Jaliil Jolge g qie 1
y
a
jki j 1 j j j j j j j j j j j j j j j j j
L
gill sall ciaalll lcll (a)
Aaill ldi yolubio g 102
1
a a a a a a a a a a
aall l jj g jnss
Jia aall 1 jll aai all 4 jll, uall
Solly's solvability (1) 252
(3)
2
(3)jll
A
a a
a

(1)
(2)
LaSg jaiwi gai 1y jki yjbi ci biin
aibab Cg D
a a a a a a a a a a a a a a a
L
.
a 1
aclll jolil ose (8) abj
J1111 11111111111111111111
0joo,ooai 15u
jill
9
136 15
ai a ai

a 1
A

2
wssill 23gall plll lal (9) wssill
jissall 9
1 1
aiaaa aaii iiee eae
2 2
1
J
jgl 00000000000000000000000000000000000000
all
100 100
LgJy
J
11)
1
y (11) 1/
aal jy a y j 1j 1j
(11)JJIJIJIJIJIJIJIJIJIJIJIJIJIJIJIJIJIJIJIJIJIJIJIJIJIJIJIJIJIJIJIJIJIJIJIJIJIJIJIJIJIJIJIJIJIJIJIJIJIJIJIJIJIJIJIJIJIJIJIJIJIJIJIJIJIJIJIJIJIJIJIJIJIJIJIJIJIJIJIJIJIJIJIJIJIJIJIJIJIJIJIJIJIJIJIJIJIJIJIJIJ
y 01)
Cieall la laa Jay 1. Jaiill cai / Jaiill cia 45
Jaae jie aee
Jaaia 4y jil y zhaue Iaiaia 2g. Jds
a

jglal jie b
jS
J 23 1
aal alal alal alal
(12)(20
Lok. jStall Jall aill gili jai 1a, dina 2n ge
j j j j j j j j j
aill Joll slo jyall lll iisio!
iicg ailll Jall al gag 1y jll k y l2c
21212111
ie elaiaill jia liassio lse! Jaiol gao jie jiai
jrgsall jy jilal qie lae rlae! 2g
JaL ≤ K1 ≤ K2 ≤ K3
(12)
Aeall 1jie oJie Joo JolS Joo
(10)
yj j 100
aee
Iaiaeale! aill Jall no ayalall gni yj0 jy
1
(13)
1 < s ≤ 3 时
JaeiaeiojLac eannn ojo
Jyll /jLill 100
J 1
(14)
( 1,5,2,1)
alil 1ol jai 5jai jia jia jao
aaii (10)
A

15u jaiy 4sji (14) jall iibpsuiie
yall all j! jj j j j j j j j j
Aid
ailll lalnloie uuul
jnnnnnll
(1) a5 + a6 + a7 + a8 = 21
jaiial aai jy jia jia jia jia jia jia
J 1
a1j, a1j1 jaii jaiy iaiyaiyaiyaiyaiyaiyaiyaiyaiyaiyaiyaiyaiyaiyaiyaiyaiyaiyaiyaiyaiyaiyaiyaiyaiyaiyaiyaiyaiyaiyaiyaiyaiyaiyaiyaiyaiyaiyaiyaiyaiyaiyaiyaiyaiyaiyaiyaiyaiyaiyai

Jaaaall jaiial all aay jaiial all yge Jaiy
中

Kablosuz Li-lon drill 14,4V / 18V CDM1121P / CDM1122P
Calisma Iambasi (13) Sekil A
DECLARATION OF CONFORMITY CDM1121P / CDM1122P - CORDLESS DRILL
(EN) We declare under our sole responsibility that this product is in conformity with directive 2011/65/EU of the European parliament and of the council of 9 June on the restriction of the use of certain hazardous substances in electrical and electronic equipment is in conformity and accordance with the following standards and regulations:
(DE) Der Hersteller erklart eigenervertontlich, dass these Produkt der Direktive 2011/65/EU des Europäischen Parliaments und des Rats vom 8. Juni 2011 über die Einschränkung der Anwendung von bestimmten gefährlichen Stoffen in elektrischen und elektronischen Geräten entspricht. den folgenden Standards und Vorschriften entspricht:
(NL) Wij verklaren onder once volledige verantwoordelijkheid dat dit product voldoet aan de conform Richtlijn 2011/65/EU van het Europees Parlement en de Raad van 8 Juni 2011 betreffende beperking van het gebruik van bepaalde gevaarlijke stoffen in elektrische en elektronische apparatuur en in overeenstem ming is met de volgende standaarden en reguleringen:
(FR) Nous déclarons sous notre seule responsabilité que ce produit est conforme aux standards et directives suivants: est conformé à la Directive 2011/65/EU du Parlement Européen et du Conseil du 8 juin 2011 concernant la limitation d'utilisation de certaines substances dangereuses dans l'emploi électrique et électronique.
(ES) Declaramos bajo esta exclusiva responsabilidad que este producto cumple con las siguientes normas y estandares de configuracion; se enquirytra conforme con la Directiva 2011/65/UE del Parliamento Europeo y del Consejo de 8 de junio de 2011 sobre la restriccion del uso de determinadas sustancias peligrosas en los equipos electricos y electronicos.
(PT) Declaramos por esta total responsabilità-de que este produit está em conformidade e cumple as normas e regulamentoaes que se seguem: está em conformidade com a Directa 2011/65/EU do Parlamento Europeu e com o Conselho de 8 de Junho de 2011 no que respeita a restricoe de utilização de determinadas substancias perigosas existentes em equipamento eletrico e electrónico.
(IT) Dichiariamo,除去la nostra responsabilità, che questo prodotto è conforme alle normative e ai regolamenti segunti: è conforme alla Diretta 2011/65/UE del Parliamento Europeo e del Consiglio dell'8 giugno 2011 sulla limitazione dell'uso di determinate sostane pericolose nelle appearecchietàelettriche ed elutentriche.
(SV) Vi garantierar peget ansvar attenna produkt uppflyer och foljer foljande standarder och bestammelser: uppflyer direktiv 2011/65/EU fran Europeiska parliamentet et EG-radet fran de 8 Juni 2011 om begrundsningen av anvandning av farliga substanzer i elektrisk och elektronisk utrusting.
(FI) Vakuutamme yksinomaan omalla vastuillamme, etta tamu teayttaea seuraavat standardit ja saadset: tayttaa Euroopan parlementin ja neuvoston 8. kesakuta 2011 pāvatyn direktivin 2011/65/EU vaatumukset koskien vaarallisten aineiden kāytön rajolusta sāhko- ja elektronisissa laiteissa.
(NO) Vierklaer unter vart eget ansvar at dette produktet er i samsvar med folgende standarder og regler: er i samsvar med EU-directivet 2011/65/EU fra Europa-parlamentet og Europa-radet, pr. 8 Juni 2011, om begrensning i bruken av visse farlige stoffer i elektrisk og elektronisk utstyr.
(DA) Vi erklaer under egel ansvar, at dette produkt er i overensstammelse med folgende standarder og bestemmelser: er i overensstammelse med direktiv 2011/65/EU fra Europa-Parliamentet et Rådet af 8, juni 2011 om begraesning af anvendelsen af visse farlie stoffer i elektrisk og elektronisk udystr.
(HU) Feelössaggink teljes tudataban kijelentjuk, hogy ez a termek teljes mertékben megfelei az alabbi szabványoknak és elörlasoknak: je v souladu se smérici 2011/65/EU Evropskeho parlamentu a Rady EU ze dne 8. cerva 2011, ktera se týká imezeni pouziti určitych nebezpečnch latek v elektrickych a elektronickych zaizenich.
(CS) Na sāni vistmi zodpovérdnost prohlásujieme, ze je tento vyrobek v souladu s následujíci mī standardy a normami: Ve Šulade s normou 2011/65/EU Europskeho parlementu a Rady z 8. juna 2011 týkajúcej sa obmedzania použivania určtích nebezepečnych látok v elektrikkom a elektronickom vyaveneni.
(SK) Vyhtasujemena naušu vyhradnú zodpovednos', Že tento vyrobok je v zhode a sulade s nasledujucimi normami a predisipimi: Je v sulade s normou 2011/65/EU Europske ho parlementu a Rady z 8. juna 2011 tykajucej sa obmedzenia pouzivania urcitych nebezepečnéch látk o elektrkroom a elektronickom vybaveni.
(SL) S polno odgovomostjo izjavlamo, da je tizdelek v skladu in da odgovarja nasledn-jim standardom terpredispom; je v skladu z direktvo 2011/65/EU Evropsega parla-menta in Sveta z dne 8. junii 2011 o omejevanju uporabe dolocenih nevamih snovi v elektrichi in elektronski opremi.
(PL) Deklarujemy na wlasna odpowiedzialnosc, ze ten produkt spelnia wymogi zawarte w nastepujacych nomach i przypesachat: jest zgodny z Dyrektywa 2001/65/UE Parfa-mentu Europejskiego i Rady z dnia 8 czerwca 2011 r. w sprawie agricanzenia stosowania niedkórych niebezpiecznych substancji w sprezielektrycznym i elektroniczynm.
(LT) Prisiländami visà atsakomybe deklaruojame, kad šis gaminys attinka zemiau paminētus standartus arba nuostatus: attinka 2011 m. birzeilo 8 d. Europos Parliamento ir Tarybos direktyva 2011/65/EB del tam tikru pavojingu medziagu naudojmo elektrós ir elektronînéje jrangoei apribojimo.
(LV) Ir atbilostoa Eiropas Parliamenta un Padomes 2011, gada 8, jüninja Direktivai 2011/65/ES par daçu blstamu vielu izmantoanas ierobezoanu elektriskas un elektroniskas ekartas.
(ET) Agpalvojam ar visu atbilidibu, ka sis produits ir saskapana un atbilst sekojsiem stand-artiem un noilkummi: ir atbilstosa Eiropas Parliamenta un Padomes 2011. gada 8. junja Direktivai 2011/65/ES par da zu bistamu vii izmantoisan ierobezoisanu elektriskas un elektroniskas iekartas.
(RO) Declaram prin aceasta cu raspunderea deplina c produsul acesta este in conformitate cu urmatoarele standarde sau directive: este in conformitate cu Directa 2011/65/UE a Parliamentului Europeani si a Consiliulii din 8 iunie 2011 cu privire la interizcerea utilizari anumitor substanje periculoase la echipamentele electrice si electronece.
(HR) Izjavljumeno pod vlasitom odgovornó su da je strojem ukladan sa slijeedesim standardima ill standardiziranim dokumentima i u skladu as odredbama: uskladeno s Direktivom 2011/65/EU europskog parliamenta i vijeka izdanom 8. lipna 2011. oograničenju koristjenka odredenih opasinih vari u elektrćnjovi elektronickoj opremi.
(SRL)Pod punom odgovomošcu izjavljEU ma de usaglašen sa sledecim standardima li normama: usaglašen sa direktivom 2011/65/EU Evropskog parlamenta i Saveta od 8.juna.2011. godine za restruktciju upotrebe odredenih opasnih materija u elektrčnoj i elektrskoj opremi.
(RU) PIOI CBOO OTBETCTBEHOCB 3a8nBnEM,TO DAHOHe HdEJIne COOTBECTCYeT CNEyIOUHM CTaHApTAM N HOPMAM: COOTBECTCYeT Tpe6OBAHNIM DInpeKTIbB 2011/65/EU EBponeckoro NapnAmEtHa N CoBaTe aT 8 INHOA 2011. no ORpaHNIHNO KcNObTOBAHNOr ONpeDeNHEbX OnaChbX BeueCt B 3JKeTPmYeeKOM NIIeKTPOHNO6OpDyOBAHIM
(UK) Ha cbo Bo nachy Bidy iDnobidnabHicbTcAraBnCmo, uO dahe 6bnadnHnBiaNobiAc HacTyHM CTahdaptam I HopmATNBAM: 3a0doBbHRe BIMOnI DnepKTHBN 2011/65/ CC CbponeCbKoro PnapameHTy Ta PaDi B 8 cepBn 2011 pOK HA oMeKeHHn BkOpCTAHnR DeEeMx HeBe3neHnx peoBHn B eNeKtpnHOMy Ta eNeKtpOHOMy 6bnaHnHI.
(EL) Ankovoue Uteuva On to TpOIO auto Ouaue KAI TpeI tao patau KAVOIAJOUc KAI npOTUa: oauapovetae Jy ToNdy 2011/65/EE To Eupwraikou KAnboAUoi KuTou Bauou Iou Nociovlu 2011 Vv To PEPIOMQ tsxHnOpiaev EIKIVUVouu OuaOe Aekptko Ka NkAETPOVIOEgTAtMQ.
(AR) 1
(TR) Tek sorumlusbu izar alak bu urinun asagidaki standart ve yonergelere uygun olduqun buenan ederiz.
EN 55014-1, EN 55014-2, EN 61000-3-2, EN 61000-3-3, EN 62233 EN 60745-1, EN 60745-2-1, EN 60745-2-2, EN 60335-1, EN 60335-2-29,
2006/42/EC, 2011/65/EU, 2012/19/EU, 2014/35/EU, 2014/30/EU
Zwolle, 01-11-2016
H.G.F Rosberg CEO FERM B.V.
FERM B.V. - Lingenstraat 6 - 8028 PM - Zwolle - The Netherlands

- Cordless Li-Ion Drill 14.4V / 18V CDM1121P / CDM1122P
- SAFETY INSTRUCTIONS
- Additional safety warnings for drills and screw drivers
- Battery tool use and care
- Service
- For the charger Intended use
- Residual risks
- Power cord replacement
- MACHINE INFORMATION
- Intended use
- Vibration level
- Description
- Fig. A
- Lithium-Ion technology
- OPERATING
- Removing the battery from the machine Fig.B
- Inserting the battery into the machine Fig.B
- Checking the battery charging status
- Fig. C
- Charging the battery (with the charger) Fig. D
- LED indicators (6) Fig.D
- Fitting and removing drills or screwdriver bits Fig. E
- Adjusting the gears Fig.F
- Adjusting the direction of rotation Fig. G
- Switching the machine on and off Fig. G
- Adjusting the torque Fig. G
- Work light (13)
- Belt hook (14)
- User tips
- MAINTENANCE
- WARRANTY
- ENVIRONMENT
- Only for EC countries
- Specifications techniques
- Trådløs litium-ion-boremaskin 14,4V / 18V CDM1121P / CDM1122P
- INFORMACE O NARADI
- Urcené pouziti
- Vibraciju limenis
- INFORMATICCU PRIVIRE LA MASINA
- Ppepnolaraemoe ncnb30baHne
- Onncahne
- Pnc.A
- I3MeHHeKpyTaeo MOMeHTa Pnc.G
- OBCJNYXINBAHNE
- TAPAHTN
- OKPYXAI0UCA CPEDA
- ToIbko IJIa cTpaH Ebponeckoro 3KOHOmNueckoro COO6uectBa
- TexvoLoyia 1iou-ovtwv
- AEITOYPTIA
- Apaipocn Tnc matapiaac ano to nxavna Eik. B
- Eioayyn tnC mnatapiaoc oTo mnxavna EIK.B
- YnoB6Eic yia to xpnoTn
- ΣYNTHPHΣH
- ETTYH2H
- IEPIBAMON
- Móvo yia xωpεc EK
- a
- (10)
- 中
- Kablosuz Li-lon drill 14,4V / 18V CDM1121P / CDM1122P
- Calisma Iambasi (13) Sekil A
- DECLARATION OF CONFORMITY CDM1121P / CDM1122P - CORDLESS DRILL
Brand : Ferm
Model : CDM1122P
Category : Electric drill