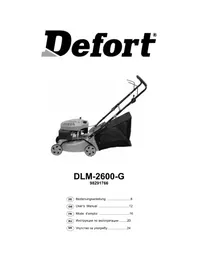
DLM1010N - Lawn mower Defort - Free user manual and instructions
Find the device manual for free DLM1010N Defort in PDF.
User questions about DLM1010N Defort
0 question about this device. Answer the ones you know or ask your own.
Ask a new question about this device
Download the instructions for your Lawn mower in PDF format for free! Find your manual DLM1010N - Defort and take your electronic device back in hand. On this page are published all the documents necessary for the use of your device. DLM1010N by Defort.
USER MANUAL DLM1010N Defort
SAFETY AND OPERATING INSTRUCTIONS
For your own safety and for the safety of others, please read these instructions carefully before using this appliance.

WARNING! Always read the instruction for electrical products carefully before use. It will help you understand your product more eas
ily and avoid unnecessary risks. Keep this instruction manual in a safe place for future use.
CONTENTS:
- Machine data
- Safety instructions
- Assembly
4.Use - Service & maintenance
1. MACHINE DATA
Introduction
The electric lawnmower is designated for lawn mowing, i.e., maintenance of proper appearance of grass plots.
TECHNICAL SPECIFICATIONS
Voltage AC 230 V
Input power 1000 W
Tool class II
Motor rotation speed 3000 r/min
Operating mowing area 320 mm
Mowing height 25/40/55 mm
Grass reservoir capacity 30 dm
Weight
10,5 kg
FEATURES (FIG.1)
- Body with a hanger
- Motor cover
- Rear cover
- Grass reservoir
- Lower parts of the handle
- Upper part of the handle
- Screw for the fastening of handle parts
- Plastic nut
- Main switch
- Cable hanger
- Rear wheel
- Front wheel
The lawnmower is assembled from the body (1) made from high-quality polymeric material as its basis; the foundation of the body is an undercarriage with 4 wheels. The motor safeguarded by a cover (2) is arranged in the upper part of the body. A horizontally rotating knife is fastened on the motor shaft. A reservoir for grass (4) made of two parts, which is also called a bag, is arranged in the rear part of the lawnmower behind the cover (3). The handle of the lawnmower is composed of 3 parts made from steel tube. Two lower side parts (5) are joined with the upper part (6) with a screw (7) and plastic nut (8). The voltage is connected and the lawnmower is started
up with a switch (9) connected to the plug, which are fixed in the upper part of the handle. A hanger (10) and clamps are used to safeguard the cables. The movable part of the lawnmower is composed of rear (11) and front (12) wheels fastened by screw axles.
2. SAFETY INSTRUCTIONS
Explanation of symbols
In this manual and/or on the machine the following symbols are used:

In accordance with essential applicable safety standards of European directives

Class II machine - Double insulation

Risk of damaging material and/or physical injuries

Remove plug from the mains immediately if cable is damaged or cut

Read instruction manual

Keep fl exible cord away from the cutting blades

Blades continue to rotate after switching off machine/do not touch rotating blade!

Outdoor noise
Electricity
- We strongly recommend the use of a Residual Current Device (RCD) of not more than 30mA , at the plug socket when using this appliance.
- All electrical connections e.g. extension cable, must be of an approved waterproof type for outdoor use and marked accordingly. Extension cables must be threecore, one of which is EARTH.
Persons
- Never allow children or people unfamiliar with these instructions to use the appliance. Local regulations may restrict the age of the operator.
- Never mow while people, especially children, or pets are nearby.
- The operator or user is responsible for accidents or hazards occurring to other people or their property. Preparation
While mowing, always wear substantial footwear and long trousers. - Do not operate the appliance when barefoot or wearing open sandals.
-
Thoroughly inspect the area where the appliance is to be used and remove all stones, sticks, wires, bones, and other foreign objects.
-
Before using, always check if the blades, blade bolts and cutter assembly are not worn or damaged. Replace worn or damaged blades and bolts in sets to preserve balance.
- On multi-bladed appliances, take care as rotating one blade can cause other blades to rotate.
Operation
- Mow only in daylight or in good artificial light.
- Avoid operating the appliance in wet grass, where feasible.
- Always be sure of your footing on slopes.
- Walk, never run.
- For wheeled rotary mowers, mow across the face of slopes, never up and down.
Exercise extreme caution when changing direction on slopes. - Do not mow excessively steep slopes.
- Use extreme caution when reversing or pulling the appliance towards you.
- Stop the blade(s) if the appliance has to be tilted for transportation when crossing surfaces other than grass, and when transporting the appliance to and form the area to be mowed.
- Never operate the appliance with defective guards or shields, or without safety devices, for example deflectors and/or grass catchers, in place.
- Switch on the motor according to instructions and with feet well away from the blade(s).
- Do not tilt the appliance when switching on the motor, except if the appliance has to be tilted for starting. In this case, do not tilt it more than absolutely necessary and lift only the part which is away from the operator. Always ensure that both hands are in the operating position before returning the appliance to the ground.
- Do not put hands or feet near or under rotating parts. For rotary mowers, keep clear of the discharge opening at all times.
- Never pick up or carry an appliance while the motor is running.
- Pull the plug from the socket:
whenever you leave the machine; - before clearing a blockage;
- before checking, cleaning or working on the appliance;
- after striking a foreign object. Inspect the appliance for damage and make repairs as necessary;
- if the appliance starts to vibrate abnormally (check immediately).
MAINTENANCE AND STORAGE
- Keep all nuts, bolts, and screws tight to be sure the appliance is in safe working condition.
- Check the grass catcher frequently for wear of deterioration.
- Replace worn of damaged parts for safety.
- For cylinder mowers, be careful during adjustment of the appliance to prevent entrapment of the fingers between moving blades and fixed parts of the appliance.
- For rotary mowers, ensure that only replacement cutting means of the right type are used.
3. ASSEMBLY
We recommend assembling the lawnmower in the enclosed space on an even surface or on a special working table. You will need a cross-tip screwdriver during the assembly. Start the assembly after the identifi cation of all parts (fi g.1)
- Upon removal of the lawnmower from the box, put the lower part of the handle (5) in the apertures of the body. Afterwards, lift the cover and fasten the ends of the handle in the body with selftapping screws from the back side.
- Fasten the cable hanger (10) to the upper part of the handle (6).
- Connect the cable to the lawnmower's handle with two clamps.
- Join the upper part of the handle (6) with lower parts (5) and fasten thereof with a screw (7) and a nut (8), placed into a plastic assembly wrench.
- Screw the wheels (11 and 12) on. All wheels should be fastened on the same height.
- The both parts of the grass reservoir (4) shall be pushed into the apertures until hearing a click.
REPLACING THE CUTTING BLADE
- Switch off and remove the plug from mains before replacing the blade.
- Note that the wings of the knife shall be directed upwards for fastening.
- A fl at or other hexagon spanner of 24 size is used for unscrewing and screwing of the blade.
- Please note that the head of the screw fastening the blade is made from plastic material; accordingly, the force applied onto the screw during the fi xing of the blade shall be 10-16 Nm.
- Replace the cutting knife with the knife of the type specified only.
4. USE
Operation
The essence of operation of the lawnmower is a horizontally cutting knife fastened to the vertical shaft of the motor; the knife, which rotates with a speed of approximately 3000~r / min cuts the grass at the preselected height. Cut grass is thrown into the bag via an aperture in the rear side of the lawnmower under the impact of centrifugal force and the pressure resulting from the rotation of the knife. Proper positioning of the knife is of great signifi cantc for this process.
Switching ON and OFF (fi g.2)
- push the round button with one hand
- draw and hold the switch handle with another hand
- release the round button
- hold the switch handle during the entire period of lawnmower operation
- releasing the switch handle will switch off the lawnmower
User tips
Please remember the most important rule for lawn care - mow grass instead of plants growing therein. The mowing procedure shall be repeated once in two-to-three days with grass growing again fast. Lawnmower
is equipped with a reservoir for the collection of mowed grass, the so-called bag, relieving of the necessity to rake. NB: mowing of humid plants results in a significant decrease in effi ciency of grass collection in the bag.
ATTENTION!
- Do not mow wet grass with the lawnmower!
- Select the desired height of mowing before starting up the appliance. All wheels shall be set on the same level. Wheel axles shall be screwed on properly. A loose wheel may fall under a rotating knife.
- Running over the electric cord on the ground with the operating lawnmower is prohibited. To prevent running over the cord, we recommend hanging it on the shoulder of the lawnmower's operator.
- Push the lawnmower carefully or drag it before yourself whenever operating the appliance.
- Start the motor up after the connection of the extension cord only.
Overfi lling of glass reservoir is not recommended. - Do not mow if the grass bag has not been arranged and the rear cover is lifted, which may RESULT
IN INJURY!
Observe all the above-mentioned requirements carefully. Start mowing from the place closest to the power source (fig. 3).
5. SERVICE & MAINTENANCE

WARNING! Unplug the electric cable (power source) prior to any maintenance or preparatory storage operations.
Cleaning
Grass or soil residues shall be removed with a brush and wooden trowel. Clean the housing regularly with a soft cloth, preferably every time it is used. Remove stubborn dirt with a soft rag moistened in soapy water. Do not use any solvents such as petrol, alcohol, ammonia, etc. as such substances can damage the plastic parts.

ATTENTION! Washing of the lawnmower under a sheet of water is prohibited - the watertightness of the body secures the IP 34 class (ot entirely water-tight)!
Maintenance
Inspect the wear-out of main units periodically. Deterioration in mowing quality, detected after a certain period of time, may signify that the blade of the lawnmower has got blunt.
The following regulations shall be observed for the sharpening of blade:
- the blade shall be cooled constantly during sharpening to prevent inadmissible overheating
- the blade shall be sharpened evenly on all sides to prevent vibration of the blade during operation
- if you note any cracks or slits, the blade shall be replaced with a new one (as well as in the case where the area of the blade decreases by over 5 millimeters during sharpening)
Lubrication
The appliance does not need any extra lubrication.
STORAGE AND TRANSPORTATION
Keep the lawnmower in well-ventilated dry premises with temperature not going below +5^ .
We recommend unscrewing of wheels during transportation, which will prevent the lawnmower from moving freely. When transporting the lawnmower on longer distances or when forwarding thereof, dismantling and placing of lawnmower into the manufacturer's packing (box) is advised.
TROUBLESHOOTING
Failure Cause/solution
Failure
The machine fails to operate
Cause/solution
Machine is not switched on correctly /see chapter 4. USE Extension cable damaged/ inspect cable, replace if damaged
Machinefunctions intermittently
Extension cable damaged/ inspect cable, replace if damaged. Machines internal wiring damaged /contact service centre
Mowing result is irregular/rough
Check mowing-height (wheels)/see Chapter 3. ASSEMBLY Cutting blade is blunt/Inspect blade, sharpen or replace the blade
Machine vibrates excessively
Some grass does not enter into grass reservoir (lies on lawn after mowing)
Rotating blade is out of balance/check blade on damages. Grass reservoir is full/empty the reservoir before continue. The fan (see spare parts list; nr.6) is damaged/ replace the fan".Grass is not dry enough/continue mowing when grass is dry
Faults
If a fault arises through wear in an element, please contact the service address shown on the warranty card. A drawing of the spare parts that may be obtained is included at the end of these operating instructions.
ENVIRONMENT
To prevent damage during transport, the appliance is delivered in a solid packaging which consists largely of reusable material. Therefore please make use of options for recycling the packaging.
WARRANTY
Read the terms of warranty on the separate warranty card which is enclosed. Please contact the service address if you have any questions regarding accessories and/or batteries.

Français
TONDEUSEÀ GAZON ÉLECTRIQUE
CONSIGNES DE SECURITE ET MODE D'EMPLOI
FÖRVARING OCH TRANSPORT
5. SERVICE OG VEDLIKEHOLD

TAIENDAVAD OHUTUSJUHISED
BbICota cKaUNBaHnpeYnpyETcN3MeHeHEm BblCOTbI KONEc.
Дя BCex Konec cneIyET yCTaHOBnTb OndHy n Ty Jxe BblCOTy CkaunBaHn.
Pykorrk
BCTaBBTe HnKHOIO CeKUNIO pyKoTKn (5) B na3bI, npedycMOtpeHHbIe B Kopnyce ra3OHokOcNlKn. 3aKpennte ee npi NOMOu BNxOJaux B KOMPNeKT KpeNexHbIX 3JIEMeHTOB.
3aKpeHnTe depKaTeIb Ka6eIa (10)HaBepXHeN cekuyn pykoTkn.
Pn nmoBnBHTOBnraek(7n8)coeHnTe BepxHIO HnKHHIO CEkUN pyKoTKn.
При помоши BXODЯиx B KOMПлeКТ BИНТВ 3akpeni-Te KOMБинацию "BUNIka-BbIKNIOuHaTeJIb" (9) Na БерхнeIceKUHpyKOrtKN.
PpKpeHnTe shyprntaHn, npJIOKeHHbI OT KOM6nHaun "BUNKa-BblKJIHOuATeN" K DBNrAteJIIO, pN NOMOu BxOJaXx B KOMnKeT 3aKIMOB KpyKoRtKe.
Kop3nHa dIa c6opa TpaBbl
OTkpOte 3aHIOU KpbIuKy (3) n3akpeNITE Kop3nHy dIy c6opa TpaBbI Ha DByx KpHOKax Ha 3aDHei NaHei KOpnyCa KocINKn.
YCTAHOBKa H3ameHa HOXa
BHHMaHHe! Y6eIITecb, yTO n3JeIne OTKJIIOyeHO OT CETNIITAHnI
YctaHOBHTe KIOH Ha raIKy, KOtopa QIKCnpyET HOK, NOTBePHNTe ee, BpaUaI KIOH pOToHB YacOB OCTpeJIKN.
CHIMTE HOX.
YcTaHOBnTe HObI HoX I HaJeXHo 3aBePnTe raKy, BpaJaa ee KNoHOM No YacBOi CTpeNke.
BHMaHHe! Nocne yCTaHOBKn HOxa Heo6xOdNMO BKNIOHTb Ra3OHOKOCNIky Ha 3 MNHyTb Ha XOIOCTOM XOy DnI npOBepKn ypOBHr BN6paCm, 3aTeM BbIKIOHTbe ee n eEe pa3 npOBepNTb HAdexKHOCTb KpENNEHn HOxa.
BkIIOyeHne
Peped Hauanom pa60bI, OTKIOUHIB ra3OHOKOcNky OT cTe NITaHnI, npOBepbTe 3aTOChy HOKa nHaDeXHOCTb ero KpenJIeHnI. Pp HEO6xOIMocTn 3aMeHnTe 3aTyINBwInsCn nnIOBpeKdEHHbHKnK.
Peped BKIOHHeM BO n36eKaHne CnyaHoro OTKIOUeHNBAJKN yDINHITEnoOT po3ETKn CdeNaIte NtTIOn3 shypa yDINHITEna n 3akpenTe ee B depKaTeNe dna Ka6eJa (pnc.4).
Y6eIITecb TOM, yTO uHyp yDInHHTenHaXoIITcB BHe DOcraEMOCTn HOKA ra3OHOKOcNIKN.
Дпгпретьрашени счayногВКПИОЕня ra3OHOKOKNK KOMBиHAЯ "BUNka-BbIKHQUaTeNb" OCHaUeHa KHONKO 3auntbI OT cNuyaHOROBKIIIOUeHnR (pnc.2).ДпгБКПIOUeHnR Ra3OHOKOCINKn, ydePknBaar 3Ty KONky B HAKATOM NIOXKeHn, HaDaBnte Ha pbuHaBbIKHQUaTeJI. 3aTeM KONky 3aunTbI OT cNvyaHOROBKIIIOUeHnMoKHO OTnyCTNTb (OHa OCTaHETcR 3aФNKcnpoBAHHo).
HaunhaTb pa60ty cneDyET uee3 5 cekyHn nocne BkIIOUeHn, KOrda DBrTaTeNb ra3OHOKOCNIKN Ha6epet MaKcMaJIbHbIe OobOpTobl.
Дявьклоченга30HOKOKNIOCTaTOHOrOTnyCTNbpbYar BblKNoyateTЯ.KhONka 3aUNTbIOTcnyaHnHO BKNochEHNBepHETcB INCXoDHOe NINOKeHneABTOMATuYeCKN.
Ipeed perynpOBKOn nnn peMOHTOM ra3OHOKOcnIKn DOXdNTecb OCTaHOBKn HOka.
CkaunBaHne TpaBbl
YCTAHOBNTE BbICOTy CkAsINBaHnB 3aBNCIMOCtN OT BbICOTb TpaBbl. Pn Heo6XoDMocTn CdeNaIte HeCKONbKO npoxOoB NO yactky, TaK, YTO6bl 3a KaKdbIn npoxoD cKauINBaTb He 60nee 4 CM BbICOTb TpaBbl.
IIO Mepe 3anOJIHeHnO npOxHry Te KOp3nHy dIa c6o- pa TpaBbl.
TEXHNUECKOE OBCNJXKBAHNE

IpeedTexHueckmO6cJyKbAHnEMOTKIOUaHTe ra3OHOKOKNy OT cTN NtAHHN.
KaKbI pa3 no OKOHaHn pa6ToI Heo6xOJIMo OuH TaB KOpNc r30HOKOcNIK NTocTaTKOB TpaBb, nbIN Ipr3n pni NOMOUI MfKOJ UETKN INIy6Kn, CJIeRka CMOueHHo B MOUcEM cpeCTBE.3TO 3NaHTeBHNO npDneBaet cPOK cnYk6bl n3dEINIA. Ppi YnCTke n3- DeINr He npImeHnTe pactBopNTeIN nrpeccNBhie BeueCTBa.
Kopnyc ra30HOKOcnIKN He 3aUuIaET NnHOCTbIO DeTaN ee MexAHN3Ma OT nONaDAnH BnAri, No3Tomy HeJIb3Mblr Ra30HOKOcnIKy CnCnOBaHEm BOdBi Hn HApabNtB Ha Hee BoDraHyo CTpyIO.
CneDnte 3a TEM, yTO6bl BEHTUNLAIOHbIe OTBepCTnHa KOpNcy DEBIRATEn He 6bln 3abNTbI TpaBOI.
Iocne KaKDo3 KcKnpyataun OOnuAaTe HOK OT rpa3n I OCTaTKOB TpaBbl, Cma3bBAaTe eO MaUnHHbIM Mac- nom. Ppi Heo6xOmoCTn 3ameHnTe nN 3aTuBaTe HOK.
B Cnyuae HnncpabHocTn o6paTntecb B Cnyk6y cepBvca SBM Group.
XpaHnte raoHOKOCNIky B CYXOM, YNCTOM MECTe, BHe DOcraEMOCTn DeTei.
He BnKOpNCTOByIte Bnpi6 nI npDi6HOBaHHra TpaBn.
TEXHIHYXAPAKTEPNUCTIKN
IPABNJIA TEXHIKN B3NEKN
106 3anobirn 3aropHHIO, ypaKeHHIO eNEKtpuHMM CTpyMOM i TpaBMyBaHHIO, ra3OHOKocapky cIid ekCnnyaTyBaTN BiNObiHNO DO BNMOR daHOIHCTpyKUII.
- Picnno kynknybaxho BnBnuTe Bnpi6 i npHcnn noro po60tn.
- DnHyBnpo6y Mae noDbHny izonayio, ane noDbHnHa izonayiz He nouHpiOeTbcra Ha Becb Bnpi6. Tomy nepeD noaTKom pObotn Heo5xIDHO HAdrTn rymoB iO60tN npOrymoBaHi pykabNKn.
- YHnKaIe NTpanJIaHHB BnpOby BDOy: KaJIoxKi, KaHaBn TOIO. Bn MoKTe OTpIMaTyn ypaKeHH eJekTpHuHm CTPymOM.
3a6opohraTbca npauoBATN B Tymahi, nid yac douy a6o npn iDnueHIN BONOROCTI.
- Henpinyctma po60ta nicra BknaBHH aikoronio abo npinomy liKIB, 10 npInytnIb yBary abo, 10 cnoBilbHIOITb peakuio, a TAKOX iD cac XbOpobn, y CTahi BTOMn a6o CTEcy.
Cpi npaioBAtn TInbKn BDeHb, npn do6pOmy ocbit- neHHi.
- Npeep noaKom pobotn nepebipte obnactb, 10 niIyrae cKouyBaHHIO Ha npedmet BiCyTHOCTi kameHib, dpoTy, Ttoo, npedmeti, kki MOxyb npni3Bectn Do 3aknnHOBAHNO6eptaHoro HOka Ta, B HacnIDOK bOro, -Dn pepeBaHTaKeHHa DnryHa.
- PpebcjduHbC, 10 BcI cactnH Bnpo hyaHIO 3aKpinnHei nepe6yBaHObB pOboHOMy CTahi.
- Ppei po6toI peKOMeHdyetybca UOpa3y npoBOnTn HeBeNkU DiarHOCTNk npaue3daTHocTi Bnpo6y B TaKn cnoci6:
BbIMKHTb Bnpi6 Ha xOIOCTOMy XoNy Ha OdHy XBUNH;
- PnBnBnHnHe3BnuaHnxUymiHaHmipHOI B6paui 3eptaTecBa Cepbichy cnxykby.
- PpaioHe B npinacobahomy OJ3i. HAprrHtB 3axncHi OkyIprn HabyuHNKn.
BbIMKHTb DnRyH 3riDHO 3 iHCTpyKjieIO. HOr npu cbo My MaHtB Nepe6yBaTH Na DoCTaTHi BId CTaHI BiD HOXa.
He TopkaTecpykamnOeepTOBOro HOKa n y KjODHO My pasi He HamaraTecra 3ynHHTn Ioro pykami!
B npoceci pobotn ndtb 3a Bnpobom, HadiHNO yTpmyuoh noo oboma pykam.
- PepecyBaIte r30HOKocApky nobIbHO npBHomipHO. PaIHHa YnCnA o6eTIB o6eToboro HOxA, BnKIMKaHe 1BnDkIM nepeCyBaHHaM BBIMKHeHOro BnOby y BnCOki i rcti TpaBi, BeDe do nepeBaHTaxeHHraEKeTpOdbnryHa.
BukopncToByte raoHokocapky TInbKn dIra ropu3oHTaIbHorO CKouyBaHHr TpaBN.
CTeKTe 3a cnpaBnHcTIO uNCTOTO KO6eHIO XMBnEH H, yHnKaIte NOro KONTAKTy 3 pyXOMMn By3JAMn BnPo6y.
- EneKtpoNODOxyBaH Ma6 ByTN BnnpocTahm TAKIM YHOM, 06 He CTBOPOBATn nepeuKOJ dNRA BAUoro nepeCyBaHH NCKOuYBaHH TpaBN.
BnKOpncToByTe TIlbKn BOIHorO3axHueHi NIOOBKyBa- cy, npn3HaueHi dnn BnKOpncTahHn IpocTo He6a.
3aIbBaIoB63neKn peKOMeHcycMo BCTaHOBTn npncpti 3axnchoro BiKlIOHeHH (P3B), 10 Cnpa- cyBv y BnnaKy iKOBnx KOnBaHb BeJIuHHn CnIN CTpyMy B Mepeki 6Inbue 30 mA.
Hikon He nepecyBaTe MaunHy 3a Ka6enb i He cmKaIte 3a HbOrO, UoB BiKlHouHTn BiD MepeKeBOi po3-etKN.
- Bynte nIbHi MaKcMaJIbHO 3OcepeJKeH I npoe ci po60Tu.
CTeXTe 3a pIBHObaroIO. He cnnpaNTecra Ha Bnpi6!
- Bydte Ooc6nbo yBaXhni, nД yap cpo3BepTaHnA 60 nepeCyBaHHN BnO6y Do ce6e.
- RaKo MaunHy Heo6xHn NepeMictu Do IHouoi DiJnHK poBt a6o HaxNJNT npn nepetHaHHi He noKpHTOI TpaBOO DInHKn, DoueKaItecra NobHOI 3yINHK HOka.
He HaxnIyTe MaunHy npB BBIMKHeHHI DnryHa, 3a BnHrKom BnnaKy, KOJI CE notpiHo DNRA IHO 3anyCky. Y TakOMy BnnaKy He HaxnIyTe MaunHy CnblHiWe Heo6xIDHO N iDhImaTe TINbKN Ty II YaactHy,
BidanaheBaBac.PnnoBepHHiMaunHny BixiHe noIOXeHHa MiHO TpMaIte pyKoRTky Oboma pykam.
HikonHe niiHimaTe He nepehocitb Bnpi6 i npaLIOOHIM DBNYHOM.
BiiKnIouaHte BuNky BiMpeXeBoi po3eTKI:
LOpa3y, KOIN 3aJIiuaeMaIInHy 6e3 Harny;
- nepeD yCyHeHHaM nepeUkoDi;
- nepei nepeBipkoH, uHnueHHa6o TexO6cnyroByBaHnHM MaunHn;
nicra 3itKHeHH 3i CTopoHHim npeMetom. 3po6iB orIyMaHnHa npeMet ykoJKeHb i, npn Heo6XiHOcti, BiDpemOHTuYte;
3 NOBBOH HeOpMaJIbHOI OyMy aO bIbpauii.
- Picna 3akihueHHpaobotn cniH eraiHOBiKJIIOHTN Bnpi6 BiEneKTpomepeki.
He do3BOJnTe dITaM Do 16 pOKIB npauOBAuN 3 Bnpo6oM.
He Do3B0JnTe CToPOHHIM OcO6aM EKcnIyAtyBaTneEJeKTpUHr Ra3OHOKocapKy.
- Ppi BnHnKHeHHi HeCnpaBHOCTi 3BepTaItecA Do CepBicHOI cIyK6N.
EKCINJYATAU(MAJI.1)
Ybara! Npei CKnadaHm, peryIOBAHHa 60 peMOH TOM ra3OHOKOCAPKn BiKIOHauTe II BiM MEPEX KINBNEHNA. Ppi pOboti 3 HOxEM HaIraTae Dyke Cynk pyKaBnKn.
YctaHOBka Konic i HanaHTyBAHH BNCOTN CNOUByBAHH BCTaTBe 4 KOleca B OTBOpN B HnKHi YactHIn KOpnyCa.
Bncota ckouybaHH perynIOeTbC3MIHO BnCOTN KOIC. IIN BCIX KOJic cnID yCTaHOBHTN OHaKOBy BnCOTy CkOuYBaHH.
PyKoTka
BCTABTE HIXHIO CekiuO pyKoRTKn (5) B nAsn, nepeD6aYeHi B Koprnyci raoHOKocapKn. 3akpiitb ii 3a Donomoroo eJeMeHTIB KpINHeHHy, IIO BXOJaTb y KOMJIeKT.
3aKpinitb TpImauch Ka6eHIO (10) Ha Bepxhi Cekui pykoTKN.
3a DOnOMOrOIO TBnHTiB i raiok (7 i 8) 3'edhaeTe BepxHIO Ta HNKHIO cekui pyKoTKn.
3a DonOMOrOIO TBnHTiB, IIO BXoJrTb y KOMnJIeKt, 3akpiNITb KOMbiHauiio "BUNIka-BUMMkau" (9) Ha BepxHi CEkuii pyKOrtKn.
PnKpinitb shypr KNBneHH, npoknaedHm BID KOM6iHa- 11 "BUNka-BMNKAu" DO dBNHyA, 3a DOnOMoRO 3aTnCKIB do pyKoRTKn, 10 BxOJrTb y KOMJINeKT.
KoWNk dny 360py TpaBn
BiDkPnIte 3aHnIO KpnUky (3) i3akpinitb KoWnk dny 360py TpaBn Ha DBOX rakax Ha 3aHni naHeJI Kopnyca Kocapkn.
YctaHObKa u 3amHa HOka
Ybara!PepecbiDitbcra,IOBpi6BiKJIOueHnBIIdMepeksiKMBHeHHI
BctaHObITb KIOHcHa raIky, Ika φikcy HIX, i BIDepeHITb II, oBeptaOHcKIOH npOn rOINHHKOBOI CTpIKN.
3HIMItb HIX.
BctaHObIb HOBIH HIXI HADiINHO 3aKpyITb raIKy, o6eptaIOH II KIIIOcEM 3a IOINHHIOBOO CTPIKOO.
YbaralicnyaTOHBOHNOHOe6xIDHO BBIMKHTn ra3oHOKocapky Ha 3 XBUNHN Ha XOIOCTOMy XOdy nnepeBipKn pIBH BApaQII,notIM BIMKHTN II N ue pa3 nepeBipTN HaidHicTB KpInnEHn HOKa.
BbIMKHeHH
Ipeep Noatkom po60tn nepeBipte 3aToeHHHOxakn HAdHnicb Noro KpInHeHH nicna BiKIOHeHHra3oHOKocapKn BId MepeKxKINBeHH. Ppi Heo6xIDHocTi 3amHITb HIX, kN 6yB NoXKOKeHH a60 3aTyJNeHH. 3po6tB netIO 3i WHPa NOOBKyBaA u3aPIniTb II HA TpMaHi DnKa6eJIIO nepeB BBIMKHeHHM, Uo6 yHNKHTu BNnADKOBOrO BiKIOueHH BnKN NODOBKyBaA Bid po3ETKn (Ma1.4).
IpeecbiitbcB Tomy, 0o uHyp noobkybau na nepe6ybae n03a DocxKHiCTHOHXa ra3ohOKocapKn. Inla 3a-nobirahn BnnaikOBoro BBIMKHeHHra3ohOKocapKn KOM-6iHaucia "BnIka-BmMkaay OChaueHa KHONKO 3axNCTy BiBnnaikOBoro BBIMKHeHHra3ohOKocapKn HaTNCHTb Ha BaXJIb BmMkKaa, yTPMMyOHN LIOKHYoHb HATNCHYOM NOIOKeHHI. Iotim KhoNkY 3axNCTy BiD BnnaikOBoro BBIMKHeHHMOXHa BiDnyCTTN (BOHa 3aIIuNTbcS 3aΦIKCOBAHO).
NoHHaTnpo60TyBapTouepe35cekyHnicJbBIMKHeH H, KOIN DBNHyra3OHOKocapKn Ha6epe MaKcImaJIbHi o6epTN.ДЯ BIMNKaHHra3OHOKocapKn DOCTaTHbO BiI NyCTHTN BaxjIB BIMNKaHa. KONKa 3axNCTy BiD BNJaKOBORo BBIMKHeHH NOBepHeTbcr y BxIDhe NoIOKeHHA ABTomATNUHO.
Ipeed HanaaHTyBaHHa m a6o peMOHToM ra30HOKocapKn doKeKaTecra 3yINHKn HOka.
CkOuSyBaHHr TpaBn
HanaTuYIe BnCOTy CKoUyBaHHB BiNObiDHO Do BnCOTn TpaBN. Pn Heo6xIDHOCTI 3pObit KInbKa npoxoIB NO diJrAHI, TAK Uo6 3a KoxHn npoxiD CkOuYBaTHn He 6iNbwe 4 CM BnCOTn TpaBN. Pn 3anOBHeHHI CnpOxHnTe KOWK DnI 36npaHH TpaBN.
TEXHUIHE OBCJLYTOBYBAHHY

IpeepTexHcHMMO6CnYROByBaHHM BiKTHQaHTe ra30HOKOCAPKy BiMepeXi XINBHeHHA.
LOpa3y nicI 3akIHHeHH pO60tn Heo6xIHO ONUuATn KOpNc rA3OHOKOCapKn BiD 3aNIuKIB TpaBn, Nnny 6pydy 3a DOnOMorIO M'koI uTkn a60 ry6kn, 3nerKa 3MoHeHoi B MInOChy 3ac0bi. Lc 3NaHNO nQOBKyc TepMIn EKcnNyataaII Bnpo6y. PpN UneHHi Bnpo6y He 3actocobyTe po3HHNKn arpeCnBHI peOvHNHn.
Kopnyc ra3oHOKocapKn He 3axuae NOBHCIO detani ii Mexahi3My BiNOTpanJIaHHBOIOn, TOMy HE MOKHa MHTn ra3oHOKocapKy 3 BKNOPNCaHHM BOIN a60 HAnpaBnTn Ha Hei BOJAHN CTpyMIh.
CTeXTe 3a Tm, 0o5 BeHTnIauiHi OTbOpn Ha Kopnyci DnIryHa He 6yIn 3a6nti TpaBOIO. Picna KoxHoi ekCnIy-atauO uNauTe HIX BID 6pydy N aunukiv TpaBN, 3MaUyIte NOr O MaUNHHM MaTcNlOM. Pp HEO6xIdHocTi 3amHIOte a6o3aTouyTe HIX.
Y BnpaKy HecnpaBHOcti 3BepTaItecB Cepbichy cIyK-6y SBM Group.
36epiraIte ra3oHOKocapky B cyxomy, uictomy micu, no- 3a doCkHicTIO dTei.
3AXNCT HABKOJIINHbOFO CEPEIOBUNA
Буднackа,Здаваite HeNoTpi6Hn Bam 6Ibwe InCTpyMeHT,прпадя ta/a60 ynaKOBky B haN6nKyy oprahi3a-цIO, zuo 3aJMaAcBcЯpepe6koB bTOpHHOi CINPOBHN.

Polski
INSTRUKCJE OBSLUGI I BEZPIECZENSTWA ELEKTRYCZNA KOSIARKA DO TRAWY
TEXNIKEZ IPOADIAIPAΦE
Tao peuatoac AC 230 V
1000
Klaon epyaaleiou II
Taxutnta kivntnpa 3000 . .
περιοχή κοτης 320
Yyoc kOtnc 25/40/55 XwpntikOtnTa aKou 30
περιούλουγής χόρτου
Bápoç 10,5 kg
NHAHPOΦOPIE Σ NPOIONTO (EIK.1)
EvpyoTioiOn (ON) kai aTevpyoTioiOn (OFF) (EIK.2)
Tnpntoucakolououc kavovcs yia to tpoxia nS AETIDAc:
n λεπίδα θα πρέπεινα υύχεται συνεχώς κατά το τρόχισμα, για την αἰτομυήτις ὄπερθέρμανός τής
n aeTia 0a TpEe i va TPOXcTeai Ooiooppa o6oAES TIC TIAeupes, yia TIV aTIOOuy nC doVnnc TNS Aetia kata nAeroupyia
av npnpoe Pwyc n oxiouc, n eia 0a th pntv avtikataoatahe ie vea. (H eia o a p tne i ng va avtikataoatae ie nepinnwn Tou ape kata nepioootepa ato 5 xioota).
Aimavon
To mnxavna dev xpeiaZeai npoOeTn Aitavon.
AToBnKeuON Kai eTApopα
AToBnkeuTe To XoOkOTNIKOe Evav Enpo, KaA aepiOevo Xwpo, OTOV OTIO n 8epuokpaa 8ev TEPKtI KAtw aTTOUc +5^
ouβoueouue va eEbiδwOeTe Touc tpoouc kata n μεταφopa. EToI, to xlookottikó δev θa μTnpéi va kiveitai eEvθepa. KaTn μεtαφopα tou xlookottikou o e μeyalutepeç aTOoTaaceis, oac ouviotouμe va aTOuvaupoaynoεTe TO xlookottikó kai va to TOTθetnt- oete OTNV apxikn Tou OoKEuaσia (KOUTI).
Eiuaon npoBAnuatw
a1j1 C000000000000000000000000000000000000000
215 ≤ 2701 ≤ 21501
A
a
1
.
J 1
m30 1
yj12y|eys
i
Jalll jall jolldy
-
-
-
-
-
-
-
-
- 10.
-
-
-
-
-
-
-
a ≤ b
.
yjg 1
Jisll Jy 1
Aisall 1i j 1j
1
1
:
A
山
A
13, y 1
1
1
AEE
a
( 1,2,3,4)
J 1
:
a
KAPAKTEPNCTNIKE (CJNKA 1)
- Teno ca HacTaBcIma
2.ПokнonaMuMToPa - 3aIbI noknonau
- Tpaba je3epo
- HnKn denobn npu
- Topnbn Deo dpwke
- Je6eU 3a npuBpuHnBaHbe pykyjete DeNoBnMa
8.Пл actuH opax
9.Главни пекидау - Ka6JIOBcKn BeaJIInca
- 3aɪn'toʊk
- PpeiBn Tocak
Kocinuca je cactabbeH oD TeNa (1) HapabBeHa je Oo BnCOKOKBaJIHTeThe NOINMEPHIX MaTePjana Kao OCHOBy,TeMeB TeNa jecTajHn Tpan ca 4 ToKa. Motop 3aUTHHeH NOKONiEEM (2) OpraHn3yje CE y rOpHeM DeNy TeNa. XOpN3OHTaIIHO potpajHyH HOK je npuBpuHEn Ha BpaTNILO MOTOPa. Pe3epBoAp 3a Tpaby (4)
HapabJbeH Od Dba Dea, KoJi ce jow Ha3nBa n Top5y, ypehen y 3aIbem DeJy KocnInuie n3a NOKnonua (3). Dpka KocnInuie ce cactojn od 3 deJa HappaBbeHx od Yenika. Dba DoHa cTpaHa Denobn (5) ce npndpyXno y ropbem DeJy (6) ca 3aBPThbem (7) nPiactnke opax (8). Hanoh je noBe3aH IKocnInuia je noeJa ca npeknauem (9) nob3aHa yTuHnUy, Koja ce fKcnpa y ropbem Deny dpwke. BewaAnuca (10) n ctere ce Kopncte 3aawtnty Ka6noba. PokpeTHn Deo KocnInuie cactojn ce od no3aIn (11) n npedhe (12) feHne npuBpuheHa 3aBPThbem OCOBHe.
2.CNΓPYHOCHA YIYTCTBA
ObjaHbeHe cmm60na
YOBOM ynyTCTBy n/nn Ha MaunHc ce cneheHn Cm-60n:

YcknaCyBaKeHmOCHOBnCMrpyHOCHM CTaHapnMaEBpONCKnxDnpeKTNBa

Klaca II Maunha -Двoctpka nOlaunja

Pn3nk OJ OwTeheBa MaTepejana n/nn Fn3nKnx NOBpeDa

I3BaIte yTnKaU n3 yTuHnue Odmax aKo je Ka-6n oWTeu nn npceee

IpounTajte ynyTCTBO 3a pykoBahe

JxNTE CaBnTbNBOCT daJIbe oD CeYBa

HOXeBn HacTaBnTn Da potnpatne Nocne NCKbYuBaHaMaunHe/He Dnpaj poTaUNOHIM HOXeM!

OTbOpEnb6yka
EneKtpnTeT
- Ppenopyjemyo Kopniuhebe ypehaj dupepehujanHe ctpye (PLI) 3a He Bnwe od 30 mA, Ha yTuHnUy KaJa KOpNCTnte Obaj ypehaj.
CBe eNektpnue He3e Hnp. npOdyKhor Ka6na, MOpajy 6ntu Odo6peHOr Tnna BOODTnOPHR 3a CnoJbHy yNoTpe6y u 6oEnExeHa y cKnady ca Tm. PpOdyKHN Ka6IOBn Mopajy 6ntu TxpeeUope, oKojnx je 3emba.
Lnca
He O3BONITE Deu Hn Jbydma KoJn Hcy yno3HaTn caOBIM ynyTcBnMa 3a ynoTpe6y anapata. IokanH nponnc Mory da OrpAnue CTapoc TonepaTe.
- HnkaHa He Koctnn DoK cy Ibyu, nOce6Ho Deua, n ly6mU cy y 6nn3Hn.
-OnepaTOP nIN KOpNCnK je OndroBopAH 3a He3roJe nIN onaChOCTnMa DeIwabajy DpyTm IByDIma INN HbXOBoJ mOBuHn. npnpema
-ДOKКоше,увек"HOCHTeObyHy3HauajAHnDyre naH TaIone.
- Hemojte da Kopuncte ypehaj kaI 6ocn uHocnte OTBopehe caHaJe.
-Добр npobepnte nOpyue je rdeanapat Tpe6a da ce KOpCTn u yKIOHHTe CBe KaMeHbe, MOTke, XNuce, KOCTnjuY n Dpynx CtpaHx TeJa.
-Ппулnotpe6e,увЕкпровпгда Ли Кс HOжEBN,3a-BPThи И сечнВOM HOЖа CКУПЛТИНЕ HMCY IСТpoшениIIN OwTeHEn.ЗаменITE NCTpoшЕ He INI OwTeHHeOwTPnUEи Вижу CETOBIMa 3a OчУBaJIbe paBHTeKe.
- Ha Bnue XnaIHor ypehaja, 6pHne KaKo potnpajyhe ceuBO MoKe Da n3a3OBe jeDaH DpyrN HOKeBn da ce potnpa.
ONEPAUNJA
- BO3HTN cAmO Ha DHeBHOJ CBETIOCTN INN y Do6pOM BeuTaUcKOM CBETny.
- N36erabajte pad anapata y BnaXhoj TpaBn, Ie je To n3BOdIbNO.
- YBek 6yDnte cnrypHn y cBoje TemeJe Ha naDnHaMa.
XoJaTe, HkaJa He paAn. - 3a TpaKTop potaNoHE KocauHc, rPIMaca npeKO JIua naHa, HkKaD rope n done.
- Bydnte n3y3ETHO naKbNBn npuNkOM npomeHe npaBaHa naDnHaMa.
- He kocHTn npetepaHo cTpMe naDHe.
- Bydnte n3y3eTHO ONpe3Hn KaJa yHa3aJ nn Byepehaj npema Bam.
- Cton5nade (a) Ako je ypehaj Mopa da 6yde HarHyT 3a npBeBO3 npNJIKOM npEnacka NOBpUHHe OCIM TpaBe, a npNJIKOM TpaHCnOpTa anapat n fOpMnpajy obNaCT Koja he 6ntu nokOweHa.
- HnkaJa He KopnCTnTe npOn3BOD ca HeNoCTaTkom CTpaxkapa nnIu WITNTOBIMa, nnIe 6e3 CnryphOCHnx ypehaja,Ha npimep DeOpKeTope n/nnIu TpaBe XbaTaN, y MeCTy.
- YKbYuHrTe MOTOp yCKJaNy ca yNyTCTBnMa n Horama daJIeKO OJ HOKa (a).
- He harhnte ypehaj kana ce npela3n Ha MOTopy, OcHm aKOanapat Mopa da 6ynde HArHyT 3a NOKpTaHe. YOBOM cIyaujy, He harhnte ra BNIwe Hero wTo je noTpe6HO nOoHHTe camo deo KoJn je daneko od pyKOBaoua. YBeK CE yBepNTe da cy o6e pyKe y paHOM noLOXkayj Ppe nobpaTKa anapat Ha 3emBy.
- He ctabbajte pyke nnn Hore 6n3y nn nncno potnpajyihnx denoBa. 3a potaunoe kocauue, dpxni no-daJIbe od n3na3HOr OTBOPa y CBAKOM TpeHyTKy.
- HmkaJa He nokynn nn da Hocn ypehaj doKMOTop pa-dn.
I3ByuTe yTuKaU u3 yTuHnUe:
KaIroOCTaBHTMaunHy; - npe yuushenba 6nokady;
- npe npoBepe, uuheha nn paae Ha anapaty;
- HAKOH yɪdapa CTpɑH O TENO. PɒpOBepɪte anapat 3a wTe-Ty nɒnpaBke no notpe6n;
- AkoanapaT noUHe a6HopMaHNo da Bn6pnpa (npoBe-pntu Odmax).
OДРЖАВИМΑГАЦИНМА
5. CEPBNC N ODPKABAH

YNO3OPEHbE! NckbyuHTe eJeKtpnHn Ka6n (n3Bop) npe 6nIO KAKBOr oDpXkaba Hn npinnpeMHnx CKnaDNHTeHa po6e.
nshene
Tpaba HIN 3embHnTE ocTau nhe 6HTy kNObeH ca YeTKOM IN DpBeHOM uNaxTIOM. OuNCTnTe kyHnTe peDOBHO MEKOM KPNOM, NO MORYHCTBY CBAKI Nyt KaJa CE KOpNTN. YKIOHnTE yNOPHY npBaBHTHy MEKOM KPNOM HABJAXEHOM y canyHnU. HeMoJTe KOpNCTnTn pactBaPapae KAO wTO cy 6eH3nH, ANKOxOJI, AMOHJaK NTd Kao TAKBE CYNCTAHCe Mory OWTeNTn PJIaCTnHe DeNoBe.

PAXHB! Ppahe Kocnue neo nict Boe je 3a6paheho -BoOnenponycnoct Tena obe3-6ehyje IP 34 Knaca camo (Hije y notnyoctn
BOOOITNOPHa)! OndxKabahe
PpOBepnte NOBpeMeHO ce TPOwe OD rnaBHnx jeDHHnua. NoropwahBe KBaNTeTa KOWeHe, OTKPNBEHa HakoOH OndpeHcHOr BPEMeHCKor nepNoDa, MoKe 3HaHTN da je je3uak Ha Kocunue He mA tyn.
Cnehe nponnc ce ncyHn 3aoWtpebe ceyBa:
- CeuBO CE KOHCTaHTHO Xnadi TKOM OwTpEba Da cnpeyu Heo3BOJbeHO nperpeBaHe
- CeuHBO ce paBHomepHo n3oUtpeHa Ha CBMcTpaHaMa kako 6n ce cnpeuIIO Bn6paunje HOka npnnKOM pada
Ako npimte 6nno KaKBe nyKOTHe nnpope3a,ceHBO he 6nTn 3ameHbEH HOBm (kao ny cnyaJy kanaOBpwnHa ceHbCaMaHyje 3a BNue od 5 MNImetapa TOKOM OWTpeHe)
ПОДMAЗИBAНЕ
AnapaT He Tpe6a HnKaKBO DoaTHO NOpMa3INBaHe.
CknadniuTeBa n TpaHcnOpTa
Imajte Kocnniuy 3a Tpaby y Do6po npoBertpeHm npocTopnjamacayCBNIM TemnepaType He nIe Ncno+5°L. Ipenopyjemy OdbnaJbe ToKOBa TKOM TpaHCnopta, WTo he cnpeHTN Kocnniuy 3a Tpaby ce Kpehe cNoBdoHO. PpINIKOM TpaHCnOpTa Kocnniuy 3a Tpaby Ha dyXMM dUCTaHaMa nn KaJa npocneHnbAbe nCTnx, demoHTaxy INocTabBaHe Kocnniue y naKOBaHy npOn3BOhaya (kyTna) je cabetobao.
PEUJABAHe IPOBJEMA
Exploded view DLM-1010N
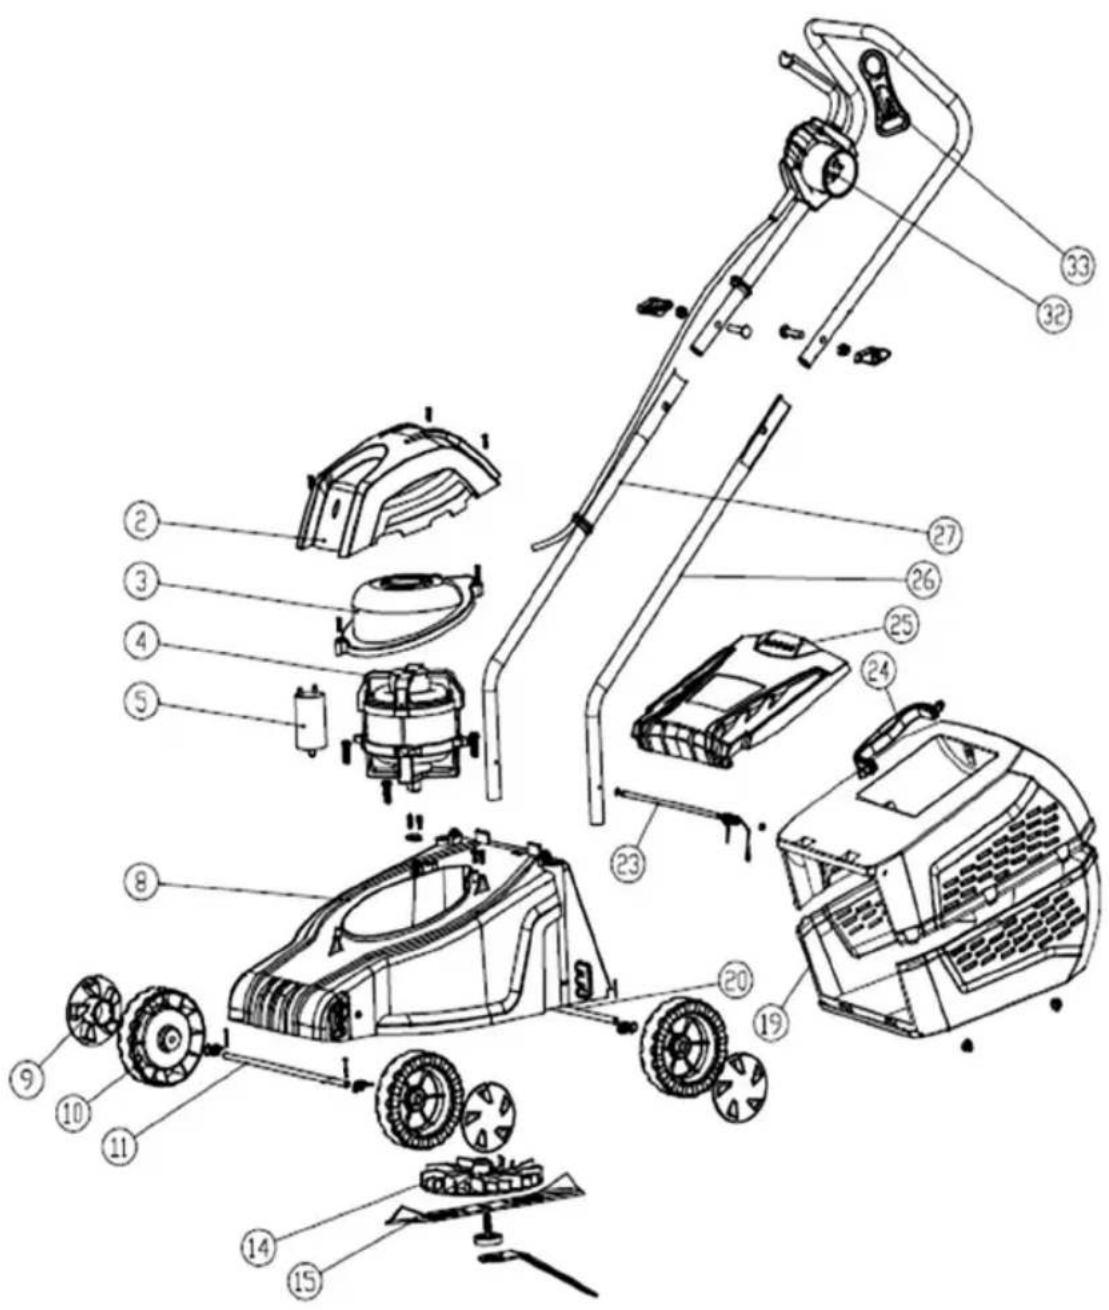
Spare parts list DLM-1010N
No. Part Name
2 Cover housing
3 Cover fan
4Motor
5Capacitor
8 Housing
9 Cap wheel
10 Wheel
11 Shaft wheel
14 Fan
15 Blade
19 Grass catcher
20 Shaft wheel
23 Shaft wheel
24 Handle grass catcher
(25) Cover housing rear
26 Tube left
27 Tube right
32 Switch
33 Holder wire
DECLARATION OF CONFORMITYGBCE
We declare under our sole responsibility that this product is in conformity with the following standards or standardized documents: EN 60 335-1, EN 60 335-2-77, EN 55014-1, EN 55014-2, EN 6100-3-2, EN 61000-3-3 in accordance with the regulations 2006/42/EEC, 2006/95/EEC, 2004/108/EEC.
NOISE/VIBRATION Measured in accordance with EN 60745 the sound pressure level of this tool is < 83dB(A) and the sound power level is < 96dB(A) (standard deviation: 3 dB), and the vibration is < 11.2m/s^2 (hand-arm method).
DICHIAZAIONE DI CONFORMITAIT
10719 Berlin, Germany

KONFORMITSETSERKLÄERINGDK
10719 Berlin, Germany

3AABJIEHNE O COOTBETCTBUNRUCE
MbC NOJHOI OTBETCTBEHHOCTbIO 3aRbIeM, YTO HaCTOUIEE N3DeJIne COOTBetCTByET CNeyIOUIM CTAnDaptam HOpMaTHBbIM DOKyMeHTAM: EN 60 335-1, EN 60 335-2-77, EN 55014-1, EN 55014-2, EN 6100-3-2, EN 61000-3-3 - corlacho npabnAm: 2006/42/EEC, 2006/95/EEC, 2004/108/EEC.
UWM N BUNPAU No pe3ynbTaTAM n3MepeHn B COOTBETCTBn c EN 60745 ypoBeH b 3ByKOBO r daJIeH N aHHoro ycToPiCTBa coCTaBnEe < 83 dA(A), ypoBeHb UwMa cocTabIeT < 96 dA(A), BN6paun paBHa < 11.2M /C^2
STRVZUJICI PROHLASENICZ

Potvrzujeme na odpovednost, ze tento vyrobek odopvida nasledujicim normam nebo normativnim podkladum: EN 60 335-1, EN 60 335-2-77, EN 55014-1, EN 55014-2, EN 6100-3-2, EN 61000-3-3 podle ustanoveni smernic 2006/42/EWG, 2006/95/EWG, 2004/108/EWG.
HLUCNOSTI/VIBRACi Mereno podle EN 60745 cini tlak hlukové vny tohoto pristoje < 83 dB(A) a davka hlucnosti < 96 dB(A) (standardni odchylka: 3 dB), a vibraci < 11.2m / s^2 (metoda ruka-paze).
CnIKECTIJK XOHHIEOTIHILKZ C
Ocb6yibm KeNeci CTaHapTTap MeH HopMaTnBti KyaTAPra CKeKectiri XeHInDe TOnbIK XayanKepiJikneH MImdeM3: EN 60 335-1, EN 60 335-2-77, EN 55014-1, EN 55014-2, EN 6100-3-2, EN 61000-3-3 -epexepeine caikec 2006/42/EEC, 2006/95/EEC, 2004/108/EEC.
Uy MEH DIPIN EN 60745 enweynepe Htunkeine CaekeocbkypblfnbHbHdbibcKbcibMbHbH DeHrei < 83 dA) Kpaab, Wy deHrei < 96 dA) Kpaanbdi, dipin < 11.2M /c^2TeH.
IZJAVA O USKLADENOSTISK

Pod punom odgovornoscu izjavljujemo da je ovaj proizvod uskladen sa sledecim standardima ili standardizovanim dokumentima: EN 60 335-1, EN 60 335-2-77, EN 55014-1, EN 55014-2, EN 6100-3-2, EN 61000-3-3 u skladu sa odredbama smernica 2006/42/EEC, 2006/95/EEC, 2004/108/EEC.
BUKA/VIBRACJE Mereno u skladu sa EN 60745, nivo pritiska zvuka ovog alata iznosi < 83 dB(A), a jacina zvuka < 96 dB(A) |normalno odstupanje: 3 dB), a vibracija < 11.2m / s^2 (mereno metodom na šaci-ruci).
3ABA NPO BIDNOBIDHICTbUA
Mn 3 NOBHO BIDNOIBaIbHicTHO 3aBbIeMo, IIO cnpabKHi Bnip6 BiINOBiJaE HAcTynHm CtAndaptam i HopMaTHBHM DOkymentAm: EN 60 335-1, EN 60 335-2-77, EN 55014-1, EN 55014-2, EN 6100-3-2, EN 61000-3-3-3rIHO i3 npabuIamn: 2006/42/EEC, 2006/95/EEC, 2004/108/EEC.
IbPAJ3a pezylbTaTAMn Bmipib BiNobiHo do EN 60745 pBeHb 3BykoBOro TnCKy daHoro npICTOPO ctaHOBtB < 83 dA),pBeHb WMy cTAHOBtB < 96 dA), Bipaui pIBHa < 11.2~M / C^2
HASONLOSAGI NYILATKOZATHU CC
10719 Berlin, Germany

DECLARATIE DE CONFORMITATERO
Declaram pe proprie raspundere ca acest product este conform cu urmatoarele standarde sau documente standardize: EN 60 335-1, EN 60 335-2-77, EN 55014-1, EN 55014-2, EN 6100-3-2, EN 61000-3-3 in conformitate cu regulile 2006/42/EEC, 2006/95/EEC, 2004/108/EEC.
10719 Berlin, Germany

Discarded electric appliances are recyclable and should not be discarded in the domestic waste! Please actively support us in conserving resources and protecting the environment by returning this appliance to the collection centres (if available).