DPW1800VAC - Pressure washer Defort - Free user manual and instructions
Find the device manual for free DPW1800VAC Defort in PDF.
Frequently Asked Questions - DPW1800VAC Defort
User questions about DPW1800VAC Defort
0 question about this device. Answer the ones you know or ask your own.
Ask a new question about this device
Download the instructions for your Pressure washer in PDF format for free! Find your manual DPW1800VAC - Defort and take your electronic device back in hand. On this page are published all the documents necessary for the use of your device. DPW1800VAC by Defort.
USER MANUAL DPW1800VAC Defort
High pressure cleaner 5
Vacuum cleaner 8
Hochdruckreiniger 9
DE Staubsauger 13
For your own safety and for the safety of others, please read these instructions carefully before using this appliance.

WARNING! Always read the instruction for electrical products carefully before use. It will help you understand your product more easily and avoid unnecessary risks. Keep this instruction in a safe place for future use.
CONTENTS:
- Machine data
- Safety instructions
- Assembly
4.Use - Service & maintenance
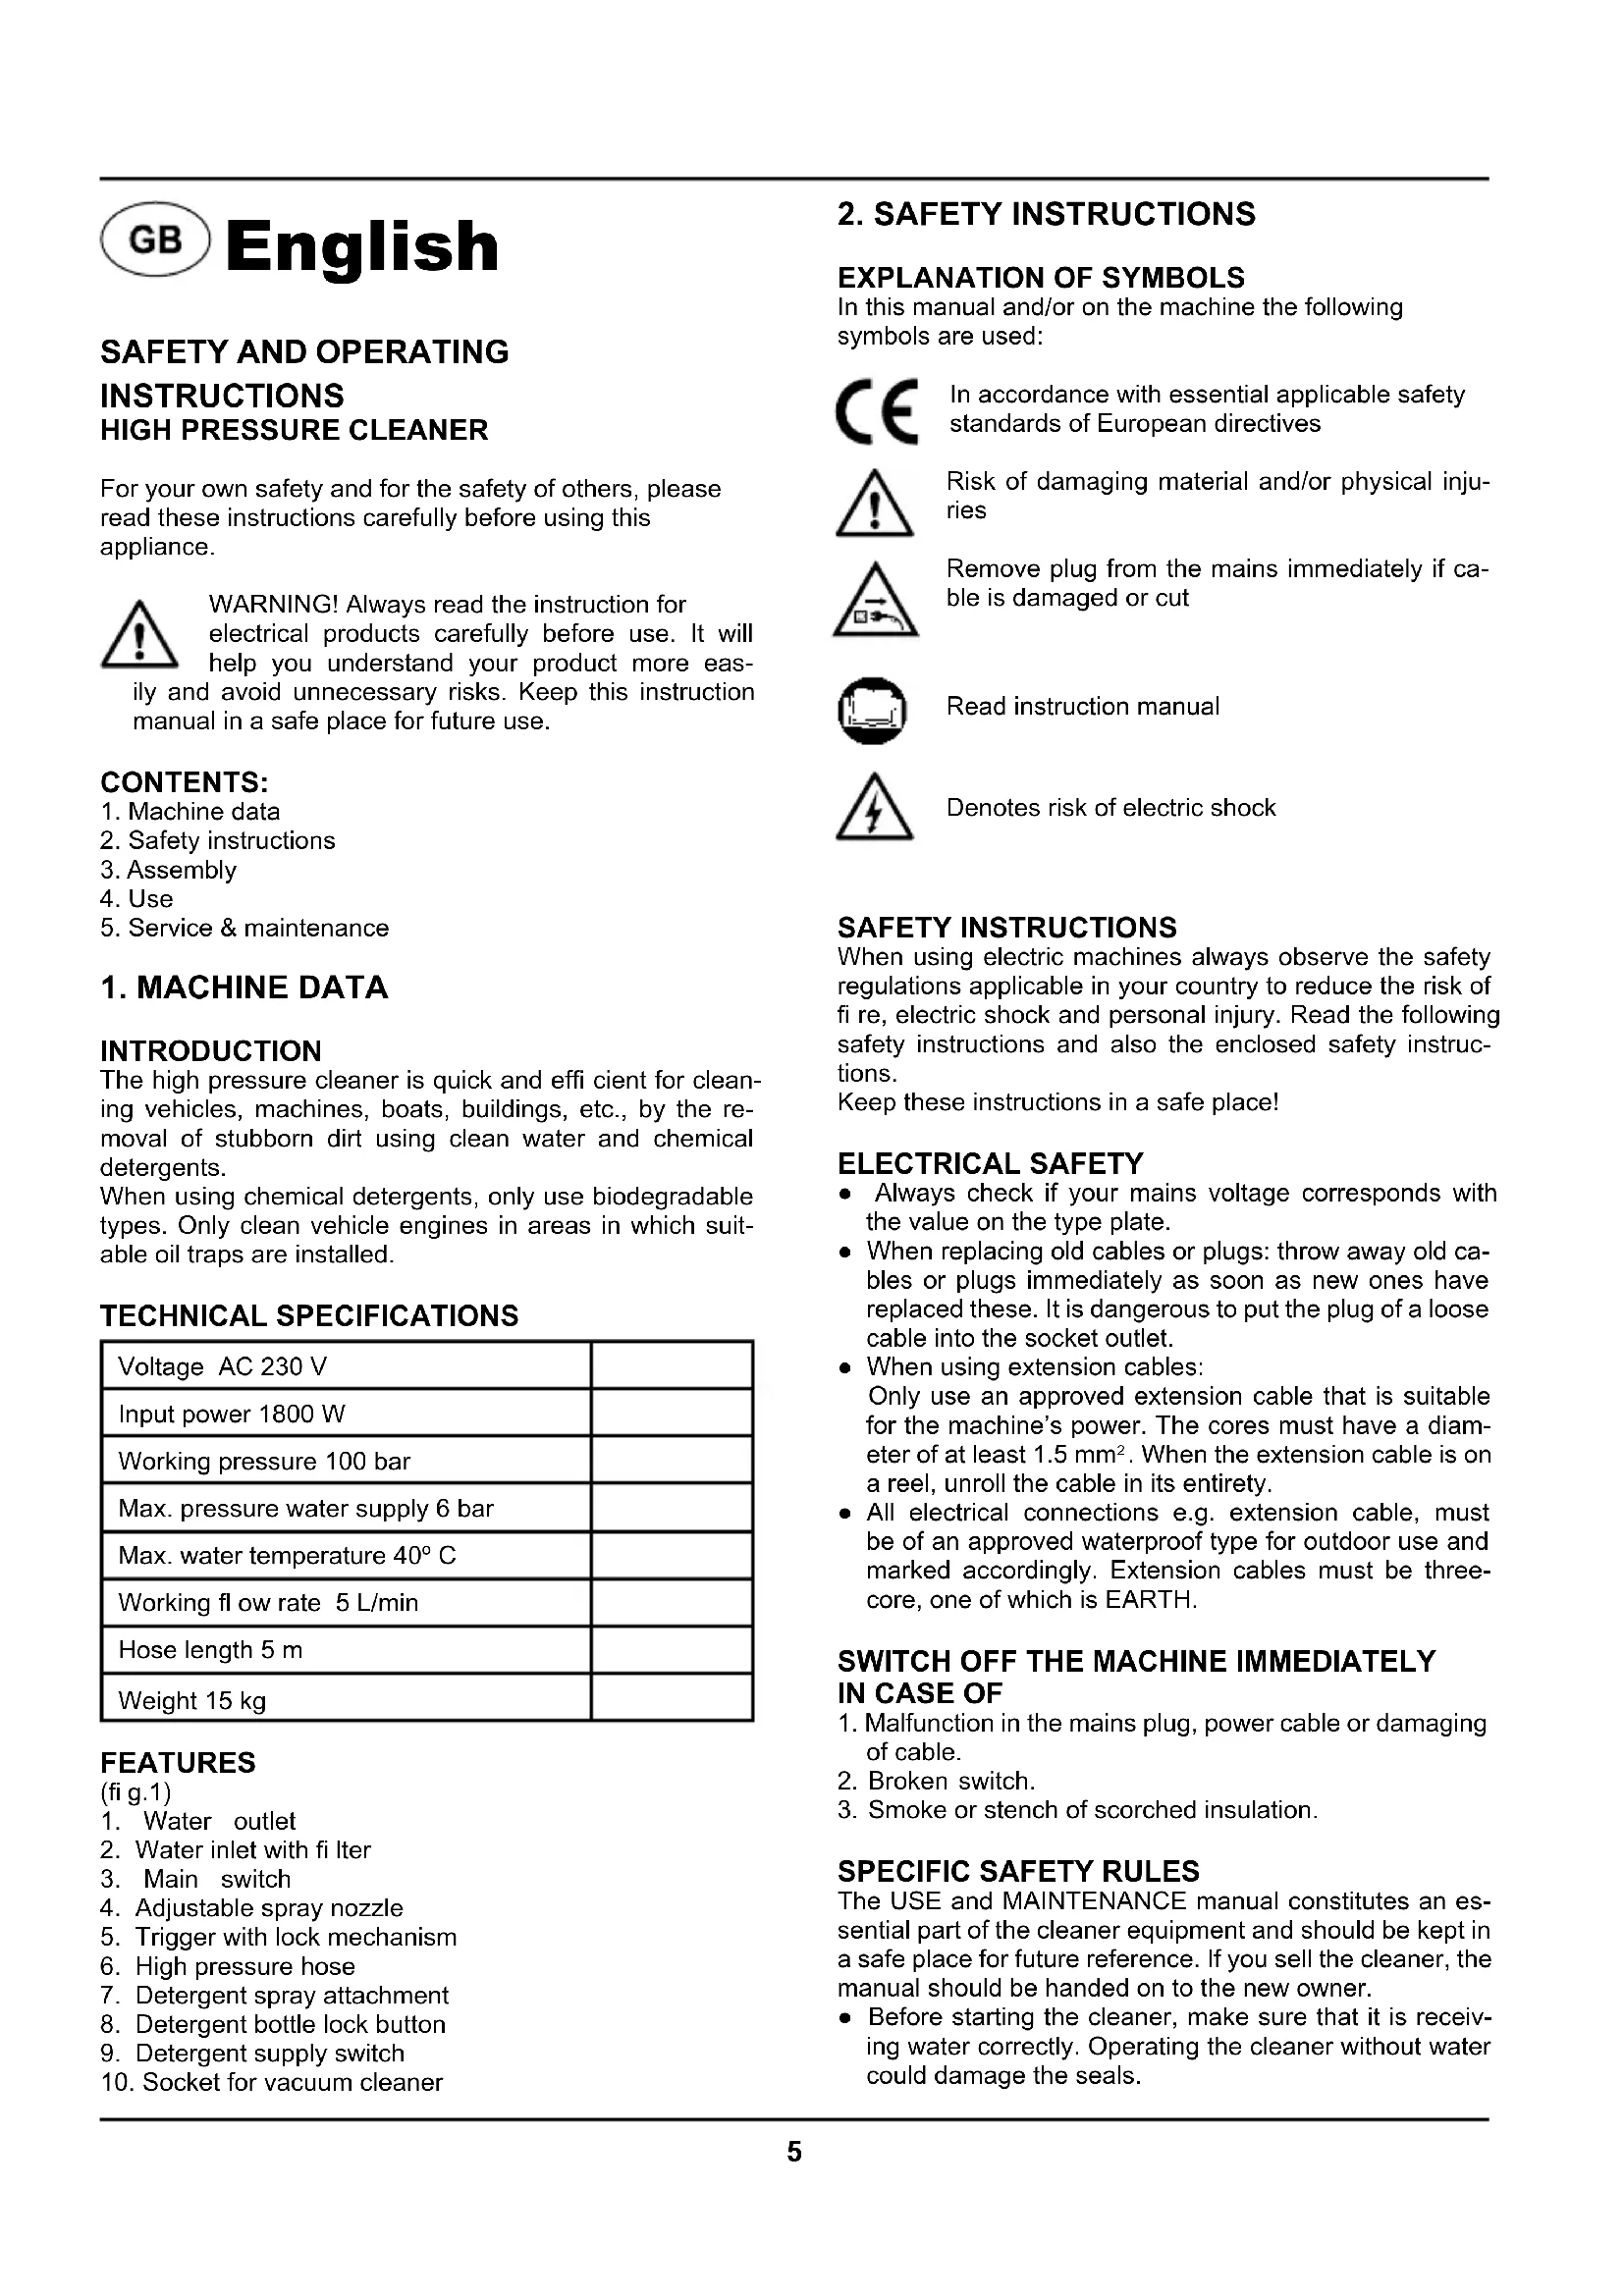
1. MACHINE DATA
INTRODUCTION
The high pressure cleaner is quick and effcient for cleaning vehicles, machines, boats, buildings, etc., by the removal of stubborn dirt using clean water and chemical detergents.
When using chemical detergents, only use biodegradable types. Only clean vehicle engines in areas in which suitable oil traps are installed.
TECHNICAL SPECIFICATIONS
| Voltage AC 230 V | |
| Input power 1800 W | |
| Working pressure 100 bar | |
| Max. pressure water supply 6 bar | |
| Max. water temperature 40°C | |
| Working flow rate 5 L/min | |
| Hose length 5 m | |
| Weight 15 kg |
FEATURES
(fig.1)
- Water outlet
- Water inlet with fi tter
- Main switch
- Adjustable spray nozzle
- Trigger with lock mechanism
- High pressure hose
- Detergent spray attachment
- Detergent bottle lock button
- Detergent supply switch
- Socket for vacuum cleaner
2. SAFETY INSTRUCTIONS
EXPLANATION OF SYMBOLS
In this manual and/or on the machine the following symbols are used:

In accordance with essential applicable safety standards of European directives

Risk of damaging material and/or physical injuries

Remove plug from the mains immediately if cable is damaged or cut

Read instruction manual

Denotes risk of electric shock
SAFETY INSTRUCTIONS
When using electric machines always observe the safety regulations applicable in your country to reduce the risk of fire, electric shock and personal injury. Read the following safety instructions and also the enclosed safety instructions.
Keep these instructions in a safe place!
ELECTRICAL SAFETY
- Always check if your mains voltage corresponds with the value on the type plate.
-
When replacing old cables or plugs: throw away old cables or plugs immediately as soon as new ones have replaced these. It is dangerous to put the plug of a loose cable into the socket outlet.
-
When using extension cables:
Only use an approved extension cable that is suitable for the machine's power. The cores must have a diameter of at least 1.5mm^2 . When the extension cable is on a reel, unroll the cable in its entirety.
- All electrical connections e.g. extension cable, must be of an approved waterproof type for outdoor use and marked accordingly. Extension cables must be three-core, one of which is EARTH.
SWITCH OFF THE MACHINE IMMEDIATELY IN CASE OF
- Malfunction in the mains plug, power cable or damaging of cable.
- Broken switch.
- Smoke or stench of scorched insulation.
SPECIFIC SAFETY RULES
The USE and MAINTENANCE manual constitutes an essential part of the cleaner equipment and should be kept in a safe place for future reference. If you sell the cleaner, the manual should be handed on to the new owner.
-
Before starting the cleaner, make sure that it is receiving water correctly. Operating the cleaner without water could damage the seals.
-
Do not disconnect the plug by pulling on the electrical cable.
- If you are too far from the object you wish to clean, do not move the cleaner nearer by pulling on the high pressure hose; use the handle provided.
- In versions not equipped with TSS device, do not operate the cleaner for more than 1-2 minutes with the gun closed as this could damage the seals.
- Protect the cleaner from freezing during the winter.
- Do not obstruct the ventilation grilles during operation.
- The cross-section of any extension cables used must be proportional to their length, i.e. the longer the extension cable, the greater the cross-section; cables with a protection level of "IPX5" must be used.
- Position the cleaner AS NEAR POSSIBLE to the water supply.
- The packaging is easily recyclable, and must be disposed of in compliance with the regulations in force in the country of installation.
- Use the cleaner only with accessories and replacement parts authorized by the manufacturer. The use of original accessories and replacement parts will ensure safe, trouble-free operation.
- The cleaner must be used standing on a secure, stable surface.
- Avoid unintentional fi ring of the trigger. Do not carry the lance/ trigger assembly with your hand over the trigger. Always use the trigger lock mechanism.
- Ensure that the safety lock on the trigger is used, when you have stopped using the pressure washer to prevent accidental operation.
SAFETY "MUST NOTES"
- EXPLOSION OR POISONING.
DO NOT use the cleaner with infl ammable or toxic liquids, or any products which are not compatible with the correct operation of the cleaner.
- INJURY HAZARD.
DO NOT direct the water jet towards people or animals.
- ELECTRIC SHOCK HAZARD.
DO NOT direct the water jet towards the unit itself, electrical parts or towards other electrical equipment.
- SHORT CIRCUIT HAZARD.
DO NOT use the cleaner outdoors in case of rain.
- INJURY HAZARD.
DO NOT allow children or incompetent persons to use the cleaner.
- ELECTRIC SHOCK HAZARD.
DO NOT touch the plug and/or socket with wet hands.
- ELECTRIC SHOCK AND SHORT CIRCUIT HAZARD.
DO NOT use the cleaner if the electrical cable is damaged.
EXPLOSION HAZARD.
DO NOT use the cleaner if the high pressure hose is damaged.
- ACCIDENT HAZARD.
DO NOT jam the trigger in the operating position.
- ACCIDENT HAZARD.
Check that the data plates are affixed to the cleaner, if not, inform your dealer. Cleaners without plates must NOT be used as they are unidentifi able and potentially dangerous.
- EXPLOSION HAZARD.
DO NOT tamper with or alter the calibration of the safety valve.
- HAZARDOUS ALTERATION OF OPERATING PERFORMANCE.
DO NOT alter the original diameter of the spray head nozzle.
- ACCIDENT HAZARD.
DO NOT leave the cleaner unattended.
- SHORT CIRCUIT HAZARD.
DO NOT move the cleaner by pulling on the electrical cable.
SAFETY "MUSTS"
- SHORT CIRCUIT HAZARD.
All electrical conductors MUST BE PROTECTED against the water jet.
- ELECTRIC SHOCK HAZARD.
The cleaner MUST ONLY BE CONNECTED to a correctly earthed power supply.
-
Use a Residual Current Device (RCD) of not more than 30mA , at the plug socket when using this appliance.
-
INJURY HAZARD.
The high pressure may cause materials to bounce off surfaces at speed; therefore protective clothing and safety goggles MUST BE WORN.
- ACCIDENTAL START-UP HAZARD.
Before doing work on the cleaner, REMOVE the plug.
- INJURY HAZARD.
Before pressing the trigger, GRIP the gun firmly to counteract the recoil.
- CONTAMINATION HAZARD.
COMPLY WITH the requirements of the local water supply company. According to DIN 1988, power-jet cleaners may only be connected to the mains drinking water supply if a backflow preventer valve with drain facility is installed in the supply hose.
-
ACCIDENT HAZARD.
-
Maintenance and/or repair of electrical components
-
MUST be carried out by qualified staff.
-
INJURY HAZARD.
DISCHARGE residual pressure before disconnecting the cleaner hose.
- ACCIDENT HAZARD.
Before using the cleaner, CHECK every time that the screws are fully tightened and that there are no broken or worn parts.
- EXPLOSION AND ELECTRIC SHOCK HAZARD.
Only USE detergents which will not corrode the coating materials of the high pressure hose/electrical cable.
- INJURY HAZARD.
ENSURE that all people or animals keep a minimum distance of 16 yd. (15m) away.
SAFETY VALVE
The safety valve also functions as a pressure limiting valve. When the gun trigger is released, the safety valve opens and the water recirculates through the pump inlet.
3. ASSEMBLY
CONNECTING THE HOSE
AND TRIGGER ASSEMBLY
Assemble the washer as shown on figures 2.1-2.7.
Before connecting any hoses or trigger/ lance assembly
fi rst check all connections to ensure they are free from any blockage.
- Screw the outlet pressure hose (6) onto the machine and ensure a good hand tight fit.
- Connect the spray lance (4) to the trigger (5) by means of the push in and twist bayonet ftting (fi g 2.7).
Ensure that this connection has been performed positively and the bayonet has located correctly. Ensure the hose has no kinks in it.
4. USE
WATER SUPPLY
- Ensure that you have a suitable water supply to feed the pressure washer. Check that all connections are tight and there are no leaks in the hose.
- The supply tap should be fully open (do not turn on the pressure washer yet).
- Now depress the trigger (unlock trigger lock fi rst) to let water pass through the unit and expel any air.

WARNING! This unit is to be used with a coldwater source only!
ELECTRICAL CABLES
Ensure that all cables are damage free before connecting to the power supply.
The electric supply connection shall be made by a qualified electrician. It is recommended that the electric supply to this appliance should include either a residual current device that will interrupt the supply if the leakage current to earth exceeds 30mA for 30~ms or a device which will prove the earth circuit.

CAUTION! The machine may cause electrical disturbances when starting. If the motor stops and fails to restart, wait 10-30 minutes before restarting. THERMAL CUTOUT TRIPPED

CAUTION! The cleaner must only be used with clean water; use of unf filtered water or corrosive chemicals will damage the cleaner.
- Turn the motor switch (3) to the "OFF" position.
- Check that the electrical supply voltage and frequency (Volts/Hz) correspond to those specified on the cleaner data plate.
- Plug in the pressure washer and turn the unit on with the main switch (3).
Switch (3) has 3 positions (see Fig. 3). When the switch is in OFF position, both the washer and the socket for vacuum cleaner (10) are disconnected from the power supply. When the switch is in position 2, the socket is connected to power supply, and the washer is disconnected. When the switch is in position 1, the washer is connected to power supply, and the socket is disconnected.
ADJUSTING THE NOZZLE
(fig. 4)
Water may be sprayed out of the nozzle either linearly or in a fan shape. Turn on the pressure fi rst, and then adjust the nozzle.
The water inlet fi iter must be inspected regularly, so as to avoid blockage and restriction of the water supply to the pump. (fi g 4)
USING THE DETERGENT BOTTLES
Press the detergent bottle lock button (8, Fig. 1) and pull the detergent bottle out. Fill the detergent bottle with liquid detergent. Insert it back. Fill another bottle if needed.
To enable supply of detergent from the bottle, remove nozzle of the spray lance according to the arrow on the Figure 5.1, and set detergent supply switch (9, Fig. 1) into position 1 or 2 (see Fig. 5.2). When the switch is in position 1 the detergent is sucked out from the left bottle. When the switch is in position 2 the detergent is sucked out from the right bottle. When the switch is in OFF position, both bottles are switched off, and the detergent is not sucked out.
RECOMMENDED CLEANING PROCEDURE
Dissolve dirt by applying detergent with the fan jet to the dry surface. On vertical surfaces, work from the bottom upwards. Leave the detergent to act for 1 to 2 minutes, but do not allow to dry out. Apply the high pressure jet, keeping the nozzle at least 30~cm (10 in.) from the surface, working from the bottom upwards. Avoid allowing the rinsing water to run on to unwashed surfaces.
SHUTTING DOWN THE PRESSURE WASHER

CAUTION! Never disconnect the high-pressure hose from the machine while the system is still pressurized.
Follow the correct procedure:
- Turn off the pressure washer by using the switch on the machine.
- Unplug the unit from the power source.
- Turn off the water supply at the tap.
- Press the trigger of the gun to depressurize the system.
- Disconnect the supply hose to the machine
- Wipe all surfaces of the unit with a damp clean cloth.
- Engage the safety lock.
TROUBLESHOOTING
-
When switched on, the machine will not start working.
-
Plug is not well connected or electric socket is faulty.
- Check plug, socket and fuse.
- The mains voltage is lower than the minimum requirement for start up.
Check that the mains voltage is adequate.
The pump is stuck.
- Refer to after storage instructions. Switch off the unit and let the motor cool.
- Thermal safety has tripped.
- Leave the lance open with water coming through.
2. Fluctuating pressure
- Pump sucking air
- Check that hoses and connections are airtight
- Valves dirty, worn out or stuck. Pump seals worn.
- Clean and replace or refer to dealer.
3. Water leaking from the pump
Seals worn out
- Check and replace, or refer to dealer
4. The motor stops suddenly
-
Thermal safety switch has tripped due to overheating.
-
Check that the mains voltage corresponds to specifications. An extension cable, which is too thin, and tool long can cause a voltage drop and cause the motor to overheat. Leave to cool down. Use heavy duty extension cables.
5. The pump does not reach the necessary pressure.
Water inlet, filter is clogged
- Clean the water inlet fi Iter
- Pump sucking air from connections or hoses
- Check that all supply connections are tight.
- Suction/ delivery valves are clogged or worn out.
- Check that the water feedinghose is not leaking
- Unloadervalue is stuck
- Clear or respire valves
- Lance nozzle incorrect or worn out
- Loosen and re-tighten regulation screw.
Check and/or replace.
5. SERVICE & MAINTENANCE

WARNING! Unplug the electric cable (power source) prior to any maintenance or preparatory storage operations.
Make sure that the machine is not live when carrying out maintenance work on the motor.
- To ensure good performance, check and clean the suction and detergent filters after every 50 hours of operation.
- Long periods of disuse may lead to the formation of lime scale deposits. Working through the hole on the rear, RELEASE the motor using a screwdriver (for models with this feature).
Then remove the screwdriver and proceed with the restart operations.
CLEANING
Keep the ventilation slots of the machine clean to prevent overheating of the engine. Clean the housing regularly with a soft cloth, preferably every time it is used. Keep the air vents free from dust and dirt. Remove stubborn dirt with a soft rag moistened in soapy water. Do not use any solvents such as petrol, alcohol, ammonia, etc. as such substances can damage the plastic parts.
LUBRICATION
The appliance does not need any extra lubrication.
STORAGE AND TRANSPORTATION
Keep the high pressure washer in well-ventilated dry premises with temperature not going below +5^ . Operate the cleaner with non-corrosive/non-toxic antifreeze before storing for the winter.
FAULTS
If a fault arises through wear in an element, please contact the service address shown on the warranty card. A drawing of the spare parts that may be obtained is included at the end of these operating instructions.
ENVIRONMENT
To prevent damage during transport, the appliance is delivered in a solid packaging which consists largely of reusable material. Therefore please make use of options for recycling the packaging.
VACUUM CLEANER
INTENDED USE
The vacuum cleaner is intended for absorbing dust, slush, non-aggressive liquids. The vacuum cleaner must not be used to absorb cement, gypsum powder, wall powder and other fine granules.
TECHNICAL PARAMETERS

230V/50Hz

800W

10 L

+

+

250W

3.5 kg
FEATURES
(Fig. 1)
- On/Off switch
- Vacuum port
- Blow port
- Locking catch
- Bucket body
SAFETY RULES
Please don't use the vacuum cleaner to absorb cement, gypsum powder, wall powder and other fi ne granules, otherwise it is possible to arouse the fi liter of the vacuum cleaner being blocked, the motor being burnt and other defects; in case the above-mentioned fi ne granules are excessively absorbed, please clean the fi liter timely (Fig. 7).
While using the vacuum cleaner, please don't let hair balls, big paper balls and other objects be absorbed into the suction inlet, suction pipe or hose, otherwise the motor defects will be aroused. In case such objects have been absorbed, please stop the cleaner and unplug timely to clear off them.
Do not forcefully bend, tread on and draw the hose, and don't continue to use the hose after it has been broken and damaged.
ASSEMBLY
See Fig. 6.
USAGE
Vacuum cleaner can be powered both from the wall socket and from the socket on the high pressure washer (10, Fig.1). In the second case the washer's power switch (3, Fig.1) must be in position 1 (see Fig.3).
WET ABSORBING
During wet absorbing, when the water level inside the bucket body reaches a certain height, the small ball in the water limiting chamber will close the air inlet of the motor;
at that time though the motor is still working, yet the vacuum cleaner refuses to absorb water any longer, and thus to protect the motor. When the small ball moves, a sound of "puff" will be heard, and the motor works in muffled sound; then it is the time to prepare for cleaner stopping; before stopping the cleaner, it is necessary to raise the absorbing tube and turn its inlet upward and then turn off the power supply switch.
During absorbing water from a container, when the water level is higher than the vacuum cleaner and the water volume is larger than the bucket volume capacity, it is necessary to carry out the absorbing in several times. Once the small ball acts, raise the absorbing pipe immediately, otherwise the water will flow into the bucket body automatically, which will lead to the absorbing of excessive water. Turn off the vacuum cleaner and empty the bucket (see instructions below) before you go on absorbing the water.
EMPTYING THE BUCKET BODY AND CLEANING THE FILTER
See Fig. 7.
Warning! Before the water emptying operation or maintenance, the power source plug must be pulled out.
- After the dry absorbing operation of the vacuum cleaner, it is necessary to clean the bucket body timely; after its wet absorbing operation, it is necessary to clean the bucket body, and dry it by airing to prepare it for next operation.
- To empty the bucket body, raise the main body assembly with one hand, and loosen the two locking catches with the other hand (Fig. 7.1-7.2), then empty the water from the bucket (Fig. 7.3).
Warning! When the main body of the vacuum cleaner is being taken off, the main body shall not be placed upside down. When pouring the water out of the bucket, please also don't put the vacuum cleaner upside down, lest the water should flow from the bucket into the motor to arouse its being short-circuited.
After the water absorbing is completed or in case the fi lter is clogged, clean and wash the fi lter (Fig. 7.4-7.5) and dry it before inserting it back (Fig. 7.7-7.8). - Clean the water limiting ball frequently (Fig. 7.6), to ensure the ball's cleanness and the structure's free movement. During this operation avoid the water flowing into the motor!

Deutsch
INNEHALLSFÖRTECKNING:
- FARA FÖR KORTSLUTNING.
5. SERVICE OG VEDLIKEHOLD

POUZITI NADOB NA DETERGENT
m = 311
15 200000000000000000000000000000000000000000000000000000000000
J 1
L 1
S 1
L 1
L 1
L 1
L 1
aalil aie 1g
Jalll al jn 10 Jy J
Jalll al al al al al al al al al al al al al al al al al al al al al al al al al al al al al al al al al al al al al al al al al al al al al al al al al al al al al al al al al al al al al al al al al al al al al al al al al al al al al al al al all a l all a l all a l all a l all a l all a l all a l all a l all a l all a l all a l all a l all a l all a l all a l all a l all a l all a l all a l all a l all a l all a l all a l all a l all a l all a l all a l all a l all a l all a l all a l all a l all a l all a lall a lall a lall a lall a lall a lall a lall a lall a lall a lall a lall a lall a lall a lall a lall a lall a lall a lall a lall a lall a lall a lall a lall a lall a lall a lall a lall a lall a lall a lall a lall a lall a lall a lall
A
aill biaiiy ayiy y
1
aannnnnne aee
aill alll aii i jil
a 1j a j 1i c i
yieeieieieieieieieieieieieieieieieieieieieieieieieieieieieieieieieieieieieieieie
y jilly jlll llll
a 1
1 1
aillllalgal
ailllll lalillll lll
2.4.15.1
a j 15
jia jia jia jia jia jia jia jia jia
A
a yjgl a aagl g
124 1y3y
sll 1c 4sila aiaa
dai jia. dols. dali
J 1
1,5
alw y alw all w g w
jill (j) cia j
RU Pycckn
MOIKA BbICOKOTo DABJIEHnA 3JIeKT-PuYeCKaR
HA3HAUEHNE
DahHoe yctpoCTBO npedHa3HaueHo dna 6bictpoN 3Φ-ΦeKTHBHO MOKN ABTomO6NJe, MaINH, NODOK, 3aHNI T.D. CnONb3OBAHmE YnCToB BObl N XUMHeCKNX MOUx CpeCTB DnA ydaenHryctOnyBBix 3arpz3HeHn.
NoIb3yrcb xIMnueckm MOIOUcIMN CpeCTBaMn, npImeHnTe TOnbKO CpeDCTBa, NOBepKeHHbE 6NOJOnuYeCKOMy pa3JIOKeHHIO.
ABTomo6nIbHbIe DBuIaTeNII pOmbIbaIe TOnbKO B Mec-Tax,OBOpyIOBaHHbIXMACIOYIOBUNTeNMI.
TEXHUNCHECKNE XAPAKTEPNCIKN
UcTaHObKa NucToJeTa-pacbInuTeJra
Cobepnte moKy coJnaCho npCyHKam 2.1-2.7.
- HabnHTte IJIaHr BbICOKOro daBHeHn (6) Ha nATpy60K MoIKn.
HacaKa (4) Kcpyetc B NCTOte (5) 3acet 6aiohEHoro 3aTBopa. Bctabte HacaKy B NCTOJET n npOBepHnTe ee BOKpyr ee oCn Do HaedxHoh fKcau (pnc.2.7). Chimaetc HacaKa B o6paTHOM npAKe: BhaJaNe HaxMITE Ha Hee, YTObI CJIeRka BdaBnTb BRny6b NCTOJETa, 3aTe M npOBepHnTe BOKpyr ee OCN n NOcJe 3TORO BBHbTe N3 NCTOJETa.
BknoueHne
IO BKNIOUeHn MOKNI HEO6XoDnMo BbIyCTNtB N3 CnCTEmbl BO3dyx Ni O6ntbcra, YTO6bl BOa DoOWla Do CONla HacaKn.
BhMaHHe!
KoHCTpykun MoKn He dOnyckaet NcNoJIb3OBAHne BObl, HarpeToI Do BbICOK TeMnepaTypbl (CM. TexHnueckne XapakTepncTkn).
- PpncoeHHte WnAHr IINI NODaH BOnbl K BXOHDomy naTpy6ky MoiKn. Y6eHTecb, yTO WnAHr He IMeET nepeRn6OB.
- OTKpOte BeHTnIb IJRA NOaCh BOBbl (Noka eUe He CJIeDyET BKNIOuHaTb annapat). PpOBepbTe HaJeXHOCTb BCEx COeINHeHm N y6eInTEcb B OTCyTCTBn IN pPoTeHek n3 UJnaHra.
- Tenepb HanaBte Ha Kypok nuctoTa-pacbInnten (chayana cneyet ChrIb erO 6nOKIpOBky), yTo6bl Boda npou7a Upe3 ycTpoiCTBO N BbITECHnla BeCb BO3dyx.
- Y6eIntecb, yTO BbIKHouateNB 3neKtpoBnuraTeN (3) HaxoIITcB NIOJoxKeHNN «BbIKHoueHO». NODKlHouHTe MOKY K CETN IITaHnR IN BKNIOUHTe yCTPOICTBO npn NOMOuIN BbIKHIOHaTeN (3).
BbikliohateJIb (3) IMeET TpI pa6oOHX NOIOKeHn (CM. pnc.
3).Пи ВькючateNe,HaxOДЯшЕмСВ NOLOXKeHHN OFF, KaK MoIka,TaK N BCTpoEHHa pO3eTka dIЯ NOДКЛIOUHeHЯ
nblneocca (10) HaxoTcB BbIKIOHCHOM COCTOHN. Pn nepeboe BbIKIOaTeN B NOIOXeHne 2 nITaHne noDaETcHa BCTpoEHyIO PO3eTKy, a MOKa OTKIOUHeHa. Pn nepeboe BbIKIOaTeN B NOIOXeHne 1 BKIOUaETcMA Kka, a PO3eTKa OTKIOUHeHa.
- Ecnn DBniratentb BO Bpempa60tI octaHOBNICn Hnepe3anyckaetc, 3TO MOKeT CnUdTeNbCTBOBaTb O cpa6aTBiBAHn N TepMO3aunTb. CneJyET DoXJaTbCn OCTbIBAHn DnIRatJI N BO3Bpata yCTpoiCTBa TepMO3aunTb B INCXODHoe COCTOHNHe.
PerynpObKa φopcyHKn
(Pnc.4)
Boda moKet pacbIJIaTbcra n3 φopcyHKn IIn6o y3koHAnpaBHeHHo cTpyE, IIn6o Beepoo6pa3Ho. CnaJa IOnaTe BDOy, 3aTeM OTperynpuyTe φopcyHky.
PpIMHeHHe eMKoCTe IJr MOUeero CpeDcTbA
3anONHnTe EMKoCTb KINkIM MOIOUM CpeCTBOM. IInr 3TOrO n3BNEKHTe EMKOCTb n3 ee OTCeKa, HAKaB Ha COOTBETCTBYUOyIO KHONky (8, pnc.1). 3aTeM BCTaBBte EMKOCTb Ha MeCTO. Pnp Heo6xOumOCTn 3anONHnTe BTOpyo EMKOCTb.
YTo6bI o6ecneuHTb noauy moIoUeO cpeCTBa n3 EMKocTn, nepeDbHbTe o6oMy paCbIInTeJrNo CTpeJIke, KaN Oka3aHO Ha pncyHke 5.1, u yctaHOBtpe peryIaTOPO naHmOIOUero cpeCTBa (9, pnc. 1) B noIOXeHne 1 nn 2 (cm. Pnc.5.2).Pn pepyIaTOpe B noIOXeHm 1 MOIOUee cpeCTBO BCacbIbAeTcra n3 JeBOi e MKOCTn. Pn pepyJIaTOpe B noIOXeHm 2 MOIOUee cpeCTBO BCacbIbAEtca n3 npabOi EMKocTn. Pn pepyJIaTOpe, HaxOJaUeMcR B noIOXeHm OFF, o6e EMKocTn OTKnIOUeHbl, nix CoedePXMoe He BCAcBiBaETcra.
PekomeHdyemb cinocobapoTbI
Tp3b CneIyET pactBoprTb, HnpaBnBnB Beepoo6pa3Hyo CTpyo C MOIOUM CpeCTBOM Ha cyxuy IOBepxHOCTb. OTMbIBaTb BepTNkAJIbHbIe NOBepxHOCTn CneIyET, nepemeuaa CTpyo CHN3y BBepx.
OCTaBBTe HaHecEHHbI pactBOp MOUeero cpeCTBa Ha 1-2 MNHyTbI, HO He N03BOJnTE eMy BbICOXHyTb. 3aTeM NOaTe CTPyIO BOJb IOD BBICOKIM DaBHeHMe, DEpKa CONIO Ha pacCToHm OkOTo 30 cm OT nobepxHOctn n nepemueaeraero CHN3y BBepx.
BbIKIOUeHne
- OTKIIOHTe MOKY npn NOMOUs BBKJIHOHaTeTEn3
- OTKJIIOHnTe annapat ot CETn nHTaHn.
- OTKHouHTe noaCy BObI npi NOMOUI BeHTNJIA.
- 063aTeNbHO HaxMnte Kypok NnctOneta, YTObI c6poCnTb DaBHeHne B CnCTeme!
- OToCoeINHInTe nOdaIoun mJlaHr OT annapata.
6.Пopotrance BCE NOBepxHocTN MOKN BnaXHOJ, YNCTOJKKaHbIO. - 3a6nokpyte kypok nictoeta-pacbinteia.
TEXHnueCKOE OBCJyXKBAHNE N YXOD

IpeedTexHnueckmO6cnyxHBaHnEMOTKIO- ChaTe yCtpoiCTBO OT CEt NHTAHN.
yxo
KaJbI pa3 no OKOHaHH pa6Otbl peKomeHdyETc npoTpaTb Kopnyc yCTpoNCTBa N BEHTNJIAHQHOHbIe OTBepCTN MRAKO BNAJXHO TKAHbIO JIN CAJIeTKO.
HeOnyCTMIO nCnOJb3OBaTb DJIy yCTpaHEnH 3aRpa3HeHn pactBopnten: 6eH3HH, CnIPT, AMMaHhIe pactBopby T.I. PpImeHHeHpe pactBopTeNe MoKet npNBecTn K NOBPExdHIO Kopnyca yCTpoiCTBa.
Поберка Фньтра
Perynpho ocmatpmbaute npn Heo6xOUMoctn npouu 7aute pnnbtp Bnyckhoro naTppy6ka (2), TTo6bl n36exkata bero 3acopeneHn uyduhenna noaun BoDbB Hacoc. (Pnc. 1)
Cma3ka
AnnapaT He HyxdaetcB DOnoJHHTenbHOm Cma3Ke.
XpaHHeHne
XpaHnte MoKy B XopoIo BOBHTUNNpyEmbIX NOMUeHNx C TemnepaTpyo H He Hxke +5^ .DInTeNbHbIe nepnoDbI npocToA annapata Moryt npnbecTu K o6pa30BaHHu N3BeCTkoBbIX OTJIOKeHn.
YcTpaHeHne HEnCnpaBHOCTe
B cnyuae HnncnpaBHOCTeN o6paTntecb B Cnyx6y cepBnca SBM Group.
3AUNTA OKPYKAIOUEN CPEblI
HeHyKbIe Bam 60nee IHCTpyMeHT, npHaIeXHOCTn I (NJIN) yNAKOBy npoc6ba CdaBaTb B 6NkaaWyo oprAH3aUIO, 3aHMAOyUoC BTOpUHNo nepepa6OTkoJ.
Пылесoc
HA3HAUEHNE
PbIeocnpeHa3Haen dna c6opa nbIn, rpa3n, HearpeccNBbIX XnKoCTe. PbIeocn HeNb3ra NcNoB3OBaTb DnA y6OpKn WtYkaTpKn, CEmeHTHO, RnncOBoN bIIN n Dpyrnx MeNKoDnCnepChbIX BeueCTB.
TEXHUNCHECKNE XAPAKTEPNCIKN

230B/50Γu
800BT

10π

+

+

250 Bt

3.5K
YCTPOINCTBO
(pnc.1)
- BbIKnIOuATEeNb
- BcacbBaiooee oTBePCTne
- BbInyckHoe OTBepCTne
14.3aueJka KpbIuKn
15.EmKocTb-MycOpoc6OpHNK
ПРавILA TEXHINК BE3ONACHOCTN
Bo n36exaHHe 3acopEnra HbIbTpna N bIXOda n3 cTpor 3NeKtpoDbnIateJr He nCNoB3yIte nbIeNecoc dIrybOpkn WTyKaTpyKn, CEmeHTHO, rInncOBOn nbIiN i Dpynx MeIKoDnCnepChbIX BeuecTB. B cnyae BCacbBaHnro NoIO6hIx BeueCTB NblNEOC npOHnCTnTe FbIbTp n EMKoCTb-MycopoC6OpHNk (pnc.7).
HeOnyckaTe BCacbHaHna CKOMkaHHo 6ymaru n T.n. noo6hIe npedMeTb MOrT 3actpBbHTn bJIIEcoca n npBecTN K BbIXOy MoTopa n3 cTpor.N3BNEKeNTe nx.
AkkypaTHO 6paauaTeCb CO IJIaHROM NbJIeCocA, He DoIyckaIte ero NOBpeKdEHH.
C6OPKA IIJIIECOCA
Cm.pnc.6.
3KCNJYATAU
Пьлесoc moket pa6otab kak OT cetn nHTAHN, TAK N OT po3eKHa MoKe (10, pnc.1). B nocJeHem cnUyae BblKnIOuATenb MoKn (3, pnc.1)doJXeH HaxOOnTbcraB noONKeHN 1 (cm. pnc.3).
BJIAXHAYBOPKA
Pn BCacBHaHn BObbl, KOrda B0da B EMKoCTn-MycopoC6OpHNke DoCTnraet KpTnueckoro ypoBn, BcNbIBaET nonnaKBOBh KnanaH npeKepbIBaET BXOHOe BO3dyHHe OTBepCTne 3NeKtpoDBuratEn. XOT 3NeKtpoDBuratEn npn 3OM npoDOnkaaet pa6oTaB, nbinecoC nepectaET BCacBtB Body, TeM camblm ppeOxApaHry DBrAteNb OT nonadaHn B Hero BoBbl. Pnp3HaKOM 3TOr RAJRETC
3Byk, 3daebmy Knaanohm, n nprrnyuHbB 3Byk Dniratela. B 3tOM cnuyae Heo6xOJMo NOHrTB 1nAHR BBepx Hacaikoi (TTo6bl PpeDIOBpaNTb BbITEKaHne BOdbI N3 WnHaRa O6pato) n ToIbKO NocJe 3TOBO BblKINOHITb NJIeCOC.
CneNyET 6bIb OOC6EHHO BHMaTeNbHbIM npu BCaCbBAHN BObl N3 EMKOCTN CypOBHEM BObl, paONIOKeHHbIM Bblwe nbInecoca, nIN OBema, 60lbwero, yem 6bEm EMKocTN-Mycopoc6OpHnka. B TAKNX cnUayx BCacBai- Te BOy B HeCKoJIbKO NOxOoB, BblIOUyAra NblIEcOC IN CNIBaBOy N3 EMKOCTN-Mycopoc6OpHnka (CM. peKOMeHaau Hnke) KaJdbi pa3, KOrDa IOnnAbKOBBI KlaNaH NaHHT N3daBaTb XapakTePbHb 3Byk. HNaYe MoKet npOn3OHTN KOPOTKoe 3AmbKaHne 3NeKTPoDBruratEn.
OuNCTKA EMKOCTN-MYCOPOCBOPHNA NΦNJbTPA
Cm.pnc.7.
BHMaHne! Ipeed ouHcTKoI nn TeXnueckm 06CnyKuBAHNEM OTKnIOaHTe nbIEcOC OTe cTuNTaHnI
Perynpho Ounuaine emkoctb-Mycopoc6bOpHK OT nblnn npn cyxon y6opke nn OT BQdbn rpa3n nocne kaxdoBnaJHOn y6opKn.
- YTo6bI CHrTb EMKocTB-MycOpoc6OpHNK, OTKpoTe 3a- uEiKN (pnc.7.1), CHIMNTE OCHOBHON KOPnyc nbinecoCa C MOTOpHBIM OTCEKOM (pnc.7.2) n TOnbKO nocJe 3TO- ro cInBaIte BOyU n3 EMKocTN-MycOpoc6OpHNka (pnc. 7.3). Npeed yCTaHOBko HA3aD BbICyWnte EMKocTB.
BHHMaHHe! Ecnn npn CnNBe BOdbI nepeBepHyTb nbineCoc (NJN CHrTbIn C Hero OCHOBHOK Kopnyc C 3JIeKTPODBNrataTeJEM) BBepx DNOM, BOda MOKeT NOnaCTb B 3JIeKTPODBNrAteJB N Bbl3BaTb KOpOTKoe 3AmbikaHne.
- Nocne BCacbBAHnB OBDI, TaOKe ecnH cNbTp CnNb HO 3aRpa3HeH, OHCTnte erO OT nbIN N BbICTnpaTte (pnc.7.4-7.5). NepeJ yCTaHOBko Ha MeCTo (pnc.7.7-7.8) cNbTp Heo6xOdmo BBcYuNTb.
- NepnoDnueckn npombBaIte nonlaBKObBn KnaanCTpye Tenno BOblc (cm. pnc. 7.6). Pnp 3tOM HeOnnyckaTe nonadaHn BObl BHyTpB dBuratela!

yKpaIHcbka
MIMKA BNCOKOTO TUCKY EJEKTPNUHA
ПИЗ3HAUYEHЯ
DAnHn npucptpi npu3HaueHH nIa WbNdkoi efeKTHBHOI MnKn ABTomO6inib, MaunH, YOBHIB, 6ydnKIB i T.D., i3 BVKOpNCtAHm YcHToI BOni XIMiHNX MnHnx 3ac06i DnBnAeHHr CTIKNX 3a6pydHeHb. KopncTyOCHb XIMiHNM MnHmN 3ac06aMn, 3actOCByte TiNbKn TaKi 3ac06n, kniPiDAIOTBc 6ioJorHOMy po3knaDHnO. ABTomO6IbHi DBnHyHn npomBaTe TiNbKn B Micx, ObnadHnX MaCTINooyNoBHOBAayAMn.
TEXHICHE OBCJNYROBYAHNMy DOJYd

IpeedTexHiHmO6cnyroBaHHMaB iDKnHouaTe npucptpi BId Mepeki KnBHeHHa.
Dorn
Ulopasy nicna 3akinyehnpo6oTpupekomEndyetbc npotnpatn Kopnyc npucptpoi BENTnlauiHi OTbOpn M'koIO BOIoroHO TkaHHO a60 cepBETKO. HenpunnyctmOB BNkopncTOByaTn dlya yCyHeHH 3a6pydHeHb po3HHNKn: 6eH3nH, CnIPT, amiauHi pO3HHn T.iH. 3actocyBaHHpO3HHNKIBMOKe npns3BeCTn Do yUkoJkeHHKopnyca npucptpoi.
Ipebeipka pfjltpa
Perylaepno orraaate Ta, B pa3i Heo6xidHocTi, npouuata-Te fiIbTp Bnycknoro natpy6ka (2), 06 yHnKHytn noro 3acmivHHN noripweHHN noaui BoDn B hacoc. (Ma1.1)
3maueHHN
Anapat He notpe6ye DoaTkoBoro 3MaueHnHa.
36epiraHHa
36epiraTe MnyB Do6pe BeHTnIbOBAHnx npMiuJeHHx 3 TemnepaTpyo He HxKye +5^ . Tpnbani nepioi npocToIO anapaTa MOxyTb Pn3BecTu DO yTBOpEHn BAHNHX BiKnadeHb.
YcyHeHHH HeCnpaBHOCTe
Y BUNaKy BHNKHeHH HeCnpaBHOcTee 3BepTaITeCe B CepbChy cnxy SBM Group.
3AXNCT HABKOJIINHbOFO CEPEIOBNIa
Буд nacka, 3daBaIte HEnoTpi6Hn Bam 6iNbwe iHCTpymEn, npuJaDЯ Ta/a60 ynaKOBky B NaBnKChy opraHizauio, 30 3aMaetbcr nepepo6koBTOBtOpHHOICnpOBHN.
ПИLOСОС
ПИЗ3HAUYEHн
NInococ npn3HaueHn dny 36opy nnu, rpr3i, HearpeCnBnXpiHH. NInococ He MoxHa BnKOpncTOByaTu dny npu6npaHn HtTyKaTpykn, cemeHTHO, rincBOrO nnu Ta iHux dpioHoDnucpeChnx peoBHn.
TEXHUIHI XAPAKTEPNUKIN

230B/50Γu

800BT

10n

+

+

250 Bt

3.5K
Бу DOBA
(man. 1)
- Bvmkaay
- BnycknI OTbip
- BnnyckHni OTBip
- Klamka kpiuken
15.EMHICTb-CMITTc36ipHNK
ПРавILA TEXHIКИ БЕЗКИ
Uo6 yHnKHytn 3acmieHHa fInbtpy Ta BnXOdy 3 naDy eNEKTPoDBnryHa, He BnKOpNCtOByIte NINOCoc Dny npN6hpAHn WTyKaTpyKn, ZcMeHTHOrO, rincBOrO NnNy Ta iHxN dpi6HODncpeChnx peOBHN. Y pa3i BCMOKTyBaHH noDi6HnX peOBHN B INIOOC, npOuNCTitb fInbTp i EMHicThb-CmTTe36ipHnK (Ma1.7).
He donyckaTe BCMOKTyBaHHa 3im'JrTO nanepy, toio: noi6hi npedmetn MOkytb 3actprrn ycepeuHn nnlococ a i npnbectn do BNXOdy DnHyHa 3 naLy. BntraHITb ix. AkypatHO NOBOdtecra 3i WnaHrom nnlococca, He donyckaTe noro NwKOdXeHHa.
3BnPAHHIINIOOCCY
MnB.MaJI.6.
EKCINLYATALI
PnIOOC MoKe npaIobATn, kB iD MepeXj KINBHeHHa, TAKi BID po3eKn Ha Mmui (10, Man.1). B ocTaHbOmy BnAaKy BmNKauch MmKu (3, Man.1) MaE 3haxoHTncb B nnoKeHHi 1 (DNB. Man. 3).
BOJIOE INPUBPAHH
Pn BCMOKTyBaHHI BOH, KOH BOA B EMHOCTI-CMITe36ipHNky DoCRAE KPNTHUHO pIBH, CNINBAE NONNAKBOBNI Knanah i nepeKpNBae BXIDH NOBITPRH N OTBIP eNEKTPOBHyHa. XOa eNEKTPoDBrHyN pN ZbOMy PNOOBKyE npauOBATn, NIOOCOC nepeCTAE BCMOKTyBAH BOY, TMM CammM oBepiraOu DNBrHyN BiD nonaDaHHB HbORO BOH. O3hakoO zuoro e WInnlaqy 3ByK, 0o BNDAETbcra Knaana
HOM, i npnnyeHn 3Byk DnBryHa. B cybomy BnnaKy He-06xIDHO nINHrtn UNaHr Bropy HacadkoO (Uo6 3ano6irTu BntiKaHHIO BOIN 3I UNaHra Ha3aJ) i Nlue nicra cboR BUMKHyTN NINOCOC.
CniD 6yTn OcO6NtBO yBaXHM npn BCMOKTyBaHHi BOH3 EMHOCti 3 pIBHEM BOH, PO3TaIIOBAHUM BUNe NINOCOCY, a6o 06'EMy, 6InbUoro, HIX 06'EMHOCTi-CMITTE6BipHNka. Y TAKNX BUNaDKAX BCMOKTyTe BOY B DeKINbKa NiXODIB, BIMNKaOHn NINOOC i 3JINBAUOn BOY 3 EMHOCTi-CMITTE6BipHNka (INB. peKOMHeHaaui HxKye) KOKHOrpo3y, KOJI NONIAKBON KJanaH NOuHAc BnDaBATn XapakTeHHN 3Byk. IHaKue MoKe Bi6yTuCA KOPOTKe 3AMNKaHHeNEKTPoDBuHyHa.
OuHueHHa CMHOCTI-CMITTE3BIPHnKA IΦIbTPy
MnB.MaJI.7.
Ybara! Nepeid OChiueHHm a6o TexHcHm 0cbnyroByBaHNbM BiKIOuAte NIOOCoc BiD Mepeki KINBHeHHa!
Perynnpno Ounuye emHictb-CmITe36ipnK BiD niny npn cyxomy npnbupaHHi a6o BiD BOOn Ta rpa3i nicna KOKHOBOJORO npnbupaHHa.
- ⅢO6 3HrtncMIHTe36ipHNK, BiKpnIte KJAMK (MaI.7.1), 3HIMITb OCHOBHNI KOPNyc NIIIOCoca 3 MOTOPHM BiDCiOM (MaI.7.2) i Nnwe nicna cbo r 3INBAIte BDOy 3 EMHOCTi-CMITe36ipHnka (MaI.7.3).Pepey UCTAHOBKOHa3aD BNCuWtBcMIHCTb.
Ybara! Kx npn 3nBAAHHI BOH npeBepHyTN NINOCOC (a6o 3HrTNI 3 HbOro OCHOBHN KOpNc 3 ENEKTPoDBNHYOM) DOROpN dHOM, BOa MOKe NOTpANITB ENEKTPoDBNYH I BKNLNAkTu KOpOTke 3AMKaHHA.
- IicJRA BCMOKTyBaHHa BOH, a TaKoXKaIoo fIpIbTp CnIbHo 3a6pydHeHn, npOuNCTiB BiD nIy i BmNte NOro (MaI.7.4-7.5).pepe yctaHOBHeHHaM (MaI.7.7-7.8) fIpIbTp Heo6xIDHO BcCyUHTn.
- PepioDnHNo npomBaIte nonlaBKObN knaan CtpyMeHem TEnIOI BODn (INB. MaI. 7.6).Pnpu bOMy He DOnnyckaIte nonadHa BODn BCEpeDnHy dBnuHa!

Kazakwa
3NEKTPJIK XOFAPfbl KbICbIMdbI XYfbli
KoJIaAHbIybl
Ocb KpybIbI aBTOMo6nIbIdepI, MaunHaIapbl KaBikTapbl FIMapaTTapbl XeHe backanapbl Ta3a cybl XeHc TpaKbl NaCTahynapbl KOU yuH xMmNblaKyy KypaNapbln naDanaHbn TNiMdi XeHc Te3 KyfAHa apHaHan. XmNblaKxv KypaNapbln KOnDaHaHaDa, 6NoonornaBk bIDbpayFa YwblpaTbH KypaNapbl fHa KaOnDaHbHb3.
ABTOMO6nIbIbI Ko3FaJITKbIITapIbI TeK MaY YCTaFbIITapMeH Ka6DbIKTaIraH opBHaDapJa rHa YaBbIbI3.
TEXHINKAJIbIK CINATTAMAJAP
| Kephey, B 230 | |
| Тутынсылатын Куат, Вт | 1800 |
| Арыстын Ксысимы, бар (КПа) | 100 (10000) |
| СуBERдин сижогары Ксысимы, сар (КПа) | 6 (600) |
| Сydын сижогары Temператypасы, °C 40 | |
| Θимdiлик, Л/Min | 5 |
| Шангын Узihдьfы, М 5 | |
| Салмары, кr 15 |
KYPbIJIFbl
(1cypert)
1. Cy ubiFapaTbH Tecik
2. Cy cy3rii6ap kipic tyriri
3. Axbipatkbil
4. Cantama
5. WaaibpaatkbilnncToJeT
6. KofapbI KbICbIMdaftbI WnHaH
7. Kyy kypaJIbHa apHaIraH bIbIC
8. Kyy KypaBHa apHaIraH bIDbICtBihΦNKCaTOP-TyIMeci
9. Kyy kypaJIbH 6epy peTteriWi
10. WahcOpfbIbTbI Kocyfa aphaIHaFaH po3eTka
KAYINCI3IK TEXHNKACbIHbIH EPEXEJIPEI
OPTTyTAY,3NEKTPTOBHaYpbHMyeKaapaKaTbI6oNDbIP May yuIN 3NEKTPNIK Ka6DbIKTaMaHbIOcbIHyCKayNbIKTBiH TaanTAPbHa cai naDanaHcypek.
3neKtpnik-TexHnKaIbikKayinci3dk
Kocybln anbHna KopekTeHy xeniciHderi kepHey kYfblu 3neKtpKo3FaNTkbIuTbH kepHeyiHe ca KeNetiH diriHe Ke3iHi3di KeTki3yHi3 Kepek.
- Tek bɪnfənʌbɪkTah Kɒpfaɪfən yʒapTkblɪneɪ naiɪdaɪaHbɪhɪs. Aca yʒbɪn yʒapTkblɪtapɒlɪ konlaɪyra 6ɒmənʌblɪ. ¥3apTkblɪw Konlaɪhɪfən Ke3e on opamHaŋ Tɒlɪk Wæuiny Kepek. ¥3apTkblɪw cbɪmʌpaɪbɪhɪn KənndeHeH KeciɪdiciHɪn aydaHbɪ 1,5 MM² a3 6ɒmay Kepek.
KyfbIbIbI KOpFaHbIC aXbIpaTy KypblfbcIb (MaKcMmaJI-dbl 6oc KeTKeH TOK-30 mA) apKblbI Kocy KepeK.
AshaHbpo3eTKaHa aKbIpaTkaH Ke3Je, KopeKeHdipy 6aybHaH TaPTnAb3.
Kbicka TynbikTanydb60ndbIpMay yuH cy afbHbH annapattbH e3i MeH 6acka 3neKtpnik XabdkTaMaFa 6afttamaHb3. KaHbipbl KyHi Kyfbltb6JMeDe H TbIC KepeKoDah6aHb3.
Cy konblhbl36eh aawara xhe (Hemece) KopekTeHdipy XeniciHH po3eTKacbHa TImeH3.
KeNeci KaFdaJnJaPa JyFbIuTbI Te3 eUipiH3:
- AuaHbIH Hemece KopeKeTHdipy 6aydbIH akayIbIFbl HeMeCe 3aKbIMdaHybl.
2.AkbiPaTkbilTbHcbiHybl. - TytiHHH Hemece KaHraH OKwaynay niCiHi, naJa da 60-nybl.
- Kofapbl KbicbIMdafbI IuaHaHTIH 3aKbIMdaIybl.
Xymbic aIbIHda:
Cy JyfbIkwKa kaxketti Type Kipin TyphaHbHa Ke3iHi3di JeTki3iHi3. KyfbIwTbI cycbI3 naJdAnaHy OHbH 3aKbIMdaNybiHa eKnIn COKtBIPy MymKiH.
- Bapnbik kocbjnrah kepneepin cehimdiirih xhe 3akbimdanr Han HeMece eckepreh Detanbnap jok 6onybiH Tekcepihi3.
Kayincizdk60bHwa kannbIepekeenep
Erepci3XyatbIH 3aTTAH TBIM anbicta 6oIcahbi3,annapattbIXOFbIPbl KbcBIM WnaraibcBiHaH XaHe KOpeKTeHHipy 6aybiHaH YCTan, XblJXbITNaHBi3;On ywiHaHaBtYTKaHbI naDanaHbHbI3.
«ABTOCTONNEH»JapakTaHdbipbImaFarh ynrinep ywiH nuctoleti Ka6bIK Kynde 1-2 MHyTTaH apTbIK yaKbit KeIemHde Kyfbtbl naDanaHyra TnbIM caBHaDbI, 6ynKaFdaannapaTTb KaTapdaH bIfapaDbI.
Kbicta annapattbXbIbXepe caKaTahb3.
AnnapaTbIH XMbICbI 6apbcihda XeJeTeY caHbIaynapbl aBbIK 6onybl KepeK.
- AnnapaTbI MymkiHdiirIHwe CymeH KaMTamacbl3 etTy Ke3iHe XaKbIH yCTaHb3.
- ΘΗιργινι ὑκay δερτηκύραπιδαρ MeH Kοςακβί Ελημεκθεραι παῦπαλασαβί. Tyνηχκαπινι Kυραπιδαρ MeH Kοςακβί δελημεκθεραι Κόπαγι Κεύμι Κεύμι Κεύμι καγίπις καύνι Κεύμι Κεύμι Κεύμι Κεύμι Κεύμι Κεύμι Κεύμι Κεύμι Κεύμι Κεύμι Κεύμι Κεύμι Κεύμι Κεύμι Κεύμι Κεύμι Κεύμι Κ ετέπι.
KyfbluTbI teric 6eTTe, TypaKtbl Kynde opHaanactblpbl3.
- NcTOnet-lwawbipatkbltbiH MaKcatcbi3 6acblnMaybIH KdaFalaHbI3. Kyfbltbi CaycaKTbi NCTOJET WypinnecinHe yctan Typbn, XyfblwBtXbIKNbITNaHbI3.
Kyblwnen Kymbc aKaTaNFaHHaH KeiH Ke3neCOK Kocbinydb60ndbpMay yuH nctOnet WypinnecHH 6nokTaHaBHaHaKe3iHi3jXeKtki3iH3.
Kapbiny MeH ynaHydbI 60nDbipMay yuiH xyfbiupe Hxmbic 6apbcbiHa Jyfbiuneh Dypbc xymbic icTeyMeH cbibcnaiTbIH Te3 TyTaHaTbIH Hemece ynb CybIKtbIKTapbl Hemece 6acka da KypanDapbl konDaaryfa TbIM caNbHaDbI.
Cy afbicbH aamap Meh kahyapnapfa Kapa 6afttAmhaI3: onap kapaKaT anyb MyMKIN. Berde aamap MeH kahyapnap Kymbc opHbIHAH 10 metpeH KEM 6oJMaTHbIH KaWbIKTBkTA TypybKepeK.
AnnapaTbI KOndaHydbi 6anap MeH OKbITbIMarHa aamdapa ceHH TaCbIPMaHbI3.
-Пистонеттін wypinnecin «Кocуbl» Кшпдеше 6eKitneH3.
-OpcyHkAHbIH WAsbIpaTkbIb 6acbHbIH TYNHcKa WeH6epiH e3reptyre Tnblm cNbHaDbI.
KyfbIuTbI KapayCbI3 KaNdbIpMaHbI3.
- Aybip Kbcimdb cydbih afbihh 3aTapfra TureHe KyuHne H onapdb aydapbi Tactaybi MymkiH, COHdbkTaH XyMbic 6apbcbiHa aphaib KIM MeH KopraHbc Ke3inDipirih KNREH a63aJ.
- Nuctonet Wypinnecin 6acap andbyHa on Kepi KaTkaH Ke3e KonDaan WbIfbn Ketney yWih KaTbI KbCbHbI3.
- NaCTaHyDbI 6oNDbIPMac yWih CymeH KAMTaMaCb3 ety 6oBbIHwa JeprinikTi YbIM TananTapbIH CaKtan OTbIPbHB3. DIN 1988 cTahdapTBHa CaiKeC, KOFapbIbI KbcIMdbI cy aFBcbl YcTaHbIMbl 6oBbIHwa XyMbIC icTeiTH JyFbIW annapattabH KeNTipriu WnAHRta DpeHaXdbI KpBbINbcbl 6ap Kepi KnanaH BOnFaH KaFdaJa, aybi3 cy K6bIPbl JeNiciHe Kocyra pyKcat etiJei.
- IJHbI annapattan akbipaty keiHne kapaKaT anydbI 6onDbipMac yuih KaNdbIK KbICbIMDbI WbIFapBIn Tactay KaKeT.
PANDAJAHY
Tnctonet-wwbipatkbIWTbnaiDanaHy
KyfbIWTbI 2.1-2.7 cypTRepre caKeC KpaHbI3.
Kofapfbl KbICbIMdbI WJIaHITbl (6) KyfbUHTbIH KeNTe Ky6bipbHa 6ypan KOBIHbI3.
- CanTama (4) nICToNETe (5) 6aHOnHeTTi KaKnak ece6iHn 6ekitine. CanTamaHbI nICToNETke canIn, OHcHimDi Type 6ekitireHwe, ocB 60nb 6ypbHb3 (cyp.2.7). CanTama Kepi Tepinte Wewinei: anDbImeOHb 6acbln, nCToNET tybihe KiUKeHe 6atbipbHkbpan, OdaH KeinOCbHocb 60bIHwA 6paHb3 da OdaH Kein OHb nICToNETe H bIfapbHb3.
Kocy
KyfbIbbl Kocy yuH, cy cantama yuBHa kety uH KyneDeh ayahbl ubfapky kaxet.
Ha3ap aydpbHbI3! Kfbl W KOHCTpyKUncBc Jxorapbl TeMnepaTpyara DeieHri KaTb Ki3ydaBc Cydb nJaTaJnaHyfa XapaMaNDb (TexHNKaNbIK CInaTTamAp).
Cy 6epy yuih kylbIuTBiH kipic KeTe Ky6bpHa IuaHrTbIKocbiH3. LnaHTbIH 6yKTeiIN KaMaHaBHa Ke3iH3diXeTKi3iH3.
Cy 6epy yuih 6ypaHdaHbI aubHb3 (e3ipwe annapaTbI Kocyfa 6onmai).BapJIbIK KocblJynapDbIH ceHIMiniRiH TeKcepIn, uHaHTa eWkaHdai Tecik KOtBfbiHa Ke3iH3di Xetki3iH3.
- Ehdi waibipatkbiw nctolettiwypinnecin 6acbin, (aandbimeH OHIN 6nOKTaHybIH bacyKepe), cydbI KpyblfbiDah eTKi3in, 6apblk ayahbl WbIfapbn any KaKET.
3NeKtp Ko3rAnTkblw eWipriuHIn (3) «Owipyni» KyinHe TpyraHbHa Ke3iH3di KekTki3H3. KyfbluTb1 KopeKeTHnDipy KenicHe KocBn, KypblnFbHbI eWipriuTIn KemerimH KocBhl3 (3).
AxbipatkbwTbH(3)yXmbic Tcini6ap(3-cyp.kapaHbI3). OFF xaraaibihda Typhah axbipatkbiw Kxyblw neH wahcopfbwTbH po3eTKacbi da (10) TOK 6epy xenicihe axbipatynb. AxbipatkbwTbH 2 xaraaibihda po3eTKa TOK xenicihe Kocynb, an xyfblw cehdipyni. AxbipatkbwTbH 1 XaRaabihda Kycybl, po3eTKca cehdipyni.
- Erep K03raTbIiXyMbIC 6apbICbIHda TOKTan KaNbIn, KaNtA KocBIMaca, 6yn KaIaN TePMOKopraHBcTBH KocBINrABHH 6inDipyi MyyMKIn. K03raTbIiWbTH cyBn, TepMO KopraHbIC KypblfbcIHbH 6actanKbI KyIre KaNTyBH KYTy KaKeT.
Bypkeriwi peTey
(4)cypet
Cy 6ypkeriHTen xiHlUke 6arblttb1 afbicneH HeMece anHaIImaIb Type Iwabpa anad. Andbimc cy 6epin, apTbIHah fOpcyHKaHb peTHei3.
Kyy KypaBbHa apHaJIFaH bIDbICTapDbI naJaAnaHy
bldbicbl cybIK kyy KypaIbIme tonTbipbHb3. Byn yuih bdbictbl 6enirHeH e3 Tymecin 6aca otbpbn anhB3 (8, 1-cyp.). Codah KeiH opHbHa KObHb3. KaXet XaFdaJa da ekIHucIH TOITbpHbH3.
Kyy KpaBbHb H bDbCTaH 6epinyiH KaMTamacb3 ety ywiH 5.1 cypTe KepeTinreHde BypikkiuTih CaybTBn XblXbTa OtbipIn, Kyy KpaBbH bepy peTteriWih (9, 1-cyp.) 1 xHe 2 XaFaBbHa (5.2 cyp.KapaHbI3) opHaTbHbI3. PeTteriWtIn 1 XaFaBbHda Kyy KpaBb coN XaKa bDbCTah, an 2 XaFaBbHda Kyy KpaBb OH XaKa bDbCTAH copbla. PeTteriWtIn OFF XaFaBbHda bDbCTbH ekeyi de KocBmAbbl XeHe iHderici copblaBn KetneNi.
Kehec6epinTeHxmbicedici
Kipdi Kyfbih Kypandbin aHaHMaIbI afbicbi H Kpyrak 6etKe 6aftTain Otbipin,epity Kaket. TIK 6etTepdi Kyy ywiH aftictbTe MeHHHeh Kofapbl Kapai 6aftTay Kaket.
Kyfbu KypaepitHicin 1-2 MNHyT KeIeMIHe KaIbipa TpybHb3,6ipak OHbl KypraTbIn anMaHb3.Coan KeiH, Wymekti 6eTTe 30cm KybIK KaUbIKbTKaYCTan, OHbl TeMeHHe Xofapbl Kapai KblNkbTa OTbIPbIN, XOFapfbl KbICbIMdb cy afbcibH 6ephi3.
Θwipy
- Xyfbwbl ewiipriu apkblbl eiwipin OTbipbHb3. (3).
- AnnapaattbI kopekeTHeDipy keJicHeH cybipHb3.
- Cydbin 6epinyin 6ypaHda apkblb eipin otbpib13.
- Kyeeneri Kbcimbl Tycipy yuiH mHdETTI Tpye nctoNet wypinnecin 6acbHb3!
- Бершшангтб annapattah.Cybipin OtbipHb3.
- KyfbIbTBiH 6apnbK 6etih cynbI, Ta3a MaTameh cyptin OTblpbiHbI3.
- WaaBbipatKbI WnCToJIeTTiW yypinnecih 6nOKTaHbI3.
TEXHINKAJIbIK KbI3MET KOPCETY MEH KYTIM

TexHnKaIbIK KbI3MeT KepCey anDbIHda KypblfblHbI KopeKTeHdipy XeniciHeH eWipin OTblpblHbI3.
KyTim
KyMbic aKaTaNFaHHa KeiH apKe3 KypblfHbH KOpNycB MeH XeIDeTy CaHbIaNaynapbH KymCaK cyIb MaTaMeH HeMeCe MaNbIKneH CypTi OTblpbHbI3.
JaTapbl Ketipy yuih epitkiuTepi: JaaHapMa, cnpt, aMMnakTBk eptikiuTepi naDanaHyra TnbIM caIbHaDbI. EpitkiuTepi kOJdaHy Kypfbl KopnycbiHbIH 3aKbIMdAlybHa aKejin cokTbpadbl.
Cy3riwiTeKcepy
Bitteny xhe copfbifa cydbih 6epinyih hawapnatybl 60n-dbipmac (2) yuih y3dkci3 kipic keTte ky6bipbHbIH cy3riuH Ta3anlan, akapan otbpmbi3. (1 cypet)
Mainay
Annapat KocbIMwa MaJnaydb KaKet etnei.
CaRTay
KybluTbI kakcbI KeNdtinreH 6eImede +5^ TeMeH 6oMaHTbIH Temnepatypada caKaTaHb3. AnnapaTbIH y3a KaBt Tpybn KaNyblk KaKaTbIPbHbH naHa 6OnybHa eKeIN COKTbIPbyMymKH.
AkaynbikTapbIxOIO
AkaynbikTapdbIH TybIHdaybI KaFdaBihDa SBM Group cepBNC Kb3MeTIHe XOJIbIFbIHbI3.
KOPUWAFAH OPTAHBI KOPFAY
C3re eHdi KaKET 60JMaTbIH KypaIbI XeHe/Hemece opamdbi KaTa eHneyMeH aHaNbIcTaBH YbIMFa etKl- 3yiHi3di cypaMbI3.
UAHCOPfbl
KOPCETIJIMI
Wahcopfbiw wahdbi, kipdi xhe arpeccnabik emec cyibkTbIKTapdbj KINHay ywiH apHaJFaH. WahcopfbIwneh cbIaNK peH cEmeHT, rncs wahdapbl MeH 6aKa da ycaK 6enweKTeP yuih naDanaHyra 6onMaIbI.
TEXHINKAJIbIK CINATTAMAJAP

230V/50Hz

800W

10L

+

+

250W

3.5 kg
KYPbINFbl
(1-cyp.)
- AxbipatKbiu
- Cihipy caHbIaaybl
- WbifapatbH caHbIay
- Kaiknak Tetiri
- KokbcJHHaftbIbIbIbc
KAYINCI3IK TEXHNIKA EPEXKECI
ΦnIbTpdiH 6itEnmeyi XHe 3JneKtp K03FaTkbWtBtH ictEH WbIKnaybl yuHwAHCOPfbiWBtCbInak neH cEmeHT, rInctH WaHapbl yuH naDaJaHa6aHbI3. OcbHda 3aTTapbl WaHcOPfbiW copFah KaDaa DphiNbTp MeH KObICKNHaftbBiDbICTb Ta3aNaHaH3. (7-cyp.)
Coprah Ke3e TynHdenre Kara3 6en T.6. con cnKtbl 3aTAPbIH Tycin Ketneyi KaaranaHbI, 6yn WAnCOPfBtBn iWihde 6iteN, MOTOpdbH icTeH WbIFyBaHa ce6en 6oNaDb. Onapdbu wbfapbn TactaHbI3.
WahcopfbiKy6bipweH KybntbI naJaHaHbHb3, OHbIH 6y3blnybHaXoJ6epMeHi3.
UAHCOPFblIUtbl KYPAY
6-cyp.KapaHb13.
ПАДАЛAHY
WahcnpfbiTOK6epyXenicimeHde,xyfblipo3etKa-cbImeHde(10,cyp.1)xymbcicteei.CoHfbkaaJaAaYfblwaxbipatkbilu(3,cyp.1)1kaFdaBbHaTpybIKepek(3-cyp.kapaHbI3).
BIJFAJIMEH TA3APTY
Cy copy Ke3iHDe, cy KOKbICXINHaBfBi-bIDbICTbH eH KOFApFbI DeHreInHe XeTKeH Ke3De KaNTKbI KaKnaWacbl KOFapbl WbIFbn, 3NeKTPKO3rAANTKbIbTIbH aya caHbIaNbYbH Xa6a-dbl. 3NeKTPKO3rAANTKbIb7 6yn XaFdaNda da XyMbic icTei 6pepi, waHcOpfbIw cy copybih TOkTaTadbl, coHdai-ak KO3rAANTKbIwka cy etin KetneyiH cKaTaNbl. Benri petiHde KaKnakwadaan WbIKKaH b3bH daBybc neH KO3rAHTKbIbTIbH
6eHey daycbl WbfaBly. MyHaJ XaFdaJa Ky6bpwek cantamacbin Kofapbi KeTePin (Ky6bpweKeTeh KaTadaH kepi cy aKnac yuH) 6apbn KaHa WaHcopfbIUtBe Hdipy kepek.
blbictan cy copy ke3iHde cy MeIwepin wahcopfbWtah Xorapbl opHaIacnaybH HeMece KeIeMI KOKbcXINHaftblbictan ykken 60lmaybH epeKwe KaIarafay Kepe. KaTkb KaKaIaWacbl 3eIHe TAn EMEc Dlb6bc6epren Ke3- De WaHCOPfbITbEwipin, KOkbIXINHaftblbICTan CydbI TeKKeHHen KeiH ep Ke3 6ipHeWe TAcJIMen CydbI copy Kepek (TeMeHderi ycBhlCTapDbI kapaHbI3).
OHaan 6oImaca 3neKtp Ko3raNTkbIbI KbICKa Mep3IMre TynbIKTaIybl MyMKH.
ФИЛБТР MEH KOKbICXINHAfblIb-ыICTbl TA3APTY
7-cyp.KapaHb13.
Eckepty! WauHcOpFbIuTb Ta3anay Hemece TexHNkaBik Kbl3MeT KepeTeP anDbIHda WauHcOpFbIuTb ToK 6epy XeniciHeH 6ocatbHbI3!
- ΘραπβιΜ KOKβικχηнανβιω bIDbιCTbI Kypfak Ta3apTy XacarafHah KeiH WaHah Hemece εp bIJFaJNbTa Ta3apTydah KeiH cy MeH 6aIIWBkTah Ta3apTbI NTbIPbIHbI3.
- KOKbcXnHaftbIbIbCTbI any ywiH, imMeKti aWbIb3 (7.1.cyp.), waHCOPfbltBtH Heri3ri KopnycbH MOTOpNbI 6enirimeh WbIFapbHb3 (7.2.cyp.) ocbiDah Kein6apBIn KaHa KOKbcXnHaftbIbIbCTaH cybl TeriH3 (7.3.cyp.). KaTaNKTbIH Ke3de bIDbICTbIKyPraTbHb3.
Eckey! Cybl TeKKeH Ke3e WaHCOPfBtB (HeMece WewinreH Herizr KOpnyctb 3neKtp Ko3FaNTKbIWBImeH acTbIMeH THeKepReHc, cy 3neKtp Ko3FaNTKbIwKa Tycin TOK KbICKa MEP3IMr TybIKTaNByb MymKiH.
Cydb copraHHaKeiH,cohImeKaTap fNbTp KaTbI NaCTaHaHa, OHb WAnHH Ta3apTbIN, KByHb3 (7.4- 7.5 cyp.). KaTa opHbHa KoarBn Ke3de (7.7-7.8 cyp.) cnBtpDb Kypraty KepeK.
- KaNTkbl KaNakJusacbIH XblIb cy aflbHbIme YdaBbl Kyybin TypbHb3 (7.6 cyp.KapaHb3). CohIme bipre Ko3raJTkbIka cydbIH eTin KetneyiHaKaadaranaHb3!
Lietuvi
ELEKTRINIS AUKSTO SLEGIO PLOVIMO APARATAS PASKIRTIS
Part No. Description of Spare Part
1 Motor
2 Pump
3 Inner wire
4 Capacitor
5 TSS wire
6 Micro switch
7 Pressing cap
8 Main switch
9 Power cord
10 Socket
11 Quick connector
12 Quick connector pad
13 Quick connector seal
14 Fix plate
15 Detergent pilot tube
16 Upper motor housing
17 Lower motor housing
18 Power cord grommet
19 Water-proof sticker for motor cover
20 Left handle
21 Right handle
22 Upper handle cover
23 Lower handle cover
24 Upper handle cover grip
25 Lower handle cover grip
26 Wheels
27 Wheels soft grip
28 Wheel panel
29 Soap bottle
30 Soap bottle cover
31 Sucking hose
32 Filter cover
33 Filter
34 Switch box upper cover
35 Switch box lower cover
36 Switch knob
37 Switch knob shaft
38 Upper sucking panel
Part No. Description of Spare Part
39 Lower sucking panel
40 Switch box seal
41 Sucking panel cover
42 Switch knob shaft seal
43 Upper sucking panel seal
44 Lower sucking panel seal
45 Safety lock cover
46 Soap bottle fasten piece
47 Soap bottle fasten button
48 Fasten piece pillar
49 Fasten piece spring
50 Socket box upper cover
51 Socket box lower cover
52 Socket box cover
53 Socket box seal
54 Twisty spring
55 Socket box cover shaft
56 Back housing
57 Front housing
58 Left housing
59 Right housing
60 Barrel's sheet
61 Accessoriess bracket
62 Left housing cover
63 Right housing cover
64 Upper gun holder
65 Lower gun holder
66 Pilot pillar for barrel
67 Water proof sponge
68 Water proof sealing band
69 Power cord grip
70 Self tapping screws
71 Self tapping screws
72 Spray gun handle
73 Spray lance
74 Pressure hose
75 Cleaning needle
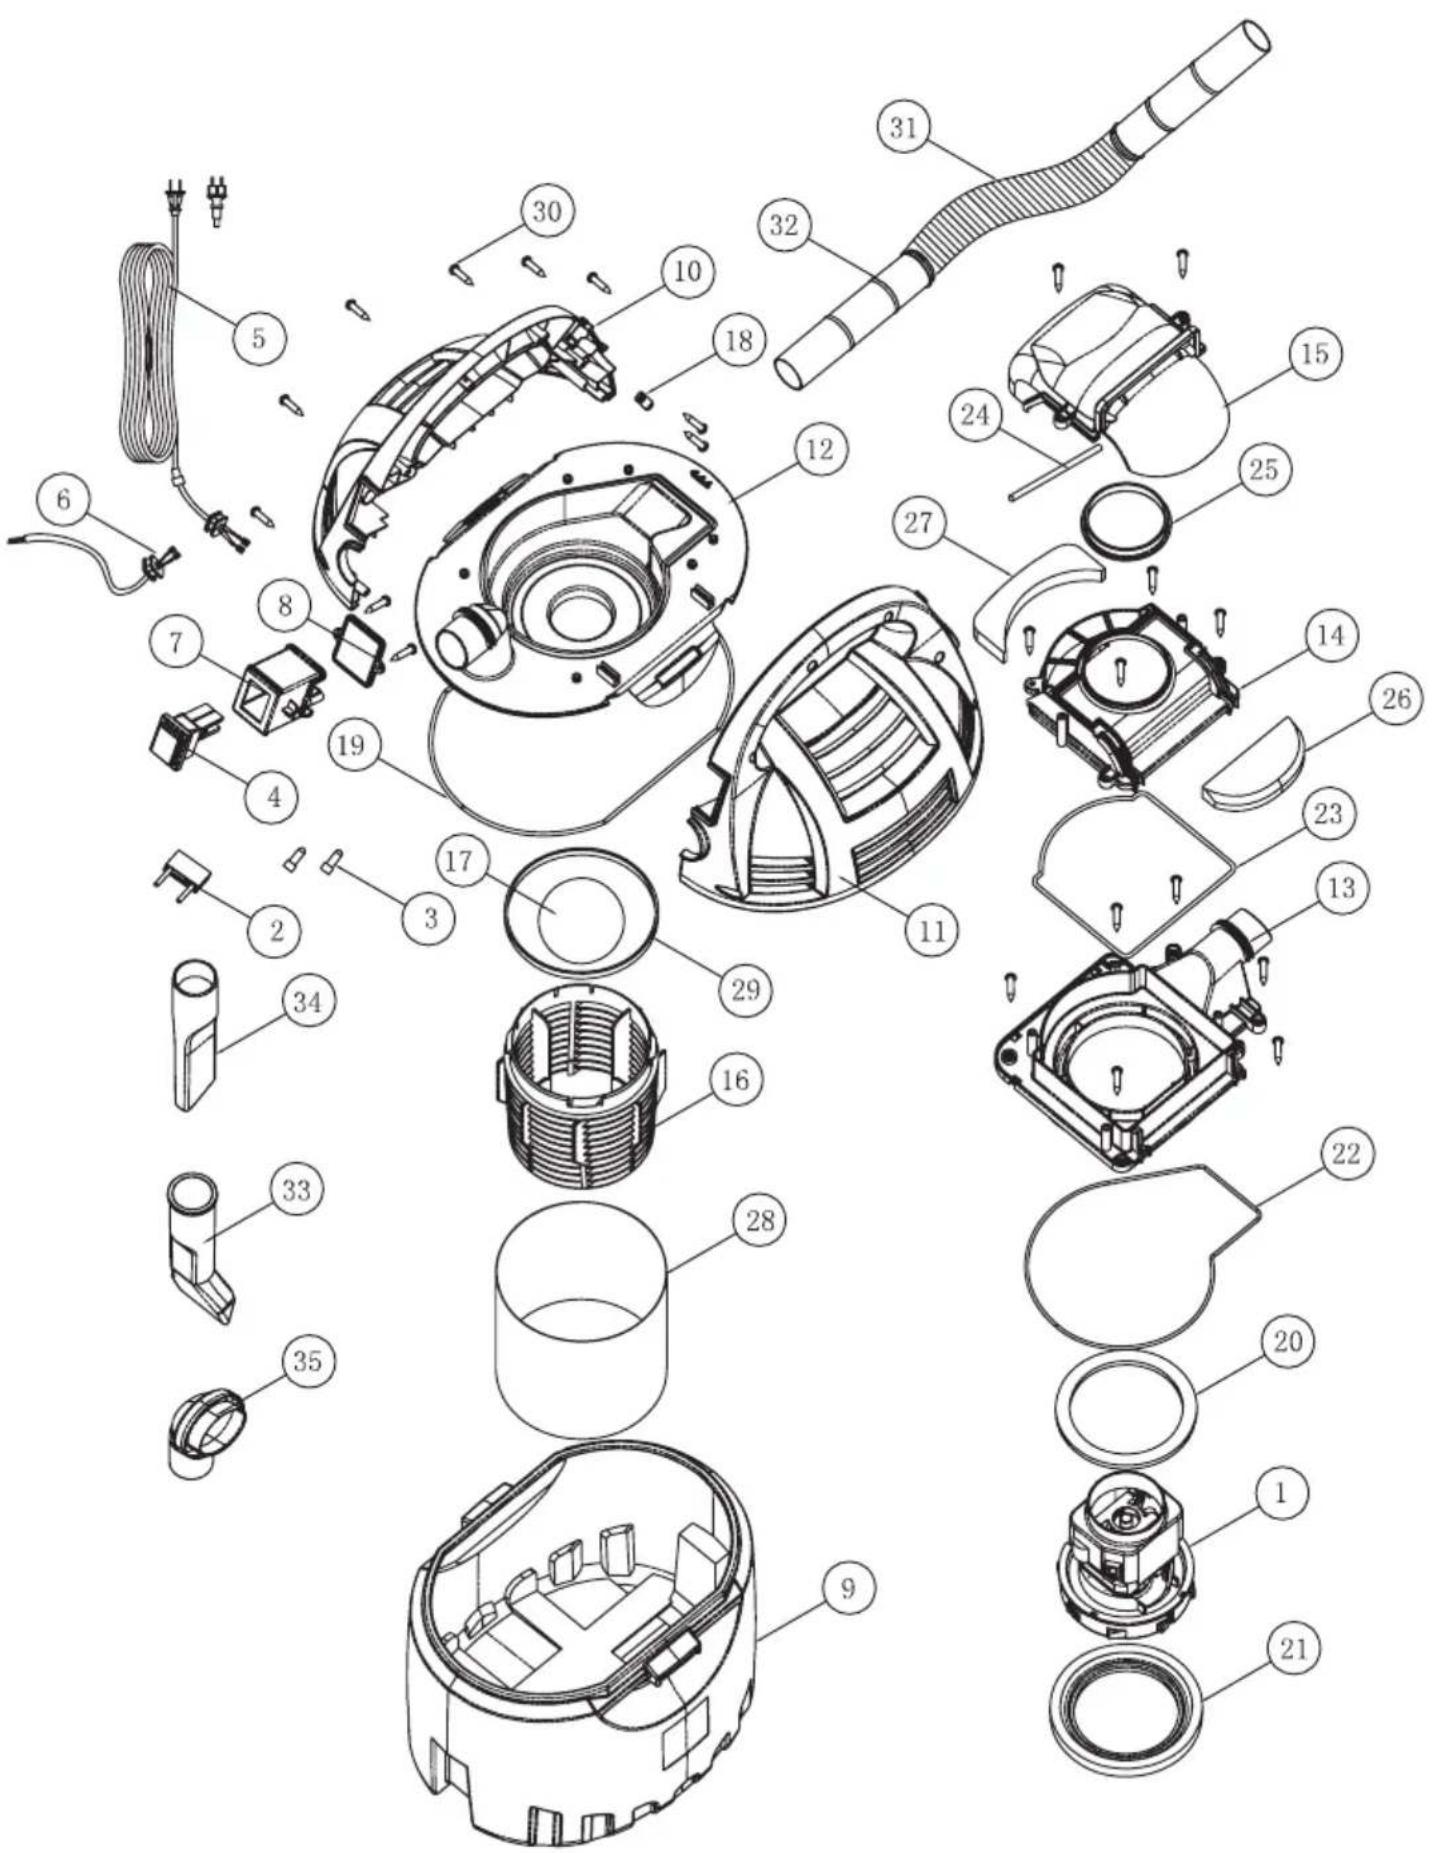
Exploded view
Spare parts list
Part No. Description of Spare Part
1 Motor
2 Capacitor
3 Pressing cap
4 Main switch
5 Power cord
6 Inner wire
7 Switch box
8 Switch box cover
9 Barrel
10 Left housing
11 Right housing
12 Motor base
13 Motor air outlet base
14 Motor cover
15 Air way cover
16 Water basket
17 Water ball
18 Power cord grip
19 Barrel seal
20 Motor seal
21 Lower motor seal
22 Air outlet base seal
23 Motor housing seal
24 Air way sealing band
25 Vibration-release ring
26 Air inlet sponge
27 Air outlet sponge
28 Dust bag
29 Fixing ring
30 Self-tapping screw
31 Soft hose
32 Soft hose connecter
33 Car nozzle
34 Crevice nozzle
35 Round brush
High Pressure Washer
GB DECLARATION OF CONFORMITY (C)
We declare under our sole responsibility that this product is in conformity with the following standards or standardized documents: EN 55014-1:2006, EN 55014-2:1997+A1, EN 61000-3-2:2006, EN 61000-3-3:1995+A1+A2, in accordance with the regulations 2006/42/CEE, 2006/95/CEE, 2004/108/CEE.
NOISE/VIBRATION Measured in accordance with EN 60 745 the sound pressure level of this tool is 85dB(A) and the sound power level is 96 dB(A) (standard deviation: 3 dB), and the vibration is 4.5m / s^2 (hand-arm method).
FR DÉCLARATION DE CONFORMITE (C)
SE KONFORMITETSFÖRKLARING (C)
10719 Berlin, Germany

High Pressure Washer
FI TODISTUS STANDARDIMUKAISUDESTA CC
CZ STRVZUJICI PROHLASENI CC
10719 Berlin, Germany

High Pressure Washer
SI IZJAVA O USTREZNOSTI
Odgovorno izjavljamo, da je ta izdelek v skladu z naslednjimi standardi ali standardnimi dokumenti: EN 55014-1:2006, EN 55014-2:1997+A1, EN 61000-3-2:2006, EN 61000-3-3:1995+A1+A2, v skladu s predpisin navodil 2006/42/EEC, 2006/95/EEC, 2004/108/EEC.
HRUP/VIBRACija Izmerjeno v skladu s predpisom EN 60 745 je raven zvočnega pritiska za to orodje 85 dB(A) in jakosti zvoka 96 dB(A) (standarden odmik: 3 dB), in vibracija 4.5m / s^2 (metoda «dlan-roka»).
CS IZJAVA O USKLAGENOSTI CC
Pod punom odgovornoscu izjavljujemo da je ovaj proizvod uskladen sa sledecim standardima ili standardizovanim dokumentima: EN 55014-1:2006, EN 55014-2:1997+A1, EN 61000-3-2:2006, EN 61000-3-3:1995+A1+A2, u skladu sa odredbama smernica 2006/42/EEC, 2006/95/EEC, 2004/108/EEC.
BUKA/VIBRACije Mereno u skladu sa EN 60 745, nivo pritiska zvuka ovog alata iznosi 85 dB(A), a jacina zvuka 96 dB(A) |normalno odstupanje: 3 dB), a vibracija 4.5m / s^2 (mereno metodom na šaci-ruci).
HR BOS IZJAVA O USKLAGENOSTI
Izjavljemo uz punu odgovornost da je ovaj proizvod uskladen sa slijedecim normama i nominativnim dokumentima: EN 55014-1:2006, EN 55014-2:1997+A1, EN 61000-3-2:2006, EN 61000-3-3:1995+A1+A2, prema odredbama smjernica 2006/42/EWG, 2006/95/EWG, 2004/108/EWG.
BUCI/VIBRACIJAMA Mjereno prema EN 60 745, prag zvučnog tlaka ovog elektricnog alata iznosi 85 dB(A) a jakost zvuka 96 dB(A) (standardna devijacija: 3 dB), a vibracija 4.5m / s^2 (postupkom na šaci-ruci).
TR STANDARDDIASYON BEYANI
Yegane sorumlu olarak, bu urunun asagidaki standartlara veya standart belgelerine uygun oldugunu Beyan ederiz: EN 55014-1:2006, EN 55014-2:1997+A1, EN 61000-3-2:2006, EN 61000-3-3:1995+A1+A2, yonetmeligi hukumeri uyarinca 2006/42/EWG, 2006/95/EWG, 2004/108/EWG.
GÜRULTÜ/TITRESIM Ölcülen EN 60 745 Göre ses basin-ci bu makinanin seviyesi 85 dB(A) ve calisma sirasindaki gürultü 96 dB(A) (standart sapma: 3 dB), ve titresim 4.5 m / s^2 (el-kol metodu).
Product management
V. Nosik
SBM group GmbH
Kurfurstendamm 21
10719 Berlin, Germany

CE 1
15
: aaii iinai gai yjaiai jai
EN 55014-1:2006, EN 55014-2:1997+A1
EN 61000-3-2:2006, EN 61000-3-3:1995+A1+A2
:4jll 1111,
2006/42/EEC, 2006/95/EEC, 2004/108/EEC
gaii 5 jiu jiu
High Pressure Washer
LT KOKYBÉS ATITIKTIES DEKLARACIJA (€
Mes atsakingai pareiskiame, kad sis gaminys atitinka tokius standartus ir normatyvinius dokumentus: EN 55014-1:2006, EN 55014-2:1997+A1, EN 61000-3-2:2006, EN 61000-3-3:1995+A1+A2, pagal EEB reglamentu 2006/42/EG, 2006/95/EG, 2004/108/EG nuostatas.
10719 Berlin, Germany

Vacuum Cleaner
GB DECLARATION OF CONFORMITY (C)
We declare under our sole responsibility that this product is in conformity with the following standards or standardized documents: EN 55014-1:2006, EN 55014-2:1997+A1, EN 61000-3-2:2006, EN 61000-3-3:1995+A1+A2, in accordance with the regulations 2006/42/CEE, 2006/95/CEE, 2004/108/CEE.
NOISE/VIBRATION Measured in accordance with EN 60 745 the sound pressure level of this tool is 79dB(A) and the sound power level is 90dB(A) (standard deviation: 3 dB), and the vibration is <2.5m/s^2 (hand-arm method).
FR DÉCLARATION DE CONFORMITE (C)
10719 Berlin, Germany

Vacuum Cleaner
FI TODISTUS STANDARDIMUKAISUDESTA CC
CZ STRVZUJICI PROHLASENI
10719 Berlin, Germany

Vacuum Cleaner
SI IZJAVA O USTREZNOSTI
Odgovorno izjavljamo, da je ta izdelek v skladu z naslednjimi standardi ali standardnimi dokumenti: EN 55014-1:2006, EN 55014-2:1997+A1, EN 61000-3-2:2006, EN 61000-3-3:1995+A1+A2, v skladu s predpisin navodil 2006/42/EEC, 2006/95/EEC, 2004/108/EEC.
HRUP/VIBRACJA Izmerjeno v skladu s predpisom EN 60 745 je raven zvočnega pritiska za to orodje 79 dB(A) in jakosti zvoka 90 dB(A) (standarden odmik:
3 dB), in vibracija < 2.5m / s^2 (metoda «dlan-roka»).
CS IZJAVA O USKLADENOSTI CC
Pod punom odgovornoscu izjavljujemo da je ovaj proizvod uskladen sa sledecim standardima ili standardizovanim dokumentima: EN 55014-1:2006, EN 55014-2:1997+A1, EN 61000-3-2:2006, EN 61000-3-3:1995+A1+A2, u skladu sa odredbama smernica 2006/42/EEC, 2006/95/EEC, 2004/108/EEC.
BUKA/VIBRACije Mereno u skladu sa EN 60 745, nivo pritiska zvuka ovog alata iznosi 79 dB(A), a jacina zvuka 90 dB(A) |normalno odstupanje: 3 dB), a vibracija < 2.5m / s^2 (mereno metodom na šaci-ruci).
HR BOS IZJAVA O USKLAGENOSTI
Izjavljemo uz punu odgovornost da je ovaj proizvod usklaeden sa slijedećim normama i nominativnim dokumentima: EN 55014-1:2006, EN 55014-2:1997+A1, EN 61000-3-2:2006, EN 61000-3-3:1995+A1+A2, prema odredbama smjernica 2006/42/EWG, 2006/95/EWG, 2004/108/EWG. BUCI/VIBRACIJAMA Mjereno prema EN 60 745, prag zvučnog tlaka ovog elektrichnog alata iznosi 79 dB(A) a jakost zvuka 90 dB(A) (standardna devijacija: 3 dB), a vibracija < 2.5m / s^2 (postupkom na šaci-ruci).
TR STANDARDIASYON BEYANI
Yegane sorumlu olarak, bu urunun asagidaki standartlara veya standart belgelerine uygun oldugunu Beyan ederiz: EN 55014-1:2006, EN 55014-2:1997+A1, EN 61000-3-2:2006, EN 61000-3-3:1995+A1+A2, yonetmeligi hukumeri uyarinca 2006/42/EWG, 2006/95/EWG, 2004/108/EWG.
GÜRULTÜ/TITRESIM Ölcülen EN 60 745 Göre ses basin-ci bu makinanin seviyesi 79 dB(A) ve calisma sirasindaki gürultü 90 dB(A) (standart sapma: 3 dB), ve titresim <2.5 m / s^2 (el-kol metodu).
Product management
V. Nosik
SBM group GmbH
Kurfurstendamm 21
10719 Berlin, Germany

CE 1
1510 100
: ailll cialgall yllal
EN 55014-1:2006, EN 55014-2:1997+A1
EN 61000-3-2:2006, EN 61000-3-3:1995+A1+A2
: 1
2006/42/EEC, 2006/95/EEC, 2004/108/EEC
aai 5i j
pall pai gill ciuill gili eie
EN60745
79 dB(A) 15
y
j 90 dB(A)
<2,5m/s²
RU 3AABLHeHNE O COOTBETCTBUN CC
MbI C NOHON OTBETCTBEHHOCBIO 3aABJREM, yTO HACTOJIeE N3dJIe COOTBETCTByET CNeDyUIM CTAHdaptAm HOpMaTINHBiM DOKymeHTam: EN 55014- 1:2006,EN 55014-2:1997+A1,EN 61000-3-2:2006,EN 61000-3-3:1995+A1+A2,-coRJaCHO npabuIm:2004/108/ EEC,2006/42/EEC,2006/95/EEC.
IWM N Bn5PAUNo pe3yNbTaTAM n3MepeHn B COOTBETCTBnC EN60745 ypOBeHb 3ByKOBOrO daBHeHn DAHHORo yCTPOINCTBa coCTaBnEeT 79 dB(A), ypOBeHb Wyma coCTaBnEeT 90 dB(A), Bn6paun paBHa < 2.5M / c^2
UA 3ABA IPO BIINOBIHNICTb
Mn 3 NOBHOI BiINOBiDaJIbHicTHO 3aBbIeMo, IIO cnpabXHi Bnip6 BiINOBiDa HAcTyNHm CTAHdaptAm I HopMaTHBHM DOKyMeHTAM: EN 55014-1:2006, EN 55014-2:1997+A1, EN 61000-3-2:2006, EN 61000-3-3:1995+A1+A2, -3riHo i3 npabJIam: 2004/108/EEC, 2006/42/EEC, 2006/95/ EEC.
IbIPA13a pe3yIbTaTAMBIMipB iINOBiIDHO EN60745 pBeHb 3ByKOBOrTO NCKy DaHORo PnCtpoCTAHOBITb 79 D(A), pBeHb IwMy CTAHOBNTb 90 D(A), Bi6paiaip IBHa < 2.5M /c^2
KZ CÖNIKECTIJK XÖHINDE ΘTIHIU CC
OcbI 6yHbIM KeNeci CTaHdapTTap MeH HopMaTnBTi KxKaTtApra cAkectiri XeHiNe ToBbK XayAnKepeuinikneH MAnimDeMiz: 2004/108/EEC, 2006/42/EEC, 2006/95/ EEC - epexenepihe cAkec EN 55014-1:2006, EN 55014-2:1997+A1, EN 61000-3-2:2006, EN 61000-3-3:1995+A1+A2.
WY MEH DIPIN EN60745 eIweynepe Hetnxkeine caikeocbkypbInfbHbIH dbl6bc KbcMbHbH deHrei 79 b(A)KpaNb, WU deHrei 90 dA) KpaNbl, dipin < 2.5M /c^2 TEH.
Vacuum Cleaner
LT KOKYBÉS ATITIKTIES DEKLARACIJA
Mes atsakingai pareiskiame, kad sis gaminys atitinka tokius standartus ir normatyvinius dokumentus: EN 55014-1:2006, EN 55014-2:1997+A1, EN 61000-3-2:2006, EN 61000-3-3:1995+A1+A2, pagal EEB reglamentu 2006/42/EG, 2006/95/EG, 2004/108/EG nuostatas.
10719 Berlin, Germany

GB ENVIRONMENTAL PROTECTION
Discarded electric appliances are recyclable and should not be discarded in the domestic waste! Please actively support us in conserving resources and protecting the environment by returning this appliance to the collection centres (if available).