
RBMM1907E - Bread maker Redmond - Free user manual and instructions
Find the device manual for free RBMM1907E Redmond in PDF.

| Product type | Bread machine |
| Brand | Redmond |
| Model | RBMM1907E |
| Power supply | 220-240 V ~ 50/60 Hz |
| Power | 500 W |
| Capacity | 500 g / 750 g / 1000 g |
| Number of automatic programs | 17 |
| Delayed start function | Up to 15 hours |
| Automatic keep warm | Yes, up to 1 hour (programs 1-8) |
| Crust color selection | Light, medium, dark |
| Addition of additional ingredients | Audible signal (selected programs) |
| Non-volatile memory | Up to 10 minutes |
| Display | LCD screen |
| Pan coating | Non-stick |
| Included accessories | Measuring cup and spoon, 2 kneading paddles, removal hook, recipe book |
| Care and cleaning | Pan and accessories washable with soapy water; wipe body with a damp cloth; do not immerse the body |
| Spare parts and repairability | Parts available from authorized service center; repair by professional only |
| Safety | Overheat protection and power failure (memory up to 10 min) |
| Warranty | 2 years |
| General information | Household use only; do not use outdoors; user manual included |
Frequently Asked Questions - RBMM1907E Redmond
User questions about RBMM1907E Redmond
0 question about this device. Answer the ones you know or ask your own.
Ask a new question about this device
Download the instructions for your Bread maker in PDF format for free! Find your manual RBMM1907E - Redmond and take your electronic device back in hand. On this page are published all the documents necessary for the use of your device. RBMM1907E by Redmond.
USER MANUAL RBMM1907E Redmond
natural_image
Exterior view of a stainless steel-colored BBA feedstock with digital display and control buttons (no visible text or symbols)User manual
GBR 6
FRA 11
DEU 17
NLD 23
ITA 29
ESP 35
PRT 41
DNK 47
NOR 52
SWE 57
FIN 62
LTU 67
LVA 72
EST 77
ROU 82
HUN 88
BGR 94
HRV 99
SRB 104
SVK 109
CZE 114
POL 119
GRC 125
TUR 132
ARE 139


A2
REDMOND
⚠️ Carefully read all instructions before operating and save them for future reference. By carefully following these instructions you can considerably prolong the service life of your appliance.
Important Safeguards
- The manufacturer is not responsible for any failures arising from the use of this product in a manner inconsistent with the technical or safety standards.
- This appliance is intended to be used in household and similar applications such as: staff kitchen areas in shops, offices and other working environments; farm houses; by clients in hotels, motels and other residential type environments; bed and breakfast type environments.
- Before installing the appliance, check that the device voltage corresponds with the supply voltage in your home (refer to the rating plate or technical data).
- While using the extension cord, make sure that its voltage is the same as specified on the device. Using different voltage may result
in a fire or another accident, causing appliance damage or short circuit.
- The appliance must be grounded. Connect only to a properly installed wall socket. Failure to do so may result in the risk of an electrical shock. Use only grounded extension cords.
CAUTION! During use the appliance becomes hot! Care should be taken to avoid touching the housing, bowl, or any other metal parts while operating. Make sure your hands are protected before handling the device. To avoid possible burns, do not lean above the open appliance.
- Always unplug the device after use, before cleaning or moving. Never handle the plug with wet hands. Do not pull the power cord to disconnect from the outlet; instead, grasp the plug and pull to disconnect.
- Keep the power cord away from hot surfaces (gas or electric ovens) or sharp edges. Do not let the cord hang over edge of a table or a counter.
Remember: damaging the cord may lead to a failure that will not be covered by the warranty. If the cable is damaged or requires replacing, contact an authorized service centre only to avoid all risks.
- Never place the device on soft surfaces to keep ventilation slots clear of any obstruction.
- Do not operate the appliance outdoors, to prevent water or any foreign object or insect from getting into the device. Doing so may result in serious damage of the appliance.
- Always unplug the device and let it cool down before cleaning. Follow cleaning and general maintenance guidelines when cleaning the unit.
Do not immerse the device in water or wash it under running water!
- This appliance can be used by children aged from 8 years and above and persons with reduced physical, sensory or mental capa-
bilities or lack of experience and knowledge if they have been given supervision or instruction concerning use of the appliance in a safe way and understand the hazards involved. Children shall not play with the appliance. Keep the appliance and its cord out of reach of children aged less than 8 years. Cleaning and user maintenance shall not be made by children without supervision.
- Keep packaging (film, foam plastic and other) out of reach of children as they may choke on them.
- Any modifications or adjustments to the product are not allowed. All the repairs should be carried out by an authorized service centre. Failure to do so may result in device and property damage or injury.
CAUTION! Do not use the appliance in case any breakdown has been noticed.
REDMOND
Technical Specifications
| Model | RBM-M1907-E |
| Power | 500 W |
| Voltage | 220-240 V, 50/60 Hz |
| Leaf weight | 500/750/1000 g |
| Baking pan | non-stick coated |
| Non-volatile memory | up to 10 minutes |
| Display | LCD |
| Automatic programmes | 17 |
| Crust colour control | yes |
| Keep Warm function | up to 1 hour |
| Time Delay function | up to 15 hours |
| Add ingredients signal | audible |
Programmes
- Basic
- French Bread
- Whole Grain Bread
- Sweet Bread
- Gluten Free Bread
- Express
- European Bread
B. Cake - Pasta Drug
10 Yeast Dough - Yeast Dough
- Oatmca
- yogurt
- Jam
- Bak
- Rice/Grain
- Pilat
- Dessert
Package Includes
| Bread maker with removable baking pan | 1 pc |
| Measuring cup | 1 pc |
| Measuring spoon | 1 pc |
| Kneading paddle | 2 pcs |
| Paddle removal hook | 1 pc |
| Cookbook "100 Recipes" | 1 pc |
| User manual | 1 pc |
| Service booklet | 1 pc |

The manufacturer reserves the right to make any modifications to design, packaging, or technical specifications of the product without prior notice.
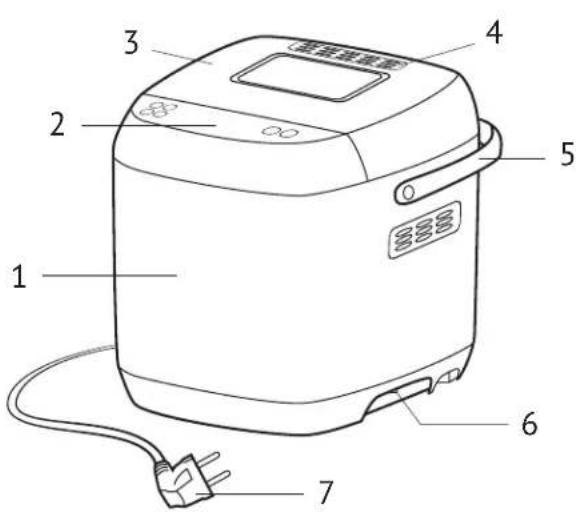
Bread Maker Parts A1
- Housing
- Control panel
- Removable Lid with viewing window
- Steam vent
- Carrying handle
- On/Off button (1/0)
- Power cord
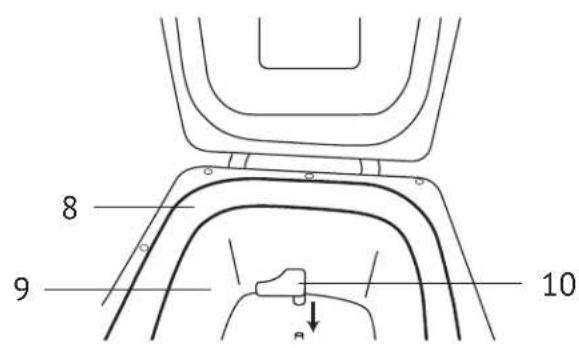
B. Baking chamber - Baking pan
- Kneading paddle
- Measuring cup
- Paddle removal hook
- Measuring cup
[Non-Text]
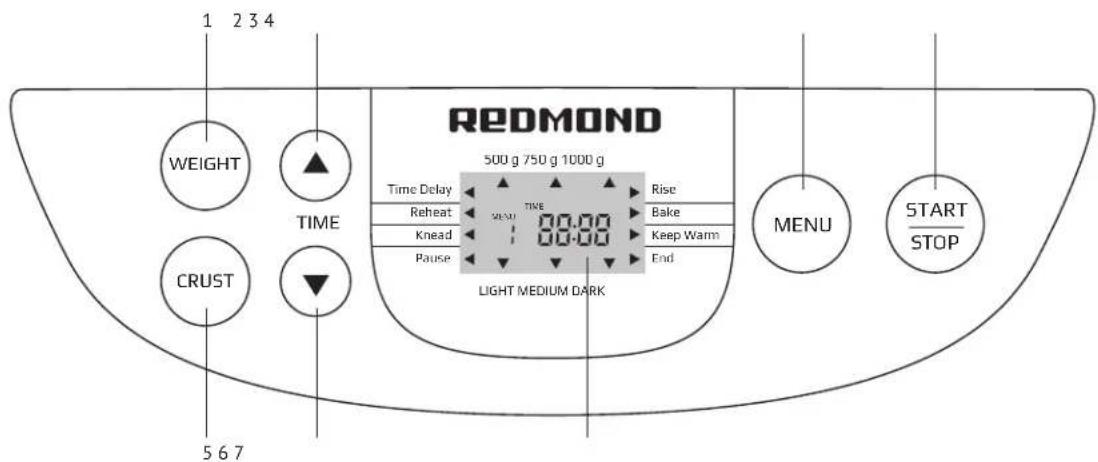
Control Panel

- "Weight" button is used to select the desired loaf size (500/750/1000 g).
The default setting is 1000 a. - ▲ button is used to increase the time of delay / cooking time.
- "Menu" button is used to select the desired programme. Display shows the number corresponding to the programme.
- "Start/Stop" button is used to start the programme; to stop the programme and to reset the bread maker to default settings.
- "Crust" button is used to select the desired crust colour (light, medium.
dark). The default setting is medium crust. - ▼ button is used to reduce the time of delay / cooking time.
- Display shows the current settings and the time remaining before the end of the programme.
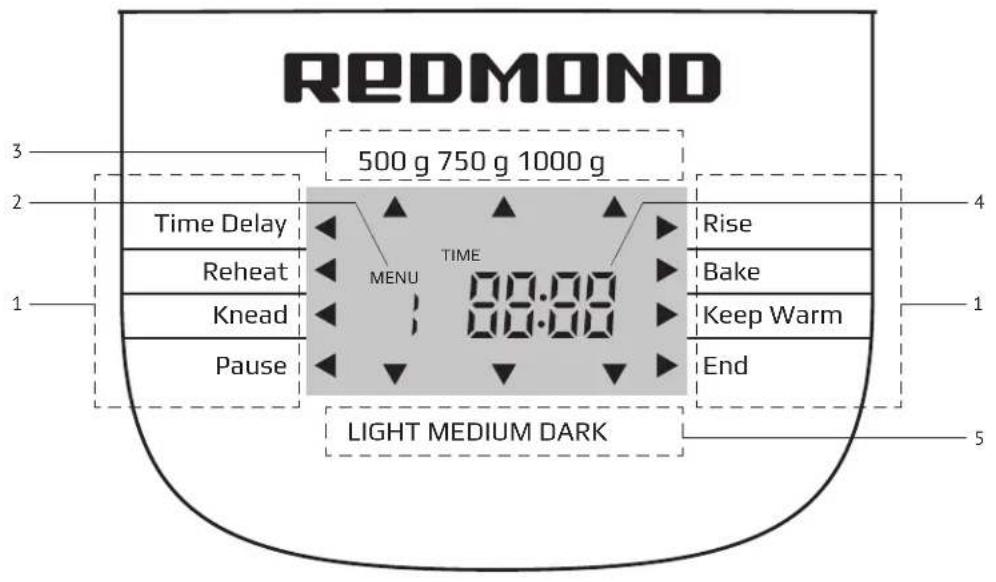
Display A3
- Progress indicators:
- "Delay" – indicates that the bread maker is in Time Delay mode, baking process has not started yet
- "Reheat" – indicates that the bread maker is preheating ingredients before kncading
- "Knead" – indicates that the bread maker is kneading
- "Pause" – indicates that the bread maker has paused (for example between the first and the second kneading cycles);
- "Rise" - indicates that the bread maker is rising the dough
- "Bake" – indicates that the bread maker is baking
- "Keep Warm" – indicates that the bread maker is in the Keep Warm mode
- "Programme is complete" – indicates that the programme is complete, Keep Warm mode is disabled.
- The number of programme selected.
- Leaf weight indicators (500/750/1000 a)
- The remaining time count drawn
- Selected crust colour indicators
I. PRIOR TO FIRST USE
Carefully remove the unit and its accessories from the packaging. Dispose of all packaging materials.

Keep all warning labels, stickers (if any), and the serial number Identification label located on the base. The absence of the serial number will deprive you of your warranty benefits!
After transportation or storage at low temperature allow the appliance to stay at room temperature for at least 2 hours before use.
Wipe the housing with a damp cloth and let dry. Wash the unit to eliminate any odours during first use.
Non-volatile Memory
REDMOND RBM-M1907-E Bread Maker is equipped with a power failure backup system. In the event of a power failure (up to 10 minutes) the bread maker stores current settings in its memory and resumes once power is restored. When the power outage lasts for more than 10 minutes all settings are cleared. If you used a recipe which contained perishable ingredients such as dairy or meat unplug the bread maker and let cool down. Remove the baking pan, discard the ingredients, clean the pan, and start from the beginning. Cleaning the baking pan follow the procedure outlined in this user manual.
If you use a recipe which does not contain perishable ingredients you can restart the programme (if baking cycle hasn't started yet) or use the "BAKE" programme to finish baking with the same ingredients (monitor the baking process through the viewing window and disable the programme when necessary). Keep in mind that restarting the programme may affect the quality of the finished bread.
II. USING BREAD MAKER
Automatic Programmes
REDMOND RBM-M1907-E Bread Maker is equipped with 17 automatic programmes. The bread maker not only bakes bread, but can also cook porridges, rice pilats, yogurts, jams, etc.

Do not open the bread maker illd during the rising cycle to prevent the dough from collapsing!

For best results follow the directions given in the cookbook provided with the bread maker.
1. "BASIC" Programme
The programme is recommended for baking traditional white bread. The programme includes 2 kneading cycles, rising cycle, and baking cycle. Loaf weight, crust colour, and Time Delay settings are applicable. Default time cannot be adjusted.
2. "FRENCH BREAD" Programme
The programme is recommended for baking French bread with crispy crust and airy, soft interior. The programme includes extended kneading and rising cycles. It is not recommended to use recipes which contain butter (shortening) and
milk

French bread goes stale very quickly. Store the bread no longer than 1 day.

programme Includes 2 kneading cycles, rising cycle, and baking cycle. Loaf t, crust colour, and Time Delay are applicable for the programme. Default cannot be adjusted.
3. "WHOLE GRAIN BREAD" Programme
Whole grain flour is heavier than all-purpose flour and requires additional 30 minutes of preheat time and an extended rise time. Finished bread is usually denser and smaller in size.
The programme Includes 2 kneading cycles, rising cycle, and baking cycle. Loan weight, crust colour, and Time Delay are applicable for the programme. Default time cannot be adjusted.
4. "SWEET BREAD" Programme
The programme is recommended for baking breads with high amount of sugar and an addition of extra ingredients (such as fruits, nuts, chocolate chips, raisins, candied fruits, etc.). The time to add the ingredients is indicated by an audible signal.
The programme includes 2 kneading cycles, rising cycle, and baking cycle. Time Delay and loaf weight are applicable for the programme. Default time cannot be adjusted. Crust colour is not applicable.
5. "GLUTEN FREE BREAD" Programme
The programme is recommended for baking bread from gluten-free flour.
Gluten is a protein composite found in grains. It gives elasticity to dough, helping the dough to rise and keep its shape. But some people are allergic or sensitive to gluten.
The programme includes preheating cycle, 2 kneading cycles, rising cycle, and baking cycle. Time Delay and loaf weight are applicable for the programme. Default time cannot be adjusted. Crust colour is not applicable.
6. "EXPRESS" Programme
The programme is recommended for quickly baking white bread. Add another 1/2 teaspoon of yeast per 1000 g loaf.
The programme includes kneading cycle, fast rising cycle, and baking cycle. Time Delay is applicable for the programme. Default time cannot be adjusted.
Loaf weight and crust colour are not applicable.
7. "EUROPEAN BREAD" Programme
The programme is recommended for baking different types of white bread and bread from combination of wheat and ryc flours.
The programme includes preheating cycle, 2 kneading cycles, rising cycle, and baking cycle. Time Delay is applicable for the programme. Default time cannot be adjusted. Loaf weight and crust colour are not applicable.
8. "CAKE" Programme
The programme is recommended for making different types of cakes.
The programme includes 2 fast kneading cycles and baking cycle. Leaf weight, crust colour, and Time Delay are not applicable for the programme. Default time cannot be adjusted.
9. "PASTA DOUGH" Programme
The programme is recommended for making pasta, noodles, and ravioli dough. The programme includes 2 kneading cycles. Default time cannot be adjusted. Time Delay and Keep Warm are not applicable for the programme.
10. "YEAST DOUGH" Programme
The programme is recommended for making yeast dough to bake in the oven. The programme includes 2 kneading cycles and a rising cycle. Default time cannot be adjusted. Time Delay and Keep Warm are not applicable for the programme.
11. "OATMEAL" Programme
The programme is recommended for making porridges with water or milk. Default time cannot be adjusted. Keep Warm and Time Delay are not applicable for the programme.
12. "YOGURT" Programme
The programme is recommended for making different types of yogurts. Default time can be adjusted between 5 and 12 hours in 10 minute increments (default time is 8 hours). Time Delay and Keep Warm are not applicable for the programme.
13. "JAM" Programme
The programme is recommended for making jams, glazes for cakes, waffles, and ice cream. It can also be used for making sauces, marinades, and for preparing foods for canning. Default time cannot be adjusted. Time Delay and Keep Warm are not applicable for the programme.
14. "BAKE" Programme
The programme is recommended for baking cakes and making main course dishes. The programme only includes baking cycle (without kneading and rising cycles). Default time cannot be adjusted. Time Delay and Keep Warm are not applicable for the programme.
15. "RICE/GRAIN" Programme
The programme is recommended for cooking rice and other grains. Default time can be adjusted between 20 minutes and 1 hour and 30 minutes in 5 minute increments (default time is 30 minutes). Time Delay and Keep Warm are not applicable for the programme.
16. "PILAF" Programme
The programme is recommended for cooking different rice pilafs. Default time can be adjusted between 30 minutes and 1 hour and 30 minutes in 5 minute increments (default time is 1 hour). Time Delay and Keep Warm are not applicable for the programme.
17. "DESSERT" Programme
The programme is recommended for making milk and chocolate desserts.
Default time can be adjusted between 30 minutes and 2 hours in 5 minute increments (default time is 1 hour). Time Delay and Keep Warm are not applicable for the programme.
Before Operating the Bread Maker
- Place the bread maker on a flat, stable, and horizontal surface away from wallpaper, decorative coatings, electronic appliances, or any other objects or cabinets that could be damaged by steam, humidity, or high temperatures. Ensure that there is adequate ventilation around the bread maker.
- Before operating, make sure that the outer and inner parts of the appliance have no dents, cracks or any other visible damages.
- Open the main lid. Take the baking pan by the handle and slightly turn it counterclockwise. Pull the pan up to remove. Ensure that the area around the mounting shaft and kneading paddle is clean.
Filling Bread Maker with Ingredients
- Mount the paddle onto the shaft at the bottom of the baking pan. Ensure that it is securely attached. Grease the baking pan and the kneading paddle with butter.
- Measure the ingredients according to the recipe directions.
- When baking bread or making dough, prepare any extra ingredients required by the recipe beforehand (cheese, ham, fruits, nuts, raisins, etc.). All ingredients must be at room temperature (25-35°C), unless recipe states otherwise. Fill baking pan with ingredients in the order listed in the recipe.
- Add the liquid ingredients first (water, milk) and/or eggs. Water must be at room temperature (around 25-35°C). If the water is too hot the yeast activity will be inhibited and the dough will not rise. When delaying the programme use powdered milk as a substitute for fresh milk. Add salt and sugar to liquids according to recipe directions.
- Add the rest of liquid ingredients (honey, molasses, syrup, etc.).
- Add the dry ingredients (first flour, then powdered milk, herbs, spices, etc.)
- Add yeast and baking powder last. Do not let these Ingredients touch liquids because fermentation process will begin too quickly. As a result finished bread will be hard and tough. Don't allow yeast to come into contact with salt. It is recommended to make a small hollow in the center of dry ingredients and place yeast or baking powder within the hollow.
- Lower the baking pan inside the bread maker, by slightly turning it counterclockwise. The pan must connect with the drive shaft. Turn the pan clockwise to secure firmly in place (as shown below). Close the lid.
Standard Operating Procedure
- Plug in the bread maker. Press "I/O" button on the side of the unit to switch the bread maker on. Audible signal will sound, display will show the number corresponding to the programme (default programme is programme 1) and its default time (3:00).
- Use the "Menu" button to select the desired programme (between 1 and 17). Display will show the number corresponding to the selected programme.
| No | Programme No | Programme No | Programme | ||
| 1 | Bisc 7 European Bread 13 Jam | ||||
| 2 | French Bread | 8 | Cake | 14 | Base |
| 3 | Whole Grain Bread 9 Piece Dough | 15 RiceCream | |||
| 4 | Sweer Bread 10 Yeast dough | 16 Pilaf | |||
| 5 Gluten Price Bread 11 Oatmeal | 17 Dessert | ||
| 6 Express | 12 Yecour. |
- Use the "Weight" button to select the desired loaf weight depending on the amount of ingredients. Loaf weight indicator will move at the top of the display. Loaf weight is not applicable for some programmes.
- Use the "Crust" button to select the desired crust colour (light, medium, dark). Crust colour indicator will move at the bottom of the display. Default setting is medium crust. Crust colour is not applicable for some programmes.
- Default time of selected programme will be displayed next to its corresponding number, if necessary adjust default time using the arrow buttons (only applicable for programmes 12, 15-17). Adjustment range and interval depend on selected programme.
- If necessary delay the programme using the arrow buttons (only applicable for programmes 1-7).
Keep in mind that the ▲ and ▼ buttons in programmes 1-7 are used to select the baking end time (time of delay is included, cooking time remains the some) while in programmes 12, 15-17 ▲ and ▼ buttons are used to adjust the cooking time.
- Press the "Start/Stop" button. The timer will start to count down the time remaining before the end of the programme.
- Each programme includes several cycles the names of which are given to the left and to the right from the display. Progress indicator on display shows which cycle is in progress at the moment.
- Depending on the programme, 15-20 minutes after the beginning of the cycle an audible signal will sound to indicate the time to add extra ingredients. Open the lid and add ingredients into the baking pan. The function is applicable for programmes 1, 3-5, and 7.
- After the programmes 1-8 are complete the bread maker automatically switches to the Keep Warm mode. Indicator on display moves to Keep Warm.
- After the programmes 9-17 and Keep Warm mode are complete 5 short audible signals sound and the bread-maker switches into the standby mode. The indicator on the display moves to Programme is Complete.
- To stop the programme and clear current settings, returning back to the menu or to disable the Keep Warm mode press and hold down the "Start/Stop" button for a few seconds. Use the "I/O" button to switch the bread maker off. Unplug the appliance.
Removing the Bread
- Open the lid. Use oven mitts to carefully remove the baking pan.
CAUTION! Finished bread, baking pan, and baking chamber are extremely hot! Be careful and use oven mints to prevent possible burns! Do not place a hot baking pan on tablecloth, plastic, or other surfaces sensitive to heat! - Turn the baking pan upside down and remove the bread. Place the bread on a rack or a plate and allow to cool down for 20 minutes. The kneading paddle is designed to remain attached to the shaft after finished bread has been removed. However, the paddle may remain inside the bread which does not indicate a defect. Remove the paddle using the removal hook, provided with the appliance.
- Let the baking pan and the bread maker cool down and clean it following the procedure outlined in this user manual.
NOTE: thoroughly clean the inside of the baking pan and the bread maker after each use.
REDMOND
Using the Baking Pan
The stain-resistant non-stick coated baking pan and kneading paddle provide excellent bread release. Please, follow the instructions below to prevent damages to the coating.
- Do not use metal or sharp utensils (such as a knife or a fork) to remove the bread from the baking pan.
- Before cutting the loaf always ensure that the kneading paddle is removed. If the paddle is inside the loaf, wait for the loaf to cool down and remove the paddle using the special paddle removing hook, provided with the bread maker. Be careful when handling the kneading paddle because it might still be hot.
- Coarse Ingredients (such as unsilted flour, sugar, nuts, or seeds) may damage the non-stick coating of the baking pan. When using a large amount of ingredients divide them into small parts. Observe the proportions and follow the method specified in the recipe.
Slicing and Storing the Bread
Use an electric knife or a serrated bread knife for even slices.
Store bread in sealed packages (sealable plastic bags or containers) at room temperature for up to 3 days. For extended storage (up to 1 month) seal and freeze the bread. Since homemade bread has no preservatives, it tends to dry out and become stale faster than commercially-made bread.
Keep Warm Function
After the programme is complete the bread maker automatically switches to the Keep Warm mode (applicable for programmes 1-8). Press and hold down the "Start/Stop" button for a few seconds to disable Keep Warm before removing the baked loaf.
When the bread is left inside the bread maker with disabled Keep Warm evaporated liquid will be absorbed, resulting in soggy loaf. The Keep Warm mode prevents bread from getting soggy by keeping finished bread worm for some time. However, for optimal results, we recommend removing your loaf as soon as the baking cycle is complete.
Delaying the Programme
The Time Delay function allows you to delay the baking end time by up to 15 hours in 10 minute increments (including the programme time). When using the Time Delay function no perishable ingredients should be used.
- Time Delay mode is not applicable for some programmes.
- Ensure that the baking pan is filled with ingredients and the programme, loaf weight, and crust colour are selected.
- Use the arrow buttons to set the timer to reflect the time difference between the present time and the time you wish the programme to be complete (up to 15 hours in 10 minute increments). Press and hold the corresponding button down to scroll through the digits.

For example, the current time is 21:00. You want to have fresh bread at 7 a'clock in the morning that is in 10 hours. You have selected programme 1, loaf weight 750 g, crust colour medium. The display is showing the cooking time of 2:55. Press and hold down the ▲ button until the display shows 10:00. If you passed the desired setting, reduce the value using the ▼ button. Now the time of delay is set. The baking cycle will be completed in 10 hours and a freshly boiled loaf will be waiting for you at 7:00.
III. CLEANING AND MAINTENANCE GUIDELINES
Before cleaning the bread maker ensure that it is unplugged and has cooled down.
-
Open the lid and take the baking pan by the handle. Slightly turn the pan counterclockwise and pull up to remove.
-
Remove the kneading paddle. If the paddle is hard to remove from the shaft fill the pan with warm water and let it soak for a while. This will loosen the paddle.
- Wash the measuring cup, measuring spoon, baking pan, and kneading paddle with a soft sponge and warm soapy water and let it dry. If the inside of the paddle gets clogged with flour, soak it in warm water and clean.
- Wipe the housing and the inside of the bread maker with a damp cloth. Use a mild soap solution if necessary. Remove any traces of soap that may affect the taste of your bread.

CAUTION! Do not immerse the housing and the power cord in water or on- other liquid. The bread maker and its parts are not dishwasher safe.

Do not use abrasive substances, chemically aggressive detergents, and abrasive sponges to clean the bread maker or its parts.
The bread maker lid can be removed for easy clean-up.
-
Open the lid to the angle of 80-85 degrees and pull it towards yourself to remove from the hinges on the housing.
-
Wipe the lid and let it dry.
-
To place the lid back into its original position insert the lid into the attachment hinges, holding the lid to the angle of 80-85 degrees. A properly positioned lid must open and close effortlessly.

Ensure that the bread maker and all its parts are thoroughly dried before use or storage.
Storage
Store a fully assembled bread maker in a dry and well-ventilated area. Do not expose the bread maker to direct sunlight and rapid temperature changes.
IV. BEFORE CONTACTING THE SERVICE CENTRE
| Problem Possible cause Solution | ||
| Bread maker does not switch on | Bread maker is not connected to power | Connect the bread maker to a property working electrical outlet. Check the power supply |
| Bread maker has switched on but the kneading cycle does not start | You did not attach the kneading paddle | Close the baking pan, attach the kneading paddle to the shaft, and start all over |
| Display shows error massage (let of letters or letters and numbers) | Bread maker is main-furntiming | Press the "40" button to switch the bread maker off and want to sit or cut down to the room temperature. Switch the bread maker back on. If this does not eliminate the error contact an authorized service centre |
V. PRODUCT WARRANTY
We warrant this product to be free from defects for a period of 2 years from the date of purchase. If the appliance falls to operate properly within the warranty period and is found to be defective in material or workmanship, we will repair or replace it free of charge. This warranty comes into force only in case an original warranty service coupon with a serial article number and an accurate impress of the company of the seller proves the purchase date. This limited warranty does not cover damage caused by the failure to use this product for its normal purpose or in accordance with the instructions on the proper use and maintenance of the product or any kind of repair works. Do not try to disassemble the device and keep all package contents. This warranty does not
cover normal wear of the device and its parts (filters, bulbs, ceramic and Teflon coating, gaskets etc.).
Service life and the applicable product warranty period start on the date of purchase or the date of manufacture (if the purchase date cannot be established). You can determine manufacture date by serial number, located on the identification label on the housing of the device. The serial number consists of 13 digits. The 6th and 7th digits of the serial number identify the month, the 8th digit the year of manufacture.
Service Life of the product, established by the manufacturer is 5 years from the date of purchase, provided that the unit is used and maintained in accordance with the user manual and applicable technical standards.
The packaging, user manual, and the device itself may not be treated as household waste. Instead, it shall be taken to the applicable collection point for the recycling of electrical and electronic equipment.
3. Programma "WHOLE GRAIN BREAD"
-
Basic (Principal)
-
French Bread (Pão francês)
-
Whole Grain Bread (Pão 4. Sugart Brevi (Pão dian)
-
SWEET BREAD (Rab block)
-
Gluten Frous Bread (200 gm gluten)
-
Exports (Rapid)
-
European Bread (Pão europeu)
II. Cake (Bola)
-
Pasta Dough (Massa insulsa)
-
Yeast Dough (Massa fermentada)
-
Oatmeal (Papa com leite)
-
Yogurt (loguite)
-
lam /lam/golaia
-
Jam (panquetera), 14. Bake (biortalaria)
-
Bake (Pastetana)
-
Rice/Grain (Arroz/Graos)
-
PilaI (PilaN
-
Dessert (Sobremas)
Componentes
3. Programa "WHOLE GRAIN BREAD"
10. Programa "YEAST DOUGH"
11. Programa "OATMEAL"
2. Program "FRENCH BREAD"
3. Program "WHOLE GRAIN BREAD"
4. Program "SWEET BREAD"
5. Program "GLUTEN FREE BREAD"
6. Program "EXPRESS"
9. Program "PASTA DOUGH"
10. Program "YEAST DOUGH"
11. Program "OATMEAL"
12. Program "YOGURT"
III. VEDLIKEHOLD AV OVN
Far du renser ovnen, sorg for at kontakten er trukket ut og ovnen er avkjelet. Alltid tørk ovnen og dens detaljer før neste bruk.
b. Express (Express)
- European Bread (Europolsk t brod)
B. Cake (Muffins)
-
Pasta Dough (Farsk deg)
-
Yeast Dough (Jasdeg)
-
Outmeal (Millipots)
-
Oatmeal (M) bilgrob
-
Yogurt (Yoghurt)
-
Jam (Marmelad/Syit)
-
Bake (Bakhing)
-
Pie/Canin (Pie/Com
-
Rice/grain (Kis/Gryn)
-
Pilat (Pilam)
-
Dessert (Desserter)
ÜVERSIKL Brörbak
| Brockbore med impateri di baklandare.... | 1 st. |
| Mättbågare.... | 1 st. |
| Måtsked.... | 2 st. |
| Degblandare.... | 2 st. |
| Krok för degblandare.... | 1 st. |
| "100 recept" boken.... | 1 st. |
| Bruksanvisning.... | 1 st. |
| Serviceboli.... | 1 st. |

3. "WHOLE GRAIN BREAD" programmet
10. "YEAST DOUGH" programmet
3. Programa "WHOLE GRAIN BREAD"
10. Programa "YEAST DOUGH"
11. Programa "OATMEAL"
3. Programul "WHOLE GRAIN BREAD"
2. "FRENCH BREAD" program
3. "WHOLE GRAIN BREAD" program
4. "SWEET BREAD" program
5. "GLUTEN FREE BREAD" program
9. "PASTA DOUGH" program
10. "YEAST DOUGH" program
11. "OATMEAL" program
12. "YOGURT" program
2. Program "FRENCH BREAD"
Program se koristi za pečenje vrto lakog, sa. hrskajućom korom francuskog hleba. Predviđeno trajno umešanje i dizanje testa. Preporućuje se za pečenje proizvoda od testa koje ne sadrži buter (margarin) i mleko.
Francuski hleb brzo postaje budav i bojle da se nu člava duže od jednog dena. Program uključuje umešanje (2 faze), dizanje testa i pečenje hleba. Može se izabrati težina proizvoda i boja koro, dostupna funkcija odloženog početka. Ručno regulisanje vremena nije dostupno.
3. Program "WHOLE GRAIN BREAD"
Brašno koje se koristi za počenje ovog hleba je tože i program vrši preliminarno podgrevanje ingredijenata pola sata pre amešanja testa i ostavlja testo da "dolazi" tokom trajnog vremena. Vekne od zitaričnog brašna su obično manje i dušce.
Program uključuje umešanje (2 faze), dizanje testa i pečenje hleba. Može se izabrati težina proizvoda i boja kore, dostupna funkcija odloženog početka. Ručno regulisanje vremena nije dostupno.
4. Program "SWEET BREAD"
5. Program "GLUTEN FREE BREAD"
Program se karisti pečenje hleba od brašna bez glutena.
Gluten je protein koji se nalazi u žitaricama i doje brašnu visaka svojstva za pečenje. Zbog toga testo stike čvstinu i elastičnost. Ali za neke iđude gluten je kontrainačkavan.
Program uključuje podgrevanje ingredijenata, umešanje (2 teze), dizanje testa i pečenje hleba. Može se izabrati telina proizvoda, dostupna funkcija odloženog početka. Nije dostupan izbor boje kore. Ručno regulisanje vromena nije dostupno.
6. Program "EXPRESS"
Program se koristi za ubrzano pečenje belog hleba. Dopunite testo za beli hleb sa ½ kašičice kvasca, ako težina pečenja je 1000 g.
Program uključuje umešanje, kratkotrajno dizanje testa i pečenje. Dostupna funkcija odloženog početka. Nije dostupan izbor težinc proizvoda i boje kore. Ručno regulisanje vremena nije dostupna.
7. Program "EUROPEAN BREAD"
9. Program "PASTA DOUGH"
Program se koristi za umešanje testa bez kvasca koje se koristi za spremanje rezanalua, itd, bez daljeg pečenja. Uklujučuje 2 faze umešanja. Ručno regulisanje vremena nije dostupno, funkcije odloženog početka i automatskog podgrevanja nisu dostupni.
10. Program "YEAST DOUGH"
Program se koristi za spremanje testa od kvasca bez daljeg počenja. Uktjučuje umešanje (2 faze) i iskušavanje testa. Ručno regulisanje vremena nije dostupno, funkcije odloženog početka i automatskog podgrevanja nisu dostupni.
11. Program "OATMEAL"
Preporučuje se za spremanje kaša od mleka i vode. Ručno regulisanje vremena nije dostupno, funkcije odloženog početka i automatskog podgrevanja nisu dostupni.
12. Program "YOGURT"
Program se koristi za spremanje različitih vrsta jogurta. Omogučeno regulisanje vremena spremanja u rasponu od 5 do 12 sati, korak je 10 minuta (podrazumovano vreme spremanja je 8 sati). Funkcije odloženog početka i automatskog podgrevanja nisu dostupni.
13. Program "JAM"
Program se koristi za spremanje džema, pretiva za pečenje, oblande i sladoled, kočap, sve vrste začina, kao i za spremanje nekih proizvoda za kućno konzerviranje. Ručno regulisanje vremena nije dostupno, funkcije odloženog početka i automatskog podgrevanja nisu dostupni.
14. Program "BAKE"
Program uključuje samo grejanje (bez umešanja i dizanja). Preporučuje se za počenje biskvitne torte i spromanje drugih jota. Ručno regulisanje vremona nije dostupno, funkcije odloženog početka i automatskog podgrevanja nisu dostupni.
15. Program "RICE/GRAIN"
Preporučuje se za spremanje pirinca i mitljivih kaša. Omogučeno regulisanje vremena spremanja u rasponu od 20 minuta do 1 sata 50 minuta, korak je 5 minuta (podrazumevano vreme spremanja je 30 minuta). Funkcije odloženog početka i automatskog podgrevanja nisu dostupni.
16. Program "PILAF"
Preporučuje se za spremanje različitih vrsta pilava. Omogučeno regulisanje vremena spremanja u rasponu od 30 minuta do 1 sata 50 minuta, korak je 5 minuta (podrazumevano vreme spremanja je 1 sat). Funkcije odloženog početka i automatskoq podgrevanja nisu dostupni.
17. Program "DESSERT"
Preporućuje se za spremanje deserta od čokolade i mleka. Omogučeno regulisanje vremena spremanja u rasponu od 30 minuta do 2 sati, korak je 5 minuta (podrazumevana vreme spremanja je 1 sat). Funkrije odloženog početka i automatskog podgrevanja nisu dostupni.
Priprema za rad
- Postavite pekarnicu na ravna čvrstu horizontalnu površinu. Uverite se da
prilikom rada uredaja nije otežana ventilacija, vruča para koja izlazi iz otvora u poklopca ne dolazi do tapeta, dekrativnih premaza, elektronskih uredaja i drugih predmeta koji mogu biti oštećeni visokom vlažnošću i temperaturom.
- Uverite se da unutrašnji i spoljni delovi pekamice nemaju oštećenja, plupazih mesta i dupih defekata.
- Otvorite poklopac sa prozorom za posmatranje. Uzmite činiju za pečenje za ručicu, malo okrenite je suprotno od kretanja kazaljki na satu i izvadi te uz mali napor gore. Uverite se da su prostor oko osovine i lopatice za mešanje čistl.
3. Program "WHOLE GRAIN BREAD"
2. Program "FRENCH BREAD"
3. Program "WHOLE GRAIN BREAD"
4. Program "SWEET BREAD"
5. Program "GLUTEN FREE BREAD"
6. Program "EXPRESS"
9. Program "PASTA DOUGH"
10. Program "YEAST DOUGH"
11. Program "OATMEAL"
12. Program "YOGURT"
3. "WHOLE GRAIN BREAD" Program
4. "SWEET BREAD" Program
5. "GLUTEN FREE BREAD" Programi
10. "YEAST DOUGH" Programi
11. "OATMEAL" Programi
| No. | Ekrandski NF | No. | Ekrandski NF | No. | Ekrandski NF |
| 1 Basic 7 | Feroporous Bread | 15 Jam | |||
| 2 French Bread & Lake 4 Bake | |||||
| 3 | Whole Grain Bread | 9 Pasta | Dough 15 Rice/Grain | ||
| 4 Sweet Bread 10 Yeast Dough 16 Pilaf | |||||
| 5 | Gutien Free Bread | 11 Damself 17 Desert | |||
| 6 | Express 12 Yungurt | ||||
(العربية) Express .6
[عربية الح Libya] Oatmeal .11
ي Authentic Regression Trengthen Without and Begin 21 meridian, EnQuech Begin and Thruver Begin. وظيفه
Environmentally friendly disposal (WEEE)
This appliance is labelled in accordance with European Directive 2012/19/EU – concerning used electrical and electronic appliances (waste electrical and electronic equipment WEEE). The guideline determines the framework for the return and recycling of used appliances as applicable throughout the EU.
© REDMOND. ALL RIGHTS RESERVED. 2014.
Reproduction, transfer, distribution, translation or other reworking of this document or any part thereof without prior written permission of the legal owner is prohibited.
Produced by Redmond Industrial Group LLC
One Commerce Plaza, 99 Washington Ave, Ste. 805A
Albany, New York, 12210, United States
www.redmond.company
www.multicooker.com
Made in China
RBM-M1907-E-UM-1