
RAG241E - Oven Redmond - Free user manual and instructions
Find the device manual for free RAG241E Redmond in PDF.

| Product type | Hot air oven (air fryer) |
| Brand | Redmond |
| Model | RAG241E |
| Power | 700–800 W |
| Supply voltage | 220–240 V, 50/60 Hz |
| Control type | Mechanical (rotary timer and thermostat) |
| Heating type | Halogen |
| Temperature range | 60–250 °C |
| Timer | 5–60 minutes |
| Diameter of glass lid | 22.5 cm |
| Included accessories | 3 metal racks (heights 20, 20, 60 mm), tongs, stand, silicone gasket, silicone mat, recipe book |
| Defrost function | Yes (Defrost position) |
| Self-cleaning | Yes (Wash position) |
| Safety | Automatic shut-off when lifting handle, mandatory grounding, overheat protection |
| Maintenance | Wipe lid and body with damp cloth, racks and gasket dishwasher safe, do not immerse body |
| Power cord length | 1.5 m |
Frequently Asked Questions - RAG241E Redmond
User questions about RAG241E Redmond
0 question about this device. Answer the ones you know or ask your own.
Ask a new question about this device
Download the instructions for your Oven in PDF format for free! Find your manual RAG241E - Redmond and take your electronic device back in hand. On this page are published all the documents necessary for the use of your device. RAG241E by Redmond.
USER MANUAL RAG241E Redmond
natural_image
Exterior view of a modern kitchen fan with heat exchanger and control knobs (no visible text or symbols)User manual
REDMOND
A1
REDMOND
GBR 5
FRA 13
DEU 22
NLD 31
ITA....40
ESP 49
PRT 58
DNK....67
NOR....75
SWE 83
FIN....91
LTU 99
LVA....107
EST 115
ROU 123
HUN....132
BGR 141
HRV....150
SRB....158
SVK 166
CZE 174
POL....183
RUS 193
GRC 203
TUR 213
ARE 224

Carefully read all instructions before operating the unit and save them for future reference. By carefully following these instructions you can considerably prolong the service life of your appliance.
Important Safeguards
- The manufacturer is not responsible for any failures arising from the use of this product in a manner inconsistent with the technical or safety standards.
- This appliance is a versatile device intended for cooking food in household and similar applications such as: staff kitchen areas in shops, offices, and other working environments; farm houses; by clients in hotels, motels, and other residential type environments; bed and breakfast type environments. Do not use the appliance for anything other than its intended use outlined in this user manual. Failure to follow product instructions may result in damage that will not be covered by the warranty. The manufacturer is not responsible for the consequences of improper use.
- Before installing the appliance, ensure that its voltage corresponds with the supply voltage in your home (refer to the specifications on the appliance rating plate or technical data).
REDMOND
- When using an extension cord, ensure that its voltage is the same as specified on the appliance. Using different voltage may result in a fire or other accident, causing device damage or short circuit.
- Connect the unit to properly grounded electrical outlets to avoid the possibility of electric shock. Using the extension cord, ensure that it is grounded.
STOP
CAUTION! The oven, the glass lid, and the cooking pot become very hot during operation! Use oven mitts when handling the unit. Do not lean over the open unit to prevent burns from steam.
- Always unplug the unit after use, before cleaning, or moving. Never handle the plug with wet hands. Do not pull the power cord to disconnect from the outlet; instead, grasp the plug and pull to disconnect.
- Keep the power cord away from hot surfaces or sharp edges. Do not let the cord hang over the edge of a table or a counter. Do not bend, twist, stretch, or bind the power cord by force.
NOTE: a damaged cord may cause a shock, fire, or lead to a failure that will not be covered by the warranty. If the cable is damaged or requires replacing, contact an authorized service centre only to avoid all risks!
- Do not operate the unit on soft or unstable surfaces. Do not cover the unit with cloth or tissue during the use to prevent overheating or malfunction.
- Keep the oven and the cooking pot at least 10 cm away from combustible materials (such as curtains, wallpaper, etc.).
- Do not operate the appliance outdoors, to prevent damages that could be caused by foreign liquids or bodies.
- Always unplug the device from the outlet and let it cool thoroughly before cleaning. Follow the cleaning procedures as outlined in the “Cleaning and Maintenance Guidelines” section.
- Avoid damage to the oven. If there are any dents, crack, or other visible damages discontinue the use.
STOP DO NOT immerse the unit in water or wash it under running water! Do not let the built-in fan assembly get wet.
REDMOND
- This appliance can be used by children aged from 8 years and above and persons with reduced physical, sensory or mental capabilities or lack of experience and knowledge if they have been given supervision or instruction concerning the use of the appliance in a safe way and understand the hazards involved. Children shall not play with the appliance. Keep the appliance and its cord out of reach of children aged less than 8 years. Cleaning and user maintenance shall not be made by children without supervision.
- Keep the packaging (film, foam plastic and other) out of reach of children as they may choke on them.
- Any modifications or adjustments to the product are not allowed. All the repair works should be carried out by an authorized service centre. Failure to do so may result in device and property damage or injury.

CAUTION! Do not use the appliance in case of any malfunctions.
Technical Specifications
| Model | RAG-241-E |
| Power | 700-800 W |
| Voltage | 220-240 V, 50/60 Hz |
| Control | mechanical |
| Heating element | halogen |
| Lid diameter | 22.5 cm |
| Temperature range | 60-250°C |
| Time range | 5-60 min |
| Power cord length | 1.5 m |
Package Includes
Multi-purpose halogen oven .... 1 pc. Metal racks:
| Diameter, mm Height, mm Quantity, pcs | |
| 160 20 1 | |
| 190 20 1 | |
| 190 60 1 |
| Rack removal tongs | 1 pc. |
| Metal holder | 1 pc. |
| Cookbook "20 Recipes" | 1 pc. |
| User manual | 1 pc. |
| Service booklet | 1 pc. |
| Silicone expander-type ring | 1 pc. |
| Silicone mat | 1 pc. |

The manufacturer reserves the right to make any modifications to design, packaging, or technical specifications of the product without prior notice.
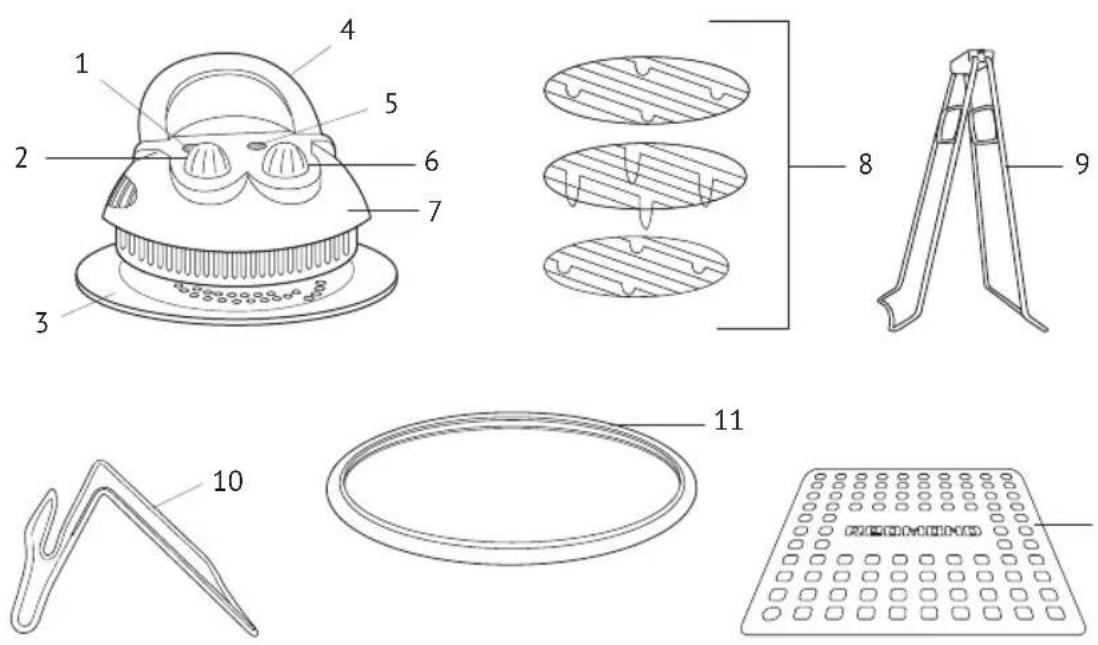
Oven Parts A1
- "Power" indicator
- Timer control knob
- 22.5 cm diameter tempered glass lid
- Carryinghandle
- "Heat" indicator
- Temperature control knob
- Housing
-
Set of racks
-
Rack removal tongs
- Holder
- Silicone expander-type ring
- Silicone mat
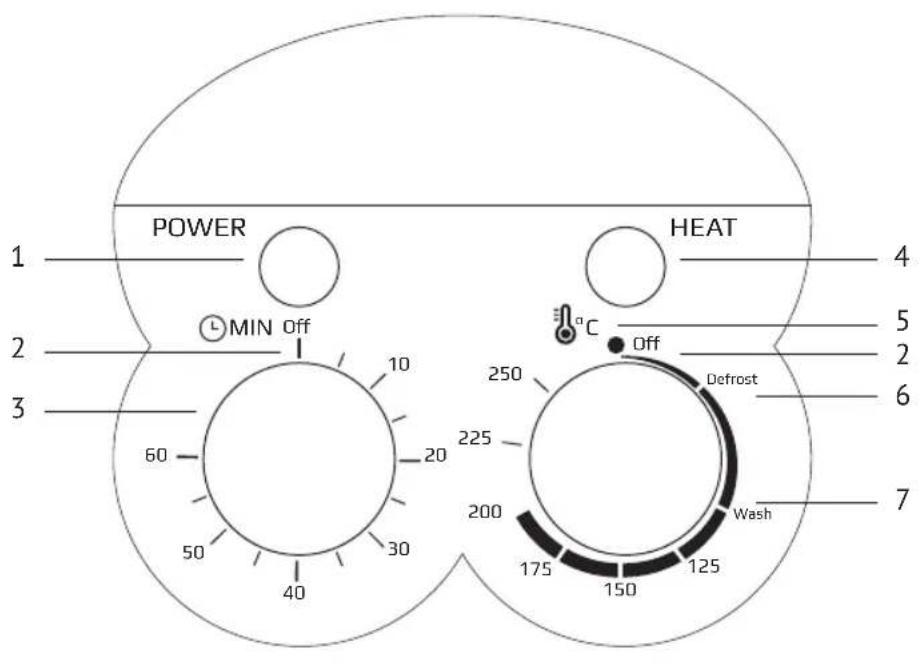
Control Panel A2
- "Power" indicator
- Temperature control knob "Off" position
- Timer dial
- "Heat" indicator
- Temperature dial
-
Temperature control knob "Defrost" position
-
Temperature control knob "Wash" position (self-clean mode)
Introducing the oven
The appliance is intended for use with heat-resistant cookware compatible with a 22.5 cm diameter lid.
The oven cooks food by heating the air inside the cooking vessel. The halogen heating element creates intense heat and the fan, mounted in the lid, gently circulates the air.
Super-heated air circulates throughout the cooking vessel. The fan constantly moves the air down and then back up, ensuring quick and even cooking.
The intensity and the temperature of the airflow can vary depending on the selected cooking mode, reaching 250°C. A built-in thermostat monitors and controls the oven temperature switching the heating element on and off when necessary.
I. PRIOR TO THE FIRST USE
Carefully remove the unit and its accessories from the package. Dispose all packing materials properly.

Keep all warning labels, stickers (if any), and the serial number identification label located on the housing. The absence of the serial number will deprive you of your warranty benefits.
Wipe the housing with a damp cloth and let dry. To eliminate any odour during the first use carry out the self-cleaning procedure. A slight odour during the first use is not considered a defect.

After transportation or storage at low temperatures allow the appliance to stay at room temperature for at least 2 hours before using.
REDMOND
Examine inner and outer parts of the oven for cracks, dents, or any other visible damages.
Prepare a cooking vessel (not provided). The vessel must be made of heat-resistant material and be compatible with the oven glass lid (22.5 cm in diameter) or outer edge of silicone expander-type ring (27 cm).
Operation
- Place a rack (low or high) into the vessel and place food on the rack. Keep food at least 1.5-2 cm away from the lid and the sides of the vessel to allow maximum hot air circulation.
- Place the vessel on a flat, stable, and heat-resistant surface (such as a stove top or a hot pad) at least 10 cm away from objects that can be damaged by high temperatures, and put the lid on the vessel. Ensure that the cooking vessel and the oven fit tightly. There should be no gaps or openings for steam to escape. For the supplementary surface protection from high temperature use the silicone mat included in set. Fix the silicone expander-type ring to the air grill lid if necessary. Make sure it is firmly fixed.
- Plug in the oven.
- Firmly put the carrying handle down (when the carrying handle is lifted during the cooking cycle the oven automatically turns off).
- Turn the timer control knob clockwise to select the cooking time, the red indicator light will illuminate, and the fan will start its operation. The cooking time can be adjusted between 5 and 60 minutes.
- Turn the temperature control knob to select the temperature according to the recipe directions or to the "Suggested Cooking Time and Temperature" section.

CAUTION! When using the oven with a multicooker do not exceed the temperature of 150°C!
- The heating indicator will illuminate and the oven will start cooking. The heating indicator can go out before the selected cooking time expires indicating that the oven has reached the selected temperature. When the temperature inside the vessel drops below the desired level, the heating indicator will automatically illuminate indicating that the oven is heating up again.
- After the selected time expires give the oven 10 minutes to cool down. Take the lid off the vessel and place it on a heat resistant surface to cool down completely.

ATTENTION! DO NOT put the hot air grill onto the silicone mat.
III. SUGGESTED COOKING TIME AND TEMPERATURE
| Food Weight, g Time, hour:min Temperature, °C | |||
| Chicken 1200 1:30 200 | |||
| Beef (cut into steaks) 400 0:20 240 | |||
| Pork 800 1:00 200 | |||
| Tiger prawns | 200 0:10 180 | ||
| Potatoes (cut into wedges) | 400 0:30 190 | ||

Actual cooking times will vary from suggested depending on the quality and freshness of food, as well as your personal preferences.
IV. SUGGESTED DEFROST TIMES
| Food | Weight, g Time, hour/min | |
| Chicken | 500 | 2:00 |
| Beef | 500 | 2:30 |
| Pork | 500 | 2:30 |
| Tiger prawns | 200 | 0:50 |
V. COOKING TIPS
- Thaw frozen foods before cooking or add 10-15 minutes per 400 g of frozen food to the suggested cooking time. To ensure thorough cooking and crispy crust turn the food periodically during cooking.
- Place the food on the rack to allow hot air to circulate freely and to reduce the cooking time.
-
Use both racks to cook a complete meal. Keep in mind, that different foods require different cooking times. Place the food that takes longer time to cook on the bottom rack. Later on during the cooking cycle add the second rack.
-
When placing several pieces of food on the rack leave minimum 2 cm between the food and the sides of the cooking vessel. This space will allow the air to flow freely. Avoid stacking foods in an attempt to cook more to ensure that hot air circulates freely.
- Grill on the top rack, make roasts, and cook larger food items on the bottom rack.
Do not put plastics (including microwave plastics) or thin glass tableware inside the cooking vessel. Use metal, ceramic (oven safe), or thick heat-resistant glass tableware instead.
Common Cooking Mistakes
The dish is undercooked
| Possible cause Solution | |
| Selected temperature is too low Increase the temperature | |
| Selected cooking time is too short Increase the cooking time | |
The dish is overfried
| Possible cause Solution | |
| Selected temperature is too high | Reduce the temperature or follow directions of the recipe adapted for your oven |
| Selected cooking time is too long | Reduce the time or follow directions of the recipe adapted for your oven |
Baked goods are soggy
| Possible cause Solution | |
| You. used wrong Ingredients (overly juicy vegetables or fruits, frozen berries, sour cream, etc.) | Choose the ingredients according to the recipe directions. Avoid using overly juicy ingredients or use them in smaller amounts |
Baked goods did not rise
| Possible cause Solution | |
| Eggs and sugar were not beaten well enough | Use proven recipes (adapted for your oven). Choose ingredients and follow the ratio and the cooking procedure suggested by the recipe. |
| You let the dough rise for too long before baking | |
| You did not sift the flour or did not knead the dough long enough | |
| Incorrect ratio or cooking procedure |
VI. CLEANING AND MAINTENANCE GUIDELINES
- Carry out the self-cleaning procedure prior to the first use.
- If not in use for an extended period of time unplug the unit.
- Before cleaning the oven ensure that it is unplugged and has cooled down completely. Use soft cloth and mild detergent to clean.

Do not immerse the unit in water or other liquid, do not let the built-in fan assembly get wet. The oven is not dishwasher safe!

Do not use abrasive sponges or scrub pads to clean the oven (unless otherwise specified in this user manual). Do not use any abrasive pastes, chemically aggressive substances, or any other agents which are not recommended for cleaning items that come into contact with food.
- Clean the glass lid after each use.
• The racks are dishwasher safe.
To Clean the Housing
Wipe the housing with a soft damp cloth. Use mild soap solution if necessary and wipe the surface dry to remove soap residue and water spots.
Quick cleaning
- Unplug the oven and let it cool down completely.
- Use a sponge or a dish cloth with mild detergent and warm water to wipe the lid clean.
- Remove soap residue.
Thorough cleaning
- Unplug the oven and let it cool down completely.
- Use a sponge or a dish cloth with mild detergent and warm water to wipe the lid and the fan assembly clean. Avoid using metal sponges and/or abrasive substances.
- Clean the rack with dishwasher detergent and warm water.
- Clean metal parts with sponge or soft cloth and dishwasher detergent. Wipe the parts dry after cleaning.
Self-clean mode
- Add approximately 3 cm of hot water into the vessel.
- Add a little amount of dishwasher detergent.
• Cover with the lid and plug into an electrical outlet. - Set the timer to 10-15 minutes.
- Turn the temperature control knob to the "Wash" setting (self-clean).
REDMOND
- Firmly put the carrying handle down to start the self-cleaning procedure.
- By the end of the cleaning rinse the vessel with warm water to remove soap residue.
Operating a dishwashing machine
Gridirons, silicone expander-type ring and silicone mat can be used in dishwashing machine.

Never wash the air grill housing in dishwashing machine!
VII. ADDITIONAL ACCESSORIES
Additional accessories for the REDMOND RAG-241-E halogen oven can be purchased separately. Information on the assortment, pricing, and compatible accessories is available through www.multicooker.com and our authorized dealers.
VIII. BEFORE CONTACTING SERVICE CENTER
| Problem Possible cause Solution | ||
| Oven does not switch on | The power cord is not connected to an electrical outlet. | Connect to a properly functioning electrical outlet |
| Dish is taking too long to cook | Power supply interruption | |
| The oven and the vessel do not fit tight enough | Ensure that the oven and the vessel fit tightly | |
IX. PRODUCT WARRANTY
We warrant this product to be free from defects for a period of 2 years from the date of purchase. If the appliance fails to operate properly within the warranty period and is found to be defective in material or workmanship, we will repair or replace it free of charge. This warranty comes into force only in case an original warranty service coupon with a serial article number and an accurate impress of the company of the seller proves the purchase date. This limited warranty does not cover damage caused by the failure to use this product for its normal purpose or in accordance with the instructions on the proper use and maintenance of the product, or any kind of repair works. Do not try to disassemble the appliance and keep all package contents. This warranty does not cover normal wear of the appliance and its parts (filters, bulbs, non-stick coating, gaskets, etc.).
The service life and the applicable product warranty period start on the date of purchase or the date of manufacture (if the purchase date cannot be established).
You can determine the manufacture date by the serial number, located on the identification label on the housing of the appliance. The serial number consists of 13 digits. 6th and 7th digits of the serial number identify the month, 8th digit the year of manufacture.
The service life of product, established by the manufacturer is 3 years from the date of purchase, provided that the unit is used and maintained in accordance with the user manual and applicable technical standards.

The packaging, user manual and the appliance itself shall be taken to the applicable collection point for the recycling of electrical and electronic equipment. Do not throw away the electronic waste with household trash to help protect the environment.

II. APPARATETS DRIFT
Environmentally friendly disposal (WEEE)
This appliance is labelled in accordance with European Directive 2012/19/EU – concerning used electrical and electronic appliances (waste electrical and electronic equipment WEEE). The guideline determines the framework for the return and recycling of used appliances as applicable throughout the EU.
© REDMOND. ALL RIGHTS RESERVED. 2014.
Reproduction, transfer, distribution, translation or other reworking of this document or any part thereof without prior written permission of the legal owner is prohibited.
Produced by Redmond Industrial Group LLC
One Commerce Plaza, 99 Washington Ave, Ste. 805A,
Albany, New York, 12210, United States
www.redmond.company
www.multicooker.com
Made in China
RAG-241-E-UM-1