
38.4 Li Comfort - Lawn mower BOSCH - Free user manual and instructions
Find the device manual for free 38.4 Li Comfort BOSCH in PDF.
| Product Type | Battery-powered lawn mower |
| Brand | Bosch |
| Model | 38.4 Li Comfort |
| Battery voltage | 38.4 V (Lithium-ion) |
| Cutting height | 3 to 7 cm, adjustable in 6 steps |
| Charging time | 2 hours for a full charge |
| Runtime | Up to 300 m² per charge (depending on conditions) |
| Cutting system | Rotary blade |
| Grass collection bag | Included, with fill level indicator |
| Battery charge indicator | Green/red LED on battery and charger |
| Safety | Safety key, automatic stop when handle is released, impact flap |
| Cutting dimensions | Not specified |
| Weight | Not specified |
| Maintenance and cleaning | Clean with a brush or cloth; do not spray with water; regularly check the blade |
| Reparability | Repairs by AL-KO authorized service; blade can be sharpened or replaced only with a kit |
| Warranty | Statutory warranty according to country of purchase; does not cover normal wear |
| Usage | Only for private gardens; not for professional use or on public grounds |
Frequently Asked Questions - 38.4 Li Comfort BOSCH
User questions about 38.4 Li Comfort BOSCH
0 question about this device. Answer the ones you know or ask your own.
Ask a new question about this device
Download the instructions for your Lawn mower in PDF format for free! Find your manual 38.4 Li Comfort - BOSCH and take your electronic device back in hand. On this page are published all the documents necessary for the use of your device. 38.4 Li Comfort by BOSCH.
USER MANUAL 38.4 Li Comfort BOSCH
natural_image
Line drawing of a lawn mower with visible blades and handle (no text or symbols)| D | DK |
| GB | S |
| NL | N |
| F | FIN |
| E | EST |
| P | LV |
| I | LT |
| SLO | RUS |
| HR | UA |
| SRB | BG |
| PL | RO |
| CZ | GR |
| SK | MK |
| H | TR |
INFORMATION | MANUALS | SERVICE
EN Translation of the original operating instructions.... 15
text_image
Diagram showing a device connected to an electrical outlet with labeled parts (a) and (b), indicating wiring or connection.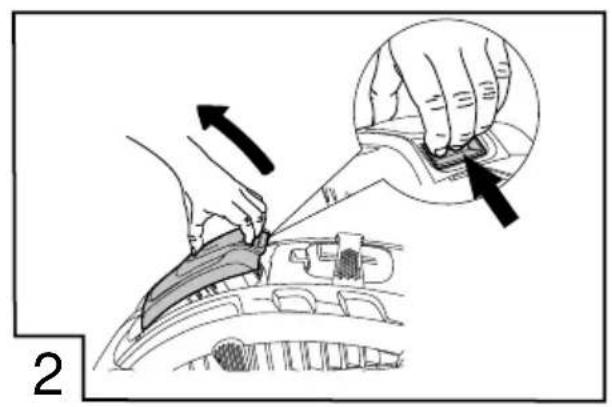
text_image
2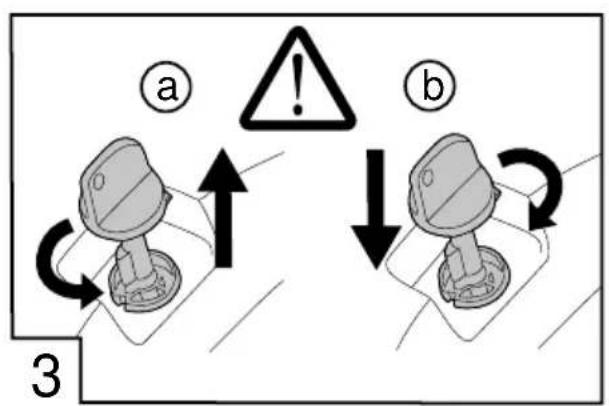
text_image
a ! b 3
natural_image
Diagram showing hands installing or adjusting a mechanical component on a vehicle head (no text or symbols present)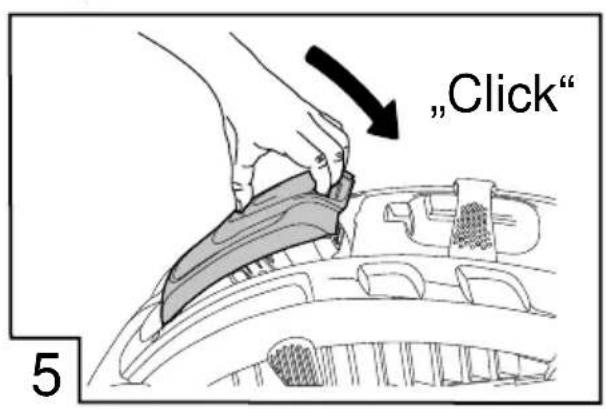
text_image
"Click" 5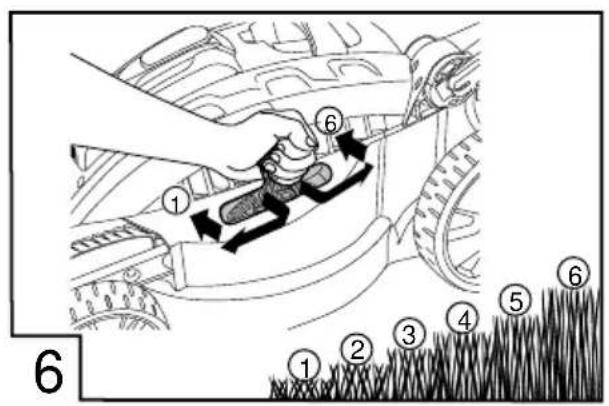
text_image
Diagram showing a car interior with numbered parts and directional arrows indicating movement or repair, labeled 1 through 6.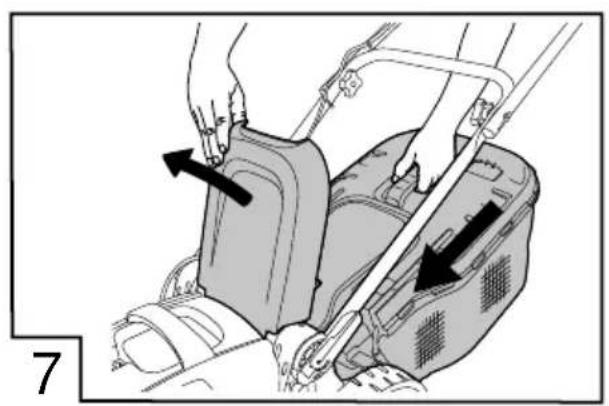
natural_image
Illustration of a person using a seatbelt device with arrows indicating movement or force (no text or symbols present)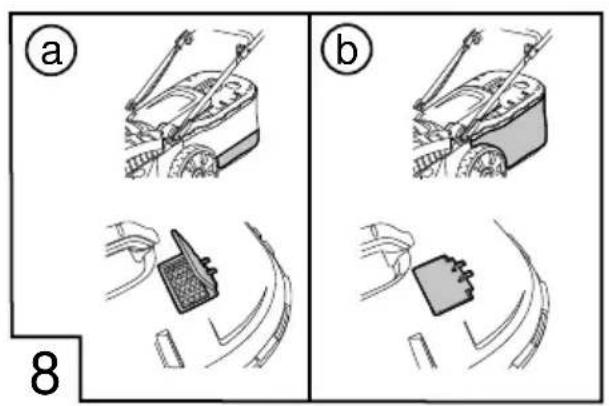
text_image
(a) (b) 8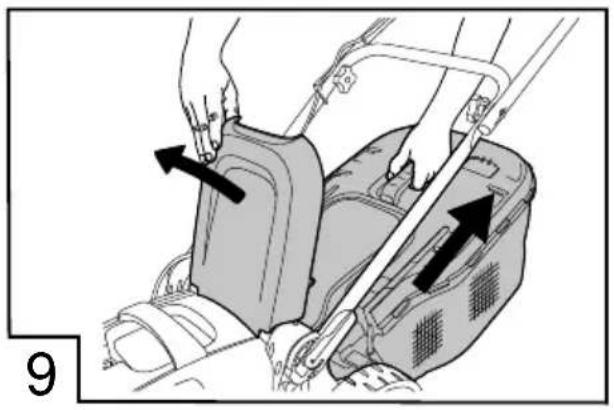
natural_image
Illustration of a person handling a device with arrows indicating movement or force direction (no text or symbols present)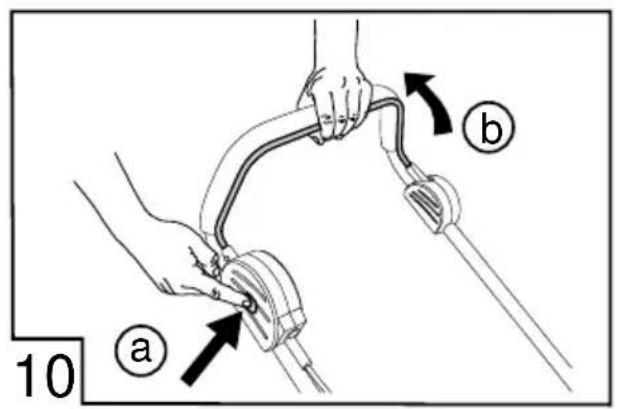
text_image
10 a b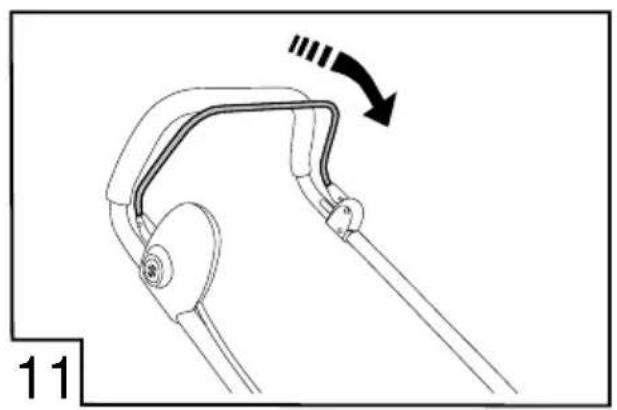
natural_image
Diagram of a mechanical linkage or clamp mechanism with a black arrow indicating rotation (no text or symbols present)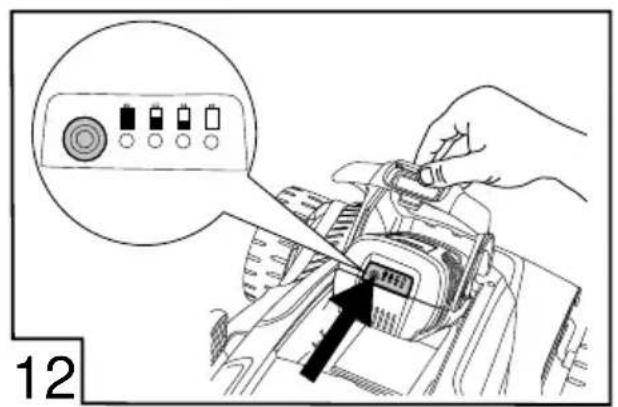
text_image
12TECHNISCHE DATEN
| 37 cm | |
| 2,5 cm - 7,5 cm | |
| L_Pa = 85 dB(A) | |
| 17,6 kg | |
| 45 l | |
| IPX1 | |
| a_hv = 8 m/s^2 |
| 36,0 VDC | 36,0 V |
| max. 3200 / min |
| Li-Ion DC 3630 LI | |
| 36,0 V / 3,0 Ah / 108 Wh |
| 100 V - 240 VAC 50 / 60 Hz |
text_image
Technical diagram of a lawn mower with numbered parts for identificationSafety instructions....17
Assembly....18
Startup....18
Operation....18
Information on working....19
Storing the battery-operated lawn mower...... 20
Storing the battery and charger.... 20
Repairs.... 20
Maintenance and care.... 20
Disposal....20
Transport.... 21
Troubleshooting....22
Warranty....23
ABOUT THIS HANDBOOK
Read this documentation before starting up the machine. This is a precondition for safe working and flawless operation.
- Observe the safety warnings in this documentation and on the product.
This documentation is a permanent integral part of the product described and must be passed on to the new owner if the product is sold.
Explanation of symbols

CAUTION!
Following these safety warnings carefully can prevent personal injury and/or material damage.

Special instructions for greater ease of understanding and improved handling.
PRODUCT DESCRIPTION
This document describes the battery-operated lawn mower with catcher.
Intended use
This appliance is intended for mowing laws in the private sector.
Any other use is deemed as being not in accordance with its intended use.
Possible misuse
This lawn mower is not intended for use in public grounds, parks, sporting arenas as well as in agriculture and forestry
The fitted safety devices must not be removed or bypassed, e.g. by tying the safety bar to the handle bar
- Do not use the mower during rain and/or on a wet lawn
The mower must not be used commercially
Safety and protective equipment

CAUTION!
Risk of injury!
Safety and protective devices should not be disabled.
Safety bar
The mower is fitted with a safety bar. Simply release it in case of danger. Motor and cutting blade are then stopped.
Baffle
The baffle protects against objects flying out.
Safety key
To prevent the mower from being switched on unintentionally it has been fitted with a safety key. Switch the mower off before doing maintenance work and always pull out the safety key.
Product overview
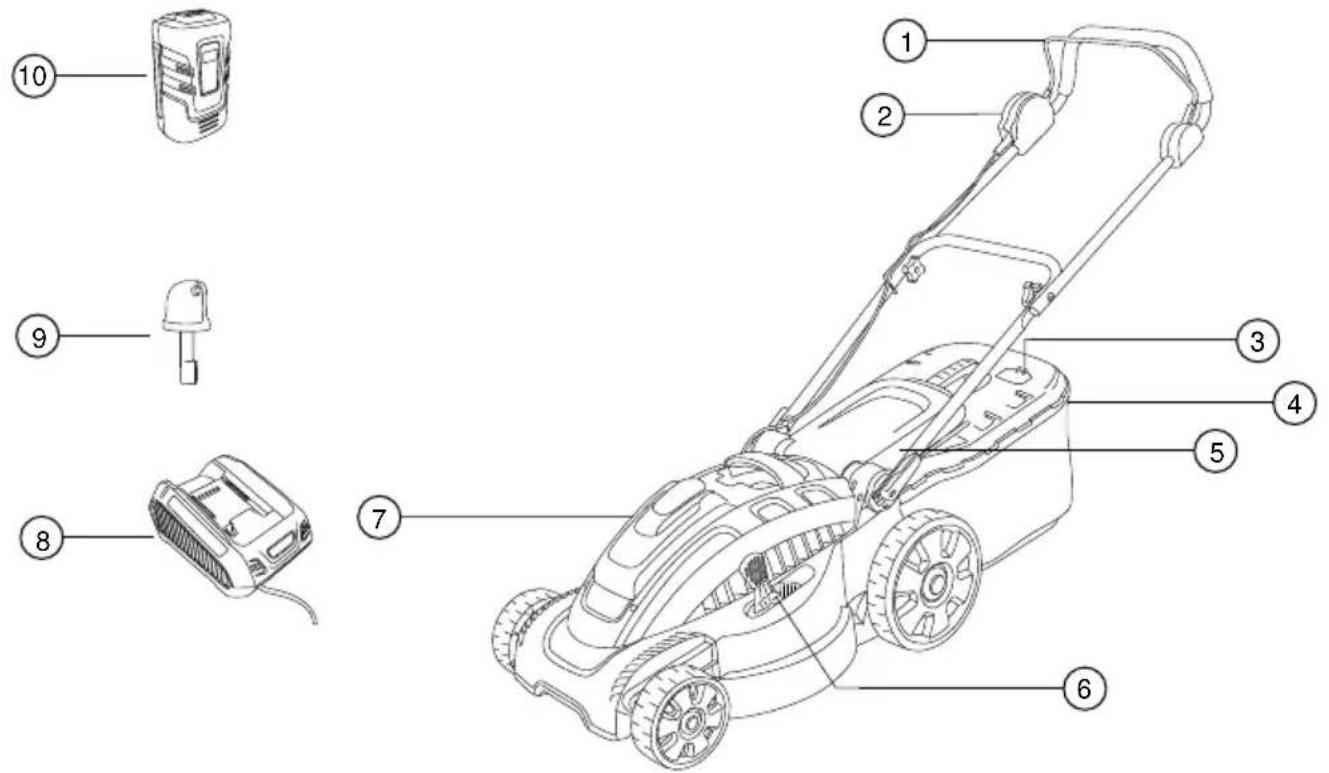
text_image
Labeled diagram of a lawn mower with numbered parts for identification| 1 Safety bar 6 Cutting height adjustment | ||
| 2 Start switch 7 Battery compartment | ||
| 3 Fill level indicator 8 Battery charger | ||
| 4 Grass catcher 9 Safety key | ||
| 5 Baffle plate 10 Battery |
Symbols on the machine

Caution! Special care required during use.

Read the instructions before start-up!

Keep other persons away from the danger area!

Danger! Keep hands and feet away from the cutter area!

Keep a distance from the danger area.

Always remove the safety key prior to working on the mower.

Caution! Sharp cutter blades!

Do not reach into the cutter area.
SAFETY INSTRUCTIONS
The lawn mower operator or user is responsible for accidents involving other persons and their property.

CAUTION!
Risk of injury!
Safety and protective devices should not be disabled.
Electrical safety
The mains voltage must match the mains voltage specifications of the charger with regard to the technical data, do not use a different mains voltage
Safety notes for battery and charger

CAUTION!
Danger - risk of fire and explosion!
- Do not throw the battery into an open fire
■ Only use the battery and charger in areas that are protected against rain or moisture.
■ Protect the battery against heat and direct sunlight
Do not short-circuit the battery
■ Protect the mower, battery and charger against moisture
■ Use only original batteries and chargers from the manufacturer.
- Do not open the appliance. Danger of short circuit.
Under abusive conditions, liquid may be ejected from the battery; avoid contact. If contact accidentally occurs, flush with water. If liquid contacts eyes, additionally seek medical help.
Safety instructions for operation

CAUTION!
Danger - risk of injury!
Unintentional start-up can lead to severe injuries. To prevent injuries always remove the safety key after switching the mower off!
■ Remove the safety key when:
■ Leaving the mower unattended
- Inspecting, cleaning or servicing the mower
- Inserting the battery
■ Faults or unusual vibrations occur on the mower
■ Releasing blockages
■ Removing clogging
There is danger of coming into contact with foreign objects
Children, or other people who are not familiar with the operating instructions, are not allowed to use the machine
- Observe local regulations regarding minimum age requirements for operating the machine.
The equipment should be used only if in good order and condition
The machine must not be operated if the operator is under the influence of alcohol, drugs or medication.
Prior to each use check the mower and battery for damage and have the damaged parts replaced
■ Remove all foreign objects from the lawn prior to mowing
■ Wear suitable work clothing:
Long trousers
■ Firm and antislip footwear
■ Always ensure stability when working.
- Keep others away from dangerous areas.
- Keep body and clothing away from cutting parts.
■ Work only when there is adequate daylight or artificial lighting.
■ Always push the mower forward, never move backwards

After contact with foreign objects inspect the mower for damage. In case of serious damage take the mower to a ALKO service center.
■ Never pull the mower toward the body
Do not mow over obstacles (e.g. branches, roots of trees).
■ Remove grass cuttings only when the motor has stopped and the safety key has been removed
- Switch the motor off when an area other than the area to be mowed is crossed
■ Never lift or carry the mower while the motor is running - Never leave the mower unattended when it is ready for operation
ASSEMBLY
Assemble according to enclosed assembly instructions.

CAUTION!
The mower must only be operated after it has been fully assembled!
STARTUP
Charging the battery (1)

The battery is supplied partially charged! Fully charge the battery before the first use.
The battery can be charged in any charge level. Interrupting charging does not damage the battery.

CAUTION!
When pulling out the battery, press and hold the engagement button on the underside of the battery so the battery will be unlocked.
- Push the battery into the charger (1a) and connect the charger to the mains (1b). Charging starts, and is indicated by the green light-emitting diode (LED) flashing.
- The battery is fully charged when the LED of the charger lights up green without flashing.
- Disconnect the plug from the mains (1b).
- Pull the battery out of the charger. (1a)
| Green LED lights: battery 100% - 50% charged | |
| Green LED flashes: battery 50% - 25% charged | |
| LED lights red: no battery inserted in charger |

The temperature range for the charging process should between 0^ C and +40^ C.
The maximum time for a full charge is 2 hours. If the operating period of the battery is greatly reduced in spite of a full charge, the battery is worn out and should be replaced with a new original battery.
Inserting the battery (2-5)
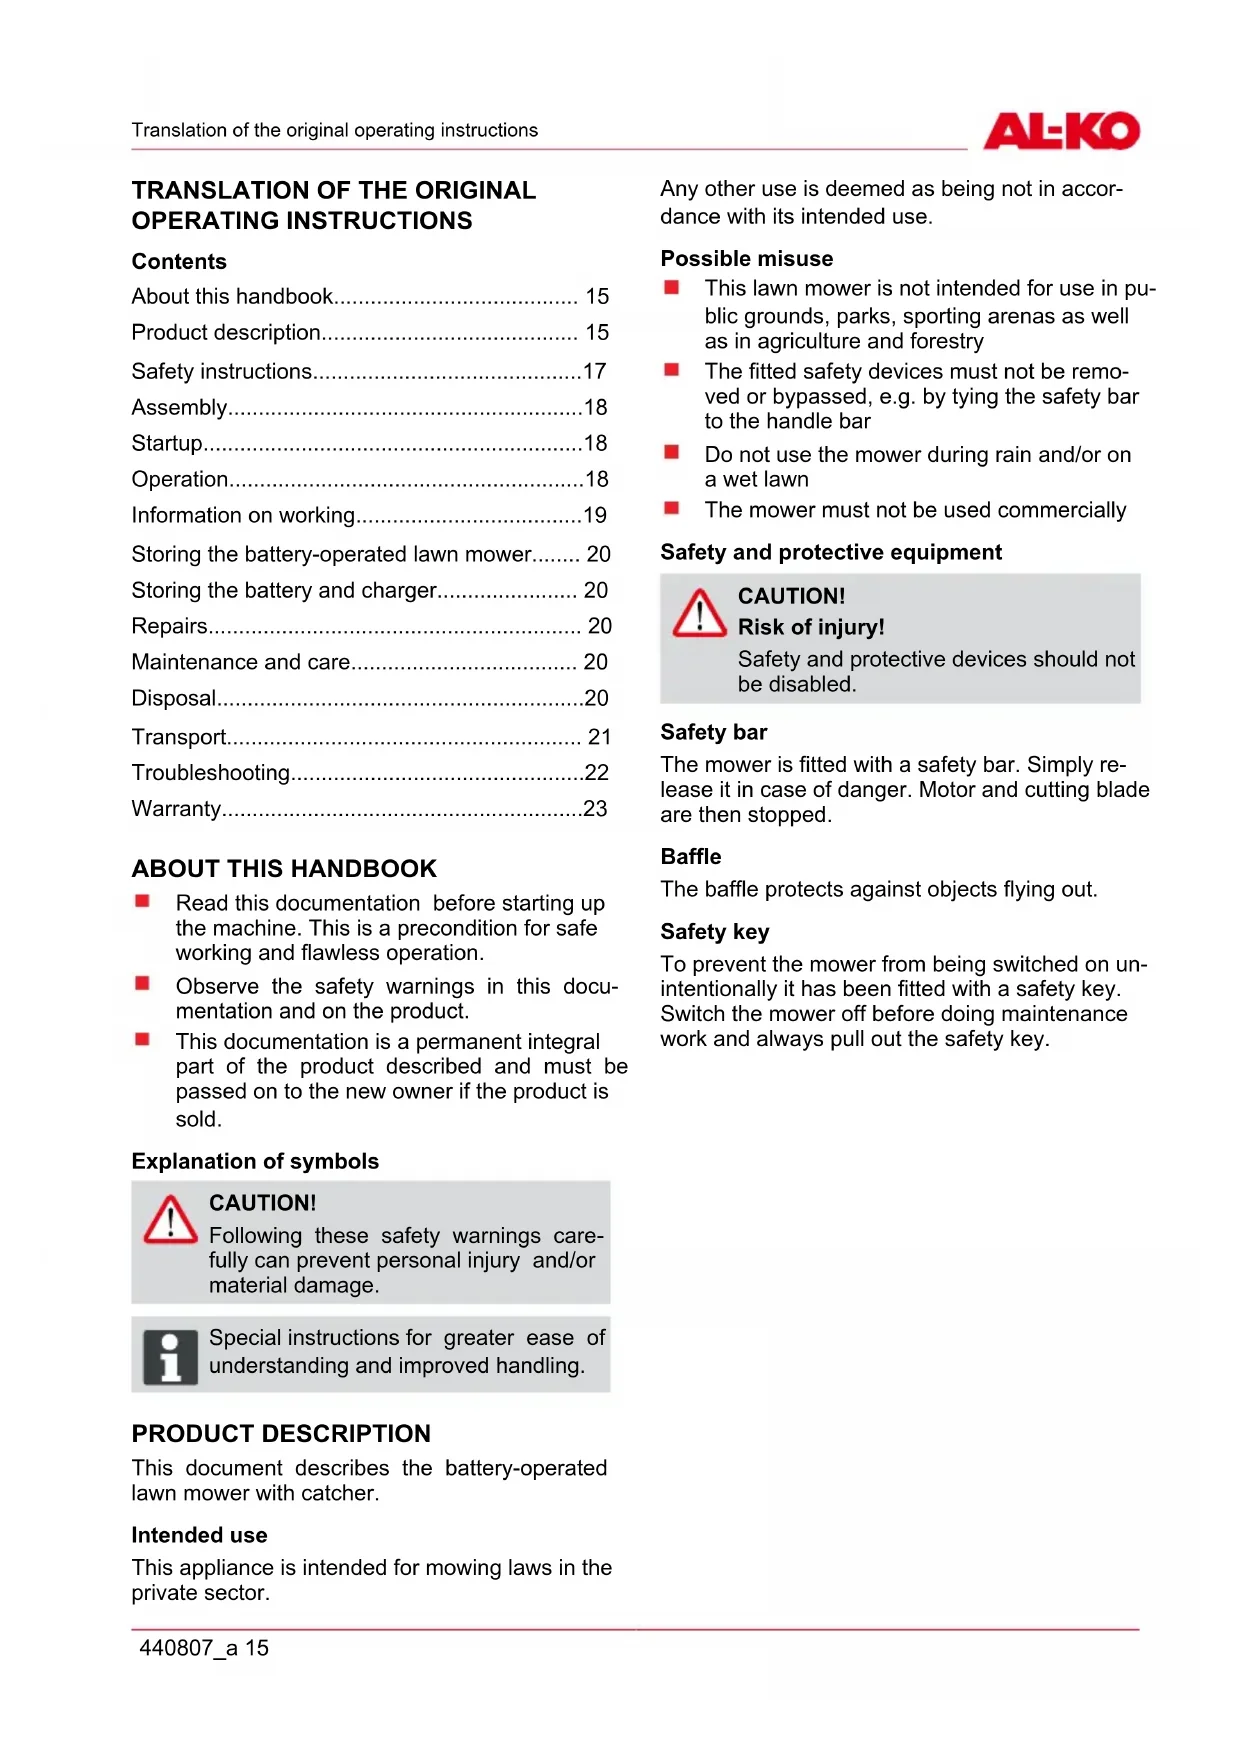
- Press on the battery cover on the mower to open it.(2)
- Remove the safety key from the mower.(3a)
- With a slight pressure push the battery into the battery compartment up to the stop until the battery sits firmly on the contact plug of the mower. (4)
- Insert the safety key again and turn it.(3b)
- Press once on the battery cover to close it. (5)
OPERATION
Adjusting the cutting height (6)

CAUTION!
Danger - risk of injury!
Adjust the cutting height only while motor is switched off and the cutting blade has stopped!
- To unlock, press the lever to the side and hold (4).
For a short lawn slide the lever in the direction of the front wheel. Minimum step 1: 3 cm
For a longer lawn slide the lever in the direction of the rear wheel. Maximum step 6: 7 cm - Release the lever and slide it forward or backward until it engages in the desired step.
Attaching the grass catcher (7)

CAUTION!
Danger - risk of injury!
Remove or replace the grass catcher only while the motor is switched off and the cutting blade has stopped.
- Lift up the baffle plate and hang the grass catcher into the holders. (7a-b)
Level indicator (8)
The level indicator is pressed upwards by the air stream during mowing (8a). When the grass catcher is full, the level indicator rests against the catcher (8b). The grass catcher needs to be emptied.
Emptying the grass catcher (9)
- Lift the baffle plate.
- Unhook the grass catcher and remove it to the rear.
- Empty grass catcher.
- Lift up the baffle plate and hang the grass catcher back into the holders. (7)
Switching on the motor (10)

The motor of this lawnmower does not accelerate to its full speed immediately when the motor is started.
Only when you move the lawnmower onto the grass to be mown does it detect the grass and accelerate the motor to the maximum blade speed, then it remains at the maximum blade speed.
This audible increase in the motor's noise level is completely normal and means that the lawnmower is cutting at the optimum blade speed.
Start the lawn mower only on level ground, and not in high grass. The ground must be free from foreign objects, such as stones. Do not lift or tilt the lawn mower to start it.
- Insert the safety key again and turn it (3b).
- Keep the start button pressed (10a).
- Pull the safety bar toward the handle bar and hold it there (10b).
- Release the start button.
Check the charge level of the battery while mowing the lawn (12)
- Switching off the motor (11).
- Open the battery compartment (2).
- Press the test button on the battery: If the LED lights up green, there is still charge in battery and you can continue mowing. If the LED lights up red, the battery is discharged and requires recharging (12).
Switching off the motor (11)
- Release the safety bar.
- Wait until the cutter blade stops.
- Remove the safety key from the mower (3a).
INFORMATION ON WORKING

Observe the local regulations on operating lawn mowers.
■ Remove foreign objects from the working area.
- Keep others away from dangerous areas.
■ Use the mower only if visibility is good
■ Guide the machine at walking pace.
■ Mow only with a sharp cutting blade
Do not mow over obstacles (e.g. branches, roots of trees).
■ Mow only across slopes. Do not use the mower up or down slopes and not on slopes with more than a slant of 20 degrees.
■ Added care must be taken on slopes when changing direction
The operating period of the lawn mower battery depends on the condition of the battery, the condition of the lawn and the setting of the cutting height. Frequently switching the mower on and off reduces the operating time
- # Optimum operating time is obtained by frequent mowing of the lawn and maintaining a short-cut lawn
Operating time at 100% battery charge in m ^2 per battery
- Cut of 6 cm to 4 cm: Up to 300 m² for well-cared for, dry lawn; thin grass
- Cut of 8 cm to 4 cm: Up to 200 m² for normal grass
- Cut of 8 cm to 4 cm: Up to 150 m² for dense grass
Mowing tips
- Constant cutting height 3–5 cm, do not cut more than half the height of the lawn
Do not overload the lawn mower! If the motor speed is greatly reduced due to long, heavy grass, raise the cutting height and mow several times
■ Since wind and sun can dry out the lawn after mowing, mow the lawn in the late afternoon
STORING THE BATTERY-OPERATED LAWN MOWER
Storage

Fold the upper handle bar to save space during storage
■ Always store the mower with the battery and the safety key removed
■ Store the mower in a dry place and inaccessible to children and unauthorized persons
STORING THE BATTERY AND CHARGER

CAUTION!
Risk of fire and/or explosion!
Do not store the machine in the vicinity of naked flames or heat sources.

The battery is protected by a supply voltage against overloading and can therefore remain connected to the mains power for a lengthy period.

The optimum temperature for storing the battery is between 0 °C and 25 °C.
■ Store the battery in dry, frost-protected location with an ambient temperature of between 0 °C and +25 °C and in a charged state of approximately 40 - 60%
■ Recharge the battery for approximately 2 hours after a 3-month storage period
Do not store the battery near metallic or acid-containing objects - risk of short-circuiting!
REPAIRS
■ Repairs must only be carried out at AL-KO service centers or authorized specialist firms.
■ Two avoid an imbalance the cutter unit and the retaining screw must only be replaced as a set.
MAINTENANCE AND CARE

CAUTION!
Danger - risk of injury!
Always remove the safety key before carrying out maintenance work! Always wear work gloves when carrying out maintenance on the cutter blade! Non-balanced cutter blades cause serious vibrations and damage the mower.
- Regularly check the grass catcher system for correct function and wear
■ After mowing, thoroughly clean the mower with a hand broom or a cloth. Contamination left on the underside of the mower can impair its proper function
Do not hose down the mower with water! Water can damage the switch as well as the battery and the electric motor - Regularly check the cutter blade for damage. Have the blunt or damaged cutter blades sharpened or replaced only at an AL-KO service center or authorized specialist firm. Resharpened cutter blades must be balanced The tightening torque of the blade screw is 15 Nm +5
■ Ensure that all nuts, bolts and screws are tightened and that the machine is in a safe operational state. - Let the motor cool down before storing the machine in a closed room.

CAUTION!
Cutting blade and motor shaft may not be aligned if damaged!
■ Professional inspection is necessary:
■ After running onto an obstacle
■ When the motor is blocked
■ When the cutter blade is bent
When the motor shaft is bent
■ When the battery is damaged, worn out
DISPOSAL
Do not dispose of old equipment, batteries or accumulators as householdwaste!
Product, packaging, and accessories were made with recyclable materials, and should be disposed of accordingly.
■ Dispose of batteries only in a discharged state
The user is obligated to return the batteries and accumulators. These can be returned to the points of sale without charge.
The following options for disposal are available:
■ Specialist supplier
A recycling station with the CCR symbol
TRANSPORT

CAUTION!
The power of the supplied batteries is more than 100 Wh!
Please comply with the following transport instructions!
The Li-ion battery contained is subject to the requirements of hazardous substances regulations. The battery can be transported on the road by private users without being subject to additional requirements. Only transport the battery if it is undamaged. The battery must be protected against contact by other objects, short circuit and inadvertent sliding. If transported by third parties (e.g. haulage company or transport by air) then it is necessary to comply with special requirements on the packaging and labelling.
Obtain the assistance of a specialist in the transport of hazardous substances in order to prepare for the transport. Only transport batteries if the housing is undamaged. Mask off exposed contacts and pack the battery so it cannot move around inside the packaging.
Please comply with any additional national regulations.
TROUBLESHOOTING

CAUTION!
Wear working gloves during all maintenance work!
| Fault duringoperation Possible cause Solution | ||
| Motor does not run | Safety key not inserted Insert safety key | |
| Control cable or switch is defective | Caution! Do not operate mower!Consult AL-KO service center | |
| Battery is missing or is incorrectly seated | Correctly seat battery | |
| Cutter blade blocked Caution! Do not carry out maintenance on cutter blade without working gloves!■ Free the cutter blade from interference■ Start lawn mower on short grass | ||
| Reduced motor performance | Battery is empty Load the battery | |
| Cutter blade is blunt Have cutter blade sharpened atAL-KO service center | ||
| Too much grass in the ejector Remove grass, clean baffle plate | ||
| Motor stops during mowing | Cutter blade is blunt Have cutter blade sharpened atAL-KO service center | |
| Motor overloaded Switch off the battery-operatedlawn mower and restart on level ground or short grass | ||
| Grass catcher does not fill up completely | Lawn is wet Allow lawn to dry | |
| Grass catcher clogged Clean the grass catcher grid | ||
| Too much grass in the discharge chute or housing | Clean discharge chute / housingCorrect cutting height | |
| Cutter blade blunt Have cutter blade sharpened atAL-KO service center | ||
| Battery operating period drops appreciably | Cutting height to low Raise cutting height | |
| Grass too long or too wet Improve conditions: allow to dry, raise cutting height | ||
| Mowing speed too high | Reduce mowing speed. Clean discharge chute / housing, the cutter blade must turn freely | |
| Grass catcher is full Empty grass catcher and clean discharge chute | ||
| Service life of battery is used up Replace the battery. Use only original accessories from the manufacturer | ||
| Loading plug or socket is dirty Consult AL-KO service centerBattery does not | ||
| Battery or charger is defective Order spare parts according to spare parts list | ||

If you encounter any malfunctions that are not listed in this table or which you cannot rectify yourself, please contact our responsible customer service.
WARRANTY
We will address claims for any defects in materials and workmanship during the statutory period of limitation by means of repairs or replacements of our choice. The period of limitation is governed by the laws of the country in which the machine was purchased.
Our warranty applies only if:
The machine has been properly handled
The operating instructions have been adhered to
■ Original replacement parts have been used
The warranty is no longer in effect if:
■ Efforts have been made to repair the machine
■ Technical modifications have been made to the machine
The machine has not been used for its intended purpose
The warranty does not cover:
■ Damage to paint work through normal use
Parts subject to wear as indicated in the replacement parts list with a box [xxx xxx (x)]
The warranty period begins with the purchase by the first buyer. The warranty period begins on the date that appears on the original purchase receipt. In the event of a warranty claim, please your contact supplier or the nearest authorised customer service centre with this warranty declaration and the purchase receipt in hand. This warranty does not affect the legal warranty claims by the purchaser against the seller.
VERTALING VAN DE ORIGINELE GEBRUIKERSHANDLEIDING
Inhoudsopgave
Over dit handboek....24
text_image
Labeled diagram of a lawn mower with numbered parts for identificationOPSLAG ACCU EN OPLADER

INFORMATIONS SUR CE MANUEL
text_image
Labeled diagram of a lawn mower with numbered parts for identificationtext_image
Labeled diagram of a lawn mower with numbered parts for identificationtext_image
Labeled diagram of a lawn mower with numbered parts for identificationtext_image
Labeled diagram of a lawn mower with numbered parts for identificationtext_image
Labeled diagram of a lawn mower with numbered parts for identificationtext_image
Labeled diagram of a lawn mower with numbered parts for identification| 1 Sigurnosni držač 6 Pomicanje visine rezanja | ||
| 2 Sklopka za pokretanje 7 Pretinac za akumulator | ||
| 3 Pokazivač stanja napunjenosti 8 Punjač za akumulator | ||
| 4 Košara za prihvat trave 9 Sigurnosni ključ | ||
| 5 Odbojni poklopac 10 Akumulator |
Simboli na stroju
 | Pozor! Budite posebno oprezni pri ru-kovanju! |
 | Pročitajte upute za uporabu prije puš-tanja u rad! |
 | Držite treće osobe daleko od područja opasnosti! |
 | Pozor - opasnost! Držite ruke i stopala daleko od rezača! |
 | Držite razmak od područja opasnosti. |


text_image
Labeled diagram of a lawn mower with numbered parts for identificationtext_image
Labeled diagram of a lawn mower with numbered parts for identificationtext_image
Labeled diagram of a lawn mower with numbered parts for identificationtext_image
Labeled diagram of a lawn mower with numbered parts for identificationtext_image
Labeled diagram of a lawn mower with numbered parts for identificationtext_image
Labeled diagram of a lawn mower with numbered parts for identificationtext_image
Labeled diagram of a lawn mower with numbered parts for identificationtext_image
Labeled diagram of a lawn mower with numbered parts for identificationSette inn batteriet (2-5)
VEDLIKEHOLD OG PLEIE

OBS! Advarsel - Fare for personskader!
text_image
Labeled diagram of a lawn mower with numbered parts for identificationCommissioning....172
Kasutamine....172
Teave töö.... 173
Akumuruniiduki hoiustamine.... 173
Aku ja laadija hoiustamine.... 173
Remont....174