
MQ 940cc - Blender BRAUN - Free user manual and instructions
Find the device manual for free MQ 940cc BRAUN in PDF.
| Product Type | Rechargeable immersion blender with accessories |
| Brand | Braun |
| Model | MQ 940cc |
| Power Supply | Rechargeable lithium-ion battery |
| Input Voltage | Auto-adaptable 100-240 V AC |
| Charging Time | Approximately 2 hours |
| Battery Life | Approximately 20 minutes |
| Chopper Bowl Capacity | 0.5 liter maximum |
| Blade Material | Stainless steel (estimated) |
| Safety | Double lock, auto-stop after 4 min, overheating protection |
| Cleaning motor unit and charger | Damp cloth only, do not immerse |
| Cleaning other parts | Dishwasher safe (except chopper drive system) |
| Included Accessories | Blending shaft, measuring cup, chopper bowl, chopper blade, ice blade, ice accessory, charger |
| Use | Household use only |
| Battery Maintenance | Protected against deep discharge; long battery life |
| Repairs | Braun Authorized Service Center only |
Frequently Asked Questions - MQ 940cc BRAUN
User questions about MQ 940cc BRAUN
0 question about this device. Answer the ones you know or ask your own.
Ask a new question about this device
Download the instructions for your Blender in PDF format for free! Find your manual MQ 940cc - BRAUN and take your electronic device back in hand. On this page are published all the documents necessary for the use of your device. MQ 940cc by BRAUN.
USER MANUAL MQ 940cc BRAUN
Cordless Hand Blender

Type 4130
www.braunhousehold.com
MQ 940 cc
Deutsch 6
English 9
Francais 12
Espanol 16
Portugues 19
Italiano 23
Nederlands 26
Dansk 29
Norsk 32
Svenska 35
Suomi 38
EAAyniká 41
Polski 45
Cesky 49
Slovenský 52
Magyar 55
Hrvatski 58
Slovenski 61
Türkce 64
Romana (RO/MD) 67
Pycckn 70
yKpaIHcbKa 74
Bbnapckn 78
85
De'Longhi Braun Household GmbH
Carl-Ulrich-StraBe 4
63263 Neu-Isenburg/Germany
5722110424/07.13
DE/UK/FR/ES/PT/IT/NL/DK/NO/SE/FI/GR/PL/CZ/
SK/HU/HR/SL/TR/RO/MD/RU/UA/BG/Arab
A
B
C
| Parmesan 1cm | Parmesan 1cm | ||||||||
| max. | 250 g | 200 g | 200 g | 30 g | 30 | 250 | 350 g | 400 g | 150 g + 700 ml |
| L sec. | 30 | 45 | 15 | 15 | 15 | 5 | 15 | 15 | 60 + 15 |
Deutsch
Our products are engineered to meet the highest standards of quality, functionality and design. We hope that you thoroughly enjoy your new Braun appliance.
Please read the use instructions carefully and completely before using the appliance.
Caution
- This appliance shall not be used by children. Keep the appliance and its cord out of reach of children. Switch off the appliance and disconnect from supply before changing accessories or approaching parts that move in use.
- This appliance can be used by persons with reduced physical, sensory or mental capabilities or lack of experience and knowledge if they have been given supervision or instruction concerning use of the appliance in a safe way and if they understand the hazards involved.
The blades are very sharp! Handle blades with utmost care in order to prevent injuries.
- High risk of injury by switching on the appliance unintentionally. As this is a rechargeable appliance, it is ready for use anytime (when charged).
- Do not expose the appliance to direct sunlight.
- When the blades are blocked remove motor part from blender shaft, before removing the food/ blockage.
- Before cleaning, remove blender shaft from motor part.
- The appliance is constructed to process normal household quantities.
- This appliance is provided with a special cord set with an integrated Safety Extra Low Voltage power supply. Do not exchange or manipulate any part of it. Otherwise there is risk of electric shock.
- Only use the appliance with the charging unit supplied.
- The charging unit can remain permanently connected to the mains.
- Protect the motor part, the charging unit and special cord set against humidity. Motor part and power supply of special cord set must no longer be used after they have been immersed in water.
- Before use, make sure that charging unit and special cord set are not damaged. Braun electric appliances meet applicable safety standards.
- Repairs or the replacement of the mains cord must only be done by authorised service personnel.
- Faulty, unqualified repair work may cause considerable hazards to the user.
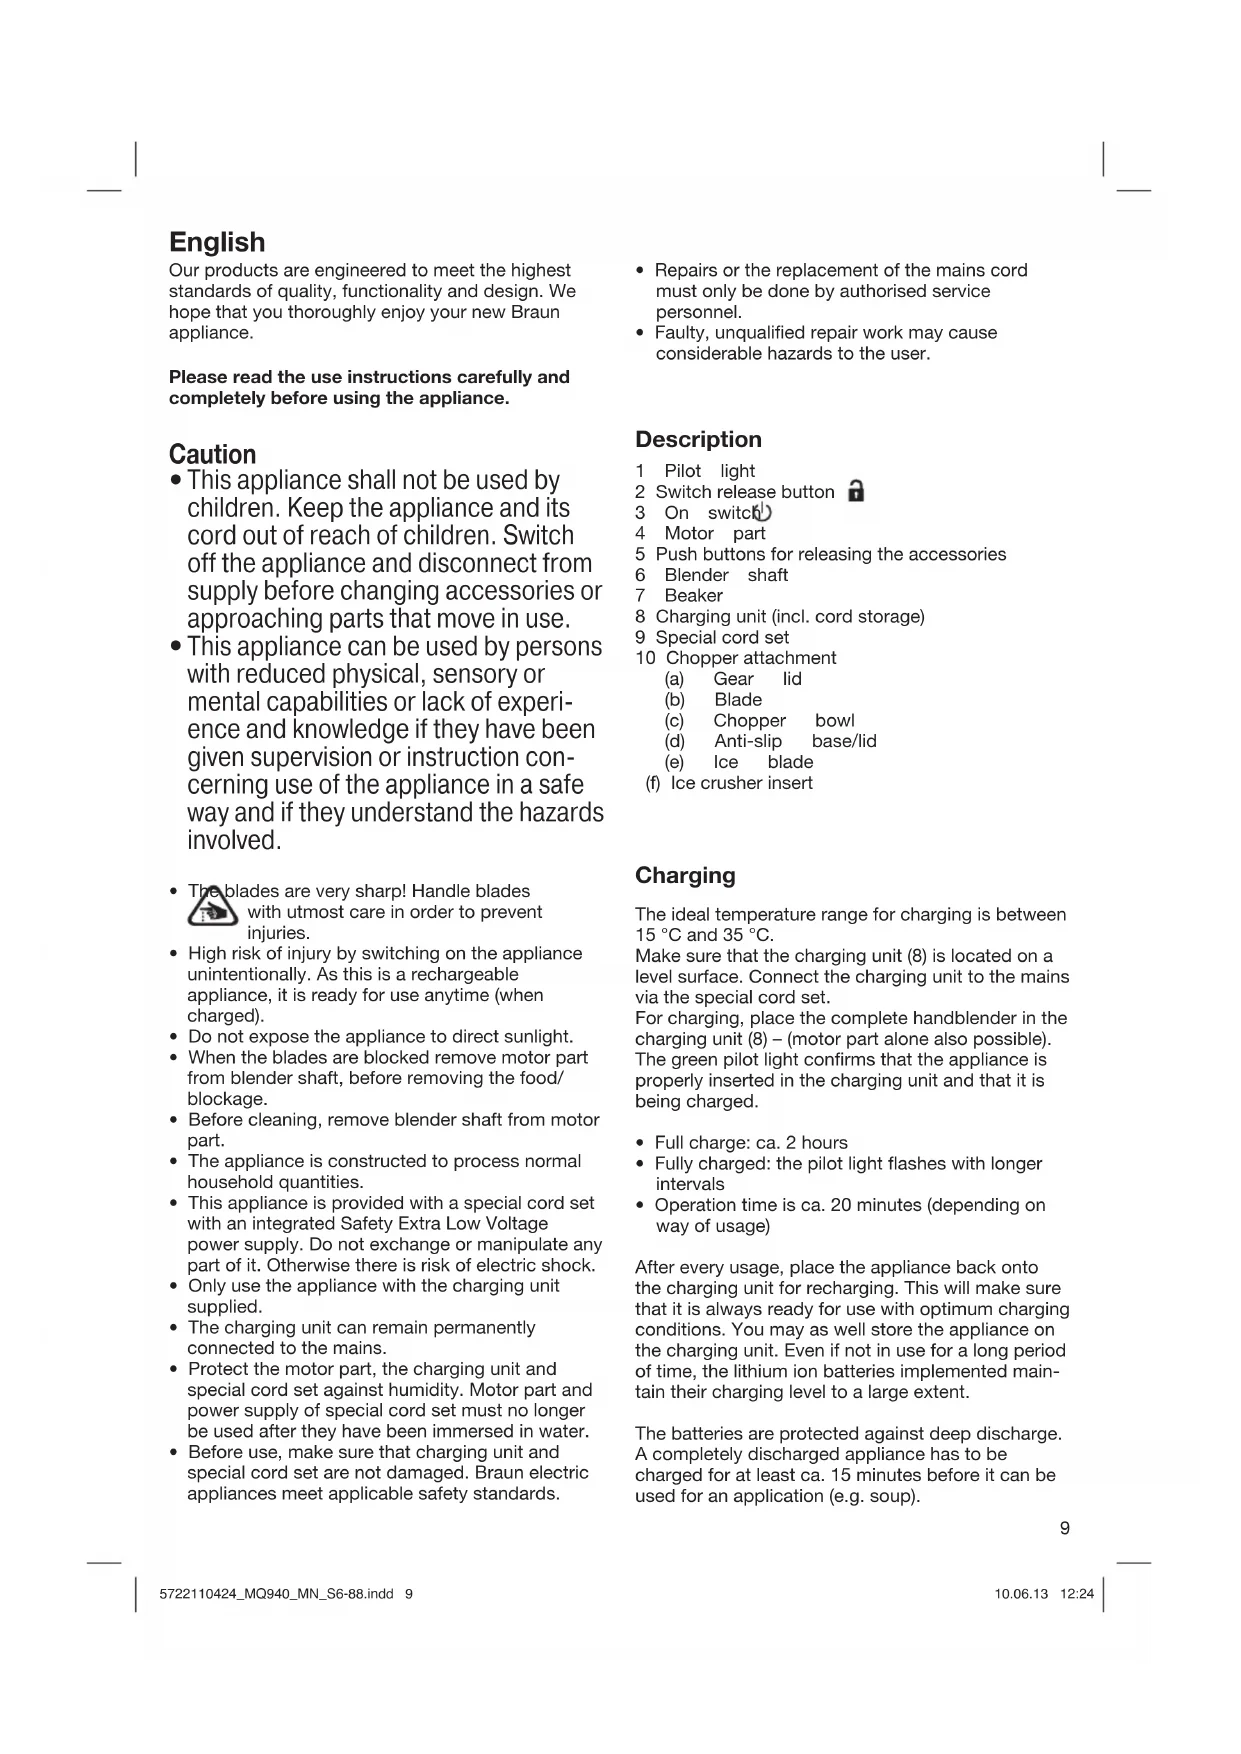
Description
1 Pilot light
2 Switch release button
3 On switch
4 Motor part
5 Push buttons for releasing the accessories
6 Blender shaft
7 Beaker
8 Charging unit (incl. cord storage)
9 Special cord set
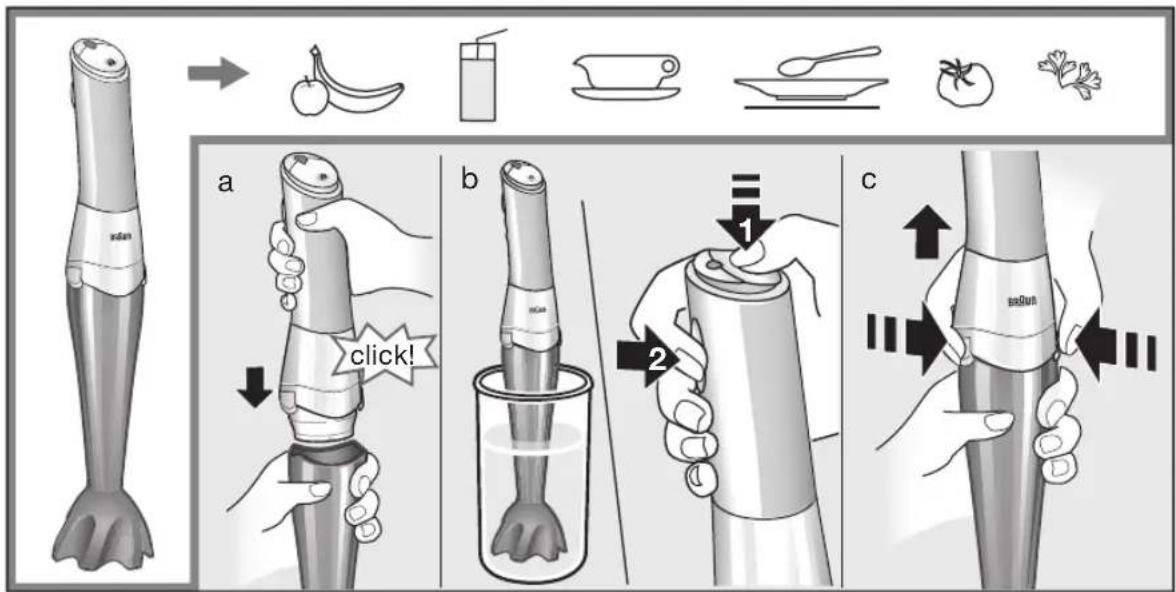
10 Chopper attachment
The ideal temperature range for charging is between 15^ and 35^ .
Make sure that the charging unit (8) is located on a level surface. Connect the charging unit to the mains via the special cord set.
For charging, place the complete handblender in the charging unit (8) - (motor part alone also possible).
The green pilot light confirms that the appliance is properly inserted in the charging unit and that it is being charged.
Full charge: ca. 2 hours
Fully charged: the pilot light flashes with longer intervals
Operation time is ca. 20 minutes (depending on way of usage)
After every usage, place the appliance back onto the charging unit for recharging. This will make sure that it is always ready for use with optimum charging conditions. You may as well store the appliance on the charging unit. Even if not in use for a long period of time, the lithium ion batteries implemented maintain their charging level to a large extent.
The batteries are protected against deep discharge. A completely discharged appliance has to be charged for at least ca. 15 minutes before it can be used for an application (e.g. soup).
Pilot Light
| Appliance in charging unit (connected to the mains) | Charging or operation conditions |
| Green flashing Battery | is charging |
| Green flashing (in longer intervals) | Battery is fully charged |
| Switch release button (2) pressed down | Charging or operation conditions |
| Green Battery is fully charged | |
| Red/green flashing Charge sufficient for at least one usage | |
| Red Battery is discharged | |
| Red Overheating protection active (go to Safety features → Overheat protection) | |
Safety features
Switching on the appliance / Switch lock
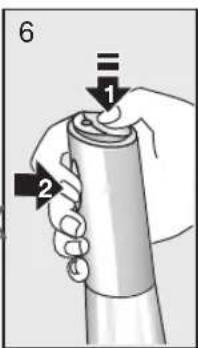
The appliance has a switch lock. To safely switch it on, follow these points:
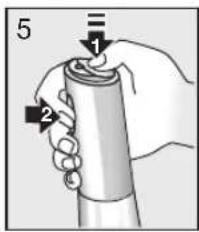
1 First press the switch release button (2) with your thumb and hold.
2 Then press the On switch (3). During operation, you can stop pressing the switch release button.
- If the On switch (3) is not pressed within 5 seconds, the appliance cannot be switched on. The pilot light goes off.
- In order to switch the appliance on, start again with step 1.
Overheat protection
When the overheat protection feature is active, the appliance turns off and the pilot light shines permanently red.
| Reason Trouble shooting | |
| Blade is blocked | 1. Remove motor part 2. Remove the food/blockage 3. Place the motor part into the charging unit (connected to the mains) for at least 1 second 4. Processing can be continued |
| Appliance is overheated | Follow points 1.-4. If the pilot light still shines red when switching on the appliance, place the motor part back into the charging unit and let it cool down for ca. 1 hour. During this time, the pilot light flashes green. |
Auto Off
For safety reasons the appliance turns off after 4 minutes of permanent usage. The appliance can be turned directly on again.
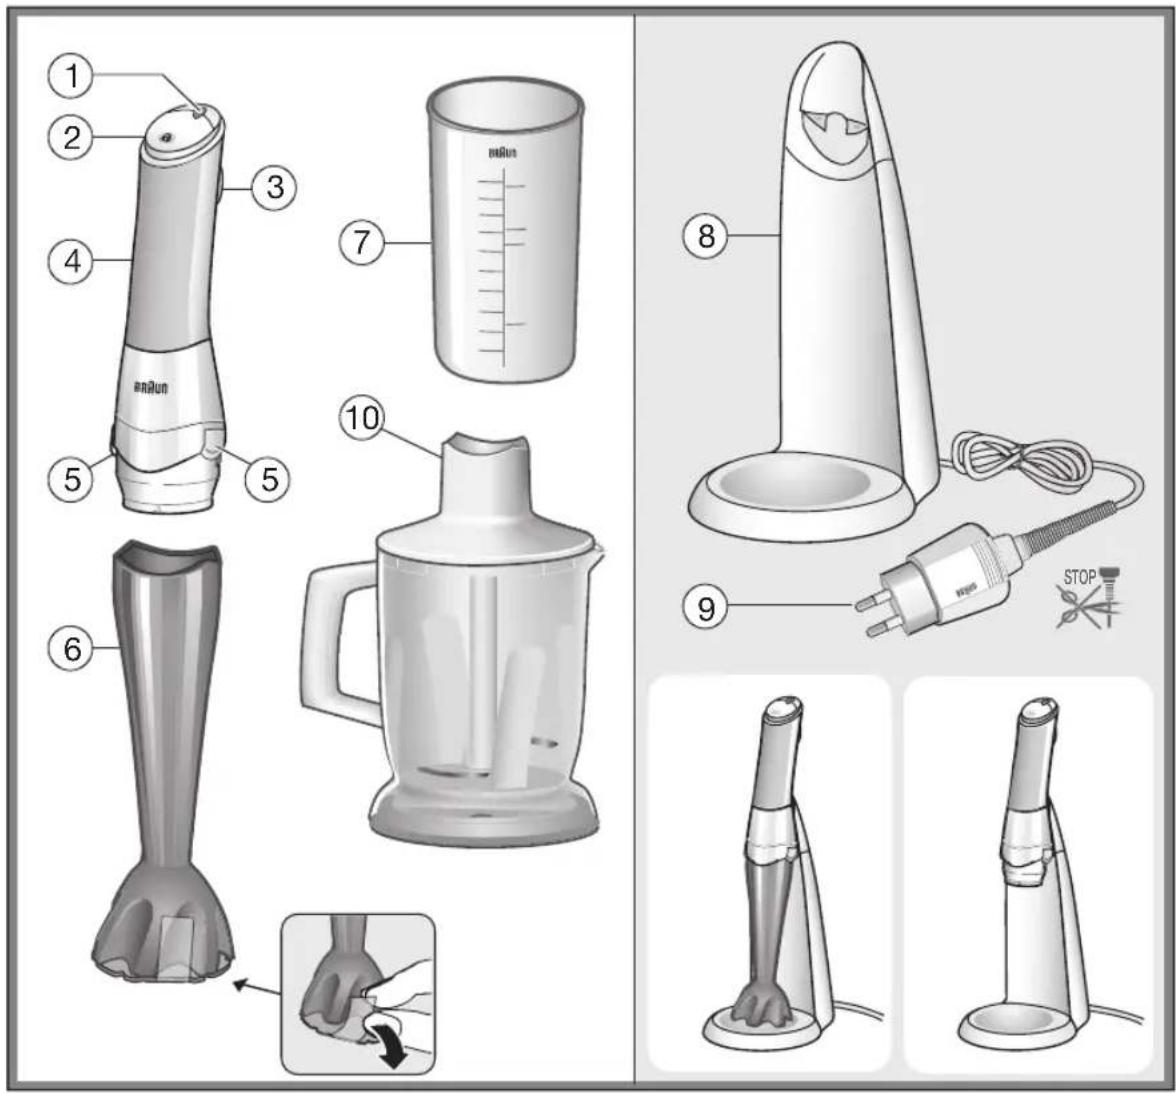
Using your handblender
The handblender is perfectly suited for preparing dips, sauces, soups, mayonnaise and baby food as well as for mixing drinks and milkshakes.
a) Remove knife protection at the bottom of the blender shaft by removing the adhesive tape. Insert the motor part (4) into the blender shaft (6) until it locks.
b) Introduce the handblender vertically into the vessel, keep the switch release (2) pressed down, then press the On switch (3).
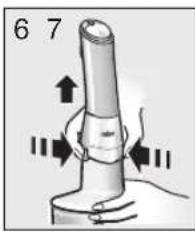
c) To remove the blender shaft from the motor part, press push buttons (5).
When operating the handblender in hot liquids do not immerse the blender shaft into - or remove it from the liquid while the appliance is switched on.
Recipe example:
Mayonnaise
200-250 ml oil,
1 egg (yolk and white),
1 tbsp. lemon juice or vinegar, salt and pepper to taste
Put all ingredients into the beaker according to the a.m. order. Introduce the handblender to the base of the beaker. After switching on, keep the handblender in this position until the oil emulsifies. Then, without switching off, slowly move it up and down until the mayonnaise is well combined.
Using your chopper attachment
The chopper is perfectly suited for chopping meat, cheese, onions, herbs, garlic, carrots, walnuts, almonds, prunes etc.
N.B.: Do not chop extremely hard food, such as nutmeg, coffee beans and grains.
Before chopping ...
- pre-cut meat, cheese, onions, garlic, carrots, chilis (see processing guide S. 5)
- remove stalks from herbs, un-shell nuts
- remove bones, tendons and gristle from meet.
Chopping
(see picture section A)
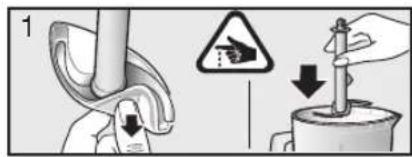
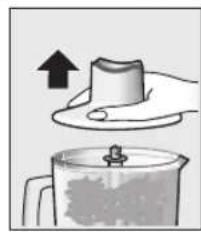
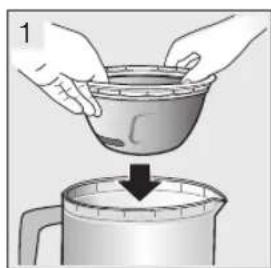
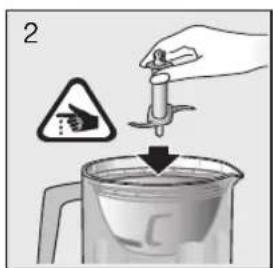
- Carefully remove the plastic cover from the blade (10b). Caution: the blade is very sharp! Always hold it by the upper plastic part. Press the blade onto the centre pin of the chopper jug (10c) until it locks. Always place the chopper jug on the anti-slip base (10d).
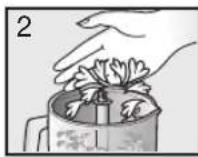
- Place the food in the chopper jug.
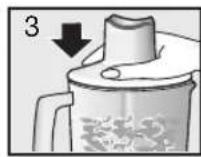
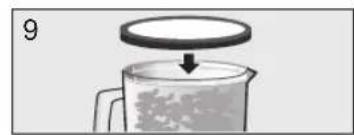
- Put the gear lid (10a) on the chopper jug.
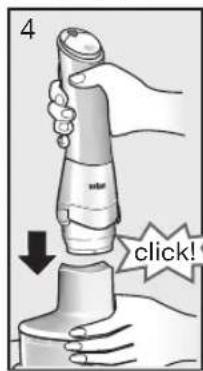
- Insert the motor part into the gear lid until it locks.
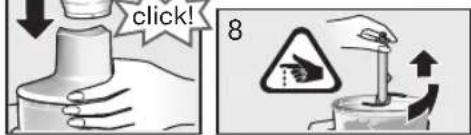
- Keep the switch release button (2) pressed down and press the On switch (3) to operate the chopper. During processing, hold the motor part with one hand and the chopper jug with the other. When chopping hard foods, press down the motor part.
- After use, press buttons to remove the motor part.
- Then remove the gear lid.
- Carefully take out the blade.
- Remove the processed food from the chopper jug. The anti-slip base also serves as an airtight lid for the chopper jug.
For purées, when very fine results are preferred, you may also use the handblender shaft in the jug.
Light dough (pancake batter)
First pour liquids into the jug, then add flour and finally eggs.
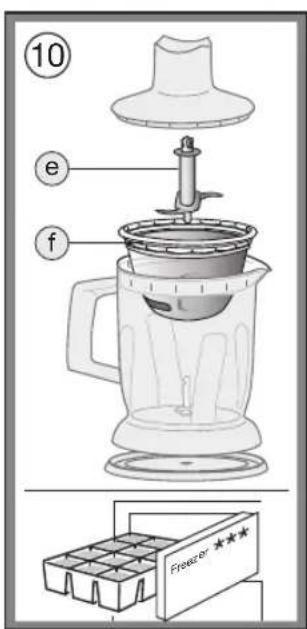
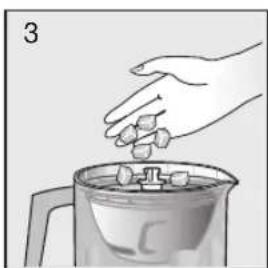
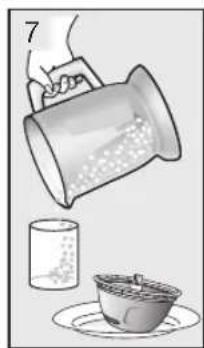
Crushed ice
(see picture section B)
- Place the ice crusher insert (10f) into the jug. Ensure it fits properly.
- Place the shaft of the ice blade (10e) into the centre hole of the ice crusher insert and press it down.
- Fill ice cubes into the ice crusher insert.
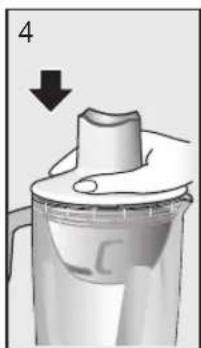
- Fit the gear lid on the jug.
-
Insert the motor part into the gear lid until it locks.
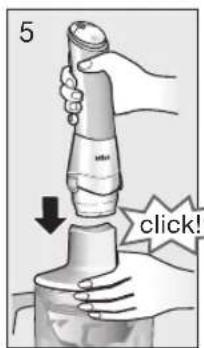
-
Keep the switch release button (2) pressed down and press the On switch (3) to operate the chopper. After use, press buttons to remove the motor part. Then remove gear lid, ice blade and ice crusher insert.
- Remove the crushed ice or simply fill your drink into the jug for serving at the table. Alternative: First mix fruits in the jug with the chopper blade (10b), filling it up to 0.5 litres maximum. Remove the blade and place the ice crusher insert into the jug in order to crush ice directly into the pureed fruits.
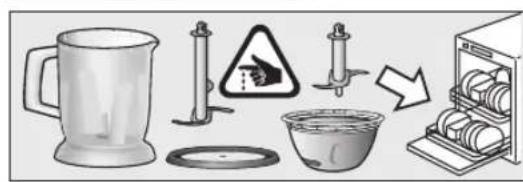
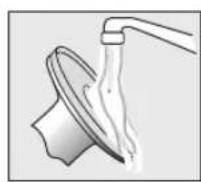
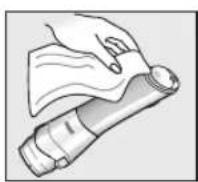
Cleaning
Before cleaning remove the motor part. Do not immerse the motor part (4) and charging unit (8) in water nor hold them under running water. These parts can only be cleaned with a damp cloth. The chopper gear lid (10a) is not dishwasher-proof. All other parts are dishwasher-proof. When processing foods with colour (e.g. carrots), the plastic parts of the appliance may become discoloured. Wipe these parts with vegetable oil before cleaning them.
For electric specifications, please see printing on the special cord set. The special cord set automatically adapts to any worldwide AC voltage.
Subject to change without notice.
This appliance contains Li-1on rechargeable batteries. Please do not dispose of the product in the household waste at the end of its useful life. Disposal can take place at a Braun Service Centre or at appropriate collection points provided in your country.

Français
Protection anti-surchauffe
Milkshakes, drinks, pureer
Pnp cpa6aTaBbAHm 3aunTbI OT npepeBa, np6op BbIKIOuayetcH, INnDnKaTOpHaJ NaMnOyKa 3aropaETcKpachbIM.
ABTomatHueckoe BbIKJIOyHeH
IIO COO6paKeHnAM 6e3oNaChOCTn np6bOp OTKJIouyaeTcA uepe3 yeTbPe MNHyTbI HenpepbIBHO pa60tbl. Nocne OTKJIouyehn Ipn6bOp MoKet 6bITb CHOBA BKJIOUeyh.
Popraok pa6oTbI c norpyxHbIM 6neHepom
IorpyxHNo 6JIeHep nIealbHO NOxOaNT dI npiroTOBJIeHn COYCOb, NOJINBOK, CynOB, MaHOHe3OB, DeTCKOro NITAHnA, a TaKKe BCEx BnIOB KOKTeJLeN.
a) YdaInte 3auNTy ne3Bn, paCNOIOKeHHyO B HxKHeuactn HacaKn-6neHepa, CHAB KneKyO JeHTy. BCTaBBTe MoTOpHyo yAcTb (4) B HacaKky-6JeHep (6) do qKcaun.
b)Onyctnte 6JeHep BepTkaJIbHO B nocdy, n, ydepKnBaHaKaToI pa3MbkaIOU KhoNky (2), HaxMNTe KONKY BKIOUeHNA (3).
c)IIINBbICBO6OJdeHnHaCaIKN-6JIeHepa n3 MOTOPHOuYAcTn,HaxMMTe KHOIPN BbICBO6OJdeHnpa6OuXuacte(5).
Pn pa6oTe c ropaHm JnKIOCTaMn He norpy- XaIe B Hnx HacaIky-6JIeHdep N He BbIHMaIte ee n3 XnKIOCTN, KOrda np6Op BKIOUeH.
PpakTHeckn npHMepe:
Maiohe3:
200-250 mJ pactnteHOro macna
1 RnIO (C KJNTKOM)
1 cTOnOBaI NOKKa JIMMOHHO COKa NIN yKcyca, COJIb n Caxap no BKcy
IomeTe BCE INHrpEIneHTb B MepHbI CTaKaH B Bblweyka3aHHoN OcneNoBaTeNbHOCTn. Iorpy3nte 6JeHep Do dHa cTaKaHa. Iocne BKJIOUeHN, ydepKnbAte erO B 3ToM NIOJXeHN Do pactBOpeHN MaCna. Daee, He BBkIOuY aBNeHepa, nepemeaTe erO BBepx-Bn3 Do IOCTNXeHN ODHOpOHorO CBeta KOHCHCTeHN.
NcnoJb3OBAHne HacaKnH3MeJbUHTeJIa
N3MeIbUHTeB NIDEaJIbHO NOIOXoJNT IIN H3MeJIbYeHnMRCa,Cbipa,NyKa,3eJIeHN,YeCHOKa,MOPKOBn, rpeKnxOpexOB,MHdJaI,YePHocnBaN T.I.
PpmeHHe: Pnp6op He npedHa3HaueH dIaN 3MeJIbYeHn OChEh JecTKnx IpoDyKToB, TaKnx KaK MycKaTHbIe Opexn, KoFeHbIe 3epHa n Kpybl.
IpeaH3MeBueHHem cneyuET ...
- Nope3aTb Ha KycOuKN MRCO, CbIP, NyKOBNUcbl, YechOK, MOpKOb, 3aMOpOKeHHbIe NpOdyKTbl (CM. pyKOBODCTBO)
- ydaTb CTe6JI 3eJIeHn n cKOpIyNy opexOB
- ydaNTb KOCTn, cyxoxnnnI IN xprnN n3 mca.
N3melenbueHne
(cm.pncyHOKBpa3deneA)
- Octopoxho CHMNTe INaCTKOByIO KpbIiKy c HOxa (10b). POMHnte: Ne3Bne HOxa OueHb ocTpoE! Bcerda yepkBaaiTe erO 3a IIaCTKOByIO OCHOBy.
YcTaHOBInTeJe3BnE Ha ceHTpaJIbHbI CTepKeHb YaSiN - N3MeJIbUHTeJIa (10c) Do ueJyKa.
Bcerda ctabte yawy ha npotnbockob3auyio noctabky, TTo6bI npedotbpaTb ckoljxehne (10d). - NpOxKHe npOdyKtB UaWy H3MeIbYnteJIa.
3.YcTaHOBnTe BepXHIOU qacb (10a)Ha ChaIy H3MeJIbHTeJIr.
4.BctaBbTe MOTOpHyu cactb B BepxHIOU cactb DoI nonHO Kcauu. - YdepKnBaHaxaToI pa3MbkaIOUyIO KhoNky (2), BKIOHTe N3MeJIbUHTeB HaxaTHeM KHOKN BkIOUeHNr (3). B npOecce pa60TbI OJHOpyKoY depKNaTe MOTOpHyO qAcTb, a dpyroI -uAuy. Ppi N3MeJIbUChEN TBePdbIX npOdyKTOB, pnnKMaTe MoTOpHyO qAcTb K aAWe N3MeJIb- uHTeN CINbHee.
6.ПО OKOHuaHn paObToH haxMHTe KHOJKNДЯ BBICBO6OXDeHn MToPHOJ YactN. - CHIMITE BepxHIOU qactb.
8.OctopoxHO BbHbTe Ne3BnA.
9.BbIbTe H3MeJIbYeHHbIe npOyKtbl N3 YaShn. IpOTNbOCKOJIb3aUaH NOCTaBkA TaKxKe IcNoJIb3yETcK Ka KpbIuKa dHa rEpMeTuHOro 3aKpbITnY aShn.
KokTeJHn, HanHTKn, nIope
IINI NOJUeyHn HExHO RIOpe,MOXHO BOCIOJIb3OBATbCn HacaIKo-6neHepom.
Xndkoe TcTo (JIN6HOB)
PnpnproTOBHeHHIeKoroTeCTa,Chayana ByaWHaINBaTe XnKDocTH,3aTeM 3acbinaTe MyKy,H,HaKoHeu,DoabJIrTe RaUca.
KoIka Ibda
(a) BepxH YAcTHHa
(b) JIe3a
(c) Yawa noDpi6HOBaHa
(d) IpoTnKOB3Ka niDCTaBka/ KpuShka
(e) JIe3o IaI noIopip6HeHHa IbOdy
(f) BCTaBka IJn noDpi6HeHHr NbOdy
3apKa npnaay
OnTImaIbHa TemnepaTypa dIa3apHdkn npnlaNy bID 15 ^ C do 35^ BcTaHObit 3apdHi npCTpii (8) Ha ropuHOTaIbHI NOBepxHi. CneiaJIbHIM 3'edHyBaJIbHM uHypom NiikNIOUHTb 3apHdi npCTpii Do eekTpomepeki.
Дязардкп nomicitb Bece 3ahypiobaIbHnI 6JIeHepB 3apdHnI npncpti8-(MOxHa NOMICTHTN JIWe MOTOPHy qactINHy).
Ikpno npnla npabInbHo nikloueHn do 3apndoro npnctpo,Ha Hbomy cnaLaxye 3eneHa lamNoyka-iHnKaTOp.
-Повна заразда:6и3ько2roDNH
-Пи NOBHIЗAPAДUЧТОТAMRAHЯлмnoукINHДКATOPA3MeHUsyETbC
- Yac po60tnpnnaDy BiD OndHie3apnKbN 6bn3bko 20xbnnn (3anexHo BiD yMOB eKcnnyatauii)
KoXHoro pa3y nicna BnKOpncTaHHa npnaNy BCTaBnIte noRo B 3apAHHn npunctpi. Lc 3a6e3neuHTb noOCTiHy roTOBHiCtB do po60Tu. BJeHep Ha 3apAHHomy npunctpoM oKHa 36epiratN
noctiHn.Habitb npn TpmbaInx nepepbax B ekcnnyataui, JitieBO-ioHHaKMyIaTOpn TpMaHOb 3apRd.
AkymyIHTOpn 3axuHeni BiD NOBHOI PO3pIKN. IOBHCTIOPO3PRAKeHNI pINaI NEpei BIKOPNCaH HAM (HAnpKJIa,I,ДЯ pNIRTOYBaHHc cNy) Heo6xIDHO 3apJXkATn IpOTAROM He MeHwe 15 XBNIH.
JaMaNoUka-iHndKaTOp
YbIMKHeHH6JeHepa/BnokyBaHH YbIMKHeHH
PpnaD OCHaueHn 6JIOKYBaHHM yBIMKHeHH.
IJa 6e3neuHoro yBIMKHeHH npuaDy BkOHyTe
HaCTyni peKOMeHdaui:
1 HaTnCHiB i yTpmyIe BeNkMn naJIbIeM pyKn KHOKNy po3MNkaHHa (2).
2 HaTnCHiB KNONy BBIMKHeHHR (3).PiJ vac po60Tu MoXHa BiDnyCTHTN KHONKy po3MnKaHHa.
- KKIO KNOKa BBIMKHeHH He HaTnCKyBaTmMeTbC npOTrOM 5ceyH, npuaI nepeiNe B HeAeKTNB Hn pexim i He BBIMKHeTBc. JAmnoYka-iHnKaTop 3rache.
-Длг NOBTOPO BBIMKHeHnЯ npnaIy NOBToPiTb npoueDpy, nouHaIOU 3 nyHKty 1.
3axnCT bID neperpipy
PnCnpaBobyBaHHi 3axncTy Bi npeperpiy npnnaBIMNKaETbCR, a IamnoUka-iHdkatop cnaanaxye YepBOHM.
3aHypobbHn 6IeHep iIealbHO nIXoDntb dI npiroTOyBaHH COYCIB, iINNBOK, CynIB, MaHOe3IB, DITrAHorO XapUyBaHH, a TAKOX BCIX BnIDIB KOKTeJIIB.
a) BndaNtB 3axnCT ne3a, po3TaUObaHm B HnKHi yactnHi HacaIKn-6neHepa, 3Hbwn KneKy cTpiKy. BcTaBte MOTOpHy actHy (4) B HacaIky-6JeHep (6) do NobHOi fikcaii.
b)OnyctIb 6JIeHep BepTnKaJIbHO B nocuI, i, yTpmyOuHaTnCHyTOIO PO3MnKAIOuy KONKy (2), HaTnCHiTb KHONKY BBIMKHeHHa (3).
c)ДЯВИBJHHeHHHaCauKn-6JIeHepa3MOTOPHOI qactHH,HaTNCiTb KONKn BUNBjNbHeHH po6OuX qactH (5).
Ppi pO60ti 3 rapAHHMpiDINHAMHe 3aHypioTe B HnX hacaIky-6JIeHepi He BnMaIte II 3 piHN, KOJI npNpAd yBIMKHeHn.
PpakTuHn npNKla:
Maiohe3:
200-250 mJ poCInHHoI oII
1 Rnue (3 KOBTKOM)
1 cTOnoBa IIOKKa IIMMOHHoro COKy a60 OuTy, ciNb i cykop 3a cMaKOM
Pomictb Bci iHrpeiEHTB MipHn CTaKaH y Bnue3raHaHH NocniIOBHOCTI. 3aHypitb 6JeHep Do dHa cTaKaHy. Iicna BBIMKHeHHY TpyMMyTe Noro B cybOMy PNOJKeHHI DO pO3UHHH MaCna. DaJI, He BmHKaOuN 6JeHepa, nepemiuAte Noro Bropy-BHN3 DO OoCARHeHH ODHOpIHORO KObOpY i KOHCnCTeHcII.
BnKOpHCTaHHHa cakNnOndpi6HIOBaHa
Iopip6HOBaIeAJIbHOJnUHTBINnoPi6HeHH
M'ra, Cpy, u6yJI, 3enEHI, YacHNKy, MOpKBN,
BOIOcBKnx RopixIB, MngdAnIO, YOphocnBy iT.D.
PpIMtKa: PpNJaD He npn3HaueHNI dJI
NoPi6HeHH dyke XopctKNX npOdyKTIB, TaKNX K
MyckaTHI ropixN, KaboI 3epHa i Kpynn.
Ipeep noopi6HeHHam cnid ...
- Nopi3aTN Ha WMaTOUKN M'RO, CUP, UN6yIIO, YachIK, MOPKBy, 3amopOKeH IpOdyKTN (INB. BkA3iBKn)
- BndaanTn cTe6nnH 3eJIeHi iKapanyr opiXIB
BndaJIHTN KICTKN, cyXOKNJIIa I xprui 3 M'ra.
NoDpi6HeHHa
1 chaHa IbXnca IIMHOB COK NIO OcET, COI INIINep Ha Bkyc.
IocTaBeTe BCnUKN CbCTaBKn B MeH3ypaT A CbUINpei. NocTaBeTe nacaTopa B OCHOBATA Ha MeH3ypata.Cnei KaTO BOKIIIOuHTe,dpBXTe nacaTopa B CbUATA NO3nUII DOKATo ONIOTO emyIrrupa.CneI TOBa 6e3 Da I3KJIIOuBaTe ypeDa, 6abHO rO DBIXKeTe HArOpE HHaDOny, DOKaTO KOCNCTeHcNITa Ha MaioHe3aTa e Do6pe KOMbHNpaHa.
Hnctpykun 3a ynoTpe6a Ha npncTaBkata 3a p3aHe
PnncTabKaTa 3a p3aHe e nepfekTHo npirodeHa 3a pr3aHe Ha MecO, CnpHe, NyK, BnKn, YecbH, MopKOBn, opexn, 6aDemn n.d.p.
Baxho:He pexeTe n3KnIOuHTeIHO TBbPda xpaHa KaTo INdNcKO opexe, KaFe N 3bPHeHxpaHn.
PpeHn da npncbntte KbM p3aHe c ypeHa
-Ппебарпелно hapжete MecOTO,сиpeнeto, lyka,чесьна,MOPKOBNTe,ЛOTNTeЧУшКИ(BЖ. nHCTpyKUnTe 3a ynotpe6a)
- OTdeneTe cTpBkqEtata Ha 6nKnTe, yepynKnTe Ha RKnTe
OTdeneTe KOKaJIrTe, cyxoxuJINrTa n xpyuJIrTe OT MecOTO
P3aHe
(Bx. KapTHKa B pa3JeA)
- BHIMATEIHOOTCPaHTe PIIACMACOBNAKANAKO HOKA(10b).BHIMAHNE:HOXBtEMMOROocTbp! BnHarrroDpBXKe OTKBm rOpHaTa PIIACMACOBAACT.NoCTABeTe HOXA BbpxuNTBa CEHTbpa Ha KaHATA 3a p3aHe (10c).HaTNCHEte HADONY HOKA DOKATOce 3akNou.NBHarn NOCTABAITe KaHATA 3a pa3aHe BbpxyNOBbpxHOCTTa npOTINB XJb3raHe (10d).
- NocTabete xpaHata B KaHaTa 3a pr3aHe.
- NocTaBeTe KaNaKa (10a) Bbpxy KaHaTa 3a pr3aHe.
- NocTaBete OCHOBHata yact B KaNaKa DoKaTo Ce 3aKnHouN
80
- 3aDpbkTe 6yToHa 3a OcB6oKdAbAhe (2) n HaTnCHete 6yToHa BKn. (3) 3a Da npncTbNtne KbM onepaunr pR3aHe. IIO Bpeme Ha pa60Ta cypeDa dpbXte OCHOBHaTa Yact C eHnTa PbKa n KaHata 3a pr3aHe C npyrata. Korato pexKeTe TBbpda XpaHa HATnCHete C eHnTa PbKa OCHOBHaTa Yact HaDoNy.
6.CneynoTpe6a,HaTnCHete 6yToHnTe 3a ocbo6oxdaBaHe Ha OCHOBnTa Yact. - Cnei ToBa OTdeneTe Kanaka.
- BhIMaTeJIHo n3BaTeTe HOxJa.
9.ИЗвадеобразоветахранаOTкунаТаа рязан.Осноьага npOTиNB3rahe CBsoIrpaepoЯHa Bakyymen Kanak 3a KaHata 3a pr3ahe.
Country of origin: Czech Republic
Year of manufacture
To determine the year of manufacture, refer to the 5-digit production code located near the type plate. The first digit of the production code refers to the last digit of the year of manufacture. The next 2 digits refer to the calendar week in the year of manufacture. And the last 2 digits show the print date automatically calculated since 1992. Example:30421 - The product was manufactured in week 4 of 2013.
:山
J 1 J
U U
J (8) J
J
J
J
J
J
J
J
J
J
J
J
J
J
J
J
J
J
J
J
J
J
J
J
J
J
J
J
J
J
J
J
J
J
J
J
J
J
J
J
J
J
J
J
J
J
J
J
J
J
J
J
J
J
J
J
J
J
J
J
J
J
J
J
J
J
J
J
J
J
J
J
J
J
J
J
J
J
J
J
J
J
J
J
J
J
J
J
J
J
J
J
J
J
J
J
J
pabll djjj jbdkall gac jcdll
iui i jai jie jie bai jia
ED//AP
JLsJ 1 JdJdJI JdJI Ia
baa siall pala
gj tllb juaal jao yolc cllw yjo jgl11ia
gJ 1 JU 2. J081 gJgJtAiaiaia
aouall jbal chay ddi jy dlall no
.
baa 4 aai jaii iiaai dao g o jaii Jaa
aay ylllally laia jaiil daj j
.
jaiil jaii jaii jaii jaii jaii jaii jaii jaii jaii jaii jaii jaii jaii jaii jaii jaii jaii jaii jaii jaii jaii jaii jaii jaii jaii jaii jaii jaii jaii jaii jaii jaii jaii jaii
dss
0o Jo Loglloaiu piie aiae, ollly jaiill ciy
( 5) 21
Joo jolal lai piai joi joi joi

- Deutsch
- Caution
- Description
- Pilot Light
- Safety features
- Switching on the appliance / Switch lock
- Overheat protection
- Auto Off
- Using your handblender
- Recipe example:
- Using your chopper attachment
- Before chopping ...
- Chopping
- Light dough (pancake batter)
- Crushed ice
- Cleaning
- Français
- Protection anti-surchauffe
- Milkshakes, drinks, pureer
- ABTomatHueckoe BbIKJIOyHeH
- Popraok pa6oTbI c norpyxHbIM 6neHepom
- PpakTHeckn npHMepe:
- Maiohe3:
- NcnoJb3OBAHne HacaKnH3MeJbUHTeJIa
- IpeaH3MeBueHHem cneyuET ...
- N3melenbueHne
- (cm.pncyHOKBpa3deneA)
- KokTeJHn, HanHTKn, nIope
- Xndkoe TcTo (JIN6HOB)
- KoIka Ibda
- 3apKa npnaay
- YbIMKHeHH6JeHepa/BnokyBaHH YbIMKHeHH
- 3axnCT bID neperpipy
- PpakTuHn npNKla:
- BnKOpHCTaHHHa cakNnOndpi6HIOBaHa
- Ipeep noopi6HeHHam cnid ...
- NoDpi6HeHHa
- Hnctpykun 3a ynoTpe6a Ha npncTaBkata 3a p3aHe
- PpeHn da npncbntte KbM p3aHe c ypeHa
- P3aHe
- Country of origin: Czech Republic
- Year of manufacture
Brand : BRAUN
Model : MQ 940cc
Category : Blender