USER MANUAL 1867 GARDENA
Soil Moisture Sensor
FR Mode d'emploi
Sonde d'humidité
Soil Moisture Sensor
Translation of the original instructions.

For safety reasons, children and young people under 16 as well as anyone who is not familiar with these operating instructions should not use the product. Persons with reduced physical or
mental abilities may use the product only if they are supervised or instructed by a responsible person. Children must be supervised to ensure that they do not play with the product. Never operate the product when you are tired, ill or under the influence of alcohol, drugs or medicine.
Intended use:
The GARDENA Soil Moisture Sensor is designed to be used solely outdoors in domestic and private gardens and in greenhouses to control sprinklers and watering systems via a GARDENA Irrigation control with a sensor connection taking account the soil moisture level.

DANGER! Risk of physical injury!
The GARDENA Soil Moisture Sensor must not be used for industrial purposes or in conjunction with chemicals, foodstuffs, easily flammable and explosive materials.
1. SAFETY
Important!
Read the operator's manual carefully before use and keep for future reference.

DANGER! Risk of suffocation!
Small parts can be easily swallowed. There is also a risk that the polybag can suffocate toddlers. Keep toddlers away when you assemble the product.

DANGER! Cardiac arrest!
This product makes an electromagnetic field while it operates. This field may under some conditions interfere with active or passive medical implants. To decrease the risk of conditions that can
possibly injure or kill, we recommend persons with medical implants to speak with their physician and the medical implant manufacturer before you operate the product.
Do not set the sensor down with the tip facing upwards. The tip poses a risk of injury.
Do not use damaged products. Ensure that all parts are correctly disposed of with immediate effect (please see Chapter 6. STORAGE Disposal/ Disposal of the batteries).
Keep damaged parts out of the reach of children.
Regularly examine the product for damage.
There is a risk of tripping. Position the sensor in such a manner that it can be seen at all times.
Regularly examine the batteries for damage.
Do not use damaged batteries. Ensure that they are correctly disposed of (please see Chapter 6. STORAGE Disposal/Disposal of the batteries). Keep damaged batteries out of the reach of children.
The product will become hot when exposed to sunlight. Touching the product in such a condition can result in slight burns if touched.
Batteries:
To ensure the Sensor runs safely, only 2 x alkalimanganese (alkaline) batteries type LR6 (AA) (Mignon) must be used.

DANGER!
There is a risk of explosion if batteries are not replaced in the proper manner. See 6. STORAGE for information on how to dispose of used batteries.
To prevent failure of the Sensor due to weak batteries in conjunction with a lengthy absence, batteries should be replaced in due course. This will depend on the previous operating life of the batteries and the probable length of absence, which should not exceed 6 months in total.
2. FUNCTION
With the GARDENA Soil Moisture Sensor the soil moisture level is taken into consideration for watering. Depending on the soil moisture, measurements are taken at intervals of between 30 and 60 minutes and sent to the irrigation control.
If the batteries are flat and are not replaced, the connected Irrigation control will function with the watering program selected.
The batteries are not included in the scope of delivery.
The Sensor must only be operated with 2 x alkalimanganese (alkaline) batteries type LR6 (AA) (Mignon).
The battery life is approx. 1 year. Depending on the outside temperature and the frequency of measurement and transmission, the battery life may vary.

CAUTION!
Rechargeable batteries should not be used!
- Pull the cover ① upwards.
- Insert the batteries (2 x alkaline type LR6 (AA)) ② into the battery compartment ③. Make sure that the polarity is correct.
The LED battery (4) in the battery compartment (3) below the batteries (2) illuminates green for 3 seconds.
- Close the cover ① again.
If the LED battery (4) flashes red every 5 seconds, the batteries are empty and must be replaced.
If the LED battery (4) illuminates red, an error has occurred (see 7. TROUBLESHOOTING).
To connect the connection cable [Fig. 15]:
- Connect the connection cable ⑤ to the plug ⑧ of the soil moisture sensor.
- Connect the connection cable to the irrigation control.
Hints:
Lay the cable flat to avoid injury and damage. - If necessary, fix the cable with GARDENA Hooks Art. 4090 (accessory for GARDENA Robotics). - Lay the cable in the ground in a bed of sand to prevent damage from stones. The connecting cable can be extended to a total length of 105 m using the GARDENA Extension Cable Art. 1868 (10 m).
To select the correct location:
Correct location:
The Sensor must be positioned at a location in the watering area which is exposed to the same climatic conditions as the plants (sun, wind, rain, etc.) for which a status is to be displayed.
Incorrect location:
The Sensor should not be covered by neighbouring plants. Areas of shade should be avoided.
To rule out erroneous results caused by waterlogging, the Sensor should not be positioned in dips in the ground.
To plant the Sensor [Fig. 16]:
![GARDENA 1867 - To plant the Sensor [Fig. 16]: - 1](/content/2025/01/332337/images/3f001915739ba4fa5e8bda8137cf5c7021eb7a7d0e86db764a039875911434a5.jpg)
CAUTION!
The tip of the sensor will only measure the soil moisture correctly if the sensor tip is in full contact with the ground on all sides! No air should be trapped at the sensor tip in the ground.
- Dig a funnel-shaped hole in the ground (7) at least 12 cm deep.
- Break up the soil ⑦ removed and take out any stones.
- Moisten the soil ⑦ if the soil is dry.
- Replace the damp broken-up soil ⑦ in the funnel-shaped hole without packing tight.
- Insert the sensor into the broken up soil up to the lower edge (upper edge in the mowing area) of the Soil Moisture Sensor ⑧. Here the sensor tip ⑨ must be in full contact with the damp soil on all sides.
- Press down the soil ⑦ around the Soil Moisture Sensor ⑧ lightly. The Sensor should not stand loose in the ground.
- Water the area around the sensor with approx. 1 litre water. Depending on the ground it may take several hours until the sensor measures the actual soil moisture.
To connect the GARDENA Micro-Drip-System:
To ensure that the quantity of water delivered is registered by the sensor tip when using the GARDENA Micro-Drip-System, a drip head should be installed directly above the sensor.
4. OPERATION
Use with the GARDENA Watering Controls Art. 1889, 1890, 1891, 1892:
The water requirement of plants depends on many factors, e.g. type of plant, soil, sunshine, wind. To find the suitable switching point of the Soil Moisture Sensor, it has to be observed during irrigation over a period of approx. 1 - 2 weeks and adjusted on the watering control side if necessary.
To set the switching point of the Soil Moisture Sensor:
- For medium-heavy outdoor soils (loamy humus), the switching point should be selected at medium humid.
- For sandy soils, the switching point should be selected when the soil is very humid.
- For potting soil, the switching point should be selected for rather dry soils.
To adjust the soil moisture level
If the soil seems too dry or too moist for a corresponding application (soil type or plant species), adjust the switching point using the sensor setting of the irrigation control.
This functionality is offered by the following irrigation controls from software version:
1889/1285: all 1890: 2.0 and higher 1891: 2.0 and higher 1892: 32 and higher
In an earlier version, a switching point is preset at the factory, see the following section.
Display of the software version of the irrigation control:
- after inserting the battery or
- after resetting to the factory setting by holding the two buttons simultaneously for 3 seconds [Fig. 01].
To display the soil moisture:
The display of the irrigation control shows the last measured moisture level. If the soil moisture is equal to or greater than the selected switch point, no watering is carried out.
Operation with all other GARDENA Irrigation Controls with Sensor Connection, Art. 1881, 1883, 1885, 1862, 1864, 1866, 1874, 1283, 1284, 1276 and previous models with a Sensor Connection:
- A switching point is preset at the factory and cannot be changed.
- For GARDENA Irrigation Controls with a two-wire Sensor Connection, an adapter cable set can be ordered from GARDENA Service.
Usages:
To keep the soil moisture level as constant as possible, irrigation should be carried out with short watering cycles and short watering times. This especially applies to flower boxes on balconies, which have a watering time of less than 5 minutes.
The spread of moisture in the soil after watering or rainfall is rather slow. In the worst-case scenario it may happen that irrigation and a rain shower overlap until the required soil moisture is attained.
5. MAINTENANCE
To clean/replace the sensor tip [Fig. M1]:
Whenever the Sensor is relocated, the sensor tip should be cleaned/ replaced. The felt on the tip should not come into contact with grease/oil.
Clean the sensor tip ⑨ with clear water.
If the felt becomes damaged, the sensor tip can be re-ordered from GARDENA Service.
Unscrew the sensor tip ⑨ and screw on the new sensor tip.
To clean the sensor:
No caustic/abrasive cleaning agents should be used.
Clean the sensor with a damp cloth (do not use solvent).
6. STORAGE
To put into storage:
The product must be stored away from children.
- Remove the batteries to preserve them (see 3. INITIAL OPERATION).
- Store the Sensor in a dry, enclosed and frost-free place.
Disposal:
(in accordance with RL2012/19/EC)

The product must not be disposed of to normal household waste. It must be disposed of in line with local environmental regulations.
IMPORTANT!
Dispose of the product through or via your municipal recycling collection centre.
Disposal of the batteries:
The batteries may only be disposed of when discharged.
IMPORTANT!
Dispose of the batteries through or via your municipal recycling collection centre.
7. TROUBLESHOOTING
| Problem | Possible Cause | Remedy |
| Watering is switched on although soil is damp | Sensor is not positioned in the watering area. | → Position the sensor in the watering area. |
| Switching point is selected too damp. | → Select the switching point “dryer”. |
| Watering is switched on although soil is damp | Defective or loose sensor cable. | → Check the sensor cable and the connections. |
| Batteries spent/inserted incorrectly/ wrong batteries used. | → Replace the batteries/insert correctly/use alkaline batteries. |
| Air is trapped at the sensor tip. | → Remove the trapped air (see 3. INITIAL OPERATION To plant the sensor). |
| Watering is not switched on although soil is dry | Sensor is in a dip in the ground. | → Insert the sensor in the correct position (see 3. INITIAL OPERATION To select the correct location). |
| Switching point is selected too dry. | → Select the switching point "damper". |
| LED battery flashes red | Batteries of the sensor are flat. | → Replace the batteries of the sensor. |
| LED battery illuminates red | Sensor is defective. | → Contact the GARDENA Service. |

NOTE: For any other malfunctions please contact the GARDENA service department. Repairs must only be done by GARDENA service departments or specialist dealers approved by GARDENA.
8. TECHNICAL DATA
| Soil Moisture Sensor | Unit | Value (Art. 1867) |
| Connection cable | m | 5 |
| Outdoor operating temperature | °C | 5 – 50 |
| Storage temperature | °C | -20 – +60 |
| Batteries required | | 2 x alkalimanganese (alkaline) batteries type LR6 (AA) (Mignon) |
| Operating time of the batteries | | approx. 1 year with alkaline batteries (min. 2000 mAh) |
9. ACCESSORIES
| GARDENA Extension Cable (length: 10 metres) | Used to extend sensor cable to max. 105 metres. | Art. 1868 |
| GARDENA Sensor tip with felt | For replacement with damaged sensor tip. | obtainable via the GARDENA Service |
| GARDENA Hooks | For attaching the connecting or extension cable. | Art. 4090 |
| GARDENA Adapter Cable Set | For GARDENA Irrigation Controls with a two-core Sensor Connection. | obtainable via the GARDENA Service |
10. SERVICE/WARRANTY
Service:
Please contact the address on the back page.
Warranty statement:
In the event of a warranty claim, no charge is levied to you for the services provided.
GARDENA Manufacturing GmbH grants a warranty for all original GARDENA new products for two years from the date of original purchase from the retailer, provided that the devices have been used for private use only. This manufacturer's warranty does not apply to products acquired second hand. This warranty includes all significant defects of the product that can be proved to be material or manufacturing faults. This warranty is fulfilled by supplying a fully functional replacement product or by repairing the faulty product sent to us free of charge; we reserve the right to choose between these options. This service is subject to the following provisions:
- The product has been used for its intended purpose as per the recommendations in the operating instructions.
- Neither the purchaser nor a third party has attempted to open or repair the product.
- Only Original GARDENA replacement parts and wear parts have been used for operation.
- Presentation of the receipt.
Normal wear and tear of parts and components (such as blades, blade fixing parts, turbines, light bulbs, V-belts/toothed belts, impellers, air filters, spark plugs), visual changes, wear parts and consumables are excluded from the warranty.
This manufacturer's warranty is limited to replacement and repair of products in accordance with the abovementioned conditions. The manufacturer's warranty does not constitute an entitlement to lodge other claims against us as a manufacturer, such as for damages. This manufacturer's warranty does not, of course, affect statutory and contractual warranty claims against the dealer / retailer.
The manufacturer's warranty is governed by the law of the Federal Republic of Germany.
In case of a warranty claim, please return the faulty product, together with a copy of the receipt and a description of the fault, with postage paid to the service address.
Consumables:
As a wear part the sensor tip with felt is not covered by the guarantee.
Faults which occur as a result of incorrectly installed or leaking batteries are not covered by the guarantee.
DANGER! Risk of suffocation!
Translation of the original instructions.

The appliance may be used by children aged 8 and above and by persons with reduced physical, sensory or mental capabilities or lack of experience and knowledge if they have been given supervision or instruction concerning use of the appliance in a safe way and understand the hazards involved. Children shall not play with the appliance. Cleaning and user maintenance shall not be made by children without supervision.
Children must not play with the appliance. Keep the appliance out of reach of children. Never operate the appliance if you are tired, under the influence of alcohol, drugs or medication.
Intended use:
The GARDENA soil moisture sensor is intended for private use in gardens and on lawns, as well as in greenhouses exclusively outdoors for controlling irrigation valves and irrigation systems with the help of GARDENA irrigation control systems and the connection of GARDENA sensors with soil moisture.

DANGER! Risk of injury!
Do not use the GARDENA soil moisture sensor in industrial environments, nor together with chemicals, foodstuffs, flammable or explosive substances.
1. SAFETY
Important!
Please read these operating instructions carefully and keep them for future reference.

DANGER! Risk of suffocation!
Small parts may be swallowed. Due to the new packaging, there is a risk of suffocation for small children. During installation, do not allow small children near the device.

DANGER! Cardiac arrest!
This device creates an electromagnetic field during operation. In certain circumstances, this field may interfere with and affect the operation of active or passive medical implants. To avoid dangerous situations that could lead to injury or fatal accidents, users of medical implants should consult with their implant manufacturer before using this device.
Do not point the device upward. The tip poses a risk of injury.
Do not use a damaged product. Immediately unplug it and follow the instructions (see Chapter 6. Storage of plugs/plug adapters).
Do not allow children near damaged parts.
Regularly check the device for damage.
There is a risk of electric shock. Position the device so that it cannot fall into water.
Regularly check the battery for damage.
Do not use damaged batteries. Dispose of them according to regulations (see Chapter 6. Storage of batteries/battery packs).
Do not allow children near damaged batteries.
Exposure to sunlight heats the device.
Contact with it may cause minor burns.
Battery:
The GARDENA soil moisture sensor is supplied with 2 alkaline batteries (LR6/AA) already installed.

DANGER!
Danger of explosion if batteries are replaced incorrectly. Dispose of used batteries as described in the section on STORAGE.
If the sensor is not used for a long period of time due to a lack of plants, the batteries must be replaced after a certain interval. The decisive factor for this is the duration of the previous operation and the expected period of absence, which together should not exceed 6 months.
2. OPERATION
With the GARDENA soil moisture sensor, the soil moisture is measured. Depending on the soil moisture, the irrigation is controlled and the results are transmitted to the control system at intervals of 30 to 60 minutes.
3. COMMISSIONING
Installing the batteries [Fig. 11/12/13/14]:
Batteries are not included in the delivery.
Only 2 alkaline (non-rechargeable) batteries of type LR6 (AA) (1.5 V) may be used in the sensor.
If the batteries are discharged and not replaced, the connected irrigation control system will continue to operate according to the programmed irrigation schedule.
The service life of the batteries is approx. 1 year. Depending on the ambient temperature and the frequency of measurements and transmissions, the battery life may vary.

ATTENTION!
Rechargeable batteries must not be used!
- Pull the cover ① upwards.
- Insert 6 batteries (2 x 10 hours) 6 batteries Type LR6 (AA) ② B 6 batteries HbO TcEK ③.
It is necessary to observe the correct polarity.
Light the battery ④ in the battery compartment ③ under the battery ② with the light on for 3 seconds.
- Close the lid again ①.
If the battery ④ is empty, replace the batteries and dispose of them properly.
If the battery ④ is low, the LED flashes. Then replace the battery (see 7. TROUBLESHOOTING).
Connecting the connecting cable [Fig. 15]:
- Connect the connecting cable ⑤ to the plug ⑥ of the moisture sensor.
- Connect the connecting cable to the control unit.
Note:
- Lay the cables so that they are protected from damage. If necessary, secure the cable with GARDENA clips art. 4090 (GARDENA accessory for lawn mower robots). In the soil, lay a sand bed to avoid damage from stones. The connecting cable can be extended with the GARDENA extension cable art. 1868 (10 m) up to a maximum length of 105 m.
Selecting the correct installation location:
Correct installation location:
The sensor should be installed in the same location as the fuel, where the same climatic conditions (sun, wind, rain, etc.) prevail as at the location of the plants whose condition is to be monitored.
Incorrect installation location:
The sensor must not be covered by plants. It is necessary to avoid shaded areas.
To prevent incorrect results arising from the influence of flooding, it is not allowed to place the sensor in depressions.
Overgrowth of the sensor [Fig. 16]:
![GARDENA 1867 - Overgrowth of the sensor [Fig. 16]: - 1](/content/2025/01/332337/images/0cc31f69dfe2afa229c6a72e6a3024b6271da49e544a75e473c42e601a2dc670.jpg)
ATTENTION!
The tip of the measuring sensor correctly measures soil moisture only if the tip of the sensor is in full contact with the soil over its entire surface! In the soil, no air must act on the tip of the sensor.
Moisture level display:
The irrigation control system is activated after the last measured moisture value.
If the moisture level is higher than the selected threshold, irrigation is not permitted.
Operation with all other GARDENA irrigation control systems with sensor connection, e.g., 1881, 1883, 1885, 1862, 1864, 1866, 1874, 1283, 1284, 1276 and previous models with sensor connection:
The exact switching threshold is preset and cannot be changed. For GARDENA irrigation control systems with two-wire sensor connection, a conversion cable set can be ordered from the GARDENA service department.
Application instructions:
In order for the soil moisture to be kept at the optimum level constantly, the soil must be watered gradually. This is especially important for heavy soils, whose permeability is less than 5 minutes.
The spread of moisture in the soil after watering with a hose has a certain inertia. In the worst case, it may happen that the watering and the soil moisture occur simultaneously until the desired soil moisture is reached.
5. MAINTENANCE
Cleaning/replacing the sensor tip [Fig. M1]:
If the sensor tip is damaged, it must be cleaned/replaced. The tip must be sharp and must contact the soil/moisture.
→Help clean the sensor tip thoroughly.
If the tip is worn, the new part can be ordered from GARDENA service.
→Unscrew the sensor tip ⑨ and attach the new sensor tip.
Cleaning the sensor:
Do not use abrasive or corrosive cleaning agents.
→Clean the sensor with a damp cloth (do not use solvents).
6. STORAGE
Disposal:
The product must be stored out of reach of children.
1. For battery removal (see 3. OPERATION). 2. Store the sensor in a dry, closed, and separate room.
Disposal:
(according to Directive 2012/19/EC)

Do not dispose of the product with household waste. It must be disposed of in accordance with local regulations for environmental protection.
IMPORTANT!
→ Rechargez les batteries via les points de collecte locaux pour les batteries usagées.
Batteries usagées :
Les batteries usagées ne doivent être éliminées que dans les points de collecte prévus à cet effet.
IMPORTANT !
→ Rechargez les batteries via les points de collecte locaux pour les batteries usagées.
7. DÉPANNAGE
| Поблеса | Возим khя рочина | Устрашени |
| Полев BKLOUaTeСРп ВсICOKо BλAJXHOCTH IOчБИ | ДатчNK размшени BVE зонь пOLINBA. | → Pa3mecTite ДатчNK в ЗОЕ пOLINBA. |
| Быбрана слишkom BλAJXHЯТ TOTka pepeknLChENHЯ. | → БыберITE bOJenne „cuyxu" TOTkу pepeknLChENHЯ. |
| ДeфктнIHи MЛN OTOCoEINHEnHь кабел дATчNKa. | → ПоверITE kabel NaCHNKa и PodKlIoYENHЯ. |
| Батаре разрakжны/нелравильно BCTablenы/ ИспальзуOTСЕНРавильные Батари. | → 3amENITE batapei / pPavilno B cTabstte batapei / nCpOJIb3yIT ue JIeONHne batapei. |
| Ha ост pine DaticnKa IMeETCSB OZdUnHь ПуЗьр. | → YcTpaHITE B0ZdUnHь пЗьр (CM. 3. BBOД B 3KClPЛYATALUIO 3apactanHe dATчNKa). |
| Полев Не BKLOUaTeСРп ИИЗКо BλAJXHOCTH IOчБИ | ДатчNK haxODITCS BОВдИнDE. | → YctaHOblITE ДатчNK в рPavilnHOM мосте (CM. 3. BBOД B 3KClPЛYATALUIO Bыбор павильно Mehta yctahOBki). |
| Быбрана слишkom сухая TOTka pepeknLChENHЯ. | → БыберITE bOJenne „bVakHyu" TOTkу pepeknLChENHЯ. |
| Светоюд Батари МИгаetting Крас希IM CBETOM | Батари ДaticnKa разрадлincь. | → 3amENITE batapen DATчNKa. |
| Светоюд Батари CBETITSCA Крас希IM CBETOM | ДатчNK NeICnРавен. | → 06patNTeCB GARDENA CepBиЧь сeHTр. |

REMARQUE : En cas d'autres dysfonctionnements, veuillez contacter votre centre de service GARDENA. Les réparations ne doivent être effectuées que dans les centres de service GARDENA, ainsi que chez les revendeurs agréés GARDENA.
- DONNÉES TECHNIQUES
Instructions du fabricant pour la Fédération de Russie Fabricant :
GARDENA Germany AB,
PO Box 7454, S-103 92 Stockholm, Sweden
Le pays de fabrication est indiqué sur le produit.
Importateur officiel sur le territoire de la Russie :
OOO «Husqvarna»,
141400, région de Moscou, Khimki
GARDENA, instruction 39
construction, placement No. OB02_04
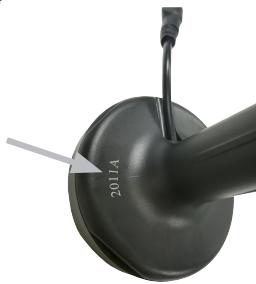
Serial number: 2011A
| 20* | 11 | A |
| Говыл汞ска | Месуьыл汞ска | 1-ий сэрп (индекس рожим�дства) |
- The last two digits of the year of manufacture 2020 (third digit is the year).
GARDENA Soil Moisture Sensor
Translation of the original instructions.

Installing the batteries [Fig. 11/12/13/14]:
The batteries are not included in the delivery.
The sensor may only be operated with 2 alkaline batteries of type LR6 (AA) (Mignon).
The service life of the batteries is 1 year. Depending on the temperature and the frequency of measurement and data transmission, the service life of the batteries may be shorter.
The batteries are discharged when they are not inserted, if the control unit is switched on before the program is started.

ATTENTION!
It is forbidden to use rechargeable batteries (accumulators)!.
1. Slide the cover in the direction of the arrow ① 2. Insert the batteries (2 alkaline type LR6 (AA)) ② observing the polarity of the batteries ③. Pay attention to the correct polarity.
The battery indicator lights up when the batteries ③ are inserted, the batteries ② are inserted, the indicator lights up for 3 seconds.
- 3aKpniTe KpniKhU ①
JXIO CBJTNOIDHNI IHDKATOP CTAYH eIeMHTB JKBHNEHH 4 KOKHI 5 cekyHd bIMAC eHPBOHM, eIeMeHTN KJBLEHN HPO3PDAKENi iX heoEHO 3AMHINi.
JHKIO CBTIIOJDHIM IINiDKATOP CTAHY ELEMETIB JXMBNENHA ④ CBITITbCS 耘RBOHHM -CTANACI NOMNIKA (DMB.7.YCYHEHHRAHECNPABHOCTE).
PiknouenHa 3'edhybailho Kaebio [306p.15]:
- 3'εДиАг Te 3'EDHyBaIbHn Ka6JIb ⑤ 3i StTeKepOM ⑥ DaTnKa BOnoroctI rpyHTy.
- 3'εdηαιTe 3'εdηναβλήκαδεβλ 3 δοκOM KépyBaHŋ rnoBOM.
BkaizbK:
HanaatbyaHHa MOMHTy BBIMkHeHHa DaTmka BOLorocti rpyHTy:
ДлcapeньовackигутВ(гlmнсгумс)МOMENT BBIMKHEHADaTHKAnOBHNH6yTnObpaHn npincepeHBIBOJOROTI. Дил пiaанхуrtгов.MOTOMBEH BIMKHEHNA DATИКА NOBENHСБТОбани рпсь ВELNICI BOLONOCTI. ДлгКВТКOBTOrgyHTY MOMENT BBIMKHeHn DaTчИKa TIOBHeH e 6yTN 6obpaHn pRc yUxM yObax.
Kopektybanna pibn BOIorocti rpynty:
→ 阿卍図rpyHT3daébC3aHADTO cyxIM abo 3aHADTO BONOMDЯBIDNO-BIDHORO BMNAXy 3ACTOcyBaHHN (TIN rpyHT abo BIDpOCINH),MOKHBAIDKMPYBATM MOMHT BBMIXHEHN DAчИKa 3a DOMONOIO HANALITyBANH DATWnka 6bOKy KEPyBAHnnoIINOB.
Li yHKui npOnHyOt hAcTyHmI moEi bokB kepyBaHHa nolbom, noHuHaOu 3 Bepci npOrpAMHOro 3abe3neueHHA:
1889/1285: Bci 1890: 2.0 Ta Bnue 1891: 2.0 Ta Bnue 1892: 32 Ta Bnue
Y nonepedHIX BEPCIXX MOMENT BBIMKHEHHaDaTmka HanaUTOBAHnHa 3abOdi, DIB. BIDNOBIDHN pO3dIN.
IIndikaijBepicnporpamHOro3a6e3neueHHbLOkyKepyBaHnnoJINOBOM:
- Elements of the living environment
- Factory setting, pressure tested with both controllers [fig. 01].
Indication of soil moisture level:
The display on the control unit shows the last measured moisture value.
If the moisture level rises above the set threshold, the watering is activated.
Operation with all GARDENA watering control units with integrated sensor, art. 1881, 1883, 1885, 1862, 1864, 1866, 1874, 1283, 1284, 1276 and cross-line models with integrated sensor:
- The activation moment of the sensor is set at the factory and cannot be changed. For GARDENA watering control units with separate sensor, a cable adapter can be ordered through the GARDENA service center.
Usage instructions:
For long service life of the soil moisture sensor, the sensor should be cleaned through the slots from time to time with a soft brush. Especially after use in calcareous soils, for which the sensor should be cleaned <5 minutes.
The soil moisture sensor measures the moisture in the soil. If the soil is too dry, the watering is activated. If the soil moisture is sufficient, the watering is stopped until the desired soil moisture is reached.
5. Maintenance
Cleaning the sensor [fig. M1]:
If the sensor is heavily soiled, it should be cleaned with a soft brush. The sensor must not come into contact with oil or grease.
- Troubleshooting
The authorized representatives
The authorized representative
Authorized representative
Authorized representative
ROBERTO C. RUMBO S.R.L.
Predio Norlog
Lote 7
Benavidez. ZC: 1621
Buenos Aires
Husqvarna Australia Pty. Ltd.
Locked Bag 5
Central Coast BC
NSW 2252
Phone: (+61) 0243527400
customer.service@
husqvarna.com.au
Brampton, Ontario L6T 4X3
Phone: (+1) 9057929330
info@gardenacadana.com
Chile
REPRESENTACIONES
JCE S.A.
No207, Song Hong Rd.
Chang Ning District,
Shanghai, PRC. 200335
3rd Floor, Building B, Mingji Plaza, No. 207 Songhong Road, Changning District, Shanghai, 200335
Colombia
Husqvarna Colombia S.A.
Calle 18 No.68 D-31, zona
Calle 18 No.68 D-31, zona
Industrial de Montevideo
Bogotá, Cundin
Tel. 571 2922700 ext. 105
jairosalazar@husqvarna.com.co
Costa Rica
Compania Exim
Euroiberoamericana S.A.
8/57 Beliashvili street
0159 Tbilisi, Georgia
Phone: (+995) 322 14 71 71
Great Britain
Husqvarna UK Ltd
Preston Road
Aycliffe Industrial Park
Newton Aycliffe
County Durham
DL5 6UP
info.gardena@husqvarna.co.uk
Greece
II. IANAIOYAOZ AEBE
AεωΦ.ABηνωv92
Aerva
T.K.104 42
EAAa
TnA. (+30) 2105193100
info@papadopoulos.com.gr
Hungary
Husqvarna Magyarorszag Kft.
Ezred u. 1-3
1044 Budapest
Phone: (+36) 1251-4161
Aycliffe Industrial Park
Newton Aycliffe
County Durham
DL56UP
info.gardena@husqvarna.co.uk
Italy
Husqvarna Italia S.p.A.
Via Santa Vecchia 15
23868 VALMADRERA (LC)
Phone: (+39) 0341.203.111
assistenza.italia@it.husqvama.com
Japan
Husqvarna Zenoah Co., Ltd.
1-9 Minamidai
Kawagoe
350-1165 Saitama
gardena-jp@husqvarnagroup.com
Kazakhstan
LAMED Ltd
155/1, Tazhibayevoi Str.
050060 Almaty
IP Schmidt
Abayavenue 3B
110 005 Kostanay
Korea
Kyung Jin Trading CO.,LTD.
107-4, SunDuk Bld.,
YangJae-dong
Seocho-gu,
Seoul, (barcode: 137-891)
Phone: (+82) (0)2574-6300
Kyrgyzstan
Alve Maki
av. Moladaya Guardir J 3
720014
Bishkek
Latvia
Husqvarna Latvija SIA
Ulbrokas 19A
LV-1021 Riga
info@gardena.lv
Lithuania
UAB Husqvarna Lietuva
Ateities pi. 77C
LT-52104 Kaunas
info@gardena.nl
Luxembourg
Magasins Jules Neuberg
Zapopan, Jalisco, Mexico
Phone: (+52) 33 3818-3434
Husqvarna New Zealand Ltd.
PO Box 76-437
Manukau City 2241
Phone: (+64) (0) 9 9202410
support.nz@husqvarna.co.nz
Norway
Husqvarna Norge AS
Gardena Division
Traskenveien 36
1708 Sarpsborg
info@gardena.no
Peru
Husqvarna Peru S.A.
Jr. Ramón Cárcamo 710
Lima 1
Tel: (+51) 1 3320400 ext. 416
juan.remuzgo@husqvarna.com
Poland
Husqvarna
Poland Spolka z o.o.
ul. Wysockiego 15 b
03-371 Warszawa
Phone: (+48) 223309600
gardena@husqvarna.com.pl
Portugal
Husqvarna Portugal, SA
Lagoa - Albarraque
02-08 Tat Ann Building
Singapore 577185
Phone: (+65) 6253 2277
shiying@hyray.com.sg
Slovak Republic
Husqvarna Cesko s.r.o.
Türkova 2319/5b
149 00 Praha 4 - Chodov
Toll-free infoline:
800154044
servis@sk.husqvarna.com
Slovenia
Husqvarna Austria GmbH
Industriezeile 36
4010 Linz
Tel.:(+43)732770101-485
service.gardena@husqvarnagroup.com
South Africa
Husqvarna
South Africa (Pty) Ltd
Postnet Suite 250
Private Bag X6
Cascades, 3202
South Africa
Phone: +27 338469700
info@gardena.co.za
Spain
Husqvarna Espana S.A.
Calle de Rivas n°10
28052 Madrid
Phone: (+34) 91708 0500