
ZFV916Y - Refrigerator ZANUSSI - Free user manual and instructions
Find the device manual for free ZFV916Y ZANUSSI in PDF.
 FR
FR
 AR
AR
 BG
BG
 CS
CS
 DA
DA
 DE
DE
 EL
EL
 EN
EN
 ES
ES
 ET
ET
 FI
FI
 HU
HU
 IT
IT
 KK
KK
 LT
LT
 LV
LV
 MK
MK
 NL
NL
 NO
NO
 PL
PL
 PT
PT
 RO
RO
 RU
RU
 SK
SK
 SL
SL
 SQ
SQ
 SR
SR
 SV
SV
 TR
TR
 UK
UK
| Product type | Cooker hood |
| Brand | ZANUSSI |
| Model | ZFV916Y |
| Controls | Touch panel |
| Motor speeds | 4 speeds + timed maximum speed (8 min) |
| Breeze function | Refresh after cooking, automatic shut-off after 60 min |
| Hob2Hood function | Automatic connection with compatible hob |
| Lighting | LED (replacement by technician) |
| Grease filter | Dishwasher safe or hand wash, monthly cleaning |
| Carbon filter | Not washable, replace every 4 months (depending on use) |
| Filter alarm | Solid red for grease, flashing for carbon |
| Alarm reset | Long press 3 seconds on dedicated button |
| Dimensions (estimated) | Width 90 cm (standard), depth 50 cm, variable height |
| Weight (estimated) | Approximately 15 kg |
| Power supply | 230 V ~ 50 Hz |
| Energy consumption | Energy class not specified |
| Noise level | Variable depending on speed |
| Installation | See separate installation instructions |
| Maintenance | Clean filters regularly, replace carbon |
| Repairability | LED lamp and driver replaceable by technician |
| Recycling | Do not dispose with household waste, take to recycling center |
Frequently Asked Questions - ZFV916Y ZANUSSI
User questions about ZFV916Y ZANUSSI
0 question about this device. Answer the ones you know or ask your own.
Ask a new question about this device
Download the instructions for your Refrigerator in PDF format for free! Find your manual ZFV916Y - ZANUSSI and take your electronic device back in hand. On this page are published all the documents necessary for the use of your device. ZFV916Y by ZANUSSI.
USER MANUAL ZFV916Y ZANUSSI
WARNING! The grease filter can catch fire.
HOOD FOR EXTRACTION OF COOKING FUMES
Fill in the table below with the appropriate values.
SAFETY INFORMATION AND INSTALLATION

WARNING!
Carefully read the Safety chapters before any use or maintenance of the appliance.
Refer to the separate Installation Instructions
booklet for Safety Information and Installation. Read
PRODUCT DESCRIPTION
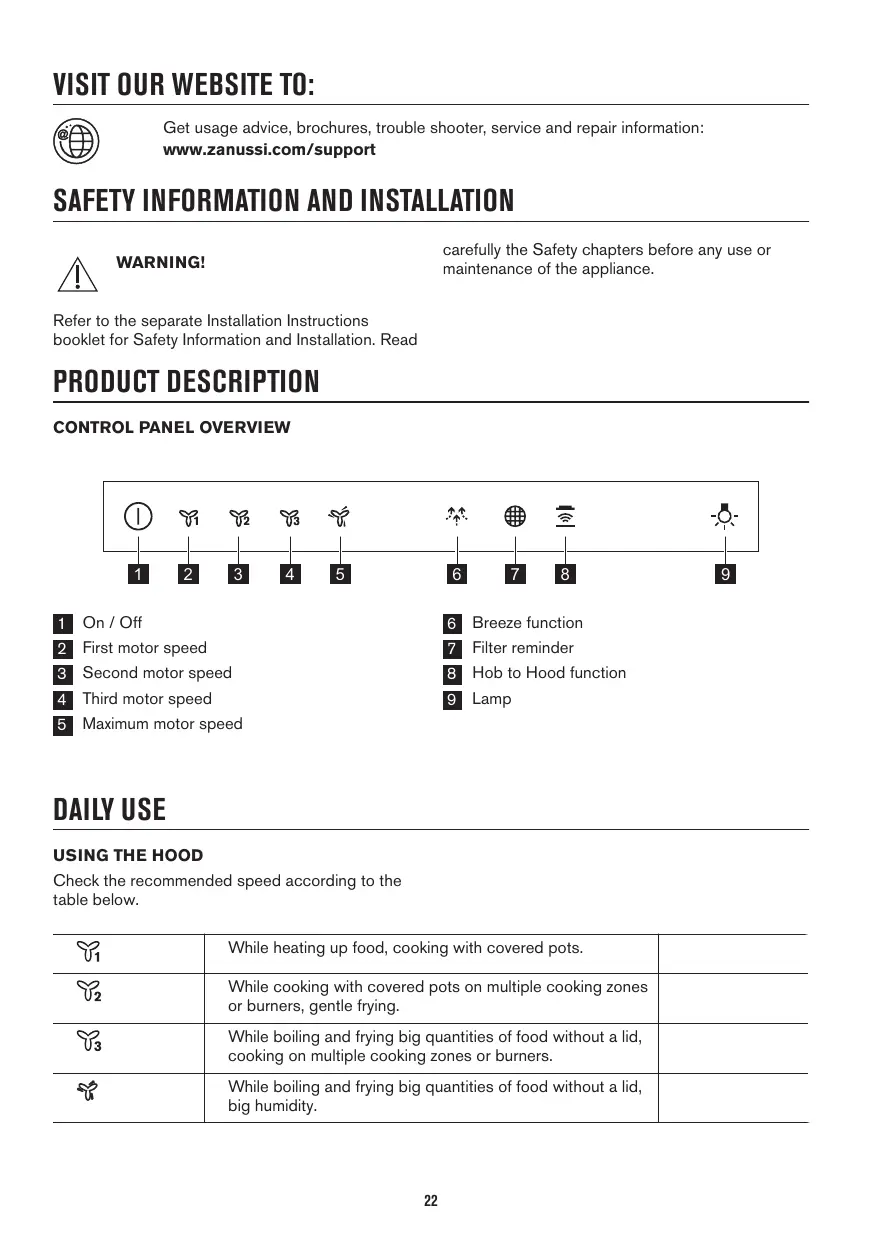
CONTROL PANEL OVERVIEW
1 On/Off 2 First motor speed 3 Second motor speed 4 Third motor speed 5 Maximum motor speed
6 Breeze function 7 Filter reminder 8 Hob to Hood function 9 Lamp
DAILY USE
USING THE HOOD
Check the recommended speed according to the
table below.
| U1 | While heating up food, cooking with covered pots. | |
| U2 | While cooking with covered pots on multiple cooking zones or burners, gentle frying. | |
| U3 | While boiling and frying big quantities of food without a lid, cooking on multiple cooking zones or burners. | |
| U4 | While boiling and frying big quantities of food without a lid, big humidity. |

It is recommended to leave the hood operating for approximately 15 minutes after cooking.

The control panel is a sensor field. Touch the symbols for 1 second to activate the functions.
To operate the hood:
- Turn on the appliance by pressing the ① symbol. You can now activate the functions.
- To activate the function, touch the symbol.
- If needed, touch the light symbol to illuminate the cooking surface.
To turn off the appliance, press the ① symbol again.
HOB TO HOOD FUNCTION
It is an automatic function which connects the hob with a hood. Both the hob and the hood have an infrared signal communicator. The speed of the fan is defined automatically based on the mode setting and the temperature of the hottest cookware on the hob. You can also operate the fan using the hob manually. The function can be activated from the panel of the hob.

For more information on how to use the function, refer to the hob user manual.
ACTIVATING MAXIMUM MOTOR SPEED
When you press the button, the Maximum Motor Speed starts to operate for 8 minutes. After
CARE AND CLEANING
CLEANING THE GREASE FILTER
Each filter must be cleaned at least once a month. Filters are mounted with the use of clips and pins on the opposite side.
To clean the filter:
- Pull the cover to open it.
At that time, the appliance returns to its previous speed settings.

When the function is turned on, additional touch on the button does not have any effects.
ACTIVATING AND DEACTIVATING THE FILTER NOTIFICATION
Filter alarm reminds to change or clean the charcoal filter and clean the grease filter. The filter indicator is turned on (red) for 30 seconds if the grease filter must be cleaned. The filter indicator flashes (red) for 30 seconds if the charcoal filter must be replaced or cleaned.

Refer to filter alarm in care and cleaning chapter.
- Switch on the control panel.
- Make sure that the icons are turned off.
- To activate or deactivate the charcoal filter notification touch for 3 seconds.

If the charcoal filter notification is activated, the filter icon flashes (red) five times.

If the charcoal filter notification is deactivated, the filter icon flashes (red) three times.
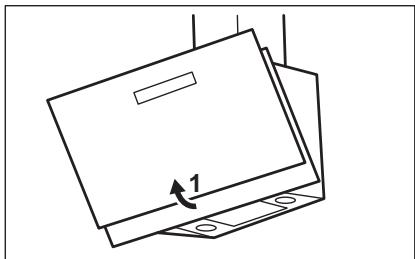
- Press the handle of the mounting clip on the filter panel underneath the hood (1).
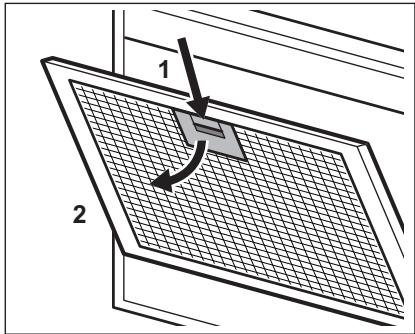
- Slightly tilt the front of the filter downwards (2), then pull.
Repeat the first two steps for all filters.
- Clean the filters using a sponge with non-abrasive detergents or in a dishwasher.

The dishwasher must be set to a low temperature and a short cycle. The grease filter may discolour, but this has no influence on the performance of the appliance.
- To mount the filters back, follow the first two steps in reverse order.
Repeat the steps for all filters if applicable.
REPLACING THE CHARCOAL FILTER

WARNING! The charcoal filter is non-washable!
The time of saturation of the charcoal filter varies depending on the type of cooking and the regularity of cleaning the grease filter.
To replace the filter:
- Remove the grease filters from the appliance. Refer to "Cleaning the grease filter" in this chapter.
- To install a new filter, perform the same steps in reverse order.
In any case, it is necessary to replace the filters at least every four months.
REPLACING THE CHARCOAL FILTER
The charcoal filter must be replaced if the filter alarm is on.

Refer to the filter alarm in this chapter.
The time of saturation of the charcoal filter varies depending on the type of cooking and the regularity of cleaning the grease filter.

WARNING! The charcoal filter is NON-washable! The filter cannot be regenerated!
To replace the charcoal filter:
- Remove the grease filters from the appliance. Refer to "Cleaning the grease filter" in this chapter.
- Turn the filter counterclockwise (1) and then pull (2).
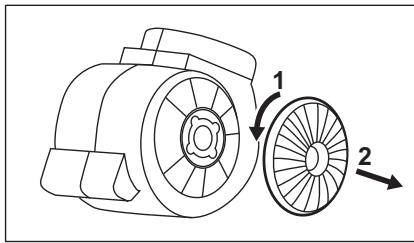
To mount the filters back follow the steps in reverse order.
FILTER ALARM

Refer to activating and deactivating the filter alarm in daily use chapter.

Refer to cleaning the grease filter in this chapter.

Refer to cleaning the charcoal filter or replacing the charcoal filter (depends on filter type).
To reset the alarm:
Touch the for 3 seconds.
REPLACING THE LAMP
This appliance is supplied with a LED lamp and separate control gear (LED driver). These parts can be replaced by a technician only. In case of any malfunction refer to "Service" in the "Safety Instructions" chapter.
Recycle materials with the symbol . Put the packaging in relevant containers to recycle it. Help protect the environment and human health by recycling waste of electrical and electronic appliances. Do not dispose of appliances marked
with the symbol with the household waste. Return the product to your local recycling facility or contact your municipal office.
HOB TO HOOD FUNCTION
REPLACEMENT OF THE CHARCOAL FILTER
www.zanussi.com/support
SAFETY INFORMATION AND INSTALLATION

WARNING!
The hood is equipped with a touch control panel.
TURNING ON THE EXTRACTOR HOOD
This hood is equipped with an automatic function. The hood is connected to the hob via a communication signal. It automatically detects the highest temperature and the highest power level of the hob. Then it adjusts the hood speed accordingly. This function can be activated by pressing the hob button.

To activate the function, press the hob button on the hood control panel.
USING THE HIGHEST POWER LEVEL
If the hob is turned on, the highest power level starts within 30 minutes. After this time, the hood automatically switches to a lower power level.

When the function is activated, pressing the hob button again will turn it off.
ACTIVATING AND DEACTIVATING THE GREASE FILTER SIGNAL
The grease filter signal indicates when the grease filter needs to be cleaned or replaced. The filter indicator (red) lights up when the grease filter needs to be cleaned within 30 seconds. The filter indicator (red) lights up when the grease filter needs to be cleaned or replaced within 30 seconds.

Press and hold the power button for 3 seconds to turn on the device.
- Do not press the control panel.
- Do not touch the heating element.
- To turn on or off the power, press and hold for 3 seconds.

If the power is turned on, the indicator light (red) will blink 5 times.

Power on
If the power is turned on, the indicator light
(red) will blink 3 times.
PRESS AND HOLD
POWER ON
Press the power button once to turn on. To arrange the buttons, the contacts and locks are provided on the opposite sides.
To turn on the power:
- Press the button for the required time.
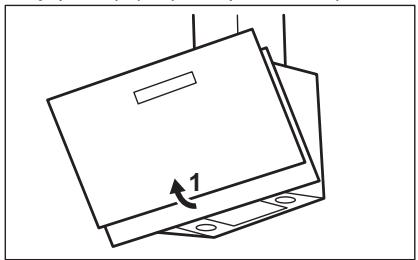
- Press the button on the control panel under the display (1).
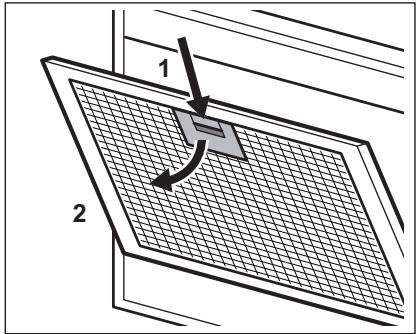
- Press the button again to turn off (2), then release.
Replace the oil filter element.
- The oil filter element must be replaced every time the oil is changed, or at least once a year.

The high-pressure oil filter must be replaced at the specified temperature and pressure. It is possible to replace the oil without removing the cover, but this affects the operation of the cover.
- To replace the oil filter, remove the two bolts on the cover.
If necessary, replace the filters for all oils.
REPLACING THE OIL FILTER

CAUTION! Do not operate the oil filter without a filter.
The oil filter must be replaced after a long period of operation or if the oil filter is clogged.
To replace the oil filter:
- Drain the oil.
See the "Draining the oil" section for this procedure.
- To replace the oil filter, remove the cover bolts.
If the oil filter is damaged, it must be replaced immediately.
REPLACING THE OIL FILTER
If the oil filter is clogged, the oil filter must be replaced.

This device is intended for checking the oil level.
The oil level must be checked with the engine stopped and the vehicle on a level surface.

WARNING! Do not check the oil level while the engine is running! It is not possible to check the oil level correctly!
To check the oil level:
- Remove the dipstick from its tube.
See the "Removing the dipstick" section in this manual.
- Wipe the dipstick with a clean cloth (1), then insert it back (2).
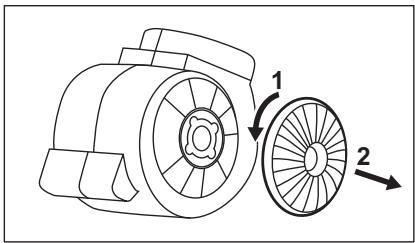
To add oil, remove the oil filler cap.
OIL LEVEL CHECK SIGNAL

See the "Oil level check signal" section in the device's operating instructions.
See the "Removing the dipstick" section in this manual. To check or add oil, see the section on oil type (see the table).
To reset the check signal:
Press the button for 3 seconds.
FIRST START-UP
The first start-up must be performed with the key in the "ON" position (ignition on). The first start-up is carried out by a technician. See the "Safety Instructions" section in the service manual.
Connect the water inlet hose to the water tap with a 3/4" thread. Connect the drain hose to the siphon or to the drain pipe. The electrical connection must be carried out by a qualified electrician.
Do not use extension cords or multi-socket adapters. Do not connect the appliance to the mains with the help of adapters. If the supply cord is damaged, it must be replaced by the manufacturer, its service agent or similarly qualified persons in order to avoid a hazard.
VISIT OUR WEBSITE FOR:

www.zanussi.com/support
SAFETY INFORMATION AND INSTALLATION

WARNING!
FUNCTION, HOB TO HOOD
www.zanussi.com/support
SAFETY INFORMATION AND INSTALLATION

WARNING!
Before using the appliance for the first time or cleaning it, carefully read the safety instructions.
FUNCTION “HOB TO HOOD”
This is an automatic function that connects the hob and the cooker hood. The hob and the cooker hood have an infrared signal communication device. The fan speed is set automatically, taking into account the mode setting and the temperature of the cooking vessel placed on the hob. The fan can also be operated manually using the hob. The function can also be activated from the hob panel.

For more information on using the function, see the hob user manual.
MAXIMUM MOTOR SPEED ACTIVATION
www.zanussi.com/support
SAFETY INFORMATION AND INSTALLATION

WARNING!
PRODUCT DESCRIPTION
CONTROL PANEL OVERVIEW

www.zanussi.com/support
SAFETY INFORMATION AND INSTALLATION

WARNING!
SAFETY INFORMATION AND INSTALLATION

ATTENTION!
SAFETY INFORMATION AND INSTALLATION ARE PROVIDED IN A SEPARATE BOOKLET. BEFORE USING OR PERFORMING ANY MAINTENANCE ON THE APPLIANCE, CAREFULLY READ THE CHAPTERS RELATING TO SAFETY.
BEFORE USING OR PERFORMING ANY MAINTENANCE ON THE APPLIANCE, CAREFULLY READ THE CHAPTERS RELATING TO SAFETY.
PRODUCT DESCRIPTION
CONTROL PANEL OVERVIEW

1 BkN/Bbkn 2 First speed of the motor 3 Second speed of the motor 4 Third speed of the motor 5 Maximum speed of the motor
6 "Breeze" function 7 Filter reminder 8 "Hob to Hood" function 9 Lighting
DAILY USE
USE OF THE EXTRACTOR
Recommended speed values are given in the table below.
www.zanussi.com/support
SAFETY INSTRUCTIONS AND INSTALLATION

WARNING!
www.zanussi.com/support
SAFETY INFORMATION AND INSTALLATION

WARNING!
"HOB TO HOOD" FUNCTION
It is an automatic function that connects the hob with an extractor hood. Both the hob and the hood have an infrared communicator. The fan speed is automatically determined based on the mode setting and the temperature of the cookware on the hob. You can also use the fan manually by using the hob. The function can be activated from the hob panel.

For more information on how to use the function, refer to the user manual for the hob.
ACTIVATION OF MAXIMUM MOTOR SPEED

1 On/Off 2 Engine oil pressure 3 Engine speed 4 Engine speed increase 5 Maximum engine speed 6 Repeat function
7 Fuel filter 8 Function for changing the start of the compressor 9 Lamp
DAILY USE
USING THE COMPRESSOR
Run the recommended speed in accordance with the table below.
USER INSTRUCTIONS
USING THE EXHAUST
Run the recommended speed in accordance with the table below.
| Y1 | HarpiBaHnЯ iЖi, roTyBaHnЯ B haKpIToMу кршkoю по-cуdi. | |
| Y2 | ГоТуВaHня B haKpIToMу кршkoю посуdi Ha kİльКоx 30-hax harpiBaHnЯ abo koHфоркax, Лergke obSmajCyBaHnЯ. | |
| Y3 | ВарIHЯ та смжehнЯ велЮкій кршостi iЖi 6e3 кршки, roTyBaHnЯ Ha kİльКоx 3онх HarpiBaHnЯ abo koHфоркax. |
- HOOD FOR EXTRACTION OF COOKING FUMES
- SAFETY INFORMATION AND INSTALLATION
- WARNING
- PRODUCT DESCRIPTION
- DAILY USE
- USING THE HOOD
- TO OPERATE THE HOOD
- HOB TO HOOD FUNCTION
- ACTIVATING MAXIMUM MOTOR SPEED
- CARE AND CLEANING
- CLEANING THE GREASE FILTER
- TO CLEAN THE FILTER
- ACTIVATING AND DEACTIVATING THE FILTER NOTIFICATION
- REPLACING THE CHARCOAL FILTER
- TO REPLACE THE CHARCOAL FILTER
- FILTER ALARM
- TO RESET THE ALARM
- REPLACING THE LAMP
- REPLACEMENT OF THE CHARCOAL FILTER
- TURNING ON THE EXTRACTOR HOOD
- USING THE HIGHEST POWER LEVEL
- ACTIVATING AND DEACTIVATING THE GREASE FILTER SIGNAL
- PRESS AND HOLD
- POWER ON
- TO TURN ON THE POWER
- REPLACING THE OIL FILTER
- TO CHECK THE OIL LEVEL
- OIL LEVEL CHECK SIGNAL
- FIRST START-UP
- VISIT OUR WEBSITE FOR
- FUNCTION, HOB TO HOOD
- FUNCTION “HOB TO HOOD
- MAXIMUM MOTOR SPEED ACTIVATION
- CONTROL PANEL OVERVIEW
- ATTENTION
- USE OF THE EXTRACTOR
- SAFETY INSTRUCTIONS AND INSTALLATION
- HOB TO HOOD" FUNCTION
- ACTIVATION OF MAXIMUM MOTOR SPEED
- USING THE COMPRESSOR
- USER INSTRUCTIONS
- USING THE EXHAUST
Brand : ZANUSSI
Model : ZFV916Y
Category : Refrigerator