
SUN - Range hood ELICA - Free user manual and instructions
Find the device manual for free SUN ELICA in PDF.




| Product type | Range hood |
| Brand | ELICA |
| Model | SUN |
| Power supply | 220-240 V ~ 50 Hz |
| Number of speeds | 3 speeds + 1 intensive (timed) |
| Control | Electronic buttons with indicator lights |
| Timer | Yes, adjustable: 20 min (speed 1), 15 min (speed 2), 10 min (speed 3), 5 min (intensive) |
| Anti-grease filter saturation signal | Indicator L5 on after 40 hours of operation |
| Charcoal filter saturation signal | Indicator L5 flashing after 160 hours (activated in recirculation mode) |
| Temperature alarm | Yes, automatically activates speed 3 if excessive temperature |
| Minimum installation distance (electric hob) | 50 cm |
| Minimum installation distance (gas hob) | 65 cm (or according to hob manufacturer's instructions) |
| Anti-grease filter | Metal, dishwasher safe (gentle cycle) |
| Charcoal filter | Non-washable, replace every 4 months maximum |
| External cleaning | Damp cloth with mild liquid detergent. Do not use alcohol or abrasives. |
| Lighting | LED, replacement by authorized service |
| Version | Ducted (external exhaust) or Recirculating (recycling) |
| Installation type | Wall or ceiling |
| Automatic shut-off | Yes, via timer |
| Signal reset | Hold button 1 for 3 seconds |
| Charcoal filter signal activation | Hood off, hold buttons 1 and 4 for 3 seconds |
| Certifications | EN/IEC 60335-1, EN/IEC 60335-2-31, EN/IEC 61591, EN 55014-1, etc. |
Frequently Asked Questions - SUN ELICA
User questions about SUN ELICA
0 question about this device. Answer the ones you know or ask your own.
Ask a new question about this device
Download the instructions for your Range hood in PDF format for free! Find your manual SUN - ELICA and take your electronic device back in hand. On this page are published all the documents necessary for the use of your device. SUN by ELICA.
USER MANUAL SUN ELICA
EN Instruction on mounting and use
RU Instruction on mounting and use
UK Instruction on mounting and use
KK Instruction on mounting and use
Closely follow the instructions set out in this manual. All responsibility, for any eventual inconveniences, damages or fires caused by not complying with the instructions in this manual, is declined. This appliance is intended to be used in household and similar application such as: - staff kitchen areas in shop, offices and other working environments; - farm houses; - by clients in hotels, motels and other residential type environments; - bed and breakfast type environments.
The hood can look different to that illustrated in the drawings in this booklet. The instructions for use, maintenance and installation, however, remain the same.
It is important to conserve this booklet for consultation at any moment. In the case of sale, cession or move, make sure it is together with the product. - Read the instructions carefully: there is important information about installation, use and safety. - Do not carry out electrical or mechanical variations on the product or on the discharge conduits. - Before proceeding with the installation of the appliance verify that there are no damaged all components. Otherwise contact your dealer and do not proceed with the installation.
Note: The parts marked with the symbol "(^)" are optional accessories supplied only with some models or otherwise not supplied, but available for purchase.
Caution
- Before any cleaning or maintenance operation, disconnect hood from the mains by removing the plug or disconnecting the mains electrical supply.
- Always wear work gloves for all installation and maintenance operations.
- This appliance can be used by children aged from 8 years and above and persons with reduced physical, sensory or mental capabilities or lack of experience and knowledge if they have been given supervision or instruction concerning use of the appliance in a safe way and understand the hazards involved. Children shall not be allowed to tamper with the controls or play with the appliance.
- Cleaning and user maintenance shall not be made by children without supervision.
- The premises where the appliance is
installed must be sufficiently ventilated, when the kitchen hood is used together with other gas combustion devices or other fuels.
- The hood must be regularly cleaned on both the inside and outside (AT LEAST ONCE A MONTH).
- This must be completed in accordance with the maintenance instructions provided. Failure to follow the instructions provided regarding the cleaning of the hood and filters will lead to the risk of fires.
- Do not flambe under the range hood.
- For lamp replacement use only lamp type indicated in the Maintenance/Replacing lamps section of this manual.
The use of exposed flames is detrimental to the filters and may cause a fire risk, and must therefore be avoided in all circumstances.
Any frying must be done with care in order to make sure that the oil does not overheat and ignite.
CAUTION: Accessible parts of the hood may become hot when used with cooking appliances.
- Do not connect the appliance to the mains until the installation is fully complete.
- With regards to the technical and safety measures to be adopted for fume discharging it is important to closely follow the regulations provided by the local authorities.
- The air must not be discharged into a flue that is used for exhausting fumes from appliance burning gas or other fuels.
- Do not use or leave the hood without the lamp correctly mounted due to the possible risk of electric shocks.
- Never use the hood without effectively mounted grids.
- The hood must NEVER be used as a support surface unless specifically indicated.
- Use only the fixing screws supplied with the product for installation or, if not supplied, purchase the correct screws type.
- Use the correct length for the screws which are identified in the Installation Guide.
- In case of doubt, consult an authorized service assistance center or a similarly qualified person.
WARNING!
- Failure to install the screws or fixing device in accordance with these instructions may result in electrical hazards.
- Do not use with a programmer, timer, separate remote control system, or any other device that switches on automatically.
- This appliance is marked according to the European directive 2012/19/EC on Waste Electrical and Electronic Equipment (WEEE).
- By ensuring this product is disposed of correctly, you will help prevent potential negative consequences for the environment and human health, which could otherwise be caused by inappropriate waste handling of this product.

- The symbol on the product, or on the documents accompanying the product, indicates that this appliance may not be treated as household waste. Instead, it should be taken to the appropriate collection point for the recycling of electrical and electronic equipment. Disposal must be carried out in accordance with local environmental regulations for waste disposal.
- For further detailed information regarding the process, collection, and recycling of this product, please contact the appropriate department of your local authorities, the local department for household waste, or the shop where you purchased this product.
Appliance designed, tested, and manufactured according to:
- Safety: EN/IEC 60335-1; EN/IEC 60335-2-31, EN/IEC 62233. Performance: EN/IEC 61591; ISO 5167-1; ISO 5167-3; ISO 5168; EN/IEC 60704-1; EN/IEC 60704-2-13; EN/IEC 60704-3; ISO 3741; EN 50564; IEC 62301.
- EMC: EN 55014-1; CISPR 14-1; EN 55014-2; CISPR 14-2; EN/IEC 61000-3-2; EN/IEC 61000-3-3. Suggestions for correct use to reduce environmental impact: Switch ON the hood at minimum speed when you start cooking and keep it running for a few minutes after cooking is finished. Increase the speed only in case of large amounts of smoke and vapor, and use boost speed(s) only in extreme situations. Replace the charcoal filter(s) when necessary to maintain good odor reduction efficiency. Clean the grease filter(s) when necessary to maintain good grease filter efficiency. Use the maximum diameter of the ducting system indicated in this manual to optimize efficiency and minimize noise.
Use
The hood is designed to be used either for exhausting or filter version.

Extraction version
In this case the fumes are conveyed outside of the building by means of a special pipe connected with the connection ring located on top of the hood.
#
CAUTION!
The exhausting pipe is not supplied and must be purchased apart.
Diameter of the exhausting pipe must be equal to that of the connection ring.
#
CAUTION!
If the hood is supplied with active charcoal filter, then it must be removed.
Connect the hood and discharge holes on the walls with a diameter equivalent to the air outlet (connection flange).
Using the tubes and discharge holes on walls with smaller dimensions will cause a diminution of the suction performance and a drastic increase in noise.
Any responsibility in the matter is therefore declined.
Use a duct of the minimum indispensable length. ! Use a duct with as few elbows as possible (maximum elbow angle: 90° ). Avoid drastic changes in the duct cross-section.

Filtration version
The aspirated air will be degreased and deodorised before being fed back into the room.
In order to use the hood in this version, you have to install a system of additional filtering based on activated charcoal.
Installation
The minimum distance between the supporting surface for the cooking equipment on the hob and the lowest part of the range hood must be not less than 50 cm from electric cookers and 65 cm from gas or mixed cookers.
If the instructions for installation for the gas hob specify a greater distance, this must be adhered to.

Electrical connection
The mains power supply must correspond to the rating indicated on the plate situated inside the hood. If provided with a plug, connect the hood to a socket in compliance with current regulations and positioned in an accessible area, after installation. If it is not fitted with a plug (direct mains connection) or if the plug is not located in an accessible area, after installation, apply a double pole switch in accordance with standards which assures the complete disconnection of the mains under conditions relating to over-current category III, in accordance with installation instructions.

WARNING!
Before re-connecting the hood circuit to the mains supply and checking the efficient function, always check that the mains cable is correctly assembled.
Warning! If the supply cord is damaged, it must be replaced by the manufacturer, its service agent or similarly qualified persons in order to avoid hazard.
Mounting
Expansion wall plugs are provided to secure the hood to most types of walls/ceilings. However, a qualified technician must verify suitability of the materials in accordance with the type of wall/ceiling. The wall/ceiling must be strong enough to take the weight of the hood.
Do not tile, grout or silicone this appliance to the wall. Surface mounting only.
Operation

4

3

2

1
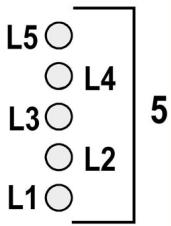
1 ON/OFF motor
Pressing the button, the hood turns on at speed 1.
Pressing the button during functioning, the hood turns OFF.
2 Speed Increase
Pressing the button the hood passes from the OFF state to speed 1.
Pressing the button (hood in ON state) the motor speed is increased from speed 1 to intensive.
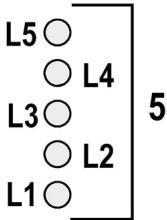
To each speed corresponds the ignition of the respective led.
Speed 1 led L1
Speed 2 led L2
Speed 3 led L3
Intensive Speed led L4 (flashing)
The intensive speed is timed. The standard timing is 5', at the end of which the hood positions itself to speed 2.
To deactivate the function before the time expires press key 2, the hood positions itself to speed 1, pressing key 1 the hood will turn off.
3 ON/OFF lights 4 Speed timing 5 Function state indicator
Speed Timing
The timing of the speed is enabled by pressing key 4, once the timing expires the hood turns off.
The timing is subdivided as follows:
Speed 1 - 20 minutes (led L1 flashing)
Speed 2 - 15 minutes (led L2 flashing)
Speed 3 - 10 minutes (led L3 flashing)
Intensive Speed - 5 minutes (led L4 flashing)
During the timed functioning pressing key 1 the hood turns off, if you press key 2 or key 4 the hood returns to the set speed.
Grease trap Signal
After 40 hours of operation the led L5 turns on.
When such signal appears the installed grease trap needs to be washed.
To reset the signal hold down key 1 for 3 seconds
Carbon filter Signal
After 160 hours of operation the led L5 flashes.
When such signal appears, the installed carbon filter must be substituted.
To reset the signal, hold down key 1 for 3 seconds.
In the case of both filters signalling at the same time, the LED L5 will indicate the alarms alternately, remaining on for 3 seconds and subsequently flashing 3 times.
The reset takes place by carrying out the procedure described above 2 times.
The first time resets the grease trap signal, the second resets the carbon filter signal.
In the standard mode, the carbon filter signal is not active.
In case one uses the hood in filter version, it is necessary to enable the carbon filter signal.
Carbon filter signal activation:
Position the hood in OFF and simultaneously hold down keys 1 and 4 for 3 seconds.
The LEDs L1 and L2 will flash for 5 seconds.
Carbon filter signal deactivation:
Position the hood in OFF and simultaneously hold down keys 1 and 4 for 3 seconds.
The LED L1 will flash for 2 seconds.
Temperature Alarm
The hood is equipped with a temperature sensor that activates the motor to speed 3 in the case that the temperature in the control panel zone becomes too elevated.
The alarm condition is indicated by the sequential flashing of LEDs L1, L2, L3.
This condition persists until the temperature drops below the alarm threshold.
You can exit this mode by pressing key 1 or 2.
Every 30 degrees, the sensor checks the ambient temperature of the control panel area.
Maintenance
Cleaning
Clean using ONLY a cloth dampened with neutral liquid detergent. DO NOT CLEAN WITH TOOLS OR INSTRUMENTS. Do not use abrasive products. DO NOT USE ALCOHOL!
Grease filter
Fig. 9-24
Traps cooking grease particles.
This must be cleaned once a month (or when the filter saturation indication system - if provided on the model in question - indicates this necessity) using non-aggressive detergents, either by hand or in the dishwasher, which must be set to a low temperature and a short cycle.
When washed in a dishwasher, the grease filter may discolor slightly, but this does not affect its filtering capacity.
To remove the grease filter, pull the spring release handle.
Charcoal filter (filter version only)
Fig. 23
It absorbs unpleasant odors caused by cooking.
The saturation of the charcoal filter occurs after more or less prolonged use, depending on the type of cooking and the regularity of cleaning of the grease filter.
In any case it is necessary to replace the cartridge at least every four months (or when the filter saturation indication system – if envisaged on the model in possession – indicates this necessity). The charcoal filter may NOT be washed or regenerated.
Remove the grease filters.
Fit the charcoal filters over the motor.
Align the pins R on the cowl with the slots S, then turn the filter clockwise until it locks in place.
Reverse the above procedure to remove the charcoal filters.
Refit the grease filters.
Replacing lamps
Fig. 25
The hood is equipped with a lighting system based on LED technology.
The LEDs guarantee an optimum lighting, a duration up to 10 times as long as the traditional lamps and allow to save 90% electrical energy.
To replace lights, contact authorised spare part center.
Activation signal fibre charbon:
Velocidae 1 20 Minutes (led L1 a piscar)
Speed 2 15 minutes (LED L2 flashing)
Speed 3 10 minutes (LED L3 flashing)
Intensive speed 5 minutes (LED L4 flashing)
Speed 2 LED L2
Speed 3 LED L3
Intensive speed LED L4 (flashing)
The intensive speed is time-limited. The standard operating time is 5 minutes, after which the hood switches to speed 2.
Signal for charcoal filter
Signal for dirty grease filter
Signal for dirty charcoal filter
After 160 hours of use, LED L5 flashes.
When this signal is activated, the installed charcoal filter must be replaced.
Press and hold button 1 for three seconds to reset the signal.
If a signal is given for both filters simultaneously, LED L5 will show both alarms by alternating between being lit steadily for 3 seconds and then flashing 3 times.
- European Directive 2012/19/EC
- Waste Electrical and Electronic Equipment (WEEE).
This appliance has been designed, manufactured, and marketed in compliance with the requirements for the protection of the environment and your health.

The symbol on the product or its packaging indicates that this product must not be treated as household waste. Instead, it must be handed over to the applicable collection points for the recycling of electrical and electronic equipment. Please contact your local authorities, the household waste disposal service, or the shop where you purchased this product for more detailed information regarding the disposal, collection, and recycling of this product.
Designed, tested, and manufactured in accordance with:
- Safety: EN/IEC 60335-1; EN/IEC 60335-2-31, EN/IEC 62233.
- Performance characteristics: EN/IEC 61591; ISO 5167-1; ISO 5167-3; ISO 5168; EN/IEC 60704-1; EN/IEC 60704-2-13; EN/IEC 60704-3; ISO 3741; EN 50564; IEC 62301.
- EMC - Electromagnetic compatibility: EN 55014-1; CISPR 14-1; EN 55014-2; CISPR 14-2; EN/IEC 61000-3-2; EN/IEC 61000-3-3.
Suggestions for correct use to minimize the impact on the environment: Turn on the extractor at minimum speed when you start cooking and leave it running for a few minutes after cooking is finished. Increase the speed only in case of a large amount of fumes or vapors. Use the increased speed only in extreme situations. Replace the filters/filter with activated charcoal when necessary to maintain good odor absorption efficiency. Clean the grease filters/filter when necessary to maintain good efficiency of the grease filter. Use the maximum diameter of the air exhaust system, as indicated in this manual, to optimize efficiency and minimize noise.
Use
Extractor hoods intended for this purpose: Suction and discharge of fumes and filter the air, while simultaneously recycling it.

Suction version
The appliance discharges the fumes outside through an exhaust pipe connected to the connecting flange.
WARNING!
The exhaust pipe is not included in the accessories and must be purchased separately.
In this case, the manufacturer assumes no responsibility.
The exhaust pipe must be installed. The exhaust pipe must be installed with the smallest possible number of bends (the maximum bend angle is 90°). Do not sharply bend the pipe!
Before connecting the appliance to the mains and putting it into operation, the room must be ventilated. To use the appliance in this operating mode, you must install a suitable flue gas exhaust system on the base of the appliance with an active flue.
Installation
The minimum distance between the surface on which the cooking appliances are placed and the lowest part of the kitchen hood must be no less than 50 cm in the case of electric cookers and no less than 65 cm in the case of gas or combination cookers.
If the instructions for the gas cooking appliance specify a greater distance, this must be taken into account.

Electrical connection
The voltage in the electrical network must correspond to the voltage indicated on the rating plate of the appliance, located on its inner side. If the appliance is supplied with a plug, connect it to a socket that complies with the applicable standards and is easily accessible after installation. If it is not supplied with a plug (direct connection to the network), or if the plug is not easily accessible after installation, use a double-pole switch with a contact gap of at least 3 mm, in accordance with the installation rules, to ensure complete disconnection from the mains under overvoltage category III.

WARNING!
Before connecting the appliance to the mains and checking that it functions properly, check that the cable is installed as it should be.
WARNING! Replacement of the power cable must be carried out by an authorized service technician to avoid any risk.
MOUNTING
For all this, we recommend that you consult a qualified technician to ensure that the supplied accessories are suitable for the installation. The wall, appropriately prepared, must be sufficiently stable to support the appliance.
Instructions for use
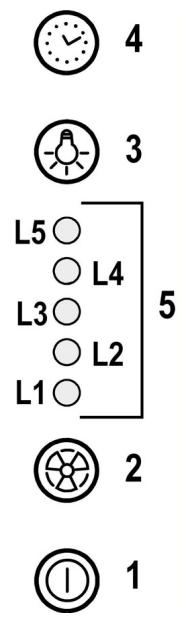
1 ON/OFF motor switch
When the button is pressed, the appliance starts at first speed.
Press the button to switch on the aspirator during operation (position OFF).
2 Speed increase
Press the button to switch the aspirator from position OFF to speed 1.
Press the button while the aspirator is on (position ON) to increase the motor speed, and the aspirator switches from speed 1 to intensive speed.
When each speed is activated, a different indicator light turns on:
Speed 1 - indicator light 1
Speed 2 - indicator light 2
Speed 3 - indicator light 3
Intensive speed - indicator light 4 (flashing)
Intensive speed with a preset time duration.
Standard time duration is 5 minutes, after which the aspirator automatically switches to speed 2.
To deactivate this function, before the preset time elapses, press button 2, the aspirator switches to speed 1, and pressing button 1 turns it off.
3 ON/OFF indicator light
4 Speed timer 5 Operating mode indicator
Speed timer
The pressure switch for gas is activated by pressing button No. 4; the set time has not been previously set, the aspirator is switched off.
The time is distributed as follows:
1 - speed - 20 minutes (LED 1 lights up)
2 - speed - 15 minutes (LED 2 lights up)
3 - speed - 10 minutes (LED 3 lights up)
Intensive speed - 5 minutes (LED 4 lights up)
Pressing button No. 1 when a speed is activated with a set time, the aspirator is switched off, and when pressing button No. 2 or 4, the aspirator switches to the set speed.
Filter change indicator
After 160 working hours, LED 5 lights up.
The gas indicator light indicates that the installed filter must be replaced.
To reset the indicator, press button No. 1 and hold it for 3 seconds.
Active carbon filter indicator
After 160 working hours, LED 5 starts to light up.
The gas indicator light indicates that the active carbon filter, which is installed, must be replaced.
To reset the indicator, press button No. 1 and hold it for 3 seconds.
Simultaneously press and hold the L5 button for 3 seconds until the alarm stops, then release the button.
Repeat the priming procedure 2 more times.
The first filter is the activated carbon filter, and the second filter is the HEPA filter.
In standard operating mode, the activated carbon filter is not activated.
If you use the aspirator in the version with filter, it is necessary to activate the filter's activated carbon.
Activating the filter's activated carbon:
Turn off the aspirator (OFF position), simultaneously press buttons 1 and 4 and hold for 3 seconds.
The L1 and L2 lights will flash for 5 seconds. Deactivating the filter's activated carbon:
Turn off the aspirator (OFF position), simultaneously press buttons 1 and 4 and hold for 3 seconds.
The L1 light will flash for 2 seconds.
Temperature alarm
The aspirator is equipped with a temperature sensor that activates the motor at speed 3 if the temperature in the command supply zone rises significantly.
When the alarm is activated, the L1, L2, L3 lights will flash sequentially.
This continues until the temperature drops below the alarm threshold.
This mode can be reset by pressing button 1 or 2.
The sensor measures the temperature in the area of the appliance.
Cleaning
Cleaning
For cleaning, use ONLY a cloth dampened with neutral detergent. Do NOT use instruments or devices for cleaning!
Avoid products containing abrasive particles. Do NOT use alcohol!
Filter for grease
Fig. 9-24
The filter retains grease particles released during cooking.
Clean the filter whenever the indicator for saturation shows it (see in case the model is equipped with such an indicator).
Use not too strong detergents and clean it regularly or when the machine is in use, but at low temperature and short washing cycle.
When cleaning the metal grease filter in the dishwasher, it is possible to discolor, but this does not affect its filtering capacity in any way.
To remove the grease filters, pull the handle with the spring mechanism.
Filter with active carbon (only for filtering version)
Fig. 23
The carbon filters retain the odors that are released during cooking.
The filter should be replaced approximately every 6 months, depending on the type of filter and how often the device is used.
In all cases, it is necessary to replace the filter with an active carbon filter every 4 months, or when the saturation indicator (if your model has one) shows that it is necessary.
The filter cannot be reused.
Removing the filter from the housing.
Mount the filter that covers the motor housing.
Make sure that the bolts are aligned with the holes, then tighten them clockwise until they are tight.
To remove the filter, perform the operations in reverse order.
Mount the new filter for the housing.
Lift the cover.
Fig. 25
The aspirator is equipped with a lighting system with LEDs.
The LEDs guarantee optimal lighting, up to 10 times more than traditional lamps and allow 90% energy savings.
To replace the lamps, contact an authorized service center for spare parts.
Speed 1 led L1
Speed 2 led L2
Speed 3 - LED L3
Speed 1 - 20 minutes (LED L1 flashing)
Speed 2 - 15 minutes (LED L2 flashing)
Speed 3 - 10 minutes (LED L3 flashing)
The product has been developed, tested, and manufactured in accordance with:
- Safety: EN/IEC 60335-1; EN/IEC 60335-2-31, EN/IEC 62233.
- Operational characteristics: EN/IEC 61591; ISO 5167-1; ISO 5167-3; ISO 5168; EN/IEC 60704-1; EN/IEC 60704-2-13; EN/IEC 60704-3; ISO 3741; EN 50564; IEC 62301. EMC: EN55014-1; CISPR 14-1; EN55014-2; CISPR 14-2; EN/IEC61000-3-2; EN/IEC61000-3-3. Recommendations for correct use in order to reduce environmental impact: Turn on the extractor hood at minimum speed when you start cooking, and leave it running for a few minutes after you finish cooking. Increase the speed only in case of a large amount of smoke and steam, and resort to using higher speeds only in extreme situations. Replace the charcoal filter when necessary to maintain good efficiency and reduce odors. Clean the grease filters when necessary to maintain good efficiency of the grease filter. Use the maximum diameter of the exhaust system, as indicated in this manual, to optimize efficiency and minimize noise.
Use
The hood is designed for use in exhaust mode (air extracted to the outside) or in recirculation mode (air recirculated).

Use of the exhaust duct
In this mode, the vapors are discharged outside through a duct connected to the connecting ring.
ATTENTION!
The exhaust duct is not included in the supply and must be purchased separately.
The diameter of the exhaust duct must match the diameter of the connecting ring.
ATTENTION!
Use a flexible duct with a smooth inner surface.
Connect the duct to the exhaust pipe with a diameter corresponding to the air outlet opening (connecting flange).
Installing pipes with a smaller diameter will reduce the air suction power and sharply increase the noise level.
Use a pipe with the minimum required length. Use a pipe with the minimum number of bends (maximum bend angle: 90° and avoid sharp changes in the pipe direction.
Air
Press the button (extractor hood on) to increase the fan speed from speed 1 to intensive speed.
Each speed corresponds to the activation of the respective indicator light.
Speed 1 indicator light 1
Speed 2 indicator light 2
Speed 3 indicator light 3
Intensive speed indicator light 4 (flashing)
The intensive speed can be programmed by time. Standard programming is 5 minutes, after which the hood switches to speed 2.
To deactivate the function, previously programmed time, press button 2, the hood switches to speed 1, press button 1, the hood turns off.
3 ON/OFF light
4 Speed programming 5 Operating status indicator
Speed programming
Speed programming is activated by pressing button 4. After the programmed time has elapsed, the extractor will switch off.
The programming is distributed as follows:
Speed 1 - 20 minutes (indicator L1 flashing)
Speed 2 - 15 minutes (indicator L2 flashing)
Speed 3 - 10 minutes (indicator L3 flashing)
Intensive speed - 5 minutes (indicator L4 flashing)
During programmed operation, pressing button 1 turns off the extractor; if you press button 2 or 4, the extractor returns to the programmed speed.
Grease filter cleaning
After 40 hours of operation, indicator L5 lights up.
When the grease filter cleaning signal appears, it is necessary to clean the filter.
The extractor is equipped with LED lighting. The LEDs provide optimal illumination, their service life is 10 times longer than that of traditional lamps, and they allow saving 90% of electrical energy.
For replacing the LEDs, contact an authorized service center.
Please follow the instructions given in this manual. Any misuse, damage, or injury that may occur as a result of using the device not in accordance with the instructions given in this manual is the user's responsibility. The extractor is designed for domestic use and is intended for household use.
This manual is an integral part of the device. It must be kept for the entire service life of the device. The device must be handed over to any new owner together with this manual. The instructions for installation, maintenance and operation must be followed in any case.
It is important to keep this manual so that you can refer to it at any time. In case of sale, transfer or resale, make sure that the manual is included with the device. - Carefully read the instructions: they contain important information on installation, use and safety. It is forbidden to make any electrical or mechanical modifications to the device in any way. - Before starting the installation of the device, check all components for defects and that they are not damaged. In the opposite case, contact the point of sale and stop the installation of the device.
Note: Parts marked with the symbol (*) are optional accessories and are supplied only with certain models, or are parts that are not supplied in the kit and need to be purchased.

Safety
Safety
Before starting any operation on installation or maintenance, disconnect the plug from the socket or switch off the main switch of the appliance.
- For all installation and maintenance operations, use work gloves. - The device can be used by children aged 8 years and above and persons with reduced physical, sensory or mental capabilities, or lack of experience and knowledge, if they have been given supervision or instruction concerning use of the appliance in a safe way
and understand the hazards involved.
- Children must be supervised and must not play with the device. Cleaning and maintenance must not be performed by children without supervision. - The appliance must have sufficient ventilation when the hood is used simultaneously with other appliances that operate on gas or other fuels. - The hood must be cleaned frequently both inside and outside (at least once a month), following any instructions given in the maintenance instructions. Failure to maintain the hood in accordance with the instructions may increase the risk of fire. It is strictly forbidden to flambé under the hood. - For lamps, use only the type of lamp specified in the maintenance/replacement section of this manual. Use of incorrect lamps may cause fire, so it is necessary to avoid this in any case. Cleaning must be carried out after the hood has cooled down. WARNING: Accessible parts may become hot when used with cooking appliances. Do not connect the device to the electrical supply until the installation is completely finished. - This concerns technical measures and safety measures in the use of the device, in particular regarding the connection of the device, strictly
Follow the regulations of the competent authorities.
Do not exhaust the duct into a wall cavity or any other enclosed space. Do not use or install the hood without properly installed lamps, as there is a risk of electric shock. Never use the hood without the correctly installed grille! The hood must never be used on a flat surface unless explicitly stated. Use the screws provided in the installation kit; if any are missing, use screws of the correct type. Use the correct screw length as indicated in the installation manual. - In case of doubt, consult an authorized service center or qualified personnel.

WARNING!
- Failure to install the screws and fixing devices in accordance with these instructions may result in a risk of electric shock. Do not use with a programmer, timer, separate remote control, or any other device that switches on automatically.
This product is marked in accordance with the European Directive 2012/19/EC on waste electrical and electronic equipment (WEEE). By ensuring the correct disposal of this product, you will help prevent potential negative consequences for the environment and human health, which could otherwise be caused by inappropriate waste handling.

The symbol on the product or on its accompanying documents indicates that this product shall not be treated as household waste. Instead, it shall be handed over to the applicable collection point for the recycling of electrical and electronic equipment. Disposal must be carried out in accordance with local environmental regulations for waste disposal. For more detailed information about treatment, recovery, and recycling of this product, please contact your local city office, your household waste disposal service, or the shop where you purchased the product.
The product is designed, manufactured, and produced in accordance with:
- Safety: EN/IEC 60335-1; EN/IEC 60335-2-31, EN/IEC 62233.
- Performance: EN/IEC 61591; ISO 5167-1; ISO 5167-3; ISO 5168; EN/IEC 60704-1; EN/IEC 60704-2-13; EN/IEC 60704-3; ISO 3741; EN 50564; IEC 62301. EMC: EN 55014-1; CISPR 14-1; EN 55014-2; CISPR 14-2;
EN/IEC 61000-3-2; EN/IEC 61000-3-3. For correct operation and to reduce the impact on the environment: Turn on the hood at the minimum speed during cooking and leave it running for a few minutes after cooking is finished. Increase the speed only in case of a large amount of fumes and steam, and use the boost speed only in extreme cases. To maintain high efficiency in odor extraction, if necessary, replace the charcoal filter(s). To maintain high efficiency in grease filtration, if necessary, clean the metal grease filters. Use the maximum diameter of the ducting system as indicated in the instructions to optimize efficiency and minimize
Use
The hood is designed for use in extraction mode, exhausting air outside, or in filter mode with recirculation of air.

Control variant
Install the exhaust pipe through the opening in the connecting flange.

ATTENTION!
The exhaust pipe is not supplied, so it must be purchased separately.
The diameter of the exhaust pipe must match the diameter of the connecting ring.

ATTENTION!
If the cap has sharp edges, they must be removed.
Attach the cap to the existing exhaust pipe and the exhaust outlet with the same inlet diameter (connecting flange).
Using existing exhaust pipes and outlets with a smaller diameter will reduce efficiency and significantly increase noise levels.
Therefore, we assume no responsibility for the above.
! Use the shortest exhaust duct. ! Use the exhaust duct with the minimum number of bends (maximum bend angle: 90°). Avoid various changes in the cross-section of the exhaust duct.

Variant with filtration
The exhaust air is cleaned, deodorized, and then returned to the room. To use the cap in this mode, it is necessary to install a filter system with activated carbon.
Installation
The distance from the lower part of the hood to the cooking surface must be at least 50 cm for electric stoves, and 65 cm for gas and combined stoves.
It is necessary to take into account the distances specified in the installation instructions for the gas stove.

The plug must match the electrical network parameters indicated on the label located inside the device. If the plug is included in the delivery set, connect the plug to a socket that meets the existing standards and is accessible, so that the plug can be disconnected after installation. If the plug is not included in the delivery set, or the socket is not accessible, also after installation, then install a reliable plug that will ensure complete disconnection from the network under overload conditions of category III, in full compliance with the installation rules.

WARNING!
Before reconnecting the device to the electrical network, check the correctness of the work, the protective shutdown so that the network is installed correctly.
Warning! Replacement of the electric plug must be carried out by authorized service technicians.
Installation
The delivery set includes brackets for fastening, designed for typical walls. However, it is necessary to consult a qualified technician to verify the suitability of materials depending on the type of wall/ceiling. The wall/ceiling must be sufficiently strong to support the weight of the device.
Operation.

4

3

2

1
1 ON/OFF button
Pressing the button once, the device will start working at the first speed.
Pressing the button again during operation, the device cover will turn off.
Press the button to switch from OFF mode to brightness.
Pressing the button (switch to ON mode) increases the brightness of the program from 1 brightness to intensive.
Each brightness corresponds to the activation of the corresponding indicator.
Brightness 1 indicator L1
Brightness 2 indicator L2
Brightness 3 indicator L3
Intensive brightness indicator L4 (flash)
Intensive brightness is programmable. Per hour.
Standard programming is 5 minutes, after which the switch goes to brightness 2.
To turn off the function earlier, it is necessary to press button 2, the switch goes to brightness 1, pressing button 1 the switch turns off.
3 ON/OFF lighting 4 Programming brightness 5 Operating mode indicator
Programming brightness
Programming brightness is activated by pressing button 4, after the end of the programmed time the switch turns off.
Programming is divided into the following modes:
Durability 1-20 minutes (with lamp L1 on)
Durability 2-15 minutes (with lamp L2 on)
Durability 3-10 minutes (with lamp L3 on)
Intensity 5 minutes (with lamp L4 on)
Take care to remember these procedures until the temperature does not fall below the emergency level.
To exit this mode, press button 1 or 2.
Every 30 seconds, the device reads the ambient temperature value.
When
Only
For the user: use a special service, the most appropriate means. Do not use tools or instruments for cleaning!
Do not use abrasive materials. Do not use spirits!
Filter for air intake
Fig. 9-24
Close the air intake before cleaning the parts.
The manufacturer's instructions must be followed to ensure proper operation.
CAUTION: The collection of filters may be hot during operation.
- Do not connect the device to the electrical supply during installation.
- When using the device near walls, furniture, or other objects, ensure sufficient clearance for proper operation. This device is intended for exhausting air to the outside or for recirculating air within the room. Do not connect the electrical supply until installation is complete. Do not use the device if the power cord or plug is damaged.
- Always disconnect the power supply before cleaning or servicing the device.
- Only use the brackets provided for installation. If they are not provided, purchase suitable brackets. Install the brackets according to the instructions. If you are unsure, contact a qualified electrician or the manufacturer's service department.
WARNING!
- Do not install the device or its brackets in a way that could damage electrical cables. - Do not use the device if it has been dropped, damaged, or if the power cord or plug is damaged.
This product is marked with the crossed-out wheeled bin symbol, in accordance with the European Directive 2012/19/EC (WEEE).
Dispose of the product properly at the end of its life.
By not disposing of it correctly, you may harm the environment and human health.

The crossed-out wheeled bin symbol indicates that the product must not be disposed of with normal household waste. Instead, it should be taken to a designated collection point for recycling of electrical and electronic equipment.
Proper disposal helps to conserve natural resources and ensures that the product is recycled in a manner that protects human health and the environment.
For more information about recycling this product, please contact your local council, your household waste disposal service, or the shop where you purchased the product.
KpybIyKeNecinepe caJxO6aHaHafH,cbHaHaH XHe JXacan 1yIfapBlnFaH:
Safety: EN/IEC 60335-1; EN/IEC 60335-2-31, EN/IEC 62233. - Performance: EN/IEC 61591; ISO 5167-1; ISO 5167-3; ISO 5168; EN/IEC 60704-1; EN/IEC 60704-2-13; EN/IEC 60704-3; ISO 3741; EN 50564; IEC 62301. EMC: EN 55014-1; CISPR 14-1; EN 55014-2; CISPR 14-2; EN/IEC 61000-3-2; EN/IEC 61000-3-3.
Instructions for proper disposal of the appliance:
At the end of its service life, the product must not be disposed of with household waste. It must be handed over to a collection point for recycling of electrical and electronic equipment. By ensuring this product is disposed of correctly, you will help prevent potential negative consequences for the environment and human health. For more detailed information about recycling of this product, please contact your local city office, your household waste disposal service, or the shop where you purchased the product.
Disposal
The appliance must be disposed of separately from municipal waste, or handed over to an authorized collection point.

Disposal instructions
This appliance is marked according to the European Directive 2012/19/EU on Waste Electrical and Electronic Equipment (WEEE).

WARNING!
The diameter of the exhaust pipe must be equal to the diameter of the exhaust outlet.

WARNING!
The exhaust pipe must be connected to the exhaust outlet, and it must be properly secured.
When connecting the exhaust pipe, use pipes of the same diameter as the outlet, and secure them with clamps (or connecting rings).
When installing the exhaust pipe, avoid sharp bends, as they reduce the suction efficiency.
! Keep the minimum required distance from the cooktop. ! Keep the minimum distance from the cooktop (minimum, maximum: 90°). ! Do not make sharp bends in the exhaust pipe.

On yuiship kemip cyrici kajet, OHbl eDetteri caTyshilapdah anyfa 60ana.
Cy3ri IbIrapIbnFaH ayaHbIXoFapfbl IbIfc TOpbl apKbIbnB6eMere KaTt Xibepy anbda Ohbl Ma Mm HicTepeH Ta3apTaBl.
KoHdbipy
Copfbltih TMeHri Kbipb Meh bDlc actbHdafti Tipeiyu Ka3blTbHbH npa KaBbIKbIbI 3neKtp Pnntacbl yin 50cm, an ra3 hemece biiktpipiren nPiTaIap yin 65cm den KEM 6oJmaybi Tnic.
ErepHcyka ra3 pntacbH opHaTyfa apTbIbpaKapa KaBtik6enrhen6onca,ohbi eckepiH3.

3JIeKtp Kocynapbl
KeninH KepHeyi acnantbH iHHe opHanackaH TaKaTnWada BEnrIneHRe HTexnKaIbIK depekTeHKepeNyTe caikec Kenyi kepek. Eere copfBb WILKAMeh Ka6bIKtaIraH 60nc, opHaTbINFaHHaKeIH De icTeyRe 60NaTbIH, KOJ KTeepNIK JepDe 60JIbTI NIC, icTe TpyFaH epexenepre Caikec anMaIbI-caMnbl bWTencBle CopfBbITb Kocbl3. Eere copfBb WILKAMeh Ka6bIKtaIaMAfAH 60nc (Kenire Typa Kocblny), HeMece anMaIbI-caMnbl WtEncelb opHaTbIH Kocbl3. Eere copfBb WILKAMeh Keih De kon JeTeepNIK JepDe 60ImacaO, OHa opHaTy HcyKayBaHa CaiKEc 3- dapexeeriACKBH KepHeydi 60JIbIPMaHTbIH KHeJIHH TOblA uBlIbIH KaMTaMaCbI3etIH Tnicti ekinONIOCTIK axbipatkbIbTI naJaDaNAHbIHb3.

ECKEPTY!
Kopek JxeliciHe COPfbltBn 3JneKtpnIK KxyneciH Kocy anDbIHda Kopek Ka6eni Dvpbic MOHTaKaIaNFaHbHa Ke3 XeTki3iH3.
ECKEPT! Hap 6epuyi cyIMxejIHI aBTOPI3aUINaHraTexHnKaIbIK optaIbIKTa Hemece 6iNkTI MaMaH aybICTbipyKepeK.
Bekity
Cy3ri KeNTereH Ka6bIprA/Te6e TypIepiHe caikec KeNETIH 6eKTIkiUtePmeH (fNkcatOpnapMeH) KaMTaMaCbI3dAnDbIpbInFaH. AnaJa,
MaTePnAnIap 6epiRHe Ka6bIpFa/T6e6 TyPiHe cAneKecTiriHe Ke3 JeKti3y UsiH 6iNtMiMaHaF aKoJIbIbIHbI3.Cy3rCaNMaBbHKeTepe anaTbIHdai Ka6bIpra/T6e6 JeKtiNlIKTI MblkTbI 6OJybl Kepe.
Pai danany

4

3

2

1
1. Introduction KINO/0R.DO:
This manual describes the 1-connector.
For your safety, read this manual carefully.
2. Connector description
This manual describes the connector ,, for the 1-connector type.
This manual describes (connector KINOEU type) and the 1-connector connection for the connector.
The connector has the following characteristics.
1-connector type - L1, 2-connector type - L2, 3-connector type - L3
4-connector type - L4 (special type)
4-connector type is optional. For the 2-connector type, the optional part is installed at a 5' angle.
The optional part is installed on the left side, 2 screws; for the 1-connector type, 1 screw, for the right side.
- LED lights L1
- LED lights L2
- LED lights L3
Intensive LED light L4 (flashing)
Intensive light and with timer. Standard timer is 5' after which the hood will move to speed 2.
To switch off the function before the time ends, press key 2, the hood will move to speed 1, pressing key 1, the hood will switch off.
3 Lights ON/OFF
4 Speed timer
(1)
1 1
ON/OFF 3
4
J 5
a
4 1
(204) 20-14
(204) L2 15-2
(204) (一) 10-3 a
aiy 1 Clll alde bainally cai lcy gall jill cai i gws4 Clllal 2 Clllal ae bainally cai lJ Lai,blil
aill 1
0
L5. 40
iill jolll jolll llo
3" 1 clll lbcia jaiy
L5. 11111111111111111111111111111111111
Cuiiill jy
3" 2d1 1
L5
3 15
3
Slll lly
Therefore, in right triangle ABD:
- ① ax = 70
J 1
.
:
1 1
34
5 5 L2 L1
:JySll Jssu auiu Juaa eai
1 1
324
L1
a
e 1
J 1

4

3
L5O
L4
L3O
L2
L1O
∴ m = 3/11

2

1
ON/OFF
1 1e yllleblal Jae cieallle baiyally
OFF
a.soll sallj
1.1 a
(ON)
aill 1 a j 10
1
.
L1 yll 1 ac yll
L2 112 ac
L3 3e
1d
#
1
j 1
a i a j = f( x i)
2011/19/EU 1000 (WEEE)
a
blai jia Jaiui 2
yipisiwi y lssll juiwul
i 1
Jlll 1
jglg 1
12
∴ ( x + 1) ( y + 1) = 0
Jolololol aIacol
J 1
i:
iic aiisw blai jia Lg
Jaiall gillgill gailll jbi
11
y
J 1
1
J 10
1 1
J 1
- CAUTION
- WARNING
- USE
- EXTRACTION VERSION
- FILTRATION VERSION
- INSTALLATION
- ELECTRICAL CONNECTION
- MOUNTING
- OPERATION
- SPEED TIMING
- GREASE TRAP SIGNAL
- CARBON FILTER SIGNAL
- CARBON FILTER SIGNAL ACTIVATION
- TEMPERATURE ALARM
- MAINTENANCE
- CLEANING
- GREASE FILTER
- FIG
- CHARCOAL FILTER (FILTER VERSION ONLY)
- REPLACING LAMPS
- ACTIVATION SIGNAL FIBRE CHARBON
- SIGNAL FOR CHARCOAL FILTER
- SIGNAL FOR DIRTY GREASE FILTER
- SIGNAL FOR DIRTY CHARCOAL FILTER
- SUCTION VERSION
- INSTRUCTIONS FOR USE
- ON/OFF MOTOR SWITCH
- SPEED INCREASE
- ON/OFF INDICATOR LIGHT
- SPEED TIMER
- FILTER CHANGE INDICATOR
- ACTIVE CARBON FILTER INDICATOR
- ACTIVATING THE FILTER'S ACTIVATED CARBON
- FILTER FOR GREASE
- FILTER WITH ACTIVE CARBON (ONLY FOR FILTERING VERSION)
- LIFT THE COVER
- USE OF THE EXHAUST DUCT
- ATTENTION
- AIR
- ON/OFF LIGHT
- SPEED PROGRAMMING
- GREASE FILTER CLEANING
- SAFETY
- CONTROL VARIANT
- VARIANT WITH FILTRATION
- PROGRAMMING BRIGHTNESS
- WHEN
- ONLY
- FILTER FOR AIR INTAKE
- DISPOSAL
- DISPOSAL INSTRUCTIONS
- KOHDBIPY
- JIEKTP KOCYNAPBL
- ECKEPTY
- BEKITY
- PAI DANANY
- INTRODUCTION KINO/0R.DO
- CONNECTOR DESCRIPTION
- LIGHTS ON/OFF
- D
Brand : ELICA
Model : SUN
Category : Range hood