
20355-56 AURA - Food processor RUSSELL HOBBS - Free user manual and instructions
Find the device manual for free 20355-56 AURA RUSSELL HOBBS in PDF.
| Product type | Food processor |
| Brand | RUSSELL HOBBS |
| Model | 20355-56 AURA |
| Main functions | Whisk, mix, knead, mince meat, seed/juice tomatoes, slice, grate, make sausages and kebbes |
| Accessories included | Whisk, beater, dough hook, meat grinder, tomato juicer/seed remover, slicer/grater, fine and coarse grinding discs, fine and coarse screens, sausage nozzle, kebbe nozzle, splash guard, funnel, pusher, tray |
| Speeds | 8 adjustable speeds (1 = low, 8 = high) |
| Bowl capacity | Approximately 3 liters (do not fill beyond half for whisking) |
| Materials | Plastic motor block, dishwasher-safe removable parts |
| Power supply | 220-240 V ~ 50/60 Hz |
| Power | 1000 W (approx.) |
| Dimensions (L x W x H) | Approximately 30 x 25 x 40 cm |
| Weight | Approximately 5.5 kg |
| Maintenance and cleaning | Wipe the motor block with a damp cloth; wash removable parts by hand or in dishwasher |
| Safety | Splash guard, stop in position 0, power cord replaceable by a professional |
| Maximum continuous use | 10 minutes for basic functions, 3 minutes for motorized tools (grinder, etc.); let rest for 10 minutes (or 3 minutes) between cycles |
| Warranty | 2 years (standard) |
| Intended use | Domestic use only |
Frequently Asked Questions - 20355-56 AURA RUSSELL HOBBS
User questions about 20355-56 AURA RUSSELL HOBBS
0 question about this device. Answer the ones you know or ask your own.
Ask a new question about this device
Download the instructions for your Food processor in PDF format for free! Find your manual 20355-56 AURA - RUSSELL HOBBS and take your electronic device back in hand. On this page are published all the documents necessary for the use of your device. 20355-56 AURA by RUSSELL HOBBS.
USER MANUAL 20355-56 AURA RUSSELL HOBBS
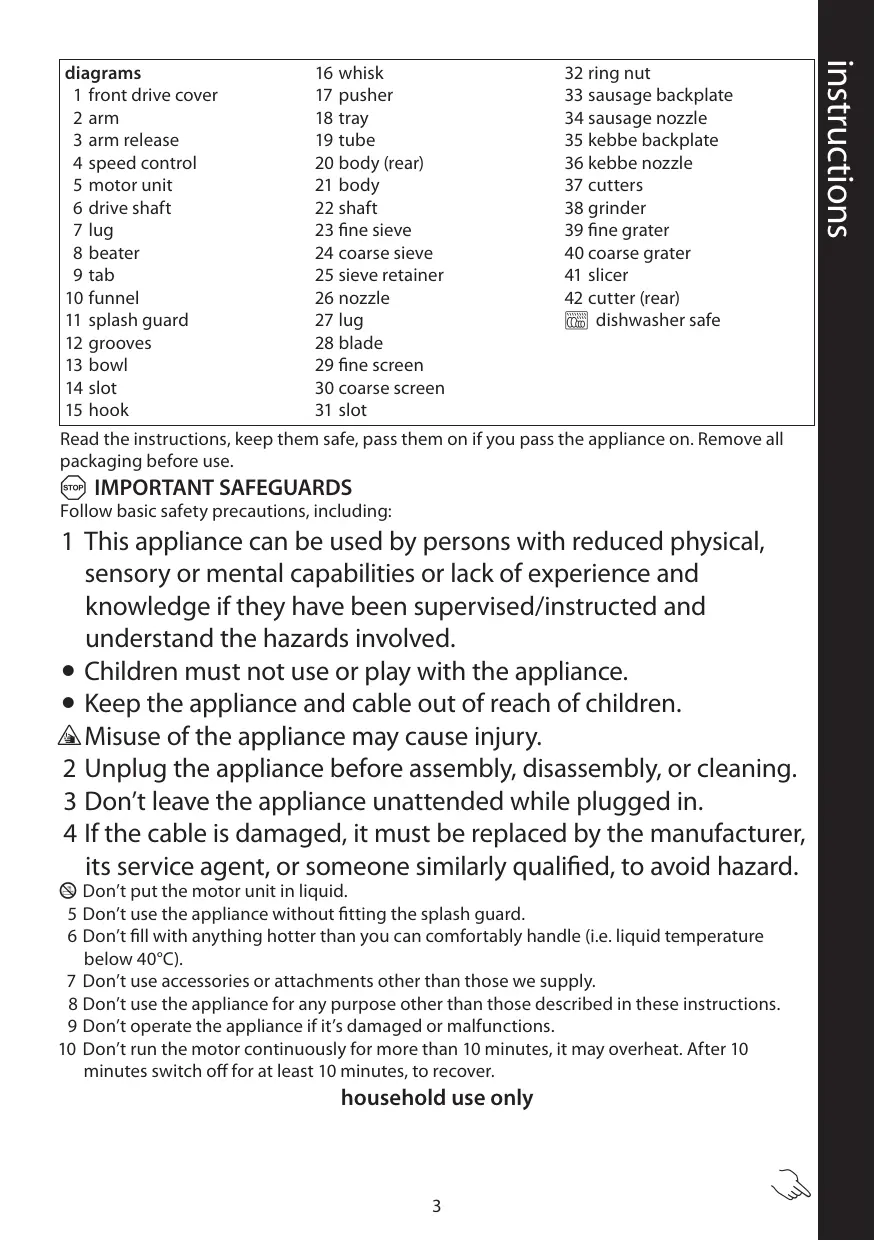
| diagrams | 16 whisk | 32 ring nut |
| 1 front drive cover | 17 pusher | 33 sausage backplate |
| 2 arm | 18 tray | 34 sausage nozzle |
| 3 arm release | 19 tube | 35 kebbe backplate |
| 4 speed control | 20 body (rear) | 36 kebbe nozzle |
| 5 motor unit | 21 body | 37 cutters |
| 6 drive shaft | 22 shaft | 38 grinder |
| 7 lug | 23 fine sieve | 39 fine grater |
| 8 beater | 24 coarse sieve | 40 coarse grater |
| 9 tab | 25 sieve retainer | 41 slicer |
| 10 funnel | 26 nozzle | 42 cutter (rear) |
| 11 splash guard | 27 lug | dishwasher safe |
| 12 grooves | 28 blade | |
| 13 bowl | 29 fine screen | |
| 14 slot | 30 coarse screen | |
| 15 hook | 31 slot |
Read the instructions, keep them safe, pass them on if you pass the appliance on. Remove all packaging before use.

IMPORTANT SAFEGUARDS
Follow basic safety precautions, including:
1 This appliance can be used by persons with reduced physical, sensory or mental capabilities or lack of experience and knowledge if they have been supervised/instructed and understand the hazards involved.
Children must not use or play with the appliance.
- Keep the appliance and cable out of reach of children.
Misuse of the appliance may cause injury.
2 Unplug the appliance before assembly, disassembly, or cleaning.
3 Don't leave the appliance unattended while plugged in.
4 If the cable is damaged, it must be replaced by the manufacturer, its service agent, or someone similarly qualified, to avoid hazard.
Don't put the motor unit in liquid.
5 Don't use the appliance without fitting the splash guard.
6 Don't fill with anything hotter than you can comfortably handle (i.e. liquid temperature below 40^ ).
7 Don't use accessories or attachments other than those we supply.
8 Don't use the appliance for any purpose other than those described in these instructions.
9 Don't operate the appliance if it's damaged or malfunctions.
10 Don't run the motor continuously for more than 10 minutes, it may overheat. After 10 minutes switch off for at least 10 minutes, to recover.
household use only
RAISING THE ARM
1 The springs in the arm are quite powerful, so:
a) Check that the appliance is switched off (0)
b) Hold the bottom of the appliance.
c) Keep clear of the top of the arm.
d) Turn the arm release to 1 .
e) The arm will move to the raised position.
f) Let go.
THE BOWL
2 Raise the arm before fitting or removing the bowl.
3 Fit the bowl to the appliance and turn it clockwise.
4 Turn it anti-clockwise to release it.
5 The contents of the bowl will rise when you start the motor – the higher the speed, the more they'll rise.
6 Try not to fill the bowl more than about half full (specially when using the whisk).
Use only the bowl supplied.
THE ATTACHMENTS
7 Fit and remove the attachments with the appliance switched off and unplugged, and the arm raised.
8 Align the slot in the top of the attachment with the lug on the drive shaft, push the attachment on to the drive shaft, and turn it anti-clockwise.
9 To remove an attachment, push it on to the drive shaft, turn it clockwise, then pull it off.
LOWER THE ARM
a) Check that the appliance is switched off (0).
b) Hold the bottom of the appliance.
c) Turn the arm release to 1.
d) Press the arm down.
e) Let the arm release go.
f) Let go.
THE SPLASH GUARD
10 The splash guard fits on top of the bowl.
11 The funnel lets you add ingredients without removing the splash guard.
12 With the bowl in position, and the arm down:
a) slide the splash guard between the arm and the bowl
b) Turn the splash guard towards you, so that you can add ingredients easily.
c) Align the tabs on the sides of the funnel with the grooves in the open part of the splash guard.
d) Slide the funnel down to cover the open part of the splash guard.
13 To remove the splash guard:
e) Lift the funnel off.
f) Lift the splash guard slightly, to clear the bowl rim.
g) Pull it out from between the bowl and the arm.
SWITCH ON
14 Sit the motor unit on a dry, firm, level surface, near a power socket.
15 Check that the speed control is set to 0.
16 Put the plug into the power socket.
SPEED CONTROL
17 Turn the speed control to the speed you want ( 1 = low, 8 = high).
18 Turn the speed control back to 0 to turn the motor off.
19 Generally, large quantities, thick mixes, and a high ratio of solids to liquids suggest longer timings and slower speeds.
20 Smaller quantities, thinner mixes, and more liquids than solids suggest shorter timings and higher speeds.
WHICH SPEED?
| attachment | speed | use |
| whisk | 4-8 | beating/aerating cream, egg whites, batter, light mixes |
| beater | 4-6 | creaming butter and sugar, medium cake mixes |
| hook | 1-3 | heavy mixtures, bread, pastry |
1 THE TOOLS
21 Fit and remove the attachments with the appliance switched off and unplugged, and the arm lowered.
22 Remove the front drive cover from the arm.
23 Align the rear of the body with the hole in the front drive, push the tool into the drive, and turn it clockwise to lock it into place.
24 To remove a tool, turn it anti-clockwise, and pull it away from the arm.
25 Don't use fingers or cutlery to push food down the tube - only the pusher.
26 Remove the pusher, and drop the ingredients down the tube.
27 Replace the pusher, and use it to push the ingredients gently down the tube.
28 The tomato skinner/juicer and the meat grinder may be fitted with the tray, to speed up the process.
Don't run the motor continuously for more than 3 minutes, it may overheat. After 3 minutes switch off for at least 3 minutes, to recover.
29 This tool can be used for skinning/juicing fruit like plums and grapes, which have a very thin skin and soft pulp inside.
30 Use seedless fruit, or remove the seeds/stones manually.
31 Larger fruit like tomatoes and plums should be quartered.
32 Push the shaft into the body.
33 Align the sieve with the body and push the sieve into the body.
- The coarse sieve allows larger particles of pulp to pass into the juice.
- The fine sieve cuts the particles down.
34 Align the sieve retainer with the body, push it on to the body, and turn it anti-clockwise, to lock it in place.
35 Align the rear of the nozzle with the front of the sieve retainer, and turn it to bring the pointer round to 1, 2, or 3, depending on the thickness of the skin.
36 You will need to experiment with the setting, but we suggest using 1 (thick) for tomatoes, 2 (medium) for plums, and 3 (thin) for grapes.
37 The, the juice/pulp 品 will come out of the bottom of the tool, the skins 品 will come out of the nozzle.
38 To disassemble the tool, switch off, unplug the appliance, then remove the tool from the arm.
39 Turn the nozzle to 0 and pull it off.
40 Turn the sieve retainer clockwise.
41 Pull the sieve out of the body.
42 Pull the shaft out of the body.
3 MEAT GRINDER
43 This tool can be used for grinding meat, making sausages, or making kebbe.
44 Push the shaft into the body.
45 Fit the blade to the front of the shaft.
46 The flat side of the blade should be towards the screen.
47 Fit the screen you want to use.
48 The slot in the edge of the screen fits over the lug inside the front of the body.
49 Fit the ring nut to the front of the body and tighten it by hand.
GRINDING
50 Cut meat into strips 25mm square, and not more than 50mm long.
51 If you want an even finer grind, put the meat twice through the fine screen.
52 When you've finished, run scraps of bread through the grinder to clear the screen.
SAUSAGES
53 Push the shaft into the body.
54 Fit the sausage backplate.
55 Put the front of the sausage nozzle through the centre of the ring nut.
56 Align the rear of the sausage nozzle with the front of the backplate.
57 Fit the ring nut to the front of the body and tighten it by hand.
58 Soak sausage skins in water for at least 10 minutes before using.
59 Slide the sausage skin over the outside of the sausage nozzle till almost all the skin is on the nozzle.
60 Tie a knot in the free end of the skin.
61 Hold the skin with one hand.
62 Run the appliance, to force meat into the skin.
63 Tighten or loosen your grip on the skin, to regulate the thickness of the sausage.
64 When you have filled a length of sausage, pinch and twist the skin every 120mm or so to make individual sausages.
KEBBE
65 Kebbe is an outer casing made from 50% ground meat and 50% bulgur wheat, stuffed with spiced meat and/or vegetables, sealed at the ends, then baked/fried.
66 Use the fine screen.
67 Grind the meat.
68 Soak the bulgur wheat in water, drain, and grind.
69 Mix the ground meat and bulgur wheat.
70 Grind the mixture twice.
71 Switch off, unplug, then remove the screen and blade.
72 Push the shaft into the body.
73 Fit the kebbe backplate.
74 Put the front of the kebbe nozzle through the centre of the ring nut.
75 Align the rear of the kebbe nozzle with the front of the backplate.
76 Fit the ring nut to the front of the body and tighten it by hand.
77 Run the appliance till you have a short (80-100mm) hosepipe of meat.
78 Crimp the free end of the hosepipe.
79 Cut the other end from the appliance.
80 Fill with your chosen filling, then crimp the other end of the hosepipe.
81 Repeat till all the wheat/meat mixture is used up.
4 SLICER/GRATER
82 Push the cutter of your choice into the body.
83 You might need to turn is slightly to engage with the drive at the rear of the body.
84 Don't use fingers or cutlery to push food down the tube - only the pusher.
85 Remove the pusher, and drop the ingredients down the tube.
86 Replace the pusher, and use it to push the ingredients gently down the tube.
Don't put your fingers inside the cutters.
CARE AND MAINTENANCE
87 Switch the appliance off (0) and unplug it.
88 Wipe the outside of the motor unit with a clean damp cloth.
89 Hand wash the removable parts.
You may wash these parts in a dishwasher.
90 If you use a dishwasher, the harsh environment inside the dishwasher will affect the surface finishes.
91 The damage should be cosmetic only, and should not affect the operation of the appliance.
ENVIRONMENTAL PROTECTION
To avoid environmental and health problems due to hazardous substances in electrical and electronic goods, appliances marked with this symbol mustn't be disposed of with unsorted municipal waste, but recovered, reused, or recycled.
recipes
= tablespoon
Teaspoon
ml = millilitres
g= grams
pizza dough (hook) makes 2 large pizzas
250 ml water
400 g plain flour
1½ olive oil
212 dried yeast
1/2 sugar
1 salt
Put the flour in the bowl. Mix the remaining ingredients in a jug. Select speed 1. Gradually add the liquid. Select speed 2. Knead for 2 minutes. Remove the dough. Cut the dough in half. Roll the dough into circles on a floured surface. Put the circles on a non-stick baking tray. Spread the circles with a tomato based sauce and add toppings. Bake in a pre-heated oven at 190^ for 15-20 minutes. The surface should be golden brown.
recipes are available on our website:
http://www.russellhobbs.com/ifu/550932
http://www.russellhobbs.com/ifu/550932
soeplepel/eetlepel (15ml) ml = milliliter
= theelepel (5ml) g = gram
http://www.russellhobbs.com/ifu/550932
http://www.russellhobbs.com/ifu/550932
spiseskefuld (15ml) ml = milliliter
teskefuld (5ml) g= gram
pizzadej (krog) til 2 store pizzaer
250 ml vand
400 g hvedemel
112 olivenolie
21/ torgaer
1/2 sukker
1 salt
http://www.russellhobbs.com/ifu/550932
http://www.russellhobbs.com/ifu/550932
BEHANDLING OG VEDLIKEHOLD
91 Vask avtakbare deler for hand.
http://www.russellhobbs.com/ifu/550932
http://www.russellhobbs.com/ifu/550932
Ipoptyte uHCTpykun, coXpaHnTe ux, npu nepedaue cOpboOAnTe uHCTpykun. Ipeed npimHeHnem u3dEInna CHmMnte C Hero ypaKOBky.

BAXKhIe MEPbl IPEIOCTOPOXHOCTN
CleyuTe OCHOBbIM HNCTpyKcIyM NO 6eONaCHOCTN, BKIOUaY CLeyuOuJe:
1 IcnoIb3OBAHnE daHHoro yCTpoiCTBa IINzAMN C OrpaHnueHHbIMN Φn3nuecknMn, CeHCOPhIMN INJN yMCTBeHHbIMN CnOCo6HOCTaMn, HeIOCTaTKOM ONbITa INJN 3HaHnJ DOnyckaETcR Prn yCNOBnN KOHTPOJIa INJN IHCTpyKTAJa IN OCO3HaHnJ CBraHHbIX PnCKOB.
TOIbKO IЯ 6bITOBO rNcNoJIb3OBaHnA

ПОДБЕМ ПLEЧА
peueNTbI MOxHO HaHTn Ha HaWeM Be6-caTe: http://www.russellhobbs.com/ifu/550932
http://www.russellhobbs.com/ifu/550932
http://www.russellhobbs.com/ifu/550932
| crteži | 15 kuka za tijesto | 31 utor |
| 1Poklopac prednje pogonske | 16 metlica | 32 navojni prsten |
| jedinice | 17 potiskivač | 33 stražnji dio za kobasice |
| 2držač | 18 plitica | 34 nastavak za kobasice |
| 3ručica za otpušanje držača | 19 cijev za umetanje sastojaka | 35 stražnji dio za kibbeh |
| 4regulator kontrole brzine | 20 kučiste (stražnji dio) | 36 nastavak za kibbeh |
| 5motorna jedinica | 21 kučiste | 37 rezači |
| 6pogonska osovina | 22 osovina | 38 mlin |
| 7stopica | 23 fino situ | 39 nastavak za sitnije ribanje |
| 8pjenjača | 24 grubo situ | 40 nastavak za krupnije ribanje |
| 9jezičak | 25 element za zadržavanje sita | 41 nastavak za rezanje na kriške |
| 10ljivak | 26 ispust | 42 rezać (straga) |
| 11zašitnik od prskanja | 27 stopica | prikladno za pranje u perilici |
| 12žljebovi | 28 sječivo | |
| 13posuda | 29 disk za fino mljevenje | |
| 14prorez | 30 disk za grubo mljevenje |
http://www.russellhobbs.com/ifu/550932
2 buyuk pizza icin pizza hamuru (yogurma ucu)
250 ml su
400 g sade un
1½ zeytinyaig
212 - kuru maya
1/2 seker
1 tuz
http://www.russellhobbs.com/ifu/550932
http://www.russellhobbs.com/ifu/550932
IpooueTe IINCTpykunnte,3ana3eTe r n r nn ppeaBaIte,ako npedaBate u ypea.OTcpanete BCnKOnaKOBKn ppeiynynoTpe6a.
STOP BAXKHIN PEPDA3HN MEPKN
CneBaiTe OCHOBHnTe Mepkn 3a 6e3OanacHOCT, BkIouHTeJIHo:
1 To3n ypeD moKe da ce nOJI3Ba OT XOpa C orpaHnueHn fI3nueckn, cETNBn IJIn yMCTBeHn Bb3MOxKHOCTn, IJIn 6e3 OINT N PO3HaHnA, aKO ca IIOd NaI3Opa/INCHTpYkTnpaHn IN OCb3HaBaT ONaCHOCTnte.
- DeçaTa He TpЯБа Да ИЗпОЛЗВАТ ИПДа ИграТ с урEDA.
-Дръктуpeаи Кабета далец OT Достьпа на Deца.
HenpaBnHaTa yNoTppe6a Ha ypeMa MoKe Da DoBeDe Do HapaHbAHe.
2 Изклочete урEDA OT KOHTaKta пpeДи сглобЯBaHe, pa3глобЯBaH e IПИ NOчICTBaHe.
3 He octabraye ypeda 6e3 ha6JIoJeHne,doKaTo e BkJIoueH B KOHTaKTA.
4 Ako Ka6eIbTe e NobpeDeH, ToT Tp86Ba Da ce NODMeHn OT npOn3BOIDNTeJIa, HeROB IpeDCTaBnTeJ 3a cepBn3HO O6CnyKBAHe nII npyro KBaIIuΦNcIpaHo 3a Ta3n ZeI nIue, 3a Da ce n36eRHe BcRAKaKBb PnCK.
He noctabrayTe 3aBnKBaunr 6JOK B TeuHOCT.
5 He n3noI3BaIte ypeDa npeDi da cIoxKeTe npedna3ntela npOTnB pa3nnckBaHe.
6 He nbIhHeTe C HnIe IIO-ropeIoo OT TOBa, C KOeTo MoKxe KOMΦOpTHO da paBoITNe (T.e. TemnepaTypa Ha TeuHocCTTa noD 40^
7 He n3non3BaIte akcecoapn uI npncTabKn, pa3nnuHn OT te3n, npedeocTaBeHn OT Hac.
8 He n3noI3BaIte ypea 3a npyIu cIeN, OCBHe TeI, ONIcAHn B HAcToIuTe IHCTpyKUIN.
9 He n3non3BaIte ypea, ako e nobpehen uHn He pa6oTu n3pAHO.
10 He octabray Te DnBraTeIa pa6OTn HnpeKbCHaTO NOBEe OT De MHyTN, MoKe da nperpee. CneI 10 MNHTyTo rO n3KnIOuBaIte 3a HaI-MaIKo 10 MNHTN, Da Ce Bb3CTaHOBN.
cAmO 3a DomaHa yNtpe6a
IOBUNIAGHEHAPbKABA
1БpbkaknteBpbkabaCaMHOROMOUHN,3aTOBa:
1)Поберете далуypedьт e n3knioyen (0).
2) XbaHeTe IbHOTo Ha ypea.
3) Πa3eTe ce OT rOpHaTa qact Ha pbKaBa.
4) 3aBbptTe KIIIOuA 3a pBKaBa Do
5)Рькавт声称придвжkinКьmПОЗИЯнHaRope.
6) Ocbo6oJeTe.
KYNATA
2Повдигнелерькава пededида поставиплдамaxнeTeКупаТ.
3 NocTabeTe KynataB Cbda n 3aBbPTeTe NO NOCOKa Ha YacOBHnKOBaTa CTpeKa.
4 3aBbptTe o6paTHo Ha yacOBHnKOBaTa CTpeJIka, 3a Ja OcBO6OJnte.
5 CbIbPjxHHeTo Ha Kynata ige ce nokayu, KOraTO BkIIOUHTe 6Ioka - KOJIKOTO NO-CINHa eCKOPoCTTa, TOnKOBA NoBEue ige ce nOKaUBa.
aab aaiy aaiy aaiy 70
-
-
-
-
-
-
-
-
-
-
-
-
-
-
-
- 17
-
-
-
-
-
-
-
-
-
-
-
-
-
-
72
.0jai jiaai 73
aannn 74
a 75
aalal alalal 5y Jd 176
77
78
(100-80)
80
jlll jll l 81
82
alllll 83
oal/abal#4
aai 84
aill 85
(50x45) 1234567890
87
88
aIyIyIyIyIyIyIy
Aalal jolll 89
aaiia aiaiaaaeae aiee aee eae aee 90
all all 191
.1234567890
calbllg 1000 allw 1000 aalil 1000 gue 1000 allw 1000 cii51,92
S BCD = S COD + S BDO - S BOC
jll lgl 15 2 8 93
alall 1e algal alu jao

a 1 1 1 1 1 1 1 1 1 1 1 1 1 1 1 1 1 1 1 1 1 1 1 1 1 1 1 1 1 1 1 1
- 100
aee
Laiy
3 2 1 0 0 0 0 0 0 0 0 0 0 0 0 0 0 0 0 0 0 0 0 0 0 0 0 0 0 0 0 0 0 0 0 0 0 0 0 0 0 0 0 0
aalal alalalal jsrjldz gaaag aegg 57
58
59
Aolssiul Jia jilai 10 jui y sial clal g jgll 60
61
62
. 63
64
65
Aa jia jia 120 Js jg jg jg jg jg jg jg jg jg jg jg jg jg jg jg jg jg jg jg jg jg jg jg jg jg jg jg jg jg jg jg jg jg jg jg jg jg jg jg jg
. jil jil jil jil jil jil jil jil jil jil jil jil jil jil jil jil jil jil jil jil jil jil jil jil jil jil jil jil jil jil jil jil jil jil jil jil jil jil jil jil jil jil jil jil jil jil jil jil jil jil jIL
.111 111 111 111 111 111 111 111 111 111 111 111 111 111 1
13
5
e 6
e 1j jlllgl lgl
J
14
.0 15
16
a yll p aill 1
.()=1)
18
ailll al gall a jia jia aillal gall no glll gsiailg, kall bial l 19
aaiy aie yaae yaae yaae yaae
20
Aille ic jw o
| الإستعمال | الإستعمال |
| الإستعمال بalsafull, ممن الحرفية, ممن الحرفية, ممن الحرفية, ممن الحرفية, ممن الحرفية, ممن الحرفية, ممن الحرفية, ممن الح註冊, ممن الح註冊, ممن الح註冊, ممن الح註冊, ممن الح註冊, ممن الح註冊, ممن الح註冊, ممن الح註冊, ممن الح註冊, ممن الح註冊, ممن الح註冊, ممن الح註冊, ممن الح註冊, ممن الح註冊, ممن الح註冊, ممن الح註冊, ممن الح註冊, ممن الح註冊, ممن الح註冊, ممن الح註冊, ممن الحarters, ممن الحarters, ممن الحarters, ممن الحarters, ممن الحarters, ممن الحarters, ممن الحarters, ممن الحarters, ممن الحarters, ممن الحarters, ممن الحarters, ممن الحarters, ممن الحarters, ممن الحarters, ممن الحarters, ممن الحarters, ممن الحarters, ممن الحarters, ممن الحarters, ممن الحarters, ممن الح註冊, ممن الح註冊, ممن الح註冊, ممن الح註冊, ممن الح註冊, ممن الح註冊, ممن الح註冊, ممن الح註冊, ممن الح註冊, ممن الح註冊, ممن الح註冊, ممن الح註冊, ممن الح註冊, ممن الح註冊, ممن الح註冊, ممن الح註冊, ممن الح註冊, ممن الح註冊, ممن الح註冊, ممن الح證, ممن الح證, ممن الح證, ممن الح證, ممن الح證, ممن الح證, ممن الح證, ممن الح證, ممن الح證, ممن الح證, ممن الح證, ممن الح證, ممن الح證, ممن الح證, ممن الح證, ممن الح證, ممن الح證, ممن الح證, ممن الح證, ممن الح證, ممن الح証, ممن الح証, ممن الح証, ممن الح証, ممن الح証, ممن الح証, ممن الح証, ممن الح証, ممن الح証, ممن الح証, ممن الح証, ممن الح証, ممن الح証, ممن الح証, ممن الح証, ممن الح証, ممن الح証, ممن�, ممن الح證, ممن الح證, ممن الح證, ممن الح證, ممن الح證, ممن الح證, ممن الح證, ممن الح證, ممن الح證, ممن الح證, ممن الح證, ممن الح證, ممن الح證, ممن الح證, ممن الح證, ممن الح證, ممن الح證, ممن الح證, ممن الح證, ممن الح譜, ممن الح譜, ممن الح譜, ممن الح譜, ممن الح譜, ممن الح譜, ممن الح譜, ممن الح譜, ممن الح譜, ممن الح譜, ممن الح譜, ممن الح譜, ممن الح譜, ممن الح譜, ممن الح譜, ممن الح譜, ممن الح譜, ممن�, ممن الح證, ممن الح證, ممن الح證, ممن الح證, ممن الح證, ممن الح證, ممن�, ممن الح證, ممن الح證, ممن الح證, ممن�, ممن الح證, ممن الح證, ممن الح證, ممن�, ممن الح證, ممن الح證, ممن�, ممن الح證, ممن الح證, ممن�, ممن الح證, ممن الح證, ممن�, ممن الح證, ممن الح證, ممن�, ممن الح證, ممن الح證, ممن�, ممن الح證, ممن الح證, ممن�, ممن الح證, ممن�, ممن الح證, ممن�, ممن الح證, ممن�, ممن الح證, ممن�, ممن الح證, ممن�, ممن الح證, ممن�, ممن الح證, ممن�, ممن الح證, ممن�, ممن الح證, ممن�, ممن الح證, ممن�, ممن الح證, ممن�, ممن�, ممن الح證, ممن�, ممن الح證, ممن�, ممن الح證, ممن�, ممن الح證, ممن�, ممن�, ممن الح證, ممن�, ممن�, ممن الح證, ممن�, ممن�, ممن الح證, ممن�, ممن�, ممن الح證, ممن�, ممن�, ممن الح證, ممن�, ممن�, ممن الح證, ممن�, ممن�, ممن الح證, ممن�, ممن�, ممن الح證, m m m m m m m m m m m m m m m m m m m m m m m m m m m m m m m m m m m m m m m m m m m m m m m m m m m 3-1 3-1 3-1 3-1 3-1 3-1 3-1 3-1 3-1 3-1 3-1 3-1 3-1 3-1 3-1 3-1 3-1 3-1 3-1 3-1 3-1 3-1 3-1 3-1 3-1 3-2 3-2 3-2 3-2 3-2 3-2 3-2 3-2 3-2 3-2 3-2 3-2 3-2 3-2 3-2 3-2 3-2 3-2 3-2 3-2 3-2 3-2 3-2 3-2 3-2 3-4 3-4 3-4 3-4 3-4 3-4 3-4 3-4 3-4 3-4 3-4 3-4 3-4 3-4 3-4 3-4 3-4 3-4 3-4 3-4 3-4 3-4 3-4 3-4 3-4 3-2 3-2 3-2 3-2 3-2 3-2 3-2 3-2 3-2 3-2 3-2 3-2 3-2 3-2 3-2 3-2 3-2 3-2 3-2 3-2 3-2 3-2 3-2 3-2 3-3 3-3 3-3 3-3 3-3 3-3 3-3 3-3 3-3 3-3 3-3 3-3 3-3 3-3 3-3 3-3 3-3 3-3 3-3 3-3 3-3 3-3 3-3 3-3 3-3 3-4 3-4 3-4 3-4 3-4 3-4 3-4 3-4 3-4 3-4 3-4 3-4 3-4 3-4 3-4 3-4 3-4 3-4 3-4 3-4 3-4 3-4 3-4 3-4 3-5 3-5 3-5 3-5 3-5 3-5 3-5 3-5 3-5 3-5 3-5 3-5 3-5 3-5 3-5 3-5 3-5 3-5 3-5 3-5 3-5 3-5 3-5 3-5 3-5 3-6 3-6 3-6 3-6 3-6 3-6 3-6 3-6 3-6 3-6 3-6 3-6 3-6 3-6 3-6 3-6 3-6 3-6 3-6 3-6 3-6 3-6 3-6 3-6 3-6 3-7 3-7 3-7 3-7 3-7 3-7 3-7 3-7 3-7 3-7 3-7 3-7 3-7 3-7 3-7 3-7 3-7 3-7 3-7 3-7 3-7 3-7 3-7 3-7 3-7 3-8 3-8 3-8 3-8 3-8 3-8 3-8 3-8 3-8 3-8 3-8 3-8 3-8 3-8 3-8 3-8 3-8 3-8 3-8 3-8 3-8 3-8 3-8 3-8 3-8 3-9 3-9 3-9 3-9 3-9 3-9 3-9 3-9 3-9 3-9 3-9 3-9 3-9 3-9 3-9 3-9 3-9 3-9 3-9 3-9 3-9 3-9 3-9 3-9 3-9 3-8 3-8 3-8 3-8 3-8 3-8 3-8 3-8 3-8 3-8 3-8 3-8 3-8 3-8 3-8 3-8 3-8 3-8 3-8 3-8 3-8 3-8 3-8 3-8 3-7 3-7 3-7 3-7 3-7 3-7 3-7 3-7 3-7 3-7 3-7 3-7 3-7 3-7 3-7 3-7 3-7 3-7 3-7 3-7 3-7 3-7 3-7 3-7 3-9 3-9 3-9 3-9 3-9 3-9 3-9 3-9 3-9 3-9 3-9 3-9 3-9 3-9 3-9 3-9 3-9 3-9 3-9 3-9 3-9 3-9 3-9 3-9 3-7 3-7 3-7 3-7 3-7 3-7 3-7 3-7 3-7 3-7 3-7 3-7 3-7 3-7 3-7 3-7 3-7 3-7 3-7 3-7 3-7 3-7 3-7 3-7 3-6 3-6 3-6 3-6 3-6 3-6 3-6 3-6 3-6 3-6 3-6 3-6 3-6 3-6 3-6 3-6 3-6 3-6 3-6 3-6 3-6 3-6 3-6 3-6 3-8 3-8 3-8 3-8 3-8 3-8 3-8 3-8 3-8 3-8 3-8 3-8 3-8 3-8 3-8 3-8 3-8 3-8 3-8 3-8 3-8 3-8 3-8 3-8 3-6 3-6 3-6 3-6 3-6 3-6 3-6 3-6 3-6 3-6 3-6 3-6 3-6 3-6 3-6 3-6 3-6 3-6 3-6 3-6 3-6 3-6 3-6 3-6 3-5 3-5 3-5 3-5 3-5 3-5 3-5 3-5 3-5 3-5 3-5 3-5 3-5 3-5 3-5 3-5 3-5 3-5 3-5 3-5 3-5 3-5 3-5 3-5 3-8 3-8 3-8 3-8 3-8 3-8 3-8 3-8 3-8 3-8 3-8 3-8 3-8 3-8 3-8 3-8 3-8 3-8 3-8 3-8 3-8 3-8 3-8 3-8 3-5 3-5 3-5 3-5 3-5 3-5 3-5 3-5 3-5 3-5 3-5 3-5 3-5 3-5 3-5 3-5 3-5 3-5 3-5 3-5 3-5 3-5 3-5 3-5 3-7 3-7 3-7 3-7 3-7 3-7 3-7 3-7 3-7 3-7 3-7 3-7 3-7 3-7 3-7 3-7 3-7 3-7 3-7 3-7 3-7 3-7 3-7 3-7 3-5 3-5 3-5 3-5 3-5 3-5 3-5 3-5 3-5 3-5 3-5 3-5 3-5 3-5 3-5 3-5 3-5 3-5 3-5 3-5 3-5 3-5 3-5 3-5 3-4 3-4 3-4 3-4 3-4 3-4 3-4 3-4 3-4 3-4 3-4 3-4 3-4 3-4 3-4 3-4 3-4 3-4 3-4 3-4 3-4 3-4 3-4 3-4 3-6 3-6 3-6 3-6 3-6 3-6 3-6 3-6 3-6 3-6 3-6 3-6 3-6 3-6 3-6 3-6 3-6 3-6 3-6 3-6 3-6 3-6 3-6 3-6 3-9 3-9 3-9 3-9 3-9 3-9 3-9 3-9 3-9 3-9 3-9 3-9 3-9 3-9 3-9 3-9 3-9 3-9 3-9 3-9 3-9 3-9 3-9 3-9 3-5 3-5 3-5 3-5 3-5 3-5 3-5 3-5 3-5 3-5 3-5 3-5 3-5 3-5 3-5 3-5 3-5 3-5 3-5 3-5 3-5 3-5 3-5 3-5 3-9 3-9 3-9 3-9 3-9 3-9 3-9 3-9 3-9 3-9 3-9 3-9 3-9 3-9 3-9 3-9 3-9 3-9 3-9 3-9 3-9 3-9 3-9 3-9 3-6 3-6 3-6 3-6 3-6 3-6 3-6 3-6 3-6 3-6 3-6 3-6 3-6 3-6 3-6 3-6 3-6 3-6 3-6 3-6 3-6 3-6 3-6 3-6 3-2 3-2 3-2 3-2 3-2 3-2 3-2 3-2 3-2 3-2 3-2 3-2 3-2 3-2 3-2 3-2 3-2 3-2 3-2 3-2 3-2 3-2 3-2 3-2 3-5 3-5 3-5 3-5 3-5 3-5 3-5 3-5 3-5 3-5 3-5 3-5 3-5 3-5 3-5 3-5 3-5 3-5 3-5 3-5 3-5 3-5 3-5 3-5 3-2 3-2 3-2 3-2 3-2 3-2 3-2 3-2 3-2 3-2 3-2 3-2 3-2 3-2 3-2 3-2 3-2 3-2 3-2 3-2 3-2 3-2 3-2 3-2 3-8 3-8 3-8 3-8 3-8 3-8 3-8 3-8 3-8 3-8 3-8 3-8 3-8 3-8 3-8 3-8 3-8 3-8 3-8 3-8 3-8 3-8 3-8 3-8 3-2 3-2 3-2 3-2 3-2 3-2 3-2 3-2 3-2 3-2 3-2 3-2 3-2 3-2 3-2 3-2 3-2 3-2 3-2 3-2 3-2 3-2 3-2 3-2 3-6 3-6 3-6 3-6 3-6 3-6 3-6 3-6 3-6 3-6 3-6 3-6 3-6 3-6 3-6 3-6 3-6 3-6 3-6 3-6 3-6 3-6 3-6 3-6 3-4 3-4 3-4 3-4 3-4 3-4 3-4 3-4 3-4 3-4 3-4 3-4 3-4 3-4 3-4 3-4 3-4 3-4 3-4 3-4 3-4 3-4 3-4 3-4 3-8 3-8 3-8 3-8 3-8 3-8 3-8 3-8 3-8 3-8 3-8 3-8 3-8 3-8 3-8 3-8 3-8 3-8 3-8 3-8 3-8 3-8 3-8 3-8 3-4 3-4 3-4 3-4 3-4 3-4 3-4 3-4 3-4 3-4 3-4 3-4 3-4 3-4 3-4 3-4 3-4 3-4 3-4 3-4 3-4 3-4 3-4 3-4 3-7 3-7 3-7 3-7 3-7 3-7 3-7 3-7 3-7 3-7 3-7 3-7 3-7 3-7 3-7 3-7 3-7 3-7 3-7 3-7 3-7 3-7 3-7 3-7 3-2 3-2 3-2 3-2 3-2 3-2 3-2 3-2 3-2 3-2 3-2 3-2 3-2 3-2 3-2 3-2 3-2 3-2 3-2 3-2 3-2 3-2 3-2 3-2 3-9 3-9 3-9 3-9 3-9 3-9 3-9 3-9 3-9 3-9 3-9 3-9 3-9 3-9 3-9 3-9 3-9 3-9 3-9 3-9 3-9 3-9 3-9 3-9 3-2 3-2 3-2 3-2 3-2 3-2 3-2 3-2 3-2 3-2 3-2 3-2 3-2 3-2 3-2 3-2 3-2 3-2 3-2 3-2 3-2 3-2 3-2 3-2 3-7 3-7 3-7 3-7 3-7 3-7 3-7 3-7 3-7 3-7 3-7 3-7 3-7 3-7 3-7 3-7 3-7 3-7 3-7 3-7 3-7 3-7 3-7 3-7 3-4 3-4 3-4 3-4 3-4 3-4 3-4 3-4 3-4 3-4 3-4 3-4 3-4 3-4 3-4 3-4 3-4 3-4 3-4 3-4 3-4 3-4 3-4 3-4 3-9 3-9 3-9 3-9 3-9 3-9 3-9 3-9 3-9 3-9 3-9 3-9 3-9 3-9 3-9 3-9 3-9 3-9 3-9 3-9 3-9 3-9 3-9 3-9 3-4 3-4 3-4 3-4 3-4 3-4 3-4 3-4 3-4 3-4 3-4 3-4 3-4 3-4 3-4 3-4 3-4 3-4 3-4 3-4 3-4 3-4 3-4 3-4 3-10 3-10 3-10 3-10 3-10 3-10 3-10 3-10 3-10 3-10 3-10 3-10 3-10 3-10 3-10 3-10 3-10 3-10 3-10 3-10 3-11 3-11 3-11 3-11 3-11 3-11 3-11 3-11 3-11 3-11 3-11 3-11 3-11 3-11 3-11 3-11 3-11 3-11 3-11 3-11 3-12 3-12 3-12 3-12 3-12 3-12 3-12 3-12 3-12 3-12 3-12 3-12 3-12 3-12 3-12 3-12 3-12 3-12 3-12 3-12 3-14 3-14 3-14 3-14 3-14 3-14 3-14 3-14 3-14 3-14 3-14 3-14 3-14 3-14 3-14 3-14 3-14 3-14 3-14 3-14 3-15 3-15 3-15 3-15 3-15 3-15 3-15 3-15 3-15 3-15 3-15 3-15 3-15 3-15 3-15 3-15 3-15 3-15 3-15 3-15 3-16 3-16 3-16 3-16 3-16 3-16 3-16 3-16 3-16 3-16 3-16 3-16 3-16 3-16 3-16 3-16 3-16 3-16 3-16 3-16 3-17 3-17 3-17 3-17 3-17 3-17 3-17 3-17 3-17 3-17 3-17 3-17 3-17 3-17 3-17 3-17 3-17 3-17 3-17 3-17 3-18 3-18 3-18 3-18 3-18 3-18 3-18 3-18 3-18 3-18 3-18 3-18 3-18 3-18 3-18 3-18 3-18 3-18 3-18 3-18 3-19 3-19 3-19 3-19 3-19 3-19 3-19 3-19 3-19 3-19 3-19 3-19 3-19 3-19 3-19 3-19 3-19 3-19 3-19 3-19 3-18 |
1 #1
21
22
aaii iia aie 1 1 1 1 1 1 1 1 1 1 1 1 1 1 1 1 1 1 1 1 1 1 1 1 1 1 1 1 1 1 1 1 1 1 1 1 1 23
LgSla glaolalwl jie
24
25
26
27
ailll llll aolll o jao gabalb o juao 28
3 sdoj jsi 4s jil 3 sdoal oaii i 3o jisi yia jai jaiy
Aolizilol alolgo
ablabl ojuc/ooia#2
Jdall g pcl l 10000000000000000000000000000000000000000000000000000000000000
30
31
aannn 2020132
a 33
| العربية 30 | العربية 15 | العربية |
| العربية 31 | العربية 16 | العربية 1 |
| العربية 32 | العربية 17 | العربية 2 |
| العربية 33 | العربية 18 | العربية 3 |
| العربية 34 | العربية 19 | العربية 4 |
| العربية 35 | (العربية 20) | العربية 5 |
| العربية 36 | العربية 21 | العربية 6 |
| العربية 37 | العربية 22 | العربية 7 |
| العربية 38 | العربية 23 | العربية 8 |
| العربية 39 | العربية 24 | العربية 9 |
| العربية 40 | العربية 25 | العربية 10 |
| العربية 41 | العربية 26 | العربية 11 |
| (العربية) | العربية 27 | العربية 12 |
| العربية الحرفية | العربية 28 | العربية 13 |
| العربية 29 | العربية 14 |
15
.0e 2
acllll jiee oolil g o jglalg c0ll
AaBbAc Cale wJie oJil JSe 4
5
(1) all 150000000000000000000000000000000000000000000
baa 2jall cgl pi
Cleal
7
8
acllll oolil ooc oolg jolgldall
Aa aclll 1000 000000000000000000000000000000
E1j山j
(0) 1
jll jll 2
(3)
Jawd Jil
5
S BCD = S COD + S BDO - S BOC
13131
10
11
jai 1 jil 1 1 1 1 1 1 1 1 1 1 1 1 1 1 1 1 1 1 1 1 1 1 1 1 1 1
e 1g jdl jdl jdl jdl (1
alg yllal alalal alalal alalal
a 1 a 1 1 1 1 1 1 1 1 1 1 1 1 1 1 1 1
Juaui 1 Jia aie 2
4 1