24393 - Electric coffee maker RUSSELL HOBBS - Free user manual and instructions
Find the device manual for free 24393 RUSSELL HOBBS in PDF.
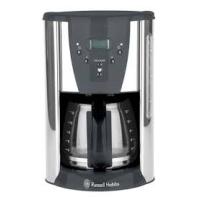
| Product type | Electric coffee maker |
| Brand | Russell Hobbs |
| Model | 24393 |
| Capacity | 10 large cups (125 ml) or 15 small cups (83 ml) |
| Filter type | Paper filter No. 4 (not included) |
| Main functions | Delayed programming, keep warm, auto shut-off |
| Display | Digital display with 24-hour clock |
| Keep warm | Approximately 40 minutes |
| Auto shut-off | Yes, after 40 minutes |
| Anti-drip valve | Yes, allows removing the carafe during brewing |
| Carafe | Glass, with lid and handle |
| Coffee scoop included | Yes |
| Cleaning | Carafe and filter holder dishwasher safe (top rack) |
| Safety | Auto shut-off, hot surfaces, use by children aged 8 and above under supervision |
| Included accessories | Carafe, filter holder, coffee scoop |
Frequently Asked Questions - 24393 RUSSELL HOBBS
User questions about 24393 RUSSELL HOBBS
0 question about this device. Answer the ones you know or ask your own.
Ask a new question about this device
Download the instructions for your Electric coffee maker in PDF format for free! Find your manual 24393 - RUSSELL HOBBS and take your electronic device back in hand. On this page are published all the documents necessary for the use of your device. 24393 by RUSSELL HOBBS.
USER MANUAL 24393 RUSSELL HOBBS
Read the instructions, keep them safe, pass them on if you pass the appliance on. Remove all packaging before use.
IMPORTANT SAFEGUARDS
Follow basic safety precautions, including:
This appliance can be used by children aged from 8 years and above and persons with reduced physical, sensory or mental capabilities or lack of experience and knowledge if they have been supervised/instructed and understand the hazards involved.
Children shall not play with the appliance.
Cleaning and user maintenance shall not be done by children unless they are older than 8 and supervised.
Keep the appliance and cable out of reach of children under 8 years.
Misuse of the appliance may cause injury.
The surfaces of the appliance will get hot. Residual heat will keep the surfaces hot after use.
Do not use this appliance near bathtubs, showers, basins or other vessels containing water.
If the cable is damaged, it must be replaced by the manufacturer, its service agent, or someone similarly qualified, to avoid hazard.
The surface of the heating element is subject to residual heat after use.
Use the appliance according to these instructions. Any misuse may cause potential injury, electric shock or other hazards.
This appliance can be used by persons with reduced physical, sensory or mental capabilities or lack of experience and knowledge if they have been given supervision or instruction concerning use of the appliance in a safe way and understand the hazards involved.
This appliance is intended to be used in household and similar applications such as:
staff kitchen areas in shops, offices and other working environments;
by clients in hotels, motels and other residential type environments;
- bed and breakfast type environments;
farm houses.
- Sit the appliance on a stable, level, heat-resistant surface.
- Keep the appliance and cable away from the edges of worktops.
- Don't use accessories or attachments other than those we supply.
- Don't use the appliance for any purpose other than those described in these instructions.
- Don't use the appliance if it's damaged or malfunctions.
PARTS
- Lid
- Water reservoir
- Paper filter #4 (not supplied)
- Filter holder
-
Water gauge
-
Hot plate
- Carafe
- Scoop
Dishwasher - top rack
BEFORE USING FOR THE FIRST TIME
Fill the reservoir to the max mark, and run the appliance without coffee.
FILLING
- Remove the carafe from the hotplate.
- Open the lid.
- Fill the reservoir with the exact amount of water required. Note that the brewing process will use all of the water that you put in the reservoir.
- Make sure that the filter holder is pressed down all the way into position. It will click when correctly installed.
- Put a #4 paper filter into the filter holder.
- The reservoir is calibrated to give 10 large cups (at 125ml per cup) and 15 small cups (at 83ml per cup). For each large cup, add 6g of ground filter coffee and for each small cup add 4g.
- Close the lid.
- Replace the carafe on the hotplate.
SET THE CLOCK
It isn't necessary to set the clock to use your coffee maker but you will need to set it if you want to use the timer functions.
- Put the plug into the power socket.
- Use the hr and min buttons to set the correct time in 24 hour format.
The clock will retain its settings until the coffee maker is unplugged. - To change the time, press the button. The time will flash. Use the hr and min buttons to set the new time. If you don't press either the hr or min buttons within 3 seconds, the coffee maker will revert to normal, and the current time will show.
MAKING COFFEE
- Press the button - the icon will appear on the display.
- Shortly afterwards, coffee will start to drip into the carafe.
- If you want to stop the coffee maker while it's brewing, press the button.
- Once brewed, the hotplate will keep the carafe warm for up to 40 minutes.
USING THE TIMER
Note: Make sure the clock is set to the correct time. Use the h and min buttons.
- Set the timer to the time you want to start brewing.
a) Press and hold the button until the icon flashes on the display.
b) Use the h and min buttons to set the time you want brewing to start.
If you don't press either the hr or min buttons within 3 seconds, the coffee maker will revert to normal, and the current time will show. Press the ① button to start again.
- When the time is programmed, press the button. The ① icon will appear on the display. Your coffee maker is now set to make coffee at the selected time.
- If you want to check the program time press the ① button. The programmed time will show for 3 seconds and then return to the time of day.
If you want to cancel the timer before brewing has started, press the button.
If you want to stop the coffee maker while it's brewing, press the button.
KEEP WARM/AUTO SHUT-OFF
- Your coffee maker will keep the coffee warm for about 40 minutes.
- 40 minutes after brewing your coffee maker will shut down and the time of day will be displayed.
- To wake the appliance, press the min button.
A QUICK CUP
If you want a quick cup of coffee before the brewing cycle has finished:
- You can remove the carafe at any time. The non-drip valve will prevent coffee dripping on to the hotplate.
- To prevent the filter holder overflowing, replace the carafe on the hotplate within about 20 seconds.
- When you replace the carafe on the hotplate the non-drip valve opens to let any remaining coffee through.
CARE AND MAINTENANCE
- Unplug the appliance and let it cool.
- Tip the contents of the filter holder into the bin.
- Wipe all surfaces with a clean damp cloth.
- Press the lever at the rear of the carafe lid, above the handle, to open the carafe lid.
- Hand wash the carafe and filter holder.
- Replace the filter holder. Make sure that the filter holder is pressed down all the way into position. It will click when correctly installed.
- Close the lid, and press down to lock it.

You may wash these parts in the top rack of a dishwasher.
RECYCLING
To avoid environmental and health problems due to hazardous substances, appliances and rechargeable and non-rechargeable batteries marked with one of these symbols must not be disposed of with unsorted municipal waste. Always dispose of electrical and electronic products and, where applicable, rechargeable and non-rechargeable batteries, at an appropriate official recycling/collection point.
BEHANDLING OG VEDLIKEHOLD
BAXHbIE MEPbI PNEOCTOPOXHOCTN
CneyuTe OCHOBbIM INHCTpyKzIyMa IIO 6e3OpaacHOCTN, BKJIouaY CneyuUoJe:
IcnoB3OBAHne DaHHoro yCTpoiCTBa DeTbMn CTapSe 8 JeT, NuaAMN COrpaHnueHHbIMN
fN3UeCKIMN, CeHCOPbIMN UIN YMCtBeHHbIMN CNOcO6HOCTaMn, HeIOCTaTKOM ONbTa UIN 3HaHNI
DOnyckaeTcR Prn ycNoBmKoHTpOJIa INN HcTpPyKTaJka INOC03HaHnC BRe3aHHbIX PNCOB.
TeTAM 3anpeSeHoIrpaTB c yCTpoiCTBOM.
OuCTky u 6cnyxmbaHne yctpoiCTBa MOrTy BblonHrTb DeTn Ctapwe 8 let npu ycNoBmHa6IIOeHnB3pOcNbIM.
XpaHnTe yctpoiCTBO n Ka6eIb B HeIoOCTyINHom dIa DeTei Do 8 Iet MeCTe. HenpaBnJIbHOe NcPONb3OBAHne PpN6Opa MoKET PpNBecTNI K TpaBMe.
Поверхноctи пибopa harpeBaIoTc.3a cuet octatoUHOro tenla nobepxhoCTn 6ydt OCTaBaTbcr ropaUMN nocle uCnoIb3OBAHn.
EcnI Ka6eJIb NOBpeKJeH, OH DoJIkeH 6bITb 3aMeHeH npOu3BOJnteJIeM, cepBnCHbIM aReHTOM nI IN dpyrIM KBAJIuΦNtUPOBaHHbIM IINcOM IJnI pPeDToBpaUeHnAOnACHOCTn.
Поверхноctь HarpeBaTeIbHOrO ΘeMeHToA OCTaetc r Oropaye Ee B TeueHne HeKOTOpRo BpeMeHn Pocle nCNoJIb30BaHnЯ np6opa.
IcnoIb3yTe np6Op B COOTBeTCTBm C npuBeHeHbIMn IHCTpyKzmaMn. HenpaBnIbHOe IcNoIb3OBAHne np6Opa MoKeT npuBeCTn K TpaBMe, IpopaKeHnIO 3JeKtpnuCeKM TOkOM IN BO3HNKHOBeHnIO DpynX ONaChbIX CNTyaUm.
IcnoB3oBaHne daHHoro yctpoCTBa IuCaMn C OgraHnueHHbIMn fN3nueCKIMn, ceHCOPHBIMn IyMCTBeHHbIMn CnOC6HOCTaMn, HeOCTaTKOM OblTa NII 3HaHm DOnyCKaTc npN yCIOBm KOHTpOJI INI INHCTpyKtJxA NO 6e3ONaCHO EKcPnyatauIN yCTpoCTBa N OCO3HaHnI CONyTCTByUOxN pxCKOB.
Даньий пибор педазачehдя Экплуataци B Домаших усовяи яи саналогиных 6обачх пимен,在В ТOM чспь В седуш: [ \text{ПИС} = \frac{\text{ПИС}}{\text{S}} = \frac{\text{S}}{\text{S}} = \frac{\text{S}}{\text{S}} = \frac{\text{S}}{\text{S}} = \frac{\text{S}}{\text{S}} = \frac{\text{S}}{\text{S}} = \frac{\text{S}}{\text{S}} = \frac{\text{S}}{\text{S}} = \frac{\text{S}}{\text{S}} = \text{S} ]
- INHdNkaTOp yPoBn BOdbI
IPEEINEPBbIMNCIOJIb3OBAHHeMIPN6OPA
HanoHnTepe3epByap BDOJdo MaKcImaJIbHOI OTMeTKn (max) u BKJIouChTe pIu6Op 6e3 KoFe.
HANOJIHEHNE
- Chmnte pe3epByap c noctabKn.
- OTKpoIe KpbIiKy.
- 3aŋoJIHnɪt b eMkoCTb HxhKbIM KOJIueCTbOM BODbl. O6paTnte BHNImaHne, yTo B npOceCep npriTOBHeHnI 6yJeT NcNoJIb3ObAtbCra BcA BoDa, KOTopAЯ ectb B pe3epeByape.
- y6eHntecb, yTO dePkataB fNbTpa HaaT do ynopa. DOnJxeh nocblwaTbcra xapaKtepHbI uenQK, O3Haauoui, yTO yCTaHOBA BbINONHeHa npaBInbHO.
- PackpoTe 6ymaXnHbI ΦnIbTp #4 n IomecTneIeeroB depXaTeIb ΦnIbTaPa.
- Pe3epByap oTKaIIN6pOBaH ha npriroTOBnEHeH 12 60JIbIX (125 mHa yauKy) n 18 MaJeHbKnx YauKe KoFe (83 mHa yauKy). IOpabIaIe Tno 6 r MonOTOro KoFe Ha KaJyU 60JIbUyU yauKy n 4 r Ha KaJNyU ManyU yauKy.
- 3akpoTe KpbIshky.
- YctaHOBHTe rpaΦnHaNoCTaBky.
HACTPOIKA YACOB
HacpoiKa yacob Heo63aTeIbHa IJI NcIOJIb3OBaHnja KoΦeBapKn, HO HuxHa IJI POJIb3OBaHnja YHKUJMAu TaIMepa.
- BctaBbTe BnIky B po3ETky.
- IyctahOBKn npabnBbIX noka3aTee BpeMeHn B 24-ycobom fOpMaTe NcnoB3ynte KhoIkn hr (4) n min (MnH).
- Yacbyt coxpaHantb CBOE 3NaueHne, noka KoΦeBapKa OTKJIuOHeA OT CETN.
Дяизменизауень Вретени Нжмite Кноку 念 3haeонe Вретени 3amiraet.Дяуctановки HOBOrO 3haeони Вретени ИспolyзуITE KhoIGNK hr (u min(MH).EcIn He haxmatabКлавиш hr (часы) Или Клавиш min (MHytbl)В тeуне 3cekyH, Koфеварka BephetcB pexim «normal» (obbyhni),и оTo6pa3ntcyrвретя.
ПРИROTOВЛЕHNE KOФЕ
- Haxmnte n OTnyctnte KhoNkky. Ha dinJIee OTo6pa3ntcra
- Ypee3 HeKOTOpoe BpemKa Kofoe HaHcT KaNaTb B pe3epByap.
-
EcnH NyKHO octaHOBNTb pa60Ty KofoEBapKn BO Bpemn pnoceca npiroTOBneHn Kofo, HaxMnte KhoNky
-
После того кak kofoe 6удт заварен, поставka 6удт до 40 минут падогревыг рафин, утобы оюстався теллblm.
NCHOJIb3OBAHNE TAIIMEPA
Y6eIntecb, YTo Ha Yaacax BbICTaBHeNo npaBnIbHoe Bpem. IcnoIb3yIte KhoNk nhr (u) n min (mH).
1.ДЯTOROyTO6bHaHauTb nprirotOBJIeHne Kofo,ycTaHOBnTe HxKHOe BpeMa Ha TaIMepe.
a) Haxmnte u yedepxkBaTe KhoNky ①, noka 3naOc ① He naHHeT MnTaTb Ha dncnlee.
b) C n o m o u s b i o K h o n o k h r n min 3 a d a i T e B p e m H a y a n a p n i r o T O B l e H N K o f e.
EcnHn HaxmTaB KnaBnUy hr (4) nnn KnaBnUy min (MnH) B TeueHne 3 cekynd, KoefeBaPka BepHeTcB pexIm «normal» (Obchh), n OTo6pa3ntcBpeMa. ChOba HaxmTe n ydepXnBaIte KhoNky
- После того кak Bby 3адали Врем,нжмп Te KhoIGNky. Ha dinciпee OTO6pa3ntc 3haOK ①. Tenepb Koфеварka HabtroeHa H nprirotoblenhe KofoeВ 3adahHoe Врем.
Дя npOBePKI 3aHaHHOrO BpeMeHn HaxMnte I OTNyCTnTe KHOJNKU ① .3aHaHHoe BpeM6yEdTo6paKaTbCBy TeueHeNc 3cekyH, nocJe Yero ChOBA OTO6pa3ntc TKeKyUee BpeM cyTok.
Дясбра таймера пени на ри�отовлий НжмITE KhoIGNky
EcnH NyKHO octaHOBnTb pa6OTo KoΦeBaPkn BO BpEm npOceCa npriGToBneHn KoΦe, HaxMnte KhoNk Ky.
ABTOMATUÇECKOE OTKJIQUÇEHNE/HEAKTÜBHBi'PEXUM
- KoΦeBaPka 6yIeT B TeueHne 40 MmHT POnIepKuBaT TeMpepaTy KoΦe.
- Yepe3 40 MmHyT nocIe npiroTOBHeHnKoΦeBapKa BbIKLIOHTcR, I OTo6pa3NTcTeKyuIeBpemcyTOK.
3.ДЯ BOZBpaueHnY uCtpoNCTBa n3 cnIaIeRo pexIma HaxMITE KHOIIky min.
БыICTРЯ YAWKA
EcnHnoeOxmo 6bictpo HauNTb Haunbky Kofo do 3aBepseHna zukn npiroTOBneHnA:
- Bbl mojte cHrtb rpaHn B IIO6oe Bpemr. HenoTeKaIounn KlaanH He doynyckaet nopaHn KaJIeB KoFe Ha NoCTaBky.
- YtobIepeKaTeJIbHtpa He npepoNnHcra, BepHnte rpaΦHnHa nOndTaBky B TeueHme 20 cekyHd.
- Ipn yctaHOBKe rpaΦuHa Ha MeCTO HeNoTeKaUoIe KlaPAn OTKPoETcA, YTObI CInTb OCTaTK KoΦe.
YXOДИОБСЛУЖИBAHINE
- OTKHIOUHTe np6op ot po3eTkn n daIte emy octbITb.
- Bb6pcbTe coepxHmoe depkaTena mibtpa B mycOpHoe BeIpo.
- IpoToPte NOBepXHOCTb YIcTcBnBIAJHOnTKaHbIO.
- Haxmnte Ha pbyar Ha 3aDneh CTOpHe KpbIshKn rpaΦHa, Had pyuKo IJra TORO, YTO6bl OTKpbITb KpbIshKy rpaΦHa.
5.ДержateNBФиltpaIrgaΦHnCneJeYeTMbITbBpyHyIO. - YctaHOBInTe DepeKAteIb fHbIbTpHa MeCTo. U6eINTeCb, TTo DepeKAteIb fHbIbTpHa HaxaTdo ynpa. IOnJxeh NocblbTaBcXapaKtepHbI ueJIyOK, O3HaauOuI, TTO YCTaHOBKa BbIOnJIHeHa PpaBnIbHO.
- 3akpoTe KpbIuKy u npnxMnte ee do 3aueKnBaHna.
Tn DeTaNMOXHOMbITb Ha BepxHne NOnKe NocyDOMOeHNO MaINHBI.

ПОВТОРHA ПЕPEPAБOTKA


Bo n36eKaHHe BO3dEiCTBnB BpeNbIbX BeueCTB Ha OKpyxHaOuSyU cpey I 3OpOBBe np6Opbl N 6bTapeN Ondopa3OBOro Nm MHOropa3OBOro NcNoIb3OBaHn, NOMEueHhIbe OndHM N3 3Tnx CmBOJOB, Heo6xoJIMo yTuINl3InpOBA Tb OTDeJIbHOOT HecOpTnPOBaHHbIX 6bITobbIX 0TxODOB. O6raTeJIbHO yTuINl3nPyUte JNeKTPnueCKe N 3JeKTPoHbHle N3dEJIa, a TAKKe (ecnn 3TO npMmeHMo) 6bTapeN Ondopa3OBOro Nm MHOropa3OBOro NcPOnb3OBaHn B COOTBeTCTByUOxNx OfNiuaJIbHbIX PYNKTax NOBtOPHO nepepa60TK / c6Oba OTxODOB.
IPIN AINO THN IPQTH XPHSE
Teiote to doxieio vepou uexpi Tny evdeiEg n staOmc max kai theste oe laitoupyia tn ouokun xwpic va npootheote kafe.
IIAHPQeH
XPHESH TOY XPONODIAKONTH
a a a a a a a a a a a a a a a a a a a a a a a a a
jiall lal 4 jaiy jiall .5
Jkl jlll 83 15 (j k Jk jll 125 10 10
4 4
a_b = 1
.8
aowll b
ailll 1iis
.1
24 25
aegell jiejuee pi jllgldlae aeell baii
- 12.
(slc) "normal" 5 n j 5 (acl) min j j b
· = 14 ( + ) ^2 - ( ^2 - ^2) ^2
o g a l l
auiuui 1
.2
jll bial (y) 1000 Jao Lgai oai ai aia
40 1 Jaa aal llae yraaie Ile lae alae. 2 1 jia jla .4
Cgall
(4a)min,(4clw)hrnurjydljduuul.
1
a
Jy aagdall aellal binal min aagdall hr aeall gjzis
"normal" 3 3 (a) min j j (aclw) hr jj baij l
① \�
aalldgaiiaiaiaiaiaiaiaiaiaiaiaiaiaiaiaiaiaiaiaiaiaiaiaiaiaiaiaiaiaiaiaiaiaiaiaiaiaiaiaiaiaiaiaiaiaiaiaiaiaiaiaiaiaiaiaiaiaiaiaiaiaiaiaiaia
aai
3 120000000000000000000000000000000000000
Aagaae gci 120000000000000000000000000000000000000000000
.1
.2
aBj 3
.4
Jalal Joljol jol 5
glaljai jai iagw. gaila Sg Jaiyall Jala gl biaial jao aai Ailal jali Jala .6
aaii
.7
jgl jg jgi jilal Jolaj jilai jll jilal