26160-56 - Electric coffee maker RUSSELL HOBBS - Free user manual and instructions
Find the device manual for free 26160-56 RUSSELL HOBBS in PDF.
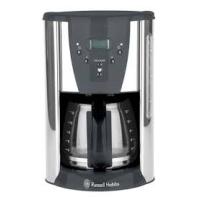
| Product type | Electric coffee maker |
| Brand | Russell Hobbs |
| Model | 26160-56 |
| Capacity | 12 large cups (125 ml) or 18 small cups (83 ml) |
| Main functions | Programmable timer, coffee strength adjustment, keep warm (40 min), auto shut-off, anti-drip valve, clock |
| Filter type | Paper filter #4 (not included) |
| Carafe material | Glass |
| Hot plate | Yes, keeps warm |
| Power supply | 220-240 V, 50 Hz (standard estimate) |
| Power consumption | 900-1000 W (standard estimate) |
| Dimensions (approx.) | 30 x 20 x 35 cm (estimate) |
| Weight (approx.) | 2.5 kg (estimate) |
| Care and cleaning | Carafe and filter basket are dishwasher safe (top rack); wipe surfaces with a damp cloth |
| Descaling | Indicator after 60 cycles; use a descaler suitable for plastics |
| Safety | Hot surface, cable replaceable by professional, use by children under supervision |
| Spare parts available | Carafe, filter basket, lid |
| Repairability | Contact the manufacturer or an authorized technician |
Frequently Asked Questions - 26160-56 RUSSELL HOBBS
User questions about 26160-56 RUSSELL HOBBS
0 question about this device. Answer the ones you know or ask your own.
Ask a new question about this device
Download the instructions for your Electric coffee maker in PDF format for free! Find your manual 26160-56 - RUSSELL HOBBS and take your electronic device back in hand. On this page are published all the documents necessary for the use of your device. 26160-56 by RUSSELL HOBBS.
USER MANUAL 26160-56 RUSSELL HOBBS
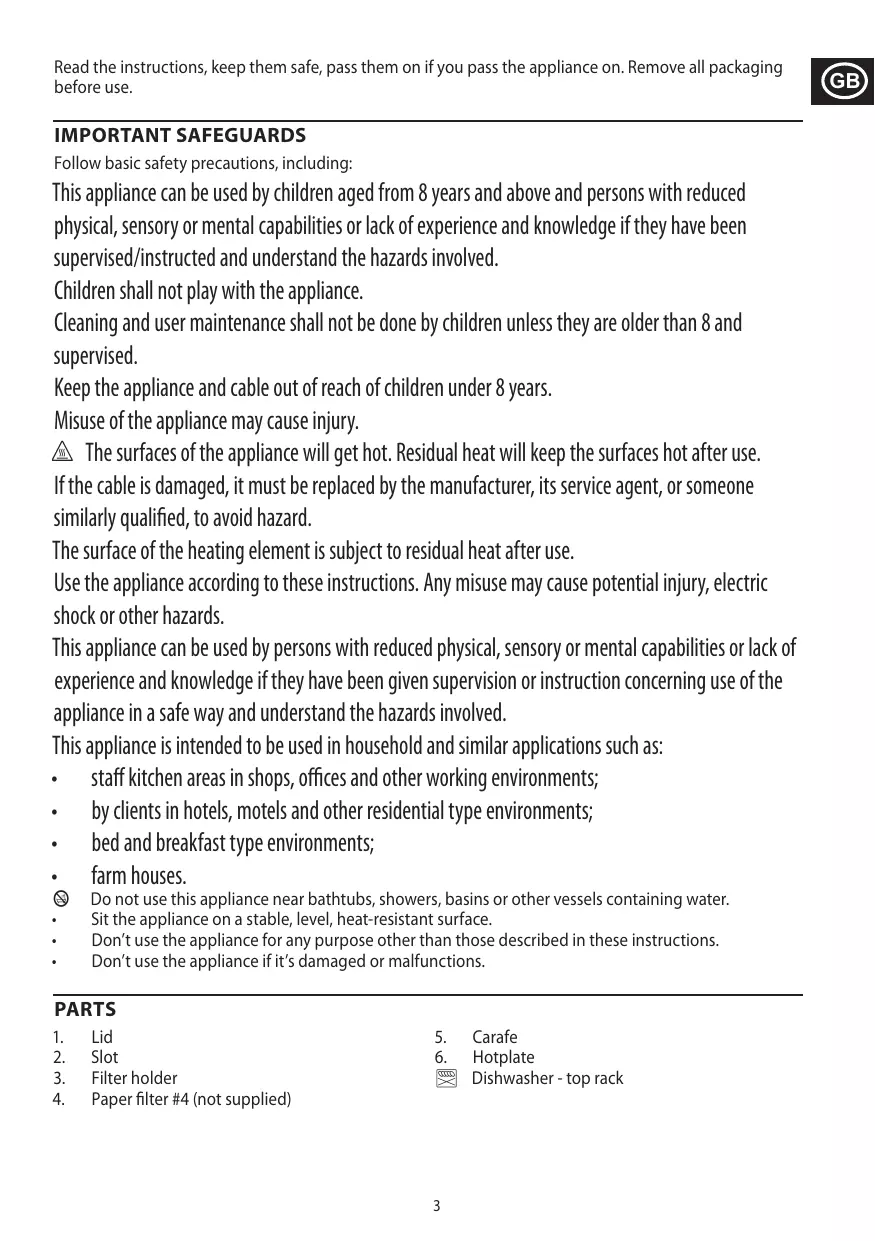
Read the instructions, keep them safe, pass them on if you pass the appliance on. Remove all packaging before use.

IMPORTANT SAFEGUARDS
Follow basic safety precautions, including:
This appliance can be used by children aged from 8 years and above and persons with reduced physical, sensory or mental capabilities or lack of experience and knowledge if they have been supervised/instructed and understand the hazards involved.
Children shall not play with the appliance.
Cleaning and user maintenance shall not be done by children unless they are older than 8 and supervised.
Keep the appliance and cable out of reach of children under 8 years.
Misuse of the appliance may cause injury.
The surfaces of the appliance will get hot. Residual heat will keep the surfaces hot after use.
If the cable is damaged, it must be replaced by the manufacturer, its service agent, or someone similarly qualified, to avoid hazard.
The surface of the heating element is subject to residual heat after use.
Use the appliance according to these instructions. Any misuse may cause potential injury, electric shock or other hazards.
This appliance can be used by persons with reduced physical, sensory or mental capabilities or lack of experience and knowledge if they have been given supervision or instruction concerning use of the appliance in a safe way and understand the hazards involved.
This appliance is intended to be used in household and similar applications such as:
staff kitchen areas in shops, offices and other working environments;
by clients in hotels, motels and other residential type environments;
- bed and breakfast type environments;
farm houses.
Do not use this appliance near bathtubs, showers, basins or other vessels containing water.
- Sit the appliance on a stable, level, heat-resistant surface.
- Don't use the appliance for any purpose other than those described in these instructions.
- Don't use the appliance if it's damaged or malfunctions.
PARTS
- Lid
- Slot
- Filter holder
-
Paper filter #4 (not supplied)
-
Carafe
- Hotplate
Dishwasher - top rack
BEFORE USING FOR THE FIRST TIME
Fill the reservoir to the max mark, and run the appliance without coffee.
FILLING
- Remove the carafe from the hotplate.
- Open the lid.
- Fill the reservoir with the exact amount of water required. Note that the brewing process will use all of the water that you put in the reservoir.
- Make sure that the filter holder is pressed down all the way into position. It will click when correctly installed.
- Put a #4 paper filter into the filter holder.
- The reservoir is calibrated to give 12 large cups (at 125ml per cup) and 18 small cups (at 83ml per cup). For each large cup, add 6g of ground filter coffee and for each small cup add 4g.
- Close the lid.
- Replace the carafe on the hotplate.
SET THE CLOCK
It isn't necessary to set the clock to use your coffee maker but you will need to set it if you want to use the timer functions.
- Put the plug into the power socket.
- Use the h and min buttons to set the correct time in 24 hour format.
The clock will retain its settings until the coffee maker is unplugged.
COFFEE STRENGTH
Pressing the button will make the brewed coffee slightly stronger. You can also use it if you are only brewing a partial carafe of coffee (i.e. not completely filling the reservoir). Your coffee maker will then alter the brewing process so your coffee will have about the same strength as it would if you had made a full carafe.
MAKING COFFEE
Note: If you want to use the coffee strength feature press the button before pressing the button. The button will light up.
- Press the button - the icon will appear on the display. The button will light up.
- Shortly afterwards, coffee will start to drip into the carafe.
- If you want to stop the coffee maker while it's brewing, press the button.
- Once brewed, the hotplate will keep the carafe warm for up to 40 minutes.
USING THE TIMER
Note: Make sure the clock is set to the correct time. Use the h and min buttons.
- Set the timer to the time you want to start brewing.
a) Press the button.
b) Use the h and min buttons to set the time you want brewing to start.
If you don't press either the h or min buttons within 5 seconds, the coffee maker will revert to "normal", and the current time will show. Press the button to start again.
- When the time is programmed, press the button. The ① button will light up and the ① icon will appear on the display. Your coffee maker is now set to make coffee at the selected time.
- If you want to use the coffee strength feature when using the timer, press the button now. The button will light up.
If you want to cancel the timer before brewing has started, press the button.
If you want to stop the coffee maker while it's brewing, press the button.
KEEP WARM/AUTO SHUT-OFF
- Your coffee maker will keep the coffee warm for about 40 minutes.
- 40 minutes after brewing your coffee maker will shut down and the time of day will be displayed.
- To wake the appliance, press the min button.
A QUICK CUP
If you want a quick cup of coffee before the brewing cycle has finished:
- You can remove the carafe at any time. The non-drip valve will prevent coffee dripping on to the hotplate.
- To prevent the filter holder overflowing, replace the carafe on the hotplate within about 20 seconds.
- When you replace the carafe on the hotplate the non-drip valve opens to let any remaining coffee through.
CARE AND MAINTENANCE
- Unplug the appliance and let it cool.
- Tip the contents of the filter holder into the bin.
- Wipe all surfaces with a clean damp cloth.
- Press the lever at the rear of the carafe lid, above the handle, to open the carafe lid.
- Hand wash the carafe and filter holder.
- Replace the filter holder. Make sure that the filter holder is pressed down all the way into position. It will click when correctly installed.
- Close the lid, and press down to lock it.

You may wash these parts in the top rack of a dishwasher.
DESCALING
After 60 brewing cycles, the display will show CL, to indicate that the appliance needs descending.
To turn this function off, press the and buttons together, and hold them for 3 seconds.
Use a proprietary brand of descaler suitable for use in plastic-bodied products. Follow the instructions on the package of descaler.
- Products returned under guarantee with faults due to scale will be subject to a repair charge.
RECYCLING
To avoid environmental and health problems due to hazardous substances, appliances and rechargeable and non-rechargeable batteries marked with one of these symbols must not be disposed of with unsorted municipal waste. Always dispose of electrical and electronic products and, where applicable, rechargeable and non-rechargeable batteries, at an appropriate official recycling/collection point.
BEHANDLING OG VEDLIKEHOLD
PNEPeI PEPBbIM IcIOJIb3OBAHnEM PIPbOPA
HanoHNHTepe3epByap BOoIdo MAKcMaJIbHOI OTMeTkn (max) IN BkIIOUHTe pIn6Op 6e KoΦe.
HANOJIHEHNE
- Chmmtpe3epByap c noDCTaBKn.
- OTKpoIe KpbIiKy.
- 3aŋoJIHnIb eMKoCTb HxHbIM KOJNUeCTBOM BODbl. O6paTInTe BHNMaHne, UTO B npOceCep npriToOBHeHn6yEdt NcNoJIb3OBAtBCa BcR BODa, KOTopAe cE7B pe3epByape.
- y6eintecb, yTO dejxateJIb fIbItpa hJaatdo ynopa. JOnJKeH nocblIaTbcra xapaKTePbIy eIeYOK, O3NaUoIu, yTO yCTaHOBka BbIOnHeHa npaBbIbHO.
- PackpoTe 6ymaxKbI ΦnIbTp #4 n NOMECTIe erO B depKaTeIb fNJIbTpa.
- Pe3epByap otKaIIn6pOboH na npriToTOBLeHne 14 60JIbXn (125 mHa yauKy) n 21 MaIeHbKnx yauke KoΦe (83 mHa yauKy). IIO6abIaIte no 6 r MoIOTOro KoΦe Ha KaJdyu 60JIbUyU yauKy n no 4 r Ha KaJdyu MaIyU yauKy.
- 3aKpoIe KpbIiKy.
- YcTaHOBInTe rpaΦnH Na IIOCTaBky.
HACTPOIKA YACOB
Hacpojka yacob Heo63aTeIbHa IJI NcNoIb3OBaHn KoΦeBapKn, HO HuxHa IJI POJb3OBaHn fynKUmaTaiMepa.
- BCTaBbTe BnIky Bpo3ETky.
2.ДЯ yctaHOBKn npabnIbHbIX NOKa3aTeJIe BpeMeHN B 24-ycobOM fOpMaTe nCNoJIb3yJTe KHOPIK h (4) n min (MnH).
Yacb6ydtcoxpaHrTb CBOe 3NaueHne, NOKoKoefBapKa OTKnIOUHeHaOTcETN.
KPENOCTb KOΦE
1.ДЯТOrOчTo6bIHaayTbPnIroTOBJIeHneKoΦe,yCTaHOBtEHyxHHeBpeMaHaTaIMpe.
a) HaxMMTe KhoNkY ①.
b) C nomou bIO KHOJOK h min 3a daIte BpeMa NaHaJa npnroTOBneHn Kofoe.
Ecn He haxmAbT kIaBnuy h (u) nIe KIaBnuy min (MnH) B TeueHne 5 cekyH, KoefebapKa BepHeTcB B pexnM «normal» (O6bIhN), n OTo6pa3ntcBpeM. ChOba haxmTe u ydepKnBaTe KNOpKy
IPIN ANO THN INPOTXPHSEH
Teiote to doxieio vepou uexpi tny evdeien otao mc max kai theste e aeitoupyia tn ouakeun xwpi va npootheote kafe.
IIAHPQsH
XPHESHTOYPXPONODIAKONTH
PQ DC
8 j 15j 11
jll jlll lss sclu uus
aaiiawbawl aaiiaal ojll gaiw .aiisw jieall cbw
1
Jilu jie jie jia
j 1
.
aaii i 1
i 1
1
jia lgluyu log ay jiall cIoluiuJpa aai Jgall i
Jlll 1n Jg jglal gall
aikill llll jla g c gall gdlll g jill
- f( x) = x - ax^2 + bx + c . 讨论
JolS 2011 Joo a gell cui s lal o gall uay y gall uuy uuy uuy uuy uuy uuy uuy uuy uuy uuy uuy uuy
[\text{Sopp}\left( {a,b,c}\right) ]
00 jll gaiw. 100 jll gl bc iiall jg 000 jll gl bc iiall ay gall ayalil ayalil ydl Jla l: abdo
.1
.2
- p jll biwai ci wuii liu yolai s i 8sall ailo
40 1 Jauo 2d Lai 3y jy 1e laal, uill 2j 1j o gall jui ju .4
Cai jiali
(aj) min, (aclw) hr n yjll jld w.
1
① ( a - b) ( a - b) = 0
Jy aagaaal gaclll bial min aagaa, hr acwol jzj
"normal" 5 5 (a) min j j (acl) h jj b
100 ① jjle baiui jiele .
auii i 1 1 1 1 1 1 1 1 1 1 1 1 1 1 1 1 1 1 1 1 1 1 1 1 1 1 1
aalllgaiogagaiinaiyauaiigai
jll jll bc biali gai jll ciaall plalil aie gail agill aiaol glaiai gai yla i.3
1p j b 1j 1j 1j 1j 1j
11p jll baiol ujull Jaoi golai oogall ailo
#
:ssll 0r 1
.1
20 1 1 1 1 1 1 1 1 1 1 1 1 1 1 1 1 1 1 1 1 1
aagaae gai jyjiai yie aae iiaaiy
ailllgl
.1
.2
auii aai jai jai jai jai 3
.4