
DESIRE 18511 - Electric kettle RUSSELL HOBBS - Free user manual and instructions
Find the device manual for free DESIRE 18511 RUSSELL HOBBS in PDF.
| Product type | Multifunction food processor |
| Brand | Russell Hobbs |
| Model | DESIRE 18511 |
| Power supply | Mains electricity (230 V~, 50 Hz estimated) |
| Power | 700 W (estimated) |
| Bowl capacity | 1.5 L (approx) |
| Number of speeds | 2 (1 - low, 2 - high) + pulse |
| Functions | Blending, chopping, emulsifying, slicing, grating, whisking, crushed ice |
| Included accessories | Bowl, lid, cap, blending blade, whisk, slicing disc, coarse grating disc, fine grating disc, support, stem, pusher |
| Maximum ingredient temperature | Below 40 °C |
| Maximum continuous use time | 1 minute 30 seconds (blender), 2 minutes (food processor with disc) |
| Recommended resting time | At least 2 minutes |
| Bowl material | Glass or plastic (not specified, estimate) |
| Blade material | Stainless steel |
| Safety | Bowl locking, stops before disassembly, do not immerse motor unit |
| Cleaning | Removable parts washable with soapy water, motor unit wiped with a damp cloth |
| Dishwasher safe | No (no parts are dishwasher safe) |
| Repairability | Power cord replaceable by the manufacturer or an authorized technician |
| Usage | Household use only |
| Weight | Approximately 2 kg (estimate) |
Frequently Asked Questions - DESIRE 18511 RUSSELL HOBBS
User questions about DESIRE 18511 RUSSELL HOBBS
0 question about this device. Answer the ones you know or ask your own.
Ask a new question about this device
Download the instructions for your Electric kettle in PDF format for free! Find your manual DESIRE 18511 - RUSSELL HOBBS and take your electronic device back in hand. On this page are published all the documents necessary for the use of your device. DESIRE 18511 by RUSSELL HOBBS.
USER MANUAL DESIRE 18511 RUSSELL HOBBS
natural_image
Black and white photo of a modern kitchen blender with a side panel and control knob (no visible text or symbols)instructions 2 инструкции (Русский) 46
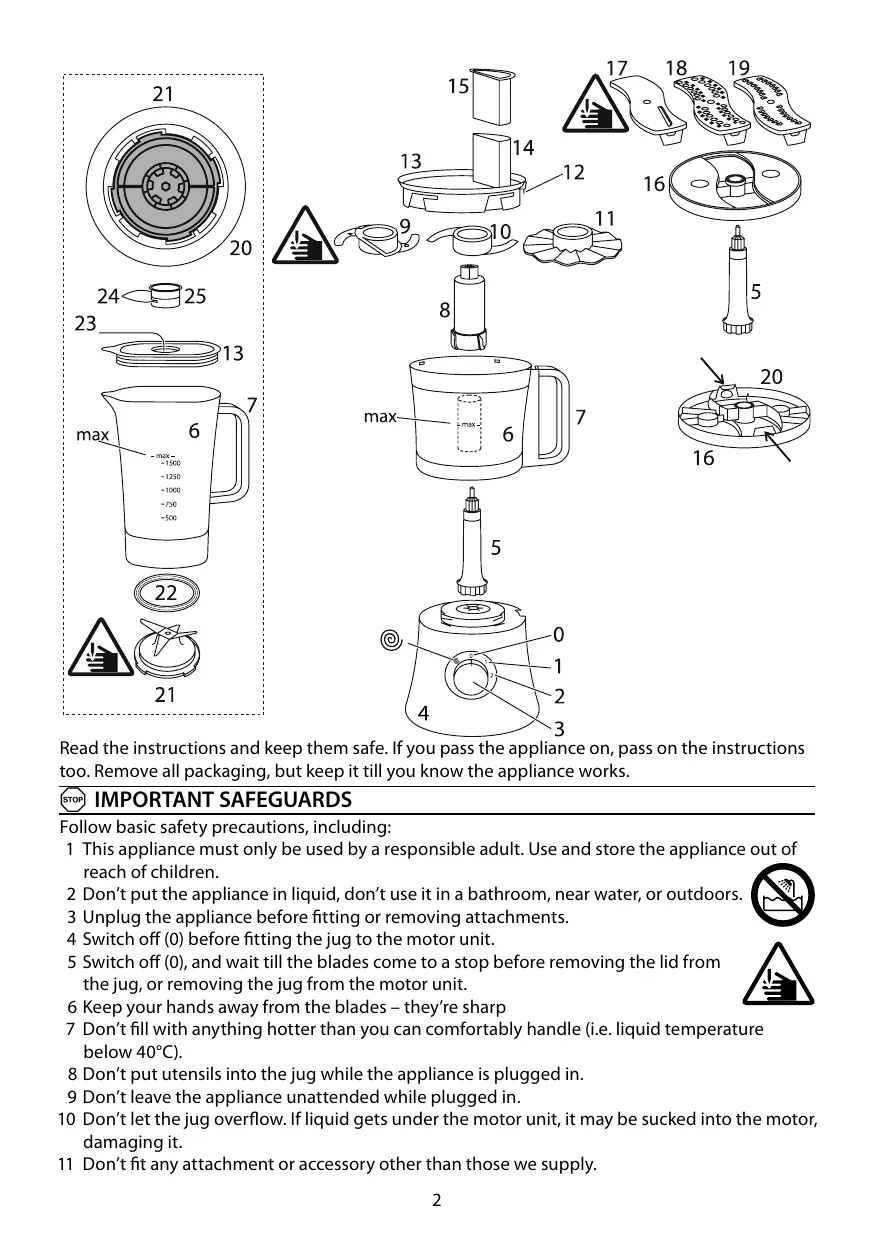
Read the instructions and keep them safe. If you pass the appliance on, pass on the instructions too. Remove all packaging, but keep it till you know the appliance works.

IMPORTANT SAFEGUARDS
Follow basic safety precautions, including:
1 This appliance must only be used by a responsible adult. Use and store the appliance out of reach of children.
2 Don't put the appliance in liquid, don't use it in a bathroom, near water, or outdoors.
3 Unplug the appliance before fitting or removing attachments.
4 Switch off (0) before fitting the jug to the motor unit.
5 Switch off (0), and wait till the blades come to a stop before removing the lid from the jug, or removing the jug from the motor unit.
6 Keep your hands away from the blades – they're sharp
7 Don't fill with anything hotter than you can comfortably handle (i.e. liquid temperature below 40°C).
8 Don't put utensils into the jug while the appliance is plugged in.
9 Don't leave the appliance unattended while plugged in.
10 Don't let the jug overflow. If liquid gets under the motor unit, it may be sucked into the motor, damaging it.
11 Don't fit any attachment or accessory other than those we supply.


| diagrams | 7 handle | 17 slicer |
| 0 off | 8 support | 18 coarse grater |
| 1 low | 9 blade | 19 fine grater |
| 2 high | 10 mixer | 20 underside |
| 3 speed control | 11 creamer | 21 blade unit |
| 4 motor unit | 12 tab | 22 seal |
| @ pulse | 13 lid | 23 hole |
| 5 spindle | 15 pusher | 24 pips |
| 6 jug | 16 disc | 25 cap |
12 Don't use the appliance for any purpose other than those described in these instructions.
13 Don't operate the appliance if it's damaged or malfunctions.
14 If the cable is damaged, it must be replaced by the manufacturer, its service agent, or someone similarly qualified, in order to avoid hazard.
household use only

PROCESSING
1 Sit the motor unit on a dry, firm, level surface, near a power socket.
2 Route the cable so it doesn't overhang, and can't be tripped over or caught.
3 Lower the jug on to the motor unit, then turn the jug clockwise, to lock it in place.
4 Remove the lid.
5 Put the ingredients into the jug.
6 Replace the lid.

SWITCH ON
7 Check that the speed control is set to 0.
8 Put the plug into the power socket.

SPEED CONTROL
9 Turn the speed control to the speed you want (1 = low, 2 = high).
10 Turn the speed control back to 0 to turn the motor off.
11 Generally, large quantities, thick mixes, and a high ratio of solids to liquids suggest longer timings and slower speeds.
12 Smaller quantities, thinner mixes, and more liquids than solids suggest shorter timings and higher speeds.

PULSE
13 Turning the speed control anti-clockwise to Ⓞ will give you a short burst at high speed. In this direction, the knob is spring-loaded. When you let go, it'll return to 0.

USING THE BLENDER
14 Don't run the motor continuously for more than 1 12 minutes, it may overheat. After 1 12 minutes switch off for at least 2 minutes, to recover.
15 Lower the jug on to the motor unit, then turn the jug clockwise, to lock it in place.
16 Lift the lid off the jug.
17 You'll find it's quite stiff (it has be, to keep the ingredients from escaping when you turn the motor on).
18 Put the ingredients into the jug.
Don't fill past the max mark.
19 Put the lid on the jug, and press it down.
20 Align the pips on the sides of the cap with the slots in the hole in the lid, put the cap into the hole, and turn it about 14 of a turn clockwise to lock it.
21 To add ingredients while the blender is working, remove the cap, pour the new ingredients through the hole, then replace the cap.
22 Turn the jug about 14 of a turn anti-clockwise and lift it off the motor unit.

CRUSHED ICE
23 Start with half to threequarters of a cup of ice, or 4 to 6 cubes, and add 15ml (1 tablespoon) of fresh cold water.
24 Put the lid on the blender, then turn the speed control to Ⓞ for a second or two, and release it.
25 Check the results, and adjust.

CARE AND MAINTENANCE
26 Switch the appliance off (0) and unplug it.
27 Wash the removable parts in warm soapy water, rinse well, drain, and air dry.
28 Wipe the outside of the motor unit with a clean damp cloth.
29 Don't put any part of the appliance in a dishwasher.

BLADE UNIT
30 You may remove the blade unit for cleaning.
31 This is best done with the jug turned upside down.
32 Grip the jug handle with one hand.
33 Grip the bottom of the blade unit with the other hand.
34 Turn the blade unit clockwise till it comes loose from the jug base.
35 Carefully, pull it up and out of the bottom of the jug.
36 Wash the seal and blade unit in warm soapy water, rinse, and air dry.
37 Take great care with the blades – don't handle them directly, use a nylon washing-up brush.
38 Replace the seal round the blade unit.
39 Turn the blade unit upside down, and replace it in the bottom of the jug base.
40 Turn the blade unit anti-clockwise to tighten it.

USING THE PROCESSOR
41 You may use the processor and disc for cutting/grating for up to 2 minutes. Any other use should be limited to 1 12 minutes. After this, let the motor rest for 2 minutes.
42 Switch the appliance off (0) and unplug it.
43 Fit the spindle to the top of the motor unit.
44 Lower the jug on to the motor unit, then turn the jug clockwise, to lock it in place.
45 Choose the attachment you need.

WITH THE SUPPORT
46 Use the chopper for pulverizing ingredients.
47 Use the mixer to mix ingredients together.
48 Use the creamer to thicken cream, to beat eggs, and to cream eggs and sugar together.
49 Fit the attachment over the support, and slide it to the bottom.
50 Lower the support into the centre of the jug, over the spindle.
51 Put the ingredients into the jug.
Don't fill past the max mark.
52 Hold the lid with the tube slightly behind the jug handle, set it on the jug, then turn it clockwise, to lock the tab into the top of the handle.
53 To add ingredients while the motor is running:
a) lift the pusher out of the tube
b) add the ingredients via the tube
c) replace the pusher
54 To remove the lid, turn it anti-clockwise to unlock it, then lift it off.


WITH THE DISC
55 Fit the slicer or one of the graters into the disc.
56 Lower the disc over the top of the spindle.
57 Hold the lid with the tube slightly behind the jug handle, set it on the jug, then turn it clockwise, to lock the tab into the top of the handle.
58 Remove the pusher, and drop the ingredients down the tube.
★ Replace the pusher, and use it to push the ingredients gently down the tube.
59 Don't use fingers or cutlery to push food down the tube – only the pusher.
60 The blade(s) on top of the disc will slice or grate the food into the jug.
61 Don't let the jug get more than about half full – stop and empty it.
62 To remove the lid, turn it anti-clockwise to unlock it, then lift it off.
63 Turn the disc over, and press one of the metal ends in and down, to remove the slicer/grater.

CARE AND MAINTENANCE
64 Switch the appliance off (0) and unplug it.
65 Wash the removable parts in warm soapy water, rinse well, drain, and air dry.
66 Wipe the outside of the motor unit with a clean damp cloth.
67 Don't put any part of the appliance in a dishwasher.

ENVIRONMENTAL PROTECTION
To avoid environmental and health problems due to hazardous substances in electrical and electronic goods, appliances marked with this symbol mustn't be disposed of with unsorted municipal waste, but recovered, reused, or recycled.

recipes
handful
♂ = clove(s)
coriander pesto
2 coriander leaves
2 garlic
60 g pine nuts
125 ml olive oil
60 g Parmesan, grated
Process the coriander, garlic, pine nuts and half the oil till smooth. Transfer to a large bowl.
Stir in the Parmesan. Add oil to adjust the consistency: For a dip: thick. For a topping: medium.
For pasta sauce: thin.
recipes are available on our website:
using the blender:
http://www.russellhobbs.com/ifu/550931
smoothies:
http://www.russellhobbs.com/ifu/550941
using the processor:
http://www.russellhobbs.com/ifu/551078

http://www.russellhobbs.com/ifu/550931
Smoothies:
http://www.russellhobbs.com/ifu/550941
http://www.russellhobbs.com/ifu/551078

4 Retirez le couvercle.
http://www.russellhobbs.com/ifu/550931
smoothies:
http://www.russellhobbs.com/ifu/550941
http://www.russellhobbs.com/ifu/551078

http://www.russellhobbs.com/ifu/550931
smoothies:
http://www.russellhobbs.com/ifu/550941
http://www.russellhobbs.com/ifu/551078
http://www.russellhobbs.com/ifu/550931
frappé:
http://www.russellhobbs.com/ifu/550941
uso del robot:
http://www.russellhobbs.com/ifu/551078
http://www.russellhobbs.com/ifu/550931
batidos:
http://www.russellhobbs.com/ifu/550941
http://www.russellhobbs.com/ifu/551078

http://www.russellhobbs.com/ifu/550931
smoothies:
http://www.russellhobbs.com/ifu/550941
http://www.russellhobbs.com/ifu/551078
http://www.russellhobbs.com/ifu/550931
smoothies:
http://www.russellhobbs.com/ifu/550941
http://www.russellhobbs.com/ifu/551078
http://www.russellhobbs.com/ifu/550931
smoothies:
http://www.russellhobbs.com/ifu/550941
http://www.russellhobbs.com/ifu/551078
BEHANDLING OG VEDLIKEHOLD
BEHANDLING OG VEDLIKEHOLD
http://www.russellhobbs.com/ifu/550931
smoothies:
http://www.russellhobbs.com/ifu/550941
http://www.russellhobbs.com/ifu/551078
http://www.russellhobbs.com/ifu/550931
smoothies-juomia:
http://www.russellhobbs.com/ifu/550941
http://www.russellhobbs.com/ifu/551078
http://www.russellhobbs.com/ifu/550931
фруктовые коктейли:
http://www.russellhobbs.com/ifu/550941
http://www.russellhobbs.com/ifu/551078

http://www.russellhobbs.com/ifu/550931
smoothie:
http://www.russellhobbs.com/ifu/550941
http://www.russellhobbs.com/ifu/551078
http://www.russellhobbs.com/ifu/550931
ovocné krémy:
http://www.russellhobbs.com/ifu/550941
http://www.russellhobbs.com/ifu/5510781
http://www.russellhobbs.com/ifu/550931
koktajle owocowe:
http://www.russellhobbs.com/ifu/550941
stosowanie robota:
http://www.russellhobbs.com/ifu/551078
Pročitajte uputstva i sačuvajte ih na sigurnom mestu. U slučaju ustupanja aparata trećim licima, priložite i ova uputstva za uputrebu. Skinite svu ambalažu, ali je sačuvajte dok ne proverite da li aparat radi.

VAŽNE SIGURNOSNE MERE
http://www.russellhobbs.com/ifu/550931
penasti voćni napici (smoothies):
http://www.russellhobbs.com/ifu/550941
upotreba aparata za preradu:
http://www.russellhobbs.com/ifu/551078
Preberite navodila in jih hranite na varnem mestu. Če napravo posredujete drugim, jim dajte tudi navodila. Odstranite vso embalažo, vendar jo shranite, dokler niste prepričani, da naprava deluje.

POMEMBNA VAROVALA
Sledite osnovnim varnostnim ukrepom, vključno z:
http://www.russellhobbs.com/ifu/550931
sadni napitki:
http://www.russellhobbs.com/ifu/550941
http://www.russellhobbs.com/ifu/551078
http://www.russellhobbs.com/ifu/550931
φρουτοποτά:
http://www.russellhobbs.com/ifu/550941
http://www.russellhobbs.com/ifu/551078
http://www.russellhobbs.com/ifu/550931
turmix:
http://www.russellhobbs.com/ifu/550941
http://www.russellhobbs.com/ifu/551078
http://www.russellhobbs.com/ifu/550931
smoothie'ler:
http://www.russellhobbs.com/ifu/550941
robotu kullanma:
http://www.russellhobbs.com/ifu/551078
http://www.russellhobbs.com/ifu/550931
smoothies:
http://www.russellhobbs.com/ifu/550941
http://www.russellhobbs.com/ifu/551078
http://www.russellhobbs.com/ifu/550931
смутита:
http://www.russellhobbs.com/ifu/550941
http://www.russellhobbs.com/ifu/551078
