RODRUM L - Uncategorized ROTHENBERGER - Free user manual and instructions
Find the device manual for free RODRUM L ROTHENBERGER in PDF.

| Product type | Pipe cleaning machine |
| Brand | Rothenberger |
| Model | RODRUM L |
| Dimensions (L x W x H) | 700 x 550 x 870 mm |
| Weight (with Ø20 mm spiral) | Approx. 68 kg |
| Power supply | 230 V / 110 V ~ 50/60 Hz |
| Rated power P1/P2 | 0.645 kW (50 Hz) / 0.690 kW (60 Hz) / 0.40 kW |
| Spiral types | Ø 13 mm, Ø 16 mm, Ø 20 mm |
| Working range (pipe diameter) | 70-100 mm (Ø13), 70-125 mm (Ø16), 150-250 mm (Ø20) |
| Max. spiral length per drum | 30 m (Ø13), 30 m (Ø16), 20 m (Ø20) |
| Maximum working length | 30 m (Ø13), 45 m (Ø16), 60 m (Ø20) |
| Spiral speed | Approx. 5 m/min (Ø13), 6.5 m/min (Ø16), 8.5 m/min (Ø20) |
| Protection class | I |
| Protection rating | IP X4 |
| Sound pressure level (LpA) | 79 dB(A) | KpA 3 dB(A) |
| Sound power level (LWA) | 90 dB(A) | KWA 3 dB(A) |
| Total vibration value | ≤ 2.5 m/s² | K=1.5 m/s² |
| Integrated safety device | PRCD switch (residual current device) |
| Control | Foot pedal and feed lever |
| Removable drum | Yes |
| Included accessories | Guide hose, tool box, separation key |
| Maintenance | Regular cleaning and greasing of the insert; use ROWONAL |
| Operation | Short-time duty max. 15 min (S2 15 min) |
Frequently Asked Questions - RODRUM L ROTHENBERGER
User questions about RODRUM L ROTHENBERGER
0 question about this device. Answer the ones you know or ask your own.
Ask a new question about this device
Download the instructions for your Uncategorized in PDF format for free! Find your manual RODRUM L - ROTHENBERGER and take your electronic device back in hand. On this page are published all the documents necessary for the use of your device. RODRUM L by ROTHENBERGER.
USER MANUAL RODRUM L ROTHENBERGER
natural_image
Red Sothenberger electric fan with black frame and control panel (no visible text or symbols)EN Instructions for use
A Overview
B Height adjustment
C Loading
Tool case removal
D
natural_image
Mechanical device with attached red box and arrow indicator (no text or symbols)Operating
E
flowchart
graph TD
    A["Input: Red Component"] --> B["Step 1: Arrow to Output"]
    B --> C["Step 2: Wavy Line"]
    C --> D["Step 3: Arrow to Output"]
    D --> E["Step 4: Arrow to Output"]
    E --> F["Output: Arrow to Output"]
F Spiral drum change
1
natural_image
3D rendering of a mechanical pump cart with visible blades and control panel (no text or symbols)2
natural_image
Mechanical device with red lever mechanism and pipe connection (no text or symbols)3
natural_image
Diagram of a red fire extinguisher with attached mechanical components (no text or symbols)Intro
| DEUTSCH - Originalbetriebsanleitung! | Seite 2 |
| Bedienungsanleitung bitte lesen und aufbewahren! Nicht wegwerfen!Bei Schäden durch Bedienungsfehler erlischt die Garantie! Technische Änderungen vorbehalten! | |
| ENGLISH | page 12 |
| Please read and retain these directions for use. Do not throw them away! The warranty does not cover damage caused by incorrect use of the equipment! Subject to technical modifications! | |
| FRANÇAIS | page 22 |
| Lire attentivement le mode d'emploi et le ranger à un endroit sûr! Ne pas le jeter ! La garantie est annulée lors de dommages dûs à une manipulation erronée ! Sous réserve de modifications techniques! | |
| ESPAÑOL | página 32 |
| ¡Por favor, lea y conserve el manual de instrucciones! ¡No lo tire! ¡En caso de daños por errores de manejo, la garantía queda sin validez! Modificaciones técnicas reservadas! | |
| ITALIANO | Pagina 42 |
| Per favore leggere e conservare le istruzioni per l'uso! Non gettarle via! In caso di danni dovuti ad errori nell'uso, la garanzia si estingue! Ci si riservano modifiche tecniche! | |
| NEDERLANDS | bladzijde 52 |
| Lees de handleiding zorgvuldig door en bewaar haar goed! Niet weggooien! Bij schade door bedieningsfouten komt de garantieverlening te vervallen! Technische wijzigingen voorbehouden! | |
| PORTUGUES | pagina 62 |
| Queiram ler e guardar o manual de instruções! Não deitar fora! Em caso de avarias por utilização incorrecta, extingue-se a garantía! Reservado o direito de alterações técnicas! | |
| DANSK | side 72 |
| Læs betjeningsvejledningen, og gem den til senere brug! Smid den ikke ud! Skader, som måtte opstå som følge af betjeningsfejl, medfører, at garantien mister sin gyldighed! Ret til tekniske ændringer forbeholdes! | |
| SVENSKA | sida 82 |
| Läs igenom bruksanvisningen och förvara den väl! Kasta inte bort den! Garantin upphör om apparaten har använts eller betjänats på ett felaktigt sätt! Med reservation för tekniska ändringar! | |
| NORSK | side 92 |
| Les bruksanvisningen og oppbevar den vel! Ikke kast den! Oppstår skader på grunn av betjeningsfeil opphører garantiens gyldighet! Tekniske forandringer forbeholdes! | |
| SUOMI | sivulta 102 |
| Lue ja säilytä tämä käyttöohje! Älä heitä pois!Takuu ei kata käyttövirheistä aiheutuvia vahinkoja! Oikeudet teknisiin muutoksiin pidätetään! | |
| POLSKI | strony 112 |
| Instrukcjë obsługi prosze przeczytac i przechowac! Nie wyrzucac!Przy uszkodzeniach wynikajacych z blédów obsługi wygasa gwarancja! Zmiany techniczne zastrzezone! | |
| CESKY | Stránky 123 |
| Navod k obsluze si prosim přečtěte a uschovejte jej! Nevyhazujte jej!V pripade poškozeni zpusobenem chybnou obsluhou zanika zaruka! Technicke změny jsou vyhrazeny! | |
| TÜRKÇE | sayfa 133 |
| Kullanim açıklamalarini lütfen dikkatlice okuyunuz ve bir yerde muhafaza ediniz! Çöpe atmayiniz!Kullaniminda yapılan hatalar, garantinin silinmesine neden olur! Teknik deðipiklikler yapma hakkimiz saklidir! | |
| MAGYAR | oldaltól 143 |
| Kérjük, olvassa el és őrizze meg a kezelési utasítást! Ne dobja el!A helytelen kezelésböl származó károsodások esetén megszůnik a jótállás! Můszaki változtatások fenntartva! | |
| SLOVENŠČINA | Stran 153 |
| Preberite navodila za uporabo in jih shranite! Ne odvrzite jih! Ob poškodbah zaradi napak v uporabi preneha veljati garancija! Pridržujemo si pravico do tehničnih sprememb! | |
| SLOVENSKÝ | Strana 163 |
| Prečítajte si prosím návod na obsluhu a uschovajte ho! Návod nezahadzujte! Pri poškodeniach v dôsledku chýb pri obsluhe zaniká záruka! Technické zmeny vyhradené! | |
| БЪЛГАРСКИ | Страница 173 |
| Прочетете внимателно и запазете инструкцията за експлоатация! Не я захвърпяйте или унищожавайте! При настъпили дефекти вследствие на неправилно обслужване гаранцията отпада! Технически изменения по уреда са изключително в компетенцията на фирмата производител! | |
| ΕΛΛΗΝΙΚΑ | Σελίδα 184 |
| Οδηγίες χειρισμού παρακαλείσθε να τις διαβάσετε και να τις φυλάσσετε! Μην τις τετάξετε!Σε ζημιες από σφάλματα χειρισμού παυει να ισχύει η εγγύηση! Με επιφύλαξη για τεχνικές αλλαγές! | |
| PYCCКИЙ | Страница 195 |
| Прочтите инструкцию по эксплуатации и сохраняйте её для дальнейшего использования! В случае поломки инструмента из-за несоблюдения инструкции клиент теряет право на обслуживание по гарантии! Возможны технические изменения! | |
| 中文版 | 第 206 页 |
| 请阅读并妥善保存本使用说明书!请勿丢弃!不正当使用所造成的损害不属于保证范围!保留因技术变化而对文档内容进行修改的权利! | |
natural_image
Mechanical device with wheels and attached components, next to a plain gray rectangle (no text or symbols visible)Links: 20 mm 4-kant Kupplung
Email: service@rothenberger.com
www.rothenberger.com
11 Entsorgung
1.1 General safety instructions .... 13
1.2 Special safety instructions....14
1.3 Residual risks....14
1.4 Intended use....15
2 Technical Data 15
3 Scope of delivery 15
4 Model plate description....16
5 Power connection....16
5.1 Putting the PRCD switch into operation 16
6 Function of the Unit....17
6.1 Overview (A)....17
6.2 Transfer....17
6.2.1 Height adjustment of the transport handle (B)....17
6.2.2 Loading the pipe cleaning machine (C)....17
6.3 Commissioning....17
6.4 Coupling/ Decoupling the tools / spirals (A/D)....18
6.5 Operation (E)....18
6.6 Removing the pipe blockage (E)....18
6.7 Pull the spiral back out of the pipe (E)....18
6.8 Shut-down....19
6.9 Changing the spiral drum (F)....19
6.10 Extending the operating area (A)....19
7 Care and Maintenance....20
7.1 Inserting new spirals....20
8 Troubleshooting....20
9 Accessories....20
10 Customer service....21
11 Disposal....21
Markings in this document:

Danger!
This sign warns against the danger of personal injuries.
Caution!

This sign warns against the danger of property damage and damage to the environment.

Call for action
1.1 General safety instructions

ATTENTION! When using electric tools, the following fundamental safety measures must be taken to prevent electric shock, injury or fire.
Read all of these instructions before you use the electric tool, and store the safety instructions properly.
Service and maintenance:
1 Regular cleaning, maintenance and lubrication. Always pull the electrical plug before any adjustment, maintenance or repair.
2 Have your device repaired only by qualified experts and only with original replacement parts. This ensures the continued safety of the device.
Working safely:
1 Keep your work area orderly. A messy work area can cause accidents.
2 Consider environmental influences. Do not expose electric tools to rain. Do not use electric tools in damp or wet environments. Keep the work area well lit. Do not use electric tools where there is a risk of fire or explosion.
3 Protect yourself from electric shock. Avoid physical contact with earthed parts (such as pipes, radiators, electric stoves or cooling devices).
4 Keep other people away. Do not let other people — especially children — touch the electric tool or its cable. Keep them away from the work area.
5 Store electric tools safely when they are not in use. Unused electric tools should be kept in a dry, high or closed area, out of reach of children.
6 Do not overload your electric tool. Work is better and safer within the performance range indicated.
7 Use the right electric tool. Don't use low-performance machines for heavy-duty jobs. Do not use the electric tool for purposes for which it was not intended. For example, do not use a portable circular saw for cutting tree branches or logs.
8 Wear proper clothing. Do not wear loose clothing or jewellery, as they can get caught in moving parts. When working outdoors, wear slip-resistant shoes. Wear a hairnet over long hair.
9 Use protective gear. Wear safety glasses. Wear a breathing mask during work that creates dust.
10 Connect the dust extraction equipment. If there are connections to dust extraction and collection equipment, make sure that they are connected and properly used.
11 Do not use the cable for purposes for which it was not intended. Never use the cable to pull the plug from the socket. Protect the cable from heat, oil and sharp edges.
12 Secure the work piece. Use clamps or a vice to hold the work piece firmly. They will hold it more securely than your hand can.
13 Avoid abnormal postures. Make sure to stand securely and always keep your balance.
14 Maintain your tools with care. For better and safer work, keep cutting tools sharp and clean. Follow the instructions for lubrication and changing tools. Regularly inspect the electric tool's connection cable, and if it is damaged, have it replaced by an authorized expert. Regularly check extension cords and replace them if they are damaged. Keep the handles dry, clean and free of oil and grease.
15 Pull the plug from the socket. When not using the electric tool, before maintenance or when changing tools, such as saw blades, drills and cutting bits.
16 Do not leave any tool keys inserted. Before switching on, check to see that keys and adjustment tools have been removed.
17 Avoid unintentional activation. When plugging the tool in, make sure that the switch is turned off.
18 Use outdoor extension cords. When outdoors, use only extension cords that are approved and appropriately marked.
19 Be alert. Pay attention to what you do. Approach your work sensibly. Do not use the electric tool when you are distracted.
20 Check the electric tool for damage. Before using the electric tool, you must inspect safety equipment or slightly damaged parts carefully to ensure that they work properly and as intended. Check to see that the moving parts operate freely and don't stick, and to make sure no parts are damaged. All parts must be mounted properly and meet all the conditions for ensuring trouble-free operation of the electric tool.
Damaged safety equipment and parts must be properly repaired or replaced by a professional facility, unless otherwise indicated in the user manual. Damaged switches must be replaced by a customer service facility.
Never use an electric tool whose switch cannot be turned on and off.
21 Caution. Using other insertion tools and accessories may cause injury.
22 Have your tool repaired by an electrical expert. This electric tool meets applicable safety requirements. Repairs must be made only by an electrical expert using original replacement parts. Otherwise accidents many occur.
1.2 Special safety instructions
Wear rubber boots (for insulation) when performing cleaning work.
Before inserting the plug into the electrical socket, make absolutely sure that the pipe cleaning machine is switched to 0 or OFF.
Whenever using electrical devices, always observe the specified voltage and generally work with a protective tube and safety gloves.
Choose the right tool for the clog and for the pipe diameter to be cleaned, in order to prevent the tool from hooking into the clog and the spiral from ejecting from the pipe.
To prevent damage, use this machine and its accessories only to clean waste water pipes — never chimneys, wells, etc.
To prevent damage to the pipes or pipe bends, do not modify tools by whetting them, etc...
Use a camera system to spot the cause of the pipe clog.
Only work on perfect lines installed according the "VDE regulations".
The spirals must never run over the guide tube!
Mechanical pipe cleaning should always be undertaken from above in the direction of the stop plug.
Ensure that no water taps leading to the pipe to be processed are actuated during the pipe cleaning. Congestion can occur here!
During pipe cleaning never leave the machine unobserved!

Protective covers: All rotating parts are made safe through use of protective covers. Removal and/or operation without these protective covers is strictly forbidden!
Secure the operation site (the road, the shaft) so that no uninvolved persons suffer injuries and always cover open shafts or gullies.
Check the area to be investigated with a gas warner for the presence of poisonous or explosive gases!
The machine and the accessories should be cleaned and disinfected after every use.
The recommended personal protective equipment should be worn whenever any work is done: safety glasses, safety helmet, safety shoes, safety vest!
The hands should be cleaned and disinfected after every activity; there is increased risk of infection by pathogens!
1.3 Residual risks
Even when observing all of the safety instructions there are still some residual risks remaining, for example: spirals can overturn (create a loop if the operating arc is too large) thereby creating the risk of clamping. Spirals under tension can spring out of the pipe \~ a risk of injury!
1.4 Intended use
The pipe cleaning machines may only be used to clean pipes of the following diameters:
13 mm spiral: 70-100 mm; 16 mm spiral: 70-125 mm; 20 mm spiral: 150-250 mm
The pipe cleaning machines are only designed for short term operation and may therefore only be operated without interruption for a maximum of 15 minutes! Do not use this product in any other way as stated for normal use!
2 Technical Data
Voltage 230V/110V - 50/60 Hz
Output P1/ P2....0,645 kW (50 Hz); 0,690 kW (60 Hz)/ 0,40 kW
Dimensions (LxWxH) 700x550x870 mm
Weight (with ∅ 20 mm spiral).....about 68 kg
Spiral type ....∅ 13 mm ....∅ 16 mm ....∅ 20 mm
Pipe diameter working range ....70-100 mm....70-125 mm..... 150-250 mm
Max. spiral length drum M....15 m....15 m....-
Max. spiral length drum L....30 m ....30 m ....20 m
Max. working length....30 m....45 m....60 m
Speed of the spiral
(according to the pipe route)......ca. 5 m/min ......ca. 6,5 m/min... ca. 8,5 m/min
Direction of rotation (switch position I)......left (looking from the front onto the drum)
Protection class ....I
Protection type....IP X4
The noise level during operation can exceed 85 dB (A). Wear hearing protection!
Measured values determined in accordance with EN 61029-1:2010.
Vibration total value ....≤ 2,5 m/s ^2 | K= 1,5m/s ^2
The vibration level given in this information sheet has been measured in accordance with a standardised test given in EN 61029 and may be used to compare one tool with another. It may be used for a preliminary assessment of exposure.

The declared vibration emission level represents the main applications of the tool. However if the tool is used for different applications, with different accessories or insertion tools or is poorly maintained, the vibration emission may differ. This may significantly increase the exposure level over the total working period.
An estimation of the level of exposure to vibration should also take into account the times when the tool is switched off or when it is running but not actually doing the job. This may significantly reduce the exposure level over the total working period. Identify additional safety measures to protect the operator from the effects of vibration such as: maintain the tool and the accessories, keep the hands warm, organisation of work patterns.
3 Scope of delivery
- Pipe cleaning machine RODRUM M/L
- Guide tube
- Operating manual
- Tool case (according to the version)
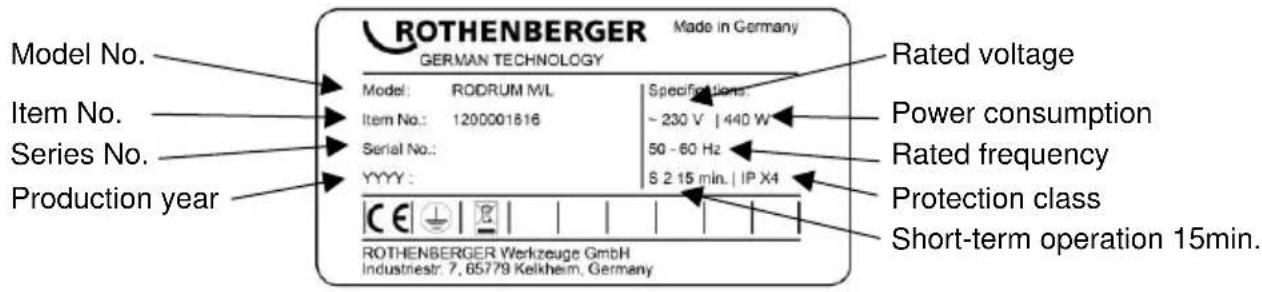
4 Model plate description
5 Power connection
Connect only to the single-phase alternating current indicated on the rating plate. Connect only to sockets with protective contacts. The machine must be operated only through a ground fault circuit with max. 30 mA rated leakage current.
Connection: Insert the device into an electrical socket and press the "RESET" button.
Once the red function display has lit up, the device is ready to operate. Whenever it is unplugged, or the power fails, the device automatically shuts off.
Operational test: Press the "TEST" button: The device shuts off. Press the "RESET" button: Once the red operation display has lit up, the device is ready to operate.
Always perform the operational test before starting up the device. If there is a repeated failure, have the connected device inspected.
Please keep in mind that this device cannot replace fundamental safety precautions. To prevent life-threatening hazards, be sure to use electrical devices only as intended.
Reliable personal protection against electric shock. Fault currents are recognized in a fraction of a second, and the current supply is immediately interrupted. The risk to humans and animals is drastically reduced.
- Never use the electric tool without a PRCD.
- The plug or electrical cord should be replaced only by the manufacturer of the electric tool or by its repair service.
- Keep water away from electrical parts of the electric tool and from people in the work area.

While operating the pipe cleaning machine, never reach into the recesses in the spiral drum – risk of injury!
5.1 Putting the PRCD switch into operation

Only suitable for AC current! Note the mains network voltage!
Perform the following test procedure on the PRCD switch before every putting into operation of the device:
- Connect the PRCD plug connector with the socket.
- Press on RESET. The indicator switches to RED (ON).
- Pull the plug connector out of the socket. The display switches itself off.
- Repeat 1. and 2.
- Press on TEST. The red indicator switches itself off.
- Press on RESET to switch the device on (RED).

These protective device protect against faults in the attached device, not against such faults in the preceding plant.
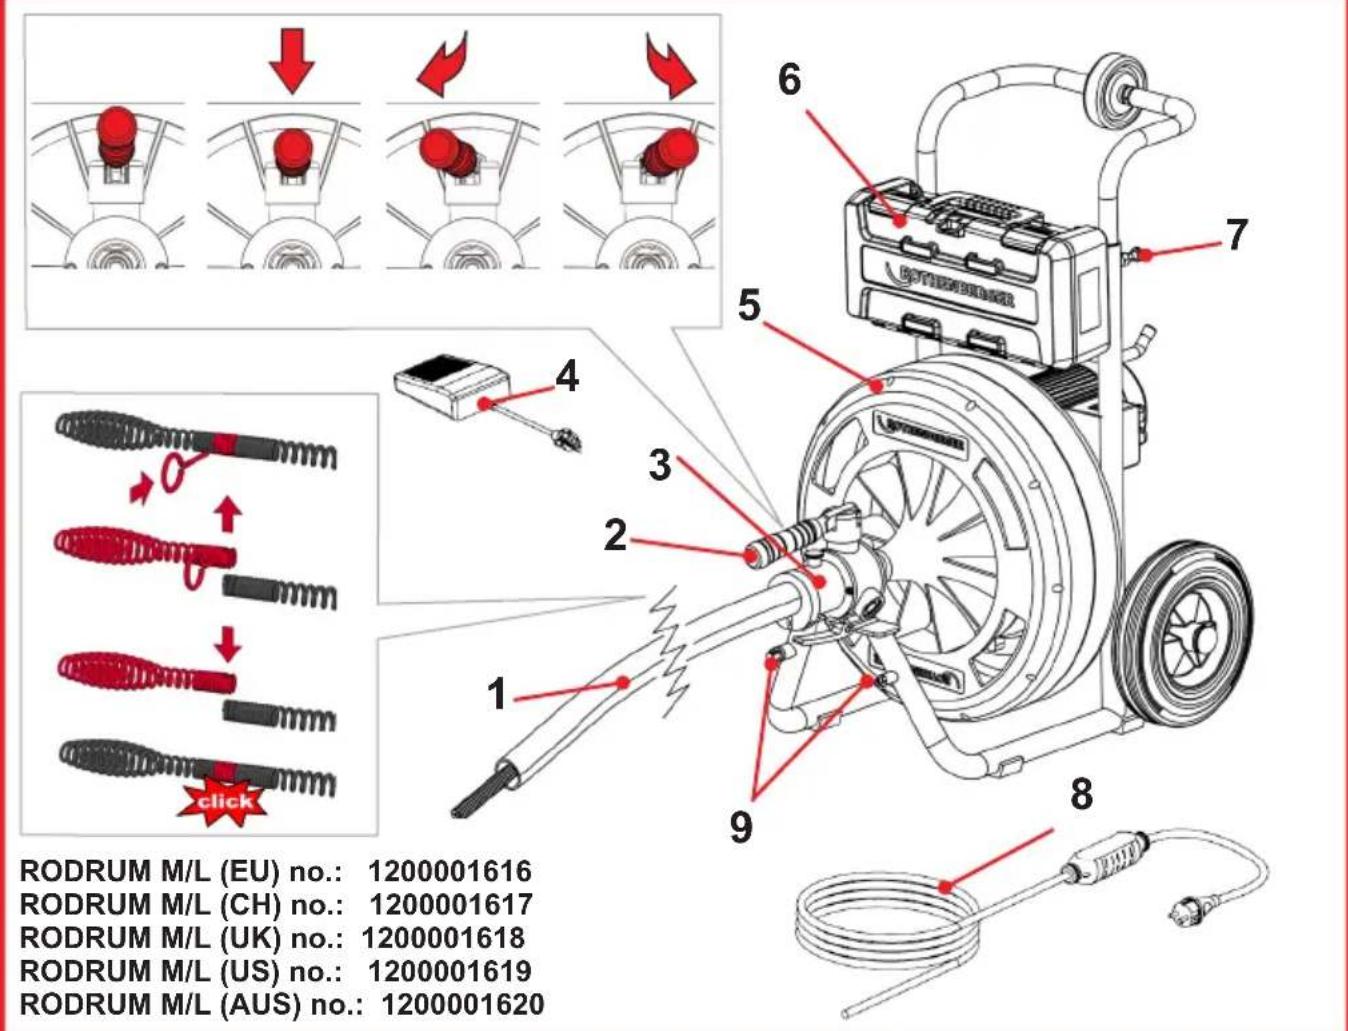
6.1 Overview (A)
| 1 | Guide tube | 6 | Tool box |
| 2 | Lever | 7 | Locking bolt |
| 3 | Feed unit | 8 | Network cable with PRCD |
| 4 | Foot switch | 9 | Couplings (on the left: 20 mm square; on the right: 16 mm T-groove) |
| 5 | Drum |
6.2 Transfer
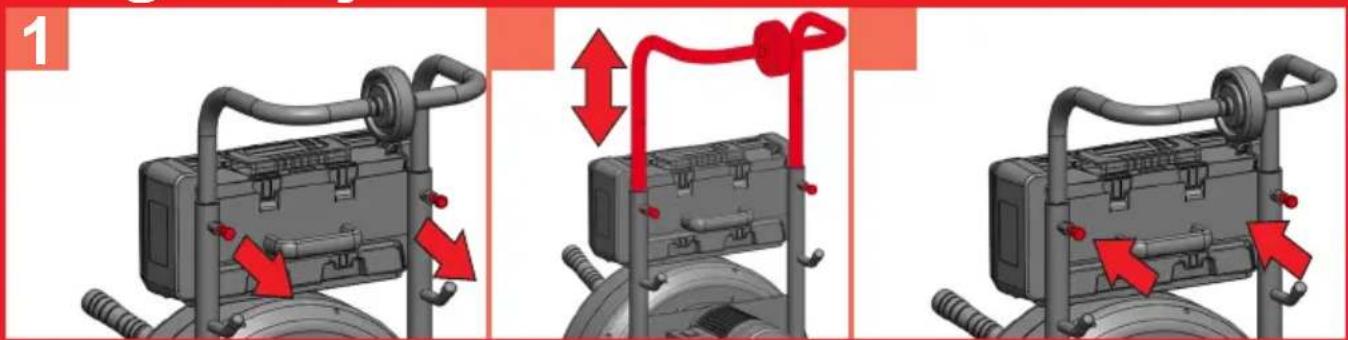
6.2.1 Height adjustment of the transport handle (B)
→ Open both locking bolts and lock this through turning through 90°.

During opening, hold the handle in position.
→ Select the suitable handle height. According to the application there are four selectable handle settings. The lowest handle position is the setting for transport in a vehicle.
→ Turn both locking bolts back into the locking position.

Ensure that both locking bolts audibly engage; if necessary check through light shifting.
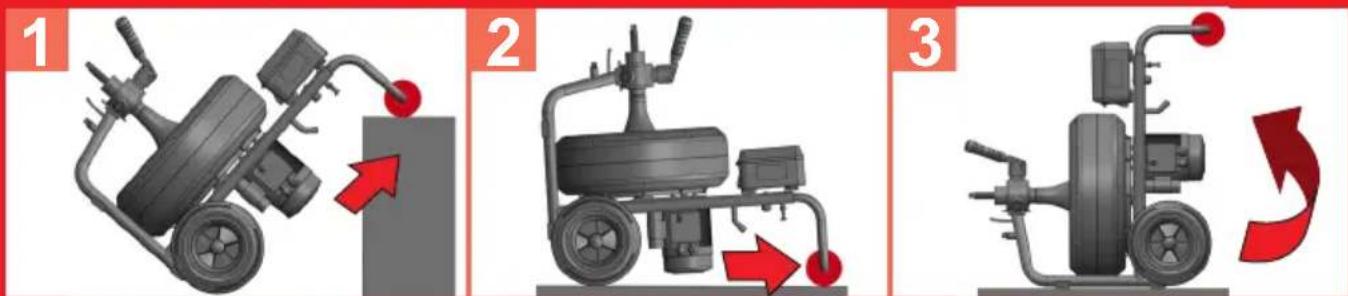
6.2.2 Loading the pipe cleaning machine (C)
→ Place the pipe cleaning machine backwards into the loading area of the vehicle.
→ Select the suitable handle height according to 6.2.1.
→ Tip the pipe cleaning machine with the transport wheel on the loading area of the vehicle.
→ Raise the pipe cleaning machine with both hands and push this completely onto the loading area.
When raising the pipe cleaning. select a back-friendly operating method, crouch down first before lifting with both hands or two people lift the pipe cleaning machine as a pair.

natural_image
3D rendering of a black industrial machine with wheels and attached components, next to a plain gray rectangle (no text or symbols visible)→ Place the pipe cleaning machine in the vehicle so that this does not slip during the drive.

Never transport the pipe cleaning machine lying down!
→ Stow away the cable in a manner suitable for transport.
6.3 Commissioning

The pipe cleaning machine should exclusively be operated by instructed and authorised personnel!
→ Check the electrical installation at the work place.
→ Place the foot switch in such a way that it can be easily reached and that all control elements are easy to operate.
→ Push the guide tube over the spiral up to the dead stop on the feed unit housing and fix in place with the catch.
→ Connect the mains power plug to the appropriate power supply network.

Ensure that the motor switch is set to "OFF"!
Never use the cleaning device without a footswitch and guide hose!
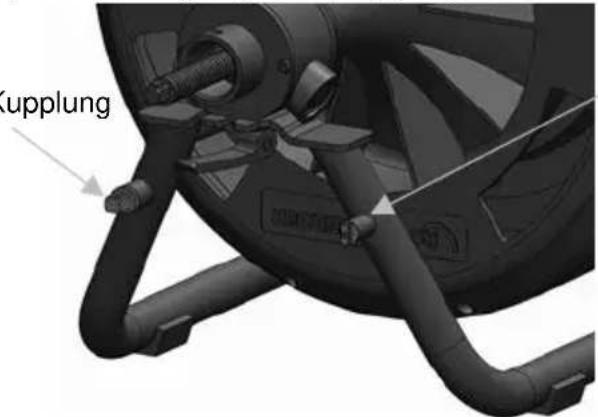
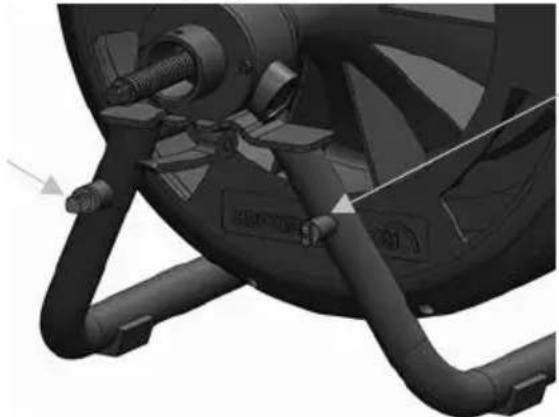
6.4 Coupling/ Decoupling the tools / spirals (A/D)
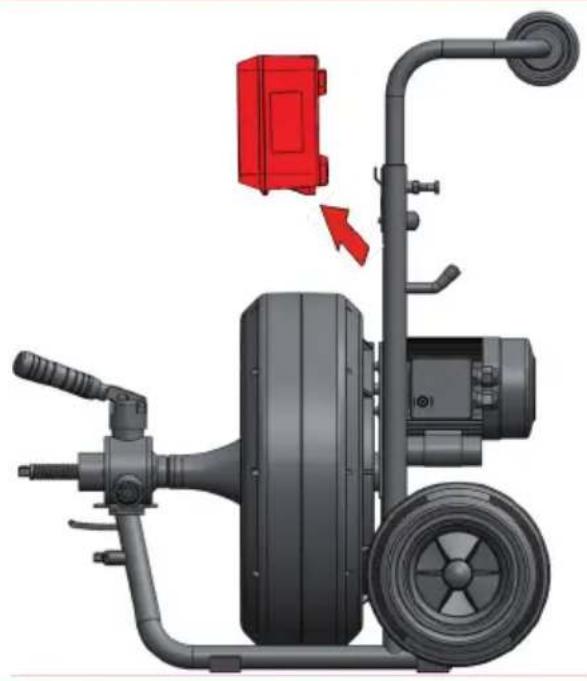
→ Remove the tool box from the holding device (see Figure D).
→ Select the suitable tool for use.
Coupling:
→ Push the tool / spiral until it engages with the coupling and check for firm seating.
Decoupling:
→ Push the segregation key into the bore and push the tool / spiral to the side out of the coupling.
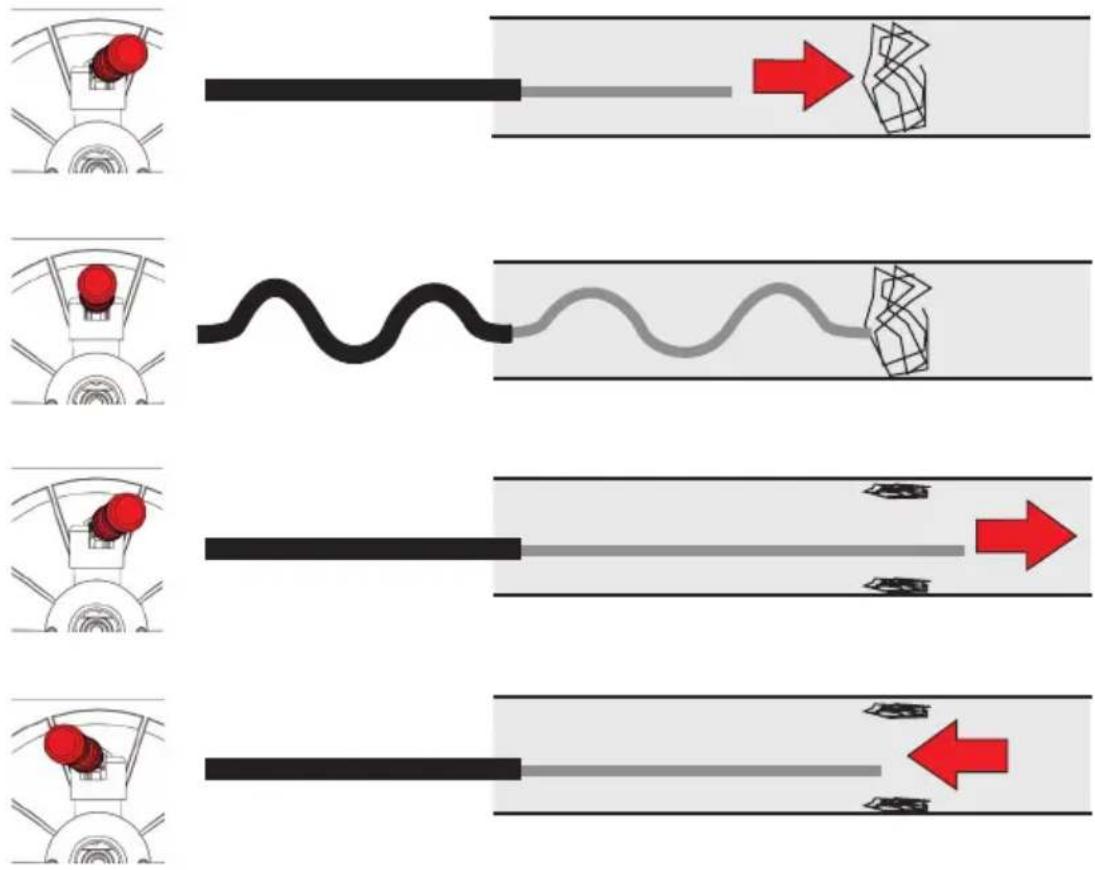
6.5 Operation (E)
Operation of the pipe cleaning machine may only be performed while taking account of all notes concerning safety of people and the machine!
Moving the spiral into the pipe:
→ Place the machine at a distance of about 1 m to the opening of the pipe to be cleaned.
→ Couple a suitable tool at the front (p. 6.4). Select the tool according to the type of dirt/fouling (being removed). Ensure correct seating!

Put on gloves before any further manual operations are performed!
Never use the cleaning device without the guide hose delivered!
→ At the motor switch, switch the machine to ready-to-operate (switch position I).
→ Hold the spiral with guide tube in the hand and switch on the motor at the foot switch.
→ The spiral feed is infinitely controlled (forwards, neutral and backwards) using the pressed feed unit handle.
6.6 Removing the pipe blockage (E)

The spiral should bore its way into the blockage material; it should not be pressed in.
→ If there is a perceptible counterpressure (from the blockage) and the spiral is pretensioned in a bowed apparatus, put the feed unit handle in neutral (the spiral simply turns on the spot) and push the bowed apparatus against the blockage.
→ If the spiral has penetrated into the pipe so that the bowed apparatus is detensioned, set the hand lever to feed again.
→ Repeat these processes until the blockage has been removed.

If there are increased loads on the spiral (recognisable by rearing up of the guide tube), release the feed unit handle immediately to release the pressure on the spiral if necessary use the return pipe!
Release pressure from the footswitch!
6.7 Pull the spiral back out of the pipe (E)
→ After successful removal of the blockage, put the feed unit handle into return travel in order to pull the spiral back into the drum.

Ensure that the spiral comes back without any great effort. If the return transport is difficult, run the spiral a short distance back into the pipe. Do not pull back the spiral by force.
→ During return travel of the spiral out of the pipe, place a water hose at the mouth of the pipe and flush off the dirty spiral with water. In this way the cleaned pipe is also flushed out.
→ If the coupled tool is visible again, release the feed unit handle, switch off the motor using the foot switch and the motor switch and remove the tool and the guide tube again.
→ Switch on the motor again and move back the spiral until it protrudes about 20cm out of the feed unit.

The spiral should never be fully moved back out of the drum!
The change in direction of rotation (switch position II) may only be performed for a short time in order to loosen a blocked tool.
6.8 Shut-down
→ Switch off the machine through actuation of the motor switch and pull out the mains power plug.
→ Remove the guide tube from the device.
To empty water out of the spiral drum, position the drum with the openings downwards; if necessary clean with a water hose.
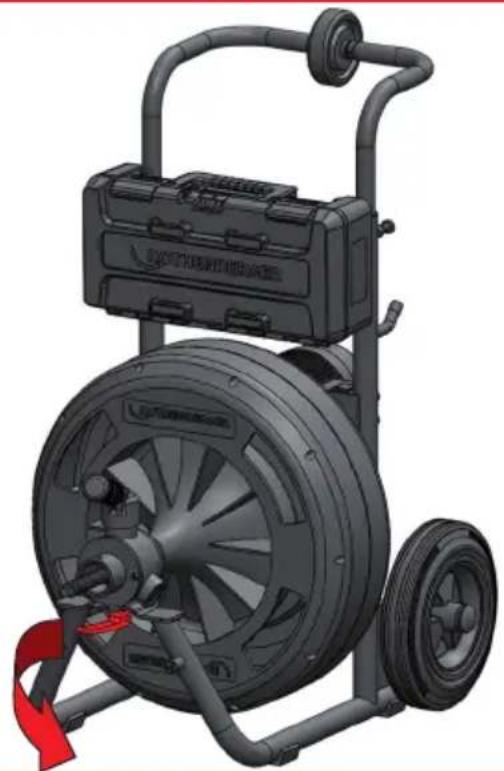
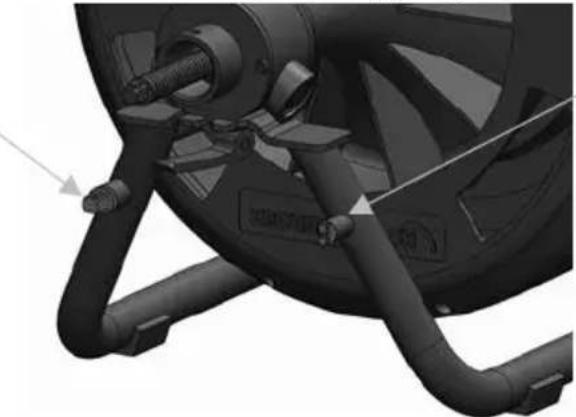
6.9 Changing the spiral drum (F)

Only change the spiral drum when the device is completely deenergized!
→ Place the pipe cleaning machine securely in a level, stable state.
→ Release the clamping grip (and push the feed unit to the front. In doing so fix the drum by hand on the frame.
→ Pull the spiral drum to the front in the axial direction and remove.

Due to the weight grip, grip the spiral drum with both hands and avoid any possible falling down on the feet.
→ Push new spiral drum in an axial direction all the way onto the axis in the frame.
→ Push the feed unit back again and fix in place with the clamping grip.

Ensure that the lever is closed with a sufficiently high force and stands at the end, as far as possible, horizontally.
The clamping grip is fitted with a setting thread in order to set the direction of the tensioning lever. A red point on the thread shows when the thread has too little overlap. For tensioning the knurled nut must be adjusted in such a way that the red point is covered otherwise the thread can be damaged. Ensure that all parts are free of dirt and are adequately greased!
Check correct seating of the feed unit!
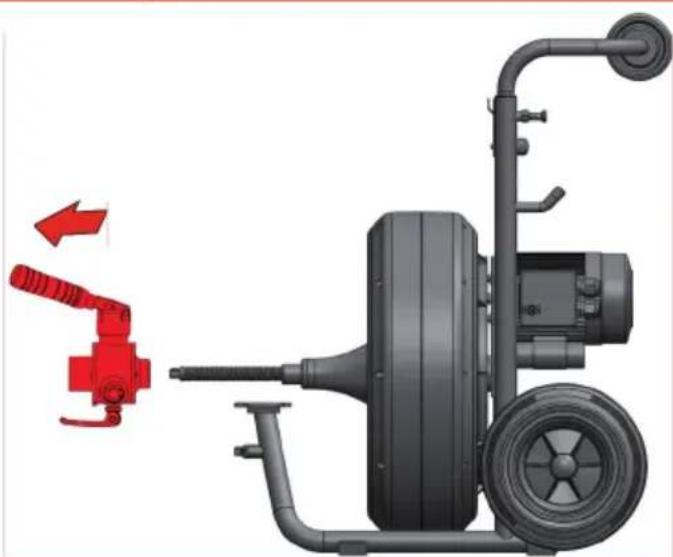
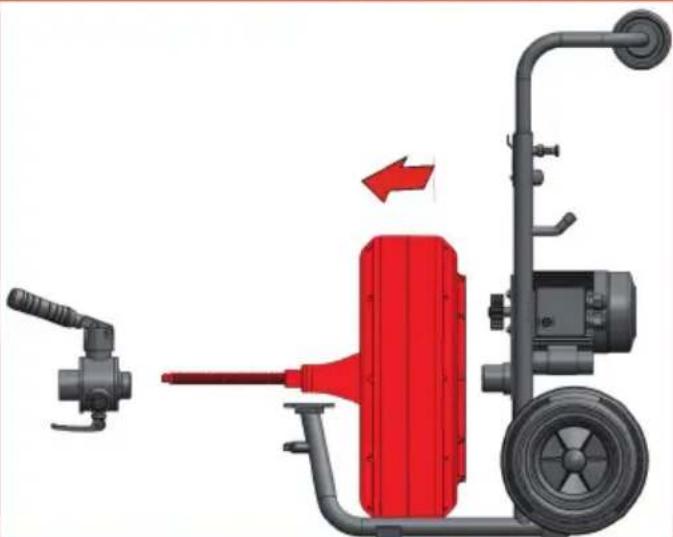
6.10 Extending the operating area (A)
→ Fully move the spirals into the pipe.
→ Decouple the spirals at the lower end from the connecting piece.
→ Fasten the spirals to the suitable coupling at the front on the frame.
On the left:
20 mm square coupling
natural_image
Close-up of a mechanical component with hoses and connectors (no visible text or symbols)On the right:
16 mm T-groove coupling for 13 mm – 16 mm spirals
According to 6.9, exchange the empty spiral drum against a drum which is fitted with the same spirals.
→ Decouple the spirals from the frame and connect these with the spirals in the spiral drum.
→ To stow the spirals proceed in the reverse sequence.
7 Care and Maintenance
Pull out the mains power plug before performing any servicing and maintenance!
The machine is maintenance-free except for the feed unit.
Clean and grease the feed unit regularly and check it for damage. The ball bearings can be replaced if necessary.
The device should be handled carefully and cleaned regularly.
The spirals and tools should be cleaned and preserved after every use. We recommend use of our special care product "ROWONAL".
All servicing, maintenance and repair work may only be performed by instructed specialist personnel!
7.1 Inserting new spirals
→ Move the spirals with the feed unit completely from the drum and unfasten the coupling.
→ Connect new spirals with the connecting piece and push in the spirals up to about 30cm.
8 Troubleshooting
| Symptom | Possible Reason | Solution |
| The machine does not start | No power supply | Check the power supply network |
| Motor defective | Contact our Customer Service Department | |
| Switch off the PRCD | Press the RESET button (PRCD) | |
| The foot switch / compressed air hose is defective | Contact our Customer Service Department | |
| No feed | Ball bearing in the feed unit is defective | Contact our Customer Service Department |
| Spiral defective | Replace the spiral |
9 Accessories
| Accessory Name | ROTHENBERGER Part Number |
| Welder's glove left, leather | 72120 |
| Welder's glove right, leather | 72121 |
| Welder's glove Pair, rubber | 1500000439 |
| ROWONAL rust remover (5 l) | 72140 |
| ROWONAL spiral combi-spray (0.2 l) | 72142 |
| Guide tube | 1000001850 |
| Segregation key | 72100 |
| Spiral 13 mm x 15 m, with bores | 1500002271 |
| Spiral 16 mm x 15 m, with bores | 72918 |
| Spiral 20 mm x 15 m, with bores | 1500002268 |
| Further accessory parts | www.rothenberger.com |
10 Customer service
The ROTHENBERGER service locations are available to help you (see listing in catalog or online) and replacement parts and service are also available through these same service locations.
Order your accessories and spare parts from your specialist retailer or using our service-after-sales hotline:
Phone: +49 (0) 61 95 / 800 - 8200
Fax: +49 (0) 61 95 / 800 - 7491
Email: service@rothenberger.com
www.rothenberger.com
11 Disposal
Components of the unit are recyclable material and should be put to recycling. For this purpose registered and certified recycling companies are available. For an environmental friendly disposal of the non-recyclable parts (e.g. electronic waste) please contact your local waste disposal authority.
For EU countries only:
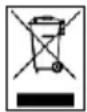
Do not dispose electric tools with domestic waste. In accordance with the European Directive 2012/19/EC the disposal of electrical and electronic equipment and its implementation as national law, electric tools that are no longer serviceable must be collected separately and utilised for environmentally compatible recycling.
natural_image
Illustration of a mechanical device with wheels and a separate gray rectangle (no text or symbols)natural_image
Close-up of a mechanical component with hoses and connectors, no visible text or symbolsEmail: service@rothenberger.com
www.rothenberger.com
6.1 Vista general (A)
natural_image
Mechanical device with wheels and a block, next to a plain gray rectangle (no text or symbols visible)natural_image
Close-up of a mechanical component with hoses and connectors (no visible text or symbols)Email: service@rothenberger.com
www.rothenberger.com
11 Eliminación
natural_image
Black industrial machine with wheels and attached mechanical components, next to a plain gray rectangle (no text or symbols visible)Email: service@rothenberger.com
www.rothenberger.com
11 Smaltimento
10 Klantenservice....61
natural_image
Black-and-white illustration of a mechanical device with wheels and a small component, next to a plain gray rectangle (no text or symbols)Links: 20 mm 4-kantige koppeling
natural_image
Mechanical component diagram showing a motor or fan assembly with hoses and connectors (no text or symbols visible)Email: service@rothenberger.com
www.rothenberger.com
natural_image
Illustration of a mechanical device with wheels and a separate gray rectangle (no text or symbols)natural_image
Close-up of a mechanical component with hoses and connectors (no visible text or symbols)Email: service@rothenberger.com
www.rothenberger.com
11 Eliminação
natural_image
Mechanical device with wheels and attached components, next to a plain gray rectangle (no text or symbols visible)natural_image
Close-up of a mechanical device with hoses and connectors (no visible text or symbols)Email: service@rothenberger.com
www.rothenberger.com
11 Affaldsbehandling
natural_image
Mechanical device with wheels and attached components, next to a plain gray rectangle (no text or symbols visible)natural_image
Close-up of a mechanical component with hoses and connectors, no visible text or symbolsEmail: service@rothenberger.com
www.rothenberger.com
11 Avfallshantering
natural_image
Illustration of a black electric vehicle with wheels and attached motor, next to a gray rectangle (no text or symbols)Høyre: 16 mm T-spor kobling for 13 mm - 16 mm spiral
7.1 Sett inn ny spiral
Email: service@rothenberger.com
www.rothenberger.com
11 Avfallsdumping
natural_image
Exterior view of a black electric vehicle with wheels and attached motor (no text or symbols visible)natural_image
Close-up of a mechanical component with hoses and connectors (no visible text or symbols)Email: service@rothenberger.com
www.rothenberger.com
11 Kierrätys
natural_image
Black industrial machine with wheels and attached mechanical components, next to a plain gray rectangle (no text or symbols visible)natural_image
Close-up of a mechanical component with hoses and connectors (no visible text or symbols)Email: service@rothenberger.com
www.rothenberger.com
11 Utylizacja
natural_image
Illustration of a mechanical device with wheels and a small attached component, next to a plain gray rectangle (no text or symbols)natural_image
Mechanical assembly diagram showing pipe connections and a motor component (no text or symbols visible)Email: service@rothenberger.com
www.rothenberger.com
11 Likvidace
natural_image
Black industrial machine with wheels and attached mechanical components, next to a plain gray rectangle (no text or symbols visible)natural_image
Close-up of a mechanical component with hoses and connectors (no visible text or symbols)Email: service@rothenberger.com
www.rothenberger.com
11 Atıklar İçin
natural_image
Illustration of a mechanical device with wheels and a small component, next to a plain gray rectangle (no text or symbols)natural_image
Close-up of a mechanical component with hoses and connectors (no visible text or symbols)Email: service@rothenberger.com
www.rothenberger.com
11 Ártalmatlanítás
natural_image
Black industrial machine with wheels and attached sensor, next to a plain gray rectangle (no text or symbols visible)natural_image
Close-up of a mechanical component with hoses and connectors (no visible text or symbols)Desno: 16 mm sklopka z utorom T za spirale 13 mm - 16 mm
→ Prazen spiralni boben zamenjajte v skladu s 6.9 z bobnom, ki ima navito enako spiralo.
→ Odpnite spiralo z okvira in jo povežite s spiralo na bobnu s spiralo.
→ Za shranjevanje spirale postopajte po obratnem zaporedju.
natural_image
Black and white illustration of a wheeled vehicle with wheels and attached equipment, next to a plain gray rectangle (no text or symbols)→ Čističku potrubia postavte vo vozidle tak, aby sa nemohla počas jazdy zošmyknút'.

Nikdy neprepravujte čističku potrubia ležmo!
natural_image
Close-up of a mechanical component with hoses and connectors (no visible text or symbols)natural_image
Black industrial machine with wheels and attached mechanical components, next to a plain gray rectangle (no text or symbols visible)natural_image
Close-up of a mechanical component with hoses and connectors (no visible text or symbols)Отдясно: 16 mm T- образен канал куплунг за 13 mm - 16 mm спирала
natural_image
Mechanical device with wheels and attached components, next to a plain gray rectangle (no text or symbols visible)Email: service@rothenberger.com
www.rothenberger.com
natural_image
Black industrial electric vehicle with wheels and attached sensor, next to a plain gray rectangle (no text or symbols visible)natural_image
Close-up of a mechanical component with hoses and connectors (no visible text or symbols)natural_image
Black industrial machine with wheels and attached mechanical components, next to a plain gray rectangle (no text or symbols visible)natural_image
Close-up of a mechanical component with hoses and connectors (no visible text or symbols)电子邮件:service@rothenberger.com
www.rothenberger.com
11 丢弃处理
natural_image
Blank grid paper with uniform gray squares on white background (no text or symbols)NOTES
NOTES

natural_image
Blank grid paper with uniform gray squares on white background (no text or symbols)EU-DECLARATION OF CONFORMITY
We declare on our sole accountability that this product conforms to the standards and guidelines stated.
DECLARATION EU DE CONFORMITÉ
Director Corporate Technology
D-65779 Kelkheim/Germany
ROTHENBERGER Worldwide
| Australia | ROTHENBERGER Australia Pty. Ltd.Unit 6 · 13 Hoyle Avenue · Castle Hill · N.S.W. 2154Tel. + 61 2 / 98 99 75 77 · Fax + 61 2 / 98 99 76 77rothenberger@rothenberger.com.auwww.rothenberger.com.au |
| South Africa | ROTHENBERGER-TOOLS SA (PTY) Ltd.P.O. Box 4360 - Edenvale 1610 |
| 165 Vanderbilt Street, Meadowdale Germiston Gauteng (Johannesburg), South AfricaTel. + 27 11/1/3 72 96 31 • Fax+ 27 11/1/3 72 96 32Info@rothenberger.co.za • www.rothenberger.co.za |
| Spain | ROTHENBERGER S.A.Ctra, Durango-Elomlo, Km 2 • E-48220 Abadiano (Mizcaya)(P.O. Box) 117 • E-48200 Durango (Mizcaya)Tel. + 34 94//6 21 01 00 • Fax + 34 94//6 21 01 3export@rothenberger.es • www.rothenbergergas |
| Sweden | ROTHENBERGER Sweden ABHemvärnsgatan 22 • S- 171 54 Solna, SverigeTel. + 46 8//54 60 23 00 • Fax + 46 8//54 60 23 01roswe@rothenberger.se • www.rothenberger.se |
| Switzerland | ROTHENBERGER (Schweiz) AGHerostr. 9 • CH-8048 ZürichTel. + 41 44//435 30 30 • Fax + 41 44//401 06 08Info@rothenberger-werkzeuge.ch |
| Turkey | ROTHENBERGER TÜRKIYEROTHENBERGER Center, Barbanos Bulvan Nr29TR-34775 Senfall / Ümraniye-IstanbulTel. + 90// 216 449 24 85 · Fax + 90//216 449 24 87rothenberger@rothenberger.com.trwww.rothenberger.com.tr |
| UAE | ROTHENBERGER Middle East FZCOPO Box 261190 • Jebel Ali Free ZoneDubai, United Arab EmiratesTel. + 971//48 83 97 /77 -Flax+ 971//48 83 97 57office@rothenberger.ae |
| ROTHENBERGER EQUIPMENT TRADING & SERVICES LLCPO Box 91208 • Mussafah Industrial AreaAbu Dhabi, United Arab EmiratesTel. +971//25:50:01:54 •+971//25:50:01:58uaesales@rothenberger.ae |
| UK | ROTHENBERGER UK Limited2, Kingsthorne Park, Henson Way,Kettering • GB-Northants NN16 8PXTel. + 44 15 36//31 03 00 • Fax + 44 15 36//31 06 00Info@rothenberger.co.uk |
| USA | ROTHENBERGER USA LLC7130 Clinton Road • Loves Park, IL 611111,USATel. +1/80 05 45 76 98 • Fax + 1/81 56 33 08 79pIpetools@rothenberger-usa.comwww.rothenberger-usa.com |
| ROTHENBERGER Werkzeuge GmbH |
| Industriestraße 7 |
| D- 65779 Kelkheim / Germany |
| Telefon + 49 (0) 61 95 / 800 - 0 |
| Fax + 49 (0) 6195 / 800 - 3500 |
| info@rothenberger.com |