
ROSCOPE i2000 - Inspection camera ROTHENBERGER - Free user manual and instructions
Find the device manual for free ROSCOPE i2000 ROTHENBERGER in PDF.

| Product type | Portable video inspection camera |
| Brand | Rothenberger |
| Model | ROSCOPE i2000 |
| Dimensions (L x W x H) | 35 cm x 10.8 cm x 7 cm |
| Weight | 0.95 kg |
| Power supply | Li-Ion battery 3.7 V / 5200 mAh (19.24 Wh) |
| Charger | Input 100-240 V AC, 50-60 Hz; output 5 V DC 1.2 A |
| Operating time | 3 to 5 hours of continuous use |
| Charging time | Approximately 5 hours (device off) |
| Display | 3.5" TFT LCD touchscreen, resolution 320 x 240 |
| Image resolution | 720 x 480 pixels |
| Video resolution | 640 x 480 pixels |
| Waterproof depth (camera head) | Up to 9 m (30 ft) |
| Standard cable length | 1.2 m (4 ft) |
| Maximum length with extensions | 9.7 m (32 ft) |
| Memory | SD card (included) |
| Main functions | Image/video capture, zoom, LED adjustment, auto level, Wi-Fi, audio annotations, torch |
| Operating temperature | 0 °C to 40 °C |
| Storage temperature | -20 °C to 60 °C |
| Humidity | Max 95% non-condensing (display unit) |
| Spare parts | TEC 1000 module, hook/magnet/mirror, charger, 25/16 module, ROLOC Plus module |
| Maintenance | Alcohol or mild detergent, soft cloth for screen, cotton for head |
| Safety | Read the manual, do not use in explosive atmosphere, do not open, battery not user-replaceable |
| Disposal | Do not dispose of in household waste, recycle according to WEEE directive |
| Customer service | Phone +49 (0) 61 95 / 800 - 8200 |
Frequently Asked Questions - ROSCOPE i2000 ROTHENBERGER
User questions about ROSCOPE i2000 ROTHENBERGER
0 question about this device. Answer the ones you know or ask your own.
Ask a new question about this device
Download the instructions for your Inspection camera in PDF format for free! Find your manual ROSCOPE i2000 - ROTHENBERGER and take your electronic device back in hand. On this page are published all the documents necessary for the use of your device. ROSCOPE i2000 by ROTHENBERGER.
USER MANUAL ROSCOPE i2000 ROTHENBERGER
natural_image
Red and black endoscopic endoscope device with curved cable, no visible text or symbolsEN Instructions for use
Intro
EU-DECLARATION OF CONFORMITY
We declare on our sole accountability that this product conforms to the standards and guidelines stated.
DECLARATION EU DE CONFORMITÉ
authorized representative signature
ppa. Thorsten Bühl Kelkheim, 22.02.2016
Director Corporate Technology
D-65779 Kelkheim/Germany
No. 1500000696 ROSCOPE i2000 + Modul TEC
Intro
| DEUTSCH | Seite 2 |
| Bedienungsanleitung bitte lesen und aufbewahren! Nicht wegwerfen! | |
| Bei Schäden durch Bedienungsfehler erlischt die Garantie! Technische Änderungen vorbehalten! | |
| ENGLISH - Original User ManualPlease read and retain these directions for use. Do not throw them away! The warranty does not cover damage caused by incorrect use of the equipment! Subject to technical modifications! | |
| FRANÇAIS | page 38 |
| Lire attentivement le mode d'emploi et le ranger à un endroit sûr! Ne pas le jeter ! La garantie est annulée lors de dommages dûs à une manipulation erronée ! Sous réserve de modifications techniques! | |
| ESPAÑOL | página 56 |
| ¡Por favor, lea y conserve el manual de instrucciones! ¡No lo tire! ¡En caso de daños por errores de manejo, la garantía queda sin validez! Modificaciones técnicas reservadas! | |
| ITALIANO | Pagina 74 |
| Per favore leggere e conservare le istruzioni per l'uso! Non gettarle via! In caso di danni dovuti ad errori nell'uso, la garanzia si estingue! Ci si riservano modifiche tecniche! | |
| NEDERLANDS | bladzijde 92 |
| Lees de handleiding zorgvuldig door en bewaar haar goed! Niet weggooien! Bij schade door bedieningsfouten komt de garantieverlening te vervallen! Technische wijzigingen voorbehouden! | |
| PORTUGUES | pagina 110 |
| Queiram ler e guardar o manual de instruções! Não deitar fora! Em caso de avarias por utilização incorrecta, extingue-se a garantía! Reservado o direito de alterações técnicas! | |
| DANSK | side 128 |
| Læs betjeningsvejledningen, og gem den til senere brug! Smid den ikke ud! Skader, som måtte opstå som følge af betjeningsfejl, medfører, at garantien mister sin gyldighed! Ret til tekniske ændringer forbeholdes! | |
| SVENSKALäs igenom bruksanvisningen och förvara den väl! Kasta inte bort den! Garantin upphör om apparaten har använts eller betjänats på ett felaktigt sätt! Med reservation för tekniska ändringar! | |
| NORSKLes bruksanvisningen og oppbevar den vell Ikke kast den! Oppstår skader på grunn av betjeningsfeil opphører garantiens gyldighet! Tekniske forandringer forbeholdes! | |
| SUOMILue ja säilytä tämä käyttöohje! Älä heitä pois!Takuu ei kata käyttövirheistä aiheutuvia vahinkoja! Oikeudet teknisiin muutoksiin pidätetään! | |
| POLSKI | strony 196 |
| Instrukcjè obsługi prosze przeczytac i przechowac! Nie wyrzucac!Przy uszkodzeniach wynikajacych z blédów obsługi wygasa gwarancja! Zmiany techniczne zastrzezone! | |
| CESKYNavod k obsluze si prosim přečtěte a uschovejte jej! Nevyhazujte jej!V pripade poškozeni zpusobenem chybnou obsluhou zanika zaruka! Technicke změny jsou vyhrazeny! | |
| TÜRKÇE | sayfa 233 |
| Kullanim açıklamalarini lütfen dikkatlice okuyunuz ve bir yerde muhafaza ediniz! Çöpe atmayiniz!Kullaniminda yapılan hatalar, garantinin silinmesine neden olur! Teknik deðipiklikler yapma hakkimiz saklidir! | |
| MAGYAR | oldaltól 250 |
| Kérjük, olvassa el és őrizze meg a kezelési utasítást! Ne dobja el!A helytelen kezelésböl származó károsodások esetén megszůnik a jótállás! Můszaki változtatások fenntartva! | |
| ROMÁNESC | Pagina 268 |
| Vä rugäm sä citiți și sä păstrați manualul de utilizare! Nu îl aruncați! În cazul deteriorărilor cauzate de erori de opera-re, garanția se pierde! Ne rezervăm dreptul de a efectua modificări tehnice. | |
| ESTU | Lehekülg 287 |
| Palun lugege kasutusjuhend läbi ja hoidke alles! Ärge visake ära! Kä-sitsemisvigadest tingitud kahjustuste korral kaotab garantii kehtivuse! Oigus tehnilisteks muudatusteks reserveeritud! | |
| LIETUVOS | Pusla-pis 305 |
| Perskaitykite naudojimo instrukciją ir pasilikite ją! Neišmeskite! Garan-tija nebus taikoma gedimams, atsiradusiems dėl netinkamo naudojimo! Pasiliekama teisė daryti techninius pakeitimus! | |
| LATVIEŠULūdzu, izlasiet un uzglabājiet lietošanas instrukciju! Nemest prom! Ja ir bojājumi ekspluatācijas klūdas dēļ, garantija zaudē spēku! Paturēt tehniskas izmaiņas! | |
| ΕΛΛΗΝΙΚΑΟδηνίες χειρισμού παρακαλείσθε να τις διαβάσετε και να τις φυλάσσετε! Μην τις πετάξετε!Σε ζημιες από σφάλματα χειρισμού παυει να ισχύει η εγγύηση! Με επιφύλαξη για τεχνικές αλλαγές! | |
| PYCCCKIЙ | Страница 360 |
| Прочите инструкцию по эксплуатации и сохраняйте её для дальнейшего использования! В случае поломки инструмента из-за несоблюдения инструкции клиент теряет право на обслуживание по гарантии! Возможны технические изменения! | |
Inhalt Seite
natural_image
Line drawing of a handheld device with a separate mechanical component (no text or symbols)natural_image
Black handheld electronic device with a screen and control buttons (no visible text or symbols)natural_image
Line drawing of a handheld device with a separate mechanical component (no text or symbols)natural_image
Close-up of a mechanical component with a highlighted section (no visible text or symbols)natural_image
Close-up of a black tool with a metallic handle and a small metallic clip attached (no text or symbols visible)natural_image
Close-up of a black-handled medical or dental tool with a curved handle, isolated on white background (no text or symbols visible)natural_image
Grayscale image of a dark, indistinct object with no visible text or symbols, surrounded by icons and a 'SD 98%' label (no readable document content)natural_image
Grid of grayscale images showing eye and lens functions with directional arrows (no text or symbols)natural_image
Three gray icons: a recycling bin with warning triangle, a checkmark, and an 'X' symbol (no text or labels)
Ja

Nein
natural_image
Grayscale image of a dark circular object with tool icons and a 'SD' badge (98%) at bottom right, no readable text or symbols on the main subject.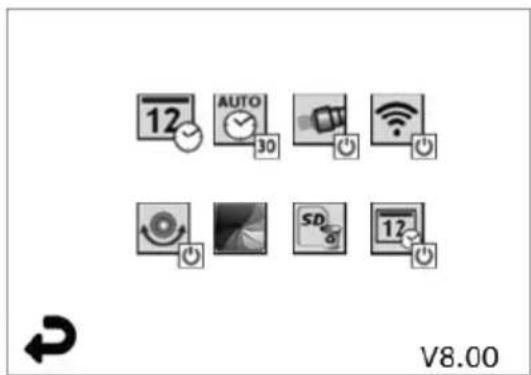
Schritt 3

flowchart
graph LR
    A["ROTHENBERGER"] --> B["Battery icon with checkmark and cross"]
    B --> C["No power symbol"]

natural_image
Close-up of a handheld electronic device with a power button icon (no text or symbols on the device itself)
natural_image
Black handheld device with a small screen and a button, pointing to a button (no text or symbols visible)Email: service@rothenberger.com
www.rothenberger.com
Contents Page
1 Safety Notes 23
1.1 General Safety Rules 23
1.2 Safety Instruction 24
2 Technical Data / Specification 25
3 Function of the unit 26
3.1 Description 26
3.2 Standard Equipment 26
3.3 Charging the ROSCOPE i2000 27
3.4 Installing the Imager Head Cable 27
3.5 Installing the Camera Accessories 28
3.6 Installing the SD Memory Card 29
4 On-Screen Navigation 30
5. Navigation Buttons 30
6. On-Screen Icons / Settings and Navigation 31
6.1 Live Screen Display 31
6.2 Tools / Menu 31
6.3 Saved Pictures and Video 32
6.4 Playback Stil Image / Adding an Audio Annotation 33
7. Touch Screen Navigation / Settings 34
8. Wireless Transfer of Images / Video 34
9. Transferring Images to a computer 35
10. How to update 35
11. Operation of the ROSCOPE i2000 App 36
12. Cleaning Instruction 36
13 Storage 36
14. Troubleshooting 37
15. Accessories 37
16. Disposal 37
17. Customer service 37
Markings in this document:
Danger!
This sign warns against the danger of personal injuries.

This sign warns against the danger of property damage and damage to the environment.
→ Call for action
This product is covered by U.S. Patents: 7,384,308; 7,431,619 B2; 7,581,988 B2; 7,584,534; Chinese Patents: ZL200620147826.1; ZL200620147827.6; ZL2007200004596.8; and other patents pending.
USA
This device complies with Part 15 of the FCC Rules. Operation is subject to the following two conditions: (1) This device may not cause harmful interference, and (2) This device must accept any interference received, including interference that may cause undesired operation.
FCC RF Radiation Exposure Statement:
This equipment complies with FCC radiation exposure limits set forth for an uncontrolled environment. End users must follow the specific operating instructions for satisfying RF exposure compliance. This transmitter must not be co-located or operating in conjunction with any other antenna or transmitter, except in accordance with FCC multi-transmitter product procedures.
This equipment has been tested and found to comply with the limits for Class A digital devices, pursuant to Part 15 of the FCC rules. These limits are designed to provide reasonable protection against harmful interference in a residential installation. This equipment generates uses and can radiate radio frequency energy and, if not installed and used in accordance with the instructions, may cause harmful interference to radio communications. However, there is no guarantee that interference will not occur in a particular installation. If this equipment does cause harmful interference to radio or television reception, which can be determined by turning the equipment off and on, the user is encouraged to try to correct the interference by one or more of the following measures:
• Reorient or relocate the receiving antenna.
- Increase the separation between the equipment and receiver.
- Consult the dealer for help.
Use of shielded cable is required to comply with Class A limits in Subpart B of Part 15 of the FCC rules.
Canada
This device complies with Industry Canada license-exempt RSS standard(s). Operation is subject to the following two conditions: (1) This device may not cause harmful interference, and (2) This device must accept any interference received, including interference that may cause undesired operation.
Changes or modifications not expressively approved by the party responsible for compliance could void the user's authority to operate the equipment.
1.1 General Safety Rules
It is recommended to read the entire manual before operating the ROSCOPE i2000:
WARNING! Read all instructions. Failure to follow all instructions listed below may result in electric shock, fire and/or serious injury. The term „power tool“ in all of the warnings listed below refers to your mains operated (corded) power tool or battery operated (cordless) power tool.
SAVE THESE INSTRUCTIONS.
1) Work area
a) Keep work area clean and well lit. Cluttered and dark areas invite accidents.
b) Do not operate power tools in explosive atmospheres, such as in the presence of flammable liquids, gases or dust. Power tools create sparks which may ignite the dust or fumes.
c) Do not expose to corrosive chemicals.
d) The imager is water-proof to 9 m depth however the use of the handheld device should be limited to dry environments (as it is not water proof).
e) Keep children and bystanders away while operating a power tool. Distractions can cause you to lose control.
2) Electrical safety
a) Power tool plugs must match the outlet. Never modify the plug in any way. Do not use any adapter plugs with earthed (grounded) power tools. Unmodified plugs and matching outlets will reduce risk of electric shock.
b) Avoid body contact with earthed or grounded surfaces such as pipes, radiators, ranges and refrigerators. There is an increased risk of electric shock if your body is earthed or grounded.
c) Do not expose power tools to rain or wet conditions. Water entering a power tool will increase the risk of electric shock.
d) Do not abuse the cord. Never use the cord for carrying, pulling or unplugging the power tool. Keep cord away from heat, oil, sharp edges or moving parts. Damaged or entangled cords increase the risk of electric shock.
e) When operating a power tool outdoors, use an extension cord suitable for outdoor use. Use of a cord suitable for outdoor use reduces the risk of electric shock.
3) Personal safety
a) Stay alert, watch what you are doing and use common sense when operating a power tool. Do not use a power tool while you are tired or under the influence of drugs, alcohol or medication. A moment of inattention while operating power tools may result in serious personal injury.
b) Use safety equipment. Always wear eye protection. Safety equipment such as dust mask, nonskid safety shoes, hard hat, or hearing protection used for appropriate conditions will reduce personal injuries.
c) Do not overreach. Keep proper footing and balance at all times. This enables better control of the power tool in unexpected situations.
d) Dress properly. Do not wear loose clothing or jewelry. Keep your hair, clothing and gloves away from moving parts. Loose clothes, jewelry or long hair can be caught in moving parts.
4) Power tool use and care
a) Do not force the power tool. Use the correct power tool for your application. The correct power tool will do the job better and safer at the rate for which it was designed.
b) Do not use the power tool if the switch does not turn it on and off. Any power tool that cannot be controlled with the switch is dangerous and must be repaired.
c) Store idle power tools out of the reach of children and do not allow persons
unfamiliar with the power tool or these instructions to operate the power tool. Power tools are dangerous in the hands of untrained users.
d) Maintain power tools. Check for misalignment or binding of moving parts, breakage of parts and any other condition that may affect the power tools operation. If damaged, have the power tool repaired before use. Many accidents are caused by poorly maintained power tools.
e) Use the power tool, accessories and tool bits etc., in accordance with these instructions and in the manner intended for the particular type of power tool, taking into account the working conditions and the work to be performed. Use of the power tool for operations different from those intended could result in a hazardous situation.
f) Do not place tool into anything or anywhere that may contain a live electrical charge.
5) Battery tool use and care
a) Recharge only with the charger specified by the manufacturer. A charger that is suitable for one type of battery pack may create a risk of fire when used with another battery pack.
b) Use power tools only with specifically designated battery packs. Use of any other battery packs may create a risk of injury and fire.
c) Under abusive conditions, liquid may be ejected from the battery; avoid contact. If contact accidentally occurs, flush with water. If liquid contacts eyes, additionally seek medical help. Liquid ejected from the battery may cause irritation or burns.
6) Service
Have your power tool serviced by a qualified repair person using only identical replacement parts. This will ensure that the safety of the power tool is maintained.
7) Battery is designed to be serviceable by a trained technician (service center), and should not be removed in the field.
1.2 Safety Instruction
A/C Power Supply Safety
- Do not probe A/C power supply with conductive objects. Shorting of battery terminals may cause sparks, burns and/or electrical shock.
- Do not use the A/C power supply if damaged. A damaged A/C power supply increases the risk of electrical shock.
- Use an appropriate power source. Do not attempt to use a step-up transformer or an engine generator. Doing so may cause damage to the A/C power supply or the ROSCOPE i2000 resulting in electrical shock, fire or burns.
- Do not allow anything to cover the A/C power supply while in use. Proper ventilation is required for correct operation of the A/C power supply. Allow a minimum of 4" (10 cm) of clearance around the charger for proper ventilation.
- Unplug the A/C power supply when not in use. Reduces the risk of injury to children and untrained persons.
- Unplug the A/C power supply from outlet before attempting any maintenance or cleaning. Reduces the risk of electrical shock.
- Do not use the A/C power supply in a damp, wet or explosive environment. Do not expose to rain, snow or dirt. Contaminants and moisture increase the risk of electrical shock.
- Do not open the A/C power supply or ROSCOPE i2000 housings. Have repairs performed only at authorized locations.
- Do not carry the A/C power supply by the power cord. Reduces the risk of electrical shock.
Battery Safety
- The battery in the ROSCOPE i2000 is NOT designed to be user replaceable. Call your Service Center if you believe the ROSCOPE i2000 battery is in need of service.
-
Properly dispose of the ROSCOPE i2000. Exposure to high temperatures can cause the battery to explode, so do not dispose of in a fire. Some countries have regulations concerning battery disposal. Please follow all applicable regulations.
-
Charge battery in temperatures above 32°F (0°C) and below 113°F (45°C). Store ROSCOPE i2000 in temperatures above -4°F (-20°C) and below 140°F (60°C). Storage for a long time at temperatures above 95°F (35°C) will reduce the capacity of the ROSCOPE i2000. It is recommended to store the ROSCOPE i2000 at 77°F (25°C) to maximize battery life. Proper care will prevent serious damage to the battery. Improper care of the battery may result battery leakage, electrical shock and burns.
- If the ROSCOPE i2000 is damaged, do not plug the A/C power supply into it. Do not attempt to charge.
- Never use a home-made or incompatible battery pack. This may result in damage to unit and/or cause injury.
- Never disassemble the ROSCOPE i2000 unit. There are no user-serviceable parts inside. Disassembling the ROSCOPE i2000 may cause electrical shock or personal injury.
- Avoid contact with fluids leaking from the ROSCOPE i2000 unit. Fluids may cause burns or skin irritation. Thoroughly rinse with water in case of accidental contact with fluid. Consult doctor if fluid comes into contact with eyes.
natural_image
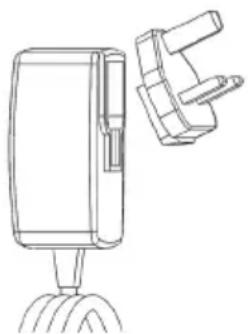
Line drawing of a handheld device with a separate bracket (no text or symbols)Figure No. 1 - Power Supply
2 Technical Data / Specification
Viewable Distance .... 5 cm – 30 cm (2" to 12")
A/C Power Supply ...... (See Figure No. 1 – Power Supply)
Input voltage 100 - 240 VAC, 50 - 60 Hz, 0.3 Amp
Maximum inrush current 15 A @ 115 VAC, 30 A @ 230 VAC
5V DC 1.2 Amp Max Output voltage
No Load Standby power < 0.3 W
Operating Temperature 32°F to 104°F (0°C to 40°C)
Storage Temperature -4°F to 140°F (-20°C to 60°C)
Relative Humidity 20% to 80% non-condensing
The charger is supplied with a selection of adaptors for use in multiple countries. Before first use, select the appropriate adaptor for your country and attach it to the charger.
Internal Li-Ion Battery ..... 3.7V, 5200 mAh, 19.24 watt-hours
Estimated run time 3 - 5 hours* of continuous use (* actual battery life will vary depending on the intensity of the Imager LEDs and the usage of the Exterior Handheld Device Lights). Battery charge time approximately 5 hours when units is turned off. (Note - Actual charge time will be considerably longer if unit is turned on while charging).
Weight 0.95 kilograms
Dimensions:
Length 35 cm (13.80")
Width 10.8 cm (4.25")
Height 7 cm (2.75")
Display:
Resolution 320 x 240 RGB
Screen Type 3.5" TFT LCD with touch panel
Operating Environment:
Temperature 0°C to 40°C (32°F to 104°F)
Humidity ...... Maximum of 95% non-condensing (display unit)
Storage Temperature....-20°C to 60°C (-4°F to 140°F)
Water Resistance .... Imager head and extensions to 9m (30') water depth (When properly assembled.)
NOTE: Hand-held unit is not moisture and water proof!
Cable Length 1.2 m (4') up to 9.7 m (32') with Optional Extensions
Image Resolution 720 x 480
Video Resolution 640 x 480
Memory ...... SD card provided for memory storage
Computer Interface ...... USB (Cable Included)
3 Function of the unit
3.1 Description
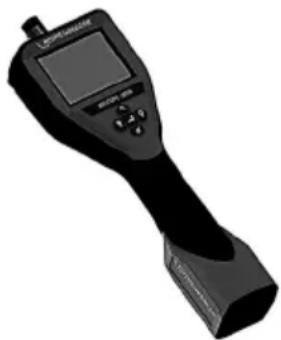
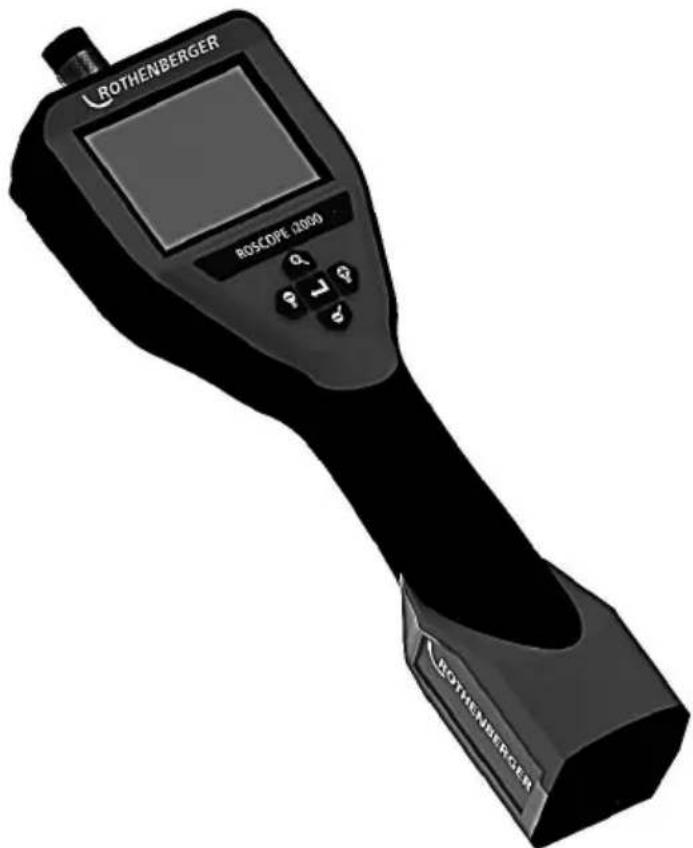
The ROSCOPE i2000, a handheld inspection device, displays live color video from an imaging source. This device is designed as a remote inspection tool to look into hard to reach areas such as home inspection, cable routing and plumbing inspections. It allows the user to capture still-images and full-motion video, along with audio. This device is equipped with an imaging and lighting source that features self-leveling, image rotation (with respect to gravity), zoom and LED light adjustment. These features ensure a detailed and accurate visual inspection. This unit is also equipped with the capability to wirelessly transmit either images or video to a secondary (local) handheld device, such as a Wi-Fi enabled smart phone or tablet, through the use of a simple app which can be downloaded from the internet. Accessories (mirror, hook, magnet, sold separately – see Figure No. 8 / Figure No. 9).
natural_image
Illustration of a handheld electronic device with a screen and control buttons (no visible text or symbols)Figure No. 2 - ROSCOPE i2000
3.2 Standard Equipment
The ROSCOPE i2000 inspection device comes with the following items (Figure No. 2):
- Handheld unit
• Internal Rechargeable Li-Ion Battery - Charger - supplied with a selection of adaptors for use in multiple countries (Figure No. 3)
- USB Cable
• 1.2 m (4') Imager (Connector Style A, Black Color)
• Manual, CD & SD card - Blow Mold Case

Figure No. 3 - Power Supply
3.3 Charging the ROSCOPE i2000
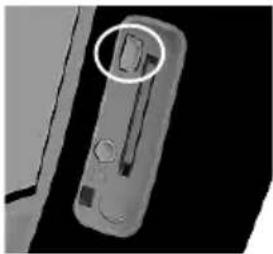
Open silicon cover on handheld unit and insert External Power Supply into the mini USB socket (Figure No. 4).
natural_image
Close-up of a mechanical component with a highlighted circular feature (no visible text or symbols)Figure No. 4 - USB Socket
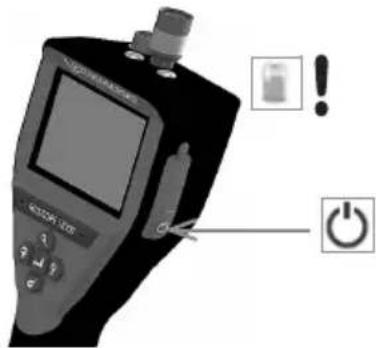
NOTE: The ROSCOPE i2000 will only charge the battery if the temperature is between 0^ C and 40^ C ( 32^ F and 113^ F). Outside of this temperature range the ROSCOPE i2000 may continue to operate but the batteries will not charge and the Charge Status LED will be off.
- Make sure the charger is unplugged. Inspect the power cord, charger and battery for damage or modifications, or broken, worn, missing, misaligned or binding parts. If any problems are found, do not use charger until the parts have been repaired or replaced.
- Clean any oil, grease or dirt from the equipment as described in the Maintenance section, especially handles and controls. This helps prevent the equipment from slipping from your grip and allows proper ventilation.
- Check to see that all warning labels and decals on the ROSCOPE i2000 and A/C Power Supply are intact and readable.
- Select the appropriate location for the A/C Power Supply before use. Check work area for:
- Adequate lighting.
- Flammable liquids, vapors or dust that may ignite. If present, do not work in area until sources have been identified and corrected. The charger is not explosion proof and can cause sparks.
- Do not use the device in wet or damp areas.
- With dry hands, plug the charger into the appropriate power source.
- When the battery is fully charged, the LED indicator will change from red to green.
- Once the battery is charged, the ROSCOPE i2000 may remain plugged into the charger until it is ready to be used. There is no risk of over-charging the battery. When the battery has been fully charged, the charger automatically switches to retention charging.
NOTE: Internal Battery delivered with partial charge. It is recommended that the battery be fully charged for at least 5 hours before initial use.
NOTE: Any service or replacement of the internal battery pack should be done by an authorized ROTHENBERGER service facility.
3.4 Installing the Imager Head Cable

Only one imager should be connected to the unit at a time. Always make sure the unit is then installing or removing an imager.
To use the ROSCOPE i2000 inspection device, the imager head cable must be connected to the handheld device. To connect the cable to the handheld device, make sure the key and slot (Figure No. 6) are properly aligned. Once they are aligned, hand-tighten the knurled nut to hold the connection in place. Note – The ROSCOPE i2000 is equipped with (2) different style connectors, making backward compatible with a variety of ROTHENBERGER imagers.
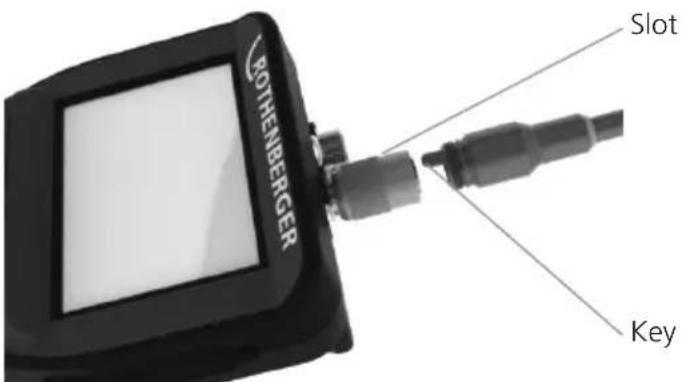
Figure 6 - Cable Connections (Connector Style "A", Black 9-Pin Style Connector) (For use with standard Imager provided with i2000 and with Module 25/16 Imager)
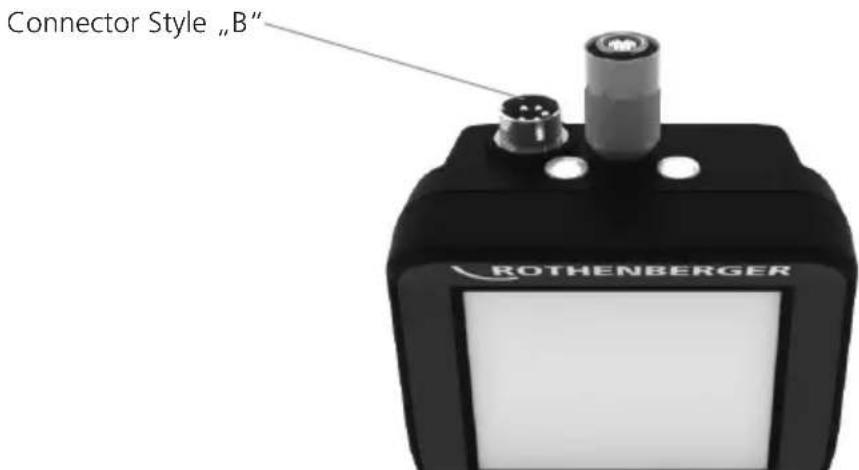
Figure 7 – Cable Connections (Connector Style "B", Silver 5-Pin Style Connector) (Connector Style "B" is used to attach previous versions of ROSCOPE Imager Cable to the ROSCOPE i2000)
NOTE: 1.2 m (4') cable extensions are available, for Connector Style "A" imager only, to increase the length of your cable up to 9.7 m (32') in length. To install an extension, first remove the imager cable from the handheld device by loosening the knurled nut. Connect the extension(s) to the handheld device as described above (Figure 6). The keyed end of the imager head cable connects to the slotted end of the extension.
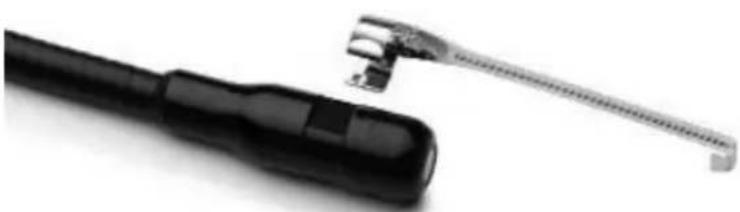
3.5 Installing the Camera Accessories
(Figure No. 8) shows a mirror, hook and magnet (accessories sold separately). Each accessory attaches to the (provided) Connector Style "A" Imager Head the same way.
natural_image
Close-up of a black tool with a metallic clamp and a small metallic bracket attached (no text or symbols visible)Figure 8 – Connector Style "A" accessories (sold separately)
To attach an accessory, hold the imager head as shown in (Figure No. 8). Slip the semicircle end of the accessory over the flats of the imager head as shown in Figure 8. Then rotate the accessory a 1/4 turn so the long arm of the accessory is extending out as shown (Figure No. 9).

natural_image
Close-up of a black-handled tool with a curved handle, isolated on white background (no text or symbols visible)Figure 9 – Installing an Accessory on the Connector "A" imager
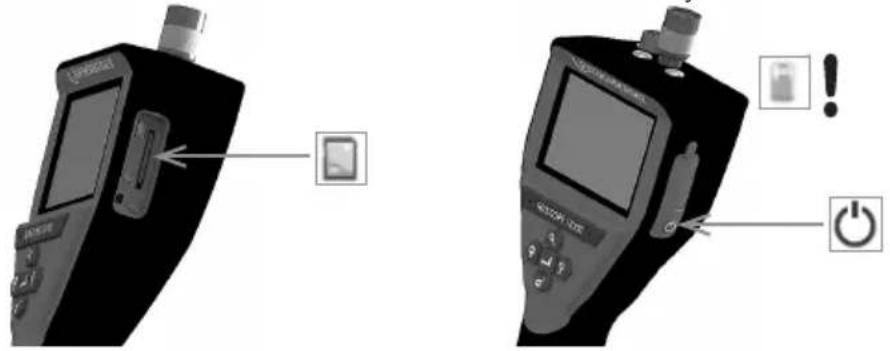
3.6 Installing the SD Memory Card
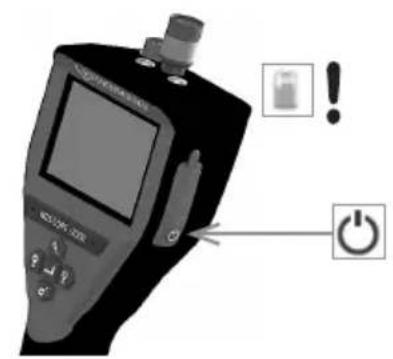
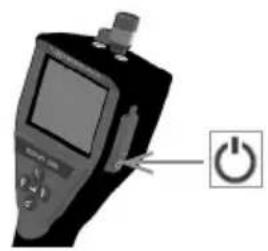
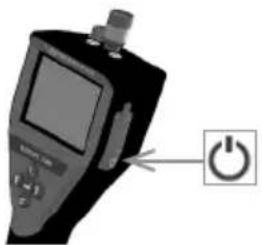
Locate the tab on the port cover (Figure No. 10), lift and pull to remove the cover and expose the SD card slot. (SD card is included). Insert the SD card into the slot (Figure No. 11) making sure the contacts are facing towards you and the angled portion of the card is facing down.
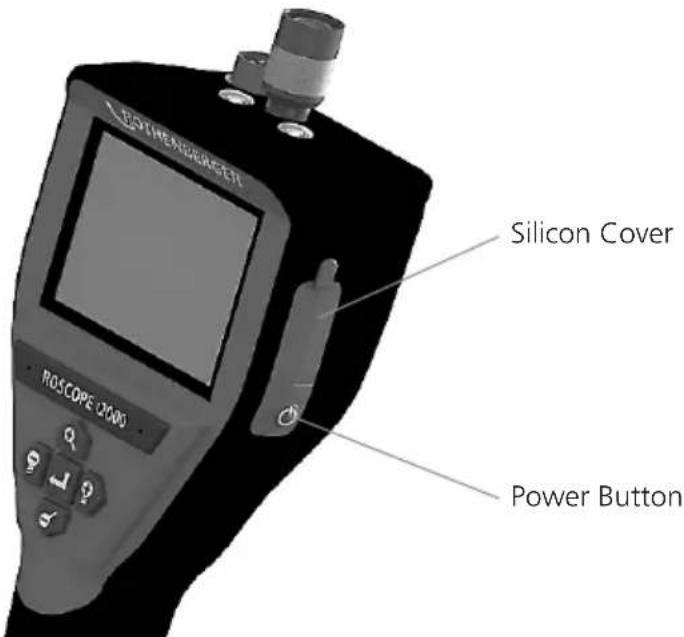
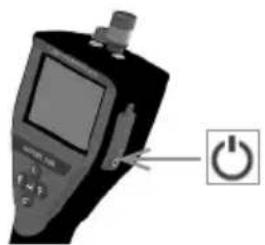
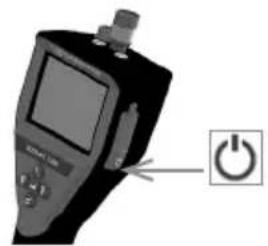
Figure 10 – Port Cover and Power Button
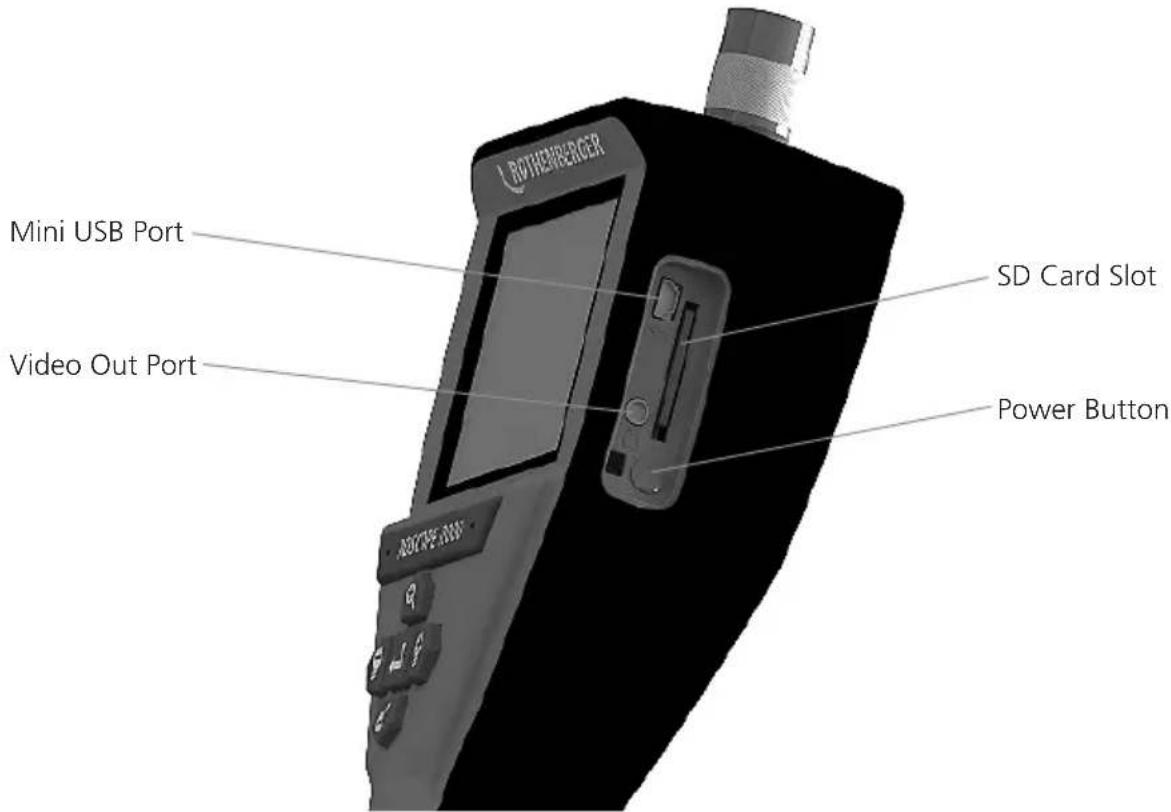
Figure No. 11 – Unit Inputs / Outputs
4 On-Screen Navigation
When the ROSCOPE i2000 inspection device is powered on, the first screen that is displayed is referred to as the splash screen (Figure No. 12). This screen tells you the device is booting up. Once the product is fully powered up, the screen will automatically switch to the live screen.

Figure No. 12 – Start-up / Splash Screen – Indicates Current Firmware Version on the Handheld Unit
5. Navigation Buttons

Capture Picture or Video (on/off)

LED Brightness +/-

Zoom Image
6. On-Screen Icons / Settings and Navigation
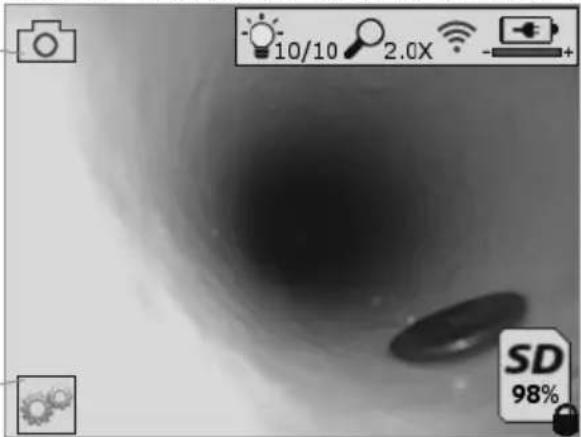
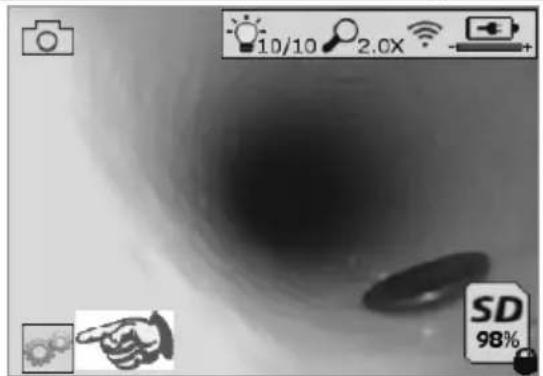
6.1 Live Screen Display
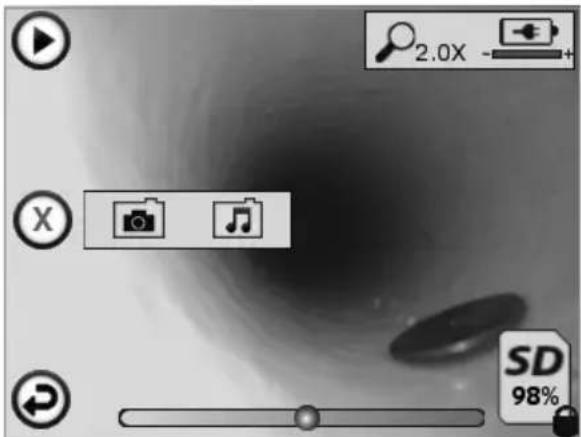
Capture Mode Indicator and Button (Touch screen to select camera or video)
natural_image
Grayscale abstract image with a dark central region and two circular shapes, no readable text or symbols.Tools/Menu Button (Touch screen to access Tools Menu)
NOTE - All icons will appear when the user touches the screen or presses a hardware button and will disappear after 3 seconds.

Video Capture Mode Selected

Image Capture Mode Selected (Default Setting)

Image LED intensity

Zoom level

Wi-Fi Connection established

Battery level

Indicates the amount of memory remaining on the installed SD card

Indicator that the SD card is write-protected
No icon will appear when there is no SD card installed (SD card required for memory storage). (Touch screen to access saved files)
NOTE - Actuating the power button while video is recording, may corrupt the SD card.
6.2 Tools / Menu

NOTE - All icons will appear when the user touches the screen or presses a hardware button and will disappear after 3 seconds.

Back Button (Touch screen to return to Live Image)

Firmware version

Set Time and Date (Touch screen for settings)

Auto-off Timer Function (Touch screen to select)
| -∞ | Disabled |
| -30 | Device will turn off after 30 minutes |
| -20 | Device will turn off after 20 minutes |
| -10 | Device will turn off after 10 minutes |

ROSCOPE "Headlight" Function (Touch screen to turn headlights on/off)

Wi-Fi Connection (Touch screen to turn on/off)
NOTE - To save the battery, turn off when not in use.

Up-is-Up Function (Touch screen to turn self-leveling on/off)

Black and White/Color (Touch screen to select)

Format SD Card

Add Time and Date to picture (Touch screen for on/off feature)
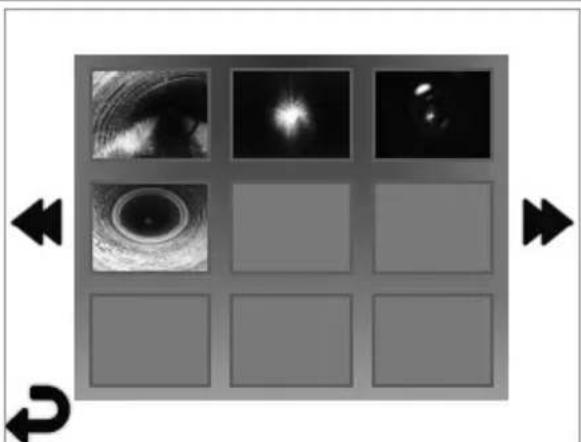
6.3 Saved Pictures and Video
natural_image
Grid of grayscale images showing eye, lens, and diffraction patterns with directional arrows (no text or symbols)NOTE - All icons will appear when the user touches the screen or presses a hardware button and will disappear after 3 seconds.
Selecting a Thumbnail will open the image/video to full-screen mode (Touch screen to select)

Back Button (Touch screen to return to Live Image)

Indication of a video file/audio file

Move to the previous page

Move to the next page

ROTHENBERGER
ENGLISH32
6.4 Playback Stil Image / Adding an Audio Annotation
NOTE - Sound-Bite can be recorded on live video. / It cannot be added to saved video.
NOTE - All icons will appear when the user touches the screen or presses a hardware button and will disappear after 3 seconds.

Back Button (Touch screen to return to Live Image)
Video or audio playback progress bar

Indicates the amount of memory remaining on the installed SD card

Indicator that the SD card is write-protected
Audio Notation Functions (Touch screen for choice of following commands)

Record an audio notation

Play an audio notation if one is present

Pause playing an audio notation

Stop the recording of an audio notation or a playing audio notation
Status Indicators

Zoom level

Battery level

Wi-Fi Connection established
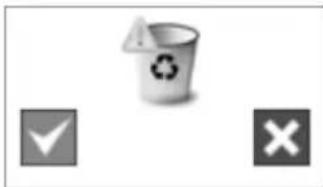
Delete current image or video


ete both image and video notation (Touch screen to delete)


ete just the audio notation (Touch screen to delete)
Touch screen to confirm deleting or cancel selection:
natural_image
Three gray icons: a recycling bin with an exclamation mark, a checkmark, and a cross on a white background (no text or symbols)
yes

no
7. Touch Screen Navigation / Settings
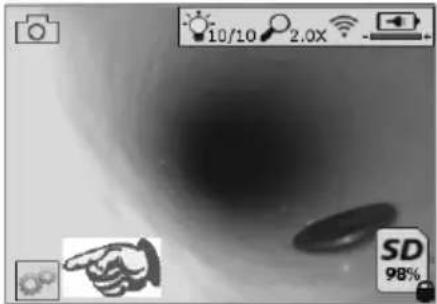

Figure No. 13 - Tools Menu Screen Figure No. 14 - Tools Menu Screen

Touch screen (Touch Tools icon / lower left corner - Figure No. 13) to enter the interact menu (Figure No. 14).

Touch the date & time icon (top left) to set date and time
- Tap each individual entry to select
- Tap up / down arrows repeatedly to desired entry
- Tap "Back" arrow to main menu

Touch "Auto Time-Out" icon (top center) to select feature:
- 10 minute time-out
- 20 minute time-out
- 30 minute time-out
- No time-out / unit must be manually turned off

Touch head lights icon (top right) to turn lights on / tap again to turn lights off

Touch to turn the Wi-Fi Connection on/off

Touch patented "Up-is-Up" self-leveling feature icon (bottom left) to turn feature on / again to turn feature off.
NOTE: You may witness black regions around the perimeter as the live image rotates within the LCD. This is a normal result of the format of the imager, zooming in on the live image will reduce this.

Touch the black & white / color icon (bottom center) to switch between black & white color modes.

Touch SD card (bottom right) - confirm yes/no to clear "ALL" SD card memory storage (100%).

Touch to turn feature for the time/date stamp on/off
8. Wireless Transfer of Images / Video
The ROSCOPE i2000 has the ability to wirelessly transfer saved images and video from the handheld device to a secondary Wi-Fi enabled smart phone, such that you can share data.
NOTE - Radio interference and the range between ROSCOPE i2000 and external devices can impact the transfer of data.
Go to www.rothenberger.com for complete details and a FREE firmware download or search Appstore.
9. Transferring Images to a computer
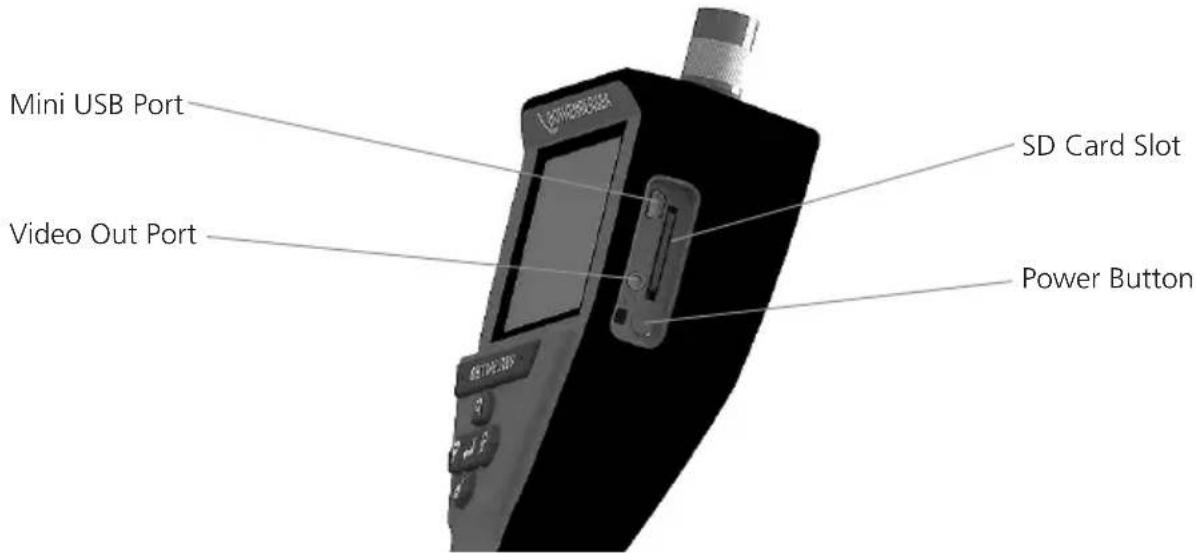
Figure No. 14 – USB Connection for Transfer
- Use the Mini USB cable to connect the ROTHENBERGER handheld device to the computer (Figure No. 14).
- Power the device ON, a splash screen saying "USB Connected" will appear on the LCD screen - follow the appropriate prompts from your computer (platforms and / or versions may vary)
- You may also remove the SD Card memory storage device and load directly into your computer - follow the appropriate prompts from your computer (platforms and / or versions may vary).
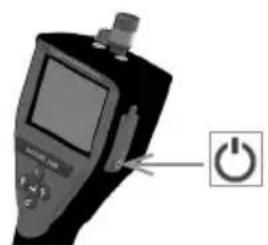
10. How to update
Periodically check for the latest version of firmware on www.rothenberger.com.
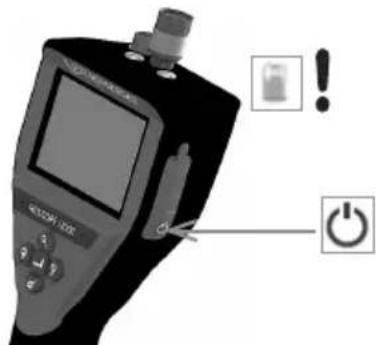
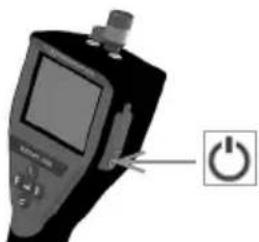
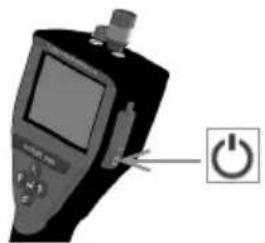
Step 1
Copy folder DCIM on an empty SD card.
Step 2
Insert SD card and start the unit. Make sure that battery level is at least 50%.
Step 3

flowchart
graph LR
    A["ROTHENBERGER"] --> B["Battery icon with checkmark and cross"]
    B --> C["Power Symbol with no accompanying circle"]
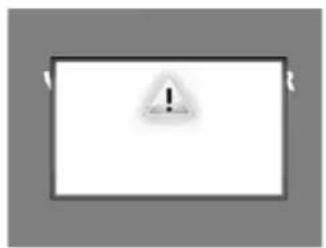
Do not press the power button when the "hour glass" is
Step 4
The firmware is updating (45 seconds).
Firmware updated successfully, OK to turn power off and remove SD card.
natural_image
Close-up of a handheld electronic device with a power button icon (no text or symbols on the device itself)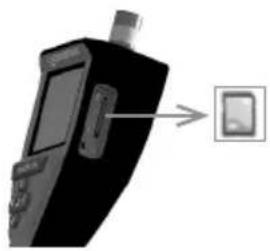
natural_image
Black handheld electronic device with a close-up of its screen and a small display, pointing to a separate screen icon (no text or symbols visible)11. Operation of the ROSCOPE i2000 App
Use of the app with an iOS device:
→ Switch on the ROSCOPE i2000, select the Extras/Menu button and activate the WLAN.
→ Activate the WLAN (RO2K.....) on the iOS device over Settings.
Settings:
Autom. connection ON
IP address:
Static
IP-address 192.168.10.241 (iOS device)
Subnet mask 255.255.0.0
Router 192.168.10.240 (ROSCOPE i2000)
→ Press the Home button on the iOS device twice and remove the programme(s) running in the background. Press the Standby On/Off button twice to close all connections.
→ Restart ROSCOPE i2000 and open the app on the iOS device.
The connection is created and Live Picture is now available.
Use of the app with the Android device:
→ Set up a "Hotspot" (mobile WLAN) on the Android device over Settings:
- Further settings
- Tethering and mobile hotspots
- Activate/select a mobile WLAN hotspot
- Click Configure in order to navigate to the hotspot settings.
- Establish the name of the hotspot and the password for the mobile network.
→ Switch on the ROSCOPE i2000, select the Extras/Menu button and activate the WLAN (IP address of the ROSCOPE i2000 visible under the hotspot name).
Then connect with the mobile WLAN hotspot (the Android device):
→ Open the app on the Android device, select Live Picture and enter the IP address of the ROSCOPE i2000 and then confirm.
The connection is created and Live Picture is now available.
12. Cleaning Instruction
- Alcohol wipes or mild detergent and water to remove dirt and grease from the product.
- Recommend soft optical cloth for cleaning the LCD window.
- Recommend cotton cloth for cleaning imager head.
- Allow appropriate drying time before operating handheld device.
13 Storage
- It is good practice to clean the unit prior to long term storage.
- It is best to store the unit in a cool dry location.
14. Troubleshooting
| Symptom Possible Reason Solution | ||
| Display unit does not turn on Battery | Battery is discharged Recharge battery | |
| Faulty electronics Contact ROTHENBERGERService Center | ||
| Display turns on, but does not show image | Loose cable connection Check cable connections | |
| Imager head covered by debris | Clean imager head | |
| Display shows an unresponsive image | Image processor encounters an error | Turn OFF unit/turn ON to reset processor |
| Battery does not hold a charge | Battery may have discharged slightly during storage | Recharge battery |
| Run time dependent on LED usage | Recharge battery more often when extensive use of LEDs | |
| Battery may be damaged Contact service center and replace battery | ||
| Life cycles of battery may have expired | Contact service center and replace battery |
15. Accessories
| Accessory Name ROTHENBERGER Part Number | |
| Replacement Module TEC 1000 69601 | |
| Hook Magnet and Mirror 69615 | |
| Charger | 1500001227 |
| Module 25/16 (16 m Imager Reel) | 1500000052 |
| Module ROLOC Plus (Line Finder) | 1500000057 |
16. Disposal
Components of the unit are of recyclable material and should be put to recycling. For this purpose registered and certified recycling companies are available. For an environmental friendly disposal of the non-recyclable parts (e.g. electronic waste) please contact your local waste disposal authority or contact your local ROTHENBERGER authorized service center.
For EU countries only:
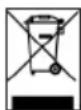
Do not dispose of electric tools with domestic waste. In accordance with European Directive 2012/19/EC on waste electrical and electronic equipment and its implementation as national law, electric tools that are no longer serviceable must be collected separately and utilised for environmentally compatible recycling.
17. Customer service
The ROTHENBERGER service locations are available to help you (see listing in catalog or on-line) and replacement parts and service are also available through these same service locations.
Order your accessories and spare parts from your specialist retailer or using RoService+ online:
Phone: +49 (0) 61 95 / 800 - 8200
Fax: +49 (0) 61 95 / 800 - 7491
Email: service@rothenberger.com
www.rothenberger.com
This product is covered by U.S. Patents: 7,384,308; 7,431,619 B2; 7,581,988 B2; 7,584,534; Chinese Patents: ZL200620147826.1; ZL200620147827.6; ZL2007200004596.8; and other patents pending.
USA
This device complies with Part 15 of the FCC Rules. Operation is subject to the following two conditions: (1) This device may not cause harmful interference, and (2) This device must accept any interference received, including interference that may cause undesired operation.
FCC RF Radiation Exposure Statement:
This equipment complies with FCC radiation exposure limits set forth for an uncontrolled environment. End users must follow the specific operating instructions for satisfying RF exposure compliance. This transmitter must not be co-located or operating in conjunction with any other antenna or transmitter, except in accordance with FCC multi-transmitter product procedures.
This equipment has been tested and found to comply with the limits for Class A digital devices, pursuant to Part 15 of the FCC rules. These limits are designed to provide reasonable protection against harmful interference in a residential installation. This equipment generates uses and can radiate radio frequency energy and, if not installed and used in accordance with the instructions, may cause harmful interference to radio communications. However, there is no guarantee that interference will not occur in a particular installation. If this equipment does cause harmful interference to radio or television reception, which can be determined by turning the equipment off and on, the user is encouraged to try to correct the interference by one or more of the following measures:
• Reorient or relocate the receiving antenna.
- Increase the separation between the equipment and receiver.
- Consult the dealer for help.
Use of shielded cable is required to comply with Class A limits in Subpart B of Part 15 of the FCC rules.
Canada
This device complies with Industry Canada license-exempt RSS standard(s). Operation is subject to the following two conditions: (1) This device may not cause harmful interference, and (2) This device must accept any interference received, including interference that may cause undesired operation.
Changes or modifications not expressively approved by the party responsible for compliance could void the user's authority to operate the equipment.
natural_image
Line drawing of a handheld device with a separate mechanical component (no text or symbols)natural_image
Black handheld electronic device with a screen and control buttons (no visible text or symbols)Figure 2 - ROSCOPE i2000
natural_image
Close-up of a mechanical component with a circular annotation highlighting a feature (no visible text or symbols)Figure 4 - Prise USB
natural_image
Close-up of a black tool with a metallic clamp and handle, isolated on white background (no text or symbols)natural_image
Close-up of a black-handled tool with a curved handle, isolated on white background (no text or symbols visible)natural_image
Black handheld electronic device with a screen and control buttons (no visible text or symbols)
natural_image
Four grayscale icons representing different media control buttons (no text or symbols)
V8.00
natural_image
Grid of grayscale images showing eye, star, and lens views with directional arrows (no text or symbols)natural_image
Three icons: a recycling bin with an 'A' symbol, a checkmark, and a cross, arranged horizontally (no text or labels)
oui

non
natural_image
Grayscale image of a tunnel with icons and a 98% SD label, no readable text or symbols in the main scene.
Étape 3

flowchart
graph LR
    A["ROTHENBERGER"] --> B["+"]
    B --> C["&"]
    B --> D["X"]
    C --> E["ON/OFF Symbol"]
    D --> E

Email: service@rothenberger.com
www.rothenberger.com
Índice Página
natural_image
Line drawing of a handheld device with a separate mechanical component (no text or symbols)Fig. 1 - Adaptador de CA
natural_image
Illustration of a handheld electronic device with a screen and control buttons (no visible text or symbols)Fig. 2 - ROSCOPE i2000
natural_image
Close-up of a handheld electronic device with a circular annotation highlighting a component (no visible text or symbols)Fig. 4 - Puerto USB
natural_image
Close-up of a black tool with a metallic handle and a small mechanical component attached (no visible text or symbols)natural_image
Close-up of a black handheld medical or laboratory tool with a curved handle, no visible text or symbols.natural_image
Grayscale image of a tunnel with a dark central area and two circular objects, no visible text or symbols.natural_image
Grid of grayscale images showing eye, lens, and star patterns with directional arrows (no text or symbols)natural_image
Simple graphic with a recycling bin and two checkmarks (no text or symbols)
Si

No
Paso 3

flowchart
graph LR
    A["ROTHENBERGER"] --> B["Battery icon with checkmark and cross"]
    B --> C["Power Symbol with 'O' symbol"]

natural_image
Close-up of a handheld electronic device with a power button icon (no text or symbols on the device itself)
natural_image
Close-up of a black handheld electronic device with a screen and a small square button, pointing to it (no visible text or symbols)Email: service@rothenberger.com
www.rothenberger.com
Argomenti Pagina
natural_image
Line drawing of a handheld device with a separate mechanical component (no text or symbols)natural_image
Illustration of a handheld electronic device with a screen and control buttons (no visible text or symbols)Figura 2 - ROSCOPE i2000
natural_image
Close-up of a mechanical component with a highlighted section (no visible text or symbols)natural_image
Close-up of a black tool with a metallic clamp and handle, isolated on white background (no text or symbols)natural_image
Close-up of a black-handled tool with a curved handle, isolated on white background (no text or symbols visible)natural_image
Black handheld medical device with digital display and control buttons (no visible text or symbols)
natural_image
Grayscale image of a tunnel interior with no visible text or symbolsnatural_image
Grid of grayscale images showing eye and lens functions with directional arrows (no text or symbols)natural_image
Three icons: a recycling bin with warning sign, a checkmark, and an 'X' symbol (no text or labels)
sì

no
natural_image
Grayscale image of a tunnel with icons and a 98% SD label, no readable text or symbols beyond UI elements.
Figura 13 - Schermata del menù Strumenti Figura 14 - Schermata del menù Strumenti

natural_image
Close-up of a black handheld electronic device with a screen and antenna, showing a small rectangular object on the right side (no visible text or symbols)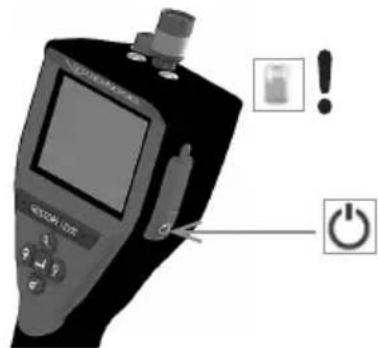
Passaggio 3

flowchart
graph LR
    A["ROTHENBERGER"] --> B["+"]
    B --> C["&"]
    B --> D["X"]
    C --> E["+"]
    D --> F["×"]
    E --> G["●"]
    F --> H["○"]

natural_image
Close-up of a handheld electronic device with a power button icon (no text or symbols on the device itself)
natural_image
Close-up of a black handheld electronic device with a screen and antenna, connected to a small square button (no visible text or symbols)Email: service@rothenberger.com
www.rothenberger.com
natural_image
Line drawing of a handheld device with a separate mechanical component (no text or symbols)natural_image
Black handheld electronic device with a screen and control buttons (no visible text or symbols)natural_image
Close-up of a mechanical component with a circular highlight and internal structure (no visible text or symbols)natural_image
Close-up of a black tool with a metallic clamp and handle, isolated on white background (no text or symbols)natural_image
Close-up of a black handheld medical or dental tool with a metallic clip, isolated on white background (no text or symbols visible)natural_image
Grid of grayscale images showing eye, star, and planet views (no text or symbols)natural_image
Close-up of a black electronic device with a screen and ports, showing a small rectangular object on the right side (no visible text or symbols)
Stap 3

flowchart
graph LR
    A["ROTHENBERGER"] --> B["Error Detection"]
    B --> C["No Power Symbol"]
natural_image
Close-up of a handheld electronic device with a power button icon (no text or symbols on the device itself)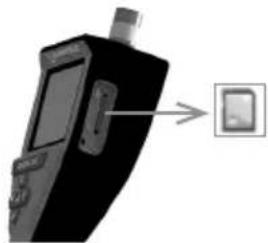
natural_image
Black handheld electronic device with a close-up of its screen and a small rectangular button (no visible text or symbols)11. Bediening van de ROSCOPE i2000 app
Email: service@rothenberger.com
www.rothenberger.com
Índice Página
1. Notas de segurança 112
natural_image
Line drawing of a handheld device with a separate mechanical component (no text or symbols)natural_image
Black handheld electronic device with a screen and control buttons (no visible text or symbols)Figura N.° 2 - ROSCOPE i2000
natural_image
Close-up of a mechanical component with a circular highlight on the top part (no visible text or symbols)Figura N.° 4 - Tomada USB
natural_image
Close-up of a black tool with a metallic clamp and handle, isolated on white background (no text or symbols)natural_image
Close-up of a black handheld tool with a metallic handle, possibly a medical or laboratory instrument (no visible text or symbols)natural_image
Black handheld electronic device with a screen and control buttons (no visible text or symbols)
Captar imagens ou vídeos (ligar/desligar)

natural_image
Grayscale image of a tunnel entrance with sensor icons and a 98% SD label (no readable text or symbols beyond UI elements)natural_image
Grid of grayscale square tiles with circular and petal-like visual patterns, no text or symbols presentnatural_image
Three icons: a recycling bin with warning symbol, a checkmark, and an 'X' symbol (no text or labels)
sim

não
flowchart
graph LR
    A["ROTHENBERGER"] --> B["Warning icon with checkmark and cross"]
    B --> C["No power symbol"]
natural_image
Close-up of a handheld electronic device with a power button icon (no text or symbols on the device itself)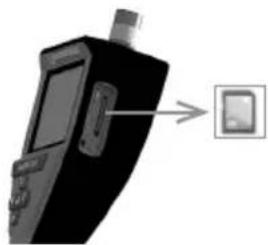
natural_image
Black handheld electronic device with a close-up of its screen and a small display, pointing to a button (no text or symbols visible)Email: service@rothenberger.com
www.rothenberger.com
Indhold Side
natural_image
Line drawing of a handheld device with a separate mechanical component (no text or symbols)natural_image
3D rendered image of a handheld electronic device with a screen and control buttons (no visible text or symbols)Figur nr. 2 - ROSCOPE i2000
3.2 Standardudstyr
ROSCOPE i2000 kontrolenheden leveres med følgende dele (figur nr. 2):
natural_image
Close-up of a mechanical component with a circled feature, no visible text or symbolsFigur 7- Kabeltilslutninger (stik stil "B", sølv 5-bens-stil stik)
natural_image
Close-up of a black tool with a metallic tool attachment, no visible text or symbolsnatural_image
Close-up of a black handheld medical or dental tool with a curved handle, isolated on white background (no text or symbols visible)natural_image
Grid of grayscale images showing eye, lens, and star patterns with directional arrows (no text or symbols)natural_image
Grayscale image of a tunnel with directional icons and a 'SD 98%' label, no readable text or symbols beyond UI elements.
Trin 3

flowchart
graph LR
    A["ROTHENBERGER"] --> B["OK"]
    B --> C["+/-"]
    C --> D["NO Battery Symbol"]
natural_image
Close-up of a handheld electronic device with a power button icon (no text or symbols on the device itself)
natural_image
Black handheld electronic device with a close-up of its screen and a small rectangular button (no visible text or symbols)11. Betjening af ROSCOPE i2000 app
Email: service@rothenberger.com
www.rothenberger.com
Innehåll Sida
USA patent: 7,384,308; 7,431,619 B2; 7,581,988 B2; 7,584,534;
Kinesiska patent: ZL200620147826.1; ZL200620147827.6; ZL2007200004596.8;
natural_image
Line drawing of a handheld device with a separate handle and base mount (no text or symbols)natural_image
Illustration of a black handheld electronic device with a screen and control buttons (no visible text or symbols)Figur nr. 2 - ROSCOPE i2000
3.2 Standardutrustning
natural_image
Close-up of a mechanical component with a circular annotation highlighting a specific feature (no text or symbols visible)Figur nr. 4 - USB-uttag
Figur 7 - kabelanslutningar (kontakttyp "A", svart 5-Pin kontakttyp)
natural_image
Close-up of a black tool with a metallic clip attached, no visible text or symbolsFigur 8 – kontakttyp "A" tillbehör (säljs separat)
natural_image
Close-up of a black handheld tool with a curved handle, isolated on white background (no text or symbols visible)Version fast program

natural_image
Grid of grayscale images showing eye, star, and galaxy patterns with directional arrows (no text or symbols)natural_image
Three gray icons: a recycling bin with an exclamation mark, a checkmark, and a cross on a white background (no text or symbols)
ja

nej
natural_image
Desktop interface with navigation icons and a circular gradient background (no readable text or symbols)
natural_image
Close-up of a black electronic device with a screen and ports, showing a small icon on the right side (no readable text or symbols)
Steg 3

flowchart
graph LR
    A["ROTHENBERGER"] --> B["Error Detection"]
    B --> C["No Power Symbol"]

natural_image
Close-up of a handheld electronic device with a power button icon (no text or symbols on the device itself)
natural_image
Black handheld electronic device with a small screen and a button, pointing to a button (no text or symbols visible)Email: service@rothenberger.com
www.rothenberger.com
Innhold Side
1. Sikkerhetsmerknader 164
1.1 Generelle sikkerhetsregler 164
1.2 Sikkerhetsanvisning 165
U.S. patenter: 7,384,308; 7,431,619 B2; 7,581,988 B2; 7,584,534;
Kinesiske patenter: ZL200620147826.1; ZL200620147827.6; ZL2007200004596.8;
natural_image
Line drawing of a handheld device with a separate bracket and cable (no text or symbols)natural_image
Illustration of a handheld electronic device with a screen and control buttons (no visible text or symbols)Figur nr. 2 - ROSCOPE i2000
3.2 Standard utstyr
natural_image
Close-up of a handheld electronic device with a circular annotation highlighting a component (no visible text or symbols)Figur nr. 4 - USB-port
natural_image
Close-up of a black tool with a metallic handle and a small metallic object attached (no text or symbols visible)natural_image
Close-up of a black handheld medical or dental tool with a curved handle, isolated on white background (no text or symbols visible)natural_image
Grayscale image of a tunnel interior with a dark central area and two circular objects, no visible text or symbols.Verktøy/meny tast (berør skjermen for å gå til verktøymenyen)
natural_image
Grid of grayscale images showing eye, lens, and star patterns with directional arrows (no text or symbols)natural_image
Grayscale image of a tunnel with camera and UI icons, no readable text or symbols
Figur nr. 13 - verktøymeny Figur nr. 14 - Verktøymeny

Berør skjermen (berør verktøysymbolet / nedre venstre hjørne - figur nr. 13) for å gå til n interaktive menyen (figur nr. 14).

- 10 minutter time-out
- 20 minutter time-out
- 30 minutter time-out
natural_image
Close-up of a black handheld electronic device with a screen and ports, showing a small icon on the right side (no readable text or symbols)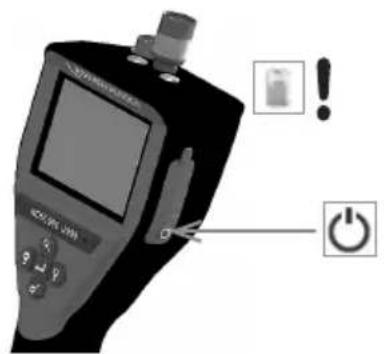
Trinn 3

flowchart
graph LR
    A["ROTHENBERGER"] --> B["Battery icon with checkmark and cross"]
    B --> C["No Power Symbol"]

natural_image
Close-up of a handheld electronic device with a power button icon (no text or symbols on the device itself)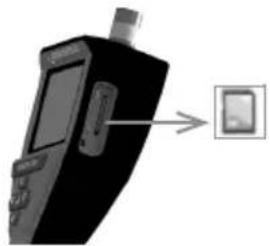
natural_image
Black handheld electronic device with a close-up of its screen and a small inset device (no visible text or symbols)11. Betjening av ROSCOPE i2000 App
Email: service@rothenberger.com
www.rothenberger.com
Sisältö Sivu
natural_image
Line drawing of a handheld device with a separate bracket (no text or symbols)natural_image
Black handheld electronic device with display and control buttons (no visible text or symbols)natural_image
Close-up of a mechanical component with a highlighted circular feature (no visible text or symbols)natural_image
Close-up of a black tool with a metallic clamp and handle, no visible text or symbolsnatural_image
Close-up of a black handheld medical or dental tool with a metallic clip extending from its tip (no visible text or symbols)natural_image
Grayscale image of a tunnel with a dark central area and two small ovals, no visible text or symbols.natural_image
Grid of grayscale images showing eye, star, and galaxy patterns with directional arrows (no text or symbols)natural_image
Grayscale image of a tunnel with icons and a 'SD 98%' label, no readable text or symbols in the main scene.

natural_image
Close-up of a handheld electronic device with a power button icon (no text or symbols on the device itself)
natural_image
Black handheld electronic device with a small screen and antenna, connected to a button (no visible text or symbols)Email: service@rothenberger.com
www.rothenberger.com
Spis treści Strona
USA 7,384,308; 7,431,619 B2; 7,581,988 B2; 7,584,534;
Chin ZL200620147826.1; ZL200620147827.6; ZL2007200004596.8;
natural_image
Line drawing of a handheld device with a separate bracket (no text or symbols)natural_image
Black handheld electronic device with a screen and handle (no visible text or symbols)natural_image
Close-up of a mechanical component with a circular highlight and internal structure (no visible text or symbols)natural_image
Close-up of a black tool with a metal clamp and a small metallic object attached (no text or symbols visible)natural_image
Close-up of a black-handled tool with a curved handle, isolated on white background (no text or symbols visible)natural_image
Grid of grayscale images showing eye, lens, and star patterns with directional arrows (no text or symbols)natural_image
Three icons: a recycling bin with an exclamation mark, a checkmark, and a cross symbol (no text or labels)
tak

nie
natural_image
Close-up of a black electronic device with a screen and ports, showing a small rectangular object on the right side (no visible text or symbols)
Krok 3

flowchart
graph LR
    A["ROTHENBERGER"] --> B["Error Detection"]
    B --> C["No Power Symbol"]

natural_image
Close-up of a handheld electronic device with a power button icon (no text or symbols on the device itself)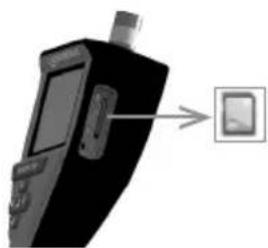
natural_image
Black handheld electronic device with a small screen and antenna, connected to a button (no text or symbols visible)Email: service@rothenberger.com www.rothenberger.com
Obsah Strana
natural_image
Line drawing of a handheld device with a separate view showing its internal components (no text or symbols)natural_image
Black handheld medical device with display screen and control buttons (no visible text or symbols)natural_image
Line drawing of a handheld device with a separate mechanical component (no text or symbols)natural_image
Close-up of a mechanical component with a highlighted circular feature (no visible text or symbols)natural_image
Close-up of a black tool with a metallic tool extending from its tip, against a white background (no text or symbols visible)natural_image
Close-up of a black handheld medical or dental tool with a curved handle, isolated on white background (no text or symbols visible)natural_image
Grayscale image of a tunnel entrance with sensor icons and a 98% SD tag (no readable text or symbols beyond UI elements)natural_image
Grid of grayscale images with arrows pointing left and right, no text or symbols presentnatural_image
Three icons: a recycling bin with a triangle, a checkmark, and an 'X' symbol (no text or labels)
ano

ne
natural_image
Grayscale image of a tunnel with a dark central area and two circular objects, no visible text or symbols.
natural_image
Close-up of a black handheld electronic device with a screen and ports, showing a small rectangular button on the right side (no visible text or symbols)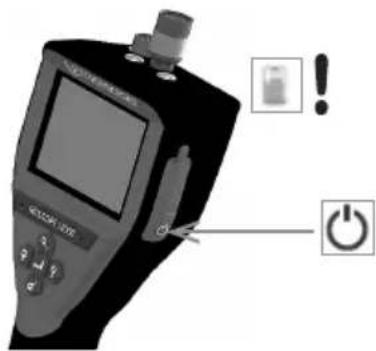
Krok 3

flowchart
graph LR
    A["ROTHENBERGER"] --> B["Warning icon with checkmark and cross"]
    B --> C["+ Battery symbol"]
Email: service@rothenberger.com
www.rothenberger.com
İçindekiler Sayfa
natural_image
Line drawing of a handheld device with a separate mechanical component (no text or symbols)natural_image
Black handheld electronic device with a screen and antenna (no visible text or symbols)Şekil No. 2 - ROSCOPE i2000
3.2 Standart Ekipman
natural_image
Close-up of a mechanical component with a circular highlight on the side (no visible text or symbols)natural_image
Close-up of a black tool with a metallic clamp and handle, isolated on white background (no text or symbols)natural_image
Close-up of a black-handled tool with a metallic handle and curved tip, isolated on white background (no text or symbols visible)natural_image
Grayscale image of a tunnel with a dark central area and two circular objects, no visible text or symbols.natural_image
Grid of grayscale images showing eye, star, and galaxy patterns with directional arrows (no text or symbols)natural_image
Three gray icons: a trash bin with recycling symbol, a checkmark, and an 'X' symbol (no text or labels)
evet

hayır
7. Dokunmatik Ekrandan Gezinti / Ayarlar
natural_image
Grayscale image of a tunnel with icons and a 98% SD label, no readable text or symbols in the main scene.

3. Adım

flowchart
graph LR
    A["ROTHENBERGER"] --> B["Error Detection"]
    B --> C["No Onset Rotation"]

natural_image
Close-up of a handheld electronic device with a power button icon (no text or symbols on the device itself)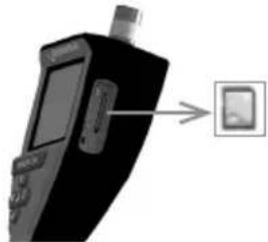
natural_image
Black handheld electronic device with a close-up of its screen and a small display (no visible text or symbols)Email: service@rothenberger.com
www.rothenberger.com
Tartalom Oldal
natural_image
Technical line drawing of a handheld device with a separate 3D view showing internal components (no text or symbols)- Ábra – Tápforrás
natural_image
Black handheld electronic device with a screen and control buttons (no visible text or symbols)- Ábra - ROSCOPE i2000
3.2 Alap berendezés
natural_image
Close-up of a mechanical component with a circular highlight and internal structure (no visible text or symbols)natural_image
Close-up of a black electronic device labeled 'BOTHENBERGER' with two cylindrical components and a metallic shaft (no readable text beyond label)natural_image
Close-up of a black tool with a metallic clamp and handle, no visible text or symbolsnatural_image
Close-up of a black-handled tool with a curved handle, isolated on white background (no text or symbols visible)natural_image
Four grayscale icons representing media control buttons (no text or symbols)
V8.00
natural_image
Grid of grayscale images showing eye, lens, and diffraction patterns with directional arrows (no text or symbols)natural_image
Grayscale image of a tunnel with icons and a 98% SD badge, no readable text or symbols in the main scene.

3. lépés

flowchart
graph LR
    A["ROTHENBERGER"] --> B["✓"]
    B --> C["×"]
    C --> D["●"]
    D --> E["NO"]

natural_image
Close-up of a handheld electronic device with a power button icon (no text or symbols on the device itself)
natural_image
Black handheld electronic device with a close-up of its screen and a small rectangular button (no visible text or symbols)Email: service@rothenberger.com
www.rothenberger.com
Cuprins Pagina
natural_image
Line drawing of a handheld device with a separate handle (no text or symbols)natural_image
Black handheld electronic device with a screen and handle (no visible text or symbols)Figura 2 - ROSCOPE i2000
3.2 Echipament standard
natural_image
Line drawing of a handheld device with a separate bracket (no text or symbols)natural_image
Close-up of a mechanical component with a highlighted section (no visible text or symbols)Figura 4 - Mufa USB
natural_image
Close-up of a black tool with a metallic clamp and metal bracket, isolated on white background (no text or symbols)natural_image
Close-up of a black-handled medical or dental tool with a curved handle, no visible text or symbols.natural_image
Grayscale image of a dark, indistinct circular object with no visible text or symbolsnatural_image
Grid of grayscale images showing eye, lens, and star patterns with directional arrows (no text or symbols)natural_image
Three icons: a recycling bin with warning symbol, a checkmark, and an 'X' symbol (no text or labels)
da

nu
natural_image
Grayscale image of a dark, indistinct circular object with no visible text or symbols
Figura 13 - Ecran meniu Instrumente Figura 14 - Ecran meniu Instrumente

natural_image
Close-up of a device with a screen and ports, showing a small electronic device with an arrow pointing to it (no visible text or symbols)
Pasul 3

flowchart
graph LR
    A["ROTHENBERGER"] --> B["Error Detection"]
    B --> C["No Power Symbol"]


natural_image
Close-up of a handheld electronic device with a power button icon (no text or symbols on the device itself)
natural_image
Black handheld electronic device with a close-up of its screen and a small display, pointing to an icon (no text or symbols visible)11. Utilizarea aplicatiei ROSCOPE i2000
Email: service@rothenberger.com
www.rothenberger.com
Sisu Lehekülg
1. Ohutusjuhised 289
natural_image
Line drawing of a handheld device with a separate mechanical component shown alongside it (no text or symbols)natural_image
Black handheld electronic device with a screen and control buttons (no visible text or symbols)natural_image
Line drawing of a handheld device with a separate bracket (no text or symbols)natural_image
Close-up of a mechanical component with a circular highlight and internal structure (no visible text or symbols)natural_image
Close-up of a black tool with a metallic clamp and a small metallic bracket attached (no text or symbols visible)natural_image
Close-up of a black and white handheld medical or dental tool with a curved handle (no visible text or symbols)natural_image
Grid of grayscale square panels with circular arrows pointing left and right, no text or symbols present
natural_image
Three icons: a recycling bin with a triangle, a checkmark, and an 'X' symbol (no text or labels)
Jah

Ei
natural_image
Grayscale image of a tunnel with camera and UI icons, no readable text or symbols
Samm 3

flowchart
graph LR
    A["ROTHENBERGER"] --> B["Warning icon with checkmark and cross"]
    B --> C["No power symbol"]

E-post: service@rothenberger.com
www.rothenberger.com
Turinys Pusla-pis
1. Atsargumo frazès 307
1.1 Bendrosios saugos taisyklès 307
1.2 Saugos nurodymai 308
natural_image
Line drawing of a handheld device with a separate mechanical component (no text or symbols)natural_image
Illustration of a handheld electronic device with a screen and control buttons (no visible text or symbols)2 pav. ROSCOPE i2000
natural_image
Line drawing of a handheld device with a separate view showing its internal components (no text or symbols)natural_image
Close-up of a mechanical component with a circular annotation highlighting a feature (no visible text or symbols)natural_image
Close-up of a black plastic tool with a metallic clip attached, isolated on white background (no text or symbols visible)natural_image
Close-up of a black-handled medical or dental tool with a curved handle, no visible text or symbols.9 pav. Priedo jrengimas modulyje su kištukine jungtimi A
natural_image
Black handheld electronic device with LCD screen and control buttons (no visible text or symbols)
natural_image
Grayscale image of a dark, indistinct circular object with two small oval shapes and a lightbulb icon (no readable text or symbols)natural_image
Grid of grayscale square tiles with circular highlights and arrows indicating rotation (no text or symbols)
natural_image
Three icons: a recycling bin with triangle, a checkmark, and an 'X' symbol (no text or labels)
Taip

Ne
7. Jutiklinio ekrano navigacija / nustatymai
natural_image
Grayscale image of a dark, indistinct circular object with two small objects and control icons (no readable text or symbols)

3 žingsnis

flowchart
graph LR
    A["ROTHENBERGER"] --> B["OK"]
    B --> C["+/-"]
    C --> D["NO Battery Symbol"]


natural_image
Close-up of a handheld electronic device with a power button icon (no text or symbols on the device itself)
natural_image
Close-up of a black handheld electronic device with a small screen and antenna, connected to a small display panel (no visible text or symbols)11. ROSCOPE i2000 programélés naudojimas
Programèlès naudojimas su iOS jrenginiu:
natural_image
Line drawing of a handheld device with a separate view showing its internal components (no text or symbols)natural_image
3D rendered image of a handheld electronic device with a screen and control buttons (no visible text or symbols)Attêls Nr. 2 — ROSCOPE i2000
3.2 Standartaprikojums
natural_image
Line drawing of a handheld device with a separate plug assembly (no text or symbols)natural_image
Close-up of a mechanical component with a circular annotation highlighting a feature (no visible text or symbols)natural_image
Close-up of a black tool with a metallic handle and a small metallic clip attached (no text or symbols visible)natural_image
Close-up of a black-handled tool with a curved handle, possibly a medical or industrial tool (no visible text or symbols)natural_image
Black handheld electronic device labeled 'SOTHERINGER' with control panel and display screen (no readable text beyond branding)
natural_image
Grid of grayscale images showing eye, lens, and spotlights with directional arrows (no text or symbols)
natural_image
Three icons: a recycling bin with warning triangle, a checkmark, and an 'X' symbol (no text or labels)
Ja (Jā)

Nein (Nē)
natural_image
Grayscale image of a tunnel with directional icons and a 98% SD badge (no readable text or symbols)
natural_image
Close-up of a black electronic device with a screen and ports, showing a small device attached to the right (no visible text or symbols)
- darbība

flowchart
graph LR
    A["ROTHENBERGER"] --> B["Warning icon with checkmark and cross"]
    B --> C["No power symbol"]

natural_image
Close-up of a handheld electronic device with a power button icon (no text or symbols on the device itself)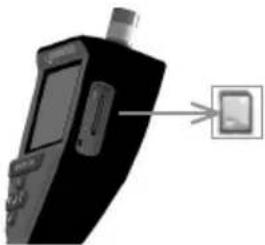
natural_image
Close-up of a black handheld electronic device with a small screen and antenna, connected to a small square button (no visible text or symbols)11. ROSCOPE i2000 lietotnes lietošana
E-pasts: service@rothenberger.com
www.rothenberger.com
σελίδα περιεχόμενο
natural_image
Illustration of a handheld electronic device with a screen and control buttons (no visible text or symbols)natural_image
Close-up of a mechanical component with a circular highlight on the side (no visible text or symbols)natural_image
Close-up of a black tool with a metallic tool attached, showing a small metallic object (no text or symbols visible)natural_image
Close-up of a black handheld medical or dental tool with a metallic clip extending from its tip (no visible text or symbols)natural_image
Grayscale image of a dark circular object with a light source icon and a 'SD 98%' label, no readable text or symbols in the main scene.natural_image
Grid of grayscale images showing eye, lens, and diffraction patterns with directional arrows (no text or symbols)natural_image
Three icons: a recycling bin with an exclamation mark, a checkmark, and a cross symbol (no text or labels)
natural_image
Grayscale image of a tunnel with a dark central area and two circular objects, no visible text or symbols.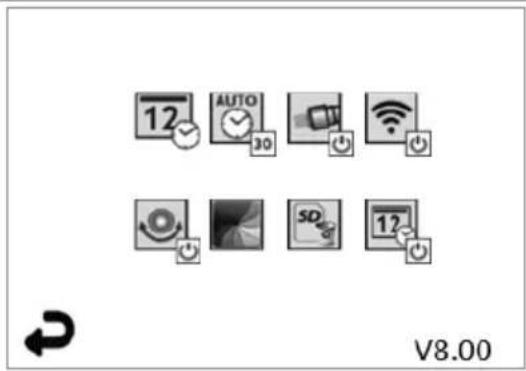
Bήμα 3

flowchart
graph LR
    A["ROTHENBERGER"] --> B["OK"]
    B --> C["+/-"]
    C --> D["NO Battery Symbol"]
natural_image
Close-up of a handheld electronic device with a power button icon (no text or symbols on the device itself)
natural_image
Black handheld electronic device with a screen and antenna, connected to a small square button (no visible text or symbols)Email: service@rothenberger.com
www.rothenberger.com
Содержание Страниц
natural_image
Line drawing of a handheld device with a separate bracket (no text or symbols)natural_image
Illustration of a handheld electronic device with a screen and control buttons (no visible text or symbols)Рисунок 2 – ROSCOPE i2000
natural_image
Close-up of a mechanical component with a circular annotation highlighting a feature (no visible text or symbols)natural_image
Close-up of a black tool with a metallic clip attached, no visible text or symbolsnatural_image
Close-up of a black handheld medical or dental tool with a metallic clip extending from its tip (no visible text or symbols)natural_image
Grayscale image of a dark circular object with two small oval shapes, no visible text or symbols.natural_image
Grid of grayscale square tiles with circular arrows pointing left and right, no text or symbols presentnatural_image
Three gray icons: a recycling bin with an exclamation mark, a checkmark, and a cross on a white background (no text or symbols)
да

Нет
flowchart
graph LR
    A["ROTHENBERGER"] --> B["Warning icon with checkmark and cross"]
    B --> C["No power symbol"]
ROTHENBERGER Worldwide
| Australia | ROTHENBERGER Australia Pty. Ltd.Unit 6 · 13 Hoyle Avenue · Castle Hill · N.S.W, 2154Tel. + 61 2 / 98 99 75 77 · Fax + 61 2 / 98 99 76 77rothenberger@rothenberger.com.auwww.rothenberger.com.au |
| South Africa | ROTHENBERGER-TOOLS SA (PTY) Ltd.P.O. Box 4360 - Edenvale 1610 |
| 165 Vanderbilt Street, Meadowdale Germiston Gauteng (Johannesburg), South AfricaTel. + 27 11/3 72 96 31 • Fax + 27 11/3 72 96 32Info@rothenberger.co.za • www.rothenberger.co.za |
| Spain | ROTHENBERGER S.A.Ctra, Durango-Elomlo, Km 2 • E-46220 Abadiano (Vizcaya)(P.O. Box) 117 • E-48200 Durango (Vizcaya)Tel. +34 94//6 21 01 00 • Fax +34 94//6 21 01 3export@rothenberger.es • www.rothenbergeras |
| Sweden | ROTHENBERGER Sweden ABHemvärnsgatan 22 • S- 171 54 Solna, SverigeTel. + 46 8// 54 60 23 00 • Fax + 46 8// 54 60 23 01roswe@rothenberger.se • www.rothenberger.se |
| Switzerland | ROTHENBERGER (Schwelt) AGHerostr. 9 • CH-8048 ZürichTel. + 41 44//435 30 30 - Fax + 41 44//401 06 08Info@rothenberger-werkzeuge.ch |
| Turkey | ROTHENBERGER TÜRKYEROTHENBERGER Center, Barbaros Bulvan No:9TR-34775 Senfall / Ümraniye-IstanbulTel. + 90//216 449 24 85 · Fax + 90//216 449 24 87rothenberger@rothenberger.com.trwww.rothenberger.com.tr |
| UAE | ROTHENBERGER Middle East FZCOPO Box 261190 · Jehel Ali Free ZoneDubai, United Arab EmiratesTel. + 971//48 83 97 77 - Fax + 971//48 83 97 57office@rothenberger.ae |
| ROTHENBERGER EQUIPMENT TRADING & SERVICES LLCPO Box 91208 • Mussafah Industrial AreaAbu Dhabi, United Arab EmiratesTel. + 971/25:50:01:54 • + 971/25:50:01:58uaesales@rothenberger.ae |
| UK | ROTHENBERGER UK Limited2, Kingsthorne Park, Henson Way,Ketterling • GB-Northants NN16 8PXTel. +44 15 36//31 03 00 • Fax +44 15 36//31 06 00Info@rothenberger.co.uk |
| USA | ROTHENBERGER USA LLC7130 Clinton Road • Loves Park, IL 611111,USATel. +1//80 05 45 76 98 • Fax+ 1//81 56 33 08 79plpstools@rothenberger-usa.comwww.rothenberger-usa.com |
| ROTHENBERGER Werkzeuge GmbH |
| Industriestraße 7 |
| D- 65779 Kelkheim / Germany |
| Telefon + 49 (0) 61 95 / 800 - 0 |
| Fax + 49 (0) 6195 / 800 - 3500 |
| info@rothenberger.com |
- Intro
- EU-DECLARATION OF CONFORMITY
- DECLARATION EU DE CONFORMITÉ
- Inhalt Seite
- Schritt 3
- Contents Page
- Safety Notes 23
- Technical Data / Specification 25
- Function of the unit 26
- On-Screen Navigation 30
- Navigation Buttons 30
- On-Screen Icons / Settings and Navigation 31
- Touch Screen Navigation / Settings 34
- Wireless Transfer of Images / Video 34
- Transferring Images to a computer 35
- How to update 35
- Operation of the ROSCOPE i2000 App 36
- Cleaning Instruction 36
- Storage 36
- Troubleshooting 37
- Accessories 37
- Disposal 37
- Customer service 37
- Markings in this document:
- Danger!
- USA
- Canada
- General Safety Rules
- SAVE THESE INSTRUCTIONS.
- 1) Work area
- 2) Electrical safety
- 3) Personal safety
- 4) Power tool use and care
- Safety Instruction
- A/C Power Supply Safety
- Battery Safety
- Technical Data / Specification
- Dimensions:
- Display:
- Operating Environment:
- Function of the unit
- Description
- Standard Equipment
- Charging the ROSCOPE i2000
- Installing the Imager Head Cable
- Installing the Camera Accessories
- Installing the SD Memory Card
- On-Screen Navigation
- Navigation Buttons
- On-Screen Icons / Settings and Navigation
- Live Screen Display
- Tools / Menu
- Saved Pictures and Video
- Playback Stil Image / Adding an Audio Annotation
- Touch Screen Navigation / Settings
- Wireless Transfer of Images / Video
- Transferring Images to a computer
- How to update
- Step 1
- Step 2
- Step 3
- Do not press the power button when the "hour glass" is
- Step 4
- Operation of the ROSCOPE i2000 App
- Use of the app with an iOS device:
- Use of the app with the Android device:
- Cleaning Instruction
- Storage
- Troubleshooting
- Accessories
- Disposal
- For EU countries only:
- Customer service
- Índice Página
- Paso 3
- Argomenti Pagina
- Passaggio 3
- Stap 3
- Bediening van de ROSCOPE i2000 app
- Notas de segurança 112
- Indhold Side
- Standardudstyr
- Trin 3
- Betjening af ROSCOPE i2000 app
- Innehåll Sida
- Standardutrustning
- Innhold Side
- Sikkerhetsmerknader 164
- Standard utstyr
- Betjening av ROSCOPE i2000 App
- Sisältö Sivu
- Spis treści Strona
- Obsah Strana
- Krok 3
- İçindekiler Sayfa
- Standart Ekipman
- Dokunmatik Ekrandan Gezinti / Ayarlar
- Adım
- Tartalom Oldal
- Alap berendezés
- lépés
- Cuprins Pagina
- Echipament standard
- Utilizarea aplicatiei ROSCOPE i2000
- Sisu Lehekülg
- Ohutusjuhised 289
- Samm 3
- Turinys Pusla-pis
- Atsargumo frazès 307
- Jutiklinio ekrano navigacija / nustatymai
- žingsnis
- ROSCOPE i2000 programélés naudojimas
- Programèlès naudojimas su iOS jrenginiu:
- Standartaprikojums
- ROSCOPE i2000 lietotnes lietošana
- σελίδα περιεχόμενο
- Содержание Страниц
- ROTHENBERGER Worldwide
Brand : ROTHENBERGER
Model : ROSCOPE i2000
Category : Inspection camera