
Wolfsburg 648 - Car radio BLAUPUNKT - Free user manual and instructions
Find the device manual for free Wolfsburg 648 BLAUPUNKT in PDF.
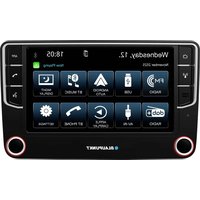


| Product type | Car radio |
| Brand | Blaupunkt |
| Model | Wolfsburg 648 |
| Vehicle compatibility | Volkswagen, SEAT, ŠKODA (selected models, see manual) |
| FM Radio | 87.5 – 108 MHz |
| DAB/DAB+ Radio | 174.928 – 239.200 MHz (channels 5A-13F) |
| Operating voltage | 12 V (14.4 V) |
| Power consumption | <10 A |
| Fuse | 15 A |
| USB port | 5 V, max. 2 A (charging and playback) |
| Preamp outputs | 2 Vss (front, rear, subwoofer) |
| Bluetooth | Audio streaming (A2DP, AVRCP) and hands-free kit |
| Apple CarPlay / Android Auto | Via USB cable or wireless |
| Rear view camera | RCA input (FBAS PAL/NTSC signal), manual or automatic activation |
| CAN functions | Steering wheel controls, GALA, dimmer, PDC, MFD |
| Display | Color LCD screen |
| AV-IN input | RCA audio and video |
| USB file formats | MP2, MP3, WMA, FLAC, WAV; FAT16/32/exFAT systems |
| Microphone | External (included) or internal (selectable) |
| Maintenance | Dry or slightly damp, lint-free cloth |
| Safety | Class 1 laser, do not open, moderate volume while driving |
| Software update | Via USB flash drive |
| Package contents | Car radio, user manual, external microphone, Quadlock cable, FAKRA antenna adapter |
Frequently Asked Questions - Wolfsburg 648 BLAUPUNKT
User questions about Wolfsburg 648 BLAUPUNKT
0 question about this device. Answer the ones you know or ask your own.
Ask a new question about this device
Download the instructions for your Car radio in PDF format for free! Find your manual Wolfsburg 648 - BLAUPUNKT and take your electronic device back in hand. On this page are published all the documents necessary for the use of your device. Wolfsburg 648 by BLAUPUNKT.
USER MANUAL Wolfsburg 648 BLAUPUNKT
MEDIA VOLUME (MEDIA)
PHONE VOLUME (PHONE)
RINGTONE VOLUME (RINGTONE)
NAVI GUIDANCE VOLUME (NAVIGATION INSTRUCTIONS) TA VOLUME (TRAFFIC ANNOUNCEMENTS)
EQUALIZER
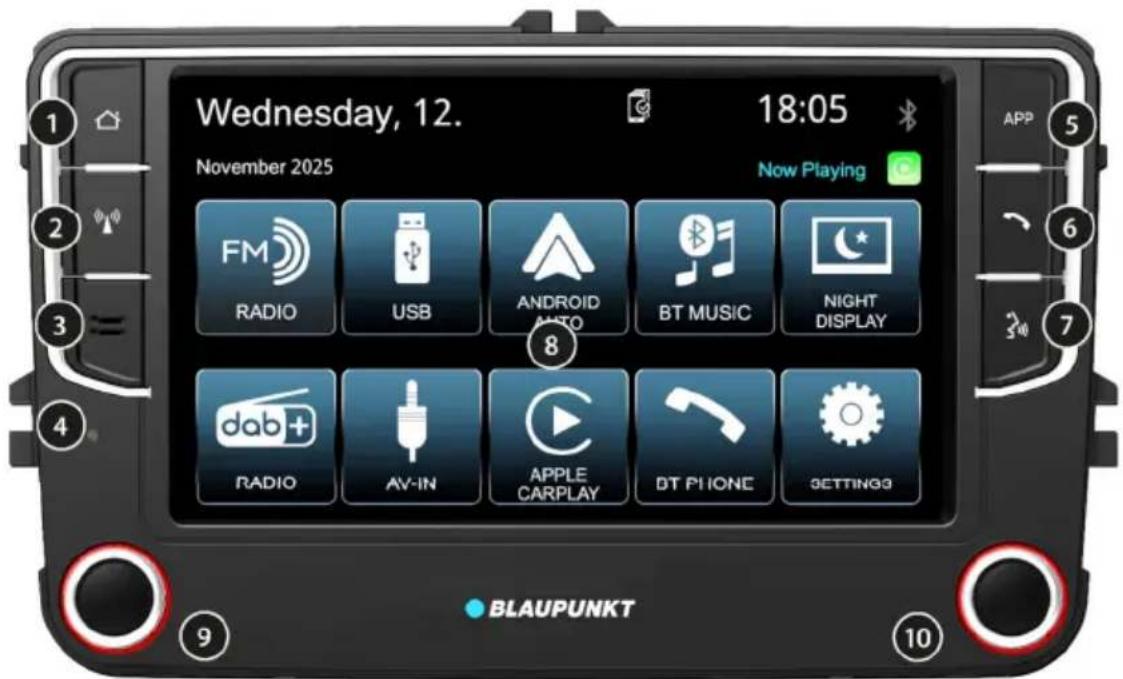
Call up the radio source or switch between FM and DAB radio
③ Microphone:
Internal hands-free microphone
④ RESET button
Reset the car radio
⑤ APP button:
Open APPLECARPLAY or Android AUTO when connected/open connection settings when no phone is connected
⑥ Telephone receiver:
Answer call/open dialling function/open connection settings when no phone is connected
⑦ Voice input:
Start voice input from the connected telephone (Apple CarPlay/Android Auto)
⑧ Display
(9) Left push/turn knob:
On/off switch, volume control
⑩ Right push/rotary encoder: Function depending on operating mode (change station, change track)
2. Congratulations | Table of contents
Congratulations on your new Blaupunkt car radio. We hope you enjoy using it.
Please read this operating manual carefully before using the unit for the first time to familiarise yourself with the functions of the car radio.
If, contrary to expectations, problems arise, please check the operating instructions to see if you can solve the problem yourself. Please also refer to the TROUBLESHOOTING section at the end of the operating instructions. Your dealer and Blaupunkt Service will be happy to help you if you are unable to solve the problem yourself. Contact details can be found at www.blaupunkt.com.
This manual may apply to different models with different features, so some functions and options may not be available or may differ on your model.
We reserve the right to make technical changes to improve the car radio, which may result in deviations from the functions described in this operating manual.
Contents
- Controls
- Congratulations | Table of contents
- Safety instructions
- General information | Scope of delivery | Software update
- Switching on/off | Volume | Audio sources | Operation
- Analogue radio operation: FM/AM
- Digital radio operation: DAB/DAB+
- Playback from external devices and data carriers: USB
- Playing external devices and data carriers: AV-IN
- Setting up and managing connections
- Bluetooth audio streaming | Hands-free system
- Apple CarPlay | Android Auto
- Reversing camera
- CAN functions (vehicle-specific)
- Settings | Menu
- Installation | Removal | Connections
- Useful information | Technical data
- Troubleshooting
3. Safety instructions
Safety instructions
The car radio has been manufactured in accordance with the latest technology and established safety guidelines. Nevertheless, dangers may arise if you do not observe the safety instructions in this manual.
This manual is intended to familiarise you with the functions of the car radio.
- Read this manual carefully and completely before installing or using the car radio.
- Keep the manual in a place where it is accessible to all users at all times.
- Always pass on the car radio to third parties together with this manual.
- Observe the instructions for the devices you use in conjunction with this car radio.
- Stop using the car radio if a problem occurs.
Symbols used
The following symbols are used in this manual:

DANGER! Warns of injury

CAUTION! Warns of damage to the DVD/CD drive or the media used

DANGER! Warns of high volume

The CE mark confirms compliance with EU directives.
Note: Facts and special features that should be observed when using the car radio.
Road safety
Please observe the following road safety information.

Use your car radio in such a way that you can control your vehicle safely at all times.
Using car radio functions while driving can distract your attention from the traffic situation and lead to serious accidents!

Refrain from using any functions that distract your attention from the traffic situation and from operating the vehicle
while driving. To use such functions, stop at a suitable location, apply the handbrake and operate your car radio while the vehicle is stationary.

Always listen at a moderate volume to protect your hearing and to be able to hear acoustic warning signals (e.g. from the
police). During mute pauses (e.g. when changing the audio source), changes to the volume are not audible. Do not increase the volume during these mute pauses.
General safety instructions
Do not modify or open the car radio.
There are no user-serviceable parts inside. Do not insert any objects into the openings of the car radio and do not turn any unsuitable screws in the housing.
Car radios with CD/DVD drives contain a Class 1 laser that can damage your eyes.
Intended use:
This car radio is designed for installation and operation in a vehicle with a 12-volt or 24-volt electrical system (depending on the model) and must be installed in a DIN slot. Observe the power limits of the car radio. The car radio is designed for private, non-commercial use.
Have repairs and, if necessary, installation carried out by a competent, qualified person.
4. General information | Scope of delivery | Software update
Declaration of conformity
Blaupunkt Competence Center Car Multimedia Evo-Sales GmbH hereby declares that this car radio complies with the essential requirements and other relevant provisions of the RED 2014/53/EU Directive and the RoHS 2011/65/EU Directive. The declaration of conformity can be found on the Internet at www.blaupunkt.com. If it is not available there, it can be requested from us.
Trademark information
All trademarks and their logos, brand names or company names referred to in this operating manual are used for identification purposes only and are the property of their respective owners.
Cleaning instructions
Solvents, cleaning agents, abrasives, cockpit sprays, air fresheners and plastic care products may contain substances that attack the surface of the car radio. Only use a dry or slightly damp, lint-free, soft cloth to clean the car radio.
Disposal instructions
Do not dispose of your car radio in the household waste! To dispose of the car radio and accessories, use the available
return and collection systems or return them to your dealer/manufacturer.
Scope of delivery
The scope of delivery includes:
Car radio - Instructions - External microphone - Quadlock connection cable with CAN interface - Connection cable with open cable ends - FAKRA 2-way to 1-way antenna adapter (passive)
Recommended or necessary accessories (not included in delivery):
DAB adhesive window antenna: 2006 021 000 000 Active/passive antenna splitter or other necessary adapters, depending on the vehicle
For further information on suitable accessories for your vehicle, please contact your dealer or vehicle manufacturer.
Software update
The car radio software can be updated via an external storage medium. Instructions for the update and further information are included with the update. Updates are available from Support.
- When requesting an update from Blaupunkt, please provide us with as much detail as possible about the problem you are experiencing with your car radio. Support also requires information about the software version currently installed on the car radio (see chapter SETTINGS | MENU). If the car radio is working properly, an update is not necessary. Every update also carries a certain risk due to errors during the update process. Despite careful testing, in rare cases new or different errors may occur or functions may be changed in an undesirable way.
- Do not download software from external sources to the car radio, as this may cause irreparable damage to the car radio.
- Individual options/functions of the car radio may differ from the instructions, as options/functions may have been changed, added or removed as a result of software development. This does not constitute a defect or grounds for complaint regarding the car radio.
5. Switching on/off | Volume | Audio sources | Operation

Main screen HOME
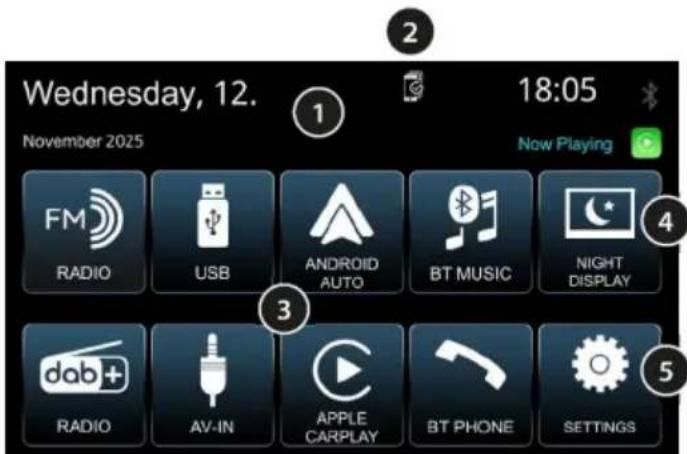
① Status bar displaying the date, time, connection status and the source currently playing. ② Call up the menu to manage connected mobile phones ③ Available media sources for the car radio ④ Dim/switch off display, can also be switched to open camera (see chapter SETTINGS | MENU) ⑤ Open car radio settings
Switching on/off
To switch on, briefly press the left push/turn knob. To switch off, press and hold the left push/turn knob for longer than one second.
Please note that after switching on/off, the car radio needs a few seconds before you can switch it off/on again, as internal processes are still active in the background.
The car radio cannot be switched on when the vehicle ignition is off
Switching on/off via the vehicle ignition
If the ignition is switched off while the car radio is running, the car radio switches off automatically and switches back on again the next time the ignition is switched on.
If the car radio has been switched off by pressing the left push/turn knob, it will remain off when the ignition is switched on/off until it is switched on again manually.
If the function does not work as described, the car radio is not connected correctly.
Changing the volume
The volume can be adjusted using the left push/turn knob. The volume can be set from 0 (no sound) to 40 (full volume).
The set volume is shown on the display for a few seconds.
Muting the car radio
During operation, briefly press the left push/turn knob to mute the car radio or to restore the previous volume.

Always listen at a moderate volume to protect your hearing and to be able to hear acoustic warning signals (e.g. from the
police).
During mute pauses (e.g. when changing the audio source), changes to the volume are not audible. Do not increase the volume during these mute pauses.
Switching off the display
Press the right push/turn knob during operation to switch off the display. Press the screen or any button to switch the display back on.
Selecting an audio source
Select the main screen using the Home button, where you can select the desired source.
Operation

Please read the SAFETY INSTRUCTIONS section carefully before operating the car radio while driving!
6. Analogue radio operation: FM/AM
Analogue transmission paths for radio signals, such as FM at 87.5-108 MHz, are the "classic" transmission types and are widely used throughout the world.
The stations are transmitted analogously (FM = frequency modulation, MW/AM = amplitude modulation).
In the case of weak or fluctuating signals, the stereo signal disappears on FM, stations are played back in mono and begin to crackle.
Depending on the region, stations can often be received on different frequencies, which car radios can switch to automatically depending on reception quality, provided that the station provides the necessary RDS information and the transmission signals are strong enough.
Main screen FM radio
Start FM/AM radio playback
Select the desired source from the main menu or the radio button.
Controls and their functions
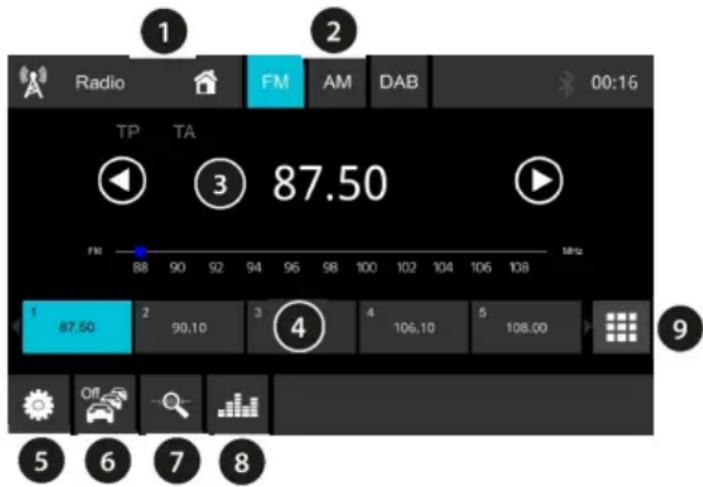
① Display of the current source; when selected, returns to the main menu and the current source continues to play. ② Select radio mode (also possible using the radio button, see chapter CONTROLS) ③ Display of frequency/station name/radio text of the current station with buttons for searching Short press: Automatic search Long press: Manual search ④ Station memory buttons Short press: Call up the stored station Long press: Save the current station ⑤ Call up settings (activate/deactivate RDS AF function and REG function) ⑥ Activate/deactivate traffic information priority for FM. When activated, the radio switches to the current station when a traffic report is broadcast, e.g. when USB or streaming is active. - Please note: This restricts the automatic search; weak stations and stations without the corresponding TP identifier are skipped. ⑦ Start Travelstore Caution: All memory locations will be overwritten with the currently strongest stations! The station memory will be deleted! ⑧ Calling up the sound settings (equaliser)
7. Digital radio mode: DAB/DAB+

Digital Audio Broadcasting (DAB/DAB+ for short) is the digital successor to analogue FM radio. Digital transmission results in a number of differences compared to familiar analogue FM radio: Several stations are broadcast on one channel - known as ENSEMBLES (also called multiplexes or programme packages).
The stations themselves, which are part of an ENSEMBLE, are called SERVICES (= stations and/or data services).
ENSEMBLES are available regionally in Germany from public broadcasters, for example, and there are currently two ENSEMBLES that can be received throughout Germany:
DR DEUTSCHLAND and ANTENNE DE.
ENSEMBLES can often be received throughout the entire broadcasting area via various transmitter locations on the same channel (single-frequency network), which eliminates the need to change channels and allows more space for additional programme providers.
The transmitters do not produce noise, as you know from FM; either the transmitter can be heard in consistent quality or it cuts out completely when the error correction can no longer reconstruct a signal, sometimes accompanied by a short "bubbling" sound.
Main screen DAB radio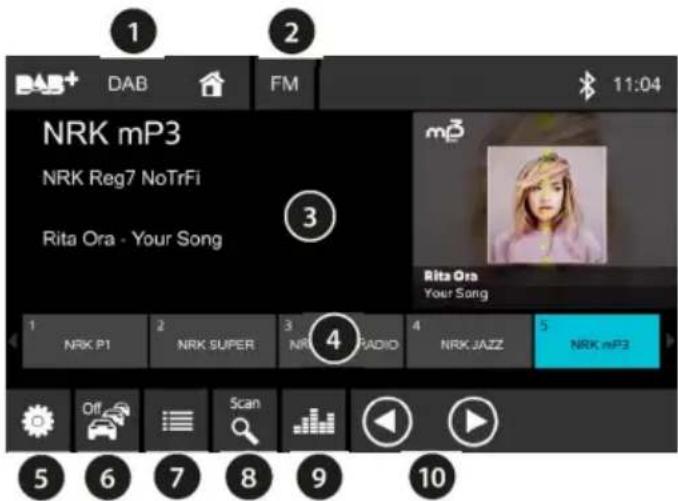
Start DAB/DAB+ radio playback
Select the desired source from the main menu on the radio button.
Controls and their functions
① Display of the current source; when selected, returns to the main menu and the current source continues to play. ② Select radio mode (also possible using the radio button, see chapter CONTROLS) ③ Display of station information (station name/ensemble/DLS and slideshow of the current station). ④ Station memory buttons
Short press: Call up the stored station Long press: Save the current station ⑤ Call up settings: Activate/deactivate DAB-DAB and DAB-FM station tracking. ⑥ Activate/deactivate traffic news priority for DAB. When activated, the radio switches to the current station when a traffic report is broadcast, e.g. when USB or streaming is active. ⑦ Open/close station list to search for and select a new station. ⑧ Update DAB station list - Updating the station list may result in stations that were previously stored on the memory buttons no longer being accessible because they were not receivable during the update. The message STATION NOT IN LIST, PLEASE PERFORM STATION SEARCH will then appear. In this case, the update must be performed again in the corresponding reception region. ⑨ Accessing the sound settings (equaliser) ⑩ Scroll forwards/backwards through the station list.
8. Playing external devices and data carriers: USB
Mass storage media (USB sticks) can be connected to the car radio via the USB port and the media files they contain can be played back, provided that the data carriers and files are compatible with the car radio.
Usable data carriers/media types:
- Data carriers with FAT16, FAT32, exFAT file systems
- File formats: MP2, MP3, WMA, FLAC, WAV. Due to the wide variety of software that can be used to create such files, we cannot guarantee that all media files, including those listed above, will function properly. It is not possible to connect MP3 players or mobile phones for music playback. The car radio's USB port can also be used to charge external devices such as mobile phones.
Manufacturer-specific fast charging functions are not supported. It cannot be guaranteed that every device can be charged, and this may also depend on the USB cable used.
The car radio has the following connections for this purpose:
- USB-A port on the rear of the car radio (see chapter INSTALLATION | REMOVAL | CONNECTIONS)
Connecting a USB storage device/Starting USB playback
Carefully insert the USB data carrier into the USB socket; do not use force and do not tilt the USB data carrier.
The car radio will automatically switch to USB mode. The data will be read in and playback will start with the first media file recognised by the car radio.
If a USB data carrier has already been connected, select the desired source from the main menu.
Main screen USB
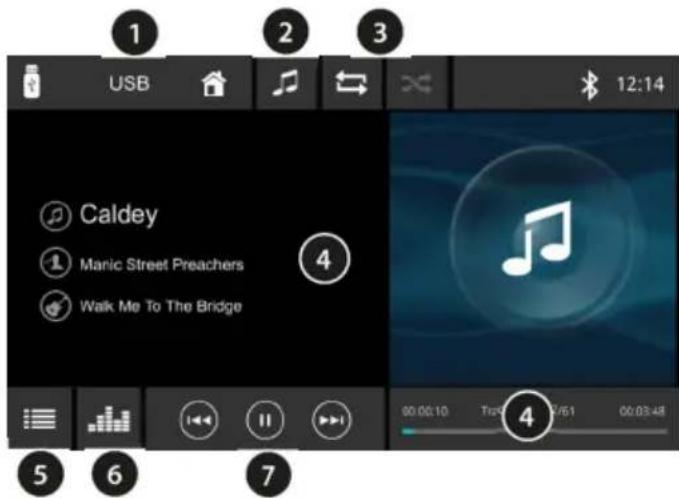
① Display of the current source; when selected, returns to the main menu and the current source continues to play. ② Select music or video files. ③ Select repeat/shuffle playback. ④ Information about the current track, such as ID3 tag, cover image, playing time. ⑤ Open the file browser to search for a media file directly. ⑥ Open the sound settings (equaliser). ⑦ Track change back/forward (long press: fast forward/rewind) and play/pause function.
Removing USB data carriers
Never remove the data carrier without first switching off the car radio, as this may damage the data carrier or the data stored on it.
9. Playing external devices and data carriers: AV-IN
Analogue audio and video signals can be fed in from external devices, such as mobile CD players, cassette players or MP3 players, via the AV-IN connection using an adapter cable. The car radio has a cinch input for this purpose. For the most common applications, you will need a cable with a 3.5 mm stereo jack plug to 2x RCA, which you can purchase from a well-stocked specialist retailer.
The car radio has the following connections for this purpose:
- AV-IN connection AV-IN on the rear (see chapter INSTALLATION | REMOVAL | CONNECTIONS
Connect the external device using a suitable adapter/cable.
Start AV-IN playback
Select the desired source from the main menu.
Adjust the volume level on the external device if necessary or possible to obtain a similar level to the other sources on the car radio.
Then check the volume via the car radio.
- Only use undamaged plugs and cables to avoid damaging the car radio.
10. Setting up and managing connections
The car radio allows you to connect mobile phones and media players wirelessly.
If you pair a compatible device with the car radio, you can use the functions described in the following chapters.
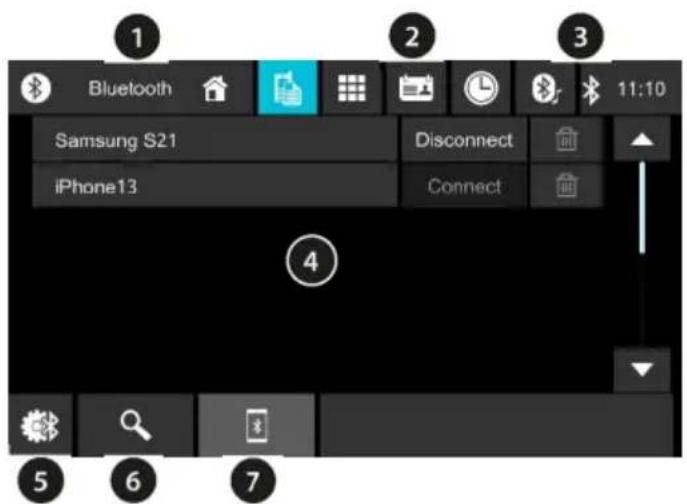
① Display of the current source; when selected, you return to the main menu and the current source continues to play. ② Select the function, in this case the device list (colour-coded option). ③ Connection status ④ List of available and connected devices. ⑤ Settings ⑥ Start searching for available devices. ⑦ Display list of devices known to the car radio.
Establishing a connection
Switch on the car radio, activate and open the Bluetooth® settings on your device or make your mobile device "visible", open the telephone function on the car radio and search for available devices with the car radio. Connect the desired device by selecting the corresponding button. Confirm all queries on your device and car radio.
- Confirm any queries on your mobile phone promptly, otherwise functions may be restricted or unavailable, or pairing may not work. This process is only necessary once; the devices will
then connect automatically when they are within range.
Managing connections
The icon on the main screen allows you to manage known or connected mobile phones (see also chapter SWITCHING ON/OFF | VOLUME | AUDIO SOURCES | OPERATION).
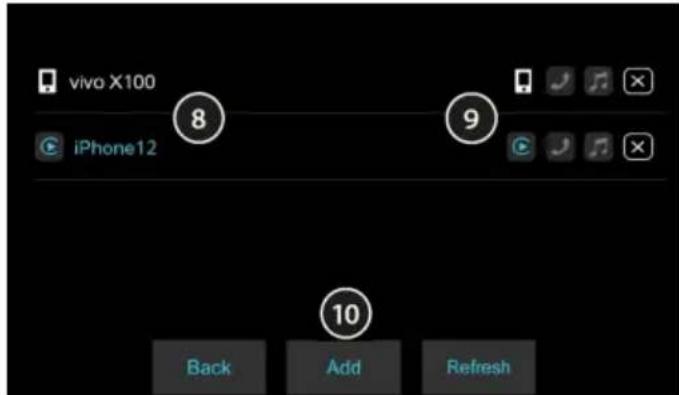
⑧ Display of devices recognised by the car radio. ⑨ Selecting the connection type (phone display/hands-free/Streaming). When the phone is displayed on the car radio, the hands-free and streaming options are deactivated; these are then made available via the display generated by the phone. Depending on the connected device, not all functions may be available. ⑩ BACK - Exit the function.
ADD - Add a new device; proceed as described on the previous page. REFRESH - Refresh the list.
- When the product was launched, extensive testing of the function was carried out with various mobile phones and media players to ensure the greatest possible compatibility. However, functions may be limited or may not work at all depending on the device used. If you encounter such problems, please check whether an update is available for your device or car radio.
11. Bluetooth audio streaming | Hands-free system
- Your mobile phone must be connected to the car radio, see chapter SETTING UP AND MANAGING CONNECTIONS. The connected device must support the A2DP and AVRCP functions so that you can play music via the car radio and control playback. To use the phone book, it must be enabled on the phone. Adjust the volume on your connected device if the sound is too low or too loud. It is not possible to stream from this car radio to another device (such as speakers, etc.); this car radio only supports the reception of a music signal. If the connected phone supports additional wireless functions for playing content on the radio and these are activated, the operation and playback functionality may differ. In this case, the user interface is provided by the mobile phone and the car radio has no influence on this (see chapter DISPLAYING THE PHONE ON THE RADIO DISPLAY).
Main screen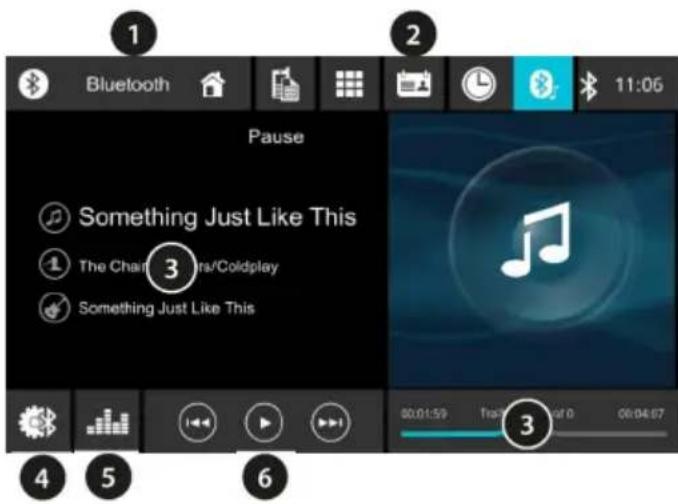
① Display of the current source; when selected, returns to the main menu and the current source continues to play. ② Select the function, in this case audio streaming (colour-coded option). ③ Information about the current track. ④ Settings. ⑤ Access sound settings (equaliser). ⑥ Track change back/forward and play/pause function.
Music playback (audio streaming)
Select the desired source from the main menu and control playback using the corresponding buttons.
If playback does not start or an incorrect application on the mobile phone starts playback, you must start/select the appropriate audio player on your connected mobile phone that you want to use for streaming. The car radio has no influence on the selection of the application to be used on the mobile phone.
Incoming call
An incoming call is signalled by a ring tone and a message on the car radio display.
You can accept, reject or end the call using the corresponding buttons on the car radio display.
Outgoing call
Select the desired source via the main menu or the telephone button, see chapter CONTROLS.
By selecting the appropriate function, you can choose NUMBER DIALLING, PHONE BOOK and CALL LISTs to enter or find a number and start dialling.
12. Apple CarPlay | Android Auto
This function allows you to display content from a connected mobile phone on the radio, provided the phone is compatible.
Depending on the mobile phone, this connection can be made with a cable or wirelessly. Please refer to the information provided by your mobile phone manufacturer.
The car radio has the following connections for this purpose:
- USB-A connection on the rear of the car radio (see chapter INSTALLATION | REMOVAL | CONNECTIONS)
- Wireless (no connection/no cable)
Activation:
Connect a phone with an original, fully wired, data-capable USB cable and follow the instructions on the devices to unlock the screen.
Alternatively, connect the device wirelessly and follow the instructions on the devices, provided your phone supports this function.
The device is then operated via the car radio display.
Under no circumstances should the connection be established manually via Wi-Fi; only the Bluetooth connection must be set up. If you experience connection problems, use a different cable or the original cable that came with your mobile phone. Content and functions are provided by the connected mobile phone; the car radio has no
influence on this or on the availability or possible malfunction of apps. In this case, please contact the manufacturer of the mobile phone or the app used.
- When setting up the function for the first time, it may be necessary to apply the handbrake. Please ensure that the car radio is connected correctly (see chapter INSTALLATION | REMOVAL | CONNECTIONS).
Start playback
Select the desired source from the main menu.
Main screen
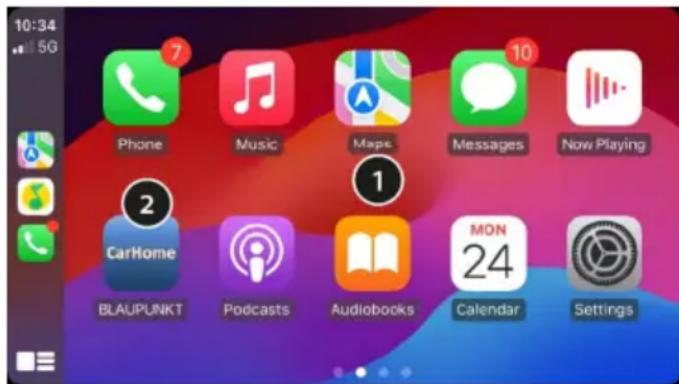
① Display of content from the mobile phone (phone-specific, may vary) ② Icon for exiting the mobile phone interface (may vary)
13. Reversing camera
You can display the image from an optionally installed camera via the camera connection. The display can be activated manually or by engaging reverse gear.
The car radio has the following connections for this purpose:
- REVERSE CAMERA-IN camera connection on the rear (see chapter INSTALLATION | REMOVAL | CONNECTIONS)
Manual activation of the camera
Select the desired source from the main menu.
Automatic camera activation
Put the vehicle in reverse gear and the car radio will switch to the camera display.
- Ensure that the camera is connected correctly and that the function is supported by your vehicle's CAN bus. (see chapter INSTALLATION | REMOVAL | CONNECTIONS)
- Configure the camera/PDC function, see chapter SETTINGS | MENU. Depending on the vehicle and its equipment, the car radio can display dynamic camera lines.

Danger due to distraction from road traffic!
Only use the camera display when the situation allows and it does not distract you from the traffic.
14. CAN functions (vehicle-specific)
In addition to detecting the ignition status for automatically switching the car radio on/off, the car radio supports the following functions. These may vary depending on the equipment/model and may not be available/supported due to the vehicle. Full support for the following functions is therefore not guaranteed depending on the vehicle.
Steering wheel remote control: With this car radio, you can use the buttons on your steering wheel remote control, which is factory-fitted. The functions may vary, but generally include functions such as changing the volume and changing the station memory (FM/DAB) as well as changing tracks on USB and streaming.
Ignition (ACC): The device receives the ignition status information via CAN and switches on/off accordingly.
Dimmer: The brightness of the display can be controlled depending on the status of the vehicle lighting. For setting options, see the SETTINGS | MENU chapter.
GALA: Speed-dependent volume control. For setting options, see the SETTINGS | MENU chapter.
Reversing camera, PDC, parking lines
(dynamic/static) display: The car radio can display the camera image from a standard reversing camera (FBAS PAL/NTSC signal) as well as the factory-fitted PDC sensors and the steering wheel angle in the form of dynamic parking lines. For setting options, see the SETTINGS | MENU chapter.
- Original OEM rear view cameras are not supported; adapters from the accessories trade are required for this.
Multifunction display (MFD): Depending on the equipment/model, the factory-fitted multifunction display (MFD) can show information such as station and title when set to the AUDIO function. For more information, please refer to your vehicle's operating instructions.
15. Settings | Menu
Select the settings by pressing SETTINGS on the main screen.
The following settings can be made or adjusted to your preferences.
The settings are divided into different categories and described on the following pages:
GENERAL
General car radio settings
DATE AND TIME
Set date and time, adjust automatic time setting
ANTENNA SUPPLY DAB
Switch DAB antenna supply voltage on/off
BEEP
Switch key tones on/off
MICROPHONE
Select internal or external microphone
LANGUAGE
Set car radio language
SOFTKEY
Icon on the main screen to switch between the NIGHT DISPLAY and CAMERA functions
Climate control display: The car radio can display corresponding functions from the vehicle.
Information from the vehicle, e.g. open flaps/doors, etc.: The car radio can display status messages from the vehicle, such as "Door open", etc.
For setting options, see the SETTINGS | MENU chapter.
AUDIO
Level and sound settings
VOLUME LEVELS
Adjustment of various volume levels
MEDIA VOLUME
PHONE VOLUME
RINGTONE VOLUME
NAVI GUIDANCE VOLUME
TA VOLUME (TRAFFIC RADIO)
EQUALIZER
Call up the equaliser to adjust the sound settings
LOUDNESS
Switch loudness (bass boost) on/off
GALA
Switch speed-dependent volume on/off
DISPLAY
Set various display options
BRIGHTNESS
Adjusting the screen brightness
DIMMER MODE
Activate/deactivate automatic brightness adjustment depending on vehicle lighting
KEY COLOUR
Adjustment of button illumination
CAR
Vehicle-specific settings provided via the vehicle's CAN bus; see also the chapter on CAN FUNCTIONS (VEHICLE-SPECIFIC)
PARK ASSIST
Configuring the display of PDC and/or camera when reverse gear is engaged
REVERSE CAMERA MUTE
Sound behaviour when reverse gear is engaged
CAMERA PICTURE
Mirror camera image on/off
OE SOUND SYSTEM
Enable/disable external active system adjustment
DYNAMIC CAMERA LINES
Switch dynamic camera lines on/off
FRONT OPS (FRONT PDC)
Enable/disable PDC function for front PDC sensors
CAR INFO POP-UP
Display vehicle status information such as "Door open"
OTHERS
Functions such as resetting the car radio, displaying the installed software version, etc.
16. Installation | Removal | Connections
Installation instructions

You should only install the car radio if you have experience installing car radios and
are familiar with the vehicle's electrical system. Please observe the information provided on the connections of the car radio. The car radio may only be connected with suitable adapters; it must be ensured that all cables carry the correct signals or voltages. Connectors in the vehicle must not be connected directly to the car radio without further testing.
The installation of the car radio must not interfere with or block the function of airbags and other safety devices or controls.
The vehicle battery (negative terminal, ground) must be disconnected before installing the car radio, otherwise faults or damage to the car radio or vehicle electronics may occur.
The safety instructions of the vehicle manufacturer
must be observed (airbag, alarm system, on-board computer, immobiliser, etc.).
To install the car radio, the vehicle's trim panels must be removed using special tools; this task should be carried out by a specialist.
When inserting the car radio, do not apply pressure to the controls and/or display/display frame.
Depending on the vehicle in which the car radio is to be installed, optional and specific connection adapters and/or installation accessories such as installation frames, panels, etc. may be required; these are available from specialist retailers.
Installation errors can lead to damage to the car radio or the vehicle's electronics.
Ensure that no cables or connectors are damaged during installation and removal. Damaged connectors or cables must not be used.

The car radio housing becomes hot during operation - ensure that no cables are in contact with the housing.
Installation locations with high humidity or dust/dirt can lead to malfunctions or defects in the car radio.
Please consult your car hi-fi installation specialist if you need assistance with installing the car radio.
Connections and definitions of connections
Blaupunkt accepts no liability or warranty for damage and/or its consequences caused by incorrect and/or unprofessional installation, operation or use.
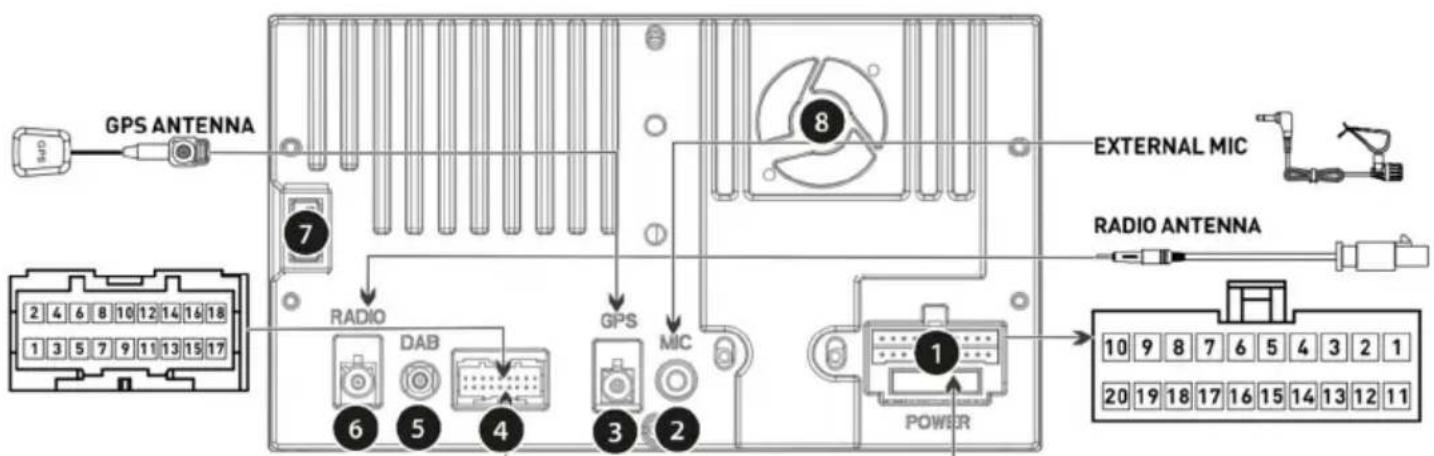
| PIN NO | Color | Description | PIN NO | Color | Description |
| 1 | White | LINEOUT_FL | 10 | Yellow | VIDEO_OUT1 |
| 2 | Black | DGND | 11 | White | R_AUX_IN_L |
| 3 | Red | LINEOUT_FR | 12 | Black | DGND |
| 4 | Red | R CAMERA_12V_OUT | 13 | Black | DGND |
| 5 | White | LINEOUT_RL | 4 | Yellow | R CAMERA Video |
| 6 | Black | DGND | 15 | Red | R AUX IN R |
| 7 | Red | LINEOUT_RR | 16 | White / Black | / |
| 8 | Red | POWER +12V | 17 | Yellow | R AUX IN VIDEO |
| 9 | Purple | LINE_SUBWOOFER | 18 | White | / |
| PIN NO | Description | PIN NO | Description |
| 1 | FL+ | 11 | FR+ |
| 2 | FL- | 12 | FR- |
| 3 | RL+ | 13 | RR+ |
| 4 | RL- | 14 | RR- |
| 5 | / | 15 | B+ |
| 6 | / | 16 | GND |
| 7 | ILLUMI | 17 | BRAKE |
| 8 | ACC | 18 | P.CNTR |
| 9 | REVERSE | 19 | P.ANT |
| 10 | MCU_RX_FR_CAN | 20 | MCU_TX_TO_CAN |
① POWER:
Connection for FAKRA adapter with CAN interface (included) and fuse (15 A).
Alternatively: Adapter on open cable ends, adapter labelling and subsequent function description must be observed (included in delivery).
② MIC:
Connection for external microphone, switching is done via the car radio settings
③ GPS: Connection for GPS antenna ④ Universal connection, see connection adapter & drawing for assignment (included in delivery) ⑤ DAB:
DAB antenna: SMB connection with 12 volt phantom power supply (max. 150 mA, switchable via settings)
⑥ RADIO:
FM/AM antenna (FAKRA connection). Passive adapter to 2x FAKRA included in delivery, with 12 volt phantom power max. (150 mA, not switchable)
⑦ USB: Rear USB-A connection ⑧ Fan:
Do not cover, do not insert cables or objects into the openings.
FL+/FL-/RL+/RL-/FR+/FR-RR+/RR-:
Speaker connections
LINE-OUT: Preamplifier outputs for connecting an external amplifier
SUBWOOFER: Subwoofer output for connecting an active subwoofer
AV-IN/VIDEO IN: Audio/video input for AV-IN source
VIDEO OUT: Video out (only video, no display mirroring)
POWER +12V: Switched power 12 V
RCAMERA 12 V: Switched power for camera
B+: Battery (KI.30), permanent power supply from vehicle battery.
P.ANT: Switched power supply for active antennas (12 V, max. 150 mA).
P.CNTR: Control voltage for external power amplifiers/subwoofers (12 V, max. 150 mA).
ILLUMINATION: Vehicle lighting input (pin 58), required for automatic brightness adjustment of buttons/display and night mode of the car radio. The input requires 0 V (off)/5-14.4 V (activated). PWM signals can cause display flickering and cannot be used in this case.
BRAKE: Connection for handbrake signal
REVERSE: Reverse signal connection
ACC: Switched ignition positive from the ignition switch (pin 15).
The functions listed for the plug marked with the number 1 are controlled via CAN when using the FAKRA connection and must not be connected separately! The connectors have a locking mechanism. When disconnecting the connectors, release the locking mechanism accordingly and do not use force, otherwise there is a risk of damaging the device or the adapter! The car radio does not support CD changers, interfaces or other components compatible with older Blaupunkt car radios. - Ensure that the ignition and continuous positive are connected correctly, otherwise the car radio may have increased power consumption and not switch off completely. This can also lead to the car battery being discharged or damaged, defects in the vehicle electronics or other external components!
17. Useful information | Technical data
Warranty
The statutory provisions applicable in the respective country apply, as well as extended warranties, depending on the country/dealer. If you have any questions, please contact your Blaupunkt dealer.
Service
If you ever need to use a repair service, please contact the dealer from whom you purchased the car radio directly. You can also find information about service partners in your country at www.blaupunkt.com.
Technical
FM frequency range: 87.5-108 MHz
DAB frequency range: 174.928-239.200 MHz (Channels 5A-13F)
Speaker impedance: ≥ 4 ohms/channel
Power supply
Operating voltage: 12 V (14.4 V)
Current consumption
Operation: < 10 A
Switched off (ACC off): < 5 mA
Inputs/outputs
Antenna/amplifier: 12 V, max. 150 mA
FM antenna: 12 V, max. 150 mA
DAB antenna: 12 V, max. 150 mA
USB port: 5 V, max. 2 A
Preamplifier output: 2 Vss
Steering wheel remote control: via CAN bus*
Ignition (ACC): via CAN bus*/analogue
Dimmer: via CAN bus*/analogue
Volume (GALA): via CAN bus*
Reversing signal (REVERSE) via CAN bus*/analogue
Parking aid (PDC): via CAN bus*
Speedometer display (MFD): via CAN bus*
Camera signal: CVBS PAL/NTSC
- CAN functions may vary depending on equipment/model and may not be available/supported due to the vehicle.
Full support for the functions may therefore not be available depending on the vehicle. Retrofitted special accessories such as auxiliary heaters are not supported.
Vehicle compatibility list

| Model (Quadlock II) | Type | Model year | |
| VW Amarok | 2H | 2010 - 2016 | |
| VW Caddy | 2K/2C | 2003 - 2014 | |
| VW CC | 35 | 2012 - 2016 | |
| VW EOS | 1F | 2006 - 2015 | |
| VW Golf V | 1K | 2003 - 2008 | |
| VW Golf V Estate | 1K | 2007 - 2009 | |
| VW Golf VI | 5K | 2008 - 2012 | |
| VW Golf VI Estate | AJ | 2009 - 2013 | |
| VW Golf VI Convertible | 51 | 2011 - 2016 | |
| VW Golf V Plus | 5M/52 | 2005 | |
| VW Golf VI Plus | 52 | 2008 | |
| VW Jetta V / Bora | 1K | 2005 - 2010 | |
| VW Jetta VI | 16 | 2010 | |
| VW Passat | 3C/36 | 2005 - 2014 | |
| VW Passat Alltrack | 36 | 2012 - 2014 | |
| VW Passat CC | 35 | 2008 | |
| VW Passat Variant | 3C/36 | 2005 - 20 | |
| VW Polo | 6R | 2010 - 2014 | |
| VW Scirocco III | 13 | 2008 - 2014 | |
| VW Sharan | 7N | 2010 - 2015 | |
| VW Tiguan | 5N | 2007 - 2014 | |
| VW Touran | 1T | 2003 - 2015 | |
| VW T5 | 7H / 7E / 7J | (1st facelift) | 200 |
| SEAT Alhambra | 71 | 2010 - 2015 | |
| SEAT Altea | 5P | 2004 - 2015 | |
| SEAT Altea Freetrack | 5P | 2007 - 2009 | |
| SEAT Altea XL | 5P | 2006 - 2015 | |
| SEAT Toledo | 5P | 2004 - 2009 | |
| SEAT Toledo | KG | 2012 - 2013 | |
| ŠKODA Octavia II | 2009 - 2013 | ||
| ŠKODA Octavia II Station Wagon | 1Z | 2 | |
| ŠKODA Octavia II Scout | 1Z | 2009 - 2013 | |
| ŠKODA Rapid NH | 2012 - 2015 | ||
| ŠKODA Rapid Spaceback NH | 2013 | ||
| ŠKODA Superb II 3T | 2008 | ||
| ŠKODA Superb II Estate | 3T | 2008 - 2014 | |
| ŠKODA Yeti | 5L | 2009 - 2014 | |
The physical design of the OEM device and the front panel must match. Models not listed in the compatibility list are not compatible. The device can be used as a replacement for OEM models RNS310/315/510 and RCD310/315/330/350/510. - Vehicles with a different Quadlock connector (such as Quadlock III/ "Power Quadlock") cannot be used.
18. Troubleshooting
Below are some error scenarios and their possible solutions.
If you continue to have problems with the car radio, contact your dealer or Blaupunkt Service. If you encounter problems, have the installation of the car radio checked or carried out by a competent, qualified person.
Most of the problems that may occur can be traced back to connection and operating errors.
Please read the operating instructions thoroughly and carefully.
Some points may not apply to your model, as the corresponding function or option is not available.
After installation, the airbag indicator lights in the dashboard are illuminated/the speedometer no longer works/the car radio is blocked and displays PHONE or TELEFON, etc.:
The car radio has been connected incorrectly or cables have been damaged. Disconnect the vehicle battery immediately and remove the car radio. Have the installation carried out/checked by a competent, qualified person.
- Car radio cannot be switched on/car radio displays 1 HOUR when switched on and switches off after one hour:
The ignition plus is not connected or is not active. Please check the connections.
- At higher volumes, the display flickers/the car radio switches off completely:
Please check the cable cross-section of the power supply.
Have the installation carried out/checked by a competent, qualified person.
- Problems with sound reproduction, individual or all channels fail:
Please check the speaker wiring and the speakers themselves; no cable may have ground contact, and the individual channels must not fall below the specified minimum impedance (see technical data).
The remote control does not work:
Remove the small plastic film from the battery compartment.
Check that the battery is inserted correctly.
Point the remote control directly at the car radio.
Ensure that the contacts are correctly seated.
Not all models have this function.
- Car radio does not switch on/car radio does not respond to ignition/car radio switches off automatically after a certain time/car radio cannot be switched on without ignition:
Are the ignition/continuous positive connections correct? The ignition positive must switch correctly to 0 volts/full voltage; there must be no residual voltage on the ignition positive when the ignition is off.
Check that the car radio is connected correctly.
Under no circumstances should the car's connectors be connected directly to the car radio without first checking the pin assignment PIN by PIN.
Have the installation carried out/checked by a competent, qualified person.
- Settings and/or station presets are lost, clock does not work properly:
The car radio permanently stores the settings, even without a power supply. However, some settings are only permanently stored after a correct shutdown or require a permanent power supply – therefore, it is essential that the car radio is switched off correctly.
Functions such as time, last audio source, last playback position USB/CD require a permanent power supply. For proper functioning, the car radio must be correctly connected to a continuous positive power supply, which must not be interrupted during operation, otherwise errors or damage to the software/memory may occur.
Not all models have permanent memory; please check this in the product description. Regardless of this, however, the device must always be connected correctly.
- The car radio has no or poor radio reception:
Check the antenna for the respective reception area.
Check whether you need a phantom power adapter if the antenna for the relevant reception area does not receive this from the radio.
Is the antenna correctly installed? Many antennas require a counter pole (car body). Window adhesive antennas must not be mounted on tinted windows. LED lamps or other electrical components can sometimes interfere with radio reception; rule out the possibility of such interference.
When using the car radio for the first time, make sure that it is set to the correct radio region, provided that the car radio offers this setting option (see chapter SETTINGS | MENU).
- In DAB mode, NO SIGNAL / NO SERVICE is suddenly displayed or reception is interrupted:
The current ensemble (programme package) has too weak a signal and the audio signal cannot be decoded. Please select a different ensemble/change your location/check the DAB antenna.
- The car radio suddenly displays SEEK PI (SEARCH PI)/SEEK TP (SEARCH TP) in radio mode or changes the station:
Please check the antenna and settings of the car radio. If necessary, deactivate the alternative frequency function (see chapter SETTINGS | MENU). Poor reception can cause the car radio to change
stations if traffic information prioritisation has been activated.
- The car radio does not display the station name correctly/no longer displays it in radio mode:
Check the reception (check the antenna).
Please note: Some stations occasionally transmit additional information instead of the RDS station name; the car radio has no influence on this.
- USB, CD, DVD, SD or other data carriers do not work:
Please check the function with another data carrier, reformat the data carrier, play other files.
Check the car radio for transport locks on the CD/DVD drive and remove them before installation.
- Mobile phone does not charge or charges slowly via USB:
This depends on the phone and the cable used; manufacturer-specific fast charging functions are not supported.
- Phone book is not displayed, phone does not connect, caller cannot be heard:
Please note that automatic reconnection only works properly if the radio is correctly connected to ACC/ignition plus (KI.15) and BATT/battery (KI.30). Please check whether software updates are available for your phone and/or car radio. Reset the car radio via NORMSET (see chapter SETTINGS | MENU) or press the RESET button (see chapter CONTROLS).
Please delete the car radio from the list in your telephone and then re-establish the connection. Confirm all authorisation requests on the telephone with YES. Try using a different phone.
- Streaming and telephony are too quiet or inaudible:
Depending on the model, phones store the volume levels for different connected devices and different applications separately. In this case, you must trigger an audio output from the app with the volume too low (start music playback from the corresponding app or navigation announcement) and adjust the volume on the phone during playback. (Support for this function may depend on the connected device).
The caller cannot hear me:
Please check the connection of the external microphone.
Check the microphone settings in the settings (if available).
Try using a different phone.
- The SUB-OUT or its settings in the car radio do not work (depending on the model):
Please check that the subwoofer is correctly connected to the SUB-Out output of the car radio, otherwise the options in the sound settings will have no effect.
- There is something wrong with the DAB station list, incorrect DAB stations are called up, DAB stations do not play:
Start a full scan of the DAB stations to fix any errors/inconsistencies in the station list.
- Error/problem not listed here. A function of the car radio is not working as expected/car radio is not behaving as expected:
Reset the car radio (see chapter SETTINGS | MENU) and/or press the RESET button (availability depends on model).
Have the installation carried out/checked by a competent, qualified person.
Contact customer service. Please note: When contacting customer service, it is essential to provide a detailed description of the error and the current software version of the car radio (for software query, see the SETTINGS | MENU section).
Ignition (ACC): via bus
Camera signal: CVBS PAL/NTSC
Ignition (ACC): via CAN-
Bus*/analog Dimmer: via
CAN-Bus*/analog
Volume (GALA): via CAN-Bus*
Camera signal: CVBS PAL/NTSC
Main screen FM radio
USB main screen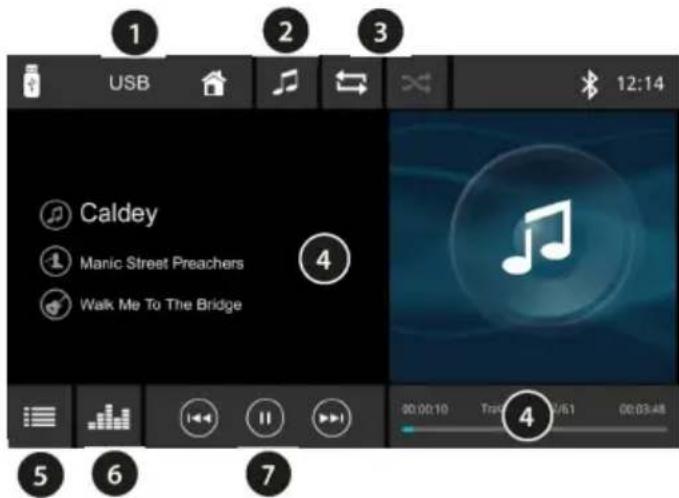
VOLUME LEVELS
Adjust the different volume levels: MEDIA VOLUME, PHONE VOLUME, RINGTONE VOLUME, NAVIGATION VOLUME, TRAFFIC VOLUME
EQUALIZER
SKODA Superb II Station Wagon 3T 2008-2014
ŠKODA Yeti 5L 2009-2014
Main screen FM Radio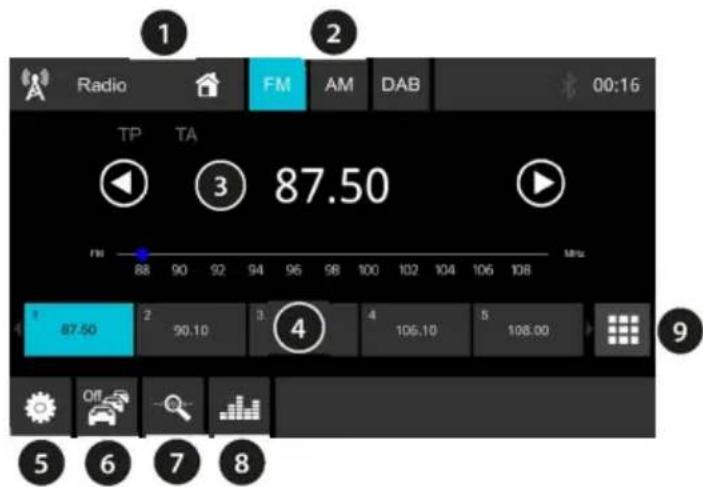
DATE AND TIME
VOLUME LEVELS
Ignition (ACC): via CAN-Bus*/analog
Dimmer: via CAN-Bus*/analog
Volume (GALA): via CAN-Bus*
Reverse signal: via CAN-Bus*/analog
Parking assist (PDC): via CAN-Bus*
Speedometer display (MFD): via CAN-Bus*
Camera signal: CVBS PAL/NTSC
The stations transmit analog (FM = frequency modulation, MW/AM = amplitude modulation).
With weak or fluctuating signals, the stereo signal disappears on FM, stations are reproduced in mono and begin to hiss.
MEDIA VOLUME (MEDIA)
PHONE VOLUME (PHONE)
RINGTONE VOLUME (RINGTONE)
NAVI GUIDANCE VOLUME
(NAVIGATION GUIDANCE)
TA VOLUME (TRAFFIC RADIO)
EQUALIZER
Open the equalizer to adjust the sound settings
LOUDNESS
Ignition (ACC): via CAN bus*/analog
Dimmer: via CAN bus*/analog
Volume (GALA): via CAN bus*
Reverse signal (REVERSE) via CAN-bus*/analog
Parking assistance (PDC): via CAN-bus*
Speedometer display (MFD): via CAN-bus*
Camera signal: CVBS PAL/NTSC
MEDIA VOLUME (MEDIA)
PHONE VOLUME (PHONE)
RINGTONE VOLUME (RINGTONE)
NAVI GUIDANCE VOLUME (NAVIGATION INSTRUCTIONS)
TA VOLUME (TRAFFIC ANNOUNCEMENTS)
EQUALIZER
Parking assistance (PDC): via CAN-bus*
Speedometer display (MFD): via CAN-bus*
Camera signal: CVBS PAL/NTSC
MEDIA VOLUME (MEDIA)
PHONE VOLUME (PHONE)
RINGTONE VOLUME
NAVI GUIDANCE VOLUME
TA VOLUME
EQUALIZER
Ignition (ACC): via CAN bus
MEDIA VOLUME
PHONE VOLUME
RINGTONE VOLUME
NAVIGATION GUIDANCE VOLUME
TA VOLUME (TRAFFIC INFORMATION)
EQUALIZER
Reverse signal via CAN
Bus*/analog
DATE AND TIME
Ignition (ACC): via CAN bus*/analog
Dimmer: via CAN bus*/analog
Volume (GALA): via CAN bus*
Reverse signal (REVERSE): via CAN bus*/analog
Parking assist (PDC): via CAN bus*
SKODA Superb II Station Wagon 3T 2008-2014
SKODA Yeti 5L 2009-2014
MEDIA VOLUME (MEDIA)
PHONE VOLUME (PHONE)
RINGTONE VOLUME (RINGTONE)
NAVI GUIDANCE VOLUME
(NAVIGATION INSTRUCTIONS)
TA VOLUME (TRAFFIC ANNOUNCEMENT)
EQUALIZER
SKODA Superb II 3T 2008
SKODA Superb II Station Wagon 3T 2008-2014
SKODA Yeti 5L 2009-2014
Use the equalizer to adjust the sound settings
LOUDNESS
Turn loudness (bass boost) on/off
GALA
Turn speed-dependent volume on/off
DISPLAY (SCREEN)
Ignition (ACC): via CAN bus*/analog
Dimmer: via CAN bus*/analog
Volume (GALA): via CAN bus*
Reverse signal (REVERSE) via CAN bus*/analog
Parking assistance (PDC): via CAN bus*
Speed display (MFD): via CAN bus*
Camera signal: CVBS PAL/NTSC
Model (Quadlock II) Type Models
VW Amarok 2H 2010-2016
VW Caddy 2K/2C 2003-2014
VW CC 35 2012-2016
VW EOS 1F 2006-2015
VW Golf V 1K 2003-2008
VW Golf V Variant 1K 2007-2009
They are adjusted analogically (FM = frequency modulation, MW/AM = amplitude modulation).
Main FM radio menu
Start FM/MW radio playback
Ignition (ACC): via CAN-
Bus / analogical brightness adjustment: via CAN-Bus / analogical
Volume adjustment (GALA): via CAN-Bus*
SKODA Superb II Station Wagon 3T 2008-2014
SKODA Yeti 5L 2009-2014
The physical connections of the OEM device and the supplied harness must match. The included adapters are not compatible with the list. The device can be used as a replacement for the OEM devices RNS310/315/510 and RCD310/315/330/350/510. Devices with a different Quadlock connector (such as Quadlock III/ "Power Quadlock") cannot be used.
VOLUME LEVELS
PHONE VOLUME
RINGTONE VOLUME
NAVIGATION INSTRUCTIONS VOLUME AND TA VOLUME (TRAFFIC RADIO)
EQUALIZER
Call up the equalizer to change the sound settings
SOUND LOAD
Ignition (ACC): via CAN-Bus*/analog
Dimmer: via CAN-Bus*/analog
Bus*/analog
Sound level (GALA): via CAN-Bus*
Reverse gear signal (REVERSE): via CAN-Bus*/analog
Parking aid (PDC): via CAN-Bus*
Speedometer (MFD): via CAN-Bus*
Camera signal: CVBS PAL/NTSC
Contact the service. Please note: Contact the service. Section SETTINGS | MENU).
1. Control elements
① Home button:
FM radio main screen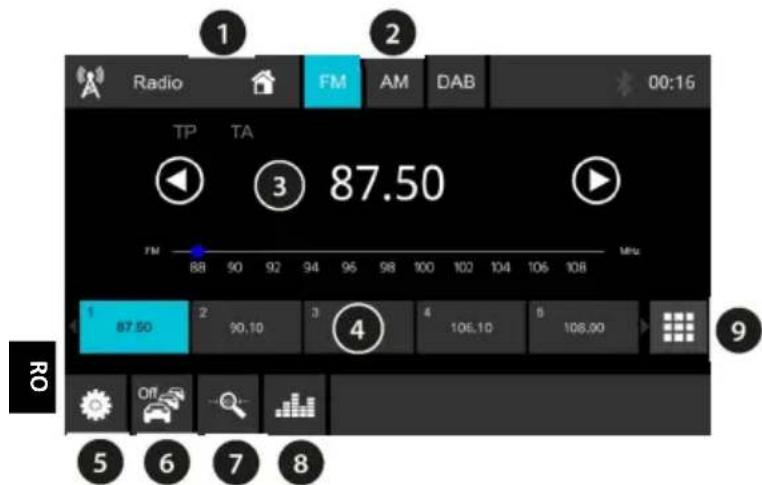
Starting FM/AM radio playback
DATE AND TIME
VOLUME LEVELS
Setting different volume levels
MEDIA VOLUME
PHONE VOLUME
RINGTONE VOLUME
NAVIGATION VOLUME
TA VOLUME (TRAFFIC RADIO)
EQUALIZER
Ignition (ACC): via CAN-
Bus*/analogic Dimmer: prin
CAN-Bus*/analog
Volum (GALA): prin CAN-Bus*
Semnal de mers inapoi (REVERSE) prin CANBus*/analog
Asistentá la parcare (PDC): prin CAN-Bus*
Afisaj vitezometru (MFD): prin CAN-Bus*
Semnal camera: CVBS PAL/NTSC
- Functiile CAN pot varia in functie de echipament/model si, in anumite circumstanste, pot sa nu fie disponibile/suportate din cauza vehiculului.
SKODA Superb II Station Wagon 3T 2008-2014
SKODA Yeti 5L 2009-2014
The manual uses the following symbols:

On/Off
To turn on, briefly press the button/turn the knob.
To turn off, press and hold the button/turn the knob for more than a second.
If you have turned on/off the device, it will automatically turn off after a few seconds, so that you can turn it off/on again, as the internal process is active on the green indicator.
The car radio cannot be turned on when the car ignition is off.
Turning on/off via the car ignition
If the ignition is turned off while the device is working, the device turns off automatically and turns on again at the next ignition on. If the device was turned off by pressing the button/turning the knob, it stays off when the ignition is turned on/off, until it is turned on again manually.
If the function does not work as described, the device is not connected correctly.
Short press: automatic search for stations. Long press: manual search. ④ Button for saving stations. Short press: recall saved station.
Long press: save current station.
⑤ Open the settings (activate/deactivate the RDS AF and REG functions). ⑥ Activate/deactivate traffic information for FM. When activated, the radio switches to the current station during traffic information, if for example USB or AUX is active.
Attention: This affects the automatic search, weak stations and stations without a proper TP identifier are skipped. ⑦ Start Travelstore. Attention: All stations are overwritten with the strongest at the moment! The station list is updated! ⑧ Open the sound settings (equalizer).
The transmitter does not mute, as you are used to from FM, the transmitter is heard with constant quality, or it turns off completely, when the error correction cannot restore the signal, which is accompanied by a short, so-called "muting".
DAB overview

Starting playback of DAB/DAB+ radio
Select the desired source from the main menu or the radio button.
Control elements and their functions
① Display of the current source: when selecting from the main menu, the current source continues to play. ② Scan mode of the radio (also possible via the radio button, see chapter "CONTROL"). ③ Display of station information (station name/ensemble/DLS and slides of the current station). ④ Buttons for station presets: short press: recall the preset station
Long press: store the current station
⑤ Audio settings: activate/deactivate DAB-DAB and DAB-FM station tracking. ⑥ Activate/deactivate traffic information for DAB. When activated, the radio switches to the current traffic information, for example if USB or streaming is active. ⑦ Open/close the station list for searching for a new station. ⑧ Update the DAB station list. Updating the station list may cause stations that were previously stored on the preset buttons to no longer be available if they were not available at the time of the update. Then the message RADIO STATION appears in the list, and you can search for radio stations. In this case, an update should be performed again in the entire reception area. ⑨ Open the sound settings (equalizer). ⑩ Previous/next page of the channel list.
AV-IN connector AV-IN on the rear side (see chapter INSTALLATION | REMOVAL | CONNECTORS)
Connect the external device with a suitable adapter/cable.
Starting playback of AV-IN
Select the desired source from the main menu.
If necessary or possible, adjust the volume of the external device to achieve a level similar to that of the other sources of the car audio system. Then check the sound quality via the car radio.
Use only shielded cables and connectors to avoid interference with the car radio.
10. Connection and control of devices
The car radio allows hands-free calling with mobile phones via Bluetooth.
If you connect a compatible device with the car radio, you can use the functions described in the following chapters.
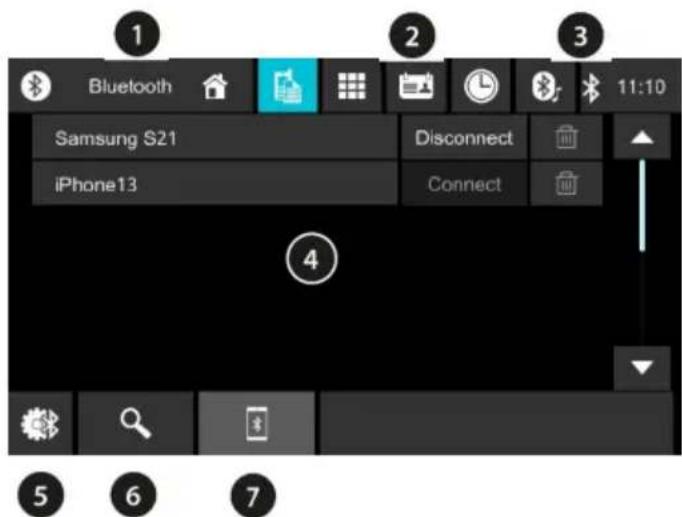
① Select the current audio source. When selecting, press the main menu, the current source will be played. ② Select function, here is a list of devices (audio, Bluetooth). ③ Connection status ④ List of all connected devices. ⑤ Settings ⑥ Start searching for nearby devices. ⑦ Show list of devices, know the author.
Connection setup
After turning on the author, activate and open the Bluetooth settings on your device or point the mobile device to "Bluetooth", open the phone function of the author and confirm with the author's device name. Select the desired device by choosing the appropriate button. Enter all requests on your device and the author.
Remember to delete all data from your mobile phone, otherwise the functions may be limited, not found or the connection may not work. This is necessary only for some.
These devices connect automatically when they are within range.
Connection management
Through the icon and the navigation you can manage known or connected mobile phones (see chapter CONNECTING/DISCONNECTING | SOUND VOLUME | AUDIO SOURCE CONTROL).
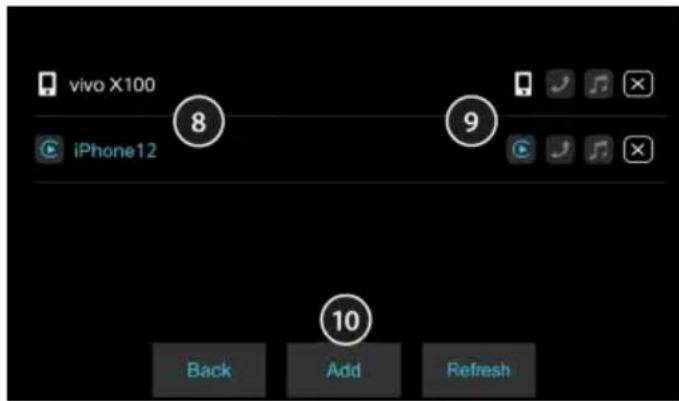
⑧ Show devices, know the author ⑨ Select connection type (phone display/free hands/streaming)
When showing the phone of the author, the options for free talking and streaming are activated and become available through the phone display.
Depending on the connected device, not all functions are available. 10 BACK (BACK) - Exit from the function ADD (ADD) - Add a new device, following the procedure described on the previous page.
REFRESH (UPDATE) - Update the list
When launching the device, extensive tests of functions with different mobile phones and media players have been carried out to ensure maximum compatibility. Nevertheless, depending on the device used, functions may be limited or may not work at all. In such cases, please check if there is an update for your device or the author.
11. Bluetooth audio streaming | Free hands
The mobile phone must be paired with the car radio. To use the hands-free function, the car radio must support the A2DP and AVRCP functions, so that you can play music through the hands-free device and control playback. To use the phone's controls, the phone must be allowed to access them. Adjust the sound level of the paired device. If the sound is too quiet or too loud, it may be because the car radio is connected to another device (e.g., a headset, etc.), and the car radio may be receiving the music signal from that device. If the paired phone supports additional functions for playback and call control and they are activated, the controls and functions for playback may differ. In this case, the user interface is provided by the mobile phone, and the car radio has no influence over it (see chapter PHONE OVERVIEW ON THE RADIO DISPLAY).
Main screen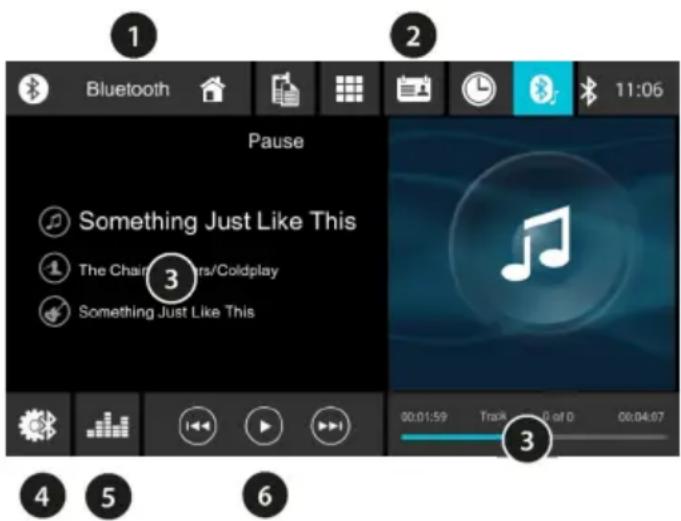
① Shows the current audio source. When selecting from the main menu, the current audio source continues to be played. ② Selection of functions, such as audio streaming (optional, marked with a check). ③ Information about the current source. ④ Settings. ⑤ Opens the sound settings (equalizer). ⑥ Track skip back/forward and playback/pause functions.
Playing music (audio streaming)
Select the desired source from the main menu and control playback using the corresponding buttons.
If playback does not start or the mobile phone application does not start playback, you must start/select the appropriate audio player on the paired mobile phone that you want to use for streaming. The car radio has no influence over the choice of application to be used on the mobile phone.
Incoming call
Incoming calls are signaled with a melody or an indicator on the car radio display. Using the corresponding buttons on the car radio display, you can accept, reject, or end the call.
Outgoing call
Select the desired source from the main menu or from the phone button, see chapter CONTROLS.
Using the corresponding function button, you can select the number source, phone book, and call list to enter or select a number and initiate the call.
12. Apple CarPlay | Android Auto
This function allows you to display the connection of the connected mobile phone to the radio, if the phone is compatible with this function.
Depending on the mobile phone, this connection can be established via cable or wirelessly. Please pay attention to the information from the mobile phone manufacturer.
The car radio has the following connections for this purpose:
- USB-A port for connecting to the car radio (see chapter INSTALLATION | REMOVAL | CONNECTION) - Wireless (without cable)
Activation:
Connect your phone with the original, high-quality USB cable that supports data transfer, and follow the device's instructions for screen mirroring.
Alternatively, connect the device wirelessly. Follow the device's instructions if your phone supports this function.
The control is then performed via the car radio's display.
Never install a wireless connection via WLAN, only a Bluetooth connection. If you have connection problems, use another cable or the original cable of your mobile phone. The connection and functions are provided by the connected mobile phone, the car radio has no influence on the functionality or possible malfunctions of
the app. In such cases, contact the manufacturer of the mobile phone or the app used.
When programming the function, the parking brake may need to be engaged. Please pay attention to the correct connection of the car radio (see chapter INSTALLATION | REMOVAL | CONNECTION).
Starting the playback
Select the local source from the main menu.
Main screen
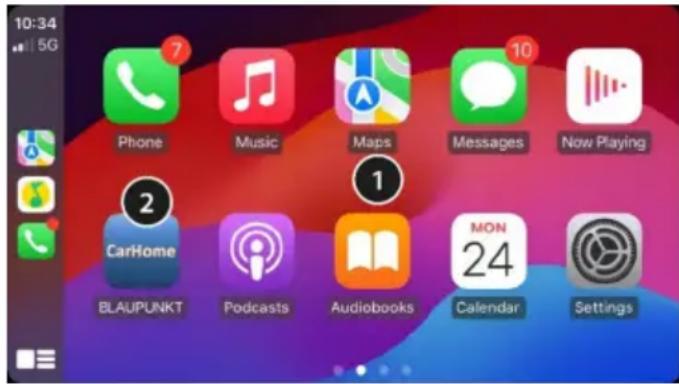
① Display of the content from the mobile phone (specific to the phone, may vary) ② Icon for launching the interface of the mobile phone (may vary)
13. Rear camera
Through the camera, you can view the image from an optionally installed camera. It can be activated automatically when engaging reverse gear.
The car radio has the following connections for this:
- Camera connector REVERSE CAMERA-IN on the rear side (see chapter INSTALLATION | REMOVAL | CONNECTORS)
Manual activation of the camera
Select the video source from the main menu.
Automatic activation of the camera
Engage reverse gear and the device will automatically switch to the camera image.
Make sure the camera is correctly connected and that it is supported by the vehicle's CAN bus. (See chapter INSTALLATION | REMOVAL | CONNECTION)
To configure the camera/PDC functions, see chapter SETTINGS MENU. Depending on the vehicle and its equipment, the device may display dynamic camera lines.

Danger of distraction from road traffic!
Use the rear view camera only when the situation allows it and it does not distract your attention from road traffic.
Setting (ACC): The device receives
the ignition status via CAN and turns on/off through it.
Dimming: The brightness of the display can be adjusted depending on the vehicle's ambient light. For settings, see chapter SETTINGS | MENU.
GALA: Adjustment of the sound level depending on speed. For settings, see chapter SETTINGS MENU.
Display of rear view camera, PDC, parking lines (dynamic/static):
The car radio can display the image from a standard rear view camera (FBAS PAL/NTSC signal), as well as from the factory-installed PDC sensors and the activation of the parking line format. For settings, see chapter SETTINGS | MENU.
Original equipment manufacturer (OEM) cameras for rear view are not supported; for this, adapters from the store for accessories are necessary.
Multifunction display (MFD):
The factory-installed multifunction display (MFD) can, depending on the equipment/model, show information such as station name and title when the AUDIO function is set. More information about this can be found in the operating manual for your vehicle.
15. Settings and Menu
Select the settings by pressing the SETTINGS button on the main screen. The settings can be adjusted according to your preferences. The settings are divided into different categories and are described on the following pages:
GENERAL
General settings for the device
DATE AND TIME
Setting the date and time, setting the automatic time adjustment
ANTENNA SUPPLY DAB
Turning on/off the power supply to the DAB antenna
BEEP
Turning on/off the sound of the buttons
MICROPHONE
Selection of the internal or external microphone
LANGUAGE (E3UK)
Setting the language of the car radio
SOFTKEY
Icon on the main screen for switching between functions quickly
DISPLAY (BRIGHTNESS) AND CAMERA
Settings for climate control:
The car radio can show the corresponding functions of the car.
Information from the car, for example open doors/trunk etc.: The car radio can show messages about the status of the car, for example "Door open" etc. For settings, see the main settings menu.
AUDIO (Audio)
Settings for volume and sound
VOLUME LEVELS (Volume levels) Setting of the different volume levels of the sound MEDIA VOLUME (Media volume) Sound of the telephone RINGTONE VOLUME (Ringtone) NAVIGATION ANNOUNCEMENTS VOLUME (Radio)
EQUALIZER
Adjusting the equalizer to set the sound settings
LOUDNESS
Enable/disable Loudness (bass boost)
GALA
Switching on/off the speed-dependent volume
DISPLAY (SCREEN)
Setting the display for presentation
BRIGHTNESS
Setting the screen brightness
DIMMER MODE
Activating/deactivating the automatic brightness adjustment depending on the vehicle's lighting
KEY COLOR (BUTTON COLOR)
Setting the button illumination
CAR (AUTO)
Settings specific to the vehicle, which are provided via the vehicle's CAN, including the main CAN function (vehicle-specific)
Camera display on/off
OE SOUND SYSTEM
Activating/deactivating the external active system
DYNAMIC CAMERA LINES
Enable/disable dynamic camera lines
FRONT PDC
Activate/deactivate the PDC function for the front PDC sensors
CAR INFO POP-UP
Display information about the car status, e.g., "Door Open"
OTHERS
Functions such as muting the car radio, displaying the installed software version, etc.
16. INSTALLATION | REMOVAL | CONNECTIONS
Installation instructions

You may install the car radio only if you have experience in car radio installation!
Familiarize yourself with the electrical system of the car. Follow the provided information about connecting the car radio. The car radio can only be connected to the supplied connector, ensuring that all cables transmit the correct signals and voltages. The contacts in
the car must not be connected directly to the car radio without proper verification.
The installation of the car radio must not interfere with or block the operation of the airbags, other safety devices, or control elements.
The car battery (negative pole, ground) must be disconnected before installing the car radio; otherwise, errors or damage may occur.
The car radio is intended for installation in cars. On the left, the safety instructions of the car manufacturer must be observed (airbag, brake system, on-board computer, mobile phone, etc.).
To install the car radio, it is necessary to remove the car panels with a special tool, and this task must be performed by a specialist.
The installation of the radio must not be carried out on the steering elements and/or the brake system of the vehicle.
Depending on the car in which the radio is to be installed, optional and specific adapters for connection and/or mounting accessories such as mounting frame, panels, etc. are required. These are available in specialized stores.
Errors during installation may lead to damage to the radio or the car's electronics.
Be careful not to damage the cables or connectors during installation and removal. Damaged connectors or cables must not be used further.
The housing of the radio heats up during operation. Ensure that cables do not touch the housing.
Installation in high humidity or dust/dirt can lead to functional problems or defects in the radio.
If you need help installing the car radio, consult a specialist for car audio systems.
Blaupunkt assumes no liability or warranty for damages and/or consequences caused by incorrect and/or incompetent installation, operation, or use.
Connection and defined terms for connections

① POWER:
Connection for ISO adapter with CAN interface (included in the scope of delivery) and fuse (15 A). Alternative: Adapter for open cable ends, observe the markings on the adapter and the following description of the functions (included in the scope of delivery). ② MIC:
Connection for external microphone, the connection is made via the settings of the car radio.
③ GPS: Connection of GPS antenna ④ Universal connector for distribution of video connector adapter and cable (included in the scope of delivery) ⑤ DAB:
Antenna: SMB connector with 12 V phantom power (max. 150 mA, switchable via settings) ⑥ RADIO:
FM/AM antenna (FAKRA connector). Adapter for 2x FAKRA in the kit, with 12 V phantom power max. (150 mA, not switchable)
⑦ USB: USB-A connector for USB devices ⑧ Ventilation:
Do not cover, do not insert cables or objects into the opening.
FL+/FL-/RL+/RL-/FR+/FR-/RR+/RR-: Connectors for speakers
LINE-OUT: Output to preamplifier for connection to an external amplifier
SUBWOOFER: Output for subwoofer for connection to an active subwoofer
AV-IN/VIDEO IN: Audio/Video input for AV-IN source
B+: Battery (terminal 30), permanent power supply from the car battery.
P.ANT: Switched power supply for active antenna (12 V, max. 150 mA).
P.CNTR: Control voltage for external amplifier/subwoofer (12 V, max. 150 mA).
ILLUMINATION: Input for car lighting (terminal 58), required for automatic switching of display brightness at night. The input accepts 0 V (off)/5-14.4 V (active). PWM signals may interfere with the display and in that case must not be used.
BRAKE: Connection for brake signal
REVERSE: Connection for reverse signal
ACC: Switched positive from ignition switch (terminal 15).
GND: 3a3emBaHe (KI.31).
Function of the connector, connection with the number ①, to be used only with the connector and must not be connected separately! The connectors are protected against reverse polarity. When the connectors are disconnected, the protection is bypassed and no force should be applied, otherwise there is a risk of damage to the device or adapter! The car radio does not support CD changers, interfaces, or other components connected to older car radio receivers Blaupunkt. Pay attention to the correct connection of the supply and ground wires, otherwise the car radio may have increased current consumption and may not switch off completely. This can lead to discharge or damage to the car battery, defects in the car's electronics, or other components!
DAB frequency range: 174.928-239.200 MHz (channels 5A-13F)
Impedance of the loudspeakers: ≥ 4 ohms/channel
Protection
Operating voltage: 12 V (14.4 V)
Current consumption
Operation: <10 A
Switched off (ACC off): < 5 mA
Inputs/Outputs
Antenna/amplifier: 12V, max. 150 mA
FM antenna: 12 V, max. 150 mA
DAB antenna: 12V, max. 150 mA
USB input: 5V, max. 2A
Output preamplifier: 2 Vss
Remote control via CAN-Bus*
Ignition (ACC): via CAN-
Bus*/analog input: via
CAN-Bus*/analog
Audio signal (GALA): via CAN-Bus*
Reverse signal (REVERSE) via CAN-Bus*/analog
Parking assist (PDC): via CAN-Bus*
Display on speedometer (MFD): via CAN-Bus*
Camera signal: CVBS PAL/NTSC
*CAN functions may vary depending on the equipment/model and in some cases may not be present/supported depending on the vehicle.
Therefore, it is possible that functions are not supported depending on the vehicle. Additional monitors and special accessories, such as parking sensors, are not supported.
List of compatible vehicles
| Моden (Quadlock II) | Тип | Моden Гдина | |
| VW Amarok | 2H | 2010 - 2016 | |
| VW Caddy | 2K/2C | 2003 - 2014 | |
| VW CC | 35 | 2012 - 2016 | |
| VW EOS | 1F | 2006 - 2015 | |
| VW Golf V | 1K | 2003 - 2008 | |
| VW Golf V Variant | 1K | 2007 - 2009 | |
| VW Golf VI | 5K | 2008 - 2012 | |
| VW Golf VI Variant | AJ | 2009 - 2013 | |
| VW Golf VI ka6рюлет | 51 | 2011 - 2016 | |
| VW Golf V Plus | 5M/52 | 2005 - 2008 | |
| VW Golf VI Plus | 52 | 2008 - 2013 | |
| VW Jetta V / Bora | 1K | 2005 - 2010 | |
| VW Jetta VI | 16 | 2010 - 2015 | |
| VW Passat | 3C/36 | 2005 - 2014 | |
| VW Passat Alltrack | 36 2012 - 2014 | ||
| VW Passat CC | 35 | 2008 - 2012 | |
| VW Passat Variant | 3C/36 2005 - 2014 | ||
| VW Polo | 6R | 2010 - 2014 | |
| VW Scirocco III | 13 | 2008 - 2014 | |
| VW Sharan | 7N | 2010 - 2015 | |
| VW Tiguan | 5N | 2007 - 2014 | |
| VW Touran | 1T | 2003 - 2015 | |
| VW T5 | 7H / 7E / 7J (1-BO обноваянe) | 2009 - 2015 | |
| SEAT Alhambra | 71 2010 - 2015 | ||
| SEAT Altea | 5P | 2004 - 2015 | |
| SEAT Altea Freetrack | 5P 2007 - 2009 | ||
| SEAT Altea XL | 5P | 2006 - 2015 | |
| SEAT Toledo | 5P | 2004 - 2009 | |
| SEAT Toledo KG | 2012 - 2013 | ||
| ŠKODA Octavia II | 1Z | 2009 - 2013 | |
| ŠKODA Octavia II kom6и | 1Z | 2009 - 2013 | |
| ŠKODA Octavia II Scout | 1Z 2009 - 2013 | ||
| ŠKODA Rapid NH | 2012 - 2015 | ||
| ŠKODA Rapid Spaceback | NH 2013 - 2015 | ||
| ŠKODA Superb II 3T | 2008 - 2014 | ||
| ŠKODA Superb II kom6и | 3T | 2008 - 2014 | |
| ŠKODA Yeti 5L | 2009 - 2014 | ||
-The physical design of the OEM device and the intended use must be followed. Models not included in the compatibility list are not compatible. The device can be used as a replacement for OEM models RNS310/315/510 and RCD310/315/330/350/510. - Devices with Quadlock connectors (such as Quadlock III/"Power Quadlock") cannot be used.
18. Troubleshooting
Below are some common errors and possible solutions.
If you have problems with the autoradio, contact your specialized dealer or Blaupunkt service. If you have problems with the installation of the autoradio, contact a qualified specialist.
Most of the possible problems are caused by faults in the connection and operation. Please read the operating instructions carefully.
It is possible that some functions are not available for your model, but they are described as standard equipment or an option.
- After the ignition is switched on, the indicator lamps for the airbag and the instrument cluster do not work / the car radio is blocked and shows PHONE or T.T.H.:
The car radio is not connected correctly or the cables are damaged. Disconnect the car battery and remove the car radio.
Have the installation carried out/checked by a competent and qualified person.
- The car radio does not switch on / the car radio shows 1 HOUR/1 HOUR when switching on and switches off after one hour:
The power supply is not connected or is not active. Please check the connections.
- At high volume levels, the display/radio switches off completely:
Please check the fuse of the power supply.
The installation must be carried out/checked by a qualified specialist.
Problems with sound reproduction, loss of individual channels:
Please check the connection of the speakers and the speakers themselves. No cable should have contact with ground. The channels must not be connected below the minimum impedance (see technical data).
- The settings and/or the station memory are lost, the clock does not work correctly:
The autoradio's memory is constantly powered, even without the ignition. Some settings are only stored permanently after correct switching off or are lost without permanent power supply - therefore it is absolutely necessary to switch off the autoradio correctly.
Functions KaTo Yac, after power on, after turning on the USB/CD source, it constantly saves. For the function to work without problems, the device must be properly connected to a constant power source, which must not be interrupted during operation, otherwise malfunctions or damage to the software/device may occur.
If the device does not have a constant power supply, then check this in the product description. Regardless of this, the device must be connected correctly. - The car radio has or does not have a radio receiver:
Check the antenna for appropriate reception coverage.
Check if the device is receiving a signal from the radio station, if the antenna for appropriate reception coverage does not receive it from the radio. Is the antenna installed correctly? Many antennas have a built-in amplifier (car stereo). Antennas that are mounted on glass should not be mounted on glass with a coating. LEDs or other electrical components may interfere with radio reception, so make sure there are no such interferences. On first use of the car radio, make sure it is tuned to the correct radio frequency, if the car radio has this option for tuning (see TUNING | MENU chapter).
- During DAB playback, the display shows NO SIGNAL / NO SERVICE or reception is interrupted:
Current ensembles (program packages) may have weak signal and decoding of the audio signal is not possible. Please select another ensemble/change the location and/or check the DAB antenna.
- The car radio suddenly shows SEEK PI (SEARCH PI)/SEEK TP (SEARCH TP) in radio mode or changes stations:
Please check the antenna and the settings of the device. If necessary, deactivate the function for alternative frequency (see TUNING | MENU chapter). The device may switch to another station if the function for traffic information priority is activated.
- The car radio does not display correctly/no longer displays the name of the station in radio mode:
Check the reception (check the antenna). Please note: some stations temporarily transmit additional information instead of the station name instead of the RDS station name, over which the device has no influence.
- USB, CD, DVD, SD or other data carriers do not function:
Please check the function with another carrier, format it accordingly, play other files. Check the device for the presence of a transport lock, remove the CD/DVD device and check the repair.
- The mobile phone does not charge or charges slowly via USB:
This depends on the phone and the cable used, the specifications of the manufacturer for fast charging are not supported.
The phone is displayed, the phone is not connected, no sound is heard from the speakers:
The device is designed for automatic operation without problems only if the radio is correctly connected to ACC/Zundplus (Kl.15) and BATT/Battery (Kl.30). Please check if the latest software update for the car radio is installed. Reset the car radio via NORMSET (see chapter SETTINGS | MENU) or press the RESET button, see chapter CONTROL.
Please remove the car radio from the phone, then re-establish the connection. Confirm all permission requests on the phone with DA.
Use another phone for testing.
- The microphone and phone conversations are too quiet or cannot be heard:
Depending on the model, the phone may have a separate volume setting for different connected devices and different applications. In this case, you need to increase the audio output from the application with a high volume level (start music playback from the corresponding application or from the radio) and then adjust the phone's volume during playback. (The availability of this function may depend on the connected device).
- Check if the microphone is not muted:
Please check the connection of the external microphone.
Check the microphone setting in the settings (if available).
Use another phone for testing.
- SUB-OUT or other audio settings on the car radio do not work (depending on the model):
Please check if the subwoofer is correctly connected to the SUB-OUT output of the car radio, otherwise the settings in the audio settings have no effect.
- There are problems with the DAB station list, incorrect DAB stations appear, DAB stations are not played:
Start a full scan of DAB stations to eliminate possible errors/mismatches in the station list.
- The preamplifier is not connected correctly. The car radio function does not work as expected/the car radio does not hold as expected:
Reset the car radio again (see chapter SETTINGS | MENU) and/or press the RESET button (availability depends on the model). Allow the installation to be carried out/checked by a competent, qualified person.
Before connecting to the service, we remind you: When you connect to the service, it is mandatory to describe the exact error and indicate the active version of the car radio software (for information about the software, see the chapter SETTINGS AND MENU).
1. Control elements
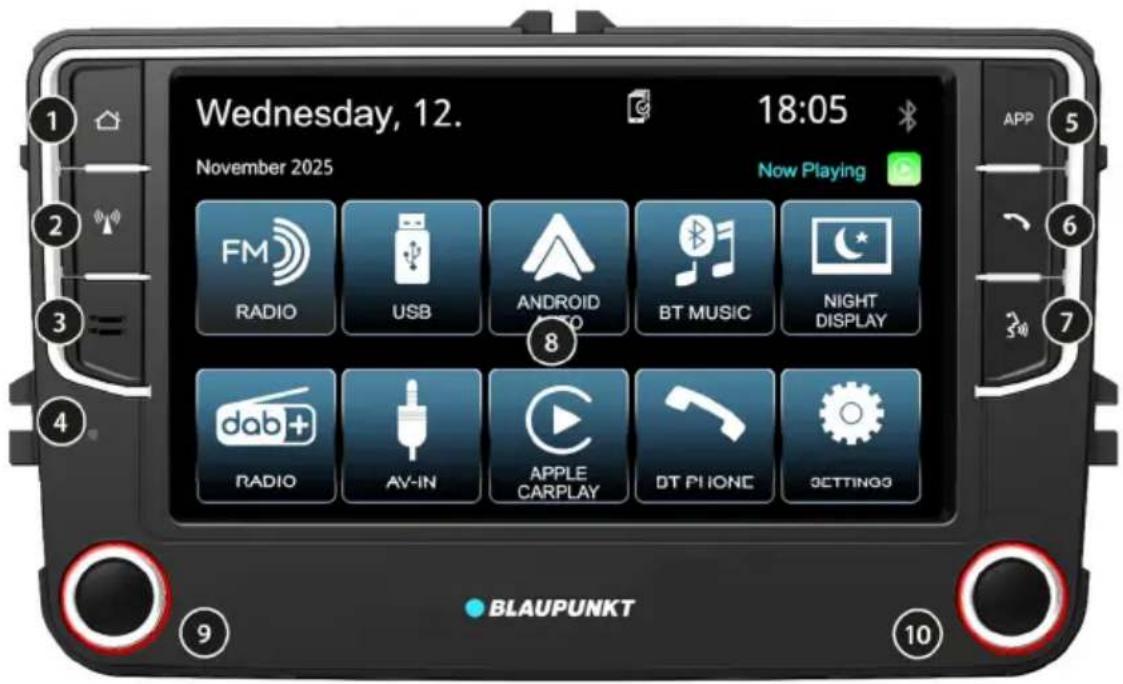
① Home button:
Return to home screen
② Radio button:
Call up radio source or switch between FM and DAB radio
③ Microphone:
VOLUME LEVELS
Setting different volume levels MEDIA VOLUME
PHONE VOLUME
RINGTONE VOLUME
NAVIGATION INSTRUCTIONS VOLUME AND TRAFFIC/RADIO VOLUME
EQUALIZER
Ignition (ACC): via CAN-Bus*/analog
Dimmer: via CAN
Bus*/analog
Glasnost (GALA): via CAN-Bus*
Reverse signal (REVERSE) via
CAN-Bus*/analog
Parking assistance (PDC): via CAN-bus*
Speed display (MFD): via CAN-bus*
Camera signal: CVBS PAL/NTSC
PHONE VOLUME (TELEPHONE)
RINGTONE VOLUME (MAIN TONE)
Navigation voice volume
TA VOLUME (TRAFFIC INFORMATION)
EQUALIZER
Call up equalizer to adjust sound settings
LOUDNESS
Ignition (ACC): via CAN-
Bus*/analog dimmer: via CAN-
Bus*/analog
Volume (GALA): via CAN-Bus*
Reverse signal (REVERSE) via CAN
Bus*/analog
Parking assistance (PDC):
via CAN-Bus*
Subject to technical changes, errors and misprints.
All rights reserved. This material may be reproduced, copied or distributed for personal use only.
This product has been manufactured and sold under the responsibility of Evo-Sales GmbH. Blaupunkt and the Blaupunkt logo are trademarks used under license by Evo Sales GmbH - further information at www.blaupunkt-brand.com.
All other products, services, companies, trademarks, trade or product names and logos referenced herein are the property of their respective owners.


- MEDIA VOLUME (MEDIA)
- PHONE VOLUME (PHONE)
- RINGTONE VOLUME (RINGTONE)
- EQUALIZER
- CONGRATULATIONS | TABLE OF CONTENTS
- CONTENTS
- SAFETY INSTRUCTIONS
- SYMBOLS USED
- ROAD SAFETY
- GENERAL SAFETY INSTRUCTIONS
- GENERAL INFORMATION | SCOPE OF DELIVERY | SOFTWARE UPDATE
- DECLARATION OF CONFORMITY
- TRADEMARK INFORMATION
- CLEANING INSTRUCTIONS
- DISPOSAL INSTRUCTIONS
- SCOPE OF DELIVERY
- SOFTWARE UPDATE
- SWITCHING ON/OFF | VOLUME | AUDIO SOURCES | OPERATION
- MAIN SCREEN HOME
- SWITCHING ON/OFF
- SWITCHING ON/OFF VIA THE VEHICLE IGNITION
- CHANGING THE VOLUME
- MUTING THE CAR RADIO
- SWITCHING OFF THE DISPLAY
- SELECTING AN AUDIO SOURCE
- OPERATION
- ANALOGUE RADIO OPERATION: FM/AM
- START FM/AM RADIO PLAYBACK
- CONTROLS AND THEIR FUNCTIONS
- DIGITAL RADIO MODE: DAB/DAB
- START DAB/DAB+ RADIO PLAYBACK
- PLAYING EXTERNAL DEVICES AND DATA CARRIERS: USB
- CONNECTING A USB STORAGE DEVICE/STARTING USB PLAYBACK
- MAIN SCREEN USB
- REMOVING USB DATA CARRIERS
- PLAYING EXTERNAL DEVICES AND DATA CARRIERS: AV-IN
- START AV-IN PLAYBACK
- SETTING UP AND MANAGING CONNECTIONS
- ESTABLISHING A CONNECTION
- MANAGING CONNECTIONS
- BLUETOOTH AUDIO STREAMING | HANDS-FREE SYSTEM
- MUSIC PLAYBACK (AUDIO STREAMING)
- INCOMING CALL
- OUTGOING CALL
- APPLE CARPLAY | ANDROID AUTO
- ACTIVATION
- START PLAYBACK
- MAIN SCREEN
- REVERSING CAMERA
- MANUAL ACTIVATION OF THE CAMERA
- AUTOMATIC CAMERA ACTIVATION
- DANGER DUE TO DISTRACTION FROM ROAD TRAFFIC
- CAN FUNCTIONS (VEHICLE-SPECIFIC)
- REVERSING CAMERA, PDC, PARKING LINES
- SETTINGS | MENU
- GENERAL
- DATE AND TIME
- ANTENNA SUPPLY DAB
- BEEP
- MICROPHONE
- LANGUAGE
- SOFTKEY
- AUDIO
- VOLUME LEVELS
- MEDIA VOLUME
- PHONE VOLUME
- RINGTONE VOLUME
- NAVI GUIDANCE VOLUME
- TA VOLUME (TRAFFIC RADIO)
- LOUDNESS
- GALA
- DISPLAY
- BRIGHTNESS
- DIMMER MODE
- KEY COLOUR
- CAR
- PARK ASSIST
- REVERSE CAMERA MUTE
- CAMERA PICTURE
- OE SOUND SYSTEM
- DYNAMIC CAMERA LINES
- FRONT OPS (FRONT PDC)
- CAR INFO POP-UP
- OTHERS
- INSTALLATION | REMOVAL | CONNECTIONS
- INSTALLATION INSTRUCTIONS
- CONNECTIONS AND DEFINITIONS OF CONNECTIONS
- USEFUL INFORMATION | TECHNICAL DATA
- WARRANTY
- SERVICE
- TECHNICAL
- VEHICLE COMPATIBILITY LIST
- TROUBLESHOOTING
- SETTINGS AND/OR STATION PRESETS ARE LOST, CLOCK DOES NOT WORK PROPERLY
- THE CAR RADIO HAS NO OR POOR RADIO RECEPTION
- IN DAB MODE, NO SIGNAL / NO SERVICE IS SUDDENLY DISPLAYED OR RECEPTION IS INTERRUPTED
- THE CAR RADIO SUDDENLY DISPLAYS SEEK PI (SEARCH PI)/SEEK TP (SEARCH TP) IN RADIO MODE OR CHANGES THE STATION
- THE CAR RADIO DOES NOT DISPLAY THE STATION NAME CORRECTLY/NO LONGER DISPLAYS IT IN RADIO MODE
- USB, CD, DVD, SD OR OTHER DATA CARRIERS DO NOT WORK
- MOBILE PHONE DOES NOT CHARGE OR CHARGES SLOWLY VIA USB
- PHONE BOOK IS NOT DISPLAYED, PHONE DOES NOT CONNECT, CALLER CANNOT BE HEARD
- (NAVIGATION GUIDANCE)
- NAVI GUIDANCE VOLUME (NAVIGATION INSTRUCTIONS)
- TA VOLUME (TRAFFIC ANNOUNCEMENTS)
- (NAVIGATION INSTRUCTIONS)
- TA VOLUME (TRAFFIC ANNOUNCEMENT)
- DISPLAY (SCREEN)
- MAIN FM RADIO MENU
- START FM/MW RADIO PLAYBACK
- NAVIGATION INSTRUCTIONS VOLUME AND TA VOLUME (TRAFFIC RADIO)
- SOUND LOAD
- CONTROL ELEMENTS
- STARTING FM/AM RADIO PLAYBACK
- NAVIGATION VOLUME
- ON/OFF
- TURNING ON/OFF VIA THE CAR IGNITION
- DAB OVERVIEW
- STARTING PLAYBACK OF DAB/DAB+ RADIO
- CONTROL ELEMENTS AND THEIR FUNCTIONS
- STARTING PLAYBACK OF AV-IN
- CONNECTION AND CONTROL OF DEVICES
- CONNECTION SETUP
- CONNECTION MANAGEMENT
- REFRESH (UPDATE) - UPDATE THE LIST
- BLUETOOTH AUDIO STREAMING | FREE HANDS
- PLAYING MUSIC (AUDIO STREAMING)
- STARTING THE PLAYBACK
- REAR CAMERA
- AUTOMATIC ACTIVATION OF THE CAMERA
- DANGER OF DISTRACTION FROM ROAD TRAFFIC
- SETTING (ACC): THE DEVICE RECEIVES
- DISPLAY OF REAR VIEW CAMERA, PDC, PARKING LINES (DYNAMIC/STATIC)
- MULTIFUNCTION DISPLAY (MFD)
- SETTINGS AND MENU
- LANGUAGE (E3UK)
- SETTINGS FOR CLIMATE CONTROL
- AUDIO (AUDIO)
- KEY COLOR (BUTTON COLOR)
- CAR (AUTO)
- FRONT PDC
- CONNECTION AND DEFINED TERMS FOR CONNECTIONS
- LIST OF COMPATIBLE VEHICLES
- PHONE VOLUME (TELEPHONE)
- RINGTONE VOLUME (MAIN TONE)
- NAVIGATION VOICE VOLUME
- TA VOLUME (TRAFFIC INFORMATION)
Brand : BLAUPUNKT
Model : Wolfsburg 648
Category : Car radio