
CR 1918 - Radio CAMRY - Free user manual and instructions
Find the device manual for free CR 1918 CAMRY in PDF.

| Brand | CAMRY |
| Model | CR 1918 |
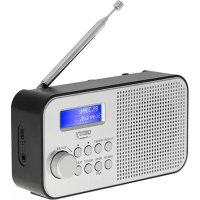
| Product type | Internet Radio and FM/DAB with Bluetooth and USB |
| Power supply | USB-C 5V (cable included) |
| Power consumption | < 1 W |
| Bluetooth version | 5.3 |
| Bluetooth range | Up to 10 m |
| Maximum USB capacity | 64 GB (FAT/FAT32/VFAT) |
| Supported audio formats | MP3 (via USB) |
| Display | LCD |
| Main functions | Internet Radio, FM/DAB, Podcasts, USB, Bluetooth, Alarm, Sleep Timer |
| Alarm | Yes, 3 independent alarms with repeat options and sound (buzzer, melody, internet radio) |
| Sleep timer | 15, 30, 60, 90, 120, 180 minutes |
| Equalizer | Yes (Normal, Jazz, Rock, News, etc.) |
| Software update | Via USB or automatically via Internet |
| Menu languages | 18 languages including French, English, German, etc. |
| Time display color | White, Blue, Green, Orange, Red |
| Cleaning and maintenance | Clean with a dry cloth. Do not use water or cleaning products. |
| Safety | Do not immerse, do not expose to moisture. Disconnect before cleaning. Do not cover ventilation openings. |
| Included accessories | USB to Type C cable |
| Control app | AirMusic (free, for smartphone) |
Frequently Asked Questions - CR 1918 CAMRY
User questions about CR 1918 CAMRY
0 question about this device. Answer the ones you know or ask your own.
Ask a new question about this device
Download the instructions for your Radio in PDF format for free! Find your manual CR 1918 - CAMRY and take your electronic device back in hand. On this page are published all the documents necessary for the use of your device. CR 1918 by CAMRY.
USER MANUAL CR 1918 CAMRY
E
F_4G
User Manual (EN)
GENERAL SAFETY CONDITIONS IMPORTANT SAFETY INSTRUCTIONS FOR USE READ CAREFULLY AND KEEP FOR FUTURE REFERENCE
- Before using the device, read the instruction manual and follow the instructions contained therein. The manufacturer is not responsible for damages caused by using the device contrary to its intended use or improper operation.
- The device is for domestic use only. Do not use for other purposes incompatible with its intended use.
- Take special care when using the device when children are around. Do not allow children to play with the device do not allow children or anyone unfamiliar with the device to use it.
- WARNING: This equipment may be used by children over 8 years of age and persons with limited physical, sensory or mental ability, or persons without experience or familiarity with the equipment, if it is done under the supervision of a person responsible for their safety or they have been given instructions on the safe use of the equipment and are aware of the dangers associated with its use. Children should not play with the equipment. Cleaning and maintenance of the equipment should not be performed by children unless they are over 8 years of age and these activities are performed under supervision.
- WARNING: Do not leave the device plugged into an outlet unattended.
- WARNING: Keep the device out of the reach of children.
- WARNING: Improper use of the device, may result in injuries, such as electric shock, among others.
-
WARNING: Always remove the plug from the power outlet after use by holding the outlet with your hand. DO NOT pull the power cord.
-
WARNING: Do not use the device near flammable materials.
- WARNING: Unplug the power cord from the outlet before cleaning and washing the unit.
- WARNING: Do not cover the ventilation holes in the device housing with other objects.
- Periodically check the condition of the power cord. If the power cord is damaged, it should be replaced by a specialized repair facility to avoid danger.
- Do not immerse the cable, plug and the entire device in water or other liquid. Do not expose the device to weather conditions (rain, sun, etc.) or use it in high humidity conditions.
- Do not use the device with a damaged power cord or if it has been dropped or damaged in any other way or is not working properly. Do not repair the device yourself, as there is a risk of electrocution. Return a damaged device to a competent service center for inspection or repair. All repairs may be made only by authorized service centers. Improper repair may cause serious danger to the user.
- Place the appliance on a cool stable, level surface, away from hot kitchen appliances such as an electric stove, gas burner, etc..
- The power cord must not hang over the edge of the table or touch hot surfaces.
- To provide additional protection, it is advisable to install in the electrical circuit, a residual current device (RCD) with a rated residual current of not more than 30 mA. In this regard, consult a specialist electrician.
- Wipe the device only with a dry cloth. Do not use water or cleaning fluids.
- Store the device in a dry room.
Device Description:
-
LCD display
-
Power
-
Menu
-
Memory settings
-
OK / Start / Pause
-
Previous track / Back / Left
-
Down / Volume down
-
Next track / next selection / right 9. Up / Increase volume
-
USB socket
-
Headphone jack
-
USB C 5V power socket
When the device is started for the first time, the system will ask you to configure the language and network configuration. See illustration B page 3.
. Use the Up / Down keys (9/7) to select the language. Confirm your selection by pressing the [OK] button (5).
. Select Yes to connect to the network. See illustration C page 3.
. If you answer "Yes," the display will proceed to scan wireless networks and after a while a list of available wireless networks will appear .
. Use the UP/DOWN keys (9/7) to enter numbers/letters. When you are on the letter you are looking for, press RIGHT (8) to move to the next character. When you have finished entering, press OK to confirm.
NOTE: Once you have selected the last character of the password, stay on the last character before pressing OK. If you press RIGHT before confirming you will add an additional character to the password that does not contain that character.
You can press Left to go to the previous character.
Main menu
In the main menu, you can select the following modes: Internet Radio, Local Radio, Setup, USB, Podcast, Bluetooth.
Use the Left, Right buttons to select the appropriate function and then the OK button to confirm.
Settings
In Settings, you can make various system settings.
Settings / Name, Device Names
To change the name of the device. You can also call up the system information here.
Settings / Equalizer
The sound filter is set to "normal" by default. You can change it to different filters (jazz, rock, news, etc.) to get the optimal sound.
Settings / Network
Changes the network settings as described on page 9 in the "Getting Started" section. Make sure the "Keep network connection" option is enabled in case of Internet connection problems.
Settings / Dimmer
Here you can activate power saving mode and reduce or increase the brightness of the display.
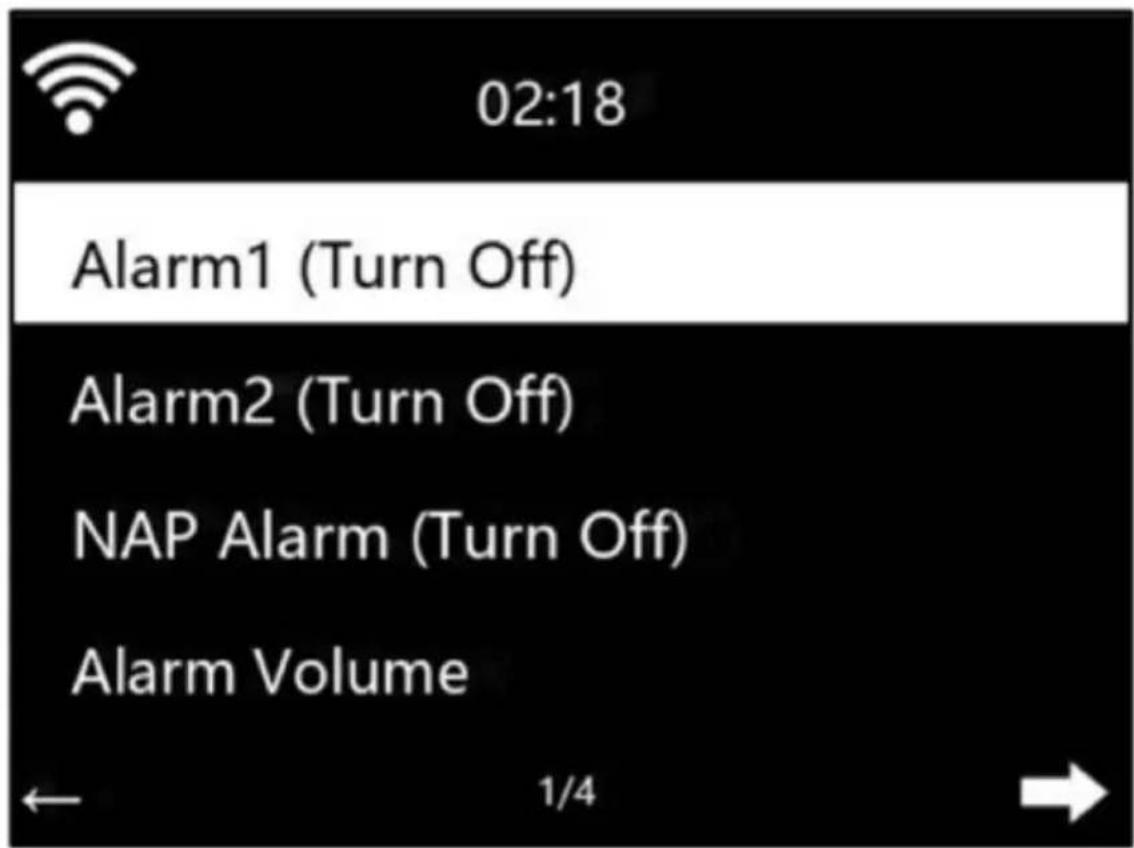
Settings / Alarm
There are three independent alarms for the alarm function: two alarms with a fixed time setting (e.g. 7:30h), "snooze alarm" or "snooze".
The snooze function set from this menu means that the alarm will sound after a set time, i.e. 5 minutes.
You can control the volume for Alarm Clock 1 and Alarm Clock 2, as well as set times and repetitions (daily, weekly, or select specific days of the week on which the alarm should sound) and select sounds (source: Buzzer, melody, internet radio which was saved to favorites.).
Note that an Internet connection is required for some sounds.
To stop the alarm function while the alarm is running by pressing the Power button (2). Press any button (except the Power button) during the alarm, the snooze alarm will be activated and automatically repeat after 5 minutes.
Settings / Power Settings
To save power, you can set here when you want the unit to go into standby mode.
Possible intervals are: Off. / 5 minutes / 15 minutes / 30 minutes.
Settings / Sleep Timer
Activates the sleep function. Here you can set the timer when the device should switch to standby mode.
Possible intervals are: Off / 15 minutes / 30 minutes / 60 minutes / 90 minutes / 120 minutes / 180 minutes.
Settings / Date and time
Date and time settings can be accessed and changed only when the device is connected to the network.
Date/Time Setting
Enable the "automatic" option if you want the device to download the current
time from the Internet (recommended). If the "Autom. Date/Time" is disabled, at this point you can also manually set the date and time.
Time format
If you disable this function, the time will be displayed in 24-hour or 12-hour format.
Date Determines the format in which the date is displayed.
Note: GMT (+01:00) is the default time zone. If you are outside this time zone, you can manually correct the time.
Make sure that in the settings, in the Network section, the "Keep network connection" option is activated in case there are problems with the time display.
Set the date format:
Three options are available: YYYY/MM/DD, DD/MM/YYYY and MM/DD/YYYY, with DD/MM/YYYY being the default format.
Settings / Time display
The color of the time display can be changed to white, blue, green, orange or red. By default, the system sets the color to white.
Settings / Weather
Set location.
Temperature unit: Two display functions are available: degrees Celsius and Fahrenheit.
Display in standby mode: You can enable or disable this function.
Settings / Playback Settings
Sets the number of playbacks (off, repeat, random, single repeat) of audio files using USB flash drives.
Settings / Language
You can choose from 18 available menu languages: English
German, Spanish, French, Portuguese, Dutch, Italian, Pycknn, Finland, Sweden, etc.
Settings / Resume playback when turned on
If you want to continue playback after turning on the device, set it here.
Settings / Software Update
To update the device's software, you can update it. Please note that the software must be on the USB storage device and it must be the only file on the storage media (folders are also considered files).
If the manufacturer provides a software update for the device, it will be downloaded automatically as soon as the device has an Internet connection. You will receive a notification that the update is available. Confirm the installation by pressing the [OK] button next to the appropriate selection.
Settings / Restore factory settings
All data stored on the device will be erased, and the device will be restored to factory defaults.
Settings / Local radio station settings
Select the region where you live or from which you want to listen to a radio station. You will be shown local FM and DAB stations that you can listen to via Internet radio. Select a station by long-pressing the [Preset] button (4). The station will then be placed in your favorites list and can be easily recalled later.
Internet radio mode
You can use the Internet radio quick selection icon to select stations and recall your favorites.
List of all radio stations. Search the country and radio stations yourself. Channel categories are Worldwide Top20, Genre, Country/Region and Recommendations.
My Favorites:
A list of saved favorites. You can access or edit them, such as move or delete them.
To save a station, press and hold the [Preset] button while receiving a radio station. The same station can only be saved once.
Radio Station:
List of all radio stations. Search the country and radio stations yourself. Channel categories are Worldwide Top20, Genre, Country/Region and Recommendations.
Sleep Radio:
A selection of different sounds (birds, piano, rain, spa, room, wave, lullaby, white noise) to help you fall asleep.
Recently listened stations:
Displays up to 10 recently listened to radio stations.
Podcast mode
Follow the instructions below to select a podcast station.
-
Use the arrow keys to select Podcast.
-
The first time you use it, you will see options to help you find podcasts.
You can find different podcasts using different methods:
Popular : You can select podcasts that you listen to frequently.
My Favorites : Save your favorites here .
History : View a list of podcasts you've listened to so far.
Browse Genres : Genre - select podcasts according to their content. There are many genres, such as: nutrition, family, sports, technology, news, etc.
Trends : Discover selected topics that are currently being discussed.
USB mode
The device has a USB 2.0 port. USB devices such as storage devices (USB flash drives, hard drives) can be connected to this port. The device supports storage devices in FAT/FAT32/VFAT format.
After selecting USB playback mode, connect an external USB flash drive to the USB port on the back of the unit.
Press OK to continue. Navigate using the arrow keys on the device to select the desired folder on the USB flash drive.
Confirm with [OK] to select the desired audio file to play. While the audio file is playing, you can skip to the next or previous track by pressing the right (next track) or left (previous track) arrow keys. You can switch to the file list view by briefly pressing the left arrow key.
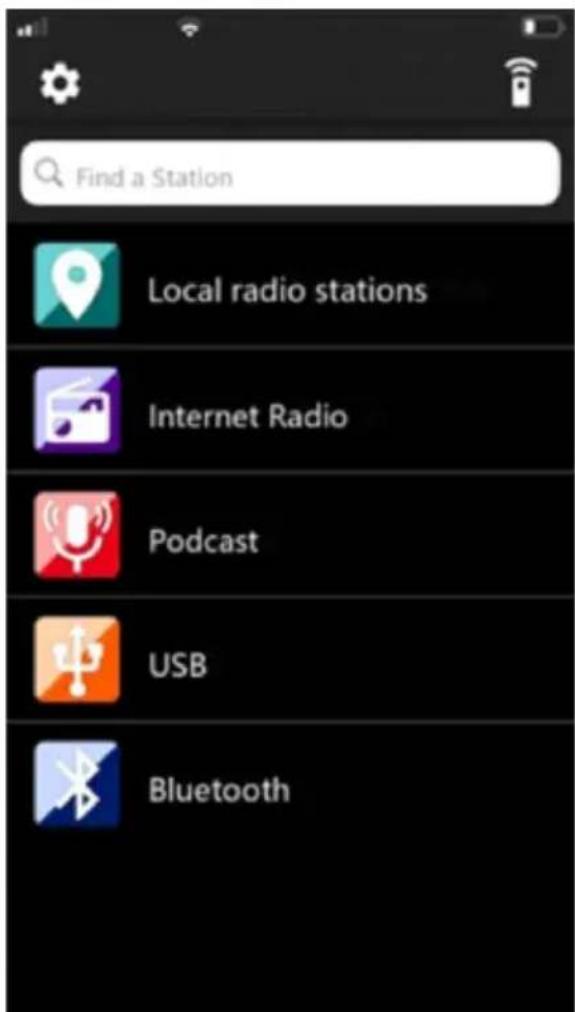
AirMusic (Illustration F page 4) - an application for controlling the device with a smartphone
With the AirMusic app, you can control the CR 1918 from your smartphone. Go to the app store on your smartphone and download the app to your smartphone.
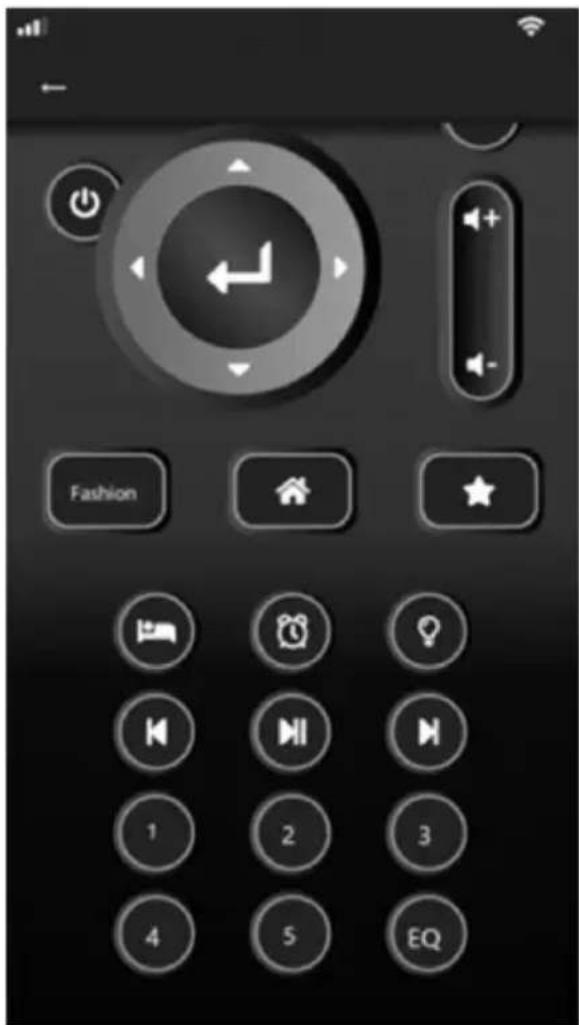
Virtual remote control Illustration G page 4
Use the highlighted menu item to open the virtual remote control. This allows you to control the device as you would with a physical remote control.
Bluetooth mode
Use the arrow keys to select the Bluetooth mode. Make sure no other device is already connected.
Connecting to the radio via Bluetooth.
Activate Bluetooth on your smartphone as well. Select your radio from the list of devices.
Once the radio is connected, you can stream audio files via Bluetooth. You can control the volume with the radio as well as with the connected Bluetooth device.
Disconnect Bluetooth
To disconnect the Bluetooth connection, press and hold the [OK] button for 3 seconds.
With Bluetooth mode, it is possible to transfer music wirelessly from a smartphone or tablet via Bluetooth (range of 10 m, depending on the environment).
Preset / Edit channel list
Press and hold the [Preset] button to save the currently playing station as a favorite.
If the selected station has already been saved before, it cannot be saved again.
Specifications:
Input voltage: DC5V (accessories : USB to type C cable)
Power consumption: : < 1W
Maximum supported USB memory capacity : 64G Supported
USB memory format: mp3
Bluetooth version: V 5.3
Transmitting frequency: 2.4GHz-2.4835GHz
BT channel emission power: Max. 6.31mW
Adler Sp. z o.o., Ordona 2a, 01-237 Warsaw, Poland hereby declares that the AD 1918 is in compliance with Directive 2014/53/EU. The full text of the EU Declaration of Conformity is available at the following internet address:
For the sake of the environment. Information about waste electrical and electronic equipment In accordance with Article 13(1) and (2) of the Law of September 11, 2015 on waste electrical and electronic equipment, we inform you about the proper handling of waste electrical and electronic equipment:
-
It is forbidden to place waste electrical and electronic equipment together with other waste - this is confirmed by marking in the form of a "crossed out basket", ordering selective collection of this type of waste.
-
Electrical and electronic equipment may contain hazardous substances, mixtures and components that, when released into the environment, can cause serious danger to the health and life of humans and living organisms. They can lead to numerous health ailments, such as vision, hearing and speech disorders, and can also damage the kidneys, liver and heart, and cause skin diseases. Harmful substances, can also have adverse effects on the respiratory and reproductive systems and lead to cancerous changes. Consumption of plants growing on contaminated soils, and products made from them, can risk the aforementioned health effects.
-
Waste electrical and electronic equipment should be handed over only to authorized collection points, a list of which should be included on each Municipality's website.
-
The household plays an important role, in contributing to the reuse and recovery, including recycling, of waste equipment. It also plays a key role in the waste electrical and electronic equipment management system due to the possibility of direct delivery to authorized collection points and the elimination of undesirable social habits resulting in leaving waste equipment in places not intended for it.
In addition, Donate waste electrical and electronic equipment at the point of delivery. A distributor, when supplying equipment intended for households to a purchaser, is obliged to take back used household equipment free of charge at the place of delivery of such equipment, provided the used equipment is of the same type and performed the same functions as the supplied equipment.
Cardboard packaging and polyethylene (PE) bags should be placed in the appropriate containers for separate collection of municipal waste according to their description. If there are batteries in the equipment, remove them and separately dispose of them at a collection and storage facility.
Do not dispose of the device in the municipal waste container!!!
Service If you wish to purchase spare parts or report any complaints, please contact directly with the seller who issued the receipt.
Settings / Equalizer
Genre, Country/Region in Recommendations.
Radio za spanje:
Input voltage: DC5V (accessories : USB to type C cable)
Power consumption: : < 1W
Maximum supported USB memory capacity: 64G Supported
USB memory format: mp3
Bluetooth version: V 5.3
Transmitting frequency: 2.4GHz-2.4835GHz
BT channel emission power: Max. 6.31mW
Mine favoritter: Gem dine favoritter her.
specific Agricultural Bureau: National Bureau of the United States
3s6s3d986980 / 10865m096580s
( \partial s\varphi z o d s\acute { m } s ) ( g\varphi b\acute { g } g o n l o m z o l ) ( l s d o \varphi s d m y z o g d y m o \partial s \varphi z o d s\acute { m } s : m \acute { o } \partial s \varphi z o d s\acute { m } s \varphi g f u o n g d y m o \varphi \acute { m } o l ) ( \partial s \acute { m } s d g \acute { g } h o o ( \partial s g . 7 : 3 0 ) ( k w ) , , , , , , , , , , , , , , , , , , , , , , , , , , , , , , , , , , , , , , , , , , , , , , , , , , , , , , , , , , , , , ,
sd ddboqosb qsygbdymno ksonmzzol gzybjos bodbszl, fmd dsmzodsns qsygzzszl qsygbdymno qfmmol, sbg 5 fymonl zslzemol ddqggg.
3s6s3d986980 / 4533601 3s6s3d986980
USB ghmgd qmso3gdol lsddysmngdom sŋqom gsonmgdolωzol qss33fou hsmqgbdol qssygbds (gsdm6n3s,
g_sd_gm_6g_8s, _gd_ob_3g_3o_0o, g_mo_xg_5g_0o_0 g_sd_gm_6g_8s).
356539070 / 965
3s6s3d986980 / 5q200m0d6030 6s400m 3s6s3d986980
sombogon hygombo, lspqsg gbmzdmdoo sb lspqsg gluymo hsgomlssqgynnol dmbdgs. gl zshzgbdou sqrzommdm03 FM qos DAB lspqzyngdu, hmdgmoos dmbdgsg ddzodmoos obghmbg hsgombl lsdysmgdoon. sombogon lspqzynfo [Preset] qomszbg (4) bsbzmdmozso qosfjnoon. ddqngg lspqzynno osgdsyds ofdzgb gszmmbgndol losl qos dmzosbgdoo doio dsmyozso gsdmdsbgs ddlsdymgdo on ofbds.
Bluetooth-ol 3s00d3s
Bluetooth 3s3d0m0u 3s1s0m0dsq, qssf0m0n qss 3g0m0mn [OK] qnoms3u 3 hs0du 3s6ds3qmmdsd0.
Bluetooth සgjodol fysenmdon, dylsdngdgmos dyluozol ylsqgbmo zgwsgds ldsmghmbqosb sb dmshdgnqosb Bluetooth-ol lsdymsngdon (10 d msgnqlo, zsmgdmqosb zdmdqnbsmg).
g_6g_6g_3m_2m_1b_2d_5g_3g_2s::<1W
natural_image
Clear glass water heater with black handle and side panel (no visible text or symbols)ELECTRIC KETTLE CR 1290
natural_image
Exterior view of a modern coffee machine (no visible text or symbols)ESPRESSO MACHINE CR 4410
natural_image
Exterior view of a modern flat-screen griddle or oven (no visible text or symbols)SANDWICH MAKER CR 3054

natural_image
Black electronic device with digital display and control buttons (no visible text or symbols)RETRO RADIO CR 1182

natural_image
White portable air conditioner unit with circular vent and grid grille (no visible text or symbols)AIR CONDITIONER CR 7925
natural_image
Modern kitchen mixer with digital display and control panel (no visible text or symbols)FOOD PROCESSOR CR 4223
natural_image
White hand mixer with whisk, no visible text or symbolsMIXER CR 4220
natural_image
Black and silver electric food grater with handle and control knob (no visible text or symbols)MEAT MINCER CR 4812
natural_image
Exterior view of a modern air fryer with digital display (no visible text or symbols)AIR FRYER OVEN CR 6311
natural_image
Exterior view of a modern office building (no signage)BAGLESS VACUUM CLEANER CR 7046
natural_image
White portable air purifier with mesh grille and black wheels (no visible text or symbols)AIR DEHUMIDIFIER CR 7851
Trimmer CR 2921
natural_image
White portable electronic device with a textured gray panel and curved handle (no visible text or symbols)CERAMIC FAN HEATER OIL FILLED RADIATOR
CR 7732 CR 7812
natural_image
Black cylindrical solar power heater with multiple cooling fans and wheels (no visible text or symbols)
natural_image
Exterior view of a modern office building (no signage)PORTABLE FRIDGE CR 8076
natural_image
A gray oval pet bed with a black cord and earplush, no visible text or symbols.HEATED ANIMAL DEN CR 7431
KARTA GWARANCYJNA

Brand : CAMRY
Model : CR 1918
Category : Radio