
CR 1113 - Radio CAMRY - Free user manual and instructions
Find the device manual for free CR 1113 CAMRY in PDF.
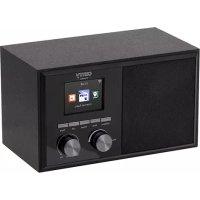
| Product Type | Radio with turntable (gramophone) |
| Brand | CAMRY |
| Model | CR 1113 |
| Power supply | 230 V ~ 50 Hz |
| Display | LCD screen |
| Radio wave bands | AM and FM |
| FM antenna | Wired, located at the rear |
| AM antenna | Built-in |
| Radio presets | 30 stations maximum |
| Automatic search | Yes (TUNER SCAN button) |
| Turntable speeds | 33 1/3, 45 and 78 rpm |
| 45 rpm adapter | Included |
| Sleep timer function | Yes, adjustable from 10 to 90 minutes |
| Alarm function | Yes, with radio |
| Snooze function | Yes, 10 minutes |
| Auxiliary input (AUX) | Yes, 3.5 mm jack |
| Line out | Yes |
| Headphone jack | Yes, 3.5 mm |
| Speaker | Built-in |
| Controls | Buttons and rotary knobs |
| Cleaning | With a dry cloth, do not use water |
| Intended use | Household use only |
Frequently Asked Questions - CR 1113 CAMRY
User questions about CR 1113 CAMRY
0 question about this device. Answer the ones you know or ask your own.
Ask a new question about this device
Download the instructions for your Radio in PDF format for free! Find your manual CR 1113 - CAMRY and take your electronic device back in hand. On this page are published all the documents necessary for the use of your device. CR 1113 by CAMRY.
USER MANUAL CR 1113 CAMRY
GENERAL SAFETY CONDITIONS
IMPORTANT INSTRUCTIONS ON SAFETY OF USE PLEASE READ CAREFULLY AND KEEP
FOR FUTURE REFERENCE
The warranty conditions are different, if the device is used for commercial purpose.
- Before using the product please read carefully and always comply with the following instructions. The manufacturer is not responsible for any damages due to any misuse.
- The product is only to be used indoors. Do not use the product for any purpose that is not compatible with its application.
- The appliable voltage is 230V , 50Hz . For safety reasons it is not appropriate to connect multiple devices to one power outlet.
- Please be cautious when using around children. Do not let the children to play with the product. Do not let children or people who do not know the device to use it without supervision.
- WARNING: This device may be used by children over 8 years of age and persons with reduced physical, sensory or mental capabilities, or persons without experience or knowledge of the device, only under the supervision of a person responsible for their safety, or if they were instructed on the safe use of the device and are aware of the dangers associated with its operation. Children should not play with the device. Cleaning and maintenance of the device should not be carried out by children, unless they are over 8 years of age and these activities are carried out under supervision.
- After you are finished using the product always remember to gently remove the plug from the power outlet holding the outlet with your hand. Never pull the power cable!!!
- Never leave the product connected to the power source without supervision.
- Never put the power cable, the plug or the whole device into the water. Never expose the product to the atmospheric conditions such as direct sun light or rain, etc.. Never use the product in humid conditions.
- Periodically check the power cable condition. If the power cable is damaged the product should be turned to a professional service location to be replaced in order to avoid hazardous situations.
- Never use the product with a damaged power cable or if it was dropped or damaged in any other way or if it does not work properly. Do not try to repair the defected product yourself because it can lead to electric shock. Damaged device always turn to a professional service location in order to repair it. All the repairs can be done only by authorized service professionals. The repair that was done incorrectly can cause hazardous situations for the user.
- Never put the product on or close to the hot or warm surfaces or the kitchen appliances like the electric oven or gas burner.
12.Never use the product close to combustibles.
13.Do not let cord hang over edge of counter. - Always unplug the device after using and before cleaning.

-
Never use this device close to water, e.g.: Under shower, in bathtub or above sink filled with water.
-
If using the device in bathroom after use remove the power plug from the socket, because water proximity presents risk, even if the device is turned off.
- Do not allow the device or power adaptor to wet. If the device falls into water, immediately remove the power plug or power adaptor from the socket. If the device is powered, do not put hands in the water. Have the device checked by the qualified electrician before using it again.
- Do not touch the device or power adaptor with wet hands.
- The device has to be turned off after every use.
- In order to provide additional protection, it is recommended to install residue current device (RCD) in the power circuit, with residual current rating not more than 30mA .
Contact professional electrician in this matter.
- If the device utilises a power adaptor, do not cover it, because this can cause a dangerous temperature rise and can damage the device. Always connect the power adaptor cable to the device, and then connect the power adaptor to the power socket.
- To save energy, if there is no audio signal from Turntable /AUX IN for a period of over 5 minutes, then the unit will automatically switch to Standby Mode.
DESCRIPTION OF THE DEVICE
- Turntable cover 15. PRESET DOWN button
- LCD display 16. PRESET UP button
- Power diode 17. ON/OFF switch/volume of
- In-built speaker 18. 45RPM disc adaptor
- FUNCTION button 19. Turntable lever
- SLEEP/TIMER button 20. Turntable arm lock
- Headphone port 21. Plate spin speed adjustment
- SNOOZE button 22. Turntable arm
- MODE/CLOCK button 23. Turntable needle guard
- TUNER SCAN button 24. LINE OUT jack
- BAND button 25. FM antenna cable
- TUNING DOWN button 26. Power cord
- TUNING UP button 27. AUTO-STOP switch
- AUX port
SETTING THE CLOCK
Before first use, unpack everything and remove all protective materials. Unwind the FM antenna cable and power cable. Do not cover the ventilation holes, make sure that there is a gap of a few centimeters around the radio, which is required for proper ventilation.
- In standby mode, press and hold the MODE/CLOCK button (9) to set the 12H or 24H clock mode. '12H/24H' will start flashing on the display (2). Using the TUNING DOWN button (12) or TUNING UP button (13) select either the 12-hour or 24-hour mode and confirm by pressing the MODE/CLOCK button again (9). The device will enter the hour editing mode.
- Using the TUNING DOWN button (12) or TUNING UP button (13) set the current hour and confirm by pressing the MODE/CLOCK button again (9). The device will enter the minute editing/ mode.
- Using the TUNING DOWN button (12) or TUNING UP button (13) set the current minute and confirm by pressing the MODE/CLOCK button again (9).
SETTING THE ALARM (RADIO ALARM FUNCTION)
- In standby mode, press and hold the SLEEP/TIMER button (6). The display will show a clock icon and '0:00' will be flashing.
- Using the TUNING DOWN button (12) or TUNING UP button (13) set the desired alarm hour and confirm by pressing the SLEEP/TIMER button (6).
- Using the TUNING DOWN button (12) or TUNING UP button (13) set the desired alarm minute and confirm by pressing the SLEEP/TIMER button (6). The alarm time will be set.
- The clock icon informs that the alarm is set. To turn the alarm off press the SLEEP/TIMER button (6) when the device is in standby mode. The clock icon will disappear.
- When the alarm is activated, the device can be put into 'snooze' mode by pressing the 'SNOOZE' button (8). The device will then
switch off for 10 minutes, after which the alarm will reactivate.
AUTOMATIC SHUT-OFF FUNCTION
- When the device is switched on press the SLEEP/TIMER button (6) the appropriate number of times to select the time after which the device is to switch off (90, 80, 70...10 minutes)
- The word 'SLEEP' on the display informs you that the automatic shut-off function is activated.
- After the selected time has elapsed the device will turn off and enter standby mode.
FUNCTION BUTTON (5)
Used to change the operating mode of the device
- PHON (turntable operation mode)
- AUX (external device operation mode)
TUNE (AM/FM radio mode)
- Turn the device on using the ON/OFF button (17) and set the radio mode using the FUNCTION button (5).
- Using the BAND button (11) set the wavelength to AM or FM.
- Using the TUNING DOWN button (12) or TUNING UP button (13) tune to the desired radio frequency. Pressing and holding the button for approximately 2 seconds will automatically search for the closest frequency. After it is found the search will stop.
- To save the radio station frequency to memory press the MODE/CLOCK button (9). The program number will begin flashing.
- Using the PRESET DOWN button (15) or PRESET UP button (16) select the program number in which you want to save the radio station.
- Confirm the selected program number by pressing the MODE/CLOCK button (9) again. The program number will stop flashing.
- Repeat steps 4-7 to program selected stations (maximum of 30 programs).
- You can switch between saved programs by using the PRESET DOWN button (15) and PRESET UP button (16).
- You can set the volume by turning the volume control knob (17).
- The FM antenna (24) is located on the back panel. If the reception is poor, try to move the antenna and find a spot in which the signal is strongest.
The AM antenna is located inside the radio receiver. If the reception is poor, try moving the receiver to a different place or turning it in another direction to catch the strongest signal.
- The TUNER SCAN button (10) is used to automatically find and save available radio stations.
PLAYBACK OF VINYL DISCS
Prior to first use of the turntable, remove the turntable needle guard (23) and untie the knot protecting the turntable arm found next to the turntable arm lock (20).
- Release the turntable arm lock (20) and set the device to the PHON mode.
- Place the disc on the turntable plate. If necessary, use the adapter (18).
- Select the plate's rotational speed (the rotational speed depending on the type of disc) by using the switch (21).
- Lift the turntable arm by using the lever (19). Gently slide the arm onto the track you want to listen to. Lower the needle arm using the lever (19).
- To stop playback of the disc, lift the turntable arm using the lever (19).
- After completion of playback of the disc lift the turntable arm using the turntable lever (19). Move the arm over the lock (20) and lower it using the lever (19).
- To turn the AUTO-STOP function on or off use the AUTO-STOP switch (27).
CLEANING AND MAINTENANCE
- Disconnect the radio from the network.
- The device may only be wiped with a dry cloth.
- The device should be kept in a dry room.
CAUTION: Do not use water for cleaning - this may damage the device.
TECHNICAL DATA
Power source: 230V 50Hz
RMS output power: 2x 1.5W
Power: 15W
Hereby, Adler Sp. z o.o., Ordona 2a, 01-237 Warsaw, Poland declares that the radio equipment type Turntable CR1113 is in compliance with Directive 2014/53/EU. The full text of the EU declaration of conformity is available at the following internet address: http://www.camryhome.eu/red/cr_1113.pdf

To protect your environment: please separate carton boxes and plastic bags and dispose them in corresponding waste bins. Used appliance should be delivered to the dedicated collecting points due to hazardous components, which may effect the environment. Do not dispose this appliance in the common waste bin.
DEUTSCH
ÜLDISED OHUTUSJUHISED
IoXUC EoOou RMS: 2x 1.5W
IoXuC:15W

Povtizoue To quoiko TepiAauov. Napakaloue va TETATE TIC Ouakeuaiec atto xapTovi OTov Kado avakukwong CAtoppmuawxaptiou. Tc oakouace aTTOIuaaiUlevio (PE), aToppipye Tc OTov Kado avakukwong nTAAOTIKW.H QApivn oukeun TpeTei va atoppiptetai OTO katalanno anjeio, eGaitias Tuv ETTIKIVDuvw vToiExiw Tou Tpeixei KAI TA OToia mTapei va atoteLaeouv ateiian via to TepiBaalov. H nEkpiKn oukeun TpTei va atoppiptetai Me Tetoio tpotto wote va Tepiopiotei n ETTavaxpooiopoion ton. Eav otn ouakeun BpiokovtaI Mpatapiec, autc npetieva apapeoov kai va TETAXTOV OE EEXWPIOTO KAIO.
(MK) MaKeDoHcKn
IapaANTHnTe ycNoBn ce pa3nnuHN,doKoJky ypeoT ce KOpncTn 3a KomepujaJIHN CEJI.
- Ппед унотpe6а на поиьдот Be молиме Bнмателно почитajte И секогш следete Г следниунатва. Ппоиьдотелnot He e odrobopen 3a кakBa 6иno StTeТа nopади кakBa 6иno 3inoynotpe6a.
- Поньот се коростсамо bo 3aTbOpEN npocToPn. He kopnstete ro npOn3BoDOT 3a 6nIto KaKBa Hameha Koja He e KOMNaTnBnHa co HerOBaTa anNkaunja.
- AnIIka6nHnoT haon e 230V, 50Hz. Iopadn 6e36eHocn npuHH, He e cooDBeTHO da nobp3eTe noBeKe ypeDn co eden wTeKep.
- Be moIime da 6nndeTe BnImateHn Kora KopnCTte OKny deua. He do3BOnyBaJte deca t a cn nirpaat co npOn3BODOT. He do3BOnyBaJte deca nll nyre kon He ro 3HaAT ypeDTo da ro KopnCTaT 6e3 Hnd3Op.
- IPEyIYPENEYBAHbE: Oboj ypeJ moKe da ro KOpNCTaT Deca nocTapn od 8 roDHH N IuCa co HamaJIeHN n3uKn, ceH3OpHn nIIM MeHTaIIHc CnOCOBHO tnn IIN IuCa 6e3 NCKyCTBO nIIN 3HaehBe 3a ypeJOT, cAmO IOd HAD3Op Ha IInue OndROBOPHO 3a HNBHaTa 6e36eHNOCT, nIIN aKO bIne yNaTeHn 3a 6e36eHNO KOpNCTeHe Ha ypeJOT n Ce CBecHn 3a OnaCHOCTITE NOBp3aHn CO HerOBOTO pa6oTeHe. DeuaT He TpeBa Da nIrpaat Co ypeJOT. YnCTeHbeto N ODPKByBaHbeto Ha ypeJOT He TpeBa Da rTO BpWAT Deca, OCBEN AKO He Ce NoCTapn OD 8 ToHn H OBne AKTNBHOCTn Ce BpWAT IOd HAD3Op.
- OTKako Ke 3aBpHInTe CO KOpNcTeHbE Ha npOn3BOJTo, cekOraI 3aONMHeTe Da HeXHO n3BaJeTe ro npKnyOkOT od npKnyOkOT 3a cTpyja, dpxeJkn ro wTekepot co pakaTa. HnkoraI He nobJeTe ro Ka6enot 3a HanojyBaJIe !!!
- Hnkoraawhe octabajte ro npOn3BODOT nobp3ah co n3BOPOT Ha eHeprija 6e3 Na3Op.
- HnKoraaw He cTabajTe ro Ka6enot 3a HanojyBaHe, npNKnyokOT nIeJNt ypeD BO BOData. Hnkoraaw He ro n3IOxuyBajTe npON3BOoT Ha aTMocOpePCKu YcNOBn KaO dIpeKTHa COHueBa CBETJIHa IIN DoXd, INTH. Hnkoraaw He ro KopNCTeTe npON3BOoT Bo BnaJHH ycNoBn.
- Перношино поверува对接а на кабелот. Ако кабелOT 3a наюува对接е оштeteн, поньдогг.Tpe6а дсврtn сбгтп сбгтп сбгтп сбгтп сбгтп сбгтп сбгтп сбгтп сбгтп сбгтп сбгтп сбгтп сбгтп сбгтп сбгтп сбгтп сбгтп сбгтп сбгтп сбгтп сбгт. <|im_start|>assistant
- Перношино поверува对接а на кабелOT. Ако кабелOT 3a наюува对接е оштeteн, поньдогг.Tpe6а дсврtn сбгтп сбгтп сбгтп сбгтп сбгтп сбгт. <|im_start|>assistant
- Перношино поверува对接а на кабелOT. Ако кабелOT 3a наюува对接е оштeteн, поньдогг.Tpe6а дсврtn сбгтп сбгт? <|im_start|>assistant
- Перношино поверува对接а на кабелOT. Ако кабелOT 3a наюува对接е оштeteн, поньдогg.Tpe6а дсврtn сбгтп сбгт? <|im_start|>assistant
- Перношино поверува对接а на кабелOT. Ако кабелOT 3a наюува对接е оштeteн, поньдогg.Tpe6а дсврtn сбгт? <|im_start|>assistant
- Перношино поверува对接а на кабелOT. Ако кабелOT 3a наюува对接е оштeteн, поньдогg.Tpe6а дсврtn сбгт? <|im_start|>assistant
- Перношино поверува对接а на кабелOT. Ако кабелot 3a наюува对接е оштeteн, поньдогg.Tpe6а дсврtn сбгт? <|im_start|>assistant
- Перношино поверува对接а на кабелOT. Ако кабелOT 3a наюува对接е оштeteн, поньдогg.Tpe6а дсврtn сбгт. <|im_start|>assistant
- Перношино поверува对接а на кабелOT. Ако кабелOT 3a наюува对接е оштeteн, поньдогg.Tpe6а дсврtn сбгт. <|im_start|>assistant
- Перношино поверува对接а на кабелOT. Ако кабелOT 3a на筏уда вдсмени, 3a дсдссberharл onachn <|im_start|>assistant
- Перношино поверува对接а на кабелOT. Ако кабелOT 3a на筏уда вдсмени, 3a дсdссberharl onachn
CnTyaun.
10.He KopncTeTe ro npOn3BOoT co oWTeTeH Ka6eI 3a HanojyBaBe IIN aKO Toa 6nlo nAdHaTO IIN OwTeTeHo Ha Koj 6nIO dpyr Naunn NIn aKO He pa6OT npabuHNO. He obNyBaJte ce camn da ro nonpaBnte DepeKTHNOT npOn3BOD, 6ndejkn Toa MoKe Da DOBeE Do eNeKTPuHEn Wok. OwTeTeHNoT ypeD cekoraW ce CBPTN KOH pOceCnoHAnHa Iokaunja 3a Da ja nonpaBn. CITE nonpaBKn MoKe Da ce n3BpUaT camo od OBlaCTEH CNyXbEHn Iua. NonpaBkata wTo e HappaBHe nOrpeuH NoMe Da npeDn3BnKa onacn CNTyaUn 3a KopNCnKOT.
11. Hikoraш He CTabajte ro npOn3BODOT ha nIIbNcKy do TOnnI INI TOINIOBpHmH nIIHa KjHcKn anapatn kaKo eNeKtpuHata pepHa nIIracHNOT pexaU.
12.He ro kopncTepeon3bODoT 6n3y do 3anaJnBn MaTeepn.
13.He Do3BonyBajTe Ka6eJOT Da BnCn Ha pad pa60T Ha waITeP.
14. Cekoraw ncknyte ro ypeoT oD ynoTpeba n nped uicTehe.
15. Hikorahe ro kopicte ypeot 6n3y do Boda, Ha npimep: noT YuW, BO KaJaHn HnMjaJIHnK nCNoJHET CO Boda.
16.ДokonkykopinCTeHbetoHa ypeoT Bo 6aHaTnO ynoTpe6a,OTcpaHete ro npNKnyOKOT 3a cTpyja Od SttekepoT,6ndejkn 6n3HaTa Ha B0da npeTcabyBa pN3NK,dypn N aKO ypeoTe NCKnyuEn.
17. He do3BoJyBajTe ypeoT nHn aadantepoT 3a HanojyBaHe da ce Mokpn. Ako ypeoT naHne BO B0da, BeHaaw n3BaJeTe ro npKnyOkOT 3a HanojyBaHe nHn aadantepoT 3a cTpyja od npKnyOkOT. Ako ypeoT e npDnBxJyBaH, He cTabajTe paue BO BOData. PpOBepeTe ro ypeoT od KbaJIuФNKyBaH eJekTpUap nped NOBtOphO Da ro ynoTpe6yBaTe.
18. He ro donnpajte ypeodTnIaanTepot co BnaJHn paue.
19. YpeodTpe6a Da ce nckJyuN no cekoJa ynoTpe6a.
20. Co质量安全部10000000000000000000000000000000000000000000000000000000000000000000000000000000000000000000000000000
21. Ako ypeodot kopnctn aanTep 3a HanojyBaHe, He ro nokpnbajte, 6ndejkn Toa moKe da npen3Bnka onacHO 3rolemyBaHe Ha Temnepatypata n moKe da ro oWTeN ypeodt. Cekoraaw nobp3eTe ro ka6enot 3a aanTep 3a HanojyBaBe co ypeodt, a noToa nobp3eTe ro aanTepoT 3a HanojyBaHe co ctpya.
22. 3a da 3aawteinte eheprnja, ako hema aydnocnhan od tacTaTpya / AUX IN 3a nepnoo od 5 MNHyTu, torawypeodt ABTomatckn Ke ce npeppln BO pexm Ha noDrotBeHocT.
ONIC HA YPEIOT
- Kanak Ha Ta6JaTa 15. Konue PRESET DOWN
- LCD ekpaH 16. konyeto PRESET UP
- Mok dnoa 17. BknyyBaBe / ncknyyBaBe npeknHyBa/ KOHTpOJa Ha jaUnHa Ta Ha 3ByKOT
4.Brpaeden3ByuHnK18.aanTep 3a nck 45RPM - Konque FUNCTION 19. JIoCt 3a rpaMoΦoH
- Konque SLEEP / TIMER 20. 3aknyybahe Ha TactaTypata
- IopTa 3a cnyuankn 21. IoDecyBaHbe Ha 6pojTo Ha zentpnuym
- Konue SNOOZE 22. JIoJaIka
- Konque MODEJ/ YACOT 23. 3aHTIa Ha nRJIi 3a npBpTyBaHe
- Konque TUNER SCAN 24. Nopt LINE OUT
- Konque BAND 25. Альперк Кабел FM
- Konque TUNING DOWN 26. Ka6en 3a HanojyBahe
- Konque TUNING UP 27. Ппекинуньа за ветомат Исклува ]
- AUX nopTa
IOCTABYBAHE HA YACOT
Ipei npBaTa ynoTpe6a, paacnakyBajTe c e n OTCpaHete rncntaHTm MaepnjaJn. OMDotajTe rF M-aHTeHcknOT ka6JI n Ka6eIOT 3a HanojyBaHe. He rN pOKpNBajTe dynKnte 3a BeHTnlaucJa, npOBepTe daJI N mHa paADONpeBaepnpoCTOp HeKOJIky caHTmEtpn, ITO e NoTpe6Ho 3a npabUNHa BeHTnlaucJa.
1.Bo pexnHa yekBahe, npTncHeTe ro n dpKeTe ro konHeTo MODE / CLOCK (9) 3a da ro noCTabnte peximOT ha yacobHnK 12H nn 24H."12H / 24H" Ke noyHe da TpeKna Ha ekpaHot (2). KopcTeTe ro konHeTo TUNING DOWN (12) nn konHeTo TUNING UP (13) nn n36epTe 12-aoBEN nn 24-aoBEN pexnM n oTbpDeTe co nOBtOpHo npTnckaBe Ha konHeTo MODE / CLOCK (9). YpeDor Ke BnEze BO pexnM 3a ypeDyBaHe ycac.
2. KopncTejkn ro konyeTo TUNING DOWN (12) nnn konyeTo TUNING UP (13), noctabeTo rKeOBHnOt qac n notBpDeTe co nobTopho npntnckaBe ha konyeTo MODE / CLOCK (9). YpeDTo Ke Bne3e BO MNHyTa ypeDyBaHe / peKIM.
3. Co konchyTo TUNING DOWN (12) nIIN konchyTo TUNING UP (13) noCTaBeTe ja MOMeHTaJIHaTa MInHyTa I NOTBpDeTe co nobTopHo npITnckaHe Ha konchyTo MODE / CLOCK (9).
TOCTABYBAHbE HA AJIAPMATA (PAIDIO AJIAPMCKA ΦYHKLIJJA)
-
Bo pexim Ha yekae, npntnche Te ro n dpke Te ro konye To SLEEP / TIMER (6). Ha ekpaHot Ke ce npinkae IKoHa 3a Yacobnikot N "0:00" Ke Tpelenka.
-
KopncTeTo KOChTeTo TUNING DOWN (12) nIe KOnHeTo TUNING UP (13) 3a da ro noctabite cakAHOT qac Ha aIapMOT n da ro NOTBpDnTe co npTtckAhe Ha konHeTo SLEEP / TIMER (6).
-
Co konchyTo TUNING DOWN (12) nIu konchyTo TUNING UP (13) noCTaBeTe ja nocaKyBaHaTa MNHyTa aIapM u NOTBpDeTe co npITnCKaHe Ha konchyTo SLEEP / TIMER (6). BpeMeTo Ha anapMOT Ke ce noCTaBn.
-
IkoHata 3a yacOBHK INΦoPmnpa DeKa anapmot e noCTaBeH. 3a da ro ncknyuHTe anapmot, npntncheTe ro konueTo SLEEP / TIMER (6) Kora ypeDor E BO peKIM Ha NOIROTBHeOCT. IkoHata 3a yacOBHKOT Ke IcHe3He.
-
Kora anapmot e akTbupan, ypeoT MOKe da ce CTaBn BO "snoOze" peXIM co npTuNcKaHe Ha konUeTo "SNOOZE" (8). YpeoT noToa Ke ce nckny 3a 10 mHyTu, no To anapmot Ke ce aKTHBupa.
ABTOMATHAФУHKUJIJA3A NCKLNYUBAHE
- Kora ypeIOT e BkIyueH, npTnCHte ro konHeTo SLEEP / TIMER (6) co cooDBeTeH 6poj nATn 3a da ro n36epeTe Bpemeto no koe ypeIOT TpeBa da ce NCKnyu (90, 80, 70 ... 10 MInHyTu)
- 360pOToT "SLEEP" Ha eKpaHOT Be INΦopMnpa DeKa ΦyHKuJaTa 3a aBtOMaTcKO NckJyUyBaHe e aKTbNpuHa.
- Otkako n36paHOTo BpeMe Ke nCTeue, ypeJoT Ke ce NCKnyuN Ke BHe3e BO peXMM Ha NoIOrTOBeHOCt.
KONUE 3A ΦYHKUNJA (5)
Ce kopncTn 3a npomHa ha pexmOt Ha pa6oTa Ha ypeDTo
- PHON (pa60TeH pexn3a rpaMoΦoH)
-AUXpekm3a pa60Ta co HaBopeeH ypei)
-TUNE(AM/FMpaanopexkm)
ODNYKA HAPADINO
- BknyeTe ro ypeIOT kOpIcTejKrTo KOnHeTo ON/OFF (17) nNoCTaBeTe ro paIIOTo CO IOMOHa KonUeTeo FUNCTION (5).
- Co konheTo BAND (11) noctabete ja 6paHOBa doJxHa ha AM uIn FM.
- KopncTeTo konHeTo TUNING DOWN (12) nnn konHeTo TUNING UP (13) 3a da ja npnilarOInte cakaHaTa paadinocpeKBeHcJa. PnTnCKaHbeto n dPxeHbeto Ha konHeTo OKoJy 2 cekyn aBtOMaTcKn Ke ja 6apa haj6nckata fpeKBeHcJa. OTKako Ke ce Hajde, npebapyBaHbeto Ke pectahe.
- 3a da ja 3aaybate fpekBeHnjaTa ha paIIO cTahNuata BO MemOpjata, npITncHeTo KOuTeO MODE / CLOCK (9). Bpojot Ha nporpamata Ke noHne da Tpenka.
- Co koncheto PRESET DOWN (15) nnn koncheto PRESET UP (16) od6epete ro 6pjoT ha nporpaMaTa BO KoJ cakate da ja 3aulyBaTe padino ctaHncaTa.
- Потьдente ro Ибраиnot 6poj Ha поррама co NOBTOPO npITnCKaHbe Ha konyeTo MODE / CLOCK (9). БpojoT Ha nporpaMaTa Keпестaineда Тpenka.
- Nobtopete nuekeopnte 4-7 3a nporpaipabe Ha n36paHn cTahu (makcmym 30 nporpaMn).
- Moxe Ta npedpnybate nomery 3aaybaHne nporpaMn co KOpncTeHe Ha konyeo PRESET DOWN (15) n konyeo PRESET UP (16).
- MoxeTe da ja Hamectnte jaunHaTa Ha 3ByKOT co BpTeHbe Ha konUeTo 3a KOHTpona Ha jaUnHaTa Ha 3ByKOT (17).
- FM aHTehata (24) ce haora ha 3aHnO T nAHeI. Ako npneMoT e loi, obuTe ce da ja npemecnte aHTehata u da npohajTe MeCTO KaJe wTO cHraJIoT e HAcunEn.
AM aHTehata ce Haofa BO BHaTpeHocTa Ha paIIO npMeMHIKOT. Ako npMeOT e loW, oBnTe ce da ro pIuBHXNTE npMeHHKOT Ha dpyro MeCTO nJIN Da ro CBPTnte Bo Dpyra HAcoka 3a da ro fatoTE HajCUNHnot CnHaJI. - KonyuTo TUNER SCAN (10) ce Kopnctn 3a aBtOMaTcKO oTKpNbAHe n 3ayByBaHe Ha doCTaHn paDIO CTaHm.
I3BOP HA BHNJCKN DNUCKOBN
Ipei npBaTa ynoTpe6a Ha rpaMoOfoHOT, 3BaTeTe ro 3aHTnTHNOr den oJrNaTa 3a rpaMoOfoH (23) n OdBpTeTe ro ja3oJTo JTo ja WtNTn IpaHnCaTa Ha rpaMoOfoH wTo ce Hora BeDaHa Do 6paBaTa 3a BpTeHe Ha rpaMoOfoH (20).
1.OcnooTe ja 6paBata 3a BpTeHe Ha rpaMoOph (20) nNoctabete ro ypeDTo BO PHON pexm.
2. Ctabete ro dinckot Ha nnoyata 3a rpaMofoH. Dokolky e noTpe6Ho, KopncTeTe ro aanterpoT (18).
3.Изберете ja potирачкata 6рзина на плоча(Tбрзинота Na BpTeье 3aBnCHOOD TINOT Ha nckot) co nOMOsh npeknhybaQT (21).
4. NpHHe ja rpaHaTa 3a rpaMoOoH co nOMoH ha paKaTa (19). HeXKHO nI3HeTe ja paKaTa KOH neChata uTo cakate da ja cnUwate. Cnytete ja irnata co nomoH ha paKaTa (19).
5. 3a da ja npekinhepe pnpodukunjata ha nckot, noirhe te ja rpaHaT a h rpaOoH KopncTejkn ja paKaTata (19).
6. No 3abpybaheTo ha pe npodykunjata Ha nckot, noiHHeTe ja rpaHaTa 3a rpaMoOoH co nomow Ha nocTOT 3a rpaMoOoH (19).
PomeCTeJa paKaTa Hd 6paBaTa (20) n cnyWte Ja co nomow Ha paKaTa (19).
7. 3a da ja bKnnyuHte nnnncknyuHte fynkuijata AUTO-STOP, KopncTeTe ro npeknHybaohr AUTO-STOP (27).
CHCTE H N ODPKYBAHBE
1.Иcknyte ro paNiOTo OJ MpeXaTa.
2. YpeodT MoKe Ia ce n36pniue cAmo co cyBa Kpna.
3. YpeoT Tpe6a Da ce UyBa BO cyBa npocTopna.
BHIMAHHE:He KopncTeTe BOa 3a YnCTeBe -OBA MOKe Da rO OWTETypeDToT.
TEXHNUKI NODATOLIN
Извор на:eнериja:230V~50Hz
U3JNe3Ha MOKHOCT RMS: 2x 1.5W
MokHOCT:15W

Ce rpnKIMe 3a npnoHaTcpeDnHa.KapTOHCKIte NaKOBMOJInMe Da Ce HameHaT 3a peuKnIpaHe. POnJIeTNIEHOBInTe Kecn (PE) da ce cPpNt BO KOHTeHerep 3a Npactnka. NcOpNCtEHNOt ypeD Tpe6a Da CE ppeJaDe BO COOdBETHNOT CKJaDnpaKINyHK, bIneJeKn He63BeHNTE CoCToJKN KOI CE HAOaAT BO ypeD0MOKaT Da bIaNAT 3arpo3yBaHe 3a CpeDnHaTA. ENEKTPnuHnOT ypeD Tpe6a Da CE ppeJaDE Ha HauH Koj Ke OHeBO3MOxN HeROBA NOBToPA YnOTpe6a NckOpNCtYBaHe. IokONky BO ypeD0T nMa BatePN, Tpe6a Da CE n3BaDat NIOCEbHO Da CE ppeJaDaT BO CKJaDnPaUKNOT nyHKT.
(CZ) CESKY
BESCHRIJVING VAN HET APPARAAT
BIDTBOPEHHAIBINJBHNXDICKIB
IpeepnBnKOpncTahHm NobopoTHoro cToNY 3HiIMt baxnchN KOxyx (23) i po3B'JiTB By30n, IIO 3axnuae pyky nobopoTHoro cToNY, po3aWOBaHy npuy i3 pikcatopom pykOyKn (20).
- BiDnyctiB pfikcatop pykoTkn (20) i BCTaHObit npicptpiy pexIM PHON.
- Po3a7yIe nck Ha nactnHi. PnH Heo6xHocTi BkOpncTobyTe aanTep (18).
- 3a donomoroio nepemikkaa (21) Bn6epiB wBnDkictb o6eTahnn (acToTy o6eTahnn 3aIexKHO BiD Tnny DnCKa).
4.Пдимь руку NOBOPOTHoi ПIATФOPMn 3a DONOMORO BaxKeJy (19).ОБepexHNO NocYhTe pyky Ha dopiKky,Яky NOTpibHO npocnyxatN. Onyctith nIee roJIKN 3a DONOMORO BaxKeJy (19). - 506 3yHHHTB iD TBOpEHn DnCKa, nIHIMtB pyKu NobopoTHoi nNaTΦopMn 3a DonomoroIO BaxeJIa (19).
6.ПсЯЗаВерш�ньВIDТВОЕньДИСКАпДИМITБ nobOPOTHy ПЛаTФОМу 3a ДONOMOROTO BAXKENA NOBOPOTHOI PNLATФOPMn (19).пелемicitтbypyку hab зamkom (20) i onyctiMb noRo 3a DOnOMOROTO BAXKENA (19). - 106 yBIMKHyTN a6o BUMKHyTN fhyHKuio AUTO-STOP, BnKOpncToByte nepemikau AUTO-STOP (27).
OuHENH TAOBCJYTOBYAHN
- Bid'edna'te paio BiMepexki.
2.Ппстpiь мохнавичати Tiльку cyхою Канною.
3.Ппсстри сид 3беригатиВсухомпимишни.
YBAFA: He BnKOpncToBvIe BoDy IJN YIuHEnH- CE MOKe NOnKoDHTn PnpCTpii.
TEXHIYI DAHI
JxepenO xNbEnHn:230B\~50T
BuxiHa nOtuyHicThb RMS:2x1,5BT
NotyXhHcTb: 15BT

Y iHTepecax HABKOLNIHbOTo CepeIOBnua.
BvIb IacKa, BiIdaIte KAPToHny yIaNokBy B Mlcce 360py MyKylatypn. POnITInJeHOBI MiXKn (PE) BUNKNHTN B CMITHNK dIy IINaCTkNy. BiInpaCbOBaHm npCtpi nOBuHem 6yt N BiInpaBHeHn y BiIDNoBIDHy TOky 36epirAHn, TOMy 1O B npCtpoi E He6e3neHi INrpeDiEHTN, Aki MoxyTB CTAnOBHTN 3arpo3y HABKOINHbOMy CEpeDObuUy. EJekTpHn nPncTpi nOTpiHo NOBepHyTu TAK, 106 ObMexHTN Ioro NoBtOpHe BIKOPNCtAHn. RaIoo y npCtpoI E 6atepeKn, To NOTp6HO iX BNTrHHTN i BiIdaTn Do BIIOBIDHO NyHTKy.
y j 1j 1j 1j 1j 1j 1j 1j
- 1
p 1
- 4auii e aai y jusy y jiaaiy J. bai jaiy
V. \~ 50Hz.
1g 1
jbjll gall jil ally jial.
- 12.14.15.16.17.18.19.20.21.22.23.24.25.26.27.28.29.30.31.32.33.34.35.36.37.38.39.40.41.42.43.44.45.46.47.48.49.50.51.52.53.54.55.56.57.58.59.60.61.62.63.64.65.66.67.68.69.70.71.72.73.74.75.76.77.78.79.80.81.82.83.84.85.86.87.88.89.90.91.92.93.94.95.96.97.98.99.
j1+11 10
a a a a a a a a a a a a a a a a a a a a a a a
. jj bai . 01 11 mode / CLOCK (9).
o. jj PRESET DOWN (15) 1 PRESET UP (16)
- jyjxbaiaallydaalolololololol mode /CLOCK (9)
V. (a)
A. j_R PRESET DOWN (15) j_R PRESET UP (16).
9.17(2024)
FM (24) 5f f 5f f f f f f f f f f f f f f f f f f f f f f f f f f f f f f f f f f f f f f f f f f f f f f f f f f f f f f f f f f f f f f f f f f f f f f f f f f f f f f f f f f f f f f f f f f f f f f f f f
J
Adler Sp. z o.o. Ordona 2a, 01-237 Warsaw, Poland hereby declares that the CR 1113 device complies with the Directive 2014/53 / EU. The full text of the EU declaration of conformity is available at the following internet address: http://www.adler.com.pl/dane/deklaracion/
DEUTSCH
Adler Sp. 01-237 Warsaw, Poland CR 1113
2014/53 / 1


- GENERAL SAFETY CONDITIONS
- DESCRIPTION OF THE DEVICE
- SETTING THE CLOCK
- SETTING THE ALARM (RADIO ALARM FUNCTION)
- AUTOMATIC SHUT-OFF FUNCTION
- FUNCTION BUTTON (5)
- PLAYBACK OF VINYL DISCS
- CLEANING AND MAINTENANCE
- TECHNICAL DATA
- DEUTSCH
- ÜLDISED OHUTUSJUHISED
- (MK) MaKeDoHcKn
- ONIC HA YPEIOT
- IOCTABYBAHE HA YACOT
- TOCTABYBAHbE HA AJIAPMATA (PAIDIO AJIAPMCKA ΦYHKLIJJA)
- (CZ) CESKY
- OuHENH TAOBCJYTOBYAHN
- TEXHIYI DAHI
Brand : CAMRY
Model : CR 1113
Category : Radio