
Quattro 19S - Lawn mower Atco - Free user manual and instructions
Find the device manual for free Quattro 19S Atco in PDF.


User questions about Quattro 19S Atco
0 question about this device. Answer the ones you know or ask your own.
Ask a new question about this device
Download the instructions for your Lawn mower in PDF format for free! Find your manual Quattro 19S - Atco and take your electronic device back in hand. On this page are published all the documents necessary for the use of your device. Quattro 19S by Atco.
USER MANUAL Quattro 19S Atco
natural_image
Simple line drawing of a fuel pump (no text or symbols)Type TU 454 ...
TU 504 ...
TU 554 ...
natural_image
Abstract black line drawing of a stylized car or vehicle (no text or symbols)
ДЛ02


GGP ITALY SPA
Via del Lavoro, 6
I-31033 Castelfranco Veneto (TV) ITALY

GLOBAL GARDEN PRODUCTS
EN Pedestrian controlled lawnmower - OPERATOR'S MANUAL
EN IMPORTANT: Before starting the motor for the first time, carefully read the instructions as set out in the engine handbook. CAUTION! Check oil level before starting.
text_image
Technical diagram showing mechanical assembly with labeled parts and directional arrows, including a magnified inset of detail view.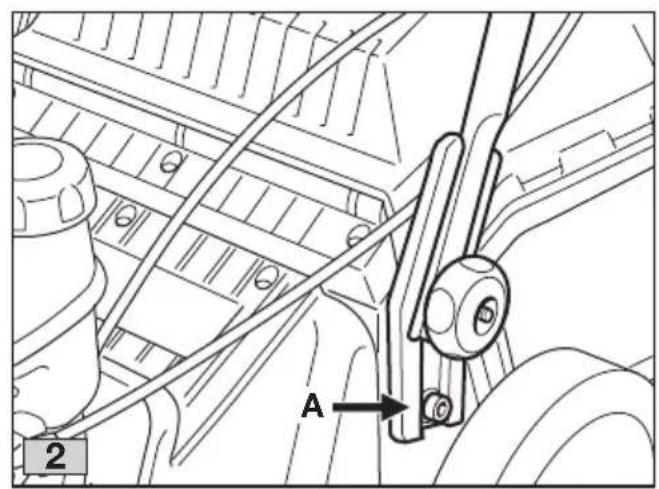
text_image
A 2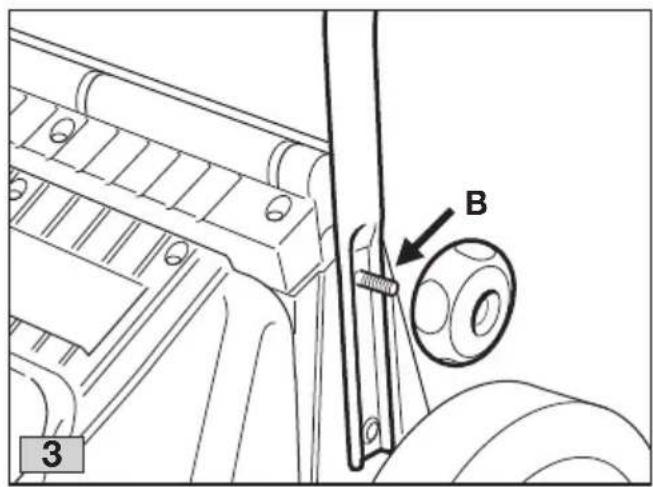
text_image
B 3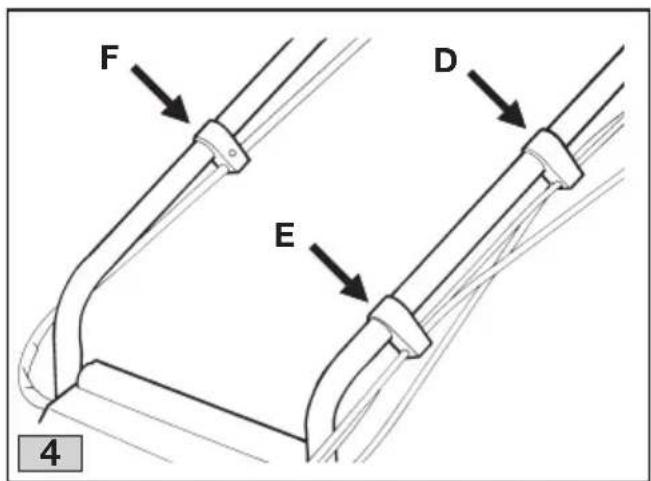
text_image
F D E 4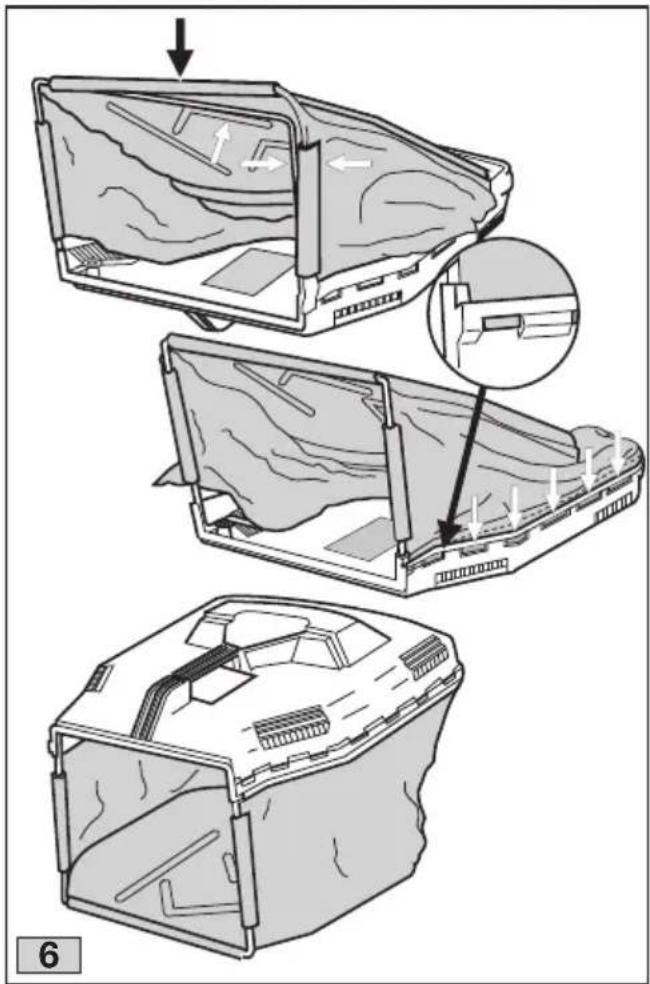
natural_image
Three-step diagram showing a mechanical assembly with internal components and directional arrows, no text or symbols present.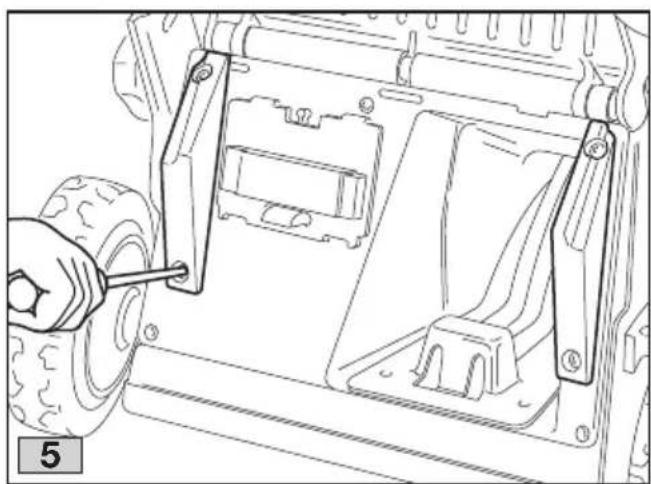
natural_image
Technical line drawing of a vehicle chassis frame with a tool inserted, showing no text or symbols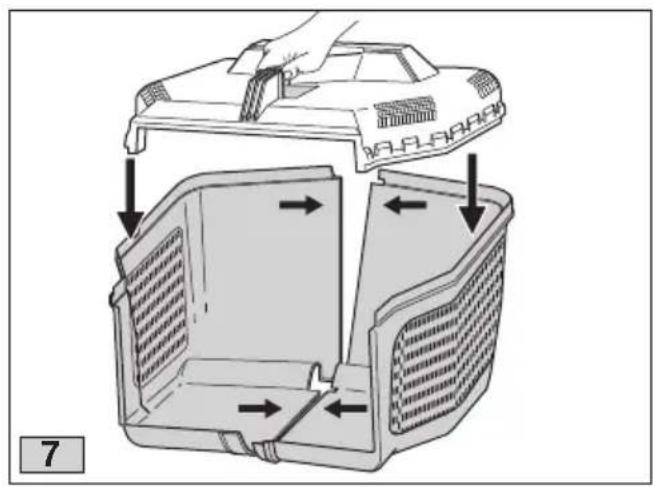
text_image
7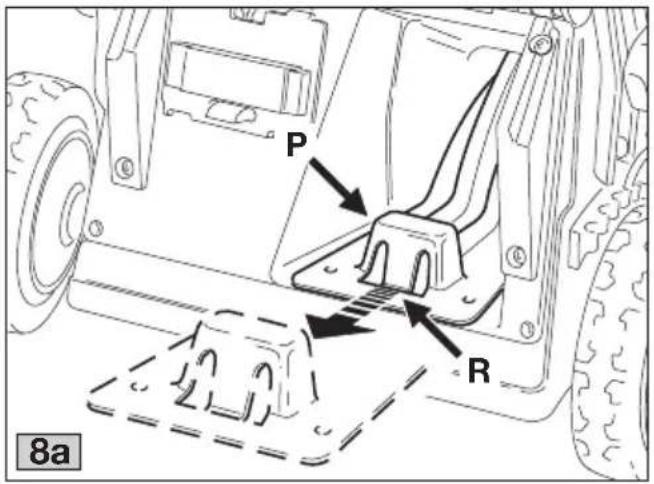
text_image
P R 8a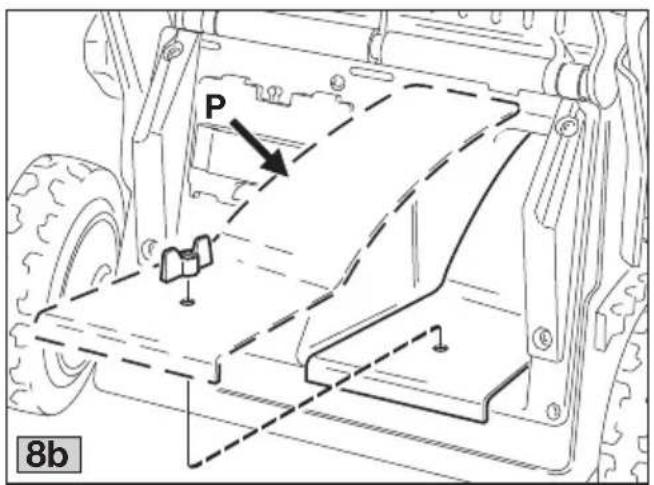
text_image
P 8b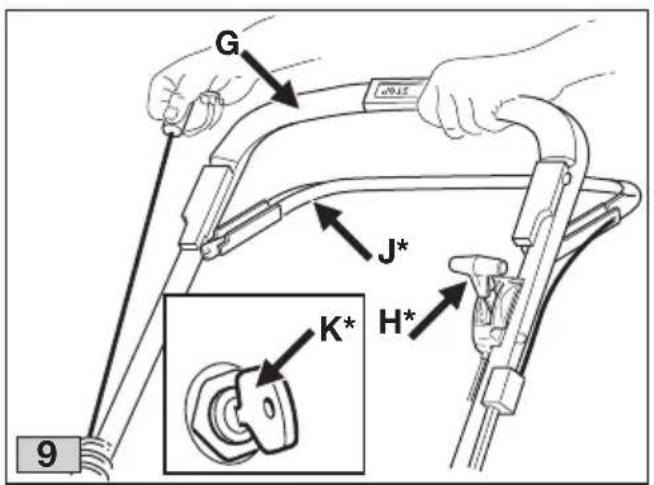
text_image
G J* K* H*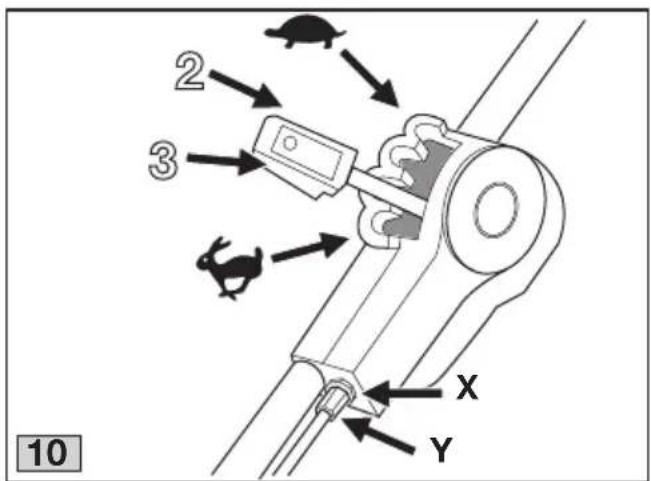
text_image
2 3 X Y 10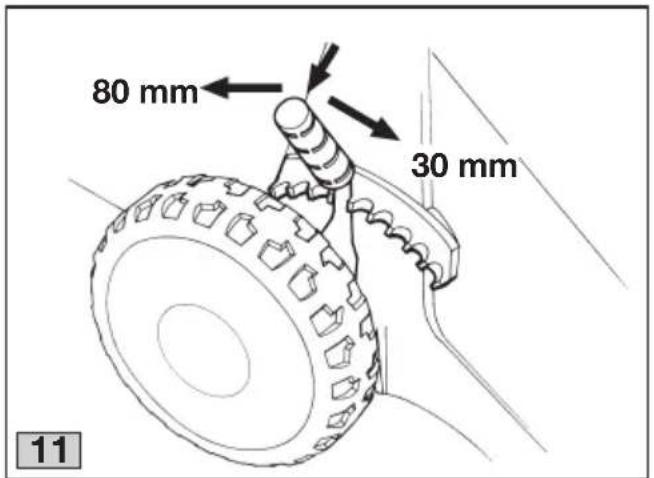
text_image
80 mm 30 mm 11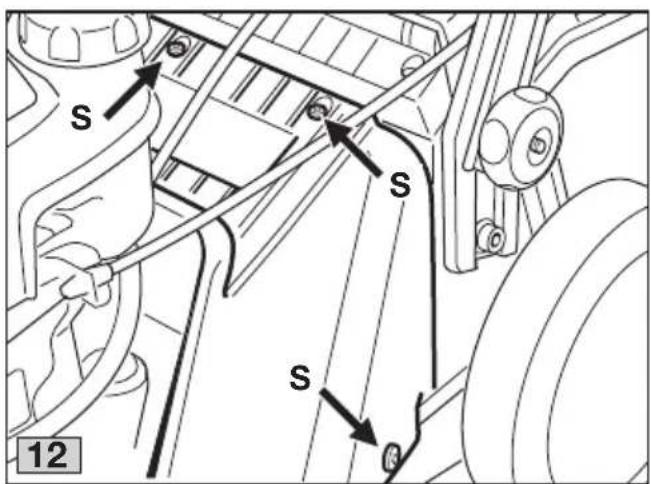
text_image
S S S 12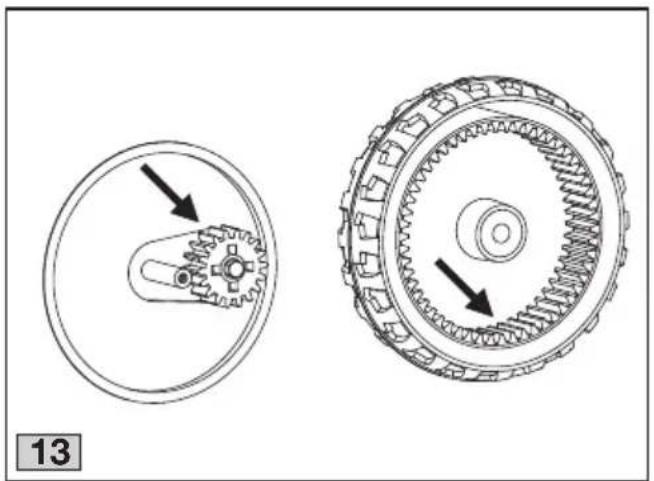
natural_image
Technical line drawing of two mechanical gears with directional arrows indicating motion (no text or symbols)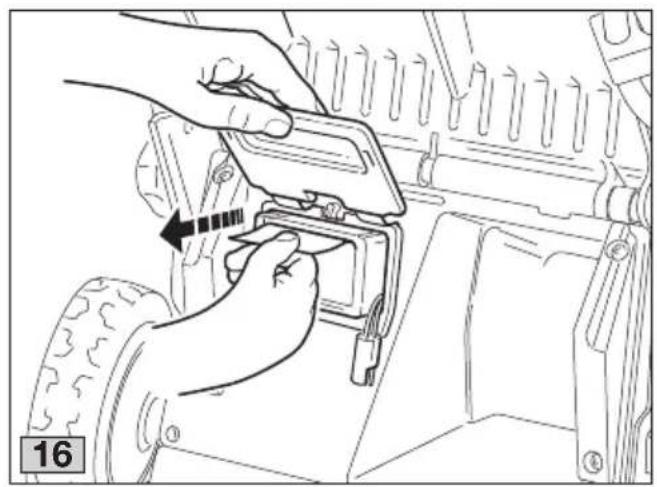
natural_image
Line drawing of hands installing or adjusting a mechanical component with a directional arrow (no text or symbols)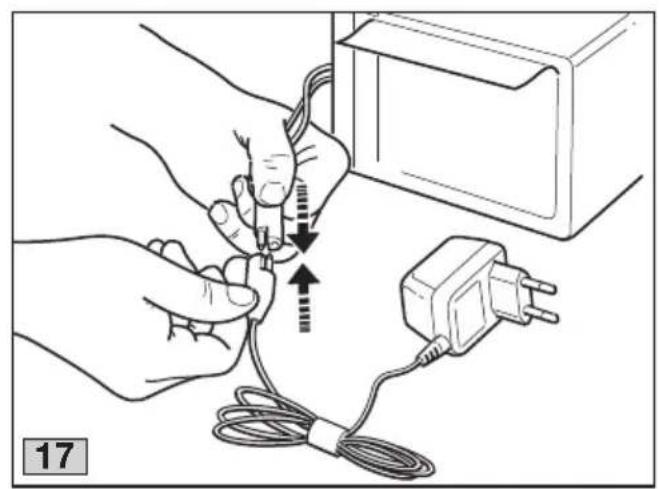
natural_image
Illustration of hands connecting cables to a wall-mounted power plug and a switch (no text or symbols)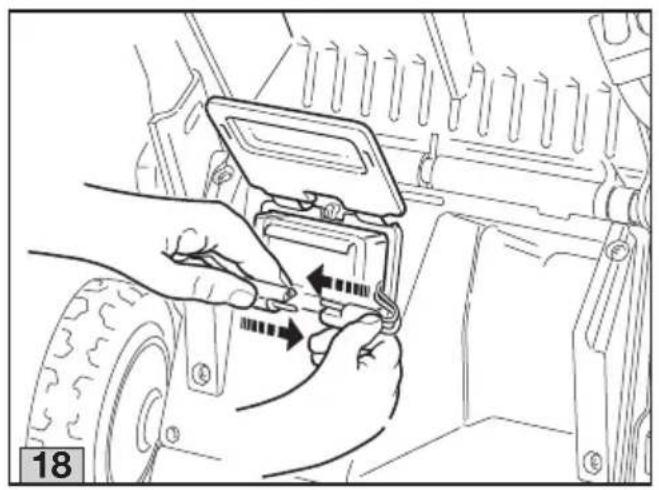
natural_image
Line drawing of hands installing or adjusting a mechanical component with arrows indicating assembly (no text or symbols)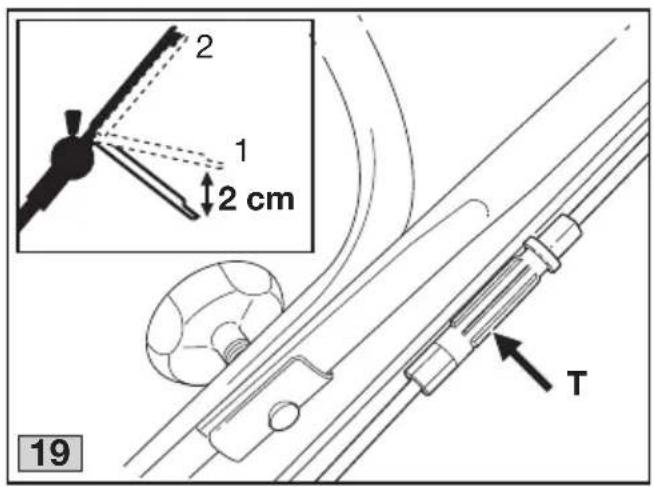
text_image
2 1 2 cm T 19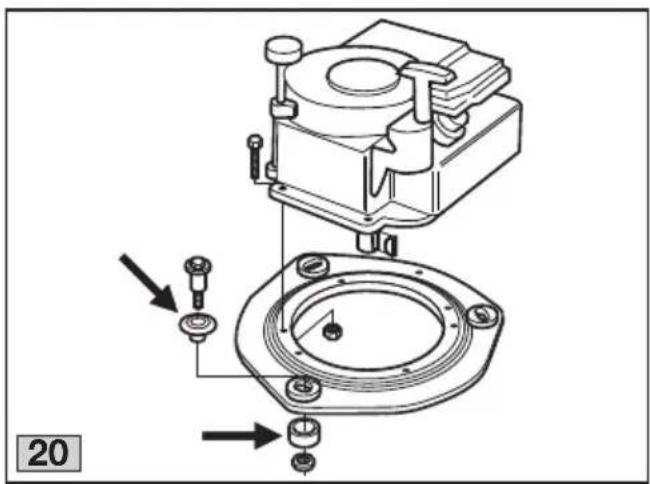
natural_image
Technical diagram of a mechanical assembly with mounting flange and housing, showing bolted components and directional arrows (no text or labels)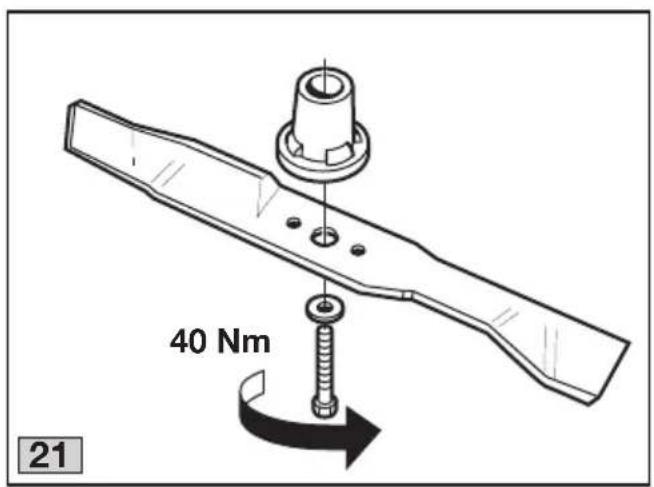
text_image
40 Nm 21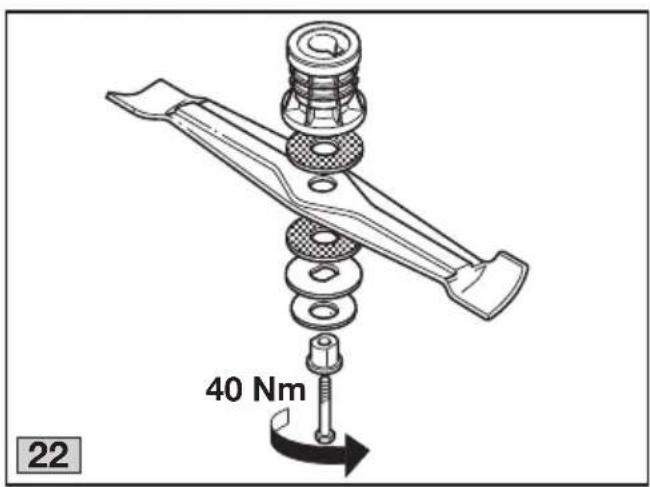
text_image
40 Nm 22SÄKERHETSFORESKRIFTER
A) BRUKSANVISNING
text_image
Collection of safety and hazard symbols including warning, open book, warning sign, human figure, traffic signs, and workplace safety icons.text_image
J* G J* G H*G Start/Stopp-bygel
H Gasreglage (*)
J Kopplingsbygel (*)
K Elstart (*)
L Variatorreglage (*)
MONTERING
text_image
Vertical sequence of safety and hazard symbols including warning, open book, warning sign, person interaction, battery, traffic light, and cartoon face.text_image
J* G J* G H*text_image
Vertical sequence of safety and hazard symbols including warning, open book, warning sign, person interaction, battery, traffic light, and cartoon face.text_image
J* G J* G H*G Start/Stop-bøjle
H Gasregulator (*)
J Koblingsbøjle (*)
K Elstart (*)
L Variatorhåndtag (*)
MONTERING
L∅SE DELE I ÅESKEN
D) VEDLIKEHOLD OG LAGRING
text_image
Vertical sequence of safety and hazard symbols including warning, open book, warning sign, person interaction, and directional arrowstext_image
J* G J* G H*G Start/stopp-bøyle
H Gassregulering (*)
J Koplingsbøyle (*)
K Elstart (*)
text_image
Vertical sequence of safety and hazard symbols including warning, open book, warning sign, person interaction, and directional arrows1 Schraubenschlüssel
+ Handbücher
1) Read the instructions carefully. Get familiar with the controls and proper use of the equipment. Learn how to stop the engine quickly.
2) Only use the lawnmower for the purpose for which it was designed, i.e. for cutting and collecting grass. Any other use can be hazardous, causing damage to the machine. Examples of improper use may include, but are not limited to:
- transport of people, children or animals on the machine;
- being transported by the machine;
- using the machine to tow or push loads;
– using the machine for leaf or debris collection; - using the machine to trim hedges, or for cutting vegetation other than grass;
- use of the machine by more than one person;
- using the blade on surfaces other than grass.
3) Never allow children or people unfamiliar with these instructions to use the lawnmower. Local regulations may restrict the age of the operator.
4) Never use the lawnmower: - When people, especially children, or pets are nearby.
- If the operator has taken medicine or substances that can affect his ability to react and concentrate.
5) Remember that the operator or user is responsible for accidents or hazards occurring to other people or their property.
B) PREPARATION
1) While mowing, always wear sturdy footwear and long trousers. Do not operate the equipment when barefoot or wearing open sandals.
2) Thoroughly inspect the area where the equipment is to be used and remove all objects which may be thrown by the machine or damage the cutter assembly and the engine (stones, sticks, metal wire, bones, etc.)
3) WARNING: DANGER! Engine fuel is highly flammable:
- Store fuel in containers specifically designed for this purpose.
- Refuel using a funnel and outdoors only. Do not smoke while refuelling or whenever handling the fuel.
- Add fuel before starting the engine. Never remove the cap of the fuel tank or add fuel while the engine is running or when the engine is hot.
- If fuel is spilled, do not attempt to start the engine but move the machine away from the area of spillage and avoid creating any source of ignition until the fuel has evaporated and the vapour dispersed.
- Replace all fuel tanks and containers caps securely.
4) Substitute faulty silencers.
5) Before use, always inspect the machine,
especially the condition of the blades, and check that the screws and cutting assembly are not worn or damaged. Replace worn or damaged blades and screws in sets to preserve balance.
6) Before mowing, attach the discharge opening guards (grass-catcher or stone-guard).
C) OPERATION
1) Do not operate the engine in a confined space where dangerous carbon monoxide fumes can collect.
2) Mow only in daylight or good artificial light.
3) If possible, avoid operating the equipment in wet grass.
4) Always be sure of your footing on slopes.
5) Walk, never run and do not allow yourself to be pulled along by the lawnmower.
6) Mow across the face of slopes, never up and down.
7) Exercise extreme caution when changing direction on slopes.
8) Do not mow on slopes of more than 20^ .
9) Exercise extreme caution when pulling the lawn-mower towards you.
10) Stop the blade if the lawnmower has to be tilted for transportation when crossing surfaces other than grass, and when transporting the lawnmower to and from the area to be mowed.
11) Never operate the lawnmower with defective guards, or without safety devices, such as the stone-guard and/or grass-catcher, in place.
12) Do not change the engine governor settings or overspeed the engine.
13) On power-driven models, disengage the drive clutch before starting the engine.
14) Start the engine carefully, following the instructions and keeping feet well away from the blade.
15) Do not tilt the lawnmower when starting the engine. Start the engine on a flat surface that is free of obstacles and tall grass.
16) Do not put hands or feet near or under rotating parts. Keep clear of the discharge opening at all times.
17) Never pick up or carry a lawnmower while the engine is running.
18) Stop the engine and disconnect the spark plug wire:
- Before carrying out any work underneath the cutting deck or before unclogging the chute;
- Before checking, cleaning or working on lawnmower;
- After striking a foreign object. Inspect the lawnmower for damage and make repairs before restarting and operating the lawnmower;
- If the lawnmower begins to abnormally vibrate (Immediate look for the cause of the vibrations and take for necessary controls at a Specialised Centre).
19) Stop the engine:
- Whenever you leave the lawnmower unattended. Remove the key from models with electric starters.
-
Before refuelling.
-
Every time you remove or replace the grass-catcher.
– Before adjusting the grass cutting height.
20) Reduce the throttle before turning off the engine and turn the fuel off when you have finished mowing, following the instructions in the engine handbook.
21) When mowing, always keep to a safe distance from the rotating blade. This distance is the length of the handle.
1) Keep all nuts, bolts and screws tight to be sure the equipment is in safe working condition. Regular maintenance is essential for safety and performance.
2) Never store the equipment with fuel in the tank inside a building where vapour may reach a flame or a spark or a source of extreme heat.
3) Allow the engine to cool before storing in an enclosed space.
4) To reduce the fire hazard, keep the engine, exhaust silencer, battery compartment and fuel storage area free of grass, leaves, or excessive grease. Do not leave containers with grass cuttings in rooms.
5) Check the stone-guard and grass-catcher frequently for wear and deterioration.
6) If the fuel tank has to be drained, this should be done outdoors and when the engine is cool.
7) Wear strong work gloves when removing and re-assembling the blade.
8) Keep the blade balanced during sharpening. All operations on the blade (dismantling, sharpening, balancing, remounting and/or replacing) require a certain familiarity and special tools. For safety reasons, these jobs are best carried out at a specialized centre.
9) For safety reasons, never use the machine when it has worn or damaged parts. Parts are to be replaced and not repaired. Use genuine spare parts. Parts that are not of the same quality can damage the equipment and impair your safety.
E) TRANSPORTATION AND HANDLING
1) Whenever the machine is to be handled, raised, transported or tilted you must:
- wear strong working gloves;
– grasp the machine at the points that offer a safe grip, taking account of the weight and its distribution.
- use an appropriate number of people for the weight of the machine and the characteristics of the vehicle or the place where it has to be placed or collected.
2) During transport, fasten the machine securely with ropes or chains.
THE ENVIRONMENT
Environmental protection should be a priority of considerable importance when using the machine, for the benefit of both social coexistence and the environment in which we live.
– Try not to cause any disturbance to the surrounding area.
- Scrupulously comply with local regulations and provisions for the disposal of waste materials after cutting.
- Scrupulously comply with local regulations and provisions for the disposal of pakagings, oils, petrol, batteries, filters, damaged parts or any elements which have a strong impact on the environment; this waste must not be disposed of as normal waste, it must be separated and taken to specified waste disposal centres where the material will be recycled.
- At the time of decommissioning, do not pollute the environment with the machine, hand it over to a disposal centre, in accordance with the local laws in force.
PRODUCT IDENTITY
The identity of the product is determined by the article and serial numbers of the machine.
These can be found on the label fixed to the chassis of the machine:
- Acoustic power level according to EEC directive 2000/14/CE
- Conformity mark according to directive 2006/42/EC 3. Year of manufacture
- Lawnmower type
- Serial number 6. Name and address of Manufacturer 7. Article Code 8. Engine power and speed 9. Mass in kilograms
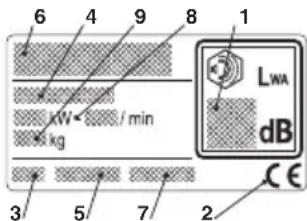
text_image
6 4 9 8 1 LWA dB kW /min kg 3 5 7 2 CEAs soon as you have purchased the machine, do not forget to write the identification numbers (3 - 4 - 5) in the spaces on the last page of the manual.
DESCRIPTION OF SYMBOLS ON CONTROLS (where applicable)
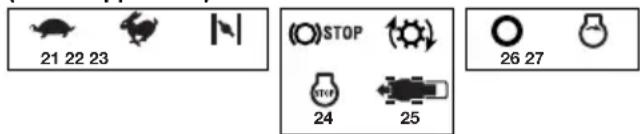
text_image
21 22 23 STOP 24 25 26 27-
Slow 22. Fast 23. Choke
-
Engine stop 25. Drive on
-
Idle 27. Engine ignition
Maximum noise and vibration levels
| For model | 454 504 554 554 | AVS | |||
| Operator ear noise pressure level (according to regulation 81/1051/EEC) | db(A) | 81,6 | 83,5 | 85,2 | 82 |
| - Measurement uncertainty (2006/42/EC - EN 27574) | db(A) | 1,2 | 1,0 | 0,7 | 1,2 |
| Measured acoustic output level (according to directive 2000/14/EC, 2005/88/EC) | db(A) | 95,3 | 95,5 | 97,6 | 96 |
| - Measurement uncertainty (2006/42/EC - EN 27574) | db(A) | 0,4 | 0,4 | 0,4 | 1,0 |
| Guaranteed acoustic output level (according to directive 2000/14/EC, 2005/88/EC) | db(A) | 96 | 96 | 98 | 98 |
| Vibration level (according to the standard EN 1033) | m/s ^2 | 5,4 | 6,3 | 6,2 | 2,0 |
| - Measurement uncertainty (2006/42/EC - EN 12096) | m/s ^2 | 0,4 | 0,9 | 0,6 | 0,8 |
IMPORTANT
For the instructions relative to the engine and the battery, please read the relevant instruction handbooks.
Equipment which is marked with an asterisk (*) comes as standard in certain models or countries. Certain models do not have throttle control. The engine's speed is set for optimal function and minimal exhaust emissions.
SYMBOLS
The following symbols can be found on the machine to remind you of the care and attention that are required during use.
The symbols mean:

text_image
Collection of safety and hazard symbols including warning, open book, warning sign, human figure, traffic signs, and workplace safety icons.Important: Read the instruction handbook before using the
Warning! Keep onlookers away. Beware of objects being flung out.
Warning! Keep hands and feet clear of the cutting deck when the machine is running. Before starting any repair work, remove the spark plug cable from the spark plug.
Warning! Always tilt the lawn-mower backwards when cleaning
the underside. Petrol and oil can run out if the lawnmower is tilted in the other direction.
INTRODUCTION
Type I
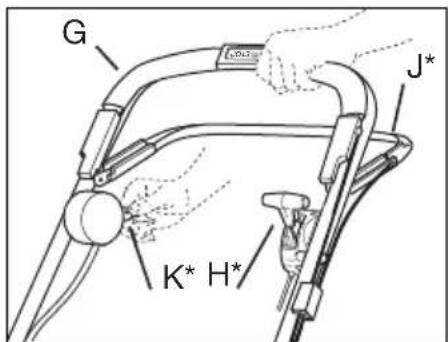
text_image
G J* K* H*Type II
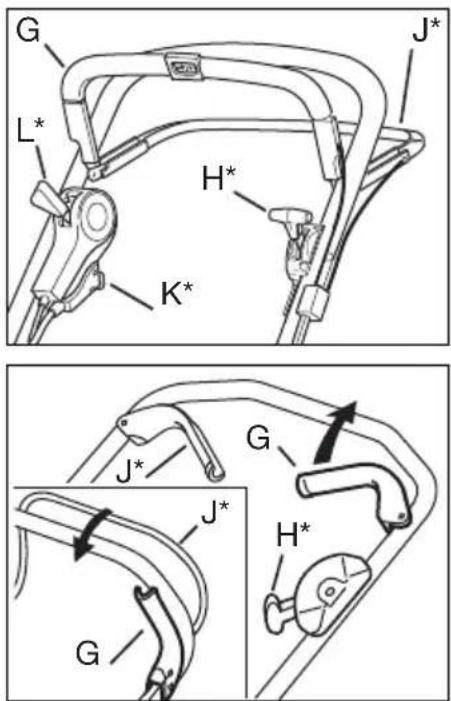
text_image
G L* H* K* J* J* J* G H*Type III
G Start/Stop loop
H Throttle control (*)
J Clutch loop (*)
K Electric start (*)
L Variator control (*)
INSTALLATION
LOOSE PARTS IN THE BOX
2 brackets for the grass collector
4 screws for the brackets
1 ignition key (*)
1 battery charger (*)
1 Allen key
1 socket wrench
+ Instruction books
NOTE - The machine can be supplied with some parts already assembled.
WARNING - Unpacking and completing the assembly should be done on a flat and stable surface, with enough space for machine handling and its packaging, always making use of suitable equipment.
Disposal of the packaging should be done in accordance with the local regulations in force.
HANDLE (Type I-II)
- Fold up the lower part of the handle.
- Secure the upper part of the handle with washers and locking wheels. There is a lug on the right hand side for the starter handle (fig. 1).
- Then tighten the locking wheels onto the lower part of the handle. When these have been tightened, the height of the handle can be adjusted by tightening the screws A with the wrench provided. (fig. 2)
HANDLE (Type III)
- Unscrew the locking wheels from the chassis and secure the lower part of the handle onto screws B (fig. 3).
- Secure the upper part of the handle with washers and locking wheels. There is a lug on the right hand side for the starter handle (fig. 1).
- Then tighten the locking wheels onto the lower part of the handle. When these have been tightened, the height of the handle can be adjusted.
CABLE HOLDER
Secure the cables in the cable holders (fig. 4):
D: Start/Stop cable + Clutch cable (*)
E: Throttle cable (*) + Clutch cable (*)
F: Electric cable (*) + Variator cable (*)
VARIATOR CONTROL (\*)
When the mower is delivered, the variator cable is set so that the transmission cannot be damaged. The cable may need tightening, see under heading "ADJUSTING VARIATOR CABLE" in the section "MAINTENANCE".
GRASS COLLECTOR
Raise the collector flap and attach the two brackets to the grass collector with the screws provided. The brackets are marked with «L» and «R» and should be installed at the corresponding mark on the rear of the mower (fig. 5).
Fabric grass collector (*): Fit the fabric bag over the steel frame and then snap the bag onto the plastic lid (fig. 6).
Plastic grass collector (*): Snap together both halves and then the upper part (fig. 7). Open the flap on the machine and attach the grass collector to the brackets.
NOTE! The lawnmower can be operated without the grass collector. The grass is then left in a line behind the machine.
BATTERY (\*)
The electrolyte in the battery is toxic and corrosive. It can cause serious corrosion damage etc. Avoid all contact with skin, eyes and clothing.
Before starting for the first time the battery should be charged for 24 hours, see further information under the heading MAINTENANCE, BATTERY. Insert ignition key (*) into the ignition lock.
USING THE MOWER
COMBI (\*)
Your new lawnmower combines two different functions in the same machine:
1. "MULCHING"
The machine comes equipped with a plug (P), installed in the ejector opening (fig. 8). The machine can be used for 'Mulching' i.e. the blade finely cuts up the grass during mowing. The grass then falls into the lawn where it is allowed to rot.
This provides the lawn with nourishment. To remove the plug, press in the catch (R - fig. 8a). On reinstalling the plug ensure that both pins are pressed firmly into the holes so that the plug snaps in place.
43 cm Combi:
To remove the plug, unscrew the wing nut (fig. 8b).
2. COLLECTION
Assemble the grass collector provided (fig. 6, 7). Open the flap, remove the plug and instead hook the collector onto the rear of the machine. When mowing, the grass is collected in the collector.
Empty the grass onto the compost heap or spread it over borders as fertiliser. The machine is also ideal for collecting up leaves in the autumn.
3. REAR EJECTION
Use the mower without the plug or the grass collector (flap closed). The grass is released behind the machine without being cut up.
STARTING THE ENGINE
- Place the lawnmower on flat, firm ground. Do not start in long grass.
- Make sure the spark plug cable is connected to the spark plug.
- Press in the Start/Stop loop G towards the handle. NOTE! The Start/Stop loop G must be kept pressed in to prevent the engine stopping (fig. 9).
4a Manual start: Grasp the starter handle and start the engine by pulling briskly on the starter cord.
4b Electric start (K ^* ): Start the engine by turning the ignition key clockwise. Release the key as soon as the engine starts. Always make short attempts at starting in order to prevent discharging the battery. - For the best mowing results, the engine should always be driven at full throttle.
STOPPING THE ENGINE
The engine may be very warm immediately after it is shut off. Do not touch the silencer, cylinder or cooling flanges. This can cause burn injuries.
Release the Start/Stop loopG (fig. 9) to stop the engine.
If the start/stop loop ceases to work, stop the engine by removing the spark plug cable from the spark plug. Immediately take the lawn mower to an authorised workshop for repair.
REAR WHEEL DRIVE (\*)
Engage the drive by pressing the clutch loop J towards the handle. Disengage the drive by releasing the clutch loop J (fig. 9).
SPEED (\*)
Do not touch the variator control when the engine is not running. This can damage the operation of the variator.
Set to a suitable speed by moving the variator control to one of the 4 positions (fig. 10).
The various positions have the following speeds:
Position 1: approx. 2.8 km/h Position 2: approx. 3.1 km/h Position 3: approx. 3.6 km/h Position 4: approx. 4.5 km/h
CUTTING HEIGHT
Do not set the cutting height so low that the blade(s) come into contact with uneven ground.
The mower has single-lever control for adjusting the cutting height. Pull the lever out, and set the cutting height to one of the nine positions best suited to your lawn (fig. 11).
LAWN CARE RECOMENDATIONS
Each type of grass has different features and may thus require different ways to care for the lawn; always read the instructions on seed boxes for mowing height for the growth conditions in the work area.
Keep in mind that most grass is made up of a stem and one or more leaves. If leaves are fully cut, the lawn is damaged and growth is more difficult.
The following indications generally apply: - too low a cut causes grass tears and uprooting, with a "spotted" aspect;
- in the summer, cutting must be higher to avoid the ground from drying;
- do not cut wet grass; this could reduce blade efficiency due to sticky grass and tear the lawn;
- for particularly high grass, initially mow at maximum admitted machine height followed by a second mow after two or three days.
MAINTENANCE
IMPORTANT - Regular, careful maintenance is essential for keeping the safety level and original performance of the machine unchanged in time.
Wear strong working gloves during any cleaning, maintenance or adjustment operation on the machine.
Should it be necessary to access the lower part, only tilt the machine from the side shown in the engine handbook; following the relative instructions.
CLEANING
Carefully clean the machines with water after each cut; remove the grass debris and mud accumulated inside the chassis to avoid their drying and thus making the next start-up difficult.
The paintwork on the inside of the chassis may peel off in time due to the abrasive action of the cut grass; in this case, intervene promptly by touching up the paintwork using a rustproof paint to prevent the formation of rust that would lead to corrosion of the metal.
Remove the transmission casing by removing the screws S (fig. 12) and clean around the transmission (*) and drive belts (*) with a brush or compressed air once or twice a year.
Once every season, the drive wheels (*) should be cleaned internally. Remove both wheels. Clean the gear wheel and the wheel gear rim of grass and dirt using a brush or compressed air (fig. 13).
BATTERY (\*)
In normal use during the season, the battery is charged by the engine. If the engine cannot be started with the ignition key, it may be because the battery is 'dead'.
Dismantle the battery by opening the battery cover, disconnecting the terminal on the engine and removing the battery (fig. 16). Connect the battery charger (provided) to the battery, then connect the charger to a wall socket and charge for 24 hours (fig. 17).
After charging, the battery may be reinstalled and the terminal on the battery connected to the terminal on the motor (fig. 18).
The battery charger may not be connected directly to the engine terminal. It is not possible to start the engine with the charger as the power source and the charger could be damaged.
WINTER STORAGE
Remove the battery and store it fully charged (see above) in a dry, cool place (between 0°C and +15°C). At least once during the winter storage period, the battery should be maintenance-charged.
Before the start of the season, the battery should be charged once again for 24 hours.
ADJUSTING CLUTCH CABLE (\*)
If the drive does not engage when the clutch loop is pressed against the handle, or if the lawnmower feels cumbersome or slow, this may be because the clutch in the transmission is slipping. To rectify this situation, adjust the clutch cable as follows (with the engine off):
- When the clutch loop is released, it should be possible to push the mower backwards without any resistance. If this is not the case, screw in the nipple T until the mower can be pushed (fig. 19).
- When the clutch loop is pressed in approx. 2 cm (position 1), there should be some resistance when pushing the lawnmower. With the clutch loop fully pressed in (position 2) it should not be possible to push the mower. Unscrew the nipple T until this position is achieved.
ADJUSTING VARIATOR CABLE (\*)
If the speed difference between the settings in the variator control giving the fastest speed (position 3 and 4) appears insignificant or nothing at all, the variator cable might need tightening (fig. 10).
- Run the mower for a few minutes in position
- If the variator cable shows some play in nipple Y it needs tightening. Undo the locking nut X and tighten the cable by unscrewing the nipple Y until the cable ceases to show any play.
- Tighten the locking nut X.
NOTE! Do not stretch the cable beyond the point where there is no play in the nipple Y. If the cable is over-tightened, the drive belt could break and/or other parts of the transmission be damaged. When setting after e.g. belt change, always start with the nipple Y completely screwed in.
SHOCK-ABSORBER
Fig. 20. Check the shock-absorber and the insulating sleeves twice per season. Replace in the event of damage or wear.
CHANGING BLADES
To replace the blade, undo the screw (fig. 21, 22). Fit the new blade so that the stamped logo is turned up facing the blade holder (not facing the grass).
Reinstall as illustrated. Tighten the screw properly. Tightening torque 40 Nm.
When replacing the blade, the blade screw should also be replaced.
Each intervention on the blade is best if conducted at a specialised Centre that has the most appropriate tools.
Only blades with the following codes must be used on this machine:
81004131/0 (for model 454 - fig. 21)
81004132/0 (for model 454 - fig. 22)
81004143/0 (for model 504 - fig. 21)
81004135/0 (for model 504 - fig. 22)
81004144/0 (for model 554 - fig. 21)
81004134/0 (for model 554 - fig. 22)
Blades must always be marked. Given the product evolution, the above mentioned blade may be replaced in time by others, with similar interchangeable and operating safety characteristics.
STORAGE
The same petrol must not remain in the tank for more than one month.
Thoroughly clean the mower and store it indoors in a dry place.
SERVICING
Genuine spare parts are supplied by service workshops and by many dealers.
We recommend that you take the machine to an authorised service station for annual servicing, maintenance and inspection of safety equipment.
For service and spare parts, please contact the dealer where the machine was purchased.
CONSIGNES DE SÉCURITÉ
A) FORMATION
text_image
Vertical sequence of safety and hazard symbols including warning, open book, warning sign, person interaction, battery, traffic light, and cartoon face.text_image
J* G J* G H*text_image
Vertical sequence of safety and hazard symbols including warning, open book, warning sign, person crossing, battery, switch, and warning sign with arrowstext_image
J* G J* H* GG Start/stop-beugel
H Gashendel (*)
J Koppelingsbeugel (*)
text_image
List of safety and hazard symbols including warning, open book, warning sign, human figure, traffic sign, bicycle, traffic light, and smiley facetext_image
Vertical sequence of safety and hazard symbols including warning, open book, warning sign, person interaction, battery, switch, and smiley facetext_image
J* G J* H* GG Estribo de Arranque/Parada
H Estrangulador (*)
J Estribo (*)
text_image
Collection of safety and hazard symbols including warning, open book, warning sign, human figure, traffic light, and workplace safety icons.text_image
J* G J* H* Gtext_image
Vertical sequence of safety and hazard symbols including warning, open book, warning sign, person interaction, battery, traffic light, and cartoon face.text_image
J* G J* G H*G Rączka Start/Stop
H Ciegło gazu (*)
J Sprzęgło (*)
WYPOSAŻENIE DODATKOWE W OPAKOWANIU
text_image
Vertical sequence of safety and hazard symbols including warning, open book, warning sign, person crossing, battery, switch, and smiley facetext_image
J* G J* G H*text_image
Collection of safety and hazard symbols including warning, open book, warning triangle, person crossing, books with arrows, and hand holding a smiley face.text_image
J* G J* G H*text_image
Vertical sequence of safety and hazard symbols including warning, open book, warning triangle, person crossing, battery, switch, and cartoon charactertext_image
J* G J* G H*G Madlo Start/Stop
H Ovladač plynu (*)
J Madlo spojky (*)
K Elektricky starter (*)
text_image
Collection of safety and hazard symbols including warning, open book, warning sign, human figure, traffic sign, and workplace safety icons.Pozor: Pred uporabo preberite knjižico z navodili.
text_image
Vertical sequence of safety and hazard symbols including warning, open book, warning triangle, person, cross, books, arrows, and cartoon stick.text_image
J* G J* H* GG Ručica za pokretanje/zaustavljanje
H Ručica gasa (*)
J Ručica spojke (*)
K Električno paljenje (*)
L Ručica varijatora (*)
MONTAŽA
NEPRIČVRŠĆENI DIJELOVI U PAKIRANJU
text_image
Vertical sequence of safety and hazard symbols including warning, open book, warning triangle, person, cross, books, arrows, and cartoon stick.text_image
Collection of safety and hazard symbols including warning, open book, warning triangle, person crossing, bicycle, hand gesture, and cartoon charactertext_image
Vertical sequence of safety and hazard symbols including warning, open book, warning sign, person interaction, barriers, and symbolic icons.text_image
J* G J* H* Gtext_image
Collection of safety and hazard symbols including warning, open book, warning triangle, person, cross, bicycle, hand, and warning signtext_image
Vertical sequence of safety and hazard symbols including warning, open book, warning sign, person crossing, building with arrows, circuit board, and smiley facetext_image
J* G J* H* Gtext_image
Vertical sequence of safety and hazard symbols including warning, open book, warning sign, person crossing, battery, switch, and smiley facetext_image
J* G J* H* Gtext_image
Collection of safety and hazard symbols including warning, open book, warning sign, human figure, traffic light, and workplace safety icons.text_image
Collection of safety and hazard symbols including warning, open book, warning sign, human figure, traffic sign, and workplace safety icons.Pažnja: Prije upotrebe mašine, pročitati knjižicu sa uputstvima.
Upozorenje! Voditi računa o sigurnosti drugih osoba koje se nalaze na radnom prostoru. Voditi računa o mogućnosti da mašina može oko sebe izbacivati razne predmete koji joj se nadu na putu.
text_image
Vertical sequence of safety and hazard symbols including warning, open book, warning sign, person crossing, building with arrows, circuit board, and smiling face.text_image
Vertical sequence of safety and hazard symbols including warning, open book, warning sign, person crossing, building with arrows, circuit board, and smiley facetext_image
J* G J* H* GG Poluga za pokretanje/zaustavljanje
H Komanda gasa (*)