EasyLevel - Measuring equipment BOSCH - Free user manual and instructions
Find the device manual for free EasyLevel BOSCH in PDF.

| Product type | Cross-line laser level (line mode and point mode) |
| Brand | Bosch |
| Model | EasyLevel |
| Dimensions (L × W × H) | 154 × 24 × 30 mm |
| Weight | 0.14 kg |
| Power supply | 2 LR3 (AAA) 1.5 V batteries |
| Battery life | Approximately 15 h (at 20–25 °C) |
| Maximum range (line mode) | 5 m (with mounting bracket) |
| Maximum range (point mode) | 20 m |
| Leveling accuracy | ±0.5 mm/m |
| Laser class | 2 |
| Laser type | < 1 mW, 635–650 nm |
| Operating temperature | +5 °C to +40 °C |
| Storage temperature | −20 °C to +70 °C |
| Main functions | Projection of horizontal and vertical lines, point mode, horizontal/vertical level check via built-in bubble level |
| Included accessories | Mounting bracket with magnets, metal plate, adjustment screws; batteries included |
| Maintenance and cleaning | Clean with a soft, damp cloth; do not use detergents or solvents; do not immerse in water |
| Safety | Do not look directly into the laser beam; do not point at people or animals; use laser viewing glasses only as visual aid, not as protection |
| Spare parts and repairability | Spare parts available at www.bosch-pt.com; repair only by authorized service |
| Warranty | Not specified in the manual |
Frequently Asked Questions - EasyLevel BOSCH
User questions about EasyLevel BOSCH
0 question about this device. Answer the ones you know or ask your own.
Ask a new question about this device
Download the instructions for your Measuring equipment in PDF format for free! Find your manual EasyLevel - BOSCH and take your electronic device back in hand. On this page are published all the documents necessary for the use of your device. EasyLevel by BOSCH.
USER MANUAL EasyLevel BOSCH
natural_image
3D rendering of a Bosch electric shock shield (no text or symbols on the device body)English ...... Page 22
C
natural_image
Simple line drawing of a framed picture frame with dashed border (no text or symbols)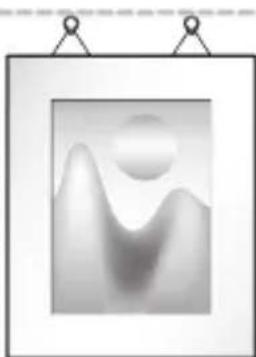
natural_image
Abstract grayscale image with a sun and mountain-like shapes, suspended by two hanging clips (no text or symbols)
natural_image
Line drawing of a Bosch brand logo (no text or symbols on the logo itself)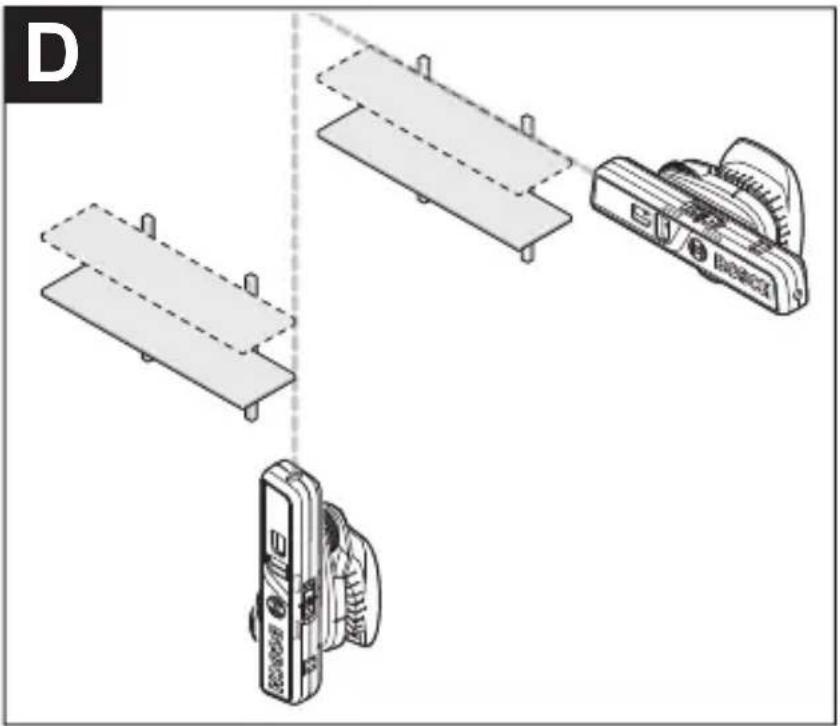
natural_image
Technical line drawing showing three mechanical components with no visible text or symbols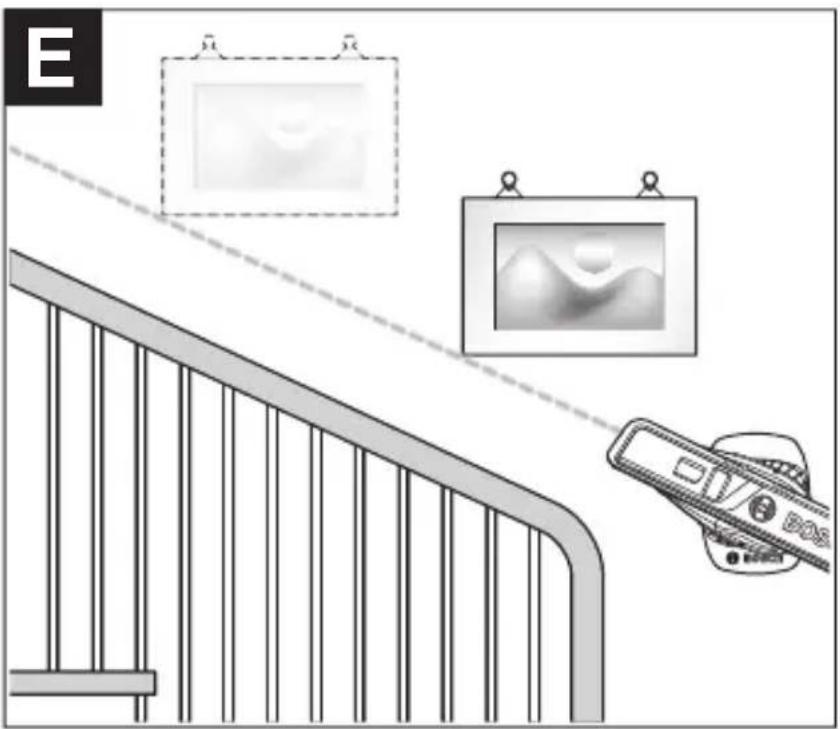
natural_image
Illustration of a staircase with hanging framed artworks and a small boat on the right (no text or symbols)8
natural_image
Interior view of a room with a camera setup and mirror reflection (no text or symbols)G
Deutsch
Sicherheitshinweise

www.bosch-pt.com/serviceaddresses
Entsorgung
All instructions must be read and observed in order for the measuring tool to function safely. The safeguards integrated into the measuring tool may be compromised if the measuring tool is not used in accordance with these instructions. Never make warning signs on the measuring tool unrecognisable. SAVE THESE INSTRUCTIONS
FOR FUTURE REFERENCE AND INCLUDE THEM WITH THE MEASURING TOOL WHEN TRANSFERRING IT TO A THIRD PARTY.
▶ Warning! If operating or adjustment devices other than those specified here are used or other procedures are carried out, this can lead to dangerous exposure to radiation.
The measuring tool is delivered with a laser warning sign (marked in the illustration of the measuring tool on the graphics page).
▶ If the text of the laser warning label is not in your national language, stick the provided warning label in your national language over it before operating for the first time.
Do not direct the laser beam at persons or animals and do not stare into the direct or reflected laser beam yourself. You could blind somebody, cause accidents or damage your eyes.
▶ If laser radiation hits your eye, you must close your eyes and immediately turn your head away from the beam.
▶ Do not make any modifications to the laser equipment.
▶ Do not use the laser goggles (accessory) as protective goggles. The laser goggles make the laser beam easier to see; they do not protect you against laser radiation.
▶ Do not use the laser goggles (accessory) as sunglasses or while driving. The laser goggles do not provide full UV protection and impair your ability to see colours.
24 | English
▶ Have the measuring tool serviced only by a qualified specialist using only original replacement parts. This will ensure that the safety of the measuring tool is maintained.
▶ Do not let children use the laser measuring tool unsupervised. They could unintentionally blind themselves or other persons.
▶ Do not use the measuring tool in explosive atmospheres which contain flammable liquids, gases or dust. Sparks may be produced inside the measuring tool, which can ignite dust or fumes.
Keep the magnet away from implants and other medical devices, e.g. pacemakers or insulin pumps. The magnet generates a field that can impair the function of implants and medical devices.
▶ Keep the measuring tool away from magnetic storage media and magnetically-sensitive devices. The effect of the magnets can lead to irreversible data loss.
Product Description and Specifications
Please observe the illustrations at the beginning of this operating manual.
Intended Use
The measuring tool is intended for determining and checking horizontal and vertical lines.
The measuring tool is suitable for indoor use.
This product is a consumer laser product in accordance with EN 50689.
Product features
The numbering of the product features shown refers to the illustration of the measuring tool on the graphic page.
(1) On/off switch with operating mode selector
(2) Supporting surface (aluminium)
(3) Level for vertical alignment
(4) Level for horizontal alignment
(5) Laser outlet aperture for line operation
(6) Supporting points
(7) Laser warning label
(8) Serial number
(9) Magnet
(10) Battery compartment cover
(11) Laser outlet aperture for point operation
(12) Laser viewing glasses ^a)
(13) Tripod ^a)
(14) Holder
(15) Metal surface for line operation
(16) Metal surface for point operation
(17) Adjusting screw of the holder
(18) 1/4" tripod mount on holder
a) Accessories shown or described are not included with the product as standard. You can find the complete selection of accessories in our accessories range.
Technical data
| Line Laser EasyLevel | |
| Article number | 3 603 F63 3.. |
| Working range up to approx. A) | |
Bosch Power Tools 1 609 92A 8KK | (24.02.2023)
26 | English
Line Laser EasyLevel
| – Line operation (with holder (14)) | 5 m |
| – Point mode 20 m | |
| Levelling accuracy ^B)C)D) | ±0.5 mm/m |
| Operating temperature +5 °C to +40 °C | |
| Storage temperature -20 °C to +70 °C | |
| Max. altitude 2000 m | |
| Relative air humidity max. 90 % | |
| Pollution degree according to IEC 61010-1 | 2^E) |
| Laser class 2 | |
| Laser type < 1 mW, | 635–650 nm |
| C_6 | 1 |
| Divergence < 1.5 mrad (full angle) | |
| Batteries 2 × 1.5 V | LR3 (AAA) |
| Operating time, approx. ^C) | 15 h |
| Weight according to EPTA-Procedure 01:2014 | 0.14 kg |
Line Laser EasyLevel
Dimensions (length × width × height) 154 × 24 × 30 mm
A) The working range may be reduced by unfavourable environmental conditions (e.g. direct sunlight).
B) when the measuring tool is positioned correctly(see "Positioning the Measuring Tool (see figure B)", page 29).
C) At 20-25°C
D) The values stated presuppose normal to favourable environmental conditions (e.g. no vibration, no fog, no smoke, no direct sunlight). Extreme fluctuations in temperature can cause deviations in accuracy.
E) Only non-conductive deposits occur, whereby occasional temporary conductivity caused by condensation is expected.
The serial number (8) on the type plate is used to clearly identify your measuring tool.
Assembly
Inserting/Replacing Batteries (see figure A)
It is recommended that you use alkaline manganese batteries to operate the measuring tool.
To open the battery compartment cover (10), push it away from the battery compartment in the direction of the arrow. Insert the batteries.
When inserting the batteries, ensure that the polarity is correct according to the illustration on the inside of the battery compartment.
Always replace all the batteries at the same time. Only use batteries from the same manufacturer and which have the same capacity.
▶ Take the batteries out of the measuring tool when you are not using it for a prolonged period of time.
The batteries can corrode and self-discharge during prolonged storage in the measuring tool.
Operation
Starting Operation
▶ Protect the measuring tool from moisture and direct sunlight.
▶ Do not expose the measuring tool to any extreme temperatures or variations in temperature. For example, do not leave it in a car for extended periods of time. In case of large variations in temperature, allow the measuring tool to adjust to the ambient temperature before putting it into operation. The precision of the measuring tool may be compromised if exposed to extreme temperatures or variations in temperature.
▶ Avoid substantial knocks to the measuring tool and avoid dropping it. Damaging the measuring tool can cause accuracy to be compromised. If the laser line is subjected to a substantial knock or is dropped, check it by comparing it to a known horizontal or vertical reference line.
Switching On/Off
To switch on the measuring tool in line operation, push the on/off switch (1) to the -position, and in point operation, push to the ● position. Immediately after being switched on, the measuring tool sends a laser beam out of outlet aperture (5) (line operation) or (11) (point operation), depending on the operating mode selected.
▶ Do not direct the laser beam at persons or animals and do not stare into the laser beam yourself (even from a distance).
To switch off the measuring tool, push the on/off switch (1) to the centre position.
▶ Never leave the measuring tool unattended when switched on, and ensure the measuring tool is
switched off after use. Others may be blinded by the laser beam.
Measuring functions
Note: The specified levelling accuracy applies for the alignment of the laser beam with reference to the spirit levels for vertical alignment (3) and for horizontal alignment (4).
Positioning the Measuring Tool (see figure B)
For precise alignment with the spirit levels, the position of the measuring tool is important.
The listed levelling accuracy is only achieved when the measuring tool is properly positioned:
- For horizontal alignment using the spirit level for horizontal alignment (4), the aluminium supporting surface (2) of the measuring tool must face downward.
- For vertical alignment using the spirit level for vertical alignment (3), the laser outlet aperture for line operation (5) must face upward and the aluminium supporting surface (2) of the measuring tool must face to the side.
Alignment with Laser Line (Line Operation)
Position the measuring tool with the three supporting points (6) against the wall or with help of the magnets (9), fasten it to the holder (14) or to another magnetic surface.
Horizontal alignment (see figures C–D): The aluminium supporting surface (2) of the measuring tool must face downward. Horizontally align the measuring tool using the spirit level (4). As an example, you can align picture frames or shelves alongside the horizontal laser line.
Note: Horizontal alignment using the laser line is only possible on the surface against which the measuring tool was placed. Even if the measuring tool has been aligned using the spirit level, the laser line on a transverse wall does
30 | English
not necessarily run horizontal, and is thus not suitable for levelling.
Vertical alignment (see figure D): The laser outlet aperture for line operation (5) must face upward and the aluminium supporting surface (2) of the measuring tool must face to the side. Vertically align the measuring tool using the spirit level (3). As an example, you can align top and base cabinets alongside the vertical laser line.
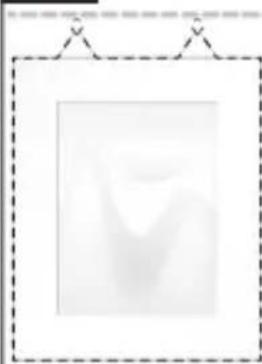
Aligning to reference points (see figure E): Turn the measuring tool to any required angle in order to align the laser line alongside your reference points. In this manner, as an example, picture frames can be hung parallel to a stairway or ceiling pitch.
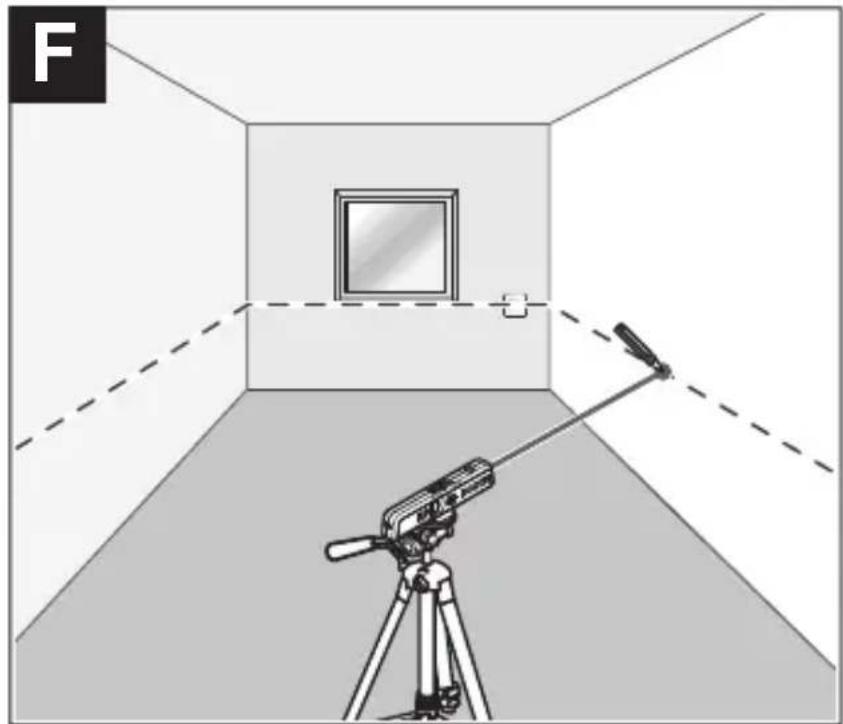
Projecting/Checking Heights using the Laser Point (Point Operation) (see figure F)
Place the measuring tool on the holder (14) and align it horizontally.
Using the laser point, you can for instance line up plug sockets on different walls or hooks on a coat rack to ensure they are all at the same height. To do this, rotate the upper section of the wall holder (14) with the measuring tool, not the other way round. Take care not to touch the measuring tool during turning, as this could displace the alignment. Once turned, check the upper section of the holder (14) to establish whether the spirit level for horizontal alignment (4) is still central. If this is not the case, realign the holder (14) using the adjusting screw (17) as required, until the spirit level (4) is central again.
Working with tripod (recommended): Align the laser beam to the required height. Project or check the height at the target location.
Working without the tripod: Establish the height difference between the laser beam and the height at the reference
point. Apply or check the height difference measured at the target location.
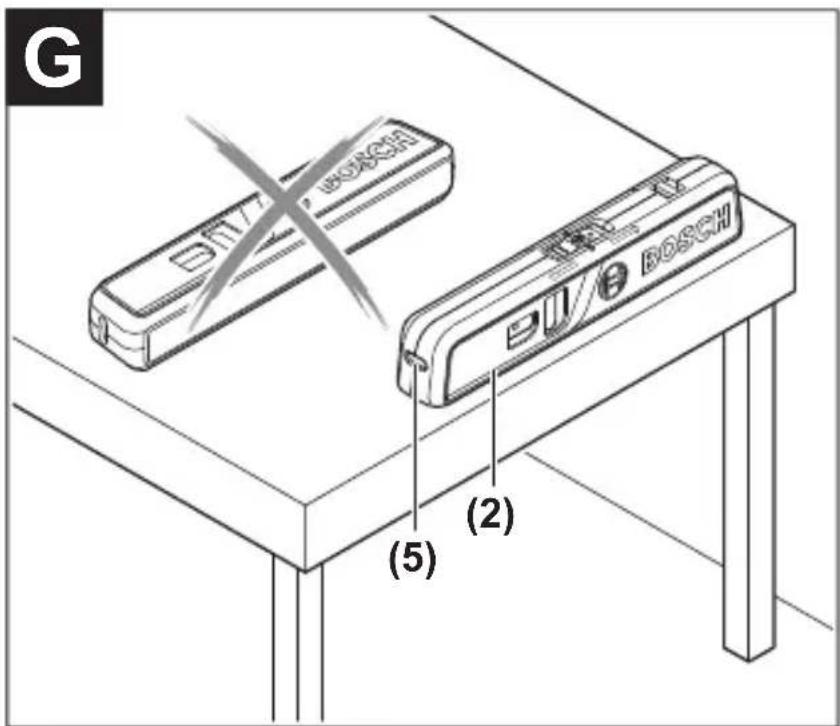
Checking Horizontal/Vertical Lines with the Spirit Levels (see figure G)
The measuring tool can also be used as a carpenter's spirit level for checking vertical and horizontal lines, for example to align a washing machine or a refrigerator. Position the measuring tool with the aluminium supporting surface (2) on the surface to be checked.
When placing on horizontal surfaces, the aluminium supporting surface (2) must face downward; when placing against vertical surfaces, the laser outlet aperture for line operation (5) must face upward.
Working Advice
▶ Only the centre of the laser point or laser line must be used for marking. The size of the laser point/the width of the laser line changes depending on the distance.
Fastening/Aligning using the Holder
Using the holder (14), the measuring tool can be fastened as follows:
- Line operation: Hanging it by the recess on its rear, place the holder onto a screw head slightly projecting out of a wall. Use the magnets (9) to fasten the measuring tool to the metal surface for line operation (15) of the holder. Turn the upper part of the holder to align the measuring tool as required.
- Point operation: Using the tripod mount (18), place the holder onto the 1/4" thread of the tripod and screw it tight using the locking screw of the tripod. Align the tripod roughly. When working without a tripod, place the holder (14) on a surface that is as level as possible.
32 | English
Position the measuring tool with the aluminium supporting surface (2) facing down on the holder. Use the left magnet (9) (viewed from the front side of the measuring tool) to attach the measuring tool to the metal surface for point operation (16) of the holder.
Horizontally align the upper part of the holder using the adjusting screw (17) of the holder and the spirit level for horizontal alignment (4) of the measuring tool. Turn the upper part of the holder by 90° and repeat the alignment.
Laser Goggles (Accessory)
The laser goggles filter out ambient light. This makes the light of the laser appear brighter to the eye.
▶ Do not use the laser goggles (accessory) as protective goggles. The laser goggles make the laser beam easier to see; they do not protect you against laser radiation.
▶ Do not use the laser goggles (accessory) as sunglasses or while driving. The laser goggles do not provide full UV protection and impair your ability to see colours.
Maintenance and Service
Maintenance and Cleaning
Keep the measuring tool clean at all times.
Never immerse the measuring tool in water or other liquids.
Wipe off any dirt using a damp, soft cloth. Do not use any detergents or solvents.
The areas around the outlet aperture of the laser in particular should be cleaned on a regular basis. Make sure to check for lint when doing this.
After-Sales Service and Application Service
Our after-sales service responds to your questions concerning maintenance and repair of your product as well as spare parts. You can find explosion drawings and information on spare parts at: www.bosch-pt.com
The Bosch product use advice team will be happy to help you with any questions about our products and their accessories.
In all correspondence and spare parts orders, please always include the 10-digit article number given on the nameplate of the product.
Great Britain
Robert Bosch Ltd. (B.S.C.)
P.O. Box 98
Broadwater Park
North Orbital Road
Denham Uxbridge
UB 9 5HJ
At www.bosch-pt.co.uk you can order spare parts or arrange the collection of a product in need of servicing or repair.
Tel. Service: (0344) 7360109
E-Mail: boschservicecentre@bosch.com
You can find further service addresses at:
www.bosch-pt.com/serviceaddresses
Disposal
Measuring tools, accessories and packaging should be recycled in an environmentally friendly manner.

Do not dispose of measuring tools or batteries with household waste.
34 | Français
Only for EU countries:
According to the Directive 2012/19/EU on waste electrical and electronic equipment and its transposition into national law, measuring tools that are no longer usable, and, according to the Directive 2006/66/EC, defective or drained batteries must be collected separately and disposed of in an environmentally correct manner.
If disposed incorrectly, waste electrical and electronic equipment may have harmful effects on the environment and human health, due to the potential presence of hazardous substances.
Only for United Kingdom:
According to The Waste Electrical and Electronic Equipment Regulations 2013 (SI 2013/3113) (as amended) and the Waste Batteries and Accumulators Regulations 2009 (SI 2009/890) (as amended), products that are no longer usable must be collected separately and disposed of in an environmentally friendly manner.
Français
Robert Bosch (France) S.A.S.
www.bosch-pt.com/serviceaddresses
www.bosch-pt.com/serviceaddresses
Eliminación
www.bosch-pt.com/serviceaddresses
Eliminação
www.bosch-pt.com/serviceaddresses
Smaltimento
www.bosch-pt.com/serviceaddresses
Afvalverwijdering
Bosch Service Center
Telegrafvej 3
2750 Ballerup
På www.bosch-pt.dk kan der online bestilles reservedele eller oprettes en reparations ordre.
Tlf. Service Center: 44898855
Fax: 44898755
E-Mail: vaerktoej@dk.bosch.com
www.bosch-pt.com/serviceaddresses
Bortskaffelse
www.bosch-pt.com/serviceaddresses
Avfallshantering
www.bosch-pt.com/serviceaddresses
Kassering
www.bosch-pt.com/serviceaddresses
Hävitys
www.bosch-pt.com/serviceaddresses
Απόσυρση
www.bosch-pt.com/serviceaddresses
Tasfiye
Robert Bosch Sp. z o.o.
www.bosch-pt.com/serviceaddresses
Utylizacja odpadów
Bosch Service Center PT
K Vápence 1621/16
692 01 Mikulov
www.bosch-pt.com/serviceaddresses
Likvidace
www.bosch-pt.com/serviceaddresses
Likvidácia
www.bosch-pt.com/serviceaddresses
Hulladékkezelés
www.bosch-pt.com/serviceaddresses
Утилизация
www.bosch-pt.com/serviceaddresses
Утилізація
www.bosch-pt.com/serviceaddresses
Кэдеге жарату
Service scule electrice
Strada Horia Măcelariu Nr. 30–34, sector 1
013937 Bucureşti
www.bosch-pt.com/serviceaddresses
Eliminarea
Service scule electrice
Strada Horia Măcelariu Nr. 30–34, sector 1
013937 Bucureşti, România
www.bosch-pt.com/bg/bg/
www.bosch-pt.com/serviceaddresses
Бракуване
www.bosch-pt.com/serviceaddresses
Отстранување
www.bosch-pt.com/serviceaddresses
Uklanjanje dubreta
Merni alati, pribor i ambalaža treba da se uključe u reciklažu koja odgovara zaštiti čovekove okoline.
310 | Slovenščina

Merne alate i baterije nemojte bacati u kućni otpad!
Samo za EU-zemlje:
Prema evropskoj direktivi 2012/19/EU o starim električnim i elektronskim uređajima i njenoj primeni u nacionalnom pravu, merni alati koji se više ne mogu koristiti, a prema evropskoj direktivi 2006/66/EC akumulatori/baterije koje su u kvaru ili istrošene moraju se odvojeno sakupljati i uključiti u reciklažu koja ispunjava ekološke uslove.
www.bosch-pt.com/serviceaddresses
Zbrinjavanje
Mjerne alate, pribor i ambalažu treba dovesti na ekološki prihvatljivo recikliranje.

Mjerne alate i baterije ne bacajte u kućni otpad!
Samo za zemlje EU:
U skladu s europskom Direktivom 2012/19/EU o električnim i elektroničkim starim uređajima i njihovom provedbom u nacionalno pravo neupotrebljivi mjerni alati i u skladu s europskom Direktivom 2006/66/EZ neispravne ili istrošene aku-baterije/baterije moraju se odvojeno sakupljati i dovesti na ekološki prihvatljivo recikliranje.
www.bosch-pt.com/serviceaddresses
Jäätmekäitlus
www.bosch-pt.com/serviceaddresses
www.bosch-pt.com/serviceaddresses
Šalinimas
www.bosch-pt.com/serviceaddresses
처리
Robert Bosch Morocco SARL
www.bosch-pt.com/serviceaddresses