
PRF0161680 - Range hood ELICA - Free user manual and instructions
Find the device manual for free PRF0161680 ELICA in PDF.
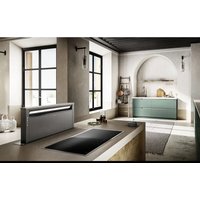


| Product type | Extractor hood or recirculating hood (recycling) |
| Brand | Elica |
| Model | PRF0161680 |
| Use | Domestic and similar (shops, offices, hotels, guesthouses) |
| Power supply | 230 V ~ 50 Hz (according to rating plate) |
| Suction power | 3 speeds + Boost 1 (30 min) and Boost 2 (7 min) |
| Lighting | LED, adjustable intensity |
| Controls | Touch controls with motorized suction panel (screens A and B) |
| Connectivity | WiFi 2.4 GHz, Elica Connect app, voice commands |
| Filters | Metal grease filter (washable) + active carbon filter (washable, optional) |
| Filter cleaning | Grease: monthly; Carbon: every 2 months (wash at 65 °C, dry 10 min at 100 °C) |
| Exhaust duct diameter | 150 mm |
| Minimum distance from hob | 400 mm (recommended) |
| Dimensions (W x D x H) | Not specified; typical dimensions: 60-90 cm x 50 cm x 30-50 cm |
| Weight | Not specified; estimated 15-25 kg |
| Safety | Safety switches, motor stop if panel open, overvoltage protection |
| Installation | Extractor version (external duct) or recirculating version (internal recycling) |
| Warranty | Not specified; standard 2-5 years depending on country |
| Recycling | Compliant with WEEE (Directive 2012/19/EU) |
Frequently Asked Questions - PRF0161680 ELICA
User questions about PRF0161680 ELICA
0 question about this device. Answer the ones you know or ask your own.
Ask a new question about this device
Download the instructions for your Range hood in PDF format for free! Find your manual PRF0161680 - ELICA and take your electronic device back in hand. On this page are published all the documents necessary for the use of your device. PRF0161680 by ELICA.
USER MANUAL PRF0161680 ELICA
EN Instruction on mounting and use
RU Instruction on mounting and use
UK Instruction on mounting and use
KK Instruction on mounting and use
EN "Download the ELICA CONNECT APP to enjoy all the advantages of your connected product. Follow the instructions in the leaflet attached to the product"
EN "You can control your Elica hood with voice commands."
Use the ELICA CONNECT APP to discover which voice assistants your hood is compatible with.
EN - Instruction on mounting and use
Closely follow the instructions set out in this manual. All responsibility, for any eventual inconveniences, damages or fires caused by not complying with the instructions in this manual, is declined. This appliance is intended to be used in household and similar applications such as: - staff kitchen areas in shops, offices and other working environments; - farm houses; - by clients in hotels, motels and other residential type environments; - bed and breakfast type environments.
The hood can look different to that illustrated in the drawings in this booklet. The instructions for use, maintenance and installation, however, remain the same.
- It is important to conserve this booklet for consultation at any moment. In the case of sale, cession or move, make sure it is together with the product.
- Read the instructions carefully: there is important information about installation, use and safety.
- Do not carry out electrical or mechanical variations on the product or on the discharge conduits.
- Before proceeding with the installation of the appliance verify that there are no damaged all components. Otherwise contact your dealer and do not proceed with the installation.
Note: The parts marked with the symbol (*) are optional accessories supplied only with some models or otherwise not supplied, but available for purchase.

Caution
- Before any cleaning or maintenance operation, disconnect the hood from the mains by removing the plug or disconnecting the mains electrical supply.
- Always wear work gloves for all installation and maintenance operations.
- This appliance can be used by children aged from 8 years and above and persons with reduced physical, sensory or mental capabilities or lack of experience and knowledge if they have been given supervision or instruction concerning use of the appliance in a safe way and understand the hazards involved.
- Children shall not be allowed to tamper with the controls or play with the appliance.
- Cleaning and user maintenance shall not be made by children without supervision.
- The premises where the appliance is
installed must be sufficiently ventilated, when the kitchen hood is used together with other gas combustion devices or other fuels.
- The hood must be regularly cleaned on both the inside and outside (AT LEAST ONCE A MONTH).
- This must be completed in accordance with the maintenance instructions provided. Failure to follow the instructions provided regarding the cleaning of the hood and filters will lead to the risk of fires.
- Do not flambé under the range hood.
- Do not remove filters during cooking.
- For lamp replacement use only lamp type indicated in the Maintenance/Replacing lamps section of this manual.
The use of exposed flames is detrimental to the filters and may cause a fire risk, and must therefore be avoided in all circumstances.
Any frying must be done with care in order to make sure that the oil does not overheat and ignite.
CAUTION: Accessible parts of the hood may become hot when used with cooking appliances.
- Do not connect the appliance to the mains until the installation is fully complete.
- With regards to the technical and safety measures to be adopted for fume discharging it is important to closely follow the regulations provided by the local authorities.
- The air must not be discharged into a flue that is used for exhausting fumes from appliance burning gas or other fuels.
WARNING! Failure to install the screws or fixing device in accordance with these instructions may result in electrical hazards.
- Do not use or leave the hood without the lamp correctly mounted due to the possible risk of electric shocks.
- Never use the hood without effectively mounted grids.
- The hood must NEVER be used as a support surface unless specifically indicated.
- Use only the fixing screws supplied with the product for installation or, if not supplied, purchase the correct screws type.
- Use the correct length for the screws which are identified in the Installation Guide.
- In case of doubt, consult an authorized service assistance center or similar qualified person.
WARNING! Do not use with a programmer, timer, separate remote control system or any other device that switches on automatically.
Electrical connection
The hood must be connected to the mains supply by qualified and trained technicians.
The mains power supply must correspond to the rating indicated on the plate situated inside the hood. If provided with a plug connect the hood to a socket in compliance with current regulations and positioned in an accessible area, after installation. If it not fitted with a plug (direct mains connection) or if the plug is
not located in an accessible area, after installation, apply a double pole switch in accordance with standards which assures the complete disconnection of the mains under conditions relating to over-current category III, in accordance with installation instructions.
WARNING! Before re-connecting the hood circuit to the mains supply and checking the efficient function, always check that the mains cable is correctly assembled.
Installation
If the instructions for installation for the gas hob specify a greater distance, this must be adhered to.
Note: The installation must be performed so that accessibility to the hood and its electronic components is always ensured for possible technical assistance interventions.
Note: the cable that connects the remote motor to the hood is 3 metres long
Caution! Do not cut the cable between the hood and the engine to avoid losing your right to warranty!
When handling the hood do not put hands within the range of action of the pull-out suction panel (trolley)
The hood is equipped with safety switches which inhibit operation when the front filter panel is unhooked.
With the intention of constantly improving our products, we reserve the right to make all the changes in their technical, functional or design characteristics, deriving from their evolution. In case of the version with external motor, the normal operation of the hood requires the use of a suction unit (external motor) of the same manufacturer.
When installing the product, it is recommended to keep a minimum distance of 400 mm between the worktop and any components laid on top of the hood.
This is to let the suction panel move upwards (opening) and downwards (closing) without any obstacles, and to facilitate access to the hood controls on the panel.
WARNING: Put the metal box containing the electronic components at a distance not shorter than 65 cm from the gas hob or 65 cm from the hood suction point.
RECOMMENDATION: We recommend you to install the metal box containing the electronic components at a distance of at least 10 cm from the ground and sufficiently from all the sources of heat (e.g.: side of an oven or hob).
- This appliance is marked according to the European
Directive 2012/19/EU - UK SI 2013 No. 3113 on Waste Electrical and Electronic Equipment (WEEE).
- By ensuring this product is disposed of correctly, you will help prevent potential negative consequences for the environment and human health, which could otherwise be caused by inappropriate waste handling of this product.

- The symbol on the product, or on the documents accompanying the product, indicates that this appliance may not be treated as household waste. Instead, it should be taken to the appropriate collection point for the recycling of electrical and electronic equipment. Disposal must be carried out in accordance with local environmental regulations for waste disposal.
- For further detailed information regarding the process, collection, and recycling of this product, please contact the appropriate department of your local authorities, the local department for household waste, or the shop where you purchased this product.
Appliance designed, tested, and manufactured according to:
- Safety: EN/IEC 60335-1; EN/IEC 60335-2-31, EN/IEC 62233.
- Performance: EN/IEC 61591; ISO 5167-1; ISO 5167-3; ISO 5168; EN/IEC 60704-1; EN/IEC 60704-2-13; EN/IEC 60704-3; ISO 3741; EN 50564; IEC 62301.
- EMC: EN 55014-1; CISPR 14-1; EN 55014-2; CISPR 14-2; EN/IEC 61000-3-2; EN/IEC 61000-3-3; ETSI EN 301 489-1; ETSI EN 301 489-17; ETSI EN 300 328; IEC 62311:2019.
Suggestions for correct use to reduce environmental impact: Switch ON the hood at minimum speed when you start cooking and keep it running for a few minutes after cooking is finished. Increase the speed only in case of large amounts of smoke and vapor, and use boost speed(s) only in extreme situations. Replace the charcoal filter(s) when necessary to maintain good odor reduction efficiency. Clean the grease filter(s) when necessary to maintain good grease filter efficiency. Use the maximum diameter of the ducting system indicated in this manual to optimize efficiency and minimize noise.
Use
The hood is designed to be used either for exhausting or filter version.

Extraction version
In this case, the fumes are conveyed outside the building by means of a special pipe connected with the connection ring located on top of the hood.

CAUTION!
The exhausting pipe is not supplied and must be purchased separately.
Diameter of the exhausting pipe must be equal to that of the connection ring.

CAUTION!
If the hood is supplied with active charcoal filter, then it must be removed.

Filtration version
The aspirated air will be degreased and deodorised before being fed back into the room.
In order to use the hood in this version, you have to install a system of additional filtering based on activated charcoal.
Note: The recycled air in the charcoal filter is sent back to the kitchen through a duct which conveys air on a side of the cabinet.
The models with no suction motor only operate in ducting mode, and must be connected to an external suction device (not supplied).
The connecting instructions are supplied with the peripheral suction unit.
Mounting
Before starting to mount the appliance, make sure that no component is damaged, otherwise contact the dealer and stop mounting. In addition, read all the instructions below carefully.
- Use an air outlet pipe no longer than 5 metres.
- Limit the number of curves in the duct since each curve reduces the suction effectiveness equivalent to 1 linear metre. (E.g.: if two 90° curves are used, the duct should be no longer than 3 metres).
- Avoid drastic changes of direction.
- Use a duct with 150mm diameter constant for the whole length.
- Use a duct made of standard complying material.
- In case of failure to observe the instructions above, the supplier cannot be held responsible for capacity or noise problems and no warranty will be granted.
- Before making the hole, make sure that the inside of the cabinet, near the hood housing area, does not have the structure of the cabinet or other particulars which may cause problems for the proper installation. Make sure that the overall dimensions of the hood and the hob are compatible with the cabinet and therefore the installation is feasible.
- Before inserting the screws into the cabinet, make sure that the product is perfectly perpendicular to the worktop.
Panel Assembly
(only for models where the panel is not supplied with the hood)

CAUTION!
Installation must be carried out only by qualified installers. FOR THE INSTALLER: Responsibility for installation of the hood, including verification of the conformity of any fixing kit supplied with the product, is the sole responsibility of the installer. Following is a non-exhaustive list of helpful instructions for the installer:
- use a fireproof PANEL (compliant with art. 30 of IEC/EN 60335-2-31), suitable for the operating temperature (at least 80°C) and humidity (at least 93%) reached during use;
- total weight of PANEL used should not exceed 1.5 kg
- secure the PANEL to the hood using the fixing points. See the illustrations dedicated to assembly of the panel not supplied with the hood.
- use suitable mechanical parts to fix the PANEL (not included in the assembly kit). Elica denies all liability for damage to persons or property resulting from incorrect installation of the gypsum panels and/or product.
Elica Connect
The hood features a WiFi function for remote connection via the Elica Connect app.
Minimum system requirements:
2.4GHz WiFi b/g/n wireless router - Android or iOS Smartphone. Via the stores, check that the app is compatible with the operating system your Smartphone is running.
Note: The ELICA manufacturer declares that this model of household appliance with WiFi module radio equipment complies with Directive 2014/53/EU.
The radio equipment operates within the 2.4GHz ISM frequency band, the maximum radio frequency power transmitted does not exceed 20 dBm (e.i.r.p.).
Warnings:
- Data protection. The data that the connected device detects is collected to allow for all the services of the connected appliance to be used. Further information on how the collected data is processed and on the privacy policy is available at www.elica.com. Availability in different countries. The Elica Connect service is available in specific countries. For further information, see the dedicated section at www.elica.com.
- Future changes. Elica reserves the right to make any changes deemed useful to improve the Elica Connect service. As a result, the descriptions contained in this manual are not binding and should be treated as purely indicative.
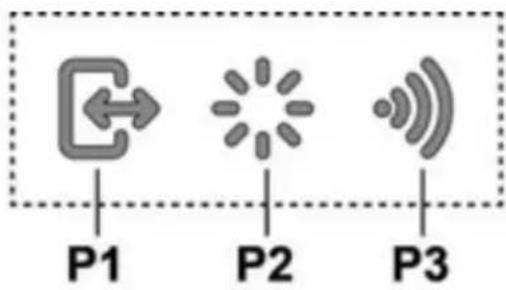
Operation Control Display A
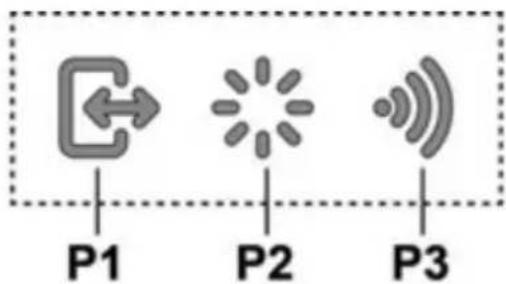
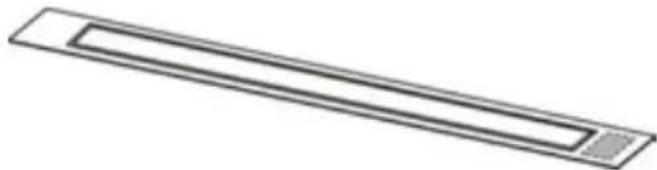
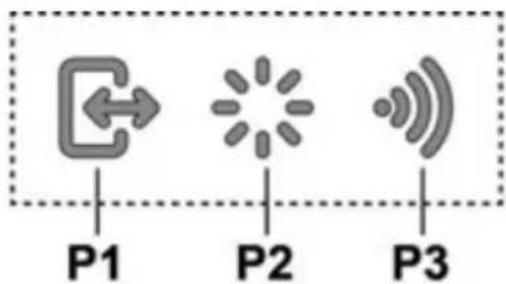
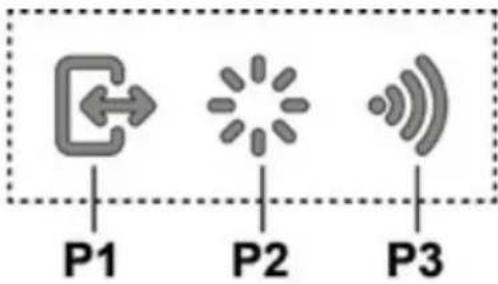
P1. Intake panel opening/closing button P2. Light ON/OFF button P3. WiFi connection button
P1. Intake panel opening/closing button
If the panel is CLOSED, by pressing button P1, the hood will turn on and the intake panel will be raised.
This operation will also give access to control display B, which manages motor and lighting.
If the panel is OPEN, by pressing button P1, the hood will turn off and the intake panel will be closed. This operation stops all active motor and lighting functions immediately.
Note: With the panel closed or while it is moving, control display B will remain deactivated. When the panel is completely open, it will be possible to use display B.
P2. Light ON/OFF button
If the panel is CLOSED, by pressing button P2, the hood will turn on, the intake panel will be raised and the lights will turn on only when the pull-out hood is completely open. If the panel is OPEN, it will only be possible to turn the hood lights on and off.
Note: Light button P2 does not manage Light Dimming and does not turn the hood off.
P3. WiFi button
- WiFi configuration: if the WiFi function is not configured, press for about 2 seconds to enter WiFi configuration mode and follow the instructions on the App to complete the procedure.
During the configuration procedure, the button will light up indicating the connectivity status (see WiFi status table). To interrupt the WiFi configuration procedure, press for about 2 seconds when the button is lit up and is flashing fast.
Once the WiFi function has been configured, if you want to change it, press for about 6 seconds to reset the WiFi parameters (the button will turn off) and repeat the configuration procedure.
- WiFi activation/deactivation: after the configuration, it is possible to deactivate/activate the WiFi function. Press for about 2 seconds to deactivate/activate the WiFi function. Deactivating the function does not cause the loss of the WiFi parameters.
WiFi status table
| WiFi button | Device connection status |
| Light off | WiFi not configured or off |
| Light on steady | WiFi connected |
| Light flashing fast | Attempt to connect to the WiFi router |
| Light flashing slowly | Attempt to connect to the Elica cloud |
| Light on with short flashing light | Remote command being received (e.g. engine ignition or light turned on) |
Control Display B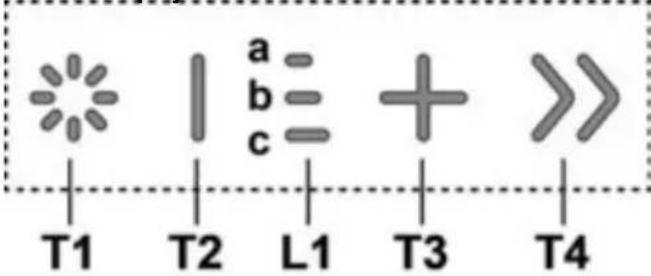
T1. Light ON/OFF button T2. Decrease intake speed / motor off button L1. Speed indicator LED on T3. Motor on / increase intake speed button T4. "BOOST" - intensive speed - function button
T1: Light ON/OFF button
to turn the light on and off.
Press and hold button T1 to increase / decrease the intensity of the light.
T2: Decrease speed / motor off button
press the decrease the intake power, until the extractor hood is turned off.
press and hold to turn the hood off directly.
L1: Speed indicator LED on
the central LEDs light up according to the intake speed active/used:
1st speed, LED a will light up
2nd speed, LEDs a + b will light up
3rd speed, LEDs a+b+c will light up
T3: Increase speed button
press to turn the hood on
press to increase the intake power.
T4: "BOOST" - intensive speed - function button
press T4 to activate the intensive intake speed "BOOST 1", timed for 30 minutes
this prolonged timing has been designed to guarantee a suitable cooking time for preparations that release high amounts of smoke during cooking
Note: after the 30 minutes, the hood will go back to the previously set intake speed ***
with the motor on "BOOST 1", press T4 again to activate the intensive intake speed "BOOST 2", timed for 7 minutes
Note: after the 7 minutes, the hood will go back to the previously set intake speed ***
Note: press T4 again, during the 7 minutes, to go back to the previously set intake speed ***
With the "BOOST1" and "BOOST2" functions active, press:
T2 to go back to the previously set intake speed ***
T3 to go back to the 3rd intake speed
*** The previous intake speed remains visible via the indicator LEDs L1
If you have set the intensive speed directly with the hood off, the motor will be turned off after the set time.
While using the "BOOST" functions, the T4 symbol flashes
("BOOST 1": white light - "BOOST 2": blue light)
Filter Saturation indicator lights
At regular intervals, the hood signals the need to perform maintenance on the filters.
LED L1 (a-b-c) on and flashing light (all indicator lights flashing together): perform maintenance on the grease filter.
LED L1 (a-b-c) on and alternating light (the indicator lights turn on in sequence): perform maintenance on the active carbon filter
Note: The filter saturation indicator is visible within the first 10 seconds on turning on the hood; the saturation indicators must be reset within this time.
Reset filter saturation indicator:
Press and hold button T3
LED L1 (a-b-c) turns on and off (depending on the type of filter being reset, the indicator lights flash together or turn on in sequence); an acoustic signal will confirm the reset operation.
Activation of filter saturation indicator
Note: this operation must be performed with the hood off.
- Grease filter
This indicator is normally activated by a 1st prolonged press of buttons T3 and T2.
If the indicator is active, button T3 turns on; press button T2 to deactivate it.
If the indicator is not active, button T2 turns on; press button T3 to activate it.
- Active carbon filter
This indicator is normally deactivated by a 2nd prolonged press of buttons T3 and T2.
If the indicator is active, button T3 turns on; press button T2 to deactivate it. If the indicator is not active, button T2 turns on; press button T3 to activate it.
Note: 3rd prolonged press of buttons T3 and T2.
Maintenance
Cleaning
Clean using ONLY a cloth dampened with neutral liquid detergent. DO NOT CLEAN WITH TOOLS OR INSTRUMENTS. Do not use abrasive products. DO NOT USE ALCOHOL!
Grease filter
Traps cooking grease particles.
This must be cleaned once a month (or when the filter saturation indication system - if envisaged on the model in possession - indicates this necessity) using non aggressive detergents, either by hand or in the dishwasher, which must be set to a low temperature and a short cycle.
When washed in a dishwasher, the grease filter may discolor slightly, but this does not affect its filtering capacity.
When inserting and removing grease filters and charcoal filters, please make sure that the extractable unit of the hood is in open position.
Then remove the front panel, by pulling on the upper part of each side at the same time.
The panel turns forward, so that grease filters can be inserted.
Fig. 18-21
Charcoal filter (filter version only)
It absorbs unpleasant odors caused by cooking.
Washable activated charcoal filter
The charcoal filter can be washed once every two months (or when the filter saturation indication system – if envisaged on the model in possession – indicates this necessity) using hot water and a suitable detergent, or in a dishwasher at 65°C (if the dishwasher is used, select the full cycle function and leave dishes out).
Eliminate excess water without damaging the filter, then put it in the oven for 10 minutes at 100°C to dry completely. Replace the mattress every 3 years and when the cloth is damaged.
After removing the grease filter, it is possible to insert the charcoal filters (not supplied).
Replacing lamps
The hood is equipped with a lighting system based on LED technology.
The LEDs guarantee an optimum lighting, a duration up to 10 times longer than the traditional lamps and allow to save 90% electrical energy.
To replace lights, contact authorized spare part center.
Activating filter saturation indicator
Display B for commands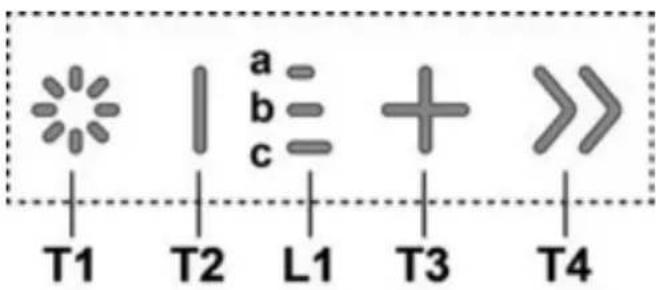
Do not connect it to the mains if it is dangerous.
Do not allow children to play with the device! - Maintenance and repair must not be carried out by children without adult supervision. - The room must have sufficient ventilation when the vacuum cleaner is used simultaneously with gas or other fuel appliances. - The vacuum cleaner must be cleaned as often as possible, both inside and outside (at least every month). - Follow the instructions for maintenance given in the manual! - Failure to follow the instructions for cleaning the vacuum cleaner and for replacing and cleaning the filters may lead to fire risk. - It is strictly forbidden to vacuum up flames or embers under the vacuum cleaner. To replace the lamps, use only those specified in the section "Maintenance/Replacing the lamps", as indicated in this manual. Using an open flame is harmful to the filters and may cause a fire, so it must be avoided at all times. Cooking with hot oil must be done under supervision, as the overheated oil may ignite. WARNING: When the appliance is not working properly, the accessible parts of the vacuum cleaner may overheat. Do not connect the appliance to the mains until you have completely finished the installation.
- This concerns the technical dimensions and safety measures that you must take for the evacuation of smoke and fumes. We recommend that you strictly follow the rules provided in the regulations of the competent local authorities.
- The vacuum cleaner must not be connected to the pipes used for evacuating smoke and fumes, nor to the pipes used for appliances working with gas or other fuels. WARNING! Failure to install the bolts and mechanisms for evacuation in accordance with these instructions may lead to risks of electric shock. Do not use or leave the vacuum cleaner without properly installed lamps due to the possible risk of electric shock.
- Never use the vacuum cleaner without a properly installed grille!
- The vacuum cleaner must never be used as a support surface unless this is specifically indicated.
- During installation, use only the fixing bolts provided with the device, or if none are available, purchase suitable bolts.
- Use bolts of the length specified in the installation manual.
- In case of doubt, contact the authorized service center for technical assistance or qualified personnel.
WARNING! Do not use with a programmer, timer, separate remote control, or any other device that activates automatically.
Electrical connection
The connection of the vacuum cleaner to the mains must be carried out by qualified and specialized technical personnel.
The appliance must be connected to the voltage specified on the data plate of the hood, located on its inner side. If it is equipped with a plug on the hood's power cord, the corresponding standard socket must be easily accessible after installation. If it is not equipped with a plug (direct connection to the mains), or if the plug is not easily accessible after installation, use a double-pole switch that complies with the standards, so that the hood can be completely disconnected from the mains, in accordance with the installation rules.
WARNING! Before connecting the hood to the mains, check that it functions correctly and that the cable is installed properly.
Installation
If the instructions for the gas appliance specify a greater distance, that distance must be
observed.
Note: Installation must be carried out in such a way as to ensure unobstructed access to the hood and its electrical components for any necessary technical maintenance. Note: The cable connecting the motor to the hood is supplied with
WARNING! Do not disconnect the connection cable between the hood and the power supply, so as not to lose the right to warranty.
During operation of the hood, do not place objects in the area of action of the suction fan.
The hoods are equipped with safety switches that stop their operation when the filters are removed.
In our efforts to constantly improve our products, we reserve the right to make changes to the technical and functional characteristics of the appliances, as well as to their aesthetic appearance, which are the result of their continuous evolution. For models with a higher-power motor, for the normal functioning of the hood, it must be installed with a higher-power hood group (higher-power motor) of the same brand.
When installing, we recommend leaving a minimum distance of 400 mm between the working surface and any components located above the hood.
In this way, you will have unimpeded access for upward (exhaust) and downward (recirculation) operation of the suction unit, and you will not hinder access to the hood's controls, located on its front.
WARNING: Position the metal box containing the electrical components at a distance of no less than 65 cm from the gas hob, and in any case, at least 65 cm from the suction grille.
RECOMMENDATION: We advise you to install the metal box containing the electrical components at least 10 cm away from the surface, and at a distance from any source of heat (for example, the side of the oven or the gas hob).
This device complies with the requirements of the
- European Directive 2012/19/EC - UK SI 2013 No.3113
- Waste Electrical and Electronic Equipment (WEEE). Please ensure that this device is recycled according to the regulations for this product, so you contribute to the protection of the environment and your health.

The symbol on the device or in the accompanying documentation indicates that this product should not be treated as household waste, but must be handed over to a specialized collection point for recycling of electrical and electronic equipment. Please refer to local regulations for waste processing. For more information regarding
the disposal, collection, and recycling of this product, we recommend that you contact the competent local services, the household waste collection service, or the store where you purchased this device.
The device is designed, tested, and manufactured in accordance with:
- Safety: EN/IEC 60335-1; EN/IEC 60335-2-31, EN/IEC 62233.
- Performance characteristics: EN/IEC 61591; ISO 5167-1; ISO 5167-3; ISO 5168; EN/IEC 60704-1; EN/IEC 60704-2-13; EN/IEC 60704-3; ISO 3741; EN 50564; IEC 62301. EMC - Electromagnetic Compatibility: EN 55014-1; CISPR 14-1; EN 55014-2; CISPR 14-2; EN/IEC 61000-3-2; EN/IEC 61000-3-3; ETSI EN 301 489-1; ETSI EN 301 489-17; ETSI EN 300 328; IEC 62311:2019.
Recommendations for proper use to minimize the impact on the environment: Turn on (ON) the extractor at minimum speed when you start cooking and leave it running for a few minutes after cooking. Increase the speed only in case of large amounts of smoke or steam, and use the speed increase only in extreme situations. Replace the filters/grease filters with active carbon when necessary to maintain good efficiency in odor absorption. Clean the filters/grease filters for grease when necessary to maintain good efficiency of the grease filter. Use the maximum diameter of the air exhaust system, as indicated in this manual, to optimize efficiency and minimize noise.
Use
The extractor has a special design: it sucks and exhausts air, and filters it simultaneously.

Extractor with exhaust
The air is exhausted outside through an air duct connected to the flue.

ATTENTION!
The exhaust hose is not included as an accessory and must be purchased separately.
For the exhaust hose, you need to purchase the hose diameter according to the filter system.

WARNING!
If the accessory is supplied with an activated carbon filter, ask the dealer to remove it.

Recirculation
The recirculated air is cleaned by the activated carbon filter before being returned to the room. To use the extractor in this operating mode, you need to install the additional filter system on the activated carbon filter.
Note: The air that is recirculated through the activated carbon filter is returned to the room through the exhaust hose, which passes from the other side of the extractor.
The model without extraction motor is intended for operation only in the extraction version. It must be connected to a peripheral extraction unit, which is purchased separately.
The connection instructions are supplied with the peripheral extraction unit.
INSTALLATION
Before starting installation, check that there are no damaged components. If any are found, contact the supplier and postpone the installation. Read all the following instructions carefully.
- Use an exhaust hose with a maximum length of 5 m.
Keep the number of hose bends to a minimum, as each bend reduces the extraction capacity by 1 linear meter (for example: if there are 2 bends of 90°, the length of the exhaust hose must not exceed 3 m).
Do not bend sharply.
Use hoses with a constant diameter of 150 mm for the entire run.
The appliance must be installed in accordance with the current standards.
In case of incorrect installation instructions, the manufacturer assumes no responsibility for any problems in the functioning or increase in noise and accordingly provides no guarantee.
Before installing the hood, make sure that the outer side of the cabinet, at the location where the hood will be installed, is not damaged by the structure of the cabinet and that there are no other elements that could obstruct the correct installation of the hood. Make sure that the dimensions of the hood and the product are compatible with those of the cabinet and that there are no obstacles for installation.
Before inserting the screws into the cabinet, make sure that the device is positioned perpendicular to the working surface.
INSTALLATION OF THE PANEL
(only for models where the panel is not supplied with the hood)
WARNING!
Installation must be carried out only by qualified technicians. For the installer: the responsibility for the installation of the hood, including the check of the suitability of the electrical connection that may be included with the product, lies entirely with the installer. In the following, only some useful instructions for the installer are presented:
- The installation must comply with the standards (in accordance with IEC/EN60335-2-31), taking into account the working conditions of temperature (up to 80°C) and humidity (up to 93%) reached during operation;
- The total weight of the panel used must not exceed 1.5 kg;
- Fix the panel to the hood using the fixing points. Refer to the illustrations, following the panel installation instructions, if it is not supplied with the hood.
- To fix the panel, use suitable mechanical components (screws included in the mounting kit). The manufacturer declines any responsibility for damage to objects or products due to incorrect installation of the panel or the product.
Elica Connect
Connect the appliance to the WiFi network for remote connection via the Elica Connect app. Minimum system requirements:
- Wireless router 2.4GHz WiFi b/g/n
- Android and iOS smartphones. Check in the app store for compatibility with your smartphone's operating system version.
Manufacturer's declaration: ELICA declares that this model complies with radio equipment directive 2014/53/EC.
The radio equipment operates in the 2.4GHz ISM frequency band, with maximum transmitted radio frequency power not exceeding 20 dBm (e.i.r.p.).
Warnings:
Data protection. Data collected through the device is stored to enable all functions of the connected appliance. For more information on how collected data is processed and for the privacy policy, you can visit the website www.elica.com.
Availability by country. The Elica Connect service is offered in certain countries. For more information, see the dedicated section on the website www.elica.com.
Changes. Elica reserves the right to make any changes necessary for improving the Elica Connect service. Therefore, the descriptions contained in this manual are not binding and have no contractual value.
Instructions for use Display Commands
P1. Button for opening/closing the suction panel. P2. Light ON/OFF button P3. WiFi connection button
P1. Button for opening/closing the suction panel
If the panel is closed, pressing button P1 will turn on the hood and the suction panel will open.
This operation will also be available via the display commands, which control the motor and lighting.
If the panel is open, pressing button P1 will turn off the hood, and it will close the suction panel. This operation will immediately stop all active motor and lighting functions.
When the panel is closed, the display for control remains in the off state. When the panel is fully open, it is not possible to use the display.
P2. Light ON/OFF button
If the panel is closed, by pressing the P2 button the aspirator will turn on, the panel for aspiration shows the lights, only when the switch is fully open.
If the panels are open, they can only be controlled by turning the aspirator lighting on and off.
Note: The light button P2 does not control the dimming of the lights and does not control the disconnection from the aspirator.
P3. WiFi button
- WiFi configuration: If the WiFi function is not configured, press for about 2 seconds to enter configuration mode: WiFi. Follow the instructions of the application to complete the procedure.
During the configuration procedure, the button lights up, showing the connection status (see the WiFi status table).
To cancel the WiFi configuration procedure, press for about 2 seconds when the button light is flashing quickly with a flashing light.
After the WiFi function is configured, if you want to change it, press for about 6 seconds to reset the WiFi parameters (the button turns off) and repeat the configuration procedure.
- Activate/deactivate WiFi: After configuration, you can deactivate/activate the WiFi function. Press for about 2 seconds to deactivate/activate the WiFi function. Deactivating the function does not lead to loss of WiFi parameters.
WiFi status table
T1: Light ON/OFF button
To turn the light on and off. By repeatedly pressing the T1 button, it is possible to increase/decrease the light intensity.
T2: Speed reduction / motor shutdown button
Press the button for the maximum power of the aspirator, until the aspirator turns off. Press and hold the button to turn off the aspirator directly.
L1: LED indicator for speed activation
The central LED indicators light up based on the speed of the activated/used aspirator:
Speed 1: LED indicator a turns on
Speed 2: LED indicators a+b turn on
Speed 3: LED indicators a+b+c turn on
T3: Button for increasing speed
Press to turn on the aspirator
Press to increase the power of the aspirator.
T4: Function button "BOOST" - intensive speed -
Press T4 to activate the intensive speed of the aspirator "BOOST 1", with a timer for 30 minutes
This delayed timer is designed to guarantee a certain time, useful for cooking with high smoke emission
Caution: after 30 minutes, the aspirator will return to the previously set speed of the aspirator ***
If the motor is turned on in "BOOST 1", press T4 again to activate the intensive speed of the aspirator
"BOOST 2", with a timer for 7 minutes
Delay: the device switches to the pre-set suction speed after 7 minutes.
Delay: press T4 again, and after the 7th minute, it switches to the pre-set suction speed.
During the "BOOST1" and "BOOST2" functions
The indicators light up
The indicator light flashes briefly
2nd prolonged press of buttons T3 and T2
If the indicators are activated, the light of button T3
Press button T2 to deactivate it
If the indicators are deactivated, the light of button T2
Press button T3 to activate it
Delay: 3rd prolonged press of buttons T3 and T2
It is selected from the settings menu.
Order
Cleaning.
For cleaning, use ONLY a dry cloth,
Always use protective equipment when handling the preparation.
Use tools for cleaning!
Remove preparations containing abrasives
parts. DO NOT USE ALCOHOL!
Oil filter
The filter retains oil parts, separated during heating.
To clean every month or when the indicator
for filter contamination shows (see in case, if the model, the filter is equipped with such an indicator).
Use not too strong cleaning agents
Clean thoroughly or in the washing machine, but at low temperature and short washing cycle.
When cleaning the metal oil filter in
the washing machine it is possible to deform it,
but this in no way impairs its filtering capabilities.
Mounting and dismounting of the oil filter is carried out with the engine off and cold, using a special mechanism.
Follow the instructions carefully, as the filter is in the hot part and simultaneously on both sides. The filter must be turned off, otherwise it will be damaged during the oil filter replacement.
ΦHr. 18-21
ΦHITbpcakTNBeH BbFJIeH (cAmO 3a φHITpnpaIaBepn)
3aIbPka He npnTHTe Mnpn3Mn, KOHTo ce OTJeJIaT npn IIbPKeHe.
MneIc eHJTbP cAKTNBEH Bblen
ΦHNTbptcakTNBEH BbTJeH MoKe Da 6bDe NOChCTBaH H BCEKN DBA MEceua NIN KORATO INDnKaTOpBt 3a HAcNlAHe Ha ΦHTPnTe (ako n36paHnT OT Bac moDen e Cha6dEh C TaKbB) ro noka3Ba. Mne ce c TOnJa BOda I NOxOJaI npenapatn NIN B cbDOMnHa MaunHa Ha 65°C . BbB BTOpyaB CbDOMnHaTa MaunHa He Tp6Ba Da IMa dpyrN CbDOBe I Tp6Ba Da CE n3NbHN pexmHa Hn3MnBaHe DoKpaN.
IocyuTe BnMaTeNo fHtpa, cJeKoTo ro nocTaBeTbBfpyHaTa 3a OKOJIO 10 MmHyTu Ha 100°C
TektunHnTe Bb3rnaBnUKN Ha φnIITbpa TpI6Ba Da ce IoMHeHr Na BCEKN TPN FOINHN NNN AKO NOBbpxHocTTa NM e yBpeDeHa.
CneI KaTO OTCTpaHITe 0nITpHTe 3a3aBpKaHe Ha Ma3HNH, e Bb3MOxHO Da NoCTaBHTe 0nITpHTe C aKTINBEH BbTHe (Koumo He ce docmaem c acnpamopa).
IopMaHa ha eJ. KpyuKn
AcnipatopbT pa3noJara c ocBETeHnHa cnCTema cbc CBETOIOI.
CBETOIOIOITE rapaHTnpaT ONTIimaJIHO OCBetJIeHHe, Do
10 nbTn NO-CINHO OT TpaNIOHHTe lamnni N IO3BOJRABat
3NeKtpnueckoe coeHHeHne
EcnB nHctpyKunx no yctaHOBe ra30BOI PINTbI OROBopeHo 6OJIbWee
pacctoHne,TOyUTte3TO.
Installation: The unit must be installed so that the extractor and electrical components are accessible for maintenance work.
Principle: The cable connecting the remote motor to the extractor has a length of 3 m.
Warning! Do not cut the connecting cable between the extractor and the motor, so as not to lose the warranty.
During movement of the extractor, hands must not enter the action zone of the extractor suction panel (carriage).
The extractor has safety switches that interrupt the operation of the extractor when the filters are removed.
With the aim of constantly improving our products, we reserve the right to make any changes to their technical, functional, or aesthetic characteristics as a result of their evolution. If you have purchased a product with an external motor, for normal operation of the extractor it is necessary to use the suction block (external motor) of the same brand.
When installing the product, we recommend keeping a minimum distance of 400 mm between the work surface and the components that may be placed above the extractor.
This distance is necessary so that the extractor panel can slide up (open) and down (close) without obstacles, so that the extractor commands located on the panel can be easily accessed.
Warning: Install the metal duct, containing electrical parts, at a distance of no less than 65 cm from the cooking surface, or, in any case, 65 cm from the suction opening of the extractor.
Note: We recommend installing the metal duct with electrical components at a distance of at least 10 cm from the floor and at a sufficient distance from any heat sources (for example: side of the oven, or cooking surface).
This product is marked in accordance with the European Directive 2012/19/EC - UK SI 2013 No.3113 on Waste Electrical and Electronic Equipment (WEEE).
By ensuring the correct disposal of this product, you
will help prevent potential negative consequences for the environment and human health.
The symbol on the product or on the accompanying documentation indicates that this product must not be treated as household waste. Instead, it should be handed over to the appropriate collection point for the recycling of electrical and electronic equipment.
Disposal must be carried out in accordance with local regulations for waste disposal.
For more detailed information about the rules for handling such products, their utilization and recycling, please contact your local authorities, the waste disposal service, or the store where you purchased this product.
The device has been developed, tested and manufactured in accordance with:
- Safety: EN/IEC 60335-1; EN/IEC 60335-2-31, EN/IEC 62233.
- Performance: EN/IEC 61591; ISO 5167-1; ISO 5167-3; ISO 5168; EN/IEC 60704-1; EN/IEC 60704-2-13; EN/IEC 60704-3; ISO 3741; EN 50564; IEC 62301.
EMC: EN 55014-1; CISPR 14-1; EN 55014-2; CISPR 14-2; EN/IEC 61000-3-2; EN/IEC 61000-3-3; ETSI EN 301 489-1; ETSI EN 301 489-17; ETSI EN 300 328; IEC 62311:2019.
Recommendations for correct use to reduce environmental impact: Turn on the extractor hood at minimum speed when you start cooking and leave it running for a few minutes after you finish cooking.
Increase the speed only in case of a large amount of smoke and steam, and use the higher speeds only in extreme situations. Replace the charcoal filter(s) when necessary to maintain good effectiveness in reducing odors. Clean the grease filter(s) when necessary to maintain good effectiveness of the grease filter. Use the maximum diameter of the air exhaust system indicated in this manual to optimize effectiveness and minimize noise levels.
Use
The hood is designed to be used in exhaust mode (air extracted to the outside) or in recirculation mode (air recirculated).
Use of recirculation mode
In this mode, the vapors are conveyed outside through flexible pipes connected to the connecting ring.
WARNING!
The exhaust pipe is not included in the package and must be purchased separately.
The diameter of the pipe must correspond to the diameter of the connecting ring.
ATTENTION!
If the hood is equipped with a charcoal filter, make sure to...

Use of the recirculation mode
A charcoal filter must be used, available from your distributor. The extracted air is de-greased and deodorized before being returned to the room through the top grille.
Usage: The air purified with the charcoal filter is returned to the room through the air duct, which discharges the air through one of the side openings of the hood.
Models of hoods without a motor unit can operate in one mode of air extraction to the outside, therefore they must be connected to an external extraction unit (not supplied).
The connection instructions are supplied with the external extraction unit.
Installation
Before starting the installation of the appliance, check that all components are not damaged, and in the opposite case, contact the point of sale and do not start the installation. Also carefully read all the instructions supplied with the product.
- Use an exhaust pipe with a length not exceeding 5 meters. Limit the number of bends in the air duct, as each bend reduces the suction efficiency by the equivalent of 1 linear meter. (E.g., if a 90° bend is used, the length of the air duct must not exceed 3 meters).
- Avoid sharp changes in direction. Use an air duct with a diameter of 150 mm along its entire length. Use an air duct made of material approved by standards. In case of non-compliance with the above instructions, the manufacturer does not bear responsibility for problems of suction power or noise and does not provide a warranty.
- Before drilling the hole, check that on the rear wall of the hood or cabinet in the installation area there is no structure of the cabinet or other parts that could interfere with proper installation. Check that the overall dimensions of the hood
match the dimensions of the hood furniture, and therefore the possibility of performing the installation. - Before inserting the screw into the cabinet, check that the product is perpendicular to the cabinet surface.
MOUNTING OF THE PANEL
(Only for models where the hood is not supplied with an exhaust hood)
WARNING!
Installation must be carried out only by qualified technicians. FOR THE INSTALLER: Responsibility for installation, including checking compliance with the pre-installed kit, if supplied with the product, lies with the installer. Below are some examples and non-exhaustive instructions for the installer:
Use a flue of fire-resistant type (in accordance with the requirements of EN 60335-2-31), suitable for the operating conditions in terms of temperature (not less than 80°C) and humidity (not less than 93%), achievable in the application; - the total weight of the flue used must not exceed 1.5 kg; - secure the flue to the exhaust hood at the fixing points. See the installation instructions for the flue, not provided with the exhaust hood. - Use suitable mechanical elements for fixing the flue (not included in the installation kit). The company Elica declines all responsibility for damage to persons or property caused by incorrect installation of the flue and/or the product.
Elica Connect
The exhaust hood is equipped with a WiFi function for remote connection via the Elica Connect app.
Minimum system requirements:
- Wireless router 2.4 GHz WiFi standards b/g/n
- Smartphone with Android or iOS. Check the compatibility of the app with the operating system on your smartphone on the app stores.
Table of WiFi function status
T3. Motor on/off button and suction speed adjustment
T4. "BOOST" function button - high speed level -
T1: Light on/off button
To turn the light on/off.
Prolonged press of button T1 allows you to increase/decrease the light intensity.
T2: Knob for reducing speed / engine deviation
Press to reduce extraction power, up to its deviation.
Press and hold to immediately switch off the extraction output.
L1: Indicator lights for speed
The central indicator lights turn on depending on the current/used suction speed:
1 speed - indicator light a turns on
2 speeds - indicator lights a+b turn on
Speed-boost button for a + b + c
T3: Speed increase button
Press the button to increase speed
Press to increase extraction power.
T4: "BOOST" function button - increased speed levels -
Press the T4 button to activate the increased suction speed "BOOST1", which operates for 30 minutes
This function's duration is designed to provide sufficient time for preparing large amounts of smoke
Note: after 30 minutes, the extraction speed will return to the previously set value ***
The device returns to the "BOOST1" mode; press button T4 again to enable the increased extraction speed "BOOST2", which is set to operate for 7 minutes.
Note: After 7 minutes, the extraction speed returns to the value set previously ***
Note: If button T4 is pressed again during the 7-minute interval, the extraction speed returns to the level that was set previously ***
If the "BOOST1" and "BOOST2" functions are active, when pressing:
T2 returns to the previously set speed ***
T3 returns to the 3rd extraction speed *** The previous extraction speed continues to be indicated by the L1 indicators
If the increased speed is set with the extraction hood closed, then after the corresponding interval, the motor turns off.
When using the "BOOST" function, the symbol lights up ("BOOST1": white color; "BOOST2": blue color)
Filter clogging indicators
After certain time intervals, the extraction hood signals the need to perform filter maintenance.
L1 (a-b-c) lights up with a steady light (all indicators - LEDs - light up together): perform maintenance of the washable filter.
L1 (a-b-c) lights up alternately (indicators light up sequentially): perform maintenance of the charcoal filter.
Note: The filter clogging indicator is displayed for the first 10 seconds after the extraction hood is turned on. During this interval, the filter clogging indicators should be reset.
Reset of clogging indicators:
Long press of button T3
The L1 indicator (a-b-c) lights up and goes off depending on the type of filter for which the filter reset is performed; the indicator lights up alternately with the acoustic signal to confirm the correct reset.
Turning on the filter saturation indicator
Note: this operation is performed with the hood switched off.
- Grease filter
The indicator is usually on
First long press of buttons T3 and T2
If the indicator is on, the T3 button lights up; press the T2 button to turn it off. If the indicator is not active, the T2 button lights up; press the T3 button to turn it on.
The device is designed, tested, and manufactured in accordance with the requirements of the EAC.
- Safety: EN/IEC 60335-1; EN/IEC 60335-2-31, EN/IEC 62233.
- Performance: EN/IEC 61591; ISO 5167-1; ISO 5167-3; ISO 5168; EN/IEC 60704-1; EN/IEC 60704-2-13; EN/IEC 60704-3; ISO 3741; EN 50564; IEC 62301. EMC: EN 55014-1; CISPR 14-1; EN 55014-2; CISPR 14-2; EN/IEC 61000-3-2; EN/IEC 61000-3-3; ETSI EN 301 489-1; ETSI EN 301 489-17; ETSI EN 300 328; IEC 62311:2019.
Tips for correct use to reduce environmental impact: Plug the hood at the minimum speed when cooking, and leave it running for a few minutes after cooking is finished. Increase the speed only in case of large amounts of fumes and steam, and use the boost speed only in extreme cases. To maintain high efficiency in odor removal, replace the charcoal filter(s) when necessary. To maintain high efficiency of the grease filter, clean the grease filter(s) when necessary. Use the maximum diameter of the ducting system, as indicated in the instructions, for optimal efficiency and minimal
Use
The hood is designed for use in recirculation mode, with air recirculated internally or in ducting mode with air recirculation.

Exhaust version
The fumes are discharged outside through an exhaust pipe connected to the flange connection.

The exhaust pipe must not be installed and therefore must be purchased separately.
The diameter of the exhaust pipe must match the diameter of the connecting ring.

If the hood has carbon filters, they must be removed.

Version with filtration
The air is drawn in, filtered, and then returned to the room. To use the hood in this mode, it is necessary to install a carbon filter system.
Note: The filtered air is returned to the kitchen through the duct, which passes through the air and exits on one side of the housing.
Hood models without a motor block can only operate in the air extraction mode, so they must be connected to an external extraction system (not included).
The connection instructions are supplied with the device.
Installation
Before installing the appliance, check that all components are not damaged; otherwise, contact the point of sale and do not start installation. Also, carefully read all instructions provided with the product.
When using the air extraction mode, the maximum length of the duct should not exceed 5 meters - limit the number of bends in the duct, as each bend reduces efficiency, especially with a 90° bend. (Note: if a 90° bend is used, the total length of the duct must not exceed 3 meters). - Avoid sharp changes in direction. Use a duct with a diameter of 150mm throughout the entire length. Use a duct made of certified material. - If the above principles are not followed, the supplier is not responsible for any resulting problems or will not provide any warranty. - Before making the hole, check that in the internal part of the housing, in the area where the hole is to be placed, there are no structural elements or other parts that could cause problems for proper installation. Make sure that the hole and the duct correspond to the space provided in the furniture for installation. - Before tightening the screws, make sure that the product is placed absolutely perpendicular to the work surface.
Mounting the panel
2. Button for changing the suction speed / turning on the light
L1. Liquid level indicator
T3. Button for increasing/decreasing the liquid level
T4. "BOOST" function button - increases the liquid level -
T1: Button for turning the light on/off
To turn the light on or off.
Pressing button T1 allows you to increase/decrease the light intensity.
T2: Button for changing the liquid level / turning on the pump. Press to change the pump speed, or to turn it off.
Press and hold to turn off the pump.
L1: Liquid level indicator
The central indicators light up according to the active/used liquid level of the pump:
1st level - orange indicator a
2nd level - indicators a+b light up
3rd level - indicators a+b+c light up
T3: Button for increasing the liquid level
Press to turn on the pump
HaTnCHiB, 36o6 36iNbunrNOTyXHcTb BCMOKTyBaHHa
T4: Khonka Фуннци “BOOST” - niĐицeti piBhi wBndkocti -
HATNCITbT4,ДЯВКЛIOUeHHNIIBUNeHOI WBNIKOCTI BCMOKTyBaHHRABOOST1》,якбудakTNBnApOTrAOM 30
XBNJINH
Taka Tpnbaiictb ciicf fyHKuii nepe6aeha dna 3abe3neueHHI DOCTaTHbOro Yacy,Notpi6Horo npn nprirotybaHHI 6nD3 yTBOpEHNM BELKOJI KINbKOCTI DmMIB
Ppimitka:Yepe3 30 XBnHH BNTJkKa NOBepHeTbCra DpaHlwe BCTaHOBJeHOI WBNKoCTi ***
KONI DVBURYN npaioe B pekimi "BOOST 1", HATNCITb ue pa3
T4ДЯВКПИЕСНЯПДВИSEHOI WBNIKOCTI BNTAJKK"BOOST
2", HanaTobaoHoi Ha po6oty npotraom 7 xBnHH
Ppumitka:Yepe3 7 XBnIH BNTJkKa NOBepHeTbCra Do paHlwe BCTaHOBJIeHOI WBNKoCTi ***
IpnMItka: npn NOBTOPHOMy HaTNCaHHi KHOJKN T4, npOTAROM IHTeBaJIy 7 XBUNH, WBNKICb BNTJKK NOBepHeTcH aPiBeH, JkN 6yB BCTAHOBJIeHn paHIwe ***
KONI ΦyHKU“BOOST1” Ta “BOOST2” aKTNBOBaHI, HATNCHYBUN :
T2 3dHcHcTBcra NOBepHeHHa DO BCTAHOBJeHO paHiue WBNDKoCTi ***
T3 3iINCHIOCTbCnOBepHeHHaO3-ⅢWBnIKoCTBnTJxKn ***Ha nonpeedHIO WBNIKcTBnTJxKn npoobKyE Bka3yBaNT CbitnoIHdkatop L1
KIOIIBNUEHa WBNIKCTb 3aHa npn BiKNIOeHOMy BNTXHOMY KOBnaky,TO,nicra 3akHHeHH BIDNOBIDHOI INTEBaJy, DBnHy BNIMKaetbcr.
Do not use abrasive materials. DO NOT USE SPIRIT!
Grease filter
Grease filter delay, to avoid the appearance of cooking odors.
The filter should be cleaned once a month (or when the filter saturation indicator system, if present in your model, indicates this need), using non-abrasive liquid detergents by hand or in a dishwasher at low temperature and short cycle.
When washing in a dishwasher, slight discoloration of the filter may occur, but its filtering characteristics remain unchanged.
Installation and removal of charcoal filters and activated carbon filters must be carried out with the hood off and the hood in the open position.
That is, remove the panel by pulling simultaneously on the upper parts of the panel from each side. The panel will fold forward, giving access to the grease filters.
Fig. 18-21
The charcoal filter (if recommended) absorbs unpleasant kitchen odors.
Charcoal filter, washable type
The charcoal filter can be washed every two months (or when the filter saturation indicator system, if present in your model, indicates this need) in warm water with mild detergents or in a dishwasher at a temperature of 65°C (in the latter case, run a full wash cycle without dishes inside the dishwasher).
Remove the filter and dry it in the oven without the filter, then put it back in the oven for 10 minutes at 100°C for complete drying.
After washing, or whenever the fabric appears clogged.
After washing the charcoal filters, it is possible to insert activated carbon filters (not included).
Replacing the lamps
The lighting system is based on LED technology.
They provide optimal lighting, their lifespan is 10 times longer than conventional lamps and they give 90% energy savings.
To contact the authorized service center for spare parts.
The following safety instructions must be followed to prevent damage to the device and to ensure safe operation. Do not attempt to open the device.
The cover of the device can only be removed by qualified personnel. Maintenance, repair, and technical service should be performed by qualified personnel.
Read the instructions carefully before using the device. If the device is damaged, dropped, or shows signs of malfunction, do not use it. - Check the device: it contains electrical components, and there is a risk of electric shock. - Do not open the device's electronic or mechanical structure or the ventilation channels. Do not attempt to repair or modify the device yourself; contact qualified personnel.
Note: (*) Items marked with an asterisk are available only for certain models (not for all models), but can be purchased as accessories.

Instructions
If the device is damaged or requires technical service, contact qualified personnel. Do not attempt to repair or replace parts yourself. When performing maintenance or technical service, follow the instructions provided. - This device can be used by children aged 8 and above, and by persons with reduced physical, sensory or mental capabilities, or lack of experience and knowledge, if they have been given supervision or instruction concerning use of the appliance in a safe way and understand the hazards involved.
Keep the device away from heat sources and do not leave it unattended. Do not allow children to play with the device or its controls.
Cleaning and user maintenance shall not be made by children without supervision. - When cleaning the device, do not use abrasive cleaners or solvents. Use a soft, dry cloth. If the device is very dirty, clean it with a slightly damp cloth and then dry it. Follow the cleaning instructions provided in the technical service manual. - For cleaning, use only the cleaning agents specified in the 'Technical Service/Cleaning' section of this manual. Using other cleaning agents may damage the device.
Always disconnect the device from the power supply before cleaning or maintenance.
To use the device safely, it is necessary to read the instructions before use.
WARNING: If the device is used in a way not specified by the manufacturer, the protection provided by the device may be impaired.
Connect the device only to a power source that matches the specifications.
Before using the device, read the safety instructions carefully and follow the regulations set by the relevant authorities.
The device's power cord must be connected to a gas or other fuel source
that is not connected to the device
for purposes other than those intended
when it is in use
and must be disconnected
when not in use. The power cord must be kept away from heat sources
and sharp edges
and must not be pinched
or damaged.
WARNING! Do not connect the device to electrical outlets that do not match the plug type.
Do not use the device if the plug is damaged or does not fit properly.
- Aphaы kερсетимеиншe, copfbltsb EWKALSAH tipek 6eti
peiHnde naIdaIaHa6aHbI3.
- Tek ophaTy ywiH eHimMeH bipre 6epiIren 6eKity 6ypaHaIapbH naIaIaHbIHbI3, erep 6epiImce, 6ypaHaHbIH Tnicti TypiH caTbIn aJIbIHbI3.
Бураздалардын ophaTy HucayлыIFbIHda KepceTiIreH dypbc Y3bIHdbIfbIH naДанбИbI3.
KymHdaHcHbI3, ekineTTi Kbl3MeT KepceTy 60nbHwa XaPdEm KepceTy OPTaNbIfbHa Hemece TnicTi MAmHaHFaHTyJfafa xa6apnacbIbI3.

ECKEPTY!
BaFapIamalayMbIMeH, TaImePmEn, 6eJIek KaIbIKTaH 6aCKApy KIeCImeH HeMece aBTOMaTTbI TypDe KocblaTbIH Ke3 KeIReH 6aCKa KypblfBIMeH KOJaHa6aHbI3.

3JIeKTp KocyIapbl
CopfbltbIH 3JneKtp KyyneCiHe Kocblnybl Tnicti MaMaHMeH Ky3ere acbipblnybl Tnic.
KeiHKePHeYi acnTbH iHne OpHaIacKaH TaKtAwaDa 6eIInenRe H TeHNkAlbIK DepeKTepei KepHeyre cKeC KeNy i Kepe. Erep copfbl WnKamEn Ka6DbikTaJFaH 6oJca, OPhaTbIraHHan KeiH de icTeyre 6oJatbH, kOJ JeTeprNik Jepde 6oJybl Tnic, icTe n TypfaH epExeJepre CaiKeC aImaJIbIcAImaJIbI wTeNCelBre CopfblTbI
KOCbIHbI3. Erep copFbIiBnJIkAmeH Xa6DbIKTaJMaFaH BoJIca (JKeJIre Tpya KocblIy), HEmec eJIMaJIbI-CaJMaJIbI IITeINCeJIb OPhaTbIJFaHHaH KeiH De KOJI JeTePJIik JepDe 6OJImaca, OHJa OPhATy HycKaybHa CAnKEc 3-OpHaTy HycKaybHa CAnKEc 6OJIbIPMaHTbIH XHe JKeJIiHiTOJIbIK aIIbIJyBH KaMTaMaCCbI3 eteTIH Tnicti ekIIOJIHOCTIK axbipaTKbIITbI NaJaJaHaHBiHbI3.
ECKEPTY!
Kopek JKeJIiCe HcOPFbIITbIH JIeKTpIIk KJYHeCIn KOCy aJIbIHJa Kopek Ka6eJIi IyPbIC MOHTaJdaJIFaHbIHa K03 JKeTKi3iHi3.
KoHdbIpy
Erep HycKayda ra3 PJIHTacbIH opHaTyFa apTbIFbIpaK apa KaIIbIKTbIK 6eJIiJeHReH 6oJca, OHbI eCKepiHi3.
Warning: To avoid any danger, it is necessary to install and operate the device in accordance with the manufacturer's instructions. Caution: Keep a distance of at least 3 meters from the motor's air outlet. To prevent overheating, keep the air inlet and outlet clear.
During operation of the air outlet, it is necessary to keep your hands away from the air outlet (grille). If the air outlet is blocked, the device may overheat and cause damage.
To ensure proper operation, it is necessary to regularly check the technical, functional, and visual parameters of the device. If the air outlet is blocked, the device may overheat and cause damage.
Installation of the air outlet (ventilation grille): Warning! It is necessary to install the air duct correctly. During installation, keep a distance of at least 400 mm between the air duct and any combustible materials. This is necessary to prevent the air outlet from heating up (above) and below, and to ensure proper operation of the device.
Warning: If the device has electronic controls, keep a distance of at least 65 cm from the air outlet, or if the air outlet is blocked, keep a distance of at least 65 cm from the air outlet.
Recommendation: If the device has electronic controls, keep a distance of at least 10 cm from the air outlet, and if the air outlet is blocked, increase the distance.
Electrical and electronic equipment waste must be disposed of in accordance with the European Directive 2012/19/EC-UK SI 2013 No.3113 (WEEE).
By disposing of this product correctly, you will help prevent potential negative consequences for the environment and human health.
If the product is marked with a crossed-out wheeled bin, it must not be disposed of as unsorted household waste. It must be taken to a designated collection point for recycling of electrical and electronic equipment.
For more information about recycling this product, please contact your local council, your household waste disposal service, or the shop where you purchased the product.
These instructions are for installation, operation, and maintenance. Keep them for future reference. If you pass the product on to a third party, please include these instructions.
If the supply cord is damaged, it must be replaced by the manufacturer, its service agent, or similarly qualified persons in order to avoid a hazard.
- Safety: EN/IEC 60335-1; EN/IEC 60335-2-31, EN/IEC 62233.
- Performance: EN/IEC 61591; ISO 5167-1; ISO 5167-3; ISO 5168; EN/IEC 60704-1; EN/IEC 60704-2-13; EN/IEC 60704-3; ISO 3741; EN 50564; IEC 62301. EMC: EN 55014-1; CISPR 14-1; EN 55014-2; CISPR 14-2; EN/IEC 61000-3-2; EN/IEC 61000-3-3; ETSI EN 301 489-1; ETSI EN 301 489-17; ETSI EN 300 328; IEC 62311:2019.
Before cleaning the appliance, turn it off and unplug it.
Clean the appliance with a damp cloth and a mild detergent. Do not use abrasive cleaners or scouring pads. For stubborn dirt, use a soft brush. If the appliance is very dirty, you may use a special cleaning product for the surface. Always dry the appliance after cleaning.
Cleaning
The hood is designed to be used in recirculation mode or with an external exhaust duct.

Grease filter
The grease filter is attached to the hood with a locking clip.

WARNING!
The diameter of the exhaust duct must be equal to the diameter of the connection ring.

WARNING!
The exhaust duct must not be bent sharply; it should be kept as straight as possible.

Water filter
If a water filter is required, it can be purchased from authorized dealers.
When the water filter is saturated, it should be replaced. To do this, remove the filter from its housing and insert a new one.
Warning: The water filter must be replaced at least once a year or when the indicator light comes on.
The cooker hood must be installed at the distance specified in the installation instructions. The hood is designed for installation above a cooking surface (hob). It must be installed at the distance specified for the hob.
Installation
Before installing the hood, check the integrity of the packaging, inform the dealer about any damage, and stop the installation procedure. Also, read all instructions carefully.
If the distance between the hob and the hood is less than 5 meters, reduce the number of bends in the duct. For each bend, reduce the equivalent length by 1 meter. (Example: if there are two 90° bends, the total length should not exceed 3 meters). Be careful. If the duct has a diameter of 150 mm, use standard materials. If the hood is not equipped with a non-return valve, install one to prevent backflow. Before installation, check that the hood and its components are correctly positioned and that the duct connections are secure. Ensure that the hood and its components are properly aligned and positioned. - Before connecting the hood to the duct, check that the electrical connections are properly made.
Panel filter
(For models with recirculation mode)

WARNING!
Installation must be carried out only by qualified personnel. ATTENTION: The hood must be installed at the distance specified, together with the fixing screws, following the installation instructions. The following instructions are for the installation of the hood:
- Install the panel filter (according to IEC/EN60335-2-31 standard, section 30), which must be resistant to high temperatures (at least 80°C) and humidity (at least 93%); - The panel filter must be cleaned at least every 1.5 kg of grease accumulated;
- Secure the panel filter using the fixing points provided. Do not use the panel filter for purposes other than those intended.
- For fixing the panel, use only the mechanical fasteners provided (do not use glue). The Elica company does not provide any warranty for damage caused by incorrect installation or use of non-original parts.
Elica Connect
This hood is equipped with WiFi functionality for connection to the Elica Connect app. The minimum requirements are:
- 2.4 GHz WiFi b/g/n router, Android or iOS smartphone. The app can be downloaded from the app store of your smartphone.
Excerpt: ELICA and its WiFi-enabled hoods. The hoods are designed in accordance with Directive 2014/53/EU. The hoods are intended for use in the frequency range of 2.4 GHz, with a maximum transmitted power of 20 dBm (e.i.r.p.).
Excerpt:
- Directive of the company. The hood's remote control can be used to control all the hood's functions. For more information on the hood's functions and to purchase accessories, visit www.elica.com.
- The Elica Connect service. The Elica Connect service is a remote control service. To use the device, visit www.elica.com. For any changes to the service, Elica reserves the right to modify the Elica Connect service. This document is not a contract, but rather a guide for use.
Control panel description
P1. Copy function button P2. Light ON/OFF (on/off) button P3. WiFi connection button
P1. Copy function button
If the hood is off, press and hold P1 for 2 seconds to activate the copy function.
The motor and light will be controlled via the control panel.
If the hood is on, press and hold P1 for 2 seconds to deactivate the copy function. This action will stop the motor and light functions.
Excerpt: If the hood is off or in standby, the control panel will be in standby mode. Only when the hood is on will the panel be active.
P2. Light ON/OFF (on/off) button
If the hood is off, press and hold P2 for 2 seconds to activate the light. The light will only turn on when the hood is on.
If the hood is on, the light can be turned on or off by pressing P2.
Excerpt: P2 light button is used to turn the light on or off.
P3. WiFi Tynmeci
- WiFi parameters setting: WiFi function button, WiFi parameters setting mode is activated by holding the button for 2 seconds until the indicator flashes.
To connect to the router, press the button (see "WiFi key" section)
To stop WiFi parameters setting, hold the button for 2 seconds again.
After the WiFi function is turned off, to reset WiFi parameters, hold the button for 6 seconds (the button will flash) and repeat the setting procedure.
- WiFi on/off: after setting, the WiFi function can be turned on/off. To turn the WiFi function on/off, hold the button for 2 seconds. This function does not affect WiFi parameters.
WiFi key section
| WiFi Туймeci | Курьлфыньи Косылу Куи |
| Шam ошірулì | WiFi peTTelmerген Немес ошірулì |
| Турактыхану | WiFi косуны |
| Шam тeз Жылblытayda | WiFi рочеріne Косылу эpeketi opbIHdaJIы |
| Шam bая Жылblытайы | Elica buNTbHa Kocblу эpeketi opbIHdaJIы |
| Шam заHAды, бірак Кыіckaша Жылblытайы | Кашыltан пэрmen КаБылдануда (MbICaJIbI, КОЗfaNTKышы otanДыр Немес Шam'dы сэнду) |
Control panel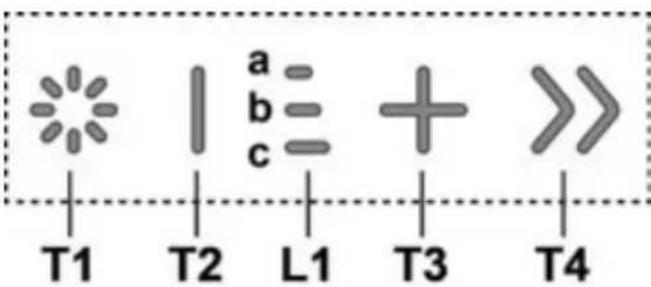
T1. Lamp ON/OFF (on/off) button T2. Suction motor on/off button
L1. Indicator light for suction power
T3. Motor speed increase button
T4. "BOOST" (turbo) - suction power boost button
T1: Lamp ON/OFF (on/off) button
Designed for turning the lamp on and off.
To increase or decrease the lamp brightness, press the T1 button.
T2: Press the button to start the device / turn on the device. The device will start working in the selected mode.
Press and hold the button to turn off.
L1: The indicator light indicates the selected mode.
The indicator light will blink according to the selected mode:
1 - Speed, a: single blink
2 - Speed, a+b: double blink
3 - Speed, a+b+c: triple blink
T3: Speed increase mode
Press and hold the button to increase the speed of the selected mode.
T4: "BOOST" (acceleration) - function mode of the device
To activate the "BOOST 1" mode for 30 minutes, press the T4 button. The device will operate at maximum speed for the set time, then return to the previous mode.
Note: After 30 minutes, the device will automatically return to the previous mode. ***
If the T4 button is pressed again while in "BOOST 1" mode, the device will switch to "BOOST 2" mode for 7 minutes.
Note: After 7 minutes, the device will automatically return to the previous mode. ***
Note: To exit the current mode, press the T4 button again within these 7 minutes. ***
"BOOST1" and "BOOST2" are used when the engine is cold, at idle speed:
For T2-axial fan, press the button for 2 seconds ***
For T3-3-11 fan, press the button
** The indicator lights for the fan will turn off after the button is pressed L1
When the fan is running at low speed, press the button for 2 seconds to turn it off, then press again to turn it on.
When the "BOOST" (turbo) functions are activated, T4 is indicated
("BOOST 1" (1st turbo): white light - "BOOST 2" (2nd turbo): red light)
Technical service
Cleaning
Before cleaning, unplug the appliance and let it cool down. Do not immerse the appliance or the power cord in water. Do not use abrasive cleaners. Do not spray liquids directly!
Filter
The filter should be cleaned regularly. Clean the filter with a soft brush or under running water, and let it dry completely before reinstalling (or replace the filter if it is damaged).
It is possible to use the appliance without the filter. However, its cleaning power will be reduced.
When inserting or removing the filters and the water tank, be careful not to damage the appliance.
After cleaning, wipe the appliance with a dry cloth and let it dry completely before storing.
Use the device only for its intended purpose.
18-21-cyper
Do not use the device if it is damaged or malfunctioning.
Replace the filter.
If the filter is dirty (or if the filter replacement indicator is on, if your model has one), clean it with a soft brush and warm water, or in a dishwasher at a temperature of 65°C (do not use detergent).
To dry the filter, let it air dry completely. For faster drying, place it in an oven at 100°C for 10 minutes.
Do not use the device without the filter and do not operate it with a damaged filter.
After cleaning, do not use the device until the filter is completely dry.
Cleaning
The housing is made of high-quality plastic.
The plastic parts are resistant to high temperatures, can withstand temperatures up to 100°C without deformation, and retain 90% of their electrical properties.
For cleaning, use a soft, damp cloth. Do not use abrasive cleaners.
Ohu valjatombega version
j / 3y j sall n a T1 jll l y bial iably
jolll 1e jnT2
y 1
. P1
()On/Off 000
glgjyJ 10
bi1i Cjie/ij.P1
P1
biil 2y ai yu, biail
B
gipip P1 jll 2a, abciy i j
aal aai 1
B. α + β = 1
psalil ssall jnsy Jolly sia yss Lsic.
B. b 段末
(1) (2) On/Off 85
WiFi C#.P3
(WiFi


Therefore, m = 3/11.
{1,2,3} ∪ {1,3,4}
Therefore, m = 3/11.
1 5 65 65 10 10 10 (2013-2012/19/EC) (WEEE) (2013-2012/19/EC) (2013-2012/19/EC)
EN/IEC 60335-2-31: EN/IEC 60335-1: EN/IEC 62233
ISO 5167-1 EN/IEC 61591 ISO 5168 ISO 5167-3 ISO 3741 EN/IEC 60704-3 EN/IEC 60704-2-13 IEC 62301 EN 50564
CISPR 14-1 EN 55014-1: EN/IEC 61000-3-2 CISPR 14-2 EN 55014-2 ETSI EN 301 489-1 EN/IEC 61000-3-3 ETSI EN 300 328 ETSI EN 301 489-17 IEC 62311:2019


- EN - INSTRUCTION ON MOUNTING AND USE
- CAUTION
- ELECTRICAL CONNECTION
- INSTALLATION
- USE
- EXTRACTION VERSION
- FILTRATION VERSION
- MOUNTING
- PANEL ASSEMBLY
- ELICA CONNECT
- WARNINGS
- OPERATION CONTROL DISPLAY A
- P1. INTAKE PANEL OPENING/CLOSING BUTTON
- P2. LIGHT ON/OFF BUTTON
- P3. WIFI BUTTON
- T1: LIGHT ON/OFF BUTTON
- T2: DECREASE SPEED / MOTOR OFF BUTTON
- L1: SPEED INDICATOR LED ON
- T3: INCREASE SPEED BUTTON
- T4: "BOOST" - INTENSIVE SPEED - FUNCTION BUTTON
- FILTER SATURATION INDICATOR LIGHTS
- RESET FILTER SATURATION INDICATOR
- ACTIVATION OF FILTER SATURATION INDICATOR
- GREASE FILTER
- ACTIVE CARBON FILTER
- MAINTENANCE
- CLEANING
- TRAPS COOKING GREASE PARTICLES
- FIG
- CHARCOAL FILTER (FILTER VERSION ONLY)
- WASHABLE ACTIVATED CHARCOAL FILTER
- REPLACING LAMPS
- OBSERVED
- WARNING! DO NOT DISCONNECT THE CONNECTION CABLE BETWEEN THE HOOD AND THE POWER SUPPLY, SO AS NOT TO LOSE THE RIGHT TO WARRANTY
- EXTRACTOR WITH EXHAUST
- ATTENTION
- WARNING
- RECIRCULATION
- INSTALLATION OF THE PANEL
- INSTRUCTIONS FOR USE DISPLAY COMMANDS
- P1. BUTTON FOR OPENING/CLOSING THE SUCTION PANEL
- ORDER
- NEKTPNUECKOE COEHHEHNE
- ECNB NHCTPYKUNX NO YCTAHOBE RA30BOI PINTBI OROBOPEHO 6OJIBWEE
- USE OF RECIRCULATION MODE
- USE OF THE RECIRCULATION MODE
- MOUNTING OF THE PANEL
- T2: KNOB FOR REDUCING SPEED / ENGINE DEVIATION
- L1: INDICATOR LIGHTS FOR SPEED
- T3: SPEED INCREASE BUTTON
- FILTER CLOGGING INDICATORS
- RESET OF CLOGGING INDICATORS
- TURNING ON THE FILTER SATURATION INDICATOR
- EXHAUST VERSION
- VERSION WITH FILTRATION
- MOUNTING THE PANEL
- THE CHARCOAL FILTER (IF RECOMMENDED) ABSORBS UNPLEASANT KITCHEN ODORS
- CHARCOAL FILTER, WASHABLE TYPE
- REPLACING THE LAMPS
- INSTRUCTIONS
- ECKEPTY
- JIEKTP KOCYIAPBL
- KOHDBIPY
- WATER FILTER
- PANEL FILTER
- EXCERPT
- CONTROL PANEL DESCRIPTION
- P1. COPY FUNCTION BUTTON
- P2. LIGHT ON/OFF (ON/OFF) BUTTON
- P3. WIFI TYNMECI
- L1: THE INDICATOR LIGHT INDICATES THE SELECTED MODE
- T3: SPEED INCREASE MODE
- T4: "BOOST" (ACCELERATION) - FUNCTION MODE OF THE DEVICE
- BOOST1" AND "BOOST2" ARE USED WHEN THE ENGINE IS COLD, AT IDLE SPEED
- TECHNICAL SERVICE
- FILTER
- CYPER
- DO NOT USE THE DEVICE IF IT IS DAMAGED OR MALFUNCTIONING
- REPLACE THE FILTER
- OHU VALJATOMBEGA VERSION
Brand : ELICA
Model : PRF0161680
Category : Range hood