
HI 3E7L0S-17 - Dishwasher HOOVER - Free user manual and instructions
Find the device manual for free HI 3E7L0S-17 HOOVER in PDF.

| Brand | Hoover |
| Model | HI 3E7L0S-17 |
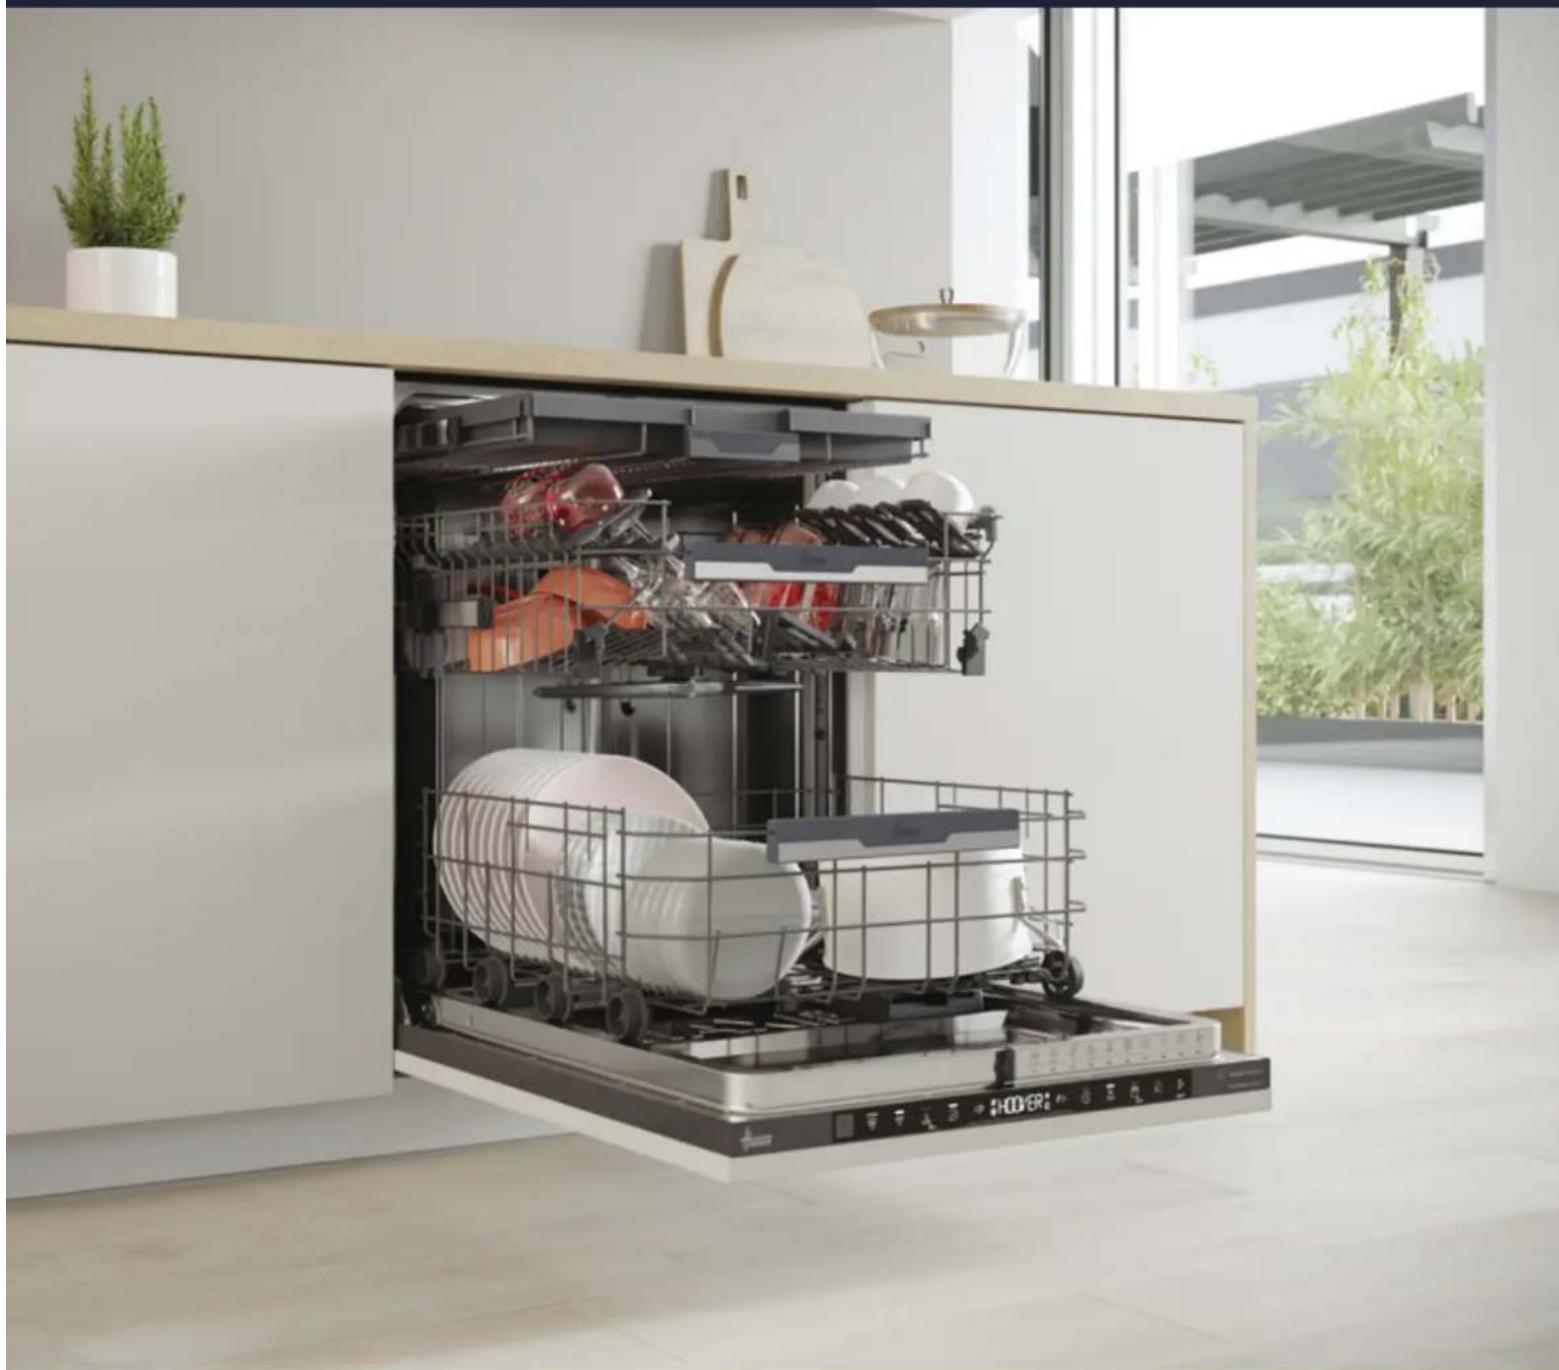
| Product type | Built-in dishwasher |
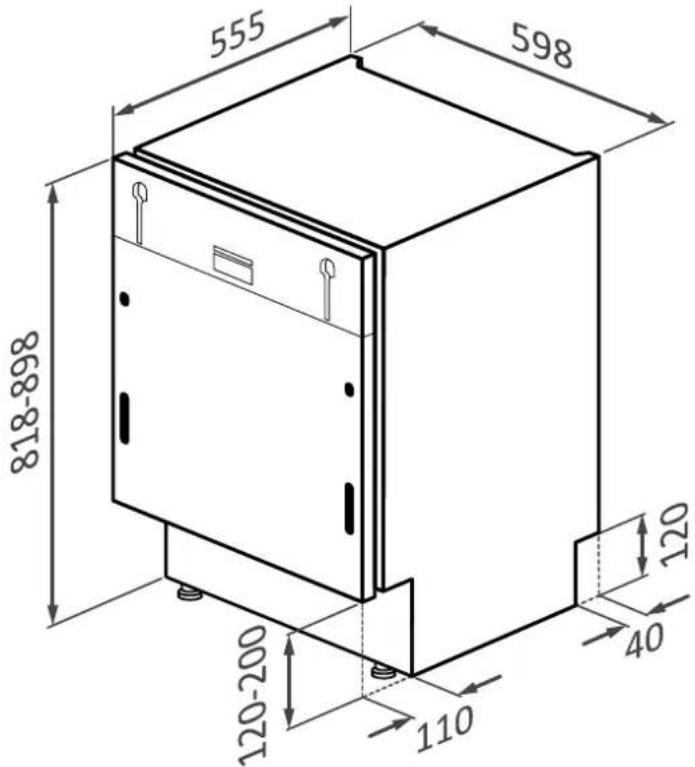
| Adjustable height | From 818 mm to 898 mm |
| Standard width | 600 mm |
| Standard depth | 570 mm |
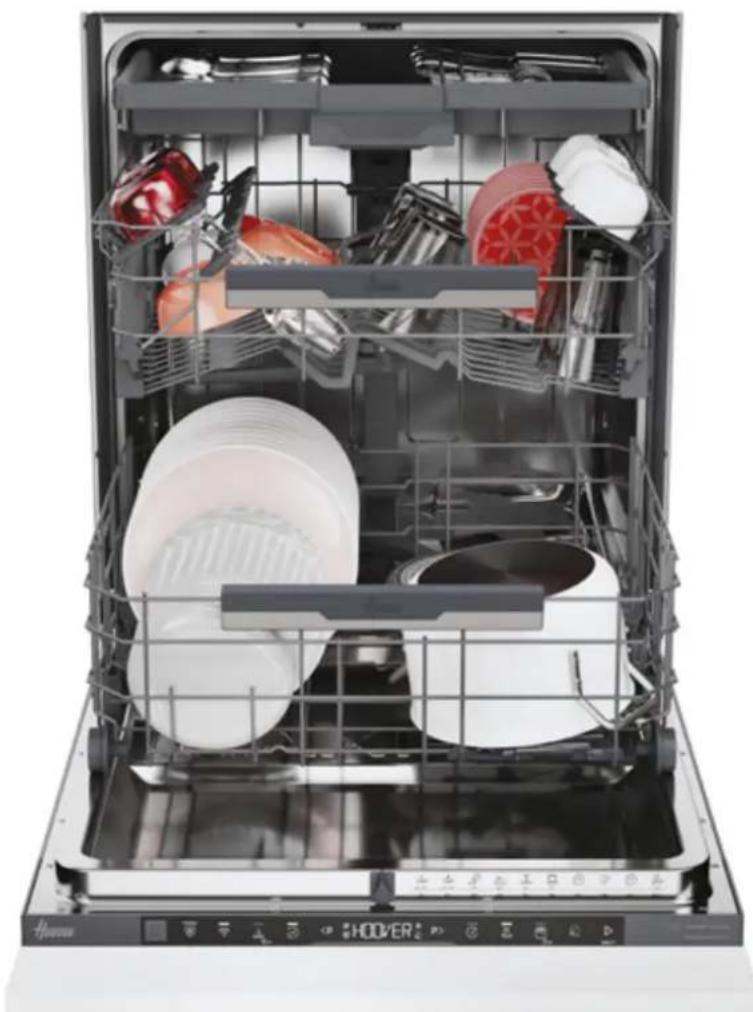
| Capacity | 13 place settings |
| Power supply | 230 V - 50 Hz |
| Required water pressure | 0.08 MPa to 1 MPa |
| Safety device | Automatic overflow protection |
| Installation | Built-in, height and tilt adjustment |
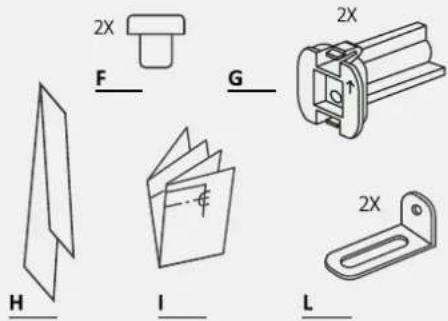
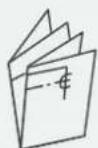
| Included accessories | Anti-steam strip, fixing kit, drilling template |
| Max kitchen panel weight | 9 kg |
| Water connection | Cold water inlet |
| Electrical connection | Standard power socket |
| Functions | Wash programs, overflow protection |
| Maintenance | Regular cleaning of filter and spray arms |
| Energy class | A+ (estimated) |
| Noise level | 46 dB (estimated) |
| Water consumption | 10 L per cycle (estimated) |
Frequently Asked Questions - HI 3E7L0S-17 HOOVER
User questions about HI 3E7L0S-17 HOOVER
0 question about this device. Answer the ones you know or ask your own.
Ask a new question about this device
Download the instructions for your Dishwasher in PDF format for free! Find your manual HI 3E7L0S-17 - HOOVER and take your electronic device back in hand. On this page are published all the documents necessary for the use of your device. HI 3E7L0S-17 by HOOVER.
USER MANUAL HI 3E7L0S-17 HOOVER
DOUBLE MOVEMENT HINGES
PERFORMANCE THAT LASTS

EN|IT|FR|DE|ES|GR|NL|PT|SK|PL|CZ|RO|HU
SL|SR|LT|EE|LV|BG|HR|DA|FI|NO|SV|UA|TR
WELCOME
This installation manual is intended for kitchen manufacturers who will accommodate these products. To ensure safety and achieve the best results, carefully read this manual, including the safety instructions, and keep it for future reference. Before proceeding with installation, note the serial number, as it may be needed in case of repairs. Check for any damage during transport and consult a technician if in doubt before use. Always keep all packaging materials out of reach of children.
NOTE: The features and images contained in this document are for reference only and may change without notice.
Index
1 safety notices for installation
2 Where to install the dishwasher p.3
3 Dishwasher dimensions p.4-5
4 step-by-step installation video p.6
5 installation tools p.6
6 Built-in dimensions p.7
7 Instructions for dishwasher installation p.8-17
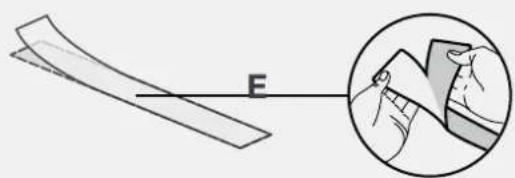
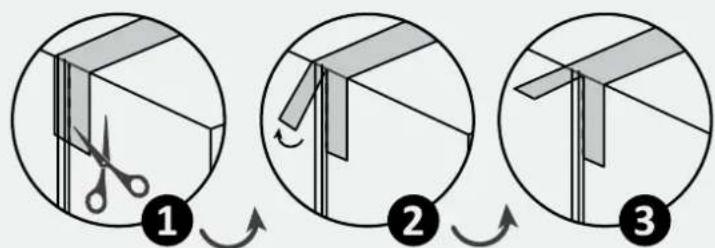
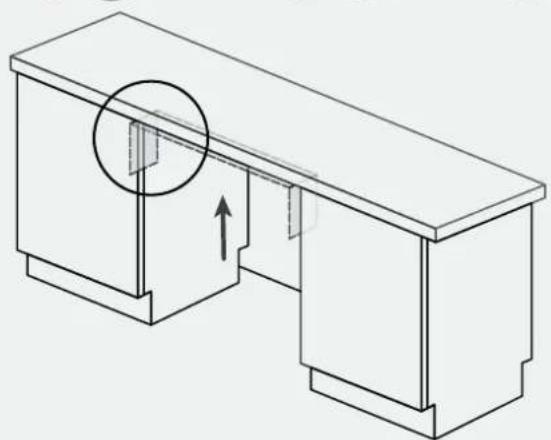
7.1 Installation of the anti-steam strip
7.2 Height adjustment
7.3 Adjustment of the rear foot
7.4 Adjustment of the front feet height
7.5 Tilt adjustment
7.6 Insertion into the built-in compartment
7.7 Fixing the front feet
7.8 Preparation of the panel
7.9 Installation of the panel
7.10 Fixing the machine to the kitchen
8 Connection to water and electrical network p.18 - 19
8.1 Connection diagram
8.2 Safety devices
9 Delivery to the user p.19
10 Dishwasher disassembly p.19
Safety warnings for installation
Observe these directions before beginning the installation of the product. Your safety is very important to us. Please read this information carefully before using the product.
- The installation must be carried out by a qualified technician who must be aware of and comply with the laws in force in the country of installation and the manufacturer's instructions;
- If manufacturer service is required to eliminate faults resulting from improper installation, such service is not covered by the fix;
- Remove the packaging material before operating the appliance;
- After unpacking the product, check that it is not damaged and, in case of problems, contact the service center before proceeding with installation and do not connect it to the power supply;
- A damaged product can cause a short circuit, electric shock, fire hazard, and other dangers;
- Check the packaging for accessories or accompanying materials (envelopes with screws, documents, brochures, etc.) and, if so, remove and store them;
- Incorrect installation may cause harm or injury to people, animals or belongin-gs. The manufacturer cannot be held responsible for such harm or injury;
- Safe use is only guaranteed if installation has been carried out properly according to these instructions. In case of damage due to improper installation, the responsibility lies with the person who installed the product;
- During installation, the appliance must not be connected to the power supply;
- It is recommended to wear protective gloves during installation to avoid cut injuries;
- In case of incorrect installation, tampering with the device and improper connection, the validity of the product warranty will expire;
- Make sure that when the product's power supply cable is completed, it is not accessible;
- After assembly, the power cord must not come into contact with moving parts of kitchen components (such as a drawer) and must not be exposed to mechanical stresses;
- When delivering the product to the end user, the technician must ensure that it has been installed correctly;
-
Do not connect the product to the electrical network until the front panel has been fully installed. Otherwise, there may be an electrical hazard;
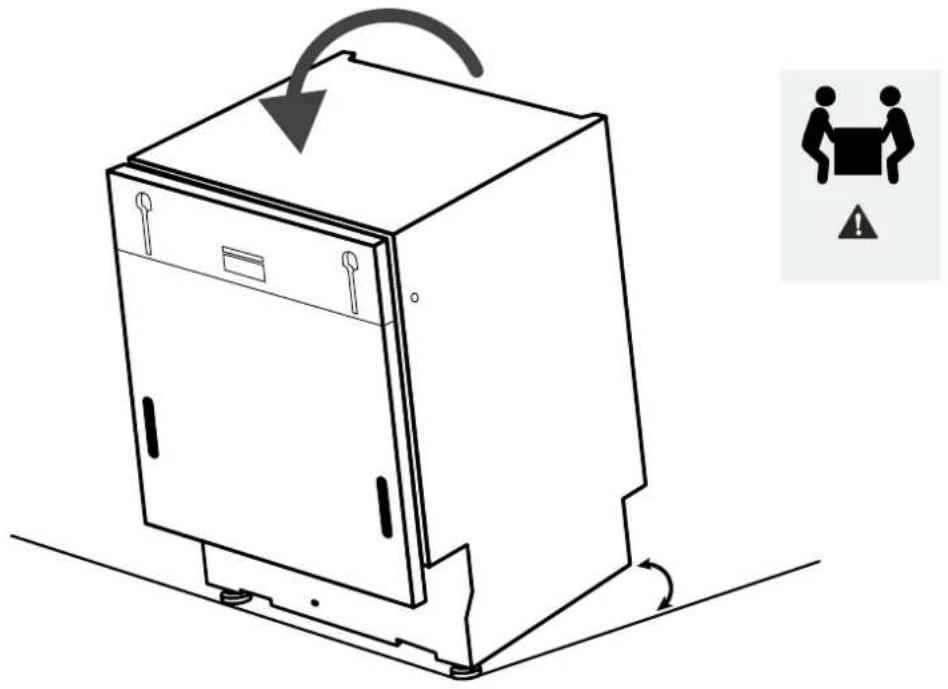
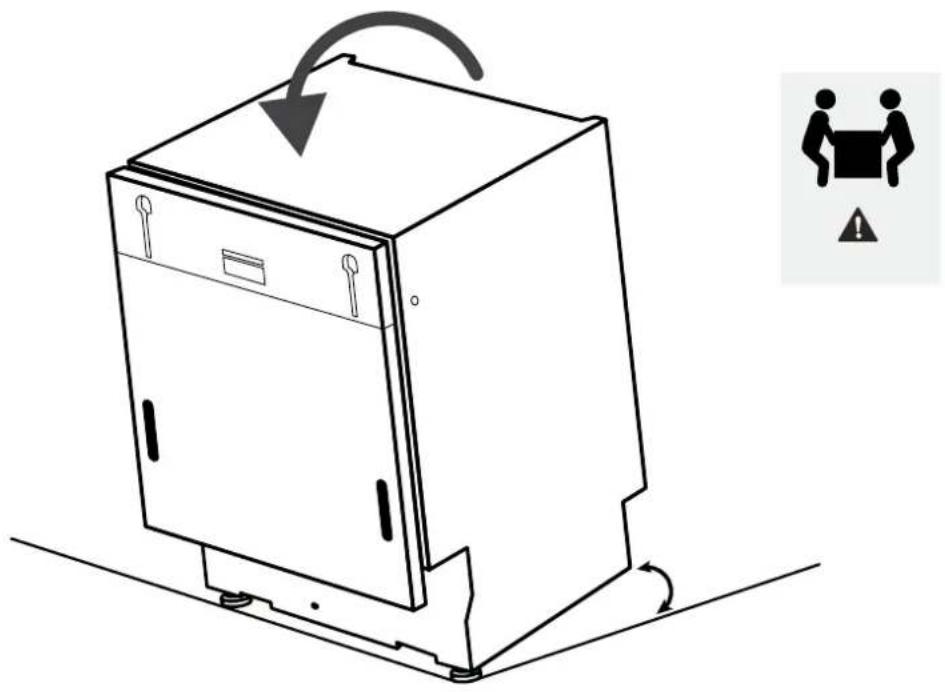
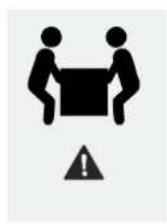
Take care during transport, the product is heavy; -
Before starting the installation, check all the dimensions of the built-in compartment by comparing them with the instructions contained in this manual. Note that it is possible to align the door with the doors of other furniture, even if it exceeds the control panel in height;
- Make sure the installation area is stable and solid;
- Apply the protective film, supplied in the installation kit, under the worktop and on surrounding furniture. This film protects the furniture from humidity;
- Be careful when opening and closing the product;
- Incorrect installation can cause the product to tip over;
- The product must be level to function correctly, otherwise the door will not close properly, leading to the escape of hot steam.
Where to install the dishwasher
2
- Install and use this product in a closed, covered, dry, and well-ventilated environment;
- Do not install the product in open environments exposed to atmospheric agents;
Install the product near an electrical outlet; - Use the product only when placed in a recessed compartment, otherwise you risk injury and burns;
- Do not install the dishwasher under a cooktop;
- Do not install the product near heat sources (radiators, stoves, etc.).
- Do not place the product on carpets or similar surfaces;
- Place the product on a clean, level, and stable surface.
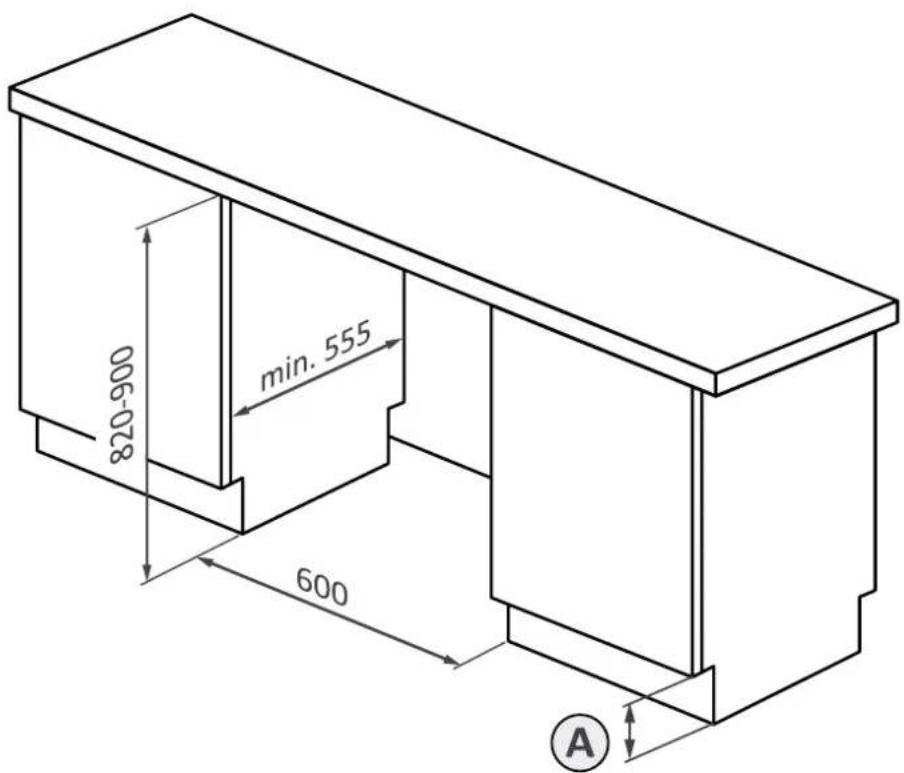
3 Dishwasher dimensions
Dimensions in mm
Front axonometric view of the product
Front axonometric view with kitchen door
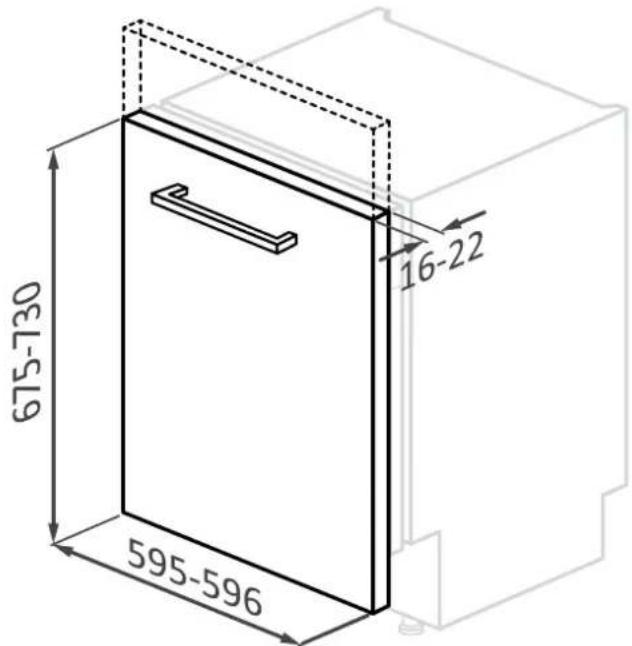

WARNING: if the kitchen panel weighs more than 9kg contact customer service.
Dimensions in mm
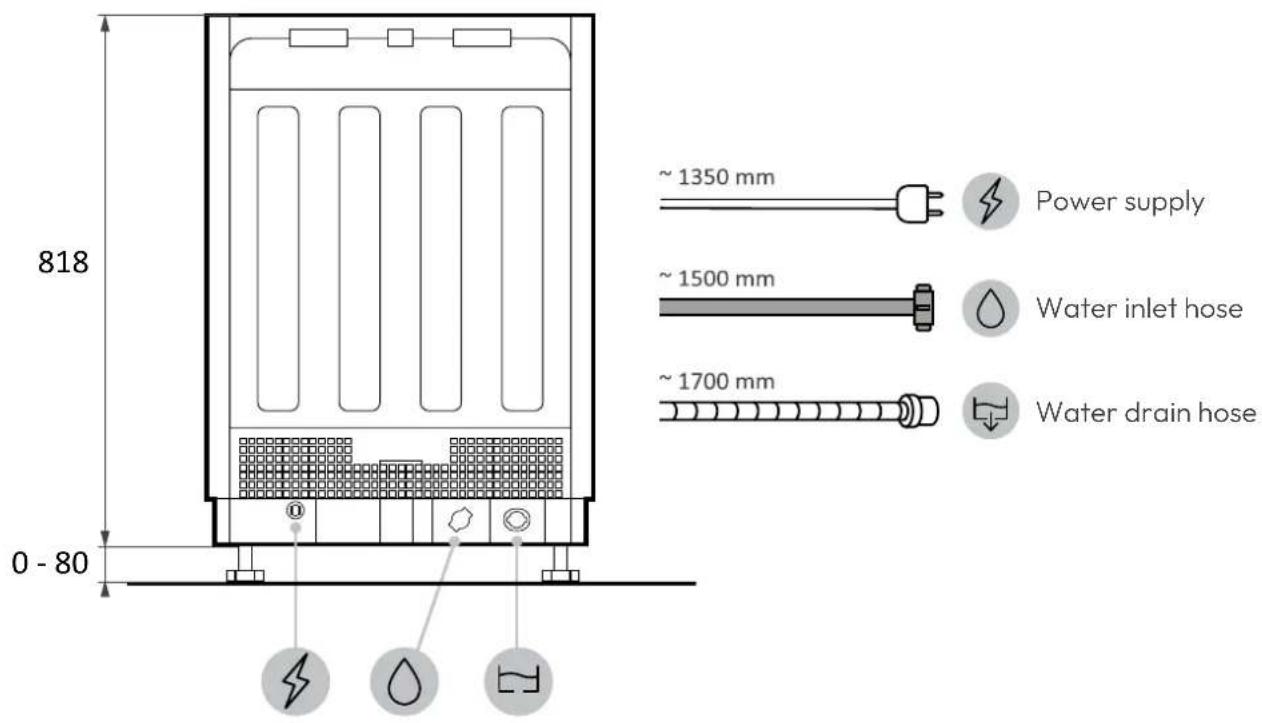
Back view
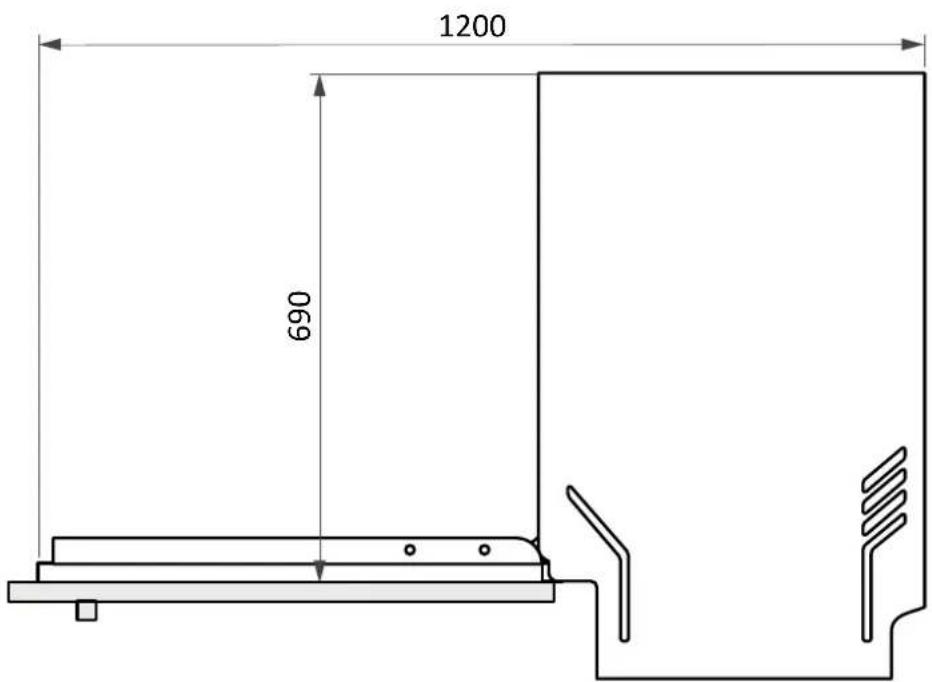
Side view
4 Step-by-step installation video
You can watch the product installation video by scanning the QR Code:

or by clicking this

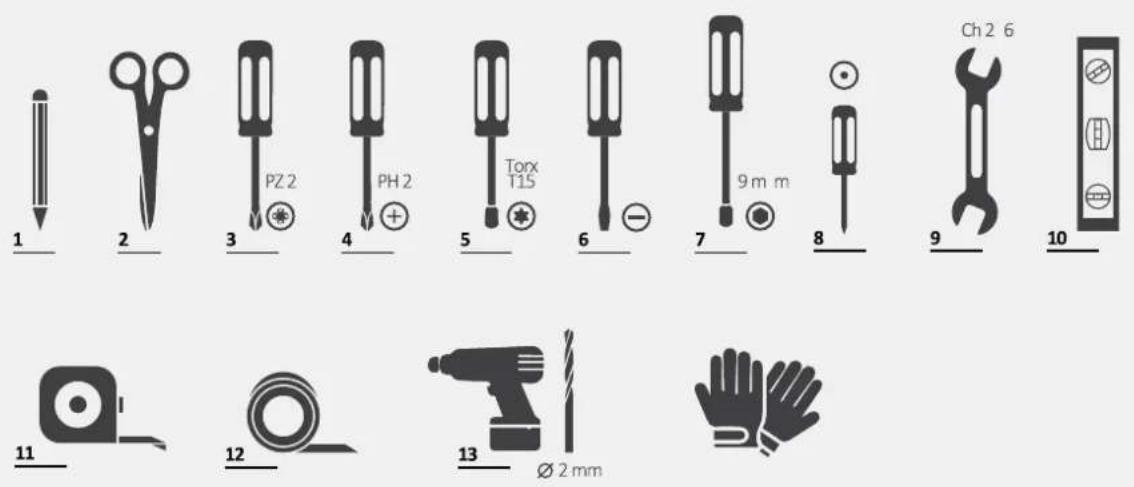
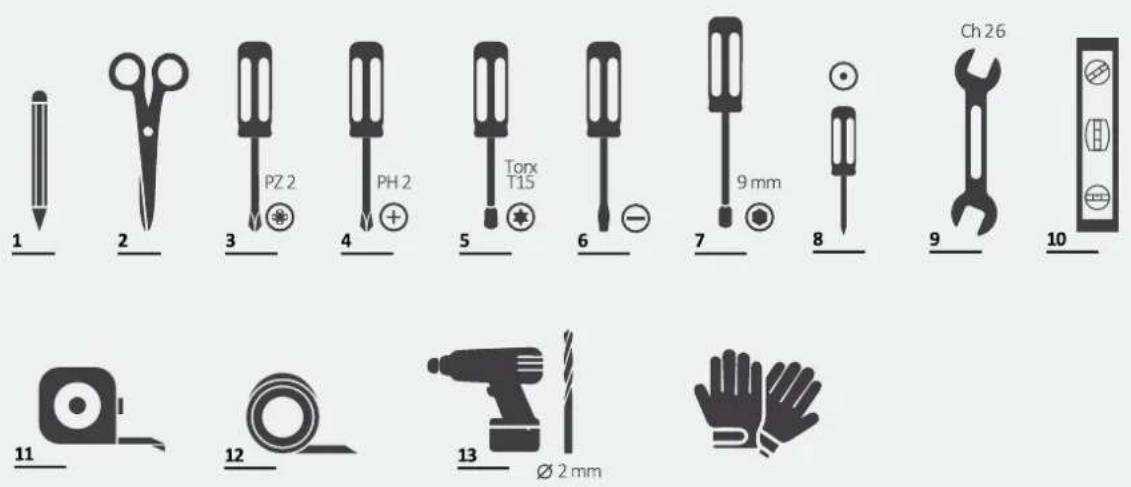
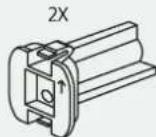
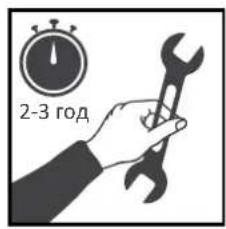
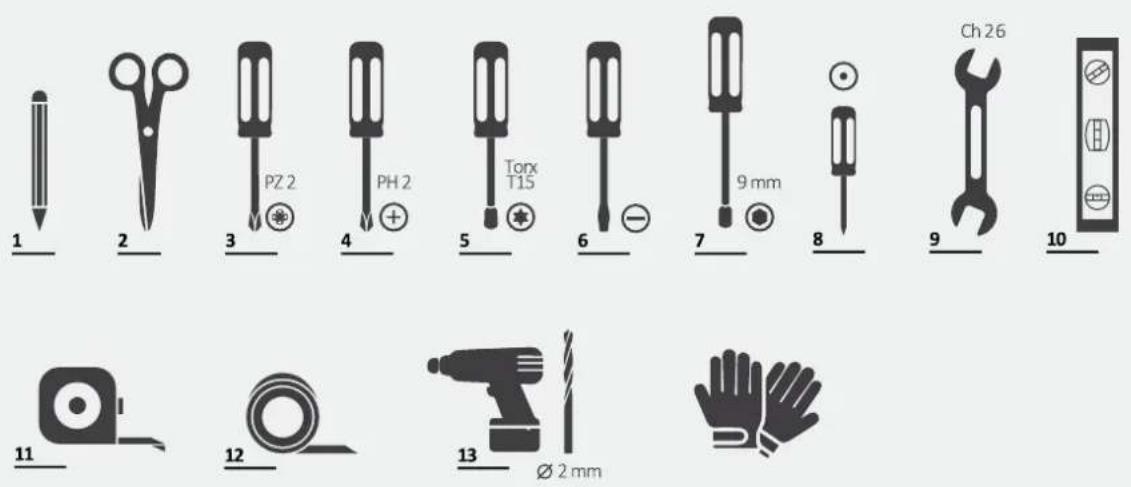
5 Installation tools
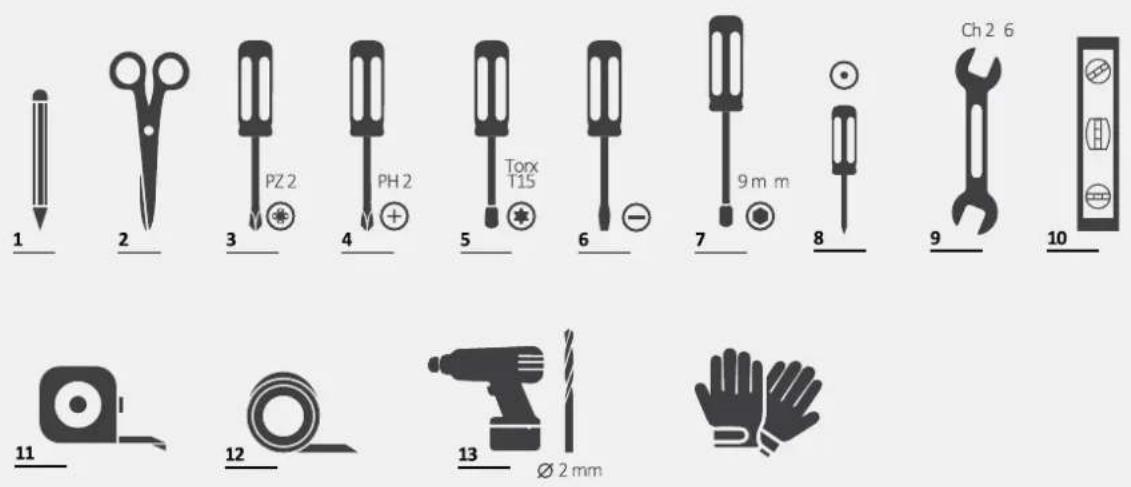
Required tools

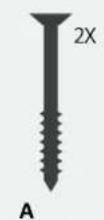
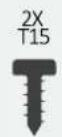
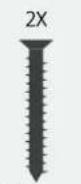
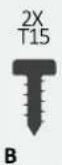
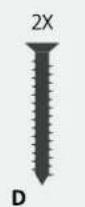
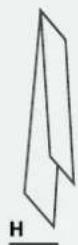
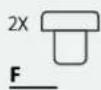
Tools provided with the product
3.9X38
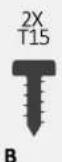
4X13
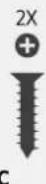
03.5X16
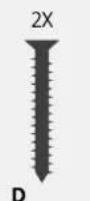
03.9X28

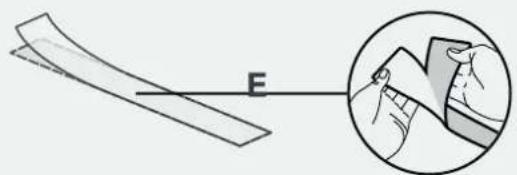
E 84X15
Dimensions in mm
Axonometric view
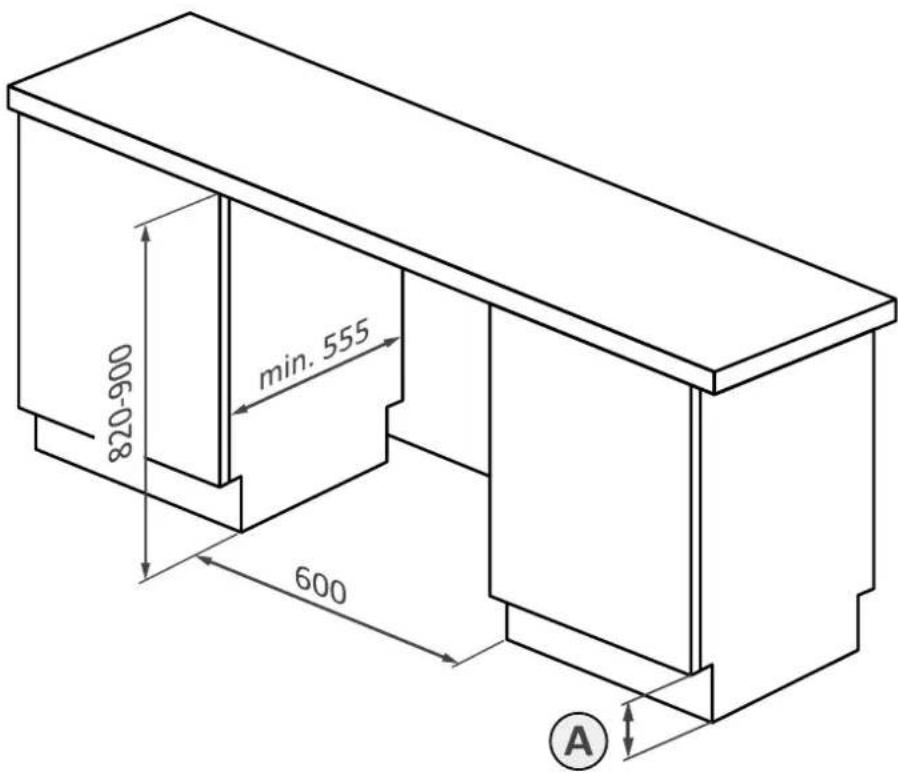
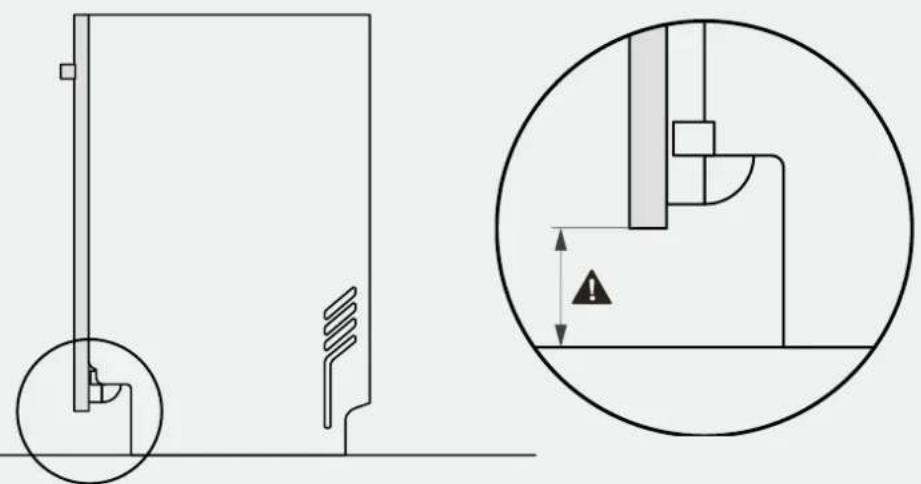
A
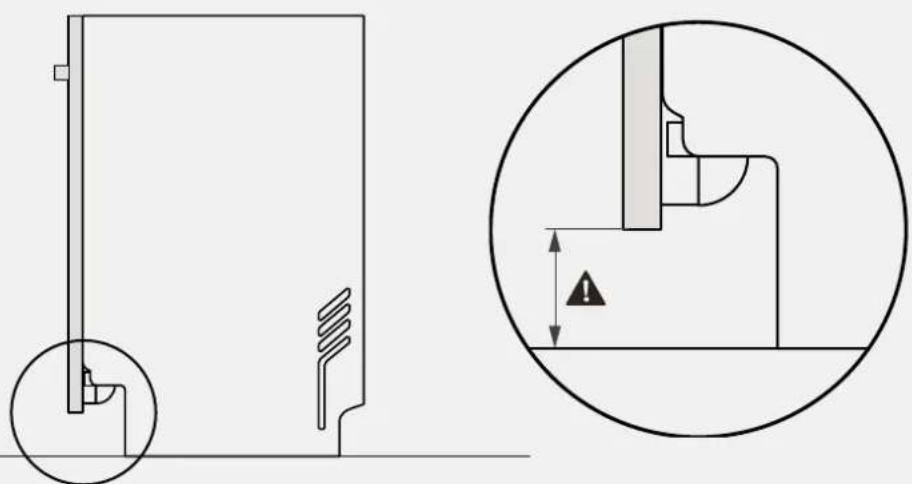
WARNING: The minimum height of the dishwasher is 818mm ; in this case, the distance between the kitchen door and the floor must be between 90 and 120mm . If the dishwasher is raised (max. 898mm ), the door-to-floor distance must also increase proportionally, up to a maximum between 170 and 200mm .
7 Instructions for dishwasher installation
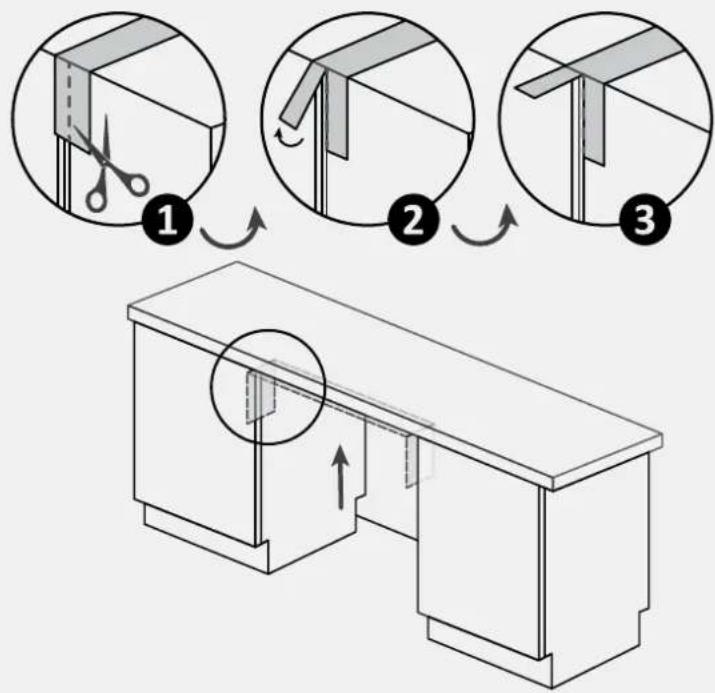
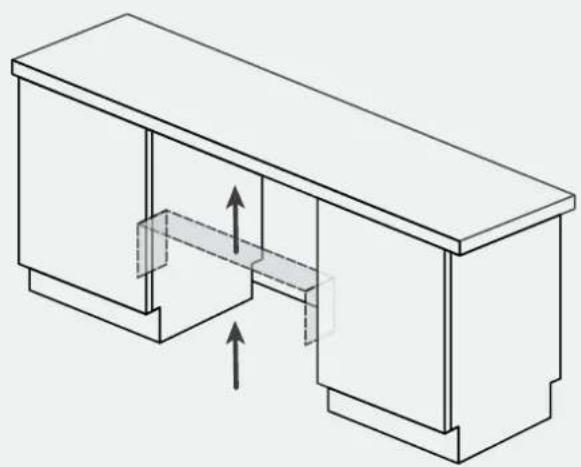
7.1 Steam band installation
Apply the sticker band under the worktop and to the sides of the adjacent furniture;
1.
2.

3.
7.2 Height adjustment
Incline the dishwasher by raising the back about 10 cm.
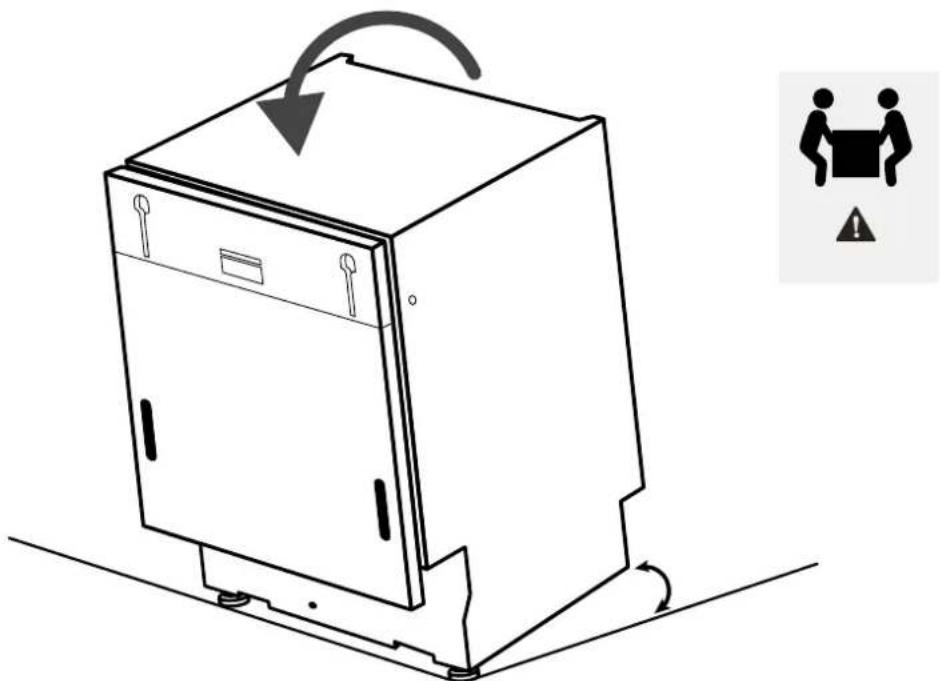
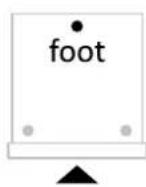
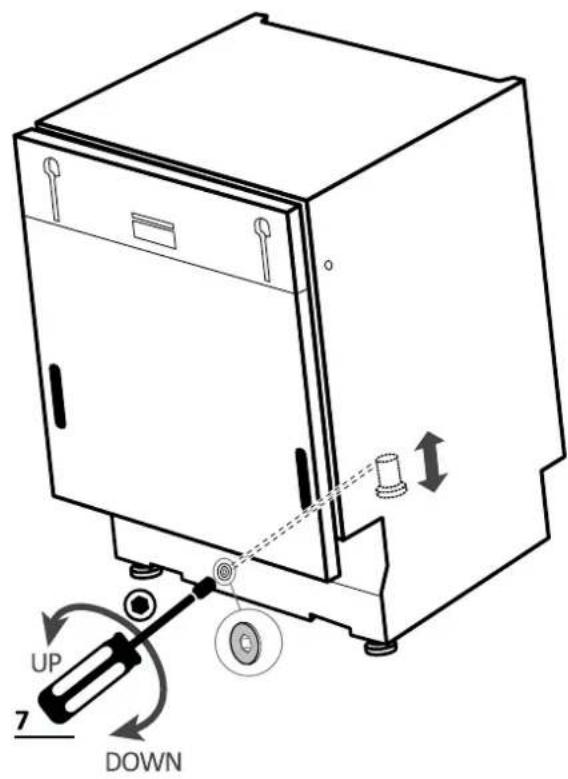
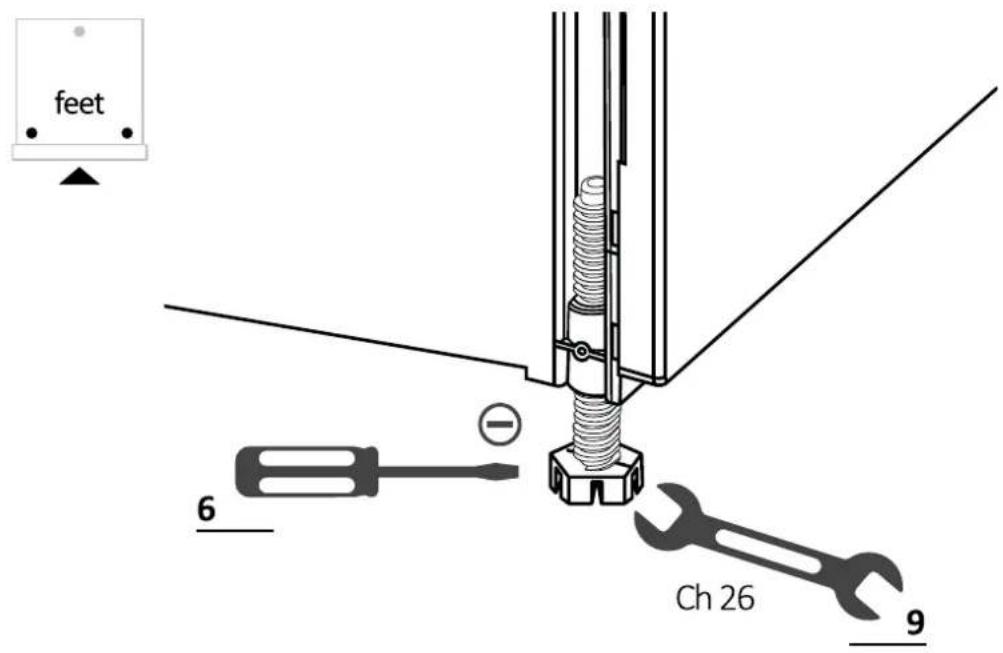
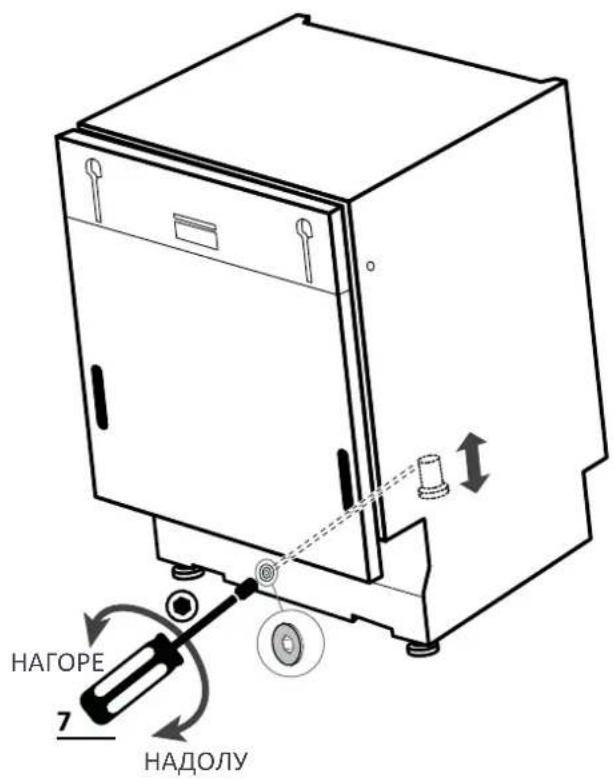
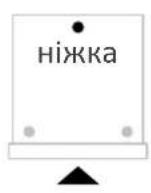
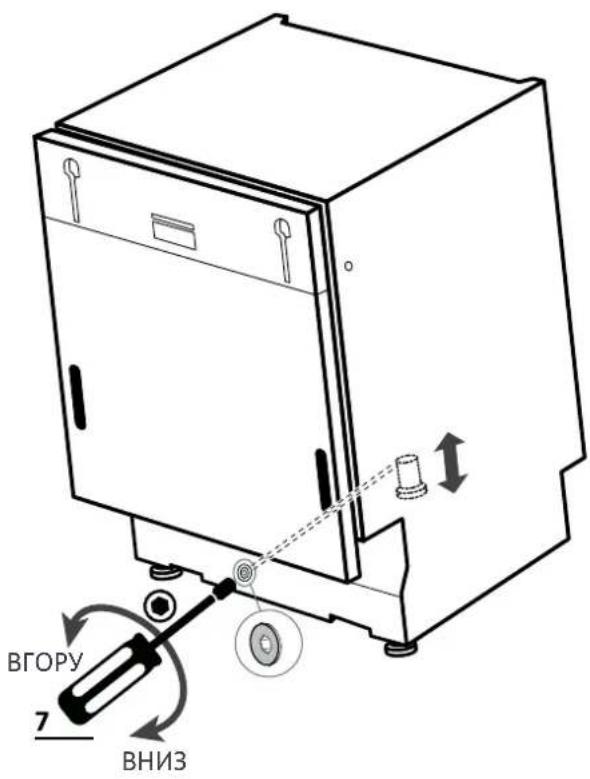
7.3 Rear foot adjustment
Adjust the rear foot height by operating from the front of the machine as indicated below.
7 Instructions for dishwasher installation
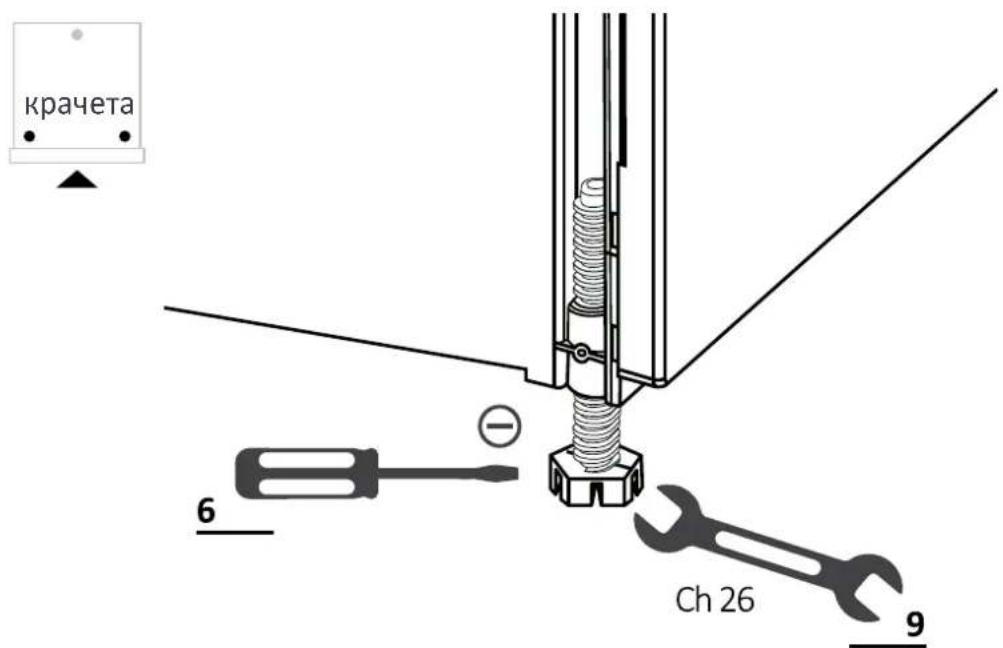
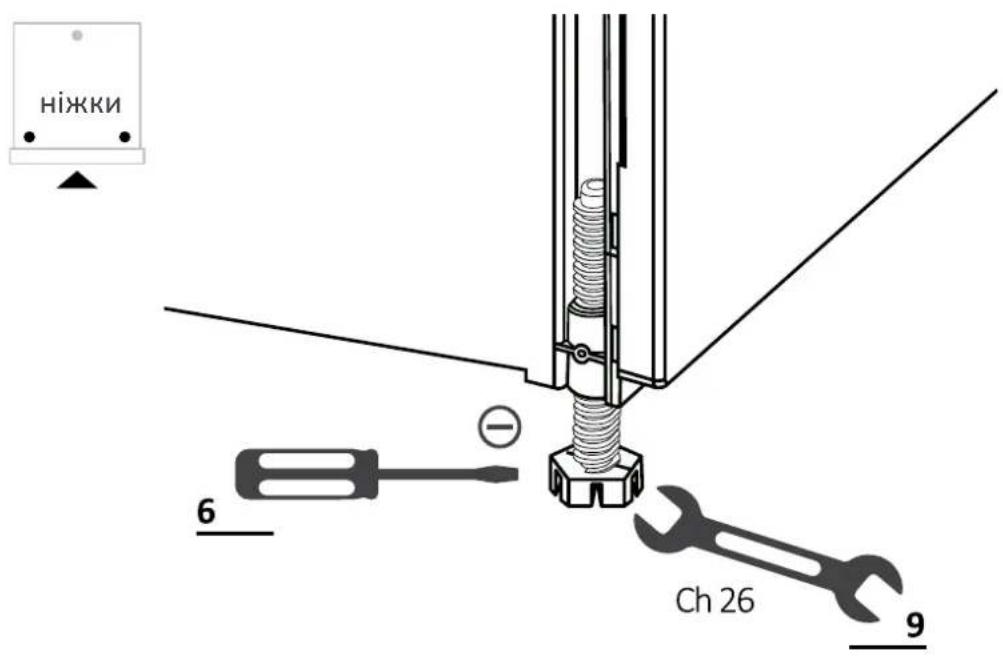
7.4 Front feet adjustment
Adjust the front feet directly. If necessary, lift the dishwasher slightly.
7.5 Tilt adjustment
Level the dishwasher by the vertical and horizontal planes.
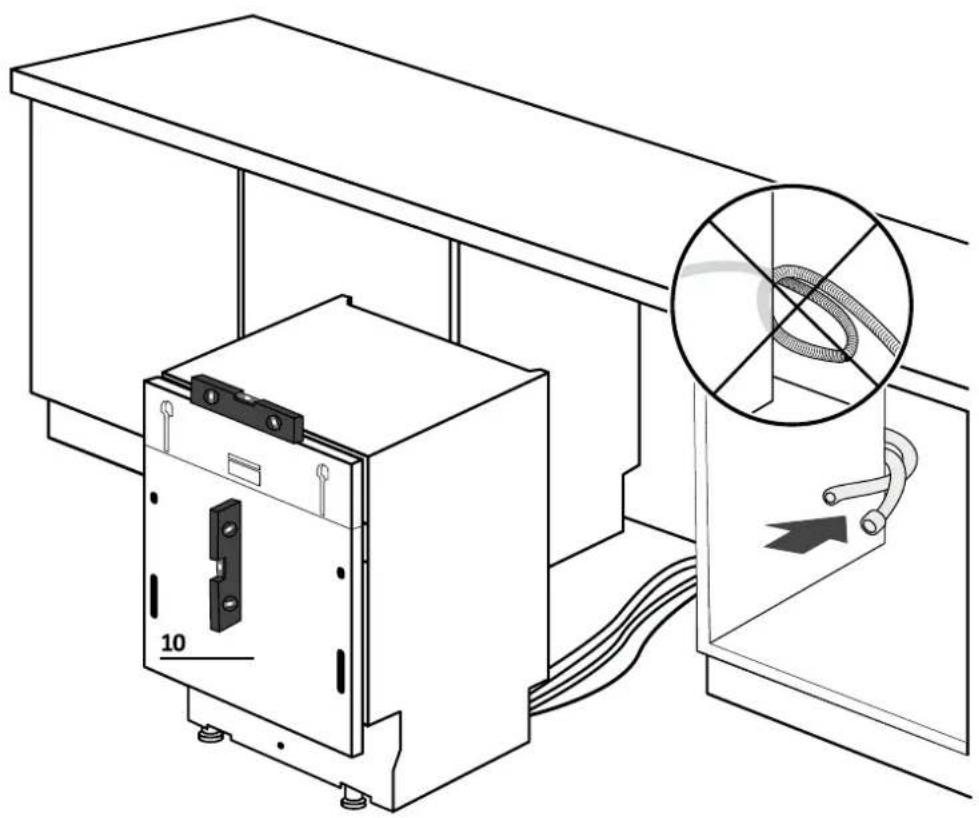
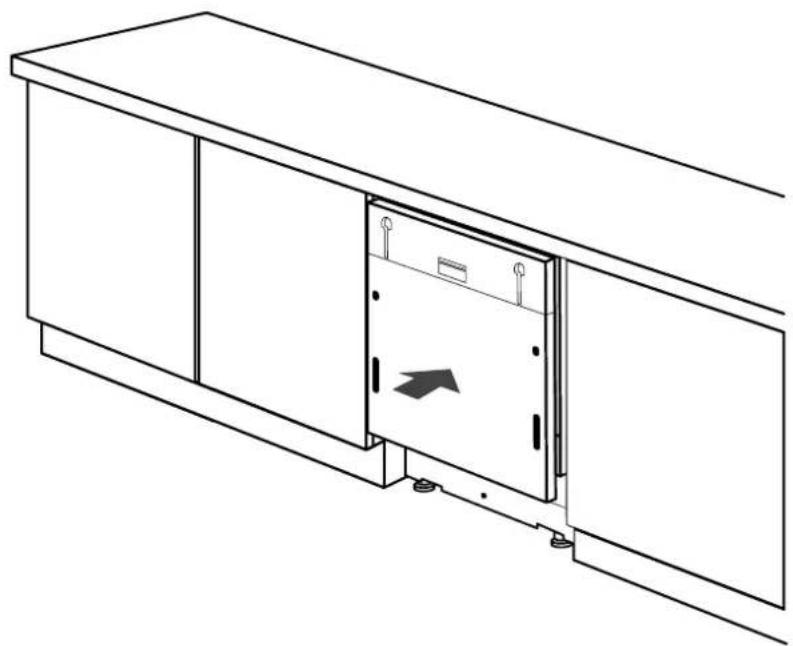
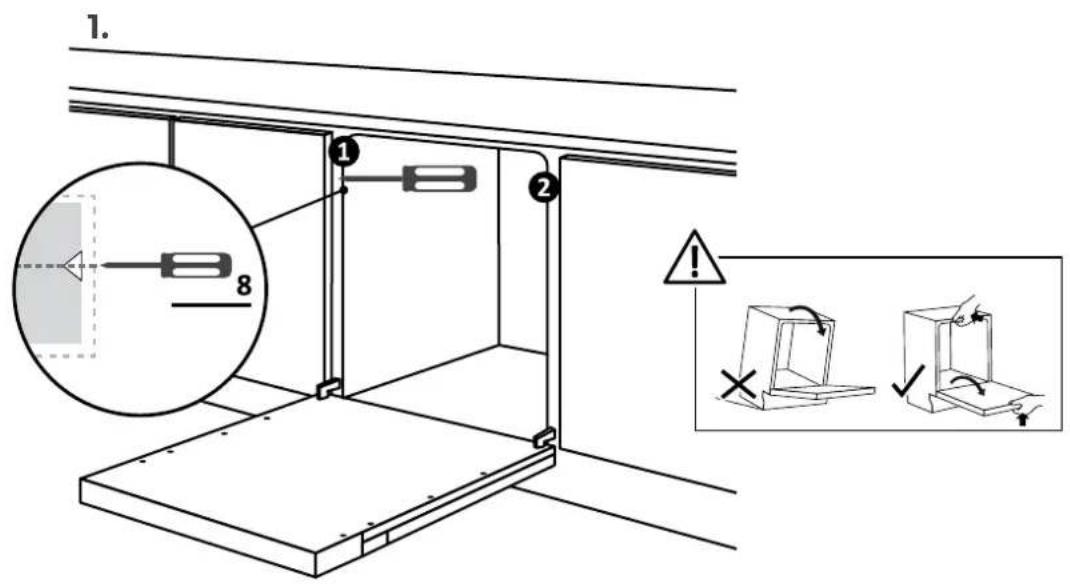
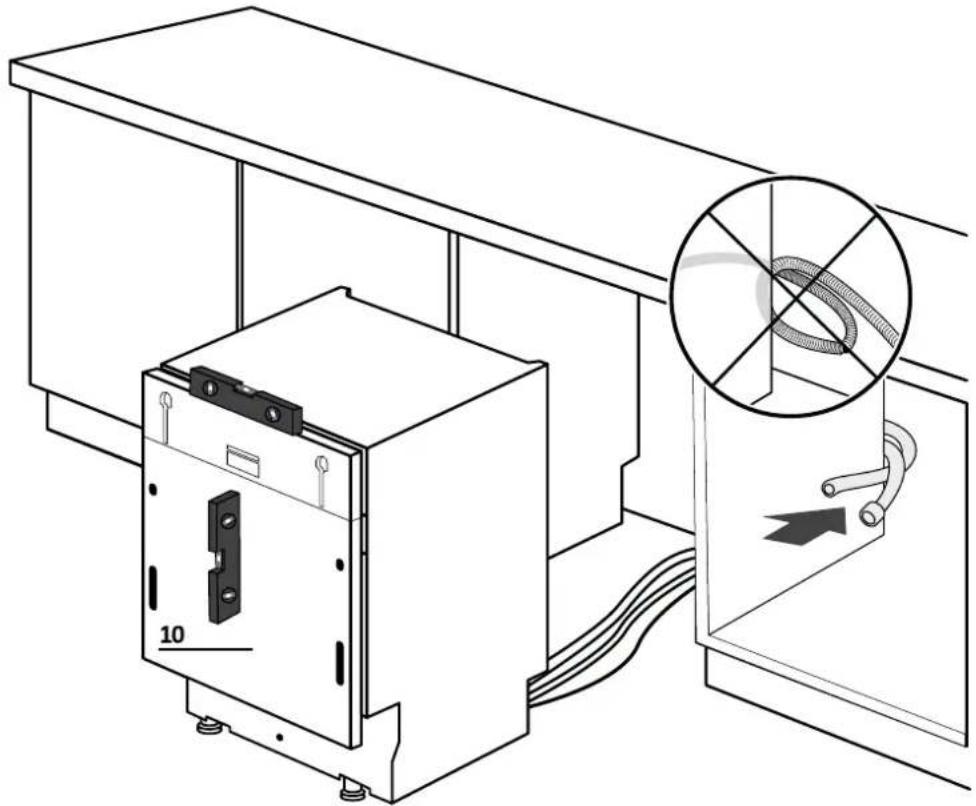
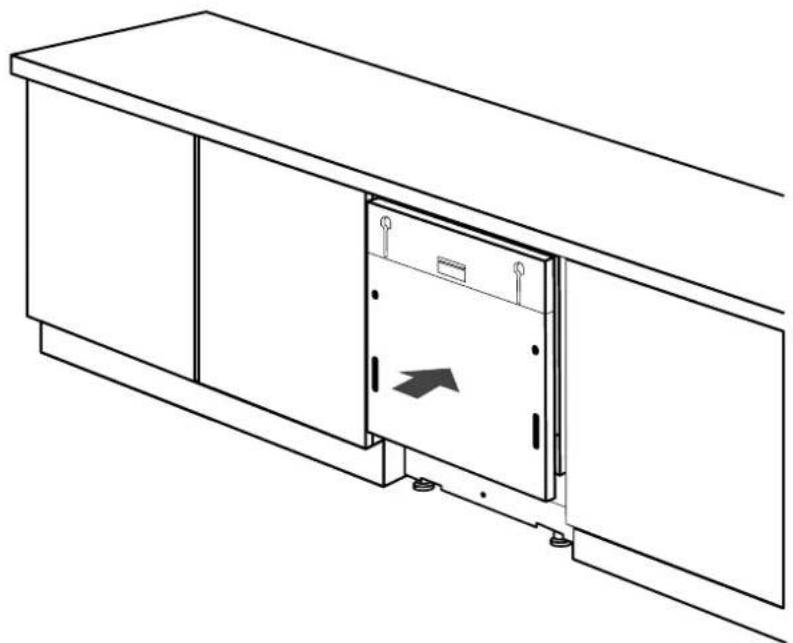
7.6 Insertion into the built-in compartment
Insert the dishwasher into the built-in compartment and check measurements and tolerances.
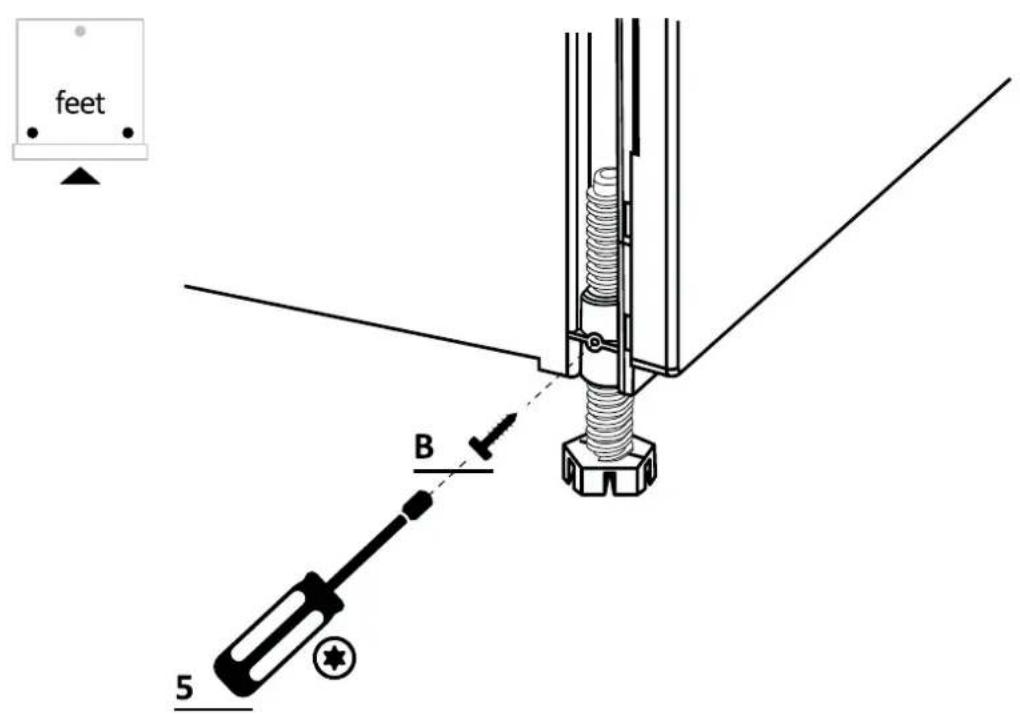
7.7 Fixing the front feet
After checking all measurements, permanently fix the front feet to prevent them from loosening over time. This operation can also be done after installing the kitchen panel.
7 Instructions for dishwasher installation
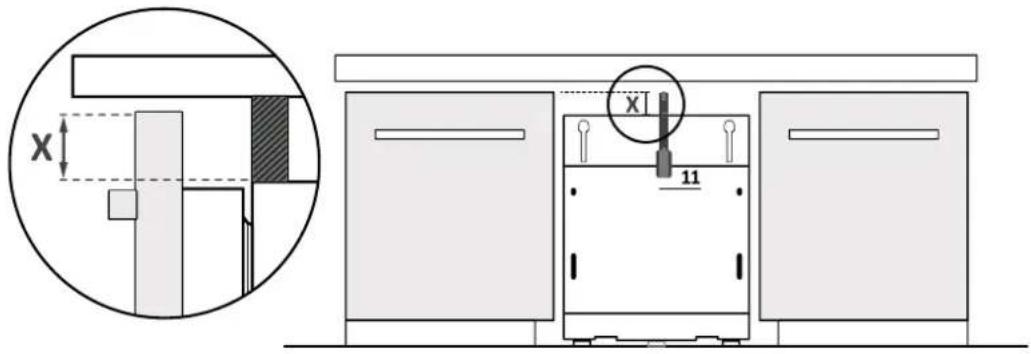
7.8 Panel preparation
1.
Measure the distance between the top edge of the adjacent doors and the dishwasher;

2.
Transfer the measurement onto the kitchen panel and locate the center;
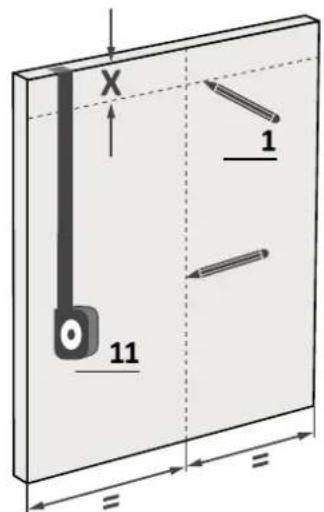
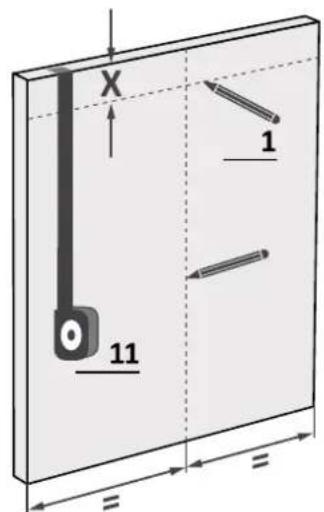
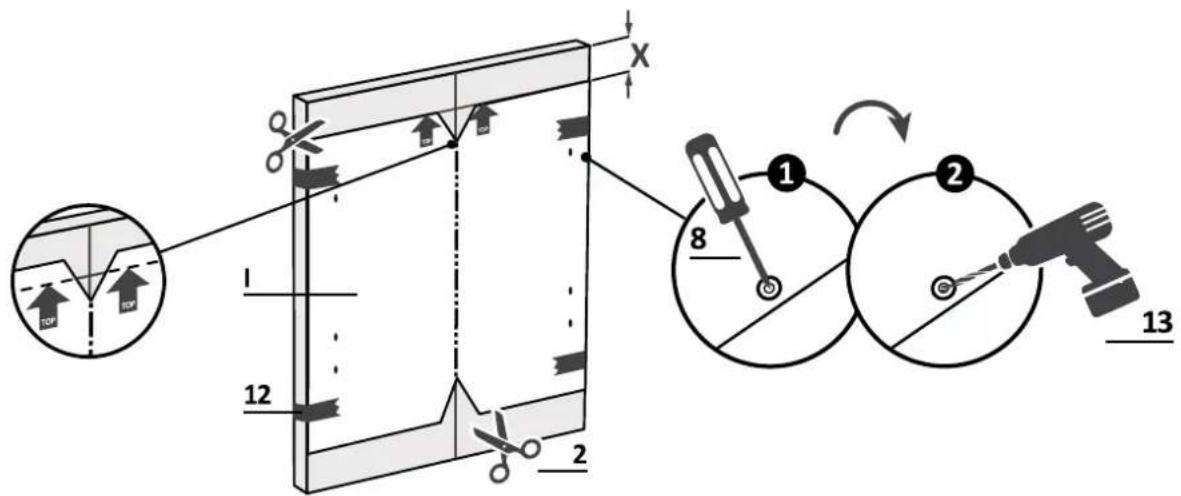
3.
Apply the drilling template anfd follow the strucions provided.
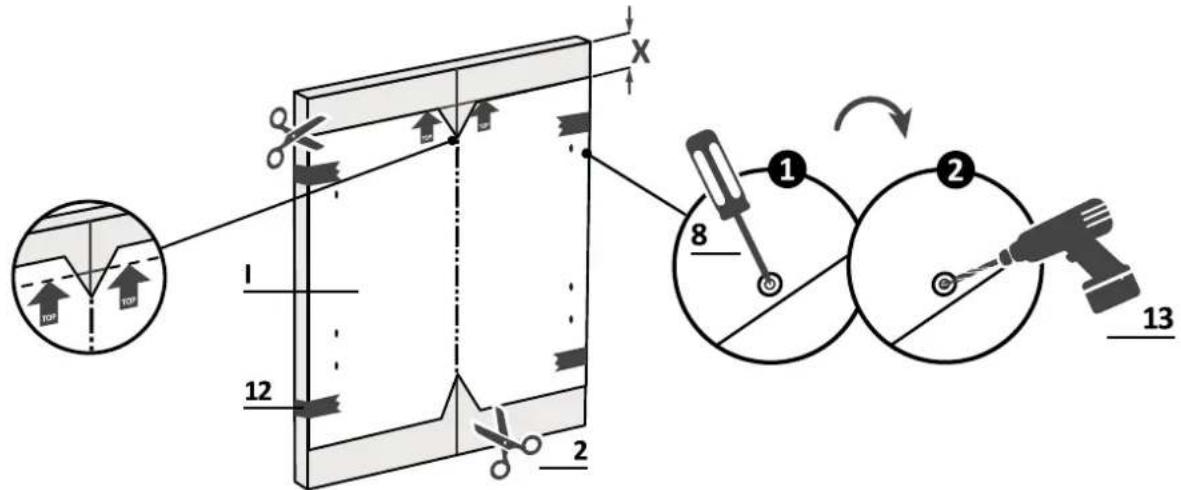
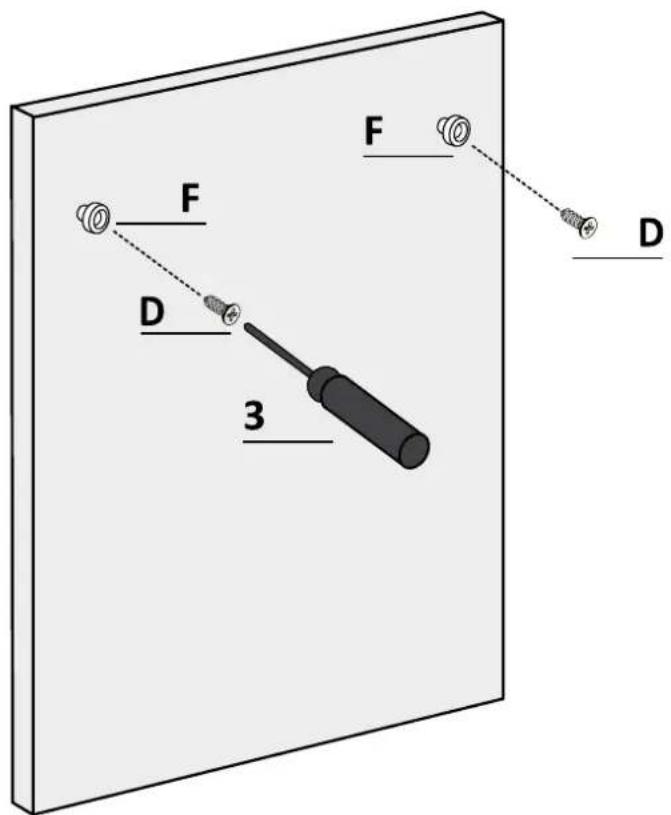
7.8 Panel preparation
4.
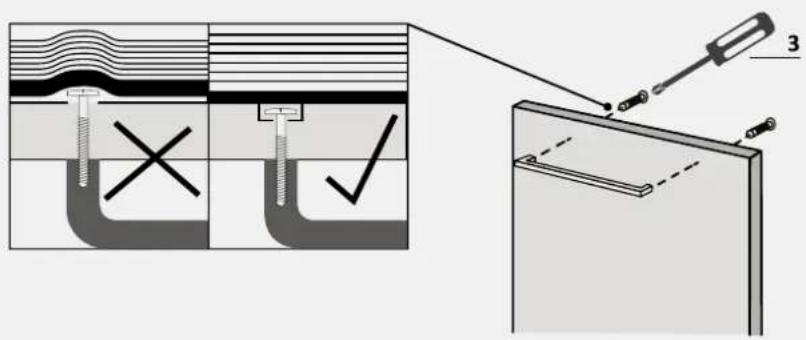
Remove the drilling template and apply the accessories.
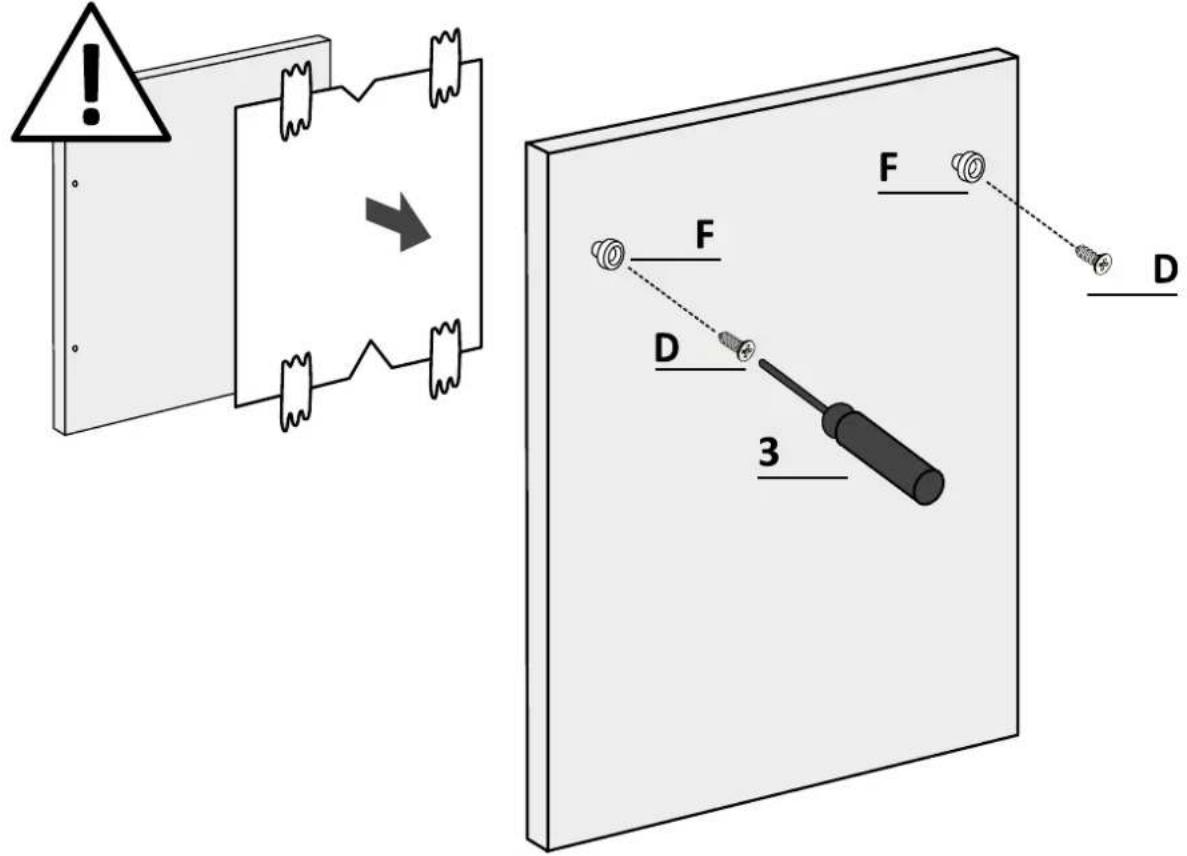
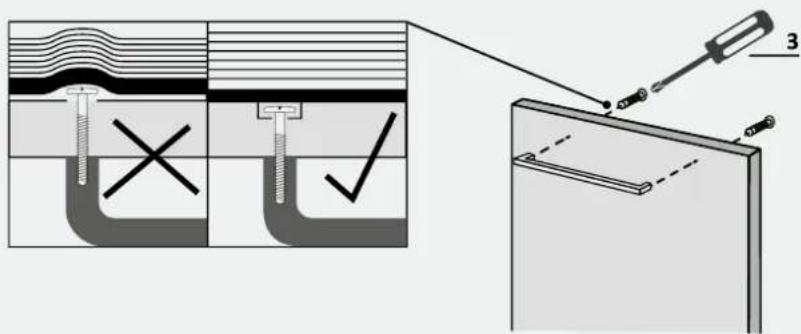
WARNING: Ensure screw heads don't protrude from the panel's rear surface, especially if you install the handle.
7 Instructions for dishwasher installation
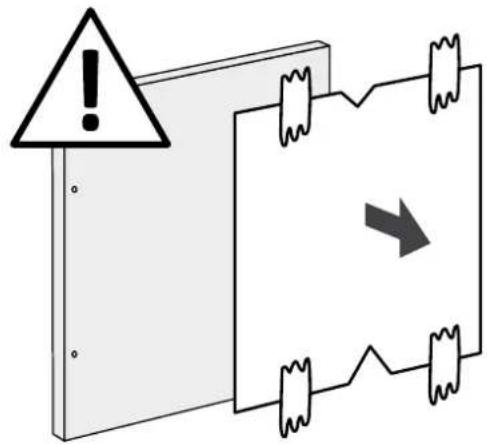
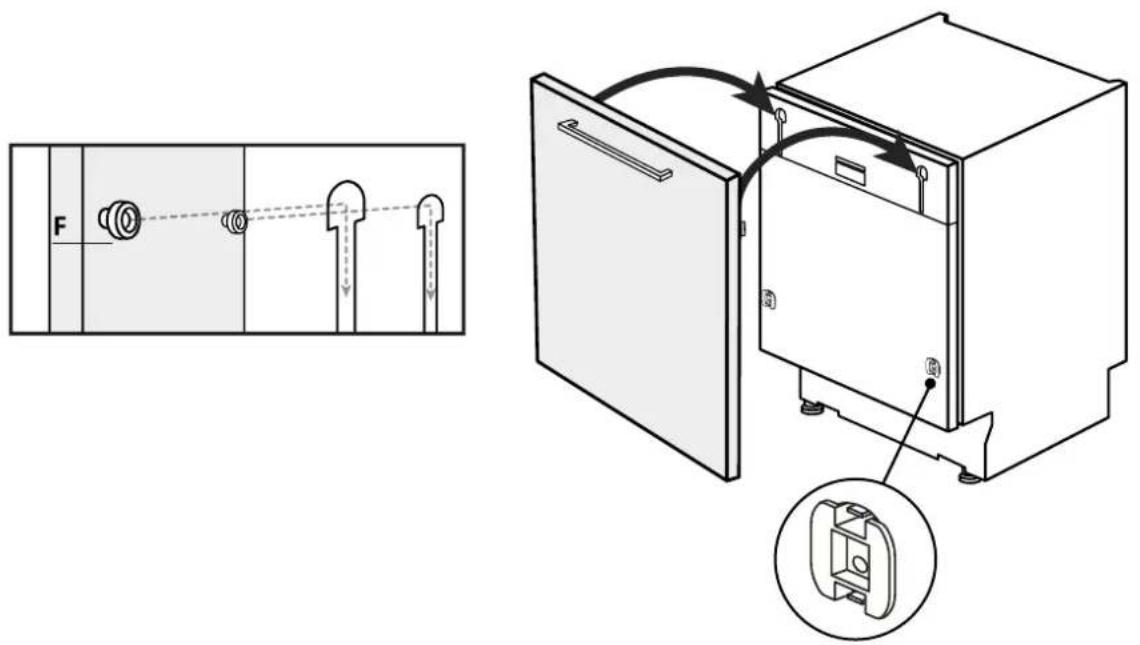
Installation of the panel7.9
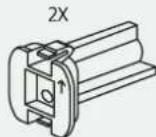
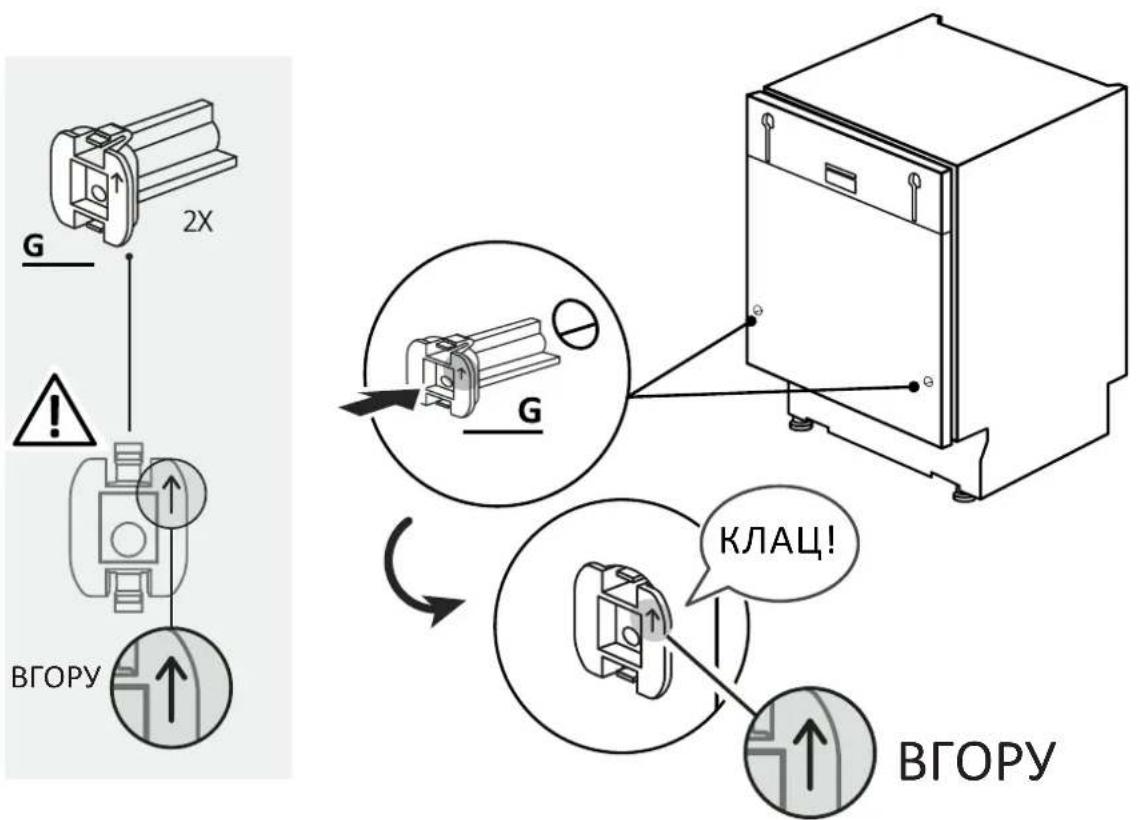
1.
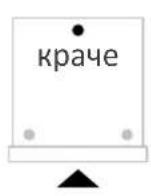
Apply the inserts to the dishwasher, making sure that the components are installed in the correct orientation with the arrow pointing upwards;
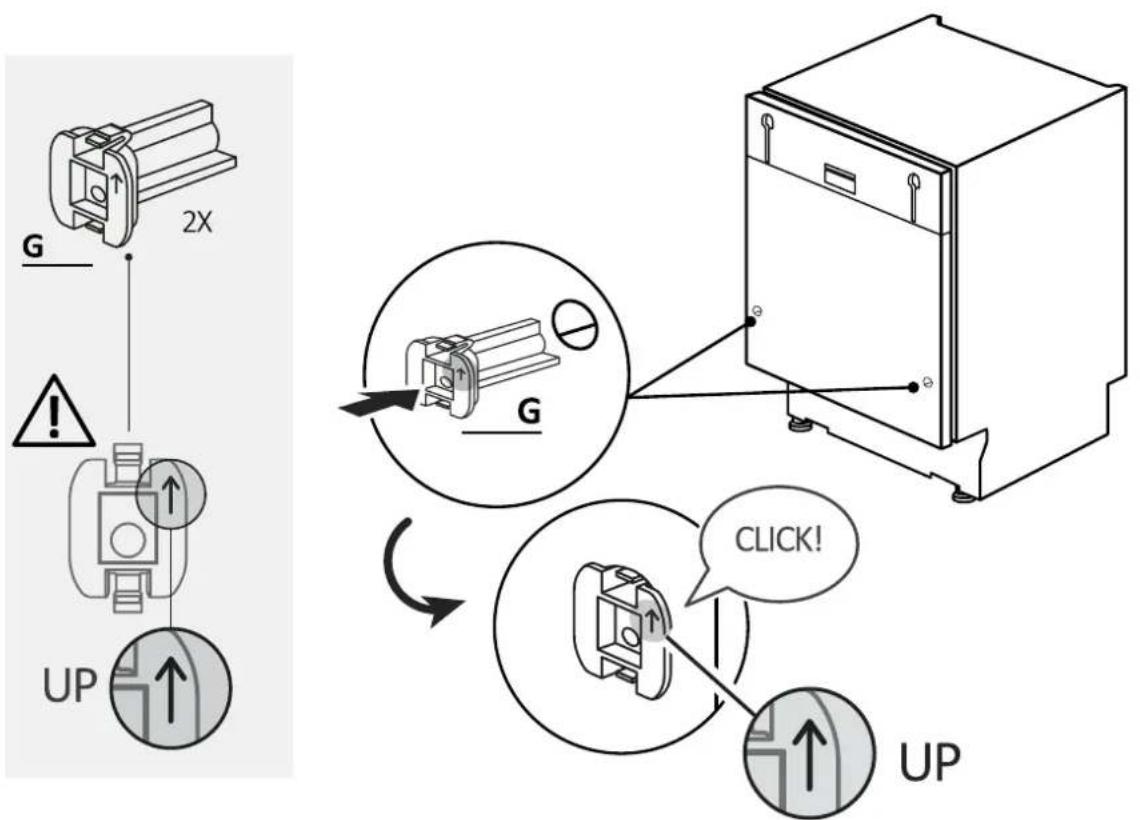
2.
Fix the panel to the lower part of the dishwasher;
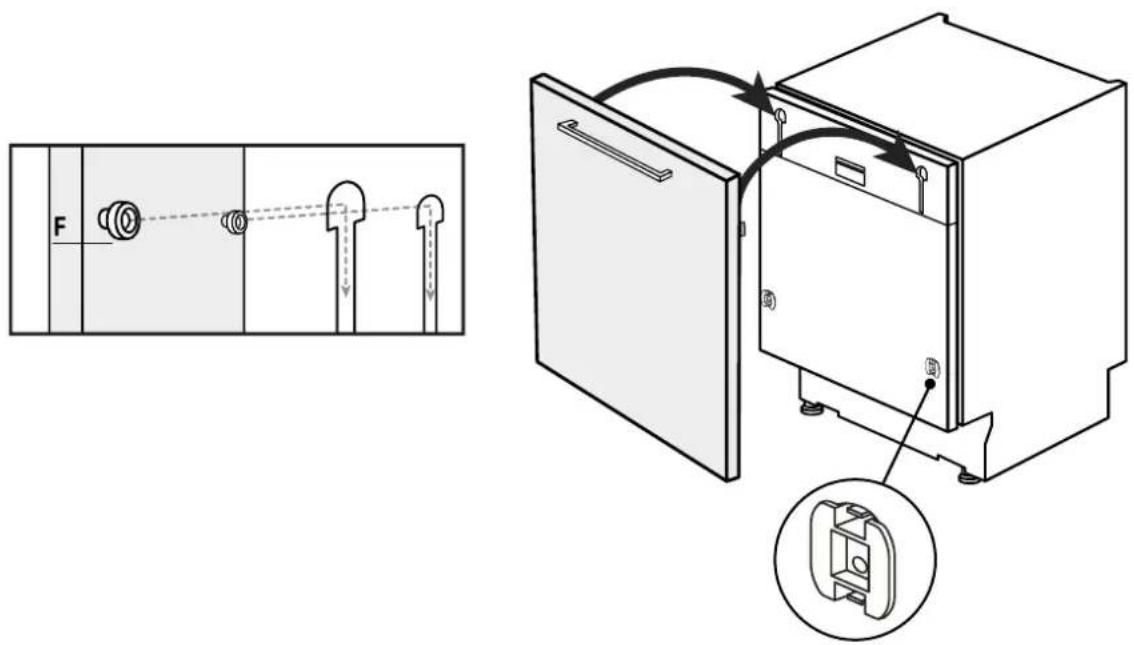
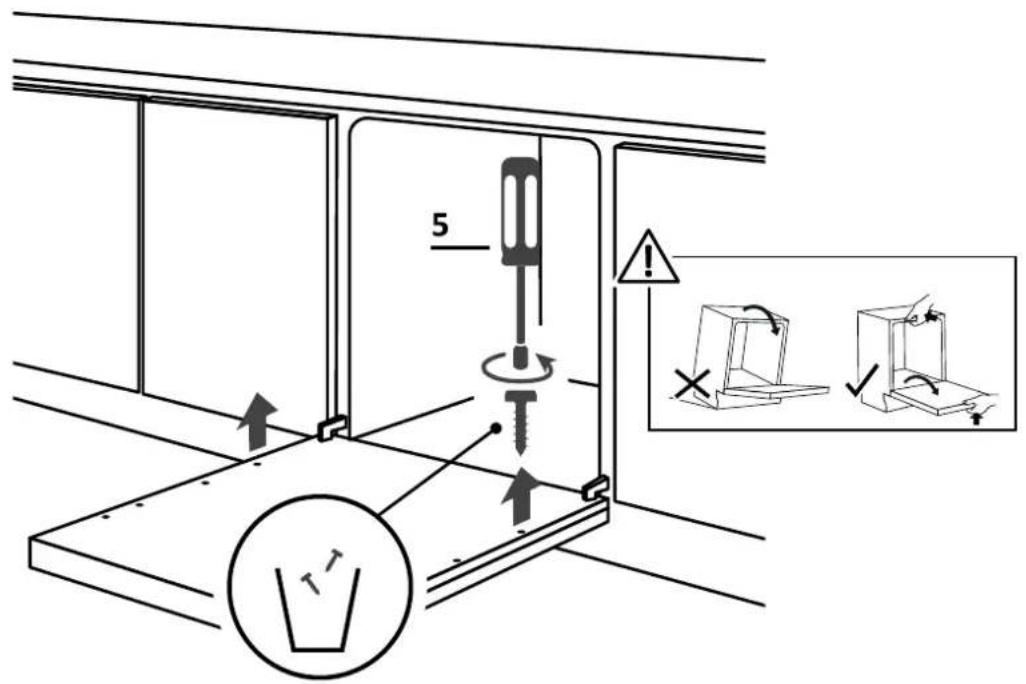
7.9 Installation of the panel
3.
Open the dishwasher door while holding the lower part of the kitchen panel, then unscrew the lower screws;

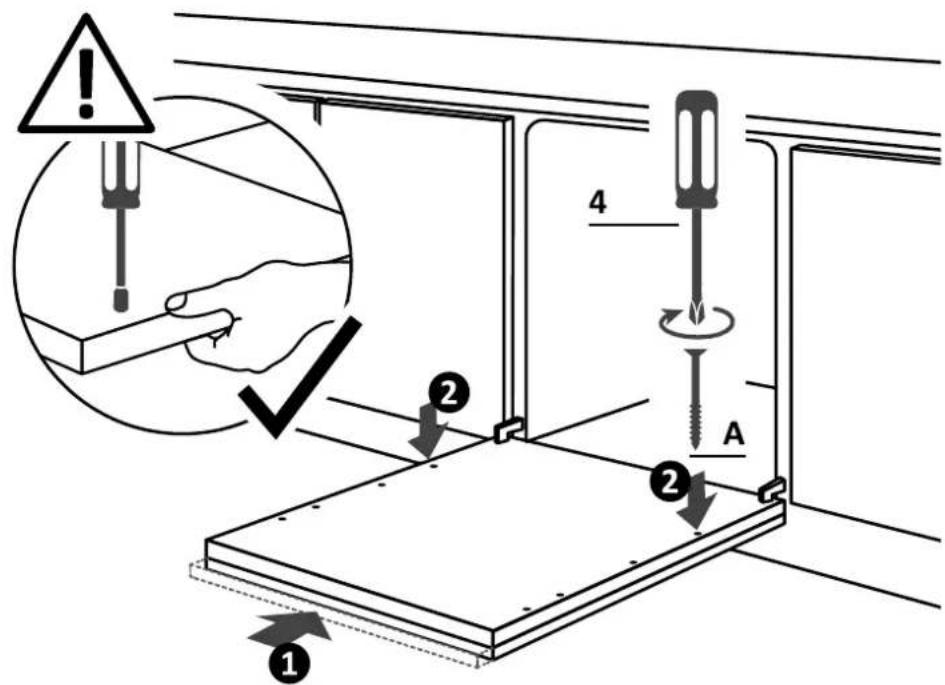
4.
Make sure the panel is fully inserted (1); fix the kitchen panel to the dishwasher using the supplied screws (2).

7 Instructions for dishwasher installation
WARNING: Connect the dishwasher now to the water and electrical network, following the instructions in chapter 8.
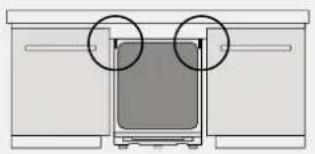
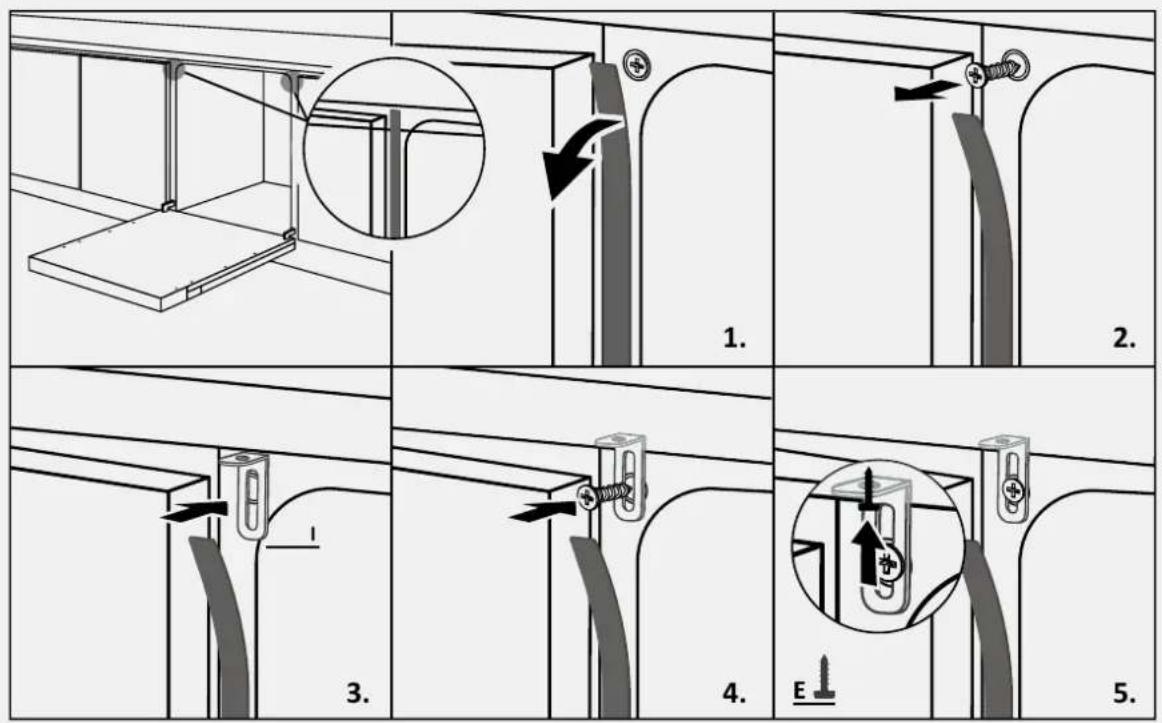
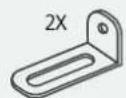
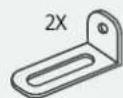
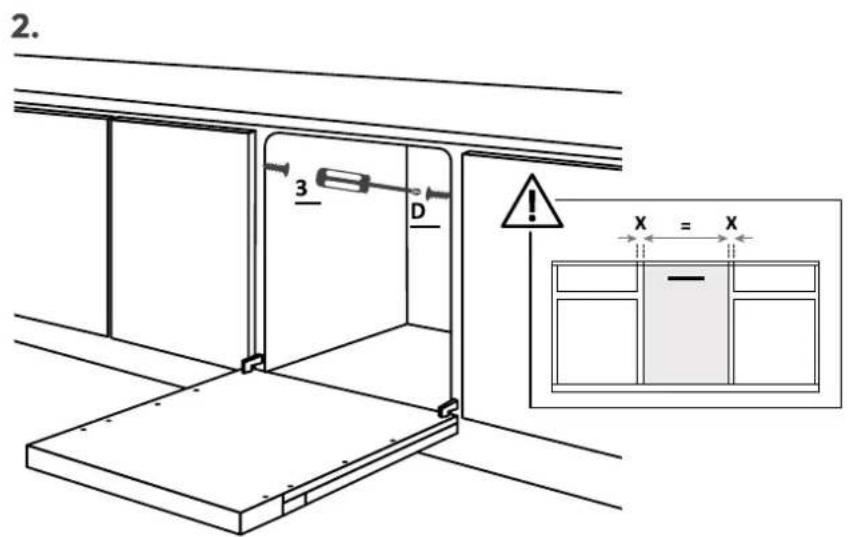
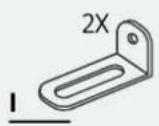
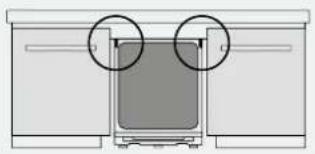
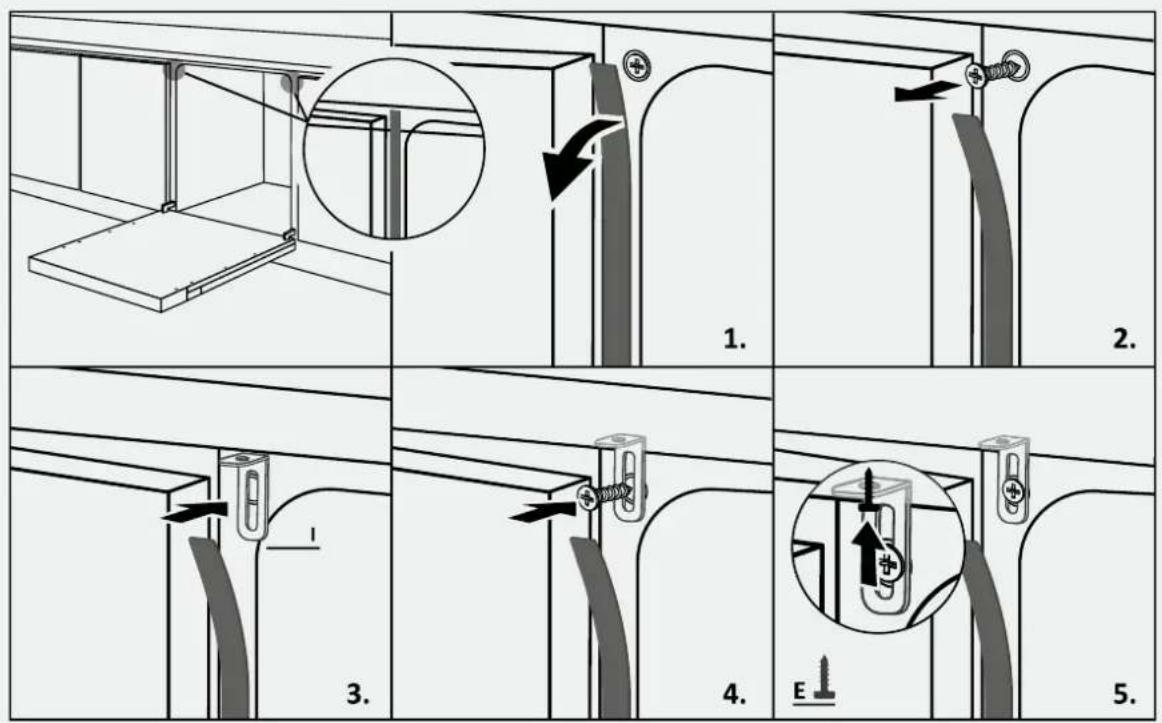
7.10 Fixing the machine to the kitchen
Instructions for fixing the dishwasher laterally to the adjacent cabinets.
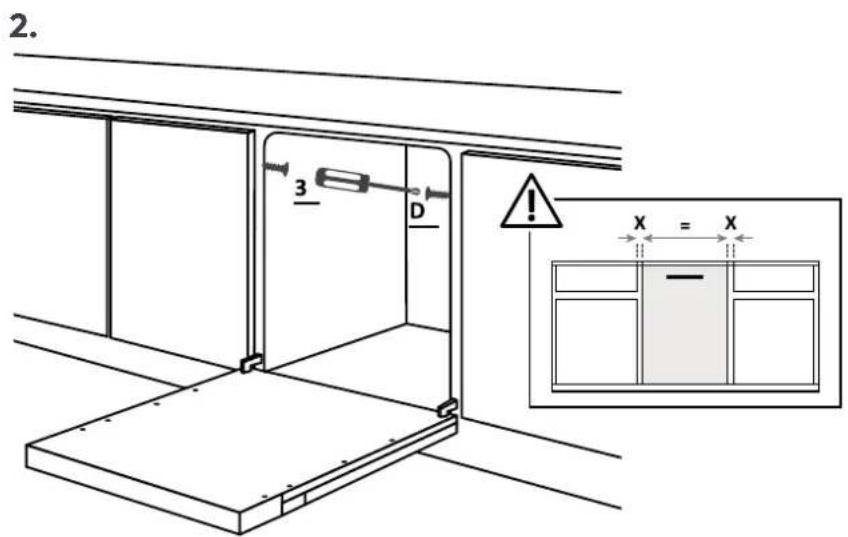
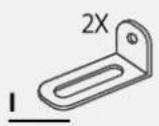
WARNING: If it is not possible to fix the dishwasher laterally, use the supplied brackets and fix it to the worktop; pay attention if the latter is not made of wood.
8 Drain water and electricity connection
8.1 Connection diagram
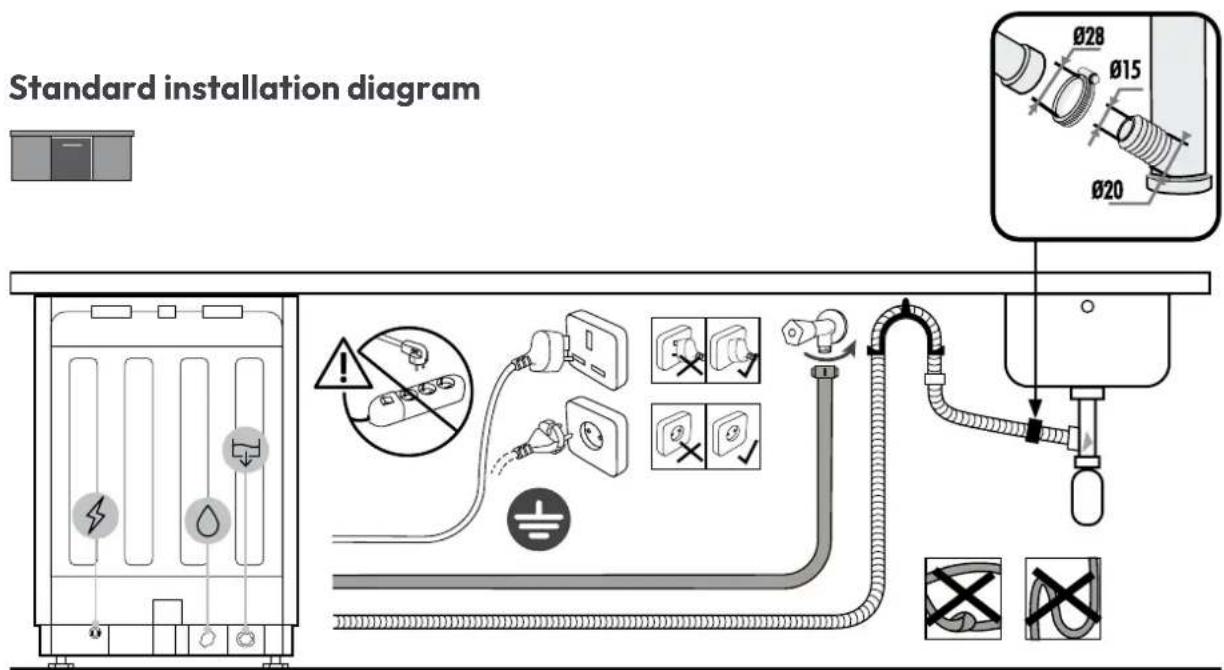
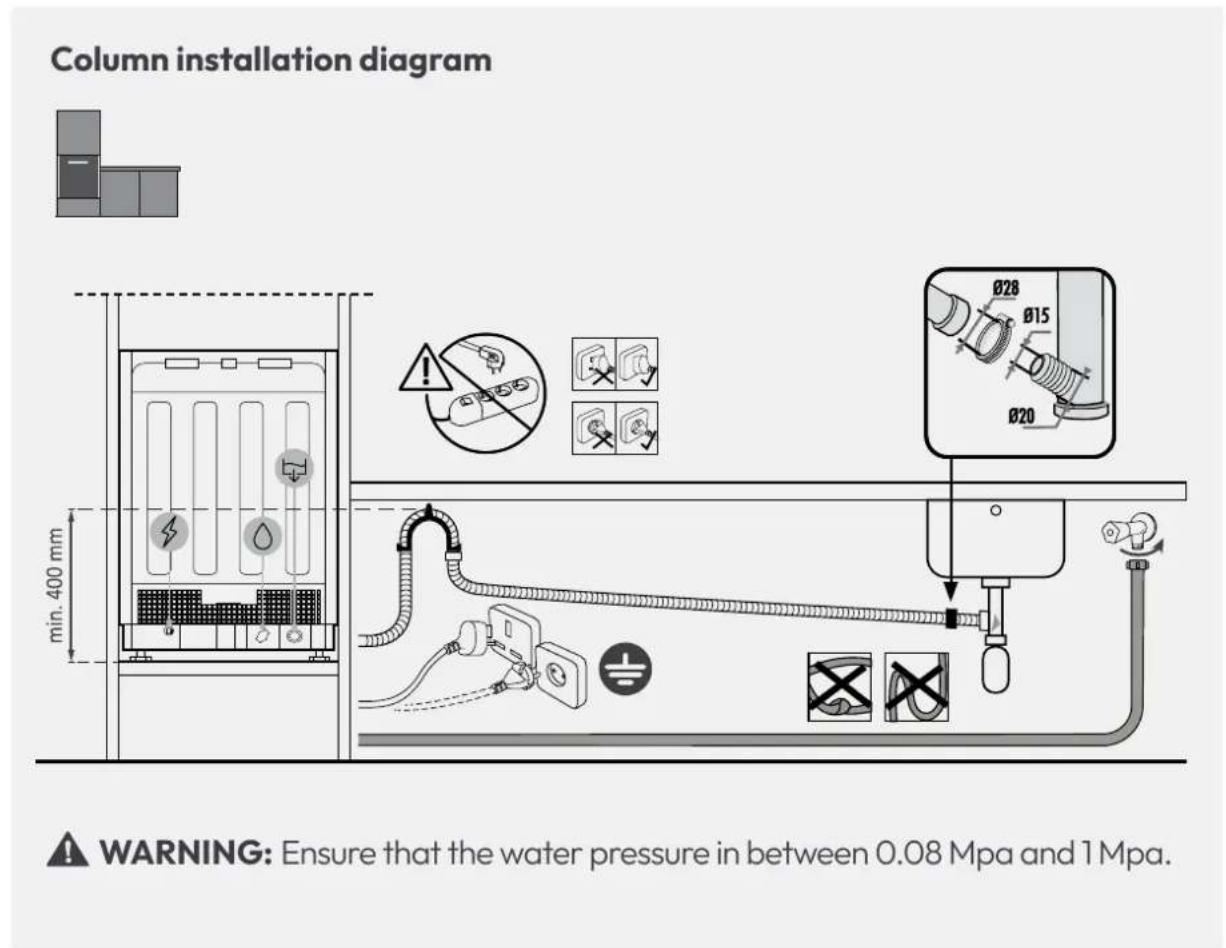
8.2 Safety devices
All dishwashers are equipped with an anti-overflow safety device which, in the event that the water exceeds the normal level due to a malfunction, automatically blocks the water flow and/or drains the excess water.
See the User Manual for more details.
Delivery to the user
9
At the end of installation:
- Inform the user about essential functions;
- Inform the user about all aspects relevant to safe use and handling;
- Deliver accessories and instructions for use and assembly to the user to be kept with care.
After installation is complete, remove the protective film, tape, and all other packing materials and remove the supplied accessories from inside the product.

NOTE: The actual appearance of the product depends on the model chosen.
Dishwasher disassembly
10
- Disconnect the product from the electrical and water supply;
- Unscrew the fastening screws;
- Slightly lift the product and pull it out completely;
- This product does not damage the furniture, which can also be used with a new appliance.
OVER


BENVENUTI
5 Installation tools
Outils nécessaires
Lugege need juhised enne toote paigaldamist hoolikalt laxi. Teie ohutus on meile vaga oluline. Palun lugege enne toote kasutamist hoolikalt laxi need juhised.
HCTpyKcnn 3a MOHTnpaHe Ha
IpoDyKta, KaTo cKaHnpaTe QR KoJa:

IIN KATO KNIKHeTe Bbpxy To3N
JMHK

5 INHcTpymeHTn 3a MOHTax
Heo6xoJIMMnHcTpymeHTn
IhctpymEnTn, npedocTaBeHc npoDyKTa
3,9X38
B
4X13

C
D
03,9X28

E
04X15


G
Pa3Mepn B MmImMeTpN
AkcohomeTpueH n3rJeD
A
BHIMAHNE:MHIMaHaTa BnCOuHa Ha CbDOMnJHaTa MaHHe 818 MM;B To3n Cnyaai pa3cTOrHneTo MeKdy KuxHeHcKaTa BpaTuKhca N PoDa Tp6Ba Da 6bDe Mekdy 90 n 120 MM.AKO CbDOMnJHaTa MaHnHa e NOBdInrHaTa (MaKc.898 MM),pa3cTOrHneTO OT BpataTdo NoDa CbIoo Tpr6Ba Da ce yBeJIuH npOpOuHOJHo,do MaKcMym MeKdy 170 n 200 MM.
7 IHctpyKznn 3a MOHTax Ha cBdomnJaHa MaunHa
7.1 Mohtax Ha JeHTata cpeu KoHdeH3
IocTaBeTe cAmO3aJIeNBAaTaCe JeHTo paoTbHaTaNIOuHa IOTCTpaHn Ha cbCcEHNTE Me6eHn;
1.
2.


3.
7.2 Peruipane Ha BncounHaTa
HaKnoHete CbDOMnAHaTa MaunHa, KaTo NOBnHHeTe 3aHaTa n Yaact C OKoNo 10 cm.
PerynpaTe BncoUnHaTa Ha 3aHTo Kpaue, KaTo DeIcTBaTe OT npedHaTa Yact Ha MaunHaTa, KaKTo e NocOeHo NO-dony.

7 IHctpyKznn 3a MOHTax Ha cBdomnJaHa MaunHa
7.4 Pergunpahe ha npednite kpaeta
PerynpaTe DnpeKTHo npedHnTe Kpaeta. Ako e Heo6xOIMO, NOBnHHeTe JekocbdomnHaTa MaunHa.
7.5 Perynipane Ha haknoha
HnBeJIpaIte CbDOMnIHaTa MaUNHa No BepTnKaIHaTa I XOpN3OHTaJIHaTa paBnHa.
7.6 NocTaBЯHe B OTdJeHneTo 3a BrpaJdaHe
IocTaBeTe CbdomnHaHaTa MaunHa B OTdJeHHeTo 3a BrpaXdaHe n npOBepeTe pa3Mepnte N DOnyCTUMTe OTKNoHeHn.

7.8 Forberedelse of panelet
4.
7.9 Installation of panelet
1.
7.9 Installation of panelet
3.
1 Sikkerhetsvarsler for installations
Ipo BCTaHOBJIeHHBnpo6y,
npockaHyBaBwn QR-koJ:

a6oHaTnCHyBwn ce
NOCUNaHH

5 HcTpymeHTnДЯ BCTaHOBJIeHHA
Heo6xidihiinctpymeHTn
IhctpymEnTn, 1o nocTaauHbC8 3 Bnpo60m

3,9X38
4X13

03,5X16
03,9X28

E
4X15
G

Po3Mipn (MM)
AkcoHometpnuHn BnIyd

A

NONEPEIXEHHa. Minimabha Bucota nocydomnHOi MaunHn CTaHOHTb 818 MM; ycbomy Bnpanky BiDcTaHb MIX KxOHmM NBePzTAMN NiIIOHO MAe 6ytuB 90 do 120 MM. RaKIO nocydomnHy MaunHy niHrTO (MaKc. 898 MM), BiDcTaHb BiD dBepqT do niIOnr TaKoX Mae nponopuiHo 36JIbSyBaTncra, MakcImymdo 170-200 MM.
7 Hctpyku3i BcTaHOBJIeHHa NocydomnHOI Maunnn
7.1 HaheceHn npo3axnchoi cTpiuKn
HaKneIte HAIINKy iD CTiNbHnCeIO I no 6okax Ha cyciHix Me6Jx.
1.

2.

3.
7.2 PerynobHH no Bncoti
HaxnijtB nocydomnHy MaunHy, iDnHBu 3aHIO uactHy np6n3HO Ha 10 cm.
7.3 PerylIOBaHHaHIX HIXOK
BidperyIIOte BnCOTy 3aHbOi HIXKN, BIKOHABUN Dii 3 nepeHbOi YactINMaunH, k NOKa3aHO HIXKYe.
7 Hctpyku3i BCTaHOBJIeHHa NocydomnHOI MaunHn
7.4 PeryllobaHn nepeHix hIXOK
BidperyIIOte nepeHn iXkN 6e3nocepEnbO. 3a noTpe6n 3nerka niHimItb nocydomnHy maunHy.
7.5 PeryilobaHHaXnIy
BnipiBnIte nocydomnHy maunHy y BeptnKaIbHi i ropn3oHTaIbHi nlounHax.
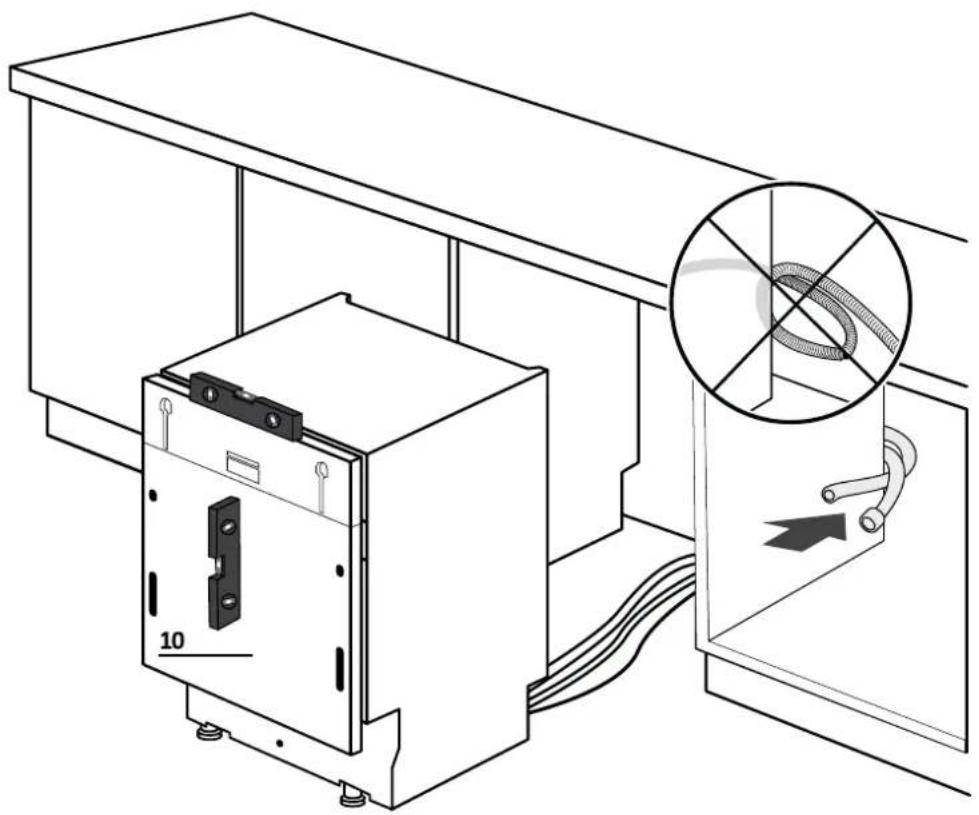
7.6 BcTaHOBJIeHHaY BiDcIK dJa B6yDoBaHO R BcTaHOBJIeHHa Y BcTaBTe nocydomnHy MaunHy y BiDcIK dJa B6yDoBaHO R BcTaHOBJIeHHa I nepeBipTe po3mipn i Donyckn.
7 Hctpyku3i BcTaHOBJIeHHa NocydomnHOI Maunnn
7.8Плд�овka панeti
1.
BmipraTe BiDcTaHb MIX BepxHIM Kpaem cyciHix DBepaT i NocydomnHOo MaunHOIO.
2.
Ipehenecitb Bmipobanha Na Kxohny naHeIb i 3HaNdITb ceHTp.
3.
BctaHOBITb 7a6noH dIy CBePdNiHH I dOtpmMyTeCb HaDaHx IHCTpyKciI.
7.8Плд�овka панелi
4.
3HIMITb Waa6NoH dna CBepeNHH i BCTaHOBIt npnna.
ANONEPEDXEHNAepeKoHaTeC,IO rONOBKN rBnHTiB He BnCTyNaOTb i3 3aHboi NOBepxHi nAneI,OCO6nBO JkUO BN BCTaHOBIOCTe pyky.
7 Hctpyku3i BCTaHOBJIeHHa NocydomnHOI MaunHn
7.9 BctaHOBJIeHH naHeJI
1.
BcTaHOiB BcTaBn B nocydomnHy MaunHy, nepeKoHaBmncb, 10 KOMnoHHTN BcTaHOJIeHi B npaBnIbHomy nOJKeHHi, 3i CTrpIKoIO, cnPMAOBaHOIO Bropy.
2.
PnKpinitb naHeB Do HxHbOi YacTtH NocyDomnHO MaunHn.
7.9 BctaHOBJIeHH naHeJI
3.
BidkpinyeDbepyta nocydomnHOi MaunH, TpmaOuH HxHIO qactHy kxyoHoi naHeni, a notim BiKpyiTb HxHHi rBuHTN.
4.
IpekoHaiTeca, 0n NaHeB NOBHCIO BCTABNeHa (1); npKpIniTB KxOHHy naHeB Do NocydomnHO Maunn3a DonomoroTO TBnHTIB (2), 0o BXOJaTb DO KOMNJIeKTy.
ANONEPEDKEHHa. TenepiKIOHITb NocydomnHy MaunHy Do BOOOnPoBOdy IeEeKtpoMepexi, DOTpIMyUOuNcB IHCTpyKciI y po3dini 8.
7.10 KpinJIeHЯ MaunHn Ha KyxHi
Ihctpykcii 0do kpiinpeHHn ocydOmHoi Maunn H36oky do cycidHex aaf.

A NOPEPDXEHHRAKUO Bn He MoXeTe 3aKpInTu NocydomnHy MaunHy 360ky, CKOpNCaTneCra HadaHmN KPOHSTeHAmi 3aKpiniTb II Do po6ooi NOBepxHi; 6ydTe o6epeKHi, RaKUo MaTepiAn po6ooi NOBepxHi He DepeBO.
8Пдклоченяdo kaHaJI3aцi i eleKtpomepexi

- WELCOME
- Index
- Safety warnings for installation
- Where to install the dishwasher
- Dishwasher dimensions
- Step-by-step installation video
- Installation tools
- Instructions for dishwasher installation
- Steam band installation
- Height adjustment
- Rear foot adjustment
- Front feet adjustment
- Tilt adjustment
- Insertion into the built-in compartment
- Fixing the front feet
- Panel preparation
- Installation of the panel7.9
- 1.
- 2.
- Installation of the panel
- Fixing the machine to the kitchen
- Drain water and electricity connection
- Connection diagram
- Safety devices
- Delivery to the user
- Dishwasher disassembly
- OVER
- BENVENUTI
- INHcTpymeHTn 3a MOHTax
- IHctpyKznn 3a MOHTax Ha cBdomnJaHa MaunHa
- Mohtax Ha JeHTata cpeu KoHdeH3
- Peruipane Ha BncounHaTa
- Pergunpahe ha npednite kpaeta
- Perynipane Ha haknoha
- NocTaBЯHe B OTdJeHneTo 3a BrpaJdaHe
- Forberedelse of panelet
- Installation of panelet
- 3.
- Sikkerhetsvarsler for installations
- HcTpymeHTnДЯ BCTaHOBJIeHHA
- Hctpyku3i BcTaHOBJIeHHa NocydomnHOI Maunnn
- HaheceHn npo3axnchoi cTpiuKn
- PerynobHH no Bncoti
- PerylIOBaHHaHIX HIXOK
- Hctpyku3i BCTaHOBJIeHHa NocydomnHOI MaunHn
- PeryllobaHn nepeHix hIXOK
- PeryilobaHHaXnIy
- 7.8Плд�овka панeti
- 7.8Плд�овka панелi
- BctaHOBJIeHH naHeJI
- KpinJIeHЯ MaunHn Ha KyxHi
- 8Пдклоченяdo kaHaJI3aцi i eleKtpomepexi
Brand : HOOVER
Model : HI 3E7L0S-17
Category : Dishwasher