
GCS 35 2x18-EC - Saw Flex - Free user manual and instructions
Find the device manual for free GCS 35 2x18-EC Flex in PDF.

| Product type | Cordless chainsaw |
| Brand | Flex |
| Model | GCS 35 2x18-EC |
| Nominal voltage | 2 x 18 V DC |
| Chain speed at no load | 12 m/s |
| Guide bar length | 35 cm |
| Oil tank capacity | 150 ml |
| Weight (without battery) | 3.85 kg |
| Battery weight AP 18.0/2.5 | 0.4 kg |
| Battery weight AP 18.0/5.0 | 0.7 kg |
| Battery weight AP 18.0/8.0 | 1.1 kg |
| Operating temperature | -10 to 40 °C |
| Storage temperature | < 50 °C |
| Charging temperature | 4 to 40 °C |
| Chain brake | Yes (kickback brake) |
| Automatic lubrication | Yes (oil tank) |
| Chain tension adjustment | Tool-free (dial) |
| Compatible battery | AP 18.0 series (2.5/5.0/8.0 Ah) |
| Sound pressure level LpA | 89 dB(A) |
| Sound power level LWA | 100 dB(A) |
| Total vibration value | 4.38 m/s² |
| Certifications | CE, EU directives 2014/30, 2006/42, 2011/65 |
Frequently Asked Questions - GCS 35 2x18-EC Flex
User questions about GCS 35 2x18-EC Flex
0 question about this device. Answer the ones you know or ask your own.
Ask a new question about this device
Download the instructions for your Saw in PDF format for free! Find your manual GCS 35 2x18-EC - Flex and take your electronic device back in hand. On this page are published all the documents necessary for the use of your device. GCS 35 2x18-EC by Flex.
USER MANUAL GCS 35 2x18-EC Flex
natural_image
Line drawing of a FLEX 2x10V chain drive with visible blade and mounting bracket (no text or symbols beyond branding)en Original operating instructions....17
natural_image
Technical line drawing of a mechanical component with gears and shafts (no text or symbols)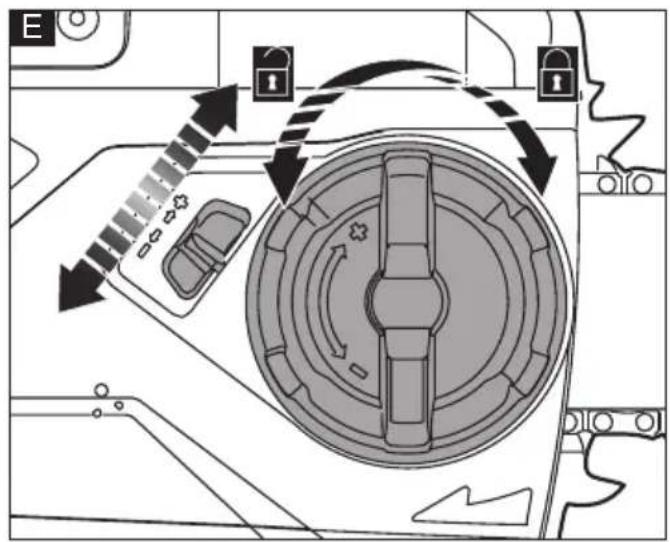
natural_image
Technical line drawing of a mechanical assembly with no visible text or symbols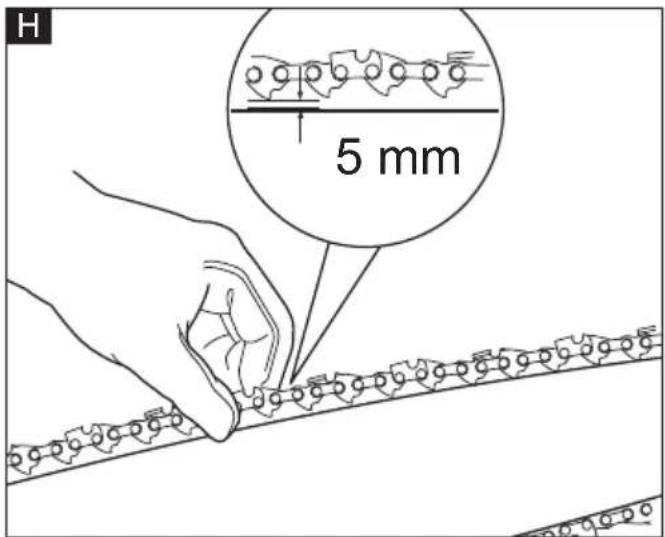
natural_image
Illustration of a person using a power tool to cut wood and move a log on a cart, with no visible text or symbols.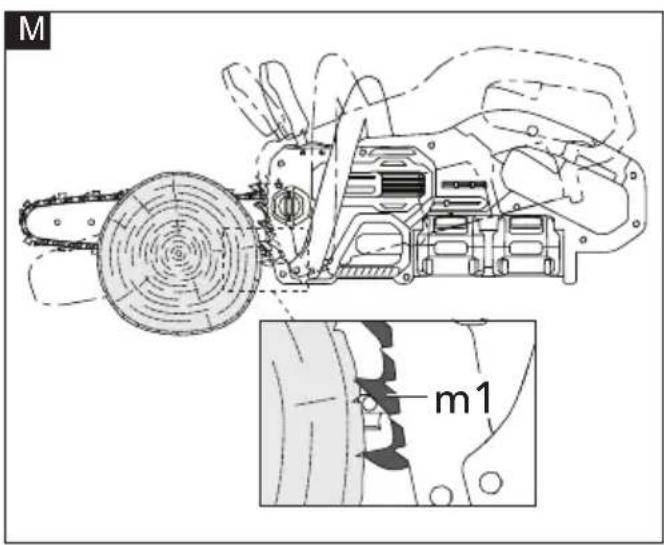
flowchart
graph TD
    A["Brain"] --> B["Rising"]
    B --> C["Walking"]
    C --> D["Racing"]
    D --> A
    style A fill:#f9f,stroke:#333
    style B fill:#ccf,stroke:#333
    style C fill:#cfc,stroke:#333
    style D fill:#fcc,stroke:#333
P
natural_image
Diagram illustrating tree crossing and water flow over a river, showing directional arrows (no text or labels)Q
R
natural_image
Illustration of a fisherman pulling a boat on water with a circular inset showing a cross symbol (no text or labels)S
natural_image
Diagram of a wooden log being struck by a moving gear, with arrows indicating force direction (no text or symbols)T
U

natural_image
Line drawing of a person using a power tool to cut wood in a forested area (no text or symbols)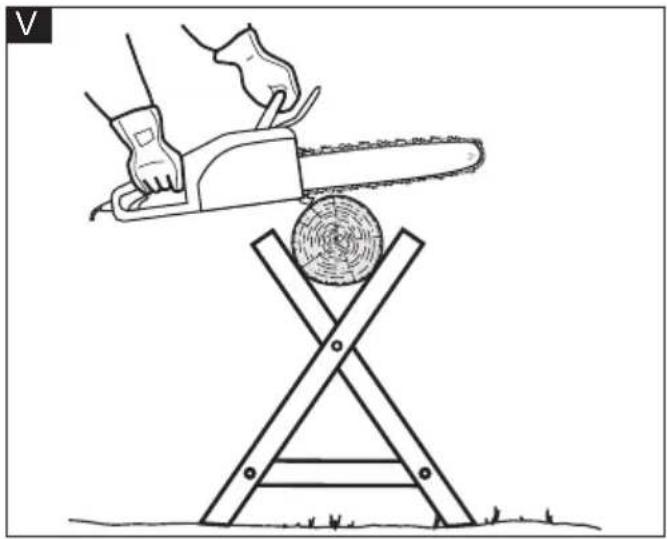
natural_image
Illustration of a person using a saw to cut a tree stump on a wooden stand (no text or symbols)Symbols used in this manual

WARNING!
Denotes impending danger. Non-observance of this warning may result in death or extremely severe injuries.

CAUTION!
Denotes a possibly dangerous situation. Non-observance of this warning may result in slight injury or damage to property.

NOTE
Denotes application tips and important information.
Symbols on the power tool
VVolts
/minRotationrate

Read the instructions

Wear ear protection!

Wear goggles!

Wear mask!

Wear protective gloves!

Guide bar.

Beware of chain saw kickback and avoid contact with bar tip.

Always use chain saw two handed.

Disposal information for the old machine (see page 23)!
For your safety

WARNING!
Before using the power tool, please read the follow:
– these operating instructions,
- the "General safety instructions" on the handling of power tools in the enclosed booklet (leaflet-no.: 315.915),
- the currently valid site rules and the regulations for the prevention of accidents.
This power tool is state of the art and has been constructed in accordance with the acknowledged safety regulations.
Nevertheless, when in use, the power tool may be a danger to life and limb of the user or a third party, or the power tool or other property may be damaged.
The cordless chain saw may be used only –asintended,
– in perfect working order.
Faults which impair safety must be repaired immediately.
Intended use
The cordless chain saw is intended
– for commercial use in industry and trade,
– for cutting wood logs and limbs.
Safety instructions for chain saw WARNING!
Read all safety warnings, instructions, illustrations and specifications provided with this power tool. Failure to follow all instructions listed below may result in electric shock, fire and/or serious injury. Save all warnings and instructions for future reference.
- Keep all parts of the body away from the saw chain when the chain saw is operating. Before you start the chain saw, make sure the saw chain is not contacting anything.
A moment of inattention while operating chain saws may cause entanglement of your clothing or body with the saw chain.
■ Always hold the chain saw with your right hand on the rear handle and your left hand on the front handle. Holding the chain saw with a reversed hand configuration increases the risk of personal injury and should never be done.
- Hold the chain saw by insulated gripping surfaces only, because the saw chain may contact hidden wiring. Saw chains contacting a "live" wire may make exposed metal parts of the chain saw "live" and could give the operator an electric shock.
■ Wear eye protection. Further protective equipment for hearing, head, hands, legs and feet is recommended. Adequate protective equipment will reduce personal injury from flying debris or accidental contact with the saw chain.
- Do not operate a chain saw in a tree, on a ladder, from a rooftop, or any unstable support. Operation of a chain saw in this manner could result in serious personal injury.
■ Always keep proper footing and operate the chain saw only when standing on fixed, secure and level surface. Slippery or unstable surfaces such as ladders may cause a loss of balance or control of the chain saw.
- When cutting a limb that is under tension, be alert for spring back. When the tension in the wood fibres is released, the spring loaded limb may strike the operator and/or throw the chain saw out of control.
■ Use extreme caution when cutting brush and saplings. The slender material may catch the saw chain and be whipped toward you or pull you off balance.
- Carry the chain saw by the front handle with the chain saw switched off and away from your body. When transporting or storing the chain saw, always fit the guide bar cover. Proper handling of the chain saw will reduce the likelihood of accidental contact with the moving saw chain.
■ Follow instructions for lubricating, chain tensioning and changing the guide bar and saw chain. Improperly tensioned or lubricated chain may either break or increase the chance for kickback.
- Cut wood only. Do not use chain saw for purposes not intended. For example: do not use chain saw for cutting metal, plastic, masonry or non-wood building materials.
Use of the chain saw for operations different than intended could result in a hazardous situation.
■ Do not attempt to fell a tree until you have an understanding of the risks and how to
avoid them. Serious injury could occur to the operator or bystanders while felling a tree.
■ Follow all instructions when clearing jammed material, storing or servicing the chain saw. Make sure the switch is off and the battery pack is removed. Unexpected actuation of the chain saw while clearing jammed material or servicing may result in serious personal injury.
Causes and operator prevention of kickback
■ Kickback may occur when the nose or tip of the guide bar touches an object, or when the wood closes in and pinches the saw chain in the cut.
■ Tip contact in some cases may cause a sudden reverse reaction, kicking the guide bar up and back towards the operator.
■ Pinching the saw chain along the top of the guide bar may push the guide bar rapidly back towards the operator.
■ Either of these reactions may cause you to lose control of the saw which could result in serious personal injury do not rely exclusively upon the safety devices built into your saw; as a chain saw user, you should take several steps to keep your cutting jobs free from accident or injury.
■ Kickback is the result of tool misuse and/or incorrect operating procedures or conditions and can be avoided by taking proper precautions as given below:
- maintain a firm grip, with thumbs and fingers encircling the chain saw handles, with both hands on the saw and position your body and arm to allow you to resist kickback forces. Kickback forces can be controlled by the operator, if proper precautions are taken; do not let go of the chain saw.
- do not over reach and do not cut above shoulder height. This helps prevent unintended tip contact and enables better control of the chain saw in unexpected situations.
- only use replacement bars and chains specified by the manufacturer. Incorrect replacement bars and chains may cause chain breakage and/or kickback.
- follow the manufacturer's sharpening and maintenance instructions for the saw chain, decreasing the depth gauge height can lead to increased kickback.
Additional safety instructions
■ Children and juveniles, with the exception of apprentices older than 16 years and under supervision, may not operate the chain saw. The same applies for persons who do not or do not sufficiently know how to handle the chain saw. The operating instructions should always be ready to hand. Persons unfit or tired must not operate the chain saw.
■ It is recommended that the first time user should have practical instruction in the use of the chain saw and the protective equipment from an experienced operator and that the initial practice should be cutting logs on a saw horse or cradle.
■ Do not touch rotating chain.
■ Always use approved personal protective equipment, this reduces the danger of injury from thrown about cutting material and accidental touching of the saw chain.
■ Do not operate chain saw near other people, children or animals.
■ Do not operate chain saw after drinking alcohol or under the influence of intoxicating drugs or medication.
■ Ensure that children do not play with the tool.
■ After use, always switch off the tool and remove the battery.
■ Store the tool indoors in a dry and locked-up place, out of reach of children.
Noise and vibration
The noise and vibration values have been determined in accordance with EN 62841.
The A evaluated noise level of the power tool is typically:
- Sound pressure level L_pA : 89 dB(A);
- Sound power level L_WA : 100 dB(A);
- Uncertainty: K = 11 dB.
Total vibration value:
- Emission value a_h : 4.38 m/s
- Uncertainty: K = 1.5 m/s ^2

CAUTION!
The indicated measurements refer to new power tools. Daily use causes the noise and vibration values to change.

NOTE
The declared vibration total value(s) and the declared noise emission level given in this information sheet has been measured in accordance with a measurement method standardized in EN 62841 and may be used to compare one tool with another.
It may be used for a preliminary assessment of exposure. The specified vibration emission level represents the main applications of the tool.
However, if the tool is used for different applications, with different cutting accessories or poorly maintained, the vibration emission level may differ.
This may significantly increase the exposure level over the total working period.
To make an accurate estimation of the vibration exposure level, it is also necessary to take into account the times when the tool is switched off or running but not actually in use.
This may significantly decrease the exposure level over the total working period.
Identify additional safety measures to protect the operator from the effects of vibration such as: maintain the tool and the cutting accessories, keep the hands warm, organization of work patterns.

WARNING!
The vibration and noise emissions during actual use of the power tool can differ from the declared value in which the tool is used; In order to protect the operator, user should wear gloves and ear protectors in the actual conditions of use.

CAUTION!
Wear ear defenders at a sound pressure above 85 dB(A).
Technical data
| Tool GCS 35 2X18-EC | ||
| Type Chain Saw | ||
| Rated voltage Vdc 2X18 | ||
| No-load speed m/s 12 | ||
| Guide bar length | cm | 35 |
| Chain oil tank volume | ml 150 | ||
| Weight according to"EPTA Procedure 01/2003" | kg 3.85 | ||
| Battery 18V | AP 18.0/2.5AP 18.0/5.0AP 18.0/8.0 | ||
| Weight of battery | kg | AP 18.0/2.5AP 18.0/5.0AP 18.0/8.0 | 0.40.71.1 |
| Working temperature | -10-40°C | ||
| Storage temperature | < 50°C | ||
| Charging temperature | 4-40°C | ||
| Charger CA 10. | 8/18.0, CA 18.0-LD | ||
Overview (see figure A)
The numbering of the product features refers to the illustration of the machine on the graphics page.
- Sprocket wheel
- Lubrication hole
- Saw chain
- Guide bar
- Kickback brake
- Front handle
- Lock-off button
- Rear handle
- Trigger switch
- Oil inspection window
- Chain oil tank cap
- Chain tension knob
- Drive sprocket cover
- Clamping knob
- Guide bar cover
- Position pin
- Chain tension pin
- Thread hole
Operating instructions

WARNING!
Remove the battery before carrying out any work on the power tool.
Before switching on the power tool
Unpack the cordless chain saw and check that here are no missing or damaged parts.

NOTE
The batteries are not fully charged on delivery. Prior to initial operation, charge the batteries fully. Refer to the charger operating manual.
Inserting/replacing the battery
■ Press the two charged batteries into the power tool until they click into place (see figure B).
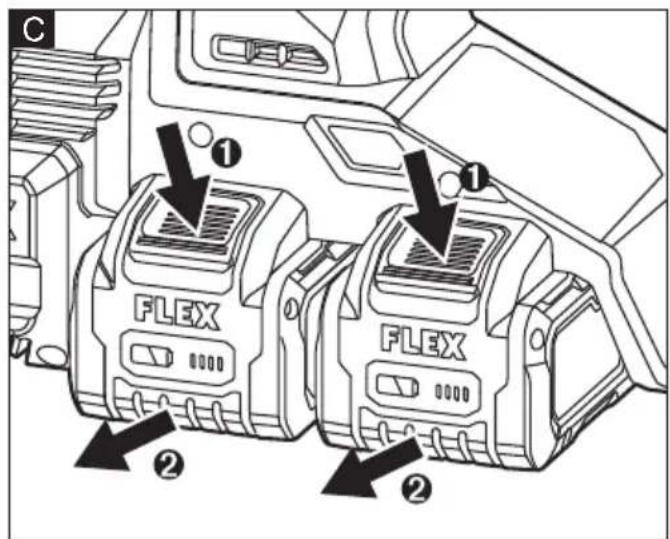
■ To remove, press the release button(1.) and pull out the two batteries(2.) (see figure C).
■ Always attach or remove the two batteries at the same time. The power tool cannot work with one battery.

CAUTION!
When the device is not in use, protect the battery contacts. Loose metal parts may short circuit the contacts; explosion and fire hazard!
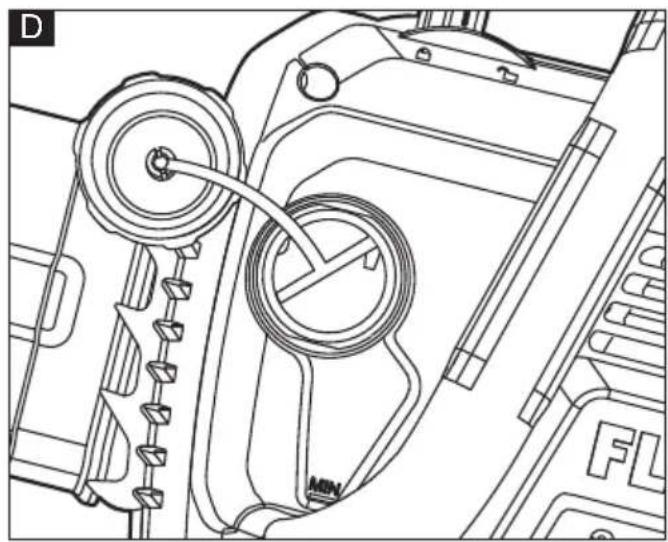
Chain lubrication oil(see figure D)

WARNING!
This chain saw is not filled with chain oil. It is essential to fill the product with chain oil before using it! Never operate the product without chain oil as this will result in extensive damage to the product!

CAUTION!
Operating the saw chain dry or with too little chain oil will decrease cutting efficiency, shorten the product life span and cause rapid wear to the saw chain and guide bar from overheating!
Fill chain oil immediately when the oil level is blow "Min" on the oil inspection window (10).
■ Position the product in a way that the chain oil tank cap (11) faces upwards.
■ Open the cap (11) and fill the tank with chain lubrication oil.
■ Do not overfill and leave approx. 5 mm space between the oil level and the inside edge of the tank to allow for expansion.
■ Tighten the cap (11) firmly.

NOTE
We recommend using environment-friendly biodegradable chain oil specifically intended to be used with chain saw. Never use recycled/old oil. Use of non-approved oil will invalidate the warranty.
Replacing the chain and guide bar

WARNING!
Always wear protective gloves when handling the chain.
■ Remove the two batteries from the tool.
■ Place the chain saw on any suitable flat surface.
■ Loosen the clamping knob (14) anticlockwise and remove the drive sprocket cover (13) (see figure E).
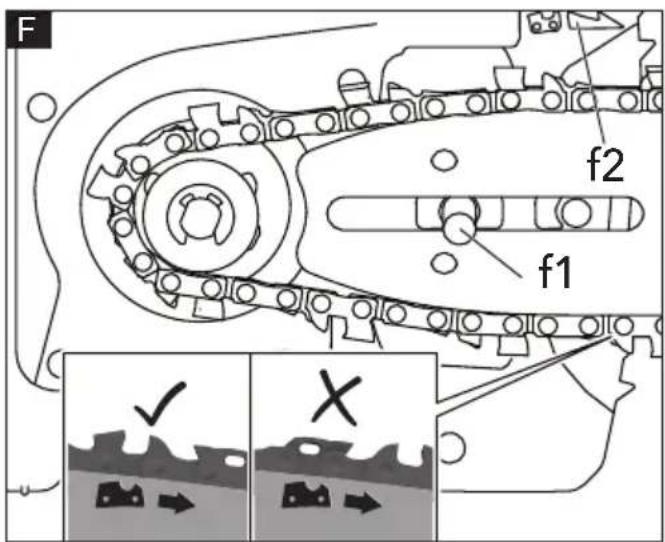
■ Fit the saw chain (3) in the solt around the guide bar (4). Ensure the saw chain is in the correct running direction.
■ Fit the guide bar onto the drive sprocket. Mark sure that the guide bar (4) is correctly positioned over the fastening bolt (f1) and the saw chain 'Cutter' complies with the chain direction indicator (f2) on the plastic housing(see figure F).
■ Make sure that the chain tension pin (17) is inserted in the lower hole in the tail of the bar, if not, rotate the chain tension knob (12) fully counterclockwise (see figure G).
■ Reattach the drive sprocket cover (13).
■ Lightly tighten the cover (13) with the clamping knob(14).
Saw chain tensioning

CAUTION!
Always check the chain tension before use. Upon initial operation, new chains can lengthen considerably.

WARNING!
Avoid tensioning the chain if it is hot, as this will cause the chain to become overtensioned and fit too tightly against the chain bar when it cools down.
■ Remove the two batteries and place the chain saw on a suitable flat surface.
■ Lift up the tip of the guide bar (4) and keep it slight lifted as you adjust the tension. Ensure that the guide bar has some movement, loosen the clamping knob (14) slightly if necessary.
■ Turn the chain tension knob (12) until all chain sections are just touching the bottom edge of the guide.
■ Check the chain tension by pulling upwards on the chain against the weight of the product. The correct chain tension is achieved when the saw chain can be lifted by approx. 5 mm from the guide bar in the centre (see figure H).
■ Re-adjust the tension as described above if you find that the chain saw is too loose or tight.
■ Tighten the clamping knob (14) firmly to fix the guide bar.
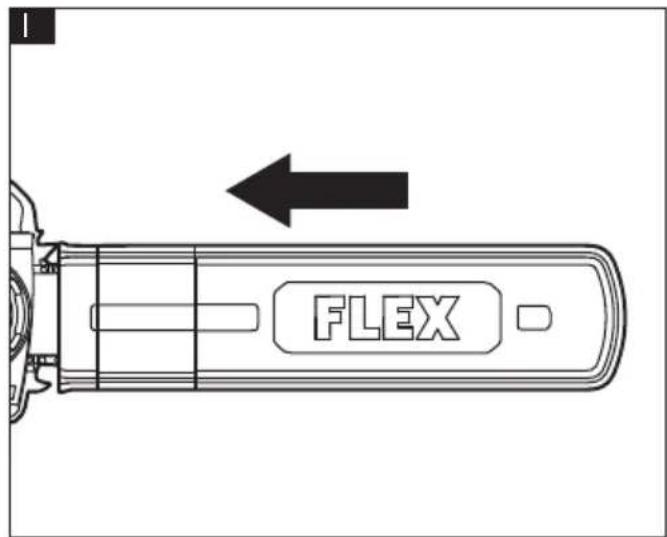
Guide bar cover (see figure I)
Always fit the guide bar cover (15) to guide bar (4) when the tool is not in use, e.g. refilling of chain oil, inserting/removing of battery packs, storage and transportation. Remove the guide bar cover (15) before operation.
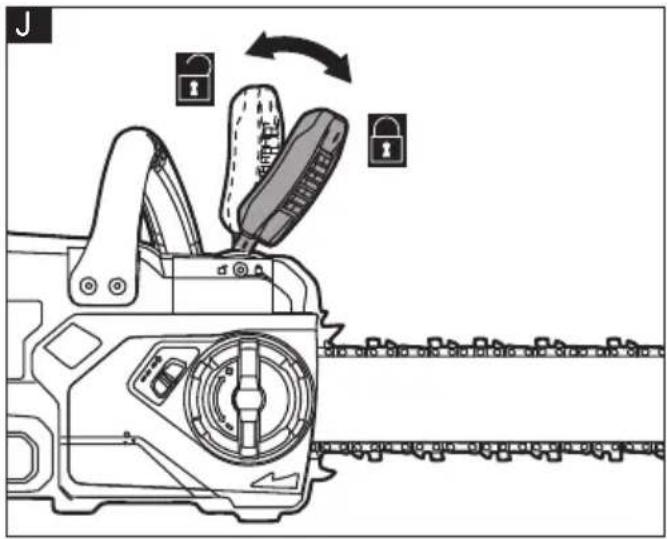
Switch on/off
■ Pull the kickback brake from position 🔒 to position 🔒 (see figure J).
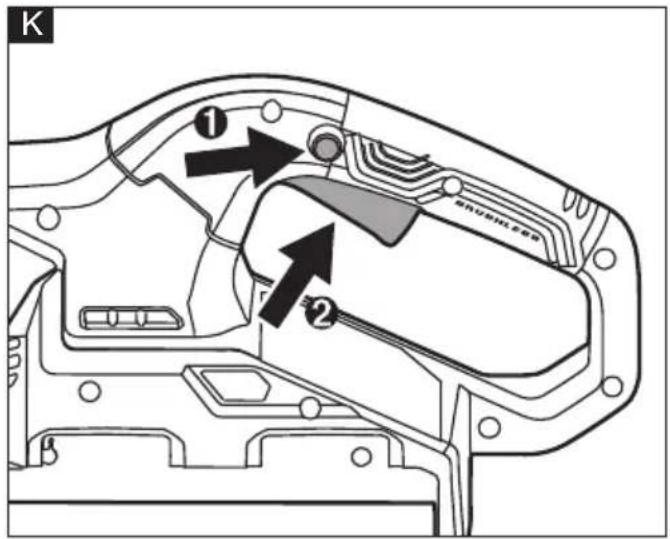
■ To start the machine, press the lock-off button (7) and then press the trigger switch (9) and keep it pressed (see figure K).
■ To switch off the machine, release the trigger switch.
General cutting process
■ Familiarise yourself with all the controls and switches. Practise all movements with the product switched off.
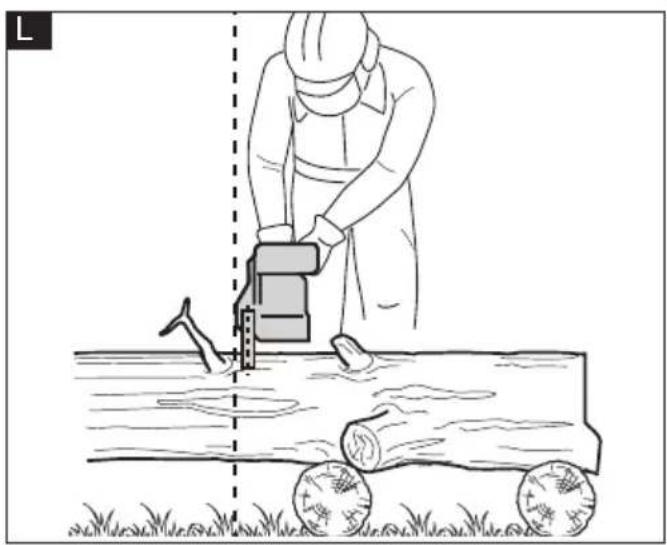
■ Always hold the product firmly with both hands. Front handle with the left hand and rear handle with the right hand. Fully grip both handles at all times during operation. Never operate the chain saw using only one hand (see figure L).
■ Only use the product with a secure stance. Hold the product at the right-hand side of your body.
■ Ensure that cutting object does not exceed the usable cutting length of the chain saw. The tip of guide bar shall always be kept at
least 5 cm outside the outline of the wood log.
■ Ensure the saw chain is running at full speed before it makes contact with the wood. Use the gripping teeth (m1) to secure the product onto the wood before starting to cut and use it as a leverage point while cutting(see figure M).
■ Do not force the saw chain while cutting, let the chain do the work.
■ Never operate the chain saw with arms fully extended. Do not attempt to saw areas which are difficult to reach, or on a ladder. Never saw above shoulder height.
■ Beware when reaching the end of the cut. The weight of the chain saw changes unexpectedly as it cuts free from the wood. Danger of injury to the legs and feet.
■ Always remove the chain saw from a wood cut while the saw chain is running.
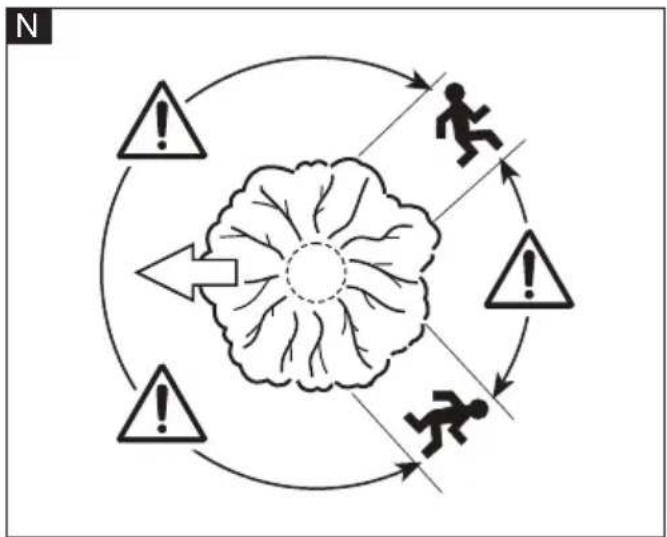
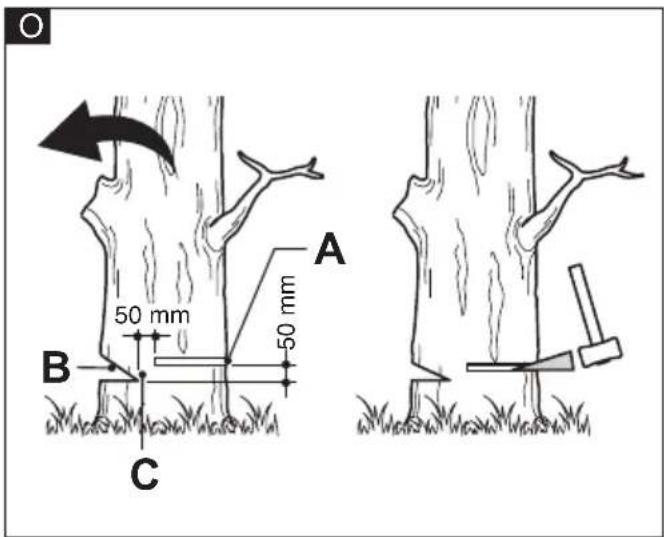
Felling a tree (see figure N & O)
When bucking and felling operations are being performed by two or more persons at the same time, the felling operations should be separated from the bucking operation by a distance of at least twice the height of the tree being felled. Trees should not be felled in a manner that would endanger any person, strike any utility line or cause any property damage. If the tree does make contact with any utility line, the company should be notified immediately.
The operator should keep on the uphill side of the terrain as the tree is likely to roll or slide downhill after it is felled.
An escape path should be planned and cleared as necessary before cuts are started. The escape path should extend back and diagonally to the rear of the expected line of fall.
Before felling is started, consider the natural lean of the tree, the location of larger branches and the wind direction to judge which way the tree will fall.
Remove dirt, stones, loose bark, nails, staples and wire from the tree.
Limbing and pruning (see figure P)
Limbing is removing the branches from a fallen tree. When limbing leave larger lower limbs to support the log off the ground. Remove the small limbs in one cut. Branches under tension should be cut from the bottom up to avoid binding the product.
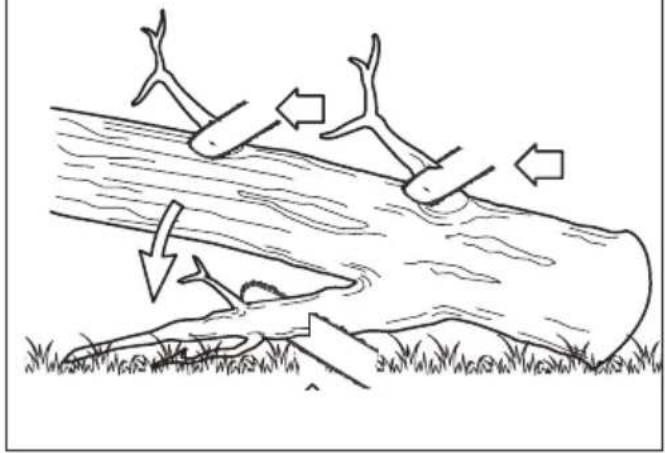
Cutting wood under tension (see figure Q)
WARNING!
Be extremely careful when sawing wood, branches or trees under tension. Leave saw jobs like these to trained professionals.
There is a high risk of accidents.
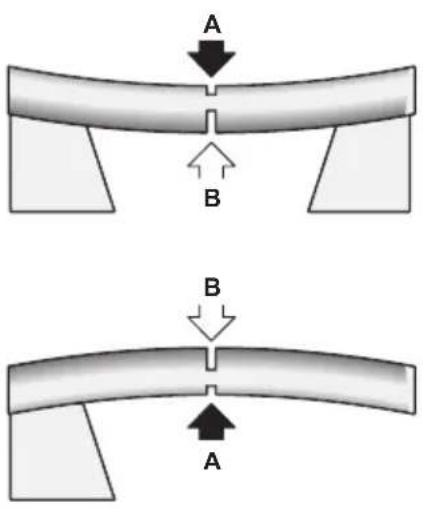
When sawing logs supported on both ends, start the cut from above (A) about one third of the diameter into the log and then finish the cut at the same spot from below (B), in order to avoid splitting of the log or jamming of the saw. Avoid contact of the saw chain with the ground.
When sawing logs supported on only one end, start the cut from below (A) about one third of the diameter into the log and then finish the cut at the same spot from above (B), in order to avoid splitting of the log or jamming of the saw.
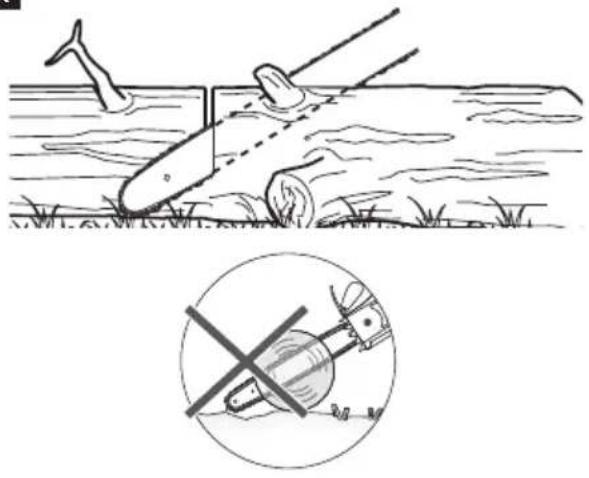
Bucking a log
■ Follow the simple directions for easy cutting. When the log is supported along its entire length, it is cut from the top (overbuck, see figure R).
■ When the log is supported on one end, cut 1/3 the diameter from the underside (underbuck). Then make the finished cut by overbucking to meet the first cut (see figure S).
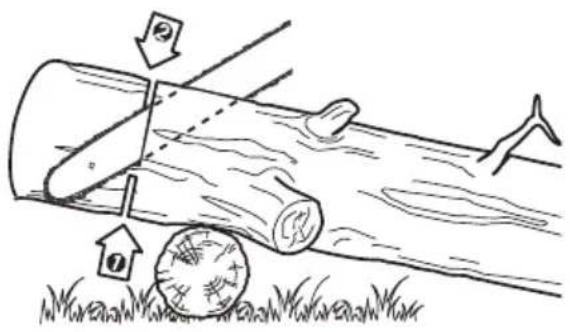
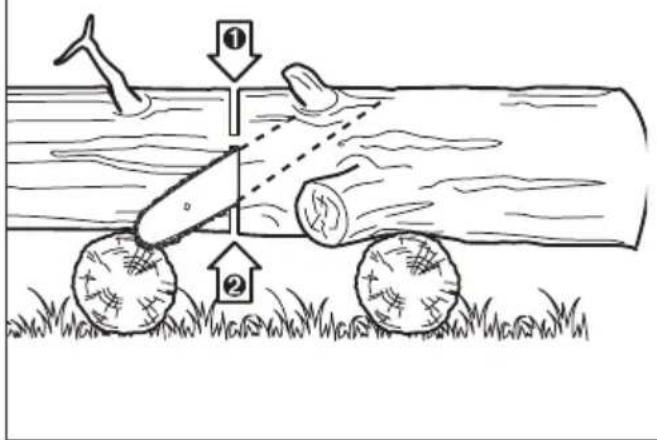
■ When the log is supported on both ends, cut 1/3 the diameter from the top (overbuck). Then make the finished cut by underbucking the lower 2/3 to meet the first cut (see figure T).
- When bucking on a slope always stand on the uphill side of the log. When “cutting through”, to maintain complete control release the cutting pressure near the end of the cut without relaxing your grip on the product handles. Do not let the chain contact the ground. After completing the cut, wait for the saw chain to stop before you move the product. Always switch off the product before moving from tree to tree (see figure U).
■ Support small logs on a sawing stand or another log while bucking (see figure V).
Maintenance and care

WARNING!
Remove the batteries before carrying out any work on the power tool.
Cleaning
■ Clean the power tool and grille in front of the vent slots regularly. Frequency of cleaning is dependent on the material and duration of use.
■ Regularly blow out the housing interior and motor with dry compressed air.
Sharpening the saw chain
Never sharpen the saw chain yourself unless you have experience with it. Replace the saw chain with the FLEX spare saw chain or have the saw chain professionally resharpened at a FLEX authorised customer services agent.
Spare parts and accessories
For other accessories, see the manufacturer's catalogues.
Exploded drawings and spare-part lists can be found on our homepage:
www.flex-tools.com.
Disposal information

WARNING!
Render redundant power tools unusable:
- battery operated power tool by removing the battery.

EU countries only
Do not throw electric power tools into the household waste!
In accordance with the European Directive 2012/19/EU on Waste Electrical and Electronic Equipment and transposition into national law used electric power tools must be collected separately and recycled in an environmentally friendly manner.

Raw material recovery instead of waste disposal.
Device, accessories and packaging should be recycled in an environmentally friendly manner. Plastic parts are identified for recycling according to material type.

WARNING!
Do not throw batteries into the household waste, fire or water. Do not open used batteries.
EU countries only:
In accordance with Directive 2006/66/EC defective or used batteries must be recycled.

NOTE
Please ask your dealer about disposal options!
C €-Declaration of conformity
We declare on our sole responsibility that the product described in "Technical specifications" conforms to the following standards or normative documents: EN 62841 in accordance with the regulations of the directives 2014/30/EU, 2006/42/EC, 2011/65/EU. Responsible for technical documents: FLEX-Elektrowerkzeuge GmbH, R & D Bahnhofstrasse 15, D-71711 Steinheim/Murr

Peter Lameli Klaus Peter Weinper Technical Director Head of Quality
Department (QD)
Exemption from liability
The manufacturer and his representative are not liable for any damage and lost profit due to interruption in business caused by the product or by an unusable product.
The manufacturer and his representative are not liable for any damage which was caused by improper use of the product or by use of the product with products from other manufacturers.

Declaration of Conformity
We as the manufacturer: FLEX
declare under our sole responsibility, that the product(s) described under „Technical specifications“ fulfills all the relevant provisions of The Supply of Machinery
(Safety) Regulations S.I. 2008/1597 and also fulfills all the relevant provisions of the following UK Regulations:
Electromagnetic Compatibility Regulations
S.I. 2016/1091, The Restriction of the Use of Certain Hazardous Substances in Electrical and Electronic Equipment Regulations
S.I. 2012/3032 and are manufactured in accordance with the following designated Standards:
BS EN 62841-1: 2015/A11:2022 E
BS EN 62841-4-1:2020
BS EN IEC 55014-1:2021,
BS EN IEC55014-2:2021
Place of declaration: Steinheim, Germany.
Responsible person: Peter Lameli, Technical
Contact details for Great Britain: FLEX Power
Tools Limited, Unit 8 Anglo Office Park,
Lincoln Road, HP 12, 3RH Buckinghamshire, United Kingdom.

Technical Director Head of Quality
Department (QD)
1.09.2023


- Symbols used in this manual
- WARNING!
- CAUTION!
- NOTE
- Symbols on the power tool
- For your safety
- Intended use
- Safety instructions for chain saw WARNING!
- Causes and operator prevention of kickback
- Additional safety instructions
- Noise and vibration
- Overview (see figure A)
- Operating instructions
- Before switching on the power tool
- Inserting/replacing the battery
- Chain lubrication oil(see figure D)
- Replacing the chain and guide bar
- Saw chain tensioning
- Guide bar cover (see figure I)
- Switch on/off
- General cutting process
- Felling a tree (see figure N & O)
- Limbing and pruning (see figure P)
- Cutting wood under tension (see figure Q)
- Bucking a log
- Maintenance and care
- Cleaning
- Sharpening the saw chain
- Spare parts and accessories
- Disposal information
- Raw material recovery instead of waste disposal.
- C €-Declaration of conformity
- Exemption from liability
- Declaration of Conformity
Brand : Flex
Model : GCS 35 2x18-EC
Category : Saw