Tondo¹³ - Slicer Ritter - Free user manual and instructions
Find the device manual for free Tondo¹³ Ritter in PDF.

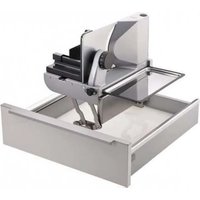
| Product type | Electric slicer |
| Brand | Ritter |
| Model | Tondo¹³ |
| Use | Domestic and similar applications (store kitchens, offices, farms, hotels, guesthouses) |
| Mains voltage | 220-240 V ~ 50/60 Hz |
| Power consumption | 150 W |
| Cutting thickness | 0 to 22 mm approx. |
| Thickness adjustment | Continuous by rotary knob |
| Max. continuous operation time | 10 minutes |
| Blade | Stainless steel rotary |
| Safety | Adjustable blade guard plate in position 0, carriage locking lever, blade clamping device |
| Cleaning | Removable parts washable in hot water (not dishwasher); blade cleaned with a brush; do not immerse the appliance |
| Maintenance | Lubricate the gear wheel and guide rails with Ritter grease or Vaseline |
| Included accessories | Carriage, push rest, cord storage |
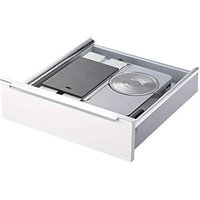
| Optional accessories | Wavy blade for bread (19 cm), wooden board, maintenance grease |
| Manufacturer warranty | 2 years (10 years for the capacitor motor) |
| Dimensions (W x D x H) | Not communicated |
| Weight | Not communicated |
Frequently Asked Questions - Tondo¹³ Ritter
User questions about Tondo¹³ Ritter
0 question about this device. Answer the ones you know or ask your own.
Ask a new question about this device
Download the instructions for your Slicer in PDF format for free! Find your manual Tondo¹³ - Ritter and take your electronic device back in hand. On this page are published all the documents necessary for the use of your device. Tondo¹³ by Ritter.
USER MANUAL Tondo¹³ Ritter
natural_image
Technical line drawing of a mechanical device with an inset view showing a bench and support structure (no text or symbols)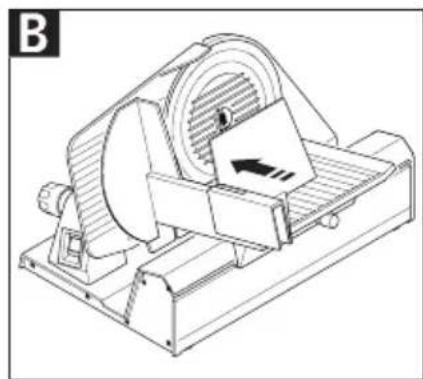
natural_image
Technical line drawing of a mechanical device with a circular component and directional arrow (no text or symbols)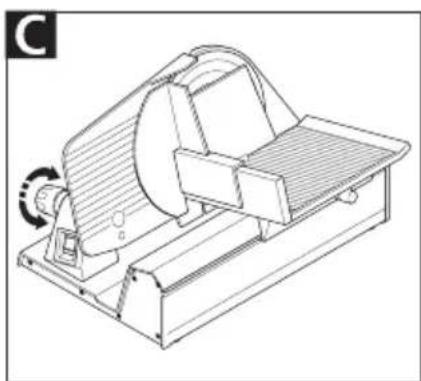
natural_image
Technical line drawing of a mechanical device with a rotating knob (no text or symbols)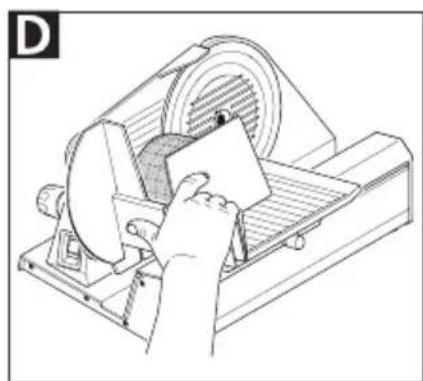
natural_image
Line drawing of a hand using a power tool to clean or adjust a machine (no text or symbols visible)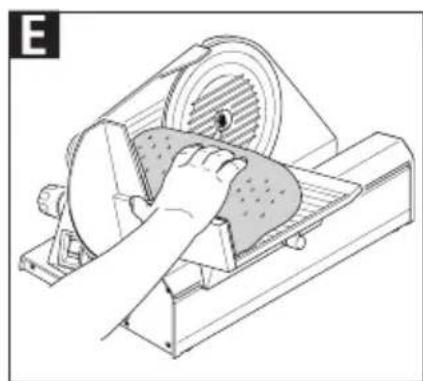
natural_image
Line drawing of a hand operating a mechanical device with a meshed circular component (no text or symbols)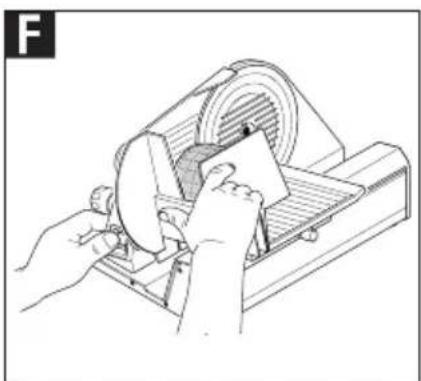
natural_image
Illustration of hands operating a lathe machine with a paper sheet (no text or symbols visible)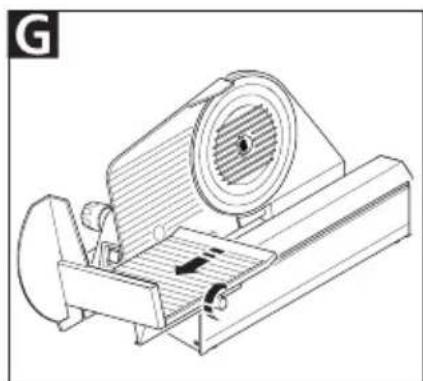
natural_image
Technical line drawing of a mechanical device with no visible text or symbols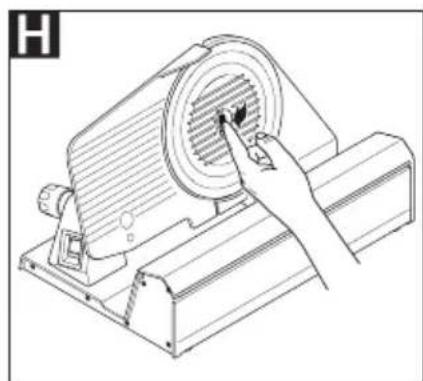
natural_image
Line drawing of a hand pressing a circular component on an industrial machine (no text or symbols)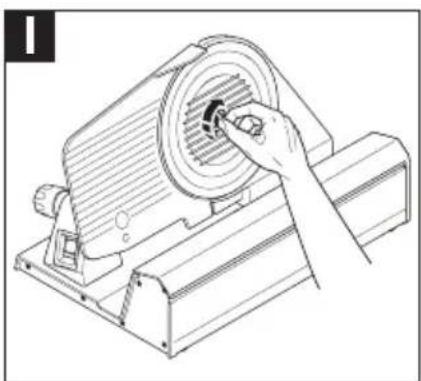
natural_image
Line drawing of a hand operating a circular mechanical device with a knob (no text or symbols)
natural_image
Line drawing of hands operating a lathe machine with a circular component (no text or symbols)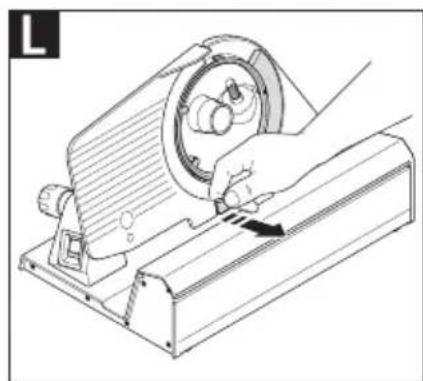
natural_image
Line drawing of a hand using a tool to cut or mark a mechanical component (no text or symbols present)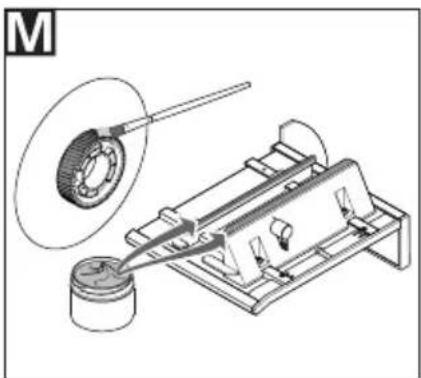
natural_image
Mechanical assembly diagram showing a piston connected to a motor with a magnified inset of the wheel (no text or labels)
GENERAL SAFETY INSTRUCTIONS
To avoid injury or damage to property, please observe the following safety instructions and keep them for future reference.
- This appliance is intended for use in the home and for similar applications including, for example: in staff kitchens in shops and offices; on farms; by guests in hotels, motels and other residential facilities; in B&Bs.
– Never set the appliance down on hot surfaces or close to a naked flame.
– Use the accessories included in the delivery specification only.
- Do not use an extension cable.
- Do not bend the power cord. Never wrap the cable around the appliance.
- Route the power cord so that it does not become a trip hazard and does not come into contact with hot or sharp-edged objects.
- Only start to use the appliance after it has been securely set up.
- Select the installation location so that children cannot reach the appliance's sharp blade.
- Store all packaging materials used out of the reach of children. Do not allow children to play with the packaging material, as there is a risk of suffocation.
- Do not allow children to play with the appliance.
- This appliance must not be used by children. Keep the appliance and its connection cable out of reach of children.
- Persons with reduced physical, sensory or intellectual capabilities or lacking in relevant experience and/or knowledge may only use this appliance if they do so under supervision or have been instructed in the safe use of the appliance and understand the potential risks associated with its use.
- Only connect the appliance to a properly installed and freely accessible socket outlet with a protective conductor system in the immediate vicinity. Operating the appliance from a socket without a protective
conductor is prohibited. The local mains voltage must correspond to the specifications on the type label.
– Always disconnect the appliance from the mains whenever it is to be left unsupervised, and also prior to assembly, dismantling and cleaning.
- Do not use it to cut frozen foods, hot foods, bones, food containing large stones, roast meats encased in netting or packaged foods!
- Do not use the appliance with an external timer or a separate remote control.
– Never leave the appliance unattended when it is in operation.
- Never allow the appliance to run for more than 10 minutes at a time. The motor could overheat. Switch off the appliance to allow the motor to cool down.
Risk of electric shock
- Always remove the power plug from the socket in the event of a malfunction, before cleaning and when the appliance is not in use. When doing so, pull on the plug and not on the cable.
- Never immerse the appliance in water. Never expose the appliance to rain or any other form of moisture. If the appliance falls into water, unplug the cable from the mains socket before removing the appliance from the water. Have the appliance inspected at an authorized service location before using it again.
- Always ensure that your hands are completely dry before using the appliance. Do not use the appliance if it is wet or damp or while you are standing on a damp surface. Do not use the appliance outdoors.
- Never open the housing of the appliance. If you touch live connections or alter the electrical and mechanical design, there is a risk of electric shock.
- Stop using the appliance immediately if any parts are damaged and contact the ritter after-sales service. Do not make any changes to the appliance yourself.
- If the power cord is damaged, it must be replaced by the manufacturer, the manufacturer's after-sales service or a similarly qualified person to eliminate risk of personal injury.
Risk of injury
- The rotary blade is extremely sharp and can cut off body parts.
- Slicing with the appliance is only possible with the slice carriage. The slide rail is not suitable for placing food on. The slice carriage can only be removed for easier cleaning.
- This appliance must be used with the left-over holder correctly positioned, unless the size and shape of the food to be sliced means that it cannot be used.
- Before replacing accessories or add-on parts that move when operated, the appliance must be switched off and disconnected from the mains.
- The rotary blade will continue to run for a short time after being switched off.
- Absolute caution is required when operating and cleaning the appliance! Take particular care to keep your fingers and other body parts away from the rotary blade. Do not reach into the space between the stop plate and the rotary blade!
- Before cleaning the appliance, switch it off, unplug the power plug from the socket and turn the slice thickness adjustment knob anticlockwise until the stop plate is in the "0" position.
- To avoid injury, use a dish-washing brush or a similar suitable cleaning device to clean the rotary blade; do not clean the rotary blade in the dishwasher as there is an increased risk of cuts when putting it in and taking it out.
Unfold the illustrations at the front and back of this manual.
Please read these instructions thoroughly before using the appliance for the first time. Keep these operating instructions in a safe place and ensure that they are included with the appliance if passing it on to a third party.
Alternatively, the current operating instructions are available at www.ritterwerk.de.
INTENDED USE
The deli slicer is used for slicing household foods.

The deli slicer is suitable for contact with foodstuffs.
If the appliance is used for any purpose other than its intended use, or if it is operated incorrectly, this may result in serious injury or damage to property. All warranty and liability claims will be rendered null and void in this case.
BEFORE USING THE APPLIANCE FOR THE FIRST TIME
Preparation
- Remove the appliance carefully from the packaging.
Info:
The deli slicer is supplied with the slice carriage and left-over holder pre-assembled.
- Remove all packaging parts and keep these together with the packaging in a safe place.
- Set the appliance down on a flat, non-skid surface close to a mains socket.
- Clean the appliance before allowing it to come into contact with any food (see CLEANING).
Assembling the appliance
After cleaning the slice carriage and left-over holder, position them as described below:
A Position the slice carriage (7) on the appliance:
- Place the two carriage bars (14), which are located on the underside of the slice carriage, on the slide rail (10) of the appliance and slide the slice carriage forwards until it locks into place. Make sure that the two guide runners (12) of the slice carriage are in the slide guides (11) of the appliance.
- Now open the locking lever (8) with your right hand by pushing it forwards. You must actively hold the locking lever in this open position so that you can push the slice carriage fully open with your other hand. When you release the locking lever, it automatically returns to the locked position. Info:
When correctly positioned, the slice carriage can be moved easily and is perpendicular to the rotary blade.
B Slide the left-over holder (6) onto the slice carriage's handle.
- Insert the power plug (15) into the socket.
• Always keep any excess power cord (15) stored in the cable compartment (16) by sliding the cord into the slot on the back of the appliance.
SLICING
C Set the required slice thickness using the infinitely adjustable slice thickness adjustment knob (2). The slice thickness adjustment scale (13) is located on the top of the stop plate (1). For the maximum slicing width, turn the slice thickness adjustment knob through 360^ several times.
Info:
For safety reasons, the "0" position on the slice thickness adjustment scale is designed to cover the blade.
D Place the food to be sliced onto the slice carriage (7). Use the left-over holder (6) to lightly press the food up against the stop plate (1).
E Slicing with the appliance is only possible with the slice carriage. The slide rail is not suitable for placing food on. Protect your hands by always using the left-over holder. Exception: Excessively large foods to be sliced
CAUTION, risk of injury from rotary blade:
Never use the appliance without the slice carriage!
F Turn the appliance on using the on/off switch (3).
- With the appliance running, gently feed the food to be sliced up against the rotary blade (4). Info:
Never use the appliance for more than 10 minutes in continuous operation. - Switch the appliance off again using the on/off switch when you have finished slicing. Wait until the rotary blade has come to a complete stop.
• After each use, set the stop plate (1) to the "0" position using the slice thickness adjustment knob (2) to cover the sharp rotary blade and to avoid any injuries.
CLEANING
CAUTION, risk of electric shock, risk of injury from exposed blade:
Switch the appliance off before cleaning it; pull the power plug out of the socket and set the stop plate to the "0" position using the slice thickness adjustment knob (2).
Clean the deli slicer regularly to prevent the accumulation of food residue.
Info:
The rotary blade must also be cleaned after each use as described below. As all foods contain acids, salts and moisture, rust film can build up, even on stainless steel. Detailed instructions on how to care for the rotary blade are available at https://www.ritterwerk.com/blade-guidance.
Preparation
- Remove the left-over holder (6).
G Release the slice carriage's lock by pushing the locking lever (8) forwards and holding it in this position. Then pull the slice carriage (7) towards you to pull the guide runners (12) out of the slide guides (11) of the appliance. You can now lift the slice carriage off the appliance.
Remove the rotary blade:
HOLD open the blade catch (5), which is integrated in the blade cover, and turn it clockwise (as shown by the padlock symbol on the cover) until the entire blade cover can be removed.
K Press against the rotary blade (4) with one hand from the rear to loosen it. Take hold of the rotary blade at its rotational centre and remove it together with the gear wheel.
L There is an additional plastic ring under the rotary blade that should also be removed for cleaning.
Cleaning after each use
- Wipe down the housing, the rotary blade as well as all other removed parts with a damp cloth.
Occasional cleaning
- Give the rotary blade and all other removed parts a thorough wash in warm soapy water (not in the dishwasher).
- Clean the housing behind the blade using a dry cloth/brush. Info:
Do not use any abrasive cleaners, sponges with rough surfaces or hard brushes to clean the appliance.
- Dry all parts that you have washed.
Assembling the appliance
- Start by reinserting the plastic ring by hooking it in at the bottom with the blade guard until you feel it click into place. Then press it firmly all the way round so that it fits snugly.
CAUTION, risk of injury from exposed blade:
Never use the deli slicer without the plastic ring!
- Now refit the rotary blade.
- Insert the blade catch (in the blade cover) (5) and close it by turning it anticlockwise (as shown by the padlock symbol on the cover).
AB: it the slice carriage and left-over holder.
MAINTENANCE
Your deli slicer is maintenance-free.
M However, we recommend that you occasionally apply a little extra ritter maintenance grease (or optionally a little Vaseline) to the gear wheel on the rotary blade (4) and the guide runners (12) on the slice carriage to keep them lubricated and ensure that the carriage continues to move easily.
STORAGE
Keep the appliance out of the reach of children.
Never wrap the power cord around the appliance. To store the power cord, always use the cable compartment (16) integrated into the appliance.
DISPOSAL OF WASTE ELECTRICAL AND ELECTRONICEQUIPMENT
This symbol indicates that this product must not be disposed of with unsorted municipal
waste. There is a separate (free) system for the collection and return of waste electrical and electronic equipment. For more information, please contact your local authority or the shop where you purchased the product. By ensuring that this product is disposed of correctly, you will help prevent potential negative consequences for the environment and human health and contribute to the conservation of natural resources.
REACH DIRECTIVE
A serrated rotary blade (19 cm diameter) is available for the deli slicer specifically for slicing bread.
A suitable wooden board is available to catch the sliced food.
The original ritter maintenance grease is available for maintaining (regreasing) the deli slicer.
SERVICE, REPAIRS AND SPARE PARTS
Please contact your local after-sales service for service, repairs and spare parts.
The appliance complies with the CE specifications.
Mains voltage/power consumption: Refer to the type label on the underside of the appliance.
Slice thickness:
0 mm to approx. 22 mm
WARRANTY
This ritter deli slicer comes with a 2-year manufacturer's warranty and a 10-year manufacturer's warranty specifically for the capacitor motor, calculated from the date of purchase and in accordance with EU warranty directives. Your legal warranty claims according to § 437 ff. BGB (German Civil Code) remain unaffected by this regulation.
The manufacturer warranty applies to all devices sold within the European Union. For details of the warranty conditions, see www.ritterwerk.de/warranty.
For any warranty claims or for customer service, the deli slicer must always be sent to the after-sales-service centre in your country.
EXPLANATION OF SYMBOLS
Symbol Explanation

CE marking: The product complies with the applicable requirements of the European Union.
The product was put on the market after 13 August 2005. It must not be disposed of as normal domestic waste.
The crossed-out wheelie bin symbol indicates that separate collection is required.

Suitable for contact with foodstuffs
INSTRUCTIONS DE SÉCURITÉ GÉNÉRALES
https://www.ritterwerk.com/blade-guidance.
Valmistelu
https://www.ritterwerk.com/blade-guidance.