
NZ85C6058KK - Cooker SAMSUNG - Free user manual and instructions
Find the device manual for free NZ85C6058KK SAMSUNG in PDF.
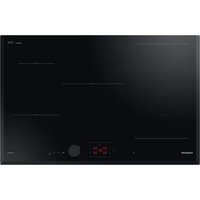


| Product type | Built-in induction hob |
| Brand | Samsung |
| Model | NZ85C6058KK |
| Number of cooking zones | 4 induction zones (including one Flex zone) |
| Power supply | 220-240 V ~, 50/60 Hz, total max power 7400 W (configurable 3000/4000/7400 W) |
| Main functions | Boost Max, Flex Zone, Flex Zone Plus (depending on model), Keep Warm, Timer, Pause/Resume, Quick Stop, Child Lock, Power Limit, SmartThings Wi-Fi Connection, Bluetooth Hood Control |
| Display | Digital display with residual heat indicator |
| Control panel | Touch controls |
| Safety | Automatic safety shut-off, Child lock, Pan detection, Residual heat indicator, Overheating shut-off |
| Maintenance and cleaning | Ceramic glass surface; clean after each use; scraper for stubborn dirt; specific ceramic glass cleaners |
| Spare parts and repairability | Power cord replaceable by a professional; Samsung after-sales service |
| General information | 884-page user manual available in several languages; model NZ85C6058KK |
Frequently Asked Questions - NZ85C6058KK SAMSUNG
User questions about NZ85C6058KK SAMSUNG
0 question about this device. Answer the ones you know or ask your own.
Ask a new question about this device
Download the instructions for your Cooker in PDF format for free! Find your manual NZ85C6058KK - SAMSUNG and take your electronic device back in hand. On this page are published all the documents necessary for the use of your device. NZ85C6058KK by SAMSUNG.
USER MANUAL NZ85C6058KK SAMSUNG
The following symbols are used in this User Manual: 3 Model name & serial number 3
Safety instructions 3
Disposing of the packaging material 7 Proper disposal of your old appliance 7 Correct Disposal of This Product (Waste Electrical & Electronic Equipment) 7
Installing the hob 8
Safety instructions for the installer 8 Tools you will need 8 Connecting to the mains power supply 8 Installing into the countertop 9 Components 11
Before you start 11
Cooking zones 11 Control panel 13 Induction heating 14 Safety shutoff 15 Residual heat indicator 15 Temperature detection 15 Cookware 16 Using the touch buttons 19 Operating noises 19 Initial cleaning 19
Operation (NZ8****7**) 19
Switching the appliance on 19 Switching the appliance off 19 Selecting cooking zone and power level 19 Max Boost 20 Using the Flex zone (Only for Flex zone applied models) 20 Flex zone Plus (Only for Flex zone plus applied models) 21 Timer 21
Pause/Resume 22
Quick stop 22 Child safety lock 22 Maximum power limit 23 Sound on/off 23 Smart Connect 23 Hood control 24
Operation (NZ8****8**) 24
Switching the appliance on 24 Switching the appliance off 24 Selecting cooking zone and power level 24 Max Boost 25 Using the Flex zone (Only for Flex zone applied models) 25 Flex zone Plus (Only for Flex zone plus applied models) 26 Keep Warm 27 Timer 27 Pause/Resume 27 Quick stop 27 Child safely lock 28 Maximum power limit 28 Sound on/off 28 Smart Connect 29 Hood control 29
Maintaining your appliance 30
Hob 30 Light soiling 30 Stubborn soiling 30 Problem dirt 30 Hob frame (option) 31 To avoid damaging your appliance 31
Troubleshooting and service 31
Troubleshooting 31 Service 33
Using this manual
Please take the time to read this owner's manual, paying particular attention to the safety information contained in the following section, before using your appliance. Keep this manual for future reference. If transferring ownership of the appliance, please remember to pass the manual on to the new owner.
The following symbols are used in this User Manual:
WARNING
Hazards or unsafe practices that may result in severe personal injury or death.
CAUTION
Hazards or unsafe practices that may result in minor personal injury or property damage.
CAUTION
To reduce the risk of fire, explosion, electric shock, or personal injury when using your hob, follow these basic safety precautions.
NOTE
Useful tips, recommendations, or information that helps users manipulate the product.
Model name & serial number
Both the model name and the serial number are labeled underneath the hob base. For later use, write down the information or attach the additional product label (located on the top of the product) onto the current page.
Model Name
Serial Number
Safety instructions
The safety aspects of this appliance comply with all accepted technical and safety standards. However, as manufacturers we also believe it is our responsibility to familiarize you with the following safety instructions.
WARNING
This appliance is not intended for use by persons (including children) with reduced physical, sensory or mental capabilities, or lack of experience and knowledge, unless they have been given supervision or instruction concerning use of the appliance by a person responsible for their safety.
Children should be supervised to ensure that they do not play with the appliance.
This appliance can be used by children aged from 8 years and above and persons with reduced physical, sensory or mental capabilities or lack of experience and knowledge if they have been given supervision or instruction concerning use of the appliance in a safe way and understand the hazards involved. Children shall not play with the appliance. Cleaning and user maintenance shall not be made by children without supervision. The means for disconnection must be incorporated in the fixed wiring in accordance with the wiring rules.
Safety instructions
This appliance should be able to be disconnected from the supply after installation. The disconnection may be achieved by having the plug accessible or by incorporating a switch in the fixed wiring in accordance with the wiring rules.
If the supply cord is damaged, it must be replaced by the manufacturer, its service agent or similarly qualified persons in order to avoid a hazard.
The method of fixing stated is not to depend on the use of adhesives since they are not considered to be a reliable fixing means.
WARNING: If the surface is cracked, power off the appliance to avoid the possibility of electric shock.
During use the appliance becomes hot. Care should be taken to avoid touching heating elements inside the hob.
WARNING: Accessible parts may become hot during use. Young children should be kept away.
A steam cleaner is not to be used.
Metallic objects such as knives, forks, spoons and lids should not be placed on the hob surface since they can get hot.
After use, power off the hob element by its control and do not rely on the pan detector.
The appliance is not intended to be operated by means of an external timer or separate remote-control system.
CAUTION: The cooking process has to be supervised. A short term cooking process has to be supervised continuously.
The appliance must not be installed behind a decorative door in order to avoid overheating.
WARNING: The appliance and its accessible parts become hot during use. Care should be taken to avoid touching heating elements. Children less than 8 years of age shall be kept away unless continuously supervised.
WARNING: Unattended cooking on a hob with fat or oil can be dangerous and may result in a fire.
NEVER try to extinguish a fire with water, but power off the appliance and then cover flame e.g. with a lid or a fire blanket.
WARNING: Danger of fire: Do not store items on the cooking surfaces.
WARNING: Use only hob guards designed by the manufacturer of the cooking appliance or indicated by the manufacturer of the appliance in the instructions for use as suitable or hob guards incorporated in the appliance. The use of inappropriate guards can cause accidents.
The surfaces are liable to get hot during use.
This appliance can be used by children aged from 8 years and above and persons with reduced physical, sensory or mental capabilities or lack of experience and knowledge if they have been given supervision or instruction concerning use of the appliance in a safe way and understand the hazards involved. Children shall not play with the appliance. Cleaning and user maintenance shall not be made by children unless they are older than 8 and supervised.
Keep the appliance and its cord out of reach of children less than 8 years.
CAUTION
Be sure the appliance is properly installed and grounded by a qualified technician.
The appliance should be serviced only by qualified service personnel. Repairs carried out by unqualified individuals may cause injury or serious malfunction. If your appliance is in need of repair, contact your local service centre. Failure to follow these instructions may result in damage and void the warranty.
Flush-mounted appliances may be operated only after they have been installed in cabinets and workplaces that conform to the relevant standards. This ensures sufficient protection against contact for electrical units as required by the essential safety standards.
If your appliance malfunctions or if fractures, cracks or splits appear:
- power off all cooking zones;
- disconnect the hob from the mains supply; and
- contact your local service centre.
If the hob cracks, turn the appliance off to avoid the possibility of electric shock. Do not use your hob until the glass surface has been replaced.
Safety instructions
Do not use the hob to heat aluminium foil, products wrapped in aluminium foil or frozen foods packaged in aluminium cookware.
Liquid between the bottom of the pan and the hob can produce steam pressure, which may cause the pan to jump.
Always ensure that the hotplate and the base of the pan are kept dry.
The cooking zones will become hot when you cook.
Always keep small children away from the appliance.
Keep all packaging materials well out of the reach of children, as packaging materials can be dangerous to children.
This appliance is to be used only for normal cooking and frying in the home. It is not designed for commercial or industrial use. Never use the hob for heating the room.
Take care when plugging electrical appliances into mains sockets near the hob. Mains leads must not come into contact with the hob.
Overheated fat and oil can catch fire quickly. Never leave surface units unattended when preparing foods in fat or oil, for example, when cooking chips.
Turn the cooking zones off after use.
Always keep the control panels clean and dry.
Never place combustible items on the hob, it may cause fire.
There is the risk of burns from the appliance if used carelessly.
Cables from electrical appliances must not touch the hot surface of the hob or hot cookware.
Do not use the hob to dry clothes.
Users with Pacemakers and Active Heart Implants must keep their upper body at a minimum distance of 30 cm from induction cooking zones when turned on. If in doubt, you should consult the manufacturer of your device or your doctor. (Induction hob model only)
Do not attempt to repair, disassemble, or modify the appliance yourself.
Always turn the appliance off before cleaning.
Clean the hob in accordance with the cleaning and care instructions contained in this manual.
Keep pets away from the appliance because pets may step on the controls of the appliance, causing a malfunction.
Disposing of the packaging material
WARNING
All materials used to package the appliance are fully recyclable. Sheet and hard foam parts are appropriately marked. Please dispose of packaging materials and old appliances with due regard to safety and the environment.
Proper disposal of your old appliance
WARNING
Before disposing of your old appliance, make it inoperable so that it cannot be a source of danger. To do this, have a qualified technician disconnect the appliance from the mains supply and remove the mains lead.
The appliance may not be disposed of in the household rubbish. Information about collection dates and public refuse disposal sites is available from your local refuse department or council.
Correct Disposal of This Product (Waste Electrical & Electronic Equipment)
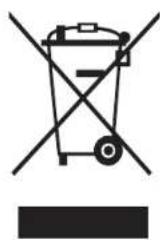
(Applicable in countries with separate collection systems) This marking on the product, accessories or literature indicates that the product and its electronic accessories (e.g. charger, headset, USB cable) should not be disposed of with other household waste at the end of their working life. To prevent possible harm to the environment or human health from uncontrolled waste disposal, please separate these items from other types of waste and recycle them responsibly to promote the sustainable reuse of material resources.
Household users should contact either the retailer where they purchased this product, or their local government office, for details of where and how they can take these items for environmentally safe recycling.
Business users should contact their supplier and check the terms and conditions of the purchase contract. This product and its electronic accessories should not be mixed with other commercial wastes for disposal.
For information on Samsung's environmental commitments and product-specific regulatory obligations, e.g. REACH, visit: www.samsung.com/uk/aboutsamsung/sustainability/environment/our-commitment/data/
Installing the hob
WARNING
Be sure the new appliance is installed and grounded only by qualified personnel. Please observe this instruction. The warranty will not cover any damage that may occur as a result of improper installation. Technical data is provided at the end of this manual.
Safety instructions for the installer
- A device must be provided in the electrical installation that allows the appliance to be disconnected from the mains at all poles with a contact opening width of at least 3 mm. Suitable isolation devices include line protecting cut-outs, fuses (screw type fuses are to be removed from the holder), earth leakage trips and contactors.
- With respect to fire protection, this appliance corresponds to EN 60335-2-6. This type of appliance may be installed with a high cupboard or wall on one side.
- The installation must guarantee shock protection.
- The kitchen unit in which the appliance is fitted must satisfy the stability requirements of DIN 68930.
- For protection against moisture, all cut surfaces are to be sealed with a suitable sealant.
- On tiled work surfaces, the joints in the area where the hob sits must be completely filled with grout.
- On natural, artificial stone, or ceramic tops, the snap action springs must be bonded in place with a suitable artificial resin or mixed adhesive.
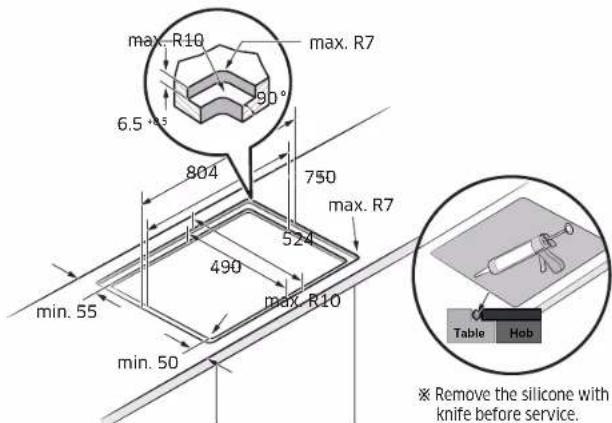
- Ensure that the seal is correctly seated against the work surface without any gaps. Additional silicon sealant must not be applied; this would make removal more difficult when servicing. The hob must be pressed out from below when removed.
- A board can be installed underneath the hob.
- The ventilation gap between the worktop and front of the unit underneath it must not be covered.
Tools you will need
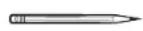
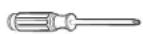
Pencil, Phillips Head Screwdriver, Ruler or Straightedge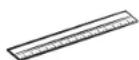
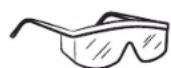
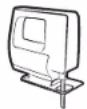
Safety Glasses, Saber Saw, Drill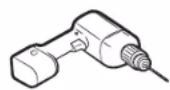
Connecting to the mains power supply
Before connecting, check that the nominal voltage of the appliance, that is, the voltage stated on the rating plate, corresponds to the available supply voltage. The rating plate is located on the lower casing of the hob.
WARNING
It should be installed suitably by a component or trained person. Shut off power to circuit before connecting wires to circuit.
The heating element voltage is AC 230 V-. The appliance also works perfectly on networks with AC 220 V~ or AC 240 V~. The hob is to be connected to the mains using a device that allows the appliance to be disconnected from the mains at all poles with a contact opening width of at least 3 mm, e.g. automatic line protecting cut-out, earth leakage trips or fuse.
WARNING
The cable connections must be made in accordance with regulations and the terminal screws tightened securely.
WARNING
Once the hob is connected to the mains supply, check that all cooking zones are ready for use by briefly switching each on in turn at the maximum setting with suitable cookware.
WARNING
Pay attention (conformity) to phase and neutral allocation of house connection and appliance (connection schemes); otherwise, components can be damaged. Warranty does not cover damage resulting from improper installation.
WARNING
If the supply cord is damaged, it must be replaced by the manufacturer, its service agent or similarly qualified persons in order to avoid a hazard.
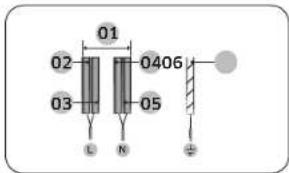
1N~ (32A)
| 01 220-240 V ~ | 04 Blue |
| 02 Black 05 Gray | |
| 03 Brown 06 Green Yellow | |
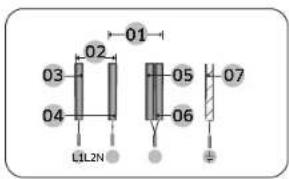
2N~ (16A): Separate the 2-phase wires (L1 and L2) before connection.
| 01 | 220-240 V | - | 05 | Blue |
| 02 | 380-415 V | - | 06 | Gray |
| 03 | Black | 07 | Yellow | |
| 04 | Brown |
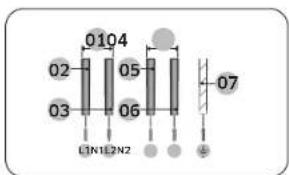
2 x 1N~ (16A): Separate the wires before connection.
| 01 220-240 V ~ | 05 Brown |
| 02 Black 06 Gray | |
| 03 Blue 07 Green/Yellow | |
| 04 220-240 V ~ |
WARNING
For correct supply connection, follow the wiring diagram attached near the terminals.
Installing into the countertop
A. Serial number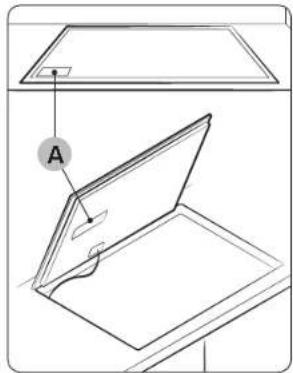
NOTE
Make a note of the serial number on the appliance rating label prior to installation. This number will be required in the case of requests for service and is no longer accessible after installation, as it is on the original rating plate on the upperside or underside of the appliance.
NOTE
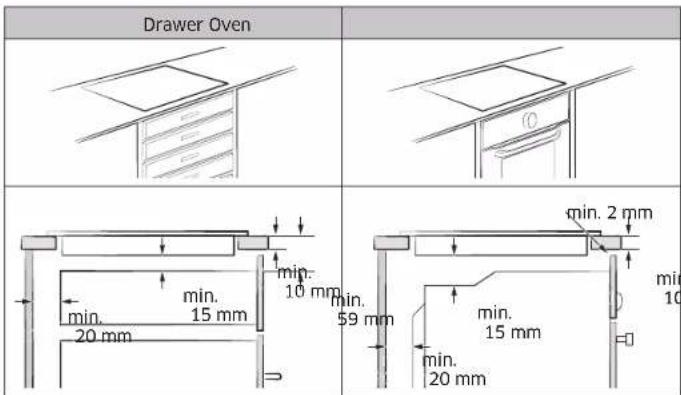
Pay special attention to the minimum space and clearance requirements.
NOTE
The bottom of the hob is equipped with a fan. If there is a drawer under the hob it should not be used to store small objects or paper, since they could damage the fan or interfere with the cooling if they are sucked into it.
Installing the hob
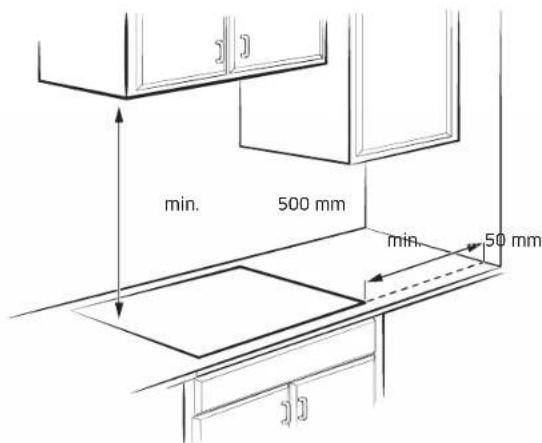
Normal Installation Type Flushed Fit Type (Only NZ8 * FK model can be installed)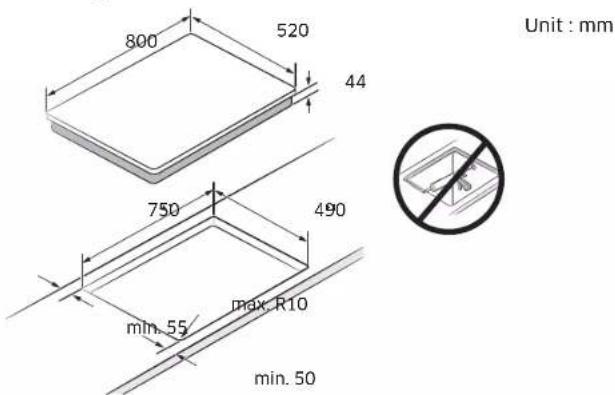
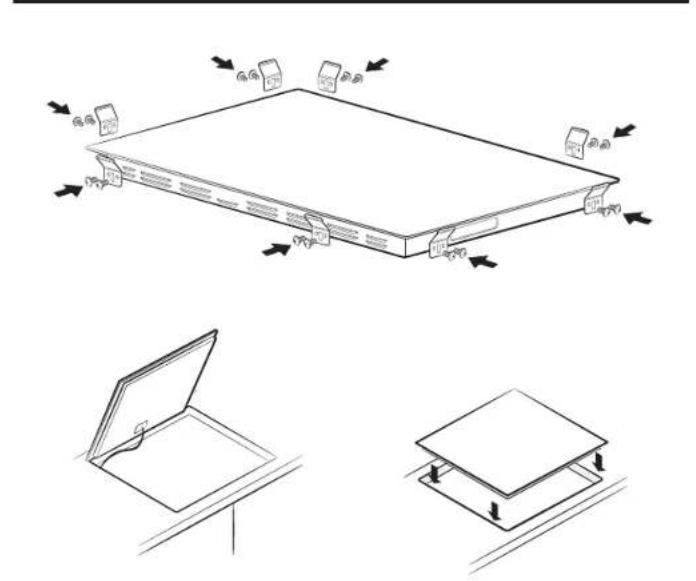
Components Induction hob Bracket Springs (8) & Screws (16)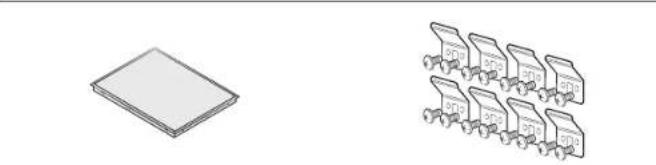
Before you start
Cooking zones NZ84C5047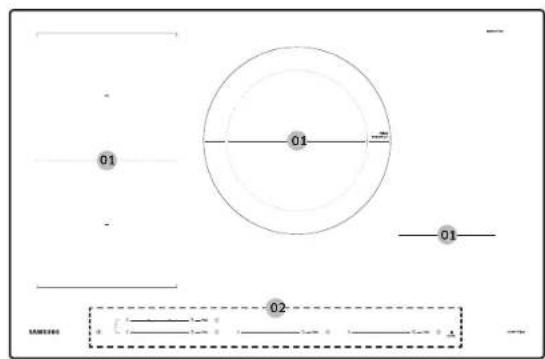
NZ85C5047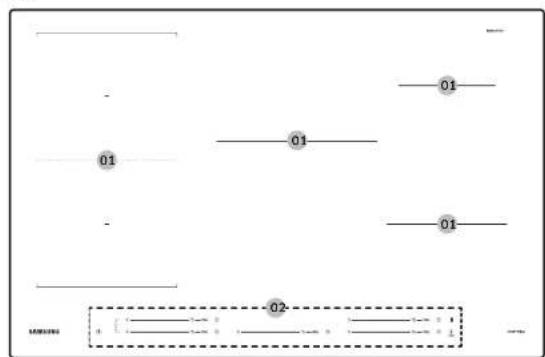
Before you start
NZ84C6057
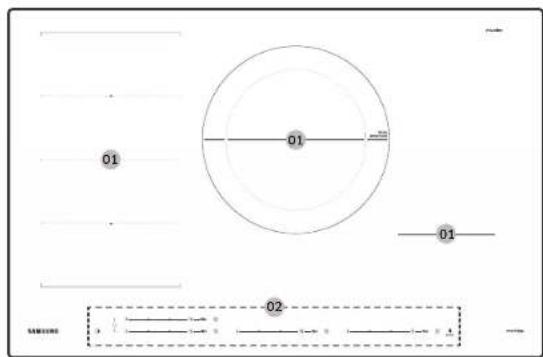
NZ85C6057*
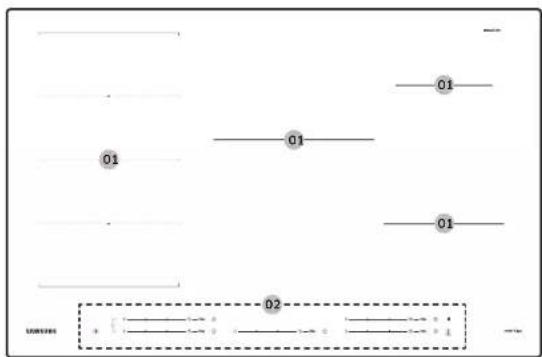
NZ84C6058
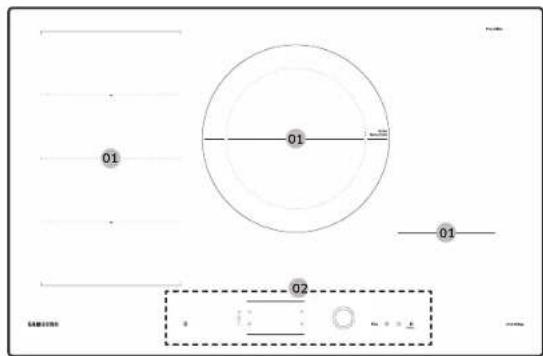
NZ85C6058
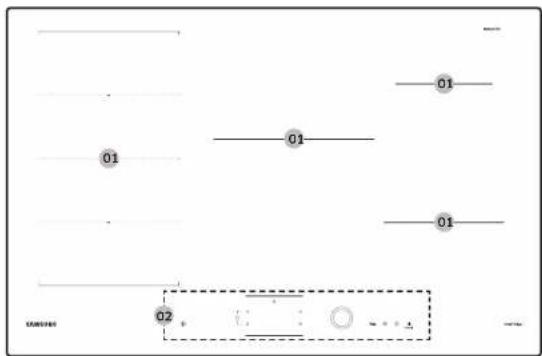
01 Induction cooking zone 02 Control panel
Control panel
Control panel 1 - NZ84C5047**
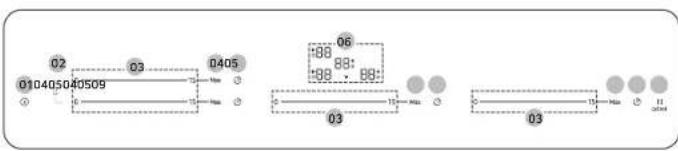
Control panel 2 - NZ85C5047**
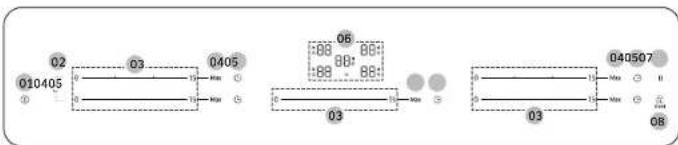
Control panel 3 - NZ84C6057**
Control panel 4 - NZ84C6058
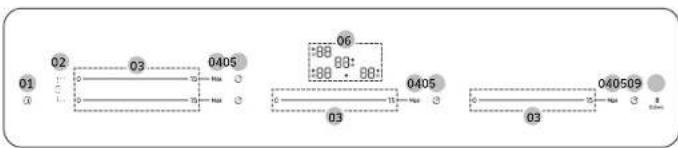
Control panel 5 - NZ85C6057**
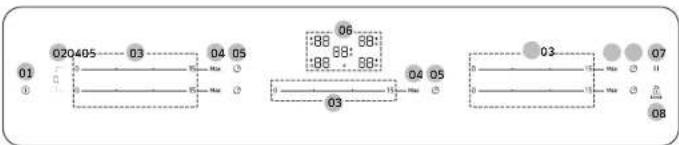
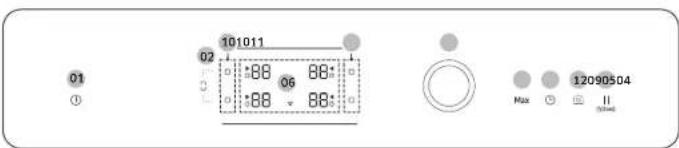
Control panel 6 - NZ85C6058
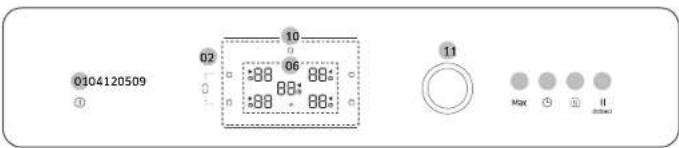
Before you start
| 01 On/Off To activate and deactivate the hob. | |
| 02 Flex zone To select the flex zone. | |
| 03 Control bar | To set a heat setting and increase or decrease the time. |
| 04 Max Max Boost To activate the function. | |
| 05 Timer To turn timer on or off and set timer. | |
| 06 Display | To show for heat settings, residual heat, and Wi-Fi connection. |
| 07 Pause | To switch all cooking zones on to the low power setting. |
| 08 Lock | Press 3 seconds to lock or unlock the control panel. (Child safety lock) |
| 09 Pause & Lock | To switch all cooking zones on to the low power setting. Press 3 seconds to lock or unlock the control panel. (Child safety lock) |
| 10 Cooking zone To select the cooking zone. | |
| 11 Control knob | To set a heat setting and increase or decrease the time. |
| 12 Keep warm To keep cooked food warm. | |
Induction heating
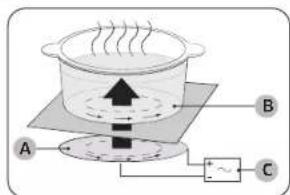
A. Induction coil B. Induced currents C. Electronic circuits
The Principle of Induction Heating: When you place your cookware on a cooking zone and turn it on, the electronic circuits in your induction hob produce "induced currents" in the bottom of the cookware, which instantly raise the cookware's temperature. - Greater speed in cooking and frying: As the pan is heated directly and not the glass, the efficiency is greater than in other systems because no heat is lost. Most of the energy absorbed is transformed into heat.
Safety shutoff
If one of the cooking zones is not switched off or the power level is not adjusted after an extended period of time, that particular cooking zone will automatically switch itself off.
The cooking zones switch themselves off at the following times.
| Power level power off | |
| 1-3 After 6 hours | |
| 4-6 After 5 hours | |
| 7-9 After 4 hours | |
| 10-15 After 1.5 hours |
NOTE
If the hob is overheated because of abnormal operation, a warning will be displayed, and the hob will be switched off.
NOTE
If cookware is unsuitable, too small, or no cookware has been placed on the cooking zone, a warning will be displayed. After 1 minute, the corresponding cooking zone will be switched off.
NOTE
Should one or more of the cooking zones power off before the indicated time has elapsed, see the "Troubleshooting" section.
Other reasons why a cooking zone will switch itself off
All cooking zones will switch themselves off if liquid boils over onto the control panel.
The automatic shutoff will also be activated if you place a damp cloth on the control panel. In both of these instances, the appliance will need to be switched on again using the On/Off key after the liquid or the cloth has been removed.
Residual heat indicator
When an individual cooking zone or the hob is turned off, the presence of residual heat is shown with an "H" (for "hot") in the corresponding cooking zone display. Even after the cooking zone has been switched off, the residual heat indicator goes out only after the cooking zone has cooled. You can use the residual heat for thawing or keeping food warm.
WARNING
As long as the residual heat indicator is illuminated, there is a risk of burns.
WARNING
If the power supply is interrupted, the "H" symbol will go out and information about residual heat will no longer be available. However, it may still be possible to burn yourself. This can be avoided by always taking care when near the hob.
Temperature detection
If for any reason the temperatures on any of the cooking zones were to exceed the safety levels, the cooking zone will automatically reduce to a lower power level. When you have finished using the hob, the cooling fan will continue to run until the hob's electronics has cooled down. And the cooling fan switches itself off depending upon the temperature of the electronics.
Before you start
Cookware
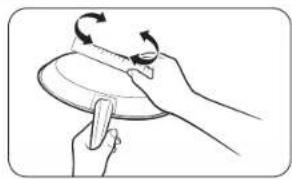
Use flat bottomed cookware that completely contacts the entire cooking zone. Check for flatness by rotating a ruler across the bottom of the cookware. Be sure to follow all the recommendations for using cookware.
- Use cookware made with the correct material for induction cooking.
- Use quality cookware with heavier bottoms for better heat distribution. This gives best cooking results.
- Match the cookware size to the quantity of food being prepared.
- Do not let cookware boil dry. This may cause permanent damage in the form of breakage, fusion, or marring that can affect the ceramic hoop. (This type of damage is not covered by your warranty).
- Do not use dirty cookware or cookware with heavy grease buildup. Always use cookware that is easy to clean after cooking.
CAUTION
- The cooking zones may appear cooled down after they have been turned off. However, the glass surface may be hot from residual heat transferred from the cookware. The risk of burns is still present.
- Do not touch hot cookware directly with your hands. Always use oven mitts or pot holders to protect your hands from burns.
- Do not slide cookware across the hob surface. Doing so may permanently damage the hob.
Cookware for induction cooking zones
The Induction burner can only be turned on when cookware with a magnetic base is placed on one of the cooking zones. You can use the cookware identified as suitable below.
| Material Suitability | |
| Steel, enameled steel, cast iron | Yes |
| Stainless steel | Yes (If magnet sticks to the bottom of the cookware) |
| Aluminum, copper, brass, glass, ceramic, porcelain | No |
NOTE
- Cookware appropriate for induction cooking is labelled as suitable by the manufacturer. Certain cookware can make noises when being used on induction cooking zones. These noises do not indicate that the hob is malfunctioning and do not affect its operation in any way.
- Special stainless-steel cookware may not be suitable for induction cooking. Check if the base of the cookware is attracted by a magnet.
Cookware sizes for induction cooking zones
Induction cooking zones adapt automatically to the bottom size of the cookware up to a certain limit. However, the magnetic part of the bottom of the cookware must have a minimum diameter depending upon the size of the cooking zone. For best results, use cookware whose ferromagnetic diameter match that of a burner. If the cookware is not sensed by the burner, try a bigger sized burner.
NOTE
For Cookware diameter, please refer to the model's Cooking zones specifications.
Other induction cookware
Some cookware has thin magnetic material on the bottom to work with an induction heating hob. These cookware has weak magnetism and may not work well. (Weak magnetism means a magnet does not stick firmly or the area where the magnet sticks is small.)
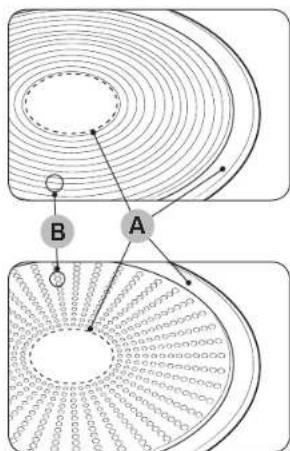
A. Area where magnet does not stick B. Area where magnet sticks
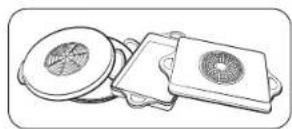
Even though cookware is designed for an induction hob, the heating performance could be weak or sometimes the hob may not detect the cookware depending on the size and strength of the magnetic area on the bottom of the cookware.
Suitability test
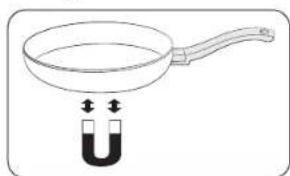
Cookware is suitable for induction cooking if a magnet sticks to the bottom of the cookware and the cookware is labelled as suitable by the cookware manufacturer.
- You can recognise good cookware by their bases. The base is supposed to be as thick and flat as possible.
- When buying new cookware, pay special attention to the diameter of the base. Manufacturers often give only the diameter of the upper rim.
- Do not use cookware which have damaged bases with rough edges or burns. Damaged cookware can scratch the ceramic hob permanently if you slide them across the surface.
- When cold, cookware bases are normally bowed slightly inwards (concave). They must not be bent outwards (convex).
- If you want to use a special type of cookware, for example, a pressure cooker, a simmering pan, or a wok, please follow the manufacturer's instructions.
Before you start
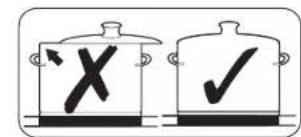
Correct positioning Energy saving tips
| Correct Incorrect | |
| Flat-bottomed cookware and straight sides | Cookware with curved or warped bottoms or sides |
| The cookware meets or exceeds the recommended minimum size for the cooking zone. | The cookware does not meet the minimum size required for the current cooking zone. |
| The cookware rests completely on the hob surface. | The cookware rests on the hob trim or does not rest completely on the hob surface. |
| The cookware is properly balanced. The | heavy handle causes the cookware to tilt. |
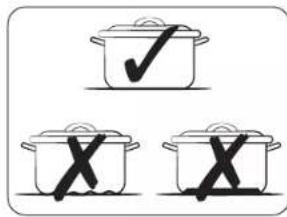
Follow these tips to save power consumption.
Always put cookware on a cooking zone before you turn the corresponding burner on. - Keep the cooking zones and cookware bases clean. Otherwise, more power will be consumed. - Firmly close the cover of cookware if available. This will reduce power consumption. - Turn the working burner off before the end of the cooking time. Use the residual heat to keep food warm.
Cookware suitability test
You can test cookware to see if they are suitable for use with the product.
- Press the On/Off ① key for 1-2 seconds to turn on the hob.
- Press the Lock key for 3 seconds to activate the child safety lock.
- Press the right front Timer key for 3 seconds to activate the cookware suitability test mode.
- Place the cookware on one of the cooking zones, and then press and hold the Max Boost key for 3 seconds.
| Display Description | |
| 0 Cookware is unsuitable | |
| 1 - 7 Cookware is suitable, but inefficient | |
| 8 - 10 Cookware is suitable | |
Operation (NZ8****7**)
Using the touch buttons
To operate the touch buttons, touch the desired button with the tip of your pointed finger until the relevant displays illuminate or go out, or until the desired function is activated.
Ensure that you are touching only one button when operating the appliance. If your finger is too flat on the button, an adjacent button may be actuated as well.
Operating noises
If you can hear: - Cracking noise: cookware is made of different materials. - Whistling: you use more than two cooking zones and the cookware is made of different materials. - Humming: you use high power levels. - Clicking: electric switching occurs. - Hissing, buzzing: the fan operates. The noises are normal and do not refer to any defects.
WARNING
Do not use cookware of different size and material.
Using cookware of different sizes or materials may cause noises and vibrations.
NOTE
Using low power levels (1-5) may cause clicking noises.
Initial cleaning
Wipe the ceramic glass surface with a damp cloth and ceramic hob glass cleaner.
WARNING
Do not use caustic or abrasive cleaners. The surface could be damaged.
Switching the appliance on
The appliance is switched on using the On/Off key. Press the On/Off key for approximately 1-2 seconds.
NOTE
After the On/Off ① key has been actuated to switch on your appliance, a power level must be selected within approximately 20 seconds. Otherwise, the appliance will switch itself off for safety reasons.
Switching the appliance off
To completely power off the appliance, use the On/Off ① key. Press the On/Off ① key for approximately 1-2 seconds.
NOTE
After switching off a single cooking zone or the entire cooking surface, the presence of residual heat will be indicated in the digital displays of the corresponding cooking zones in the form of an BB two steps for "hot". The temperature is lowered, BB, BB will be disappeared.
Selecting cooking zone and power level
- For selecting the cooking zone, press the corresponding Control bar.
- For setting and adjusting the power level, use the Control bar.
| Control bar | 0 15 Max |
| Control Knob | Max |
NOTE
If more than one key is pressed for longer than 8 seconds, "BO" will show in the cooking zone display.
Operation (NZ8****7**)
Suggested settings for cooking specific foods
The numbers in the table below are guidelines. The power level required for various cooking methods depends on a number of variables, including the quality of the cookware being used and the type and amount of food being cooked.
| Power level Cooking method Examples for Use | ||
| 14-15 | Warming / Sauteing / Frying | Warming large amounts of liquid, boiling noodles, searing meat, browning goulash, braising meat |
| 8-11 Intensive frying | Steak, sirloin, hash browns, sausages, pancakes / griddle cakes | |
| 7-10 Frying | Schnitzel / chops, liver, fish, rissoles, fried eggs | |
| 5-7 Boiling | Cooking up to 1.5 l liquid, potatoes, vegetables | |
| 2-4 | Steaming / Stewing / Boiling | Steaming and stewing of small amounts of vegetables, boiling rice and milk dishes |
| 1-2 Melting | Melting butter, dissolving gelatine, melting chocolate | |

NOTE
You will need to adjust the power level according to specific cookware and foods.
Max Boost
The Max Boost function makes additional power available to each cooking zone (e.g., bring a large volume of water to the boil).
After Max Boost times, the cooking zones automatically set back to the highest heat setting.

NOTE
- In certain circumstances, the Max Boost function may be deactivated automatically to protect the internal electronic components of the hob. For example, it is impossible to output max power on Flex zone rear and Flex zone front at the same time. Refer to your model's Cooking zones specification for Max Boost time.
Power management
The cooking zones have a maximum power available to them. If this power range is exceeded by switching on the Max Boost function, Power Management automatically reduces the power level of the cooking zone. After that, the display changes from the set power level to the maximum possible power level.
Using the Flex zone (Only for Flex zone applied models)
The Flex function can operate a complete single side cooking zone for using large size cookware. (example: oval cookware, fish kettle)
- Press the Flex zone key.
- For setting and adjusting the power level, use the Control bar.

NOTE
- Press the Flex zone key during operation, Flex zone function will be off. If you press the Flex zone key while each burner operation different level, burner set at a high level.
Flex zone Plus (Only for Flex zone plus applied models)
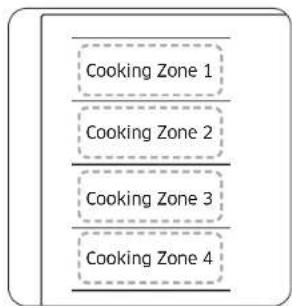
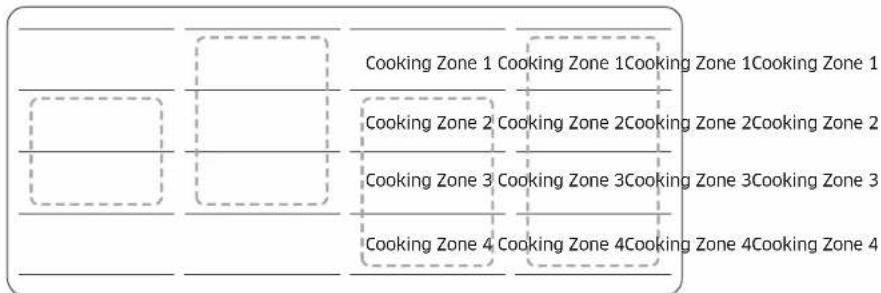
The Flex zone is the large cooking area located on the left side of the hob (see the figure left) that is specially designed to accommodate multiple pots and pans of varying shapes and sizes at once. The Flex zone has four zones that are operated by individual inductors, allowing you to cook regardless of where cookware is placed on a cooking zone.
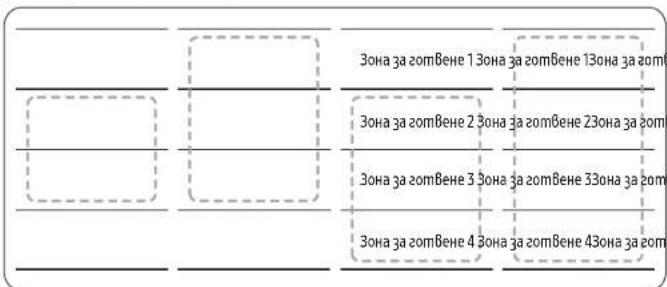
With Flex zone Plus, you can use a combination of different cooking zones to enlarge the cooking area. Press the Flex zone key to use the cooking zone as follows.
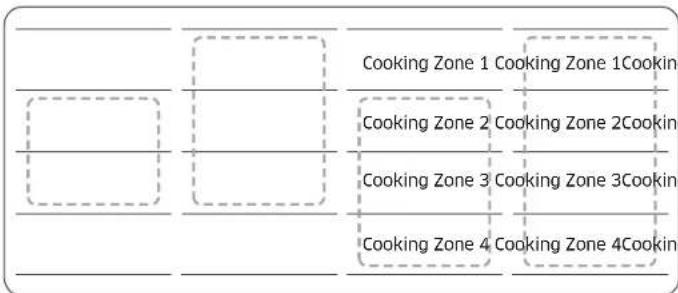
NOTE
- When using only one cooking zone, the diameter of the bottom of the cookware must be less than 14 cm . The hob may take 5-10 seconds to recognise the position of cookware.
- Noises may occur while the hob recognise the cookware.
- Do not remove cookware during cooking. For safety purposes, the hob automatically stops if cookware has been removed for more than 5 seconds.
Using the Flex zone Plus (Only for Flex zone plus applied models)
- Press the Flex zone key.
- For setting and adjusting the power level, use the Power level key.
NOTE
If you press the Flex zone key during operation, the Flex zone function will be turned off. If you press the Flex zone key while each cooking zone is operating at different levels, it will be automatically adjusted to the higher level. - When moving or adding cookware to a new Flex zone, cancel the current operation, and then press the corresponding Cooking zone key to activate the cooking zone.
Timer
Using the timer as a safety shutoff
If a specific time is set for a cooking zone, the cooking zone will shut itself off once the set time has elapsed. This function can be used for multiple cooking zones simultaneously.
Zone 2
The cooking zone(s) for which you want to apply the safety shutoff must be: 3 Cooking Zone 3
- Press the Timer key. Set the time by repeatedly pressing the Timer key.
- To cancel the timer settings, hold the Timer key for 3 seconds.
NOTE
To change the settings quicker, press and hold the Timer key until the desired value is reached. - When the timer is terminated, it sounds a beep several times. And then the cooking zone will be turned off.
Operation (NZ8****7**)
Pause/Resume
The Pause/Resume function simultaneously switches all cooking zones that are switched on to the low power setting and then back to the power level that was previously set. This function can be used to briefly interrupt and then continue the cooking process, e.g., to take a telephone call. When the Pause/Resume function is activated, all keys except for the Pause II, Lock, and the On/Off keys are disabled. To resume cooking, press the Pause I key again.
| Control Panel Display | ||
| To Switch On | Press thePause | key | " " |
| To Power off | Press thePause | key | Return to previous power level |
Quick stop
This option reduces the step and time it takes to stop cooking. To power off a cooking zone, press the Cooking zone key for 2 seconds.
NOTE
The Flex zone key does not support the quick stop function.
Child safety lock
You can use the child safety lock to safeguard against unintentionally turning on a cooking zone and activating the cooking surface. Also, the control panel, with the exception of the On/Off ① key (only to turn off control), can be locked in order to prevent the settings from being changed unintentionally, for example, by wiping over the panel with a cloth.
Switching the child safety lock On/Off
- Press the Lock key for approximately 3 seconds. An acoustic signal will sound as confirmation.
- Press any key. BB will appear in the displays, indicating the child safety lock has been activated.
- To switch the child safety lock off, press the Lock key again for 3 seconds. An acoustic signal will sound as confirmation.
NOTE
- Regardless of power on/off, child lock is activated.
- You can set the child safety lock during cooking. To turn off the burner with the child safety lock on, press the On/Off ① key.
Maximum power limit
This function allows you to adjust the maximum power of the unit.
- Keep the power off.
- Press the left front Max Boost key and left rear Timer key at the same time for approximately 3 seconds.
- Press the right front Timer key for approximately 3 seconds.
- Press the left front Timer key for approximately 1.5 seconds. The displays will show the current maximum power.
- You can adjust the power limit using the Lock key. (3000 W, 4000 W, 7400 W)
- Press the On/Off key to set the setting.
NOTE
In low-power (3000 W, 4000 W) mode, the power level will be adjusted automatically.
Sound on/off
- Press the On/Off key for approximately 1-2 seconds.
- Press the right front Timer key for 2 seconds within 10 seconds after the power has turned on.
- Sound will turn off and be displayed in the display.
- To change the sound setting, repeat steps 1 and 2. Sound will turn on and will be displayed in the display.
NOTE
It is not possible to change the sound settings after 10 seconds from turning the power on.
Smart Connect
The hob has a built-in Wi-Fi module that you can use to sync the hob with the SmartThings app. On the phone app, you can: - monitor the operating status and the power level settings of the hob elements. - monitor the timer settings. Functions that can be operated from the SmartThings app may not work smoothly if communication conditions are poor or the product is installed in a place with a weak Wi-Fi signal.
How to connect the hob
Before you can use the remote features of your Samsung hob, you must pair it to the SmartThings app.
- Download and open the SmartThings app on your smart device.
- Press the Pause key for approximately 5 seconds to turn on the "AP".
- While the connection is being made, the Wi-Fi indicator will link. Once the process is complete, the indicator glows without blinking. Now the hob is connected successfully.
- If the Smart Connect Wi-Fi indicator does not turn on, follow the instruction in the app to reconnect.
NOTE
- Make sure to set the Smart Connect function only when no hob operation is in process. For further instructions, refer to the web manual at www.samsung.com
Wi-Fi On/Off
To change the Wi-Fi On/Off, repeat steps 1 to 3.
- Press the On/Off ① key for approximately 1-2 seconds to turn the hob on.
- Press the Lock key for approximately 3 seconds to turn on the child safety lock.
- Press the right front Max Boost key for approximately 3 seconds.
Operation (NZ8****8**)
Hood control
This product features a Bluetooth device that you can use to connect the hob to Samsung hood control models. Through the Bluetooth connection, you can use the hood control function on the SmartThings app. To find out more about Samsung hood control enabled models, visit www.samsung.com.
To connect to a hood control model
- Follow the Bluetooth instructions of the hood control model and activate the Bluetooth connection.
- Press and hold the right front Timer and Pause keys simultaneously to make the Bluetooth connection. When the Bluetooth connection is successfully established, it appears on the display.
NOTE
- If the Smart Connect connection is not successful, you cannot use the SmartThings app to monitor and control the hood. Without a Smart Connect connection to the hob, you can use a Bluetooth connection to pair the hob with the hood and sync them. To do this, follow steps 2 and 3 above.
Operation (NZ8****8**)
Switching the appliance on
The appliance is switched on using the On/Off key. Press the On/Off key for approximately 1-2 seconds.
NOTE
After the On/Off key has been actuated to switch on your appliance, a power level must be selected within approximately 20 seconds. Otherwise, the appliance will switch itself off for safety reasons.
Switching the appliance off
To completely switch off the appliance, use the On/Off ① key. Press the On/Off ① key for approximately 1-2 seconds.
NOTE
After switching off a single cooking zone or the entire cooking surface, the presence of residual heat will be indicated in the digital displays of the corresponding cooking zones in the form of an "H" for "hot". The temperature is lowered, and the "H" will disappear.
Selecting cooking zone and power level
- For selecting the cooking zone, press the corresponding Cooking zone key.
- For setting and adjusting the power level, use the Control bar or Control key or Control knob.
| Control bar | 0 15 Max |
| Control Knob | Max |
NOTE
The default level is set to 15 when selecting the cooking zone. If more than one key is pressed for longer than 8 seconds, an error will show in the cooking zone display.
Suggested settings for cooking specific foods
The numbers in the table below are guidelines. The power level required for various cooking methods depends on a number of variables, including the quality of the cookware being used and the type and amount of food being cooked.
| Power level Cooking method Examples for Use | ||
| 14-15 | Warming / Sauteing / Frying | Warming large amounts of liquid, boiling noodles, searing meat, browning goulash, braising meat |
| 8-11 Intensive frying | Steak, sirloin, hash browns, sausages, pancakes / griddle cakes | |
| 7-10 Frying | Schnitzel / chops, liver, fish, rissoles, fried eggs | |
| 5-7 Boiling | Cooking up to 1.5 l liquid, potatoes, vegetables | |
| 2-4 | Steaming / Stewing / Boiling | Steaming and stewing of small amounts of vegetables, boiling rice and milk dishes |
| 1-2 Melting | Melting butter, dissolving gelatine, melting chocolate | |
NOTE
You will need to adjust the power level according to specific cookware and foods.
Max Boost
The Max Boost function makes additional power available to each cooking zone. (example: bring a large volume of water to the boil) After Max Boost time, the cooking zones automatically set back to the highest heat setting.
NOTE
In certain circumstances, the Max Boost function may be deactivated automatically to protect the internal electronic components of the hob. For example, it is impossible to output max power on Flex zone rear and Flex zone front at the same time. Refer to your model's Cooking zones specification for Max Boost time.
Power management
The cooking zones have a maximum power available to them. If this power range is exceeded by switching on the Max Boost function, Power Management automatically reduces the power level of the cooking zone. The display for this cooking zone alternates for some seconds between the set power level and the maximum possible power level. After that, the display changes from the set power level to the maximum possible power level.
Using the Flex zone (Only for Flex zone applied models)
The Flex function can operate the complete left side cooking zone for using large size cookware. (example: oval cookware, fish kettle)
- Press the Flex zone key.
- For setting and adjusting the power level, use the Power level key.
NOTE
- Press the Flex zone key during operation, the Flex zone function will be off.
- If you press the Flex zone key while each burner operates at a different level, the burner is set at a high level.
Operation (NZ8****8**)
Flex zone Plus (Only for Flex zone plus applied models)
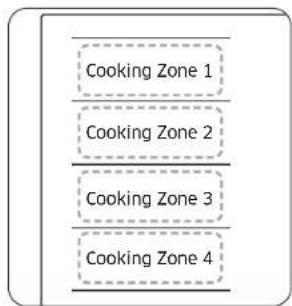
The Flex zone is the large cooking area located on the left side of the hob (see the figure left) that is specially designed to accommodate multiple pots and pans of varying shapes and sizes at once. The Flex zone has four zones that are operated by individual inductors, allowing you to cook regardless of where cookware is placed on a cooking zone.
With Flex zone Plus, you can use a combination of different cooking zones to enlarge the cooking area. Press the Flex zone key to use the cooking zone as follows.
- Noises may occur while the hob recognises the cookware.
- Do not remove cookware during cooking. For safety purposes, the hob automatically stops if cookware has been removed for more than 5 seconds.
Using the Flex zone Plus (Only for Flex zone plus applied models)
- Press the Flex zone key.
- For setting and adjusting the power level, use the Power level key.
NOTE
- If you press the Flex zone key during operation, the Flex zone function will be off. If you press the Flex zone key while each cooking zone is operating at different levels, it will be automatically adjusted to the higher level.
- When moving or adding cookware to a new Flex zone, cancel the current operation, and then press the corresponding Cooking zone key to activate the cooking zone.
NOTE
- When using only one cooking zone, the diameter of the bottom of the cookware must be less than 14 cm. The hob may take 5-10 seconds to recognise the position of cookware.
Keep Warm
- Use this function to keep cooked food warm. Press the corresponding Cooking zone key.
- Press the Keep warm key.
- The cooking zone display will be changed.
- Press the Keep warm key again to turn off the cooking zone.
Timer
Using the timer as a safety shutoff
If a specific time is set for a cooking zone, the cooking zone will shut itself off once this period of time has elapsed. This function can be used for multiple cooking zones simultaneously.
Setting the timer
The cooking zone(s) for which you want to apply the safety shutoff must be switched on.
- Press the Timer key.
- Set timer by repeatedly pressing the Timer key.
- To cancel the timer settings, hold the Timer key for 3 seconds.
NOTE
To change the settings quicker, press and hold any of the Timer key until the desired value is reached. - When the timer is terminated, it sounds a beep several times. However, the cooking zone will not be turned off.
Pause/Resume
The Pause/Resume function simultaneously switches all cooking zones that are switched on to the low power setting and then back to the power level that was previously set. This function can be used to briefly interrupt and then continue the cooking process e.g. to take a telephone call.
When the Pause/Resume function is activated, all keys except for the Pause & Lock and the On/Off keys are disabled.
To resume cooking, press the Pause & Lock key again.
| Control Panel Display | ||
| To Switch On | Press thePause & LockIIkey | II |
| To Switch Off | Press thePause & LockIIkey | Return to previous power level |
Quick stop
This option reduces the step and time it takes to stop cooking. To switch off a cooking zone, press the Cooking zone key for 2 seconds.
NOTE
The Flex zone key does not support quick stop function.
Operation (NZ8****8**)
Child safety lock
You can use the child safety lock to safeguard against unintentionally turning on a cooking zone and activating the cooking surface. Also the control panel, with the exception of the On/Off ① key (Only turn off control), can be locked in order to prevent the settings from being changed unintentionally, for example, by wiping over the panel with a cloth.
Switching the child safety lock On/Off
- Press the Pause & Lock key for approximately 3 seconds. An acoustic signal will sound as confirmation.
- Press any key. will appear in the displays, indicating the child safety lock has been activated.
- For switching the child safety lock off, press the Pause & Lock key again for 3 seconds. An acoustic signal will sound as confirmation.
NOTE
- Regardless of power on/off, child lock is activated.
- You can set the child safety lock during cooking. To turn off the burner with the child safety lock on, press the On/Off key or turn off the child safety lock first and then press the corresponding Cooking zone key.
Maximum power limit
This function allows you to adjust the maximum power of the unit.
- Keep the power off.
- Press the Pause & Lock key for approximately 3 seconds to turn on the child safety lock.
- Press the left front Cooking zone key and right front Cooking zone key at the same time for approximately 3 seconds.
- Press the Timer key for approximately 3 seconds. The displays will show P and current maximum power.
- You can adjust the power limit using the Pause & Lock key. (3000 W, 4000 W, 7400 W)
- Press the On/Off ① key to set the setting.
NOTE
In low-power (3000 W, 4000 W) mode, the power level will be adjusted automatically.
Sound on/off
- Press the On/Off key for approximately 1-2 seconds.
- Press the Timer key for 3 seconds within 10 seconds after the power has turned on.
- Sound will turn off and BB will be displayed in the display.
- To change the sound setting, repeat steps 1 and 2. Sound will turn on and will be displayed in the display.
NOTE
It is not possible to change the sound settings after 10 seconds from turning the power on.
Smart Connect
The hob has a built-in Wi-Fi module that you can use to sync the hob with the SmartThings app. On the smartphone app, you can: - monitor the operating status and the power level settings of the hob elements. - check and change the timer settings. Functions that can be operated from the SmartThings app may not work smoothly if communication conditions are poor or the product is installed in a place with a weak Wi-Fi signal.
How to connect the hob
Before you can use the remote features of your Samsung hob, you must pair it to the SmartThings app.
- Download and open the SmartThings app on your smart device.
- Press the On/Off ① key for approximately 1-2 seconds to turn the hob on.
- Press the Pause & Lock key for approximately 3 seconds to turn on the child safety lock.
- Follow the app's instructions, and then press and hold the Max key for 3 seconds.
- While the connection is being made, the Wi-Fi indicator will link. Once the process is complete, the indicator glows without blinking. Now the hob is connected successfully.
- If the Smart Connect Wi-Fi indicator does not turn on, follow the instruction in the app to reconnect.
NOTE
Make sure to set the Smart Connect function only when no hob operation is in process. For further instructions, refer to the web manual at www.samsung.com
Wi-Fi On/Off
To change the Wi-Fi On/Off, repeat steps 2 to 4.
Hood control
This product features a Bluetooth device that you can use to connect the hub to Samsung hood control models. Through the Bluetooth connection, you can use the hood control function on the SmartThings app. To find out more about Samsung hood control enabled models, visit www.samsung.com.
To connect to a hood control model
- Download and run the SmartThings app on your smartphone. Then, complete the Smart Connect procedure to connect to the hob.
- Follow the Bluetooth instructions of the hood control model and activate the Bluetooth connection.
- Press and hold the Timer and Pause & Lock keys simultaneously to make the Bluetooth connection. When the Bluetooth connection is successfully established, happens on the display.
- Follow the instructions in the user manual of the hood control model and the App guide to use the hood control.
NOTE
- If the Smart Connect connection is not successful, you cannot use the SmartThings app to monitor and control the hood. Without a Smart Connect connection to the hob, you can use a Bluetooth connection to pair the hob with the hood and sync them. To do this, follow steps 2 and 3 above.
Maintaining your appliance
Hob
WARNING
Cleaning agents must not come into contact with a heated ceramic glass surface. All cleaning agents must be removed with adequate amounts of clean water after cleaning because they can have a caustic effect when the surface becomes hot. Do not use any aggressive cleaners such as grill or oven sprays, scouring pads or abrasive pan cleaners.
NOTE
Clean the ceramic glass surface after each use when it is still warm to the touch. This will prevent spillage from becoming burnt onto the surface. Remove scales, watermarks, fat drippings and metallic discolouration with the use of a commercially available ceramic glass or stainless steel cleaner.
Light soiling
- Wipe the ceramic glass surface with a damp cloth.
- Rub dry with a clean cloth. Remnants of cleaning agent must not be left on the surface.
- Thoroughly clean the entire ceramic glass cooking surface once a week with a commercially available ceramic glass or stainless steel cleaner.
- Wipe the ceramic glass surface using adequate amounts of clean water and rub dry with a clean lint-free cloth.
Stubborn soiling
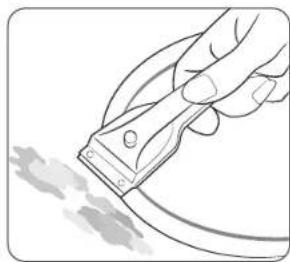
- To remove food that has boiled over and stubborn splashes, use a glass scraper.
- Place the glass scraper at an angle to the ceramic glass surface.
- Remove soiling by scraping with the blade.
NOTE
Glass scrapers and ceramic glass cleaners are available from specialty retailers.
Problem dirt
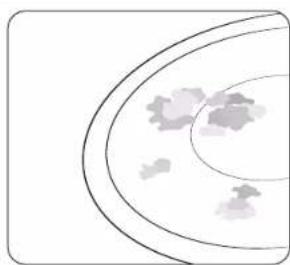
- Remove burnt-on sugar, melted plastic, aluminium foil or other materials with a glass scraper immediately and while still hot.
WARNING
There is a risk of burning yourself when the glass scraper is used on a hot cooking zone: 2. Clean the hob as normal when it has cooled down. If the cooking zone on which something has melted has been allowed to cool, warm it up again for cleaning.
NOTE
Scratches or dark blemishes on the ceramic glass surface, caused, for example, by a pan with sharp edges, cannot be removed. However, they do not impair the function of the hob.
Troubleshooting and service
Hob frame (option)
WARNING
Do not use vinegar, lemon juice or scale remover on the hob frame; otherwise dull blemishes will appear.
- Wipe the frame with a damp cloth.
- Moisten dried debris with a wet cloth. Wipe and rub dry.
To avoid damaging your appliance
- Do not use the hob as a work surface or for storage.
- Do not operate a cooking zone if there is no pan on the hob or if the pan is empty.
- Ceramic glass is very tough and resistant to temperature shock, but it is not unbreakable. It can be damaged by a particularly sharp or hard object dropping onto the hob.
- Do not place pans on the hob frame. Scratching and damage to the finish may occur.
- Avoid spilling acidic liquids, for example, vinegar, lemon juice and descaling agents, onto the hob frame, since such liquids can cause dull spots.
- If sugar or a preparation containing sugar comes into contact with a hot cooking zone and melts, it should be cleaned off immediately with a kitchen scraper while it is still hot. If allowed to cool, it may damage the surface when removed.
- Keep all items and materials that could melt, for example, plastics, aluminium foil and oven foils, away from the ceramic glass surface. If something of this nature melts onto the hob, it must be removed immediately with a scraper.
Troubleshooting
A fault may result from a minor issue that you can correct yourself with the help of the following instructions. Do not attempt any further repairs if the following instructions do not help in each specific case.
WARNING
Repairs to the appliance are to be performed only by a qualified service technician. Improperly effected repairs may result in considerable risk to the user. If your appliance needs repair, please contact your customer service centre.
| Problem Possible cause Solution | ||
| What should I do if the cooking zones are not functioning? | The fuse in the house wiring is not intact. | If the fuses trip a number of times, call an authorised electrician. |
| What should I do if the cooking zones will not switch on? | The On/Off ① key was accidentally actuated.The control panel is partially covered by a clamp cloth or liquid. | The appliance is properly switched on.Clean the control panel. |
| What should I do if the display except for BB, BB the residual heat indicator suddenly disappears? | The On/Off ① key was accidentally actuated.The control panel is partially covered by a damp cloth or liquid. | The appliance is properly switched on.Clean the control panel. |
| What should I do if, after the cooking zones have been switched off, residual heat is not indicated in the display | The cooking zone was only briefly used and therefore did not become hot enough. | If the cooking zone is hot, please call a local service centre. |
Troubleshooting and service
| Information code | Possible cause Solution | |
| 88 | There is a problem with the burner temperature sensor. | Restart the appliance using the On/Off ① key. If the problem continues, disconnect power for more than 30 seconds. Then, restart the appliance and try again. If the problem still continues, contact a local service centre. |
| 89 | The temperature is sensed higher than specified. | |
| 92 | There is a problem with the PBA sensor. | |
| 82 | The DC Motor fails to operate because of problems with the PCB or wiring, or electrical disturbance on the motor blade. | |
| 80 | A key is being pressed for more than 8 seconds. | Check if the key is wet or is being pressed. If the problem continues, restart the appliance using the On/Off ① key. If the problem still continues, contact a local service centre. |
| 80 | Communications between main and sub PCBs fail. | Restart the appliance using the On/Off ① key. If the problem continues, disconnect power for more than 30 seconds. Then, restart the appliance. If the problem still continues, contact a local service centre. |
| 82 | The touch-enabled IC communicates abnormally. | |
| 88 | It is out of normal voltage (220 ~ 240 V). | Check home power environment. |
| 98 | If the cooking container is not suitable for the induction, or operates without the cooking container, it is displayed. | Use a cooking container suitable for inductions. |
What should I do if the cooking zone will not switch on or off?
This could be because of one of the following possibilities:
- The control panel is partially covered by a damp cloth or liquid. The child safety lock is on. and display
What should I do if the display is illuminated?
Check for the following:
The control panel is partially covered by a damp cloth or liquid. To reset, press the On/Off ① key. If liquid has overflowed on control panel, please wipe the liquid.
What should I do if the display is illuminated?
Check for the following:
The hob is overheated because of abnormal operation. After hob is cooled down, press the On/Off ① key for resetting
What should I do if the display is illuminated?
Check for the following:
Cookware is unsuitable, too small, or no cookware has been placed on the cooking zone. If you use suitable cookware, the displayed message will automatically disappear.
What should I do if the cooling fan runs after the hob is turned off?
Check for the following:
- When you have finished using the hob, the cooling fan runs by itself to cool down.
- After the hob's electronics have cooled down or the maximum time (10 minutes) has elapsed, the cooling fan will be turned off. If you request a service call because of information provided in the operating instructions, the visit from the customer service technician may incur a charge even during the warranty period.
Service
Before calling for assistance or service, please check the section "Troubleshooting".
If you still need help, follow the instructions below.
Is it a technical fault?
If so, please contact your customer service centre.
Always prepare in advance for the discussion. This will ease the process of diagnosing the problem and also make it easier to decide if a customer service visit is necessary.
Please take note of the following information.
What form does the problem take? - Under what circumstances does the problem occur? When calling, please know the model and serial number of your appliance. This information is provided on the rating plate as follows: Model description S/N code (15 digits). Recommended that you record the information here for easy reference. Model: - Serial number: When do you incur costs even during the warranty period? - If you could have remedied the problem yourself by applying one of the solutions provided in the section "Troubleshooting". - If the customer service technician has to make several service calls because he was not provided with all of the relevant information before his visit and as a result, for example, has to make additional trips for parts. Preparing for your phone call as described above will save you the cost of these trips.
QUESTIONS OR COMMENTS?
| COUNTRY CALL OR VISIT US ONLINE AT | ||
| UK 0333 | 000 0333 www.samsung.com/uk/support | |
| IRELAND (EIRE) | 0818 717100 www.samsung.com/ie/support | |
| GERMANY 06 | 196 77 555 77 www.samsung.com/cle/support | |
| FRANCE 01 | 48 63 00 00 www.samsung.com/fr/support | |
| SPAIN 91 | 175 00 15 www.samsung.com/es/support | |
| PORTUGAL | 210 608 098Chamada para a rede fixa nacionalDias ñteis das 9h às 20h | www.samsung.com/pt/support |
| LUXEMBURG | 261 03 710 www.samsung.com/be_fr/support | |
| NETHERLANDS | 088 90 90 100 www.samsung.com/nl/support | |
| BELGIUM | 02-201-24-18 | www.samsung.com/be/support(Dutch)www.samsung.com/be_fr/support(French) |
| NORWAY | 21629099 | www.samsung.com/no/support |
| DENMARK | 707 019 70 | www.samsung.com.dk/support |
| FINLAND 030 | 6227 515www.samsung.com/fi/support | |
| SWEDEN | 0771-400 300 www.samsung.com/se/support | |
| AUSTRIA | 0800 72 67 864 (0800-SAMSUNG) | www.samsung.com/at/support |
| SWITZERLAND | 0800 726 786 | www.samsung.com/ch/support(German)www.samsung.com/ch_fr/support(French) |
| HUNGARY | 0680SAMSUNG (0680-726-7864) | www.samsung.com/hu/support |
| CZECH | 800 - SAMSUNG(800-726786) | www.samsung.com/cz/support |
| SLOVAKIA | 0800 - SAMSUNG(0800-726 786) | www.samsung.com/sk/support |
| CROATIA | 072 726 786 | www.samsung.com/hr/support |
| COUNTRY CALL OR VISIT US ONLINE AT | ||
| BOSNIA | 055 233 999 | www.samsung.com/ba/support |
| NORTH MACEDONIA | 023 207 777 | www.samsung.com/mk/support |
| MONTENEGRO | 020 405 888 | www.samsung.com/support |
| SLOVENIA | 080 697 267 (brezplaţă 5ievilka) | www.samsung.com/si/support |
| SERBIA | 011 321 6899 | www.samsung.com/rs/support |
| Kosovo | 038 40 30 90 | www.samsung.com/support |
| ALBANIA | 045 620 202 | www.samsung.com/al/support |
| BULGARIA | 0800111 31 - Белларен за в�金融机构 *3000 - центаший гаддзк разrostор яй сюрецардата на моблике оретатор 09:00 до 18:00 - Понеделник до пétък | www.samsung.com/bg/support |
| ROMANIA | 0800872678 - Арел gratuit '8000 - Арел tarifat in retea Program Call Center Luni - Vineri: 9 AM - 6 PM | www.samsung.com/ro/support |
| ITALIA | 800-SAMSUNG (800.7267864) | www.samsung.com/lt/support |
| CYPRUS | 8009 4000 only from landline, toll free | www.samsung.com/gr/support |
| GREECE | 80111-SAMSUNG (80111 726 7864) only from land line (+30) 210 6897691 from mobile and land line | |
| POLAND | 801 172 678* (oplata wedlug taryfy operatore) | http://www.samsung.com/pi/support/ |
| LITHUANIA B-800-77777 www.samsung.com/lt/support | ||
| LATVIA | 8000-7267 | www.samsung.com/lv/support |
| ESTONIA | 800 7267 | www.samsung.com/cc/support |
QUESTIONS OR COMMENTS?
| PAYS APPELEZ-NOUS OU VISITEZ-NOUS EN LIGNE A | ||
| UK 0333 | 000 0333 www.samsung.com/uk/support | |
| IRELAND (EIRE) | 0818 717100 www.samsung.com/ie/support | |
| GERMANY 06 | 196 77 555 77 www.samsung.com/de/support | |
| FRANCE 01 | 48 63 00 00 www.samsung.com/fr/support | |
| SPAIN 91 | 175 00 15 www.samsung.com/cs/support | |
| PORTUGAL | 210 608 098Chamada para a rede fixa nacionalDias uteis das 9h às 20h | www.samsung.com/pt/support |
| LUXEMBURG | 261 03 710 www.samsung.com/be.fr/support | |
| NETHERLANDS | 088 90 90 100 www.samsung.com/nl/support | |
| BELGIUM 02 | 201-24-18 | www.samsung.com/be/support(Dutch)www.samsung.com/bc_fr/support(French) |
| NORWAY | 21629099 | www.samsung.com/no/support |
| DENMARK | 707 019 70 | www.samsung.com.dk/support |
| FINLAND 03 | 0-6227 515 www.samsung.com/h/support | |
| SWEDEN | 0771-400 300 www.samsung.com/se/support | |
| AUSTRIA | 0800 72 67 864 (0800 SAMSUNG) | www.samsung.com/at/support |
| SWITZERLAND | 0800 726 786 | www.samsung.com/ch/support(Cerman)www.samsung.com/ch_fr/support(French) |
| HUNGARY | 0680SAMSUNG (0680-726-7864) | www.samsung.com/hu/support |
| CZECH | 800 - SAMSUNG(800-726786) | www.samsung.com/cz/support |
| SLOVAKIA | 0800 - SAMSUNG(0800-726 786) | www.samsung.com/sk/support |
| CRATIA | 072 726 786 | www.samsung.com/hr/support |
| PAYS APPELEZ-NOUS OU VISITEZ-NOUS EN LIGNE A | ||
| BOSNIA | 055 233 999 www.samsung.com/ba/support | |
| NORTH MACEDONIA | 023 207 777 www.samsung.com/mk/support | |
| MONTENEGRO | 020 405 888 | www.samsung.com/support |
| SLOVENIA | 080 697 267 (brezplačna stevilka) | www.samsung.com/si/support |
| SERBIA | 011 321 6899 www.samsung.com/rs/support | |
| Kosovo | 038 40 30 90 | www.samsung.com/support |
| ALBANIA | 045 620 202 | www.samsung.com/al/support |
| BULCARIA | 0800 11131 - Бразлатен за BCNUKNI onepatopri *3000 - Лета на саду разоворни соред тariфота на моблике onepatop 09:00 до18:00 - Рочnéдених по Лету | www.samsung.com/bg/support |
| ROMANIA | 0800872678 - Apel Gratisuit '8000 - Apel tarifat in retea Program Call Center Luni - Vineri: 9 AM - 6 PM | www.samsung.com/ro/support |
| ITALIA | 800-5AMSUNG (800.7267864) | www.samsung.com/it/support |
| CYPRUS | 8009 4000 only from landline, toll free | www.samsung.com/gr/support |
| GREECE | 80111 SAMSUNG (80111 726 7864) only from land line (+30) 210 6897691 from mobile and land linc | |
| POLAND | 801-172-678* (*opfata wedlug tary/ty operatora) | http://www.samsung.com/pl/support/ |
| LITHUANIA | 800-77777 www.samsung.com/it/support | |
| LATVIA | 8000-7267 | www.samsung.com/lv/support |
| ESTONIA 800-7267 www.samsung.com/ee/support | ||
Induction hob
User manual
NZ84C5047 / NZ85C5047 / NZ84C6057** /
NZ84C6058 / NZ85C6057 / NZ85C6058**
Contents
WARNING
For information on Samsung's environmental commitments and product-specific regulatory obligations, e.g. REACH, visit: www.samsung.com/uk/aboutsamsung/sustainability/environment/our-commitment/data/
Installing the hob
WARNING
It should be installed suitably by a component or trained person. Disconnect the power before connecting the cables to the circuit.
The voltage of the heating element is AC 230 V-. The appliance also works perfectly on networks with AC 220 V- or AC 240 V-. The hob should be connected to the mains with a device that allows the appliance to be disconnected from the mains on all poles with a contact opening of at least 3 mm, i.e. an automatic circuit breaker for disconnecting the line, an earth leakage circuit breaker or a protective switch.
WARNING
The cable connections must be made in accordance with the regulations, and the terminal screws must be securely fastened.
WARNING
As soon as the hob is connected to the power supply, you must check that all cooking zones are ready for use by switching them on briefly, one at a time, at the maximum setting with suitable cookware.
WARNING
Make sure to correctly match and balance the connections in the house and the appliance (wiring diagrams) to avoid damaging components. The warranty does not cover damage caused by installation errors.
WARNING
Zone 2 Timer setting
Model number and serial number
Turning the sound on/off 23
Smart Connect 23
Action (NZ8****7**) 24
Action (NZ8****8**) 24
Turning the device on 24
Turning the device off 24
Selecting the cooking zone and power level 24
Adjusting the power level 25
Using the Flex zone (only for models with Flex zone) 25
30Ha Flex Plus (cama 3a Mogeu cbc 30Ha Flex) 26
3ana3emmonu 27
Taumep 27
Pay3a/nogHO8BaHe 27
BbP30 cnupahe 27
3akouBahe 3a 3aumha geua 28
Aumum 3a MakcumaAHa MOUHocm 28
BkHouBaHe/u3kaHouBaHe Ha 3Byka 28
Smart Connect 29
YnpaBHeue Ha a6cop6amopa 29
IoggbpkaeHa ypega 30
IIOUa 3a zomBeHe 30
Aeko 3ambpcBahe 30
Ynopumo 3ambpc8ahe 30
Pp6aemno 3ambpcaBaHe 30
PamkaHa naoama (onua) 31
3a ga u36e2heme no8pega Ha ypega 31
OmcpaH8aHe Ha Heu3npaBnocmu cepBu3upahe 31
OmcpaHaBaeHaHeu3npa8Hocmu 31
06aykBahe 33
H3noA3BaHe Ha moBa pkoBogcmBo
OmgemaBpeme ga npoememe moBa pkoBogcmBo ha co6cmBenuka, kamo o6bpHeme oc0ebn BHMuahe Na uHofpmaaHa 3a 6e0anacHcM, c5gpkaua ce B cagbau pa3geA, npegu ga u3no3aBe ypega. 3anaeme moBa pkoBogcmBo 3a 6bgeuu cnpa8ku. Ako npegaame npumekaaHemu Ha ypega Ha gpya, He 3abpaRume ga npegageme pkoBogcmBomo Ha HoBura co6cmBenuk.
Bpko8ogcmBomo 3a nompe6umeA ca u3noA3BaHu cAegHume cumBoAU:
PTEADYTPEEXAEHE
Onachocmu uau onacu npakmuku, koumo mozam ga go6egam go mekku meaechu hapaRaBauu uau cmbpm.
BHIMAHINE
Onachcmu uonanchu npakmuku, koumo mozam ga go8egam go leku meaechu HapaBauu noBpega h umyueemBo.
BHIMAHINE
3a ga hamaumepucka om nokap, ekcnao3ua, moko8 yag uu HapaH8aHe npu u3no3BaHe Ha nOyama, cAegBume me3u ochoBn npegna3Hu mepku.
3ABEANKA
Noise, interference, or information that has fallen on the user to work with the product.
Setting the temperature
If for any reason the temperature exceeds the safety zone, the appliance will automatically switch to a lower power level.
When you stop adding food, the exhaust fan will continue to work until the electronics of the food have cooled down. The exhaust fan turns on and off depending on the temperature of the electronics.
Preheating
Cookware
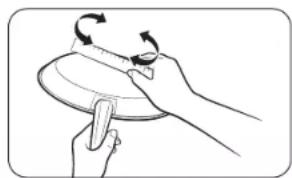
Use flat-bottomed cookware that has full contact with the hotplate. Check if the bottom is flat by turning it over. You should use high edges for adding food.
- Use cookware made of proper material and with induction heating. Use quality cookware with a thicker bottom for better energy distribution. This leads to better results when cooking. The size of the cookware must correspond to the amount of food. Do not allow it to overheat. This can lead to permanent damage under the form of warping, cracking, or discoloration, which can damage the ceramic hob. (This type of damage is not covered by the warranty). Do not use cast iron cookware or steel with a magnetic base. Use cookware that is suitable for washing after cooking.
WARNING
It may seem that the food for cooking is not hot, just after it is removed. However, the contact surface may be hotter than the hotplate from the hot cookware. There is a risk of burns. Do not touch the hot cookware directly with your hands. Always use oven mitts or handles for cookware to protect your hands from heat. Do not place cookware on the surface of the hob. This can permanently damage the hob.
Cookware for induction zones for cooking
The induction coil can be heard when the cooking zone is placed on a magnetic base. You can use the cookware, pointing it as it suits you.
Power adjustment
The cooking zone has a maximum power. If this power is not enough for boiling, increasing the power will automatically adjust the power of the cooking zone. After this, the display shows the set power level up to the maximum possible.
Using the Flex zone
Press the Flex button to select the cooking zone and the corresponding burner. (For example: one burner).
- Press the button for zone 2.3 to set and adjust the power level of the hob.

NOTE
Press the button for the Flex zone during operation; the Flex zone function will be activated. If you press the button for the Flex zone while each burner is working at a different level, the burner will be set to a high level.
Flex Zone Plus (only for models with Flex Zone)
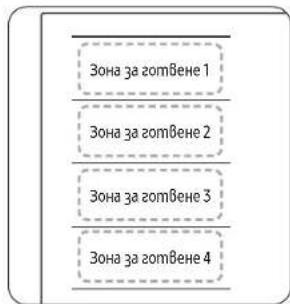
The Flex zone is a cooking zone on the cooking surface (see figure B8), which is specially designed to accommodate cookware of different sizes and shapes at the same time. The Flex zone has four zones, which are controlled by separate inductors, allowing you to cook independently of where the cookware is placed on the cooking zone.
With the Flex Zone Plus you can use cookware from different cooking zones to increase the cooking zone. Press the Flex Zone C button to use the cooking zone as follows.
NOTE
When using a single cooking zone, the diameter of the cookware must be at least 14 cm. You may hear a sound for 5-10 seconds before the cooking zone recognizes the cookware.
Do not place cookware on the cooking surface during operation. For safety reasons, the cooking surface will automatically turn off if the cookware has been removed for more than 5 seconds.
Using Flex Zone Plus (only for models with Flex Zone)
- Press the button for the Flex zone
- To set and adjust the power level of the hob, use the Power level button.
NOTE
If you press the button for the Flex zone during operation, the Flex zone function will be activated. If you press the button for the Flex zone while each cooking zone is working at a different level, it will automatically be set to a higher level. When you move or add cookware to a new Flex zone, cancel the current operation and press the corresponding cooking zone button to activate the zone.
Timer
Setting the timer for delayed shutdown
If a shutdown time is set for the delayed shutdown zone, it will be excluded, just like the zones from the time zones. This function can be used for multiple shutdown zones simultaneously.
Setting the timer
The zones for which you want to apply delayed shutdown must be
- Press the timer button
- Set the timer by pressing the timer button multiple times
- To cancel the timer settings, press the timer button for 3 seconds.
CANCELLATION
For faster settings, press and hold the timer button until the desired value is reached. When the timer is activated, an audible signal will sound. After that, the shutdown zone will be excluded.
Bulgarian 21
Action (NZ8****7**)
Pause/Resume
The Pause/Resume function temporarily interrupts all cooking zones with a lower power setting and then returns to the previously set power. This function can be used for a short pause and resume of the cooking process, for example, for answering the phone. The Pause/Resume function interrupts all cooking zones with the exception of zone 11, including and excluding 1 second with activation. To increase the response, press the zone button once
| Паену 3a уралдемпс дucлдем | ||
| За вклочынe | Hamucheme 6у'mона Пayза || | || |
| За uзkuчынe | Hamucheme 6у'mона Пayза || | Вршане кьnpгшимо huБо Но мошюсп |
Quick start
Press the button for 3 seconds to activate the child lock. To lock the hob zone, press the hob zone lock button for 2 seconds.
NOTE
Inside the Flex zone, the child lock does not support the function for 3 seconds.
Child safety lock
You can use the child safety lock to prevent accidental activation of the hob zone and activation of the heating surface. In addition, the control panel, the buttons for switching on/off, as well as the control of the hob can be locked to prevent unintentional operation, for example, wiping the tabletop.
Switching on/off the child safety lock
- Press the child lock button for approximately 3 seconds. A sound signal will be emitted for confirmation.
- The button will light up. The display will show the symbol indicating that the child safety lock is activated.
- To deactivate the child safety lock, press the child lock button again for 3 seconds. A sound signal will be emitted for confirmation.
NOTE
Regardless of the switching on/off of the child safety lock, it is activated. You can set the child safety lock during the hob operation. To remove the lock when the child safety lock is activated, press the button for switching on/off.
Power management
This function allows you to regulate the maximum power of the device. 1. Press the lock button. 2. Press the maximum power button. The maximum power indicator will light up. The timer will start for approximately 3 seconds. 3. Press the timer button. The timer will start for approximately 3 seconds. 4. Press the timer button again. The timer will start for approximately 1.5 seconds. The display will show the maximum power. 5. You can regulate the power level by using the pause button (3000 W, 4000 W, 7400 W). 6. Press the button for switching on/off to set the power level.
NOTE
The power level (3000 W, 4000 W) will be regulated automatically.
Sound output/input settings
1. Press the button to turn the sound on/off for approximately 2 seconds. 2. Press the button for the timer for 2 seconds to set it to 10 seconds after turning on the device. 3. The sound will turn on and off repeatedly. 4. To change the sound settings, repeat steps 1 and 2. The sound will turn on and off repeatedly.
NOTE
It is not possible to change the sound settings for 10 seconds after turning on the device.
Smart Connect
The oven has a built-in Wi-Fi module that can be used to connect to the SmartThings app. During the setup process, you can:
Check the operating status and settings for the oven's power level, monitor the timer settings. Functions controlled by SmartThings may not work properly if the communication is poor or if the product is installed in a place with weak Wi-Fi signal.
Each surface for cooking
Before you can use the functions of the Samsung oven, you must connect it with the SmartThings app.
- Open the SmartThings app on your smartphone.
- Press the Pairing button for approximately 5 seconds to activate the pairing mode.
- While the connection is being established, the Wi-Fi indicator will blink. Once the process is complete, the indicator will stay on without blinking. The connection has been established successfully. 4. If the Wi-Fi indicators for Smart Connect do not turn on, follow the instructions in the manual to connect again.
NOTE
- Make sure to set up the Smart Connect function only when the oven is working properly.
- For more instructions, refer to the manual at www.samsung.com
Press the Wi-Fi button
To turn Wi-Fi on or off, press and hold the button for 1 to 3 seconds.
- Press the On/Off button ① for approximately 1-2 seconds to turn the device on or off. To activate the child lock, press and hold the button for 3 seconds.
- Follow the instructions in the app, then press and hold the Max button for 3 seconds.
Action (NZ8****7**)
Controlling the air conditioner
This product can connect to Bluetooth devices, which you can use to control compatible Samsung air conditioners. Through the Bluetooth connection, you can use the air conditioner control function and the SmartThings app. To find out more about compatible Samsung air conditioners, visit www.samsung.com.
Connecting to the air conditioner controller
- Follow the Bluetooth instructions for the air conditioner controller model and activate the Bluetooth connection.
- Press and hold the timer and pause buttons simultaneously for 3 seconds to establish a Bluetooth connection. When the Bluetooth connection is successfully established, the display will show

CONNECTED
If the Smart Connect connection is unsuccessful, you cannot use the SmartThings app to control the air conditioner. Without a Smart Connect connection, you can still use the Bluetooth connection to control the air conditioner and sync it with your home appliances. To do this, follow steps 2 and 3 above.
Action (NZ8****8**)
Turning on the device
Press the On/Off button ① for approximately 1-2 seconds.
To switch on the appliance, press and hold the button for about 20 seconds. Otherwise, the appliance will be switched off for safety reasons.
Switching off the appliance
To switch off the appliance, use the On/Off button. Press the On/Off button for approximately 1-2 seconds.
SAFETY
The heating zone indicator lights up when the cooking surface is hot. The remaining heat indicator will not be shown for the corresponding zones under the format "H" for "hot". The temperature decreases gradually.
Heating zone and power level
- To select a heating zone, press the corresponding zone button. To set the power level, use the controls, the control button, or the knob for adjustment.
| Анма с контуло | 0 | 15 | Max |
| Кончеса уразьдениe | Max | ||
SAFETY
The power level is set to 15 by default when selecting a heating zone. If more than one key is pressed for more than 8 seconds, the display of the zone will flash.
Recommended settings for heating specific foods
The values in the table below are indicative. The power level required for different cooking methods depends on the type of food, including the quality of the ingredients used and the type and quantity of food being cooked.
| HuBo ha mouHocm | Memog ha zomBehe | pumepu 3a u3noA3BaHe |
| 14-15 | ЗamonaHE/ comupaHe/mbpkHe | ЗамonaHE Na 20aleMu kOuaecMbGa meyHocm, Варе He Na Φuge,Залчанe Ha Meco,Залчанe Ha zyaau,ЗадушБаHe Na Meco |
| 8-11 | ИнmunьUBO mbpkHe | СмeK,ФaIe,kapmoФeHu kOФmema,HagChuKhU, nalaunku/amepukAncku nalaunku |
| 7-10 ПырkeHe | ШицeL/nbprkoLу,чeрe GpO6,pu6a,nanupanu kOφmEnu,mbpkHe rIIu | |
| 5-7ВарeHe | TomBHe He Na MeuHocMu,kapmoФu,zeleHcyu go 1,5 Aumpa | |
| 2-4 | TomBHe He Na npa/ zaduyaBaHe/BapHe | TomBHe He Na npa U zaduyaBaHe Na MaIku kOuaecMbGa 3eIeHcyu,Варe He Na opu3 UЯсmua cMaIko |
| 1-2РazmaHne | РazmaHne Ha MacLo,pa3mBaprHe Na JkeAamH, pazmaHne Ha wokolag |
SAFETY
Do not adjust the power level according to specific foods.
Increasing the power level
The power increase function increases the power in the zone for heating (e.g., heating a larger amount of food). After the time for increasing the power has elapsed, the zone for heating automatically returns to the highest setting for the zone.
CAUTION
In certain circumstances, the power increase may activate automatically to protect the electronic components. For example, it is not possible to achieve maximum power with the Flex zone front and back simultaneously. See the specifications of the zones for heating for your model for the time and duration of the power increase.
Power management
The zones for heating have maximum power.
If the power is not selected from the activation of the power increase function, the power management automatically sets the new power for the zone for heating.
The display of the zone for heating for a few seconds shows the setting of the set power for the heating zone. After this display, the set level of power for the heating zone is set.
Using the Flex zone (only for models with Flex zone)
The Flex function can control two zones for heating for use with large cookware (e.g., oval cookware).
- Press the button for the Flex zone
- To set and adjust the new power level, use the Power level button.
CAUTION
Press the button for the Flex zone during operation, the Flex zone function will be changed. If you press the button for the Flex zone while each zone is operating at a different level, the level will be set to a high level.
Flex zone Plus (only for models with Flex zone)
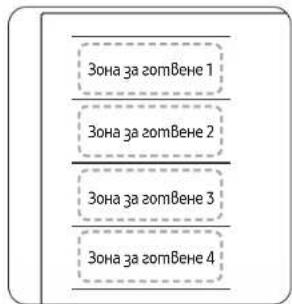
The Flex zone is a zone for heating according to the surface for heating (see the figure above), which is specially designed to accommodate cookware with different sizes and shapes simultaneously. The Flex zone has two zones that are heated by a separate inductor, which allows you to cook, regardless of where the cookware is placed on the zone for heating.
The Flex Plus zone can be used in different zones for cooking, where the cooking zones are combined. Press the Flex zone button to use the cooking zone as a single zone.
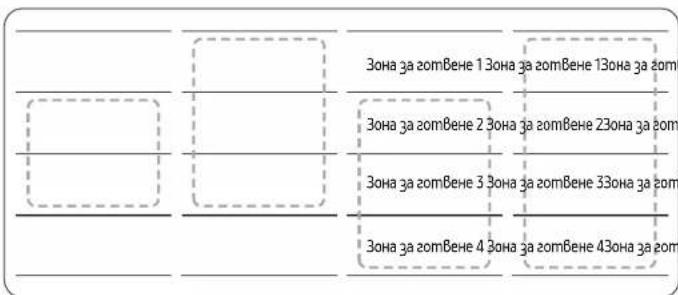
When using only one cooking zone, the diameter of the pan must be at least 14 cm. You can change it for 5-10 seconds before starting cooking to recognize the pan. - When recognizing the pan, a sound may be heard. Do not place the pan on the cooking zone during cooking. For safety, the cooking zone will automatically turn off if the pan is removed for more than 5 seconds.
Using the Flex Plus zone (only for models with Flex zone)
- Press the Flex zone button to set and adjust the power level, use the Power level button.
If you press the Flex zone button during operation, the Flex zone function will be turned off. If you press the Flex zone button while the cooking zone is working at a different level, it will automatically be set to a higher level. Cooking zone 1
When you add more food to the Flex zone, remove the current operation and press the Flex zone button to turn off the zone.
Keep warm
- Use this function to keep cooked food warm. Press the corresponding button for the cooking zone.
- Press the keep warm button
- The cooking zone indicator will light up.
- Press the keep warm button again to turn off the cooking zone.
Timer
Using the timer as a safety switch-off
The delayed start function allows you to set a time for the device to turn on, which is counted as a period of time. This function can be used for multiple zones to turn on simultaneously.
Setting the timer
The zones for which you want to set the delayed start must be enabled.
- Press the Timer button
- Set the timer by repeatedly pressing the Timer button
- To cancel the timer settings, press and hold the Timer button for 3 seconds.
DELAYED START
For quicker settings, press and hold the Timer button for 10 seconds until the desired value is reached. When the timer is activated, it emits a sound signal. Despite this, the zone for watering must be turned on.
Pause/Resume
The Pause/Resume function temporarily stops all enabled watering zones at a lower power and then returns to the set power. This function can be used for a short pause and resume of the watering process, for example, to check the soil.
Activating the Pause/Resume function: every press of the Pause button pauses the watering, and pressing it again resumes it.
To resume watering, press the Pause button again.
Enabling/Disabling the sound
- Press the Enable/Disable button (for approximately 1-2 seconds).
- Press the Timer button for 3 seconds within 10 seconds after enabling the lock.
- Press the button repeatedly to adjust the sound, repeat steps 1 and 2. Press the button to turn off the sound and it will turn off.
SETTINGS
It is not possible to change the sound settings for 10 seconds after turning on the power.
Smart Connect
The hob has a built-in Wi-Fi module that you can use to synchronize it with the SmartThings app. On the app, you can:
set the operating mode and adjust the power level of the elements for each zone,
check the current settings of the hob.
Functions that can be controlled from SmartThings may not work properly if the communication conditions are poor or if the product is placed in an area with a weak Wi-Fi signal.
Keeping the hob clean
Before you can use the functions of the Samsung hob, you must connect it with the SmartThings app.
- Download and install the SmartThings app on your smart device.
- Press the On/Off button for approximately 1-2 seconds to turn on the hob.
- Press the Lock button for approximately 3 seconds to activate the child lock.
4. Follow the instructions in the app and then touch and hold the oven for 3 seconds.
- When the connection is established, the Wi-Fi indicator lights up. Only after the process is complete, the indicator lights up without blinking. The oven has been connected successfully.
6. If the Wi-Fi indicator in Smart Connect does not turn on, follow the instructions in the app to connect again.
NOTE
Make sure to set up the Smart Connect function only when the oven is not in use. For more instructions, read the manual at www.samsung.com
Turning Wi-Fi On/Off
To turn Wi-Fi on or off, repeat steps 2 to 4.
Controlling the Hood
This product includes a Bluetooth device that you can use to connect the oven to your compatible Samsung hoods. Through the Bluetooth connection, you can use the hood control function in the SmartThings app.
To learn more about compatible Samsung hood models, visit www.samsung.com.
Connecting to a Hood Model
- Open the SmartThings app on your smartphone. Then run the Smart Connect procedure to connect the oven.
- Follow the Bluetooth instructions for the hood model and activate the Bluetooth connection.
- Touch and hold the Timer and the Start/Stop buttons simultaneously for 3 seconds to establish the Bluetooth connection. When the Bluetooth connection is successfully established, the display will show 4. Follow the instructions in the user manual for the hood model and the app to control the hood.
If the connection via Smart Connect is unsuccessful, you cannot use the SmartThings app. You can still control the hob without a Smart Connect connection. You can use a Bluetooth connection to connect the hob and synchronize it. To do this, follow steps 2 and 3 above.
Cleaning the device
Ceramic hob
WARNING
Cleaning must be done with the contacts on the ceramic surface: all cleaning agents must be removed with suitable amounts of clean water after cleaning, as they may have a corrosive effect when the surface heats up. Do not use aggressive cleaning agents, abrasive sponges or scouring pads, or sharp metal objects.
CAUTION
Clean the ceramic surface after each use, when it is still warm but not hot to the touch. This will prevent the build-up of dirt on the surface. Remove the pan, wipe with water, and clean the glass and metal parts with the recommended cleaning agents for ceramic hobs.
Cleaning
1. Wipe the ceramic surface with a damp cloth. 2. Dry with a clean cloth. No cleaning agent residue should remain on the surface. 3. Apply the ceramic cleaning agent to the surface for 20 minutes, then wipe with a clean cloth. 4. Wipe the ceramic surface with a suitable amount of clean water and dry with a clean cloth without pressure.
Removing stubborn dirt
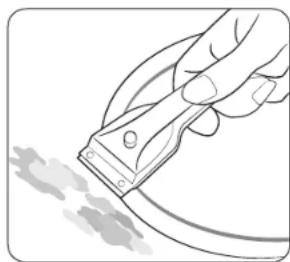
1. To remove burnt-on food or stubborn dirt, use the scraper for the hob. 2. Place the scraper blade on the ceramic surface. 3. Remove the dirt by scraping with the blade.
CAUTION
The scraper and cleaning agents for the ceramic hob are available in specialized stores.
Problem with cleaning
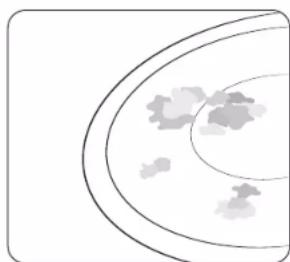
- Description of gaps, placed parts, aluminum foil and other materials with the scraper for seams, and so on.
WARNING
There is a risk of fire when the scraper for seams is used on a hot hob: 2. Place the hob as usual when it cools down. If the hob on which it is placed is hot, and the hob is on, there is a risk of ignition.
CAUTION
Scratches and marks on the ceramic hob surface caused by dragging pots and pans cannot be removed. They may impair the function of the device.
Troubleshooting and servicing
Hob (ceramic)
WARNING
Using an unsuitable cleaning agent or product for removing stains on the hob may, in some cases, cause damage.
- Select the hob with the corresponding knob.
- Wipe off any remaining moisture with a dry cloth. Let it dry.
To avoid damage to the device
Do not use the hob as a work surface or for storage. Do not work with the hob if there is a crack or break on the surface. The ceramic surface is very hard and resistant to temperature changes, but it is not unbreakable. It can be damaged by very sharp objects falling on the surface. Do not place objects on the hob. This can cause scratches and damage to the surface. Avoid contact with sharp objects, such as knives, and abrasive materials against the hob surface, as these can cause scratches. If sugar or a sugar mixture spills on the hot hob, it must be cleaned immediately with the scraper while it is hot. If it cools down, this can damage the surface when removing. - Remove from the ceramic surface all materials that can melt, such as plastic, aluminum foil, or foil for grilling. If something like this melts on the surface, it must be removed immediately with the scraper.
Troubleshooting
Faults may arise from incorrect use, which you can correct with the help of the following instructions. Do not attempt more extensive repairs if the instructions do not help in each individual case.
Repairs must be carried out by a qualified service technician. Improperly performed repairs may lead to serious risk for the consumer. If you need repairs, contact the service and maintenance team.
Combi cooking zone+
(for models with Combi cooking zone+ function) 21
Timer 21
Stop/continue 22
Quick stop 22
Child lock 22
Maximum power limit 23
Sound on/off 23
Smart Connect 23
The appliance is switched on with the On/Off button ① . Press the On/Off ① key for approximately 1-2 seconds.
NOTE
| 01 On/Off To activate and deactivate the hob. | |
| 02 Flex zone To select the flex zone. | |
| 03 Control bar | To set a heat setting and increase or decrease the time. |
| 04 Max Max Boost To activate the function. | |
| 05 Timer To turn timer on or off and set timer. | |
| 06 Display | To show for heat settings, residual heat, and Wi-Fi connection. |
| 07 Pause | To switch all cooking zones on to the low power setting. |
| 08 Lock | Press 3 seconds to lock or unlock the control panel. (Child safety lock) |
| 09 Pause & Lock | To switch all cooking zones on to the low power setting. Press 3 seconds to lock or unlock the control panel. (Child safety lock) |
| 10 Cooking zone | To select the cooking zone. |
| 11 Control knob | To set a heat setting and increase or decrease the time. |
| 12 Keep warm To keep cooked food warm. | |
The cooking zones will become hot when you cook.
Children must not be allowed to stay near the appliance.
| Nivo moči Izklop | |
| 1-3 After 6 hours | |
| 4-6 After 5 hours | |
| 7-9 After 4 hours | |
| 10-15 After 1.5 hours |
NOTE
The automatic switch-off is also activated if a wet cloth is placed on the control panel. In both of these instances, the appliance will need to be switched on again using the On/Off ① key after the liquid or the cloth has been removed.
Residual heat indicator
When an individual cooking zone or the hob is switched off, the residual heat is indicated by B (B*voce<>) on the corresponding cooking zone display. When you switch off the cooking zone, the residual heat indicator goes out only when the cooking zone has cooled down.
Using low power levels (1-5) may cause clicking noises.
Initial cleaning
Switch on the appliance using the On/Off ① key. Press the On/Off ① key for approximately 1-2 seconds.
NOTE
After the On/Off ① key has been actuated to switch on your appliance, a power level must be selected within approximately 20 seconds. Otherwise, the appliance will switch off automatically for safety reasons.
Switching off the appliance
To switch off the appliance completely, use the On/Off ① key.
Press the On/Off ① key for approximately 1-2 seconds.
NOTE
After switching off a single cooking zone or the entire cooking surface, the presence of residual heat will be indicated in the digital displays of the corresponding cooking zones in the form of an B, Bwo steps for "hot". When the temperature decreases, the B, Bwill disappear.
Selecting the cooking zone and power level
- To select a cooking zone, press the corresponding control bar.
- To set and adjust the power level, use the control bar.
| Nadzorna vystica | 0 15 Max |
| Nadzorni gumb | Max |
NOTE
You will need to adjust the power level according to specific cookware and foods.
Max. power
Functions that can be operated from the SmartThings app may not work smoothly if communication conditions are poor or the product is installed in a place with a weak Wi-Fi signal.
- Press the Flex zone key during operation, Flex zone function will be off. If you press the Flex zone key while the Flex zone is operating, the Flex zone function will be deactivated. If you press the Flex zone key while the Flex zone is operating, the Flex zone function will be deactivated.
- Press the Flex zone key
- To adjust the power level, use the Power level key.
NOTE
If you press the Flex zone key during operation, the Flex zone function will be deactivated. If you press the Flex zone key while the Flex zone is operating, the Flex zone function will be deactivated. If you press the Flex zone key while the Flex zone is operating, the Flex zone function will be deactivated.
Flex zone Plus (For use with the Flex zone plus app)
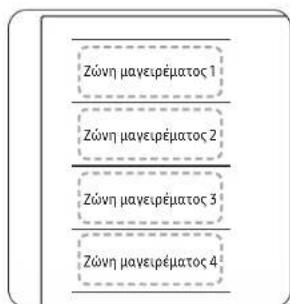
The Flex zone is the flexible cooking area located on the left side of the hob (see the figure on the left) and is specially designed to accommodate various cookware sizes and shapes simultaneously. The Flex zone has multiple zones that operate independently, allowing you to place cookware anywhere on the cooking area.
With the Flex zone Plus, you can use a group of different cooking zones to increase flexibility. Press the Flex zone key to use the cooking zone in the following way.
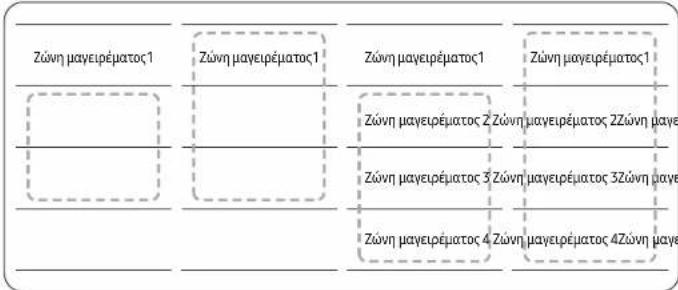
NOTE
The appliance is intended for domestic use and should be placed on a stable surface at least 14 cm away from the wall. The plug must be inserted into a suitable socket. Before using the appliance, check that the voltage corresponds to the value indicated on the rating plate. Do not leave the appliance unattended while it is in operation. For safety reasons, the appliance should be unplugged if it is not going to be used for more than 5 minutes.
Using the Flex zone Plus (Only for models with Flex zone plus)
- Flex zone
- To adjust the power level, press the Power level button.
NOTE
If the Flex zone button is pressed during operation, the Flex zone function is activated. If the Flex zone button is pressed while the Flex zone is operating, the power level is automatically set to the highest level. When you add or remove cookware in the Flex zone, the current operation is interrupted and the corresponding zone indicator lights up.
Keep Warm
- Use this function to keep cooked food warm. Press the corresponding button for the zone.
- Press the Keep Warm button. The indicator light will turn on.
- Press the Keep Warm button again to deactivate the function.
Timer
Using the timer to set a cooking time
You can set a specific time for a cooking zone or for the appliance to switch off automatically. This function can be used for multiple zones simultaneously.
Setting the timer
The cooking zones that you want to set a time for must be activated.
- Press the button on the water purifier to turn it on. To turn on the water purifier, press the power button 3.1a to check the water purifier, then press the power button 3.3 again.
NOTE
To change the filters more easily, press the water purifier button and wait for the filter replacement indicator to appear. Then, follow the instructions. The filter replacement process takes a few hours, and the water purifier is not usable during this time.
Sound On/Off
- Press the button for 20 seconds to turn the sound on/off. Approximately 1-2 seconds.
- Press the button for 20 seconds to turn the sound on/off. After 2 seconds, the sound will turn on or off.
- The sound will turn off on the display. To turn the sound back on, repeat steps 1 and 2. The sound will turn on on the display.
NOTE
You cannot change the sound settings within 10 seconds of turning the sound on or off.
Smart Connect
Instructions for the Wi-Fi module that you can use to sync your water purifier data with the SmartThings app. In the app, you can check the working status and settings for the water purifier elements. Adjust the settings as needed.
The SmartThings app may not work properly if the Wi-Fi connection is unstable or the router is far from the device.
How to set up the water purifier
To use the smart functions of the Samsung water purifier, you must first connect it to the SmartThings app.
- Before using the SmartThings app, read and accept the terms and conditions.
- Press and hold the button for about 5 seconds to turn on the AP.
- The device will restart, and the Wi-Fi indicator will blink. When the process is complete, the indicator will blink without interruption. Now the device is successfully connected. 4. If the Smart Connect Wi-Fi indicator turns on, follow the instructions in the app to reconnect.
NOTE
Make sure to set up the Smart Connect device only when it is in the cooking mode. For more information, visit the website at www.samsung.com
Turning Wi-Fi On/Off
To turn Wi-Fi on or off, repeat steps 1 to 3.
- Press and hold the button for about 1-2 seconds to turn on the cooking device.
- Press and hold the button for about 3 seconds to turn on the wireless function.
- Follow the instructions in the app and then press and hold the button. Wait for the connection.
Operation (NZ8****7**)
Hood Control
This product is equipped with a Bluetooth device that can be used to connect the cooking device with Samsung hood control models. Through the Bluetooth connection, you can use the hood control function in the SmartThings app.
To learn more about models with available hood control from Samsung, visit www.samsung.com.
To connect with a hood control model
- Connect the device to Bluetooth via the control panel and activate it using the Bluetooth button.
- Press and hold the front buttons for the timer and display simultaneously to restore the connection with Bluetooth. When the Bluetooth connection is established, the display will show the connection status.
NOTE
If the connection via Smart Connect is unsuccessful, you cannot use the SmartThings app to control and monitor the device. If the connection via Smart Connect fails, you can use the Bluetooth connection to pair the device with your phone and sync the data. To do this, follow steps 2 and 3 below.
Operation (NZ8****8**)
Turning on the device
The device turns on with the on/off button①. Press the on/off button① for approximately 1-2 seconds.
NOTE
When the on/off button 1 is activated to turn on the device, the power level must be selected within approximately 20 seconds. Otherwise, the device will automatically turn off for safety reasons.
Turning off the device
To completely turn off the device, use the on/off button ①. Press the on/off button ① for approximately 1-2 seconds.
NOTE
The heating zones and the heating surface, the presence of the pan, and the corresponding heating zones are indicated on the display. The temperature is set, not the power level.
Selecting the heating zone and power level
- To select the heating zone, press the corresponding button for the heating zone 2. To set and adjust the power level, use the control dial or the control buttons.
| Коньрална Чебма | 0 | 15 | Max |
| Коньрално konчо | Max | ||
NOTE
The appliance has been set to 15 minutes for the cooking zone. If food from one side is cooked for more than 8 seconds, the cooking zone will switch off.
Cooking time settings
The times in the table are indicative. The power level required for different cooking methods depends on the type of food, including the quality of the cooking zone used and the type and quantity of food being cooked.
| HuBo ha mokhosc | Hauun Ha zomBehe | Pumepu Ha yonompe6a |
| 14-15 | TonLeHe / ComupaHe / PpkeHe | TonLeHe Ha zomLeu mokluu mu meynocm, BapeHe meccmenu, npkeHe Meco, npaBeHe zanpuka 3a ayyau, kpykaHe Meco |
| 8-11 | MnmeH3uBho npkeHe | CmeK, 6uΦmek, xau6payn, ko6acu, naauuHku / ukomcku naauuHku |
| 7-10 PpkeHe | UHHuAU / komlemu, uzaep, pu6a, KoΦmuHa, npkeHu jaua | |
| 5-7 BapeHe | BapeHe Ha hajmHOz ygo 1,5 I meuHocm, komnupu, 3eAenvYk | |
| 2-4 | TomBeHe Ha napea / DuncmHa/ BapeHe | TomBeHe Ha napea u guHcmaHe Ha mauu koLauuHn zuAenvYk, jageBa co BapeH opu3 u mLeko |
| 1-2 ToneHe | ToneHe numep, pacsBopae JeklAmuH, moneHe yokoAago |
NOTE
You should find the power level according to the corresponding cooking zones and food.
Max. Boost
The Max. Boost function provides additional power to the cooking zone for a short time. (Example: for boiling a large pot of water) The Max. Boost function, the cooking zone automatically switches to the highest power setting.
NOTE
In certain circumstances, the Max. Boost function may be automatically deactivated to protect the internal components of the cooking zone. For example, it is not possible to activate the maximum power of the Flex zone if the Flex zone is already in use. - Check the specifications of the cooking zones on your model for the Max. Boost time.
Power management
The cooking zones have the maximum power available to them. If the power level is exceeded with the Max. Boost function, the power management automatically adjusts the power level of the cooking zone. The limit for the cooking zone is specifically changed for a few seconds after the set power level. The maximum power level changes from the set power level to the maximum power level.
Using the Flex zone (Only for models that work with Flex zone)
The Flex function can work with the entire cooking zone from one side for use with large cookware. (Example: oval cookware, fish pan)
- Press the Flex zone button 2. To set and adjust the power level, use the Power level button.
If you press the Flex Zone button during operation, the Flex Zone function will be disabled. If you press the Flex Zone button while the oven is working on different levels, the set temperature will be adjusted.
Flex Zone Plus (Only for models that support Flex Zone Plus)
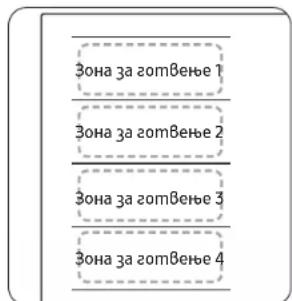
Flex Zone is a cooking area that is located on the left side of the oven (see the figure below) and is specially designed to accommodate larger dishes and pans with different shapes and sizes. Flex Zone has four zones with individual indicators, which allow you to cook safely when you place your cookware on the cooking zone.
With Flex Zone Plus, you can use a combination of different cooking zones to create a larger cooking area. Press the Flex Zone Plus button to use the cooking zone in a flexible way.
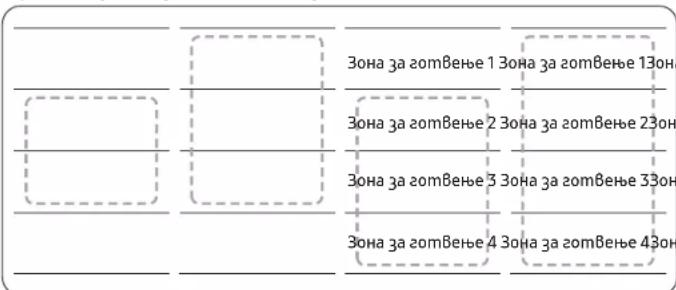
When using only one cooking zone, the indicator on the cookware should be at least 14 cm. On the cooking surface, it may take 5-10 seconds to recognize the position of the cookware. - Beeps may sound while the surface is recognizing the cookware. During cooking, do not remove the cookware. For safety reasons, the cooking surface automatically turns off if the cookware is removed for more than 5 seconds.
Using the Flex Zone Plus (Only for models that support Flex Zone Plus)
- Press the Flex Zone Plus button to set and adjust the power level. Use the Power level button.
If you press the Flex Zone button during operation, the Flex Zone function will be disabled. If you press the Flex Zone button while the cooking zone is working at different levels, it will automatically adjust to a higher level when you place or add cookware in the new Flex Zone. Turn off the oven and then press the corresponding button.
Cooking Zone 3
Keeping warm
- Use this function to keep cooked food warm. Press the corresponding button for the cooking zone.
- Press the Keeping warm button.
- The heating zone will not turn on for 20 minutes.
- Press the timer button to set the heating zone for the desired time.
Timer
Using the timer as a safety shutdown
If a specific time is set for the heating zone, the heating zone will automatically turn off after that time period has elapsed. This function can be used for multiple heating zones simultaneously.
Setting the timer
The heating zones that you want to include in the safety shutdown must be activated.
- Press the timer button
- Set the timer using the arrow buttons on the timer button.
- To cancel the timer settings, hold the timer button for 3 seconds.
NOTE
To change the settings quickly, press and hold the timer button until the desired time is displayed. When the timer is interrupted, a beep sounds several times. However, the heating zone will not turn off.
Pause/Resume
The Pause/Resume function simultaneously pauses all heating zones that are activated at a low power level and at a power level that was previously set. This function can be used to briefly interrupt, and then continue with the cooking process, e.g., to answer the phone.
When the Pause/Resume function is activated, all buttons except the Pause and Lock/Unlock buttons are disabled.
Press the button again to repeat the 20-second pause for the cooking zone.
| Коньштона мабаяЕран | ||
| За вкучувае | Плumsчиме 20 konчиме 3a Пayзa у закучиме II | II |
| За ускучувае | Плumsчиме 20 konчиме 3a Пayзa у закучиме II | Вракале на пемхогomo НMuBo на мokностп |
Quick stop
This option will reduce the speed and time needed to stop the cooking zone.
To exclude the cooking zone, press the 20-second button for the cooking zone again.
NOTE
The FlexZone does not support the quick stop function.
Operation (NZ8****8**)
Child safety lock
The child safety lock can protect against unintentional activation of the cooking zone and activation of the cooking surface. Even when the control is locked, with the exception of the on/off button, it can be turned off with the on/off button if the power supply is interrupted, for example, by a power cut.
Activating/deactivating the child safety lock
- Press the 20-second pause button for approximately 3 seconds. An audible signal will sound as confirmation.
- Press any button. The indicator will light up, showing that the child safety lock is activated. To deactivate the child safety lock, press the 20-second pause button again for 3 seconds. An audible signal will sound as confirmation.
NOTE
- Without the on/off function, the child safety lock is activated. You can set the child safety lock for the duration of the cooking. To deactivate the child safety lock, press the on/off button ① UU first, then press the corresponding button for the cooking zone.
Limiting the maximum power
The device is switched on at maximum power.
- Before use, read the instructions.
- Press the button for about 3 seconds to switch on the device.
- Press the left button for the left zone and the right button for the right zone simultaneously, for about 3 seconds.
- Press the timer button for about 3 seconds. The display will show P and the maximum power.
- You can adjust the power with the buttons for
Pause and stop (3000 W, 4000 W, 7400 W). 6. Press the button for switching on/off to set the power supply.
WARNING
At low power (3000 W, 4000 W), the power level will be set automatically.
Switching the sound on/off
- Press the button for switching on/off (approximately 1-2 seconds).
- Press the timer button for 3 seconds. The display will show the time from 10 seconds after switching on.
- The sound will be switched off and the display will show E. 4. To switch the sound on again, repeat steps 1 and 2. The sound will be switched on and the display will show
WARNING
The sound settings cannot be changed within 10 seconds of switching on the device.
Smart Connect
You can use the SmartThings app to control your Samsung oven and Wi-Fi module. From the app on your phone, you can:
Check the operating status and set the power level of the heating elements. - Check and change the settings for the timer.
The functions controlled by the SmartThings app may not work properly if the communication settings are lost or if the product is monitored in a place with a weak Wi-Fi signal.
How to connect the oven to the app
Before you can use the smart functions of your Samsung oven, you must pair it with the SmartThings app.
- Open the SmartThings app on your mobile device.
- Press and hold the button for turning on/off for about 1-2 seconds to turn on the oven.
- Press and hold the button for 3 seconds to activate the child safety lock.
- Follow the instructions from the app and then press and hold the button for 3 seconds.
- While the connection is being established, the Wi-Fi indicator will blink. When the process is complete, the indicator lights up without blinking. Now the oven has successfully connected.
- If the Smart Connect Wi-Fi indicator does not turn on, follow the instructions in the app to connect again.
NOTE
Make sure to enable the Smart Connect function only when the oven is not in operation. - For more information, visit the website at www.samsung.com
Turning on/off Wi-Fi
Replacement of the Wi-Fi module may take 2 to 4 minutes.
Vacuum cleaner control
The vacuum can be controlled with a Bluetooth remote, which you can use to connect your vacuum to Samsung vacuum control models. Before using Bluetooth, you can use the vacuum control function in the SmartThings app.
To learn more about models with Samsung vacuum control support, visit www.samsung.com.
To connect to a vacuum control model
- Open and activate the SmartThings app on your smartphone. After completing the Smart Connect settings, the vacuum will connect to the remote.
- Follow the Bluetooth instructions on the vacuum control model and activate the Bluetooth connection.
- Press and hold the Timer and Power buttons simultaneously to restore the Bluetooth connection. When the Bluetooth connection is successfully restored, a short beep will sound.
- Follow the instructions in the vacuum control model's user manual and the app to use the vacuum control features.
NOTE
If the Smart Connect connection is unsuccessful, you cannot use the SmartThings app to control and monitor the vacuum. - Without Smart Connect connection to the remote, you can use the Bluetooth connection to pair the vacuum and sync them. To do this, follow steps 2 and 3 above.
Maintenance
Cleaning display
CAUTION
Cleaning agents must not come into contact with the ceramic glass surface: All cleaning agents must be wiped off with appropriate cloths. Water after cleaning may have a caustic effect when surfaces are heated. Do not use any abrasive cleaning agents such as scouring pads or steel wool, or acidic cleaning agents.
Use a damp cloth to wipe the ceramic hob, as well as the pan bottoms. The surface should be cleaned with a suitable ceramic hob cleaner. Wipe with a soft cloth, remove limescale and metal marks using a ceramic hob scraper.
Daily cleaning
- Wipe the ceramic hob surface with a damp cloth.
- Wipe with a clean cloth. Do not leave any residue of the cleaning agent on the surface.
- Then wipe the ceramic hob surface dry with a clean, dry cloth.
- Wipe the ceramic hob surface with a suitable ceramic hob cleaner and dry it with a clean cloth without streaks.
Stubborn dirt
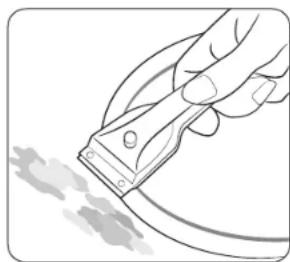
- First remove food residues and melted plastic, and stubborn stains using a ceramic hob scraper.
- Place the ceramic hob scraper at an angle to the ceramic hob surface.
- Remove the dirt by scraping with the blade.
Ceramic hob scrapers and ceramic hob cleaners are available from specialist retailers.
Problem stains
- Remove limescale, burnt-on food, aluminum foil and other materials with a ceramic hob scraper while the surface is still warm, but not hot.
WARNING
Before using the hob for the first time, read the section on safety. 2. Read the instructions for use in the usual way. The appliance will be damaged. If the hob is damaged, do not use it and contact the service center.
NOTE
Cracks or scratches on the ceramic glass surface caused by, for example, sharp objects, cannot be removed. However, they will not affect the function of the hob.
Hob frame (optional)
A WARNING
Do not use the hob if the frame is damaged, cracked, or has sharp edges; otherwise, injuries may occur.
- Clean the frame with a damp cloth
- Wipe the remaining dirt with a damp cloth. Wipe dry.
For cleaning the appliance
Do not use the hob as a work surface or for storage. Do not operate the hob if there is no pan on it or if the pan is empty. The ceramic glass is very hard and resistant to temperature changes, but it is not unbreakable. It can be damaged by a sharp or hard object falling on the hob. Do not place objects on the hob frame. This may cause scratches and damage to the glass. Avoid spilling acidic liquids, for example, vinegar, lemon juice, or descaling agents, on the hob surface, as such liquids may cause permanent stains. If any substance containing sugar comes into contact with the hot hob and melts, it must be cleaned immediately with a scraper while the hob is still hot. If it is allowed to cool, it may damage the surface that will be cleaned. Remove all objects and materials that could melt, for example, plastic, aluminum foil, and foil for food packaging, from the ceramic glass surface. If something melts on the hob, it must be removed immediately with a scraper.
Troubleshooting and service
Troubleshooting
Malfunctions may occur as a result of incorrect information that you can fix yourself with the help of the following instructions. Do not attempt to make any additional repairs if the instructions do not cover the specific case.
I WARNING
Replacement of parts must be performed only by qualified service personnel. Incorrect replacement may result in significant risk to the user. If your device requires replacement, contact the customer service center.
| ПюбLEM Можа рчupa Ночи | |
| Што мреба GA наразьам代谢 зониме заizonовпсунограда? | • Ос��урвачим Букнomo ожухвашие не сеньен. |
| Што мреба GA наразьам代谢 зониме заizonовпсунограда? | • КONDузma 3aВлухвache/ uckухвашие①e cayajно akmuьрано. • КONDузma ma6laegeумно поspruesa co Влухна крna уlu meyuhoem. |
| Што мреба GA наразьам代谢 зониме заizonовпсунограда? | • КONDузma 3aВлухвache/ uckухвашие①e cayajно akmuьрано. • КONDузma ma6laegeумно поspruesa co Влухна крna уlu meyuhoem. |
| Kog ha unфорmaцшо Mochka npuunha Peuehne | ||
| 60 | Има побLEM co мемпорун� сених на рунлама. | ПrecsmapnyБajme ja anlukauujama co konquemо 3a 6kIvyБajbe/ucklyvBajbe① .Ако побLEM'mpoqoxju, уckaye'me zu hanojyБajtemo noBeke og 30 cekyuho. Помoa npecmapryBajme zu ypegom u obugeme ce noBmopno. Ako pobLEM'mce yumte npogokvBa, konmakmpajme co lokaHnUOM cepBusen ueHmap. |
| 61 | СечБсмБьМсрпсмура поБucoka og habogetamata. | |
| 62 | Има побLEM co PBA сенилама. | |
| 63 | DC-Momorom He pa6omu nopagru npob6eMcu co PCB uuu okkuyBajtemo, uau, nak, elekmpruhu nepeku na ceuALOmoHa Na Momorom. | |
| 64 | Кончemo e npumuchamo noBeke og 8 cekyuho. | Пюревиме gan konquemo e Bλakno uau npumuchamo. Ako pob6eMOM npogoklu, npecmapryBajme zu ypegom co konquemo 3a 6kIvyБajbe/ucklyvBajbe① .Ако пob6eMOM ce yumte npogokvBa, konmakmpajme co lokaHnUOM cepBusen ueHmap. |
| 65 | Комунukaцшama nomeəу alAByhume u cnopegHnme PCB He ycnea. | ПюрсмгуБajme ja anlukauujama co konquemo 3a 6kIvyБajbe/ucklyvBajbe① .Ако пob6eMOM npogoklu, uckaye'me zu hanojyBajtemo noBeke og 30 cekyuho. Помoa npecmapryBajme zu ypegom. Ako pob6eMOM ce yumte npogokvBa, konmakmpajme co lokaHnUOM cepBusen ueHmap. |
| 66 | IC umo e obo3mokhen 3a gonup komynuцupa NeHOPMaHNo. | |
| 67 | HagBop og HOpMALEH HANOH (220 ~ 240 V). | Пюревиме zu onkpykBuHApemO 3a HanojyBaNHe og gomom. |
| 68 | Ова сепakuzyБа akо cagoBume 3a zomBSe№ He ce coogBemHu 3a ungykUckackema nacua, uau, nak, akо pa6omu 6e3 cagoBu 3a zomBSe№. | Корсметe cagoBu 3a zomBSe№ umo ce coogBemHu 3a ungykUckuKnU. |
What should I do if the cooking zone needs to be turned on or off?
This could be due to one of the following possibilities:
The control panel is partially covered by a damp cloth.
- The safety lock is activated and the controls are locked.
What should I do if the appliance does not turn on?
Check the following:
The control panel is partially covered by a damp cloth.
To reset, press and hold the on/off control for 3 seconds.
If the control panel displays an error code, select the error code.
What should I do if the appliance does not turn on?
Check the following:
- The cooking zone has been used incorrectly.
Once the cooking zone has cooled down, press and hold the on/off control for 3 seconds to reset.
What should I do if the appliance does not turn on?
Check the following:
The drying racks are unsuitable, damaged, or there are no drying racks installed in the drying zone.
If you use suitable drying racks, the recommended order will disappear automatically.
What should I do if the supply fan operates even after the drying programs are turned off?
Check the following:
When you finish using the drying zone, the supply fan activates automatically for ventilation.
Once the electronics of the drying zone are activated and reach the maximum (10 minutes), the supply fan will turn off.
If you require service support due to an informational error in the calculation with the device, visit the service technician for assistance and during the warranty period.
Service
Before requesting assistance or service, check the possible problems. If you still need help, contact the following services.
Is it a technical issue?
If so, contact the service center for assistance.
Always prepare in advance for discussion. This will speed up the troubleshooting process, and also determine whether a visit from the service is necessary.
Have 2 pieces of information ready.
What is the problem?
- How can the problem be reported?
When you call, please have the model and serial number of the device ready. General information is given in the specification chapter at the end:
Description of the device
S/N code (15 digits)
We recommend that you write down the information here for easy reference.
Model:
Serial number:
When will you be notified about the repair, and for the duration of the warranty period?
If you can solve the problem yourself by applying one of the solutions given in the chapter "Troubleshooting", the service technician for customers must perform several service visits, but he was not given all the necessary information before his visit, so he will have to, for example, make additional visits for parts. The costs for these additional visits, which are not covered by the warranty, will be charged to you.
WARRANTY AND COMMENTS?
| 3EMJA NOVIMKAJE HÉ MÄN IIOCETETE HÉ OHAJIH HA | ||
| UK 0333 000 0333 www.samsung.com/uk/support | ||
| IRELAND (EIRE) 0818 717100 www.samsung.com/e/support | ||
| GERMANY 0619 67 555 77 www.samsung.com/de/support | ||
| FRANCE 0148 63 00 00 www.samsung.com/fr/support | ||
| SPAIN 91 175 00 15 www.samsung.com/es/support | ||
| PORTUGAL | 210 608 098Chamada para a rede fixa nacionalDias uteis das 9h às 20h | |
| LUXEMBURG 261 | 03 710 www.samsung.com/be_fr/support | |
| NETHERLANDS 088 90 90 100 www.samsung.com/nl/support | ||
| BELGIUM | 02-201-24-18 | www.samsung.com/be/support (Dutch)www.samsung.com/be_fr/support(French) |
| NORWAY 2162 | 9099 www.samsung.com/no/support | |
| DENMARK 707 | 019 70 www.samsung.com/dk/support | |
| FINLAND | 030-6227 515 www.samsung.com/fi/support | |
| SWEDEN | 0771-400 300 | www.samsung.com/se/support |
| AUSTRIA | 0800 72 67 864 (0800-SAMSUNG) | www.samsung.com/at/support |
| SWITZERLAND | 0800 726 786 | www.samsung.com/ch/support (German)www.samsung.com/ch_fr/support(French) |
| HUNGARY | 0680SAMSUNG (0680-726-7864) | www.samsung.com/hu/support |
| CZECH | 800 - SAMSUNG(800-726786) | www.samsung.com/cz/support |
| SLOVAKIA | 0800 - SAMSUNG(0800-726 786) | www.samsung.com/sk/support |
| CROATIA | 072 726 786 www.samsung.com/hr/support | |
| BOSNIA 055 233 999 www.samsung.com/ba/support | ||
| Зема Повима щerte НЕ ман пocetete НЕ оондан Ha | ||
| NORTHMACEDONIA | 023 207 777 www.samsung.com/mk/support | |
| MONTENEGRO | 020 405 888 | www.samsung.com/support |
| SLOVENIA | 080 697 267 (brezplažna stevilka) | www.samsung.com/sl/support |
| SERBIA 0113 | 21 6899 www.samsung.com/rs/support | |
| Kosovo | 038 40 30 90 | www.samsung.com/support |
| ALBANIA | 045 620 202 www.samsung.com/al/support | |
| BULGARIA | 0800 111 31 - Беэнаменя востоку оретаму *3000 - Сени на сейung орету улесег мар�ама на моблике оретаму 09:00 go 18:00 - Понегамк go Пемьк | www.samsung.com/bg/support |
| ROMANIA | 0800872678 - Арел gratuit *8000 - Арел tarifat in retea Program Call Center Luni - Vineri; 9 AM - 6 PM | www.samsung.com/ro/support |
| ITALIA | 800-SAMSUNG (800.7267864) | www.samsung.com/it/support |
| CYPRUS | 8009 4000 only from landline, toll free | www.samsung.com/gr/support |
| GREECE | 80111-SAMSUNG (80111 726 7864) only from land line (+30) 210 6897691 from mobile and land line | |
| POLAND | 801-172-678* (* oplata wedlug taryfy operatore) | http://www.samsung.com/pl/support/ |
| LITHUANIA | 8-800-7777 | www.samsung.com/lt/support |
| LATVIA 8000 | 7267 www.samsung.com/lv/support | |
| ESTONIA 800- | 7267 www.samsung.com/ee/support | |
- SAFETY INSTRUCTIONS
- INSTALLING THE HOB
- BEFORE YOU START
- OPERATION (NZ8****7**)
- PAUSE/RESUME
- OPERATION (NZ8****8**)
- MAINTAINING YOUR APPLIANCE
- TROUBLESHOOTING AND SERVICE
- USING THIS MANUAL
- THE FOLLOWING SYMBOLS ARE USED IN THIS USER MANUAL
- WARNING
- CAUTION
- NOTE
- MODEL NAME & SERIAL NUMBER
- DISPOSING OF THE PACKAGING MATERIAL
- PROPER DISPOSAL OF YOUR OLD APPLIANCE
- CORRECT DISPOSAL OF THIS PRODUCT (WASTE ELECTRICAL & ELECTRONIC EQUIPMENT)
- SAFETY INSTRUCTIONS FOR THE INSTALLER
- TOOLS YOU WILL NEED
- CONNECTING TO THE MAINS POWER SUPPLY
- INSTALLING INTO THE COUNTERTOP
- CONTROL PANEL
- INDUCTION HEATING
- SAFETY SHUTOFF
- OTHER REASONS WHY A COOKING ZONE WILL SWITCH ITSELF OFF
- RESIDUAL HEAT INDICATOR
- TEMPERATURE DETECTION
- COOKWARE
- COOKWARE FOR INDUCTION COOKING ZONES
- COOKWARE SIZES FOR INDUCTION COOKING ZONES
- OTHER INDUCTION COOKWARE
- SUITABILITY TEST
- COOKWARE SUITABILITY TEST
- USING THE TOUCH BUTTONS
- OPERATING NOISES
- INITIAL CLEANING
- SWITCHING THE APPLIANCE ON
- SWITCHING THE APPLIANCE OFF
- SELECTING COOKING ZONE AND POWER LEVEL
- SUGGESTED SETTINGS FOR COOKING SPECIFIC FOODS
- MAX BOOST
- POWER MANAGEMENT
- USING THE FLEX ZONE (ONLY FOR FLEX ZONE APPLIED MODELS)
- FLEX ZONE PLUS (ONLY FOR FLEX ZONE PLUS APPLIED MODELS)
- USING THE FLEX ZONE PLUS (ONLY FOR FLEX ZONE PLUS APPLIED MODELS)
- TIMER
- USING THE TIMER AS A SAFETY SHUTOFF
- ZONE
- QUICK STOP
- CHILD SAFETY LOCK
- SWITCHING THE CHILD SAFETY LOCK ON/OFF
- MAXIMUM POWER LIMIT
- SOUND ON/OFF
- SMART CONNECT
- HOW TO CONNECT THE HOB
- WI-FI ON/OFF
- HOOD CONTROL
- TO CONNECT TO A HOOD CONTROL MODEL
- KEEP WARM
- SETTING THE TIMER
- HOB
- LIGHT SOILING
- STUBBORN SOILING
- PROBLEM DIRT
- HOB FRAME (OPTION)
- TO AVOID DAMAGING YOUR APPLIANCE
- TROUBLESHOOTING
- WHAT SHOULD I DO IF THE DISPLAY IS ILLUMINATED
- WHAT SHOULD I DO IF THE COOLING FAN RUNS AFTER THE HOB IS TURNED OFF
- SERVICE
- INDUCTION HOB
- CONTENTS
- ACTION (NZ8****7**)
- ACTION (NZ8****8**)
- IOGGBPKAEHA YPEGA
- OMCPAH8AHE HA HEU3NPABNOCMU CEPBU3UPAHE
- H3NOA3BAHE HA MOBA PKOBOGCMBO
- BPKO8OGCMBOMO 3A NOMPE6UMEA CA U3NOA3BAHU CAEGHUME CUMBOAU
- PTEADYTPEEXAEHE
- BHIMAHINE
- ABEANKA
- SETTING THE TEMPERATURE
- PREHEATING
- COOKWARE FOR INDUCTION ZONES FOR COOKING
- POWER ADJUSTMENT
- USING THE FLEX ZONE
- FLEX ZONE PLUS (ONLY FOR MODELS WITH FLEX ZONE)
- USING FLEX ZONE PLUS (ONLY FOR MODELS WITH FLEX ZONE)
- CANCELLATION
- QUICK START
- SWITCHING ON/OFF THE CHILD SAFETY LOCK
- SOUND OUTPUT/INPUT SETTINGS
- EACH SURFACE FOR COOKING
- PRESS THE WI-FI BUTTON
- CONTROLLING THE AIR CONDITIONER
- CONNECTING TO THE AIR CONDITIONER CONTROLLER
- CONNECTED
- TURNING ON THE DEVICE
- SWITCHING OFF THE APPLIANCE
- SAFETY
- HEATING ZONE AND POWER LEVEL
- RECOMMENDED SETTINGS FOR HEATING SPECIFIC FOODS
- INCREASING THE POWER LEVEL
- USING THE FLEX ZONE (ONLY FOR MODELS WITH FLEX ZONE)
- USING THE FLEX PLUS ZONE (ONLY FOR MODELS WITH FLEX ZONE)
- USING THE TIMER AS A SAFETY SWITCH-OFF
- DELAYED START
- ENABLING/DISABLING THE SOUND
- SETTINGS
- KEEPING THE HOB CLEAN
- TURNING WI-FI ON/OFF
- CONTROLLING THE HOOD
- CONNECTING TO A HOOD MODEL
- CLEANING THE DEVICE
- CERAMIC HOB
- CLEANING
- REMOVING STUBBORN DIRT
- PROBLEM WITH CLEANING
- TROUBLESHOOTING AND SERVICING
- HOB (CERAMIC)
- TO AVOID DAMAGE TO THE DEVICE
- SELECTING THE COOKING ZONE AND POWER LEVEL
- MAX. POWER
- FLEX ZONE PLUS (FOR USE WITH THE FLEX ZONE PLUS APP)
- USING THE FLEX ZONE PLUS (ONLY FOR MODELS WITH FLEX ZONE PLUS)
- USING THE TIMER TO SET A COOKING TIME
- HOW TO SET UP THE WATER PURIFIER
- TO CONNECT WITH A HOOD CONTROL MODEL
- TURNING OFF THE DEVICE
- SELECTING THE HEATING ZONE AND POWER LEVEL
- COOKING TIME SETTINGS
- MAX. BOOST
- USING THE FLEX ZONE (ONLY FOR MODELS THAT WORK WITH FLEX ZONE)
- FLEX ZONE PLUS (ONLY FOR MODELS THAT SUPPORT FLEX ZONE PLUS)
- USING THE FLEX ZONE PLUS (ONLY FOR MODELS THAT SUPPORT FLEX ZONE PLUS)
- KEEPING WARM
- USING THE TIMER AS A SAFETY SHUTDOWN
- ACTIVATING/DEACTIVATING THE CHILD SAFETY LOCK
- LIMITING THE MAXIMUM POWER
- SWITCHING THE SOUND ON/OFF
- HOW TO CONNECT THE OVEN TO THE APP
- TURNING ON/OFF WI-FI
- VACUUM CLEANER CONTROL
- TO CONNECT TO A VACUUM CONTROL MODEL
- MAINTENANCE
- CLEANING DISPLAY
- DAILY CLEANING
- STUBBORN DIRT
- PROBLEM STAINS
- HOB FRAME (OPTIONAL)
- A WARNING
- FOR CLEANING THE APPLIANCE
- I WARNING
Brand : SAMSUNG
Model : NZ85C6058KK
Category : Cooker