
WR36DG - Screwdriver HiKOKI - Free user manual and instructions
Find the device manual for free WR36DG HiKOKI in PDF.
| Product type | Cordless impact wrench |
| Brand | HiKOKI |
| Model | WR36DG |
| Rated voltage | 36 V / 18 V (automatic switching) |
| Battery capacity | 2.5 Ah / 5.0 Ah (depending on battery) |
| No-load speed (mode 1) | 600 min⁻¹ |
| No-load speed (mode 2) | 900 min⁻¹ |
| No-load speed (mode 3) | 1200 min⁻¹ |
| No-load speed (mode 4) | 1500 min⁻¹ |
| Automatic stop mode | Yes (stops after 1.2 s of impact) |
| Automatic slow mode | Yes (speed reduction after loosening) |
| LED lighting | Yes (auto-off after 10 s) |
| Battery charge indicator | Yes (4 levels) |
| Protection class | IP56 (dust and water resistance) |
| Battery type | Lithium-ion (BSL36A18) |
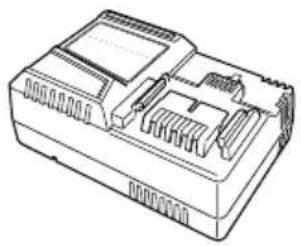
| Charger | UC18YSL3 (with USB port) |
| Sound pressure level | 97 dB (A) |
| Sound power level | 108 dB (A) |
| Vibration values | 16.8 m/s² (impact tightening) |
| Maintenance and cleaning | Clean with dry cloth or soapy water; avoid solvents |
| Warranty | In accordance with national regulations (see certificate) |
Frequently Asked Questions - WR36DG HiKOKI
User questions about WR36DG HiKOKI
0 question about this device. Answer the ones you know or ask your own.
Ask a new question about this device
Download the instructions for your Screwdriver in PDF format for free! Find your manual WR36DG - HiKOKI and take your electronic device back in hand. On this page are published all the documents necessary for the use of your device. WR36DG by HiKOKI.
USER MANUAL WR36DG HiKOKI
(Original instructions)
GENERAL POWER TOOL SAFETY WARNINGS

WARNING
Read all safety warnings, instructions, illustrations and specifi cations provided with this power tool.
Failure to follow all instructions listed below may result in electric shock, fire and/or serious injury.
Save all warnings and instructions for future reference.
The term "power tool" in the warnings refers to your mains-operated (corded) power tool or battery-operated (cordless) power tool.
1) Work area safety
a) Keep work area clean and well lit.
Cluttered or dark areas invite accidents.
b) Do not operate power tools in explosive atmospheres, such as in the presence of flammable liquids, gases or dust. Power tools create sparks which may ignite the dust or fumes.
c) Keep children and bystanders away while operating a power tool.
Distractions can cause you to lose control.
2) Electrical safety
a) Power tool plugs must match the outlet.
Never modify the plug in any way.
Do not use any adapter plugs with earthed (grounded) power tools.
Unmodified plugs and matching outlets will reduce risk of electric shock.
b) Avoid body contact with earthed or grounded surfaces, such as pipes, radiators, ranges and refrigerators.
There is an increased risk of electric shock if your body is earthed or grounded.
c) Do not expose power tools to rain or wet conditions.
Water entering a power tool will increase the risk of electric shock.
d) Do not abuse the cord. Never use the cord for carrying, pulling or unplugging the power tool.
Keep cord away from heat, oil, sharp edges or moving parts.
Damaged or entangled cords increase the risk of electric shock.
e) When operating a power tool outdoors, use an extension cord suitable for outdoor use.
Use of a cord suitable for outdoor use reduces the risk of electric shock.
f) If operating a power tool in a damp location is unavoidable, use a residual current device (RCD) protected supply.
Use of an RCD reduces the risk of electric shock.
3) Personal safety
a) Stay alert, watch what you are doing and use common sense when operating a power tool.
Do not use a power tool while you are tired or under the influence of drugs, alcohol or medication.
A moment of inattention while operating power tools may result in serious personal injury.
b) Use personal protective equipment. Always wear eye protection.
Protective equipment such as a dust mask, non-skid safety shoes, hard hat or hearing protection used for appropriate conditions will reduce personal injuries.
c) Prevent unintentional starting. Ensure the switch is in the off -position before connecting to power source and/or battery pack, picking up or carrying the tool.
Carrying power tools with your finger on the switch or energising power tools that have the switch on invites accidents.
d) Remove any adjusting key or wrench before turning the power tool on.
A wrench or a key left attached to a rotating part of the power tool may result in personal injury.
e) Do not overreach. Keep proper footing and balance at all times.
This enables better control of the power tool in unexpected situations.
f) Dress properly. Do not wear loose clothing or jewellery. Keep your hair and clothing away from moving parts.
Loose clothes, jewellery or long hair can be caught in moving parts.
g) If devices are provided for the connection of dust extraction and collection facilities, ensure these are connected and properly used.
Use of dust collection can reduce dust-related hazards.
h) Do not let familiarity gained from frequent use of tools allow you to become complacent and ignore tool safety principles.
A careless action can cause severe injury within a fraction of a second.
4) Power tool use and care
a) Do not force the power tool. Use the correct power tool for your application.
The correct power tool will do the job better and safer at the rate for which it was designed.
b) Do not use the power tool if the switch does not turn it on and off.
Any power tool that cannot be controlled with the switch is dangerous and must be repaired.
c) Disconnect the plug from the power source and/ or remove the battery pack, if detachable, from the power tool before making any adjustments, changing accessories, or storing power tools.
Such preventive safety measures reduce the risk of starting the power tool accidentally.
d) Store idle power tools out of the reach of children and do not allow persons unfamiliar with the power tool or these instructions to operate the power tool.
Power tools are dangerous in the hands of untrained users.
e) Maintain power tools and accessories. Check for misalignment or binding of moving parts, breakage of parts and any other condition that may affect the power tool's operation.
If damaged, have the power tool repaired before use.
Many accidents are caused by poorly maintained power tools.
f) Keep cutting tools sharp and clean.
Properly maintained cutting tools with sharp cutting edges are less likely to bind and are easier to control.
g) Use the power tool, accessories and tool bits etc. in accordance with these instructions, taking into account the working conditions and the work to be performed.
Use of the power tool for operations diff erent from those intended could result in a hazardous situation.
h) Keep handles and grasping surfaces dry, clean and free from oil and grease.
Slippery handles and grasping surfaces do not allow for safe handling and control of the tool in unexpected situations.
5) Battery tool use and care
a) Recharge only with the charger specified by the manufacturer.
A charger that is suitable for one type of battery pack may create a risk of fire when used with another battery pack.
b) Use power tools only with specifically designated battery packs.
Use of any other battery packs may create a risk of injury and fire.
c) When battery pack is not in use, keep it away from other metal objects, like paper clips, coins, keys, nails, screws or other small metal objects, that can make a connection from one terminal to another.
Shorting the battery terminals together may cause burns or a fire.
d) Under abusive conditions, liquid may be ejected from the battery; avoid contact. If contact accidentally occurs, fl ush with water. If liquid contacts eyes, additionally seek medical help.
Liquid ejected from the battery may cause irritation or burns.
e) Do not use a battery pack or tool that is damaged or modified.
Damaged or modifi ed batteries may exhibit unpredictable behaviour resulting in fire, explosion or risk of injury.
f) Do not expose a battery pack or tool to fire or excessive temperature.
Exposure to fire or temperature above 130^ cause explosion.
g) Follow all charging instructions and do not charge the battery pack or tool outside the temperature range specified in the instructions.
Charging improperly or at temperatures outside the specified range may damage the battery and increase the risk of fire.
6) Service
a) Have your power tool serviced by a qualified repair person using only identical replacement parts.
This will ensure that the safety of the power tool is maintained.
b) Never service damaged battery packs.
Service of battery packs should only be performed by the manufacturer or authorized service providers.
PRECAUTION
Keep children and infirm persons away.
When not in use, tools should be stored out of reach of children and infirm persons.
CORDLESS IMPACT WRENCH SAFETY WARNINGS
Hold the power tool by insulated gripping surfaces, when performing an operation where the fastener may contact hidden wiring.
Fasteners contacting a "live" wire may make exposed metal parts of the power tool "live" and could give the operator an electric shock.
ADDITIONAL SAFETY WARNINGS
-
This is a portable tool for tightening and loosening bolts and nuts. Use it only for these operation.
-
Make sure to securely hold the tool during operation. Failure to do so can result in accidents or injuries. (Fig. 2)
-
Preparing and checking the work environment. Make sure that the work site meets all the conditions laid forth in the precautions.
-
Check the actual tightening torque with a torque wrench.
-
Stop the tool before switching the direction of rotation. Always release the switch and wait for tool to stop before switching the direction of rotation.
-
Never touch the turning part. Do not allow the turning part section to get near your hands or any other part of your body. You could be cut or caught in the turning part. Also, be careful not to touch the turning part after using continuously it for a long time. It gets quite hot and could burn you.
-
Please use the designated attachments which are listed in the operations manual and HiKOKI's catalog. Accidents or injuries could result from not doing so.
-
Make sure to firmly install the attachments in the anvil. If the attachments is not firmly installed it might come out and cause injuries.
-
Tightening mode selector function
-
Select tightening mode while the trigger switch is released. Failure to do so could result in malfunction.
The appropriate mode differs depending on the bolts and the material being screwed. Tighten in a few test bolts and adjust the mode setting accordingly.
The tightening mode selector switch can only be set after the battery has been installed in the tool and the trigger switch has been pulled once.
The power tool is equipped with a temperature protection circuit to protect the motor. Continuous work may cause the temperature of the unit to rise, activating the temperature protection circuit and automatically stopping operation. If this happens, allow the power tool to cool before resuming use.
- The motor may stop in the event the tool is overloaded. In this should occur, release the tool's switch and eliminate the cause of the overload.
Avoid touching the front case which can heat up during continuous operation.
-
The use of the battery in a cold condition (below 0 degree Centigrade) can sometimes result in the weakened tightening torque and reduced amount of work. This, however, is a temporary phenomenon, and returns to normal when the battery warms up.
-
The push button can not be switched while the power tool is turning. To switch the push button, stop the power tool, then set the push button.
-
Install securely the hook. Unless the hook is securely installed, it may cause an injury while using.
When electing to carry the tool hooked to your hip belt, make sure to detach the tool socket. Failure to do so may result in unexpected injury.
-
Do not give a strong shock to the switch panel or break it. It may lead to a trouble.
-
Do not look directly into the light. Such actions could result in eye injury.
Wipe off any dirt or grime attached to the lens of the LED light with a soft cloth, being careful not to scratch the lens.
Scratches on the lens of the LED light can result in decreased brightness.
- To prevent the battery power consumption caused by forgetting to turn off the LED light, the light goes off automatically in about 10 seconds.
English
-
Resting the unit after continuous work.
-
Do not touch the hammer case, as it gets very hot during continuous work.
-
Always charge the battery at a temperature of 0^ - 40^ . A temperature of less than 0^ will result in over charging which is dangerous. The battery cannot be charged at a temperature higher than 40^ .
The most suitable temperature for charging is that of 20^ - 25^
- Do not use the charger continuously.
When one charging is completed, leave the charger for about 15 minutes before the next charging of battery.
-
Do not allow foreign matter to enter the hole for connecting the rechargeable battery.
-
Never disassemble the rechargeable battery and charger.
-
Never short-circuit the rechargeable battery. Shortcircuiting the battery will cause a great electric current and overheat. It results in burn or damage to the battery.
-
Do not dispose of the battery in fire. If the battery is burnt, it may explode.
-
Bring the battery to the shop from which it was purchased as soon as the post-charging battery life becomes too short for practical use. Do not dispose of the exhausted battery.
-
Do not insert object into the air ventilation slots of the charger. Inserting metal objects or inflammables into the charger air ventilation slots will result in electrical shock hazard or damaged charger.
-
Make sure that the battery is installed firmly. If it is at all loose it could come off and cause an accident.
-
Do not use the product if the tool or the battery terminals (battery mount) are deformed.
Installing the battery could cause a short circuit that could result in smoke emission or ignition.
- Keep the tool's terminals (battery mount) free of swarf and dust.
Prior to use, make sure that swarf and dust have not collected in the area of the terminals.
During use, try to avoid swarf or dust on the tool from falling on the battery.
- When suspending operation or after use, do not leave the tool in an area where it may be exposed to falling swarf or dust.
Doing so could cause a short circuit that could result in smoke emission or ignition.
- Always use the tool and battery at temperatures between -5^ and 40^ .
CAUTION ON LITHIUM-ION BATTERY
To extend the lifetime, the lithium-ion battery equips with the protection function to stop the output.
In the cases of 1 to 3 described below, when using this product, even if you are pulling the switch, the motor may stop. This is not the trouble but the result of protection function.
- When the battery power remaining runs out, the motor stops.
In such a case, charge it up immediately.
-
If the tool is overloaded, the motor may stop. In this case, release the switch of tool and eliminate causes of overloading. After that, you can use it again.
-
If the battery is overheated under overload work, the battery power may stop.
In this case, stop using the battery and let the battery cool. After that, you can use it again.
Furthermore, please heed the following warning and caution.
WARNING
In order to prevent any battery leakage, heat generation, smoke emission, explosion and ignition beforehand, please be sure to heed the following precautions.
- Make sure that swarf and dust do not collect on the battery.
During work make sure that swarf and dust do not fall on the battery.
-
Make sure that any swarf and dust falling on the power tool during work do not collect on the battery.
-
Do not store an unused battery in a location exposed to swarm and dust.
Before storing a battery, remove any swarf and dust that may adhere to it and do not store it together with metal parts (screws, nails, etc.).
-
Do not pierce battery with a sharp object such as a nail, strike with a hammer, step on, throw or subject the battery to severe physical shock.
-
Do not use an apparently damaged or deformed battery.
-
Do not use the battery for a purpose other than those specified.
-
If the battery charging fails to complete even when a specified recharging time has elapsed, immediately stop further recharging.
-
Do not put or subject the battery to high temperatures or high pressure such as into a microwave oven, dryer, or high pressure container.
-
Keep away from fire immediately when leakage or foul odor are detected.
-
Do not use in a location where strong static electricity generates.
-
If there is battery leakage, foul odor, heat generated, discolored or deformed, or in any way appears abnormal during use, recharging or storage, immediately remove it from the equipment or battery charger, and stop use.
-
Do not immerse the battery or allow any fluids to flow inside. Conductive liquid ingress, such as water, can cause damage resulting in fire or explosion. Store your battery in a cool, dry place, away from combustible and flammable items. Corrosive gas atmospheres must be avoided.
CAUTION
- If liquid leaking from the battery gets into your eyes, do not rub your eyes and wash them well with fresh clean water such as tap water and contact a doctor immediately.
If left untreated, the liquid may cause eye-problems.
- If liquid leaks onto your skin or clothes, wash well with clean water such as tap water immediately.
There is a possibility that this can cause skin irritation.
- If you find rust, foul odor, overheating, discolor, deformation, and/or other irregularities when using the battery for the first time, do not use and return it to your supplier or vendor.
WARNING
If a conductive foreign matter enters in the terminal of lithium ion battery, the battery may be shorted, causing fire. When storing the lithium ion battery, obey surely the rules of following contents.
- Do not place conductive debris, nail and wires such as iron wire and copper wire in the storage case.
To prevent shorting from occurring, load the battery in the tool or insert securely the battery cover for storing until the ventilator is not seen.
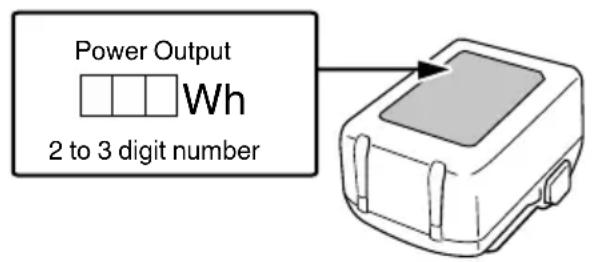
REGARDING LITHIUM-ION BATTERY TRANSPORTATION
When transporting a lithium-ion battery, please observe the following precautions.
WARNING
Notify the transporting company that a package contains a lithium-ion battery, inform the company of its power output and follow the instructions of the transportation company when arranging transport.
Lithium-ion batteries that exceed a power output of 100 Wh are considered to be in the freight classification of Dangerous Goods and will require special application procedures.
For transportation abroad, you must comply with international law and the rules and regulations of the destination country.
USB DEVICE CONNECTION PRECAUTIONS (UC18YSL3)
When an unexpected problem occurs, the data in a USB device connected to this product may be corrupted or lost. Always make sure to back up any data contained in the USB device prior to use with this product.
Please be aware that our company accepts absolutely no responsibility for any data stored in a USB device that is corrupted or lost, nor for any damage that may occur to a connected device.
WARNING
Prior to use, check the connecting USB cable for any defect or damage.
Using a defective or damaged USB cable can cause smoke emission or ignition.
- When the product is not being used, cover the USB port with the rubber cover.
Buildup of dust etc. in the USB port can cause smoke emission or ignition.
NOTE
There may be an occasional pause during USB recharging.
- When a USB device is not being charged, remove the USB device from the charger.
Failure to do so may not only reduce the battery life of a USB device, but may also result in unexpected accidents.
- It may not be possible to charge some USB devices, depending on the type of device.
PRECAUTIONS REGARDING THE DUST-RESISTANCE AND WATERPROOFING FUNCTIONS
This product conforms to IP56 protection class ratings (dust-resistance and water-proofing) for electrical equipment as stipulated by the international IEC regulations. (Only the main unit conforms to the IP56 protection class ratings when equipped with a battery.)
[Descriptions of IP Codes]
IP56
Protection rating for water penetration
Must be no adverse effects on the equipment when sprayed with powerful jets of water from all directions (waterproofed).
(100 L of water per minute sprayed for approximately three minutes from a distance of approximately three meters with the use of a spray nozzle with a diameter of 12.5 mm.)
Protection rating for external assault by solid objects
Dust that may cause adverse effects on the equipment must not be able to enter (dust-resistance).
(The equipment to be left non-operable in a test chamber in which particles of talcum powder with a diameter of less than 75 m are floating in the air with the use of an agitation pump at a rate of 2kg per cubic meter for eight hours.)
The equipment has been designed to withstand the effects of dust and water, but there is no guarantee that it will not malfunction. Do not use or leave the equipment in locations where it is subject to excessive amounts of dust, or in locations where it is submerged in water or subject to rainwater.
NAMES OF PARTS (Fig. 1 - Fig. 19)
| ① | Hammer case | 15 | High / Low mode indicator lamp |
| ② | Anvil (A) | 16 | Auto stop mode selector switch |
| ③ | Friction ring (C) | 17 | Auto stop mode indicator lamp |
| ④ | LED Light Latch | 18 | |
| ⑤ | Trigger switch Charge indicator lamp | ||
| ⑥ | Switch panel | 20 | Battery level indicator switch |
| ⑦ | Battery | 21 | Battery level indicator lamp |
| ⑧ | Hook Display panel | 22 | |
| ⑨ | Handle Groove | 23 | |
| ⑩ | Push button Screw | 24 | |
| ⑪ | Motor 3/4" Drive hex. socket | ||
| ⑫ | Anvil (B) O-ring | 26 | |
| ⑬ | Friction ring (B) Pin | 27 | |
| ⑭ | High / Low mode selector switch | 28 | 1/2" Drive hex. socket |
SYMBOLS
WARNING
The following show symbols used for the machine. Be sure that you understand their meaning before use.
| WR36DF / WR36DG : Cordless Impact Wrench | |
| To reduce the risk of injury, user must read instruction manual. | |
| Only for EU countries Do not dispose of electric tools together with household waste material! In observance of European Directive 2012/19/EU on waste electrical and electronic equipment and its implementation in accordance with national law, electric tools that have reached the end of their life must be collected separately and returned to an environmentally compatible recycling facility. | |
| --- | Direct current |
| V Rated voltage | |
| n0 | No-load speed |
| min-1 | Oscillation per minute |
| Bpm Impact rate | |
| Ordinary bolt | |
| H | High tension bolt |
| MT Tightening torque (Maximum) | |
| Square drive size | |
| kg | Weight* (According to EPTA-Procedure 01/2014) |
| I | Switching ON |
| O | Switching OFF |
| Disconnect the battery | |
| R | Clockwise rotation |
| L | Counterclockwise rotation |
| Remaining battery indicator switch | |
| High / Low mode selector switch | |
| 4321 | High / Low mode indicator lamp |
| MODE | Auto stop mode selector switch |
| AUTO STOP | Auto stop mode indicator lamp |
| Warning | |
- Depending on attached battery. The heaviest weight is measured with BSL36B18 (sold separately).
Battery
| Lights; The battery remaining power is over 75%. | |
| Lights; The battery remaining power is 50%-75%. | |
| Lights; The battery remaining power is 25%-50%. | |
| Lights; The battery remaining power is less than 25%. | |
| Blinks; The battery remaining power is nearly empty. Recharge the battery soonest possible. | |
| Blinks; Output suspended due to high temperature. Remove the battery from the tool and allow it to fully cool down. | |
| Blinks; Output suspended due to failure or malfunction. The problem may be the battery so please contact your dealer. |
STANDARD ACCESSORIES
In addition to the main unit (1 unit), the package contains the accessories listed on page 234.
Standard accessories are subject to change without notice.
APPLICATIONS
Tightening and loosening of all types of bolts and nuts, used for securing structural items
SPECIFICATIONS
The specifications of this machine are listed in the Table on page 233.
NOTE
Due to HiKOKI's continuing program of research and development, the specific cations herein are subject to change without prior notice.
Battery
| Model BSL36A18 | |
| Voltage 36 V / 18 V (Automatic Switching*) | |
| Battery capacity | 2.5 Ah / 5.0 Ah |
| (Automatic Switching*) | |
- The tool itself will automatically switch over.
CHARGING
Before using the power tool, charge the battery as follows.
-
Connect the charger's power cord to the receptacle. When connecting the plug of the charger to a receptacle, the charge indicator lamp will blink in red (At 1-second intervals).
-
Insert the battery into the charger.
Firmly insert the battery into the charger as shown in Fig. 4 (on page 2).
- Charging
When inserting a battery in the charger, the charge indicator lamp will blink in blue.
When the battery becomes fully recharged, the charge indicator lamp will light up in green. (See Table 1)
(1) Charge indicator lamp indication
The indications of the charge indicator lamp will be as shown in Table 1, according to the condition of the charger or the rechargeable battery.
Table 1
| Charger status | Status of indicator lamp | Indication meaning |
| Before charging | ON/OFF at 0.5 sec. intervals (RED) | Plugged into power source *1 |
| While charging | Lights for 0.5 sec. at intervals of 1 sec. (BLUE) | Charged at less than 50% |
| Lights for 1 sec. at intervals of 0.5 sec. (BLUE) | Charged at less than 80% | |
| Lights continuously (BLUE) | Charged at more than 80% | |
| Charging complete | Lights continuously (GREEN) (Continuous buzzer sound: about 6 sec.) | |
| Overheat standby | ON/OFF at 0.3 sec. intervals (RED) | Battery overheated. Unable to charge. *2 |
| Charging impossible | ON/OFF at 0.1 sec. intervals (PURPLE) (Intermittent buzzer sound; about 2 sec.) | Malfunction in the battery or the charger *3 |
1 If the red lamp continues to blink even after the charger has been attached, check to confirm that the battery has been fully inserted.
2 Although charging will start once the battery has cooled down even when left in situ, the best practice is to remove the battery and allow it to cool down in a shaded, well-ventilated location before charging.
*3
O Fully insert the battery.
Check to confirm that no foreign matter is stuck to the battery mount or terminals.
- Charging will take longer at extremely low ambient temperatures. Charge the battery in a warm location (such as indoors).
- Do not block the air vent. Otherwise the interior will overheat, reducing the charger's performance.
If the cooling fan is not operating, contact a HiKOKI Authorized Service Center for repairs.
English
(2) Regarding the temperatures and charging time of the rechargeable battery
The temperatures and charging time will become as shown in Table 2.
Table 2
| Model | UC18YSL3 | |
| Type of battery Li-ion | ||
| Charging voltage 14.4-18 V | ||
| Temperatures at which the battery can be recharged | 0°C-50°C | |
| Charging time for battery capacity, approx. (At 20°C) | 1.5 Ah 15 min | |
| 2.0 Ah 20 min | ||
| 2.5 Ah 25 min | ||
| 3.0 Ah | 20 min(BSL1430C,BSL1830C: 30 min) | |
| 4.0 Ah | 26 min(BSL1840M: 40 min) | |
| 5.0 Ah 32 min | ||
| 6.0 Ah 38 min | ||
| 8.0 Ah 52 min | ||
| Multi volt battery | 1.5 Ah (×2 unit) | 20 min |
| 2.5 Ah (×2 unit) | 32 min | |
| 4.0 Ah (×2 unit) | 52 min | |
| Number of battery cells 4-10 | ||
| Charging voltage for USB 5 V | ||
| Charging current for USB 2 A | ||
| Weight 0.6 kg | ||
NOTE
The recharging time may vary according to the ambient temperature and power source voltage.
-
Disconnect the charger's power cord from the receptacle.
-
Hold the charger firmly and pull out the battery. NOTE
Be sure to pull out the battery from the charger after use, and then keep it.
Regarding electric discharge in case of new batteries, etc.
As the internal chemical substance of new batteries and batteries that have not been used for an extended period is not activated, the electric discharge might be low when using them the first and second time. This is a temporary phenomenon, and normal time required for recharging will be restored by recharging the batteries 2-3 times.
How to make the batteries perform longer.
(1) Recharge the batteries before they become completely exhausted.
When you feel that the power of the tool becomes weaker, stop using the tool and recharge its battery. If you continue to use the tool and exhaust the electric current, the battery may be damaged and its life will become shorter.
(2) Avoid recharging at high temperatures.
A rechargeable battery will be hot immediately after use. If such a battery is recharged immediately after use, its internal chemical substance will deteriorate, and the battery life will be shortened. Leave the battery and recharge it after it has cooled for a while.
CAUTION
If the battery is charged while it is heated because it has been left for a long time in a location subject to direct sunlight or because the battery has just been used, the charge indicator lamp of the charger lights for 0.3 seconds, does not light for 0.3 seconds (off for 0.3 seconds). In such a case, first let the battery cool, then start charging.
- When the charge indicator lamp flickers (at 0.2-second intervals), check for and take out any foreign objects in the charger's battery connector. If there are no foreign objects, it is probable that the battery or charger is malfunctioning. Take it to your authorized Service Center.
MOUNTING AND OPERATION
| Action | Figure | Page |
| Removing and inserting the battery | 3 | 2 |
| Charging | 4 | 2 |
| Remaining battery indicator | 5 | 2 |
| Removing and mounting the hook | 6 | 3 |
| How to use the hook 7 3 | ||
| Mounting the socket*1 (WR36DF) | 8 | 3 |
| Mounting the socket*1 (WR36DG) | 9 | 3 |
| Reversing the rotational direction | 10 | 3 |
| Switch operation | 11 | 4 |
| How to use the LED light*2 | 12 | 4 |
| Tightening mode selector function*3 | 13 | 4 |
| Auto stop mode selector switch | 14 | 4 |
| Auto stop mode | 15 | 4 |
| Auto slow mode | 16 | 4 |
| Charging a USB device from a electrical outlet | 17-a | 5 |
| Charging a USB device and battery from a electrical outlet | 17-b | 5 |
| How to recharge USB device | 18 | 5 |
| When charging of USB device is completed | 19 | 5 |
| Selecting accessories | — | 235 |
*1 Installing a socket
Select the socket to be used.
[WR36DF]
(1) Slide the O-ring out of the groove, then align the hole of the socket with the hole of the anvil and insert the anvil into the socket.
(2) Insert the pin into the socket.
(3) While making sure that the pin doesn't fall, attach the O-ring to the groove on the socket.
[WR36DG]
(1) Align the square portions of the socket and the anvil with each other.
(2) Make sure to firmly install the socket by pushing it all the way into the anvil.
(3) When removing the socket, pull it out of the anvil.
*2 How to use the LED light
To prevent the battery power consumption caused by forgetting to turn off the LED light, the light goes off automatically in about 10 seconds.
*3 Tightening mode selector function
CAUTION
Select tightening mode while the trigger switch is released. Failure to do so could result in malfunction.
NOTE
The appropriate mode will vary depending on the screw and the material being screwed. Adjust the tightening mode setting by test-tightening a number of screws.
The tightening mode cannot be changed unless the rechargeable battery has been mounted in the tool and the switch has been pulled.
(1) High / Low mode selector switch (Fig. 13)
The tightening mode switches between 4 different rotation speeds each time the High / Low mode selector switch is pressed.
(2) Auto stop mode selector switch (Fig. 14)
Each time the auto stop mode selector switch is pressed, the auto stop function will switch between ON and OFF.
High/Low mode setting
| 4 3 2 1 AUTO STDP | 4 3 2 1 AUTO STDP | 4 3 2 1 AUTO STDP | 4 3 2 1 AUTO STDP |
| Mode 1 600 min-1 | Mode 2 900 min-1 | Mode 3 1200 min-1 | Mode 4 1500 min-1 |
| Auto Stop Time: OFF | |||
| USE: [Mode 1 and 2] For work that requires fine adjustments. [Mode 3] For work that requires the power to be suppressed. [Mode 4] For work that requires power and speed. | |||
(3) Auto stop mode (Fig.15)
Stops automatically after a preset time has elapsed.
Push the Push button to the forward ("R") position, then press the Auto stop mode selector switch to select the setting.
Auto stop mode setting
| AUTO STOP | AUTO STOP | AUTO STOP | AUTO STOP |
| Mode 1 600 min-1 | Mode 2 900 min-1 | Mode 3 1200 min-1 | Mode 4 1500 min-1 |
| Auto Stop Time: Stops within 1.2 seconds after impact begins. | |||
| USE: [Mode 1] Steel frame temporary tightening, etc. [Mode 2] Truck wheel nut or piping temporary tightening, etc. [Mode 3 and 4] Heavy machinery or bridge girder temporary tightening, etc. | |||
(4) Auto slow mode (Fig. 16)
Stops for a preset time and/or changes the speed automatically to a preset speed.
Push the Push button to the reverse ("L") position, then press the Auto stop mode selector switch to select the setting.
Auto slow mode setting
| MODE 1 600 min-1 | MODE 2 900 min-1 | MODE 3 1200 min-1 | MODE 4 1500 min-1 |
| [Trigger displacement: Maximum] Pauses for 0.5 seconds after bolt loosening is detected. ↓ Rotation speed is reduced to 60-350 min-1 depending on how far the trigger is pulled after restarting. (Rotation does not stop after restarting.) | |||
| [Trigger displacement: Halfway] Pauses for 0.5 seconds after bolt loosening is detected. ↓ Rotation speed is reduced as follows depending on how far the trigger is pulled after restarting. (Rotation does not stop after restarting.) | |||
| 60-330 min-1 | 60-500 min1 | 60-660 min1 | 60-830 min1 |
| USE: For work of loosening bolts or nuts. | |||
This function helps prevent nuts from dropping when loosening them.
NOTE
Depending on factors such as the bolt or nut size, socket used, and extent of tightening, there is a risk of nuts accidentally dropping if the nut becomes detached from the screw thread while the power tool is operating.
MAINTENANCE AND INSPECTION
1. Inspecting the socket
A worn or deformed hex. or a square-holed socket will not give an adequate tightness to the fitting between the nut or anvil, consequently resulting in loss of tightening torque. Pay attention to wear of a socket holes periodically, and replace with a new one if needed.
2. Inspecting the mounting screws
Regularly inspect all mounting screws and ensure that they are properly tightened. Should any of the screws be loose, retighten them immediately. Failure to do so could result in serious hazard.
3. Maintenance of the motor
The motor unit winding is the very "heart" of the power tool. Exercise due care to ensure the winding does not become damaged and/or wet with oil or water.
4. Inspection of terminals (tool and battery)
- Check to make sure that swarf and dust have not collected on the terminals.
On occasion check prior, during and after operation.
CAUTION
Remove any swarf or dust which may have collected on the terminals.
Failure to do so may result in malfunction.
5. Cleaning on the outside
When the tool is stained, wipe with a soft dry cloth or a cloth moistened with soapy water. Do not use chloric solvents, gasoline or paint thinner, for they melt plastics.
6. Storage
Store the power tool and battery in a place in which the temperature is less than 40^ and out of reach of children.
NOTE
Storing lithium-ion batteries.
Make sure the lithium-ion batteries have been fully charged before storing them.
Prolonged storage (3 months or more) of batteries with a low charge may result in performance deterioration, signifi cantly reducing battery usage time or rendering the batteries incapable of holding a charge.
However, signifi cantly reduced battery usage time be recovered by repeatedly charging and using the batteries two to five times.
If the battery usage time is extremely short despite repeated charging and use, consider the batteries dead and purchase new batteries.
CAUTION
In the operation and maintenance of power tools, the safety regulations and standards prescribed in each country must be observed.
Important notice on the batteries for the HiKOKI cordless power tools
Please always use one of our designated genuine batteries. We cannot guarantee the safety and performance of our cordless power tool when used with batteries other than these designated by us, or when the battery is disassembled and modified (such as disassembly and replacement of cells or other internal parts).
GUARANTEE
We guarantee HiKOKI Power Tools in accordance with statutory/country specific regulation. This guarantee does not cover defects or damage due to misuse, abuse, or normal wear and tear. In case of complaint, please send the Power Tool, undismantled, with the GUARANTEE CERTIFICATE found at the end of this Handling instruction, to a HiKOKI Authorized Service Center.
Information concerning airborne noise and vibration
The measured values were determined according to EN62841 and declared in accordance with ISO 4871.
Measured A-weighted sound power level:
109 dB (A) (WR36DF)
108 dB (A) (WR36DG)
Measured A-weighted sound pressure level:
98 dB (A) (WR36DF)
97 dB (A) (WR36DG)
Uncertainty K: 3 dB (A).
Wear hearing protection.
Vibration total values (triax vector sum) determined according to EN62841.
Impact tightening of fasteners of the maximum capacity of the tool:
Vibration emission value a_h = 17.7m / s^2 (WR36DF)
16.8 2 (WR36DG)
Uncertainty K = 1.5 m/s^2
The declared vibration total value and the declared noise emission value have been measured in accordance with a standard test method and may be used for comparing one tool with another.
They may also be used in a preliminary assessment of exposure.
WARNING
The vibration and noise emission during actual use of the power tool can differ from the declared total value depending on the ways in which the tool is used especially what kind of workpiece is processed; and
- Identify safety measures to protect the operator that are based on an estimation of exposure in the actual conditions of use (taking account of all parts of the operating cycle such as the times when the tool is switched off and when it is running idle in addition to the trigger time).
NOTE
Due to HiKOKI's continuing program of research and development, the specifi cations herein are subject to change without prior notice.
TROUBLESHOOTING
Use the inspections in the table below if the tool does not operate normally. If this does not remedy the problem, consult your dealer or the HiKOKI Authorized Service Center.
| Symptom Possible | cause Remedy | |
| Tool doesn't run No remaining | g battery power Charge the battery. | |
| Tool suddenly stopped Tool | was overburdened Get rid of the problem causing the overburden. | |
| The battery is overheated. Let the battery cool down. | ||
| The trigger switch was held down for 5 minutes or more. | This is not a malfunction. The motor was automatically stopped to prevent failure of the tool. | |
| Tool sockets -can't be attached -fall off -can't be removed | The shape of the attachment portion doesn't match | Make sure to use sockets with the appropriate square drive size. WR36DF: 19 mm WR36DG: 12.7 mm |
| Switch can't be pulled | The Push button is positioned halfway | Press the button fi rmly into position for the desired direction of rotation. |
| An abnormal high-pitched noise occurs when the trigger switch is pulled. | The trigger switch is being pulled only slightly. | This is not a malfunction. It does not occur if the trigger switch is pulled more fully. |
| Battery cannot be installed | Attempting to install a battery other than that specifi ed for the tool. | Please install a multi volt type battery. |
VOORZORGSGMAATREGELEN
VOORZORGSGMAATREGELEN AANSLUITING USB-APPARAAT (UC18YSL3)
VOORZORGSGMAATREGELEN MET BETREKKING TOT DE STOFBESTENDIG EN WATERDICTH MAKEN FUNCTIONS
En好吗, some of the people in this room are very nice.
PRECAUCIONES RESPECTO A LAS FUNCTIONS DE RESISTENCIA AL POLVO E IMPERMEABILIZANTES
Estamericana:
Able to do the work of a lawyer.
NOTA
VEDLIKEHOLD OG INSPEKSJON
1. Inspisere kontakten
IPOΦYΛΑΞEΙΣ Σ'YNΔΕΣΗΣ ΣΥΣKEYΗΣ USB (UC18YSL3)
OTav eufavioti kanoio anpoosoknto npoBna, mtope va aopouv n xaohouv ta ea ouokun USB nou evai ouvdeepevn u auto to npoiov. Na povticeté na'tva va avtypapa aofaiaac twv nou nepiaauabovtai otn ouokun USB npiv ano tn xphon me auto to npoiov.
Napakaoue aBETe unoyn oTn eTaipia mac dev
fepei kaia anoAUTWC eUoovn yia tuxov 6e0eva
nou eiva anoOKeuEv aEmu OoKeuN USB ta onoi
kataopouv n xaOuv, ouTE yia onoiadnote 3aβn
nou mOpei va ePhiavioTei eMia ouv66eVn ouokeuN.
IPOEIOnOIHsH
O Pniv ano tn xphon, eAeYsTe to ouvBcIko kaawio USB yia tuxov eAaTtWmuata n 8aBn.
XpnoiOnoiWvTac eva eAattwpatiko n 0hapuevo kaawio USB mtopei va npokn0eiknou n avaphxE.
O 'Tav to npoiov xpoiooioietai, va kaunTe Tn 0upa USB to eaaotko kauuma.
Vooawpeoon oKovnc kT. Otn thupa USB mnpoei va npokaEeE KIOUMn KAnvou n avapEeN.
ZHMEIΩsH
O Mnopei va unapEi iia nepiotaoiakn nauon kat aynv εnavaΦoptiŋ USB.
O 'Tav FOptiTeaui ia oukeun USB, aphiote Tn oukeun USB ano tov optiotn.
Av dev to kavete auto, evexetai oxi movo va ealtwthetai n diapkeia zwnc tnc matapiaac iaocovakeunc USB, aaaa mopei enionc va odynoei oe anpoosoknta atuxmuata.
Evexetai va nv eivai duvatn npoption opioevw voukeuwv USB, avaloya me tov tuno tn ookunc.
PREPRAVA TYKAJUCA SA LITIOVIOIónovych BATERI
Pri preprave litiovo-ionovej baterie dodrziavaje nasledovne opatrenia.
VYSTRAHA
Pri organizovani prepravy ohlaste prepravnej spolocnosti, ze balenie obsahuje litiovo-ionov bateriu, informujte ju o vystupnom vykone a postupujte pod'a pokynov prepravnej spolocnosti.
c) He n3laarTe eNeKtpnueeCKnte nHCTpyMeHTn Ha BJIaHHeTo Ha BLaRa HJn DbXd.
IonaaHeTo Ha Bnara B eJeKtpnueeCKnte INHCTpyMeHTn NOBnUba pNcKa OT eJeKtpnueeKn ydap.
d) He HapyuBaIte 9eIOCTTa Ha Ka6eJIHTe. HnKora He n3KnUOyBaIte eEKeTpNuecHNTe ypei, Kato N3DbPnBaTe OT Ka6eJa.
Na3ete Ka6eJIte OT n3ToUHnCu Ha ToIInHa, OT Cm3oOHN MaTePnaHn, OCTpn Pb6OBe H NOdBUNHH KOMNOHEHTN.
Hapaen nn npenTeHN Kaebn nobuaBat pncKa oEeKtpueckn yap.
e) Horato n3noJ3BaTe eIeKtpnueChn ypeJ Ha OTKpnto, n3NOJ3BaJte YdBJIHnTeJ, NOxOJa 3a BbHUnn ycNoBnHa pa6ota.
H3noI3BaIte Ka6eI, NOxOJa 3a BbHsHn YcNoBna, KOITo HamaJIba pNcKa OT eJeKTPnueckn ydap.
f) Ako e HaIOHNTeJIHO H3NOJ3BaHeTO Ha eIeHTpueeCKn HNCTpyMeHT BBB BlaJHH YcIobn, H3NoJ3BaIte ypeu c dIepeHuaHa 3aunTa (RCD) cpeuyyTeuHa. H3noJ3BaHeTo Ha dIepeHuaHa 3aunTa haMaJIbRa pUcKa OT eJeHTpueeCKn ydap.
3)Лична6e3oNaCHOCT
a)БbTe 6dTeJIHH, BHNMaBaIte B DeIcTBHrTa cn n H3NoJ3BaIte pa3yMHO eIeHTpNueChIte HHCTpyMeHTn.
He n3noJ3BaIte eIeKtpnueChn HNCTpyMeHT, HORATO CTe N3MOpEHN, INN NOD BINRAHNETo HaJeHApCTBeHN cpeCDtBA, aHHOXoN INN ONHaTH.
BcraKHeBHMaHne npn pa6Ota c eJeKtpnueChn HNCTpyMeHTN MOKe da DOBeDe Do cepNo3HN HapaHaBaHna.
b) H3noJ3BaIte IINHn IpeDna3HN cpeCTBa. BInHarH Hocete 3aunTHN OUYNa IIN MaCA.
3aunTHnTe cpeCTBa, KaTO npaxo3aunTHa MaCKa, 3aunTHn ObyBn C yCTOuYBa Ha NtB3raHe NOmETKa, KACKa, Hn aHTNFOH, H3NOJ3BaHN Cnopej YcNoBnTa Ha pa6ota, Ue HamaJrT OnaCHOCTTA OT HapaHBAhe.
c) PpeDToBpaTBAHe Ha CnyaHNO BkIIOUBaHe. YBepTe Ce, Ye 6yToHbT 3a CTapr Ha ypeDa e B H3KIIIOUeHO NIOJOKeHne, PpeDu Da CBbpKeTe EJekTpNueeCN HnCTpyMeHT KbM N3TOuHNK Ha 3axpaHbAhe n/nn 6aTePn, KaHTo N ppeDu da ro B3eMeTe nn npeHaCATE.
IpehaHTo Ha HnctpyMeHTn C npbCT Ha CTapT 6yToHa, Hn Ha NpeBnIOuBaTeJHa 3axpaHbaHeTO, HOCn ONaCHOCT OT INUdEHTN.
d) OTePaHete BCnHu pa6oTHn npncTabHN, npei Da BkIIOHTe ypea KbM 3axpaHbaHeTo.
TaeueH KIOU HN INHCTpymeHT, 3abpaBEN B potaunOHn KOMNOHeHTn Ha eNEKTPueckn INHCTpymeHT, MoKe da DOBeDe Do HapaHraBaHe.
e) He ce npecaraTe. Ppe3 qIto Bpeme Tpr6Ba Da HMaTe Cta6HnHa Onopa N da NODbPHe 6aHaHC Ha TJIOTO.
Toba OCHyprBa NO-06bP KOHTpO1 Bbpxy eNeKtPruecknte HHCTpyMeHTn Pn HeoayKaBAHn CHTyaUN.
f) Hocete noxdxoadno 06leHIO. He hocete npekaleno shpokn dpexn nn 6nHyta. Dpbhte hocata n dpexnte cn daJeou ot DBnHeuNTe ce qactn.
Unpoknte npexn, bnyta n IbIra Koca Morat da 6bdaT3axbaHATN OT NOdBKNHHTe KOMNOHEHTN.
g) Ako ca ocHrypeHn ycTpoNCTBa 3a npncbEdHHBaHe KbM npaxoyIOBHTeHN HhctaHaun, yBepTe ce, ye ca npabHnHO npncbEdHHeHn.
H3noJ3BaHeTo Ha npaxoyIOBHTeIN N uKJIOHN MOHe Da HamaJIu Cbbp3aHInTe Cbc 3aMbpCRABaHETO pNCKOBE.
h) He no3BoJRABaIte ONHTHOCTTBA, npHIO6bTa OT YecToTO H3NoJ3BaHe Ha IHCTpyMeHTn, da BN Cb3daPe cAmOyBcTBHe, 3apaN KoETO da HrHopnPate npHUnNTe Ha 6e3oNaCHOCT npn pa6ota c INHCTpyMeHTn.
HeBHMaTeJIHO DeIcTBnE MoKe Da IOBeIe Do TeKHN HapaHbAHN B paMHTe Ha Yactn OT CekyHdata.
4) EHCnloataaun H noDpBHHHa Ha eJeHTpHuecN HhCTpyMeHTn
a) He hacnBaIte eIeKtpnuechnte nHcTpymeHTn. H3noJ3BaIte npXoJaU eIeHTpnueechn HHcTpymENT 3a cbOTBETHnte cJIH.
Iopxoadnrae enektpueeckn nHCTpymENT
OCHyprBa 6e3oNaCHOTo H NO-Do6Po N3BbPswBaHe Ha pa6oTHnTe DeHocTn Pn PpeBnDeHnTe HOMHaJIHn npaMeTpN.
b) He n3no13BaIte eIeHTpHuecHn HNCTpyMeHT, aHO He MoKe Da 6bJe BKNIOUeH Nnn N3KIOUeH OT CbOTBeTHnCtApT 6yTOH Nnn npebKnIOu4BaTeI.
BceKn eJeKtpnueckn HNCTpyMeHT, KOITo He MoKe Da ce KOHTpOJnpa OT npEeBKnIOUyBaTeJI, e ONaceH n PodJeKN Ha peMOHT.
c) N3KIOUeTe 5eCenaHa HNCTpyMeHTa OT n3TOUHnHa Ha 3axpaHbAHe H/INn H3BaTe6BATEpHnHnnaKet OT INHCTpyMeHTa, aHO ToI NO3BOJBA CBaJIHe, ppeH Da H3BbPbBaTe HAcTPOHKn, pRn CmHa Ha npNCtABn HIn pRn CbXpaHEHne.
Te3n npedna3HmepKn HamaJIaBaT pNcKaOT CnyauHNO HeKeJHaHO BKHIOUbaHe Ha eJeHTpnueChnI NHCtpyMeHT.
d) CbXpaHbAHTe HEn3NoI3BaHHTe eIeHTpHuecHn HhCTpyMeHTn DaJIeY OT DocTbn Ha Deua n He No3BOJRABaHTe Ha IInca, He3aNo3HaTHn c HaunHa Ha pa6Ota C hHCTpyMeHTte N Te3n HhCTpyKUnn, da pa6OTrC Tax.
Enektpueechnte HnctpymEnTH npedCTaBnBaT ONaCHOCT BpbTeHa HeonTuHn Lna.
e) NopdIbpaHte eNkTPoHHCTpymeHTnE n aHccecoapTe. PpOBepraBaTe zHTPOBKaTaN 3aHPenBaHeTo Ha NOdBnHHte YactN, PpOBepraBaTe 3a NOBpeDeH NactN, HONTO MORa T da ce Otpa3rHa pa60tata Ha eNkTPpuYeCKHte HhCTpyMeHTn. AHO yCTaHOBHTe NOBpeH, OTCTpaHHeTe rN ppeH da H3noJ3BaTe eNkTPuYeCKHte HHCTpyMeHTn.
Mhoro 3nononyu Ce IbIHaT Ha loa nOdpbHKHa ha eNektpnuecknte HNCTpymEnH.
f) IopdIbpaHaepeKeIeHT HcTpymEnTH 3aToueHN uHCTN.
PpabnHNO NOIbPkaHnte peKeu INHCTpyMeHTN, C HatoeHN peKeu eJeMeHTN, CE ynpaBlaBaT N KOHTPOIVaT No-JeCHO.
g) N3noI3BaIe eIeHTpHueChn HNCTpyMeHTN, npHcTAbKN I aKceCoapN, H T.H., CbrlaCHO Te3N INCHTpKUnN, HATO B3EmTe PpeBnD pa60THTE yCIOBn I BNda pa6OTn, HOTo ige ce N3BbpWBaT.
H3noI3BaHe Ha eJekTpnuyecknte HnctpymeHTn 3a pa60TN, pa3NHyN OT Te3N, 3a KOnTO Ca npdeBnJeHN, MOKe Da DOBeE Do NOBnWeH PnCK N ONaCHN CNTyaUN.
h) Na3eTe pbKoXBaTHNte n NOBbpxHOCTnTE 3a 3axBaUaHe cyxN, YHCTn, 6e3 MacNo I rpec.
Xlb3raBHTpe pbKoXBaTHN n NOBbpxHocTn 3a 3axBa7aHe He no3BOJRAbT 6e3OnaChata pa6ota n ynpabIeHne Ha HnCTpyMeHa B HeoayKaBaHn CNTya4nn.
5) EKcnoaataunn noDpBbHa Ha eJeKtpnuechn HhctpyMeHTn 3axpaHbHn OT 6atePN
a) 3apeHdaTe ypeDHTe cMo cbc 3apAHDHTe yctpOInCTBa, NocOeyHn OT npOn3BODHTeJI.
3apAnHO yctpoNCTBO, noDxOJaIO 3a eINH TnN Batepnn, MoHe Ja Cb3JaIe pICH OT NOHAp npn N3NoJ3BaHe 3a Dpy TnN Batepnn.
b) H3noJ3BaIe eJIeKTpNueCKeHte NHCtpymEnTn camo c onpeJeHn 3a TAn 6aTepn.
H3noJI3BaHeTo Ha npTn 6aTeepn Cb3daBa pNCK OT HapaHBAHe N NOkap.
c) Horato He H3noJ3BaTe 6atepHnTe, Te Tp86Ba Da ce CbXpaHBAt Dajeu OT dpyr MeTaJIHN PpeDMeTH KATO KImepH, MOHeT, HIOOBe, RBO3DeH, BHTOBe HIN dpyr MaIKH MeTAJIHN PpeDMeTH, KOHTO MORaT Da OcbIeCTBAT KOHTAKT MeHdy KInEMnTE nM.
Hontant Mejdy Klemnte Ha 6atepnnte Mohe da DOBeDe OT NcKp Hn NoKap.
d) Ipn HenoDxOJn yCIOBna Ha cbXpaHeHne, 6atePnte Morat Da n3TeKaT; n36rBaHTe KOHTaNT. AHO cIyuaHNO BJe3eTe B KOHTaKT C eJIeKTPoINTHata TeuHOCT, n3IIaKHeTe O6NJHO C BOJa. AHO nonaHHe eJIeKTPoINT B OUYte, n3IIaKHeTe O6NJHO NOTbpcTe MeiUHcHa NOMOU.
EeKtpoNtBt Ha 6aTePnnte MoKe Da npuHn Bb3pnaHe Hnn n3rapHn.
e) He n3no3BaIte 6aTePnHnn HnCTpyMeHT, KOHTO ca NOBpeHn Hn MoHΦnUpaHn.
IobpehenTe IIN MOINΦHUPaH N BATEPN MOraT Da IMaT HENPeBnIMO NOBeHne, KOeTo Da IOBeE Do NOKap, EKCIIO3N IN PnCK OT HapaHraBaHe.
f) He n3laraTe 6aTeepnTa nn HnHcTpymeHa Ha orbH nn Ha npKaIeHo BnCOKa TemnepaTpa. N3laraHeTo Ha orbH nn Ha TemnepaTpa Ha 130°C MoKe Da npEdn3BnKa ekCnNo3n.
g) CneBaIte BCnHn HNCTpyKcHn 3a 3apeXdaHe n He 3apeXdaIte 6aTepeHra Tnn HNCTpyMeHTa N3BbH TemnepaTypHn DaHa3OH, yKa3aH B HNCTpyKcHnTe.
HenpaBnHnoTo 3apeKdahe nn 3apeKdahe npntempepatypn n3BbH onpepeleHnaa3OH moKe da noBpeH batepnaTa n da yBeHnHu pNcKa ot noXap.
6) 06cIyHbAHe
a) 06cIyHbAHeTo Ha eJIeKtpnuecknte HNCTpyMeHTn Tp8Ba Da ce N3BbpWba cAmO OT KBAJIHΦHnIpaHn CepBn3HN pa6OTHnI, npn H3NOJ3BaHe HaOpRnHaJIHn pe3epBHN qAcTn.
Toba ue rapaHTnpa 6e3oNaChocCTTa npn pa6ota c eIeHTpnuEchnte nHcTpymEnTH.
b) HnHora He 06cnyKbaTe NOBpeDeHN 6aTePN. O6cIyKbaHeTo Ha 6aTePNtE Tpr6Ba da ce n3BbPbBa CaMo OT npOn3BOJNTeJI Nn OT oTopu3nPaHte DoCTaBuNHa yClyr.
BHIMAHNE
He donyckaIte B 30HaTa Ha pa6Ota Deu a N Bb3paCTHn Xopa.
Horato He n3noI3BaTe eIeHTpHuecKHe HnCTpyMeHTN, cBxaPahBaIte rHa daJeu OTO DocTbN Ha deua N Bb3pacTHN Xopa.
БЕЗПАСНСТ ПИРAPБОТACBEЗЖИЧЕНУДAPEHГAEЧENKЛЮCH
Pn pa6ota, dpbhte ypea 3a H3OlnpaHnte PboXbaTHN, aKO KpeenEHHHT EneMeHT NMa ONaCHOCT Da BHe3e B HOHTAe TcBc CkPHTN pOBODHn.
Hontaht Ha npctabknte N KpeencknTe elementnc npoBODnI IOd HappeKeHne, MoKe Da DOBeJe Do npOTnuHaHe Ha ToK Ipe3 eEeKtpueeCKn INcTpyMeHT n TOKOyap.
ДОПьЛНITEЛНМЕРК 3A БЕЗОПACHОCT
- Toba e npehocim HnctpymEn 3a 3aTgraHe n pa3BvBaHe Ha 6oJIToBe n raiKn. N3noJ3BaIe ro caMo 3a Te3n ZeiN.
- YBepeTe ce, Ye mATE cTa6nIeH 3aXBaT Bbpxy eJIeKtpnueckn HnCTpyMeHT NO BpeMe Ha pa6Ota. HeCTa6nIHnRt 3axBaT Kpne pncOBE OT 3JIoNOLyni HapaHraBe. (Φnr.2)
3.Под�тови и поверka Ha pa6oTHOTo MЯсTO.YBepete ce, Ye pa6oTHOTo MЯСTO OTROBApЯ Ha BCnKn YCLOBnI, NOCOeHb B MEPKnTe 3a 6e3OnaCHOCT.
4.Поберете ДейстВNTeHnT BbTpA MOMeHT C INHaMometPruYeH KInOy. - Cnpete ypega, npedn da npebHIOUHTe nocokata Ha Bbptene. BinaHn ocbo6xdaBaIte cTAP 6yToHa H3yaKbaTe ypeBt Da cnpe HaBlnHO, npedn da CMeHnte nocokata Ha Bbptene.
- HnKora He DoKocBaIte BbptTtne Ce qactn. He doBnKaBaTe pBeTe cn, nIn dpyra qact OT TAnlOTo cn, Do BbptTtnc Ce KOMNoHEHTn Ha ypeDa. Ima onaCHOCT OT cPra3BaHe nIN 3axBaUaHe. OCBen TOba, BHIMaBaIte Da He DoKOCHeTe BbptTtnc Ce KOMNoHEHT Ha ypeDa CLEd npoDbNkHtEnHO n3NOJ3BaHe. BbptTtnc Ce KOMNoHEHTn Ce 3aqrBaTcNlHO nMOrat da Bu n3rOprt.
- MoI, n3noI3BaIe TcBOTBeTHNTE npIOKeHn, nocOeHN B PbKOBoIDCTBOTO 3a EKcIIIOaTaunr HataIora Ha HiKOKI. Hecna3BaHe Ha INcHTpyKUnTe MOKe Da IOBeDe TO HapaHraBHn INn INCuIeHTn.
- YbepeTe ce, Ye cTe NOCTaBnIn npNCtABKaTa 3paBO B dbpKaua. B npOTnBEH cnUyai npNCtABKaTa MoKe da H3Je3e N da npNCHn HapaHbAHn.
9.превкючbatelзаразимзатяганe
O H36epete peKIM Ha 3aTfRaHe, DOkato NyCKOBnRT npebKnUcbTaTeI eOCBO6oJeB IpOTnBeH cnyaH mHa onaCHOCT OT NOBpeDa.
O Iopxodnrt peHmce pa3nuaBa 3aBNCMOCT OT BnHTa mATEpnaIa, KOITc ce 3aBHTBa. 3aterhe THKoIKo TectOBN BnHTa n peryJnpaTe HAcTPOKaTa HapeKIMa IIO NOxODnHaunH.
IpeBkHIObBaTeJIa3peXnMaHa 3aTgAHe MoKe Da ce HAcTPOEBA CNEKATO BATEPnTa e NoCTaBeHa BYpeDa I NcCKOBnRT KIOUe HAHTCHAT BeHbK. - EneKtpnuecknT ype e obopydBaH c Bepnra 3a TemnepaTypHa 3auNTa, 3a da npedna3n DBnraTeJI. PpOdbJHHTeJIHata pa6oTa MOHe da nobuIN TemnepaTypa Ha ypeJa, KOeTO aHTNBIPA BepnraT3a TemnepaTypHa 3auNTa n ABTomatNHO npekbcba p6oTa. Ako ToBa ce cnUyH, OCTaBeTe eJeKtpnuecknYpe Da ce OxlaDN, npedn da Bb306HOBnTe ynoTpe6aTa.
- MoToBt MoHe Da OTHaKe npn npTeOBapBaHe Ha ypeHa. Ako ToBa ce Cnyu, OCBO6OJeTe CnycbKa n OTCTpaHete npuHHata 3a npTeOBapBaHe.
H36aRbAte Da DOKOCBaTe npedHaTa KyTna, KOrTo MoKe da ce Harpee npn npOdbJIHKHTeJIHa pa6ota.
12.ИЗнOL3BaHTo Ha 6aTePnIaВ B cTydeHa cpeDa (noD O rpaIyca no LcJI3n) MoHe Da IOBeIe DO OTcIa6BaH e HbptTJmMOMeHT N KanaIITeTa Ha pa6Ota. ToBa e BPemEHHOЯBJIeHne, KOeTO ce eJIIMnHnpa, CJIeD KaTO 6aTePnIa 3arpee. -
ByToHbT 3a HaTnCKaHe He MoKe Da 6bJe BKnIOueH, DOKaTO ypeDbT pa6oTu. 3a Da BKnIOuHTe 6yToHa 3a HaTnCKaHe, NpBPO cnpTe ypeDa n CneD TOBa 3aJeCTBaIte 6yToHa.
-
MoHTnpaTe Hkykata.AHO He 3aKpeNeHa 3dpaBO,TOBa MOKe Da DOBeDe Do HapaHbAHe PnI N3NO3BaHe. Korato N36epTe Da npeHacTe ypeDa 3aKaaHEn 3a KOlaHa Ha KpbCTa B,NyBepTe Ce,Ye CTe N3BaDnIn UeenceJa.B npOTuBEH clyuayn IMa ONaCHoc T HeOuaKaBaHo HapaHbAHe.
- He noIaIaTe KOHTpoHnHa nHeI Ha cnIHn yApn I He ro cynTe. Toba 6n cb3dano npo6JIemn.
- He rIeJaTe DnpeKTHo B INHnHaTOpa. TOba MoHe Da DOBeDe Do yBpeKHaNe Ha OChTe.
N36bpweTE BCRAKKBN 3aMbpcBaHnno JLeuata Ha LED CBeTInHaTa CnapYe MEK PnA,T, KaTO BHIMaBaTe da He N3dpackaTe JeuaTa.
ДраскOTин no ЛeшаHa LED CBetинhaTma MOraТ д IOBEdaTdoNo-Cna6aЯPkOCT.
17.3a da ce npedotbpaTn pa3peHdahe Ha 6aTeepraTa nopaN 3abpaBEN CBteU LED HndNKaTop, HndNKaTopbT ABTOMATNUHO 3racBa CJeD OKOLO 10 cekyHn.
18. CneI npOJIbJIHnTeJIHa pa6Ota,ypeBbT cNeJBa Da 6bJe OCTaBnH B NOKOH 3a N3BeCTHO BpeMe.
19. He doxocbaite Kopnyca Ha yka, TbB KaTo Toi ce 3aarpBa H3KIOUHTeHNO MHOrO npn npoDbJHKITeHa pa60Ta.
20. Binhari 3apeHdaTe 6aTepeHra npn TempeHpaTpa ot 0^ do 40^ . TempeHpaTpa, no-HnchA oT 0^ , ue doBeDe o npekomepho 3apeHdaHe, Koeto e onacHO. BaTepeHra Ta He MoKe da ce 3apeKda npn TempeHpaTpa no-BincoKa ot 40^ .
Hai-noxoxaTa Tempepatya 3a 3apeKdahe e 20^ - 25^
21.He n3noJ3BaITe 3apJdHTo ycTpoiCTBO HepeKbChaTO.
Korato eDHO 3apeXdahe npNKIOUH, octaBeTe 3apAHOTo yCtpoIcTBO 3a OKoI 15 MNHyTN ppeIN cIeBaIoTO 3apeXdaHe Ha 6aTePn.
22. He donyckaIte npOHKBaHcTeHa ChKIn TeJa B OTbopa Ha Bp3KaTa 3a 6aTePnnte.
23. Hnkora He pa3rIIO6BaIte npe3apeKdaunTe ce akymylatopHn 6aTepn n 3apdHOTo.
24. Hikora He daBaIte Ha Kbco akymlaTopHnte 6aTePn. Kbco cbeINHeHne MoKe Da npuHHn IpehanpeKeHne n IperpaBHe.ToBa MoKe Da DOBeDe Do nobPeDa nnN3rapAHe Ha 6aTePnHaTa.
25. Otpa6toHnte 6aTePNn He Tp8Ba Da ce n3raprT. ToBa MoKe Da DoBee Do eKcnIIO3N.
26. Bbphete 6atepnnte B mara3nHa, OT KOHTO ca 6nHn 3aHyneH, BeHara cIeK KaTO uKbJa Ha HNBOT Ha npe3apeHte 6atepn CTaHe PpeKaJIeHO KbC 3a Da ce n3noJ3BaT. OTPa6oTeHnte 6atepn He Tp8Ba da ce n3XBpbJrT.
27.He noctabraIte npedMeTH Bbpxy OTBOpHTe 3a oxlaKdaHe Ha 3apAHO TO yCTPOHCTBO.BkapBaHTo Ha MeTALHNJN 3anaJIMNIpEMeTHBBEHTNJauOHHNTe CLOTOb e IOBeDe DO ONaCHOCT OT eJeKTPnueChN ydAp JINI Ue NOBpeTATAPADHO TO yCTPOHCTBO.
28. Ybepete ce, ye 6aTepyTa e dope n 3paBO noCTaBeHa.AKe en HaaiMaIko pa3Xla6eH, MoKe da ce H3BaDN I Da npuHHn HnCndEHT.
29. He n3noI3BaIte npOdyKTa, aKO ypeIbT IIN KJIeMNTe Ha 6aTePnra (3a MOHTaH Ha 6aTePnra) ca DeΦOpMIIpaHn.
IocTabaHrTo Ha 6atepnaTa MoKe Da npuHHN Kbco CbeDnHeHne, KOeTo MOKe Da IOBede Do nOBa Ha dIM HIN 3anaBaHe.
30. NdIbpaHae KHe HnHCTpyMeHTa (3a MoHTaHa 6aTepeHra) nCTn OT npctn npax.
O Ipeu pa6oTa ce yBepeTe,ue B 30HaTa Ha KIemnte HMa HAtpyNaHn npax nCTpyKKn.
O No BpeMe Ha pa6oTa ce ONnTbaIe Ta n36erHeTe nonaHaHTo Ha cTpjuKnn nn npax Bbpx 6aTePnra.
O Ppi npekpataBaHe Ha pa6oTa nn CneI ynoTpe6a He OCTABnTe INHCTpyMeHTa Ha MRCTo, KbDeTO MOKe Da 6bJe n3IOJKeH Ha npax I cTpYKKn. Hecna3BaHeTo Ha TOBa MoKe Da npuynH KbCO cBeDInHeHne, KOeTo MOKe Da DOBede Do NOrBa Ha dIM nn 3anaJIbaHe.
31. BnHaHn n3noJI3BaIte nHCTpyMeHTa n 6aTepeYTa npN TeMnepaTpymexdy -5°C n 40°C.
ГРИЖА 3A ЛNTHEBO-ИОHHATA BATEPЯ
3a da ydbnHnTe HNBOTA Ha IHTneBO-IOHHata 6aTePnra, TnIma 3aunTHa fynKcua 3a npekbcBaHe Ha nOdaBaHeTo Ha 3apn.
B clyuante 1 do 3, onncan no-dony, korato n3no3BaTe TOBA u3dene, dopn npn HATNCaHe Ha cnycbHa, MOTOpBT MOKe da cnpe. TOBa He E B cIeDCTBne Ha nobpea, a Ha 3aunTHa fynKpia.
- Horato pa3p8bT ha 6aTeepnra HamaJe e 3HaunTeJHo, MOTOpbT cnpa.
B TaKbB cIyua, 3apeTe 6aTepeHraTa He3a6aBHO. - Ako INHCTpyMeHTbTe 6nI npTeOBapeH, MOTOpbT MOHe Da cPpe. B To3n CnyaA, OCBO6OJeTe cnycbKa n OTcPaHete npuHHaTa 3a npTeOBapBaHe. CneTToBa MOKe Da N3NOJ3BaTe ypeDa OTHOBO.
- Ako 6aTeepnTa e nperepna npn npetobapbaHe, TMOKe Da OTKaKe Da pa60TH.
BTo3n cIyau, cnpeTe n3noJI3BaHeTO n I OCTaBeTe da ce oxlaeni. CneT TOBa MoKe Da n3noJI3BaTe ypeDa OTHOBO.
OcBeHToBa,MOJIa3BaIte CJIeHNITe IpeDyIpEKeHHeNIA. PPEyPPEKDEHNE
3a Da npedotbpaTHe pa3peXdaHe Ha 6aTeepnTa, 3aqrbaHe, NOBa Ha dIM, 3aNaIbAe N EKcNIO3n, yBepeTe ce, ye cna3BaTe yKa3aHnTa 3a 6e30nacHOCT.
1. YBepeTe ce, Ye no 6aTePnraTa He ce HaTpynBaT npax n CTpyKnn.
O YBepeTe Ce, Ye No 6aTePnIa He Ce HATpyNbAT npax N CTpyKKn NO Bpeme Ha pa60Ta.
O YBepeTe Ce,Ye npax N CTrpyHKn He ce HaTpyNBaT Bbpxy 6aTeepra Tn Bpeme Ha pa6ota.
He cbxpaHbAte Heu3noJ3BaHnTe 6aTePNB MeTa, KbTeCa H3IOKeHN Ha Bb3dEiCTBHeTO Ha npax N CTpyKKn.
O Pn CbXpaHHeH He 6aTeepn, OCTpaHHe EBEHTyaJIHo HATpyNaHn CTpyKn N npax, KaTO He TpR6Ba Da ce CbXpaHra 3aeDHO C MeTaJIHn PpeDMeTn (6oJTOBe, rBO3DeH n dp.).
2. Πa3eTe 6aTepeHraTa OT npObBaHe C octpnpEpmEtN KATO rBO3dE,OT yAp C uK, HAcTbIbAHe, NIM OT cnJen fH3nueckn yAp.
3.He n3noJI3BaITeBnDnMoIOBpeDeHa nnIeΦOpMnpaHa 6aTePnIy.
4. He n3noI3BaIte 6aTepeIraTa 3a ceJIH, pa3JIuHn OT npedHa3NaueHneTo I.
5.Ako 6aTepeHra He MoKe Da ce 3apeHnBJIHo, dopn CteI KaTo H3TeHe npenOpbHaHNr nepIOd OT BpeMe, He3a6abHO npeKpaTe Te NocJeBaun ONHTN 3a 3apeJdaHe.
6. He n3laaIte 6atepnaHa BnCOH TempepaTpy nn HalaRaHe, He noCTaBnTe B MKNPOBbHOBa npa, cyuJIHn KOnTeHepn NOBnCOKo HaIraHe.
7. Pn yCTaHOBBAHe Ha Teu HnHnepnTHa Mnpn3Ma OT 6aTepeNa, He n3JaTaNe Ha Bb3JeCTBnETo Ha CnHa TOJIINHa HnOtKpNTn NlaMbU.
8. He n3no3BaIte 6aTepeRnTa B MeTa, KbTeTo ce reHeepnpa cHINHO CTaTNUHO eNEKtpNueCTBO.
- Ako 6aTepeRyTa Teue, HMa He npraTHa Mnp3Ma, 3aRpaBa nn Ce oBe3uBETn n DeΦopMnpa nn aKo ce Np8Bt HeoBuAynn np3Haun npn ynoTpe6a, npe3apeHdaHe n CbXpaHeHne, He3a6aBHO r OTCpaHete OT ObopydBaHeto nn 3apAnHO To Hre JN3POJ3BaYte.
10.He notanrIte 6aTepeHra H He N03BOJIbAHTe HABIN3aHTo Ha TeUHOCTN B He. IpoHNKBaHETo Ha IPOBOIMn TEuHOCTn KaTO HApnpMEp BOda, MOKe Da DOBeDe Do NOBpeHn I Da npuHH NoKap NnE KcNIO3n. CbXpaHRABaTe 6aTeepHa Ha XlaHOn Cyxo MRCTo, DaJeY OT rOpHMn JLeCHO3aNaHIMMaTepeHn. N36yRbaTe aTMocfepn C Kopo3NBn Ra3OBe.
BHIMAHNE
- Ako eIeKToPIrOT 6aTeepnra TOnaHHe B OChTe, He rN TbPKaHTe, a N3PnAknHeTe 0bHIO C YnCTa, HApN. YeIIMHa, BOda n NtBpCeTe He3a6abHO JekapcKa NOMOu.
Ako He ce B3eMaT MepK, eJeKtpoJNTbT MoKe da npuHHOCHN pO6JIemn. - Ako eIekToIOT 6aTepeHra IOnaIHe Bbpxy KoHaTa HIN dpexHTe, He3a6abHO N3MnIte C YncTa, HApP. YeuMaHa, Boda.
Bb3MOxHo e eJeKtpoNt bT da npuHn KOxHO Bb3paleHne.
3.AKOp npn pBpBOTo H3NOJ3BaHe Ha 6aTePnraTa 3a6eJIeKHTe pBXJa, HEnpNtTeH MnpNC, npeprBaHe, OBe3cBETBaHe, DeOpMnpaHe N/INn DpyrH HepeDHOCTn, He a N3NOJ3BaIte N BbPHeTe Ha DOCTaBvNka INn TbpRoBeua, OT KOIT OTE RaKyNiln.
PNEyPENKDEHNE
Ako yHdo Tnlo, KOTo e npoBODnK, nonaDHe Bbpxy KJIeMITE Ha NHTneBO-NOHHata 6aTepeRn, TAnMOKe Da daDe Ha KbCO nDa npuHHn noKap. Korato CbXpaHraBaTe JNTneBO-NOHHata 6aTepeRn cna3BaIte cIeDHnte npabHnla 3a 6e30NaCHOCT.
O BkytnraTa 3a cbxpaHraBaHe He nocTaBryTe npoBOJaUnpedMeTH KaTO rBO3DeH, NapyTe npoBOHNu MeHa TeI.
O 3a Na npedOTbpaTne KbcO cbeHHeHne, cneBkapBaHe Ha 6aTePnraTa B eJIeKtpnueckn HNCTpyMeHTNoCTabRnTe KaNaKa N TaKa, Ye BEHTnlaTopbT da He CeBVnDa.
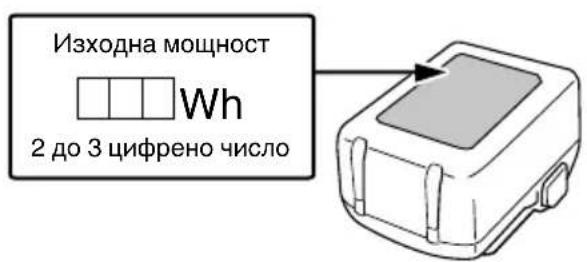
OTHOCHO TPAHCIOPTA HA JIHTHEBO-NOHHA BATEPNA
Ptp TaHcnpTnpaHe Ha IHTneBO-IOHHa 6aTepeRna, MoJI cNa3BaIte CJIeHNITe IpeDn3Hm MepKIn.
PNEyPEXDEHNE
YBeDomete TpaHCnOpTHaTa KOMnHn, Ye npaTka Ta CbDbpKa IITHeBO-NOHb 6aTePn, INHΦOpMnPaIe KOMnHaHTa 3a HeHnTA HxOHa MOuHOCT N CnA3BaIe NHCTpyKmHte Ha TpaHCnOpTHaTa KOMnHn, KOraTO ypeJdATE TpaHCnOpTa.
O JInTHeBO-IOHHTe 6aTePN, KOINTo HADBnIaBaT n3xoJHa MoUHOCrOT 100 Wh, ce CHTaT 3a TpaHCnOpTHa KaTEROpNr ONaCHn cToH N I3NcKBa T npINarAHeTo Ha CneuJIHn IpOueDpyn.
O 3a TpaHcnpTnpaHe B UyKbHa Tpr6Ba Da CnAsHTe MeJHyHapOAnHte 3aKOHn I npAunla n pa3nopeEbn Ha cTpaHaTa, Do KOrTo Ce TpaHCnpTnpat.
ПЕДПАЗНМЕРН 3A CBьP3BAHE HA USB YCTPOИCTBO (UC18YSL3)
PnBb3HKnBaHe Ha HeOuaKbaH npo6IeM, DaHHnte B USB yctpoiCTBO, CBbp3aHO KbM TO3n IpOdyKT, MORaT Da 6bDat NOBpeHn nn 3ary6eHn. BuHaH oCnHypaBaiTe pe3epBHO KOIIne Ha BCNUHn DaHHN, CbDbpKaUc Ce B USB yctpoiCTBOTo, PpeHN 3nOJ3BaHEto Ha To3n IpOdyKT. MoJIa, ImaIte ppeBvI, Ye Hauata KomnaHn He Hocn OTROBOPHOCT 3a DaHHNtE, CbXpAHen B USB yctpoiCTBO, KOHTO Ca NOBpeHn nn 3ary6eHn, HHTO 3a NobpeDa, KOATO MOKe Da Bb3HKnHE B Hero.
PNEyPENKDAEHNE
O Ipeyn ynoTpe6a npOBepTe cBbP3Bauny USB Ka6eJ 3a DeFeKTHnIINoBpeN. H3noJI3BaHTo Ha deFeKTeH nIIN NobpeDeH USB Ka6eJ MOKe Da IOBeE Do NOBAtHa dIM nIJa npuHH 3anaJIbaHe.
Korato npodykTBHe ce n3noJ3Ba, noCTaBeTe rymeHn Kaanbpxy USB nopTa. HatpynbaneTo Ha npax i npryn OTnabuB USB nopTa MOKe da doBeDe Do nOBaTa Ha dIM mIa npuHH 3anaJIbaHe.
3ABEJIeHHKA
O Bb3MOxH0 e USB 3apeXdaHeTo da npeKbcBa Ha MOMeHTN.
O HsBaTe USB yCTpoiCTBOTO OT 3apJHOTO, KOraTO He ce 3apeKHa.
B npOTnBEH cIyau JINBOIT Ha 6aTePnraHa USB yCTPOIcTBOTO MOHe Da ce ChbCN, KaKTo N da Ce CTnHr He DO HeOuaKaBaHN HUNDEHTN.
O Bb3MOxH0 e da He MoXeTe da 3apeDInTe HAKo USB yCTpoIcTBa, B 3abNCMocT OT Tnna yCTpoIcTBO.
IPEДПАЗНМЕРИ ПО OTHOWEHNE HAФУнкINTE3A IPNAXOYCTOИNBOCTи XnДрОн3ОЛАЦЯ
To3n npodyKT OTROBAPr Ha KBaJIHΦHKaUHTe 3a KIac 3aunTa IP56 (npaxoyctOuHBOcT n XHDPON30Jau) 3a eJIeKtpnuecko OOBpyDbaHe, KaTO e ppeBnDEHO B MeJdyHapOHNTE perJaMeHTN IEC. (Camo oCHOBHO TO yCTpOINCTBO OTROBAPr Ha KBaJIHΦHKaUHTe 3a KIac 3aunTa IP56, Korato e oOBpyDaHo c akyMylatop.)
[Onncanna Ha IP kOIOBe]
IP56
CTeneHa 3aunTa 3a npOHKBaHe Ha Boda
Tpba Da Hama He6laonpnaTHo Bb3deICTBne Bbpxy 06opydBaHTo, KOraTO 6bIe HnPbCKaHO C MouHn CTpyn BOda OT BCNUKNIOCOH (XNDPOUNOJIIPAHO).
(100 J BODa 3a MNHyTa, pa3npbCHaTH 3a OKoJIO TPN MNHyTN OT pa3CTOARHne np6IIN3HTeJIHO TPN MeTp a Cn3NOJ3BaHETo Ha IIO3a C DnAmETbp 12,5 MM).
CTenHHa 3aunTa OT BbHwe Hatack OT TBbpn npedmetn
PpaxbT, KOTo MOKe Da npuHH HeKeJAHn eFeKTH Bbpxy 6OpUdBaHTo, He TpR6Ba Da npOHKnBa (npaxOyCTOnuBOcT).
(ObopydBaHeTo Da 6bDe OCTaBeHO B Hepa6oTeOc CbCToHne B H3nITBaTeJHa KaMepa, B KOrTO YaCTNu TaIK Ha npax C DnAmEtBp NO-MaJIbK OT 75 μm ce pa3npbCKBaT BbB Bb3dyXa C NOMUeTa Ha BnXpoBa NOMNa npN CKOpocT OT 2 KI Ha Ky6uHcH MeTpB I npOblJKeHne Ha OCem Yaca.)
O6opyDbaHTo e npoeHTnpaHO da n3dbpHa Ha Bb3deIcTBHeTo Ha npax H B0a, Ho HMa rapaHn, Ye Hma Da ce nobpei. He n3no13BaIte n He oCTaBnTe o6OpYBaHTo Ha Mecta, KbTeTO e n3IOKeHO Ha RoJIemn KOJInEcTBA npax, nn HA MeCTa, KbTeO e NOToneHO BbB B0a nn E n3IOKeHO Ha DbXOBHa BOda.
HMEHA HA YACTNTE
(Фиг.1-Фиг.19)
CTAHДAPTHN AHCECOAPN
BdonbJIHeHne KbM OCHOBHHa KOMnIeKT (1 KomnIeKT) ca npdeOCTaBeHn n akcecoapnte n npNCtABKNTe, 36poEHn Ha cTp.234.
CtaHapTHHTe npncTaBKn n akcecoapn ca npedMeT Ha npomHa 63 npedynpeJkdeHne.
ПРИLOЖЕНИ
3aTaraHe n pa3BnBaHe Ha BCnKn BnOBe 6oTObe n raKn, h3NoI3BaHn B KOHCTpyKTnBHN KOHCTpyKun
CNEUHRAUH
Cneunkaunte Ha ypea ca daeHN B Ta6ncaTa Ha cTp.233.
3ABEJIEXHA
Iopadn HnpeKbChaTTo pa3Bntne Ha HayHOppa3BOHnata npoPpama Ha HiKOKI, daJeHnTe Tyn CneuPhiKaun ca npedmet Ha npomraHa 6ez yBeDOMLeHne.
BaTePnA
| Моden BSL36A1 | 8 |
| Нар每一天ени | 36 V / 18 V (АВТOMATИЧNO превк nullуванe*) |
| Каразитей на батерияta | 2,5 Ah / 5,0 Ah |
| (АВТOMATИЧNO превк nullуванe*) |
- CamnT nHCTpyMeHT aBtOMaTHUHO ue npeBkIIOuN.
3APEXDAHE
IpeNi Da n3nol3BaTe eJeKtpnuecknT INHCTpyMeHT, 3apeTe 6aTePnTa KaKTo CJIeDba.
- CbbpHeTe Ka6eJa Ha 3apHNOTo yCTpoNCTBO KbM KOHTaHT.
Korato BHKIOHTe Ka6eJa Ha 3aprHOTo yCTPOINCTBO B KOHTAHT, CBEToHNDAKATOpbT 3a 3aprD ige Mnra B YepBeHO (Ha HHTepBaII N OT 1 ckyHda).
- NocTabete 6aTeepnTa B 3apHNOy yCTpoNCTBO. BkapaTte 6aTeepnTa nIbTHO B 3apHNOy yCTPONCTBO, KaKTo e noka3aHo Ha Fnr.4 (Ha cTpaHnca 2).
3.Заразнданe
PnnoocTabHe Ha 6aTePNB 3aprHOTO yCTPOINCTBO, CBeToHnDnKAtOpbT 3a 3apJd Ie Mnra B CnHbO.
Korato 6aTePnra Ce 3apeHn HnBJIHO, CBeToHnDnKaTOpbT 3a 3apJd 1ue CBeTu B 3eJeHO. (BnKTe Ta6nca 1)
(1) INHdkaunn Ha CBeToHdkaTopa 3a 3apJd
HnKaunHe CBeToHNkAToPA 3a 3apJ, Otpa3BaUN CbCTOHNHeTO Ha 3apJHO TOyCtPOIcTBO Nn AkyMylTopHaTa 6aTePn, ca nKa3aHn B Ta6nca 1.
Ta6nua 1
HactpoHa3a cIneH/cJa6peHHM
| AUTO STOP | AUTO STOP | AUTO STOP | AUTO STOP |
| Реким 1 600 мин.-1 | Реким 2 900 мин.-1 | Реким 3 1 200 мин.-1 | Реким 4 1 500 мин.-1 |
| Врееме за豌tomатically спираент: ИЗКЛ. | |||
| УПOTPEБА: [Реким 1 и 2] 3a paбotinga, КОТо ИЗСНВа ФИнаностюк. [Реким 3] 3a paбotinga, КОТо ИЗСНВа мошноctтада се намал. [Mode 4] 3a paбotinga, КОТо ИЗСНВа мошноctи сокорст. | |||
(3) PeKIM Ha aBToMaTnUHO cNpuAhe (ФИr. 15)
Cnnpa aBtOMaTHUHO CneI n3TuHaHe Ha npEeBapHTHo 3aadaHOTOBpeme.
HaTnCHeTe 6yToHa 3a HaTnCKaHe B NIOJKeHHe HAppeD ("R"), CNeI KOeTO HaTnCHeTe NpeBKnIOUbATEJIa 3a n36Op Ha peHM Ha aBTOMaTHuHO cNIPAHe, 3a da n36epete HAcTpoMkata.
HaTpoiKa 3a peKIM Ha aBTOMaTHNO cNIPAHe
BbnpeknTOBa,6aTePNc bC 3HaunTeHNO cKbcEN HINBOT MOrat Da 6bDaT Bb3CTaHOBeHN, Ype3 HAKOLKOkPaTHO 3apeKaHaHe N PbJHOTo NM pa3peKaHaNe OT DBA Do IET TbTN.
Ako nol3HnT HnBOT Ha 6aTePnTa e 3HaunTeHo CbKpaTeH, He3aBnCMo OT MHOKpaTHOTo 3apeKdaHe Hn3NOJ3BaHe, CHTaTte 6aTePnTa 3a N3HOceHa n CMeHETe C HOBA.
BHHMAHNE
IIO Bpeme Ha pa6oTa n noDpBxKa Ha eJeKtpueChn ypei Tpr6Ba Da ce Cna3BaT pa3npoe6nte N CTaHapTnte 3a 6e30nacHOCT 3a BCra KCTpaHa.
BauHn HhOpMaun 3a 6aTeepn 3a 6e3HHN HHcTpymEnHiKOKI
Molra, BnHaHn n3noJ3BaIte HaWnte opunHaJIHn 6aTePnn. He rapaHTnpame 6e3oNaChocTt a pa6oTaT ha ypeDa, Korato Ce n3NoJ3BaT 6aTePnn, pa3JnuHn OT nocOueHNTe OT Hac, nn KOraTO ca npabeHn npOMEHN 6aTePnTE (KATO pa3rIo6BaHe n NOmHa Ha KLeTKnTe nn DpyuBbTpseHn KOMNOHeHTN).
TAPAHUN
Ipeoctabme rapaunna 3a Eektpnueckn HhctpymEnH HiKOKI cbrlacho CneuqnHnTe MeCTeHN 3aHOdaTeJIcTbHa cBtBeTHnTe IbpaHn. HactoJata rapaun He NOKPnBa DeEeKTN nIN NobpeDn, npuHHeNOT He npaBnH OIN HepeKHo n3NoJ3BaHe, KaTO n DblkaUc He aOBuaH No3HocBaHe Ha KOMnoHEHTte. B cnuyaHa peKaIamaun, MoJr, n3npaTeE EektpnuecknT HhctpyMeT, B Hepa3rIo6en BnD, c TAPAHUHOHHATA KAPTA, npodobOJIcTBena B KpaHa nHCTpyKUnTe, Ha oTopn3napan cepBn3eH ueTbpHa HiKOKI.
HhOpmaqna 3a WymoBO 3aMbpcBaHe n Bn6paunn
I3MepeHnte CToHOCTH OTROBAPr HA N3NCKBAHNrTa Ha EN62841 n CbOTBeTCTBaT Ha ISO 4871.
IImpeHOn A-IPeTeJIeHO IyMoBO HNBO:
109 dB (A) (WR36DF)
108 dB (A) (WR36DG)
IImpeHo A-npTeTneHa cIna Ha 3Byka:
98 dB (A) (WR36DF)
97 dB (A) (WR36DG)
HeToHocK:3dB(A).
HocTe aHTnΦoHN.
O6u n cToHocTn Ha Bn6paunn (BeKTopHa cyMa) onpeJeHencBrlacHo EN62841.
YdapHo 3aTgAne Ha KpeNeJHn eJeMeHTn Do MaKcMaJIHn KaIauITeT Ha ypeDa:
CTOHOCT Ha eMnCnHa Bn6paun a h=
17,7 m/s² (WR36DF)
16,8 m/s² (WR36DG)
HeTOuHOCT K=1,5M/ceK2
IeKlapnpaHata 06ua CTOnHOCT Ha Bn6paunnte H
IeKlapnpaHata CToHOCCT Ha WymOBNTe EMCHN Ca
H3MpeHN B CbOTBETCTBNE CbC CTaHApTeH MeTOd 3a
H3NITBaHe N MORAT Da 6bDat N3No13BaHN 3a CpaBHraBe
Ha eINH INCTpymEt C dpYr.
Te Morat da ce n3no3BaT npn npedBapnteHa oceHka Ha eKcno3nurra.
PPEyPPEKDEHNE
O H3JIbUbaHeTo Ha Bn6paQmN I yM No BpeMe Ha DeIcTBInTeJHaTa yNoTpe6a Ha eJeKtpOnHCTpyMeHTa MOKe Da ce pa3JIuHaBa OT DeKJIapnPaHaTa O6ua CTOINHOCTB 3aBNCIMOCT OT HaYHNITE, NO KONTO Ce H3IOJ3Ba INHCTpyMeHTbT, OCOeHO KaKbB BnD JeTaNJCe 06pa6oTBA; n
O NdENTnHcnpaHe Ha MepHnte 3a 6e3oNacHocT 3a onepaTopa, Bb3 OCHOBa OueHka Ha Bb3dEInCTBneTo npn DeIcTBnTEJHN YcIOBnHa H3NOJ3BaHe (KaTO ce B3emAT NpeBnD BCnHn EJIeMeHTn OT pa6OTnur LKbI, KaTO NepNoHn Ha BkIIOUbaH n3KIOUbaHe, KaKTo n pa60Ta Ha npa3Hn O6OpOTn HenOCpeJCTBeHO npedn CJIeM MOMeTA Ha N3NOJ3BaHe).
3A6EJIEXHA
Iopadn HnpeKbCaTTo pa3BNTHe Ha HayHo-pa3BOHHaTa nporpama Ha HiKOKI, daeHnte tyk cneuΦkaun ca npedMe Ta npomraHa 6e3 yBeDoMJIeHne.
OTCTPAHRABE HA HEN3INPABHOCTN
I3noJI3BaIte INCnEKnITe B Ta6nIaTa no-dOly, aKo INHCTpyMeHTbT He fynKIOHOpa HOpMaJIHO. AKO C TOBa Ipo6JeMbT He 6bJe OTCpaHeN, o6bpHeTe Ce KbM BaIINy DNlTp np NkM OToPn3npAHH cepBn3eH c9ENTbp Ha HiKOKI.
ODRžAVANJE I PROVERA
- Provera grla
Istrošeno ili deformisano šestougaono ili Četvrtasto grlo nece dati odgovarajuću Čvrstinu za umetanje izmedu navrtke ili ležista i izazvace gubitak momenta zatezanja. Povremeno proverite istrošenost grlu i zamenite ga novim ako je potrebno.
| WR36DF, WR36DG | |||
| (2XCP) (NNP) (NN) | |||
| 1- | - | ||
| 2- | - | ||
| 1- | - | ||
| 1 | 1 | - | |
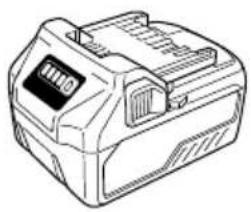
BSL36..18
UC18YSL3 (14,4V-18V)
329897
337108
375578
| English Dansk Română | ||||
| GUARANTEE CERTIFICATE 1 Model No. 2 Serial No. 3 Date of Purchase 4 Customer Name and Address 5 Dealer Name and Address (Please stamp dealer name and address) | GARANTIBEVIS 1 Modelnumber 2 Seriunumber 3 Købsdato 4 Kundesnav og adress 5 Forhandlersnav og adress (Indsæt stempel med forhandlers nav og adress) | CERTIFICATE DE GARANTIE 1 Model nr. 2 Nr. de série 3 Data cumparã¡ri 4 Numelo与此 adress clientuili 5 Numelo与此 adress distributorului (Và rugãm aplicatița stampila cu numele与此 adress distributorului) | ||
| Deutsch Norsk Slovenžina | ||||
| GARANTIESCHEIN 1 Model-No. 2 Serien-No. 3 Kaufdatum 4 Name und Anschrift des Kunden 5 Name und Anschrift des Handliers (Bitte mit Namen und Anschrift des Handler abstempelin) | GARANTISERTIFIKAT 1 Modeln. 2 Serien. 3 Kjopsdato 4 Kundensnav og adress 5 Forhandlersnav og adress (Vennligst stemple forhandlers nav og adresse) | GARANCIJSKO POTRDIGO 1 St. modela 2 Serijka与此. 3 Datum nakupa 4 Ime in naslov kupca 5 Ime in naslov prodajalca (Prosimo vitisnite zig z imenom in naslov promedalca) | ||
| Français Suomi Slovenčina | ||||
| CERTIFICATE DE GARANTIE 1 No. de modele 2 No de série 3 Date d'achat 4 Nom et adresse du client 5 Nom et adresse du revendeur (Cachet portant le nom et l'adresse du revendeur) | TAKUUTODISTUS 1 Malli nro 2 Sarja nro 3 Ostopäävamãrã 4 Asiakkaan nimìa osoite 5 Myyjän nimìa ja osoite (Leimaa myyjän nimìa ja osoite) | ZÁRUÇNÑ LISTS 1 Č. modelu 2 Sériove Č. 3 Datum zaküpenia 4 Meno a adresa zákaznika 5 Názov a adresa predajcu (Peciatka s názvom a adresou predajcu) | ||
| Italiano Eλλινίκα Βυμράκη | ||||
| CERTIFICATE DI GARANZIA 1 Modello 2 N° di serié 3 Data di acquisto 4 Nome e indirizzo dell'acquirente 5 Nome e indirizzo del rivenditore (Si prega di apporre il timbro con quosti dati) | ΠΙΤΟΙΟΙHTΙΚΟ ΕΥΥΗΝΕ | ΓΑΡΑΗΙΝΗΝΕ ΚΑΡΙΦΗΝΑH 1 Módel № 2 Cepenæ N# 3 Daça 3a zákyúnubaene 4 Meme i adresa na Klímeneta 5 Meme i adresc na Tьрравец (Mólya, otmeцатайе идresu trgovca) | ||
| Nederland Polski Srpski | ||||
| GARANTIEBEWIJS 1 Modelnumber 2 Serienummer 3 Datum van aankoop 4 Naam en adres van de gebruiker 5 Naam en adres van de handelaar (Stempel a.u.b. naam en adres vande de handelaar) | GWARANCJA 1 Model 2 Numer serjyny 3 Data zakupu 4 Nazwaclienta i adres 5 Nazwa dealera i adres (Pieczćć punctu sprzedázy) | GARANTNI SERTIFIKAT 1 Br. modela. 2 Serijski br. 3 Datum kupovine 4 Ime i adresa kupca 5 Ime i adresa prodavca (Molimo da stavite pećat na ime i adresu trgovca) | ||
| Espanol Magyar Hrvatski | ||||
| CERTIFICADO DE GARANTÍA 1 Mínero de modele 2 Mínero de série 3 Fecha de adquisión 4 Nombre y direccion del cliente 5 Nombre y direccion del distribuidor (Se rueqa poner el sello del distribuidor con su nombre y direccion) | GARANCIA BIZONYLAT 1 Tipusszám 2 Sorozatszám 3 A vásárlásátáuma 4 A Vásárálo neve és címe 5 A Kereskedő neve és címe (Kérjúkide elhelyezni a Kereskedő novének és címenek pecsétjét) | JAMSTVENI CERTIFIKAT 1 Br. modela. 2 Serijski br. 3 Datum kupnej 4 Ime i adresa kupca 5 Ime i adresa trgovca (Molimo stavite pećat na ime i adresu trgovca) | ||
| Portugues Cesena | ||||
| CERTIFICADO DE GARANTIA 1 Mínero do modele 2 Mínero do série 3 Data de compra 4 Nome e morada do cliente 5 Nome e morada do distribuidor (Por favor, carimbe o nome e morada do distribuidor) | ZÁRUÇNÍ LIST 1 Model ě. 2 Série ě. 3 Datum nákupa 4 Mèmeno a adresa zákaznika 5 Mèmeno a adresa prodejce (Prosíme o razítoke se jmídem a adresou prodejce) | |||
| Svenska Türke | ||||
| GARANTICERTIFIKAT 1 Modellnr 2 Seriern 3 Inkópsdatur 4 Kundensnamn och adress 5 Försäljarensnamn och adress (Stámpla försäljarensnamn och adress) | GARANTI SERTIFIKASI 1 Model No. 2 Seri No. 3 Satin Alma Tarihi 4 Müşörti Advi Adresi 5 Bayi Advi Adresi (Lütfen bayi adini ve adresini kage olaram basin) | |||
HiKOKI
| ① | |
| ② | |
| ③ | |
| ④ | |
| ⑤ |
Siemensring 34, 47877 willich, Germany
Tel: +49 2154 49930
Fax: +49 2154 499350
URL: http://www.hikoki-powertools.de
Hikoki Power Tools Norway AS
Kjeller Vest 7, N-2007 Kjeller, Norway
Tel: (+47) 6692 6600
Fax: (+47) 6692 6650
URL: http://www.hikoki-powertools.no
Hikoki Power Tools Netherlands B.V.
Brabanthaven 11, 3433 PJ Nieuwegein, The Netherlands
Tel: +31 30 6084040
Fax: +31 30 6067266
URL: http://www.hikoki-powertools.nl
Hikoki Power Tools Sweden AB
Rotebergsvagen 2B SE-192 78 Sollentuna, Sweden
Tel: (+46) 859899900
Fax: (+46) 859899940
URL: http://www.hikoki-powertools.se
Hikoki Power Tools (U.K.) Ltd.
25 Majestic Road, Southampton,
SO16 OYT, United Kingdom
Tel: +44 1908 660663
Fax: +44 1908 606642
URL: http://www.hikoki-powertools.uk
Hikoki Power Tools Denmark A/S
Lillebaeltsvej 90, 6715 Esbjerg N, Denmark
Tel: (+45) 75 14 32 00
Fax: (+45) 75 14 36 66
URL: http://www.hikoki-powertools.dk
Hikoki Power Tools France S.A.S.
Hikoki Power Tools Belgium N.V./S.A.
Koningin Astridlaan 51, B-1780 Wemmel, Belgium
Tel: +32 2 460 1720
Fax: +32 2 460 2542
URL http://www.hikoki-powertools.be
Hikoki Power Tools Italia S.p.A
Via Piave 35, 36077, Altavilla Vicentina (VI), Italy
Tel: +39 0444 548111
Fax: +39 0444 548110
URL: http://www.hikoki-powertools.it
Hikoki Power Tools Ibérica, S.A.
C/ Puigbarral, 26-28, Pol. Ind. Can Petit, 08227 Terrassa
(Barcelona), Spain
Tel: +34 93 735 6722
Fax: +34 93 735 7442
URL: http://www.hikoki-powertools.es
Hikoki Power Tools Romania S.R.L.
Ring Road, No. 66, Mustang Traco Warehouses, Warehouse
No.1, Pantelimon City, 077145, Ilfov County, Romania


- (Original instructions)
- GENERAL POWER TOOL SAFETY WARNINGS
- WARNING
- 1) Work area safety
- 2) Electrical safety
- 3) Personal safety
- 4) Power tool use and care
- PRECAUTION
- CORDLESS IMPACT WRENCH SAFETY WARNINGS
- ADDITIONAL SAFETY WARNINGS
- English
- CAUTION ON LITHIUM-ION BATTERY
- CAUTION
- REGARDING LITHIUM-ION BATTERY TRANSPORTATION
- USB DEVICE CONNECTION PRECAUTIONS (UC18YSL3)
- NOTE
- PRECAUTIONS REGARDING THE DUST-RESISTANCE AND WATERPROOFING FUNCTIONS
- [Descriptions of IP Codes]
- IP56
- SYMBOLS
- STANDARD ACCESSORIES
- APPLICATIONS
- SPECIFICATIONS
- CHARGING
- Regarding electric discharge in case of new batteries, etc.
- How to make the batteries perform longer.
- MOUNTING AND OPERATION
- MAINTENANCE AND INSPECTION
- Inspecting the socket
- Inspecting the mounting screws
- Maintenance of the motor
- Inspection of terminals (tool and battery)
- Cleaning on the outside
- Storage
- Important notice on the batteries for the HiKOKI cordless power tools
- GUARANTEE
- Information concerning airborne noise and vibration
- TROUBLESHOOTING
- VOORZORGSGMAATREGELEN
- VOORZORGSGMAATREGELEN AANSLUITING USB-APPARAAT (UC18YSL3)
- VOORZORGSGMAATREGELEN MET BETREKKING TOT DE STOFBESTENDIG EN WATERDICTH MAKEN FUNCTIONS
- PRECAUCIONES RESPECTO A LAS FUNCTIONS DE RESISTENCIA AL POLVO E IMPERMEABILIZANTES
- NOTA
- VEDLIKEHOLD OG INSPEKSJON
- Inspisere kontakten
- IPOΦYΛΑΞEΙΣ Σ'YNΔΕΣΗΣ ΣΥΣKEYΗΣ USB (UC18YSL3)
- ZHMEIΩsH
- PREPRAVA TYKAJUCA SA LITIOVIOIónovych BATERI
- VYSTRAHA
- 3)Лична6e3oNaCHOCT
- 6) 06cIyHbAHe
- BHIMAHNE
- БЕЗПАСНСТ ПИРAPБОТACBEЗЖИЧЕНУДAPEHГAEЧENKЛЮCH
- ДОПьЛНITEЛНМЕРК 3A БЕЗОПACHОCT
- ГРИЖА 3A ЛNTHEBO-ИОHHATA BATEPЯ
- PNEyPENKDEHNE
- OTHOCHO TPAHCIOPTA HA JIHTHEBO-NOHHA BATEPNA
- PNEyPEXDEHNE
- ПЕДПАЗНМЕРН 3A CBьP3BAHE HA USB YCTPOИCTBO (UC18YSL3)
- PNEyPENKDAEHNE
- 3ABEJIeHHKA
- IPEДПАЗНМЕРИ ПО OTHOWEHNE HAФУнкINTE3A IPNAXOYCTOИNBOCTи XnДрОн3ОЛАЦЯ
- [Onncanna Ha IP kOIOBe]
- CTAHДAPTHN AHCECOAPN
- ПРИLOЖЕНИ
- CNEUHRAUH
- 3ABEJIEXHA
- 3APEXDAHE
- HactpoHa3a cIneH/cJa6peHHM
- PeKIM Ha aBToMaTnUHO cNpuAhe (ФИr. 15)
- HaTpoiKa 3a peKIM Ha aBTOMaTHNO cNIPAHe
- BHHMAHNE
- BauHn HhOpMaun 3a 6aTeepn 3a 6e3HHN HHcTpymEnHiKOKI
- TAPAHUN
- PPEyPPEKDEHNE
- 3A6EJIEXHA
- OTCTPAHRABE HA HEN3INPABHOCTN
- ODRžAVANJE I PROVERA
- HiKOKI
- Hikoki Power Tools Norway AS
- Hikoki Power Tools Netherlands B.V.
- Hikoki Power Tools Sweden AB
- Hikoki Power Tools (U.K.) Ltd.
- Hikoki Power Tools Denmark A/S
- Hikoki Power Tools France S.A.S.
- Hikoki Power Tools Belgium N.V./S.A.
- Hikoki Power Tools Italia S.p.A
- Hikoki Power Tools Ibérica, S.A.
- Hikoki Power Tools Romania S.R.L.
Brand : HiKOKI
Model : WR36DG
Category : Screwdriver