
58G488 - Saw Graphite - Free user manual and instructions
Find the device manual for free 58G488 Graphite in PDF.
| Product type | Circular saw |
| Brand | Graphite |
| Model | 58G488 |
| Year of manufacture | 2023 |
| Power supply | 230 V AC, 50 Hz |
| Power | 1200 W |
| No-load speed | 5500 min⁻¹ |
| Blade diameter | 185 mm |
| Blade bore | 20 mm |
| Max. cutting depth (90°) | 65 mm |
| Max. cutting depth (45°) | 43 mm |
| Bevel angle range | 0° to 45° |
| Weight | 3.8 kg |
| Protection class | II |
| Sound pressure level (LpA) | 92.1 dB(A), K=3 dB(A) |
| Sound power level (LwA) | 103.1 dB(A), K=3 dB(A) |
| Vibration (ah) | 2.092 m/s², K=1.5 m/s² |
| Parallel guide included | Yes, 1 piece |
| Blades supplied | 2 pieces |
| Carrying case | Yes, included |
| Main functions | Straight cut, bevel cut, plunge cut, parallel guiding |
| Maintenance and cleaning | Cleaning of ventilation openings, replacement of blade and carbon brushes |
| Safety | Automatic lower guard, switch lock, anti-kickback protection |
| Spare parts and repairability | Standard blades available, replaceable carbon brushes, authorized service |
| General information | Indoor use, DIY and light work |
Frequently Asked Questions - 58G488 Graphite
User questions about 58G488 Graphite
0 question about this device. Answer the ones you know or ask your own.
Ask a new question about this device
Download the instructions for your Saw in PDF format for free! Find your manual 58G488 - Graphite and take your electronic device back in hand. On this page are published all the documents necessary for the use of your device. 58G488 by Graphite.
USER MANUAL 58G488 Graphite
SR UPUTSTVO ZA UPOTREBU....60
FR MANUEL D'INSTRUCTION ....75
natural_image
Diagram of a mechanical assembly with a spring and central component, no text or symbols present
INSTRUKCJA ORYGINALNA (OBSŁUGI)
PILARKA TARCZOWA 58G488

UWAGA: PRZED PRZYSTĄPIENIEM DO UŻYTKOWANIA ELEKTRONARZĘDZIA NALEŻY UWAŻNIE PRZECZYTAĆ NINIEJSZĄ INSTRUKCJĘ I ZACHOWAĆ JĄ DO DALSZEGO WYKORZYSTANIA.
SZCZEGÓŁOWE PRZEPISY BEZPIECZEŃSTWA
SZCZEGÓŁOWE BEZPIECZEŃSTWO UŻYTKOWANIA PILAREK TARCZOWYCH WRZYNAJĄCYCH BEZ KLINA ROZSZCZEPIA-JĄCEGO
Procedura cięcia

GTX SERVICE
TRANSLATION OF

THE ORIGINAL INSTRUCTIONS
CIRCULAR SAW
58G488
CAUTION: BEFORE USING THE POWER TOOL READ THIS MANUAL CAREFULLY AND KEEP IT FOR FUTURE REFERENCE.
DETAILED SAFETY REGULATIONS
DETAILS OF OPERATIONAL SAFETY FOR PLUNGE TYPE SAWS WITHOUT RIVING KNIFE
CAUTION:
Neglecting the instructions specified in the below warnings about risks and guidelines for safety of use may cause risks of electric shock, fire and/or serious injuries.
Cutting procedures

a) DANGER: Keep hands away from cutting area and the blade. Keep your second hand on auxiliary handle, or motor housing. If both hands are holding the sow, they cannot be cut by the blade.
b) Do not reach underneath the workpiece. The guard cannot protect you from the blade below the workpiece.
c) Adjust the cutting depth to the thickness of the workpiece. Less that a full tooth of the blade teeth should be visible below the workpiece.
d) Never hold piece being cut in your hands or across your leg. Secure the workpiece to a stable platform. It is important to support the work properly to minimize body exposure, blade binding, or loss of control.
e) Hold the power tool by insulated surfaces gripping surfaces only, when performing an operation where the cutting tool may contact hidden wiring or its own cord. Contact with a "live" wire will also make exposed metal parts of the power tool "live" and could give the operator an electric shock.
f) When ripping, always use a rip fence or starting edge guide. This improves the accuracy of cut and reduces the chance of blade binding.
g) Always use blades with correct size and shape (diamond versus round) of arbour holes. Blades that do not match the mounting hardware of the saw will run eccentrically, causing loss of control.
h) Never use damaged or incorrect blade washers or bolts. The blade washers and bolt were specially designed for your saw, for optimum performance and safety of operation.
Kickback causes and related warnings
- Kickback is a sudden reaction to a pinched, bound or misaligned saw blade, causing an uncontrolled saw to lift up and out of the workpiece toward the operator;
- When the blade is pinched or bound tightly by the kerf closing down, the blade stalls and the motor reaction drives the unit rapidly back towards the operator;
- If the blade becomes twisted or misaligned in the cut, the teeth at the back edge of the blade can dig into the top surface of the wood causing the blade to climb out of the kerf and jump back towards the operator.
Kickback is the result of saw misuse and/or incorrect operating procedures or conditions and can be taking proper precautions as given below.
a) Maintain a firm grip with both hands on the saw and position your arms to resist kickback forces. Position your body to either side of the blade, but not in line with the blade. Kickback could cause the saw to jump backwards, but kickback forces can be controlled by the operator, if proper precautions are taken.
b) When blade is binding, or when interrupting a cut for any reason, release the trigger and hold the saw motionless in the material until the blade comes to a complete stop. Never attempt to remove the saw from the work or pull the saw
backward while the blade is in motion or kickback may occur. Investigate and take corrective actions to eliminate the cause of blade binding.
c) When restarting a saw in the workpiece, centre the saw blade in the kerf and check that saw teeth are not engaged into the material. If saw blade is binding, it may walk up or cause kickback from the workpiece as the saw is restarted.
d) Support large panels to minimise the risk of blade pinching and kickback. Large panels tend to sag under their own weight. Supports must be placed under the panel on both sides, near the line of cut and near the edge of the panel.
e) Do not use dull or damaged blades. Unsharpened or improperly set blades narrow kerf causing excessive friction, blade binding and kickback.
f) Blade depth and bevel adjusting locking levers must be tight and secure before making cut. If blade adjustment shifts while cutting, it may cause binding and kickback.
g) Use extra caution when sawing into existing walls or other blind areas. The protruding blade may cut objects that can cause kickback.
Lower guard function
a) Check lower guard for proper closing before each use. Do not operate saw if lower guard does not move freely and close instantly. Never clamp or tie the lower guard into the open position. If saw is accidentally dropped, lower guard may be bent. Raise the lower guard with the retracing handle and make sure it moves freely and does not touch the blade or any other part, in all angles and depths of cut.
b) Check the operation of the lower guard spring. If the guard and the spring are not operating properly, they must be serviced before use. Lower guard may operate sluggishly due to damaged parts, gummy deposits, or a build-up of debris.
c) Lower guard may be retracted manually only for special cuts such as "plunge cuts" and "compound cuts". Raise lower guard by retracting handle and as soon as blade enters the material, the lower guard must be released. For all other sawing, the lower guard should operate automatically.
d) Always observe that the lower guard is covering the blade before placing saw down on bench or floor. An unprotected, coasting blade will cause the saw to walk backwards, cutting whatever is in its path. Be aware of the time it takes for the blade to stop after switch is released.
Additional safety instructions
Precautions
a) Do not use damaged or deformed cutting blades.
b) Do not use grinding wheels.
c) Use only cutting blades that are recommended by the manufacturer and comply with the standard EN 847-1.
d) Do not use cutting blades without sintered carbide tips on teeth.
e) Dust of certain wood types may be dangerous to health. Direct physical contact with dusts may cause allergic reaction and/or respiratory system diseases of operator or bystanders. Dusts of oak and beech are considered carcinogenic, especially in connection with wood processing substances (wood impregnants).
f) Use personal protection measures, such as:
- earmuff protectors to reduce risk of hearing damage,
- eye shield,
- respiratory system protection to reduce risk of harmful dusts inhalation,
- gloves for maintenance of cutting blades and other rough and sharp materials (hold cutting blades by mount hole whenever possible).
g) Connect dust extraction system when cutting wood.
Safe work and maintenance
a) Match cutting blade with material that you plan to cut.
b) Never use the saw for cutting materials other than wood and wood-like.
c) Do not use the saw without guard or when the guard is blocked.
d) Floor close to the machine work place must be kept tidy and without loose materials and protrusions.
e) Provide appropriate work place illumination.
f) Machine operator must be properly trained for use, operation and working with the machine.
g) Use only sharp cutting blades.
h) Observe maximum speed indicated on the cutting blade.
i) Make sure to use parts in accordance with the manufacturer's instructions.
j) Disconnect the saw from power supply when performing maintenance tasks.
k) If the power cord gets damaged during operation, disconnect the power supply immediately. DO NOT TOUCH POWER CORD BEFORE DISCONNECTING FROM THE POWER SUPPLY.
I) If the saw is equipped with laser, replacement with laser of another type is forbidden and all repairs must be carried out by the service. Do not aim the laser beam at people or animals.
m) Do not use the tool in stationary mode. It is not designed for use with sawing table.
n) Fix processed material to stable surface and secure with clamps or vice to eliminate shifting. This kind of work piece fixation is safer than holding the work piece in hand.
o) Wait until blade comes to a complete stop before putting the power tool away. Cutting blade may jam and cause loss of control over the power tool.
CAUTION! This device is designed to operate indoors.
The design is assumed to be safe, protection measures and additional safety systems are used, nevertheless there is always a small risk of injuries at work.
CONSTRUCTION AND USE
Circular saw is a hand-held power tool with insulation class II. It is driven by a single-phase commutator motor. This type of power tools is widely used for cutting wood and objects made of wood-like materials that match with the tool size. Do not use the saw for cutting firewood. Attempts to use the circular saw for purposes other than specified will be considered an improper use. Use the circular saw only with appropriate cutting blades with teeth with sintered carbide tips. Circular saw is designed for light duty works in service workshops and any individual, amateur activities (tinkering).

Use the power tool according to the manufacturer's instructions only.
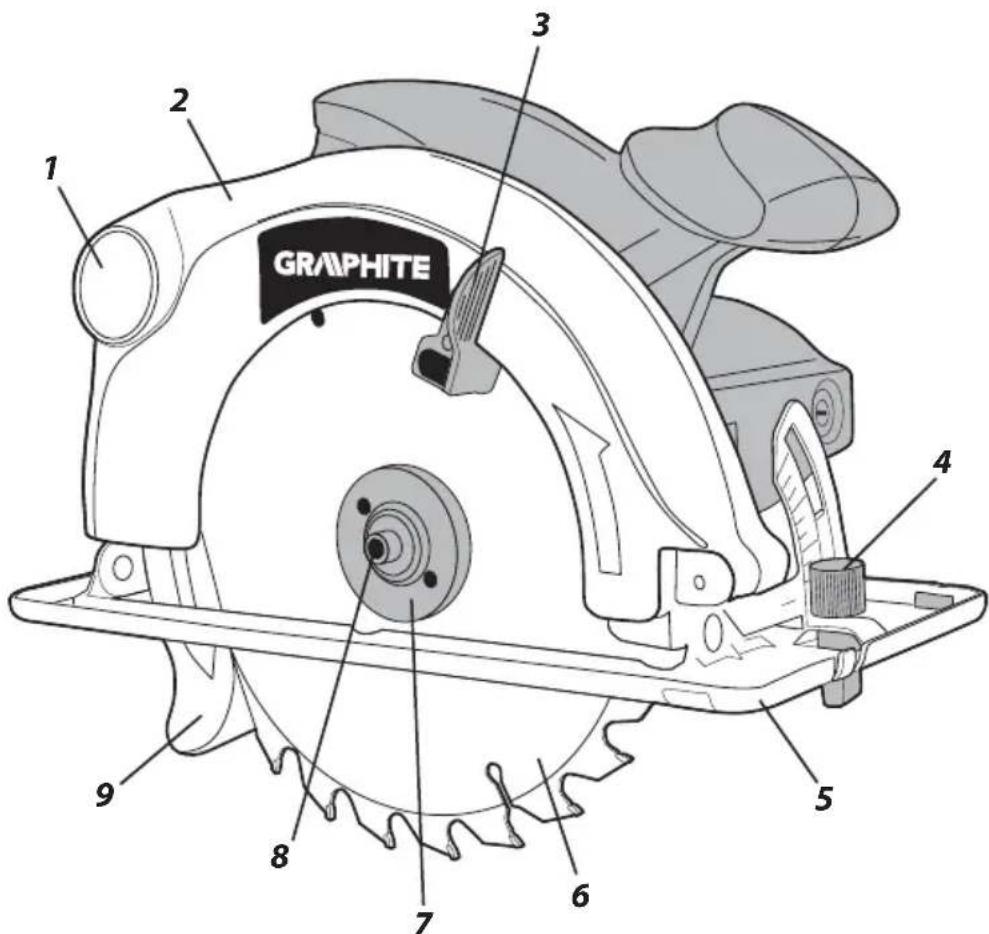
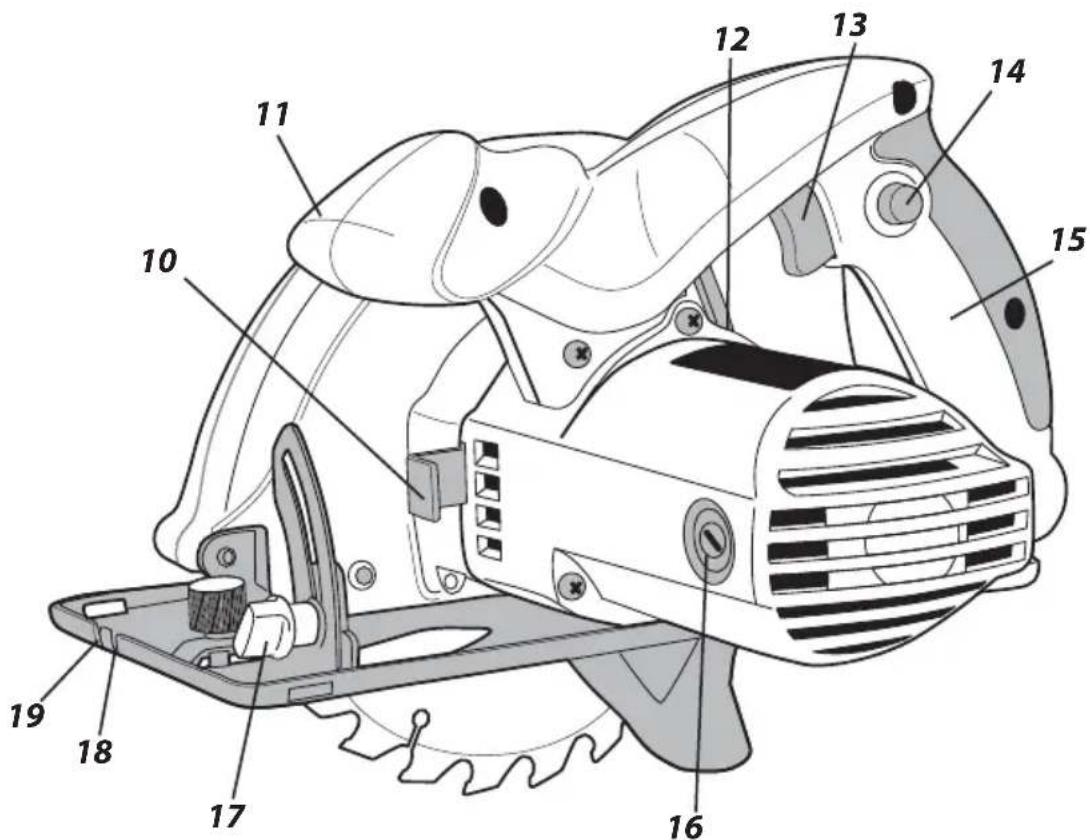
DESCRIPTION OF DRAWING PAGES
Below enumeration refers to the device elements depicted on the drawing pages of this manual.
- Dust extraction outlet
- Upper guard
- Lower guard lever
- Parallel guide locking knob
- Saw base
- Cutting blade
- Collar washer
- Bolt for cutting blade fixing
- Lower guard
- Spindle lock button
- Front handle
- Cutting depth locking lever
- Switch
- Switch lock button
- Main handle
- Brush cover
- Knob for base bevel adjustment
-
0° marker for bevel cutting
-
0° marker for perpendicular cutting
* Differences may appear between the product and drawing
MEANING OF SYMBOLS

CAUTION

WARNING

ASSEMBLY/SETTINGS

INFORMATION
EQUIPMENT AND ACCESSORIES
- Parallel guide - 1 pcs
- Cutting blade - 2 pce
- Hexagonal key - 1 pcs
- Transport case - 1 pcs
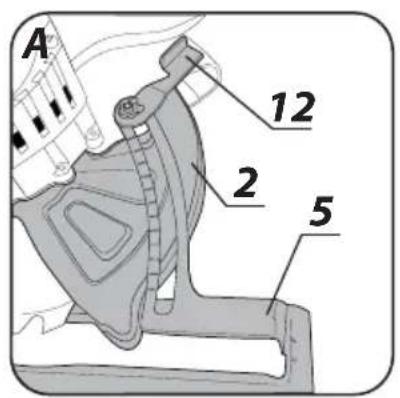
CUTTING DEPTH ADJUSTMENT

Cutting depth can be set from the range of 0 to 65 mm.
- Loosen the cutting depth locking lever (12).
- Set desired cutting depth (use the scale).
- Lock the cutting depth locking lever (12) (fig. A).
INSTALLATION OF GUIDE FOR PARALLEL CUTTING

Use parallel guide when cutting material to narrow pieces. Guide can be installed on left and right side of the power tool.
- Loosen the parallel guide locking knob (4).
- Insert parallel guide bar into two holes in the saw base (5).
- Set desired distance (use the scale).
- use the parallel guide locking knob to fix the parallel guide (4).
The parallel guide can also be used for cutting at angles ranging from 0^ to 45^ .

Never put hand or fingers behind the working saw. When kick back happens the saw can fall on the hand, it may be the cause of heavy body injury.
Lower guard (9) of cutting blade (6) is pushed away automatically as the blade deepens into the material.
To remove it manually push the lower guard lever (3).
DUST EXTRACTION
Circular saw is equipped with dust outlet (1) that allows for extraction of sawdust produced when cutting.
SWITCHING ON / SWITCHING OFF

The mains voltage must match the voltage on the rating plate of the circular saw. Hold the saw with both hands when starting up, because engine turning moment may cause uncontrolled turn of the power tool.
Remember that rotating parts of the saw rotate for some time after the tool has been switched off.

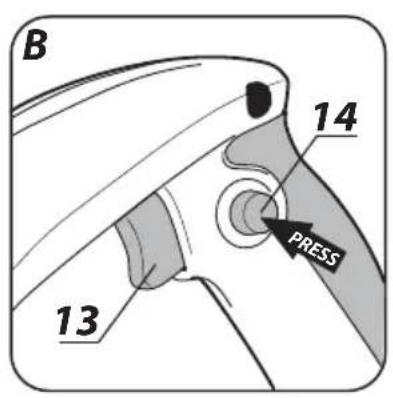
The saw is equipped with the switch lock button (14) that protects against accidental starting.
Switching on:
- Press the switch lock button (14) (fig. B).
- Press the switch button (13).
Switching off:
- Release pressure on the switch button (13).
CUTTING

- When starting operation always hold the saw firmly with both hands by two handles.
- Switch on the circular saw only when it is away from the material that is to be cut.
- Do not press the saw too hard. Pressure should be moderate and continuous.
• After the cut is finished allow the cutting blade to stop completely. - If the cutting is aborted before the task is completed, prior to continuation start the saw and allow for idle operation. Wait until the tool achieves its full rotational speed and then carefully drive the cutting blade into the kerf in the processed material.
- When cutting perpendicular to fibres of material (wood), fibres tend to lift up and tear off (moving the saw slowly minimizes this effect).
- Ensure the lower guard reaches its extreme position.
- Before starting to cut always ensure that cutting depth locking lever and knob for base bevel adjustment are tightened firmly.
- With the circular saw use only cutting blades with correct arbour hole and outer diameter.
- Processed material must be firmly fixed.
- Place wider part of the saw base on the part of the material, which is not cut off.

If the object is small, fix the processed material with F-clamps. If the circular saw base does not move on the processed material, but is lifted instead, there is danger of kick back.

Properly fixed processed material and firm hold of the tool ensure full control over power tool operation. This allows to avoid risk of body injury. Do not try to hold short pieces of material with your hand.
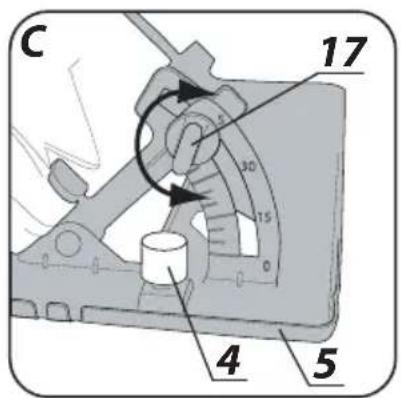
BEVEL CUTTING

- Loosen the knob for base bevel adjustment (17) (fig. C).
- Use the scale to set the saw base to appropriate angle (from 0^ to 45^ ).
- Tighten the knob for base bevel adjustment (17).

Remember that for bevel cutting the risk of kick back is greater (pinching of cutting blade more probable), therefore it is particularly important that the saw base lies on the processed material with its whole surface. Perform cutting with smooth move.
MAKING A CUT BY CUTTING INTO MATERIAL

Disconnect the saw from power supply before starting any adjustments.
- Set desired cutting depth that matches thickness of material planned to be cut.
- Tilt the saw so the front edge of the saw base lies on the cut material and 0^ marker for perpendicular cutting is in the line of planned cutting.
- When the saw is in the place to start cutting, lift the lower guard (9) with the lower guard lever (3) (cutting blade is lifted above the material).
- Switch the power tool on and wait until cutting blade reaches its full rotational speed.
- Gradually lower the saw and sink the cutting blade in material (during this move front edge of the saw base should have contact with surface of the material).
- When the blade starts cutting release the lower guard.
- When whole surface of the saw base rests on the material, move the saw forward to proceed with cutting.
- Never move the saw backwards when the blade is rotating, there is danger of kick back.
- Finish cutting in reverse order it was started, by turning the saw around line of contact of the processed material and front edge of the tool base.
- Before removing blade from the material, allow it to stop after switching the saw off.
- Finish the process with reciprocating saw or hand saw when necessary.
CUTTING OR CUTTING OFF LARGE PIECES OF MATERIAL

When cutting large boards of material support them to avoid potential blade hitch (kick back) due to pinching the blade in material kerf.

- Support the panel or board close to the place of cutting.
- Ensure the cutting blade settings guarantee that work bench or support will not be damaged during cutting.
Unplug the power cord from the mains socket before commencing any activities related to installation, adjustment, repair or maintenance.
- Keep the ventilation holes of the saw body pervious with no deposition of dust. All adjustment parts of the saw should also be clean. Clean them with brush when necessary. The most effective cleaning is with the use of compressed air. Wear anti-splinter goggles and protective mask always when using compressed air. Do not clean ventilation holes by inserting sharp objects there, such as screwdrivers and alike.
- When cleaning never use petrol, solvents or detergents that could damage plastic parts of the saw.
- In case of excessive sparking on the motor commutator stop using the power tool and deliver it to service workshop.
- During normal operation cutting blade gets blunt after some time. When it happens it is necessary to apply greater pressure when moving the saw during cutting. When cutting blade is found damaged, replace it immediately.
• Cutting blade must always be sharp.
CUTTING BLADE REPLACEMENT

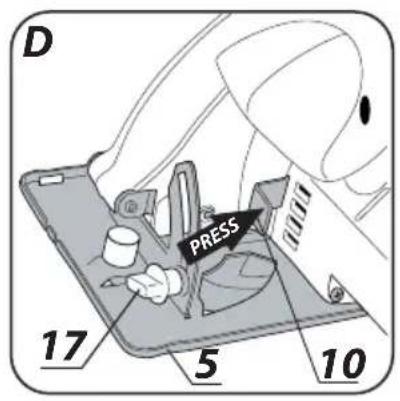
- Use supplied hexagonal key to unscrew the bolt (8) for blade fixing by turning it counter-clockwise.
- To prevent rotation of saw spindle, lock the spindle with spindle lock button (10) when unscrewing the bolt that fixes the cutting blade (fig. D).
• Disassemble outer collar washer (7).
- Use lower guard lever (3) to move lower guard (9) so it is hidden in the upper guard (2) maximally (check condition and operation of the spring that pulls the lower guard at that time).
- Slide the blade out through slit in the saw base (5).
- Position new cutting blade so blade teeth and arrow on the blade match direction of the arrow on the lower guard.
- Insert new cutting blade through the slit in the saw base and install it on the spindle by following dismantle procedure in reverse order.

When installing cutting blade observe correct direction of the teeth. Arrow on the saw body shows direction of spindle rotation.
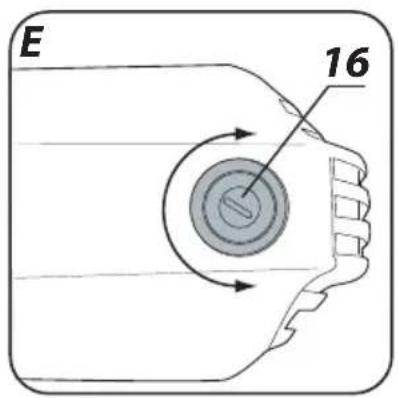
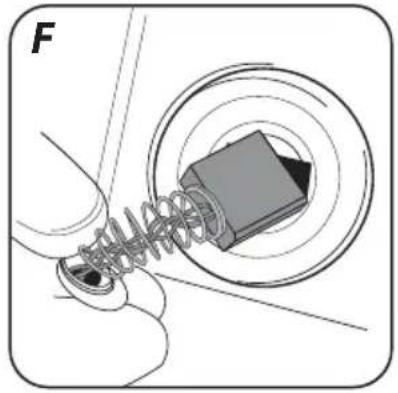
REPLACEMENT OF CARBON BRUSHES

Replace immediately used up (shorter than 5 mm), burnt or cracked motor carbon brushes. Always replace both brushes at a time.
• Unscrew brush covers (16) (fig. E).
- Remove used brushes.
- Remove any carbon dust with compressed air.
- Insert new carbon brushes (fig. F) (brushes should easily move into brush-holders).
• Install brush covers (16).

After the brushes are replaced start the power tool with no load and wait until the brushes fit to the motor commutator. Entrust replacement of carbon brushes only to a qualified person. Only original parts should be used.

All faults should be repaired by service workshop authorized by the manufacturer.
TECHNICAL PARAMETERS
RATED PARAMETERS
| Circular Saw | |
| Parameter Value | |
| Supply voltage 230 V AC | |
| Current frequency 50 Hz | |
| Rated power 1200 W | |
| Spindle rotational speed with no load 5500 rpm | |
| Bevel range 0° - 45° | |
| Outer diameter of cutting blade 185 mm | |
| Hole diameter of cutting blade 20 mm | |
| Maximum thickness of cut wood | Right angle 65 mm |
| Bevel (45°) 43 mm | |
| Protection class II | |
| Weight 3.8 kg | |
| Year of production | 2023 |
NOISE LEVEL AND VIBRATION PARAMETERS
Sound pressure: Lp_A = 92.1 dB(A) K = 3 dB(A)
Sound power: Lw = 103.1 dB(A) K = 3 dB(A)
Vibration acceleration: a_h = 2.092 m/s^2 K = 1.5 m/s^2
ENVIRONMENT PROTECTION
Do not dispose of electrically powered products with household wastes, they should be utilized in proper plants. Obtain information on wastes utilization from your seller or local authorities. Used up electric and electronic equipment contains substances active in natural environment. Unrecycled equipment constitutes a potential risk for environment and human health.
* Right to introduce changes is reserved.
"Grupa Topex Spółka z ograniczoną odpowiedzialnością" Spółka komandytowa with seat in Warsaw at ul. Pograniczna 2/4 (hereinafter Grupa Topex) informs, that all copyrights to this instruction (hereinafter Instruction), including, but not limited to, text, photographs, schemes, drawings and layout of the instruction, belong to Grupa Topex exclusively and are protected by laws accordingly to Copyright and Related Rights Act of 4 February 2004 (ustawa o prawie autorskim i prawach pokrewnych, Dz. U. 2006 No 90 item 631 with later amendments). Copying, processing, publishing, modifications for commercial purposes of the entire Instruction or its parts without written permission of Grupa Topex are strictly forbidden and may cause civil and legal liability.

GRAFISKÄS DALAS APRAKSTS
POSEBNI PROPISI O SIGURNOSTI
DETALJI SIGURNOG KORIŠTENJA KRUŽNIH UBODNIH PILA BEZ RAZVODNOG KLINA
Procedura piljenja
a) OPASNOST: Ruke držite dalje od radne zone rezanja i od lista pile. Drugu ruku držite na pomoćnoj ručci ili na kućištu motora. Ako pilu držite s obje ruke, smanjuje se opasnost od nastanka ozljeda uzrokovanih listom pile.
b) Ruke nemojte stavljati ispod obrađivanog predmeta. Štitnik ne može učinkovito zaštićivati od rotirajućeg lista pile ispod izratka.
c) Postavite dubinu rezanja adekvatnu do dubine izratka. Preporuča se da list pile strši ispod rezanog materijala manje nego do visine zuba.
REPLACEMENT DES BALAIS CHARBON

M8A 097526 0070 Rev. 02
EC Declaration of Conformity
Manufacturer: Grupa Topex Sp. z o.o. Sp.k., Pograniczna 2/4 02-285 Warszawa
Product: Circular saw
Model: 58G488
Trade name: GRAPHITE
Serial number: 00001 ÷ 99999
This declaration of conformity is issued under the sole responsibility of the manufacturer.
The product described above complies with the following documents:
Machinery Directive 2006/42/EC
Electromagnetic Compatibility Directive 2014/30/EU
RoHS Directive 2011/65/EU as amended by Directive
2015/863/EU
And meets the requirements of the standards:
EN 62841-1:2015/A11:2022; EN 62841-2-5:2014;
EN IEC 55014-1:2021; EN IEC 55014-2:2021; EN IEC 61000-3-2:2019/A1:2021; EN 61000-3-3:2013/A2:2021;
EN IEC 63000:2018
Notified body:
No. 0123; TÜV SÜD Product Service GmbH, Ridlerstraße 65, 80339 München, Germany
EC type-examination certificate no:
M8A 097526 0070 Rev. 02
This declaration relates only to the machinery as placed on the market and does not include components
added by the end user or carried out by him/her subsequently.
Name and address of the EU resident person authorised to prepare the technical dossier:
Signed on behalf of:
Grupa Topex Sp. z o.o. Sp.k.
TOPEX GROUP Quality Officer
Warsaw, 2023-07-31
DE
M8A 097526 0070 Rev. 02
M8A 097526 0070 Rev. 02
M8A 097526 0070 Rev. 02
M8A 097526 0070 Rev. 02
M8A 097526 0070 Rev. 02
M8A 097526 0070 Rev. 02
M8A 097526 0070 Rev. 02
Toode: toode: Ketassaag
Mudel: 58G488
Kaubanimi: GRAPHITE
Seerianumber: 00001 ÷ 99999
M8A 097526 0070 Rev. 02
M8A 097526 0070 Rev. 02
M8A 097526 0070 Rev. 02
M8A 097526 0070 Rev. 02
M8A 097526 0070 Rev. 02
M8A 097526 0070 Rev. 02
Directive Machines 2006/42/CE
- INSTRUKCJA ORYGINALNA (OBSŁUGI)
- PILARKA TARCZOWA 58G488
- SZCZEGÓŁOWE PRZEPISY BEZPIECZEŃSTWA
- SZCZEGÓŁOWE BEZPIECZEŃSTWO UŻYTKOWANIA PILAREK TARCZOWYCH WRZYNAJĄCYCH BEZ KLINA ROZSZCZEPIA-JĄCEGO
- TRANSLATION OF
- THE ORIGINAL INSTRUCTIONS
- CIRCULAR SAW
- 58G488
- DETAILED SAFETY REGULATIONS
- DETAILS OF OPERATIONAL SAFETY FOR PLUNGE TYPE SAWS WITHOUT RIVING KNIFE
- Kickback causes and related warnings
- Additional safety instructions
- Precautions
- Safe work and maintenance
- CONSTRUCTION AND USE
- DESCRIPTION OF DRAWING PAGES
- MEANING OF SYMBOLS
- EQUIPMENT AND ACCESSORIES
- CUTTING DEPTH ADJUSTMENT
- INSTALLATION OF GUIDE FOR PARALLEL CUTTING
- DUST EXTRACTION
- SWITCHING ON / SWITCHING OFF
- Switching on:
- Switching off:
- CUTTING
- BEVEL CUTTING
- MAKING A CUT BY CUTTING INTO MATERIAL
- CUTTING OR CUTTING OFF LARGE PIECES OF MATERIAL
- CUTTING BLADE REPLACEMENT
- REPLACEMENT OF CARBON BRUSHES
- TECHNICAL PARAMETERS
- NOISE LEVEL AND VIBRATION PARAMETERS
- ENVIRONMENT PROTECTION
- GRAFISKÄS DALAS APRAKSTS
- POSEBNI PROPISI O SIGURNOSTI
- DETALJI SIGURNOG KORIŠTENJA KRUŽNIH UBODNIH PILA BEZ RAZVODNOG KLINA
- REPLACEMENT DES BALAIS CHARBON
- DE
- M8A 097526 0070 Rev. 02
Brand : Graphite
Model : 58G488
Category : Saw