N14DSL - Stapler HiKOKI - Free user manual and instructions
Find the device manual for free N14DSL HiKOKI in PDF.
User questions about N14DSL HiKOKI
0 question about this device. Answer the ones you know or ask your own.
Ask a new question about this device
Download the instructions for your Stapler in PDF format for free! Find your manual N14DSL - HiKOKI and take your electronic device back in hand. On this page are published all the documents necessary for the use of your device. N14DSL by HiKOKI.
USER MANUAL N14DSL HiKOKI
natural_image
Technical line drawing of a mechanical component with internal parts and mounting holes (no text or symbols)N14DSL

en Handling instructions
de Bedienungsanleitung
fr Mode d'emploi
it Istruzioni per l'uso
nl Gebruiksaanwijzing
es Instrucciones de manejo
pt Instruções de uso
sv Bruksanvisning
da Brugsanvisning
no Bruksanvisning
fi Käyttöohjeet
el Οδηγίες χειρισμού
pl Instrukcja obsługi
hu Kezelési utasítás
cs Návod k obsluze
tr Kullanım talimatları
ro Instructiuni de utilizare
① Navodila za rokovanje
sk Pokyny na manipuláciu
bg Инструкция за експлоатация
sr Uputstvo za rukovanje
hr Upute za rukovanje
1 2
text_image
Technical diagram of a printer internal structure with numbered parts for identification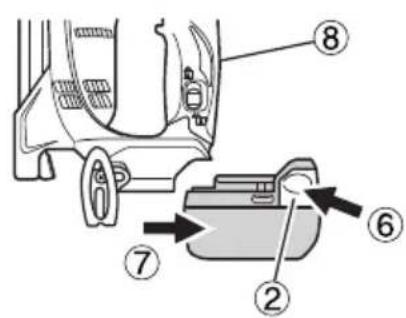
text_image
Diagram of a vehicle interior with numbered parts, likely illustrating a mechanical or automotive component assembly.3
text_image
Diagram of a device with labeled parts, showing a box and a device with internal components.
text_image
Technical diagram of a car interior with numbered components and directional arrows indicating movement or alignment.5

natural_image
Diagram of a mechanical component with labeled parts and an upward arrow indicator (no text or symbols present)6
text_image
Technical diagram of a mechanical device with numbered parts and an arrow indicating direction or force7

text_image
Diagram of a sewing machine with numbered parts labeled 1, 2, and 10 pointing to the component.8

text_image
Technical diagram of a sewing machine with numbered parts and directional arrows indicating assembly steps9

text_image
Technical diagram showing mechanical assembly with numbered components and a cross-sectional view below10

text_image
Technical diagram showing mechanical assembly with numbered components and directional arrow indicating motion11 12

text_image
Technical diagram showing a mechanical assembly with numbered parts and an arrow indicating direction or transformation.
text_image
Technical diagram of a mechanical assembly with numbered parts for identification| English Deutsch Français Italiano | ||||
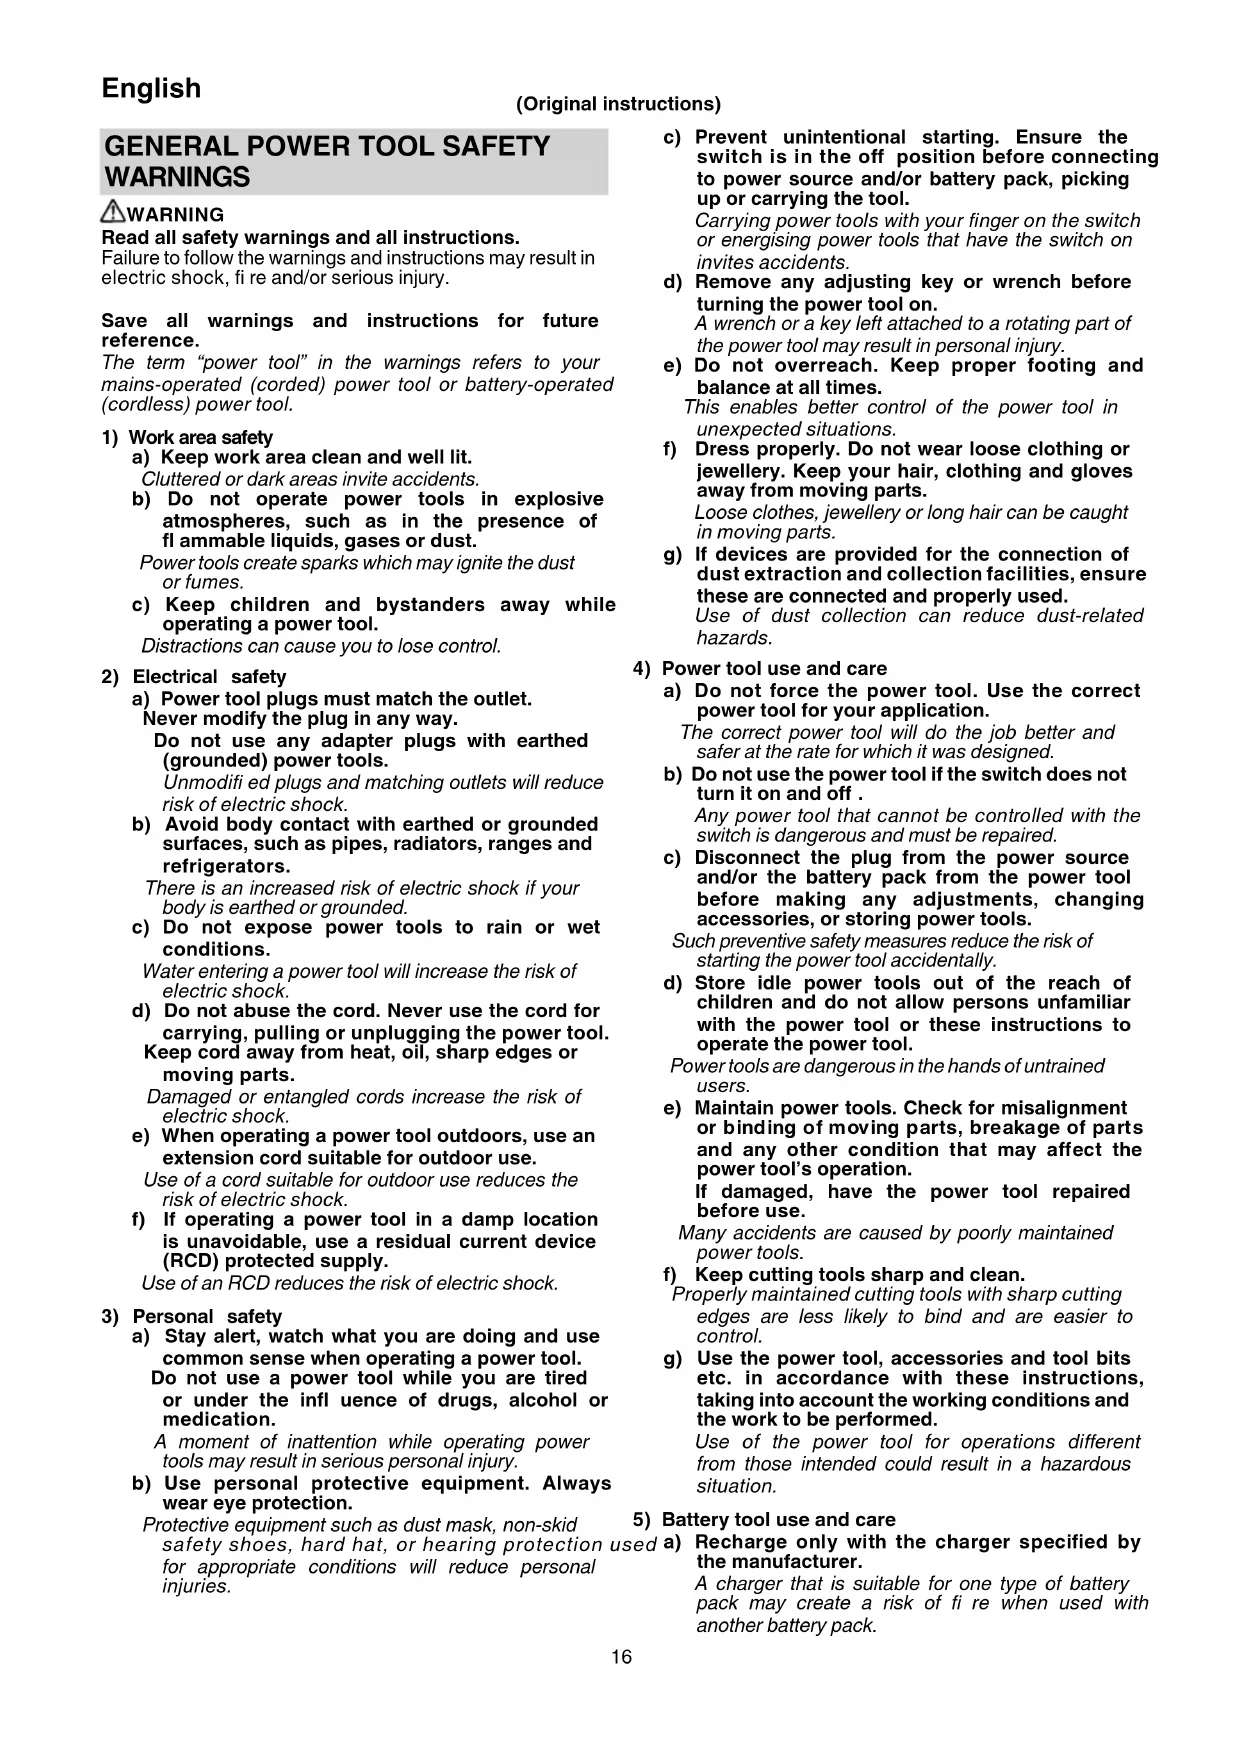
| 1 | Rechargeable battery Akkumulator Batterie rechargeable Batteria ricaricabile | |||
| 2 | Latch Schnapper Loquet Fermo | |||
| 3 | Battery cover Batterieabdeckung Couvercle de batterie Coperchio per la batteria | |||
| 4 | Terminals Anschlüsse Bornes Terminali | |||
| 5 | Ventilation holes | Belüftungslöcher | Orifices de ventilation | Fori di ventilazione |
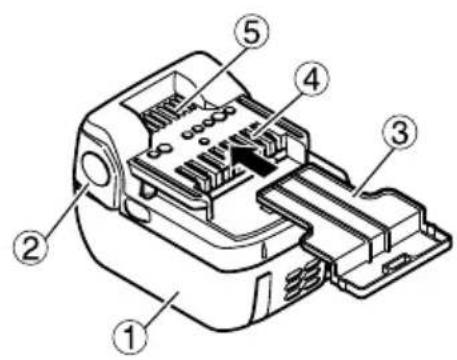
| 6 | Push | Drücken Pousser | Spingere | |
| 7 | Pull out | Herausziehen | Tirer | Estrarre |
| 8 | Handle | Griff | Poignée | Impugnatura |
| 9 | Pilot lamp Kontrolllampe | Lampe témoin | Spia | |
| 10 | Trigger Auslöser | Détente Grilletto | ||
| 11 | Lock lever | Verriegelungshebel | Levier de verrouillage | Leva di bloccaggio |
| 12 | Lock position | Verriegelungsposition | Position de verrouillage | Posizione di bloccaggio |
| 13 | Free position | Unverriegelte Position | Position libre | Posizione libera |
| 14 | Push lever | Druckhebel | Levier-poussoir | Leva di spinta |
| 15 | Staple | Krampe Agrafe | Punto | |
| 16 | Magazine Magazin Magasin Caricatore | |||
| 17 | Stop lever | Stopphebel Levier d'arrêt | Leva di arresto | |
| 18 | Adjuster | Einstellvorrichtung | Ajusteur | Regolatore |
| 19 | Sink | Absenken | Descendre Più profondo | |
| 20 | Rise | Anheben | Monter | Poco profondo |
| 21 | Proper | Korrekt | Adéquat Corretto | |
| 22 | Too sink Zu sehr abgesenkt | Trop bas | Troppo profondo | |
| 23 | Too rise | Zu sehr angehoben | Trop haut | Troppo poco profondo |
| 24 | Screwdriver | Schraubenzieher | Tournevis Cacciavite | |
| 25 | Screw | Schraube | Vis | Vite |
| 26 | Hook | Haken | Crochet Gancio | |
| 27 | Groove | Nut | Gorge | Scanalatura |
| 28 | Blade guide | Klingenführung | Guide-lame | Guida della lama |
| 29 | Slotted screwdriver | Schlitzschraubenzieher | Tournevis pour écrous à fente | Cacciavite a lama piatta |
| 30 | Micro switch Mikroschalter | Micro-interrupteur Microinterruttore | ||
| Nederlands Español | Português Svenska | |||
| 1 | Oplaadbare batterij Batería | recargable Bateria de recarregável | Uppladdningsbart batteri | |
| 2 | Vergrendeling Enganche Lingüeta | Lås | ||
| 3 | Batterijdeksel Tapa de batería | Tampa da bateria | Batteriskydd | |
| 4 | Aansluitpunten Terminales | Terminais | Poler | |
| 5 | Ventilatieopeningen | Orificios de ventilación | Orifícios de ventilação | Ventilationshål |
| 6 | Drukken Presionar Apertar | Tryck | ||
| 7 | Uittrekken Sacar | Retirar | Dra ut | |
| 8 | Handgreep | Mango | Cabo | Handtag |
| 9 | Controlelampje | Lámpara piloto Lâmpada piloto | Signallampa | |
| 10 | Trekker | Gatillo | Gatilho | Avtryckare |
| 11 | Blokkeerhendel | Palanca de bloqueo Alavanca de bloqueio | Låsarm | |
| 12 | Blokkeerstand | Posición de bloqueo | Posição de bloqueio | Låsläge |
| 13 | Vrije stand | Posición libre | Posição livre | Olåst läge |
| 14 | Veiligheidshendel | Palanca de empuje Alavanca de pressão | Tryckarm | |
| 15 | Niet | Grapa | Agrafo | Klammer |
| 16 | Magazijn | Cargador Carregador | Magasin | |
| 17 | Stophendel | Palanca de parada | Alavanca de paragem | Stopparm |
| 18 | Afsteller | Ajustador Regulador | Justerare | |
| 19 | Dieper | Hundir | Baixar | Sänk |
| 20 | Ondieper | Elevar | Elevar | Höj |
| 21 | Correct | Adecuado | Correcto | Lämplig |
| 22 | Voor dieper indrijven | Demasiado hundido | Demasiado baixo | För att sänka |
| 23 | Voor ondieper indrijven | Demasiado elevado | Demasiado alto | För att höja |
| 24 | Schroevendraaier | Atornillador | Chave de parafusos | Skruvmejsel |
| 25 | Schroef | Tornillo | Parafuso | Skruv |
| 26 | Haak | Gancho | Gancho | Krok |
| 27 | Groef | Ranura | Ranhura | Spår |
| 28 | Bladgeleider | Guía de cuchilla | Guia da lâmina | Bladstyrning |
| 29 | Sleufschroevendraaier Atornillador ranurado | Chave de fenda | Spårmejse | |
| 30 | Microschakelaar | Micro-interruptor | Micro-interruptor | Mikrobrytare |
| Dansk Norsk Suomi Ελληνικά | ||||
| 1 | Genopladeligt batteri Oppladbart batteri Ladattava paristo | Επαναφορτιζόμενη μπαταρία | ||
| 2 | Smæklås Sperrehake Salpa Ασφάλεια | |||
| 3 | Batteridæksel Batteri deksel Akun kansi Κάλυμμα μπαταρίας | |||
| 4 | Terminaler Tilkoblingspunkter Navat Ακροδέκτες | |||
| 5 | Ventilationsåbninger Ventilasjons hull Tuuletusaukot Οπές εξαερισμού | |||
| 6 | Tryk | Trykk | Paina Σπρώξτε | |
| 7 | Træk ud | Dra ut | Vedä ulos | Τραβήξτε προς τα έξω |
| 8 | Händtag | Händtak | Kahva | Λαβή |
| 9 | Kontrollampe | Pilot-lys | Markkivalo | Ενδεικτική λυχνία |
| 10 | Udløser | Avtrekker Laukaisin | Σκανδάλη ενεργοποίησης | |
| 11 | Låsearm | Låsehendel Lukitusvipu | Βίδα | |
| 12 | Låst position | Låst posisjon | Lukitusasento | Οπή |
| 13 | Fri position Åpen posisjon | Vapaa asento Εγκοπή | ||
| 14 | Udløserarm | Støtstang | Painovipu | Μοχλός ώθησης |
| 15 | Klamme | Krampe | Niitti | Διχάλα |
| 16 | Magasin | Magasin | Makasiini Γεμιστήρας | |
| 17 | Stoparm | Stopphendel | Pysäytysvipu | Μοχλός διακοπής |
| 18 | Reguleringsmekanisme | Justering | Säädin | Προσαρμογέας |
| 19 | Sænk Senk | Uppoaa Κάθοδος | ||
| 20 | Hæv | Hev | Nousee | Άνοδος |
| 21 | Tilpas | Passende | Sopiva | Κατάλληλος |
| 22 | Sænket for meget | For senket | Liian uppoava | Υπερβολική άνοδος |
| 23 | Hævet for meget | For hevet | Liian nouseva | Υπερβολική κάθοδος |
| 24 | Skruetrækker | Skrutrekker | Ruuviavain | Κατσαβίδι |
| 25 | Skrue Skrue Ruuvi | Βίδα | ||
| 26 | Krog | Krok | Koukku | Άγκιστρο |
| 27 | Rille | Spor | Ura | Εσοχή |
| 28 | Bladstyr | Knivbladbeskyttelse | Teränohjain | Οδηγός λεπίδας |
| 29 | Skruetrækker med lige kærv | Flatjern | Loviruuviavain | Άσιο κατσαβίδι |
| 30 | Mikrokontakt | Mikrobryter | Mikrokytkin | Μικροδιακόπτης |
| Polski Magyar Čeština Türkçe | ||||
| 1 | Akumulator | Újratölthető akkumulátor | Dobíjecí akumulátor | Şarj edilebilir batarya |
| 2 | Zatrzask Rekesz Aretace Mandal | |||
| 3 | Pokrywa akumulatora Akkumulátor fedél Kryt akumulátoru Batarya kapağı | |||
| 4 | Styki | Aljzatok | Kontakty | Terminaller |
| 5 | Otwory wentylacyjne | Szellőzőnyilások | Ventilační otvory | Havalandırma delikleri |
| 6 | Przycisk zatrzasku | Nyomni | Tlačit | Ítin |
| 7 | Kierunek wyciągania | Húzni | Vytáhnout | Çıkarın |
| 8 | Uchwyt | Fogantyú | Rukojeť Tutma Yeri | |
| 9 | Lampka pilotująca | Ellenőrző lámpa | Kontrolka | Kontrol lambası |
| 10 | Przełącznik spustowy | Indítógomb | Spoušť | Tetik |
| 11 | Śruba | Csavar | Šroub | Vida |
| 12 | Otwór | Lyuk | Otvor | Delik |
| 13 | Rowek | Vájat | Drážka | Kanal |
| 14 | Dźwignia dociskowa | Nyomókar | Tlačná páka | Ítme kolu |
| 15 | Zszywka | Tűzőkapocs | Sponka | Zimba çivisi |
| 16 | Magazynek | Tár | Zásobník | Kartuş |
| 17 | Dźwignia ogranicznika | Ütközőkar | Zastavovací páka | Durdurma kolu |
| 18 | Element nastawny | Beállító | Nastavovač | Ayarlayıcı |
| 19 | Zagłębienie | Leengedés | Spustit | Alçaltma |
| 20 | Podnoszenie | Felemelés | Zvednout | Yükseltme |
| 21 | Odpowiedni | Megfelelő | Správně | Uygun |
| 22 | Nadmierne zagłębienie | Túl alacsony | Příliš sníženo | Çok gömülü |
| 23 | Nadmierne podniesienie | Túl magas | Příliš zvýšeno | Çok yüksek |
| 24 | Śrubokręt | Csavarhúzó | Šroubovák | Tornavida |
| 25 | Śruba | Csavar | Šroub | Vida |
| 26 | Hak | Akasztó | Hák | Kanca |
| 27 | Rowek | Horony Drážka | Oluk | |
| 28 | Prowadnica ostrza | Pengevezető | Vedení čepele | Biçak kılavuzu |
| 29 | Śrubokręt płaski | Hornyos csavarhúzó | Plochý šroubovák | Düz tornavida |
| 30 | Mikro przełącznik | Mikrokapcsoló | Mikro spínač | Mikro şalter |
| Română | Slovenščina | Slovenčina | Български | |
| 1 | Accumulator | Akumulatorska baterija | Nabíjateľná batéria | Акумулаторна батерия |
| 2 | Clapetă de închidere Zatič | Západka Фиксатор | ||
| 3 | Capac accumulator | Pokrov baterije | Kryt batérie | Капак на батерията |
| 4 | Borne Priključki Svorky Клеми | |||
| 5 | Orificii de ventilație | Prezračevalne odprtine | Vetracie otvory | Вентилационни отвори |
| 6 | Apăsare | Potisnite | Potlačte | Натискане |
| 7 | Scoatere | Izvlecite | Vytiahnite | Изваждане |
| 8 | Mâner | Ročaj | Rukovăť | Дръжка |
| 9 | Lampă pilot | Kontrolna lučka | Kontrolka | Пилотна лампа |
| 10 | Trăgaci | Sprožilo | Spúšť | Спусък |
| 11 | Şurub Vijak | Skrutka | Винт | |
| 12 | Orificiu | Odprtina | Otvor | Отвор |
| 13 | Şanț | Utor | Drážka | Канал |
| 14 | Manetă împingere | Potisna ročica | Prítlačný prvok | Бутало |
| 15 | Capsă | Sponka | Zošivacie spony | Скоба |
| 16 | Magazie | Magazin | Zásobník | Касета |
| 17 | Manetă oprire | Ustavna ročica | Blokovací prvok | Лост за спиране |
| 18 | Reglor | Regulator | Nastavovací prvok | Регулатор |
| 19 | Coborâre | Spustite | Väčšia híbka | Потапяне |
| 20 | Ridicare | Dvignite | Menšia híbka | Покачване |
| 21 | Adecvat | Ustrezno | Správna híbka | Правилен |
| 22 | Prea coborât | Preveč spuščeno | Príliš veľká híbka | Твърде голямо потапяне |
| 23 | Prea ridicat | Preveč dvignjeno | Príliš malá híbka | Твърде голямо покачване |
| 24 | Şurubelniță | Izvijač | Skrutkovač | Отвертка |
| 25 | Şurub Vijak | Skrutka | Винт | |
| 26 | Cârlig | Kavelj | Háčik | Кука |
| 27 | Canelură | Utor | Drážka | Жлеб |
| 28 | Ghidaj lamă | Vodilo rezila | Vodiaci prvok čepele | Водач за острие |
| 29 | Şurubelniță cu cap plat | Ploščati izvijač | Plochý skrutkovač | Шлицова отвертка |
| 30 | Micro-comutator | Mikrostikalo | Mikrospínač | Микро превключвател |
| Srpski Hrvatski | ||
| 1 | Punjiva baterija Punjiva baterija | |
| 2 | Reza Brava | |
| 3 | Poklopac baterije Poklopac | baterije |
| 4 | Krajevi baterije Terminali | |
| 5 | Rupe za ventilaciju Ventilacijske rupe | |
| 6 | Gurni Gurni | |
| 7 | Izvuci Izvuci | |
| 8 | Ručka Ručka | |
| 9 | Pilot lampa Pilot lampa | |
| 10 | Okidač Okidač | |
| 11 | Šraf Vijak | |
| 12 | Rupa Rupa | |
| 13 | Žleb Utor | |
| 14 | Potisna poluga Potisna poluga | |
| 15 | Spajalica Spajalica | |
| 16 | Spremnik Spremnik | |
| 17 | Poluga za zaustavljanje | Poluga za zaustavljanje |
| 18 | Podešavač | Regulator |
| 19 | Duboko | Potopiti |
| 20 | Visoko | Podignuti |
| 21 | Ispravno | Ispravan |
| 22 | Preduboko | Previše duboko |
| 23 | Previsoko | Previše podignuto |
| 24 | Odvijač | Odvijač |
| 25 | Šraf Vijak | |
| 26 | Kuka | Kuka |
| 27 | Žleb Žlijeb | |
| 28 | Vodič oštrice | Vodilica oštrice |
| 29 | Pljosnati odvijač | Ravni odvijač |
| 30 | Mikro prekidač | Mikro prekidač |
| Symbols⚠ WARNINGThe following show symbols used for the machine. Be sure that you understand their meaning before use. | Symbole⚠ WARNUNGDie folgenden Symbole werden für diese Maschine verwendet.Achten Sie darauf, diese vor der Verwendung zu verstehen. | Symboles⚠ AVERTISSEMENTLes symboles suivants sont utilisés pour l’outil.Bien se familiariser avec leur signifi cation avant d’utiliser l’outil. | Simboli⚠ AVVERTENZADi seguito mostriamo i simboli usati per la macchina. Assicurarsi di comprenderne il signifi cato prima dell’uso. | |
 | To reduce the risk of injury, user must read instruction manual.Failure to follow the warnings and instructions may result in electric shock, fi re and/or serious injury. | Der Anwender muss die Bedienungsanleitung lesen, um das Risiko einer Verletzung zu verringern.Wenn die Warnungen und Anweisungen nicht befolgt werden, kann es zu Stromschlag, Brand und/oder ernsthaften Verletzungen kommen. | Pour réduire les risques de blessures, l’utilisateur doit lire le manuel d’utilisation.Tout manquement à observer ces avertissements et instructions peut engendrer des chocs électriques, des incendies et/ou des blessures graves. | Per ridurre il rischio di lesioni, l’utente deve leggere il manuale delle istruzioni.La mancata osservanza degli avvertimenti e delle istruzioni potrebbe essere causa di scosse elettriche, incendi e/o gravi lesioni. |
 | Operators and others in work area must wear safety glasses with side shields. | Bediener und andere Personen im Arbeitsbereich müssen Schutzbrillen mit Seitenschildern tragen. | Les opérateurs et autres personnes se trouvant dans la zone de travail doivent porter des lunettes de sécurité équipées de protections latérales. | Gli operatori e le altre persone che si trovano nell’area di lavoro devono indossare occhiali di protezione con protezioni laterali. |
 | Only for EU countries Do not dispose of electric tools together with household waste material!In observance of European Directive 2012/19/EU on waste electrical and electronic equipment and its implementation in accordance with national law, electric tools that have reached the end of their life must be collected separately and returned to an environmentally compatible recycling facility.Symbolen⚠ WAARSCHUWINGHieronder staansymbolen afgebeeld dievan toepassing zijn opdeze machine. U moetde betekenis hiervanbegrijpen voor gebruik. | Nur für EU-Länder Werfen Sie Elektrowerkzeuge nicht in den Hausmüll!Gemäss Europäischer Richtlinie 2012/19/EU über Elektro- und Elektronik- Altgeräte und Umsetzung in nationales Recht müssen verbrauchte Elektrowerkzeuge getrennt gesammelt und einer umweltgerechten Wiederververtung zugeführt werden.Símbolos⚠ ADVERTENCIAA continuación semuestran los símbolosusados para lamáquina. Asegúresede comprender susignifi cado antes deluso. | Pour les pays européens uniquementNe pas jeter les appareils électriques dans les ordures ménagères!Conformément à la directive européenne 2012/19/UE relative aux déchets d’équipements électriques ou électroniques (DEEE), et à sa transposition dans la législation nationale, les appareils électriques doivent être collectés à part et être soumis à un recyclage respectueux de l’environnement.Símbolos⚠ AVISOA seguir aparecem ossímbolos utilizados pela máquina. Assimile bemseus signifi cados antesdo uso. | Solo per Paesi UE Non gettare le apparecchiature elettriche tra i rifi uti domestici.Secondo la Direttiva Europea 2012/19/UE sui rifi uti di apparecchiature elettriche ed elettroniche e la sua attuazione in conformità alle norme nazionali, le apparecchiature elettriche esauste devono essere raccolte separatamente, al fi ne di essere reimpiegate in modo eco-compatibile.Symboler⚠ VARNINGNedan visas desymboler som användsför maskinen. Se tillatt du förstår vad debetyder innan verktygetanvänds. |
 | Om het risico opverwondingen teverminderen, moetde gebruiker deinstructiehandleidinglezen.Nalating om dewaarschuwingen instructies op te volgenkan in een elektrische schok, brand en/oftenstig letsel resulteren. | Para reducir el riesgode lesiones, el usuariodeberá leer el manualde instrucciones.Si no se siguenlas advertencias einstrucciones, podríaproducirse una descargaeléctrica, un incendio y/odaños graves. | Para reduzir o riscode lesão, o utilizadordeve ler o manual deinstruções.Se não seguir todasas instruções e osavisos, pode provocarum choque eléctrico,incêndio e/ou ferimentosgraves. | Användaren måsteläsa bruksanvisningenför att minska riskenför personskador.Underlåtenhet attfölja varningarna ochinstruktionerna nedankan resultera i elstötar,brand och/eller allvarligaskador. |
 | De bediener vanhet gereedschap enanderen in de buurt vande werkplek moeteneen veiligheidsbril metzijbescherming dragen. | Tanto los operadorescomo las demáspersonas que esténen la zona de trabajodeberán utilizar gafasde seguridad conprotecciones laterales. | Os operadores e asoutras pessoas na áreade trabalho têm de usaróculos de segurançacom protecções laterais. | Operatörer och andrainom arbetsområdetmåste bära glasögonmed sidoskydd. |
 | Alleen voor EU-landenGeef elektrischgereedschap niet mthet huisvuil mee!Volgens de Europeserichtlijn 2012/19/EUinzake oude elektrischeen elektronischeapparaten en detoepassing daarvanbinnen de nationalewetgeving, dientgebruikt elektrischgereedschapgescheiden te wordeningezameld en teworden afgevoerd naareen recycle bedrijf datvoldoet aan de geldendemilieu-eisen.Symboler⚠ ADVARSELDet følgende visersymboler, somanvendes for maskinen.Vær sikker på, at duforstår deres betydning,inden du begynder atbruge maskinen. | Sólo para países de laUnión Europea¡No deseche losaparatos eléctricosjunto con los residuosdomésticos!De conformidad conla Directiva Europea2012/19/EU soberesiduos de aparatoseléctricos y electrónicosy su aplicación deacuerdo con lalegislación nacional, lasherramientas eléctricascuya vida útil haya llegado a su fi n sedeberán recoger porseparado y trasladar auna planta de reciclajeque cumpla con lasexigencias ecológicas.Symboler⚠ ADVARSELFølgende symbolerbrukes for maskinen.Sørg for å forståbetydningen av dissesymbolene før maskinentas i bruk. | Apenas para paísesda UENão deite ferramentaseléctricas no lixodoméstico!De acordo com adirectiva europeia2012/19/UE sobereferramentas eléctricase electrónicas usadase a transposição paraas leis nacionais, asferramentas eléctricasusadas devem serrecolhidas em separadoe encaminhadas a umainstalação de reciclagendos materiais ecológica.Symbolit⚠ VARIOITUSSeuraavassa on näytettykoneessa käytetytsymbolit. Varmista,että ymmärrät niidenmerkityksen ennen kuinaloitat koneen käytön. | Gäller endast EU-länderElektriska verktygfår inte kastas ihushållssoporna!Enligt direktivet2012/19/EU som avseräldre elektrisk ochelektronisk utrustningoch dess tillämpningenligt nationelllagstiftning ska uttjäntaelektriska verktygsorteras separat ochlämnas till miljövänligåtervinning.Συμβολα⚠ ΠΡΟΕΙΔΟΠΟΙΗΣΗΤα παρακάτω δείχνουντα σύμβολα πουχρησιμοποιούνται στομηχάνημα. Βεβαιωθείτεότι κατανοείτε τησημασία τους πριν τηχρήση. |
 | Brugeren skal læsebetjeningsvejledningenfor at mindske risikoenfor skader.Det kan medføre elektriskstød, brand og/elleralvorlig personskade,hvis alle advarslerne oginstruktionerne nedenforikke overholdes. | For å minske faren forskade må brukeren leseinstruksjonsboken.Hvis du ikke følgeralle advarsler oginstruksjoner kan brukav utstyret resulterei elektrisk støt, brannog/eller alvorligpersonskade. | Loukkaantumisriskinvähentämiseksikäyttäjän on luettavakäyttöopas.Jos varoituksia jaohjeita ei noudateta, onolemassa sähköiskun,tulipalon ja/tai vakavanhenkilövahingon vaara. | Για τον περιορισμότου κινδύνουτραυματισμού, οχρήστης πρέπεινα διαβασει τοεγχειρίδιο οδηγιώνχρήσης.Η μη τήρηση τωνπροειδοποιήσεωνκαι οδηγιών μπορείνα προκαλέσειηλεκτροπληξία,πυρκαγιά και/ή σοβαρότραυματισμό. |
 | Operatører og andrei arbejdsområdet skalbære beskyttelsesbrillermed sideafskærmninger. | Brukere og andre iarbeidsområdet måbruke beskyttelsesbrillermed sidebeskyttelse. | Laitteen käyttäjienja muidentyöskentelyalueellaolevien tulee käyttääsuojalaseja, joissa onsivusuojukset. | Οι χειριστές και άλλαάτομα στον χώροεργασίας θα πρέπεινα φορούν γυαλιάασφαλείας με πλαϊνάπροστατευτικά. |
 | Kun for EU-landeElværktøj må ikkebortskaff es somalmindeligt aff ald!I henhold til deteuropæiske direktiv2012/19/EU ombortskaff else afelektriske ogelektroniske produkterog gældende nationallovgivning skal brugtelværktøj indsamlesseparat og bortskaff espå en måde, der skånermiljøet mest muligt.Symbole⚠ OSTRZEŻENIENastępujące oznaczeniasą symbolamiużywanymi w instrukcjielektronarzędzia.Przed rozpoczęciemużytkowania należy sięupewnić, że ich znaczniejest zrozumiałe. | Kun for EU-landKast aldri elektroverktøyi husholdningsavfallet!I henhold til EU-direktiv 2012/19/EUom kasserte elektriskeog elektroniskeprodukter og direktivetsiverksetting i nasjonalrett, må elektroverktøysom ikke lengerskal brukes, samlesseparat og returnerestil et miljøvennliggjenvinningsanlegg.Szimbólumok⚠ FIGYELMEZTETÉSAz alábbiakban agéphez alkalmazottjelöléseket soroltuk fel.A gép használata előttfeltétlenül ismerkedjenmeg ezekkel ajelölésekkel. | Älä hävitäsähkötyökalua tavallisenkotitalousjätteenmukana!Vanhoja sähkö- jaelektroniikkalaitteitakoskevan EU-direktiivin2012/19/EU ja senmaakohtaistensovellusten mukaisestikäytetyt sähkötyökaluton toimitettavaongelmajätteenkeräyspisteeseenja ohjattavaympäristöystävälliseenkierrätykseen.Symboly⚠ VAROVÁNÍNásledující textobsahuje symboly, kteréjsou použity na zařízení.Než začnete nářadípoužívat, ujistěte se, zerozumíte jejich významu. | Μόνο για τις χώρεςτης ΕΕΜην πετάτε ταηλεκτρικά εργαλείαστον κάδο οικιακώναπορριμμάτων!Σύμφωνα με τηνευρωπαϊκή οδηγία2012/19/ΕΕ περίηλεκτρικών καιηλεκτρονικώνσυσκευών και τηνενσωμάτωσή τηςστο εθνικό δικαιο, ταηλεκτρικά εργαλείαπρέπει να συλλέγονταιξεχωριστά και ναεπιστρέφονται γιαανακύκλωση μετρόπο φιλικό προς τοπεριβάλλον.Semboller⚠ UYARIAşağıda, bu makineicin kullanılan simgelergösterilmiştir. Makineyikullanmadan önce busimgelerin ne anlamageldiğini bildiğinizdenemin olun. |
 | Aby zmniejszyć ryzykoodniesienia obrażeń,użytkownik powinienprzeczytać instrukcjęobstugi.Nieprzestrzeganieostrzeżeń orazwskazówekbezpieczeństwa możespowodować porażenieprądem elektrycznym,pożar i/lub odniesieniepoważnych obrażeń. | A sérülésekkockázatánakcsökkentéseérdekében, ahasználónak el kellolvasnia a használatiútmutatót.A fi gyelmeztetésekés utasítások be nemtartása áramůtést, tüzetés/vagy súlyos sérülésteredményezhet. | Aby se snížilo rizikozranění, uživatel simusí přecíst návod kobsluze.Nedodržení těchtovarování a pokynůmůže mít za následekelektrický šok, požár a/nebo vážné zranění. | Kullanıcı yaralanmariskini azaltmak içinkullanım kılavuzunuokumalıdır.Uyarılara ve talimatlarauyulmaması elektrikçarpmasina, yangına ve/veya ciddi yaralanmayaneden olabilir. |
 | Operatorzy i inneosoby znajdujące się wobszarze pracy musząnosić okulary ochronnez osłonami bocznymi. | A kezelőknek és más,a munkaterületentartózkodószemélyeknekoldalvédelemmel ellátottvédőszemüveget kellviselniük. | Pracovníci a ostatníosoby na pracovišti musínosit bezpečnostní brýlese štíty sahajícími dostran. | Operatörler ve çalışmaalanındaki diğer kişiler,yan korumalı güvenlikgözlükleri giymelidir. |
 | Dotyczy tylko państw UENie wyrzucajelektronarzędziwraz z odpadamiz gospodarstwadomowego!Zgodnie z EuropejskąDyrektywą2012/19/UE w sprawiezużytego sprzętuelektrotechnicznego ielektronicznego orazdostosowaniem jejdo prawa krajowego,zużyte elektronarzędzianależy posegregowaći zutylizować wsposób przyjazny dlaśrodowiska.Simboluri⚠ AVERTISMENTIn cele ce urmează sunt prezentate simbolurile folosite pentru mașină.Înainte de utilizare,asigurați-vă că înțelegeti semnificația acestora. | Csak EU-országokszámáraAz elektromoskéziszerszámokatne dobja a háztartásiszemétbe!A használt villamosés elektronikaikészülékekről szóló2012/19/EU irányelv éssannak a nemzeti jogbavaló átültetése szerint azelhasznált elektromoskéziszerszámokatkülön kell gyűjteni, éskörnyezetbarát módonújra kell hasznosítani.Symboli⚠ OPOZORILOV nadaljevanju so prikazani simboli,uporabljeni pri stroju.Pred uporabo se prepričajte, da jih razumete. | Jen pro státy EUElektrické nářadínevyhazujte dokomunálního odpadu!Podle evropskésměrnice 2012/19/EUo nakládání spoužitými elektrickýmiazařízeními aodpovídajícíchustanovení právníchpředpisů jednotlivýchzemí se použitáelektrická nářadí musísbirat odděleně odostatního odpadu apodrobit ekologickyšetrnému recyklování.Symboly⚠ VYSTRAHANižšie sú zobrazené symboly, ktoré sa v prípade strojného zariadenia používajú.Pred použitím náradia sa oboznámte s významom týchto symbolov. | Sadece AB ülkeleri içinelektrikli el aletlerinievdeki çöp kutusunaatmayınız!Kullanılmış elektriklialetleri, elektrik veelektronikli eski cihazlarhakkındaki 2012/19/ABAvrupa yönergelerinegöre ve bu yönergelerulusal hukuk kurallarınagöre uyarlanarak, ayrıolarak toplanmalı veçevre şartlarına uygunbir şekilde tekrardeğerlendirmeyegönderilmelidir.Символи⚠ PŘEДУПРЕЖДЕНИЕИзползвани са следните символи за машината. Уверете се, че разбирате значението им, преди употреба. |
 | Pentru a reduce riscul de accidente, utilizatorul trebuie să citească manualul de utilizare.Nerespectarea avertismentelor și a instructiunilor poate avea ca efect producerea de șocuri electrice, incendii și/sau vătămări grave. | Da ne bi prišlo do poškodb, mora uporabnik prebrati navodila.Z neupoštevanjem opozoril in navodil tvegate električni udar, požar in/ali resne telesne poškodbe. | Aby sa znížilo riziko zranenia, musí si užívatel’ prečitať návod na obsluhu.Nedodržanie výstrah a pokynov môže viest’ k zasiahnutiu elektrickým prúdom, požiaru a/alebo vážnemu poraneniu osoby. | За да намали риска от наранявания, потребителят трябва да прочете ръководството за работа.Неспазването на инструкциите и предупрежденията може да доведе до електрически удар, пожар и/или сериозни наранявания. |
 | Operatorii și alte persoane din zona de lucru trebuie să poarte ochelari de protecție cu scuturi laterale. | Upravljavci in druge osebe v delovnem območju morajo nositi zaščitna očala s stranskimi ščitniki. | Operátori a ostatné osoby na pracovisku musia používať ochranné okuliare s bočnými štítmí. | Операторите и другите лица в работната зона трябва да носят предпазни очила със странични протектори. |
 | Numai pentru țările membre UENu aruncați această sculă electrică împreună cu deșeurile menajere!În conformitate cu Directiva Europeană 2012/19/UEReferitoare la deșeurile reprezentând echipamente electrice și electronice și la implementarea acesteia în conformitate cu legislațiile naționale, sculele electrice care au ajuns la fi nalul duratei de folosire trebuie colectate separat și duse la o unitate de reciclare compatibilă cu mediul înconjurător. | Samo za države EU Električnih orodij ne zavržite skupaj z gospodinjskimi odpadki!V skladu z evropsko direktivo 2012/19/EU o odpadni električni in elektronski opremi in izvedbi v skladu z državnimi zakoni, je treba električna orodja, ki so dosegla življenjsko dobo ločeno zbirati in vrniti v z okoljem združljivo ustanovo za recikliranje. | Ibą pre krajiny EU Elektrické náradie nezneškodňujte spolu s komunálnym odpadom z domácností!Aby ste dodržali ustanovenia európskej smernice 2012/19/EU o odpadových elektrických a elektronických zariadeniach a jej implementáciu v zmysle národnej legislatívy, je potrebné elektrické zariadenie po uplynutí jeho doby životnosti separovať a doručiť na environmentálne prijatel’né miesto recyklovania. | Само за страни от ЕС Не изхвърляйте електрически инструменти заедно с битовите отпадьци!Във връзка с разпоредбите на Европейска директива 2012/19/ЕС за електрическите и електронни уреди и нейното приложение съгласно националните законодателства, електрически уреди, които излизат от употреба, трябва да се събират отделно и предават в специализирани пунктове за рециклиране. |
| Oznake⚠ UPOZORENJEOvde su prikazane oznake koje se koriste na mašini. Postarajte se da razumete njihovo značenje pre upotrebe. | Simboli⚠ UPOZORENJEZa uređaj se koriste sljedeći simboli. Uvjerite se da prije uporabe razumijete njihovo značenje. | |
 | Da bi se smanjio rizik od povreda, korisnik mora da pročita korisničko uputstvo.Propust da se slede upozorenja i uputstva može da izazove strujni udar, požar i/ili teške povrede. | Kako bi smanjio opasnost od ozljede, korisnik mora pročitati priručnik za uporabu.Nepoštivanje upozorenja i uputa može uzrokovati strujni udar, požar i/ili teške ozljede. |
 | Operateri i drugi u području rada moraju da nose bezbednosne naočari sa bočnim štitovima. | Operatori i ostali u radnom području moraju nositi sigurnosne naočale s bočnim štitovima. |
 | Samo za zemlje EU Nemojte odlagati električni alat zajedno sa smećem iz domaćinstva!Na osnovu Evropske direktive 2012/19/EU o dotrajaloj električnoj i elektronskoj opremi, kao i njene primene u skladu s državnim propisima, električni alat koji je došao do kraja svog radnog veka mora se prikupiti zasebno i odneti u postrojenje za reciklažu koje ispunjava ekološke zahteve. | Samo za zemlje EU Električni alat ne bacajte zajedno s ostalim kućnim otpadom!Sukladno europskim direktivama 2012/19/EU o otpadnoj električnoj i elektroničkoj opremi, te provedbi u skladu s nacionalnim zakonima i propisima, električni alat i baterije koji su dostigli kraj korisnog radnog vijeka potrebno je prikupljati odvojeno i predati u ustanove za recikliranje. |
GENERAL POWER TOOL SAFETY WARNINGS
WARNING
Read all safety warnings and all instructions.
Failure to follow the warnings and instructions may result in electric shock, fi re and/or serious injury.
Save all warnings and instructions for future reference.
The term “power tool” in the warnings refers to your mains-operated (corded) power tool or battery-operated (cordless) power tool.
1) Work area safety
a) Keep work area clean and well lit.
Cluttered or dark areas invite accidents.
b) Do not operate power tools in explosive atmospheres, such as in the presence of fl ammable liquids, gases or dust.
Power tools create sparks which may ignite the dust or fumes.
c) Keep children and bystanders away while operating a power tool.
Distractions can cause you to lose control.
2) Electrical safety
a) Power tool plugs must match the outlet.
Never modify the plug in any way.
Do not use any adapter plugs with earthed (grounded) power tools.
Unmodifi ed plugs and matching outlets will reduce risk of electric shock.
b) Avoid body contact with earthed or grounded surfaces, such as pipes, radiators, ranges and refrigerators.
There is an increased risk of electric shock if your body is earthed or grounded.
c) Do not expose power tools to rain or wet conditions.
Water entering a power tool will increase the risk of electric shock.
d) Do not abuse the cord. Never use the cord for carrying, pulling or unplugging the power tool.
Keep cord away from heat, oil, sharp edges or moving parts.
Damaged or entangled cords increase the risk of electric shock.
e) When operating a power tool outdoors, use an extension cord suitable for outdoor use.
Use of a cord suitable for outdoor use reduces the risk of electric shock.
f) If operating a power tool in a damp location is unavoidable, use a residual current device (RCD) protected supply.
Use of an RCD reduces the risk of electric shock.
3) Personal safety
a) Stay alert, watch what you are doing and use common sense when operating a power tool.
Do not use a power tool while you are tired or under the influence of drugs, alcohol or medication.
A moment of inattention while operating power tools may result in serious personal injury.
b) Use personal protective equipment. Always wear eye protection.
Protective equipment such as dust mask, non-skid safety shoes, hard hat, or hearing protection for appropriate conditions will reduce personal injuries.
c) Prevent unintentional starting. Ensure the switch is in the off position before connecting to power source and/or battery pack, picking up or carrying the tool.
Carrying power tools with your finger on the switch or energising power tools that have the switch on invites accidents.
d) Remove any adjusting key or wrench before turning the power tool on.
A wrench or a key left attached to a rotating part of the power tool may result in personal injury.
e) Do not overreach. Keep proper footing and balance at all times.
This enables better control of the power tool in unexpected situations.
f) Dress properly. Do not wear loose clothing or jewellery. Keep your hair, clothing and gloves away from moving parts.
Loose clothes, jewellery or long hair can be caught in moving parts.
g) If devices are provided for the connection of dust extraction and collection facilities, ensure these are connected and properly used.
Use of dust collection can reduce dust-related hazards.
4) Power tool use and care
a) Do not force the power tool. Use the correct power tool for your application.
The correct power tool will do the job better and safer at the rate for which it was designed.
b) Do not use the power tool if the switch does not turn it on and off.
Any power tool that cannot be controlled with the switch is dangerous and must be repaired.
c) Disconnect the plug from the power source and/or the battery pack from the power tool before making any adjustments, changing accessories, or storing power tools.
Such preventive safety measures reduce the risk of starting the power tool accidentally.
d) Store idle power tools out of the reach of children and do not allow persons unfamiliar with the power tool or these instructions to operate the power tool.
Power tools are dangerous in the hands of untrained users.
e) Maintain power tools. Check for misalignment or binding of moving parts, breakage of parts and any other condition that may affect the power tool's operation.
If damaged, have the power tool repaired before use.
Many accidents are caused by poorly maintained power tools.
f) Keep cutting tools sharp and clean.
Properly maintained cutting tools with sharp cutting edges are less likely to bind and are easier to control.
g) Use the power tool, accessories and tool bits etc. in accordance with these instructions, taking into account the working conditions and the work to be performed.
Use of the power tool for operations different from those intended could result in a hazardous situation.
5) Battery tool use and care
ed a) Recharge only with the charger specified by the manufacturer.
A charger that is suitable for one type of battery pack may create a risk of fire when used with another battery pack.
b) Use power tools only with specifically designated battery packs.
Use of any other battery packs may create a risk of injury and fire.
c) When battery pack is not in use, keep it a from other metal objects like paper clips, coins, keys, nails, screws, or other small metal objects that can make a connection from one terminal to another.
Shorting the battery terminals together may cause burns or a fire.
d) Under abusive conditions, liquid may be ejected from the battery; avoid contact. If contact accidentally occurs, flush with water. If liquid contacts eyes, additionally seek medical help.
Liquid ejected from the battery may cause irritation or burns.
6) Service
a) Have your power tool serviced by a qualified repair person using only identical replacement parts.
This will ensure that the safety of the power tool is maintained.
PRECAUTION
Keep children and infi rm persons away.
When not in use, tools should be stored out of reach of children and infi rm persons.
CORDLESS STAPLER SAFETY WARNINGS
- Always assume that the tool contains fasteners.
Careless handling of the stapler can result in unexpected fi ring of fasteners and personal injury.
- Do not point the tool towards yourself or anyone nearby.
Unexpected triggering will discharge the fastener causing an injury.
- Do not actuate the tool unless the tool is placed firmly against the workpiece.
If the tool is not contact with the workpiece, the fastener may be deflected away from your target.
- Disconnect the tool from the power source when the fastener jams in the tool.
While removing a jammed fastener, the stapler may be accidentally activated if it is plugged in.
- Use caution while removing a jammed fastener.
The mechanism may be under compression and the fastener may be forcefully discharged while attempting to free a jammed condition.
- Do not use this stapler for fastening electrical cables.
It is not designed for electric cable installation and may damage the insulation of electric cables thereby causing electric shock or fire hazards.
PRECAUTIONS ON USING CORDLESS STAPLER
- Safe operation through correct usage.
This tool was designed for driving staples into wood and similar materials. Use it for its intended purpose only.
- Be careful of ignition and explosions.
Since sparks may fly during stapling, it is dangerous to use this tool near lacquer, paint, benzine, thinner, gasoline, gas, adhesives and similar infl ammable substances as they may ignite or explode. Under no circumstances should this tool therefore be used in the vicinity of such infl ammable material.
- Always wear eye protection (protective goggles).
When operating the power tool, always wear eye protection, and ensure that surrounding people wear eye protection too.
The possibility of fragments of staples or staples that were not properly hit entering the eye is a threat to sight. Eye protection can be bought at any hardware store. Always wear eye protection while operating this tool. Use either eye protection or a wide vision mask over prescription glasses.
Employers should always enforce the use of eye protection equipment.
- Protect your ears and head.
When engaged in stapling work please wear ear mufflers and head protection. Also, depending on condition, ensure that surrounding people also wear ear mufflers and head protection.
- Pay attention to those working close to you.
It would be very dangerous if staples that were not properly driven in should hit other people. Therefore, always pay attention to the safety of the people around you when using this tool. Always make sure that nobody's body, hands or feet are close to the staple outlet.
- Never point the staple outlet towards people.
Always assume the tool contains fasteners. If the staple outlet is pointed towards people, serious accidents may be caused if you mistakenly discharge the tool. When connecting and check disconnecting the battery, during staple loading or similar operations, be sure the staple outlet is not pointed towards anyone (including yourself). Even when no staples are loaded at all, it is dangerous to discharge the tool while pointing it at someone, so never attempt to do so. No horseplay. Respect the tool as a working implement.
- Before using the power tool, check the push lever.
Before using the power tool, make sure to check that the push lever operate properly. Without staples loaded into the power tool, connect the battery and check the following. If the sound of operations occurs this indicates a fault, so in such a case do not use the power tool until it has been inspected and repaired.
○ If merely pulling the trigger causes operating sound of drive bit movement occur, the power tool is faulty.
☐ If merely pushing the push lever against the material to be stapled causes the sound of drive bit movement to occur, the power tool is faulty. Furthermore, with regard to the push lever, please note that it must never be modified or removed.
- Use specified staples only.
Never use staples other than those specified and described in these instructions.
- Do not carelessly place your finger on the trigger.
Do not place your finger on the trigger except when actually stapling. If you carry this tool or hand it to someone while having your finger on the trigger, you may inadvertently discharge a staple and thus cause an accident.
- Completely Close the blade guide and do not open it during operation.
If stapling is attempted when the blade guide is open, staples will not be driven into the timber, and there is a risk of dangerous discharge.
- Press the staple outlet firmly against the material to be stapled.
When driving in staples, press the staple outlet firmly against the material to be stapled. If the outlet is not applied properly, the staples may rebound.
- Keep hands and feet away from the firing head when using.
It is very dangerous for a staple to hit the hands or feet by mistake.
English
13. Beware of the tool's kickback.
Do not approach the top of the tool with your head etc. during operation. This is dangerous because the tool may recoil violently if the staple currently being driven in comes into contact with a previous staple or a knot in the wood.
14. Take care when stapling thin boards or the corners of wood.
When stapling thin boards, the staples may pass right through, as may also be the case when s corners of wood due to deviation of the staples. In such cases, always make sure that there is no one (and nobody's hands or feet; etc.) behind the thin board or next to the wood you are going to staple.
15. Simultaneous staping on both sides of the same wall is dangerous.
Under no circumstances should stapling be performed on both sides of a wall at the same time. This would be very dangerous since the staples might pass through the wall and thus cause injuries.
16. Do not use the power tool on scaff oldings, ladders.
The power tool shall not be used for specific application for example:
- when changing one driving location to another involves the use of scaff orldings, stairs, ladders or ladder alike constructions, e.g. roof laths,
- closing boxes or crates,
- fi tting transportation safety systems e.g. on vehicles and wagons
17. Do not disconnect the battery with your finger on the trigger.
If you disconnect the battery with your finger on the trigger, the next time the battery is connected, there is a danger that the power tool will fire a staple spontaneously, or operate incorrectly.
18. Disconnect the battery and take out any staples left in the magazine after use.
Disconnect tool from battery before doing tool maintenance, cleaning a jammed fastener, leaving work area, moving tool to another location, or after use. It is very dangerous for a staple to be fired by mistake.
19. When removing a staple which has become stuck, make sure to first of all disconnect the battery.
When removing a staple which has become stuck in the staple outlet, first of all make sure to disconnect the battery.
Accidental firing of the staple could be very dangerous.
20. To avoid hazards caused by falling staples, never open the magazine with the device facing downward while loading staples.
21. When cleaning the power tool, do not use gasoline or other infl ammable liquids.
If vapour from an inflammable liquid gets into the power tool, there is a danger that sparks produced when stapling etc. may cause an explosion.
22. Always charge the battery at a temperature of 0 - 40°C.
A temperature of less than 0^ C will result in over charging which is dangerous. The battery cannot be charged at a temperature greater than 40^ C.
The most suitable temperature for charging is that of 20 - 25^ .
23. Do not use the charger continuously.
When one charging is completed, leave the charger for about 15 minutes before the next charging of battery.
-
Do not allow foreign matter to enter the hole for connecting the rechargeable battery.
-
Never disassemble the rechargeable battery and charger.
-
Never short-circuit the rechargeable battery. Short-circuiting the battery will cause a great electric current and overheat. It results in burn or damage to the battery.
-
Do not dispose of the battery in fire. If the battery burnt, it may explode.
- Do not insert object into the air ventilation slots of the charger. Inserting metal objects or inflammables into the charger air ventilation slots will result in electrical shock hazard or damaged charger.
- Bring the battery to the shop from which it was purchased as soon as the post-charging battery life being done too short for practical use. Do not dispose of the exhausted battery.
- Using an exhausted battery will damage the charger.
CAUTION ON LITHIUM-ION BATTERY
To extend the lifetime, the lithium-ion battery equips with the protection function to stop the output.
In the cases of 1 to 3 described below, when using this product, even if you are pulling the switch, the motor may stop. This is not the trouble but the result of protection function.
-
When the battery power remaining runs out, the motor stops.
In such case, charge it up immediately. -
If the tool is overloaded, the motor may stop. In this case, release the switch of tool and eliminate causes of overloading. After that, you can use it again.
-
If the battery is overheated under overload work, the battery power may stop. In this case, stop using the battery and let the battery cool. After that, you can use it again.
Furthermore, please heed the following warning and caution.
WARNING
In order to prevent any battery leakage, heat generation, smoke emission, explosion and ignition beforehand, please be sure to heed the following precautions.
- Make sure that swarf and dust do not collect on the battery.
During work make sure that swarf and dust do not fall on the battery.
○ Make sure that any swarf and dust falling on the power tool during work do not collect on the battery. - Do not store an unused battery in a location exposed to swarf and dust.
Before storing a battery, remove any swarf and dust that may adhere to it and do not store it together with metal parts (screws, nails, etc.). - Do not pierce battery with a sharp object such as a nail, strike with a hammer, step on, throw or subject the battery to severe physical shock.
- Do not use an apparently damaged or deformed battery.
- Do not use the battery in reverse polarity.
- Do not connect directly to an electrical outlets or car cigarette lighter sockets.
- Do not use the battery for a purpose other than those specified.
- If the battery charging fails to complete even when a specified recharging time has elapsed, immediately stop further recharging.
- Do not put or subject the battery to high temperatures or high pressure such as into a microwave oven, dryer, or high pressure container.
- Keep away from fire immediately when leakage or foul odor are detected.
- Do not use in a location where strong static electricity generates.
-
If there is battery leakage, foul odor, heat generated, discolored or deformed, or in any way appears abnormal during use, recharging or storage, immediately remove it from the equipment or battery charger, and stop use.
-
Do not immerse the battery or allow any fluids to flow inside. Conductive liquid ingress, such as cause damage resulting in fire or explosion. Store your battery in a cool, dry place, away from combustible and fl ammable items. Corrosive gas atmospheres must be avoided.
CAUTION
- If liquid leaking from the battery gets into your eyes, do not rub your eyes and wash them well with fresh clean water such as tap water and contact a doctor immediately.
If left untreated, the liquid may cause eye-problems.
- If liquid leaks onto your skin or clothes, wash well with clean water such as tap water immediately.
There is a possibility that this can cause skin irritation.
- If you find rust, foul odor, overheating, discolor, deformation, and/or other irregularities when using the battery for the first time, do not use and return it to your supplier or vendor.
WARNING
If an electrically conductive fore terminals of the lithium ion battery, a short-circuit may occur resulting in the risk of fire. Please observe the following matters when storing the battery.
Do not place electrically conductive cuttings, nails, steel wire, copper wire or other wire in the storage case.
To prevent shorting from occurring, load the battery in the tool or insert securely the battery cover for storing until the ventilator is not seen (Fig. 1).
REGARDING LITHIUM-ION BATTERY TRANSPORTATION
When transporting a lithium-ion battery, please observe the following precautions.
WARNING
Notify the transporting company that a package contains a lithium-ion battery, inform the company of its power output and follow the instructions of the transportation company when arranging transport.
○ Lithium-ion batteries that exceed a power output of 100 Wh are considered to be in the freight classification of Dangerous Goods and will require special application procedures.
○ For transportation abroad, you must comply with international law and the rules and regulations of the destination country.

flowchart
graph TD
    A["Power Output"] --> B["Device 1"]
    A --> C["Device 2"]
    B --> D["2 to 3 digit number"]
    C --> D
SPECIFICATIONS ter. can
POWER TOOL
| Model N14DSL | N18DSL | |
| Voltage | 14.4 V | 18 V |
| Applicable staples | Ref. Fig. | |
| Amount of loadable staples | 150 staples | |
| Weight* | 1.4 kg(BSL1430C) | 1.5 kg(BSL1830C) |
* Weight according to EPTA-Procedure 01/2003
STAPLE SELECTION
The staples indicated in the chart below can be used with this stapler.
g50 staple are bonded together to form a strip.
Contact the dealer from which you purchased the stapler for details on obtaining the staples.
NOTE
Only staples manufactured by HiKOKI may be used.
Staples other than those manufactured by HiKOKI may cause jamming and subsequent malfunctions.
(Size unit: mm)
| Shape | A | B | C | D |
 | 12 | 0.5 | 0.7 | 6 |
| 10 | ||||
| 13 |
STANDARD ACCESSORIES
In addition to the main unit (1), the package contains the accessories listed in the table below.
| NN | |
| Eye protector | 1 |
Standard accessories are subject to change without notice.
OPTIONAL ACCESSORIES (Sold separately)
○ Battery

BSL14..

BSL18..
○ Charger
○ Battery cover
Optional accessories are subject to change without notice.
English
APPLICATION
○ Securing the moisture-permeable waterproofing sheet in position
○ Securing the heat insulation material in position
BATTERY REMOVAL/INSTALLATION
1. Battery removal
Hold the handle tightly and push the battery latch to remove the battery (Fig. 2).
CAUTION
Never short-circuit the battery.
2. Battery installation
Insert the battery while observing its polarities (Fig. 2).
CHARGING
Battery and battery charger are not included with this product.
For rechargeable batteries, please charge in according to the handling instructions of the charger which you are using. (Fig. 3)
BEFORE USE
1. Preparing the Staples and Performing Safety Inspections
WARNING
○ Do not use the product near flammable liquids or gases.
○ Do not place the product near children or other non-qualified people.
○ Run a full check to make sure that no screws are loose.
○ Check to make sure that there are no damaged or missing parts, or malfunctioning parts owing to rust, etc.
Prepare staples that match the job at hand.
Refer to MAINTENANCE AND INSPECTION and carry out safety inspections without fail.
2. Trigger Lock Mechanism (Fig. 4)
WARNING
Make sure the trigger is locked when not fi ring staples.
This stapler has a lock mechanism to prevent the staples from being fi red.
Set the lock lever at the position to lock the trigger.
Slide the lock lever to the 🔒 position when the stapler is to be used, and to the 🔒 position when it is not in use.
3. Checking Push Lever Operations (Fig. 5)
WARNING
Always make sure the trigger is locked and the battery removed from the power tool when checking push lever operations.
Check to make sure the push lever slides smoothly when operated.
Clean the sliding area on the push lever if it doesn't slide smoothly.
4. Handling the Staples
NOTE
○ Handle the staples carefully.
There are cases in which the joined staple strips may be broken if they are dropped, and using them in this state may result in defective staple loading, leading to blank fi ring or staple jams. Do not use joined staple strips that are broken.
○ Do not leave the staples outdoors or in direct sunlight for long periods of time.
Failure to observe this may result in rusting or defects in the joined staple strips. Use the staple packaging or other materials for storage purposes.
5. Loading the Staples (Fig. 6)
WARNING
Lock the trigger and remove the battery from the stapler when loading or removing staples.
(1) Press the stop lever and slide the magazine backward.
(2) Place the staples in the magazine with the prongs facing upward.
(3) Slide the magazine back into position until the stop lever locks into place.
NOTE
○ Close the magazine gently.
Using excessive force to close the magazine may result in the joined staple strips being deformed, preventing the magazine from being closed.
- Check the magazine blade guide if it won't close smoothly.
HOW TO USE THE CORDLESS STAPLER
There are two ways to discharge staples: Single Shot, in which the push lever is placed against the area where the staple is to be fired first and the trigger then pulled, and Continual Shot, in which the trigger is pulled first and the push lever then placed against the relevant area.
The single-shot mode places the emphasis on finishing and is used to ensure that the staple is driven into the required place, while the continual-shot mode is used to drive in staples repeatedly with the trigger constantly being pulled.
The power tool is equipped with a mechanism to alternate between single-shot and continual-shot operations to ensure that work is carried out in the most efficient way.
Safety Devices
The power tool has been designed so that staples cannot be fi red unless both the push lever and the trigger are simultaneously operated. In other words, staples will not be discharged when only the trigger is pulled, or when only the push lever (discharge outlet) is placed against the required area. This is to prevent the staples from being discharged when the trigger is accidentally pulled or when the push lever (discharge outlet) is accidentally placed against something.
● Single-shot Stapling (Fig. 7)
(1) Make sure the discharge outlet is firmly placed against the place where the staple is to be discharged.
(2) Pull the trigger to fire the staple.
(3) Withdraw the power tool and release the trigger.
NOTE
○ Use the single-shot mode to accurately staple the required location.
There are cases in which subsequent stapling will not be possible if the trigger is released halfway through being pulled.
To correct this, remove the battery and then replace it.
● Continual-shot Stapling (Fig. 8)
First pull the trigger then place the push lever (discharge outlet) against the required area to repeatedly fire staples.
(1) First pull the trigger.
(2) Place the push lever (discharge outlet) against the required area to fire the staples.
(3) Withdraw the stapler with the trigger pressed, and then repeat procedure from step (2) to repeatedly fire staples.
Anti Blank Firing Mechanism
The stapler is equipped with an anti blank fi ring mechanism to prevent blank fi ring when the staples run out.
The stapler will cease to operate when eight or fewer staples remain.
Approximately eight staples will remain after firing a strip of staples, but replenishing the magazine with the same staples will enable stapling to be continued.
1. Stapling procedures
WARNING
○ Never point the discharge outlet at people.
○ Make sure that work is carried out with the dischar outlet well away from faces, hands, feet and other parts of the body.
○ Do not fire staples directly onto existing staples.
○ Remove the battery when the stapler is not being used and during work breaks.
- When work has been completed, remove the battery, and then remove the remaining staples.
When pulling the trigger, make sure that other fingers are not touching the push lever.
Failure to observe this may result in injury.
NOTE
There are cases in which operations will become sluggish if used at low ambient temperatures.
There are cases in which the staples will bend or cracks will appear in the stapled material depending on the hardness, thickness and combinations of the material. Test the stapling operability before commencing full use.
(1) Locking the trigger and removing the battery Remove the battery from the stapler to prevent unexpected operations. (Fig. 2)
(2) Loading staples Load staples of a size appropriate for the job in hand into the magazine. (Fig. 6)
(3) Attaching the battery Place the battery onto the stapler and press on it until it clicks into place.
(4) Releasing the lever lock Slide the lock lever until the lock has been released. (Fig. 4)
(5) Firing staples Adjust the depth of the staples with the adjuster. (Fig. 9)
(6) Finishing work When work has been finished, lock the trigger and remove the battery, and then remove all of the staples from the magazine.
2. How to adjust the stapling depth (Fig. 9)
WARNING
When adjusting staple depth, aim the discharge outlet downwards and check that it is not pointing at faces, hands, feet or other parts of the body first of all, and then lock the trigger.
Fire a test staple, and if it is too deep adjust the depth by rotating the adjuster to drive it shallower. If the staple is not driven in deep enough, rotate the adjuster to drive it deeper.
The adjuster rotation modifi es the depth by up to 2 mm.
3. Using the hook
The hook is used to hang up the power tool to your waist belt while working.
CAUTION
When using the hook, hang up the power tool firmly not to drop accidentally.
If the power tool is dropped, it may lead to an accident.
○ Make sure the trigger has been locked and the battery removed when using the hook.
○ Install securely the hook. Unless the hook is securely installed, it may cause an injury while using.
(1) Removing the hook.
Remove the screws fixing the hook with Philips screw driver. (Fig. 10)
(2) Replacing the hook and tightening the screws. Install securely the hook in the groove of power tool and tighten the screws to fix the hook firmly. (Fig. 11)
MAINTENANCE AND INSPECTION
WARNING
Make sure the trigger has been locked and the battery removed before carrying out inspections and maintenance. Also make sure that the recharger has been unplugged.
1. Removing Staple Jams (Fig. 12)
(1) Remove the battery from the power tool.
(2) Press the stop lever, slide open the magazine and remove all staples.
(3) Remove adhesive of staples, fragments and splinters that have collected in the blade guide with a flathead screwdriver or similar implement.
(4) Check to ascertain that the push lever works smoothly.
NOTE
After removing staple jams, reload the staples and fire a test staple.
2. Magazine Inspections
The inside of the magazine needs to be cleaned from time to time. Slide the magazine open and remove adhesive of staples, fragments and splinters that have collected.
NOTE
Dirt inside the magazine may result in the operations of the staple feeder becoming sluggish, which may cause blank fi ring.
3. Inspecting the mounting screws
Regularly inspect all mounting screws and ensure that they are properly tightened. Should any of the screws be loose, retighten them immediately. Failure to do so may result in serious hazard.
4. Cleaning of the outside
When the power tool is stained, wipe with a soft dry cloth or a cloth moistened with soapy water. Do not use chloric solvents, gasoline or paint thinner, as they melt plastics.
5. Storage
Store the power tool in a place in which the temperature is less than 40^ C, and out of reach of children.
NOTE
Storing lithium-ion batteries.
Make sure the lithium-ion batteries have been fully charged before storing them.
Prolonged storage (3 months or more) of batteries with a low charge may result in performance deterioration, significantly reducing battery usage time or rendering the batteries incapable of holding a charge.
However, significantly reduced battery usage time may be recovered by repeatedly charging and using the batteries two to five times.
If the battery usage time is extremely short despite repeated charging and use, consider the batteries dead and purchase new batteries.
CAUTION
In the operation and maintenance of power tools, the safety regulations and standards prescribed in each country must be observed.
Important notice on the batteries for the HiKOKI cordless power tools
Please always use one of our designated genuine batteries. We cannot guarantee the safety and performance of our cordless power tool when used with batteries other than these designated by us, or when the battery is disassembled and modified (such as disassembly and replacement of cells or other internal parts).
GUARANTEE
We guarantee HiKOKI Power Tools in accordance with statutory/country specific regulation. This guarantee does not cover defects or damage due to misuse, abuse, or normal wear and tear. In case of complaint, please send the Power Tool, undismantled, with the GUARANTEE CERTIFICATE found at the end of this Handling instruction, to a HiKOKI Authorized Service Center.
Information concerning airborne noise and vibration The measured values were determined according to EN60745 and declared in accordance with ISO 4871.
Measured A-weighted sound power level: 89 dB (A) Measured A-weighted sound pressure level: 78 dB (A) Uncertainty KpA: 3 dB (A)
Wear hearing protection.
Vibration total values (triax vector sum) determined according to EN60745.
The length of the staples was 13 mm: Vibration emission value a_h = 2.4 m/s^2 Uncertainty K = 1.5 m/s^2
The declared vibration total value has been measured in accordance with a standard test method and may be used for comparing one tool with another.
It may also be used in a preliminary assessment of exposure.
WARNING
☐ The vibration emission during actual use of the power tool can differ from the declared total value depending on the ways in which the tool is used.
○ Identify safety measures to protect the operator that are based on an estimation of exposure in the actual conditions of use (taking account of all parts of the operating cycle such as the times when the tool is switched off and when it is running idle in addition to the trigger time).
NOTE
Due to HiKOKI's continuing program of research and development, the specifications herein are subject to change without prior notice.
TROUBLESHOOTING
Use the inspections in the table below if the tool does not operate normally. If this does not remedy the problem, consult your dealer or the HiKOKI Authorized Service Center.
| Symptom Possible | cause Remedy | ||
| Tool The stapler won't fi re staples. | The battery has run out of power. Recharge the battery with the recharger. | ||
| The battery has not been attached correctly. | Remove the battery and check to see if foreign matter exists in the stapler's battery insertion bed. Also check to make sure that the battery terminals are not soiled. Press down on the battery until it clicks into place. | ||
| The trigger was released halfway through being pulled in the single-shot mode. | Remove the battery from the stapler, and then replace it. | ||
| Power tool abnormalities. Contact your dealer or the HiKOKI Authorized Service Center. | |||
| Staples are not fully driven in. | The material is too hard. There are cases in which hard materials cannot be stapled correctly. | ||
| The stapler is recoiling. The discharge outlet is not being pressed firmly enough against the area where the staple is to be drive. | |||
| The driver blade is worn down. Contact your dealer or the HiKOKI Authorized Service Center. | |||
| Blank firing. | The anti-blank firing mechanism is not working. Clean all dirt or foreign matter from around the micro switch inside the magazine. | ||
| Staples are jammed nearby the discharge outlet. Clean all jammed staples or dirt, etc. | |||
| The driver blade is worn down. Contact your dealer or the HiKOKI Authorized Service Center. | |||
| Feeder operations are sluggish. Clean all dirt or foreign matter from the inside of the magazine. | |||
VEILIGHEIDSWAARSCHUWINGEN VOOR ACCU NIETAPPARAAT
5. Legge inn krampene (Fig. 6)
ADVARSEL
(2) Legge inn kramper
VEKLIKEHOLD OG INSPEKSJON
ADVARSEL
Siemensring 34, 47877 willich, Germany
Tel: +49 2154 49930
Fax: +49 2154 499350
URL: http://www.hikoki-powertools.de
Hikoki Power Tools Netherlands B.V.
Brabanthaven 11, 3433 PJ Nieuwegein, The Netherlands
Tel: +31 30 6084040
Fax: +31 30 6067266
URL: http://www.hikoki-powertools.nl
Hikoki Power Tools (U.K.) Ltd.
Precedent Drive, Rooksley, Milton Keynes, MK 13, 8PJ, United Kingdom
Tel: +44 1908 660663
Fax: +44 1908 606642
URL: http://www.hikoki-powertools.uk
Hikoki Power Tools France S.A.S.
Hikoki Power Tools Belgium N.V./S.A.
Koningin Astridlaan 51, B-1780 Wemmel, Belgium
Tel: +32 2 460 1720
Fax: +32 2 460 2542
URL http://www.hikoki-powertools.be
Hikoki Power Tools Italia S.p.A
Via Piave 35, 36077, Altavilla Vicentina (VI), Italy
Tel: +39 0444 548111
Fax: +39 0444 548110
URL: http://www.hikoki-powertools.it
Hikoki Power Tools Ibérica, S.A.
C/ Puigbarral, 26-28, Pol. Ind. Can Petit, 08227 Terrassa
(Barcelona), Spain
Tel: +34 93 735 6722
Fax: +34 93 735 7442
URL: http://www.hikoki-powertools.es
Kjeller Vest 7, N-2007 Kjeller, Norway
Tel: (+47) 6692 6600
Fax: (+47) 6692 6650
URL: http://www.hikoki-powertools.no
Hikoki Power Tools Sweden AB
Rotebergsvagen 2B SE-192 78 Sollentuna, Sweden
Tel: (+46) 8 598 999 00
Fax: (+46) 8 598 999 40
URL: http://www.hikoki-powertools.se
Hikoki Power Tools Denmark A/S
Lillebaeltsvej 90, 6715 Esbjerg N, Denmark
Tel: (+45) 75 14 32 00
Fax: (+45) 75 14 36 66
URL: http://www.hikoki-powertools.dk
Hikoki Power Tools Finland Oy
Tupalankatu 9, 15680 Lahti, Finland
Tel: (+358) 20 7431 530
Fax: (+358) 20 7431 531
URL: http://www.hikoki-powertools.fi
Hikoki Power Tools Hungary Kft.
Hikoki Power Tools Romania S.R.L.
Ring Road, No. 66, Mustang Traco Warehouses, Warehouse
No.1, Pantelimon City, 077145, Ilfov County, Romania