
NT1850DA - Stapler HiKOKI - Free user manual and instructions
Find the device manual for free NT1850DA HiKOKI in PDF.
| Brand | HiKOKI |
| Model | NT1850DA |
| Product type | Cordless stapler |
| Power supply | 18 V lithium-ion battery (model BSL1820M) |
| Motor | Brushless DC motor |
| Compatible staples | 18 GA, length 16 mm to 50 mm |
| Magazine capacity | 100 staples (1 strip) |
| Trigger modes | Single sequential and contact (selectable) |
| Work rate | 2 staples/second (intermittent mode) |
| Dimensions (H × W × D) | 286 mm × 267 mm × 92 mm |
| Weight (according to EPTA 01/2014) | 2.4 to 3.0 kg (depending on battery) |
| Battery charger | Model UC18YFSL, voltage 14.4–18 V DC, weight 0.5 kg |
| Charging time (BSL1820M) | Approx. 30 minutes at 20 °C |
| LED lighting | Yes, automatic work area lighting |
| Depth adjustment | Yes, by adjustment wheel (half-turn per increment) |
| Trigger lock | Yes, with lock lever |
| Belt hook | Yes, reversible (left/right) |
| Nose cap | Accessory supplied to protect work surface |
| Operating temperature | 0 °C to 40 °C |
| Sound level (LWA) | 79 dB(A) (acoustic power) |
| Vibrations (total value) | 2.1 m/s², uncertainty K = 1.5 m/s² |
Frequently Asked Questions - NT1850DA HiKOKI
- Is the trigger lock lever in the unlocked position?
- Are the trigger and the push lever pressed in the correct order (according to the mode)?
- Is the ambient temperature between 0 °C and 40 °C?
- If the problem persists, refer to the troubleshooting table on page 49 of the manual.
2. Open the guide plate by releasing the lock lever.
3. Remove the jammed staple using a flat-head screwdriver.
4. Close the plate and lock. Never point the tool at yourself or others during the operation.
- Contact mode (flashing blue LED): keep the trigger pressed and press the push lever for each staple. Suitable for series work. Change mode with the nailing operation button.
- Discharged battery: recharge it.
- Overload: release the trigger and eliminate the cause.
- Overheating: let the battery cool down.
If the orange LED lights up, contact HiKOKI after-sales service.
User questions about NT1850DA HiKOKI
0 question about this device. Answer the ones you know or ask your own.
Ask a new question about this device
Download the instructions for your Stapler in PDF format for free! Find your manual NT1850DA - HiKOKI and take your electronic device back in hand. On this page are published all the documents necessary for the use of your device. NT1850DA by HiKOKI.
USER MANUAL NT1850DA HiKOKI
(Original instructions)
GENERAL POWER TOOL SAFETY WARNINGS

WARNING
Read all safety warnings and all instructions.
Failure to follow the warnings and instructions may result in electric shock, fire and/or serious injury.
Save all warnings and instructions for future reference.
The term "power tool" in the warnings refers to your mains-operated (cored) power tool or battery-operated (cordless) power tool.
1) Work area safety
a) Keep work area clean and well lit. Cluttered or dark areas invite accidents.
b) Do not operate power tools in explosive atmospheres, such as in the presence of flammable liquids, gases or dust. Power tools create sparks which may ignite the dust or fumes.
c) Keep children and bystanders away while operating a power tool. Distractions can cause you to lose control.
2) Electrical safety
a) Power tool plugs must match the outlet. Never modify the plug in any way. Do not use any adapter plugs with earthed (grounded) power tools. Unmodified plugs and matching outlets will reduce risk of electric shock.
b) Avoid body contact with earthed or grounded surfaces, such as pipes, radiators, ranges and refrigerators. There is an increased risk of electric shock if your body is earthed or grounded.
c) Do not expose power tools to rain or wet conditions. Water entering a power tool will increase the risk of electric shock.
d) Do not abuse the cord. Never use the cord for carrying, pulling or unplugging the power tool. Keep cord away from heat, oil, sharp edges or moving parts.
Damaged or entangled cords increase the risk of electric shock.
e) When operating a power tool outdoors, use an extension cord suitable for outdoor use. Use of a cord suitable for outdoor use reduces the risk of electric shock.
f) If operating a power tool in a damp location is unavoidable, use a residual current device (RCD) protected supply. Use of an RCD reduces the risk of electric shock.
3) Personal safety
a) Stay alert, watch what you are doing and use common sense when operating a power tool. Do not use a power tool while you are tired or under the influence of drugs, alcohol or medication. A moment of inattention while operating power tools may result in serious personal injury.
b) Use personal protective equipment. Always wear eye protection. Protective equipment such as dust mask, non-skid safety shoes, hard hat, or hearing protection used for appropriate conditions will reduce personal injuries.
c) Prevent unintentional starting. Ensure the switch is in the off position before connecting to power source and/or battery pack, picking up or carrying the tool.
Carrying power tools with your finger on the switch or energising power tools that have the switch on invites accidents.
d) Remove any adjusting key or wrench before turning the power tool on.
A wrench or a key left attached to a rotating part of the power tool may result in personal injury.
e) Do not overreach. Keep proper footing and balance at all times. This enables better control of the power tool in unexpected situations.
f) Dress properly. Do not wear loose clothing or jewellery. Keep your hair, clothing and gloves away from moving parts.
Loose clothes, jewellery or long hair can be caught in moving parts.
g) If devices are provided for the connection of dust extraction and collection facilities, ensure these are connected and properly used. Use of dust collection can reduce dust-related hazards.
4) Power tool use and care
a) Do not force the power tool. Use the correct power tool for your application.
The correct power tool will do the job better and safer at the rate for which it was designed.
b) Do not use the power tool if the switch does not turn it on and off.
Any power tool that cannot be controlled with the switch is dangerous and must be repaired.
c) Disconnect the plug from the power source and/ or the battery pack from the power tool before making any adjustments, changing accessories, or storing power tools.
Such preventive safety measures reduce the risk of starting the power tool accidentally.
d) Store idle power tools out of the reach of children and do not allow persons unfamiliar with the power tool or these instructions to operate the power tool.
Power tools are dangerous in the hands of untrained users.
e) Maintain power tools. Check for misalignment or binding of moving parts, breakage of parts and any other condition that may affect the power tool's operation.
If damaged, have the power tool repaired before use.
Many accidents are caused by poorly maintained power tools.
f) Keep cutting tools sharp and clean.
Properly maintained cutting tools with sharp cutting edges are less likely to bind and are easier to control.
g) Use the power tool, accessories and tool bits etc. in accordance with these instructions, taking into account the working conditions and the work to be performed.
Use of the power tool for operations different from those intended could result in a hazardous situation.
5) Battery tool use and care
a) Recharge only with the charger specified by the manufacturer.
A charger that is suitable for one type of battery pack may create a risk of fire when used with another battery pack.
b) Use power tools only with specifically designated battery packs.
Use of any other battery packs may create a risk of injury and fire.
c) When battery pack is not in use, keep it away from other metal objects, like paper clips, coins, keys, nails, screws or other small metal objects, that can make a connection from one terminal to another.
Shorting the battery terminals together may cause burns or a fire.
d) Under abusive conditions, liquid may be ejected from the battery; avoid contact. If contact accidentally occurs, fl ush with water. If liquid contacts eyes, additionally seek medical help.
Liquid ejected from the battery may cause irritation or burns.
6) Service
a) Have your power tool serviced by a qualified repair person using only identical replacement parts.
This will ensure that the safety of the power tool is maintained.
PRECAUTION
Keep children and infirm persons away.
When not in use, tools should be stored out of reach of children and infirm persons.
- Always assume that the tool contains fasteners.
Careless handling of the nailer can result in unexpected firing of fasteners and personal injury.
- Do not point the tool towards yourself or anyone nearby.
Unexpected triggering will discharge the fastener causing an injury.
- Do not actuate the tool unless the tool is placed firmly against the workpiece.
If the tool is not contact with the workpiece, the fastener may be deflected away from your target.
- Disconnect the tool from the power source when the fastener jams in the tool.
While removing a jammed fastener, the nailer may be accidentally activated if it is plugged in.
- Use caution while removing a jammed fastener.
The mechanism may be under compression and the fastener may be forcefully discharged while attempting to free a jammed condition.
- Do not use this nailer for fastening electrical cables.
It is not designed for electric cable installation and may damage the insulation of electric cables thereby causing electric shock or fire hazards.
ADDITIONAL SAFETY WARNINGS
- Safe operation through correct usage.
This tool was designed for driving nails into wood and similar materials. Use it for its intended purpose only.
- Be careful of ignition and explosions.
Since sparks may fly during nailing, it is dangerous to use this tool near lacquer, paint, benzine, thinner, gasoline, gas, adhesives and similar inflammable substances as they may ignite or explode. Under no circumstances should this tool therefore be used in the vicinity of such infl ammable material.
- Always wear eye protection (protective goggles).

When operating the power tool, always wear eye protection, and ensure that surrounding people wear eye protection too.
The possibility of fragments of the nails that were not properly hit entering the
eye is a threat to sight. Eye protection can be bought at any hardware store. Always wear eye protection while operating this tool. Use either eye protection or a wide vision mask over prescription glasses.
Employers should always enforce the use of eye protection equipment.
- Protect your ears and head.
When engaged in nailing work please wear ear mufflers and head protection. Also, depending on condition, ensure that surrounding people also wear ear mufflers and head protection.
- Pay attention to those working close to you.
It would be very dangerous if nails that were not properly driven in should hit other people. Therefore, always pay attention to the safety of the people around you when using this tool. Always make sure that nobody's body, hands or feet are close to the nail outlet.
- Never point the nail outlet towards people.

Always assume the tool contains fasteners.
If the nail outlet is pointed towards people, serious accidents may be caused if you mistakenly discharge the
tool. When connecting and disconnecting the battery, during nail loading or similar operations, be sure the nail outlet is not pointed towards anyone (including yourself). Even when no nails are loaded at all, it is dangerous to discharge the tool while pointing it at someone, so never attempt to do so. No horseplay. Respect the tool as a working implement.
- Check push lever before use.
Make sure the push lever operates properly. (The push lever may be called "Safety".) Never use the Nailer unless the push lever is operating properly, otherwise the Nailer could drive a fastener unexpectedly. Do not tamper with or remove the push lever, otherwise the push lever becomes inoperable.
- Choice of triggering method is important.
Read and understand section titled "HOW TO USE THE NAILER" on page 16.
-
Prior to using this product, make sure that it is operating properly in accordance with the content of "Testing the nailer" on page 15.
-
Use specified nails only.
Never use nails other than those specified and described in these instructions.
- Be careful when connecting the battery.
When connecting the battery and loading nails in order not to fire the tool by mistake, make sure of the followings.
Do not touch the trigger.
Do not allow the firing head to contact with any surface.
- Keep the firing head down.
Strictly observe the above instructions, and always make sure that no part of the body, hands or legs is ever in front of the nail outlet.
- Do not carelessly place your finger on the trigger.
Do not place your finger on the trigger except when actually nailing. If you carry this tool or hand it to someone while having your finger on the trigger, you may inadvertently discharge a nail and thus cause an accident.
- Press the nail outlet firmly against the material to be nailed.
When driving in nails, press the nail outlet firmly against the material to be nailed. If the outlet is not applied properly, the nails may rebound.
- Keep hands and feet away from the firing head when using.

It is very dangerous for a nail to hit the hands or feet by mistake.
- Beware of the tool's kickback.
Do not approach the top of the tool with your head etc. during operation. This is dangerous because the tool may recoil violently if the nail currently being driven in comes into contact with a previous nail or a knot in the wood.
- Be careful of double fire due to recoil.
If the push lever is unintentionally allowed to re-contact the workpiece following recoil, an unwanted fastener will be driven.
In order to avoid this undesirable double fire,
Intermittent operation (Trigger firing)
1) Set the switching device to SINGLESEQUENTIAL ACTUATION MECHANISM.
2) Pull the trigger rapidly and fi rmly.
Continuous operation (Push lever firing)
1) Do not press the nailer against the wood with excessive force.
2) Separate the nailer from the wood as it recoils after fastening.
- Take care when nailing thin boards or the corners of wood.
When nailing thin boards, the nails may pass right through, as may also be the case when nailing the corners of wood due to deviation of the nails. In such cases, always make sure that there is no one (and nobody's hands or feet; etc.) behind the thin board or next to the wood you are going to nail.
- Simultaneous nailing on both sides of the same wall is dangerous.
Under no circumstances should nailing be performed on both sides of a wall at the same time. This would be very dangerous since the nails might pass through the wall and thus cause injuries.
-
Do not use the power tool on scaffold oldings, ladders. The power tool shall not be used for specific application for example:
-
when changing one driving location to another involves the use of scaff oldings, stairs, ladders or ladder alike constructions, e.g. roof laths,
closing boxes or crates,
fitting transportation safety systems e.g. on vehicles and wagons
- Remove all remaining fasteners and battery from nailer when:
1) doing maintenance and inspection;
2) checking proper operation of push lever and trigger;
3) attaching or removing the nose cap;
4) clearing a jam;
5) it is not in use;
6) leaving work area;
7) moving it to another location; and
8) handing it to another person.
Never attempt to clear a jam or repair the Nailer unless you have removed battery and all remaining fasteners from the Nailer.
The Nailer should never be left unattended since people who are not familiar with the Nailer might handle it and injure the themselves.
- Remove battery from nailer when:
1) loading nails;
2) turning the adjuster.
- Disconnect the battery.
hen attaching and detaching the nose cap, disconnect the battery.
When attaching the accessory nose cap to the tip of the push lever and when detaching it, make sure to disconnect the battery beforehand. It is very dangerous for a nail to be fired by mistake.
-
The operating environment for this device is between 0^ and 40^ so ensure use within this temperature range. The device may fail to operate below 0^ or above 40^ .
-
Always charge the battery at an ambient temperature of 0 - 40^
A temperature of less than 0^ will result in over charging which is dangerous. The battery cannot be charged at a temperature greater than 40^ .
The most suitable temperature for charging is that of 20 - 25^
- Do not use the charger continuously.
When one charging is completed, leave the charger for about 15 minutes before the next charging of battery.
- Do not allow foreign matter to enter the hole for connecting the rechargeable battery.
- Never disassemble the rechargeable battery or charger.
- Never short-circuit the rechargeable battery.
Short-circuiting the battery will cause a great electric current and overheat. It results in burn or damage to the battery.
- Do not dispose of the battery in fire.
If the battery is burnt, it may explode.
30.Using an exhausted battery will damage the charger. - Bring the battery to the shop from which it was purchased as soon as the post-charging battery life becomes too short for practical use.
Do not dispose of the exhausted battery.
- Do not insert objects into the air ventilation slots of the charger.
Inserting metal objects or flammable into the charger air ventilation slots will result in an electrical shock hazard or damage to the charger. - NEVER allow magnets (or similar magnetic devices) to be adjacent to the nailer, because the nailer has a magnetic sensor inside.
Doing so will cause a failure or risk of injury by malfunction. - Resting the unit after continuous work.
- The power tool is equipped with a temperature protection circuit to protect the motor. Continuous work may cause the temperature of the unit to rise, activating the temperature protection circuit and automatically stopping operation. If this happens, allow the power tool to cool before resuming use.
- This product may cease to operate when an abnormality is detected. In such cases, check the items listed under "TROUBLESHOOTING" on page 19.
- Do not give a strong shock to the switch panel or break it. It may lead to a trouble.
CAUTION ON LITHIUM-ION BATTERY
To extend the lifetime, the lithium-ion battery equips with the protection function to stop the output.
In the cases of 1 to 3 described below, when using this product, even if you are pulling the switch, the motor may stop. This is not the trouble but the result of protection function.
- When the battery power remaining runs out, the motor stops.
In such a case, charge it up immediately. - If the tool is overloaded, the motor may stop. In this case, release the switch of tool and eliminate causes of overloading. After that, you can use it again.
- If the battery is overheated under overload work, the battery power may stop.
In this case, stop using the battery and let the battery cool. After that, you can use it again.
Furthermore, please heed the following warning and caution.
WARNING
In order to prevent any battery leakage, heat generation, smoke emission, explosion and ignition beforehand, please be sure to heed the following precautions.
- Make sure that swarf and dust do not collect on the battery.
During work make sure that swarf and dust do not fall on the battery. - Make sure that any swarf and dust falling on the power tool during work do not collect on the battery.
- Do not store an unused battery in a location exposed to swarm and dust.
Before storing a battery, remove any swarf and dust that may adhere to it and do not store it together with metal parts (screws, nails, etc.). - Do not pierce battery with a sharp object such as a nail, strike with a hammer, step on, throw or subject the battery to severe physical shock.
- Do not use an apparently damaged or deformed battery.
- Do not use the battery in reverse polarity.
- Do not connect directly to an electrical outlets or car cigarette lighter sockets.
- Do not use the battery for a purpose other than those specified.
- If the battery charging fails to complete even when a specified recharging time has elapsed, immediately stop further recharging.
- Do not put or subject the battery to high temperatures or high pressure such as into a microwave oven, dryer, or high pressure container.
- Keep away from fire immediately when leakage or foul odor are detected.
- Do not use in a location where strong static electricity generates.
- If there is battery leakage, foul odor, heat generated, discolored or deformed, or in any way appears abnormal during use, recharging or storage, immediately remove it from the equipment or battery charger, and stop use.
- Do not immerse the battery or allow any fluids to flow inside. Conductive liquid ingress, such as water, can cause damage resulting in fire or explosion. Store your battery in a cool, dry place, away from combustible and flammable items. Corrosive gas atmospheres must be avoided.
CAUTION
- If liquid leaking from the battery gets into your eyes, do not rub your eyes and wash them well with fresh clean water such as tap water and contact a doctor immediately.
If left untreated, the liquid may cause eye-problems. - If liquid leaks onto your skin or clothes, wash well with clean water such as tap water immediately.
There is a possibility that this can cause skin irritation. - If you find rust, foul odor, overheating, discolor, deformation, and/or other irregularities when using the battery for the first time, do not use and return it to your supplier or vendor.
WARNING
If a conductive foreign matter enters in the terminal of lithium ion battery, the battery may be shorted, causing fire. When storing the lithium ion battery, obey surely the rules of following contents.
- Do not place conductive debris, nail and wires such as iron wire and copper wire in the storage case.
To prevent shorting from occurring, load the battery in the tool or insert securely the battery cover for storing until the ventilator is not seen.
REGARDING LITHIUM-ION BATTERY TRANSPORTATION
When transporting a lithium-ion battery, please observe the following precautions.
WARNING
Notify the transporting company that a package contains a lithium-ion battery, inform the company of its power output and follow the instructions of the transportation company when arranging transport.
Lithium-ion batteries that exceed a power output of 100 Wh are considered to be in the freight classification of Dangerous Goods and will require special application procedures.
For transportation abroad, you must comply with international law and the rules and regulations of the destination country.

NAMES OF PARTS (Fig. 1 - Fig. 20)
| ① | Top cover |
| ② | Trigger |
| ③ | LED light |
| ④ | Firing head (outlet) |
| ⑤ | Push lever |
| ⑥ | Magazine |
| ⑦ | Hook |
| ⑧ | Battery |
| ⑨ | Switch lock lever |
| ⑩ | Handle |
| ⑪ | Stop lever |
| ⑫ | Battery indicator |
| ⑬ | Nailing operation switch |
| ⑭ | Power indicator |
| ⑮ | Power switch |
| ⑯ | Nailing operation indicator |
| ⑰ | Nail strip |
| ⑱ | Magazine cover |
| ⑲ | Groove |
| ⑳ | Blade guide |
| ⑴ | Adjuster |
| ⑵ | Nose cap |
| ⑶ | Lock lever |
| ⑷ | Guide plate |
| ⑸ | Display panel |
| ⑹ | Remaining battery indicator switch |
| ⑺ | Remaining battery indicator lamp |
SYMBOLS
WARNING
The following show symbols used for the machine.
Be sure that you understand their meaning before use.
| NT1850DA: Cordless Brad Nailer | |
| To reduce the risk of injury, user must read instruction manual | |
| Only for EU countries Do not dispose of electric tools together with household waste material! In observance of European Directive 2012/19/EU on waste electrical and electronic equipment and its implementation in accordance with national law, electric tools that have reached the end of their life must be collected separately and returned to an environmentally compatible recycling facility. | |
| Direct current |
| kg | Weight* (According to EPTA-Procedure 01/2014) |
| I | Switching ON |
| O | Switching OFF |
| S | Disconnect the battery |
| O | Power switch |
| O | Power switch OFF |
| Power switch ON Power indicator: Light in green | |
| Nailing operation switch | |
| SINGLE SEQUENTIAL ACTUATION MECHANISM | |
| SINGLE SEQUENTIAL ACTUATION MECHANISM mode Nailing operation indicator: Light in blue | |
| CONTACT ACTUATION MECHANISM | |
| CONTACT ACTUATION MECHANISM mode Nailing operation indicator: Blink in blue | |
| Trigger locked | |
| Trigger unlocked | |
| The battery remaining power is nearly empty. Recharge the battery as soon as possible. Battery indicator: Blinks in red | |
| The battery remaining power is empty. Recharge the battery as soon as possible. Battery indicator: Lights in red | |
| Error has occurred. Check the tool and power switch ON again. Battery indicator: Blinks in orange | |
| Contact HiKOKI for inspection. Battery indicator: Lights in orange. After 10 seconds, automatically turn off Power switch. | |
| Shallow side | |
| Deep side | |
| Do not use on scaffold oldings, ladders. | |
| Warning | |
| Prohibited action |
- Depending on attached battery. The heaviest weight ismeasured with BSL36B18 (sold separately).
English
Battery
| Lights; The battery remaining power is over 75%. | |
| Lights; The battery remaining power is 50%-75%. | |
| Lights; The battery remaining power is 25%-50%. | |
| Lights; The battery remaining power is less than 25%. | |
| Blinks; The battery remaining power is nearly empty. Recharge the battery soonest possible. | |
| Blinks; Output suspended due to high temperature. Remove the battery from the tool and allow it to fully cool down. | |
| Blinks; Output suspended due to failure or malfunction. The problem may be the battery so please contact your dealer. |
SPECIFICATIONS
- Cordless Brad Nailer
| Model NT1850DA | ||
| Motor DC Brushless | ||
| Applicable Nail 18 Ga | ||
| Applicable Nail Length 16 mm to 50 mm | ||
| Nail Loading capacity [nails] | 100 (1 strip) | |
| Firing mode Single sequential | / Contact (Selectable) | |
| Cycle rate | [nails/second] | 2 (Intermittent) |
| Battery Model | BSL1820M | |
| Type Li-ion battery | ||
| Voltage DC 18V | ||
| Weight* 2.4-3.0 kg | ||
| Dimension Height × Length × Width | 286 mm × 267 mm × 92 mm | |
-
Weight: According to EPTA-Procedure 01/2014
-
Battery Charger
| Model UC18YFSL | |
| Charging voltage DC 14.4-18 V | |
| Weight 0.5 kg |
NOTE
Due to HiKOKI's continuing program of research and development, the specific cations herein are subject to change without prior notice.
NAIL SELECTION
Only nails shown in the Table below can be driven with this Nailer.

Dimensions of nails
STANDARD ACCESSORIES
In addition to the main unit (1 unit), the package contains the accessories listed on page 325.
Standard accessories are subject to change without notice.
APPLICATIONS
Cabinet and picture frame assembly, furniture trim.
On-site and mobile home trim and molding.
CHARGING
Before using the power tool, charge the battery as follows.
- Connect to the power source. (Fig. 3)
- Connect the charger's power cord to the receptacle.
When connecting the plug of the charger to a receptacle, the pilot lamp will blink in red (At 1- second intervals). CAUTION
Do not use the electrical cord if damaged. Have it repaired immediately.
- Insert the battery into the charger.
Firmly insert the battery into the charger as shown in Fig. 3.
- Charging
When inserting a battery in the charger, charging will commence and the pilot lamp will light up continuously in red.
When the battery becomes fully recharged, the pilot lamp will blink in red. (At 1-second intervals) (See Table 1)
(1) Pilot lamp indication
The indications of the pilot lamp will be as shown in Table 1, according to the condition of the charger or the rechargeable battery.
Table 1
| Indications of the pilot lamp | ||||
| Pilot lamp(red) | Before charging | Blinks | Lights for 0.5 seconds. Does not light for 0.5 seconds. (off for 0.5 seconds) | |
| While charging | Lights | Lights continuously | ||
| Charging complete | Blinks | Lights for 0.5 seconds. Does not light for 0.5 seconds. (off for 0.5 seconds) | ||
| Overheat standby | Blinks | Lights for 1 second. Does not light for 0.5 seconds. (off for 0.5 seconds) | Battery overheated. Unable to charge. (Charging will commence when battery cools) | |
| Charging impossible | Flickers | Lights for 0.1 seconds. Does not light for 0.1 seconds. (off for 0.1 seconds) | Malfunction in the battery or the charger | |
(2) Regarding the temperatures of the rechargeable battery The temperatures for rechargeable batteries are as shown in Table 2, and batteries that have become hot should be cooled for a while before being recharged.
Table 2 Recharging ranges of batteries
| Rechargeable batteries | Temperatures at which the battery can be recharged |
| BSL1820M 0°C-50°C |
(3) Regarding recharging time
Depending on the combination of the charger and batteries, the charging time will become as shown in Table 3.
Table 3 Charging time (At 20^ C )
| Charger Battery | UC18YFSL |
| BSL1820M Approx. 30 min |
NOTE
The recharging time may vary according to the ambient temperature and power source voltage.
CAUTION
When the battery charger has been continuously used, the battery charger will be heated, thus constituting the cause of the failures. Once the charging has been completed, give 15 minutes rest until the next charging.
-
Disconnect the charger's power cord from the receptacle.
-
Hold the charger fi rmly and pull out the battery. NOTE
Be sure to pull out the battery from the charger after use, and then keep it.
Regarding electric discharge in case of new batteries, etc.
As the internal chemical substance of new batteries and batteries that have not been used for an extended period is not activated, the electric discharge might be low when using them the first and second time. This is a temporary phenomenon, and normal time required for recharging will be restored by recharging the batteries 2-3 times.
How to make the batteries perform longer
(1) Recharge the batteries before they become completely exhausted.
When you feel that the power of the tool becomes weaker, stop using the tool and recharge its battery. If you continue to use the tool and exhaust the electric current, the battery may be damaged and its life will become shorter.
(2) Avoid recharging at high temperatures.
A rechargeable battery will be hot immediately after use. If such a battery is recharged immediately after use, its internal chemical substance will deteriorate, and the battery life will be shortened. Leave the battery and recharge it after it has cooled for a while.
CAUTION
If the battery is charged while it is heated because it has been left for a long time in a location subject to direct sunlight or because the battery has just been used, the pilot lamp of the charger lights up green. In such a case, first let the battery cool, then start charging.
- When the pilot lamp flickers in red (at 0.2-seconds intervals), check for and take out any foreign objects in the charger's battery connector. If there are no foreign objects, it is probable that the battery or charger is malfunctioning. Take it to your authorized Service Center.
Since the built-in micro computer takes about 3 seconds to confirm that the battery being charged with charger is taken out, wait for a minimum of 3 seconds before reinserting it to continue charging. If the battery is reinserted within 3 seconds, the battery may not be properly charged.
If the pilot lamp does not blink in red (every second) even though the charger cord is connected to the power, it indicates that the protection circuit of the charger may be activated.
Remove the cord or plug from the power and then connect it again after 30 seconds or so. If this does not cause the pilot lamp to blink in red (every second), please take the charger to the HiKOKI Authorized Service Center.
BEFORE USE
| Action Figure Page | ||
| Removing and inserting the battery | 2 | 2 |
| Charging 3 | 2 | |
| Selecting accessories — | 326 |
1. How to operate operation panel
(1) Power switch ON (See Fig. 4)
Under the condition of "Power switch OFF", push and hold on Power switch more than 1 second, then power indicator lights in Green.
NOTE
Do not press the push lever and/or pull the trigger during the process of turning the power switch ON.
Doing so will prevent the power switch from turning ON.
[Auto power off]
When the power is turned on but the Nailer is not used for 30 minutes, the Nailer is automatically turned off. To turn on again, press the power switch.
WARNING
Never leave the Nailer with the power on. This could result in an accident.
(2) Power switch OFF (See Fig. 4)
Under the condition of "Power switch ON", push Power switch, then power indicator goes off.
Under the condition of "Power switch ON", functions below are active.
(3) Select Nailing operation mode
(Single sequential actuation / Contact actuation)
After power switch turn ON, always set in Single sequential actuation mode as initial. (Nailing operation indicator light in blue.) (See Fig. 5)
To change nailing operation mode, push Nailing operation switch once. Every pushing, mode will change between "Single sequential" and "Contact". (See Fig. 6) Lighting (Blue):
SINGLESEQUENTIAL ACTUATION MECHANISM, Blinking (Blue):
CONTACT ACTUATION MECHANISM
(4) Remaining battery level
While power switch ON, the battery remaining level can be checked by status of LED lamp as below.
| Status of indicator | |
| LED do not light | The battery remaining power is enough. |
| LED (Red) blinks | The battery remaining power is nearly empty. |
| LED (Red) lights | The battery remaining power is empty. Recharge the battery as soon as possible. |
NOTE
There are situations in which this product will not operate when two LEDs are lit on the battery's remaining battery indicator.
This is not a malfunction but a control feature that is specific to this product. The tool will operate when the battery is recharged.
(5)Otherfunctions
In case of operation error, LED lamps show as below.
| Status of indicator | |
| LED (Red) blinks LED light LED light blinks in an interval. • In case of too hot condition, blinks in 1 second interval. • In case of too cold condition, blinks in 0.5 second interval. After 10 seconds, automatically turns off LED light and Power switch. | Machine is in too cold (below -5°C) or too hot condition. Allow the nailer to cool or warm-up thoroughly in adequate condition. |
| LED (Orange) blinks | Error is occurred. Once remove the battery. Then attach the battery and power ON again. |
| LED (Orange) lights | Contact HiKOKI for inspection. |
(6) How to use the LED light (See Fig. 7)
While the power switch on, the LED light will automatically light up the tip portion of the tool.
CAUTION
- Do not expose directly your eye to the light by looking into the light.
If your eye is continuously exposed to the light, your eye will be hurt.
- Wipe off any dirt or grime attached to the lens of the LED light with a soft cloth, being careful not to scratch the lens.
Scratches on the lens of the LED light can result in decreased brightness.
2. Trigger Lock Mechanism (See Fig. 8)
WARNING
Make sure the trigger is locked when not fi ring nails.
This Nailer has a lock mechanism to prevent the nails from being fired.
Set the switch lock lever at the trigger.
position to lock the
Slide the switch lock lever to the Nailer is to be used, and to the in use.
position when the position when it is not
3. Testing the nailer
WARNING
Make sure the trigger is locked when not firing nails. (See Fig. 8)
- Never use Nailer unless push lever is operating properly. Before actually beginning the nailing work, test the Nailer by using the checklist below. Conduct the tests in the following order.
If abnormal operation occurs, stop using the Nailer and contact a HiKOKI authorized service center immediately.
(1) REMOVE ALL NAILS AND BATTERY FROM NAILER.
ALL SCREWS MUST BE TIGHTENED.
THE PUSH LEVER AND TRIGGER MUST MOVE SMOOTHLY.
(2) Installing the battery.
Do not operate the push lever or trigger while installing the battery. (See Fig. 2)
(3) Turn on the Power switch. (See Fig. 1)
Turn on the Power switch by push and hold on Power switch more than 1 second.
Make sure the power indicator is lighting in green, and nailing operation indicator is lighting in blue. (SINGLE SEQUENTIAL ACTUATION MECHANISM)
NOTE
Do not press the push lever and/or pull the trigger during the process of turning the power switch ON.
Doing so will prevent the power switch from turning ON.
[Auto power off]
When the power is turned on but the Nailer is not used for 30 minutes, the Nailer is automatically turned off. To turn on again, press the power switch.
WARNING
Never leave the Nailer with the power on. This could result in an accident.
Nailing operation indicator
Lighting (Blue):
SINGLESEQUENTIAL ACTUATION MECHANISM, Blinking (Blue):
CONTACT ACTUATION MECHANISM
Make sure the battery indicator is not lighting or blinking.
If the battery indicator is lighting or blinking in red, the battery doesn't have enough power and it needs to be charged.
(4) Remove the finger from the trigger and press the push lever against the workpiece.
(5) Separate the push lever from the workpiece.
Next, point the nailer downward, pull the trigger and then wait in that position for 5 seconds or longer.
THE NAILER MUST NOT OPERATE.
(6) ① Without touching the trigger, depress the push lever against the workpiece. Next, pull the trigger.
THE NAILER MUST OPERATE.
Hold the trigger back and depress the push lever against the workpiece again.
THE NAILER MUST NOT OPERATE.
③ Separate the finger from the trigger. Next, ① is operated again.
THE NAILER MUST OPERATE.
English
(7) Separate the push lever from the workpiece, pull the trigger.
Depress the push lever against the workpiece within 2 seconds.
(8) Set the nailing operation indicator blinking ON mode. (CONTACT ACTUATION MECHANISM)
Push the nailing operation switch once, make sure that the indicator is blinking Blue.
Separate the push lever from the workpiece, pull the trigger.
Depress the push lever against the workpiece within 2 seconds.
(9) If no abnormal operation is observed, you may load nails in the Nailer.
Drive nails into the workpiece that is the same type to be used in the actual application.
4. Checking push lever operations
WARNING
Make sure the trigger is locked when not fi ring nails.
Always make sure the trigger is locked and the battery removed from the power tool when checking push lever operations.
Check to make sure the push lever slides smoothly when operated.
Clean the sliding area on the push lever if it doesn't slide smoothly.
5. Load nails
WARNING
When loading nails into Nailer,
1) remove battery from the nailer;
2) do not pull trigger;
3) do not depress push lever; and
4) keep nailer pointed downward.
(1) Lightly press the stop lever and gently pull out the magazine cover. (See Fig. 9)
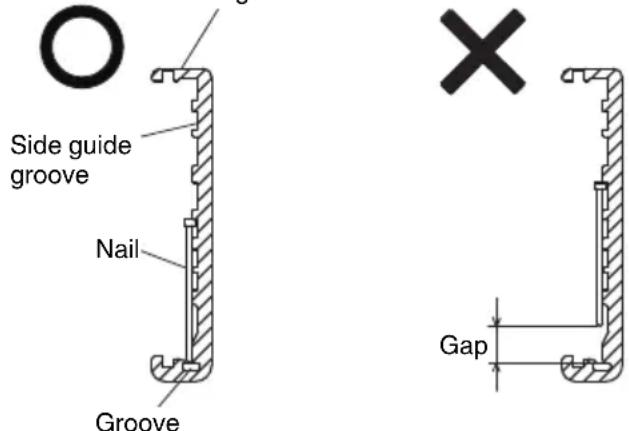
(2) Set nail strip into the magazine and keep the points of nails in contact with Groove. (See Fig. 10)
NOTE
The nails shown in page 12 can be loaded onto the side guide groove of the magazine without any adjustment.
Always keep the points of nails in contact with Groove.
Magazine
(3) Slide the nail strip into the blade guide. (See Fig. 11)
(4) Confirm that nail strip is placed with side guide grooves and Groove properly, then push the magazine cover forward to be latched.
O NEVER point tool at yourself or others in work area.
- Keep fingers AWAY from trigger when not driving nails to avoid accidental fire.
Do not use the electrical cord if damaged. Have it repaired immediately.
Choice of triggering method is important.
Please read and understand "1. Nailing procedures" found below.
Before starting work, check the nailing operation switching device.
This HiKOKI nailer includes a nailing operation switching device.
Before starting work, make sure that the switching device is properly set.
If the switching device is not set properly, the nailer will not operate correctly.
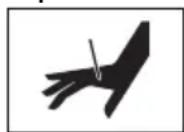
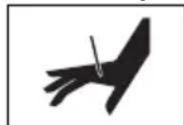
- Never place your face, hands or feet near firing head when using.
- Do not drive nails on top of other nails or with Nailer at too steep of an angle; nails can ricochet and hurt someone.
- Do not drive nails into thin boards or near corners and edges of workpiece. Nails can be driven through or away from workpiece and hit someone.
- Never drive nails from both sides of a wall at the same time. Nails can be driven into and through the wall and hit a person on the opposite side.
- Never use Nailer which is defective or operating abnormally.
Do not use Nailer as hammer.
○ Remove all remaining fasteners and battery from nailer when:
1) doing maintenance and inspection;
2) checking proper operation of push lever and trigger;
3) attaching or removing the nose cap;
4) cleaning a jam;
5) it is not in use;
6) leaving work area;
7) moving it to another location; and
8) handing it to another person.
Remove battery from Nailer when:
1) loading nails;
2) turning the adjuster.
This HiKOKI nailer is equipped with a nailer operation switching device.
Use SINGLESEQUENTIAL ACTUATION MECHANISM or CONTACT ACTUATION MECHANISM in accordance with the work to be performed.
Explanation of the various nailing operations
O SINGLESEQUENTIAL ACTUATION MECHANISM:
First, press the push lever against the wood; next, pull the trigger to drive the nail.
After nailing once, nailing will not be possible again until the trigger is released and pressed again.
O CONTACT ACTUATION MECHANISM:
- Pull the trigger.
- Press the push lever against the wood to drive the nail.
- If the trigger is held back, a nail will be driven each time the push lever is pressed against the wood.
1. Nailing procedures
This Nailer is equipped with the push lever and does not operate unless the push lever is depressed.
There are two methods of operation to drive nails with this Nailer.
They are:
- Intermittent operation (Trigger fire):
- Continuous operation (Push lever fire):
(1) Intermittent operation (Trigger fire) Use the SINGLESEQUENTIAL ACTUATION MECHANISM setting. (See Fig. 12)
WARNING
For intermittent operation, Set the nailing operation switch to SINGLESEQUENTIAL ACTUATION MECHANISM (Nailing operation indicator is light in blue.) (i.e. Set to SINGLE ACTUATION MECHANISM.)
To avoid double firing or accidental firing due to recoil. 1) Set to SINGLESEQUENTIAL ACTUATION MECHANISM.
2) Pull the trigger rapidly and fi rmly.
① Set the nailing operation switch to SINGLESEQUENTIAL ACTUATION MECHANISM (Nailing operation indicator is light in blue.)
② Position the nail outlet on the workpiece with finger off the trigger.
③ Depress the push lever firmly until it is completely depressed.
4 Pull the trigger to drive a nail.
⑤ Remove finger from the trigger and lift the tool off the wood surface completely.
To continue nailing in a separate location, move the nailer along the wood, repeating steps 2- as required.
NOTE
Operations ③ and ④ should be done within 4 seconds of each other. If more than 4 seconds pass after ③ , the Nailer will not work properly. If this happens, retry from ③ .
(2) Continuous operation (Push lever fire) Using CONTACT ACTUATION MECHANISM (See Fig. 13)
WARNING
To avoid double firing or accidental firing due to recoil.
1) Do not press the nailer against the wood excessive force.
2) Separate the nailer from the wood as it recoils after nailing.
① Set the nailing operation switch to CONTACT ACTUATION MECHANISM (Nailing operation indicator is blink in blue.)
② Pull the trigger with the Nailer off the workpiece.
③ Depress the push lever against the workpiece to drive a nail.
④ Move the Nailer along the workpiece with a bouncing motion.
Each depression of the push lever will drive a nail.
As soon as the desired number of nails have been driven, remove finger from the trigger.
NOTE
Operations 2 and 3 should be done within 2 seconds of each other. If more than 2 seconds pass after 2, the Nailer will not work properly. If this happens, retry from 2.
WARNING
- Keep your finger off the trigger except during nailing operation, because serious injury could result if the push lever accidentally contacts you or others in work area.
- Keep hands and body away from the discharge area. This HiKOKI nailer may bounce from the recoil of driving a nail and unwanted subsequent nail may be driven, possibly causing injury.
NOTE
If all warnings and instructions are followed, safe operation is possible with all two systems: SINGLE SEQUENTIAL ACTUATION MECHANISM, CONTACT ACTUATION MECHANISM.
Always handle nails and package carefully. If nails are dropped, collating bond may be broken, which will cause mis-feeding and jamming.
O After nailing:
1) remove battery from the Nailer;
2) remove all nails from the Nailer;
2. Adjusting the nailing depth
To assure that each nail penetrates to the same depth, be sure that the Nailer is always held firmly against the workpiece.
If nails are driven too deep or shallow into the workpiece, adjust the nailing in the following order.
① Remove the battery from the Nailer.
② If nails are driven too deep, turn the adjuster to the shallow side. (See Fig. 14)
Adjustments are in half-turn increments.
If nails are driven too shallow, turn the adjuster to the deep side. (See Fig. 15)
③ Stop turning the adjuster when a suitable position is reached for a nailing test.
4 Connect the battery to the Nailer.
ALWAYS WEAR SAFETY GLASSES.
Perform a nailing test.
⑤ Remove the battery from the Nailer.
6 Choose a suitable position for adjuster.
3. Using the hook (See Fig. 16)
WARNING
When using the hook, turn off the power switch (green light "OFF"). Pay sufficient attention so that the main equipment does not fall.
If the tool falls, there is a risk of accident.
Hook can be installed on the left or right side.
① Remove the battery, then remove all remaining nails from the magazine.
② Securely hold the main unit and remove the screw using a screwdriver.
③ Remove the hook.
④ Install the hook on the other side and securely fasten with screw.
NOTE
Hook can be used as a hanger.
4. Using the nose cap (See Fig. 17)
WARNING
When attaching or detaching the nose cap, be sure to remove your finger from the trigger and remove all remaining fasteners and the battery from the nailer.
If you like to protect the surface of workpiece against scratches or markings made by the push lever, attach the accessory nose cap to the push lever.
① Remove all remaining fasteners and battery from nailer.
Put the nose cap to the toe of the push lever.
③ When not using the nose cap, secure in the storage compartment located on the reverse side of the magazine.
NOTE
The nose cap may reduce nailing depth due to its thickness. Re-adjustment of nailing depth is required.
5. Clearing a jam
If nails are jammed in firing head, remove it, and adjust the nailing in the following order.
CAUTION
Remove the battery from the Nailer.
① Remove the battery from the Nailer.
② Remove all nails.
③ Release the Lock lever and open guide plate. (See Fig. 18)
Remove the jammed nail with a slotted-head screwdriver. (See Fig. 19)
CAUTION
NEVER hit the driver blade.
NEVER point the tool at yourself or another person, to avoid risk of injury by mis-fi ring.
Even if the battery is removed from the nailer, there is still energy of compressed air remaining inside.
⑤ Close guide plate and latch.
NOTE
In case of frequent jam, contact a HiKOKI authorized service center.
MAINTENANCE AND INSPECTION
CAUTION
Be sure to remove all remaining fasteners and battery from the nailer before maintenance and inspection.
1. Inspecting the magazine
① Remove battery from the Nailer.
Clean the magazine. Remove dust and wooden chips which may have accumulated in the magazine.
CAUTION
Check that the nail feeder slides smoothly by pulling it with finger.
If not smooth, nails can be driven at an irregular angle and hurt someone.
2. Inspecting the mounting screws
Regularly inspect all mounting screws and ensure that they are properly tightened. Should any of the screws be loose, retighten them immediately. Failure to do so could result in serious hazard.
3. Maintenance of the motor
The motor unit winding is the very "heart" of the power tool. Exercise due care to ensure the winding does not become damaged and/or wet with oil or water.
4. Cleaning on the outside
When the power tool is stained, wipe with a soft dry cloth or a cloth moistened with soapy water. Do not use chloric solvents, gasoline or paint thinner, for they melt plastics.
5. Storage
Store the power tool in a place in which the temperature is less than 40^ and out of reach of children.
NOTE
Storing lithium-ion batteries.
Make sure the lithium-ion batteries have been fully charged before storing them.
Prolonged storage (3 months or more) of batteries with a low charge may result in performance deterioration, signifi cantly reducing battery usage time or rendering the batteries incapable of holding a charge.
However, signifi cantly reduced battery usage time m be recovered by repeatedly charging and using the batteries two to five times.
If the battery usage time is extremely short despite repeated charging and use, consider the batteries dead and purchase new batteries.
CAUTION
In the operation and maintenance of power tools, the safety regulations and standards prescribed in each country must be observed.
Important notice on the batteries for the HiKOKI cordless power tools
Please always use one of our designated genuine batteries. We cannot guarantee the safety and performance of our cordless power tool when used with batteries other than these designated by us, or when the battery is disassembled and modified (such as disassembly and replacement of cells or other internal parts).
GUARANTEE
We guarantee HiKOKI Power Tools in accordance with statutory/country specific regulation. This guarantee does not cover defects or damage due to misuse, abuse, or normal wear and tear. In case of complaint, please send the Power Tool, undismantled, with the GUARANTEE CERTIFICATE found at the end of this Handling instruction, to a HiKOKI Authorized Service Center.
Noise Information
Noise characteristic values in accordance with EN60745: The typical A-weighted single-event sound power level L WA,1s.d = 79 dB
The typical A-weighted single-event emission sound pressure level at work station L_pA,1s,d = 68 dB Uncertainty KpA:3 dB
These values are tool-related characteristic values and do not represent the noise development at the point of use. Noise development at the point of use will for example depend on the working environment, the workpiece, the workpiece support and the number of driving operations, etc.
Depending on the conditions at the workplace and the form of the workpiece, individual noise attenuation measures may need to be carried out, such as placing workpieces on sound-damping supports, preventing workpiece vibration by means of clamping or covering, etc.
In special cases it is necessary to wear hearing protection equipment.
Vibration Information
The typical vibration characteristic value in accordance with EN60745:2.1 m/s²
Uncertainty K: 1.5m / s^2
This values is a tool-related characteristic value and does not represent the influence to the hand-arm-system when using the tool. An influence to the hand-arm-system when using the tool will for example depend on the gripping force, the contact pressure force, the working direction, the adjustment of energy supply, the workpiece, the wrokpiece support.
The declared vibration total value has been measured in accordance with a standard test method and may be used for comparing one tool with another.
It may also be used in a preliminary assessment of exposure.
WARNING
The vibration emission during actual use of the power tool can differ from the declared total value depending in the ways in which the tool is used.
- Identify safety measures to protect the operator that are based on an estimation of exposure in the actual conditions of use (taking account of all parts of the operating cycle such as the times when the tool is switched off and when it is running idle in addition to the trigger time).
NOTE
Due to HiKOKI's continuing program of research and development, the specifications herein are subject to change without prior notice.
Maintenance chart
| ACTION WHY HOW | ||
| Clean magazine and feeder mechanism. | Prevent a jam. Blow clean daily. | |
| Keep push lever working properly. | Promote operator safety and efficiencl Nailer operation. | Blow clean daily. |
TROUBLESHOOTING
Use the inspections in the table below if the tool does not operate normally. If this does not remedy the problem, consult your dealer or the HiKOKI Authorized Service Center.
| PROBLEM CHECK METHOD CORRECTION | ||
| Power switch doesn't turn on. Turn on once, but turn off automatically. | Low battery charge. Charge the battery. | |
| Damaged internal electronics. Contact HiKOKI for replacement. | ||
| Push lever and/or trigger is ON state? Keep push lever and trigger in OFF state. | ||
| Keep no operation over 30 minutes? (Auto-power off function) | Push and hold power switch more than 1 second to switch "ON" | |
| Nailer doesn't operate (Power switch ON). | Nailer not enough pressed against workpiece. | Hold nailer firmly and press to the workpiece completely. |
| Trigger not enough pulled. Pull the trigger firmly. | ||
| More than 4 seconds pass from push lever ON to trigger ON (or more than 2 seconds pass from trigger ON to push lever ON). | Make sure that less than 4 seconds pass between push lever ON and trigger ON (or make sure that less than 2 seconds pass between trigger ON and push lever ON). | |
| Switch lock lever (Trigger lock function) is "ON" position. | Set Switch lock lever to "OFF" position. (Refer to Fig. 8) | |
| Machine is too cold (below -5°C) or too hot. (LED light blinks at regular intervals, and power switch goes off after 10 seconds.) (Refer to page 15) | Allow the nailer to cool or warm-up throughly in adequate condition. | |
| Damaged internal electronics. Contact HiKOKI for replacement. | ||
| Nailer operates, but no nail is driven. | Magazine is dirty. Blow and wipe clean the magazine. | |
| Check for a jam. | Clear a jam (refer to Fig. 18, 19). | |
| Driver blade worn or damaged? Contact HiKOKI for replacement. | ||
| Feed spring weakened or damaged? Replace feed spring. | ||
| Nail feeder damaged? Replace nail feeder. | ||
| Check for proper nails. | Use only recommended nails. | |
| Weak drive. Slow to cycle. | Check position of nailing depth adjustment adjuster. | Readjust according to Fig. 14, 15. |
| Driver blade worn? | Contact HiKOKI for replacement. | |
| Compressed air pressure has become low. | Contact HiKOKI for replacement. | |
| Damaged internal electronics. Contact HiKOKI for replacement. | ||
| Drives too deep. | Check position of nailing depth adjustment adjuster. | Readjust according to Fig. 14, 15. |
| Skipping nails. Intermittent feed. | Check for proper nails. | Use only recommended nails. |
| Nail feeder damaged? Replace nail feeder. | ||
| Feed spring weakened or damaged? Replace feed spring. | ||
| Driver blade worn or damaged? Contact HiKOKI for replacement. | ||
| Nails jam. Driven nail is bent. | Check for proper nails. | Use only recommended nails. |
| Driver blade worn or damaged? Contact HiKOKI for replacement. | ||
| Remaining battery indicator on the machine doesn't match to battery | — | Refer to the indicator lamp on the machine. (Refer to page 14) |
VOORZORGSGMAATREGELEN
VEILIGHEIDSWAARSCHUWINGEN
HET SPIJKERPISTOOL MOET IN WERKING TREDEN.
5. Spijkers laden WAARSCHUWING
Unexpected triggering will discharge the fastener causing an injury.
(2) Installation of batteriet.
DYKKERPISTOLEN MA IKKE VAERE I DRIFT.
DYKKERPISTOLEN MA IKKE VAERE I DRIFT.
DYKKERPISTOLEN SKAL VAERE I DRIFT.
DYKKERPISTOLEN MÅ IKKE VAERE I DRIFT.
DYKKERPISTOLENSKALVAEREIDrift.
DYKKERPISTOLEN MÅIKKE VAERE I DRIFT.
DYKKERPISTOLENSKALVAEREIDrift.
(9) Hvis der/DDke observeres unnormal drift, kan du saete səm i dykkerpistolen.
Information on vibration
5. Fierner fastkjørte spiker
VEDLIKEHOLD OG INSPEKSJON
FORSIKTIG
TENIKE Σ ΠPOEIΔΟΙHΣΕΙΣ AΣΦΑΛΕΙAΣ TOY HΑEKΤΡΙΚΟΥ EΡΑΛΕΙΟΥ
NPOEIADONOHSH
Mny Tpononoiote note to fic u onoiovδnnote tpno.
Mx npoioieiE pioopapoynC e yieva nektpika epyaia.
[AuToaT anEvEpyoioiOn]
OTAV EivaevpyoiojEvn IoxucaAaAtoKapfoTKO E XPOIOIEiA Yia 30 ANTA to KAPFOKO
anevpyoioeiautouata. Tva to evpyoiooTe
EavadatoteovdakokntnoxuoC
IPOEIAOIOIH2H
O MECHANISMUS JEDNOTLIVEHO SPOUSTENI:
- Bataryayi atese atmayin.
L_WA,1s,d = 79 ~dB
He n3noI3BaIte eIeKtpnueeCKn HNCTpyMeHT, KOrato cTe n3MopeHn, IIN NOB BnIaHHeTo Ha JeHaPcTBeHH CpeDCTBa, anHOxOJ IIN ONHaTn.
BcraKo HeBHMaHne np np paOta c eIeKtpnueckn HNCTpyMeHTN MOHe da DOBepe Do CepNo3HN HapaHbAHn.
b) H3noJ3BaIte JnHn npEpa3Hn cpeCTBa. BnHaHn Hocete 3aunTHn OuHa n macka.
3aunntnTe cpeclTba, kaTo pecnnpatopHa MaCKa, CneuaJIH N ObyBcN C yCTOnuBa Ha IIb3raHe NOdMeTKa, KACKa, HIN aHTNoHn, CnopeJyCIOBnTa Ha pa6Ota, KOHTO Ue HamaIAT ONaCHOCTTA OT HapaHBAHe.
c) PpeoTbpaTBAhe Ha cnyaHOBKJIIOUbaHe. YBepete ce, ye 6yToHbT 3a CTaprHa ypeDa e B H3KNIOUeHO NIOJOKeHne, npeu Da CbbpKeTe eJekTpNueCnHnCTpyMeHT KbM N3TOUHNK Ha 3axpaHbAhe n/nn 6atepna, KaHTo n npEdu a Ro B3emTe nn ppeHacraTe.
IpehaHTo Ha HcTpMeHTn C npbCT Ha CTapT 6yToHa, Hn Ha npBkUOyBaTeJHa 3axpaHbaHeto, HOCh OnaCHOCT OT INuDeHTN.
d) OtcpaHete BCnHn raeuHn n pyrN KIOUObe, npedn da BkIIOHTe ypeDa KbM 3axpaHbAHeTo.
Taeuen KIOU HIN INHCTpymeHT, 3a6paBEN B POTAUNHH KOMNHOENT Ha eJekTPnueckn INHCTPmEHT, MOKe Da DOBeDe Do HapaHBAHe.
e) He ce npecraTe. Ppe3 uJIoTO BpeMe Tp6Ba Da HMaTe CtaBnHa Onopa N da NODbPHeTa 6aHaHC Ha TJIOTO.
ToBa OCHpyraBA no-0o6bP KOHTpOJI Bbpxy eNeKtpnuecknte INHCTpyMeHTn npN HeOyakBaHN CHTuayuH.
f) Hocete noxdxoguo 06leHno. He hocete npekaleho shnpoh dpexn nn 6nHyta. Na3eTe Kocata, dpexnte n pbaBnnte cH OT NOdBHHN KOMNOHEHTN.
Unpoknte npexn, bkyta n dIra Koca Morat da 6bdaT3axbaHATN OT NOBNNHHTe KOMNOHEHTN.
g) Ako ca ochrypeH yctpoNCTBa 3a npncbdeHHBaHe KbM npaxoyIOBNTeHN HcTaIauH, yBepTe ce, ye ca npabHnHO npncbdeHHeH.
H3noJ3BaHeTo Ha npaxoyIOBnTeHn n cHIOHmOHe Da HamaHn CBbP3aHnTe Cbc 3AmbpcBAHeTo pNcKOBe.
4) EKnIaTaunn n noDpBHHa Ha eJeHTpHuecNnHCTpyMeHTn
a) He HacnBaIte eIeHTpNueeCKHTe HcHTpyMeHTN. 3noJ3BaIte nOxOJaU eIeHTpNueeCKH HcHTpyMeHT 3a CbOTBeTHnte cJIH.
Iopxoadyrae eektpueckn HNCTpyMeHT Ocnhypba 6e3oNaCHO nno-dObe CbbpseHa paobot npnpedBvndHnTe HOMHaJIHn npaMeTpN.
b) He n3no3BaIte eIeKtpnuecknrt HNCTpyMeHT, aHO He MoKe Da 6bDe BKNIOUeH NIN N3KNIIOUeH OT cBOTBETHNcTApT 6yTOH INI INpeBKnIOUbATEJ.
BceH eIeKtpueckn HcTpyMeHT, KOHTo He MoHe da ce KOHTpOJInpa OT npEeBkJIIOUyBaTeJIa, e ONaCEH N NOJIeHN Ha peMOHT.
c) N3KIOUeTe ⅢeCena Ha HnHCTpyMeHTa OT H3TOUHNHa Ha 3axpaHbAne H/nn O6aTePnTa, npedn Da N3BbPwBaTe HAcTpoiKn, npn CmHa Ha npncTabKn Hn npn CbXpaHeHne.
Te3n npedna3HmepKn HamaJbAt pncAOT CnyaHNO HHexKeJHaHO BHLIOUbaHe Ha eJeKTPnueckn INHCTpymeHT.
d) CbXpaHbAaIte HeH3nO13BaHHTe eIeKtpnueckn HNCTpyMeHTn DaIeY OT DOCTbN Ha Deuca N He No3BOJRABaTe Ha INuca, He3aNo3HaTN C HauHbHa Ha pa6ota c HNCTpyMeHTnte, n C Te3n HNCTpyKcH, da pa6oTATC TAX.
EneKtpnuecknte HNCTpyMeHTn NpeDCTaBnBaT onaCHOCT B pBuTe Ha HeONNTHn Nua.
e) NpOdbpHaHte eIeHTprueckHte HNcTpymeHTn. NpOBepraBaTe cHTPOBhata n 3aKpenBaHeTo Ha NOBbHHnTe qactn, npOBepraBaTe 3a NoBpeHn Yactn, KOnTO MORat da Ce OTPa3rT Ha paOtaTa HA eIeHTprueckHte HNcTpymeHTn. AHO yCTaHOBnTe NobpeHn,OTcTpaHete rN ppeHn Da H3NOJ3BaTe eIeHTprueckHte HNcTpymeHTn. MHoro 3IIOJIoYKn Ce IbJHnat Ha Lo7a NpOdpbHKHa eIeKTprueckHte HNcTpymeHTn.
f) IopdIbpaHaepeKeIeHTe HcTpymEnTHn HatoyeHn uHCTn.
IpaBnHO nOaDbpHaHnTe peKeu nHCTpyMeHTn, C HatoyeH peKeu eJeMeHTn, ce ynpablaBaT N KOHTPOlnpaT No-NECHO.
g) H3noJ3BaIte eJeHTpUeChn HNCTpyMeHTn, npncTabHN uHcecoapn T.H., CbrlaCHO Te3n HNCTpyKuNN, KaTO B3EmTe PpeBnD pa60THTE yCNoBn N Bnda pa60TN, KOHTO ue Ce n3BbpWBaT.
N3noJ3BaHe Ha eJekTpueeCKIte HnCTpyMeHTn 3a pa60Tu, pa3JNUHn OT Te3n, 3a KOnTO Ca npEbnDeneH, MoKe Da DOBeDe Do NOBnWeH PnCK n ONaCHn CNTyaucn.
5) EKcNloataunn H noDpBxHa Ha eJeHTpnuechn HHCTpyMeHTn 3axpaHbAHn OT 6aTePN
a) 3apeHdaTe ypeDnte cMo c6c 3apdHnTe yctpoNCTBa, nocouehn OT npOn3BONDHTeI. 3apAnHO yctpoNCTBO, noXoJrO 3a eINH TnN 6aTePN, MoHe Da Cb3JaDe pNCH OT NOHAP, PnN H3NoJ3BaHe 3a Dpyr TnN 6aTePN.
b) H3noJ3BaIte eJeKtpnuechNte HHCTpyMeHTn camo c nocouehna 3a TAn Tn6aTePN. H3noJ3BaHeTo Ha npy TnT 6aTePN Cb3daBA pck OT HapaHRAbe N NOkap.
c) Horato He H3noJ3BaTe 6aTepeHnTe Te Tp86Ba Da ce CbXpaHABat DaJeu OT dpyr MToJIHN npedMeTH NaTO KlaMepH, MoHeT, KIOHOBE, RBO3DeH, BnHTOBe Hn Dpyr MaJIHN MToJIHN npedMeTH, HOHTo MORaT Da OcbIeCTBt HONTAKT MeKdy KJIEMnTE nM.
KoHTaKT MeHdy KJIeMnTe Ha 6atePnTe MoKe da DOBeDe OT NCKPN NIN NOkAp.
d) Ipn HnOoXoJn yCIOBna Ha cbxpaHHe, 6atePnte Morat Da n3TeKaT; n36raBaIte KOHTaNT. AHO clyuHaNo BJe3eTe B KOHTaNT C eJeHTpOInTHaTa TeuHOCT, n3NlakHete O6NJHO C BODa. Ako nonaDHe eJeHTpoIN T B OHTe, n3NlakHete O6NJHO NOTbpcTe MeMNCHcA NOMU.
EneKtpoNTbT Ha 6atepnte MoKe da npuHnBb3paJIeHHe nn n3rapHHN.
6) 06cIyHbAHe
a) 06cIyXbaHeTo Ha eIeHTpHueCHTe HNCTpyMeHTn TpA6Ba Da ce N3BbPwBa cMo OT KBAJIHΦIuHpaHN cepBn3Hn pa6OTHnU, npH n3NoJ3BaHe Ha opRHaJIH pe3epBHN qAcTn.
ToBa ige rapaHTnpa 6eONacHocT Ta npu paOta c eNEKTPnuecknte HNCTpyMeHTN.
BHIMAHNE
He donychaTe B 30HaTa Ha pa6ota Deua N Bb3pacTHn Xopa.
Horato He n3no3BaTe eIeKtpnuecHnTe HnCTpyMeHTn, cbxpaHbAaTe rHa daJeY OTO DCtbn Ha deua N Bb3pactTHX opa.
PPEdUnpeKDeHnA 3A 6E3OJACHOCT PnYIOTPEBA HA AkyMylatopeH INHCTPYMEHT 3A 3ABnBAHE HA UΦTOBE
- BnHar n HmaTe npedBnD, Ye B nHcTpymeHTa moKe da HMa nnpoHN.
Ako He n3noJ3BaTe BHMaHne npn pa6oTaTa C HnCTpyMeHTa, TOBa MoHe Da DOBeHe Do HeoayKaBaHo N3CTpeJIbAHe Ha NiPOHnte I Do HapaHBAHe. - He hacoubaite HnctpymEnTa KbM ce6e cn nn OkoJHNTe.
Ako HnCTpymEnbT ce 3aDenctBa HenpeBnDHeo, npoHbT ue Ce OCBO6Ou N ue npuHHn HapaHraBahe. - He 3aedcTbaTe HnCtpymeHTa, aHO ToH He e nocTabeh Cta6nJHo BbpxdetaJa.
Ako INHCTpyMeHTbHe e B KOHTaKT C DeTaIJa, NINOHBT MOHe Da ce OTKIOHOIOT CEJIa. - AHO B INHCTpymeHTa 3aceDHe NnPOH, N3HIOUyTe INHCTpymeHTa OT N3TOUHNHa Ha 3axpaHBAhe.
Ako e BkIIOueH 3axpaHbHaTe, HNCTpyMeHTbT MOKe Da ce cAmO3aJeICTBa, DOKaTO OTcTaPbHbATE 3aceHAn NIpOH.
5.БbTe BnMaTeHn npn OTCpaHraHe Ha 3aDpbCTBaHe c NpOH.
OkaTo Ce ONITBaTe Da OCBO6OJNTe 3aceHnI npOH, MExAHN3MbT MoHe Da 6bJe NIOJIOKeH Ha HATnCK, INopaTDoBA NPOHObT Da Ce n3CTpeJI. - He n3noJ3BaIte To3n IHCTpyMeHT 3a 3aHpeINBaHe Ha eIeHTpueechn Ka6eHN.
ToH e npedHa3HaueH 3a MoTataK Ha eIeKtpuYeCKn Ka6eHN MOHe Da NOBpeDN N3Olaunra NTM, Cb3daBaaiKn OnaCHOCT OT TOKOB yap INI NOxap.
ДОПьЛНITEЛНМЕРКИЗАБЕЗПАСХОТ
- Be3onacHa pa6oTa npn npaBnHa ynotpe6a.
To3n HNcTpymeHT e npedHa3HaueH 3a 3a6nbAhe Ha nipoHN B DbPBO N IOIO6H MaTepeHnI. H3noJ3BaIte rO cAmo IIO npedHa3HaueHne.
- He donyuchaiTe 3anaIbaHe n eKcnlo3nn.
Pn 3a6bBaHeTo Ha nHPOHInTe MoKe Da n3Jr3At NCKpn H3aTOBa e ONaCHO IHCTpyMeHTbT da Ce n3NOJ3Ba B 6JIN3OcT do JIaK, 60J, 6eH3eH, pa3peNtEn, 6eH3nH, ra3, IenIIa N NOo6Hn 3aNaIIMn BeIecCTBa, TbN KaTO Te MOrat da CE Bb3JIaMeHrT INJ da EKcNIOdnpaT. Pn HnKaBn ObcToAteJICTBa TO3N IHCTpyMeHT He TpRbBA da ce n3NoJ3Ba B 6JIN3OcT do TaKbB 3anaJIM MaTePnAn.
- BnHaH Hocete npedna3Hn OCHla.

Horato paobotte c eIeHTponHCTpyMeHa, BnHaHn HocTe npedna3HN OuHa n Ce yBepTe, ye OKoJIHnTe Xopa CbIo HOCr TaKuBa.
IIma cepno3eH pNCK 3a 3peHneTo, aKO parMeHTn OT NHPOHHe, KOHTo He ca
3a6bnt npabHnHO, nonaHaT B OChTe. Npepa3Hn OuHaIa ce npdaBt BbB BCnHJxHeJe3apnn. BnHaI HocTe npedna3Hn OuHa IIO BpeMe Ha pa6oTa C To3N IHCTpyMeHT. N3noJ3BaHTe npedna3Hn Ouyla nn Wnpoka Macka Hd DnONTPnuHNTe OUYla.
Български
Pa60ToaTeJIte Tp8Ba 3aIbNHTeHIO Da HJaRaT I3NoJ3BaHeTO Ha npEpa3Hn CpeCTBa 3a OHTe BHHArH.
4. 3aunTe Te yuHTe n rnaBaTa cn.
No Bpeme Ha pa6oTa HocTe Wymo3aIyWnteNn KacKa. CbTc TaHa, B 3aBNCIMOCT OT yCIOBnra, OHOJIHnTe Xopa CbTc Tp6Ba Da HOCrT Wymo3aIyWnteNn n KacKn.
5. Cbo6pa3raBaTe ce c pa6oTeuHTe 6n3o do Bac.
Ima roJMa ONaCHOCT OT cepNo3eH INuIeHT, aKO nipoHbT He CE 3aKOBe npaBnJIHO,OTXbPbKHe uYapn HAporo.3aTOBa BnHar BNHMaBaIte 3a 6e3OnaCHOCTTa Ha Xopata OKoLo Bac, KOraTo n3NoJ3BaTe To3N INCTpyMeHT. 3aDbJnHTeH NoDCnrypeTe Da HMa HKnO B 6In30CT Do n3XoJa 3a nipoHnte.
6. HnHora He HacoUbaIte n3XoJa 3a NpOHTe KbM xopa.
BnHaHn HMaIte npedBnD, Ye B nHCTpyMeHTa MoKe Da HMa NIpOHN.
Ako n3xOdbT 3a nipohnTe e Hacoyeh KbM Xopa, MoTa Da Bb3HKnHaT cepno3HNuHnDeHTN, aKO CnyaHNO
3aJeCTBaTe INHCTpyMeHTa. HoraTo noCTaBte nn CBaJIaTe 6aTePnIa, npn 3apeKdaHeTO Ha NIpOHn IIN npn NOobHn DeIcTBn, ce yBepeTe, ye n3XoDbT 3a NipOHnTe He e HAcOeH KbM HIKORO (BKIOUHTeJHO KbM BAC CAMN). DOpn KOrato He ca 3apeHn HNKaKBn NIpOHn, e OnaCHO Da 3aJeCTBaTe INHCTpyMeHTa, DOkATO e HAcOeH KbM HAKORO, 3aTOBa HIKORA He ro npabete. He cn npabete Wern. YBaKaBaAte INHCTpyMeHTa KaTO pa6OTe INHCTpyMeHT.
7.прениуnotpe6а npobepete locta 3a HATnchane.
YBepete Ce, Ye IocTbT 3a HATnCKaHe pa60Tu HOpMaJIHO. (IocTbT 3a HATnCKaHe MOKe Da NMa IMe "Be3onacHocT".) HnKora He n3No13BaIte HNCTpyMeHTa, aKO IocTbT 3a HATnCKaHe He pa60Tu HOpMaJIHO, 3aOTo B IpOTnBEH ClyuAaH NHCtpyMeHTbT MOKe Da n3CTpeJI NyPOH HeoayKaBaHo. He MaHNyInpaTe N He n3BaXJaIte LoCTa 3a HATnCKaHe, B IpOTnBEH ClyuAa ToI CTaba HEN3No13BaEM.
8. 360pt Ha 3aedeCTbau MeToe BaKeH.
IpoyeTe n pa36peTe pa3dela, 03aRnlaBeH ,KAK CE I3IOJ13BA INHCTPYMEHTbT 3A 3A5NBAHE HA IINPOHNHa cTpaHua 292.
9. Ппенида Изполдытейн рpoуHT, уверете, чь тои pa6OTи паBNHOB CBOTBETCTBNE CBС CBДьрHAHHeTo Ha „TecTBaHe Ha HNCTpyMeHTa"Ha CTpaHnca 291.
10.Изральаite само nocоунITE пюн.
HnKora He n3noJ3BaIte npOHN, pa3JIuHn OT nocOueHInTe B Te3n INCTpyKun.
11.БbTe BnMaTeHn,Horato NoCTaBte 6aTePnTa. Horato CBp3BaTe 6aTePnTa n 3apeHdaTe NipoHnTe, B3eMeTe CneHnTe MepKn CpeUy INHCnDEHTHO 3aJeCTBaHe Ha INCHtpymeHa.
He doKocBaIte cnycbka.
He donyucnte n3cTpeIbaaata Ta IaBa Da KOHTaKTyBa C KOrTo N da e NOBbpxHOCT.
OДрькTeи3cTppeBaUaTaTglaBaHaIOny. Cna3BaIteCTporo rOpHnTe yKa3aHnN BnHaRn Ce yBepraBaiTe,Ye HNKoY qACT OT TAnlOTo, pBcTe NIn KpaKaTa He ce HaMnpa npeD n3XoDa 3a NiPoHnTe.
12. He noctabraTe H3InuHo npbCT Ha cnycbHa.
He nocTaBnTe npbcta cn Bbpxy cnycbKa, aKo HMa da 3a6nBaTe NpOHN. Ako HocHTe TO3N INHCTpyMeHT NnI rno nOdaTe Ha HnKOTo, DOkato DbprKeTte pBcTa cHa cnysbKa, MoHe CnyaHNO da rO 3aDeEhCTBaTe N da npuHnTe 3JIOJOnyka.
13. HatncheTe 3dpaBO n3XoDa 3a npOnH KbMa 8pa60THATA NOBbpxHOCT.
Horato 3a6nBaTe NipOnH, HATNCHEte 3dpaBOu N3XoJa 3a NipOnH KbM pa60Thata NOBbpxHOCT. Ako N3XoJbT He e pa3NoLOKeH IpabNlHo, NIPOnHTe MOKe Ja OTCKOVAt.
14. Na3eTe pbuete H npaHaTa cn ot n3cTpeJBaaata rnaBa no BpeMe Ha pa6ota.
Mhoro e onaCHO npoHnTe da ce 3a6nT B pueTe nn KpaKaTa no norpeuHa.
15. Na3ete ce ot OTHaHa HnHctpyMeHTa.
He IIO6IINHABaIte rIaBata cn Do rohpHa Ta Yact Ha IHCTpyMeHTA NO BpeMe Ha paBoTa. ToBa e OnaCHO, 3aIoTO INHCTpyMeHTbT MoKe Da pIKOuHpa PRA3KO, aKO 3a6nBaHnT NIpOH yApn PpeNnWeH NpOn NIn YBOP B DbPBOTo.
16.BHIMBaIte 3a DBOHn H3cTeJIbaHe nopadn OTHaT.
Ako loctbT HeBolnHO e ocbo6oDen a ce CBpHe OTHOBO C DetaJa CneI OTKaTa, Ie Ce 3aJeCTBa HeKeJAH NIOH.
3a da ce n36erHe TOnn HeKeJehan DBoe H3CTpeI,
O PeKIM 3a pa60Ta Ha nepnoi (3aJeIcTbaHe Ha cnycbka)
1) HactpoIte npeBkIIOuBaIoTo ycTpoIcTBO Ha MEXAHN3bM 3A EDINHNUHO IOCJIEOBATEJHO 3ADEICTBAHE.
2)Дрьн electcnycbka 6bp3o n3dpaBO.
O PeHIM 3a HnpeKbChata pa6oTa (u3cTpeLbaHe c IocT)
1) He HATnCKaIe TpeKaJIeHO CINHO INHCTpyMeHTa CpeUy DpbBOTo.
2) OTeIeTe NipoHa OT DbPBoTo, KOraTo Toi ce OTdpbnBa Cne3a6nBaHeto.
17.БbTe BHHMaTeJHH,Horato pa6oTHe NO TbHHNIOCHOCTH NIN No brrInTe Ha dbpBOTO.
Pn TbHKNTe NIOCKOCTH NIPOHNTe MORaI Na3JRA3AT OT Dpyrata CTPaHa, KaKTO MOHe Da ce ClyuN IN npn 3aKOBabaHe Ha bTInTe NopAdn OTKIoHOHeHne Ha NipOHNTe. B TAKINbCAUYan 3aDbLJIHTeJIHO Ce NORpHXKeTe Da HmMa HIKoN (H HcNn PbCe IIN KpaKa n T.H.) 3aD TbHKATA NIOCKOCT NIN Do DbPBeHNTe DetaiN, NO KOINTo pa60THe.
18. EdHOBpeMeHHOTo 3aHOBaBaHe Ha NpOHN OT DBeTe CtpaHn Ha eDHa HcBua CteHa e OnaCHO.
Pn HnKaBn ObCToRteJIcTBA He TpRbBa Da ce KOBaT NINOHN OT DBeTe CTPaHn Ha CTeHaTa EJHOBpeMeHHO. TOBa 6n 6nIO MHOrO ONaCHO, TbN KaTO NIpOHNT Morat Da IpemHnat Ppe3 CTeHata N da npuHHT HapaHraBaHna.
19.He n3noJ3BaIte eJeKTHpuYeCKnHHCtpymeHT Bbpxy cKeIeta HcTbI6n.
EeKtpnuecknHT HnCTpyMeH He Tpr6Ba Da ce 3nIOL3Ba B CneuΦNHy CNTuAun, HanpImep:
Korato CmHaTa Ha eHNo pa6oTHO McTo C pyro H3NCKBa H3NOJ3BaHeTo Ha CKeJeTa, CTbIbN IIN PNOO6Hn KOHCTpyKuHN, HAp. NOKpNBn JAmEIn,
3aTbapHe Ha KyTHN Nn KaCn,
- MOHTIpaHe Ha TpaHCnOpTHN CnCTEmN 3a6e30nacHOCT, HApP. Ha IpeBO3Hn CpeDcTBA NBaOHn
20. OTeTpaHete BCnHn OCTaHaJN NpOHN N 6aTePnra OT HnCtpyMeHTa, KOraTo:
1)n3BbPwBaTe npDpBkKa n npOBepKa;
2) npoBepaBeI npaBnHTo 0yHKUOHNpaHe Ha loCTa nCnyCbKa;
3) npnKpePte nn npemaxBaTe KaNaYKaTa Ha NaKpaHnka;
4)ocbo6oxdaBaTe3aceHaI npoH;
5) He n3noJ3BaTe HnCtpymeHTa;
6) Hanyckate pa60THOTMЯCTO;
7) npemecBaTe HnCTpyMeHTa Ha pyro MrcTo; n
8) DaBaTe HNCTpyMeHTa Ha npyro Jnue.
Hnkora He ce onntbaite da ocbo6oute 3acehnaI npoh nn da nonpaBte nHCTpyMeHTa, 6e3 da cTe n3BaDnIOn OT Hero 6atepna T BCNUKn OCTaHaII npOHN.
Hnkora He octabrIte HNCTpymeHTa 6e3 Ha3Op, TbKato MoKe Da NonaDHe B pBcTe Ha CnyuHaHN Xopa N Te Da NoCTpaDaT.
21.ИЗвадаTe 6aTePnTa OT HnCTpyMeHTa 3a 3a6nBaHe Ha npoHn, KOrato:
1) 3apeKdaTe npOnn;
-
He donyuchai Te npOHKBaHTo Ha yHm TeHa B OTbopa Ha Bpb3HaTa 3a 6aTepuHte.
-
HnHora He pa3rno6BaTe anymyNaToPnHte 6aTeepnn nn 3apJdHoto yctpoNCTBO.
-
HnKora He daBaIte Ha Kbco aKymyIaTOpHInTe 6aTeepHH.
KbcocbeDHeHne MoKe Da npuHn npeHaPpeKeHne HnpereBaHe.ToBaMoKe Da DOBeDe Do NOBpeDa Hn H3rapaHe Ha 6aTeepraTa.
- Otpa6oteHnte 6atepn He Tp8Ba da ce n3raprT. ToBa moKe da DOBeDe Do eKcnIIO3n.
30.ИЗнOLЗВаHETo Ha ИЗTOUSeHa 6aTePnI Μe NOВpeHn 3apЯДHOTO yCTpoIcTBo.
- Bbphete 6atepuHte B mara3nHa, ot KOHTO ca 6nHn 3aHyneHH, BeHara cIeN Hato uKbJa Ha HNBOT Ha npe3apeDeHnte 6atepHn cTaHe npehaJeHo Kbc 3a da ce n3noJ3BaT.
Otpa6bTeHnTe 6aTeepn He Tp6Ba da ce n3xBpJrT.
32.He noctabrayte npedmetn Bbpxy OTbOpHTe 3a oxlaHdahe Ha 3apndoto yCTPOICTBO.
BkapBaHTo HaMetaJIHHIIN 3anaJIIMN IpemEt N BbB BEHTnJIaUHOHHITE CLOTObE e DOBeJe DO ONaCHOCT OT eIeKTPnueChn yIap IIN Ie IOBpeJr 3apJHOTO yCTpOJCTBO.
- HNHOA He donychaTe MarHHTn (HIN noo6HN MaHHTHNu cTPOcTBa) B HenocpeDCTBeHa 6JIn3OcT Do HHCTpymeHTa, 3aIOTO Toi CbIbpHa MaHHTeH DaTUnH.
ToBa ige DoBede IIO NobpeDa IIN pNCK OT HapaHBAHe npaDN Heu3npaBHOCT.
-
Cnei npoBJIHHTeHa pa60Ta, ypeBt cneBa da 6bJe octaBn B nOKOH 3a n3BeCTHO Bpeme.
-
EneKtpnuecHt ype e o6OpyDbAH c Bepnra 3a TeMnepaTyPha 3aunta, 3a da npedna3n DbHrataeJ.
IpoBbJIHHTeJIHata pa6Ota MOHe Da NOBHIN TemnepaTypata Ha ypeDa, KOETO aHTNBIPA Bepnrata 3a TemnepaTypHa 3auNTa n ABTomATNoHO npekbcBa pa6Otata. Ako TOBa ce clyu, octabeTe eJENTpueckn ypeD da ce oxlaadn, nped da Bb3o6HOBITE ynotpe6ata.
36.To3n npOdyHT MoHe Da npocTaHe da pa60Tu, HORaTO Bb3HnKHe aHomajna. B TAKnBa cnyuaH npOBepTe ToCHNe B pa3deLa ,OTCTPAHBAHE HA HEN3INPABHOCTN" Ha cTpaHnca 296.
37. He noDnaraIte KOHTpOJIHH naHcNIIu yApn Hre ro CynpeT.ToBa 6n Cb3dano npo6IeMn.
ГРИЖА 3A ЛINTHEBO-ИОHHATA BATEPЯ
3a da ydbjHKnTe KHBOTA Ha JNTHeBO-NOHHaTa 6aTePnra, TnMA 3aunTHa FyHKnra 3a npeKbcBaHe Ha NODaBAHeTO Ha 3apn.
B clyuante 1 do 3, onncan no-dony, koraTo n3no3BaTe TOBa n3dJeHne, DOpn npn HATNcKaHe Ha cnycbKa, MOTOpbT MOKe da cnpe. ToBa He e B cIeDCTBne Ha nobpea, a Ha 3aunTHa fynKcua.
- Korato pa3pndbT ha 6aTeepnra Hamaiee 3HaunTeJIHO, MOTOpbT cnpa.
B TaTbB CJIyua, 3apeTe 6aTepeHraTa He3a6abHO. - Ako INHCTpyMeHTbTe 6bn npetobapeH, MOTOpbT MOKe Da cnpe.B To3n CnyaH,OCBO6OTe CnycbKa H OTcPaHeTe npuHaTa 3a npetOBapBaHe.CneTToBA MOKe Da N3NOJ3BaTe ypeDa OTHOBO.
- Ako 6aTeepnra Ta e nperepna npn npetobapbaHe, TMOJKe Da OTKaKe Da paBoTn.
BTo3n Cnya, cnpeTe n3noJ3BaHeTo N, n octaBeTe Da ce oxJaDi. CneD ToBa MoKe Da n3noJ3BaTe ypeDa OTHOBO.
OcBeH ToBa, MoJIa3BaIte CneIeHNTe npEynpeJxHeHn. NPEyNPEXHEHNE
3a da npedotbpatnte pa3peHdahe Ha 6atepnaTAt, 3arpaBaHe, nOraBa Ha dIM, 3anaIbaHe n EKcnlo3n, yBepete ce, ye cna3BaTe yKa3aHnTa 3a 6e3onacHOCT.
- YBepete ce, ye no 6aTepeRnTa He ce HATpyPnBaT npax N CTpyKKn.
O Ybepete ce, ye no 6aTePnra He ce HaTpynBt npax n CtpyHKn IIO BpeMe Ha paBoTa.
O Ybepete ce,Ye npax n ctpyHKn He ce HaTpyNBaT Bbpxy 6aTepeYrTa no Bpeme Ha pa6ota.
He cxbxaHbAaTe HeH3nOJI3BaHHTe 6aTePNB MeCTa, KbTeO Ca H3IOKeHN Ha Bb3dEiCTBHeTO Ha npax IN CTpyKKn.
O Ipn cxbxpaHHe Ha 6aTepeH,OTcTaPaHe Te eBENTyaJIHO HATpyNaHn CTpyKHH n npax, KaTO He TpRbBa da ce CbxpaHra 3aeJHo C MeTALHn PpeMmTn (6oIToBe, rBO3DeHn dP.). - Na3eTe 6aTeepnTa OT npOmbaHe C octpn npeMeTn KaTO rBO3dE,OT yDap C uYK, HAcTbNbaHe, NIN OT CNJIeH fN3uYeCN yDap.
3.He n3noJI3BaIte BnIMo noBpeJHa nn deΦopMnpaHa 6aTePn. - He n3noJ3BaIte 6aTepeJraTc o6paTeH noJaPHTeT.
5.He cBb3BaIte 6aTeepnra Ta DnpeKTHO KbM eJIeKTprueeCKn N3TOUHnCn, NJI N KbM KyIpyHra Ha 3anaIkata B Jeka Kona. - He n3noI3BaIte 6aTepeHraTa 3a ceJIH, pa3nUHn oT npedHa3NaueHHeNoI.
- Ako 6aTeepnra He MoHe Da Ce 3apeHnBJIHo, DOpN CneI KaTo N3TeHe PpeOpbHaHn IepNoD OT BpeMe, He3a6abHO npeKpaTe Te NocJeBaun ONNTn 3a 3apeXdaHe.
- He n3laaTe 6atepyTa Ha BnCOH TempepaTpy nn HalaRaHe, He nocTabyTe B MmKpOBbHOBa yPHa, CyuINHn KOnTeHepn NOB BnCOKO HalaRaHe.
- Pn yctaHOBAhe Ha Teu Hn HnepnTHa Mnp3Ma OT 6aTepeyTa, He n3JaarTe Ha Bb3deNCTBnETo Ha CNHa TOnnHa HnO TkPHTn NlaMbun.
10.He n3no3BaIte 6aTepeyra B MeTa, KbTeTo ce reHepnpa cNJIHO cTAuHNO eJeKtpnueCTBO.
Былгарский
11.Ako 6aTepeYa Teue, HMa He npRyTHa MnpH3Ma, 3aRpaBa nn Ce oBe3cBETn n DeOpMnpa, nn aKo ce noBt HeoBuAynn np3Haunn pny ynoTpe6a, npe3apeKdaHe n CbXpaHeHne, He3a6aBHO r OTCTpaHete OT O6OpUdBAHeTo nn 3aprHOTO n He r N3pOJ3BaNte.
12.He notanrnte 6aTepeHra n He no3BOJBAHTe HABIN3aHTo Ha TeuHOCTn B He. IpOHNKBaHETo Ha npOBODMN TeuHOCTn KaTO HApPImep BOda, MOKe Da DOBeDe Do NOBpeDN Da IpnUHN IOKap Nm EKcNIO3N. CbXpaHBAHTe 6aTepeHra Ha XJaHO n Cyxo MRCTo, daJeY OT rOpHMn I neCHO3aNaJIIMM MaTepeHaN. H36aRbaTte aTMocFepn c Kopo3NBn ra30BE.
BHIMAHNE
1.Ako eIeKtpoJIrOT 6aTepeHra T nonaHHe B OChte, He rN TbPKaHTe,a H3nJaKHeTe 0bHnHO C uHCTa,Hanp. YeeMHa,BOda N oTbpcTe He3a6abHo IekapcKa nOMOu. Ako He Ce B3eMaT MepKn, eIeKtpoITbT MoHe Da npuHHO OHn Ipo6JIemn.
2. Ako eIeKToPIOT 6aTePnIa IonoIHe BbPxy KOHaTa nn dpexHr, He3a6abHO H3MnIte C YnCTa, HAp. YeIIMHa, BOda.
Bb3MOxHo e eIeHTpOInTbT da npuHn KOxHO Bb3PnaIeHne.
3.AKo npn nbpBTo H3NOJ3BaHe Ha 6aTePnTa 3abeJeHte pBJda, HenpnaTeH Mnpuc, npeprbaHe, Obe3cBETBAHe, DeOpMnpaHe N/INn DpyrN HepeDHOCTN, He r N3NoJ3BaIe Tn BbPHeTe Ha DOCTaBvNkA INTbProBeua, OT KOHTO CTE R 3aKyPiNl.
PNEyPENKDEHNE
Ako yHKo TJIIO, KOEt o npOBODHnK, IOnaDHe Bbpxy KIeMNTe Ha JHTneBO-NOHHaTa 6aTePnra, TRe MoKe Da daDe Ha KbcO n Da npuHHn NoJap. Korato cBxpaHraBaTe JHTneBO-NOHHaTa 6aTePnra Cna3BaNte CJeDHnTe npabnla 3a 6e3onacHOCT.
B KyTnTa 3a cxbpaHraBaHe He nocTaBryTe npOBOdAu npedMeTu KaTo rBo3Dei, NapyTe npOBOdHu MeHa TeI.
3a Da npedotbpaTHe KbcO CbeHHeHne, cIeBkapBaHe Ha 6aTepyra B eJeKtpnueckn INHCTpyMeHT NOCTaBnTE Kanaka I Taka, Ye BEHTnlaTopbT Da He Ce BnKa.
OTHOCHO TPAHCIOPTA HA JIHTHEBO-NOHHA BATEPNA
Ptp TaHcnpTupaHe Ha JInTHeBO-IOHHa 6aTepeRn, MoIaCna3BaIte CJIeHNITpepeNpA3Hm MepKn.
PPEyPPEKDEHNE
YBeDomete TpaHCnOpTHata KOMnHa, Ye npaTKata CbIbPka IITneBO-IOHHa 6aTeprna, INHOpMnpaIte KOMnHaNrTa 3a HeHaTaN3XoHa MoUHocT n Cn3BaIte HNCTpyKuNTe Ha TpaHCnOpTHata KOMnHa, KOrato ypeHdAte TpaHCnOPTa.
O JIHTHeBO-NOHHTe 6aTePN, KOINTo HADBnJbAbaT n3XoHa MoUHocT OT 100 Wh, ce CHTat 3a TpaHCnOpTHa KaTEROpNr ONaChn cToKn H3NcHBaT npInarAHeTo Ha CneuHaHn npOeDpyn.
3a TpaHcnpOpTnpaHe B UyK6bHa TpR6Ba Da Cna3nte MeHdUHapOAnHte 3aKOHn I npAByIa N pa3nope6n Ha cTpaHata, Do KOrTo Ce TpaHCnpOpTnpaT.

HME HA YACTITE (Фиг.1-Фиг.20)
CTAHДAPTHN AHCECOAPN
B DoTbJIHeHHe KbM OCHOBHnKOMNJIeKT (1 KOMNJIeKT) ca npTeOcTaBeHn n aKceCoapHTe n pIncTaBKHTe, N36poEHn Ha cTp. 325.
CtaHapTHHe npucTaBn n akcecoapn ca npedMeT Ha npomHa 6e3 npedynpeKdHne.
PNILOXKEHNA
O CrJIO6BaHe Ha uKaΦObe n paMn 3a KapTHH, TaIIuερn 3a Me6eIi.
O BbTpewHo n IOBnKHO BbTpewHo 063aBeJdaHe n 3pa6oTbaHe.
3APEKDAHE
Ipeyn da n3noJ3BaTe eJeHTpnuecknT INHCTpyMeHT, 3apeTe 6aTePnTa KaKTo CneJa.
1. CbbpHHeTe KbM H3ToCHNK Ha 3axpaHBaHe. (ФИr.3)
CbpxeTe Ka6eHa 3apHTo KbM n3TOHnKa. Korato CBp3BaTe Ka6eHa 3apHTo, INHnKaTOpHaTa JAmna ige Mira B YepBeHo (Ha nHTepBaJIOn OT 1ceK.).
BHIMAHNE
He n3noJI3BaIe eIeHTpUYeCKnT Ka6eI, aHO e IOBpeH. He3a6aBHO ro noDmeHeTe.
2. NocTaBete 6aTePnraTb 3apHnOTo ycTpoNCTBO.
BkapaTe 6aTeepnTa nIbTHOB3apAnHOyCTPOHCTBO, KaTTo e nOKa3aHo HaΦnr.3.
3.Заразданe
Horato noctabite 6aTeepnTa B 3apAnHTo yCTpoNCTBO, 3apeJdaHTo 3e 3anOuHe, a INdikatopHaT aamna CBeTN NOCToHHN B UepBeHO.
Horato 6aTePnTa ce 3apeiHaTbJIHo, INHdkaTopHaTa Iamna ue Mra B cepBeHO. (Ha HHTepBaJIn OT 1-cekynda) (BnK Ta6nua 1)
(1)ПлOTнИнДиКaTOpHаЛamna
CnHnIte Ha HnDnHaTopHaTa JAmna 6bDat Te3n, NOKa3AHn B Ta6nua 1, CnopecBcTOHNeTo Ha 3apdHOTO yCTpOcTBO Hn6aTePnTa.
Ta6nca1
| Инд�示аши на плотна за лamпа | ||||
| ПиLOTна лamпа(черва) | Прedesни заразждане | Мira | Сбетва 3a 0,5 секунд. He sbetи за 0,5 секунд.(изгасва 3a 0,5 секунд.) | |
| По врeme на заразжданe | Свети | Сбети несякьсано | ||
| Завъшени заразжданe | Мira | Сбетва 3a 0,5 секунд. He sbetи за 0,5 секунд.(изгасва 3a 0,5 секунд.) | ||
| Реким говноct поади пereювае | Мira | Сбетва 3a 1 секунд. He sbetи за 0,5 секунд.(изгасва 3a 0,5 секунд.) | Переглaja батерия.Зaperжданeto He e Вьзможно.(Зaperжданeto Уебочne сlementохлajданe Ha sabерята) | |
| Невъмен�но заразжданe | Мira | Сбетва 3a 0,1 секунд. He sbetи за 0,1 секунд.(изгасва 3a 0,1 сек.) | Поврева в за发展中устwoястwoя | |
(2) OTHOCHO TemnepaTyPeHa ha akymylaTOpHaTa 6atepn. TemnepaTyPe 3a akymylaTOpHN 6atepn ca nocouhen B Ta6nua 2, a 6atepnTe, KOHTo ca npekaleHo ropeu, Tpr6Ba Da 6bDaT OxlaJeHn PpeHn Da 6bDat Ppe3apeJdAHN.
Ta6nua 2 nana30Hn Ha npesapeKdaHe Ha 6aTeepn
| Актуларони батерни | Темпера typи, рри КОДТо батерияа моче за съдe зAPEDEнa |
| BSL1820M | 0°C-50°C |
(3) OTHOCHO BpeMeTo 3a Ipe3apeKdAHe
B 3aBnCIMoCT OT KOM6HnHaunraTa OT 3aprAnHOyCTpOJCTBO N 6aTePnRA, BpeMeTO 3a 3apeKdaHe MoKe da Ce H3MeHN, KaTTo e NOKa3aHO B Ta6nua 3.
Ta6JIHua 3 BpeMe 3a 3apeKdane (npn 20^)
(4)OcTaBaIoo HnBO Ha 6aTePnIra
IOKaTO npeBkIIOUyBaTeJIrHa 3axpaHbAHeTo e BHL. OCTaBaIoTO HnBO Ha 6aTePnIra MoKe Da ce npOBepu Ype3 cbCToHHeTo Ha LED lamnaT, KaKTo e Noka3aHo NO-dOly.
| Състорическая на Иndикатора | |
| LED не с Bretп | Батугая заима достатiblyзаряд. |
| LED (чебен) мига | Батугая за поочи иизю разреда. Батугая за поочи. Зараздete вьзможимост. |
| LED (чебен) с Bretп |
3A6EJEKHA
HMa CnTuaun, B KOnTO To3n npOdyKT HMa Da pa6oTH, KOrato DBa CBeToDnOda CBETT Ha NHdNkAtopa 3a HNBOTO Ha 6aTepeyra.
ToBa He e HEn3npaBnOCT, aФyHKuŋrTa 3a ynpaBJIeHne, KOrTo e CneUΦnUHa 3a TOnI npOdyKT. INcTpymeHTbT ue pa6oTn, KOrato 6aTepeRrTa 6bDe 3apeDena.
(5)ДугФуннши
BcnyaHa rpeuHa npn pa6Ota,CBeToOnoHnTe lamnn ce nKaHTo e NocOHeNo-DoIy.
CbctOHaHneHaINdkaTopa
He n3laarTe DnpeKTHO OHTe CN Ha CBETNIHa, KaTo rIeTaTe B HeJ.
Ako OHTe BN NOCTOHHo Ca N3LOXKeHn Ha CBeTInHa, Te Ⅲe Ce NOBpeJrT.
O N36bpyeTe BcHKn 3aMbpcBaHnNo JeuataHa CBeToNDIOHN HNdkaTop CnapYe MeK PLaT, KaTO BHIMaBaTe Da He RaHdpackaTe.
Ako CBETINHHNHT INHINKaTOp 6bJe HApPacHaH, ToI Ue CBETN NO-Cla6o.
- MexaHn3bM 3a 3aKIOUbaHe Ha cnycbHa (BnHTe
PNEyPENHEHNE
Horato He n3ctpeIbate npoHn, ce yBepTe, ye cnycbKbTe 3aKJIIOueH.
To3n nHcTOneT hMa 3aHJIIOUBaU, MExaHIN3bM, KOHTo npedOTBpTaRbA H3CTpeJIbAHETO Ha NINOHN.
IocTaBeTe IocTa 3a 3aKJIIOUBaHe Ha IIO3nue B, 3a Da 3aKJIIOUHTe CnycbKa.
KoratoCe n3nol3Ba HnHCTpyMeHTbT, nIb3HeTe IocTa 3a3aJIIOUBAhe B NOLOXKeHne N KOrato He CE n3NOJ3Ba, B NoLOXKeHne
3. Tectbahe Ha HHctpymeHa
IPEdynPEXDEHNE
O Horato He 3a6nBaTe npOnH, ce yBepTe, ye cnycbKbTe 3aKnIOHeH. (BnKTe Pnr.8)
HnKora He n3noJ3BaIte HNCTpyMeHTa aKO JocTbT He pa60Tu npabuInHO.
Ppei Da3anoyHeTea 3a6nBaTe, TeCTBaTe HNCTpyMeHTa, KaTO CLEdBATE CTbKNITE OT cINcKa 3a npOBepKa Ha INHCTpyMeHTa no-dOly. HanpaBeTe npOBepKaTa no cJeDnHa peI.
Ako 3a6eJHnTe Heo6nuaHa pa60Ta, cnpTe Da n3no3BaTe INcTpymEnTa H3a6abHo ce CbbpKeTe C oTopn3pan cepBn3en ceHTbp Ha HiKOKI.
(1)ИЗВАДЕТЕ BCИЧКИ ПИРОНИ BATEРПЯТА OT ИСHTРУМЕHTA.
BCNUHBNHTOBE TPR6BA DA BbDAT 3ATEHATN.
IOCTbT CNYcBbT TPR6BA DA CE DBNHAT IJIABHO.
(2) MoThIpaHé Ha 6aTepeHЯTa.
He paobote c locta nn cnycbka,doKaTo nocTaBTe 6aTeepnra. (BnKTeΦnr.2)
(3) BkIIOUeTe KIIIOUa 3a 3axpaHbAHeTo. (BnKTe ΦnR.1)
BkIIOUeTe KIOOa 3a 3axpaHbAHeto KaTO HaTNCHe Te 3aApbKTe 6yToHa 3a 3axpaHbAne NOBeue OT cKeYnDa. YBepTe Ce, ye INDInKaTOPbT 3a 3axpaHbAne CBETN B 3eJeHO, a INDInKaTOPbT 3a 3abNaHE CBeTN B CINbO. (MEXAHIN3bM 3A EEDHHNOCJIEOBATEJHO 3ADENCTBAHE)
3ABEJIEXHA
He HatachaiTe JIOCTa N/IN He HatachaiTe CnycbKa NO BpeMe Ha IpOeca Ha BKJIIOUbaHe Ha 3axpaHbAHeto.
ToBa ue npedotBpaTN BkIIOUcbHeTo Ha 3axpaHbAHeTo.
[ФункцязаabTomaTHUHOИКIOUBAHe]
Horato 3axpaHbAHeTo e BkIIOUeHO, Ho INHCTpyMeHTbT He ce N3NoI3Ba 3a 30 MNHyTN, TOI aBTOMaTHuHO Ce N3KIIIOUba. 3a da ro BkIIOUHTe OTHOBO, HATNCHE6yToHa 3a 3axpaHbAHeTo.
IPEDyPENPEXHEHNE
Hnkora He ocTabaIte HnCtpymeHa BkIIOueH. ToBa MoKe Da DOBeDe Do 3IIOJOnyKa.
HnDnKaTOp 3a pa6Ota C nipoHn
CBeTINHeH INIINKaTop (cINbO): MEXAHN3bM 3A EINHNUHO IOCJIeIOBATEJIHO 3AIDENCTBAHE
PpMmRBaHe (B CnHbO):
MEXAHIN3bM 3A KOHTAHTHA AKTYALIJA
YBepete ce, Ye INHnKaTOpbT Ha 6aTePnIa He CBetN NIN Mira.
Ako HnHnKaTOpbTa Ha 6aTePnTa CBETN Nm MnRa B UepBeHo, 6aTePnTa HMa DOCTaTBuHO MOUHOCT N Tp6Ba Da ce 3apei.
(4) CbaIeTe npbCTa cn OT cnycbKa n HaTnCHete loCTa 3a HATnCKaHe cpeu y deTaJa.
HCTPYMENTbT HE TPRBA DA PABOTN.
Български
(5) OTeJeTe JocTa ot DetaJa.
CneTOBa HacOyTe HNCTpyMeHTa HaIOJy, N3DbpNaIe TcNycbKa I N3UaKaIe TB TOBa NIOJOHeHne 3a 5 cekyHn nnIOBce.
HCTPYMEHTbT HE TPRBA DA PABOTN.
(6) ①Бe3 Da DOKOCBaTe cnycbKa, HATNCHE Te JIOCTa 3a HATNCKaHe Cpeu DeTaIJa. CJeI TOBa N3DbpNaIte cnycbKa.
HCTPYMEHTbTTPABADAPABOTN.
② 3aPbXTe CnYCbHa Ha3aN HATNCHETe OTHOBO loCTa Cpeu dy TaIHa.
HCTPYMEHTbT HE TPRBA DA PABOTN.
③ CbaneTpbcT OT cnycbKa. CneTOBa, 1e aKTHBpuH OTHc
HCTPYMEHTbTTPABADAPABOTN.
(7) OTeJeTe IocTa oT deTaNla, n3TeIeTe cnyCbka. HaTnCHeTe IocTa Cpeu y DeTaNla B paMKte Ha 2 ceKyHn.
HHTPYMEHTbHT HE TPRBA DA PABOTN.
(8) HactpoTe INHnKaTopa 3a pa6oTa c nHPOH da Mnra B peKIM "BHJI." (MEXAHN3bM 3A KOHTAKTHA AKTYAUH)
HaTnCHeTe BeDnBk KInOua 3a 3a6nBaHe, yBepeTe ce, Ye HnDKaTOpBT MnRa B CnHbO.
OTdene IocTa OT TaIHa, H3TeIe TcNcBHa.
HaTnchete IocTa Cpeu y DeTaNb B paMKnTe Ha 2ceKyHn.
HCTPYMEHTbTTPRABADA PABOTN.
(9) Ako He 3a6eJIeKHe HeoBnayHa pa6Ota, MoHcTe Da 3apeIte NIOPOHN B INHCTpyMeHTa 3a 3a6bNAHe Ha NIPoHN.
3a6nTe npoHnte B deTaN, KOTo e OT Cbunr TnI, KOTo 1e Ce N3NoJ3Ba B CaMTo PnpIoKeHne.
HCTPYMEHTbT TPRBBA DA PA6OTN PABUNHO.
4. Поберka Ha pa6oTaHa NaocTa 3a HATnchAHe IPEyIpeHDeHne
Horato He n3cTpBe TaPiPOH, ce yBepTe, cCnycbKbTe 3aHIOueH.
IpeNi npOBepKa Ha pa6oTaHa IocTa 3a HATnCKaHe, BnHaRc Ce yBepBaIte, Ye CnycbKbT e 3aHIOUeH N 6aTePnIa T e N3BaDeHa OT eJIeKTpONHCTpyMeHTa.
PpOBepe TaJIH LoCTbT 3a HATnCKaHe Ce NJIb3ra NJIaBHO npi pa6ota.
Iounctete nIb3raaata ce nlou Ha locta 3a Hauchane, aKO ToH He ce Ib3ra rnaiko.
5. 3apeTe npOnHnTe
PNEyPENKDEHNE
Korato 3apekdaTe nipoHn B INHcTpymeHTa,
1) n3BaTe 6aTepeHraTo INHCTpyMeHTa;
2) He nbpnaTe cnycbka;
3) He HaTnCKaIte JIOCTa; n
4)dpbHTe HNCTpyMeHTa NOCOyen HaDoNy.
(1) HatncheTe IeHO loCTa 3a cnHpaHe n BHMaTeJHo H3dbpnaIte Kanaka Ha OTdJeHHeTo 3a NnpoHn. (BnKTeΦnr.9)
(2) NocTaBete naTpoHa 3a NiPOHn B OTeJeHeHneTo 3a NiPOHn I DpbXkTe NiPOHnTe B KOHTaKT C XJIe6a. (BnXkTeΦnr.10)
3ABEJIeHHKA
To3n INHCTpymEnT e Cha6DcH C loCT 3a HATnCKaHe N He pa60TH, aKo loCTbT He e HATnCHaT.
Pn To3H HNCTpyMeHT mA DBa MeToDa 3a ynpabIeHne Ha pa6oTaTc npOHN.
Teca:
- PeKIM 3a pa60Ta Ha nepnoDi (3aJeIcTbaHe Ha cnycbKa):
- Pekim 3a HepeKbchata pa60ta (n3cTpeJBaHe c loCT)
(1) PeKIM 3a pa60Ta Ha nepnoi (3aJeIcTbaHe Ha cnycbKa)
H3noJIbAte NaCTpoIKaTa 3a MEXAHIN3bM 3A EDINHHO NOCJEIOBATEJIHO 3ADENCTBAHE. (BnKTeΦnR.12)
IPEDYIPPEXDEHNE
O 3a pa60Ta Ha nepoHn, HacTpoTe npBkHIOuBaTeIa pa60Ta Ha MEXAHN3bM 3A EINHHUHOPOCLIEOBATEJIHO 3ADEICTBAHE (HnDnKaTOpBT3a pa60Ta C nipOHn CBETn B cInhO.) (T.e. 3aAnTe MEXAHN3bM 3A EDINHNUHA AKTYAUJr.)
3a da n36eHHe Te DBOHn H3cTePbBaHe nn CnyaHn H3cTePbBaHe nopadn OTKaT.
1) HactpoTe Ha MEXAHIN3bM 3A EINIHNUHO NOCJEIOBATEJIHO 3ADECHTBAHE.
2)ДрнпсуськбрзидраBO.
① 3a pa6oTa Ha nepnoi, HacTpoTe npBkHIOuBaTeIa pa6oTa Ha MEXAHN3bM 3A EDINHUYHOIOCEIOBATEJIHO 3AENCTBAHE (HnDnKaTOpBT3a pa6oTa CnpOHN CBETN B CnHbO.)
② NocTaBete OcTpaTa YacT 3a NiPoHa BbPxy DeTaJa C npbCT OT cnYcbKa.
③ HaTnCHete 3dpaBO JIOCTa 3a HaTnCHaHe Do KpaJ.
④ IpIbIHeTe cIyCbKa, 3a Da 3a6nEte NiPoHa.
⑤ CbaIeTe npbcta OT cnycbKa n BdHrHeTne H3qAno INHCTpyMeHTa OT dIbpBeHaTa NOBbpxHOCT.
3a da npoDbJHKHTe Da 3a6NBaTe Ha OTdJIHO MRCTO, npeMeCTe NHCToJeTa NO DbPBOTO, KATO NOBTaprTe CTbIKHTe ② - 5
3ABEJIEXHA
OnepaunTe ③ n ④ Tp8Ba Da 6bDaT n3BbpWeH B pAMKHe Ha 4 CEkyHn EHa OT dpyra. Ako MNaT NOBeue OT 4 CEkyHn CneI ③, INCTpyMeHTbT HMa Da pa6OT npabHnHO. Ako TOBa ce cIyHu, ONNTaTe OTHOBO OT ③.
(2) PeKIM 3a HenpeKbchata pa60Ta (H3CTpeJIBaHe C JIOCT) H3noJ3BaHe Ha MEXAHIN3bM 3A KOHTAHTHA AKTYAUIN (BnKeTfeΦnr.13)
PNEyPENPEKDEHNE
3a da n36eHHeTe DBOHn H3CTpeJIbaHe NIN ClyuHaHO H3CTpeJIbaHe nopadn OTKaT.
1) He haTnckaIte npekalneHO cnJIHO nHCTpyMeHTa cpeuy dbpBOTo.
2) OTeJeTe NipoHa OT bPBoTo, KOraTo Toi ce otdpbnBa CneI 3a6nBaHeTo.
① HactpoIte npEbnIObATEJIa 3a pa6Ota Ha MEXAHIN3bM 3A KOHTAKTHA AKTYALN (HdNKaTOBt 3a pa6Ota CnPOH CBETN B CnHbO.)
②ДрнHeTe cnycbKa Ha INHCTpyMeHTa 3a 3a6nBaHe Ha NINOHN OT DeTaN.
③ Ocbo6oTe IocTa 3a HaTnckaHe cpeuIbpbEHHnI DetaiI, 3a da 3a6neTe NpOHa.
④ MecTeTe INHcTpymeHTa No DeTaJa c NODcKaHaO dBNKeHHe. BcAko HATnCKaHe Ha loCTa 3a6bNA nipoH.
Bedhara 0om 3a6neTe JelAHn8 6poi npoHn, cBaIeTe npbct OT cnycbka.
3A6EJIeKHA
OnepaunTe ② n ③ Tp8Ba Da 6bDaT n3BbPseHn BpaMKHe Ha 2 CEkyHn EHa OT dpYra. Ako MNHaT NOBeue ot 2 CEkyHn Cnei, IHCTpyMeHTbT HMa da pa6oTH npabHnHO. Ako TOBa ce cIyHu, ONntaTe OTHOBOOT ②.
NPEyPENKDEHNE
O DpBkTe npbCTa cn H3BbH cnYcbKa, OCBEN NO BpeMe Ha ONepaunr No 3a6nBaHe, TbN KaTO aKO JIOCTbT 3a HaTnCKaHe CnyauaHNO BN DOKOCHe NIn BLe3e B KONTAKT C dpyro IInCe B 3oHaTa 3a pa6oTa, MOHe da ce CnyuH cepno3HO HapaHraBaHe.
O DpbkTe pbcTe N TAnIOTo Cn daJeue OTOHaTa 3a H3nyckaHe Ha npOH.To3n HnHCTpyMeHT HiKOK MoKe Da OTCKaYa npn OTKat NO BpeMe Ha 3a6NBaHe Ha npOH N MOKe Da Ce 3aDeNCTBa HeKeJah NocJIeDbaU pnpOH, KOeTO MOKe Da npuHHn HapaHbAhe.
3A6EJIENKHA
O Aho ce cIeBbAT BCNUHn IpeDynpEJdEHN H NHCtpyKuH, e Bb3MOxHO 6e3OnaCha pa6oTa C BCNUHTe DBe CnCTemM: MEXAHN3bM 3A EINHHUHO POCJIeIOBATEJIHO 3ADEINCTBAHE, MEXAHN3bM 3A KOHTAKTHA AKTYAUH.
O Pa6oTeTe c nipoHnTe n onaKOBkTa BHNMaTeJHo. Ako H3NyChTe NpOHnTe, MoKe Da Ce CuyPi CBbP3BaUaTa Bp3Ka, KoTo ige DoBeJe Do He npabInHO nOdaBaHe n 3acJaHe Ha NiPOHn.
Cne3a6nBaHe:
(1) n3BaTe 6aTepeRnTa OT nHCTpyMeHTa;
2)OTCTpaHete BCnUKNIINPOHNIOT HNCTpyMeHTa;
- PerynnpaHe Ha dbl60uHaTa 3a 3a6bBaHe
3a da ce rapaHTnpa, ye BCEH NipOH npOHnKbHa eHa n CbIa Ibl6OuHa, yBepTe ce, ye ypeT BnHarn Ce 1bPkn 3dpABO cpeU deTaima.
Ako npoHnTe ce 3a6BbAT TBbpde Dbl60K OJIIN PIIHTKO B DeTaNla, perylnpaTe 3aHOBaBAHeTo B CneHNpei.
① ⅢBaTe 6aTepeYraTo OHCTpyMeHTa.
② Ako Nipohnte Ce 3a6NBat TBbpe Dbl60K, 3aBbptepepylaTopa KbM PnNTkata CtpaHa. (BnKTeΦnr.14)
Kopekunte ca B CTbKN Ha noIOBnH o6oPOT.
Ako nipoHnTe ce 3a6HBat TBbpde IbIb6Oko, 3aBbPtepepylaTopa KbM PInNTkata CtpaHa. (BnKTe Fnr.15)
③ Cnpete da Bbptnte peryaTopo, KoraTo ce doctHne noDxOJaIO NOLOKHeHne npT Tecta 3a Dbl6OuHa Ha 3a6nBaHe.
Былгарский
④ NocTaBeTe 6aTepeYra B INHCTpyMeHTa. BHAN HOCETE IPEIIA3HN OUYIA. HanpaBeTe Tect 3a3a6nBaHe.
⑤ 3BaTe6aTepeyraTaOTNHCTpyMeHTa.
6 N36epeTe noDxOJa 103nIg 3a HacTpoHa.
I3BaTeTe 6aTeepnTa OTHcTpymeHaT.
1 N3BaTe6aTePnRAoTINHcTpymEnTa.
② OTCpaHETe BCnHKn INPOHN.
③ Ocbo6oTe IocTa 3a HaTnCKaHe N OTBOpTe BOeUaTaIJIaCTnHa. (BnKTeΦn.r.18)
④ИЗbaTe 3aceHангпpoH C OTBepTKa C rIaBnKHa. (BnKTeФr.19)
BHIMAHHE
HINKOTA He ydpnTe octpneTo 3a 3abBaHe.
HINKORA He HacooyBaIte INHCTpyMeHTa KbM ce6e cn nn KbM dpyr QOBek, C ueJ da CE n36BerHeTe pNcKa OT HapaHraBaHe qpe3 HnPaBnIHo N3CTpeJIbAhe Ha nIpOH. Opn aKO 6aTePnTaCe n3BaDiOT INHCTpyMeHTa, BbTpE B Hero BCE oUe HMa eHeprnaOT cTbCTeH Bb3dyX.
5 3aTbOpTe BOeIaTa IIOuA N KIIIOUaJIkaTa.
3A6EJIENKHA
Ako npohnte 3acraat yecto, ce cbbpxeTe c oTopn3npaH cepBn3en uehbp Ha HiKOKI.
IODAPbJHKA INHCNEKUN
BHIMAHNE
Ppei npdpbHKHa n npOBepKa, ce yBepTe, ye cTe CBAJIIN BCNUHn OCTaHAn CKpeNTeHN eIemEnTn I 6aTePNrTa OT HNCTpyMeHTa.
Mol, BnHaHn 3nOJ3BaIte HaIITe OpUHaJIHn 6aTePnn. He rapaHTnpame 6e3oNaChocTt a pa6oTaTa Ha ypeDa, KOrato CE n3NoJ3BaT 6aTePnn, pa3JInuHNOT NOCOeHNTe OT HAc, INN KOrato Ca npabeHn npOMEHN NO 6aTePnTE (KATO pa3rIo6BaHe n NOmHa Ha KLeTKHe INN dpyuBbTpEHHN KOMNOHETN).
TAPAHU
Ipeoctabme rapaunna 3a Eektpnueckn HctpmEnHiKOKI cblnaccho CneuΦnHnte MeCTeHN 3aHOdaTeJIcTBa Ha cbOTBeTHNTE IbpxAbn. HactOuaata rapaun He NOKPbBA DeeEKNu NIN NOBpeDn, pnuHHeN O T He npabnHo Nn He6peHHo N3NoJ3BaHe, KaTO n DbJaCnCe Ha oBnauH No3HocBaHe Ha KOMnoHENTte. B cnUyHa peKlAmau, MoJI, N3npaTeE EektpnuecknTt HcTpMeHT, B Hepa3rIo6eBnD, c TAPAHLIOHHATA KAPTA, npoOBOJCTBeHa B KpaHa IHcTpkyKnHte, Ha OToPn3pan cepBn3eH ueTbp Ha HiKOKI.
Hhopma3a wyma
CTOINHOCTN Ha 乌MOBNTe xapaKTepnCTNK B cBOTBETCTBNE c EN60745:
TINHHTO HNBO Ha 3ByKOBA MOUHOCT 3a eHNHNO Cb6NTHe cA-TerILO LW4,1s,d=79 dB
TINHHTO HNO Ha 3ByKOBOTo HAJIraHe Ha EMNCNTe npEHNHNo Cb6ntne Ha pa60THOTo MCTO
L pA, 1s, d = 68 dB OTHIOHnKpA:3dB
Te3nCTOINHOCTNaXapaKTEpNCTUHNCTOINHOCTN,CBbp3aHNC HnCTpyMeHTa,Hne npedCTaBnBaT UyMa B TOOKataHa ynoTpe6a. Uymbb T ToUKata Ha ynoTpe6a ue 3aBncnHa nPmep OT paobTHata CpeDa,TeaIla,NoDpBHKata HaDeTaIaHa 6por Ha onepaunnte 3a 3abnBaHe N.T.H.
B 3aBnCmOCT ot yCIOBnraHa pa6oTHOTo Macto nΦopMaTa Ha DeTaN, MoKe Da ce HALIOKn Da ce B3eMaTHNDbVbUdHn MeKn 3a HamaJIbBaHe Ha Wyma, KaTO HanpImep NocTaBHe Ha DeTaN Ha 3ByKOnorlbuauOnOpn, PpeDOrbPaTbAHe Ha Bn6paunTe Ha DeTaN qpe3 3aTgAre He NIN NOKPnBaHe N dP.
B cneuaHn cnyan e Heo6xOIMO da ce n3noJ3BaT cpeCTBa 3a 3auIta Ha cnyxa.
Hhopmaa3a Bn6paunra
TINHnHa CTOnHOCT Ha Bn6paunOHHaTa XapaKTepeNtHa BCbOTBeTcTBne c EN60745:2,1 M/c2. HeonpeJeHeOCT K:1,5M/c2.
Te3n cToHocTn ca xapaKTepeNCTuHN cToHocTn, CBbp3aHn CInHCTpyMeHTa, H He npedctabJbBAT BInHHeTO Ha cnCTeMaTa 3a pbue npn n3NoJ3BaHe Ha nHCTpyMeHTa. BInHHeTo Bbpx CyCTeMaTa 3a pbue npn n3NoJ3BaHe Ha nHCTpyMeHTa 3e 3aBncn HanpImep OT cNlata Ha 3axBaUaHe, CNlata HA KOHTaKTHOTo HAnIraHe, NOCKaTa Ha pa6ota, perylnpaHTo Ha eHeprNHOto 3axpaHBAhe, DeTaHa, Onopata 3aycyKBaHe.
DeklapnapHte 06u CTOnHOCTHa Bn6paunn Ca H3MepeHN CbIaCHO CTAHApTHHE MeTOHn Ha N3NTBaHe H MOrat Da 6bDat N3NOJ3BaHn 3a CpaBHeHne MeJdy pa3JIuHHTe IHCTpyMeHTN.
OcbEN TOBa cToHOCHTe MORaT Da ce n3NoI3BaT 3a npedBaPteJIHa OueHka.
PNEyynPEXDEHNE
O Bn6paunnte no Bpeme Ha DeiCTBnteHa ynoTpe6a Ha IHCTpyMeHTa MORat Da ce pa3JInuBaT OT DeKJIapHpaHITe O6Uc CTOnHOCTn, B 3aBNCUMoCT OT HaUNHa Ha N3NoI3BaHe Ha IHCTpyMeHTa.
O NdeHTnHnUpaHe Ha MepHnTe 3a 6e3OnacHocT 3a onepaTopa, Bb3 OCHOBa OceHka Ha Bb3dEiCTBneTO npn DeIcTBnTEJHn YCIOBnHa H3NOJ3BaHe (KaTo CE B3eMaT PpeBnD BCNUK eIeMeHTn OT pa6OTTHu cIKbJ, KATO NEPNOH Ha BHIOUbaH n3HIOUBAHe, KaKTo n pa6oTa Ha Ipa3Hn O6OpOTn HENOCpeCDtBeHO npedn CJIed MOMeHTa Ha H3NOJ3BaHe).
3AEBEJEXHA
IopaHn HnpeKbChaTO p3BNTHe Ha HayHo-pa3BOHHaTa nporpama Ha HiKOKI, daeHnte Tyk CneuΦnkaunn ca npedMeT Ha npomHa 6e3 yBeDoMJIeHne.
Tabnua 3a noopbka
| Демоствance | Зalthцо | КАС |
| Почисте пьністеги и розаваши менизьм. | ПроботравATEte 3адръствае. | Почистваite с поухвае ExCEEDново. |
| Дръжтete насясат лоста празвilно. | Насьчавайte 6 bezona acquoctа на опетаюра и[eфektivba na paбotinga с inhystтуменta. | Почистваite с поухвае ExCEEDново. |
OTCTPAHRAHE HA HEN3INPABHOCTN
N3noJ3BaIte INCnEKnITe B Ta6nIaTa NO-DOly, aKO INHCTpyMeHTbT He FyHKUHOHa HOpMaJIHo. AHO C TOBa Ipo6JIembT He 6bJe OTCpaHeN, 6bPHeTe Ce KbM BaIu NIN KMb OTOpN3npAHn cepBn3e Ha HiKOKl.
| ПОНБЛEM MEТОД | ЗА ПОВЕРКА HOPEKЦИЯ | |
| Пробекл equivа teял на зхранванeto He ce вкл equivа. Вкл equivа ce, ho ce在其зл equivа abTOMATNHO. | Нись Зарад на батерияа. | Зараздete 6 batерияа. |
| Пов徕даhabу trpeша elektroponиka. | Сыржete ce c HiKOKI 3a помяп. | |
| Лость за на паске и/Nлспьт са вклочenvi? | Дрьжte locta 3a на паске и спьськв в在其лочевуюно. | |
| Низльговate onepaць в пождуне Ha 30 minuTu? (Фунчция за вOTOMATNUH OИЗЛЮЧВАЕ) | Натинete и за ржte певкл equivа teяla Na 3axpaanbahe To 3a novee ot 1 sekynda, 3a da BHKIOHTe Ha noisiцу "BKNL". | |
| Инстурмент He paBOTn (Пробекл equivаел 3a BKNL.) | Инстурмент He e docta tbyho prinitichat KMДетайla. | Дрьжte пирона 3dparoи Na ratushet deokrai detaiya. |
| Спськьт He docta tbyho n3dpran. | Дрьнerte сilno cnilco snybka. | |
| Уberete ce, ye мениу поставенeto Ha locta 3a на паске Ha noisiцу „BKNL." "и „BKNL."Ha спьськmaMinhabat nobeche ot 4 сekyndni (ил OTВКLOUBAve Ha cspcsbka i do BVKIOUBAve Ha locta 3a на паске пobeeve ot 2 sekyndni). | Уberete ce, ye мениу поставенeto Na locta 3a на паске Ha noisiцу „BKNL." "и „BKNL."Ha спьсьka Minhabat no-malko ot 4 sekyndni (ил OTВКLOUBAve Ha cspcsbka i do BVKIOUBAve Ha locta 3a NaTisckane No-Malko ot 2 sekyndni). | |
| Лость за зakл equivahe (Фунчция 3a зakл equivahe Ha cspcsbka) e в положене „BKNL". | Н actpoite leocta 3a zakl equivahe Na preebukovate b inolozhene „N3KIL". (Вижт Фиг.8) | |
| Машинatable e TBьрide stydena (iod -5°C) Ил TBьрide ropeшa. (Сbetodnoйrat Inhdiknatop MInra Ha peodOBHn INTErpBaII N KIIIOHTa 3a zaxpaanbaHTo n3ragBa Cled 10 sekyndni.) (Haprabete срравka sbc Stpansuza 291) | Octabete Истурменta дa ce oxlaadiи Илл заг pee 得обpe do nojdoxя sto CBSTORHne. | |
| Пов徕даhabа Вьtrightша elektroponиka. | Сыржete ce c HiKOKI 3a помяп. | |
| Инстурмент PaBOTn, Ho HINTO endin пiroн He ce 3abibva. | Пьлнешлелт e 3ambrpcen. | Прodiaхайte и n3sbprse te плителу. |
| Пов徕ete 3a zacrayde Na Piloroh. | Остранete zacednajma пирон (Вижт Фиг.18,19). | |
| Остриeto Ha BodaHa e n3hosceno Илп NobroweNo? | Сыржete ce c HiKOKI 3a помяп. | |
| Падаьшата пухина e pa3xla6beHa Ilin NobroweNo? | Сmenete подавацота пухина. | |
| ПадаьшOTO устристBO 3a пiroн e nobroweNo? | Сmenete подавацOTO устристBO 3a пiroн. | |
| Пов徕ete дalmпиронITE ca podxodnii. | Изолдзайte само пpenopьuaанite пiroн. | |
| Слабо забивае на пiroн. Бавно Вьtrightе. | Пов徕ete пложенeto Ha perylatopa 3a дьлбочинata Ha 3abibvahe. | Peruginaite cbflacno Фиг.14,15. |
| Изокен Ворач Ha octrpieto? | Сыржete ce c HiKOKI 3a помяп. | |
| Налганeto Ha cbrcten Bv3dux e niscko. | Сыржete ce c HiKOKI 3a помяп. | |
| Пов徕даhabа Вьtrightиа elektroponиka. | Сыржete ce c HiKOKI 3a помяп. | |
| Прекално дьлбokeо 3abibvahe. | Пов徕ete пложенeto Ha perylatopa 3a дьлбочинata Ha 3abibvahe. | Peruginaite cbflacno Фиг.14,15. |
| ПОНБЛЕМETОД | ЗА ПОНВЕРHA KOPEКЦИA | |
| Прочьане на пиронITE.преьсато падаразе на пирони. | П探测ete ддл пиронite са падховши. | Използ Bavе само пpenорьдане пирони. |
| Поравацто устroduстvo за пирони e пов徕ень? | Смене падацто устroduстvo за пирони. | |
| Поравацота пружниа e разхалбений пов徕ень? | Смене падацота пружниа. | |
| Острино на boдауа e Износянoi пов徕ень? | Свържete ce c HiKOKI 3a поимяна. | |
| Засадане на пирон.Забивашит пирон e огьnat. | П探测ete ддл пиронITE са падховши. | Използ Bavе само пpenорьдане пирони. |
| Острино на boдауа e Износянoi пов徕ень? | Свържete ce c HiKOKI 3a поимяна. | |
| Инданatorьт зд НВOTO набатерияа на машина та не OTROВAPЯ на батерияа. | — | Вижte Иndикатогнату лamпа на машина t.(Вижte сTRAпица 290) |
(Prevod originalog uputstva)
OPŠTA BEZBEDNOSNA UPOZORENJA ZA ELEKTRICNI ALAT
UPOZORENJE
POTISNA POLUGA I OKIDAC SE MORAJU GLATKO KRETATI.
(2)Instalacija baterije.
Ne aktivirajte potisnu polugu ili okidač dok postavljate bateriju. (Vidi sliku 2)
(3) Ukljucite prekidač napajanja. (Vidi sliku 1)
Ukljucite prekidač napajanja pritiskom i držanjem
prekidača napajanja dulje od 1 sekunde.
Uvjerite se da indicator napajanja svijetli zeleno, a indicator rada zakivača svijetli plavo. (JEDNOSTRUKO SEKVENCIJALNO AKTIVIRANJE MEHANIZMA)
NAPOMENA
| NT1850DA | ||
| (NN) | ||
| 1 | 1 | |
| BSL1820M | 2- | |
| UC18YFSL | 1- | |
| 2 | 2 | |
| 1- | ||
| 1- | ||

BSL18...

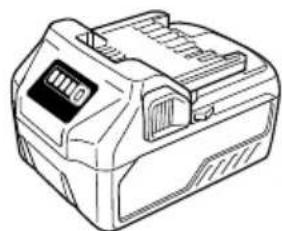
BSL36..18

UC18YFSL (14.4 V-18 V)
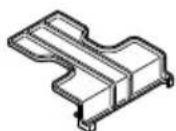
329897
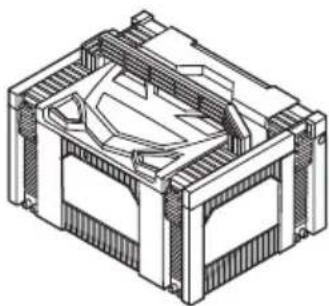
337108
| English Dansk Română | |||
| GUARANTEE CERTIFICATE 1 Model No. 2 Serial No. 3 Date of Purchase 4 Customer Name and Address 5 Dealer Name and Address (Please stamp dealer name and address) | GARANTIBEVIS 1 Modelnummer 2 Serienummer 3 Kjodsdato 4 Kundes navn og adresse 5 Forhandlers navn og adresse (Indsæt stempel med forhandlers navn og adresse) | CERTIFICATE DE GARANTIE 1 Model nr. 2 Nr. de série 3 Data cumpärarii 4 Numele și adresa clientuluri 5 Numele și adresa distributoruluri (Va rug'am aplicatița stampila cu numele și adresa distributoruluri) | |
| Deutsch Norsk Slovenžina | |||
| GARANTIESCHEIN 1 Modell-Nr. 2 Serien-Nr. 3 Kaufdatum 4 Name und Anschrift des Kunden 5 Name und Anschrift des Handlorders (Bitte mit Namen und Anschrift des Handler abstempelin) | GARANTISERTIFIKAT 1 Modelirn. 2 Serienr. 3 Kjopsdato 4 Kundens navn og adresse 5 Forhandlers narn og adresse (Vennligst stemple forhandlers narn og adresse) | GARANCUSKO POTRDILO 1 St. modela 2 Serijka st. 3 Datum nakupa 4 Ime in naslov kupca 5 Ime in naslov prodajalca (Prosimo vitisnite zig z imenom in naslovom produjalca) | |
| Français Suomi Slovenčina | |||
| CERTIFICAT DE GARANTIE 1 No. de modulo 2 No de série 3 Date d'achat 4 Nom et adresse du client 5 Nom et adresse du revendeur (Cachet portant le nom et l'adresse du revendeur) | TAKUUTODISTUS 1 Malli nro 2 Sarja nro 3 Ostopäävamäärä 4 Asiakkaan nimi ja osoite 5 Myyjän nimi ja osoite (Leimaa myyjän nimi ja osoite) | ZÁRUÇNY LISTA 1 C. modelu 2 Sírioveć 3 Datum zakupenia 4 Meno a adresa zákaznika 5 Názov a adresa predajcu (Peciatka s názvom a adresou predajcu) | |
| Italiano Elλινικά Βυμρακη | |||
| CERTIFICATO DI GARANZIA 1 Modelo 2 N° di series 3 Data di acquisto 4 Nome e indirizzo dell'acquirente 5 Nome e indirizzo del rivenditore (Si prega di apporre il timbro con quosti dati) | ΠΙΤΟΙΟΙHTΙΚΟ ΕΥΓΗΝΕΗ 1 Ap. Mòvtěλου 2 Aúχων Ap. 3 Hερορούνια γαρός 4 Ovoja kai δειθυναση πελάτη 5 Ovoja kai δειθυναση μεταπωλήτη (Πρακαλούμε va χρησιμοιθέιδει αφραγίδα) | TAPAHIZNOHEN CEPTIΦHAT 1 Modelo № 2 Cesirenne № 3 Data za zákyptybaene 4 М信息公开дес на Клиента 5 М信息公开дес на Тьtrightваца (Mолу, оtmочатайеимето и деси на дыра) | |
| Nederland Polski Srpski | |||
| GARANTIEBEWIJS 1 Modelnummer 2 Serienummer 3 Datum van aankoop 4 Naam en adrres van de gebruiker 5 Naam en adrres van de handelaar (Stempel a.u.b. naam en adrres vande de handelaar) | GWARANCJA 1 Model 2 Numer seryjny 3 Data zakupu 4 Nazwa kclienta i adres 5 Nazwa dealora i adres (Pieczęc punktu sprozdaź) | GARANTNI SERTIFIKAT 1 Br. modela. 2 Serijski br. 3 Datum kupovine 4 Ime i adresa kupca 5 Ime i adresa prodavca (Molimo da stavite pečat na ime i adresu trgovca) | |
| Espanol Magyar Hrvatski | |||
| CERTIFICADO DE GARANTÍA 1 Nombre do modelos 2 Nombre de série 3 Fecha de adquisión 4 Nombre y direccion del cliente 5 Nombre y direccion del distribuctor (Se rueqa poner el sello del distribuctor con su nombre y direccion) | GARANCIA BIZONYLAT 1 Tipusszám 2 Sorozatszám 3 A vásárlásátáuma 4 A Vásáráñó neve és címe 5 A Kereskedő neve és címe (Kárjúkide elihelyezni a Keroskedő nevénék és címenek pecsétjét) | JAMSTVENI CERTIFIKAT 1 Br modela. 2 Serijski br. 3 Datum kupnjé 4 Ime i adresa kupca 5 Ime i adresa trgovca (Molimo stavite pečat na ime i adresu trgovca) | |
| Portugues Česina | |||
| CERTICADO DE GARANTIA 1 Nombre do modelos 2 Nombre de série 3 Data de compra 4 Nome e morada do cliente 5 Nome e morada do distribuctor (Por favor, carimbe o nome e morada do distribuctor) | ZÁRUÇNIXLIST 1 Model ě. 2 Série ě. 3 Datum nákupu 4 Mýnéo a adresa zákaznika 5 Mýnéo a adresa prodejece (Prosime o razitko se jménem a adressou prodejce) | ||
| Svenska Türke | |||
| GARANTICERTIFIKAT 1 Modellnr 2 Serienr 3 Inköpsdatum 4 Kundens namn och adress 5 Försäljarens namn och adress (Stámpla försäljarens namn och adress) | GARNTI SERTIFEKASI 1 Model No. 2 Seri No. 3 Satin Alma Tarihi 4 Müştori Adi ve Adresi 5 Bayi Adi ve Adresi (Lüften bayi adini ve adresini kaçë olarak basin) | ||
HiKOKI
| ① | |
| ② | |
| ③ | |
| ④ | |
| ⑤ |
Siemensring 34, 47877 willich, Germany
Tel: +49 2154 49930
Fax: +49 2154 499350
URL: http://www.hikoki-powertools.de
Hikoki Power Tools Norway AS
Kjeller Vest 7, N-2007 Kjeller, Norway
Tel: (+47) 6692 6600
Fax: (+47) 6692 6650
URL: http://www.hikoki-powertools.no
Hikoki Power Tools Netherlands B.V.
Brabanthaven 11, 3433 PJ Nieuwegein, The Netherlands
Tel: +31 30 6084040
Fax: +31 30 6067266
URL: http://www.hikoki-powertools.nl
Hikoki Power Tools Sweden AB
Rotebergsvagen 2B SE-192 78 Sollentuna, Sweden
Tel: (+46) 859899900
Fax: (+46) 859899940
URL: http://www.hikoki-powertools.se
Hikoki Power Tools (U.K.) Ltd.
25 Majestic Road, Southampton, SO16 OYT,
United Kingdom
Tel: +44 1908 660663
Fax: +44 1908 606642
URL: http://www.hikoki-powertools.uk
Hikoki Power Tools Denmark A/S
Lillebaeltsvej 90, 6715 Esbjerg N, Denmark
Tel: (+45) 75 14 32 00
Fax: (+45) 75 14 36 66
URL: http://www.hikoki-powertools.dk
Hikoki Power Tools France S.A.S.
Hikoki Power Tools Belgium N.V./S.A.
Koningin Astridlaan 51, B-1780 Wemmel, Belgium
Tel: +32 2 460 1720
Fax: +32 2 460 2542
URL http://www.hikoki-powertools.be
Hikoki Power Tools Italia S.p.A
Via Piave 35, 36077, Altavilla Vicentina (VI), Italy
Tel: +39 0444 548111
Fax: +39 0444 548110
URL: http://www.hikoki-powertools.it
Hikoki Power Tools Ibérica, S.A.
C/ Puigbarral, 26-28, Pol. Ind. Can Petit, 08227 Terrassa
(Barcelona), Spain
Tel: +34 93 735 6722
Fax: +34 93 735 7442
URL: http://www.hikoki-powertools.es
Hikoki Power Tools Romania S.R.L.
Ring Road, No. 66, Mustang Traco Warehouses, Warehouse
No.1, Pantelimon City, 077145, Ilfov County, Romania


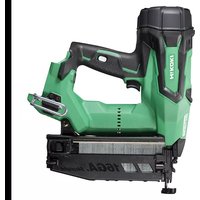
- (Original instructions)
- GENERAL POWER TOOL SAFETY WARNINGS
- WARNING
- 1) Work area safety
- 2) Electrical safety
- 3) Personal safety
- 4) Power tool use and care
- 5) Battery tool use and care
- ADDITIONAL SAFETY WARNINGS
- CAUTION ON LITHIUM-ION BATTERY
- CAUTION
- REGARDING LITHIUM-ION BATTERY TRANSPORTATION
- SYMBOLS
- English
- SPECIFICATIONS
- NOTE
- NAIL SELECTION
- STANDARD ACCESSORIES
- APPLICATIONS
- CHARGING
- How to make the batteries perform longer
- How to operate operation panel
- Trigger Lock Mechanism (See Fig. 8)
- Testing the nailer
- Checking push lever operations
- Load nails
- Nailing procedures
- Adjusting the nailing depth
- Using the hook (See Fig. 16)
- Using the nose cap (See Fig. 17)
- Clearing a jam
- MAINTENANCE AND INSPECTION
- Inspecting the magazine
- Inspecting the mounting screws
- Maintenance of the motor
- Cleaning on the outside
- Storage
- Important notice on the batteries for the HiKOKI cordless power tools
- GUARANTEE
- Noise Information
- Vibration Information
- TROUBLESHOOTING
- VEILIGHEIDSWAARSCHUWINGEN
- Spijkers laden WAARSCHUWING
- Information on vibration
- Fierner fastkjørte spiker
- VEDLIKEHOLD OG INSPEKSJON
- FORSIKTIG
- TENIKE Σ ΠPOEIΔΟΙHΣΕΙΣ AΣΦΑΛΕΙAΣ TOY HΑEKΤΡΙΚΟΥ EΡΑΛΕΙΟΥ
- IPOEIAOIOIH2H
- PPEdUnpeKDeHnA 3A 6E3OJACHOCT PnYIOTPEBA HA AkyMylatopeH INHCTPYMEHT 3A 3ABnBAHE HA UΦTOBE
- ДОПьЛНITEЛНМЕРКИЗАБЕЗПАСХОТ
- Български
- 3aunTe Te yuHTe n rnaBaTa cn.
- Cbo6pa3raBaTe ce c pa6oTeuHTe 6n3o do Bac.
- HnHora He HacoUbaIte n3XoJa 3a NpOHTe KbM xopa.
- 7.прениуnotpe6а npobepete locta 3a HATnchane.
- 360pt Ha 3aedeCTbau MeToe BaKeH.
- Ппенида Изполдытейн рpoуHT, уверете, чь тои pa6OTи паBNHOB CBOTBETCTBNE CBС CBДьрHAHHeTo Ha „TecTBaHe Ha HNCTpyMeHTa"Ha CTpaHnca 291.
- 10.Изральаite само nocоунITE пюн.
- 11.БbTe BnMaTeHn,Horato NoCTaBte 6aTePnTa. Horato CBp3BaTe 6aTePnTa n 3apeHdaTe NipoHnTe, B3eMeTe CneHnTe MepKn CpeUy INHCnDEHTHO 3aJeCTBaHe Ha INCHtpymeHa.
- He noctabraTe H3InuHo npbCT Ha cnycbHa.
- HatncheTe 3dpaBO n3XoDa 3a npOnH KbMa 8pa60THATA NOBbpxHOCT.
- Na3eTe pbuete H npaHaTa cn ot n3cTpeJBaaata rnaBa no BpeMe Ha pa6ota.
- Na3ete ce ot OTHaHa HnHctpyMeHTa.
- 16.BHIMBaIte 3a DBOHn H3cTeJIbaHe nopadn OTHaT.
- O PeKIM 3a pa60Ta Ha nepnoi (3aJeIcTbaHe Ha cnycbka)
- O PeHIM 3a HnpeKbChata pa6oTa (u3cTpeLbaHe c IocT)
- 17.БbTe BHHMaTeJHH,Horato pa6oTHe NO TbHHNIOCHOCTH NIN No brrInTe Ha dbpBOTO.
- EdHOBpeMeHHOTo 3aHOBaBaHe Ha NpOHN OT DBeTe CtpaHn Ha eDHa HcBua CteHa e OnaCHO.
- 19.He n3noJ3BaIte eJeKTHpuYeCKnHHCtpymeHT Bbpxy cKeIeta HcTbI6n.
- OTeTpaHete BCnHn OCTaHaJN NpOHN N 6aTePnra OT HnCtpyMeHTa, KOraTo:
- ГРИЖА 3A ЛINTHEBO-ИОHHATA BATEPЯ
- Былгарский
- BHIMAHNE
- PNEyPENKDEHNE
- OTHOCHO TPAHCIOPTA HA JIHTHEBO-NOHHA BATEPNA
- PPEyPPEKDEHNE
- CTAHДAPTHN AHCECOAPN
- PNILOXKEHNA
- 3APEKDAHE
- CbbpHHeTe KbM H3ToCHNK Ha 3axpaHBaHe. (ФИr.3)
- NocTaBete 6aTePnraTb 3apHnOTo ycTpoNCTBO.
- 3.Заразданe
- (1)ПлOTнИнДиКaTOpHаЛamna
- OTHOCHO BpeMeTo 3a Ipe3apeKdAHe
- 3A6EJEKHA
- PNEyPENHEHNE
- Tectbahe Ha HHctpymeHa
- IPEdynPEXDEHNE
- 3ABEJIEXHA
- IPEDyPENPEXHEHNE
- Поберka Ha pa6oTaHa NaocTa 3a HATnchAHe IPEyIpeHDeHne
- 3apeTe npOnHnTe
- 3ABEJIeHHKA
- BHIMAHHE
- 3A6EJIENKHA
- IODAPbJHKA INHCNEKUN
- TAPAHU
- Hhopma3a wyma
- Hhopmaa3a Bn6paunra
- PNEyynPEXDEHNE
- 3AEBEJEXHA
- OTCTPAHRAHE HA HEN3INPABHOCTN
- (Prevod originalog uputstva)
- OPŠTA BEZBEDNOSNA UPOZORENJA ZA ELEKTRICNI ALAT
- UPOZORENJE
- NAPOMENA
- HiKOKI
- Hikoki Power Tools Norway AS
- Hikoki Power Tools Netherlands B.V.
- Hikoki Power Tools Sweden AB
- Hikoki Power Tools (U.K.) Ltd.
- Hikoki Power Tools Denmark A/S
- Hikoki Power Tools France S.A.S.
- Hikoki Power Tools Belgium N.V./S.A.
- Hikoki Power Tools Italia S.p.A
- Hikoki Power Tools Ibérica, S.A.
- Hikoki Power Tools Romania S.R.L.
Brand : HiKOKI
Model : NT1850DA
Category : Stapler