
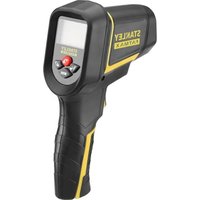
STHT077365 - Thermometer STANLEY - Free user manual and instructions
Find the device manual for free STHT077365 STANLEY in PDF.
| Product type | Cordless portable air inflator |
| Brand | Stanley |
| Model | STHT077365 |
| Dimensions | 7.6 x 5.3 x 17.7 cm |
| Main power supply | Li-ion battery 11.1 V / 2 Ah (22.2 Wh) |
| Charging | USB-C (5 V / 1 A) |
| Alternative power supply | 12 V DC cigarette lighter socket (10 A min) |
| Maximum pressure | 10 bar (145 psi) |
| Pressure units | psi, bar, kPa, kg/cm² |
| Display | LCD digital |
| Auto stop function | Yes, at preset pressure |
| LED light | White and flashing red (safety mode) |
| Built-in power bank | Yes, USB output 5 V / 1 A |
| Battery capacity | 11.1 V / 2 Ah (22.2 Wh) |
| Operating temperature | -10 °C to 45 °C |
| Air hose length | 29 cm |
| Included valve adapters | 3 adapters + storage |
| Supplied accessories | USB-C cable 1 m, cigarette lighter cord 3 m, spare fuse, bag |
| Estimated runtime | Variable depending on use (approx. 20 min continuous inflation) |
| Protection | Overload fuse, auto shut-off, double insulation |
| Maintenance | Clean with dry cloth, store away from moisture |
| Warranty | See full manual |
Frequently Asked Questions - STHT077365 STANLEY
User questions about STHT077365 STANLEY
0 question about this device. Answer the ones you know or ask your own.
Ask a new question about this device
Download the instructions for your Thermometer in PDF format for free! Find your manual STHT077365 - STANLEY and take your electronic device back in hand. On this page are published all the documents necessary for the use of your device. STHT077365 by STANLEY.
USER MANUAL STHT077365 STANLEY
Fig.D
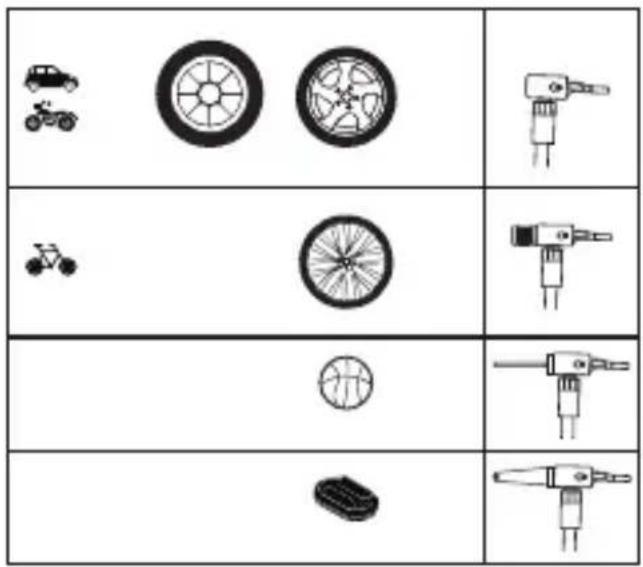
Fig.E
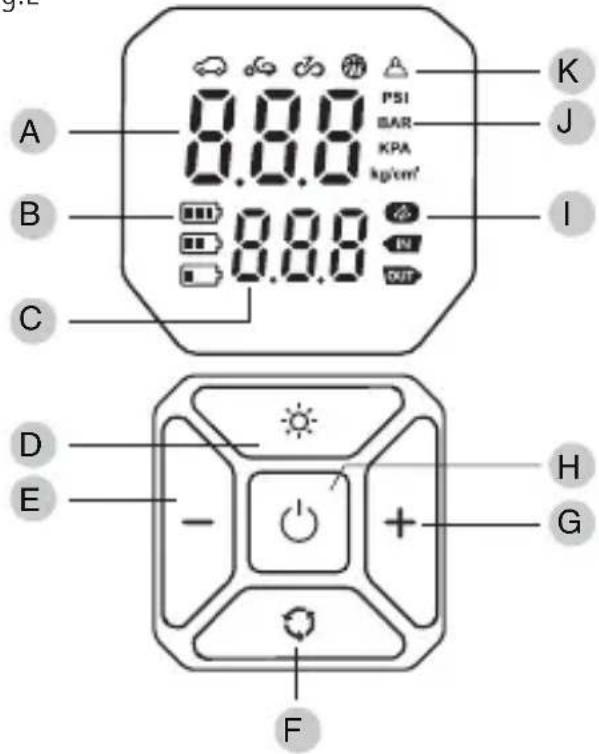
Fig.F
GEM ALLE ADVARSLER OG INSTRUKTIONER TIL FREMTIDIG REFERENCE

FARE: RISIKO FOR EKSPLOSION ELLER BRAND

⚠️ GEFAHR: GEFAHR FÜR DIE ATMUNG.

WARNING: BERSTGEFAHR.

WARNUNG: STROMSCHLAGGEFAHR.

WARNING: GEFAHR DURCH GENDE OBJEKTE.


LERNEN SIE IHREN MINI-LUFTKOMPRESSOR KENNEN
- Keep work area clean and well lit. Cluttered or dark areas invite accidents.
- Do not operate inflator in explosive atmospheres, such as in the presence of flammable liquids, gases or dust. Inflator create sparks which may ignite the dust or fumes.
- Keep children and bystanders away while operating an inflator. Distractions can cause you to lose control.
Electrical Safety
- Inflator plugs must match the outlet. Never modify the plug in any way. Do not use any adapter plugs with earthed (grounded) inflator. Unmodified plugs and matching outlets will reduce risk of electric shock.
- Avoid body contact with earthed or grounded surfaces such as pipes, radiators, ranges and refrigerators. There is an increased risk of electric shock if your body is earthed or grounded.
- Do not expose inflator to rain or wet conditions. Water entering an inflator will increase the risk of electric shock.
- Do not abuse the cord. Never use the cord for carrying, pulling or unplugging the inflator. Keep cord away from heat, oil, sharp edges or moving parts. Damaged or entangled cords increase the risk of electric shock.
- When operating an inflator outdoors, use an extension cord suitable for outdoor use. Use of a cord suitable for outdoor use reduces the risk of electric shock.
Personal Safety
- Stay alert, watch what you are doing and use common sense when operating an inflator. Do not use an inflator while you are tired or under the influence of drugs, alcohol or medication. A moment of inattention while operating inflator may result in serious personal injury.
- Use personal protective equipment. Always wear eye protection. Protective equipment such as dust mask, non-skid safety shoes, hard hat, or hearing protection used for appropriate conditions will reduce personal injuries.
- Prevent unintentional starting. Ensure the switch is in the off position before connecting to power source and/or battery pack, picking up or carrying the tool. Carrying inflator with your finger on the switch or energizing inflator that have the switch on invites accidents.
- Do not overreach. Keep proper footing and balance at all times. This enables better control of the inflator in unexpected situations.
- Dress properly. Do not wear loose clothing or jewelry. Keep your hair, clothing and gloves away from moving parts. Loose clothes, jewelry or long hair can be caught in moving parts.
Inflator Use and Care
- Do not force the inflator. Use the correct inflator for your application. The correct inflator will do the job better and safer at the rate for which it was designed.
- Do not use the inflator if the switch does not turn it on and off. Any inflator that cannot be controlled with the switch is dangerous and must be repaired.
- Disconnect the plug and turn it off from the power source from the inflator before making any adjustments, changing accessories, or storing inflator. Such preventive safety measures reduce the risk of starting the inflator accidentally.
- Store idle inflator out of the reach of children and do not allow persons unfamiliar with the inflator or these instructions to operate the inflator. inflator are dangerous in the hands of untrained users.
- Maintain inflator. Check for misalignment or binding of moving parts, breakage of parts and any other condition that may affect the inflator operation. If damaged, have the inflator repaired before use. Many accidents are caused by poorly maintained inflator.
Battery Tool Use and Care
- Recharge only with the charger specified by the manufacturer. A charger that is suitable for one type of battery pack may create a risk of fire when used with another battery pack.
- Use inflator only with specifically designated battery packs. Use of any other battery packs may create a risk of injury and fire.
- When battery pack is not in use, keep it away from other metal objects, like paper clips, coins, keys, nails, screws, or other small metal objects, that can make a connection from one terminal to another. Shorting the battery terminals together may cause burns or a fire.
- Under abusive conditions, liquid may be ejected from the battery; avoid contact. If contact accidentally occurs, flush with water. If liquid contacts eyes, additionally seek medical help. Liquid ejected from the battery may cause irritation or burns.
Service
Have the inflator serviced by a qualified repair person using only identical replacement parts. This will ensure that the safety of the inflator is maintained.

DANGER: RISK TO BREATHING.


WARNING: The compressed air from your inflator is not safe for breathing. Never inhale from your inflator or from a breathing device connected to the inflator.

WARNING: RISK OF BURSTING.

- Too much air pressure causes a hazardous risk of bursting. Check the manufacturer's maximum pressure rating for objects being inflated.
- Do not leave inflator running unattended. It could burst tires or other items.
- Use a tire gauge to check the tires' pressure before each use and while inflating tires; see the tire sidewall and the vehicle manual for the correct tire pressure.

WARNING: RISK OF UNSAFE

OPERATION.
- Do not modify or attempt to repair. Never drill into, weld, or make any modifications to the inflator or its attachments.
- Operate only with the accessories included or air handling parts acceptable for not less than 10 bar. The use of any accessory not recommended for use with this tool could be hazardous.
- Never "horseplay." High pressure air is dangerous. Don't direct air-flow at yourself or others.

WARNING: RISK OF UNSAFE

OPERATION.
Inflator can become hot during use. Allow inflator to cool 30 minutes before storing away.

WARNING: RISK OF ELECTRICAL

SHOCK.
Your air inflator is powered by electricity. Like any other electrically powered device, If it is not used properly it may cause electric shock.

WARNING: RISK FROM FLYING

OBJECTS.

WARNING: Stay alert, watch what you are doing and use common sense when operating a power tool. Do not use a inflator while you are tired or under the influence of drugs, alcohol or medication. A moment of inattention while operating inflator may result in serious personal injury.
Never point any nozzle or sprayer toward any part of the body or at other people or animals.
PROTECTING THE ENVIRONMENT
Separate collection. Products and batteries marked with this symbol must not be disposed of with normal household waste.
Products and batteries contain materials that can be recovered or recycled reducing the demand for raw materials. Please recycle electrical products and batteries according to local provisions. Further information is available at www.2helpU.com
ADDITIONAL SAFETY INFORMATION

WARNING: ALWAYS use safety glasses.
Everyday eyeglasses are NOT safety glasses. Also use face or dust mask if cutting operation is dusty.

CAUTION: When not in use, place tool on de on a stable surface where it will cause a tripping or falling hazard.
Some tools with large battery packs will stand upright on the battery pack but may be easily knocked over.
The label on your tool may include the following symbols. The symbols and their definitions are as follows:
V....volts
Hz ...... hertz
min ......minutes
or DC.....direct current

Class I Construction (grounded)
.../min.....per minute
BPM.....beats per minute
IPM.... impacts per minute
RPM...... revolutions per minute
sfpm ....surface feet per minute
SPM....strokes per minute
A.....amperes
W......watts

or AC...... alternating current

or AC/DC..... alternating or
direct current

Class II
Construction
(double insulated)
n_0 ......no load speed
n ......rated speed

......earthing terminal

......safety alert symbol

......visible radiation

......wear respiratory protection

......wear eye protecti on

......wear hearing protection

......read all documentation

....do not stare at light source
PRODUCT SPECIFICATIONS
| Product Model | SXIF0101 |
| Battery Capacity | 11.1V/2Ah (22.2Wh) |
| Voltage | 12V DC |
| Rated Input | 5V 1A |
| Rated Output | 5V 1A |
| Rated Power | 72W |
| Max Pressure | 10 Bar |
| Product Size | 7,6x5,3x17,7cm |
| Operating Temperature | -10°C to 45°C |
ASSEMBLY AND ADJUSTMENTS (Fig.A)
1 Digital display
2 Operation buttons
3 Valve adapter storage
4 LED light
5 USB output
6 Type-C charging port
7 Air hose port
8 12V DC port
9 Bag
10 Air hose
11 USB Type C charging cord
12 Cigarette lighter cord
13 Extra fuse
14 Extra valve adapter x3
ASSEMBLY AND ADJUSTMENTS

WARNING: To reduce the risk of serious personal injury, turn unit off and disconnect it from power source before making any adjustments or removing/installing attachments or accessories.
An accidental start-up can cause injury.

WARNING: Risk of unsafe operation. Unit cycles automatically when power is on. When performing maintenance, you may be exposed to voltage sources, compressed air, or moving parts. Personal injuries can occur. Before performing any maintenance or repair, disconnect power source from the compressor and bleed off all air pressure.
KNOW THE MINI INFLATOR
READ THIS OWNER'S MANUAL AND SAFETY RULES BEFORE OPERATING THE UNIT. Compare the illustrations with This unit to familiarize yourself with the location of various controls and adjustments. Save this manual for future reference.
BATTERY LEVEL INDICATOR & CHARGING BATTERY LEVEL INDICATOR (Fig.B)
- Battery level ≥slant 100% :
- 75% > Battery level ≥slant 75% :
- Battery level < 25%: Needs to be charged:
CHARGING (Fig.B)
Please fully charge the mini inflator before first use. Connect the charging cable to a compatible 5V USB power adapter to charge the mini inflator.
Power bank for electronic devices.
- Please charge the unit indoors.
- Please use the matching charger only.
- A safe and compliant power adapter must be purchased separately.
CHARGING STATUS:
25% > Battery level 📄 blinking
75% > Battery level ≥ 25% 📄 blinking
99% ≥ Battery level ≥ 75% 🚗 blinking
Battery level = 100% ☐ remains on for 20 seconds and then go off.
NOTES:
- The mini inflator cannot be used while charging.
- A safe and compliant power adapter must be purchased separately.
FITTING/CHANGING THE ADAPTER (Fig.D)
Select the adapter best suited to the intended application.
Slide the lid off the adapter storage compartment and remove the adapter.
Screw the adapter fully into the pressure hose.
NOTE: For standard car tire valves (sometimes also used on bikes), no adapter is required.
OPERATION
Starting Operation
1. Powering with integrated battery.
NOTE: For best practices, please fully charge the inflator before each use. Prolonged non-use may make it run out power.
2. Powering with the 12V DC Vehicle
Connector (found in the lower storage compartment) connect it to your vehicle's 12V DC accessory socket. Always fully extend the 12V DC cord before each use. Your vehicle's accessory socket must be rated for at least 10A.
SWITCHING ON AND OFF
Long press the button" 🔊 " to switch this unit on or off. When no button on the inflator is pressed for approx. In 2 minutes, the inflator automatically switches off to preserve battery life.
SWITCHING THE WORKLIGHT ON AND OFF
Press the light on/off button "※" to cycle through white light on, red light flashing slowly, red light flashing fast and light off.
NOTE: Do not look directly into the work light; it can blind you.
PRESET THE PRESSURE AND THE UNIT OF MEASUREMENT
Long press "☐" to select the target unit from psi, bar, kpa and kg/cm². short press "+" or "-" button to preset the pressure value, and wait for a few seconds when the setting is completed.
INFLATION (Fig.E)
Fit the appropriate adapter to the pressure hose if required. If present, remove the valve cap on the item to be inflated.
Tighten the pressure hose with or without the adapter on or in the valve. Short press " 🔊" to start inflating and the unit will stop inflating automatically once the preset pressure is reached. The current pressure in the connected item appears in the measured value indicator.
A Current tire pressure
B Battery display
C Target tire pressure
D LED light
E Decrease tire pressure
F Mode/pressure unit button
G Increase tire pressure
H ON/OFF
I Status light
J Unit display
K Mode selected
MODE SELECTION AND AIR PRESSURE REFERENCE TABLE

Car

Motorcycle Bicycle Ball Manual


| CATEGORY | TYPE | PRESSURE RANGE |
| Bicycles | 30.48cm, 35.56cm and 40.64cm bicycle tires | 30–50 psi/2.0–3.4 bar |
| 50.8cm, 55.88cm and 60.96cm bicycle tires | 40–50 psi/2.7–3.4 bar | |
| 66.04cm, 69.85cm and 73.66cm mountain bike tires/electric scooter tires | 45–65 psi/3.1–4.5 bar | |
| 700c road bike clincher tires | 100–130 psi/6.9–9.0 bar | |
| 700c road bike tubular tires | 120–145 psi/8.3–10 bar | |
| Motorcycles | Motorcycle or electric scooter tires | 26–43.5 psi/1.8–3.0 bar |
| Cars | Car tires | 32–40.5 psi/2.2–2.8 bar |
| Balls | Basketball | 7–9 psi/0.5–0.60 bar |
| Football | 8–16 psi/0.55–1.1 bar | |
| Volleyball | 4–5 psi/0.3–0.35 bar | |
| Football | 12–14 psi/0.8–1.0 bar |
NOTE: The pressure range values are for reference only. Please refer to the instructions or manual of the item being inflated.
TROUBLESHOOTING

WARNING: Risk of Unsafe Operation. Unit cycles automatically when power is on. Before servicing unit disconnect electrical supply to the mini inflator, and allow the mini inflator to cool.
| PROBLEM | CORRECTION |
| The mini inflator does not turn on. | 1. Check whether the air hose is removed from its compartment. The mini inflator can be turned on only when the air hose is removed from its compartment.2. Fully charge the mini inflator and turn it on. |
| The inflation speed is slow. | 1. Check whether the battery power is sufficient.2. Check whether the air hose is leaking.3. Check whether both ends of the air hose are securely connected.4. Check whether the inflated item is leaking. |
| The mini inflator turns on but does not inflate. | 1. Check whether the battery power is sufficient.2. Check whether the current air pressure is higher than the preset value. |
| The preset pressure cannot be increased or decreased. | Make sure the air compressor is set to the correct inflation mode. Manual mode allows you to adjust the preset value within a range of 0,2–10 bar. |
| The mini inflator inflates normally but the displayed pressure is zero. | The pressure of low-pressure inflatables including balloons is too low to measure. |
| The mini inflator has already turned off after connecting the air hose to a valve. | Press and hold the start/stop button to turn the mini inflator on again. |
| The air leaks out when connecting the air hose. | Make sure the air hose is securely connected. |
| The battery level indicator on the display does not light up while charging. | Replace the charging cable and adapter with safe and compliant ones, and charge again. |
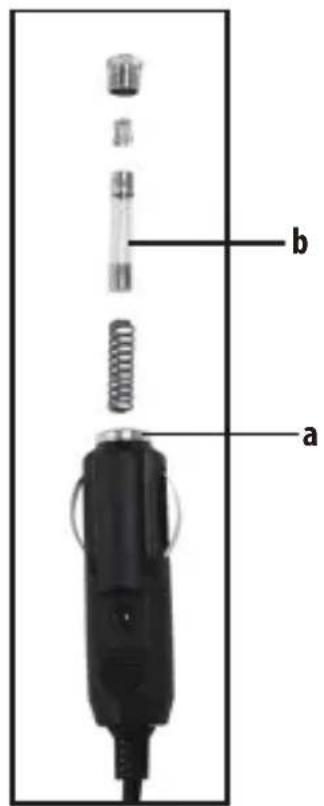
OVERLOAD FUSE (Fig.F)

WARNING: Never use a fuse with a higher tripping current. Otherwise, this poses a fire hazard!
In the event of overuse or malfunction the overload fuse (b) in the cigarette lighter plug (a) will trip to protect the device. Replace the fuse after resolving the reason for the fuse tripping.
- Unscrew the tip of the cigarette lighter plug (a) and remove the overload fuse (b).
- Insert the new overload fuse (b) and screw the tip of the cigarette lighter plug (a) back on.
CAUTION: When not in use, place tool on its side on a stable surface where it will not cause a tripping or falling hazard. Some tools with large battery packs will stand upright on the battery pack but may be easily knocked over.
The label on your tool may include the following symbols. The symbols and their definitions are as follows:
V....voltios
Hz ...... hertz
min...... minutos
or DC...... direct current

do not stare at light source
SPÉCIFICATIONS DU PRODUIT
APPLICATION PRÉVUE (Fig.D)
GEVAAR: RISICO VOOR ADEMHALING.


WAARSCHUWING: RISICO OP BARSTEN.

WAARSCHUWING: RISICO OP ONVEILIGE WERKING.

WAARSCHUWING: RISICO OP ONVEILIGE WERKING.

Batterijniveau = 100% remains on for 20 seconds and then go off.
OPMERKINGEN:
SLÅ PÅ OG AV ARBEIDSLYS
The image contains a graphical icon of a person wearing sunglasses, enclosed in a circle. There is no text or mathematical content to process.
use proteção ocular
O
TUOTTEEN TEKNISET TIEDOT
25% > Battery level 📄 blinking
75 % > Akun varaustaso ≥ 25 % 📄> vilkkuu
99 % ≥ Akun varaustaso ≥ 75 % 📄 vilkkuu
An accidental start-up can cause injury.
TEHLIKE: SOLUNUM RISKI


Inflator can become hot during use. Allow inflator to cool 30 minutes before storing away.

JSPÉJIMAS: ELEKTROS SMÜGIO A.

Suzhou Alton Electrical & Mechanical Industry Co., Ltd.
North linhu Road, East Laixiu Road, Wujiang Foho Economic
Development Zone, Jiangsu, 215211, China
10.07.2024
STANLEY and STANLEY logo are trademarks of Stanley Black & Decker, Inc. or an affiliate thereof and are used under license.
© 2024 Stanley Black & Decker, Inc.
For more information, please contact ALTON at the following address:
Alton Europe B.V.
Logistiekweg 18, 4906 AB Oosterhout The Netherlands
E-Mail: EUSales@altonindustries.com
For Customer Service please visit our Online Customer
Service Centre at www.2helpU.com
- GEM ALLE ADVARSLER OG INSTRUKTIONER TIL FREMTIDIG REFERENCE
- FARE: RISIKO FOR EKSPLOSION ELLER BRAND
- ⚠️ GEFAHR: GEFAHR FÜR DIE ATMUNG.
- WARNING: BERSTGEFAHR.
- WARNUNG: STROMSCHLAGGEFAHR.
- WARNING: GEFAHR DURCH GENDE OBJEKTE.
- LERNEN SIE IHREN MINI-LUFTKOMPRESSOR KENNEN
- Electrical Safety
- Personal Safety
- Inflator Use and Care
- Battery Tool Use and Care
- Service
- DANGER: RISK TO BREATHING.
- WARNING: RISK OF BURSTING.
- WARNING: RISK OF UNSAFE
- OPERATION.
- WARNING: RISK OF ELECTRICAL
- SHOCK.
- WARNING: RISK FROM FLYING
- OBJECTS.
- PROTECTING THE ENVIRONMENT
- ADDITIONAL SAFETY INFORMATION
- ASSEMBLY AND ADJUSTMENTS (Fig.A)
- ASSEMBLY AND ADJUSTMENTS
- KNOW THE MINI INFLATOR
- BATTERY LEVEL INDICATOR & CHARGING BATTERY LEVEL INDICATOR (Fig.B)
- CHARGING (Fig.B)
- CHARGING STATUS:
- NOTES:
- FITTING/CHANGING THE ADAPTER (Fig.D)
- OPERATION
- Starting Operation
- Powering with integrated battery.
- Powering with the 12V DC Vehicle
- SWITCHING ON AND OFF
- SWITCHING THE WORKLIGHT ON AND OFF
- PRESET THE PRESSURE AND THE UNIT OF MEASUREMENT
- INFLATION (Fig.E)
- TROUBLESHOOTING
- OVERLOAD FUSE (Fig.F)
- APPLICATION PRÉVUE (Fig.D)
- GEVAAR: RISICO VOOR ADEMHALING.
- WAARSCHUWING: RISICO OP BARSTEN.
- WAARSCHUWING: RISICO OP ONVEILIGE WERKING.
- OPMERKINGEN:
- SLÅ PÅ OG AV ARBEIDSLYS
- TEHLIKE: SOLUNUM RISKI
- JSPÉJIMAS: ELEKTROS SMÜGIO A.
Brand : STANLEY
Model : STHT077365
Category : Thermometer